Reference
The reference section runs through all of uberSVN's screens and explain what everything does. Some screens, relating to the administration of uberSVN may not be visible to you if your login account doesn't have system admin privileges.
1. Welcome
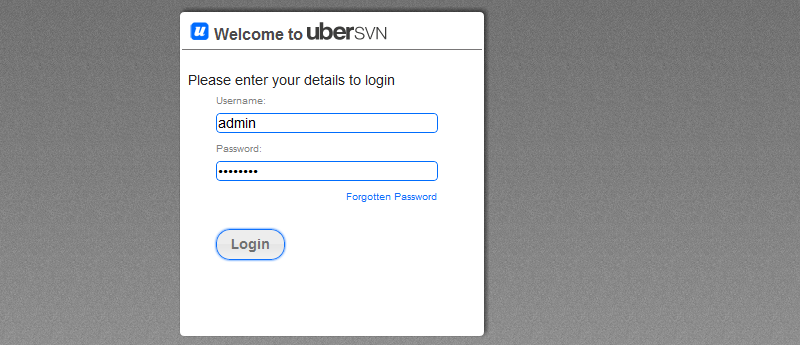
Login to the uberSVN portal.
The welcome screen features the login entry box. Enter a username and password.
1.1 Status bar

The top of the uberSVN screen features some key elements of functionality.
Once logged in, there's a link "My Profile" to your account profile screen in the Users section. There's a help link, that leads to the online admin guide (that you're currently reading), and a link to the support page on the ubersvn.com website. whenever there's a system change, an alert window will appear at the top of the screen with a note to what has changed.
At the bottom of uberSVN's frame is an indicator of which update channel is currently set. Click on the indicator to go to the Update settings. Read more about the update channels under Update Settings.
Most of uberSVN's features are available within the section tabs. The next section of this guide runs through each tab, explaining what functionality it covers.
2. Dashboard
The dashboard shows the state of the uberSVN deployment. The main panel features the activity stream where comments from uberSVN users and repository activity is displayed. Other panels show the server's status, a twitter based news feed and some Quick Links to popular features that appear deeper within the uberSVN portal.
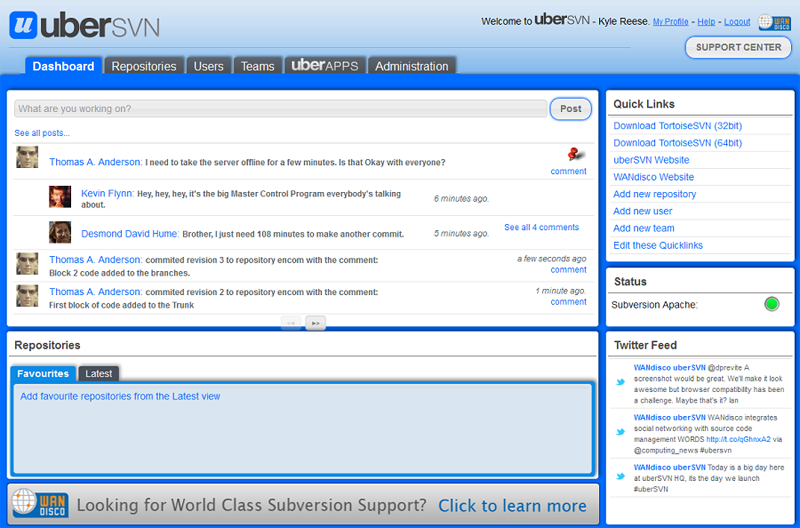
uberSVN starts at the dash.
3. Repositories
The Repositories is the very heart of uberSVN, it's where the Subversion repositories are added or modified.
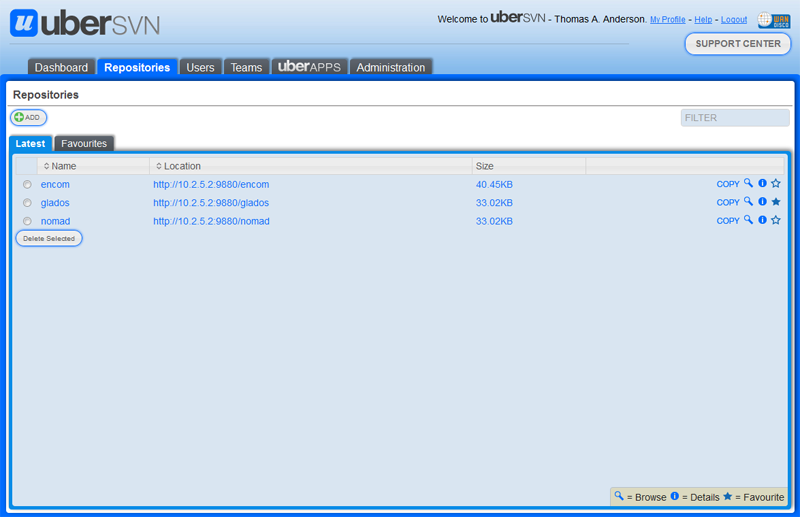
Repository list screen.
The main Repositories screen lists all the Subversion Repositories that are currently running under uberSVN. Repositories that have been added, but then subsequently deleted from uberSVN will not appear on the list, even though they may remain installed on the server.
- ADD
- Click ADD to add a new repository (either created from scratch or imported).
- FILTER:
- A search entry box to search for a particular repository, useful if you are running a lot of repositories.
- Latest
- Repositories listed in order of creation.
- Favorites (tab)
- A list of repositories tagged as your favourites.

Make a repository a favourite to give it top billing on the repositories screen.
- Repository Widgets
- Widgets give you one-click control over the repository:
Click the COPY ( ) to make a copy of the repository.
Click the"Magnifying glass" ( ) to view the repository through the repository browser.
Click the "i" ( ) to view/edit the repository details. Clicking this widget has the same effect as clicking the repository's name.
Click "Star" ( ) to add the repository to your favourites. Click the star to turn it solid, indicating that it is a favourite.
The repository will be added to the Favourites tab until the star is clicked again, which will remove the favourite status.
3.1 Add Repository
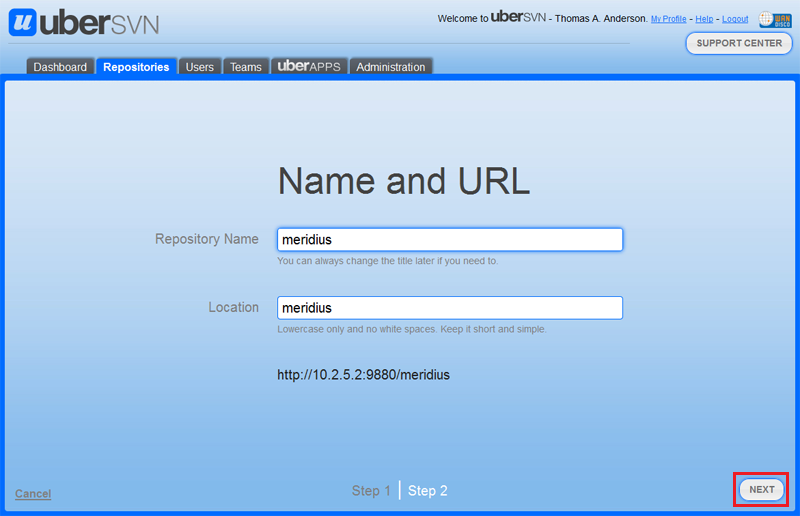
Add New Repository: General Settings
- Repository Name
- A name for the repository. You can change it later.
 Repository Naming Rules:
The following restrictions apply to the naming of repositories:
- Limited to 25 characters.
- colons (:), spaces, double forward slashes (//) are not permitted. Single forward slashes (/) are allowed, but not as the first character.
- On Windows systems, the usual Windows restrictions apply with the following characters not permitted: -?*<>|
- While names that contain multi-byte characters are permitted they are not recommended. Multi-byte characters are not supported by the repository browser, and may result in other problems.
- Location
- The directory name for the repository that will appear at the end of the URL. Simple is best, use only lower case letters and numbers with no spaces. Choose carefully, the location can't be changed later.
- URL
- Shows the repository URL including your chosen DAV Location. This is the URL that you will use to access the repository on the web.
Click Next to move to the next part of the setup.
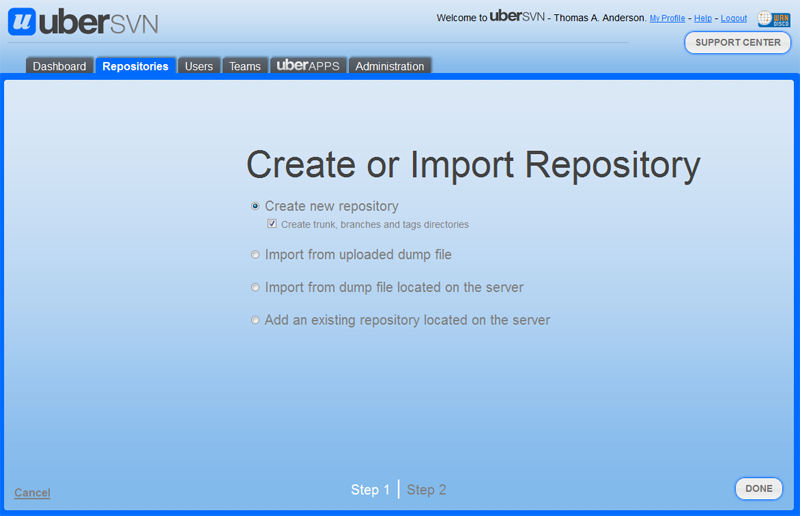
Add New Repository: new repository
- Create new repository
- Create a new repository, tick the checkbox to also create trunk, branches and tags directories. Read more about Subversion's recommended directory structure.

Add New Repository: Created from scratch
- Import from dump file
- Select Import from dump file to import the dump file from an already existing repository. The dump file must be less than 250MB.

Add New Repository: Import from upload dump file
- Import from a dump file located on the server
- If there's a dump file located on the server it can be imported. There's no size limit if the file is imported from the server itself.

Add New Repository: Import from dump file located on the server
- Add an existing repository from the server
- If there's a repository already set up on the server (independently from uberSVN) it can be imported. Once imported, a repository comes under full control of uberSVN.
Alert
Existing repositories that are added to uberSVN become new repositories, losing all their revision history.
Copying an existing repository and keeping its revision history
1. Create a new blank repository in uberSVN, with the same name as your current repository.
2. Delete the new repository from the file system.
3. Create a hotcopy of your existing repository and move it into the file location where you had deleted the new uberSVN repository.
4. uberSVN will now treat the hotcopy as a 'live' repository with its revision history intact.

Add New Repository: Import from dump file located on the server.
Click DONE to complete the repository creation. Clicking CANCEL will return you to the repository list screen without saving any changes.
Permissions
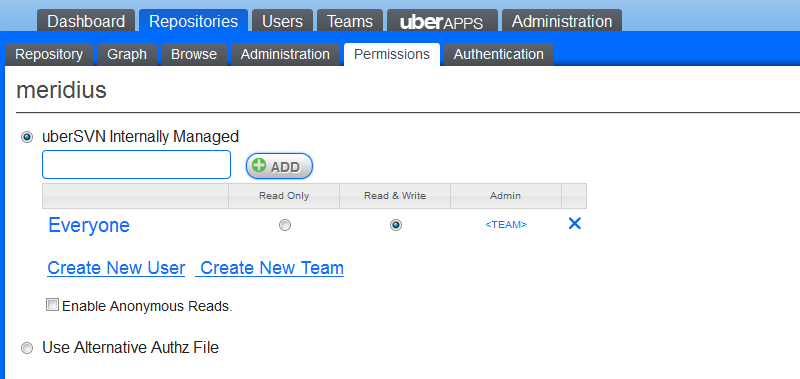
Add New Repository: Permissions
Once you're done adding the repository you'll automatically be taken to the new repositories Permissions tab in order to set up access rules. Changes made to repository permissions are made instantly, there's no need to submit changes - for this reason, take care when making changes.
Permissions can be controlled by uberSVN (uberSVN Internally Managed) or through an externally controlled Authorization file (User Alternative Authz File).
An external AuthZ file can be set up on a per repository basis, its location is set on the Administration tab of the Repository.
- ADD
- Enter the name of a user or a team that you wish to wish to provide with access to the new repository. As you type, uberSVN will list all the names that match the letters you enter.
Alert
By default all repositories are created with Read & Write permissions assigned to the "Everyone" group. As you add specific permissions to individual users and the teams that you create, you may wish to delete the Everyone team permissions, or downgrade them to Read only.
- Create New User
- Use this link if you want to add a user to this repository that isn't already present in uberSVN.
- Create New Team
- Use this link if you want to associate a team to this repository that isn't already present in uberSVN.
3.2 Repository tab
If you click on a repository, you'll be taken to the repository tab where the repositories can be edited or managed.
 Tip
Tip
It's possible to deep link to, or bookmark an individual repository screen.
http://xx.xx.xx.xx:9890/ubersvn/views/platform/repository/repositoryProfile.jsf?repoId=<Repository Number>
View repository details.
- url
- The fully qualified web address of the repository. This is the same address that users will use to access the repository from their Subversion clients.
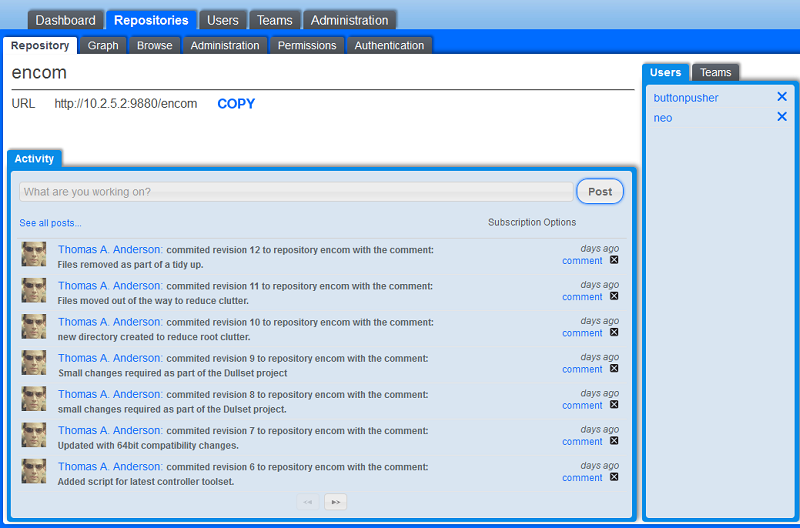
- Activity Tab
- All system activity / user comments will be tracked on the activity tab.
- Users
- The Users tab shows all users who currently have permission to use access the repository. If you have system admin or team privileges then you can remove a user by clicking on the cross.
Click the cross to remove a team member or time itself.
To add or update go to the list from the Permissions tab.
- Teams
- The Teams tab lists all the teams that are associated with the repository.
3.3 Graph
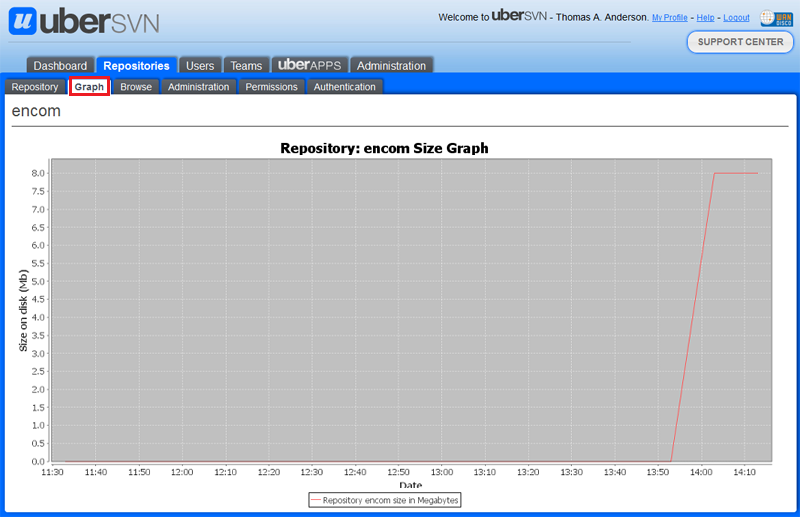
View repository activity in the form of a graph.
The graph plots the change in size of the repository over the previous 2 hours and 20 minutes. The graph updates every 30 minutes, or whenever the uberSVN service is restarted.
3.4 Browse
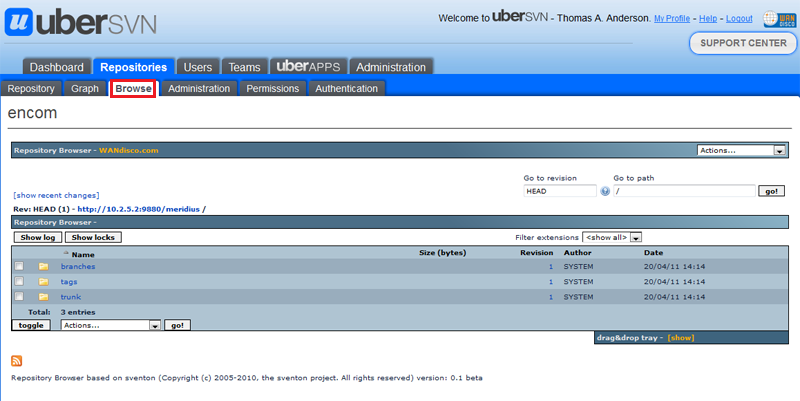
View repositories, through the integrated Subversion Repository Browser.
The repository browser provides a web interface to help manage repository files and directories. There is a list of all the file changes, adds or deletions in any given revision.
uberSVN has a built-in repository browser that makes it easier to keep track of repository changes. This section runs through what you can do with the browser.
Tip
If you run into problems when using the repository browser, check the current Repository Browser Known Problems.
3.4.1 Repository Browser Guide
Known Problem (Windows only)
The repository browser currently doesn't work with repositories that use LDAP for user authentication.
We're looking to fix the problem, although our long term strategy is to bring in a replacement repository browser.
Login
Click on the browser tab and you'll see a login screen. This login is for access to Subversion itself, not uberSVN. You'll need to use an account that has permission to access the repository.
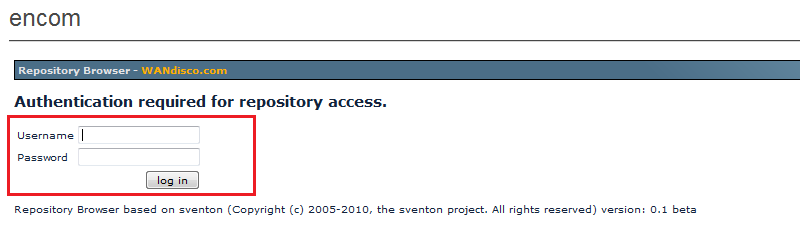
Repository authentication required.
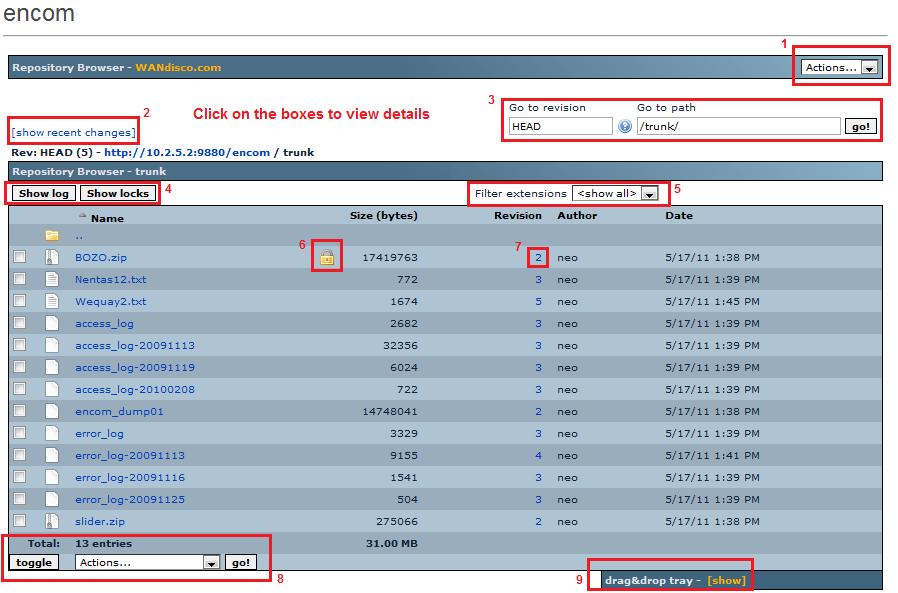
Main Repository Browser Screen
The main repository browser screen.
- 1. The Actions drop-down menu lists context sensitive actions. Currently it includes a logout button.

Logout for the repository browser.
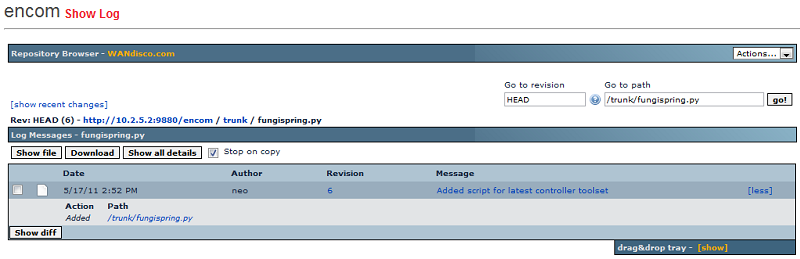
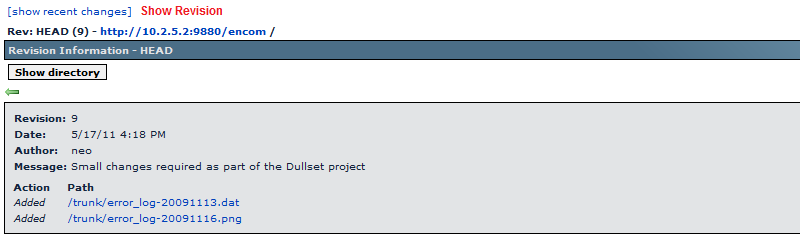
- 2. The link [show recent change] will open a box containing the details of the last revision made on the repository.
Included is a reference to the Revision, Date and time that the change was made, the Author, along with whatever Message was entered
during the change.
The Action notes the type of change that was made, and the Path shows the local path and file(s) that changed.

Show recent change link.
- 3. The "Go to revision" filter box lets to view a specific revision. Enter the revision number, change the path if required and click the go! button.
- 4. The Show log and Show locks buttons open screens that show a log of all repository changes (Show log) and a list of files that
have been locked (Show locks). Files that are locked will be listed with a small padlock icon (see 6.)
Show log.
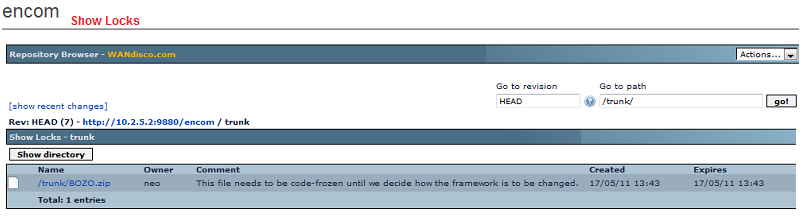
Show locked files.
- 5. The Filter extension drop-down lets you limit the view of the current repository directory by whatever file types are present.
By default, all file types will be shown.

Filter by file extension.
- 6. Files that have been locked will show a padlock icon. It's not possible to lock a file from the repository browser, this can be done
from a Subversion client, such as Tortoise.
- 7. The Revision number links to a log of the changes made in the revision.
Filter by file extension.
- 8. At the bottom of the main screen is another drop-down filter, offering Actions to perform on selected files. Use the check boxes to
select files, or click the toggle button. Actions available are Diff entries and Show as thumbnails. The Diff entries actions will show
selected files for comparison. The thumbnails view is intended to be used to view image files.
- 9. The Drag&drop tray offers a way to pick out files or folders in the repository for performing actions. To use the Drag&drop try, click on the icon
image of a file of folder in the browser's main panel and drag it down to the drag&drop tray. The dragged item will then appear in the
tray, ready to apply an action to. Select an available action from the drop-down menu and click go!.

drag&drop selector.
View file
From the repository browser you can view details about any files that are contained in the repository by clicking on the file's name.

To view file details, click on the name.
The file details screen will display the contents of the file, unless it is in binary format.
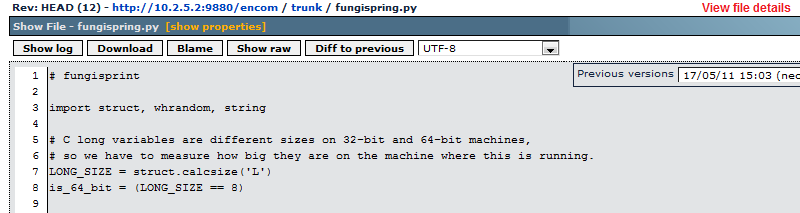
File details screen.
There are some additional screens that offer specific details concerning the view being viewed.
- Show log
- View all revisions of the file, along with who made the change, what message they associated with the change. Optionally you can also view the type of change made, the file name and relative path.
File details screen.
- Download
- You can download the file to view locally. Just remember that changes made to the file won't be picked up unless you first copy it to the local copy and commit the changes.
 Caution
When downloading very large files, ensure that you have enough system memory to store them. There's a problem with downloading large files through the repository browser, which doesn't check that there's enough system memory to store the file. Downloading a file that is larger than the server's remaining RAM will cause the system to stop working or crash.
- Blame
- From the name of this rather useful tool you might think that Subversion's developers are used to living in a "blame culture". In fact, it's just really useful to be able to identify exactly who made a particular change to a file, especially when a file has been touched by a lot of people.
Blame shows each line of the file along with which user last changed that line and in which revision the change was made.
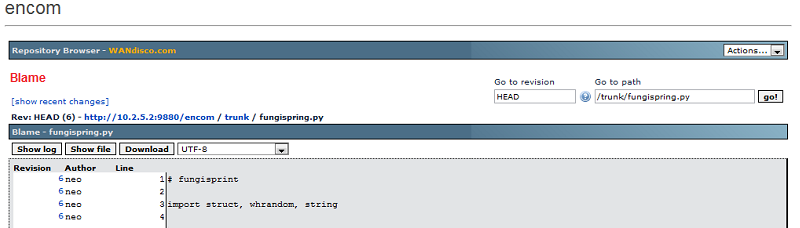
Blame neo for revision 6 changes.
- Show raw
- View a raw version of the file renders the file without any adornment, ideal for copying out code.
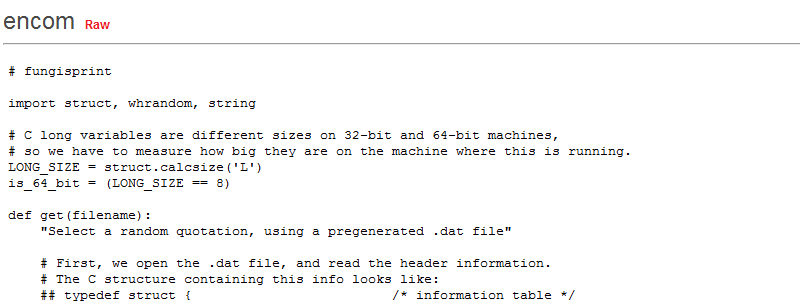
Raw.
- Diff to previous
- Offers a comparison view of the file, useful if you need to review changes that have been made to a file. There's an option to Toggle line wrap, which forces the file to display within the window.
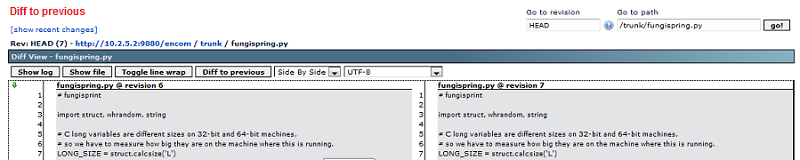 There are two drop-down boxes offering additional options:
Layout
Change the way that compared files are displayed. Unified shows only the changed elements, Inline shows the file with the changed lines both in the before and after state, Side By Side, as the name suggests, shows the two revisions together for side by side comparison.

Character format
There's an exhaustive list of available character encoding types, so that any character rendering problems can be fixed by selecting the matching encoding type.
3.5 Administration
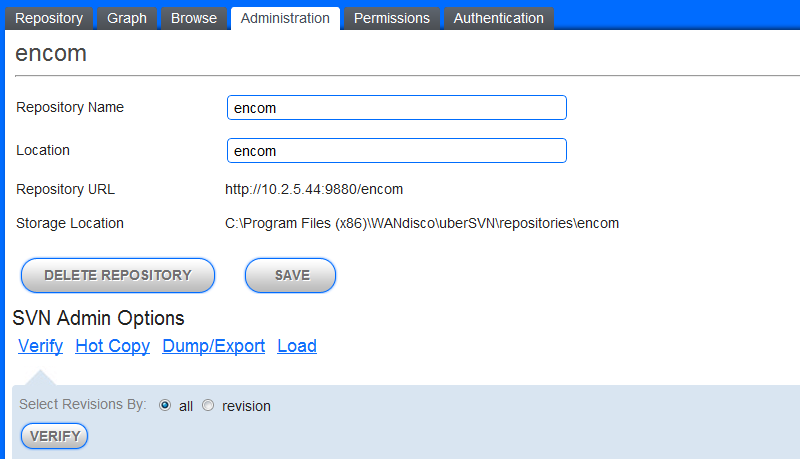
Administer the repository though the admin tab.
- Repository Name
- The name you have given to the repository. This can be changed at any time.
- Repository URL
- The web address for accessing the repository.
- Storage Location
- The file location of the repository on the server.
- DELETE REPOSITORY
- Click the DELETE REPOSITORY button to remove the repository from uberSVN's control. The repository files will remain in place but will not show up in uberSVN. After clicking the button you will be asked if you also want to delete the files from the disk.
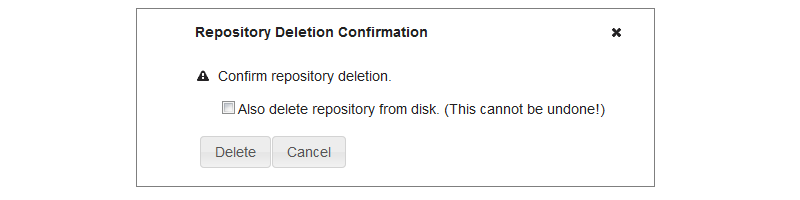
Caution
Take care when deleting repository files from disk, this action can not be undone.
- SAVE
- Click save to save changes you make on the to the name, URL or storage location.
SVN Admin Options
uberSVN provides some functions for managing repositories that are available on the Administration sub-tab.
Verify
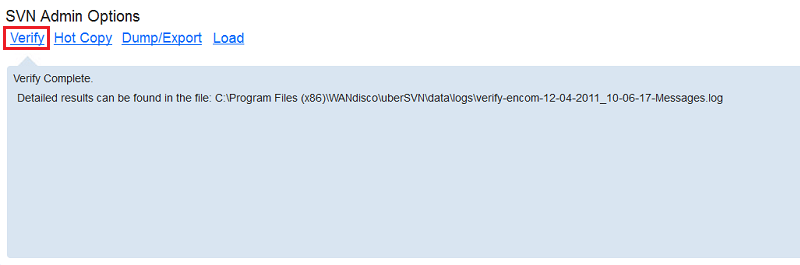
SVN Verify command.
Run the Verify command to check the integrity of the repository data.
Hotcopy
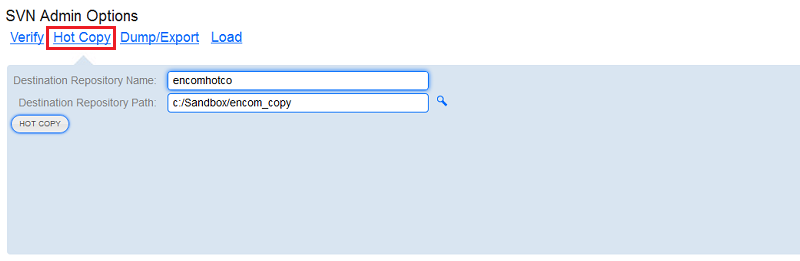
SVN Hotcopy command.
Run the svnadmin hotcopy subcommand, which makes a full "hot" backup - so there's no need to take Subversion off-line, or stop users from committing changes to the repository.
- Destination Repository Name
- Name of the repository copy that you will create.
-
- Destination Repository Path
- The file path of the repository copy that you will create.
-
A word about Hotcopy
The hotcopy subcommand is designed specifically to offer a quick backup solution, it creates a complete, functional copy of a repository - revision history and all
(that's all hook scripts, configuration and database files).
There are a few things you should remember:
- It has an advantage over a regular filesystem copy as it preserves the lock states of repository files and doesn't have problems copying files when they're being held by other processes.
- Where you want to have control over what gets copied, use an SVN dump instead.
- Before performing a hotcopy, it's wise to perform an SVN verify to ensure that you're not going to create a corrupted backup.
- Discrepancies between the size of a source repository and hotcopy can be accounted for by temporary transactions and other system files.
Dump/Export
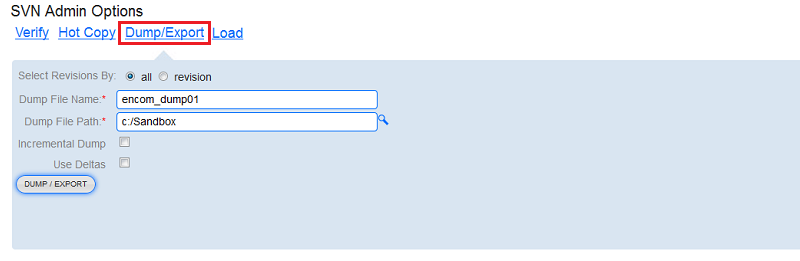
SVN Dump command.
Run the svnadmin Dump subcommand, which saves out the repository's file data as an stdout "dump-file".
- Select Revision By
- Select all or revision.
-
- Dump File Name
- The name of the dump file you will create.
-
- Dump File Path
- The path to the dump file you will create.
-
- Incremental Dump
- Sets the dump file's first revision to contain only the files and directories modified in that revision, instead of being presented as the addition of a new tree, and in exactly the same way that every other revision in the dump file is presented.
-
- Use Deltas
- If the repository is very large you can tick Use Deltas to greatly reduce the dump file size, as only the changes are copied.
-
- DUMP/EXPORT
- Click the DUMP/EXPORT button to begin the dump process.

Once run, you'll see a confirmation message that includes a path to the log.
-
Load
Run the SVNAdmin Load command to at a repository using a saved dump file.

SVN Admin Load Command.
- Dump File
- The full path to the dump file to be loaded.
-
- Ignore UUID
- Tick Ignore UUID to override the default behavior whereby the load command will use the UUID (unique serial number for the repository) from the dump file.
-
- Force UUID
- Tick Force UUID to ensure that the old UUID is maintained.
-
- LOAD
- Click the LOAD button to start the loading process.
-
Alert
In order to complete the Load of an SVN dump file, ensure that the repository in which you are loading the dump file is completely empty - it must not have been created with the default TTB (Trunk, Tags and Branches) format..

3.6 Permissions
The Permissions tab is used to manage which users and teams are able to access the repository, and what read/write permissions they have.
 uberAPPS
When uberSVN Access Control is enabled, the repository permissions tab is removed. Instead all permissions need to be set from within the Access Control tab.
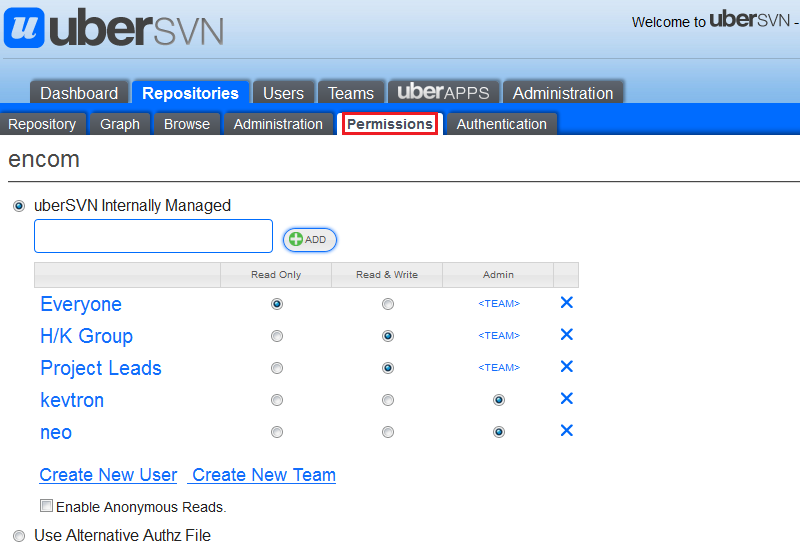
Set the repository permissions.
The permissions table lists both users and teams with their corresponding permissions. All users and teams will have one of three levels of access permission: No permission, which is indicated by the users or team not having a record on the table. Read-only permission, by which they are able to view repository files, but will be unable to commit any changes themselves. If the Read and Write radio button is selected then the user or team has full access to the repository files.
The Admin column will show if a user has admin permissions, which allow them to manage the repository structure, as well as the files that are stored in the repository.
- Create New User
- Use this link if you want to add a user to this repository that isn't already present in uberSVN.
- Create New Team
- Use this link if you want to associate a team to this repository that isn't already present in uberSVN.
Caution with team names
Don't give a team exactly the same (case-matching) name as a repository. When a team is created with a name that matches that of an existing repository, assigning this team to another repository can result in unintended read-write access being assigned to non-members of the team.
- Enable Anonymous Reads
- Tick this checkbox to allow anyone to view the contents of the repository, although limited to read-only access. This is a useful feature if you want to open up a repository to a wider audience without having to create login credentials for everyone.
- SAVE
- Click to save any changes that you make to the repository permissions. Currently this is required only for switching between uberSVN Internally Managed and Use Alternative Authz File or after making a change to Enable Anonymous Reads. Individual permission changes are instant and do not require you to click SAVE
3.7 Authentication
Options for how to handle authentication of the repository's users. The authentication method can be different for each repository hosted on uberSVN.
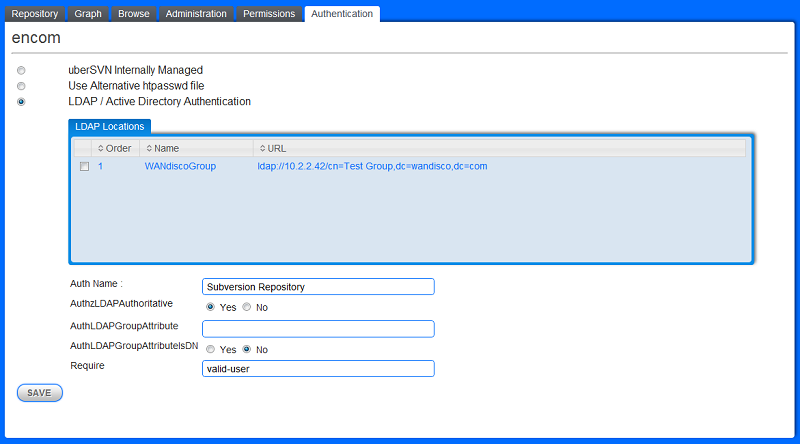
Set the repository authentication type.
- uberSVN Internally Managed
- uberSVN's default authentication option is to use the built-in htpasswd.
Access Control--
- Use Alternative htpasswd file
- Select this option to have uberSVN use a different htpasswd file for authentication. The location of the file is set on the Alternative htpasswd File tab, in the Subversion Server section under the Administration tab.
- LDAP / Active Directory Authentication
- This option enables LDAP/Active Directory authentication.
This table displays the available LDAP Locations.
You can add/edit LDAP Locations by going to the LDAP Locations tab under the Administration tab.
- Auth Name: The AuthName directive sets the name of the authorization realm for this directory.
- AuthzLDAPAuthoritive: Specifies whether LDAP has exclusive control over authentication.
- AuthLDAPGroupAttribute: Specifies which LDAP attributes are used to check for group membership.
- AuthLDAPGroupAttributeIsDN: directive specifies the use of the distinguished name of the client username when checking for group membership. Otherwise, the username will be used.
- Require: Identifies which authenticated users can access a resource.
SAVE Click the SAVE button to store any change to settings that have been made.
4. Users
UberSVN users (including administrators) are managed under the Users tab. New users are created or imported from here and any user properties can be modified.
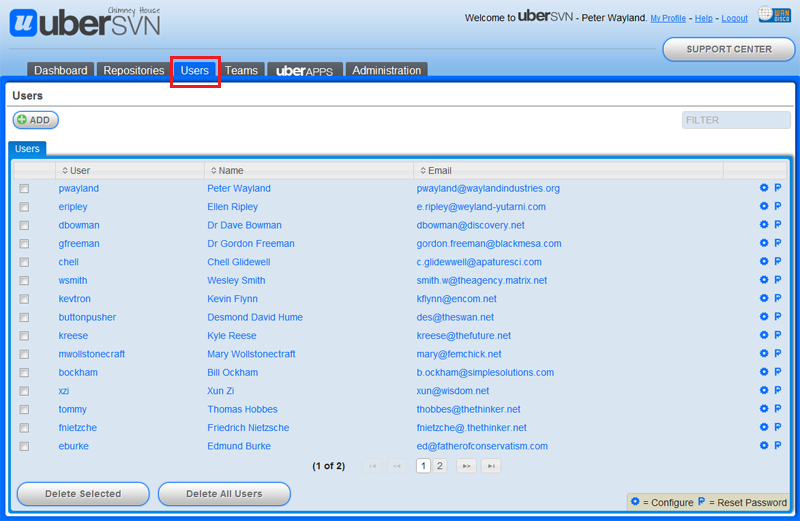
Users main screen.
The main Users screen shows a list of users, along with their usernames and email addresses. From here you can:
- Create Users - Click on Add. See the Create User section.
- Delete a user - Tick the check boxes, then click the Delete Selected button.
- Delete all users - Click this button to automatically delete all users displayed in the screen, making mass deletion quicker.
- Search for a user - Enter part of the name or username of a user you are looking for into the Filter box.
- Configure a user - Click the configure
 widget or click on a username.
- Change a password - Click on the change password
 widget.
4.1 Create User
Manually add new users into uberSVN using the Create User Wizard.
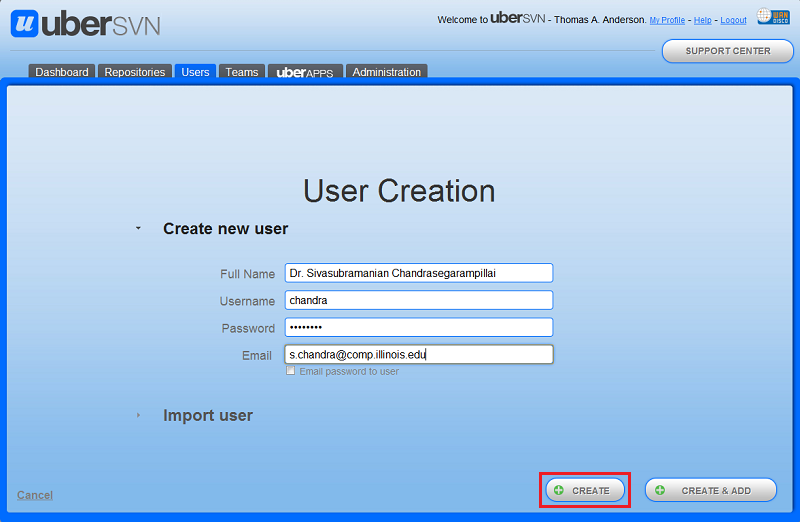
Users - Single User Creation
- Full Name :
- The user's full name, e.g. Thomas Hobbes.
- Username:
- A name by which the user will be known on uberSVN. It should be a single word, consisting only of numbers and letters.
Username Rules:The following restrictions apply to what form usernames can take:
- Limited to 25 characters.
- colons (:) are not permitted.
- While usernames that consist of multi-byte characters are permitted, using them could potentially lead to problems.
- Password
- A password, which also should consist of numbers and letters only.
- Email:
- The email address for the users. Tick the Email password to user checkbox to have the password sent to the user in an email.
Configure User
You can view or configure user details by clicking on a user, or their configure widget. Most of the user details are presented on the Profile tab.
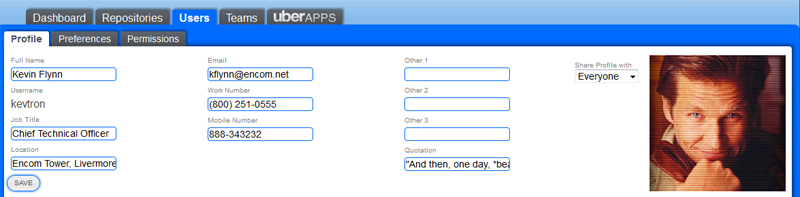
4.2 Profile
The profile tab shows the users information, avatar and contact details. When viewing with an account with admin privileges, an edit button will also appear, allowing you to make changes to the details. The avatar image can only be edited when logged in as the user (or by a user with system admin privileges).

Users - User Profile
- Full Name :
- The user's full name, e.g. Kevin Flynn.
- Username:
- A name by which the users will be known on uberSVN. It should consistent of a single word, with only numbers and letters.
- Job Title
- The user's position within your organization.
- Location
- The location of the office in which the user works.
- Email:
- The email address for the user.
- Work Number:
- The telephone number for the user.
- Mobile Number:
- The mobile telephone number for the user.
- Other:
- One of three option fields for additional information.
- Share Profile With:
- Choose who can view the user's profile: Everyone, Team Only or Nobody.
- Quotation
- A memorable saying or greeting from the user.
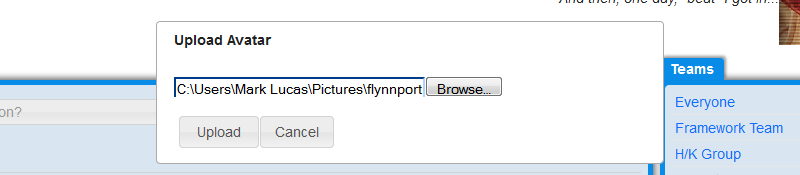
- Upload Avatar
- User avatars can only be uploaded or changed by the user. To upload or change an avatar, click on the image and then click on browse. Select the image you want to use and then click Upload.
- Activity
- The users comments and Subversion changes are logged in the Activity panel.
- Teams
- Lists the teams of which the user is a member. Click on the edit widget to make changes to the team.
Users - Edit Profile
Tip
It's possible to deep link to, or bookmark an individual user's profile.
http://xx.xx.xx.xx:9890/ubersvn/views/platform/users/userProfile.jsf?userId=<User Number>
4.3 Preferences
4.3.1 Change Password
It's possible for a user to change their password through the uberSVN User Profile screen.

- Current Password
- Enter the current password in this box
- New Password
- Enter a new password. Passwords can only contain numbers and letters. The password you enter will be graded, Weak, Good or Strong.

Tip
A strong password should contain 12 or more characters, mixing capital and small case letters and numbers.
- Confirm Password
- Retype the new password to ensure you entered it correctly the first time.
- Update Password
- Click the Update Password button to confirm that you wish to use the new password.
Changing another user's password
Administrators are able to change a user's password by clicking on the user's profile and using the same method. An administrator doesn't need to enter the user's current password and also has the check box option for sending the password by email to the user, providing uberSVN's Email server settings have been completed correctly.
4.3.2 Mute List
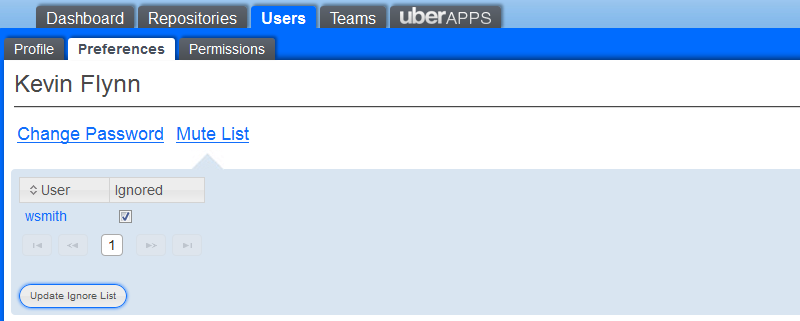
- Any users who have been set to be muted will be listed here, along with a ticked checkbox in the Ignored column. To un-mute a user, untick the checkbox and click the Update Ignore List button.
Click Cancel to close the Ignore List editor without making a change.
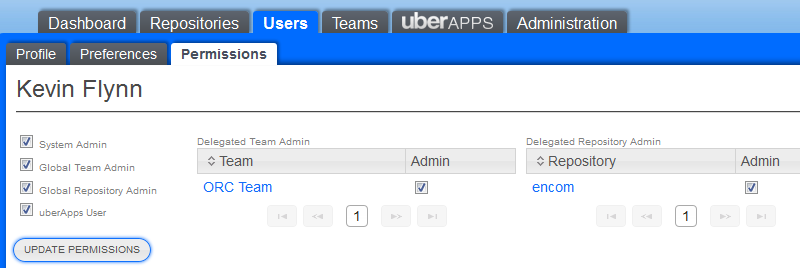
4.4 Permissions
User permissions tab
From the Permissions tab the user's access priviledges are controlled.
- System Admin
- Tick the System Admin checkbox to give the user full admin rights for uberSVN. System Admin rights let users access all sections of uberSVN, including the Administration tab and all the admin sub-tabs, giving them complete control of uberSVN. For this reason it is prudent to limit the number of users who have Systems Admin rights.
- Global Team Admin
- Tick the Global Team Admin checkbox to give the user access to the Users and Teams Tabs. A user with Global Team Admin priviledges is able to create and delete Teams. A users with System Admin privileges is still required to create new users.
- Global Repository Admin
- Tick the Global Repository Admin checkbox to give the user full acess to the repositories tab. The user will be able to create or delete repositories, as well as use all the available Subversion Admin commands.
- uberAPPS User
- Tick the uberAPPS User checkbox to give the user the ability to register themselves as a purchaser in the uberAPPS store. An uberAPPS user gets access to the Account tab when they view uberAPPS.
- Delegated Team Admin
- The table shows the teams for which that the user has been delegated admin rights. Untick the Admin checkbox to remove the Team admin permissions.
- Delegated Repository Admin
- The table shows the repositories for which the user has been delegated admin rights. Untick the Admin checkbox to remove the Repository admin permissions.
- UPDATE PERMISSIONS
- The UPDATE PERMISSIONS button will save any changes that have been made to the Permissions tab.
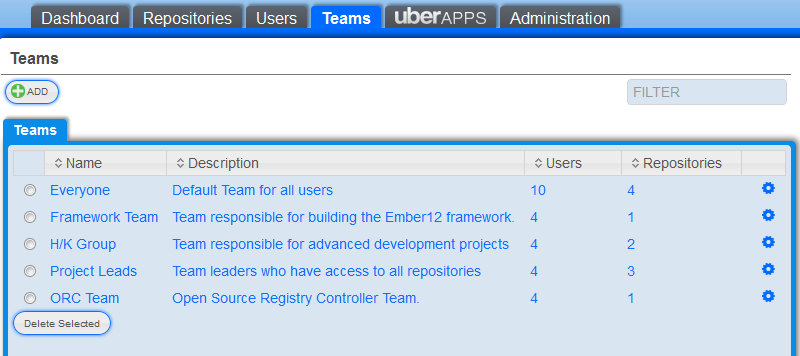
5. Teams
Teams List
Click on the Teams tab to see the Teams List screen. All teams are listed, along with a description and the number of users and repositories associated with it. Clicking on the Team's name or corresponding Configure widget will open the Team's screen.
Caution with team names
Don't give a team exactly the same (case-matching) name as a repository. When a team is created with a name that matches that of an existing repository, assigning this team to another repository can result in unintended read-write access being assigned to non-members of the team.
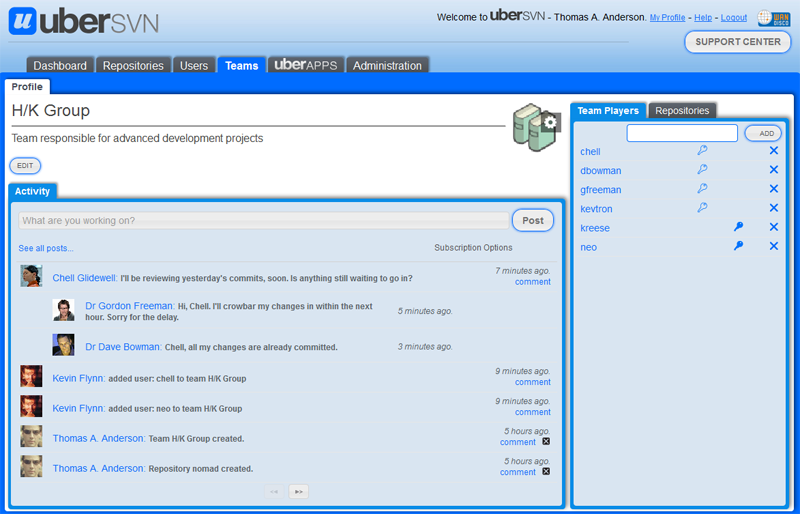
View Team
Each uberSVN team has a team screen which has a description of the team, a lists the team members and a team-specific Activity window which tracks team posts.
Tip
It's possible to deep link to, or bookmark a specific team's screen.
http://xx.xx.xx.xx:9890/ubersvn/views/platform/teams/teamProfile.jsf?teamId=<Team Number>
Edit a User Group by clicking on its name. Use the Filter by Name entry box to search for a particular group.
6. uberAPPS
uberAPPS is a built-in store for development applications and services that turns uberSNV into a full development hub.
View the uberAPPS guide for more information about how to add, manage and update more applications for your uberSVN suite.
7. Administration
The administration tab provides access to uberSVN's inner workings and is only available (visible) to users with system admin privileges.
7.1 Status
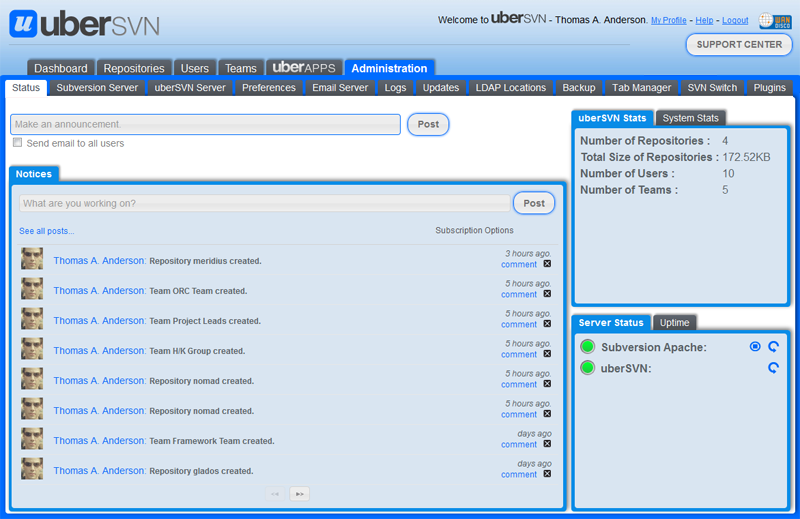
Administration - status tab.
The Administration status tab provides a quick view of what's going on.
Notices
- Announcements
- As an uberSVN administrator you can post a message to all users through the Announcements tool. Announcements are posted on the uberSVN Dashboard and remain pinned to the top of the message board, much like 'sticky' threads do in online forums.

Announcements - How administrators send messages to all users.
Send email to all users
Tick this check box to also send the announcement to all users by email, using the email addresses that users provide when they set up their accounts.
- Notices
- System changes and messages appear on the notice board.
- Subscription Options
- Click on the Subscription Options to either enable or disable the sending of these messages to the email account associated with your uberSVN account.
uberSVN Stats
Lists the basic statistics for the server, useful for keeping an eye on application usage.
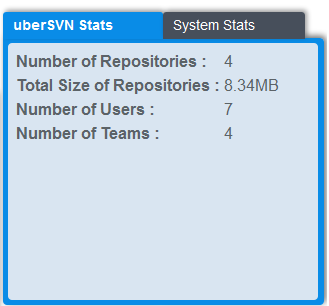
- Number of Repositories
- The number of repositories currently hosted by uberSVN. This will not include repositories that have been deleted from uberSVN that remain in place on the server's drive.
- Total Size of Repositories
- Displays the amount of disk space used by the repositories. Again, this will not included repositories that have been deleted from uberSVN that have been left in place on the server.
- Number of Users
- Shows the number of uberSVN that are create or imported onto the server.
- Number of Teams
- The number of teams that have been created on the server.
System Stats
Lists the basis hardware statistics, useful for keeping an eye on server load.
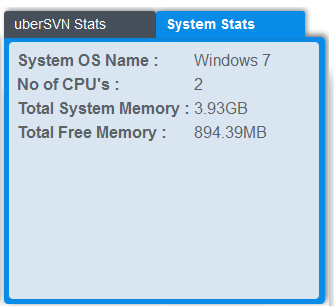
- System OS Name
- The operating system of the server on which uberSVN is running.
- No. of CPUs
- The number of processors or number of cores within the server's processor.
- Total System Memory
- The total memory that the uberSVN server has installed.
- Total Free Memory
- The total memory that remains free for assignment.
Server Status
Shows the current state of Subversion and uberSVN.
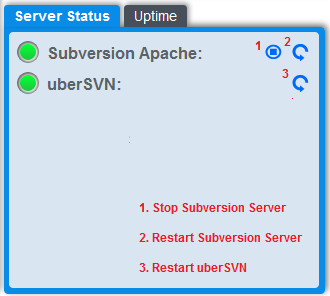
- Subversion Server:
- Green box indicates that Subversion is running, a red box will display if Subversion is not running. There's a Stop and restart button should you need to manually stop or restart the Subversion server.
- uberSVN:
- Green box indicates that uberSVN service is running, a red box will display if the uberSVN service is not running.
Uptime
Shows how long the server and uberSVN have been running.
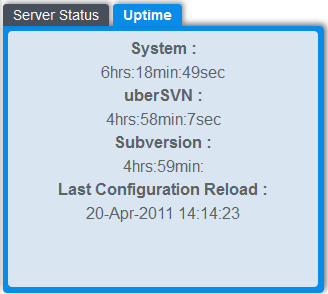
- System
- Indicates how long the system as been running.
- uberSVN
- Indicates how long uberSVN has been running.
- Subversion Last Configuration Reload:
- Indicates the time and date of the last Apache restart (which is triggered whenever a change is made to the Apache config file.
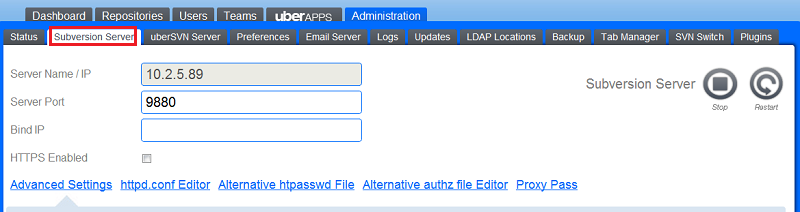
7.2 Subversion Server
The Subversion Server tab (formerly known as the Apache Server tab) handles user access to the repositories.
Subversion Server - Main
- Server Name / IP
- The server's IP Address. This is no longer editable after installation, if you need to change the server's address change the Base URL located on the uberSVN Server sub-tab.
- Server Port
- The port that Apache will use. By default this is set to 9880. You can change this to any port that you like, although you should avoid using a common port (one that is numbered 1023 or less) as these will require that uberSVN is run with root privileges.
- Bind IP
- On a multi-homed server (one with multiple network cards) you would need to specify which IP address that Apache will be bound on.
- HTTPS Enabled
- Tick this checkbox to encrypt Apache traffic using SSL.
- Subversion Server Stop/Start/Restart
- The Stop and Restart buttons allow you to manually trigger a stop or restart of Apache. System changes that force Apache to be restarted will happen gracefully, you don't need to do anything to trigger them.
Caution
There's a known problem for Linux users (seen in CentOS and Ubuntu) who start Apache from command line when logged in as root.
Attempting to use Apache service controls will fail because Apache is not running as the ubersvn user.
The workaround is:
1. Login to the console as root and stop the httppdserverctl service, i.e. sudo ./httpdserverctl stop
2. Login to the uberSVN portal ( http://yourserver:9890/ubersvn) with an account that has system admin permissions.
3. Click on the Administration tab, then the Subversion Server sub-tab, then click the Subversion Server start button.
Apache will now be under uberSVN's control and will respond to future start/stop/restart commands.
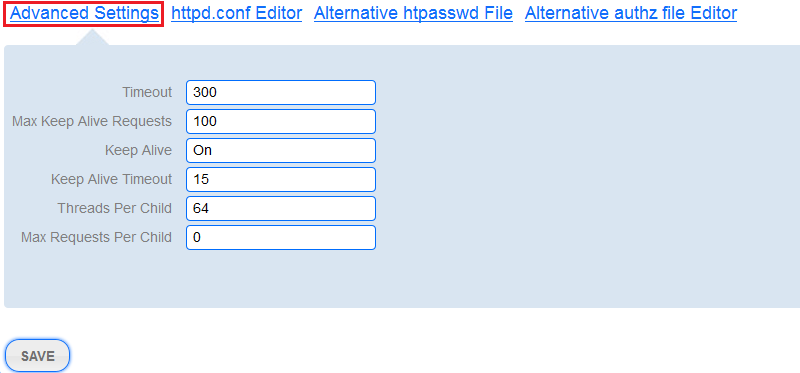
Advanced Settings
The more advanced settings relate to Apache's fine tuning. It's recommended that you don't change these settings unless you're quite familiar with Apache's inner workings.
Subversion Server - Advanced Settings
- Timeout
- The number of seconds before receives and sends time out.
default: 300
- Max Keep Alive Requests
- The maximum number of requests allowed during a persistent connection. Set to 0 for unlimited connections.
default: 100, which ensures a balance between connection capacity and performance.
- Keep Alive
- Whether or not to allow persistent connections (more than one request per connection). Set to "Off" to deactivate.
default: on
- Keep Alive Timeout
- Number of seconds to wait for the next request from the same client on the same connection.
default: 15
- Threads per Child (Windows installation only)
- ThreadsPerChild parameter in the httpd.conf file specifies the number of requests that can be handled concurrently by Apache.
Requests in excess of the ThreadsPerChild parameter value wait in the TCP/IP queue. Having the requests wait in the TCP/IP queue can get you the best trade-off between response time and throughput.
default: 300
- Max Requests per Child
- Maximum number of requests that the Apache child process will serve before the child expires.
Setting a maximum value can help avoid long-lived process induced memory leaks, however, in most setups no maximum is set.
default: 0 - ensures that child processes never expire.
httpd.conf Editor
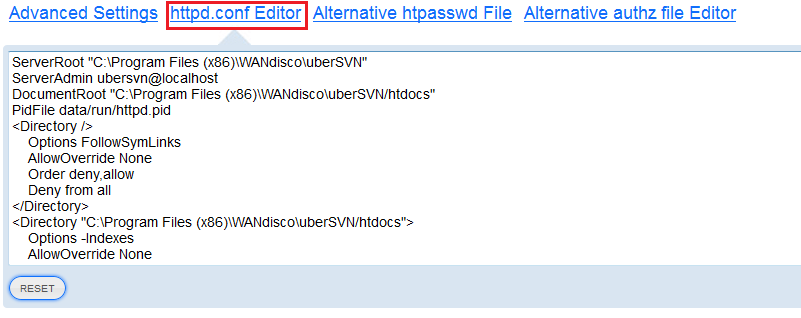
Users - Httpd.conf Editor
The httpd.conf editor allows for manual changes to be made to Apache's main configuration file. Click Save to store any changes you have made. Click Reset to ignore any changes and return to the previous settings. Any change to the httpd.conf file will come into effect as soon as the Apache process is restarted.
View a sample copy of the httpd.conf file
Alternative htpasswd File

Subversion Server - Alternative htpasswd File
Allows you to replace the default htpasswd file with a different one. Simply browse to and select a different htpasswd file to set it as the password file to be used. This selection is made on a per repository basis.
Alternative authz file Editor
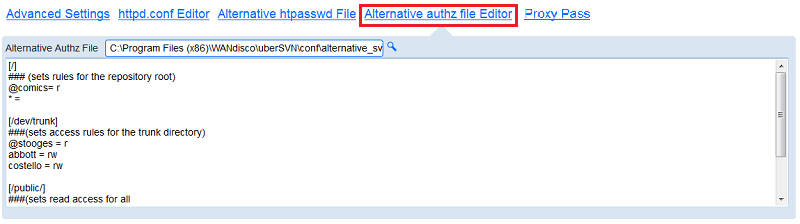
Subversion Server - Alternative authz File
Allows you to replace the default authz file with a different one. Simply browse to and select a different authz file to set it as the password file to be used. This selection is made on a per repository basis.
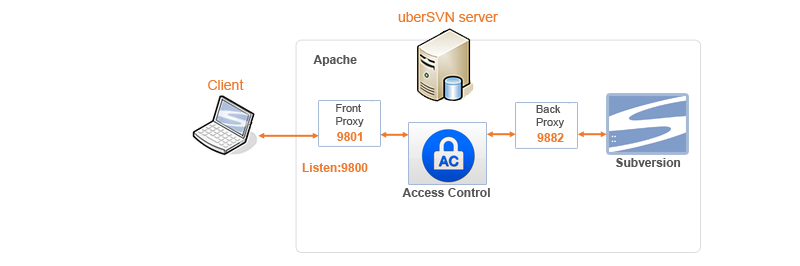
ProxyPass
UberSVN supports the Apache ProxyPass directive which allows a reverse proxy to be configured. When enabled, Apache can proxy traffic between the client and back-end applications like uberSVN Access Control.
ProxyPass Example
Initially, Proxypass has been added to allow the use of SSL encryption, which is not supported by uberSVN Access Control. In the example above, Proxypass is enabled, Apache listens on port 9800, the front proxy decrypts and forwards traffic directed at Subversion to Access Control via port 9801. Access Control (via the Back Proxy port of 9882) then directs this traffic to Subversion.
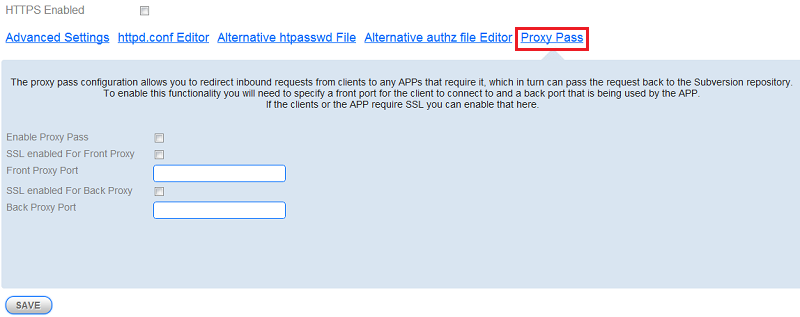
Subversion Server - ProxyPass Settings
- Enable ProxyPass
- Tick this checkbox to enable ProxyPass on your uberSVN server. If enabled you'll also need to provide port numbers for both the front and back proxy.
- SSL enabled for Front Proxy
- Tick to enable https for traffic between client and Apache.
- Front Proxy Port
- Enter a port number for the front proxy.
- SSL enabled for Back Proxy
- Tick to enable https for traffic between Access Control and Subversion.
- Back Proxy Port
- Enter a port number to be used by the back proxy.
You can check the configuration that results from enabling ProxyPass by viewing the Apache proxy-pass configuration file:
C:\Program Files (x86)\WANdisco\uberSVN\conf\conf.d\proxy-pass.conf
LoadModule proxy_module modules/mod_proxy.so
LoadModule proxy_http_module modules/mod_proxy_http.so

Listen 9800

<VirtualHost *:9800>
SSLEngine on
SSLCertificateFile C:\Program Files (x86)\WANdisco\uberSVN\openssl\certs\ubersvn.crt
SSLCertificateKeyFile C:\Program Files (x86)\WANdisco\uberSVN\openssl\certs\ubersvn.key
SSLProxyEngine on
ProxyPass / https://10.2.5.89:9900/
ProxyPassReverse / https://10.2.5.89:9900/
</VirtualHost>
7.3 uberSVN Server
uberSVN's own server settings can be managed from this screen.
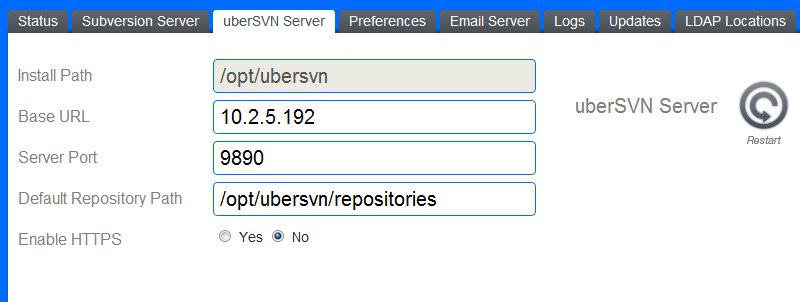
uberSVN Server - Settings
- Install Path
- The local path to where uberSVN has been installed.
- Base URL
- The hostname or IP address on which uberSVN is accessed.
Caution
If you list a hostname, you must also include the protocol, i.e. 'http://ubersvn.server.com'
- Server Port
- The port used to access the uberSVN portal.
- Default Repository Path
- The local path to the directory in which all Subversion repositories are stored.
- Enable HTTPS
- Choose "Yes" to encrypt uberSVN using SSL. In this case you would need to access uberSVN using the HTTPS protocol.
- HTTPS Port
- If you select "Yes" for Enable HTTPS, enter the port that you want to use for SSL. (The default is port 9900.)
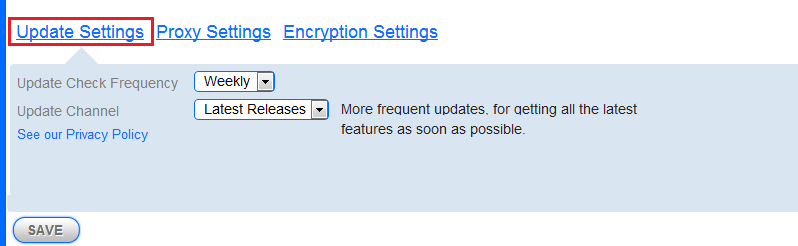
Update Settings
Tell uberSVN how you want to manage its software updates, through the Updates tab.
uberSVN Server - Settings
Update Frequency (days)
This sets how frequently uberSVN checks for software updates. Choose between Daily (24h), Weekly (7 days) or Monthly (30 days).
Update Channel
You can choose between two update channels:
Latest Releases: (default setting) uberSVN will always download the very latest files, as they are made available. This approach will get you the latest features and fixes, but it won't have benefitted from community testing.
Stable Releases: This channel will limit system updates so that they only occur when a new version of uberSVN is released - you wait longer for releases but there will be fewer bugs and more complete features.
Privacy Policy: A link to our uberSVN Privacy Policy which explains exactly how we manage any of your personal information that is stored within or transferred through uberSVN.
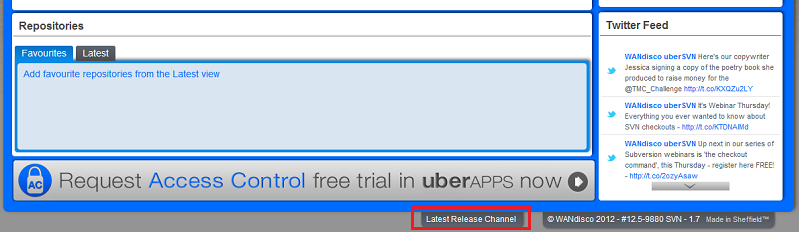
There's a tab button on the footer of the uberSVN that highlights that the installation defaults to the Latest Release Channel.

Latest Release Channel tab
Click on the tab to go to the uberSVN Server settings screen where you can change to the Stable Release Channel. Once you select the Stable Release Channel this tab will disappear. Return to the uberSVN Server screen if you ever want to switch back to the Latest Release channel.
Proxy Settings
If your uberSVN server requires a proxy in order to talk to the outside world you enter the details here. When external connectivity is through a proxy, you'll need to configure this section to:
- To get notifications of when updates are available for uberSVN
- To download and buy add-ons from the uberAPPS store
- To subscribe to Twitter feeds
- These settings do not affect connections to uberSVN from users' web browsers or Apache Subversion clients.
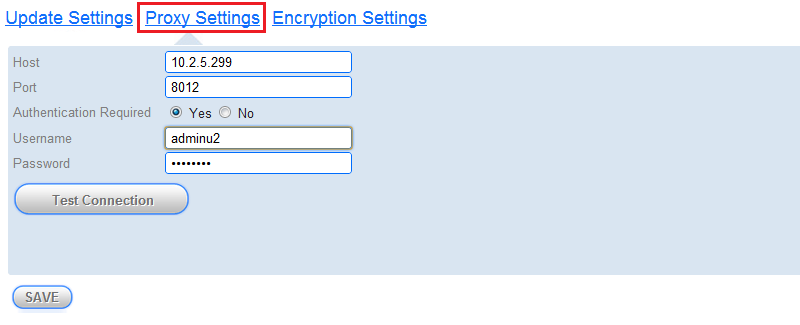
- Host
- The proxy server's IP or hostname.
- Port
- The port on which the proxy is running.
- Authentication Required
- If the proxy server requires authentication then select the "Yes" radio button. Additional fields will be revealed:
- Username
- The username required for logging into the proxy.
- Password
- The password required for logging into the proxy.
Encryption Settings
Manage the Trust Store credentials for use in securing uberSVN connections with SSL.
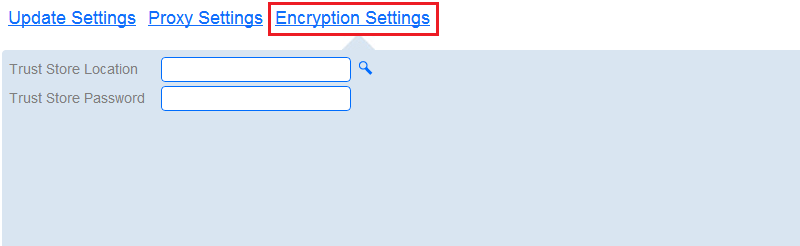
Administration- Preferences
- Trust Store Location
- Type the trust file name and file path.
- Trust Store Password
- Type in the password needed to access the truststore file.
7.4 Preferences
The preferences screen is used to manage various uberSVN setting, including the visual themes, Social Interface messaging and Quick Links.
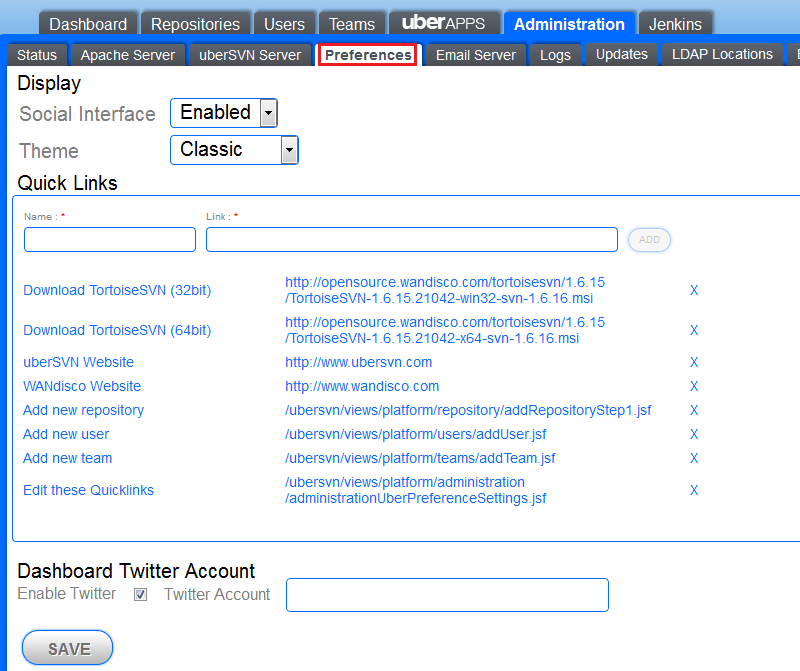
Administration- Preferences
- Social Interface
- uberSVN integrates messaging and activities streams that are associated with the Dashboard, teams and repositories. The Social Interface control lets you disable the feature so that no further messages or activity will be displayed.
- Theme
- The Display Theme is currently not implemented in the current version. In future it will be possible to change the way that messaging streams are displayed.
- Quick Links
- The Quick Links panel that appears on the dashboard is edited from here. You can delete or add your own links, either deep linking to a screen in uberSVN, or an external link. Due to limited space on the dashboard there is currently a maximum limit of 8 Quick Links.
- Dashboard Twitter Account
- Subscribe to a Twitter feed by entering a twitter account name (the twitter account name without the @ prefix) into the Twitter Account entry box and clicking the SAVE button. The feed that you add will appear on the dashboard within 5 minutes. You can enable/disable the twitter feed by ticking or unticking the Enable Twitter check box.
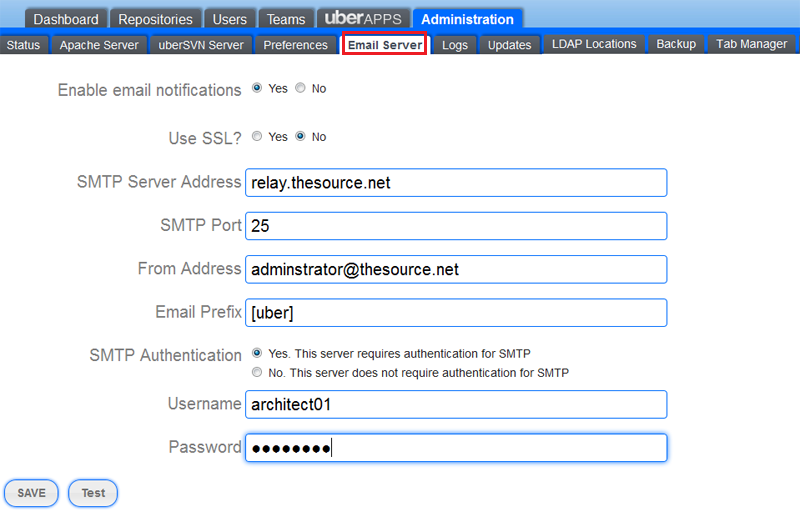
7.5 Email Server
The Email Server screen is used to set up uberSVN to send emails out (using a seperate email server).
Users - Email Server
- Enable email notifications
- Select "Yes" to enable the sending of notifications emails to users who have subscribed to message/activity streams. Select "No" to disable all notification emails.
If email notifications are enabled you'll receive notification emails:
- alerting actions based on user subscriptions (Repository activity, commits etc)
- confirming forgotten Password resets
- admin notifications, including update availability
uberSVN alert emails come from your server
To be clear, these emails are sent from your instance of uberSVN, they are not sent from WANdisco. If receiving yet more emails is going to mess with your calm you can click the Disable Email Notifications button. Just remember that many important system changes or problems will only be reported in log files.
- Use SSL
- Select "Yes" to use encryption for connections to the mail server. Select "No" to disable encryption of email traffic.
- SMTP Server Address
- The address IP or hostname of the email server.
- SMTP Port
- The port used by the mail server, the default port is 25.
- From Address
- This is the address that will appear as the source of notification emails, it will also be the address to which replies are sent.
- Email Prefix
- An optional value that is stuck on the front of all notifications that can assist in email filtering.
Tip
If you run multiple instances of uberSVN, use the Email Prefix field to distinguish which instance from which the email has been sent.
- SMTP Authentication
- If the mail server requires authentication, select yes and provide a mail account username and password.
- SAVE
- Click the save button to save any changes you have made to the email server settings.
- Test
- Clicking Test will trigger a test message to be sent to the email address associated with the user account that is currnently logged in.
7.6 Logs
The Logs tab provides access to a number of system logs for uberSVN, Subversion and Apache.
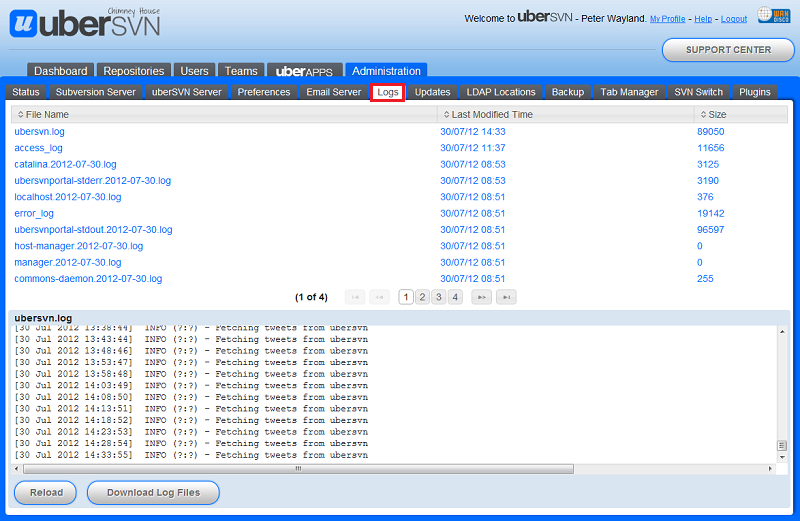
Administration - Logs
Which log files appear will depend on which Subversion commands have been run and which uberSVN tools have been used.
- PackagerTool.log.yymmddhhmmss
- This log file is created when an update is performed in uberSVN.
- access_log
- Apache server records all incoming requests and all requests processed to this log file.
- catalina.yyyy-mm-dd.log
- Tomcat web server log.
- commons-daemon.yyyy-mm-dd.log
- Commons Daemon is a Java software library belonging to the Apache Commons Project.
- error_log
- The main uberSVN error log, tracks system behavior that can help with diagnosing problems.
- host-manager.yyyy-mm-dd.log
- Tomcat host manager log.
- localhost.yyyy-mm-dd.log
- Tomcat localhost log.
- manager.yyyy-mm-dd.log
- Tomcat manager application log.
- RepoName_dump1-Dump-Messages.log
- Generated after a successful dump.
- RepoName_dump1-Load-Messages.log
- Generated after a successful repository data Load.
- rest-audit.log
- uberSVN rest api audit log file.
- svn_logfile
- Shows log messages from the repository.
- ubersvn-audit.log
- uberSVN audit log file.
- ubersvn.log
- The main log file for uberSVN. It tracks most of the system changes that are made through the uberSVN console.
- ubersvnportal-stderr.yyyy-mm-dd.log
- Standard error is an output stream used to output error messages or diagnostics.
- ubersvnportal-stdout.yyyy-mm-dd.log
- Standard output is the stream where a program writes its output data.
- verify_dumpXX-Load-Messages.log
- Generated after a successful run of a Subversion dump.
- verify-repositoryname-mm-dd-yyyy_hh-mm-ss-Messages.log
- Generated after running a repository verification.
- error.log
- The error file is the place where Apache httpd will send diagnostic information and record any errors that it encounters in processing requests. It is the first place to look when a problem occurs with starting the Subversion server or with the operation of the server, since it will often contain details of what went wrong and how to fix it.
- access.log
- The server access log records all requests processed by the server.
Reload Click the reload button to refresh your view of the available log files.
Download Log Files Click the Download Log Files button to download a zip archive of all the current log files.
uberAPPS When uberSVN Access Control is enabled, more detailed logs for Access Control can be viewed within the Access Control installation
i.e.
C:\Program Files (x86)\WANdisco\uberSVN\svn-security\logs
When Access Control is running you can view the logs from the Log Viewer, under the System tab
Access Control Log Viewer.
7.7 Updates
Once uberSVN has been installed, there's no need to re-install from scratch when a new version is release, instead the Updates section allows you to view which new versions of components are available and select which ones you want to install.
Update Channel: bang up-to-date or super-stable
UberSVN's updates can be set to come from one of two channels:
Latest Releases - By default, the Updates tool will make you aware of updates to individual components, which you can download as and when they're made available.
Stable Releases - If you prefer you can wait until uberSVN has completed a full development cycle, by which time any problems found by early adopters should be ironed out.
Set the Update Channel under the uberSVN Server settings screen.
Administration - Updates
List of currently available modules
- updater
- The uberSVN Updater itself. This file controls how the update tool actually works.
- apr-util
- Apache Portable Runtime Utilities are a bunch of libraries that help implement some of uberSVN's core functionality.
- db
- Berkeley Database Engine is used for storage by our implementation of Subversion.
- apr
- This is the Apache Portable Runtime, a library used by Subversion's Apache web server. It provides a set of APIs that map to the underlying operating system (OS). Where the OS doesn't support a particular function, APR will provide an emulation - making Apache portable across different platforms.
- openldap
- This is the open source variant of the Lightweight Directory Access protocol (LDAP) that can be used to manage user access.
- serf
- serf is a HTTP client library built upon the Apache Portable Runtime (APR) library. It multiplexes connections, running the read/write communication asynchronously. Memory copies and transformations are kept to a minimum to provide high performance operation.
- sqlite
- The database system that Subversion client libraries use for the storage of working copy information. APR also has a DBD module that uses sqlite for it's back-end, so it can also be used by Apache.
- openssl
- Cryptographic Library that enables uberSVN to encrypt its traffic using Secure Socket Layer technology.
- ubersvn
- the uberSVN Core software.
- bzip2
- A compression Library.
- tomcat
- Apache Tomcat is the Web Application Server on which uberSVN runs.
- zlib
- Another compression Library.
- httpd
- This is the Apache HTTP Web Server on which Subversion runs.
- neon
- Is a HTTP and WebDAV Client Library.
- mod_wsgi
- (For future use) This Python Adaptor for Apache will allow uberSVN to feature apps that run using Python.
- expat
- Is a stream-oriented parser XML Parsing Library.
- Python
- Python Language Interpreter, required for when uberAPPS suppies Python-based apps.
- subversion17
- The Subversion 1.7.x Binaries - these are installed along with Subversion 1.6, which is used by default.
- subversion16
- The Subversion 1.6.x Binaries.
- accesscontrol
- uberSVN Access Control - Access Control App is a commerical add-on for uberSVN that provides full authorization, authentication, access control and audit capabilities for Subversion. Visit uberAPPS to learn more.
- accesscontrol-license-Demo
- uberSVN Access Control License - this is the license file for running the demonstration version of the Access Control app.
Updating PluginsBefore updating any installed plugins you should download and install the core uberSVN update. Failure to do this may result in the plugin updates failing.
Completing an Online Update
Updating uberSVN is usually done online and couldn't be simpler. A run-through of the process follows below.
Should you have problems connecting to the update service from your network, you may need to set up a proxy - See Proxy Settings, under the uberSVN Server settings for more details.
In some cases, you may be installation or update files to install locally, instead of downloading from uberSVN's update server. For these occasions see the section about How to Upload Offline Update.
Alert: Problem running Apache on a privileged (numbered lower than 1024) port:
As part of the update process, Apache is updated so that the new LDAP features will work. The updater doesn't have root privileges, so if you are running Apache on a port that is lower than 1024 you'll need to run an extra script (opt/ubersvn/bin/fixup.sh) to finish the update.
- 1. Login to uberSVN. Click on the Administration tab, then click on the Updates sub-tab. uberSVN's constituent components are listed (as described in the previous section). To see if updates are available, click on the Check For Updates button.

uberSVN Updates - Step 1 "Check For Updates"
- 2. If there are updates available, they'll show up in the status column. To download and install available updates, click the Download Components button.

uberSVN Updates - Step 2 "Download Components"
Alert
Once an update has started, Don't disconnect from the network and don't restart uberSVN.
Any unexpected interuption to the update may cause you to get 'stuck in progress'. If this happens you'll need to complete a full reinstallation.
- 3. You may need to refresh the screen to confirm the that the updates have been downloaded. Successful downloads will result in the status of the downloaded components changing to Ready for update. Click the Update Components button to continue the process.
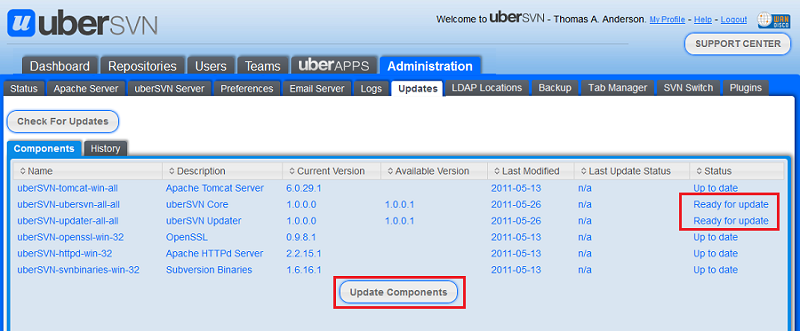
uberSVN Updates - Step 3 "Ready for update"
- 4. An alert box will appear, warning you that during the next stage of the update, uberSVN and any hosted Subversion repositories will be briefly unavailable. You may wish to inform users of the outage.
Click the Continue button to complete the update.
Clicking Not Yet will cancel the update, although the update files will remain available to update at a later date.

uberSVN Updates - Step 4
- 5. A refresh of the screen will confirm that the Last Update Status for the updating components is Success. Congratulations, uberSVN is up-to-date.
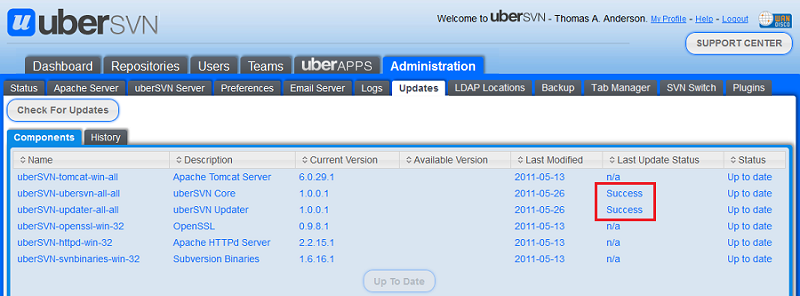
uberSVN Updates - Step 5
Completing an Offline (local) Update
It's possible to update uberSVN or uberAPPS using a local installer or update file instead of downloading through the uberSVN server. To complete an offline update, click the Upload Offline Update button that appears at the bottom of the update screen, then follow the prompts.

uberSVN Offline Updates.
Licence Comparison Functionality
When a licence update is available it will be shown in Updates under the uberSVN Administration tab.
7.8 LDAP Locations
The LDAP Locations tab stores settings for use when an LDAP service is used for managing authentication for Subversion users (and optionally for uberSVN access too). You can add multiple LDAP locations (multiple LDAP groups or servers).
Known Problem (Windows only)
Enabling LDAP authentication for a repository will prevent you from viewing it using uberSVN's repository browser.
We're looking to fix the problem, although our long term strategy is to bring in a replacement repository browser.
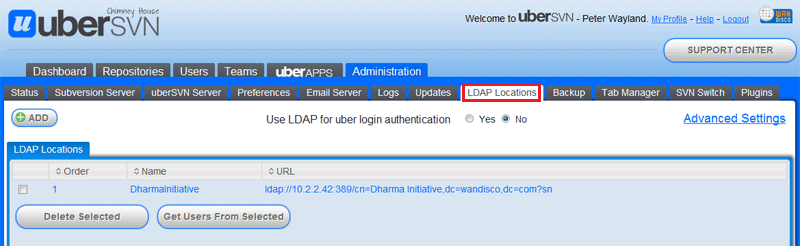
Administration - LDAP Locations settings
- +ADD
- Click the ADD button to add a new LDAP/Active Directory location for use with Subversion/uberSVN.
- Use LDAP for uber login authentication
- Select "Yes" if you want to manage uberSVN access via your LDAP/Active Directory service. Select "No" if you only wish to manage Subversion users through LDAP/Active Directory.
- Advanced Settings
- Click to edit the advanced settings that uberSVN uses for fine-tuned LDAP/Active Directory setup
- Delete Selected
- Tick the corresponding check box for an available LDAP location, then click Delete Selected to remove the LDAP location from uberSVN.
- Get User From Selected
- Tick the corresponding check box for an available LDAP location, then click Get User From Selected to sync with the LDAP group.

Administration - LDAP Locations Advanced Settings
Cache Settings
- Cache Entries
- The maximum size of the primary LDAP cache. This cache contains successful search/binds. Set it to 0 to turn off search/bind caching.
- Cache TTL
- The time in seconds that an item in the search/bind cache remains valid.
- Connection Timeout
- This value typically controls how long LDAP will wait for the TCP connect to the LDAP server to complete. If a connection is not successful within the timeout period, either an error will be returned or the LDAP client library will attempt to connect to the secondary LDAP server if one is specified in the URL.
- Operation Cache Entries
- The maximum size of the LDAP comparison operation cache. Setting it to 0 disables operation caching.
- Operation Cache TTL
- The time in seconds that entries in the operation cache remain valid.
- Shared Memory Cache File
- The directory path and file name of the shared memory cache file. If not set, anonymous shared memory will be used.
- Shared Memory Cache Size
- The number of bytes to allocate for the shared memory cache. if set to 0, shared memory caching will not be used.
Apache Encryption Settings
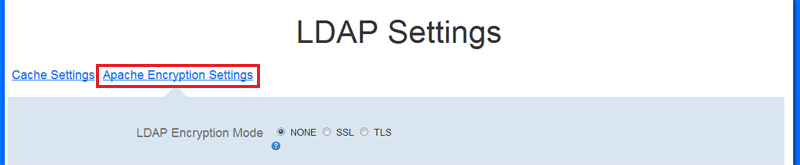
Apache Encryption Setting
- LDAP Encryption Mode
- The encryption mode to be used when connecting to the LDAP server. Select between three encryption types, None (no encrytion), SSL (Secure Socket Layer) or TLS (Transport Security Layer).
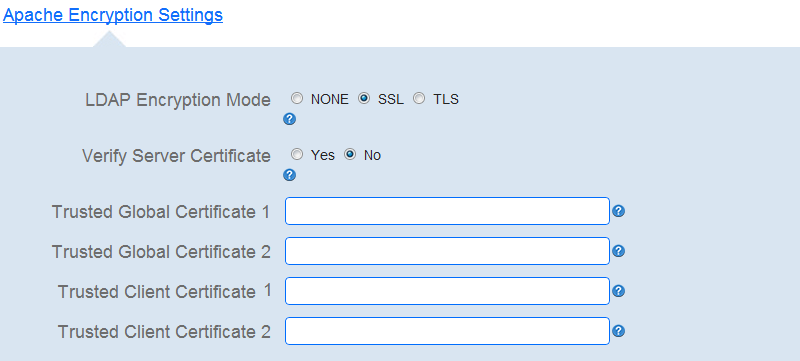
SSL Encryption settings
- Verify Server Certificate
- Whether to force the verification of the server certificate when establishing an SSL connection with the LDAP server.
- Trusted Global Certificate 1
- The type, directory path and file name of the trusted CA certificates and/or system-wide client certificates that should be used when establishing an encrypted connection to an LDAP server. E.g.
CERT_BASE64 "C:/path/to/cert.pem".
- Trusted Global Certificate 2
- The type, directory path and file name of a second trusted CA certificates and/or system-wide client certificates that should be used when establishing an encrypted connection to an LDAP server. E.g.
CERT_BASE64 "C:/path/to/cert.pem".
- Trusted Client Certificate 1
- The type, directory path and file name of per-connection client certificates that should be used when establishing an encrypted connection to an LDAP server. This certificate will be applied GLOBALLY, not per-location. E.g.
CERT_BASE64 "C:/path/to/cert.pem".
- Trusted Client Certificate 2
- The type, directory path and file name of a second set of per-connection client certificates that should be used when establishing an encrypted connection to an LDAP server. This certificate will be applied GLOBALLY, not per-location. E.g.
CERT_BASE64 "C:/path/to/cert.pem".
- Cancel
- Click Cancel to exit back to the LDAP settings screen without saving any changes
-
- SAVE
- Click SAVE to save any changes you have made to the advanced LDAP Settings
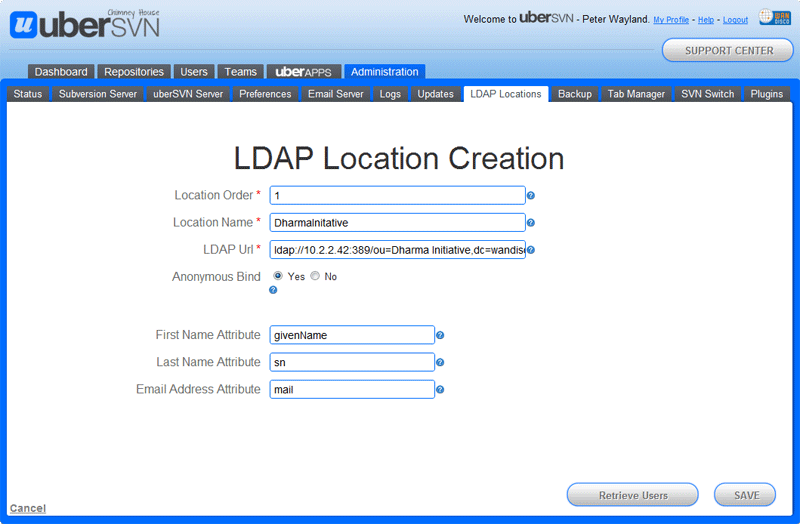
LDAP Location Creation
This section will run through the creation of an example LDAP location.
Setting up an LDAP Location
- Location Order
- This field sets the order that LDAP authorities are queried. An LDAP authority with the location order of 1 will be the first to be checked.
- Location Name
- A meaningful name that you provide that will identify the LDAP authority - it must not contain spaces.
- LDAP URL
- The URL to connect to an DALP server and perform a search for entries to authenticate against,
e.g.
ldap(s)://primaryhost:port secondaryhost:port/basedn?attribute?scope?filter
- note this example illustrates that you can string multiple redundancy servers into the URL.
Tip
LDAP URLs follow the format:
ldap(s)://host:port/basedn?attribute?scope?filter
- host is the fully qualified domain name or IP of the LDAP server.
- port is the network port of the LDAP server
- DN is the Distinguished Name to use as the search base
- attributes is a comma-separated list of attributes to retrieve
- scope is the starting point of an LDAP search and the depth from the base DN to which the search should occur
- filter is a normal string which expresses the criteria for which you want to filter
- Anonymous Bind
- Anonymous binds can be used if the server does not require a DN and password to search for entries. Active Directory does not accept anonymous binds by default.
Set to "Yes",by default this will allow users to connect through LDAP without supplying a username or password. Anonymous binds simplify common search and read operations. If you select "No" then you have the option of supplying:
Bind User DN
An optional DN used to bind to the server when search for entries
Bind User Password
A bind password to use in conjunction with the bind DN.
Caution
The bind password may be sensitive so you should only use a bind DN and password if absolutely necessary.
- First Name Attribute
- This is the attribute of your LDAP entries that contains a user's first name, e.g in Active Directory this could be 'givenName'.
- Last Name Attribute
- This is the attribute of your LDAP entries that contains a user's family name, e.g. in Active Directory this could be 'sn'.
- Email Address Attribute
- This is the attribute of your LDAP entries that contains a user's email address, e.g. in Active Directory this could be 'mail'.
Retrieve Users Click to query the LDAP service and return the first 10 users who match the current settings.
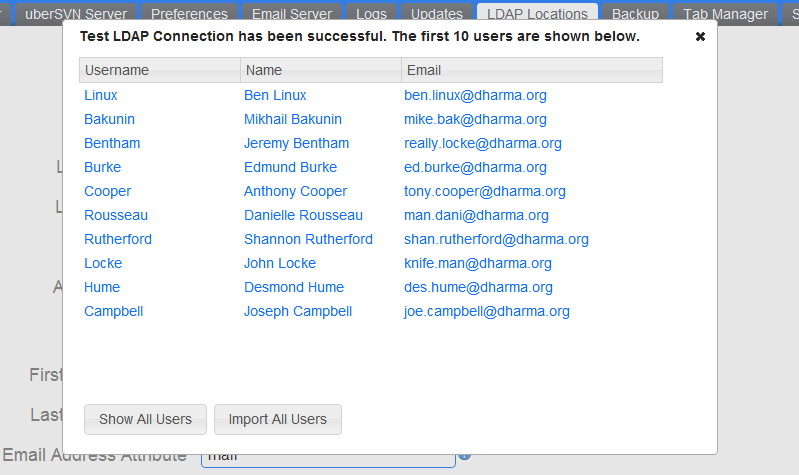
Use the retrieve users button to test a connection.
Click Show all users if you wish to view everyone who matches your query. If you are happy to use the LDAP group, click Import All Users.
SAVE Click on the SAVE button to store changes you have made to the current LDAP settings.
Windows Active Directory LDAP Query Limit
Be aware that (Microsoft) Active Directory LDAP sets a default limit of 1000 entries (users etc) per fetch. Any query that exceeds this limit will result in the "LDAP error code: 4 Sizelimit exceeded" error.
Workarounds?
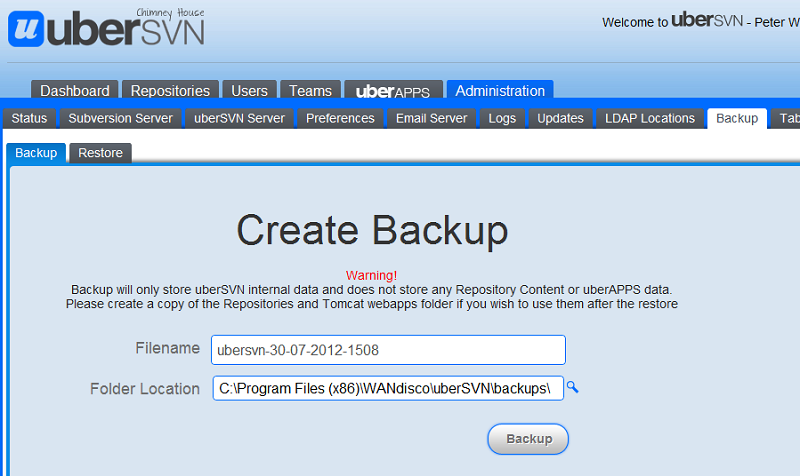
7.9 Backup
The Backup tab holds uberSVN's backup and recovery tools. From the Backup sub-tab you can save uberSVN's working database and Apache configuration files, safe in the knowledge that your repository data is protected against potential mishaps.
Alert
Backups will not work between different versions of uberSVN. We advise you to do a backup immediately after completing any product updates.
Backup tab
uberSVN offers a complete backup and restore capability that ensures you don't lose your data.
Warning!
Backup will only store uberSVN internal data and does not store any Repository Content or uberAPPS data.
Please create a copy of the Repositories and Tomcat webapps folder if you wish to use them after the restore
- Filename
- The name of the backup file, this is automatically generated with the name "ubersvn-dd-mm-yyyy-hhmm", although you can rename it anything you like.
- Folder Location
- By default, uberSVN will create a backup folder in the uberSVN folder.
Click the Backup button to create a backup. How long the process takes will depend on the size of your repositories.
Restore
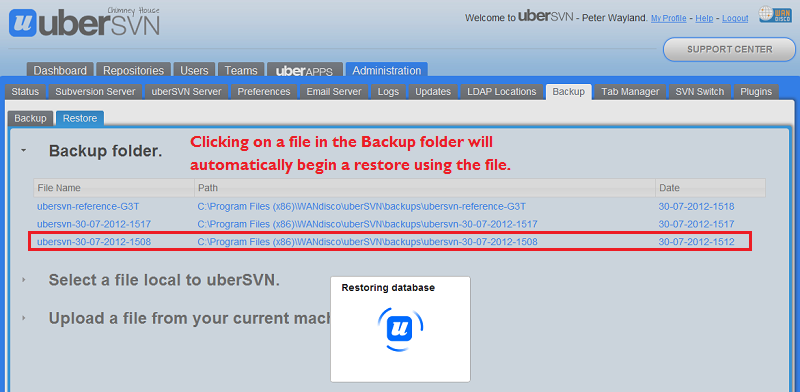
Restore sub-tab handles the reimport of backedup data.
- Backup folder
- This is the default method of backing up. If you use the default folder location in which to save backups, the backup files will appear in the Backup folder table. To restore one of the backup files, just click on it.
Alert
If you choose to restore your data, the restore tab will now show any backups that you made after completing the restored backup. The backups will still be present on your drive, you just need to select them manually.
Restore using a manually selected backup file from the uberSVN server filesystem.
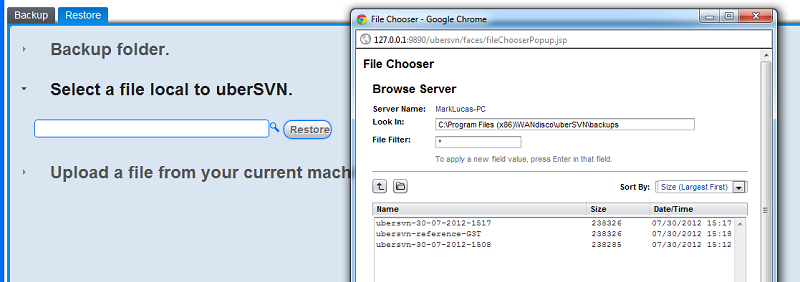
- Select a file local to uberSVN
- Restore from a backup file that is located on the uberSVN server, but not located in the default Backup folder. Click on the spyglass icon and browse to the backup file that you want to use for the restore.
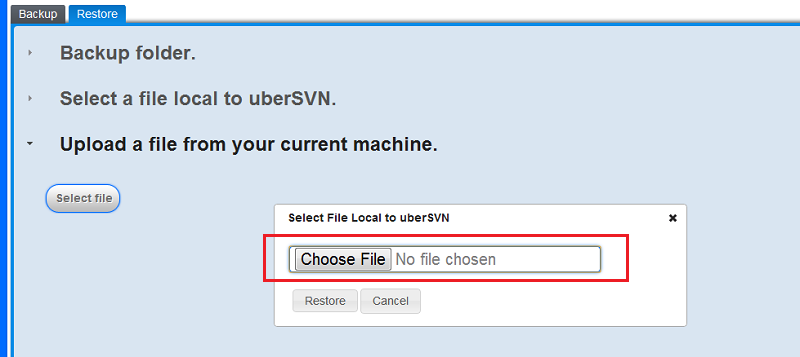
Restore using a manually selected backup file from the local machine.
- Upload a file from your current machine
- Restore from a backup file that is stored locally which will need to be uploaded to the uberSVN server.
Alert
Consider that if the backup file is very large, it might be better to transfer the file onto the uberSVN server first and then use Select a file local to uberSVN option to restore uberSVN.
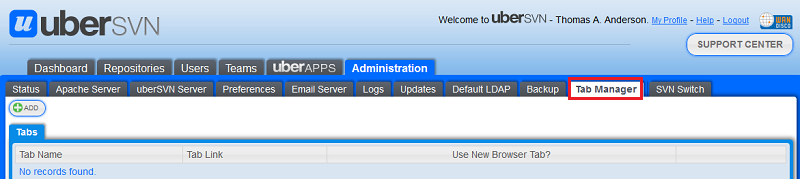
7.10 Tab Manager
The Tab Manager lets you add additional tabs to the uberSVN portal so that you can add your own choice of applications and tools.
Click the ADD button to add a new tab.
Add tabs!
- Name
- A name for the new tab, which will also appear on the tag.
- Link
- The URL for the application or website that you wish to associate with the new tag.
- Use New Browser Tab
- Leave unticked if you want the application or website to appear within uberSVN's main panel. This option offers the best integration, so that the tab becomes an integral part of the uberSVN portal. Tick the check box if you prefer to open the application in a new browser window, this option is best if rending the application within the uberSVN portal causes problems with navigation or usability.
Tip
Adding your own tabs is our first step in making uberSVN an open and flexible ALM stack. In time, we'll be adding applications that fully integrate with uberSVN, right now it's worth testing your preferred development tools to see how well they work from inside uberSVN.

Name and locate your application, site or tool.
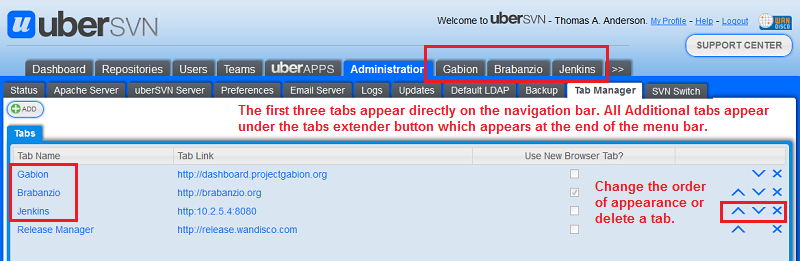
When new tabs have been added, they are listed under the Tab manager, along with their details.
The order in which the tabs appear on the list determinds the order in which the tabs appear. Ordering can be changed usuing the up/down arrows that appear at the end of the tabs list.
Tip
Only the first three tabs will appear on the menu bar, any additional tabs will appear after clicking the tab extender button that appears at the end of the menu bar after the first extra tab has been added.
Tabs list.
A tab's details can be edited by clicking the tab name.
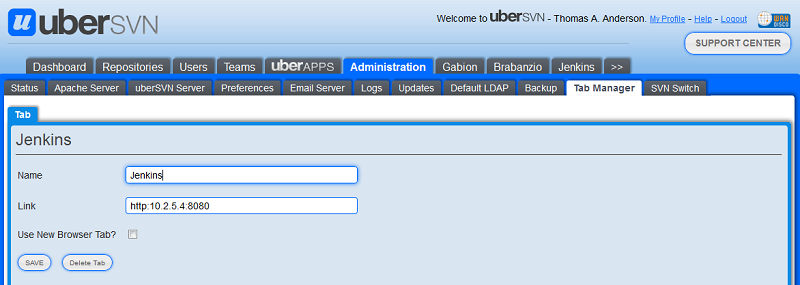
Edit tabs!
- Name
- A name for the new tab, as it appears on the tag.
- Link
- The URL for the application or website.
- Use New Browser Tab
- Tick to open the application in a new browser tab. When not ticked the application will open within uberSVN's panel.
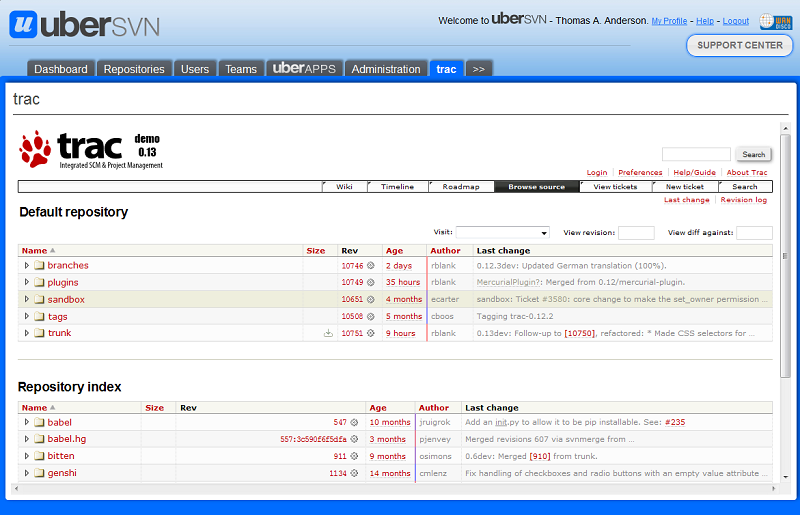
Example tab: trac running in uberSVN.
7.11 SVNSwitch
uberSVN can switch between different versions of Subversion. Currently this lets you choose between Subversion 1.7 (default) and Subversion 1.6.
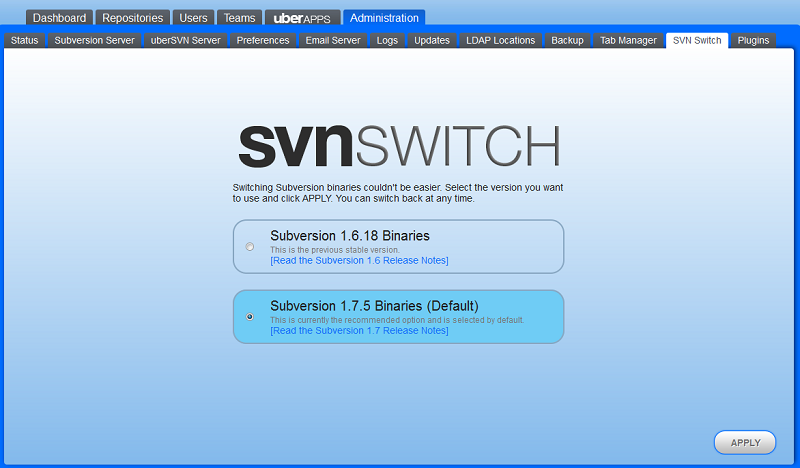
SVN Switch
Which version to choose?
Version 1.7 is set to run by default and brings with it various fixes and improvements over 1.6 and has now seen enough live deployments to provide high levels of confidence over stability.
Subversion 1.6 remains selectable should you need to continue using Subversion 1.6 due to a specific known issue of compatibility between Subversion 1.7 and your environment.
You may find that you don't have the very latest version of Subversion on your system, in which case you can use uberSVN's built-in Update tool to get it. Once downloaded and installed, you'll be able to return to the SVNswitch and make the switch.
What happens when you switch
When the APPLY button is clicked, a restart of the uberSVN service is triggered, at which time uberSVN points at your chosen set of binaries. The process should only take a few seconds, although any Subversion activity that is ongoing at the time of the restart will fail.
7.12 Plugins
The plugin tab is used to manage any uberSVN plugins - by which we mean external processes, that are currently installed/running. At the time of writing, the plugin tab is only used by WANdisco Subversion Access Control.
Updating PluginsBefore updating any installed plugins you should download and install the core uberSVN update. Failure to do this may result in the plugin updates failing.

SVN Switch
- Plugin Name
- The name of the plugin's service.
- Plugin Provider
- The originator of the plugin
- Plugin ID
- The unique name for the plugin's Java process.
- Link
- The URL for the application or website.
- Use New Browser Tab
- Tick to open the application in a new browser tab. When not ticked the application will open within uberSVN's panel.
- Plugin Version
- The installed version of the plugin.
- Status
- The status indicates whether the plugin is currently running or not.
- Plugin Control
- Contains any controls that correspond with the tool, including a start or stop button.
Copyright © 2010-2012 WANdisco plc.
All Rights Reserved
This product is protected by copyright and distributed under
licenses restricting copying, distribution and decompilation.
uberSVN "Chimney House"
Last doc build: 11:10 - Monday 30th July 2012