
Navigation:
uberSVN.com |
Welcome |
Release Notes |
Installation |
Admin |
Reference |
uberAPPS |
Glossary
The Admin guide runs through how to use uberSVN.
To start the uberSVN portal follow these steps:
/opt/ubersvn/bin
[root@localhost bin]# ./ubersvncontrol start
Starting Tomcat
Using CATALINA_BASE:   /opt/ubersvn/tomcat
Using CATALINA_HOME:   /opt/ubersvn/tomcat
Using CATALINA_TMPDIR: /opt/ubersvn/tomcat/temp
Using JRE_HOME:        /home/user/jdk1.6.0_21/
Using CLASSPATH:       /opt/ubersvn/tomcat/bin/bootstrap.jar
Please allow 30 seconds or so for the uberSVN portal to start
To stop uberSVN portal:
/opt/ubersvn/bin
[root@localhost bin]# ./ubersvncontrol stop
Stopping Tomcat
Using CATALINA_BASE:   /opt/ubersvn/tomcat
Using CATALINA_HOME:   /opt/ubersvn/tomcat
Using CATALINA_TMPDIR: /opt/ubersvn/tomcat/temp
Using JRE_HOME:        /home/user/jdk1.6.0_21/
Using CLASSPATH:       /opt/ubersvn/tomcat/bin/bootstrap.jar
Killing: 31981
The Windows version of uberSVN is run as a Windows service, so it requires less user intervention to run. However, there's a batch file available from the Start menu that you can run that will setup uberSVN to automatically start up on system boot.
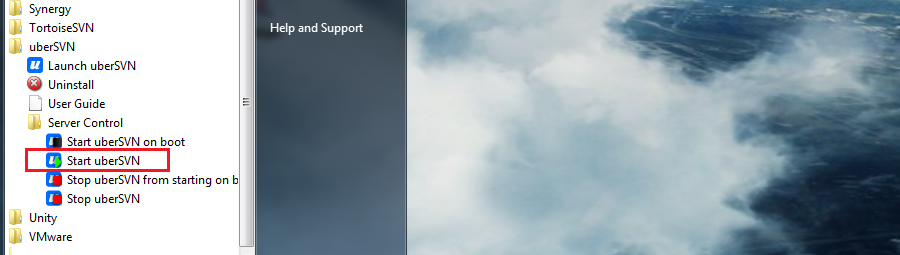
Starting uberSVN on Windows
Also present are batch files for starting and stopping uberSVN manually.
The Windows version of uberSVN can be stopped by clicking on the Stop uberSVN batch file that is present in the Server Control directory of the uberSVN installation directory.
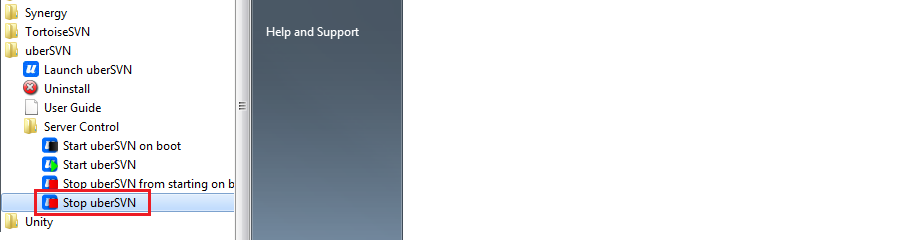
Stopping uberSVN on Windows
To start the Subversion server follow these steps:
/opt/ubersvn/bin
[root@localhost bin]# ./svnservercontrol start
To stop the Subversion server follow these steps:
/opt/ubersvn/bin
[root@localhost bin]# ./svnservercontrol stop
On the Windows version of uberSVN, you control the Subversion service through the Subversion Server tab, located under Administration.
Setting up a repository couldn't be easier. We made it that way, although, right now, the focus is on setting up a common-or-garden repository, without all the options available when manually setting up using pure Apache Subversion.
Although you can surely add a repository without referring to the following procedure, you might appreciate having it as an overview of the procedure and as an explanation of what everything means.
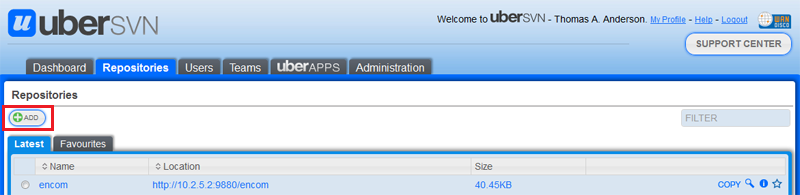
Add a repository
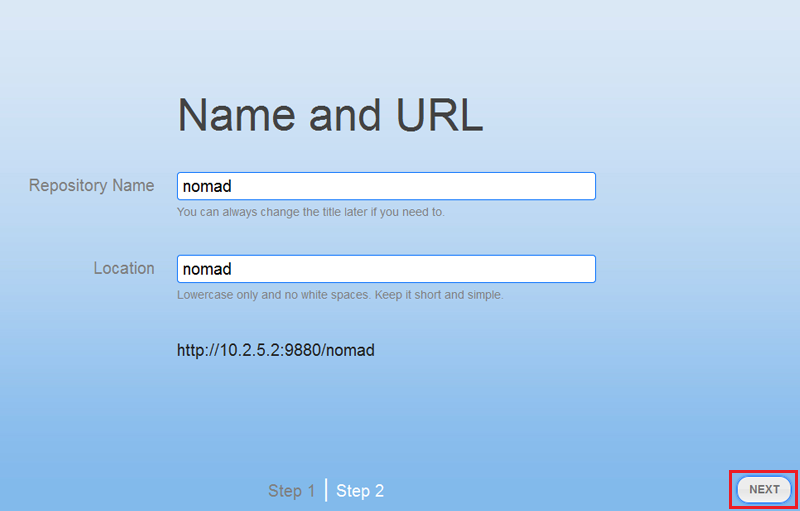
Name the repository
 Repository Naming Rules:
Create a new repository
Create a completely new, empty repository.Import from uploaded dump file
Use a dump file that has been uploaded onto the server remotely.Import from dump file located on the sever
Use a dump file that has been copied onto the server, then just imported from the server's own local drive.Add an existing repository located on the server
You can add an existing repository to uberSVN.Alert
Existing repositories that are added to uberSVN become new repositories, losing all their revision history.
Copying an existing repository and keeping its revision history
1. Create a new blank repository in uberSVN, with the same name as your current repository.
2. Delete the new repository from the file system.
3. Create a hotcopy of your existing repository and move it into the file location where you had deleted the new uberSVN repository.
4. uberSVN will now treat the hotcopy as a 'live' repository with its revision history intact.
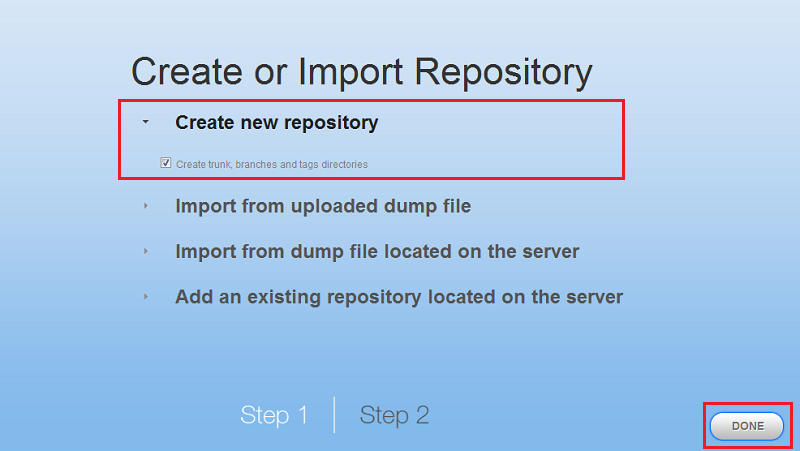
3 options for new repositories: 1) New (blank), 2) new (with imported data) or 3) old (added into uberSVN).
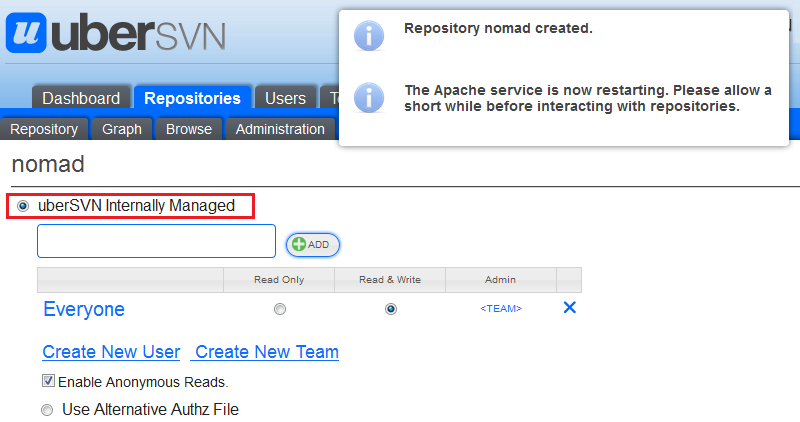
Repository created.
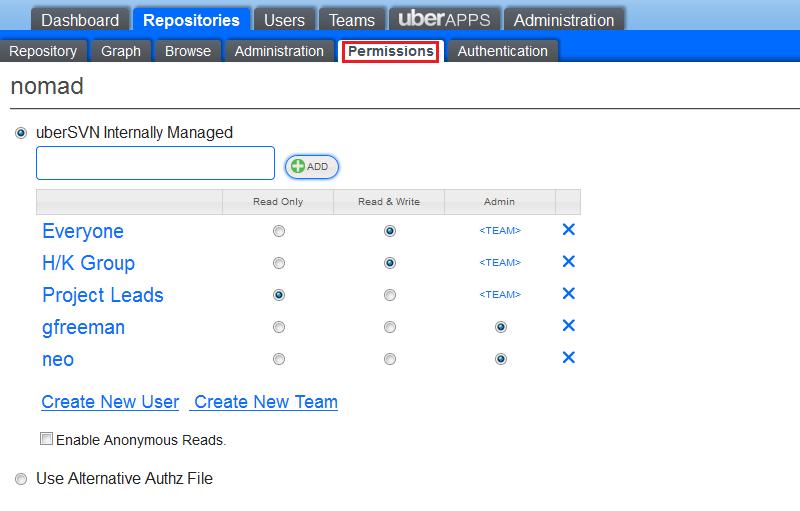
Setting users permissions - you can add existing users or teams.
Manually add new users into uberSVN using the Add User Wizard.
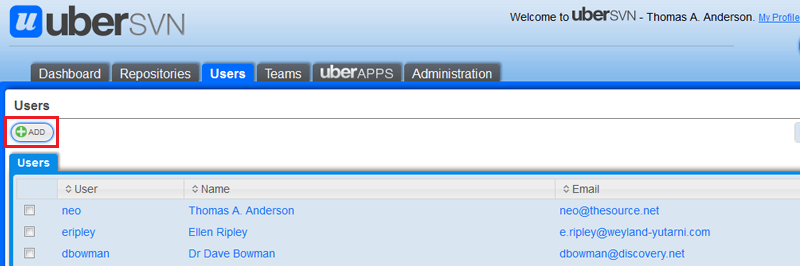
Users - Add Users.
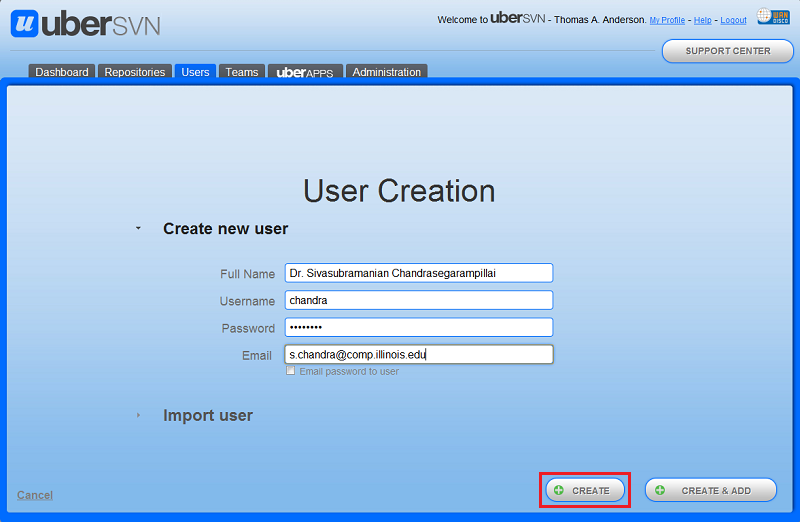
Users - Single User Creation
To bulk import users into uberSVN you need either a Subversion password file (file format: username:password) or a comma delimited (CSV) with the file format: username, full name, email, password.
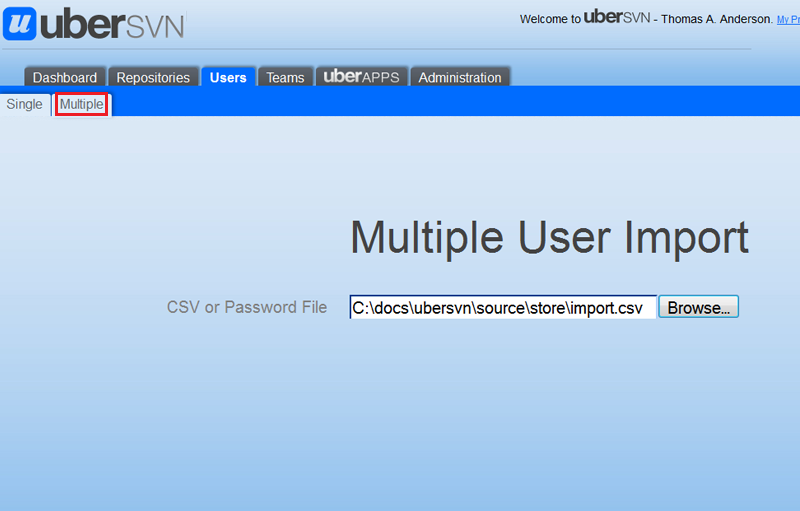
The Multiple tab, used for the bulk import of users.
Click Choose File and select a comma delimited (csv) file containing new users. The, click the Import button.
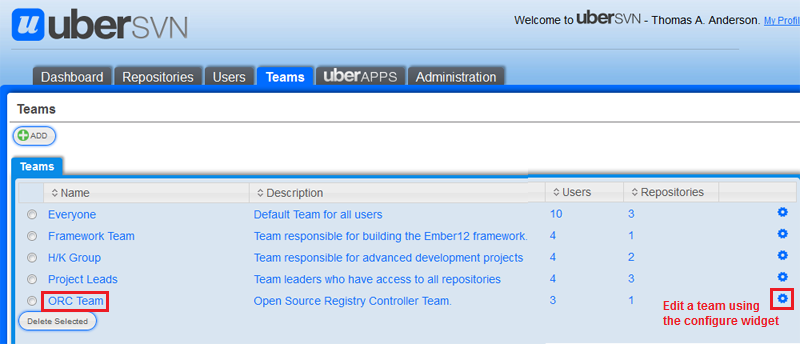
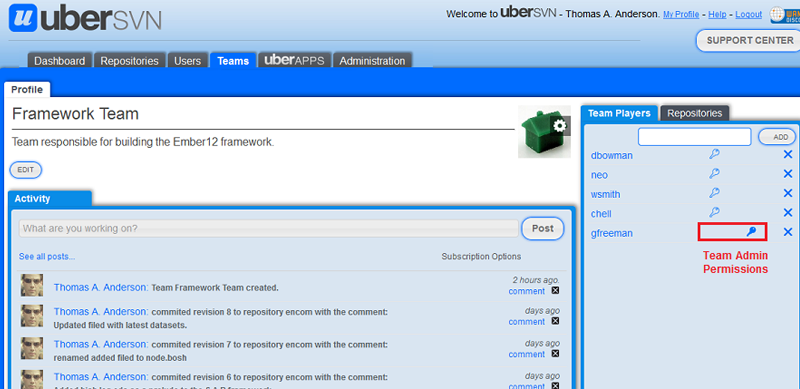
Use this procedure to add a new team to your uberSVN implementation.

The Multiple tab, used for the bulk import of users.

The Multiple tab, used for the bulk import of users.
Team Name: A name for the team. Caution with team names
Don't give a team exactly the same (case-matching) name as a repository. When a team is created with a name that matches that of an existing repository, assigning this team to another repository can result in unintended read-write access being assigned to non-members of the team.
The Multiple tab, used for the bulk import of users.
The Multiple tab, used for the bulk import of users.
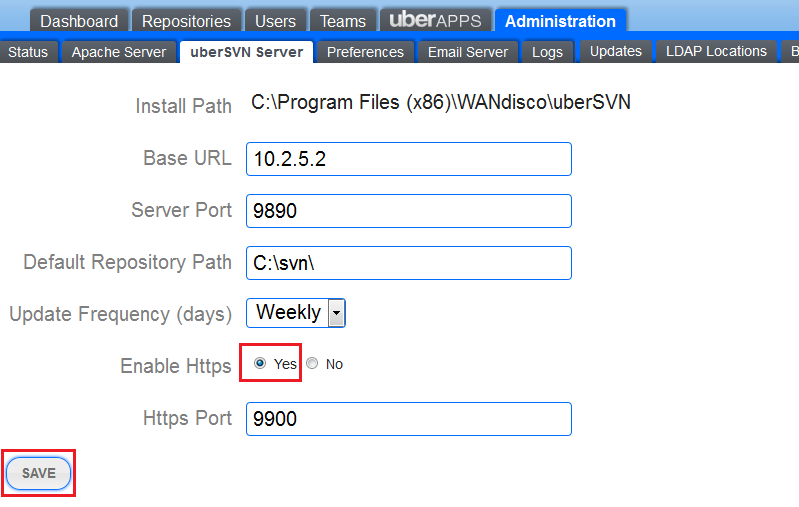
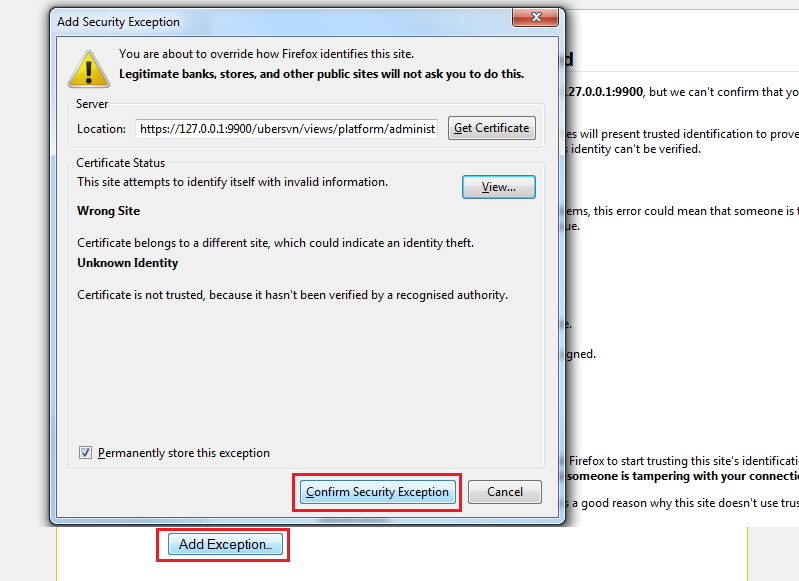
Secure connections to uberSVN by enabling SSL. This will ensure that connections to the uberSVN portal are encrypted.


The integrated repository browser doesn't work with all Linux distributions. The following procedure can be used to replace the browser with the latest version of Sventon (supporting SVNKit):
<uberSVN_Install_Directory>/bin/ubersvncontrol stop
chown <New User>:<New Group> RepositoryBrowser.war
<uberSVN_Install_Directory>/bin/ubersvncontrol startThis is required to expand the RepositoryBrowser.war into the webapps folder. This process can take a while to complete, so wait a minute or so before proceeding.
<uberSVN_Install_Directory>/bin/ubersvncontrol startYou now have a working replacement repository browser.
Under Linux, uberSVN is run by a user and group called ubersvn. If you need to run uberSVN using a different user and group then follow these steps:
$ sudo su
# find /opt/ubersvn | grep -v "httpdstarter" | xargs chown <New User>:<New Group>
# chown root:<New Group> /opt/ubersvn/bin/httpdstarter
# chmod 4750 /opt/ubersvn/bin/httpdstarter
sudo /opt/ubersvn/httpdserverctl restart
sudo /opt/ubersvn/ubersvncontrol restart
uberSVN/Apache will now run with your chosen user and group.
The following procedure lets you change the port on which uberSVN's Apache server runs. You may need to change the port if you have another application or service (maybe another instance of Apache) already runs on the same port.
Changing the Apache port will change the URLs that are used to access repositories, so before making the change it's a good idea to let everyone know that they'll need to update their settings.
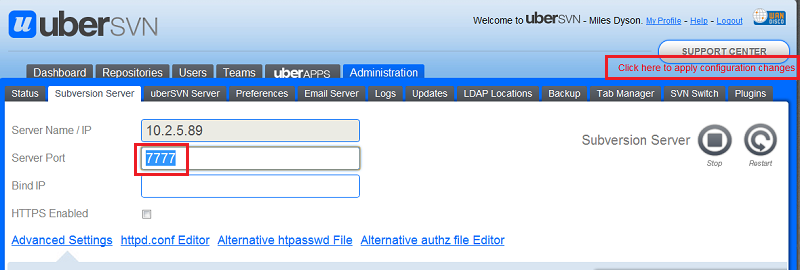
Caution
Anyone currently accessing Subversion will lose their connection, and will need to change their client settings to the new port to regain access.
http://[server address]:[new port number]/[repository name]

During setup you elected to not allow uberSVN to run Apache on a common port, but what if you later find that you need to, in spite of the security risks.
$   su - -c 'chown root:ubersvn /opt/ubersvn/bin/httpdstarter'
$   su - -c 'chmod 4750 /opt/ubersvn/bin/httpdstarter'
Copyright © 2010-2012 WANdisco plc.
All Rights Reserved
This product is protected by copyright and distributed under
licenses restricting copying, distribution and decompilation.
uberSVN "Chimney House"
Last doc build: 10:17 - Tuesday 19th June 2012