Troubleshooting Guide
1. Logs
SVN MultiSite Plus logs SVN and replication events in several places:
- Admin UI: Growl messages
- The growl messages provide immediate feedback in response to a user's interactions with the Admin UI. Growls are triggered only by local events and only display on the node (and in the individual browser session) where the event was triggered.
Growl messages appear in the top right-hand corner of the screen and persist for a brief period (15 seconds in most cases) or until the screen is refreshed or changed. - System Status
-
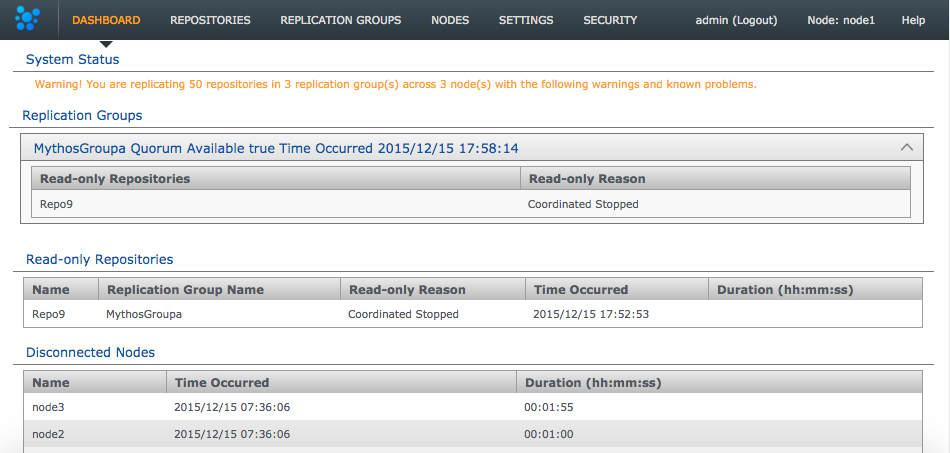
Always check the dashboard
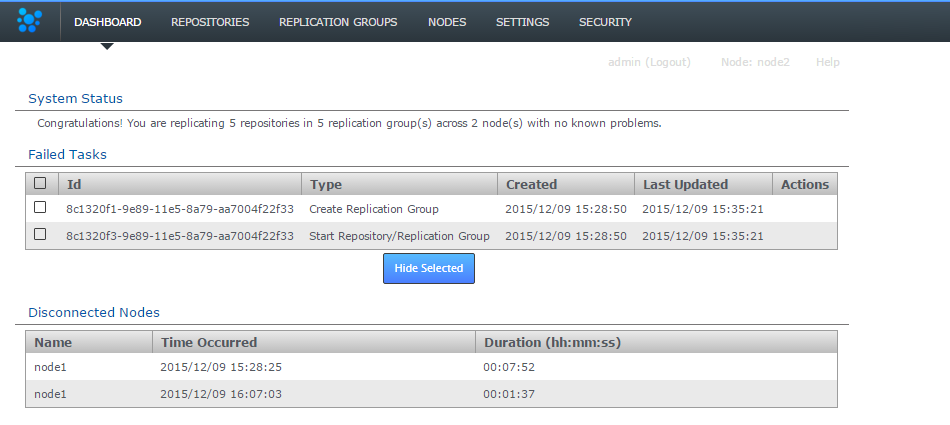
If you are troubleshooting a problem we strongly recommend that you check the Dashboard's Replicator Tasks panel as well as the log files. The growl messages give you an immediate alert for events as they happen, they are not the main method of tracking failures or important system events. - Dashboard: Replicator Tasks
- Events that are more complex and are not bound by user interactions may appear on the Dashboard's Replicator Tasks. Tasks may consist of a simple statement or, with a click on the Task name, a multi-line report:
- Application Logs
- Read more about Application logs
- Replication Logs
- Read more about Replication logs
1.1 Application logs
/opt/wandisco/svn-multisite-plus/
The main logs are produced by the watchdog process and contain messaging that is mostly related to getting SVN MultiSite Plus started up and running. Logs are rotated when they hit 100MB in size.
-rw-r--r-- 1 wandisco wandisco   88 Jan 15 16:53 multisite.log
-rw-r--r-- 1 wandisco wandisco  220 Jan 15 16:53 replicator.20140115-165324.log
-rw-r--r-- 1 wandisco wandisco 4082 Jan 15 16:53 ui.20140115-164517.log
-rw-r--r-- 1 wandisco wandisco 1902 Jan 15 16:53 watchdog.log
- multisite.log
- Basic events that relate to the starting up/shutting down of SVN MultiSite Plus, e.g:
2014-01-15 16:45:17: [3442] Starting ui 2014-01-15 16:53:24: [3571] Starting replicator - replicator.yyymmdd-hhmmss.log
- Events relating to the startup and shutdown of the replicator, and also logging. This log does not include information about the actual operation of the replicator. For this see the replicator's own logs.
- ui
- Startup and everything to do with the UI, including lightweight in-use logging
- watchdog.log
- The running of the watchdog process which monitors and maintains the running of the SVN MultiSite processes.
1.2 Replicator logs
The logging system has been implemented using Simple Logging Facade for Java (SLF4J) over the log4J Java-based logging library. This change from java.util.logging lets you collate data into specific package-based logs, such has a security log, application log, DConE messages, etc.
Set the logging behavior in the log4j properties file, /svn-multisite-plus/replicator/properites/log4j.properties:
# Direct log messages to a file
log4j.appender.file=com.wandisco.vcs.logging.VCSRollingFileAppender
log4j.appender.file.File=fsfswd.log
log4j.appender.file.MaxFileSize=100MB
log4j.appender.file.MaxBackupIndex=10
log4j.appender.file.layout=org.apache.log4j.PatternLayout
log4j.appender.file.layout.ConversionPattern=%d{yyyy-MM-dd HH:mm:ss} %-5p %c{1}:%L - %m%n
log4j.appender.file.append=true

# Root logger option
log4j.rootLogger=INFO, file
This configuration controls how log files are created and managed. A change to log4j configuration currently requires a replicator restart to take affect.
- The log file name is
fsfswd.log. - The maximum size of a log file is set at 100MB.
- The maximum number of logs is limited to 10.
- The VCSRollingFileAppender offers some benefits over Log4j's default RollingFileAppender. It has a modified rollover behavior so that the log file
fsfswd.logis saved out with a permanent file name (rather than being rotated). Whenfsfswd.logreaches its maximum size it is saved away with the namefsfswd.log.<Date>. The date/time stamp is in ISO-8601 format. - When the maximum number of log files is reached, the oldest log file is deleted.
1.2.1 Additional log destinations (appenders)
Apache log4j provides Appender objects are primarily responsible for printing logging messages to different destinations such as consoles, files, sockets, NT event logs, etc.
Appenders always have a name so that they can be referenced from Loggers.
For more information about setting up appenders, see the Apache documenation.
We strongly recommend that you work with WANdisco Support team before making any significant changes to your logging.
If you enable the debug mode, we recommend that you adjust your log file limits, increasing the maximum file size and possibly the maximum number of files.
If possible, put the log files on a separate file system.
1.3 Logging levels
- ERROR
- (previously Severe) Message level indicating a serious failure.
- WARN
- A message level indicating a potential problem.
- INFO
- Interesting runtime events (startup/shutdown). Expect these to be immediately visible on a console, so be conservative and keep to a minimum.
- CONFIG
- Details of configuration messages.
- DEBUG
- Provides a standard level of trace information.
- TRACE
- Provides a more detailed level of trace information.
- ALL
- (previously "Finest") Provides a boggling level of trace information for troubleshooting hard to identify problems.
1.3.1 Changing the logging level
You can change the logging levels, either temporarily to help in a current investigation, or permanently if you want to change your ongoing logging. See Logging Settings Tool.
It's still possible to modify log settings directly by editing the logger properties file:
/opt/wandisco/svn-multisite-plus/replicator/properties/logger.properties
When you've made a change, you need to restart the replicator for the change to take effect.
Log changes are not replicated between nodes, so each node has its own logging setup.
2. Consistency check
Consistency check is done on a per node basis. It enables you to check whether a selected repository remains in the same state across the nodes of a replication group. Follow these steps to check on consistency:
Limits of the Consistency Checker
The Consistency Check tells you the last common revision shared between repository replicas. Given the dynamic nature of a replication group, there may be in-flight proposals in the system that have not yet been agreed upon at all nodes. Therefore, a consistency check cannot be completely authoritative.
Specifically, consistency checks should be made on replication groups that contain only Active (inc Active Voter) nodes. The presence of passive nodes causes consistency checks to fail.
If you run consistency checks, specially on a schedule, take care when changing node roles that you don't make an affected node passive. This will result in the consistency check failing, as noted above Active/Active Voter roles are required for consistency checks.
If you run a consistency check for a repository that does not exist, the dashboard displays
[]. You also get this result if you perform an /api/consistencyCheck call on a removed node.Prior to performing an induction (of a new node) you must ensure that consistency check settings are uniform across all nodes.
Don't run a consistency check if any of your replica repositories are in the Local Read-only state. In this case a consistency check will not complete until the LRO state is cleared.
You receive a consistency error if you run a consistency check when there is no quorum. Consistency checks cannot verify consistency without a quorum so shouldn't be run.
If scheduled consistency checks are being skipped, possibly due to the previous check having failed, you can get the scheduled checks back into action by cancelling the previous task though the admin UI. Read how to set up Scheduled Consistency Checks.
- Log in to a node, and click the REPOSITORIES tab.

Go to the repository
- Click one of the listed repositories.
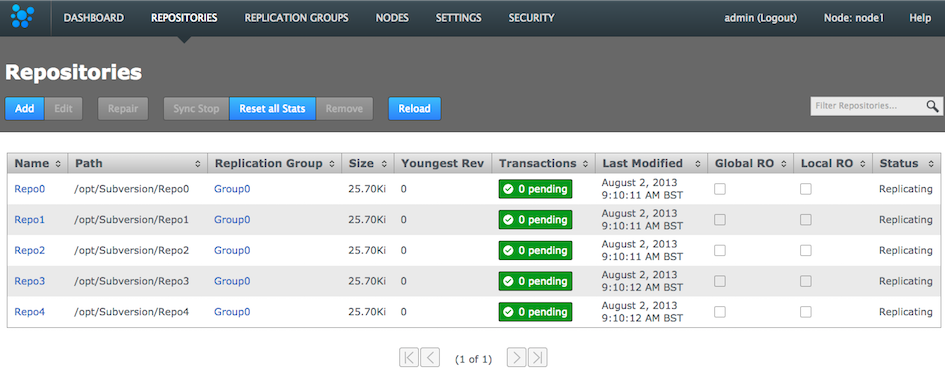
Click a repository
- Click the Consistency check. You see a growl message Invoking consistency check on repository <Repository Name>.
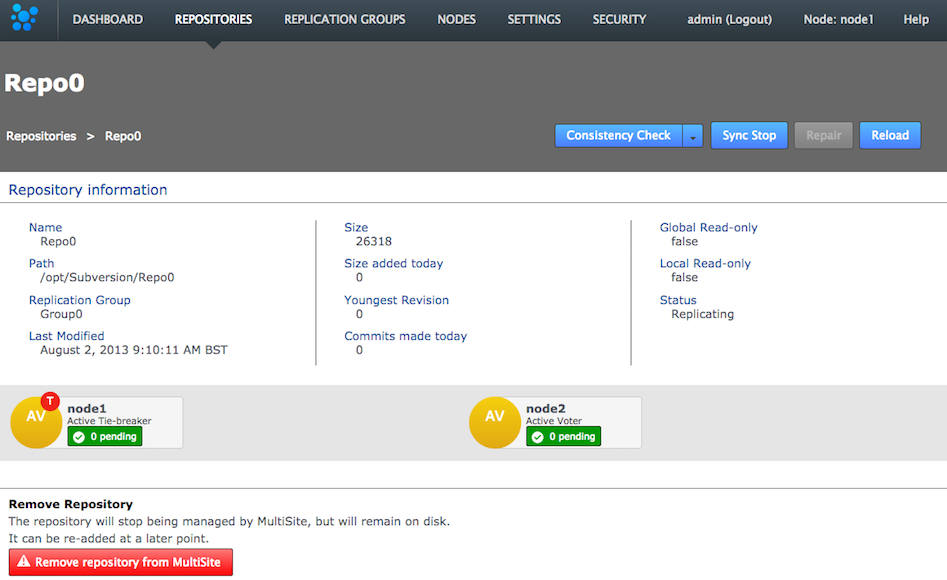
Consistency check in action
You see a growl message "Invoking consistency check on repository <Repository Name>".Known issue: Don't run a consistency check if the repository has been removed from one of the nodes.
There's currently a problem with running a consistency check on a repository if the replica on one or more or more nodes has been deleted. In this situation a "Highest Common Revision" task appears on the dashboard and remains permanently in a Pending state. Until we resolve this problem you shouldn't run the consistency checker on a repository if it has been removed from the file system of any of your nodes. - Click the DASHBOARD tab. The results of the consistency check appear on the Replicator Tasks widget. You need to select All Tasks, instead of the default Pending Tasks.
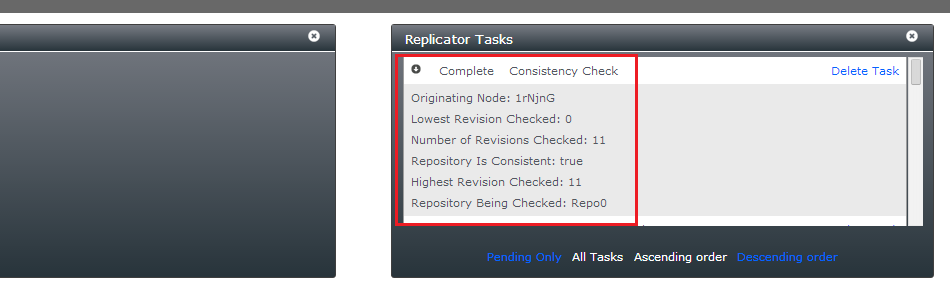
Are the repository replicas identical?
- Originating Node
- The node from which the check was requested.
- Lowest Revision Checked
- The oldest revision compared across all nodes.
- Number of Revisions Checked
- Total number of revisions checked.
- Repository is Consistent
- The result of the check as a 'true' or 'false' statement.
- Highest revision Checked
- The youngest revision compared across all nodes.
- Repository Being Checked
- The name of the repository that has had its consistency checked.
Check the dashboard for the status of the consistency check.
You can also check the results of a consistency check by viewing the replicator's log file (e.g. fsfswd.log.2016-04-26T16:05:30). See Logs
Scheduled Consistency Checks
You can have consistency checks triggered automatically on a predefined schedule. Run scheduled consistency checks are on a per-node basis as follows:
- Log into the admin console, click Settings.

Settings
- Go to the end of the list of editable settings, you'll see a Scheduled Consistency Check Enabled? checkbox. Tick the box to enable the schedule. The time between checks (if enabled) is set in the Scheduled Consistency CHeck Frequency (Hours) box.

p class="label">Enable and set the check frequency
By default the frequency is set to 24 hours, i.e. repositories are checked for consistency once per day. The entry field permits an interger value from 1 (an hour) to 999 (41 days, 14 hours). - Once your settings are in place, click Save.

Save!
Checking more often than hourly
Scheduled consistency checks are not replicated, there'd be no point as all repository replicas across all nodes are being checked anyway. You can use the fact that they are not replicated to your advantage, if you want to perform checks that are more frequent than once per hour. For example, if you have four nodes you could run an hourly check on each node, staggering the check so that one is occuring every 15 minutes. Such frequent checks wouldn't be recommended if you're deploying very large numbers of repositories.
2.1 Inconsistency: causes and cures
WANdisco's replication technology delivers active-active replication that, subject to some external factors, ensures that all replicas are consistent. However, there are some things that can happen that break consistency that would result in a halt to replication.
- Temporary removal of a repository from a node, then adding it back incorrectly.
Fix: Ensure that an rsync is performed between your restored repository and the other replicas. Don't assume that nothing has changed even if the repository has been off-line.Known Issue: Don't run a consistency check if the repository has been removed from one of the nodes.
There's currently a problem with running a consistency check on a repository if the replica on one or more or more nodes has been deleted. In this situation a "Highest Common Revision" task will appear on the dashboard and will remain permanently in a 'pending' state. Until we resolve this problem you shouldn't run the consistency checker on a repository if it has been removed from the file system of any of your nodes. -
The Consistency Check would not be expected to deal with consistency issues that pre-dated the revision at which replication was started.
Fix: Ensure consistency between replicas before you start replicating a repository. - The Consistency Check would not be expected to pick up on inconsistencies that occur very early revisions in a very large repository (revision 12 in a repository with 10,000 revisions, etc.)
Fix: These sorts of issues should be managed through SVN admin best practices such as through regular, incremental backup of repositories and verifications using svnadmin. - Restoring a backup of a repository from a VM snapshot can introduce differences.
Fix: Repeat the repository restoration, account for factor's such as the use of Change Block Tracking (CBT) - Possible SVN/VCS bugs that leads to non-deterministic behaviour, leading to a loss of sync.
Fix: Need to be handled on a case by case basis, subject to the nature of the problem. - Manipulation of file/folder permissions outside of SVN's control will lead to divergence that will force the affected replica to become read-only.
Fix: The easiest to fix as correcting the file/ownership errors will generally result the replicas re-syncing and automatically coming out of Read-only mode.
Loss of consistency is generally caused by external factors such as environmental differences, system quirks or user error. We've never encountered a loss of sync that resulted from a deficiency in the replication engine.
The Consistency Check will tell you the last common revision shared between repository replicas. Given the dynamic nature of a replication group it's possible that there will be in-flight proposals in the system that have not yet been agreed upon at all nodes. For this reason it isn't possible for a consistency check to be completely authoritative.
Specifically, consistency checks should be made on replication groups that contain only Active (inc Active Voter) nodes. The presence of passive nodes will cause consistency checks to fail.
- Log in to a node, click the REPOSITORIES tab.
Go to the repository
- Click one of the listed repositories. This will activate the below line of buttons.
Consistency Check is done on a per node basis
- Click the Consistency check. A growl message "Invoking consistency check on repository <Repository Name>" will appear.
Consistency check in action
- Click the DASHBOARD tab. The results of the consistency check will appear on the Replicator Tasks widget - you'll need to select All Tasks, instead of the default Pending Tasks.
Repository replicas need to be identical - are they?
- Originating Node:
- The node from which the check was requested.
- Lowest Revision Checked:
- The oldest revision compared across all nodes.
- Number of Revisions Checked:
- Total number of revisions checked.
- Repository is Consistent:
- The result of the check as a 'true' or 'false' statement.
- Highest revision Checked:
- The youngest revision compared across all nodes.
- Repository Being Checked:
- The name of the repository that has had its consistency checked.
2.2 Log results
It's also possible to check the results of a consistency check by viewing the replicator's log file (e.g. fsfswd.log.2016-04-26T16:05:30). See Logs
2.3 A note about replica size and consistency
It is possible that repository replicas that are essentially consistent between nodes, actually have different reported file sizes. This difference should not be a cause for concern and can be explained by a number of factors that mostly relate to house keeping and actions that don't need to be synchronized. These can include:
- Aborted transactions, still waiting to be cleaned up.
- The local use of various repository admin tools that create or change repository files.
- Collection timing skew; different revision numbers.
3. Copying repositories
This section describes how to get your repository data distributed before replication.
SVN installations must have:
These items repeat the installation checklist. Ensure that you meet these requirements for replication to run effectively:
- the same version of SVN server
- matching file and directory level permissions on repositories
- exactly matched contents of the svnroot directories between servers (including the repository UUID):
Specifically following this guide:- /conf
- Strongly recommend that the contents match between replicas
- /db
- As this is where repository data is stored it is crucial that this is a perfect match between servers
- Hooks
-
Pre-commit hooks
Wandisco's modified version of the FSFS libraries will intercept commits after any pre-commit hooks have run. This means that the pre-commit hook run on the initiating node (on the server, Apache, SVNserve, etc.) rather than in the replicator. Should a pre-commit hook fail then the server will return an error to the client before the FSFSWD intercept call. As a result, the replicator is never involved with failed pre-commit hooks - with the possible exception of protorev/abort notifications.So if a commit (on the originating node) is delegated for replication a corresponding pre-commit hook will already have succeeded.
Post-commit hooks
The replicator completes the commit on the originating node by invoking a JNI function - a low level function that doesn't run any hooks. When the replicator returns the commit status to the originating repository FSFSWD a successful commit will cause the post-commit to run on the server.The net effect is that pre- and post- hooks run in the server on the originating repository and they do not run at all for the replicated repositories. Although a replicator could explicitly invoke the hooks for the replicated repositories if required.
- locks
- Locks must be sync'ed between nodes. You can't afford for a commit to be rejected on one site that was allowed on all the others.
3.1 Copying existing repositories
It's simple enough to make a copy of a small repository and transfer it to each of your nodes. However, remember that any changes made to the original repository will invalidate your copies unless you perform a syncronzation prior to starting replication.
If a repository needs to remain available to users during the proccess, you should briefly halt access, in order to make a copy. The copy can then be transferred to each node. Then, when you are ready to begin replication, you need use rsync to update each of your replicas. Fore more information about rsync, see Synchronizing repositories using rysnc.
3.2 New repositories
If you are creating brand new repositories, don't create them at each node, instead create the repository once, then rsync it to the other nodes. You need to do this to ensure that each replica has the same UUID.
If you do create repositories at each node instead of using rysnc, you can use SVN's UUID command to get them all matching:
You can confirm the UUID of a repository using the svnlook uuid command:
[root@ip-10-0-100-6 SVN]# svnlook uuid Repo0
67d41b33-3c7c-4ba0-8af1-119dbb0d42ba
You can use the Set UUID command to ensure that a new repository that you've created has a UUID that matches with the other replicas:
$ svnadmin setuuid /opt/SVN/Repo0 67d41b33-3c7c-4ba0-8af1-119dbb0d42ba
4. Repair an out-of-sync repository
There are several situations where a repository may be corrupted or lose sync with its other copies. For example, it could be the result of file/permission changes on the server. If this happens, the node with this copy stops replicating data for that repository. Other repositories are unaffected and continue to replicate. You can use MSP's repair tool to quickly repair the repository and continue replicating.
If an existing repository is added to a Replication Group that contains Passive nodes or a repository on a Passive node enters an Local Read-only state, the UI does not offer a repair option because it cannot coordinate with the repository copy on the Passive node. You must temporarily change the passive node into an active node:
- Log in to the Passive node, then click the Replication Group tab.
- Click the Configure button, then change the role of the passive node so that it becomes active.
- When the repair is completed successfully, reverse this change to return to your established replication model.
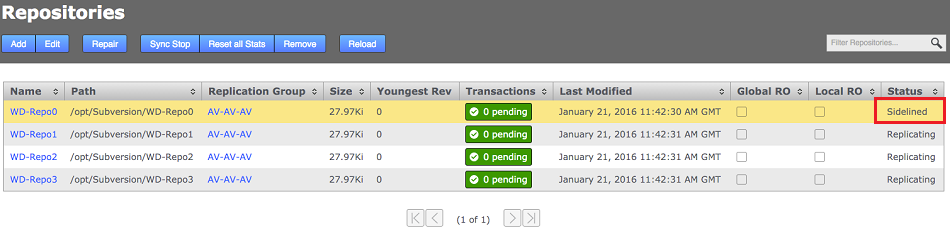
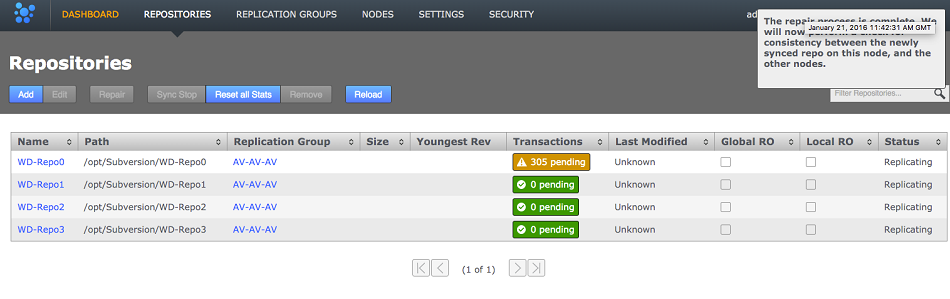
- Log in to the admin UI on all nodes and click the REPOSITORIES tab. Any repository that is out of sync is flagged as Local RO and Stopped. Other replica may continue to update.
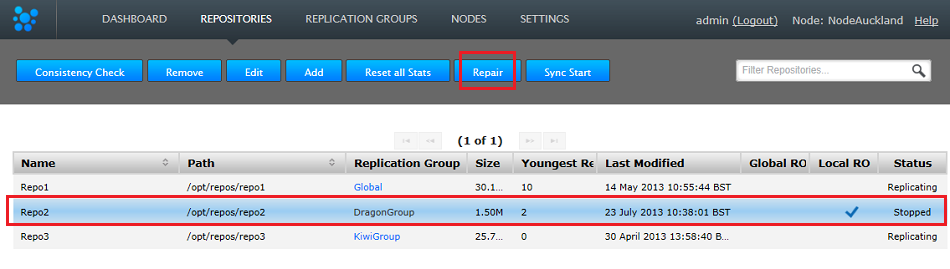
Out of sync
- Go back to the REPOSITORIES tab and click the Repair button.
- The Repair Repository window opens. Select a helper from the nodes still in replication. Make sure that the helper's copy of the repository is the latest version.
- Click the Start Repair Process button. This briefly takes the selected node offline, to ensure that changes don't occur to the repository while you conduct the repair. Log in to handle the repair manually:
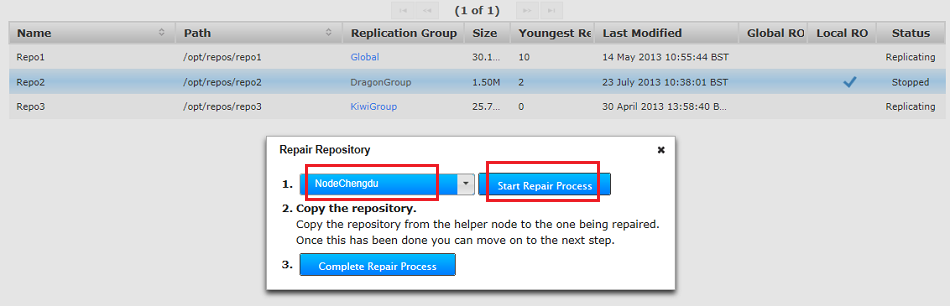
Start the repair
-
Hooks will be overwrittenUse the good copy of the repository on the helper node, overwriting the out-of-sync copy. We recommend that you use rsync. See more about using rsync.
When restoring a repository using rsync, you will also copy across the helper repository's hooks, overwriting those on the destination node.
Need to maintain existing hooks?
Before doing the rsync, copy the hooks folder to somewhere safe. Then when you've completed the rsync, restore the backed-up hooks.[root@localhost repos]# rsync -rvlHtogpc /opt/repos/repo2/ root@172.16.2.41:/opt/repos/repo2/ The authenticity of host '172.16.2.41 (172.16.2.41)' can't be established. RSA key fingerprint is 9a:07:b2:bb:b6:85:fa:93:41:f0:01:d0:de:8f:e1:5d. Are you sure you want to continue connecting (yes/no)? yes Warning: Permanently added '172.16.2.41' (RSA) to the list of known hosts. root@172.16.2.41's password: sending incremental file list ./ README.txt format conf/ conf/authz conf/passwd conf/svnserve.conf db/ db/current db/format db/fs-type db/fsfs.conf db/min-unpacked-rev db/rep-cache.db db/txn-current db/txn-current-lock db/uuid db/write-lock db/revprops/ db/revprops/0/ db/revprops/0/0 db/revprops/0/1 db/revprops/0/2 db/revprops/0/eeeeeeeeeee3 db/revs/ db/revs/0/ db/revs/0/0 db/revs/0/1 db/revs/0/2 db/revs/0/3 db/transactions/ db/txn-protorevs/ hooks/ hooks/post-commit.tmpl hooks/post-lock.tmpl hooks/post-revprop-change.tmpl hooks/post-unlock.tmpl hooks/pre-commit.tmpl hooks/pre-lock.tmpl hooks/pre-revprop-change.tmpl hooks/pre-unlock.tmpl hooks/start-commit.tmpl locks/ locks/db-logs.lock locks/db.lock sent 1589074 bytes received 701 bytes 167344.74 bytes/sec total size is 1585973 speedup is 1.00 [root@localhost repos]# - When the repository is updated, check that the fixed repository now matches the version on your helper node.
- Restart Apache. This frees up file handlers that are holding the rep-cache.db file open as well as clearing any in-memory cache data that could point to references that don't exist in the repaired repository.
- Complete the repair process. Click the "Complete Repair Process" button.

Complete
- Now, restart the replicator. You can use the Restart Replicator button on the Admin UI's Settings Tab or the init.d script described in the Admin section 1.1 Starting up.
- Make sure that the re-synced repositories are Replicating again.
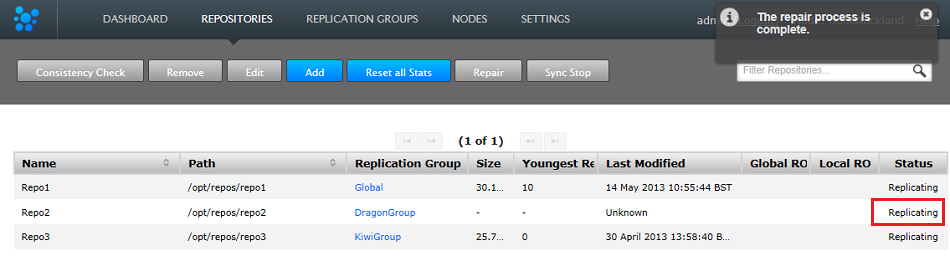
Back in sync
4.1 Recovering Sidelined Repositories
The sidelining feature is used for putting a repository into the offline mode. This tells the other nodes to press on, and not queue up subsequent proposals. When a repository has been taken offline, it can never catch up and will require a Repository Repair.
Without the sidelining feature, any replica that remained offline could cause the remaining nodes to exhaust their storage. This is because they would attempted to cache all the continuing repository changes, so that they could automatically "heal" the offline repository, should it come back online.
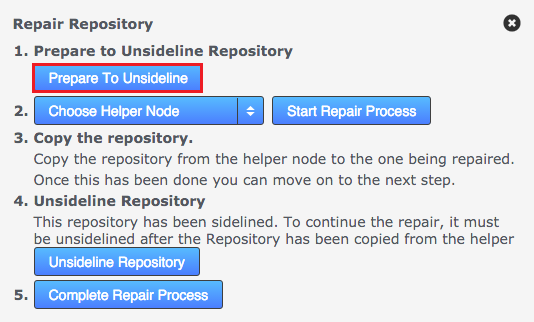
Use the following procedure to free a repository from a sidelined state:
- View, then click on the sidelined repository.
- Click on Repair opens the repair dialog with sidelining-related options. Start by clicking "prepare to unsideline" button.
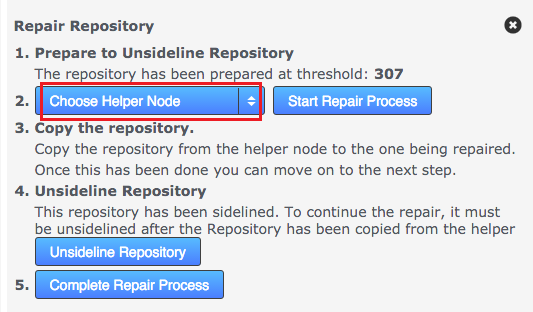
- Choose the Helper Node from the Choose Helper Node dropdown. In this case we choose "Node2".
- CLick the Start Repair Process button.
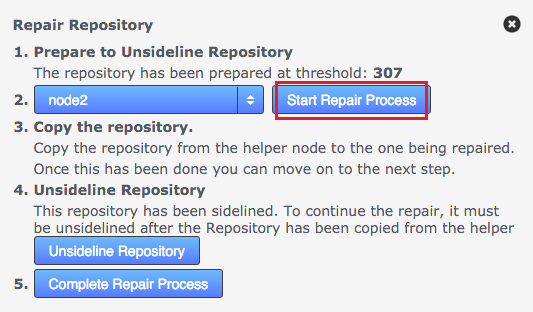
- A Growl message will appear saying that the helper process has completed and a consistency check will be carried out, if this is check fails the repo will go Global Read-only. You can check this by refreshing the page. The repository will show up as replicating again.
5. Synchronize repositories using rsync
If for any reason repositories are corrupted or unable to automatically catch up it's usually possible to use rsync to get them back into sync.
The use of rsync to recover replication is slightly complicated by the presense of in-memory caching, requiring that additional steps need to be performed in order to ensure that the node with the out-of-sync replica is put into a suitably clean state before completing the recovery:
Recovery scenario
One node has an out-of-syn repository, write operations are suspended as the repository is classified as Read-only. Otherwise, Apache and the WANdisco replicator remain online.
- On all nodes in the replication group, log into SVN MultiSite Plus's admin UI and ensure that the out-of-sync / corrupted repository is set to GLOBAL read-only. We need to ensure that all traffic to the repository is halted during the repair.
- Begin a Repair operation (See previous section, 4. Repair an out-of-sync repository for a more detailed run through of the repair steps), initiated from a node that is known to be in a pristine state (helper node), this temporarily suspends write operations for the problem repository here too.
- Perform the rsync operation (from the helper node), e.g.
svnadmin verify <Repository-path>
From the node with the up-to-date repository, type the following commands:
rsync -rvlHtogpc /path/to/repo/ remoteHost:/path/to/repo/
For example:
rsync -rvlHtogpc /SVN/Repo root@172.7.2.33:/SVN/ - To ensure that there's no in-memory caching th at might cause problems, shut down Apache / svnserver on the under-repair node.
- On the helper node you can mark the repair as completed
- Restart the SVN MultiSite Plus replicator - See Using the init.d script or use the restart button on the admin UI.
- On the problem node, Restart Apache
- Log into each node in the affected replication group and untick Global Read-only for the recovered repository.
Rsync locks directory
Then follow up with an additional rsync that will ensure that contents of the locks directory are identical (by deleting locks that are not present on the originating server)
rsync -rvlHtogpc --delete /path/to/repo/db/locks <Repository Name> remoteHost:/path/to/repo/db
For example:
rsync -rvlHtogpc --delete /SVN/Repo/db/locks root@172.7.2.33:/SVN/Repo/db
6. Recover from node disconnection
SVN MultiSite Plus can recover from a brief disconnection of a member node. The crucial requirement for MultiSite's continued operation is that agreement over transaction ordering must be able to continue. Votes must be cast and those votes must always result in an agreement. No situation must arise where the votes are evenly split between voters.
If, after a node disconnection, a replication group can no longer form agreements then replication is stopped. If the disconnected node was a voter and there aren't enough remaining voters to form an agreement, then either the disconnected node must be repaired and reconnected, or the replication group must undergo emergency reconfiguration (EMR).
6.1 EMR
EMR is only necessary if there is a lack of quorum in one or more replication groups after a node has been disconnected/lost. If you use EMR then the disconnected node will be permanently removed from your ecosystem - including all replication groups where it is a member. You must contact WANdisco's support team for assistance before using EMR as the operation poses several risks to overall operation. We therefore recommend that you do not attempt the procedure without assistance from WANdisco support.
EMR is a final option for recovery
The EMR process cannot be undone, and it involves major changes to your replication system. Only consider an EMR if the disconnected node cannot be repaired or reconnected in an acceptable amount of time.
The EMR procedure needs to be co-ordinated between sites/nodes. You must not start an EMR if an EMR procedure has already started from another node. Running multiple EMR procedures at the same time can lead to unpredictable results or cause the processes to get stuck.
Any replication group which has its membership reduced to one node will continue to exist after the emergency reconfiguration as a non-replicating group. When you have set up a replacement node you should be able to add it back to the group to restart replication.
Note: If EMR is used to remove a node you may be left with a pending task of type tasksTypeREMOVE_STATE_MACHINE_TASK.
If this is the case then:
- Cancel the active/pending task (type is
tasksTypeREMOVE_STATE_MACHINE_TASK) - Restart the node where the pending task existed.
7. Run Talkback
Talkback is a bash script that is provided in your SVN MultiSite Plus installation for use in the event that you need to talk to the WANdisco support team.
Manually run Talkback using the following procedure. You can run Talkback without the need for user interaction if you set up the variables noted in step 3, below:
- Log in to the server with admin privileges. Navigate to the SVN MultiSite Plus's binary directory:
/opt/wandisco/svn-multisite-plus/bin/
- Run talkback.
[root@localhost bin]# ./talkback
- You'll need to provide some information during the run - also note the environmental variables noted below which can be used to further modify how the talkback script runs:
#######################################################################
# WANdisco talkback - Script for picking up system & replicator       #
# information for support                                             #
#######################################################################

    To run this script non-interactively please set following environment vars:

    ENV-VAR:
    MSP_REP_UN                  Set username to login to MultiSite-Plus
    MSP_REP_PS                  Set password to login to MultiSite-Plus
    MSP_SUPPORT_TICKET          Set ticket number to give to WANdisco support team
    MSP_RUN_SVNADMIN            Run svnadmin verify, lstxns and lslocks commands - turned off by default

    By default, your talkback is not uploaded. If you wish to upload it, you may also specify
    the following variables:

    MSP_FTP_UN                  Set ftp username to upload to WANdisco support FTP server. Note that
                                specifying this may cause SSH to prompt for a password, so don't set
                                this variable if you wish to run this script non-interactively.


      ===================== INFO ========================
      The talkback agent will capture relevant configuration
      and log files to help WANdisco diagnose the problem
      you may be encountering.

Please enter replicator admin username: adminUIusername
Please enter replicator admin password: thepasswordhere

retrieving details for repository "Repo1"
retrieving details for repository "Repo3"
retrieving details for repository "Repo4"
retrieving details for repository "repo2"
retrieving details for node "NodeSanFransisco"
retrieving details for node "NodeAuckland"
retrieving details for node "NodeParis"

Please enter your WANdisco support FTP username (leave empty to skip auto-upload process):
Skipping auto-FTP upload

TALKBACK COMPLETE

---------------------------------------------------------------
 Please upload the file:

     /opt/wandisco/svn-multisite-plus/talkback-201312191119-redhat6.3-64bit.tar.gz

 to WANdisco support with a description of the issue.

 Note: do not email the talkback files, only upload them
 via ftp or attach them via the web ticket user interface.
--------------------------------------------------------------
Note that we have disabled the svnadmin check as in some situations it can impeded the rapid collection of system data. If you want to turn it back on set the corresponding env variable as follows.
Enter the following string to switch the SVNAdmin checks back on:
export MSP_RUN_SVNADMIN=trueand then run the talkback. You can check the status of the variable by entering:
echo '$MSP_RUN_SVNADMIN'Also, you'll need to talk to Support about setting up access to WANdisco's Support FTP space.
If you're not using our secure FTP you can upload your talkback output files to our support website. Just attach them to your case. Read our Knowledgebase article about How to raise a support case.
7.1 Talkback output example
replicator
        config
            application
            license
            logger.properties
            ms-resource-monitoring-elements.xml
            ms-resource-monitoring-elements.xml.old
            svnok.catalog
            ui.properties
        nodes
            NodeAuckland
                connection-test
                location.xml
                node.xml
            NodeParis
                connection-test
                location.xml
                node.xml
            NodeSanFrancisco
                connection-test
                location.xml
                node.xml
        recent-logs
            fsfswd.0.log
            replicator.log.20130716-105414.211
            svn-multisite
            thread-dump-2013-07-16
            ui.log.20130716-105414

        repositories
            Repo1
                info
                membership.xml
                replicationGroup.xml
                repository.xml
                statemachine.xml
                stats.xml
        application
        license.xml
        locations.xml
        md5s
        memberships.xml
        nodes.xml
        replicationGroups.xml
        replicator-file-list
        repositories.xml
        statemachine.xml
        tasks.xml
        VERSION

system
    logs
    file-max
    file-nr
    limits.conf
    netstat
    processes
    services
    sysctl.conf
    sys-status
    top
8. Replication over a bad WAN link
Nodes that fall behind will eventually recover
SVN MultiSite Plus runs with a smart commit strategy and ignores all read operations so activities such as checkouts never impact upon WAN traffic. This, along with network optimization can allow deployments to provide developers with LAN-speed-like performance over a WAN for write operations at every location, while keeping all of the repositories in sync. In the event the connection to particular node is temporarily lost or experiences extreme latency or low speeds, it's possible that a node could fall behind and become temporarily out of sync while transactions are queued up.
In this situation the node should eventually catch up in a self-healing manner without administrator intervention. In this situation it is worth monitoring the state of your WAN connectivity to help gain assurance that replication is going to be able to catch up. Clearly, if connectivity drops to almost zero for a prolonged period then this will inevitably result in the node becoming isolated and increasingly out-of-sync. If this happens you should monitor traffic for a period of time, contact WANdisco's support team and start considering contingencies such as making network changes or removing the isolated node from replication, potentially using the Emergency Reconfiguration procedure.
9. Logger settings tool
Loggers are usually attached to packages. Here, the level for each package is specified. The global level is used by default, so levels specified here act as an override that takes effect in memory only - unless saved to the logger properties file.
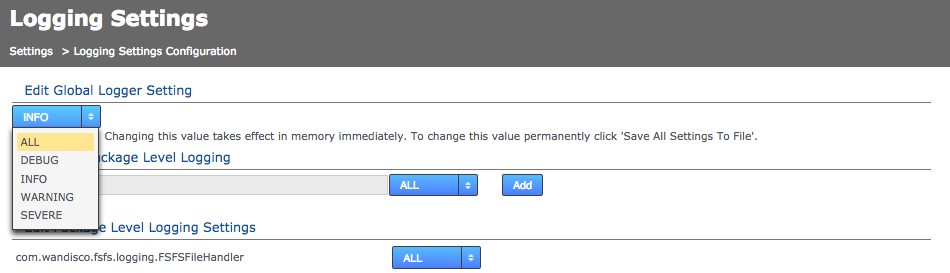
9.1 Edit global logger settings
- Log in to the admin console, click the Settings tab.
- Scroll down the settings till you reach the Logging Settings block.

- Click the Configure button.
- The Logging Settings Config page opens. Click the drop-down menu to change the current global logger setting. This change will be applied to all loggers that have not been specified in the edited Logger settings. Changing this value takes effect in memory immediately, to change this value permanently click Save All Settings To File. Loggers that you Add or Edit (specify) will always override this global setting.
9.2 Add or edit logger settings
- Log in to the admin console, click the Settings tab.
- Scroll down the settings till you reach the Logging Settings block.
- Click the Configure button.
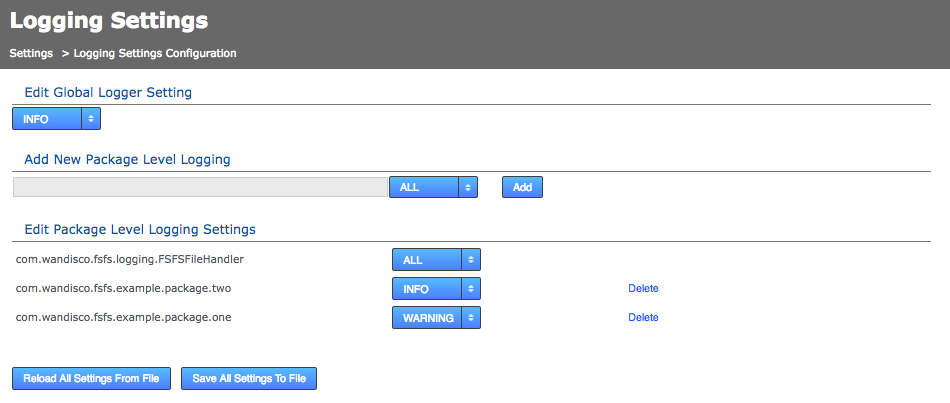
- The Logging Settings Config page will open, it has the following sections:
- Add New Logger Settings
- Enter the name of the logger, assign its level then click the Add button.
- Edit Existing Logger Settings
- Use the corresponding drop-down list to change the level of any of the existing loggers or click the Delete button to remove the logger. The default logging package com.wandisco.fsfs.logger.FSFSFileHandler cannot be deleted.
- Reload Logging Settings
- Click Reload All Settings From File button to ditch all changes by reloading the logger settings from the <install-dir>/replicator/properties/logger.properties file.
- Save Logging Settings
- Click Save All Settings To File to apply your changes to the above logger.properties file.
- Edit Global Logging Level
- Allows for a change to the global logging level, although not the deletion of logger settings.
All changes so far are immediate in effect and in-memory only. Changes are not persisted after replicator restart unless you use the save or reload button:
10. Disable external authentication
In the event that you need to disable LDAP or Kerberos authentication and return your deployment to the default internally managed users, use the following procedure.
- Open a terminal on your node. Navigate to the replicator directory:
$ cd /opt/wandisco/svn-multisite-plus/replicator/
- Run the following command-line utility:
$ java -jar resetSecurity.jar
Use resetSecurity.jar ...
... to reset an existing admin user's password, or to create a new admin user. - You are asked for new administrator credentials then prompted to restart the replicator in order for the change to be applied.
- Now log in using the orginal authentication form:

11. Create a new users.properties file
If you need to create a fresh users.properties file for your deployment:
- Shut down all nodes with the command: service svn-multisite-plus stop
- Create an empty /opt/wandisco/svn-multisite-plus/replicator/properties/users.properties which is owned by the user that MSP is running as.
- Start the SVN MultiSite service on that node.
- Use the resetSecurity.jar utility
- Restart svn-multisite-plus on the node. This adds the user to the users.properties file.
- Copy the newly created /opt/wandisco/svn-multisite/replicator/properties/users.properties file to all other nodes.
- Restart the SVN MultiSite services on all nodes.
12. Change content.server.port after installation
Use this procedure if you need to change the port allocated for content distribution (4321 by default), this is the replicator's payload data: repository changes etc. It's not possible to edit this value manually, you need to change it through the REST API. Here's how:
- Get the locationIdentity value for the node you want to change. To do this use:
curl -X get -u username:password -s http://<node IP>:8082/api/nodes | xmllint --format -
You see something like the following example for your node:<node> <nodeIdentity>dfb1beb1-fcf0-454b-96a0-cfa90ab269d3</nodeIdentity> <locationIdentity> 645acf2c-b618-11e3-b7d4-08002722bb05</locationIdentity> <isLocal>true</isLocal> <isUp>true</isUp> <isStopped>false</isStopped> <lastStatusChange>1408614664181</lastStatusChange> <attributes> <attribute> <key>eco.system.membership</key> <value>ECO-MEMBERSHIP-c0506041-b618-11e3-8957-08002783d862</value> </attribute> <attribute> <key>node.name</key> <value>svnmsplus1</value> </attribute> <attribute> <key>eco.system.dsm.identity</key> <value>ECO-DSM-64c2dfcd-b618-11e3-b7d4-08002722bb05</value> </attribute> </attributes> </node>You see that the locationIdentity is "645acf2c-b618-11e3-b7d4-08002722bb05". - Construct a payload to send to the node, using the following XML snippet as a guide:
route1="<?xml version=\"1.0\" encoding=\"UTF-8\" standalone=\"yes\"?><routes><route><routeType>ContentDistributionType</routeType><hostname>IP-ADDRESS</hostname><port>15102</port></route></routes>" temp_file=$(mktemp ${TMP}/job.XXXXXX) echo ${route1} > ${temp_file} - Using the payload in the temp file, make a REST API call to change the Content Delivery port. The call should be made directly to the node on which you intend to change the port:
curl -s -u username:password --header "Content-Type: application/xml" -X PUT --data @"${temp_file}" http://<Node-IP>:8082/api/location/<the-node-locationIdentity>Example:
curl -s -u username:password --header "Content-Type: application/xml" -X PUT --data @"${temp_file}" http://192.168.56.200:8082/api/location/645acf2c-b618-11e3-b7d4-08002722bb05 - When the call completes successfully, the change is done without having to restart the svn-multisite-plus service. You will now see the updated value for the content dstribution port under the Settings tab of the node. Repeat this procedure for each node so that the content distribution port matches across all nodes.