Administration Guide
1. Housekeeping
1.1 Starting up
To start the SVN MultiSite Plus replicator:
- Open a terminal window on the server and log in with suitable file permissions.
- Run the svn-multisite service, located in the /etc/init.d folder:
lrwxrwxrwx 1 root root 37 May 9 10:37 svn-multisite -> /opt/svn-multisite-plus/bin/svn-multisite - Run the start script:
[root@localhost init.d]# ./svn-multisite start
20130520-164811 (24088) [INFO]: Starting WANdisco MultiSite Plus 20130520-164811 (24088) [INFO]: Started replicator (24100) 20130520-164811 (24088) [INFO]: Started ui (24110) 20130520-164811 (24088) [INFO]: Number of errors: 0 20130520-164811 (24088) [INFO]: Number of warnings: 0 - The two components of SVN MultiSite Plus, the replicator and the UI will start up. Read more about the svn-multisite init.d script
1.2 Shutting down
To shutdown:
- Open a terminal window on the server and log in with suitable file permissions.
- Run the svn-multisite service, located in the init.d folder:
lrwxrwxrwx 1 root root 37 May 9 10:37 svn-multisite -> /opt/svn-multisite-plus/bin/svn-multisite
- Run the stop script, i.e.:
[wandisco@ip-10-0-100-7 bin]$ ./svn-multisite stop 20130520-165704 (24767) [INFO]: Stopping WANdisco MultiSite Plus 20130520-165704 (24767) [INFO]: Request received to shut down replicator 20130520-165704 (24767) [INFO]: replicator processes ended 20130520-165704 (24767) [INFO]: Request received to shut down ui 20130520-165704 (24767) [INFO]: Sending signal 15 to watched ui process (attempt 1)... 20130520-165707 (24767) [INFO]: Sending signal 15 to watched ui process (attempt 2)... 20130520-165710 (24767) [INFO]: ui processes ended 20130520-165710 (24767) [INFO]: Number of errors: 0 20130520-165710 (24767) [INFO]: Number of warnings: 0 - Both the replicator and the UI processes shut down. Read more about the svn-multisite init.d script
1.3 Using the init.d script
The startup script for persistent running of SVN MultiSite Plus is in the /etc/init.d folder.
Run the script with the help command to list the available commands:
[root@localhost init.d]# ./svn-multisite help
usage: ./svn-multisite-plus (start|stop|restart|force-reload|status|uistart|uistop|repstart|repstop)

start         Start SVN MultiSite Plus services
stop          Stop SVN MultiSite Plus services
restart       Restart SVN MultiSite Plus services
force-reload  Restart SVN MultiSite Plus services
status        Show the status of SVN Multisite Plus services
uistart       Start the SVN MultiSite Plus User Interface
uistop        Stop the SVN MultiSite Plus User Interface
repstart      Start the SVN Multisite Plus Replicator
repstop       Stop the SVN Multisite Plus Replicator
1.4 Change the administration password
You can change SVN MultiSite Plus's login password at any time by following this procedure:
- Log in to the MultiSite admin console.
Login
- Click the SECURITY tab.

Security
- At the top of the Security screen is the password change form. Enter the current password, along with a new password.
Changed password
- Click the SAVE button to store the new password. You can be sure that the new password has been accepted if you see a notification message appear at the bottom of the screen.
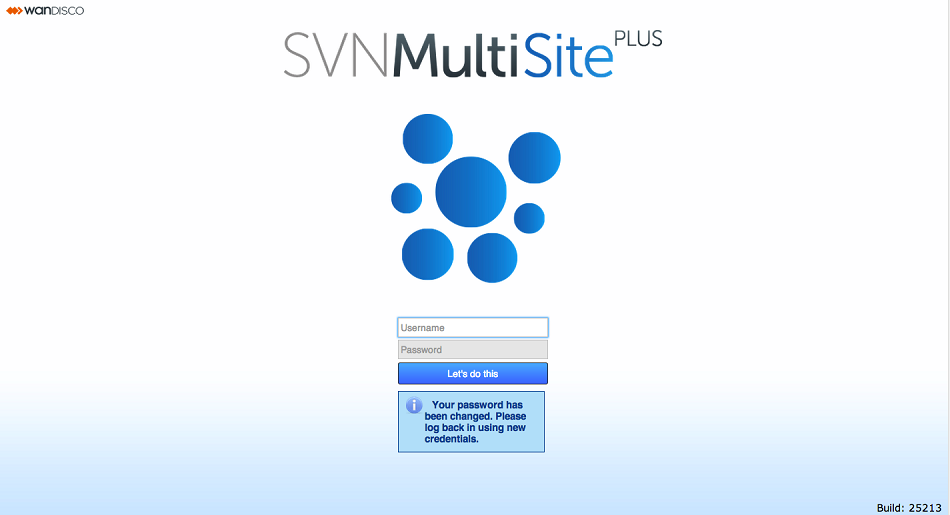
Growl
It's currently not possible to change the Administration username. In order to change the username you would need to re-install SVN MultiSite Plus.
1.5 Update your license.key file
Follow this procedure if you need to change your product license. You would need to do this if, for example, you needed to increase the number of SVN users or the number of replication nodes.
- Log in to your server's command line, navigate to the properties directory:
/opt/wandisco/svn-multisite-plus/replicator/propertiesand rename thelicense.keytolicense.20130625.
i.e.total 16 -rw-r--r-- 1 wandisco wandisco 1183 Dec 5 15:58 application.properties -rw-r--r-- 1 wandisco wandisco 512 Dec 5 15:05 license.key <- -rw-r--r-- 1 wandisco wandisco 630 Dec 17 15:43 logger.properties -rw-r--r-- 1 wandisco wandisco 747 Dec 4 10:31 svnok.catalog - Get your new
license.keyand drop it into the/opt/svn-multisite-plus/replicator/propertiesdirectory. - Restart the replicator by running the SVN MultiSite Plus script with the following argument:
/etc/init.d/svn-multisite-plus restart
This will trigger an SVN MultiSite Plus replicator restart, which will force SVN MultiSite Plus to pick up the new license file and apply any changes to permitted usage.
If you follow the above instructions but don't do the restart SVN MultiSite Plus will continue to run with the old license until it performs a daily license validation (which runs at midnight). Providing that your new license key file is valid and has been put in the right place then SVN MultiSite Plus will then update its license properties without the need to restart.
If you run into problems, check the replicator logs (/opt/svn-multisite-plus/replicator/logs
) for more information.
PANIC: License is invalid com.wandisco.fsfs.licensing.LicenseException: Failed to load filepath>
1.6 Update a node's properties
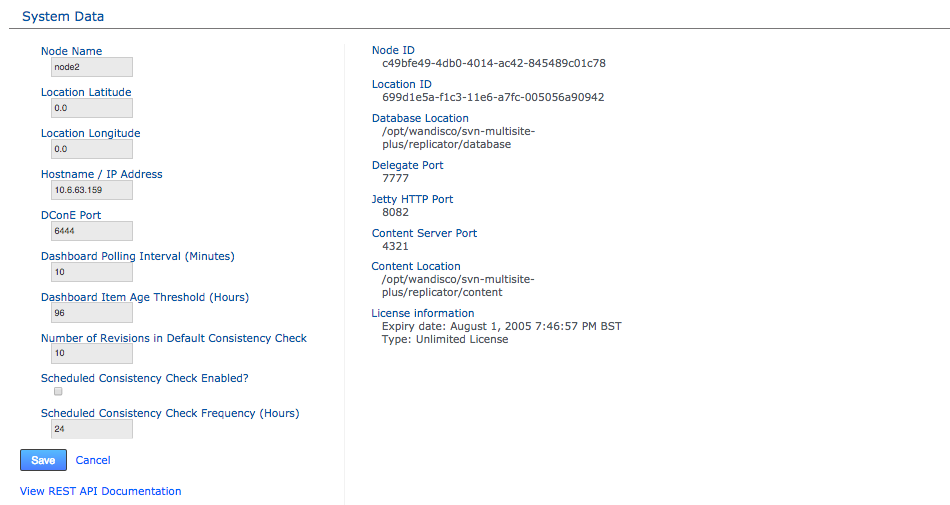
In the System Data section of the SETTINGS tab there's a bank of editable properties that can be quickly updated by re-entering, saving and allowing the SVN MultiSite replicator to restart - although this may cause brief disruption to users whose in-flight commits will fail.
Node properties that you can change - subject to a restart of the replicator
- Node Name
- This is the human-readable form of the node's ID. Unlike the Node ID you can change the value of Node Name and reuse it (after it has been removed from the replication network). That is, you can't have two nodes with the same name, but you can now reuse a previously removed node name.
- Location Longitude
- The Node's geographical location is no longer recorded during installation. Instead you enter the details here.
- Location Latitude
- Along with Longitude, this value places the node on the internal map and helps the application determined the local time for the node based on the timezone in which it falls.
- Hostname / IP Address
- The hostname or underlying IP address can be updated. Changing this property initiates a Replicator restart and requires a manual UI restart.
- DConE Port
- The TCP port used for DConE agreement traffic - not to be confused with the Content Distribution port which carries the payload repository data. Changing this property initiates a Replicator restart and requires a manual UI restart.
- Dashboard Polling Interval (Minutes)
- Sets how often the dashboard messaging is updated. The messaging is populated by Warnings and Errors that appear in the replicator logs file. The default frequency is every 10 minutes.
- Dashboard Item Age Threshold (Hours)
- The number of hours a logged event is displayed on the Dashboard for. We recommend not setting this value lower than 96 hours so you don’t miss an important issue over a 3-day weekend.
If SSL is configured then after an IP address change all nodes must be manually restarted.
The UI can only be used to change the IP address of a single node at one time. If you need to change the address of multiple nodes see the KB article on How to use updateinetaddress.jar to change IP address. Please contact WANdisco support for assistance if you want to carry out this procedure.
After entering a new value, click the Save button. A growl message will appear to confirm that the change is being replicated - this will result in a restart of the replicator which may cause brief disruption to SVN users.
1.6.1 Other property changes
You can also modify other properties in the application.properties configuration file. By default it is located in /opt/wandisco/svn-multisite-plus/replicator/properties/application.properties.
Content Delivery Port
To change the Content Delivery Port follow these steps. In this example we change the port for node1 to 4322:
- On the node you want to change open the application.properties file and change:
content.server.port=4322
- On all remaining nodes create a new file in the replicator directory called
update.properties. This file should have the following content:port.content.<node1nodeId>=4322
Then run the following command from the replicator directory:java -jar svn-ms-replicator-updateinetaddress.jar -c /opt/wandisco/svn-multisite-plus/replicator/properties/application.properties
This will update the route for the Content Delivery port on node1. - Restart all nodes
-
To check your change has occurred, log in to the updated node and check its System Data.
Also check the api on each node which will show that node1 has the following entry post change:<route> <routeType>ContentDistributionType</routeType> <hostname>NODE1NODEID</hostname> <port>4322</port> </route>
- You should do some test commits to ensure that replication continues successfully.
Task garbage collection
There are two configurable properties that control how often the task garbage collection process should run. These properties are set during the installation. If you need to modify their values you need to add them to the application.properties file.
- task.removal.interval
- This setting controls how often the task garbage collection process should run. The default is 96 hours, noted in milliseconds (i.e. 345600000 milliseconds for 96 hours).
- task.expired.interval
- This setting controls how old a successfully run task must be before it is made available for garbage collection. The default is 96 hours, noted in milliseconds (i.e. 345600000 milliseconds for 96 hours).
Recommended settings
Summary: For large deployments reduce the time from 96 to 24 hours
The recommended settings are suitable for most deployments. However, for deployments with very large numbers (thousands) of repositories and where repository consistency checks are automated then we recommend that you reduce the setting times, initially to 24 hours (86400000 ms).
Shorter periods will result in a corresponding reduction in your ability to troubleshoot problems that involve replicator task history. If you notice large numbers of failed tasks accumulating over time or have any concerns about what settings are right for your specific deployment, contact WANdisco's support team.
Example
For a deployment that replicates several thousand repositories and schedules daily consistency checks it's decided to reduce the task expiry to 48 hours and the garbage collection frequency to 24 hours. The settings would therefore be:
task.removal.interval   86400000L
task.expired.interval   172800000L
Note that you must add an "L" to the end of your value.
1.6.2 Node content distribution timeouts
There are two configurable properties that you can modify as part of fine-tuning an SVN MultiSite Plus deployment. They are provided to allow you to balance best possible performance against the tolerance of a poor WAN connectivity. Both properties are contained within the application properties file, by default located here: /opt/wandisco/svn-multisite-plus/replicator/properties/application.properties.
socket.timeout
socket.timeout=900000
This is the time, in milliseconds, that a read() call on a socket will wait before timing out. Default value is 15 minutes (90,000 milliseconds).
DO NOT set socket.timeout to less than 10 minutes (60,000 milliseconds) or you may encounter problems.
content.pull.timeout
content.pull.timeout=300000
The content pull timeout sets how long the Content Distribution system will wait for new content to be pulled fully over from a remote node. The default value is 5 minutes (300,000 milliseconds). This default is set on the assumption that there are no problems with the deployment's WAN connectivity.
Increasing the timeout
Increasing the value may help if poor connectivity is resulting in the replicator repeatedly giving up on content distribution that would have eventually transferred had it been given enough time, i.e. not as a result of a slow network rather than something that has caused a permanent error.
Decreasing the timeout
Decreasing the value is not generally recommended. Doing so is not intended as a method for boosting performance - although this may occur in some situations. We recommend that you don't drop the timeout value below 5000 (5 seconds) without consulting with our support team.
1.7 Set up data monitoring
The Monitoring Data tool monitors the disk usage of SVN MultiSite Plus's database directory, providing a basic level of protection against SVN MultiSite Plus consuming all disk space. The tool also lets you set up your own monitors for user-selected resources.
Monitoring Data - not intended as a final word in system protection
Monitoring Data is no substitute for dedicated, system-wide monitoring tools. Instead, it is intended to be a 'last stand' against possible disk space exhaustion that could lead to data loss or corruption.
Read our Recommendations for system-wide monitoring tools.
1.7.1 Default settings
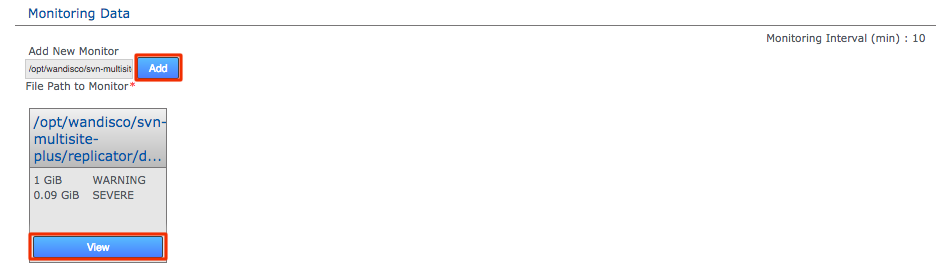
Click the "View" link to go to a monitor's settings.
By default MultiSite's database directory (/opt/wandisco/svn-multisite-plus/replicator/database) is monitored - this is the location of MultiSite's prevayler database where all data and transactions files for replication are stored.
This built-in monitor runs on all nodes. Any additional monitors that you set up will monitor on a per-node basis. Monitors are not replicated so a monitor set up on one node is not applied to any other node.
1.7.2 Additional monitors
As well as SVN MultiSite Plus's own database folder, there are several directories that might grow very large and potentially consume all available file space.
Consider monitoring the following MultiSite directories:
/opt/wandisco/svn-multisite-plus/replicator/content/opt/wandisco/svn-multisite-plus/logs/opt/wandisco/svn-multisite-plus/replicator/logsAlso monitor /path/to/authz. If you are using Authz to manage authorization and your Authz file is situated on different file system from SVN MultiSite Plus, then you are recommended to set up monitoring of the authz file.
For most deployments all these directories reside on the same file system, so that your default monitor would catch if any of them were consuming the available space. However, there are two scenarios where we'd recommend that you set up your own monitor for the content directory:
- You want to set a higher trigger amount than the default monitor (1GiB for warning, 0.09GiB for emergency shutdown).
- You have placed the content directory on a different filesystem with its own capacity that wouldn't be tracked by the default monitor.
In both cases, after setting up a monitor you should set up a corresponding email notification that is sent if some or all of your monitor's trigger conditions are met.
Create additional resource monitors using the following procedure:
- Log in to the Administrator user interface.
- Click the SETTINGS tab.
- Monitoring Data is situated below the Administrator Settings. Enter the full path to the resource that you wish to monitor. For example, you might wish to monitor the replicator logs: "
/opt/svn-multisite-plus/replicator/logs". Enter the path and click "Add".

Add resource path
- The new resource monitor appears as a new box - it will display "No records found", indicating that it doesn't yet have any monitoring rules set. Click its corresponding Configure link.
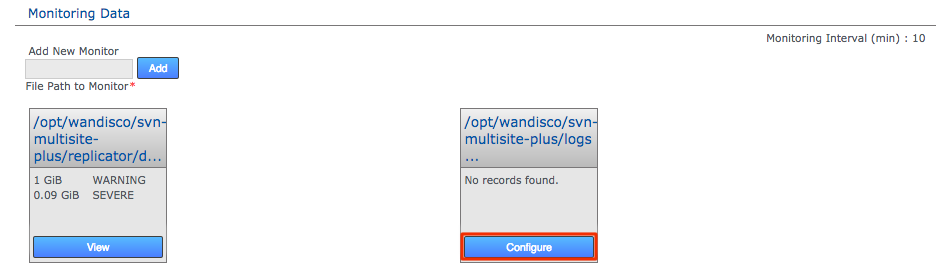
Configure
- The screen updates to show the Resource Monitoring screen for your selected resource.
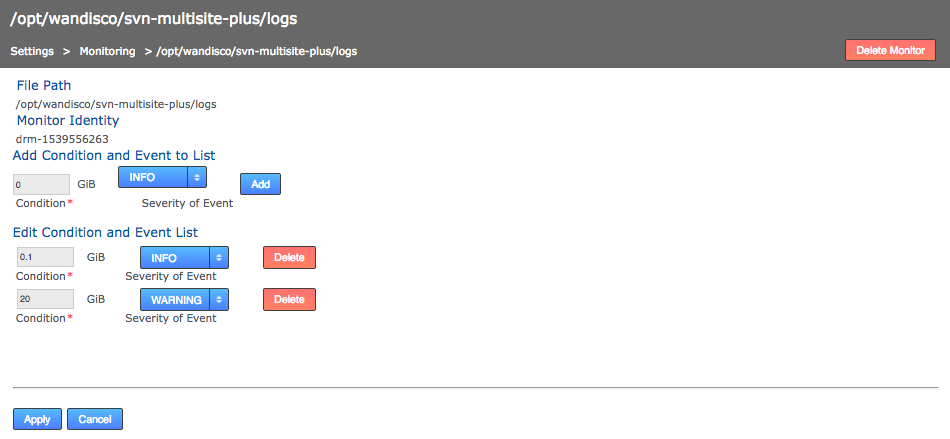
Settings
- File Path:
- The full path for your selected resource
- Monitor Identity:
- The unique string that will identify the monitor
- Edit Condition and Event List
- Lists current resource monitors, initially this will state "No records found"
- Add Conditional and Event to list.
- Storage amount entry field
- Enter an amount of disk space in Gigabytes. e.g. 0.2 would be equal to 200 Megabytes of storage.
- Select an Event from the dropdown:
-
- SEVERE
- Initiates a shutdown of SVN MultiSite Plus and also writes a message to the log and the "SEVERE" logging level. See next section for more information.
- WARNING
- Writes a message to the log and the "WARNING" level of severity.
- DEBUG
- Writes a message to the log and the "DEBUG" level of severity.
- INFO
- Writes a message to the log and the "INFO" level of severity.
- When you have added all the trigger points and events that you require for the resource, click Update. You can then navigate away: Click Resource Monitoring on the breadcrumb trail to return to the settings screen.
1.7.3 When a shutdown is triggered
If the disk space available to a monitored resource is less than the value you have for a Severe event then the event is logged and MultiSite's replicator shuts down after a set interval of 10 minutes. You can configure the interval in application.properties file:
/opt/wandisco/svn-multisite-plus/replicator/properties/application.properties
- monitor.period.min=10L
- Value in minutes.
Any change that you make to the application.properties file will require that you restart SVN MultiSite Plus's replicator.
When shut down, all SVN repositories are unavailable to users. You should immediately take action to make more disk space available. You can then start the replicator up again using SVN MultiSite Plus's service ./svn-multisite start as soon as the resource that triggered the shutdown has enough available disk space not to shut down again.
Note that if the replicator is in a shutdown state you can't bring it back up using the restart button on the Admin UI, instead you need to run the start command. See 1.1 Starting up
You may need to override the forced shutdown if you can't start a node to resolve the cause of the forced shutdown. For example, you might have created a data monitor that triggers a severe log message if there's less disk space than the disk's actual capacity. You then cannot free up space, apart from swapping for a bigger disk.
To unlock the forced shutdown:
- Log in to the locked node using a terminal.
- Navigate to the properties folder, by default it is here:
/opt/wandisco/svn-multisite-plus/replicator/properties/application.properties
- Create a backup, then edit the file, changing the line:
monitor.ignore.severe=false
to:monitor.ignore.severe=true
- Save the change to the file.
- Restart the replicator (see Starting up). During the restart the replicator ignores the severe warning, which is still written to the log file, allowing you to delete the monitor.
You cannot use this procedure to override the default monitor. Its emergency shutdown limit of <100MiB will ALWAYS shut down the replicator.
Tunable settings
Change the threshold used to trigger low disk space warnings. From MSP1.6.2 onwards you can set the following values in the application.properties, then restaring the replicator:
- monitor.threshold.severe
- Set the level at which the replicator will shutdown. Give the storage amount in bytes, remembering to add an "L" to the end to signify Large value, e.g. 1000000000L = 953.67MiB.
- monitor.threshold.warning
- Sets the threshold for a notification warning if the free disk space drops below the specified value. Given in bytes, as noted above.
1.8 Set up email notifications
The email notification is a rules-based system to deliver alerts based on user-defined templates over one or more channels to destinations based on triggers that are activated by arbitrary system events. Put simply, email notification sends out emails when something happens within the SVN MultiSite Plus environment. The message content, trigger rules and destinations are all user-definable.

Automated alert emails
The different aspects of setting up notifications are:
- Gateways - the store for email server details.
- Destinations - the email addresses of recipients.
- Templates - the email messages. These can contain different variables depending on the rules applied.
- Rules - defines which event triggers a notification, which template is used and who the recipients are.
1.8.1 Set up a Gateway
The Gateways section stores your email (SMTP) server details. You can set up multiple gateways to ensure that the loss of the server doesn't prevent alert notifications from being delivered.
- Log into the admin UI, then click SETTINGS.
- Click the Gateway section of the Notifications area.

Add Gateway
- Enter your email gateway's settings:
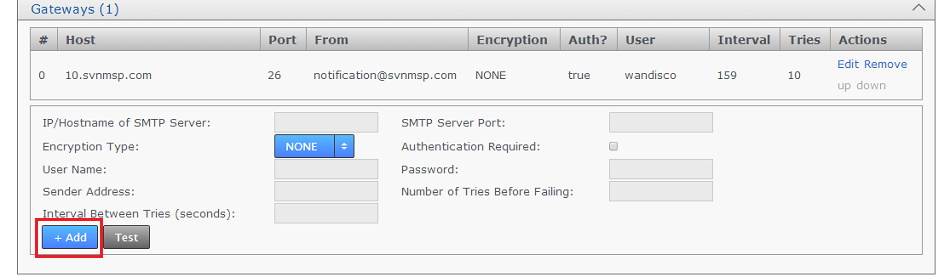
Enter settings
- IP/Hostname of SMTP Server:
- your email server's address.
- SMTP Server Port
- The port assigned for SMTP traffic (Port 25 etc).
- Encryption Type
- Indicate your server's encryption type - None, SSL (Secure Socket Layer) or TLS (Transport Layer Security). SSL is a commonly used. For tips on setting up suitable keystore and truststore files see Setting up SSL Key pair.
keystores?
If you're not familiar with the finer points of setting up SSL keystores and truststores it is recommended that you read the following article: Using Java Keytool to manage keystores. - Authentication Required
- Indicate whether you need a username and password to connect to the server using true or false.
- User Name
- If authentication is required, enter the authentication username here.
- Password
- If authentication is required, enter the authentication password here.
- Sender Address
- Provide an email address that your notifications will appear to come from. If you want to be able to receive replies from notifications you'll need to make sure this is a valid and monitored address.
- Number of Tries Before Failing
- Set the number of attempts that SVN MultiSite Plus makes to send out notifications.
- Interval Between Tries (Seconds)
- Set the time, in seconds, between your server's attempts to send notifications.
- Click +Add. Your gateway appears in the table.
You can add any number of gateways. SVN Multisite Plus exhausts the Number of Tries Before Failing for each registered gateway before moving on down the list to the next.
You can use the Test button to verify that your entered details connect to a mail gateway server.
1.8.2 Set up a destination
The destinations section stores the email address for your notification recipients.
- Click + on the Destinations line.
- Enter an email address for a notification recipient. Click + Add.

Notification
- The destination appears in a table. Click Edit or Remove to change the address or remove it from the system.
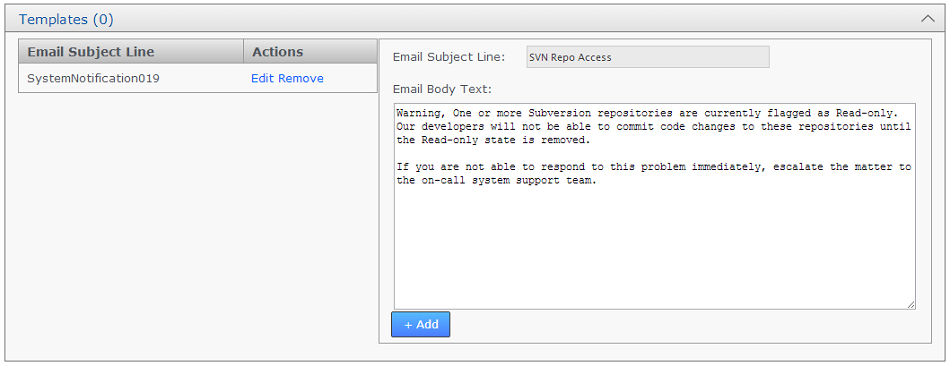
1.8.3 Set up a template
The template section stores email messages. You can create any number of templates, each with its own notification message, triggered by one of a number of trigger scenarios that are set up in the Rule section.
- Click + on the Template line.
- Enter a Template Subject line which will be the subject of the notification email.
- Enter some Body Text which will be the message that is sent out when the notification is triggered. The message has a 1024 character limit. You can track the available number of characters at the bottom of the text box.
- When you've entered the message, click + Add to save the message template.
Notification
For example if an Admin wanted to receive an email when a new repository is deployed the the body text could be:
Hi Admin,
RepositoryDeployedEvent occurred {timestamp).
The repository deployed was {event.repository.name} and its path is {event.repository.fSPath}
Regards,
Replicator
In the rules, the template needs to trigger in the event Deploy Repository Succeeded, and the event selected determines which variables are avaliable in the message body - for more information see events and variables.
1.8.4 Set up a rule
The Rule section defines which system event should trigger a notification, what message template should be used and which recipients should be sent the notification.
- Click + on the Rule line.
- Choose an event from the Event drop-down list:

Rules
- Choose a Template from the drop-down list. These are the templates that you have already set up under the Templates section.
- Choose destinations for your notification from the available destination email addresses. You can make multiple selections so that a message is sent to more than one recipient address.
- Click + Add to save your rule.

Rule set
1.8.5 Events and variables
When writing email notification templates, you can insert variables into the template that will be interpolated when the notification is delivered. The variables avaliable depend on the event type selected. The following variables are available for ALL event types:
- {node} - This returns the node name.
- {timestamp} - This returns the time at which the event is received (not the time at which the notification is delivered).
- {event} - This returns the raw dump of the event.
All events are now listed along with a brief description and the additional variables avaliable for each specific event:
- Disk Monitor Info
- Disk Storage has dropped below the Info level. This will trigger if any data monitor message is written to the logs at the "INFO" level.
{event.message} - This returns information about the disk monitoring threshold that was exceeded.
{event.resource} - This returns the resource on disk that is being monitored. - Disk Monitor Severe
- Disk Storage has hit the Severe level. This will trigger if any "Severe" level data monitor message is written to the logs. At this level, SVN MultiSite Plus will have shutdown to ensure that disk space exhaustion doesn't corrupt your system and potentially your SVN repositories. For more information about disk warning messages, see the Setting up data monitoring section.
{event.message} - This returns information about the disk monitoring threshold that was exceeded.
{event.resource} - This returns the resource on disk that is being monitored. - Disk Monitor Warning
- Disk Storage has dropped below the Warning level.This will trigger if any data monitor message is written to the logs. For more information about disk warning messages, see the Setting up data monitoring section.
{event.message} - This returns information about the disk monitoring threshold that was exceeded.
{event.resource} - This returns the resource on disk that is being monitored. - Generic file replication error occurred
- An error occured in the system that handles the replication of system files.
{event.message} - This returns information on the triggering event.
- Repository exited Global Read-Only
- A repository that was flagged as Global Read-Only has now returned to replication.
{event.repository} - This returns the repository object.
{event.repository.name} - This returns the user-specified name of the repository to which the event pertains.
{event.repository.fSPath} - This returns the location on-disk of the repository that the event pertains to.
{event.repository.dsmId} - This returns the deterministic state machine ID in which the event occurred.
{event.repository.state} - This returns the repository state.
{event.repository.globalReadOnly} - This will be True if the repository Global Read only. - Repository entered Global Read-Only
- A repository that has been replicating successfuly is now flagged as Global Read-only.
{event.repository} - This returns the repository object.
{event.repository.name} - This returns the user-specified name of the repository to which the event pertains.
{event.repository.fSPath} - This returns the location on-disk of the repository that the event pertains to.
{event.repository.dsmId} - This returns the deterministic state machine ID in which the event occurred.
{event.repository.state} - This returns the repository state.
{event.repository.globalReadOnly} - This will be True if the repository Global Read only. - License is about to expire
- The user license for the node is about to expire.
{event.message} - This returns information on the triggering event.
- License has expired
- The user license for the node has now expired.
{event.message} - This returns information on the triggering event.
- License is nearing the maximum number of users
- The number of active users is close to the license limit.
{event.message} - This returns information on the triggering event.
- User License Limit Reached
- The number of active users has now reached the licensed limit.
{event.message} - This returns information on the triggering event.
- Repository Local Read-Only Event
- A repository has entered Local Read-Only mode.
{event.repository} - This returns the repository object.
{event.repository.name} - This returns the user-specified name of the repository to which the event pertains.
{event.repository.fSPath} - This returns the location on-disk of the repository that the event pertains to.
{event.repository.dsmId} - This returns the deterministic state machine ID in which the event occurred.
{event.repository.state} - This returns the repository state.
{event.repository.localReadOnly} - This will be True if the repository is Local Read only. - Repository exited Local Read-Only
- A repository that was in Local Read-Only mode has now left the mode.
{event.repository} - This returns the repository object.
{event.repository.name} - This returns the user-specified name of the repository to which the event pertains.
{event.repository.fSPath} - This returns the location on-disk of the repository that the event pertains to.
{event.repository.dsmId} - This returns the deterministic state machine ID in which the event occurred.
{event.repository.state} - This returns the repository state. - Repository entered Local Read-Only
- A repository has entered the local Read-Only mode.
{event.repository} - This returns the repository object.
{event.repository.name} - This returns the user-specified name of the repository to which the event pertains.
{event.repository.fSPath} - This returns the location on-disk of the repository that the event pertains to.
{event.repository.dsmId} - This returns the deterministic state machine ID in which the event occurred.
{event.repository.state} - This returns the repository state. - Replicator is Started and Ready
- The replicator component of a node is up-and-running and ready to replicate data.
{event.message} - This returns information on the triggering event.
- Deploy Repository Checks Failed
- A repository added to SVN MultiSite Plus has failed to deploy, in which case the repository will not be replicated.
{event.repository} - This returns the repository object.
{event.repository.name} - This returns the user-specified name of the repository to which the event pertains.
{event.repository.fSPath} - This returns the location on-disk of the repository that the event pertains to.
{event.repository.state} - This returns the repository state. - Deploy Repository Checks Succeeded
- A repository added to SVN MultiSite Plus has successfully deployed. Such an event might be sent to a mail group received by SVN users, telling them that their repository is now accessible.
{event.repository} - This returns the repository object.
{event.repository.name} - This returns the user-specified name of the repository to which the event pertains.
{event.repository.fSPath} - This returns the location on-disk of the repository that the event pertains to.
{event.repository.dsmId} - This returns the deterministic state machine ID in which the event occurred.
{event.repository.state} - This returns the repository state. - Deploy Repository Succeeded
- A repository has been successfully added to SVN MultiSite Plus.
{event.repository} - This returns the repository object.
{event.repository.name} - This returns the user-specified name of the repository to which the event pertains.
{event.repository.fSPath} - This returns the location on-disk of the repository that the event pertains to.
{event.repository.dsmId} - This returns the deterministic state machine ID in which the event occurred.
{event.repository.state} - This returns the repository state. - Global Read-Only Due To Admin Action
- In case of any repository entering a global read-only mode as a result of administrator interaction through the admin UI.
{event.repositoryIdentity} - This returns the repository ID
{event.globalReadOnly} - This will be True if the repository Global Read only.
{event.reason} - This returns a message indicating why the repository went read only. - Any Repository Global Read-Only Event
- In case of any repository entering a global read-only mode.
{event.repository} - This returns the repository object.
{event.repository.name} - This returns the user-specified name of the repository to which the event pertains.
{event.repository.fSPath} - This returns the location on-disk of the repository that the event pertains to.
{event.repository.dsmId} - This returns the deterministic state machine ID in which the event occurred.
{event.repository.state} - This returns the repository state.
{event.repository.globalReadOnly} - This will be True if the repository Global Read only.
{event.repository.globalReadOnlyReason} - This returns a message indicating why the repository went read only.
{event.message} - This returns information on the triggering event. - Global Read-Only Due To Consistency Check Failure
- In case of any repository entering a global read-only mode as a result of failing a consistency check with its replicas.
{event.repositoryIdentity} - This returns the repository ID
{event.globalReadOnly} - This will be True if the repository Global Read only.
{event.reason} - This returns a message indicating why the repository went read only.. - scheduledConsistencyCheckSkippedNotificationEvent
- A scheduled consistency check has been skipped.
{event.message} - This returns information on the triggering event.
- Repository is Sidelined
- A repository has entered the sidelined mode and has been dropped from the replication system.
{event.repository} - This returns the repository object.
{event.repository.name} - This returns the user-specified name of the repository to which the event pertains.
{event.repository.fSPath} - This returns the location on-disk of the repository that the event pertains to.
{event.repository.dsmId} - This returns the deterministic state machine ID in which the event occurred.
{event.repository.state} - This returns the repository state.
{event.repository.globalReadOnly} - This will be True if the repository Global Read only.
{event.repo.globalReadOnlyReason} - This returns a message indicating why the repository went read only. - Repository is Unsidelined
- A repository has left the sidelined mode and can be recovered using the standard repair procedure.
{event.repository} - This returns the repository object.
{event.repository.name} - This returns the user-specified name of the repository to which the event pertains.
{event.repository.fSPath} - This returns the location on-disk of the repository that the event pertains to.
{event.repository.dsmId} - This returns the deterministic state machine ID in which the event occurred.
{event.repository.state} - This returns the repository state.
{event.repository.globalReadOnly} - This will be True if the repository Global Read only.
{event.repository.globalReadOnlyReason} - This returns a message indicating why the repository went read only.
1.9 Back up SVN MultiSite Plus data
You can back up SVN MultiSite Plus's own database in case you need to quickly restore a node.
This procedure backs up SVN MultiSite Plus's internal Prevayler database. It does not touch your SVN repository data or any other system files (such as Apache configuration, authz files etc.) that you should also be backing up.
-
Create a backup of the current installation by invoking the following API call:
curl --user <username>:<password> -X POST http://[node_ip_address]:8082/dcone/backupThis creates a backup folder in
[INSTALL-DIR]multisite-plus/replicator/db/backup/X.X.X_DConE_Backup directory.
1.9.1 Back up while shut down
Run this from within /replicator:
java -cp ./fsfsrestore.jar com.wandisco.fsfs.backup.FsfsBackup -c ./properties/application.properties
Use this to back up the current state of all prevaylers when SVN MultiSite Plus is shut down. You therefore do not need to start the replicator in order to create a backup of the database.
1.10 Restore SVN MultiSite Plus data
Contact WANdisco Support if you want to restore SVN MultiSite Plus data.
1.11 Back up and restore other data
Restore data as follows:
Repository content
See Repair an out-of-sync repository.
Repository config and hooks
MSP manages the synchronization of the revision information. It does not synchronize the hooks or other repository configuration data, except for the files fsfs.conf and fs-type. The hooks exist depending where you install them, i.e. which version of the hooks, which nodes, which repos. The other configuration files should not be touched. However, you may need to copy them, e.g. conf/svnserve.conf, to all of the repositories at the same time so that the behavior is uniform.
Apache config
Depending on the number and configuration of your replication groups, you may be able to copy them from another node. This is part of your system configuration and should be backed up and restored according to your own IT policy.
SSL config
Add this to your system backup strategy, because you may have custom configuration between nodes.
1.12 Manage access to SVN MultiSite Plus
SVN MultiSite Plus supports three different mechanisms for managing access to its admin UI:
- Internally Managed users: admin accounts that are set up from within SVN MultiSite's Admin UI.
- LDAP Authorities: you can have SVN MultiSite Plus query LDAP services and filter for a suitable group from which to populate admin users.
- Kerberos Security: If your organization uses a Kerberos authentication system you can set up MultiSite to use it.
You can set up multiple administrator accounts for accessing the SVN MultiSite Plus admin console. Accounts can be set up from within the admin UI (via the SECURITY tab). These users can then log in to any node's admin UI by providing their username and password.
The following sections explain how to set up multiple accounts, set up managing LDAP authorities and export/import the resulting data.
1.11.1 Adding additional users
- Log in to the Admin UI using an existing admin account.

Login
- Click SECURITY, then click Add User.

Add User
- Enter details for the new administrator, then click Add User at the end of the entry bar.
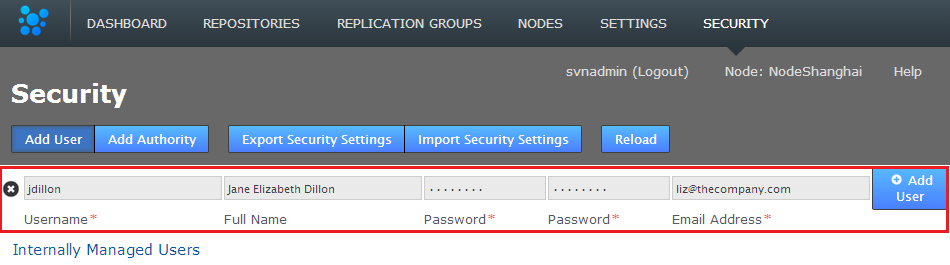
Click Add User to save their details
- You'll see a growl message confirming that the user has been added. You'll see them listed on the Internally Managed Users after clicking the Reload button (or refershing your browser session).
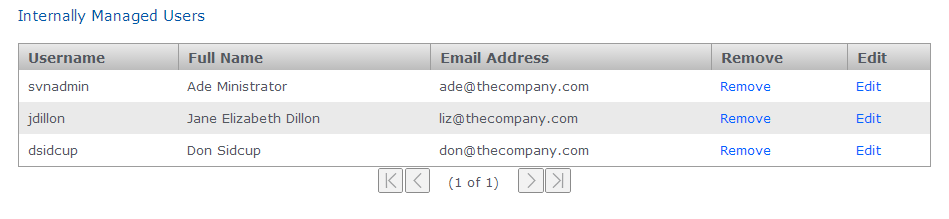
New user appears
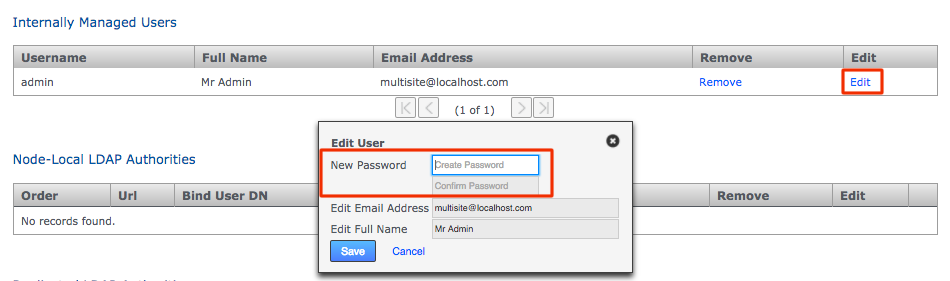
1.11.2 Removing or editing user details
You can modify any user details.
- Click the corresponding Edit button on the Internally Managed Users table.

Remove or Edit users
1.11.3 LDAP authorities
SVN MultiSite Plus supports the use of LDAP authorities for managing admin logging accounts. See our Guide to LDAP.
When connecting SVN MultiSite Plus to available LDAP authorities it is possible to classify the authority as "Local" i.e. specific to the node in question or not - in which case the authority details will be replicated to the other nodes within the replication network.
It's possible to run multiple LDAP authorities that are of mixed type, i.e. using some local authorities along with other authorities that are shared by all nodes. When multiple authorities are used, it's possible to set what order they are checked for users.
The standard settings are supported for each configured LDAP authority: URL, search base and filter and bind user credentials. Note that the bind user's password cannot be one-way encrypted using a hash function because it must be sent to the LDAP server in plain text, so for this reason the bind user should be a low privilege user with just enough permissions to search the directory for the user being authenticated. Anonymous binding is permitted for those LDAP servers that support anonymous binding.
Add authority
Use the Add Authority feature to add one or more LDAP authorities, either local to the node or connected via WAN. Locally LDAP services are treated as having presedence. When Internally managed users are enabled they are first checked when authenticating users. See Admin Account Precedence.
To add an authority:
- Log in to the admin UI, click the SECURITY tab.
- Click Add Authority.

Add Authority
The Authority entry form appears.
- Enter the following details:

Add Authority
- URL
- Enter your authorities URL. You need to include the protocol ldap:// or ldaps://
Example (Active Directory)ldap://<server IP>:389
- Bind User DN
- Enter a LDAP admin user account that will be used to query the authority
Example (Active Directory)cn=Administrator,cn=Users,dc=windows,dc=AD
- Search Base
- Enter the Base DN, that is the location of users that you wish to retrieve.
Example (Active Directory)CN=Users,DC=sr,DC=wandisco,DC=com
- Search Filter
- Optionally add a query filter that selects a user based on relevant LDAP attributes. Create a search filter so that it filters LDAP query result into unique result. A workaround might look something like:
Example: (Active Directory)(&(memberOf=[DN of user group])(sAMAccountName={0}))This dynamically swaps the {0} for the ID of the active user.
To authenticate the current user you need to include uid={0} or a similar user search against {0}. For example, if you want to restrict access to MSP to the LDAP user ldapuser1 and you are using openLDAP, then the searchFilter should be:
(&(uid={0})(uid=ldapuser1))For more information about query filter syntax, consult the documentation for your LDAP server. - Is Local?
- Tick this checkbox if you want the authority to only apply to the current node and not be replicated to other nodes (which is otherwise done by default).
- Click Add Authority. This saves the authority settings that you have just entered. You can click Test to verify that the details successfully connect to the authority without adding the authority yet.
- When running with multiple authorities, you need to set the order in which MultiSite polls the authorities. Use the +- symbols at the end of each authority entry to push it up (+) or down (-) the list.

Order authorities
Edit authority
Modify an existing authorities settings:
- Log in to the admin UI, click the SECURITY tab.
- Click the edit link on the line that corresponds with the authority that you wish to edit.

Edit authorities link
- Update the settings in the popup box, then click Save.

Edit authorities box
Kerberos security
This section describes the basic requirements for integrating SVN MultiSite Plus with your existing Kerberos systems. The procedure requires the following:
- A Key Distribution Center
- A Workstation setup on each node
- A machine with a suitably configured browser. See Enabling Kerberos access on your browser
Ensure that time synchronization and DNS are functioning correctly on all nodes before configuring Kerberos. A time difference between a client and the master Kerberos server that exceeds the Kerberos setting (5 mins default) will automatically cause auth failure.
Configuration
This procedure assumes that you have already set up your DNS service and master Key Distribution Center.
- On each node, add the service principal:
	    # kadmin -p root/admin -q "addprinc -randkey HTTP/node1.example.com"
	    # kadmin -p root/admin -q "ktadd -k /opt/krb5.keytab HTTP/node1.example.com"
	    # chmod 777 /opt/krb5.keytab
- Each node should have installed the add-on JCE Java 6 or Java 7 Unlimited Strength Jurisdiction Policy Files". These can be downloaded from Oracle, subject to your local import rules concerning encryption technology. Once downloaded, extract to the the Java security library, i.e.
$JAVA_HOME/lib/security/
- At this point you can install SVN MultiSite Plus on each node. If that's already done, then configure the Kerberos settings under the SECURITY tab.

Edit Kerberos box
- Service Principal:
- This unique name for an instance of a service, such as HTTP/node1.example.com
- Keytab Location:
- This is the location of the keytab, a file containing pairs of Kerberos principals and encrypted keys (often derived from the Kerberos password). It's used for logging into Kerberos without being prompted for a password.
- Kerberos Config Location:
- The krb5.conf file contains Kerberos configuration information, including the locations of KDCs and admin servers for the Kerberos realms of interest, defaults for the current realm and for Kerberos applications, and mappings of hostnames onto Kerberos realms. Normally, you should install your krb5.conf file in the directory /etc. i.e. /etc/krb5.conf
- Save the settings.
- Log out.
- Return to the node in your browser. This time you should log in automatically (in this case as user sally@EXAMPLE.COM).
See Security Reference: Kerberos settings.
See Configure browsers for Kerberos authentication.
2. Nodes
2.1 Add a node
To replicate SVN repository data between sites, you first tie the nodes together in the form of a replication network, this process starts with the adding (connecting) of nodes in a process we call induction.
You can also remove a node.
- Log in to the SVN MultiSite admin console of the new node that you are connecting to your existing servers.
- Click the Nodes tab.
- Click the Connect to node button.

Connect to node
- Enter the details of an existing node, from the SETTINGS tab of the existing node. For more information on these details see System Data.
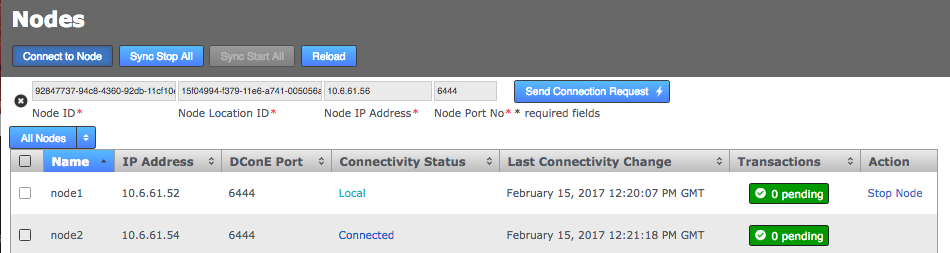
Enter the details from an existing, connected node
- Click SEND CONNECTION REQUEST. The new node appears on the active list of Sites.
You may find that the new node gets stuck in a pending state. If this happens see If Induction fails.
2.2 Remove a Node
The removal of a node from the SVN MultiSite Plus replication group is useful if you will no longer be replicating repository data to its location and wish to tidy up your replication group settings.
The option to remove a node should only appear if it is not currently a member of a replication group. You may need to remove and recreate replication groups in order make it eligible for removal.
Known issue:
NOTE: If a node is inducted but not in a replication group then it is possible (from that node) to remove other inducted nodes that are in a replication group. There's currently an issue in that a node isn't aware of the membership of replication groups of which it is not itself a member. This means that it is possible to remove a node that is a member of a replication group, if done from another node that doesn't have knowledge of the replication group.
Until we block this capability you should do a manual check of any nodes that you plan to remove to make absolutely sure that it is not a member of a replication group.
Take care when removing nodes. To ensure that replication network is kept in sync, removed nodes are barred from being re-inducted. The only way that you can bring back a node is to perform a reinstallation of SVN MultiSite Plus using a new Node ID.
- Log in to the SVN MultiSite admin console of any connected node.
- Click the Nodes tab.
- Nodes that are eligable for removal will have the "Remove Node" option available under the Action column.
- Click Remove Node.
Removing a node is not reversible
You must be absolutely sure that you want to permanently remove the node.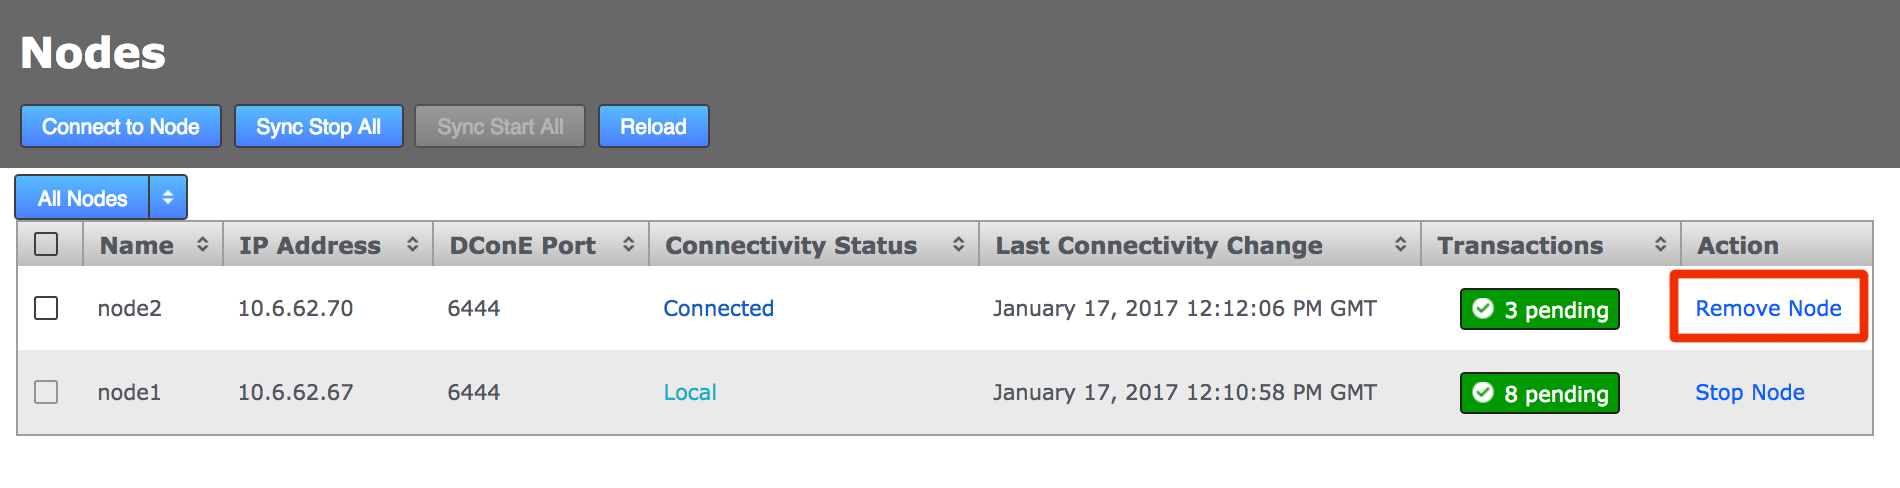
Ready to remove Node
- After a refresh of the admin user interface you see that the removed node still displays if you click Display Removed Nodes. Removed nodes have the status "Removed" in the Connectivity Status column.
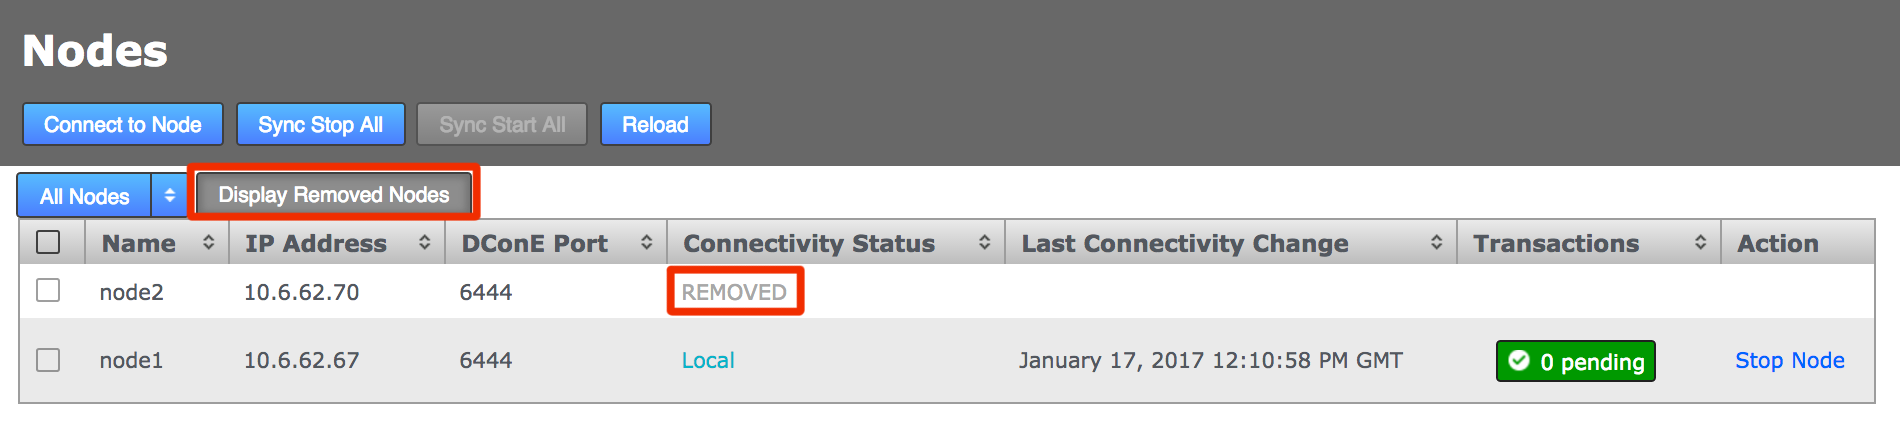
Node removed
2.3 Stop all nodes
You can bring all nodes to a stop with a single button click (if all associated repositories are replicating/writable).
Before starting a Sync Stop All, make sure that none of your nodes have repositories in a local read-only state.
- Log in to the admin UI and click the Nodes tab.
- Click the Sync Stop All button.
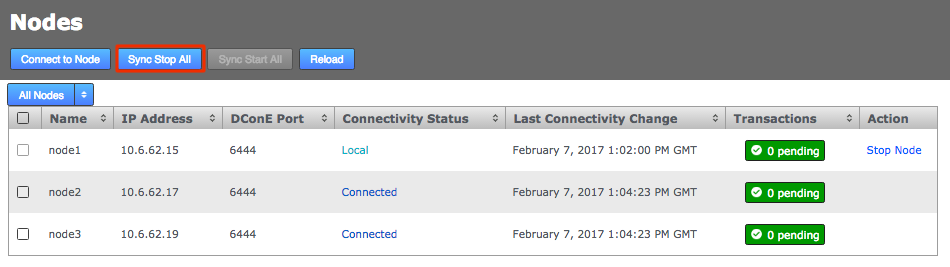
Stop all nodes
You get a growl message confirming the stop has been triggered. You see the results when you refresh your browser session.
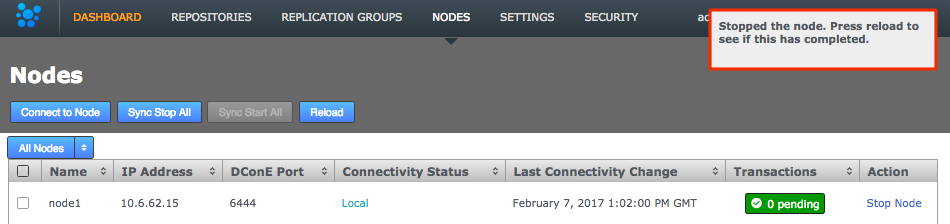
Stopped
- On the Nodes table all nodes are shown as Stopped. In this state you can do maintenance or repairs without risking your replication getting out-of-sync.
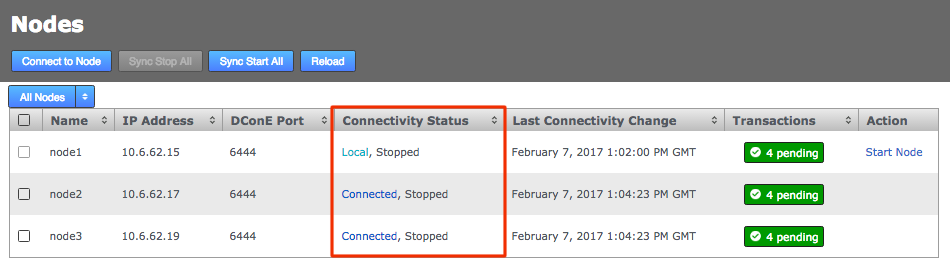
Node removed
- The Sync Stop All button has changed to Start all. You can start selected nodes by logging in to the admin console of each node that you want to start. Use the Start Node link in the Action column of the Nodes table.
We strongly recommend that you watch the log messages and confirm that all nodes report as stopped. If you suspect that one or more nodes are not going to stop you should investigate immediately. The DASHBOARD messages should report the stop, for example:
Aborted tasksType PREPARE_COORDINATE_STOP_TASK_TYPE
Delete Task
Originating Node: Ld5UYU
tasksPropertyTASK_ABORTING_NODE: Ld5UYU
tasksPropertyTASK_ABORT_REASON: One or more replicas is already stopped.
The replica was: [[[Ld5UYU][bf0c6395-77b6-11e3-9990-0a1eeced110e]]]
Look for the message:
Aborted tasksType PREPARE_COORDINATE_STOP_TASK_TYPEIn the replicator.log file you might see the error type:
"DiscardTaskProposal <task id etc> message: One or more replicas is already stopped."
2.4 Start all nodes
- If all nodes have been stopped, click Start All to start them replicating again.

Stopped
- After a browser refresh, all nodes will now show as running.
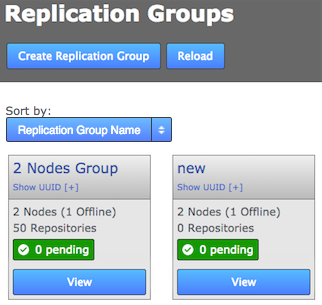
2.5 Disconnected/offline nodes
If a node is disconnected you can see this from the UI:
- When you click the REPLICATON GROUPS tab, you can see the groups with nodes that are offline:
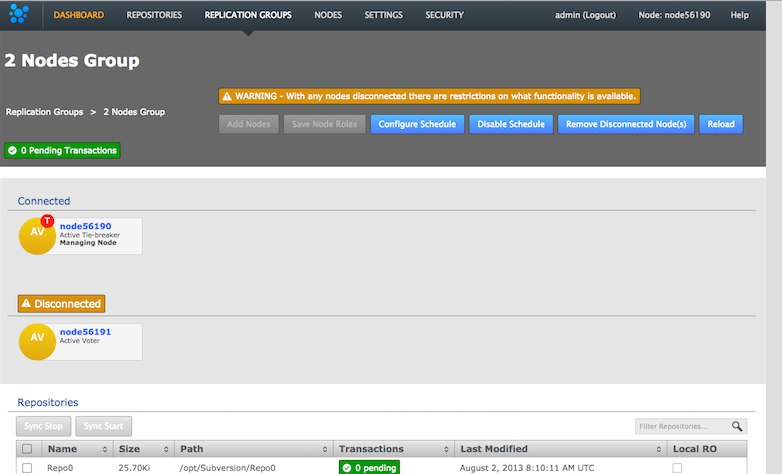
- When you click View to see a replication group, you are warned that functionality is reduced when a node is disconnected, plus you see which nodes are connected/disconnected:
- If you try to create a new replication group that includes a disconnected node you are warned that the node is unavailable and the group is pending:
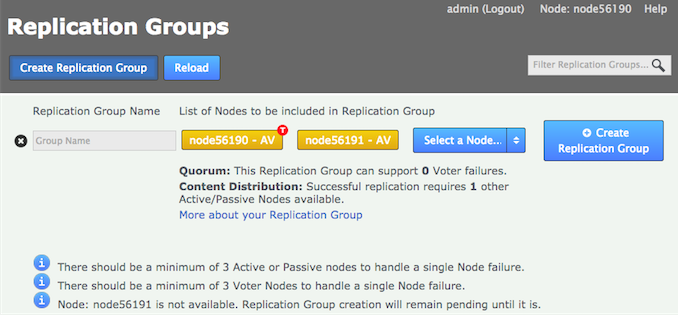
- You cannot add a new node to an existing replication group while a member node is disconnected. You get this message in the UI log on the dashboard:
Replication group schedule cannot be updated with a new node whilst a member is disconnected.
3. Replication groups
See Disconnected/offline nodes.
3.1 Add a replication group
You add a new replication group when you need to replicate between a new combination of sites, i.e. sites that are not currently replicating in an existing group. If, instead, you want to replicate a new repository between existing sites, you can add a new repository to those sites.
- Log in to the SVN MultiSite browser-based user interface. Click the REPLICATION GROUPS tab, then click the CREATE REPLICATION GROUP button.

Creating a replication group
- Enter a name for the group in the Replication Group Name field, then click the drop-down selector on the Add Sites field. Select the sites that you want to replicate between.
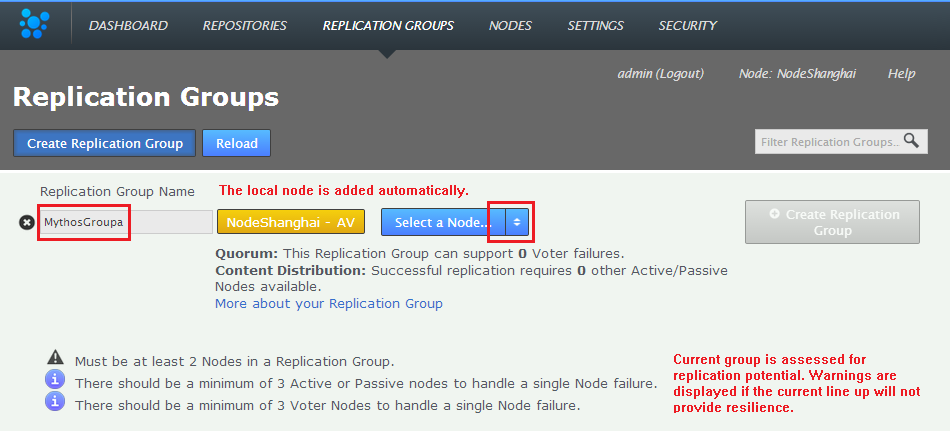
Replication group details
Replication Rules:
- A node can belong to any number of replication groups.
- A repository can only be part of a single active replication group at any particular time.
- You can easily move a repository between replication groups.
- Click each node label to set its node type. Nodes can be changed to any type, provided the configuration allows, except Voter-only which has to be designated during Replication Group creation.
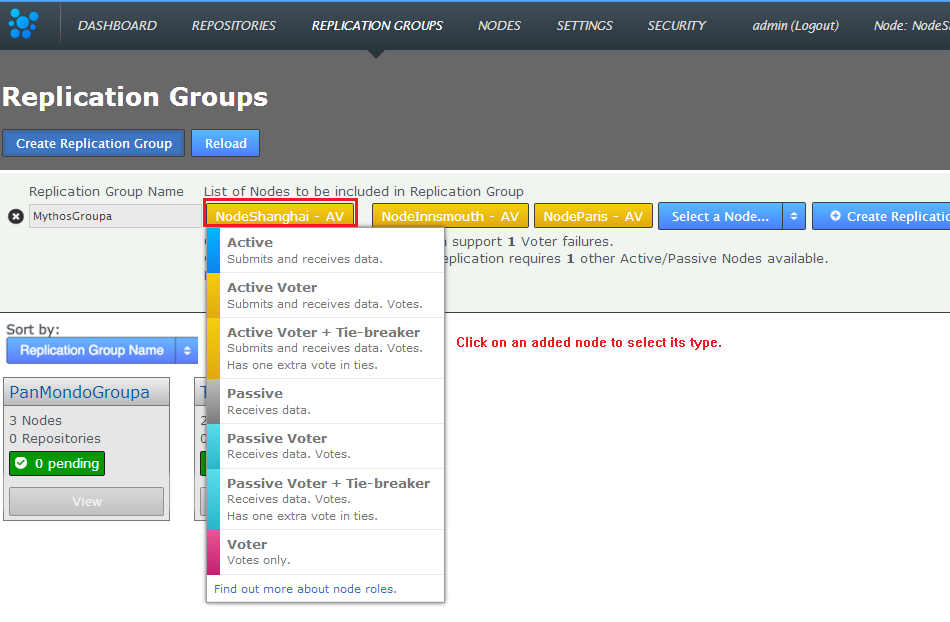
Click node labels to change their type
Advice on creating effective replication groups
For a description of rules for replication read Creating resilient Replication Groups.
Nodes are automatically added to a group as "Active Voters".
tiebreaker availability
If you add or remove nodes so that a replication group goes from having an even to an odd number of voter nodes, any node that is assigned as a tiebreaker will lose this designation. Tiebreakers are only applicable/available when there is an even number of voter nodes and the corresponding risk of a "split brain".
To understand the differences between different types of nodes, read Guide to node types - When you have created all the sites and configured the settings, click CREATE REPLICATION GROUP.

Create Replication Group
You may see the message:
Adding replication group, this may take some time. Press reload to see if this has completed.
Newly created replication groups appear on the Replication Group tab, but only on the admin UI of nodes that are themselves members of the new group.
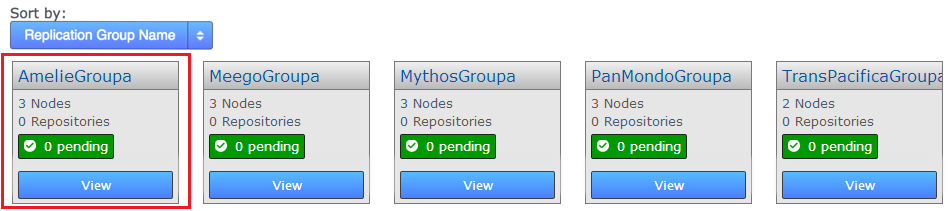
New replication group appears
If you create a new replication group, then find that the task is stuck in pending because one of your nodes is down, do not use the Cancel Tasks option on the Dashboard's Pending Tasks table.

If, when all nodes are up and running, the replication group creation tasks are still not progressing, please contact the WANdisco support team for assistance.
3.2 Delete a replication group
You can remove replication groups from SVN MultiSite Plus, although only if they they have been emptied of repositories. The following procedure is an example:
- Replication group VineyanRepos needs to be removed from SVN MultiSite Plus. It has a single repository associated with it. Click View to see which one.
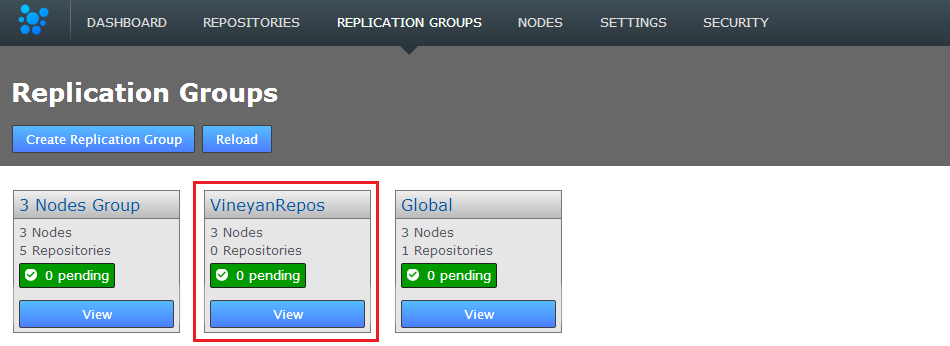
View
- The Replication Group configuration screen shows that Repo5 is associated with the group. Currently Delete Replication Group (VinyardRepos) is disabled. You can follow the link to the repositories page to remove the association.
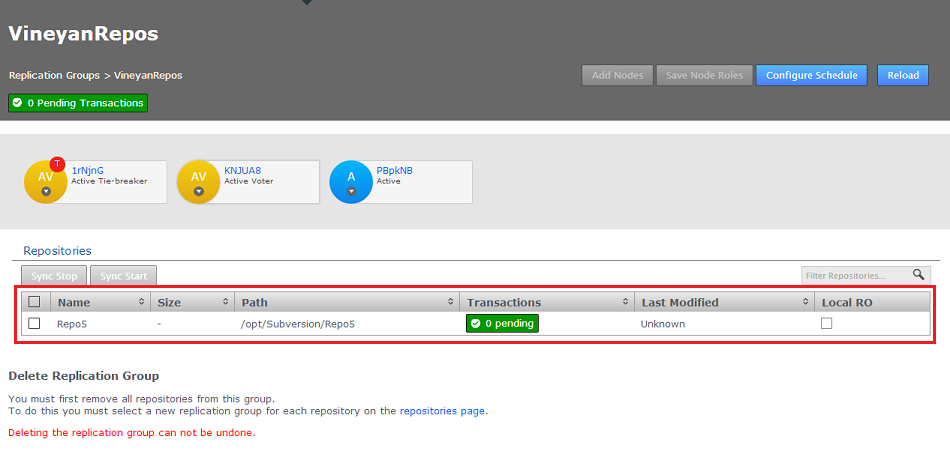
Repositories
- On the Repositories screen, click the associated repository, in this example Repo5, then click EDIT.
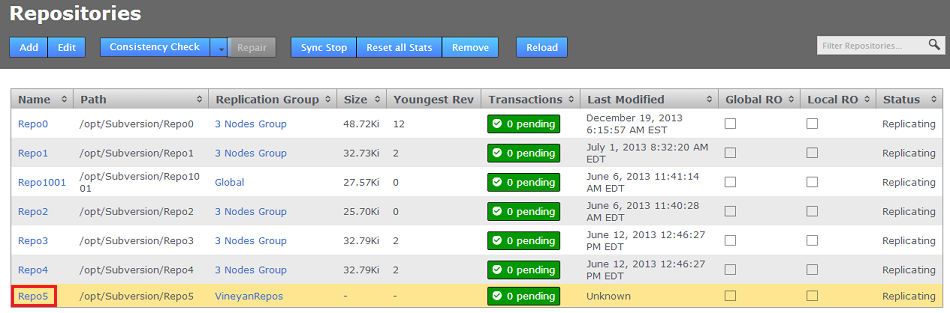
Select and Edit
- In the Edit Repository box, use the Replication Group drop-down to move the repository to a different Replication Group. Then click SAVE.

Edit
- Repeat this process until there are no more repositories assoicated with the Replication Group that you wish to delete. In this example VinyardRepos only had a single repository, so it is now empty, and can be deleted. Click on View, then on Configure.

Move it
- Now that Replication Group VinardRepos is effectively empty of replication payload the Delete link is enabled. Click Delete Replication Group (VinyardRepos) to remove the replication group. Note that there's no undo. Although no data is removed when a replication group is deleted, you should be able to recreate a group if necessary.
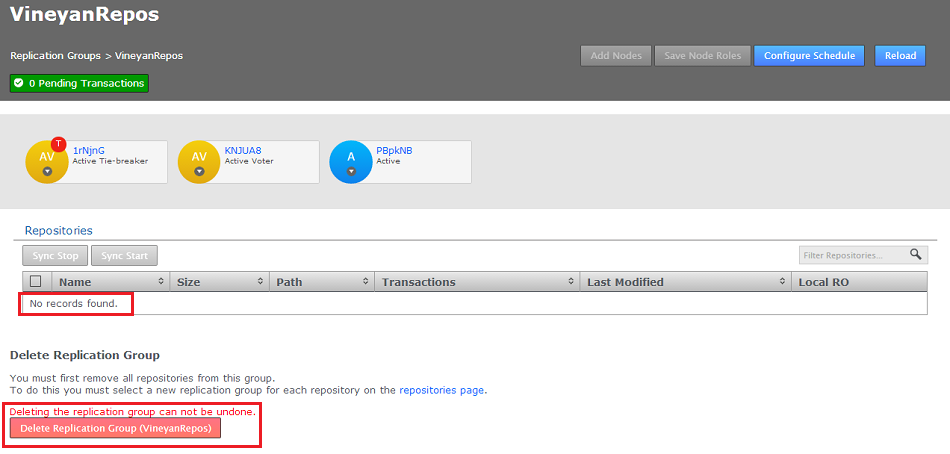
Click the Delete link button
- A growl will appear confirming that the replication group has been deleted.
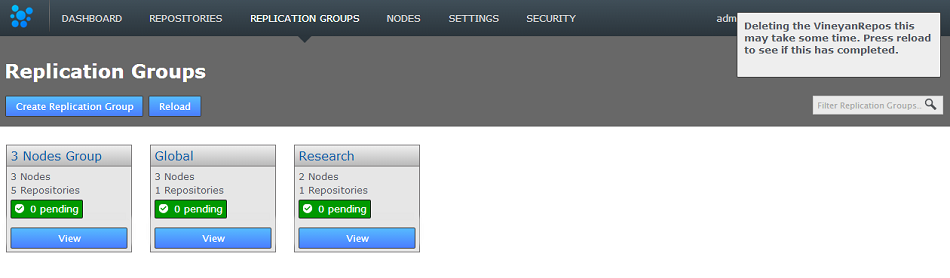
Deleting the replication group
3.3 Add a node to a replication group
When adding nodes to a replication group that already contains three or more nodes, ensure that there isn't currently a large number of commits being replicated.
Adding a node during a period of high traffic (heavy level of commits) going to the repositories may cause the process to stall.
Once the "Add Node" process starts, don't navigate away from the screen or make any further changes on the Admin UI until the process completes. Moving away or making other changes is likely to disconnect the UI from the state of the operation, so you won't get a confirmation that it has completed.
What to do if you do get stuck
If for whatever reason the process gets stuck, you can get unstuck by restarting the Admin UI process using the SVN MultiSite service, E.g.:
[root@redhat6]#This will not impact the replicator's operation so end users' access to Subversion is not affected. Once the Admin UI process has restarted the operation to add the node should be confirmed as complete.service svn-multisite-plus uistop[root@redhat6]#service svn-multisite-plus uistart
You can add additional nodes to an existing replication group, so that there's minimal disruption to users:
- Log in to a node, click the REPLICATION GROUPS tab.
- Click VIEW on the replication group where you want to add a new node.
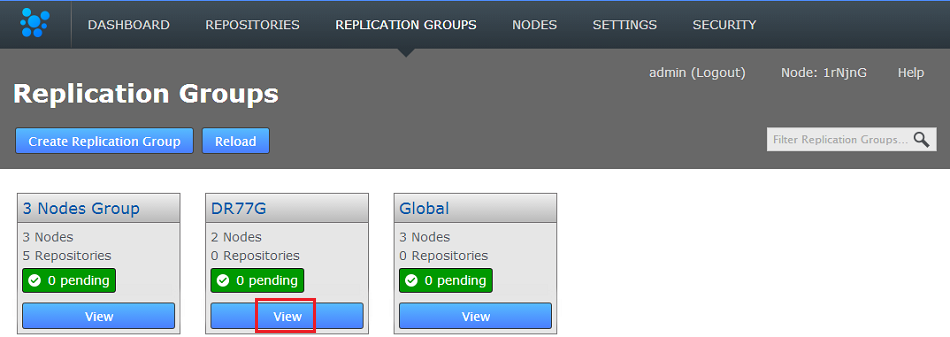
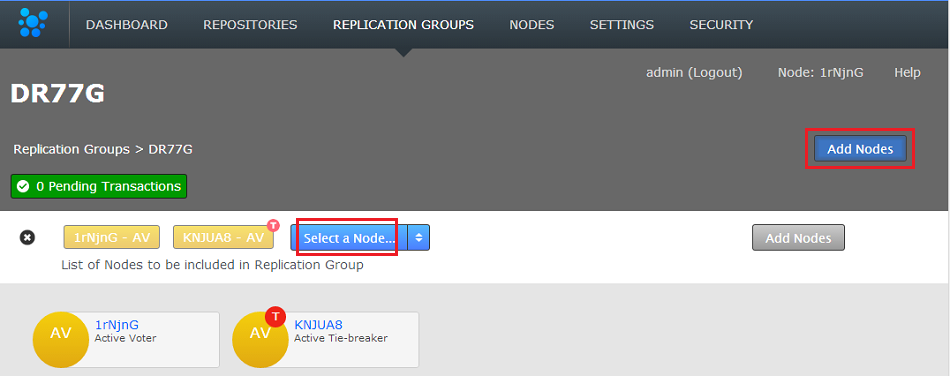
The replication group screen appears. - Click Add Nodes.
The Add Nodes button is disabled
The Add Nodes button is grayed out if the current replication group configuration will not support the addition of a new voter node:

Also, a configuration that is scheduled in the future may block the addition of a new node. Check the schedule if you think that you should be able to add a new node to the replication group. - Select the node to add from the Select a Node dropdown list.

- When you have added the nodes, click Add Nodes.

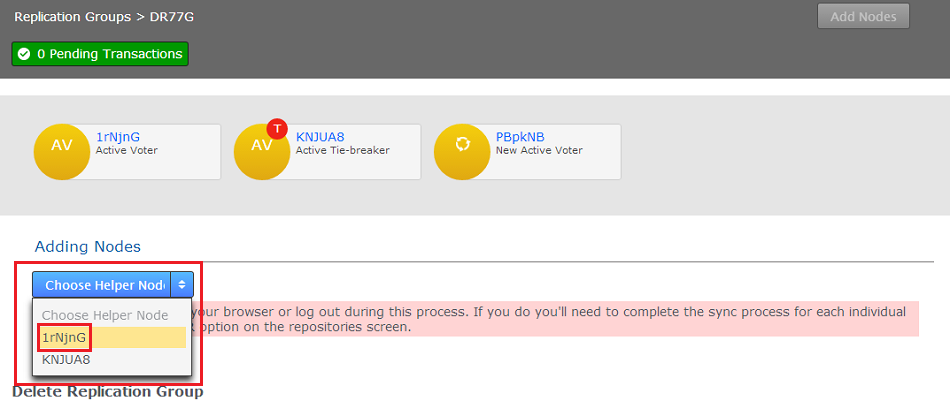
- Select a Helper node from which you will synch repository data.
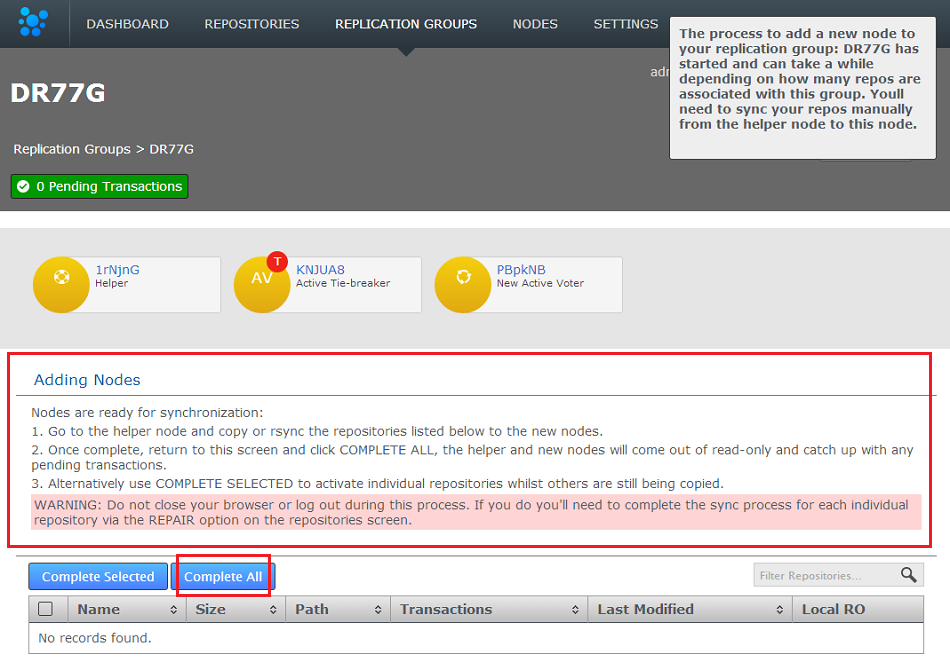
- Note the warning about not closing the browser or logging out during this process otherwise you'll need to perform a long repair procedure. Click Start Sync.

-
Avoid time consuming repair process!You now need to manually synchronize the repositories from the helper node (which is temporarily offline for users until this process is finished). See Synchronizing repositories using rsync.
In the next steps, when you click Complete all a consistency check is invoked automatically on all repositories in the replication group. Make sure that you copy and sync correctly before clicking Complete all. If the consistency check finds any "inconsistent" repository, it is set into a global read-only state. You will then need to take each repository, one by one, through the repair process. This will be extremely time consuming for multiple repositories.
If this happens, it is best to drop the node out of the replication group and start over. However, you will then need to write a script to remove the global read-only state for the inconsistent repositories.
Therefore, we highly recommend that you take care not to make a mistake in copying and rsyncing. Take time to check and double check so that the consistency checks run smoothly.
The process lets you do a complete sync or select specific repositories that you wish to sync. Assuming that you have synced all repositories you would click Complete All. The helper node is then released from the process, allowing it to catch up with any transactions it missed while taking part in the procedure.
- A growl message appears copnfirming that the new node has been added to the replication group.
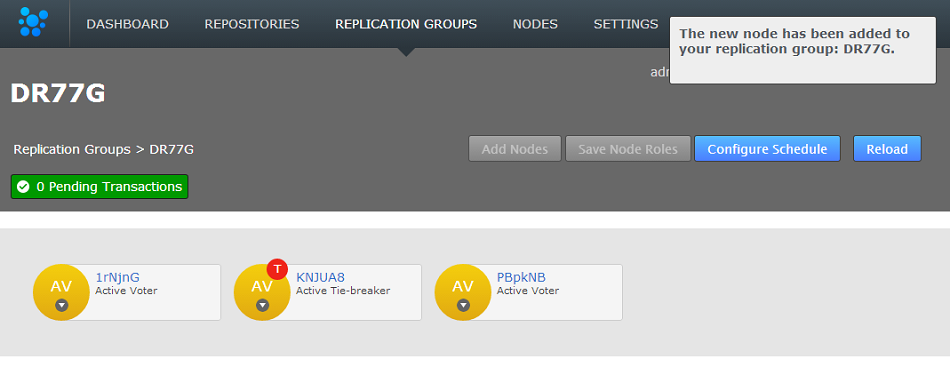
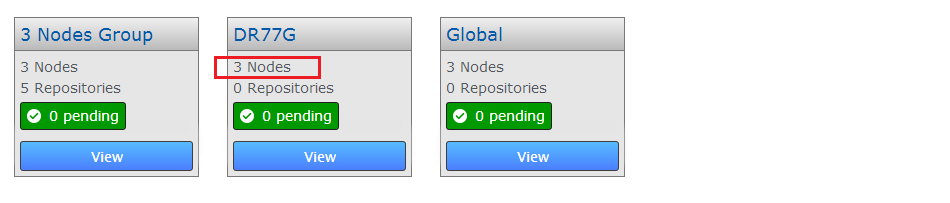
- Returning to the Replication Group screen, you can see the new node count.
3.4 Remove a node from a replication group
You can remove a node from a replication group. You might need to do this, for example, if the developers at one of your nodes are no longer going to contribute to the repositories handled by a replication group. Removing a node from a replication group stops updates to its repository replicas.
If you remove a node from a replication group, you should delete its copy of the repositories managed by the replication group. Having an out-of-date stray copy can result in confusion or users working from old data.
You cannot remove a node that is currently assigned as the Managing Node. To change the managing node, go to the Configure Schedule page and assign a different node as the Managing Node.
- Log in to the admin console of one of your nodes. The node needs to be a member of the relevant Replication Group, otherwise it is not listed.
- Click Replication Groups then the View button for the Replication Group from which you want to remove a node.
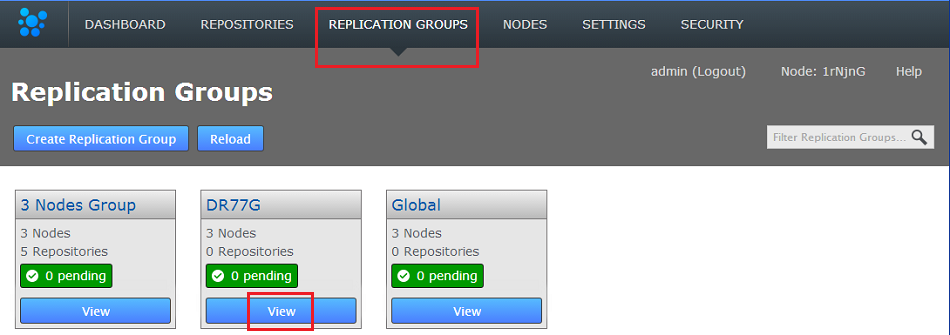
- Click the node that you want to remove from the group. If the removal of the node does not invalidate the remaining configuration, then you see a Remove node from replication group link. Click the link.
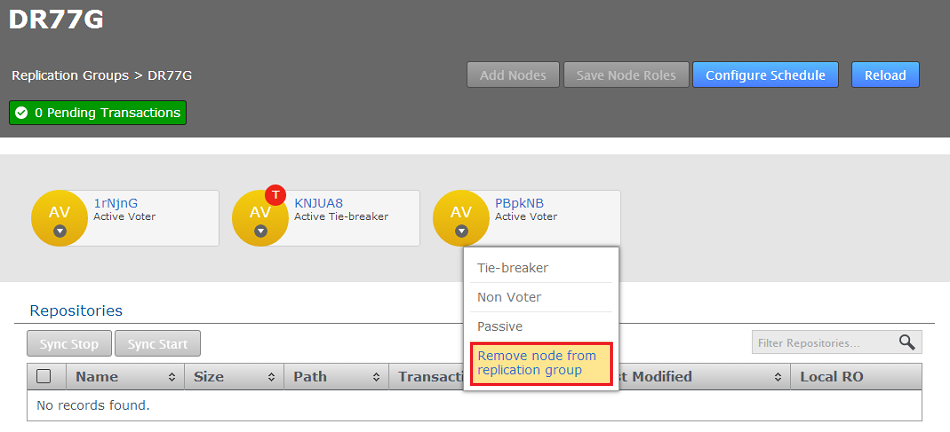
- A dialog opens which asks you to confirm the removal of the selected node from the Replication Group. Click Remove.
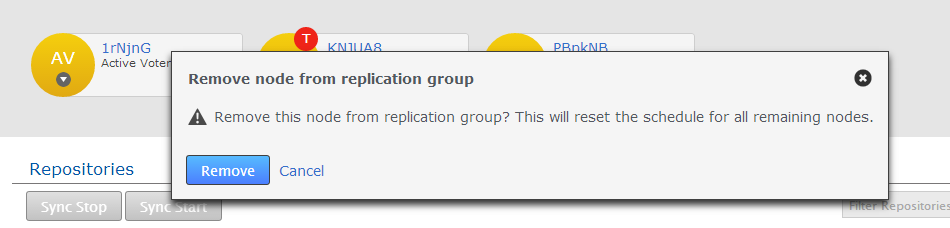
- A growl message confirms that the removal is in progress. You many need to click Reload to ensure that the action has been completed on all nodes.
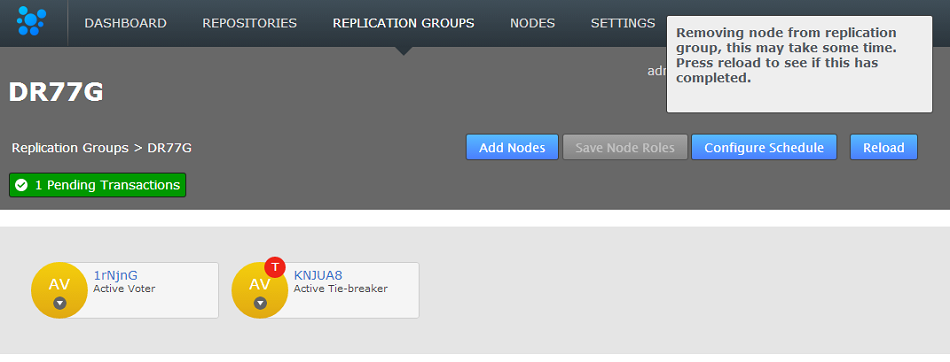
The node is now removed from the replication group. On the Replication Groups panel you now see that the constituent number of nodes has reduced by one.

3.5 Schedule node changes: follow the sun
You can schedule the member nodes of a replication group to change type according to when and where it is most beneficial to have active voters. To understand why you may want to change your nodes read about Node types.
3.5.1 Schedule node type changes via the public API
Instead of manually setting up schedules through a node's UI you can do it programmatically through calls to the public API. See Public API ScheduledNodeAPIDTOList element and scheduledNodeAPIDTOList Datatype.
Use the following API call:
http://<ip>:8082/public-api/replicationgroup/{repgroupID}/schedule
e.g.
http://10.0.100.135:8082/public-api/replicationgroup/97913c04-bbad-11e2-877a-028e03094f8d/schedulePUT with
ReplicationGroupAPIDTO XML as body:
To make Node N3 a tie-breaker 'T' FROM 10:00 - 16:00 (GMT) every day of the week with Node N1 as tie-breaker 'T' afterwards:
When viewed on a node, times are shifted to the local timezone although internally they are always recorded in UTC.
Example curl command:
Make a text file containing ReplicationgroupAPIDTO XML (as above) called schedule.xml:
curl -u username:password -X PUT -d @schedule.xml http://[IP]:[PORT]/public-api/replicationgroup/97913c04-bbad-11e2-877a-028e03094f8d/schedule
Sample 'schedule.xml' file
<ReplicationGroupAPIDTO>
	   <replicationGroupName>global</replicationGroupName>
	 <replicationGroupIdentity>97913c04-bbad-11e2-877a-028e03094f8d</replicationGroupIdentity>
	   <scheduledNodes>
	       <dayOfWeek>1</dayOfWeek>
	       <hourOfDay>14</hourOfDay>
	       <schedulednode>
		   <nodeIdentity>N1</nodeIdentity>
		   <locationIdentity>c0e486a0-bbab-11e2-863b-028e03094f8e</locationIdentity>
		   <isLocal>true</isLocal>
		   <isUp>true</isUp>
		   <lastStatusChange>0</lastStatusChange>
		   <role>AV</role>
	       </schedulednode>
	       <schedulednode>
		   <nodeIdentity>N3</nodeIdentity>
		   <locationIdentity>5480f515-bbad-11e2-8301-028e03094f8c</locationIdentity>
		   <isLocal>false</isLocal>
		   <isUp>true</isUp>
		   <lastStatusChange>0</lastStatusChange>
		   <role>T</role>
	       </schedulednode>
	       <schedulednode>
		   <nodeIdentity>N2</nodeIdentity>
		   <locationIdentity>478c766f-bbad-11e2-877a-028e03094f8d</locationIdentity>
		   <isLocal>false</isLocal>
		   <isUp>true</isUp>
		   <lastStatusChange>0</lastStatusChange>
		   <role>AV</role>
	       </schedulednode>
Download the full sample schedule.xml file.
- Log in to a node, click on the REPLICATION GROUPS tab. Click on the VIEW link for the replication group that you wish to make a schedule.
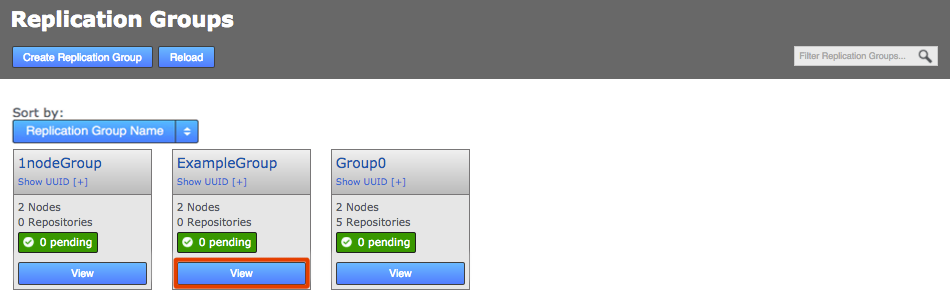
Scheduling is done through replication group settings
- Click Configure Schedule.
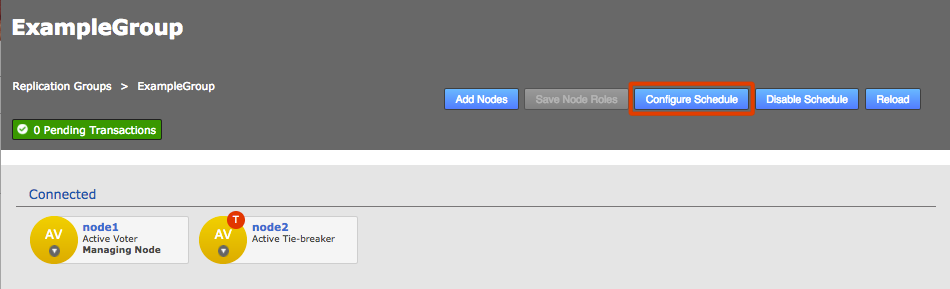
Configure
Membership views are what is scheduled which is not necessarily what is currently active.
The roles and membership displayed in the popup is based upon the agreed schedule, it's the setup that should be in place if everything is running smoothly. It is always possible that it doesn't accurately represent the state of the replication group, due to a delay in processing on a node, or if something has caused a process to hang. This should not be a cause for concern but it's important to be aware that the displayed membership is an approximation based on the information currently available to the local node. - The replication groups Schedule screen will appear. The main feature of the screen is a table that lists all the nodes in the replication group, set against a generic day (midnight to midnight) that is divided into hourly blocks. Each hourly block is color-coded to indicate the specific node’s type. To change the schedule, click a block.
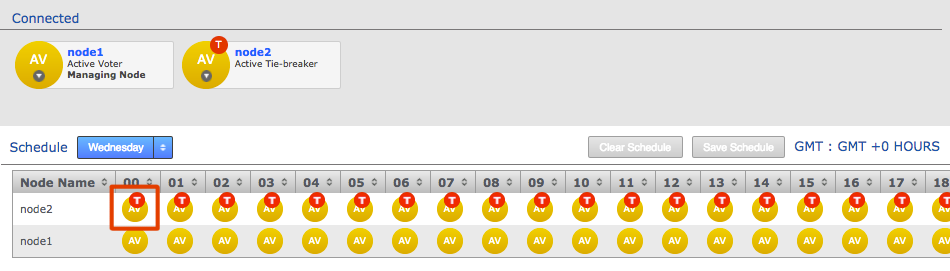
Role schedule
- The Schedule screen appears which lets you modify any hours for any available node.
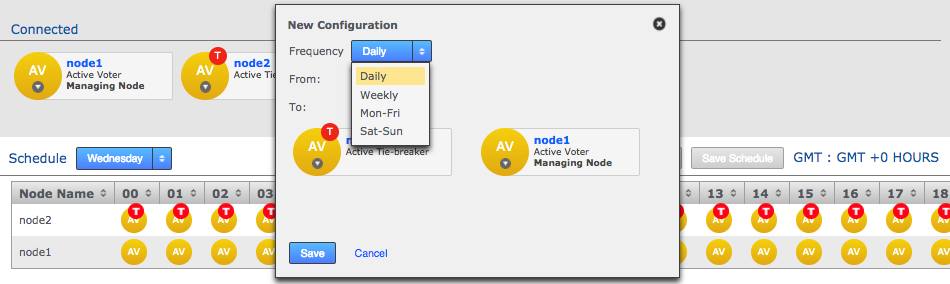
New schedule
- Frequency
- Select from the available frequency patterns: Daily, Weekly, Monday-Friday or Saturday to Sunday.
- From
- The starting hour for the new schedule, e.g. 00 for the start of the day.
- To
- The hour at which the scheduled changes end, e.g. 24 would effectively end the scheduled change at midnight.
- Click on the node icon to change its type.
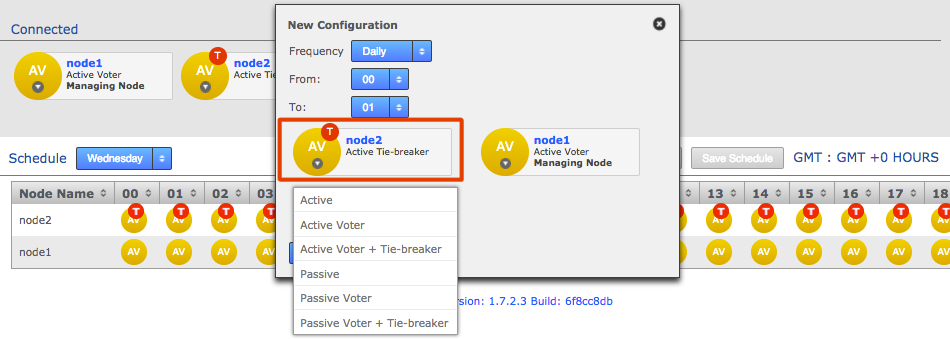
Swapping roles.
When all node changes have been made, click on the SAVE button to continue, or the CANCEL button if you change your mind. - The schedule view now changes to show the changes that you make. You must click the Save Schedule button for the changes to be applied.
With all necessary changes made, you need to review the change to the schedule table and then click SAVE SCHEDULE button.Note: You cannot change the role of the managing node
Because of a known issue, you cannot change the role of the managing node.
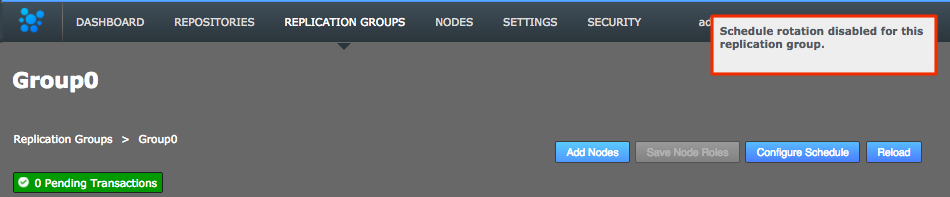
3.5.2 Disable the schedule
If you need to stop any and all scheduled rotations, e.g. in an emergency to prevent losing quorum:
- Click the REPLICATION GROUPS tab, then select your group:
- Click Disable Schedule:
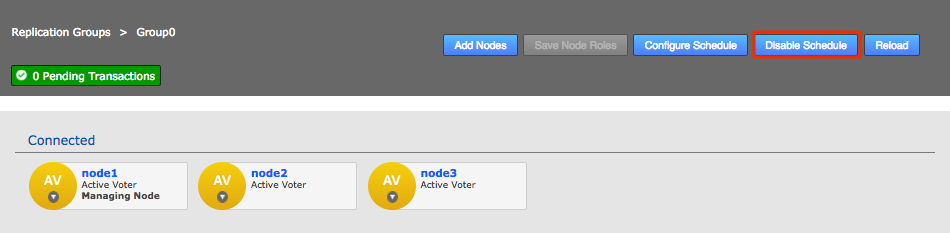
Note the warning message.
4. Repositories
4.1 Add a repository
You can add repositories for replication through the admin UI. The repository needs be present on all the nodes that will be part of the corresponding replication group. Therefore the repository copies need to be introduced to the replication system in an identical state.
- Ensure that the repository that you are going to replicate is copied to each node that is a member of the replication group that will be responsible for the repository. The repository copies must be in an identical state before you add them into SVN MultiSite Plus.
- Log in to the SVN MultiSite Plus admin UI. Click REPOSITORIES.
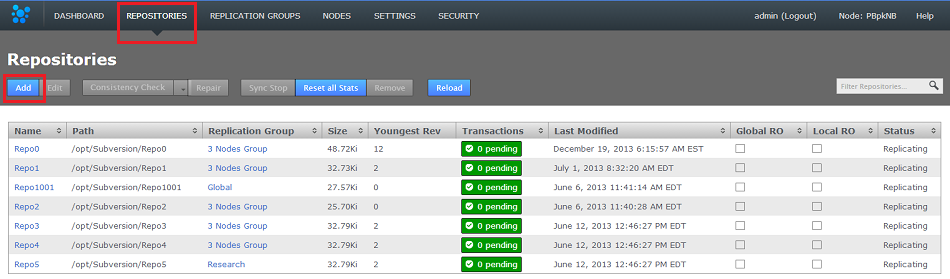
Login
- Click Add and enter the repository information:
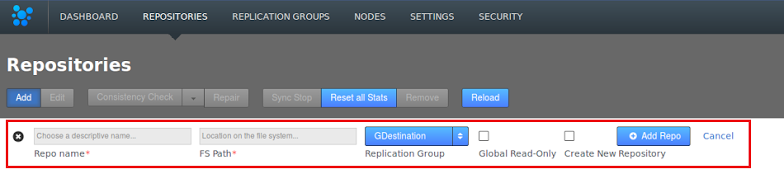
Enter repository details
- Repo name
- A name that you want SVN MultiSite Plus to use when referring to the new repository.
Known issue: duplicate repository names allowed
It's currently possible to add multiple repositories with the same name (they'll need different paths though). Ensure that you don't use the same name for multiple repositories, this is for obvious reasons a bad practice and will be prevented in future releases. - FS Path
- The absolute file system path for the repository. This should be identical on each node.
- Replication Group
- The replication group under which this repository will be managed. Select from available groups or go and create a new replication group.
- Global Read-Only
- This check-box lets you add the repository in a locked-down state that won't allow SVN users to commit changes to the repository. This feature is useful for putting a repository into maintenance mode where the copies might otherwise get out-of-sync.
- Recheck the repositories table to see that the new repository has been added and has a Replicating status.

Replicating
If you try to add a repository and it gets stuck in Pending state deploying state, shown on the DASHBOARD in the Replicator Tasks, you can cancel the deployment and try adding the repository again. To cancel a deployment, go to the Replicator Tasks window and click Cancel Task.
If you are creating a new repository and this gets stuck in Pending state, see Fix pending repository creation.
It's not currently possible to run the svnadmin pack command when running SVN MultiSite Plus. Support for this command is currently being added to FSFSWD and should be available in future.
4.2 Fix pending repository creation
A repository may fail to create because of incorrect permissions on one of the nodes. For example, from Node 1 you might click Create new repository and complete all the details. You see the message about the repository being added and then refresh the page. However, the repository is not listed if, for example, Node 2 has incorrect permissions. In this example:
- The dashboard of Node 1 shows a pending task and a failed task.
- The dashboard of Node 2 shows two SEVERE messages:
[Can't create folder [/opt/deny/test1_TMP]. Abandoning deployment.]
[Cannot unzip new repo: can't create new repo folder!]
To fix this problem:
- Go to the repository folder on Node 2 and make the permissions read/write.
- If you now try to create the same repo that you added before, using the same name and filepath, the repository is not added because on the first attempt Node 1 folder permissions were read/write and so the repository directory was created.
Therefore, to create the same repository you must first remove the repository folders that were created on Node 1 in the first creation attempt.
4.3 Remove a repository
To remove repositories from SVN MultiSite Plus follow this quick procedure.
If this implementation of Subversion MultiSite Plus is integrated with Access Control Plus then start the removal process with the following 2 steps and then continue on with the normal process below.
- Remove all references to the repository as a resource from ACP
- Generate AuthN/AuthZ files from ACP and verify distribution to all SVN MultiSite Plus nodes
- Log in to the admin console of one of your nodes. The node needs to be a member of the replication group in which the repository is replicated, otherwise it does not appear on the tab. Click the REPOSITORIES tab to see it.

Login
- On the want tab, click the line that corresponds with the repository that you want to remove.
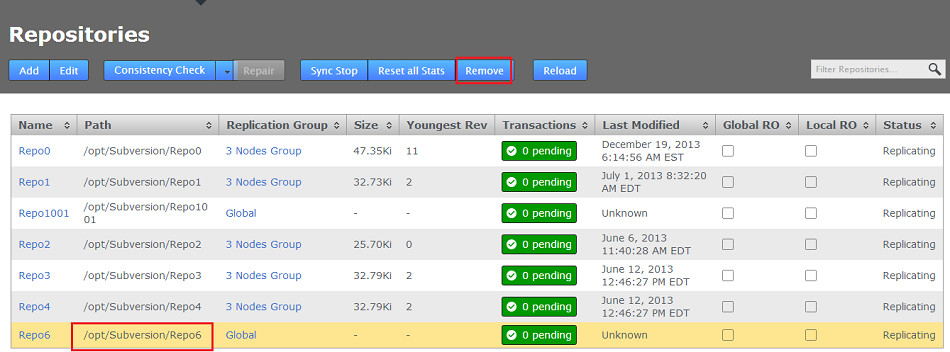
Repositories
- When a repository is highlighted (in yellow), the REMOVE button shows. A dialog box appears: Remove repository from replication group. This confirms that removing the repository stops it from being replicated. No repository data is removed. Click Remove.
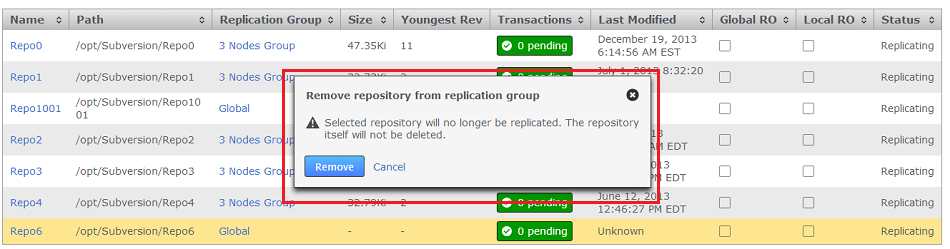
Remove
If a repository is removed and in some way historically edited (e.g. an SVN dumpfilter to remove content/revisions due to sensitive content), before re-introducing the repository to MultiSite Plus (all whilst maintaining the same UUID), commits may fail due to the existing fulltext cache references no longer being applicable.
Workaround: Restart Apache and MultiSite Plus before you use the repository.
4.4 Edit a repository
You can edit a repository's properties when they are set up in SVN MultiSite Plus:
- Log in to the admin console of one of your nodes. The node needs to be a member of the replication group in which the repository is replicated, otherwise it won't appear on the tab. Click the REPOSITORIES tab.
Login
- Click the line for the repository that you want to edit, then click Edit.
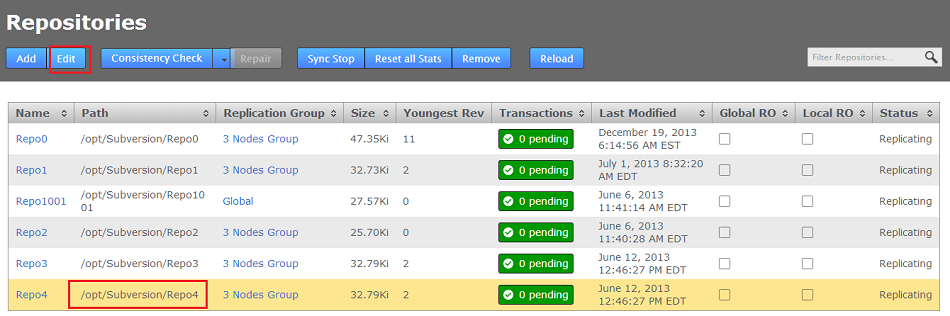
Repositories
The Edit Repository window opens.

Edit Repository
- Local Read-Only
- Enable or disable the repository local read-only setting. When enabled, the repository is not writable, either for local users or for the replication system (that would push changes made to the repository on other nodes). However, changes that come from the other nodes are stored to be rolled out as soon as the read-only state is removed.
- Global Read-Only
- Enable or disable the repository global read-only setting. When enabled, the repository is not writable, either locally or globally. This setting locks a repository, stopping any changes.
- Replication Group
- Use the drop-down selector to change the replication group to which the repository belongs. See information on moving repositories.
- Make your changes and click Save.
4.5 Move a repository to another replication group
You can move a repository to another replication group by following the steps in the Edit a repository section. After selecting a different Replication Group, you see a message similar to:
Repository moved, it will be deployed in a read-only state and require repair on the following nodes: NodeParis
The new repository definition is created on your chosen node, and the repository is in the locally read-only state on that node. This is because you have not yet had a chance to rsync the repository over to the node. To do this, follow the repository repair procedure. This allows the repository to be continually available for write operations on one of the other two nodes in the replication group, while the other is used for the source of the rsync.
4.6 Repository synchronized stop
The Repository Synchronized Stop is used to stop replication between repository replicas. You can use it on a per-repository basis or on a replication group basis (where replication is stopped for all associated repositories). To stop some or all nodes, use the Sync Stop All command from the NODES tab.
Repository Stops are synchronized between nodes using a 'stop' proposal to which all nodes need to agree. So that while not all nodes will come to a stop at the same time they do all stop at the same point.
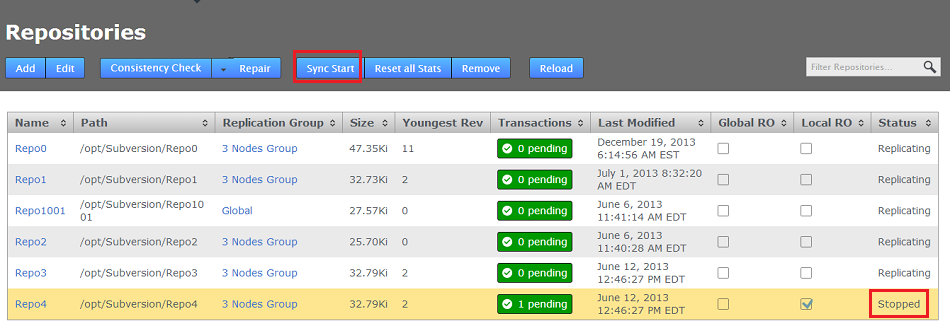
- Log in to a node's browser-based UI and click on the REPOSITORIES tab. Click on the repository that you wish to stop replicating.
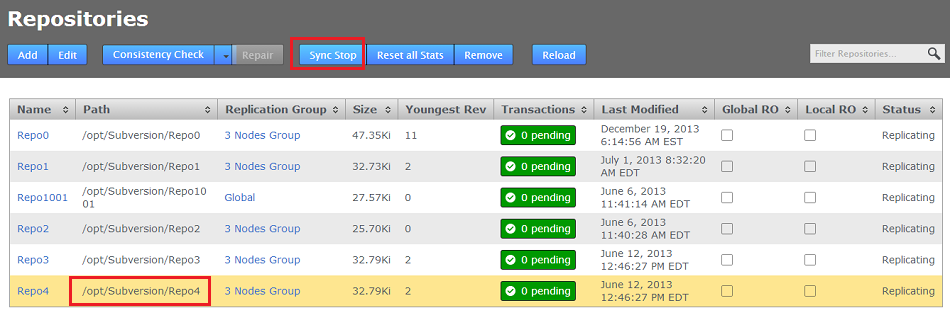
- With the repository selected, click the Sync Stop button. A growl message will appear to confirm that a synchronized stop has been requested. Note that the process may not be completed immediately, especially if there are large proposals transferring over a WAN link.
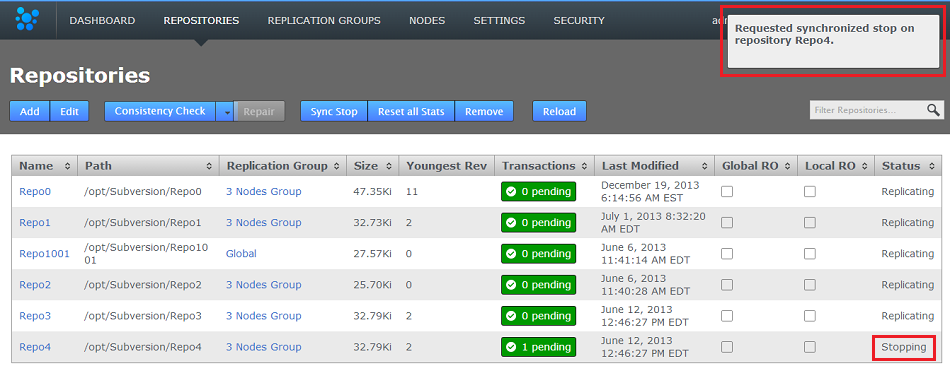
- On refreshing the screen you will see that a successfully sync stopped repository will have a status of Stopped and will be Local RO (Locally Read-only) at all nodes.
4.7 Repository synchronized start
Restarting replication after performing a Synchronized Stop requires that the stopped replication be started in a synchronized manner.
- Click on a stopped repository and click on the Sync Start button.
- The repository will stop being Local Read-only on all nodes and will restart replicating again.
4.8 Stopping repositories on a node
In some situations, such as performing a repository backup, you may need to stop writes to the local repository replica. There are a couple of methods for doing so:
- Sync-Stop the Node - this takes the node offline as it will stop accepting proposals from other other.
- Stop Node via API call - use the API to stop all repositories on a nodes. This method is less obtrusive as the first as it doesn't stop the node from otherwise operating
4.8.1 Stop node via API call
Using this method proposals will still be delivered to the node and the node can still participate in voting, but the proposals will not be executed until the output is restarted.
This is supported in the API with the RepositoryResource methods:PUT <server>:<port>/api/repository/{repositoryId}/stopoutput
This command takes one argument: NodeListDTO nodeListDTO which is the list of nodes on which the repo output will be stopped. In this case that list will only include NodeX.
Note that whilst the output is stopped it will show in the UI as LocalReadOnly.
PUT <server>:<port>/api/repository/{repositoryId}
    /startoutput
This command takes one argument: NodeListDTO nodeListDTO which is the list of nodes on which the repo output will be started. In this case that list will only include NodeX.
PUT: <server>:<port>/api/replicator/stopall
If you don't need the stop to be coordinated the the following method is simpler and immediately stops the output of proposals on all repositories on the node it is executed against:
PUT: <server>:<port>/api/replicator/stopall
This will stop all repositories on the node on which it is invoked (with no coordination).
To start them all again call:
PUT: <server>:<port>/api/replicator/startall
4.6 Single-node configurations
No replication takes place when you have a single node. Other functionality works, but you may have issues relating to quorum.
You may have a single-node configuration in the following situations:
- If the other nodes in a replicaton group are disconnected: contact WANdisco Support.
- To support WANdisco Access Control Plus's standalone mode: for more information see ACP guide.