Navigation: v |
Release Notes |
Install |
Upgrade |
Administration |
Reference |
API |
Glossary |
Archive
To start the SVN MultiSite Plus replicator, follow these steps:
lrwxrwxrwx 1 root root 37 May 9 10:37 svn-multisite -> /opt/svn-multisite-plus/bin/svn-multisite
[root@localhost init.d]#  ./svn-multisite start


20130520-164811 (24088) [INFO]: Starting WANdisco MultiSite Plus
20130520-164811 (24088) [INFO]: Started replicator (24100)
20130520-164811 (24088) [INFO]: Started ui (24110)
20130520-164811 (24088) [INFO]: Number of errors: 0
20130520-164811 (24088) [INFO]: Number of warnings: 0
To shutdown:
lrwxrwxrwx 1 root root 37 May 9 10:37 svn-multisite -> /opt/svn-multisite-plus/bin/svn-multisite
[wandisco@ip-10-0-100-7 bin]$  ./svn-multisite stop

20130520-165704 (24767) [INFO]: Stopping WANdisco MultiSite Plus
20130520-165704 (24767) [INFO]: Request received to shut down replicator
20130520-165704 (24767) [INFO]: replicator processes ended
20130520-165704 (24767) [INFO]: Request received to shut down ui
20130520-165704 (24767) [INFO]: Sending signal 15 to watched ui process (attempt 1)...
20130520-165707 (24767) [INFO]: Sending signal 15 to watched ui process (attempt 2)...
20130520-165710 (24767) [INFO]: ui processes ended
20130520-165710 (24767) [INFO]: Number of errors: 0
20130520-165710 (24767) [INFO]: Number of warnings: 0
The 'start-up' script for persistent running of SVN MultiSite Plus can be found in the /etc/init.d folder.
Run the script with the help command to list the available commands:
[root@localhost init.d]# ./svn-multisite help
usage: ./svn-multisite-plus (start|stop|restart|force-reload|status|uistart|uistop|repstart|repstop)

start         Start SVN MultiSite Plus services
stop          Stop SVN MultiSite Plus services
restart       Restart SVN MultiSite Plus services
force-reload  Restart SVN MultiSite Plus services
status        Show the status of SVN Multisite Plus services
uistart       Start the SVN MultiSite Plus User Interface
uistop        Stop the SVN MultiSite Plus User Interface
repstart      Start the SVN Multisite Plus Replicator
repstop       Stop the SVN Multisite Plus Replicator
You can change SVN MultiSite Plus's login password at any time by following this procedure:

Login.

Settings.

Changed password
Growl!
 Changing Username
It's currently not possible to change the Administration username. In order to change the username you would need to re-install SVN MultiSite Plus.
Follow this procedure if you ever need to change your product license. You would need to do this if, for example, you needed to increase the number of SVN users or the number of replication nodes.
/opt/wandisco/svn-multisite-plus/replicator/properties
and rename the license.key to license.20130625.
total 16
-rw-r--r-- 1 wandisco wandisco 1183 Dec  5 15:58 application.properties
-rw-r--r-- 1 wandisco wandisco  512 Dec  5 15:05 license.key <-
-rw-r--r-- 1 wandisco wandisco  630 Dec 17 15:43 logger.properties
-rw-r--r-- 1 wandisco wandisco  747 Dec  4 10:31 svnok.catalog
license.key and drop it into the /opt/svn-multisite-plus/replicator/properties directory./etc/init.d/svn-multisite-plus restartThis will trigger an SVN MultiSite Plus replicator restart, which will force SVN MultiSite Plus to pick up the new license file and apply any changes to permitted usage.
If you don't restart
If you follow the above instructions but don't do the restart SVN MultiSite Plus will continue to run with the old license until it performs a daily license validation (which runs at midnight).
Providing that your new license key file is valid and has been put in the right place then SVN MultiSite Plus will then update its license properties without the need to restart.
If you run into problems, check the replicator logs (/opt/svn-multisite-plus/replicator/logs
) for more information.
PANIC: License is invalid com.wandisco.fsfs.licensing.LicenseException: Failed to load filepath>
In the System Data section of the Settings tab there's a bank of editable properties that can be quickly updated by re-entering, saving and allowing the SVN MultiSite replicator to restart - although this may cause brief disruption to users whose in-flight commits will fail.
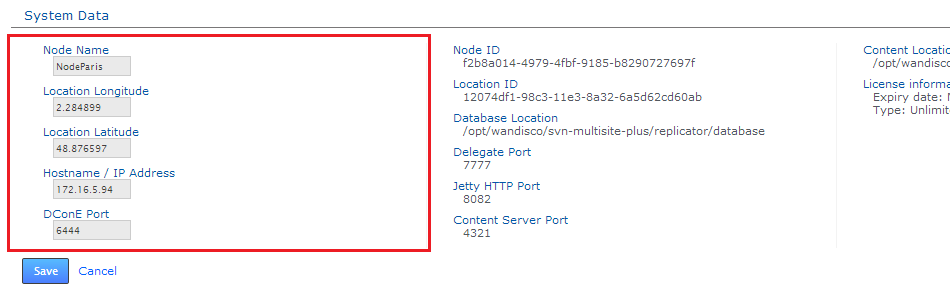
Node properties that you can change -- subject to a restart of the replicator.
After entering a new value, click the Save button. A growl message will appear to confirm that the change is being replicated - this will result in a restart of the replicator which may cause brief disruption to SVN users.
content.port.<Node id>=<new port>
java -jar svn-ms-replicator-updateinetaddress.jar -c <path to application.properties>
There are two configurable properties that you can modify as part of fine-tuning an SVN MultiSite Plus deployment. They are provided to allow you to balance best possible performance against the tolerance of a poor WAN connectivity. Both properties are contained within the application properties file, by default located here: /opt/wandisco/svn-multisite-plus/replicator/properties/application.properties.
socket.timeout=90000
The socket.timeout is an amount of time in milliseconds that the local node will wait for the connection to be established before throwing an exception - therefore signalling that it failed to connect within that timeout. Default value is 15 minutes (90,000 milliseconds).
 Not less than 10 minutes!
DO NOT set socket.timeout to less than 10 minutes (60,000 milliseconds) or you may encounter problems.
content.pull.timeout=300000
The content pull timeout sets how long the Content Distribution system will wait for new content to be pulled fully over from a remote node. The default value is 5 minutes (300,000 milliseconds). This default is set on the assumption that there are no problems with the deployment's WAN connectivity.
Increasing the value may help if poor connectivity is resulting in the replicator repeatedly giving up on content distribution that would have eventually transferred had it been given enough time, i.e. not as a result of a slow network rather than something that has caused a permanent error.
Decreasing the value is not generally recommended. Doing so is not intended as a method for boosting performance - although this may occur in some situations. We recommend that you don't drop the timeout value below 5000 (5 seconds) without consulting with our support team.
The Monitoring Data tool monitors the disk usage of SVN MultiSite Plus's database directory, providing a basic level of protection against SVN MultiSite Plus consuming all disk space. The tool also lets you set up your own monitors for user-selected resources.
Monitoring Data - not intended as a final word in system protection
Monitoring Data is no substitute for dedicated, system-wide monitoring tools. Instead, it is intended to be a 'last stand' against possible disk space exhaustion that could lead to data loss or corruption.
Read our Recommendations for system-wide monitoring tools.
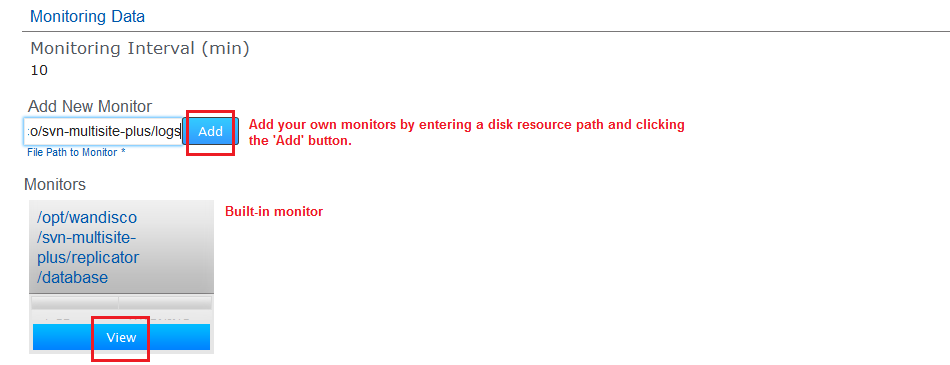
Click the "View" link to go to a monitor's settings.
By default MultiSite's database directory (/opt/wandisco/svn-multisite-plus/replicator/database) is monitored - this is the location of MultiSite's prevayler database where all data and transactions files for replication are stored.
This built-in monitor runs on all nodes. Any additional monitors that you set up will monitor on a per-node basis. Monitors are not replicated so a monitor set up on one node is not applied to any other node.
As well as SVN MultiSite Plus's own database folder, there are a number of other directories that could in certain circumstances grow very large and potentially consume all available file space.
MultiSite directories that it may be worth monitoring:
Other directories that should be monitored:
If you are using Authz to manage authorization and your Authz file is situated on different file system from SVN MultiSite Plus, then you are recommended to set up monitoring of the authz file.
For most deployments all these directories will reside on the same file system, so that our default monitor would catch if any of them were consuming the available space. However, there are two scenarios where we'd recommend that you set up your own monitor for the content directory:
1) You wish to set a higher trigger amount than the default monitor (1GiB for warning, 0.09GiB for emergency shutdown).
2) You have placed the content directory on a different filesystem with its own capacity that wouldn't be tracked by the default monitor.
In either case you should follow up the setting up of a monitor with a corresponding email notification that will be sent if some or all of your monitor's trigger conditions are met.
Create additional resource monitors using the following procedure:
/opt/svn-multisite-plus/replicator/logs". Enter the path and click "Add".
Add resource path
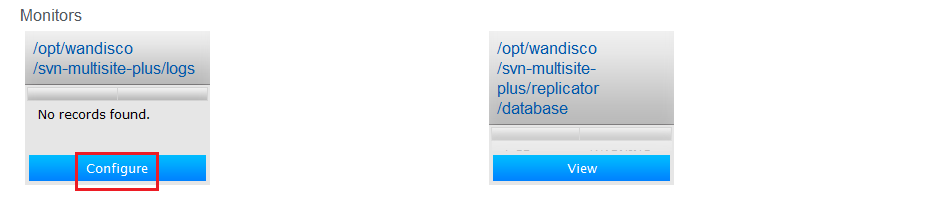
Configure
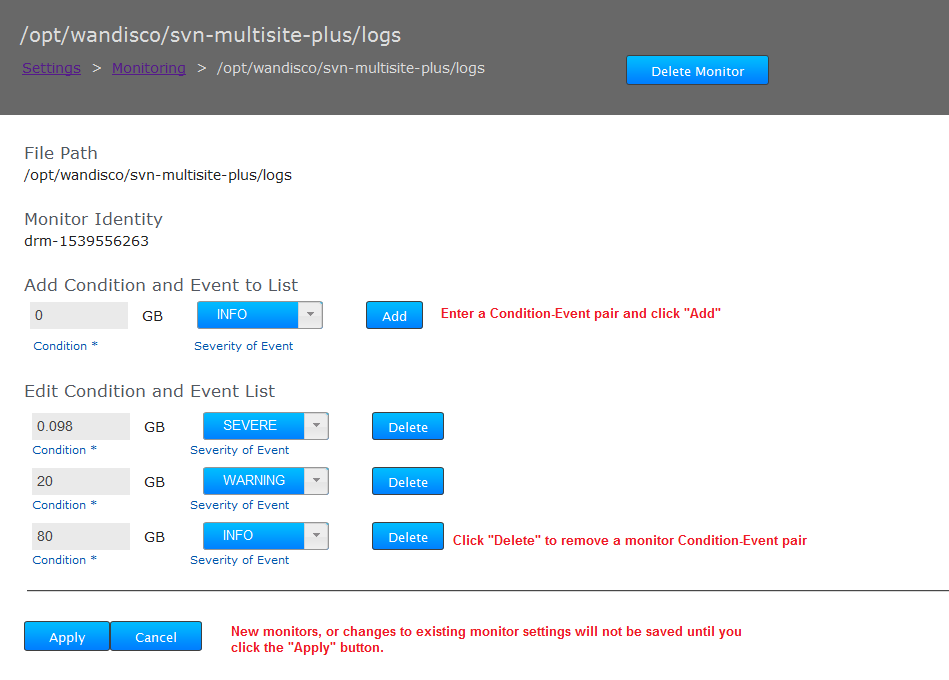
Settings
If the disk space available to a monitored resource is less than the value you have for a "Severe" event then the event is logged and MultiSite's replicator will shut down after a set interval of 10 minutes. You can configure the interval in application.properties file:
/opt/wandisco/svn-multisite-plus/replicator/properties/application.properties
Edits to property files require a replicator restart
Any change that you make to the application.properties file will require that you restart SVN MultiSite Plus's replicator.
Once shut down all SVN repositories will become unavailable to users, you should immediately take action to make more disk space available, the replicator can be restarted using SVN MultiSite Plus's service as soon as the resource that triggered the shutdown has enough available disk space not to shut down again.
Overriding the forced shutdownThere's a method you can use to unlock the forced shutdown.
/opt/wandisco/svn-multisite-plus/replicator/properties/application.properties
monitor.ignore.severe=falseto say
monitor.ignore.severe=trueSave the change to the file.
The email notification is a rules-based system to deliver alerts based on user-defined templates over one or more channels to destinations based on triggers that are activated by arbitrary system events. Put simply, email notification sends out emails when something happens within the SVN MultiSite Plus environment. The message content, trigger rules and destinations are all user-definable.
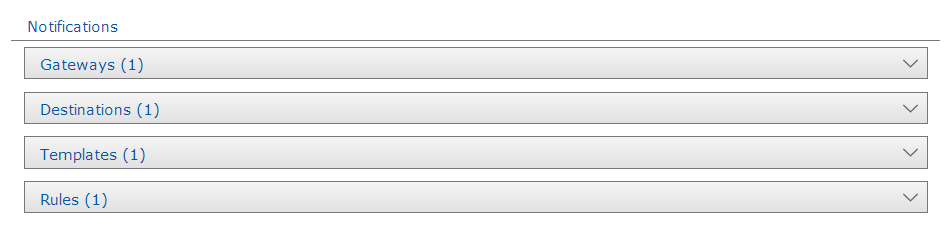
Automated alert emails
The Gateway section stores your email (SMTP) server details. You can set up multiple gateways to ensure that the loss of the server doesn't prevent alert notifications from being delivered.

Add Gateway
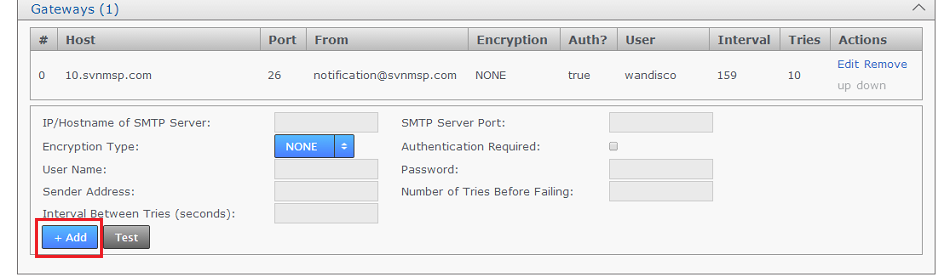
Enter settings
 keystores?
If you're not familiar with the finer points of setting up SSL keystores and truststores it is recommended that you read the following article: Using Java Keytool to manage keystores.
The destinations section stores the email address for your notification recipients.

Notification
The template section is used to store email messages. You can create any number of templates, each with its own notification message, triggered by one of a number of trigger scenarios that are set up in the Rule section.
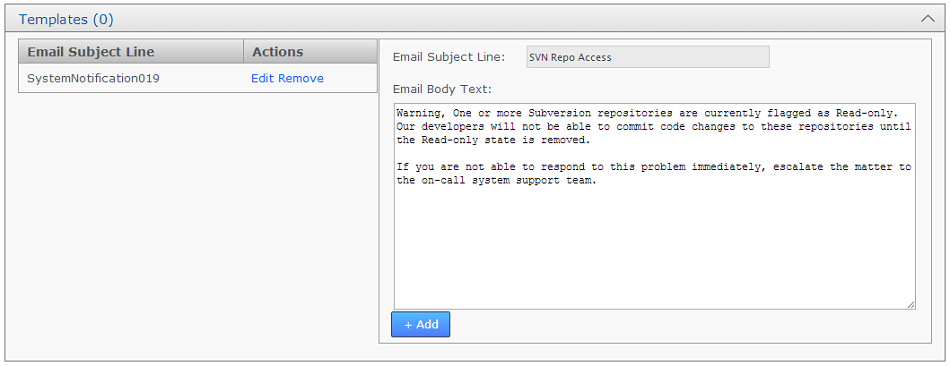
Notification
When writing email notification templates, you can insert variables into the template that will be interpolated when the notification is delivered. The following two variables are available for ALL event types:
For the event types "Disk Monitor Info", "Disk Monitor Severe" and "Disk Monitor Warning", the following additional variable is available:
For the event types "Deploy Repository Succeeded" and "Deploy Repository Failed", the following additional variables are available:
The Rule section is used to define which system event should trigger a notification, what message template should be used and which recipients should be sent the notification.
Known issue
It's currently not possible to edit notification rules that you create. This issue will be addressed in a later release. For now, use the simple workaround of deleting then recreating rules that you want to change.

Rules

Rule set
It's possible to back up SVN MultiSite Plus's own database in case you need to quickly restore a node.
Only MultiSite Settings are backed-up
This procedure backs up SVN MultiSite Plus's internal Prevayler database, it doesn't touch your SVN repository data or any other system files (such as Apache configuration, authz files etc.) that you should also be backing up.
curl --user <username>:<password> -X POST http://[node_ip_address]:8082/dcone/backupThis will create a backup folder in
[INSTALL-DIR]multisite-plus/replicator/db/backup/X.X.X_DConE_Backup directory.
java -cp ./fsfsrestore.jar com.wandisco.fsfs.backup.FsfsBackup -c ./properties/application.properties
Use this to back up the current state of all prevaylers when SVN MultiSite Plus is shut down - you don't therefore need to start the replicator in order to create a backup of the database.
The restore functionality is no longer supported since the product upgrade functionality is handled using the installer.
SVN MultiSite Plus supports three different mechanisms for managing access to its admin UI:
It is possible to set up multiple administrator accounts for accessing the SVN MultiSite Plus admin console. Accounts can be set up from within the admin UI (via the Security tab). These users are then able to login to any node's admin UI by providing their username and password.
The folloing section will explain how you set up multiple accounts, set up managing LDAP authorities and export/import the resulting data.

Login

SVN MultiSite Plus - Add User
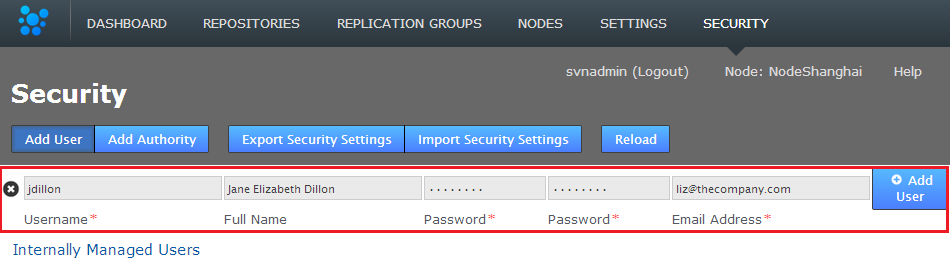
SVN MultiSite Plus - Click Add User to save their details.
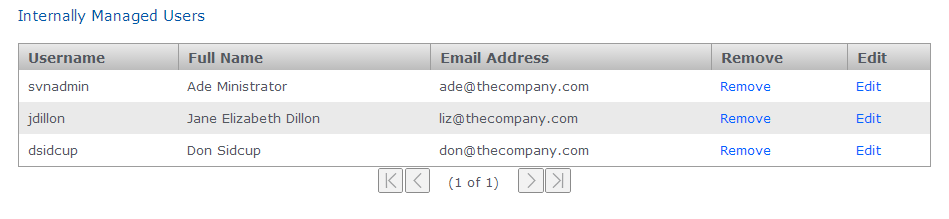
SVN MultiSite Plus - New user appears
You can modify any user details by clicking their corresponding Edit button on the Internally Managed Users table

SVN MultiSite Plus - Remove or Edit users
SVN MultiSite Plus supports the use of LDAP authorities for managing admin loging accounts. See our brief Guide to LDAP
When connecting SVN MultiSite Plus to available LDAP authorities it is possible to classify the authority as "Local" i.e. specific to the node in question or not - in which case the authority details will be replicated to the other nodes within the replication network.
It's possible to run multiple LDAP authorities that are of mixed type, i.e. using some local authorities along with other authorities that are shared by all nodes. When multiple authorities are used, it's possible to set what order they are checked for users.
The standard settings are supported for each configured LDAP authority: URL, search base and filter and bind user credentials. Note that the bind user's password cannot be one-way encrypted using a hash function because it must be sent to the LDAP server in plain text, so for this reason the bind user should be a low privilege user with just enough permissions to search the directory for the user being authenticated. Anonymous binding is permitted for those LDAP servers that support anonymous binding.
Use the Add Authority feature to add one or more LDAP authorities, either local to the node or connected via WAN. Locally LDAP services are treated as having presedence. When Internally managed users are enabled they are first checked when authenticating users - see Admin Account Precedence
Procedure for adding an authority:

Add Authority

Add Authority
ldap://<server IP>:389
cn=Administrator,cn=Users,dc=windows,dc=AD
/CN=Users,DC=sr,DC=wandisco,DC=com?sAMAccountName
(&(memberOf=[DN of user group])(sAMAccountName={0}))
This dynamically swaps the {0} for the ID of the active user. For more information about query filter syntax, consult the documentation for your LDAP server.

Order authorities
Modify an existing authorities settings:

Edit authorities link

Edit authorities box
This section covers the basic requirements for integrating SVN MultiSite Plus with your existing Kerberos systems. The procedure requires the following:
Time, ladies and gentlemen, please.
Ensure that time synchronization and DNS are functioning correctly on all nodes before configuring Kerberos. A time difference between a client and the master Kerberos server that exceeds the Kerberos setting (5 mins default) will automatically cause auth failure.
This procedure assumes that you have already set up your DNS service and master Key Distribution Center.
# kadmin -p root/admin -q "addprinc -randkey HTTP/node1.example.com"
# kadmin -p root/admin -q "ktadd -k /opt/krb5.keytab HTTP/node1.example.com"
# chmod 777 /opt/krb5.keytab
$JAVA_HOME/lib/security/

Edit Kerberos box
To replicate SVN repository data between sites, you first tie the nodes together in the form of a replication network, this process starts with the adding (connecting) of nodes in a process we call induction.
You can also remove a node.
Unique Node Names
You can't reuse Node IDs. If you have removed a node, you can't create a replacement that uses the old name. The replication network maintains a record of the old node and will block it from reintroduction.

Connect to Node

Enter the details from an existing, connected node.

System Data table, found on the Settings tab.
The removal of a node from the SVN MultiSite Plus replication group is useful if you will no longer be replicating repository data to its location and wish to tidy up your replication group settings.
No ties allowed
The option to remove a node should only appear if it is not currently a member of a replication group. You may need to remove and recreate replication groups in order make it eligible for removal.
Known issue:
NOTE: If a node is inducted but not in a replication group then it is possible (from that node) to remove other inducted nodes that are in a replication group. There's currently an issue in that a node isn't aware of the membership of replication groups of which it is not itself a member. This means that it is possible to remove a node that is a member of a replication group, if done from another node that doesn't have knowledge of the replication group.
Until we block this capability you should do a manual check of any nodes that you plan to remove to make absolutely sure that it is not a member of a replication group.
Once removed a node can't come back
Take care when removing nodes. In order to ensure that replication network is kept in sync, removed nodes are barred from being re-inducted. The only way that you can bring back a node is to perform a reinstallation of SVN MultiSite Plus using a new Node ID.

Nodes table under the Nodes tab

Ready to remove NodeSanFrancisco.

Node removed.
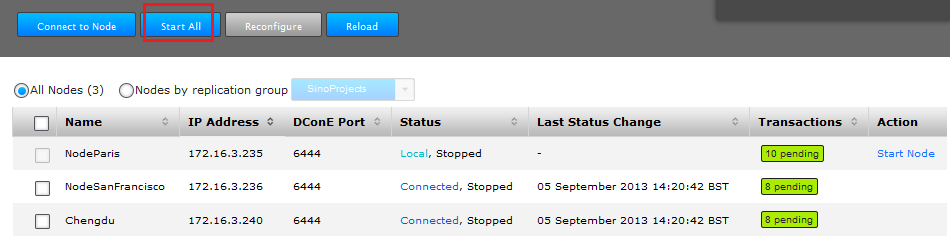
It's possible to bring all nodes to a stop through the use of a single button click (providing all associated repositories are replicating/writable).
A stop can't be synchronized if associated repositories are Local Read-only
Before starting a Sync Stop All, make sure that none of your nodes have repositories in a Local Read-only state.
Here's how:
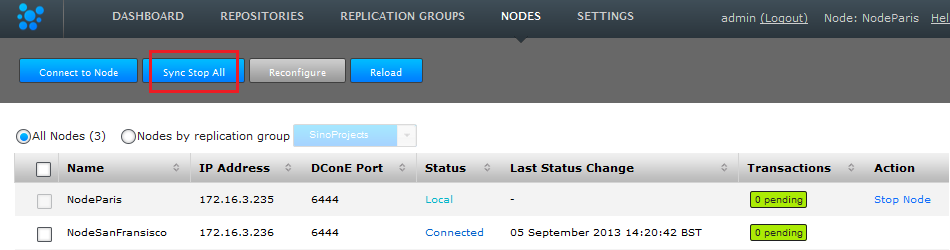
Stop all nodes.

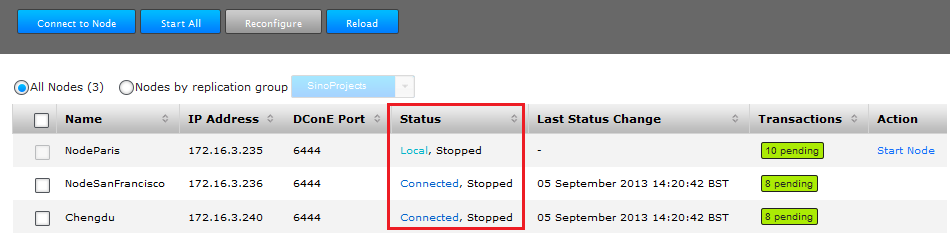
Stopped!
Node removed.
Important!Aborted tasksType PREPARE_COORDINATE_STOP_TASK_TYPE Delete Task Originating Node: Ld5UYU tasksPropertyTASK_ABORTING_NODE: Ld5UYU tasksPropertyTASK_ABORT_REASON: One or more replicas is already stopped. The replica was: [[[Ld5UYU][bf0c6395-77b6-11e3-9990-0a1eeced110e]]]The thing you would look for is the message:
Aborted tasksType PREPARE_COORDINATE_STOP_TASK_TYPEin the replicator.log file you might also see the following error type:
"DiscardTaskProposal <task id etc> message: One or more replicas is already stopped."
Stopped!
Use the procedure to add a new Replication Group. You need to add a new replication group when you need to replicate between a new combination of sites - i.e. sites that are not currently replicating in an existing group. If you are, instead, looking to replicate a new repository between existing sites, it's possible to add a new repository to those sites. In this case see Add a new repository.

Creating a replication group.
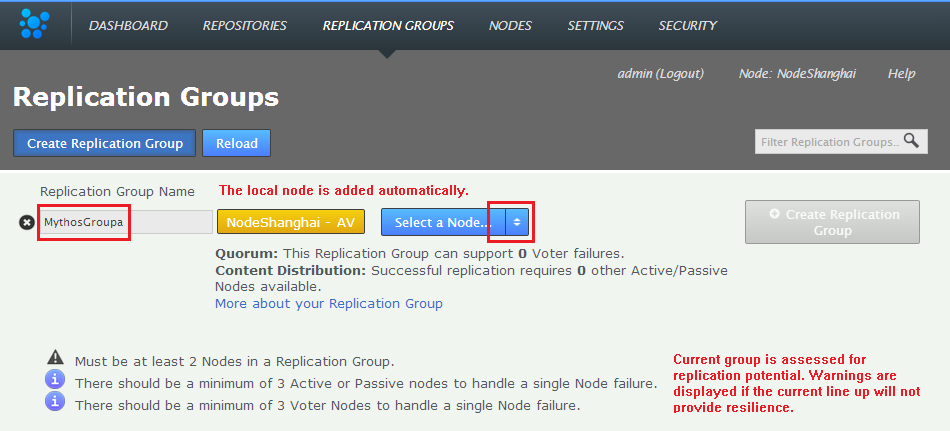
replication group details.
Replication Ground Rules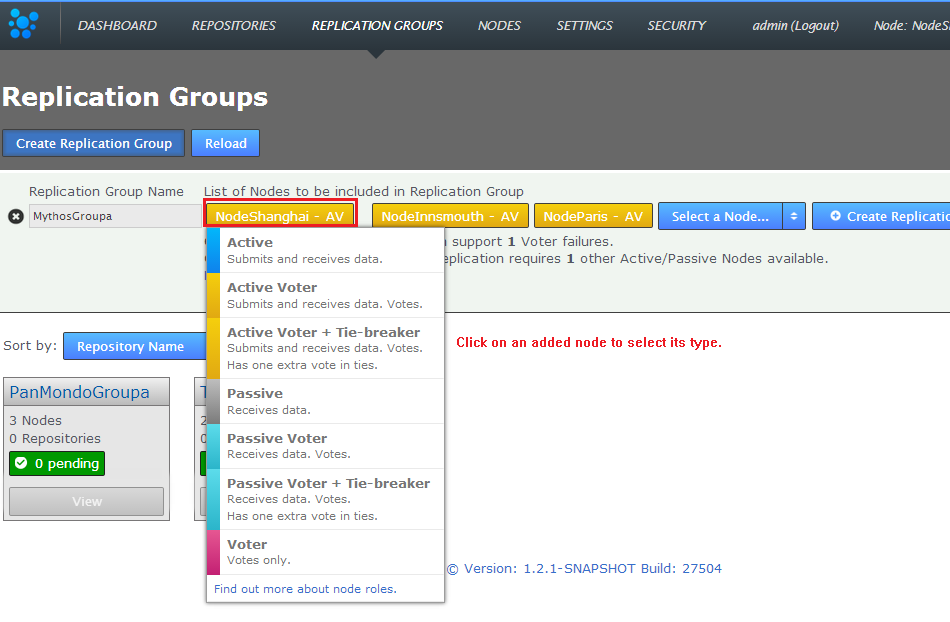
Click on node labels to change their type.
Advice on creating effective replication groups
Create Replication Group.
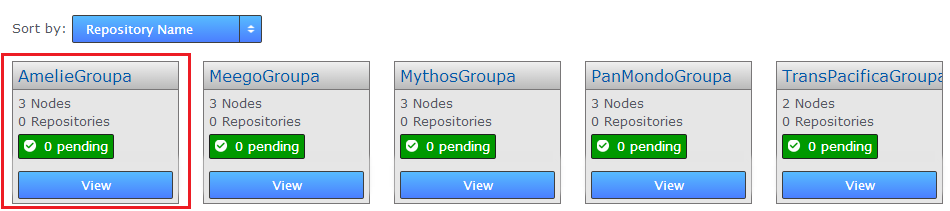
The new replication group now appears - if you are logged into one of its constituent nodes.
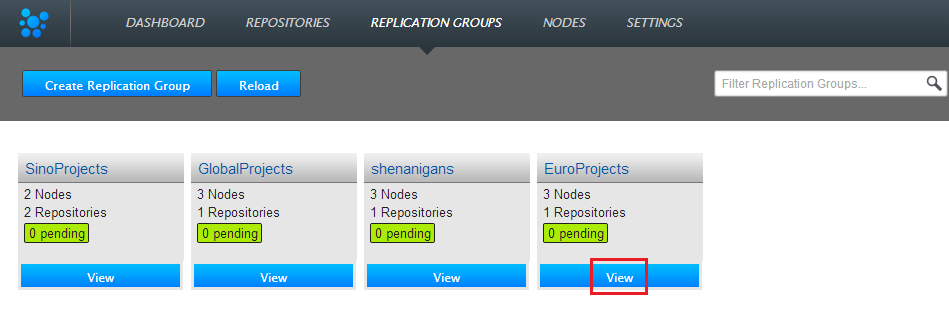
It's possible to remove replication groups from SVN MultiSite Plus, although only if they they have been emptied of repositories. Run through the following procedure as an example.
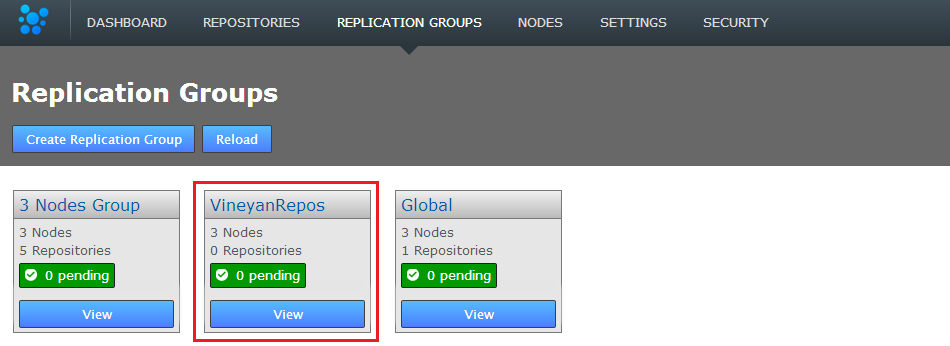
View
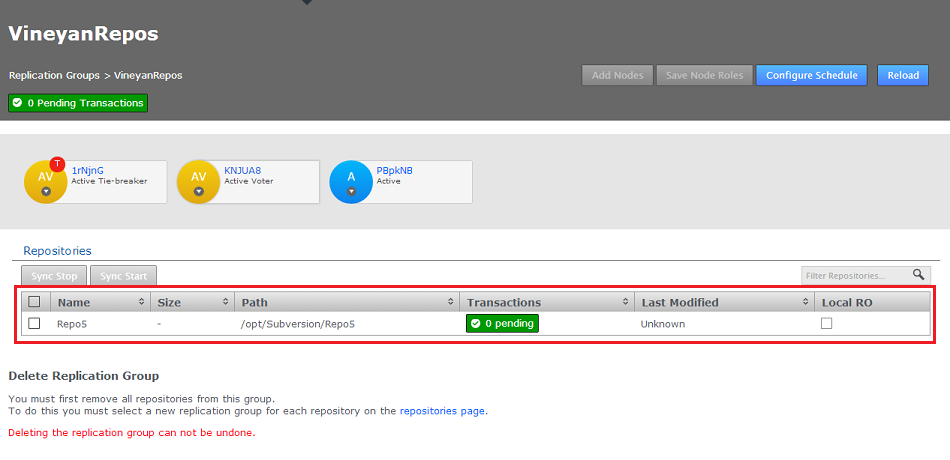
Repositories
Select and Edit

Edit

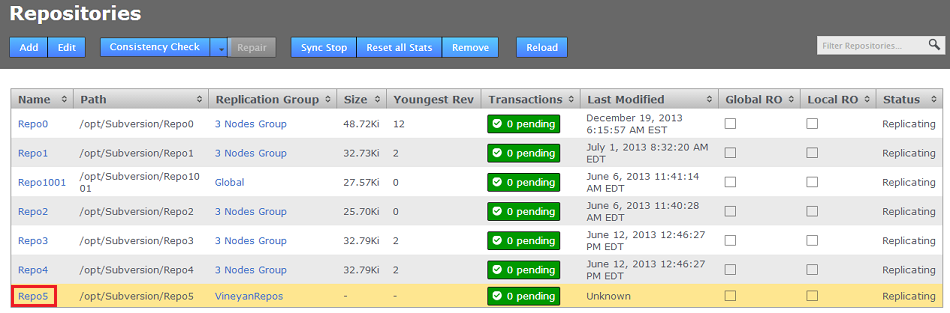
Move it
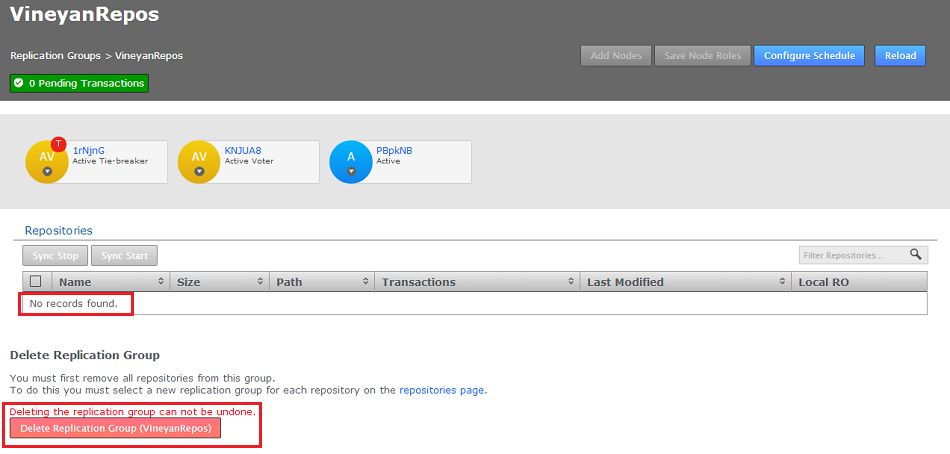
Click the Delete link button
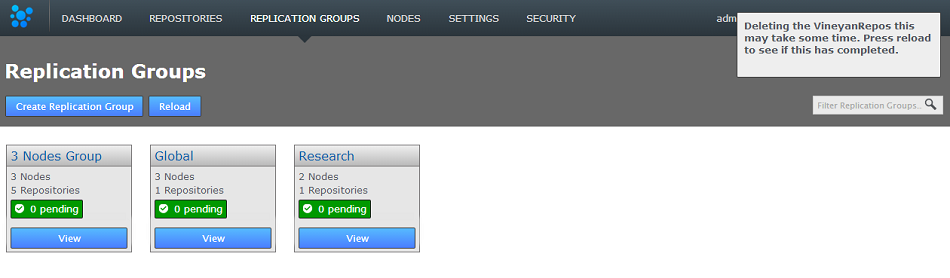
Deleting the replication group
Don't add a node during a period of high replication load
When adding nodes to a replication group that already contains three or more nodes, ensure that there isn't currently a large number of commits being replicated.
Adding a node during a period of high traffic (heavy level of commits) going to the repositories may cause the process to stall.
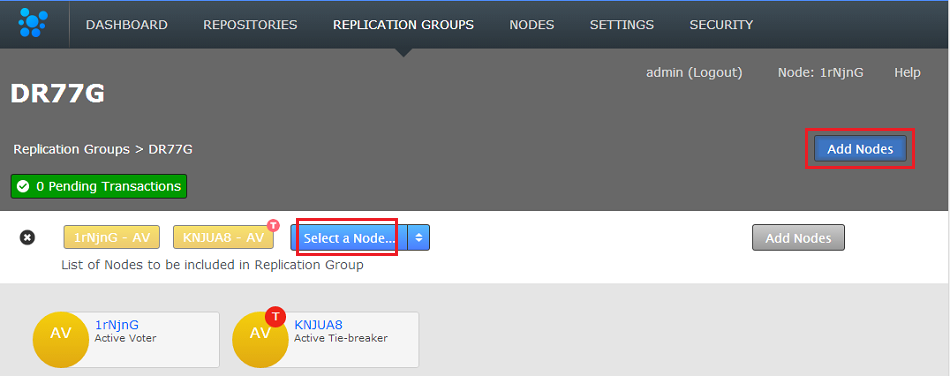
It's possible to add additional nodes to an existing replication group, so that there's minimal disruption to users. Here's the procedure:
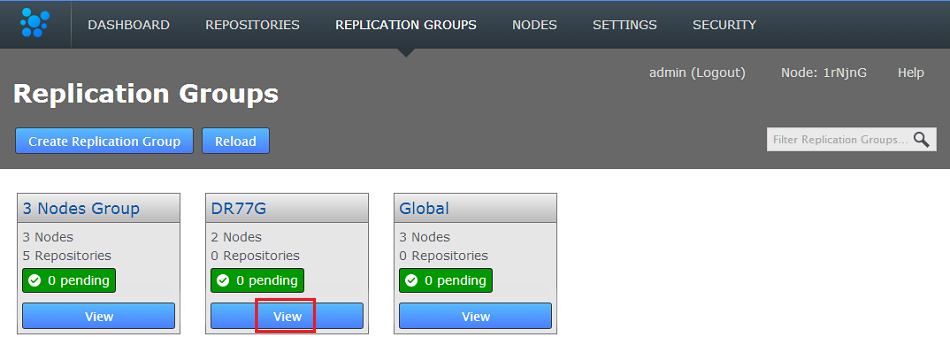
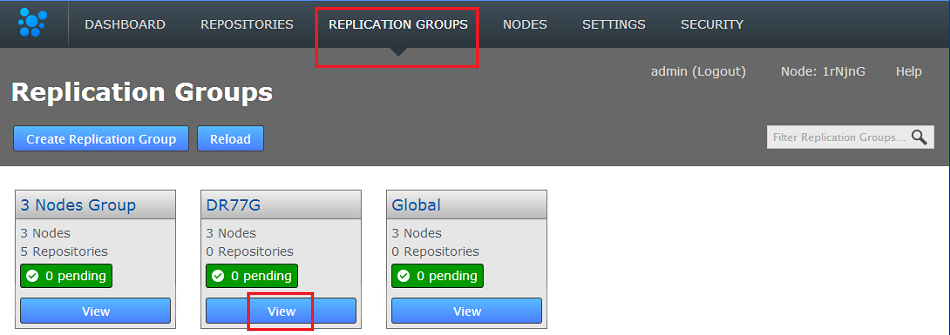
Replication Groups
View the group settings
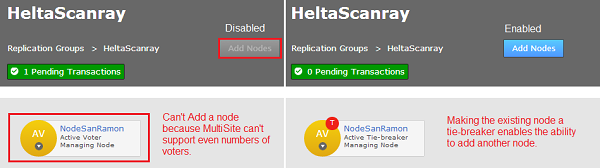
Why the Add Nodes button is disabled?
The Add Nodes button may be greyed out if the current replication group configuration won't support the addition of a new voter node.
It is also possible that a configuration that is scheduled in the future may block the addition of a new node. Check the schedule if you think that you should otherwise be able to add a new node to the replication group.

Select

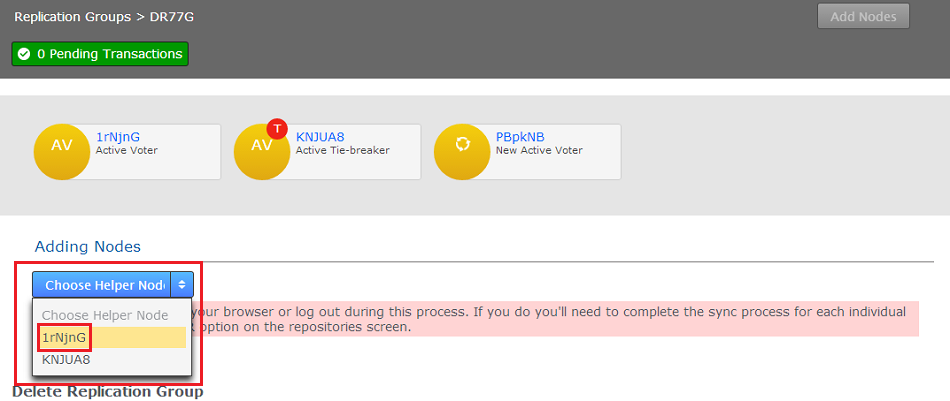
Helper node

start sync
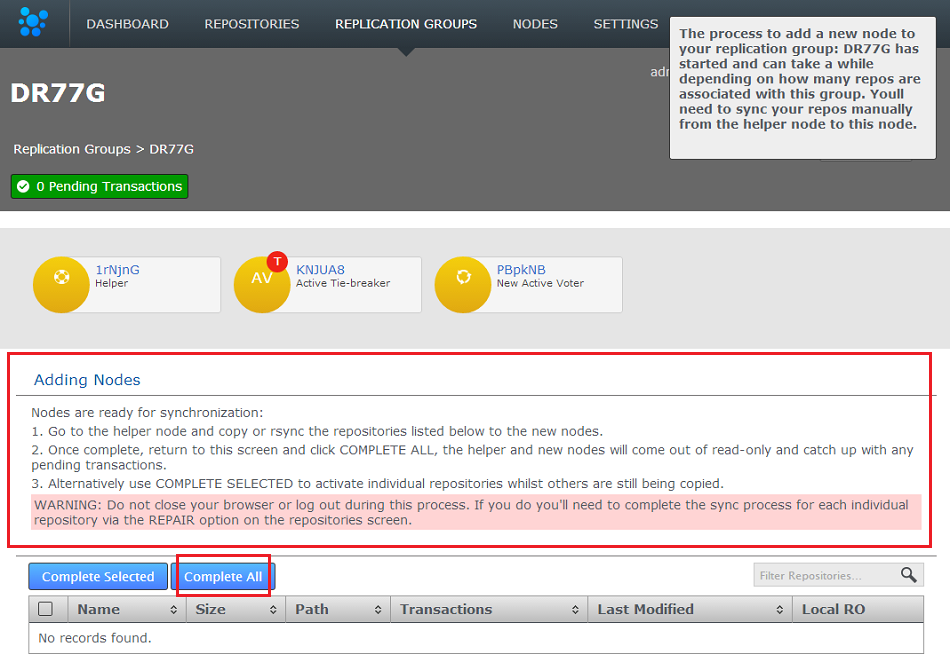
complete all
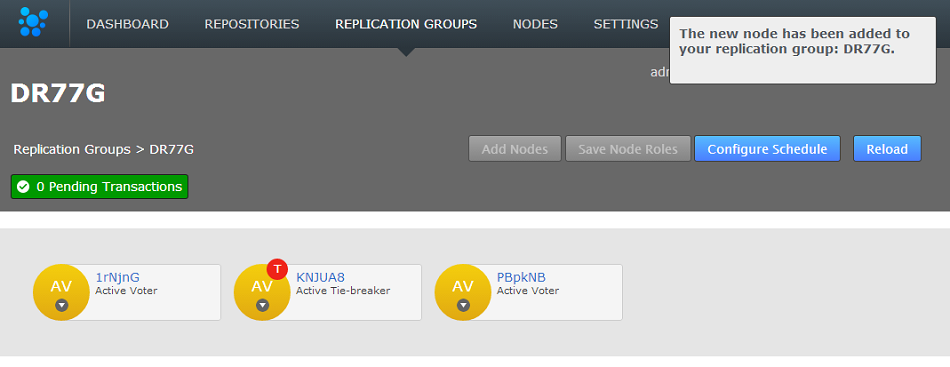
new node!

Adding new node complete!
It's possible to remove a node from a replication group. This functionality is required if the developers at one of your nodes are no longer going to contribute to the repositories handled by a replication group. Removing a node from a replication group will halt further updates to its repository replicas.
Remove stray repositories
In the event that you remove a node from a replication group, you should delete its copy of the repositories managed by the replication group. Having an out-of-date stray copy could result in confusion/users working from old data.
You will not be allowed to remove a node that is currently assigned as the "Managing Node". In order to remove the managing node, go to the Configure Schedule page and assign a different node as a Managing Node.
Login and go to REPLICATION GROUPS
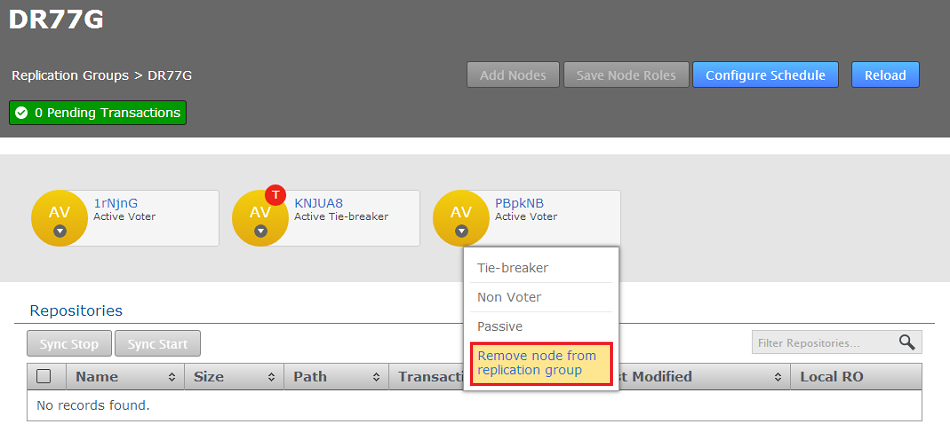
Remove!
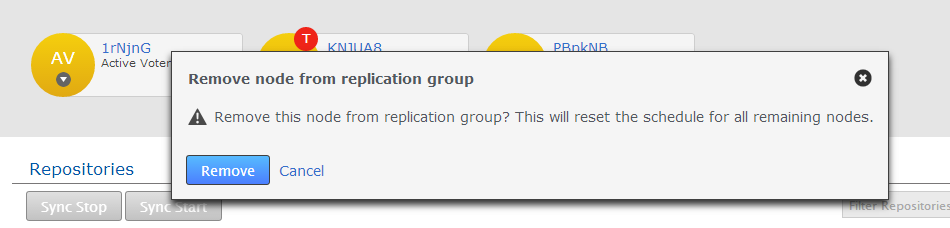
Remove. Really!
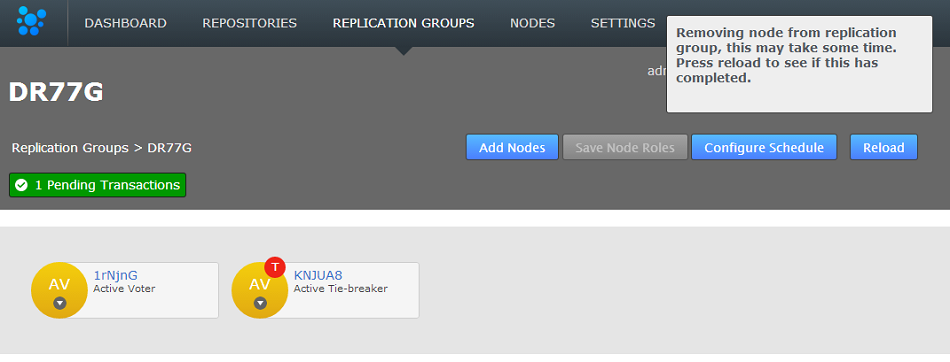
Reload to confirm the updated state.

Less one member node
You can schedule the member nodes of a replication group to change type according to when and where it is most beneficial to have active voters. To understand why you may want to change your nodes read about Node Types
Instead of manually setting up schedules through a node's UI you can do it programmatically through calls to the public API.
See Public API ScheduledNodeAPIDTOList element
and scheduledNodeAPIDTOList Datatype
Use the following API call
http://<ip>:8082/public-api/replicationgroup/{repgroupID}/schedule
e.g.
http://10.0.100.135:8082/public-api/replicationgroup/97913c04-bbad-11e2-877a-028e03094f8d/schedulePUT with
ReplicationGroupAPIDTO XML as body:
To make Node N3 a tie-breaker 'T' FROM 10:00 - 16:00 (GMT) every day of the week with Node N1 as tie-breaker 'T' afterwards:
Times are always in UTC (GMT)
When viewed on a node times are shifted to the local timezone although internally they are always recorded in UTC.
Make a text file containing ReplicationgroupAPIDTO XML (as above) called schedule.xml
curl -u username:password -X PUT -d @schedule.xml http://[IP]:[PORT]/public-api/replicationgroup/97913c04-bbad-11e2-877a-028e03094f8d/schedule
<ReplicationGroupAPIDTO>
       <replicationGroupName>global</replicationGroupName>
     <replicationGroupIdentity>97913c04-bbad-11e2-877a-028e03094f8d</replicationGroupIdentity>
       <scheduledNodes>
           <dayOfWeek>1</dayOfWeek>
           <hourOfDay>14</hourOfDay>
           <schedulednode>
               <nodeIdentity>N1</nodeIdentity>
               <locationIdentity>c0e486a0-bbab-11e2-863b-028e03094f8e</locationIdentity>
               <isLocal>true</isLocal>
               <isUp>true</isUp>
               <lastStatusChange>0</lastStatusChange>
               <role>AV</role>
           </schedulednode>
           <schedulednode>
               <nodeIdentity>N3</nodeIdentity>
               <locationIdentity>5480f515-bbad-11e2-8301-028e03094f8c</locationIdentity>
               <isLocal>false</isLocal>
               <isUp>true</isUp>
               <lastStatusChange>0</lastStatusChange>
               <role>T</role>
           </schedulednode>
           <schedulednode>
               <nodeIdentity>N2</nodeIdentity>
               <locationIdentity>478c766f-bbad-11e2-877a-028e03094f8d</locationIdentity>
               <isLocal>false</isLocal>
               <isUp>true</isUp>
               <lastStatusChange>0</lastStatusChange>
               <role>AV</role>
           </schedulednode>
Download the full sample schedule.xml file.
Scheduling is done through replication group settings.
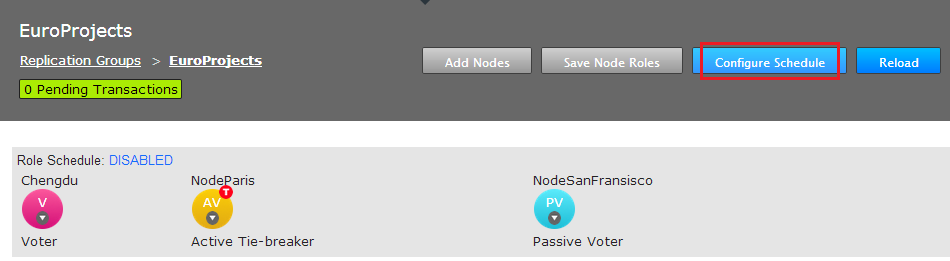
Configure.
Membership views are what is scheduled not necessarily what is currently active
The roles and membership displayed in the popup is based upon the agreed schedule, it's the setup that should be in place if everything is running smoothly. It is always possible that it doesn't accurately represent the state of the replication group, due to a delay in processing on a node, or if something has caused a process to hang. This should not be a cause for concern but it's important to be aware that the displayed membership is an approximation based on the information currently available to the local node.
Role Schedule: Disabled (for now).
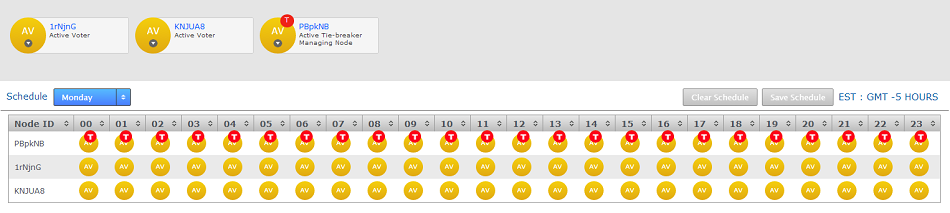
In the image below NodeSanFrancisco is coded as blue which indicates that it is set as a Passive Voter. The hourly blocks associated with NodeChengdu are Magenta, indicating that it is set as a pure voter. The blocks for NodeParis are colored yellow, indicating that this node is set as an Active Voter.

Vanilla Scheduling - no changes to type over time.

New Schedule Form.
In this example NodeSanFransisco is changed to a Tie-breaking Passive Voter, then NodeAuckland is changed into a Tie-breaker.
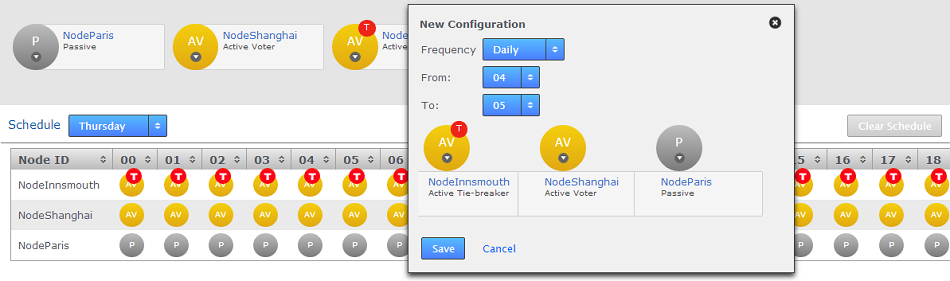
Swapping roles.
When all node changes have been made, click on the SAVE button to continue, or the CANCEL button if you change your mind.Changing role of the managing node
It's currently not possible to change the role of the node that is assigned as the managing node.
If you need to change a node's role, first make a different node the manager. This restriction was intended stop the managing node from being given a non-active role. Not only would this stop the node from managing schedule changes, it would make it impossible to move the managing node status to another node.
In a future release we may be able to make it possible to change the managing node's role to another compatible role, e.g. from Active Voter to Active.
You can add additional repositories for replication through the admin UI. The repository first needs be present on all the nodes that will be part of the corresponding replication group. So the repository copies need to be introduced to the replication system in an identical state.
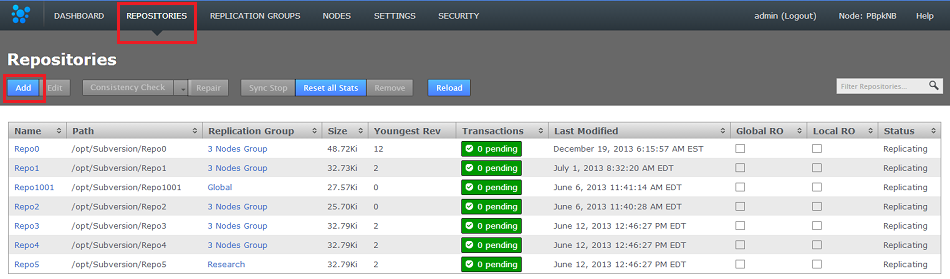
Login.

Enter repository details.
Known issue: duplicate repository names allowed
It's currently possible to add multiple repositories with the same name (they'll need different paths though). Ensure that you don't use the same name for multiple repositories, this is for obvious reasons a bad practice and will be prevented in future releases.

Replicating.
Repository stuck in Pending state
If a repository that you added gets stuck in the deploying state - you'll see this on the Dashboard, in the Replicator Tasks window - you can cancel the deployment and try adding the repository again. To cancel a deployment, go to the Replicator Tasks window and click on the Cancel Task link.
svnadmin pack support
It's not currently possible to run the svnadmin pack command when running SVN MultiSite Plus. Support for this command is currently being added to FSFSWD and should be available in the near future.
It's possible to remove repositories from SVN MultiSite Plus. Follow this quick procedure.
Important requirement when performing a repository dump / load
If a repository is removed and in some way historically edited (e.g. an SVN dumpfilter to remove content/revisions due to sensitive content), before re-introducing the repository to MultiSite Plus (all whilst maintaining the same UUID), commits may fail due to the existing fulltext cache references no longer being applicable.
Workaround: Restart Apache and MultiSite Plus before you use the repository.

Login.
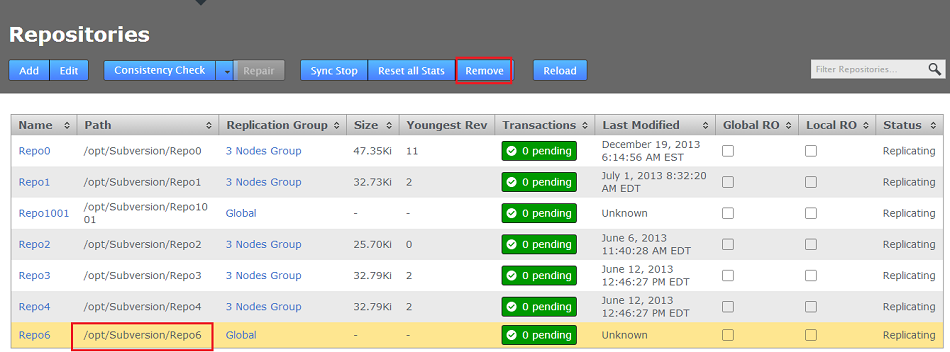
Repositories.
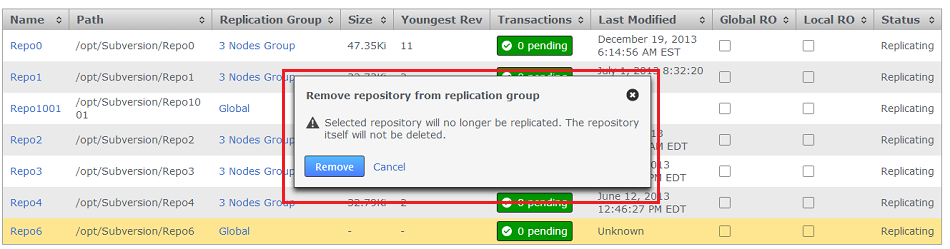
Remove.
It's possible to edit a repository's properties after they have been set up in SVN MultiSite Plus. Follow this quick procedure.
Login.
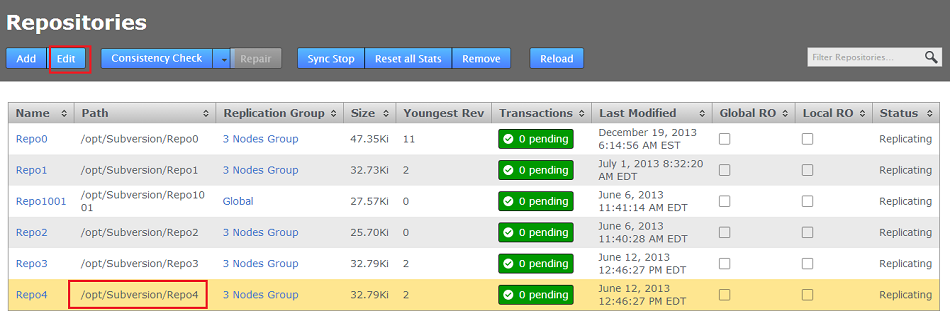
Repositories.

Edit Repository.
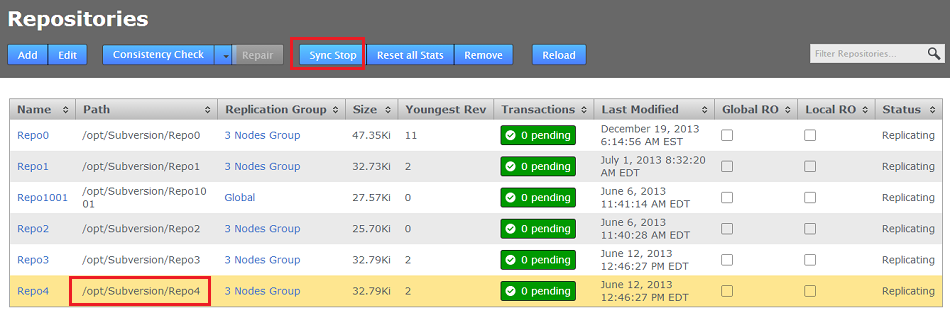
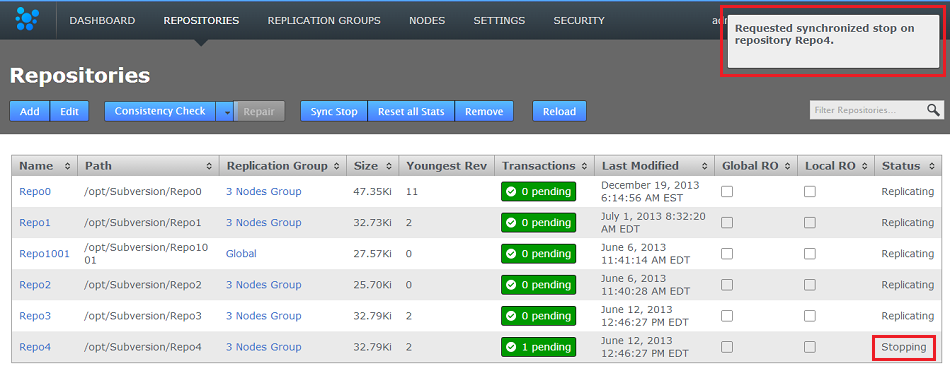
The Repository Synchronized Stop is used to stop replication between repository replicas, it can be performed on a per-repository basis or on a replication group basis (where replication will be stopped for all associated repositories).
To bring some or all nodes to a stop, use the Sync Stop All command found on the Nodes tab.
Repository Stops are synchronized between nodes using a 'stop' proposal to which all nodes need to agree. So that while not all nodes will come to a stop at the same time they do all stop at the same point.
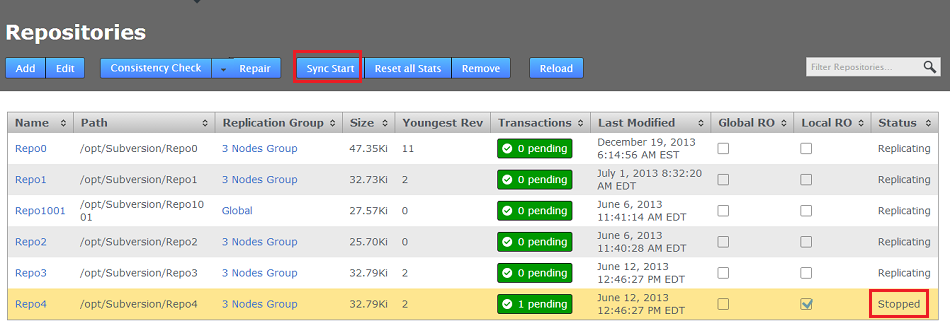
Restarting replication after performing a Synchronized Stop requires that the stopped replication be started in a synchronized manner.
In some situations, such as performing a repository backup, you may need to stop writes to the local repository replica. There are a couple of methods for doing so:
Using this method proposals will still be delivered to the node and the node can still participate in voting, but the proposals will not be executed until the output is restarted.
This is supported in the API with the RepositoryResource methods:PUT <server>:<port>/api/repository/{repositoryId}/stopoutput
This command takes one argument: NodeListDTO nodeListDTO which is the list of nodes on which the repo output will be stopped. In this case that list will only include NodeX.
Note that whilst the output is stopped it will show in the UI as LocalReadOnly.
PUT <server>:<port>/api/repository/{repositoryId}
/startoutput
This command takes one argument: NodeListDTO nodeListDTO which is the list of nodes on which the repo output will be started. In this case that list will only include NodeX.
PUT: <server>:<port>/api/replicator/stopall
If you don't need the stop to be coordinated the the following method is simpler and immediately stops the output of proposals on all repositories on the node it is executed against:
PUT: <server>:<port>/api/replicator/stopall
This will stop all repositories on the node on which it is invoked (with no coordination).
To start them all again call:
PUT: <server>:<port>/api/replicator/startall
SVN MultiSite Plus has a number of points where SVN and replication events are logged:

Always check the dashboard
If you are troubleshooting a problem we strongly recommend that you check the Dashboard's Replicator Tasks panel as well as the log files. While we added the gowl messaging as way giving administrators an immediate alert for events as they happen, they are not intended to be used as the main method of tracking failures or important system events.
SVN MultiSite Plus has two sets of logs, one set is used for application, the other logs replication activity:
/opt/wandisco/svn-multisite-plus/
The general logs are chiefly produced by the watchdog process and contain messaging that is mostly related to getting SVN MultiSite Plus started up and running. replicator -- logging the startup etc of the replicator ui -- startup/everything to do with the UI, inc in-use logging. lightweight.-rw-r--r-- 1 wandisco wandisco 88 Jan 15 16:53 multisite.log -rw-r--r-- 1 wandisco wandisco 220 Jan 15 16:53 replicator.20140115-165324.log -rw-r--r-- 1 wandisco wandisco 4082 Jan 15 16:53 ui.20140115-164517.log -rw-r--r-- 1 wandisco wandisco 1902 Jan 15 16:53 watchdog.log
        2014-01-15 16:45:17: [3442] Starting ui
        2014-01-15 16:53:24: [3571] Starting replicator
The logging system has been implemented using Simple Logging Facade for Java (SLF4J) over the log4J Java-based logging library. This change from java.util.logging has brought some benefits:
This change lets us collate data into specific package-based logs, such has a security log, application log, DConE messages etc.
Logging behavior is mostly set from the log4j properties file. /svn-multisite-plus/replicator/properites/log4j.properties
# Direct log messages to a file
log4j.appender.file=com.wandisco.vcs.logging.VCSRollingFileAppender
log4j.appender.file.File=fsfswd.log
log4j.appender.file.MaxFileSize=100MB
log4j.appender.file.MaxBackupIndex=10
log4j.appender.file.layout=org.apache.log4j.PatternLayout
log4j.appender.file.layout.ConversionPattern=%d{yyyy-MM-dd HH:mm:ss} %-5p %c{1}:%L - %m%n
log4j.appender.file.append=true

# Root logger option
log4j.rootLogger=INFO, file
This configuration controls how log files are created and managed.
Apache log4j provides Appender objects are primarily responsible for printing logging messages to different destinations such as consoles, files, sockets, NT event logs, etc.
Appenders always have a name so that they can be referenced from Loggers.
You can learn more about setting up appenders by reading through the Apache documenation - http://logging.apache.org/log4j/1.2/manual.html
We strongly recommend that you work with our support team before making any significant changes to your logging.
Debug is chatty
If you enable the debug mode you should consider adjusting your log file limits (increasing the maximum file size and possibly the maximum number of files).
Send logging
If it is possible, consider placing the log files an a separate file system.
It's possible to change the logging levels - either temporarily to help in a current investigation, or perminently if you desire to change your ongoing logging. For making changes to logging, see 35. Logging Settings Tool.
It's still possible to modify log settings directly by editing the logger properties file:
/opt/wandisco/svn-multisite-plus/replicator/properties/logger.propertiesOnce you've made a change, you will need to restart the replicator in order for the change to take effect.
 Logs are managed per node
Log changes are not replicated between nodes, so each node has its own logging setup.
The consistency Check gives you a quick and easy check whether a selected repository remains in the same state across the nodes of a replication group. Follow these steps to check on consistency:
Limits of the Consistency Checker
The Consistency Check will tell you the last common revision shared between repository replicas. Given the dynamic nature of a replication group it's possible that there will be in-flight proposals in the system that have not yet been agreed upon at all nodes. For this reason it isn't possible for a consistency check to be completely authoritative.
Specifically, consistency checks should be made on replication groups that contain only Active (inc Active Voter) nodes. The presence of passive nodes will cause consistency checks to fail.

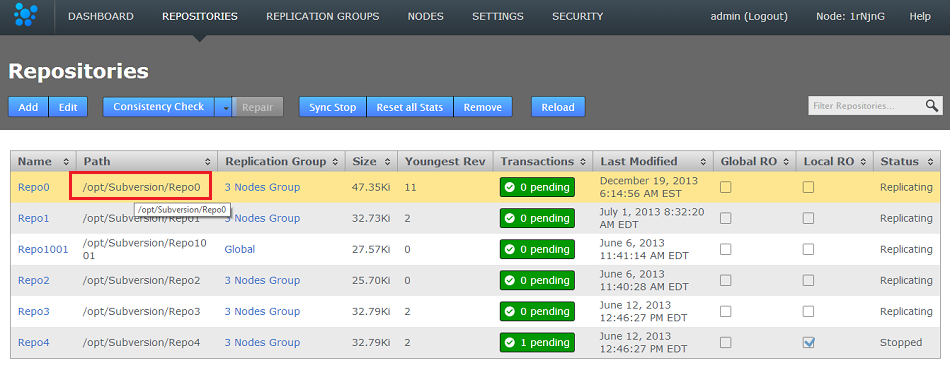
Go to the repository
Consistency Check is done on a per node basis
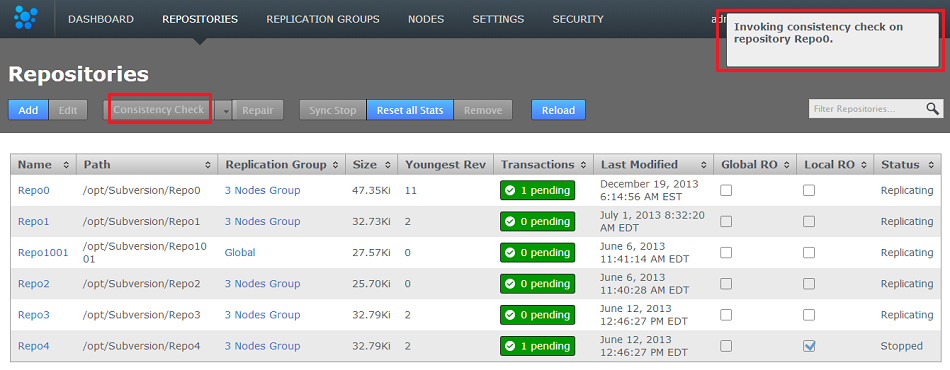
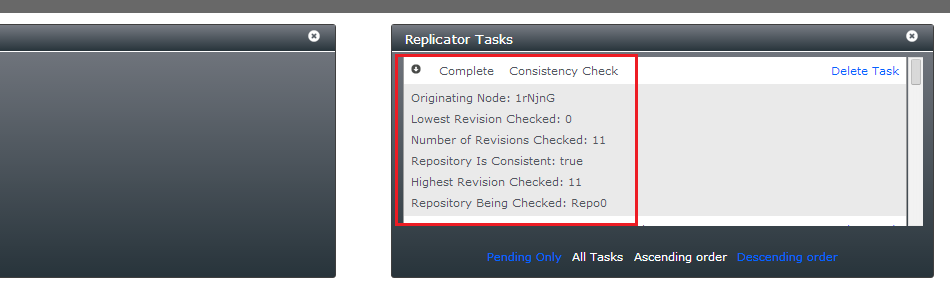
Consistency check in action
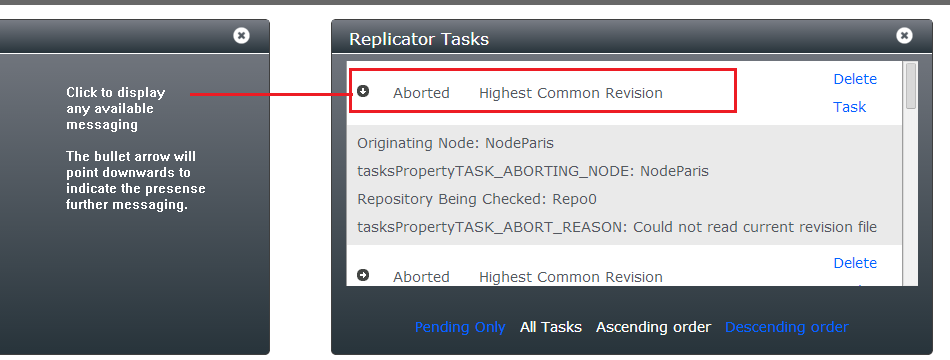
Known Issue: Don't run a consistency check if the repository has been removed from one of the nodes.
There's currently a problem with running a consistency check on a repository if the replica on one or more or more nodes has been deleted. In this situation a "Highest Common Revision" task will appear on the dashboard and will remain permanently in a 'pending' state. Until we resolve this problem you shouldn't run the consistency checker on a repository if it has been removed from the file system of any of your nodes.
Repository replicas need to be identical - are they?
It's also possible to check the results of a consistency check by viewing the replicator's log file (fsfswd.##). See Logs
This section provides advice on getting your repository data distributed prior to starting replication.
These items are a recap of the installation checklist. Ensure you meet these requirements in order for replication to run effectively:
Pre-commit Hooks
Wandisco's modified version of the FSFS libraries will intercept commits after any pre-commit hooks have run. This means that the pre-commit hook run on the initiating node (on the server, Apache, SVNserve, etc.) rather than in the replicator. Should a pre-commit hook fail then the server will return an error to the client before the FSFSWD intercept call. As a result, the replicator is never involved with failed pre-commit hooks - with the possible exception of protorev/abort notifications.
So if a commit (on the originating node) is delegated for replication a corresponding pre-commit hook will already have succeeded.
Post-commit Hooks
The replicator completes the commit on the originating node by invoking a JNI function - a low level function that doesn't run any hooks. When the replicator returns the commit status to the originating repository FSFSWD a successful commit will cause the post-commit to run on the server.
The net effect is that pre- and post- hooks run in the server on the originating repository and they do not run at all for the replicated repositories. Although a replicator could explicitly invoke the hooks for the replicated repositories if required.
It's simple enough to make a copy of a small repository and transfer it to each of your nodes. However, remember that any changes made to the original repository will invalidate your copies unless you perform a syncronzation prior to starting replication.
If a repository needs to remain available to users during the proccess, you should briefly halt access, in order to make a copy. The copy can then be transferred to each node. Then, when you are ready to begin replication, you need use rsync to update each of your replicas. Fore more information about rsync, see Synchronizing repositories using rysnc.
If you are creating brand new repositories, don't create them at each node, instead create the repository once, then rsync it to the other nodes. You need to do this to ensure that each replica has the same UUID.
If you do create repositories at each node instead of using rysnc, you can use SVN's UUID command to get them all matching:
You can confirm the UUID of a repository using the svnlook uuid command:
[root@ip-10-0-100-6 SVN]# svnlook uuid Repo0
67d41b33-3c7c-4ba0-8af1-119dbb0d42ba
You can use the Set UUID command to ensure that a new repository that you've created has a UUID that matches with the other replicas:
$ svnadmin setuuid /opt/SVN/Repo0 67d41b33-3c7c-4ba0-8af1-119dbb0d42ba
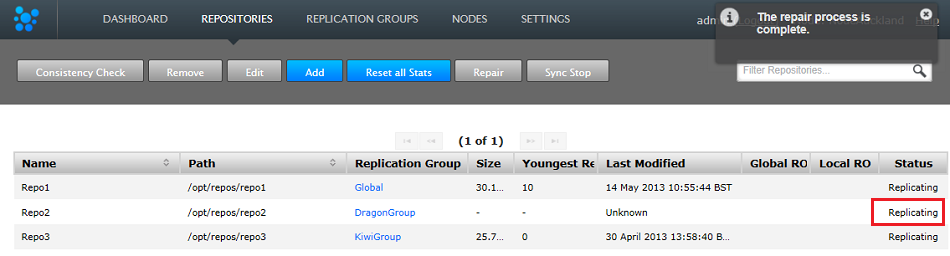
There are a number of situations where a repository may be corrupted or lose sync with its other copies -- this could be the result of file/permission changes on the server. In such an event the node on which this copy is situated will stop replicating data for that repository (other repositories will be unaffected and should continue to replicate.) SVN MultiSite Plus has a repair tool that can be used to quickly get the repository repaired and replicating again.
No option to repair?
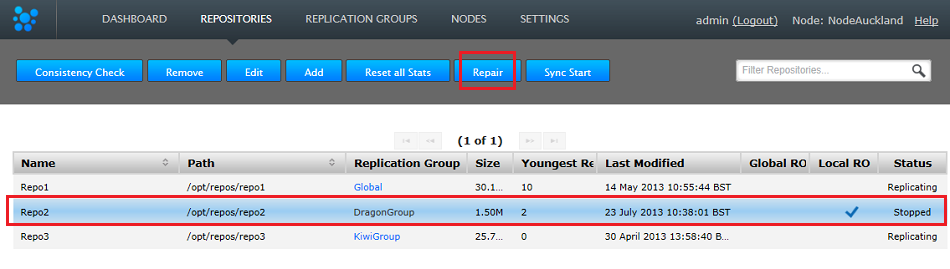
Out of sync
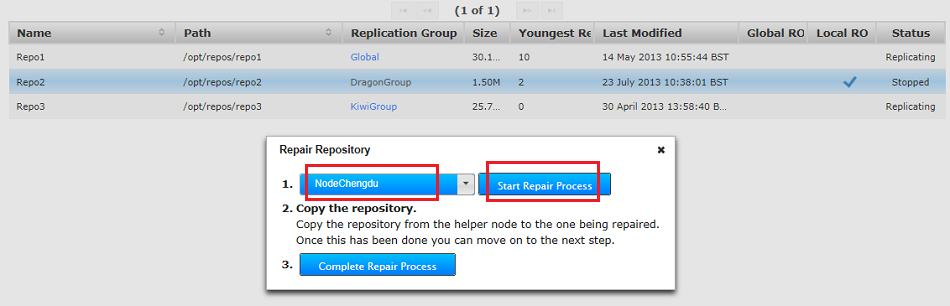
Start the repair!
Hooks will be overwritten
Take note that when restoring a repository using rsync, you will also copy across the "helper" repository's hooks, overwriting those on the destination node.
Need to maintain existing hooks?
Before doing the rsync, copy the hooks folder to somewhere safe. Then when you've completed the rsync, restore the backed-up hooks.
[root@localhost repos]#  rsync -rvlHtogpc /opt/repos/repo2/ root@172.16.2.41:/opt/repos/

The authenticity of host '172.16.2.41 (172.16.2.41)' can't be established.
RSA key fingerprint is 9a:07:b2:bb:b6:85:fa:93:41:f0:01:d0:de:8f:e1:5d.
Are you sure you want to continue connecting (yes/no)? yes
Warning: Permanently added '172.16.2.41' (RSA) to the list of known hosts.
root@172.16.2.41's password:
sending incremental file list
./
README.txt
format
conf/
conf/authz
conf/passwd
conf/svnserve.conf
db/
db/current
db/format
db/fs-type
db/fsfs.conf
db/min-unpacked-rev
db/rep-cache.db
db/txn-current
db/txn-current-lock
db/uuid
db/write-lock
db/revprops/
db/revprops/0/
db/revprops/0/0
db/revprops/0/1
db/revprops/0/2
db/revprops/0/3
db/revs/
db/revs/0/
db/revs/0/0
db/revs/0/1
db/revs/0/2
db/revs/0/3
db/transactions/
db/txn-protorevs/
hooks/
hooks/post-commit.tmpl
hooks/post-lock.tmpl
hooks/post-revprop-change.tmpl
hooks/post-unlock.tmpl
hooks/pre-commit.tmpl
hooks/pre-lock.tmpl
hooks/pre-revprop-change.tmpl
hooks/pre-unlock.tmpl
hooks/start-commit.tmpl
locks/
locks/db-logs.lock
locks/db.lock

sent 1589074 bytes  received 701 bytes  167344.74 bytes/sec
total size is 1585973  speedup is 1.00
[root@localhost repos]#
Once the repository is updated you should check that the fixed repository now matches the version on your helper node.<repository_name>/db/rep-cache.dbThis step is not essential and could result in the repository becoming slightly larger, however it removes the risk that the repaired repository will not match with the cache file.

Complete!
Back in sync
If for any reason repositories are corrupted or unable to automatically catch up it's usually possible to use rsync to get them back into sync.
svnadmin verify <Repository-path>
From the node with the up-to-date repository, type the following commands:
rsync -rvlHtogpc /opt/SVN/repo/ remoteHost:/opt/SVN/
For example:
rsync -rvlHtogpc /SVN/Repo root@172.7.2.33:/SVN/
Then follow up with an additional rsync that will ensure that contents of the locks directory are identical (by deleting locks that are not present on the originating server)
rsync -rvlHtogpc --delete /path/to/repo/db/locks <Repository Name> remoteHost:/path/to/repo/db
For example:
rsync -rvlHtogpc --delete /SVN/Repo/db/locks root@172.7.2.33:/SVN/Repo/db
Knowledgebase
You can read a more detailed step-by-step guide to using rsync in the Knowledge Base article Reset and rsync SVN repositories.
It's possible for SVN MultiSite Plus to recover from the brief outage of a member node, which should be able to resync once it is reconnected. The crucial requirement for MultiSite's continued operation is that agreement over transaction ordering must be able to continue. Votes must be cast and those votes must always result in an agreement - no situation must arise where the votes are evenly split between voters.
If after the loss of a node, a replication group can no longer form agreements then replication is halted. If the lost node was a voter, and there aren't enough remaining voters to form an agreement, then either the lost node must be repaired/reconnected, or the replication group must undergo emergency reconfiguration.
The emergency reconfiguration process can't be undone, and it represents a big shakeup of your replication system. Only complete an emergency reconfiguration if the lost node can not be repaired or reconnected in an acceptable amount of time.
Gone but not forgotten
After a lost node has been removed and a replication group reconfigured, the lost node should not be allowed to come back online. Whilst the DConE replication engine will be unphased by the presence of a rogue node, it could result in confusion or be mistaken for an active repository - when in fact it will receive no further updates from the other replicas. You should ensure that you perform a cleanup after completing an emergency reconfiguration.
Last node standing
Any replication group which has its membership reduced to one node will continue to exist after the emergency reconfiguration as a non-replicating group. Once you have set up a replacement node you should be able to add it back to the group to restart replication.
Only one at a time
The EMR procedure needs to be co-ordinated between sites/nodes. You must not start an EMR if an EMR procedure has already started from another node. Running multiple EMR procedures at the same time can lead to unpredictable results or cause the processes to get stuck.
In the event that you need to perform a perminent removal of a node from one of your replication groups (an emergency reconfiguration) then you should contact WANdisco's support team for assistance. The operation poses a number of risk to the overall operation of MultiSite Plus, for this reason we're recommend that customers not attempt the procedure by themselves.
Talkback is a bash script that is provided in your SVN MultiSite Plus installation for use in the event that you need to talk to the WANdisco support team.
Manually run Talkback using the following procedure. You can run Talkback without the need for user interaction if you set up the variables noted in step 3, below:
/opt/wandisco/svn-multisite-plus/bin/
[root@localhost bin]# ./talkback
#######################################################################
# WANdisco talkback - Script for picking up system & replicator       #
# information for support                                             #
#######################################################################

    To run this script non-interactively please set following environment vars:

    ENV-VAR:
    MSP_REP_UN                  Set username to login to MultiSite-Plus
    MSP_REP_PS                  Set password to login to MultiSite-Plus
    MSP_SUPPORT_TICKET          Set ticket number to give to WANdisco support team
    MSP_RUN_SVNADMIN            Run svnadmin verify, lstxns and lslocks commands - turned off by default

    By default, your talkback is not uploaded. If you wish to upload it, you may also specify
    the following variables:

    MSP_FTP_UN                  Set ftp username to upload to WANdisco support FTP server. Note that
                                specifying this may cause SSH to prompt for a password, so don't set
                                this variable if you wish to run this script non-interactively.


      ===================== INFO ========================
      The talkback agent will capture relevant configuration
      and log files to help WANdisco diagnose the problem
      you may be encountering.

Please enter replicator admin username: adminUIusername
Please enter replicator admin password: thepasswordhere

retrieving details for repository "Repo1"
retrieving details for repository "Repo3"
retrieving details for repository "Repo4"
retrieving details for repository "repo2"
retrieving details for node "NodeSanFransisco"
retrieving details for node "NodeAuckland"
retrieving details for node "NodeParis"

Please enter your WANdisco support FTP username (leave empty to skip auto-upload process):
Skipping auto-FTP upload

TALKBACK COMPLETE

---------------------------------------------------------------
 Please upload the file:

     /opt/wandisco/svn-multisite-plus/talkback-201312191119-redhat6.3-64bit.tar.gz

 to WANdisco support with a description of the issue.

 Note: do not email the talkback files, only upload them
 via ftp or attach them via the web ticket user interface.
--------------------------------------------------------------
Note that we have disabled the svnadmin check as in some situations it can impeded the rapid collection of system data. If you want to turn it back on set the corresponding env variable as follows.
Enter the following string to switch the SVNAdmin checks back on:
export MSP_RUN_SVNADMIN=true'
and then run the talkback. You can check the status of the variable by entering:
echo '$MSP_RUN_SVNADMIN'
Also, you'll need to talk to Support about setting up access to WANdisco's Support FTP space.
Don't send talkback files via email
If you're not using our secure FTP you can upload your talkback output files to our support website. Just attach them to your case. Read our Knowledgebase article about How to raise a support case.
replicator
        config
            application
            license
            logger.properties
            ms-resource-monitoring-elements.xml
            ms-resource-monitoring-elements.xml.old
            replicator-api-authorization.properties
            svnok.catalog
            ui.properties
        nodes
            NodeAuckland
                connection-test
                location.xml
                node.xml
            NodeParis
                connection-test
                location.xml
                node.xml
            NodeSanFrancisco
                connection-test
                location.xml
                node.xml
        recent-logs
            fsfswd.0.log
            replicator.log.20130716-105414.211
            svn-multisite
            thread-dump-2013-07-16
            ui.log.20130716-105414

        repositories
            Repo1
                info
                membership.xml
                replicationGroup.xml
                repository.xml
                statemachine.xml
                stats.xml
        application
        license.xml
        locations.xml
        md5s
        memberships.xml
        nodes.xml
        replicationGroups.xml
        replicator-file-list
        repositories.xml
        statemachine.xml
        tasks.xml
        VERSION

system
    logs
    file-max
    file-nr
    limits.conf
    netstat
    processes
    services
    sysctl.conf
    sys-status
    top
SVN MultiSite Plus runs with a smart commit strategy and ignores all read operations so activities such as checkouts never impact upon WAN traffic. This, along with network optimization can allow deployments to provide developers with LAN-speed-like performance over a WAN for write operations at every location, while keeping all of the repositories in sync. In the event the connection to particular node is temporarily lost or experiences extreme latency or low speeds, it's possible that a node could fall behind and become temporarily out of sync while transactions are queued up.
In this situation the node should eventually catch up in a self-healing manner without administrator intervention. In this situation it is worth monitoring the state of your WAN connectivity to help gain assurance that replication is going to be able to catch up. Clearly, if connectivity drops to almost zero for a prolonged period then this will inevitably result in the node becoming isolated and increasingly out-of-sync. If this happens you should monitor traffic for a period of time, contact WANdisco's support team and start considering contingencies such as making network changes or removing the isolated node from replication, potentially using the Emergency Reconfiguration procedure.
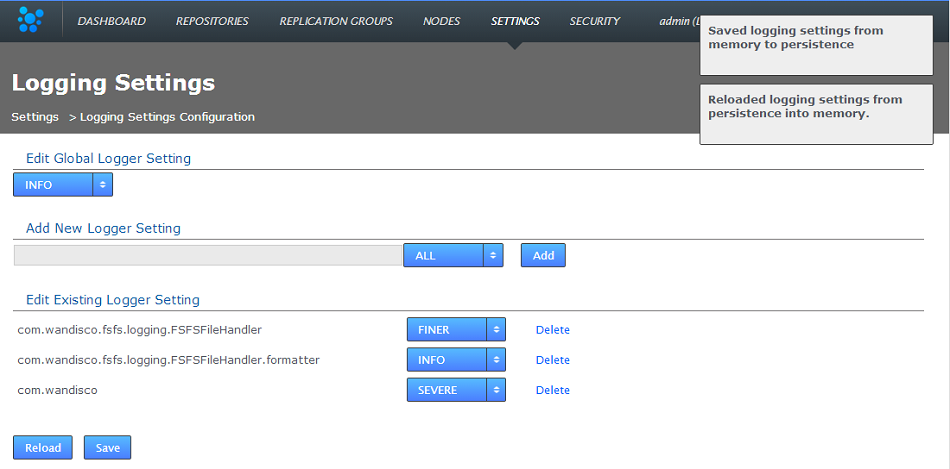
Loggers are usually attached to packages. Here, the level for each package is specified. The global level is used by default, so levels specified here simply act as an override that takes effect in memory only - unless saved to the logger properties file.


In the event that you need to disable LDAP or Kerberos authentication and return your deployment to the default internally managed users, use the following procedure.
$ cd /opt/wandisco/svn-multisite-plus/replicator/
$ java -jar resetSecurity.jar

In the event that you need to create a fresh users.properties file for your deployment, follow this short procedure:
/opt/wandisco/svn-multisite/replicator/properties/application.properties
application.username=admin
application.password=wandisco