3. Administration Guide
This Admin Guide describes how to set up and use WANdisco's WD Fusion.
3.1 Housekeeping
This section covers basic operations for running a WD Fusion deployment, including commands and tooks that help you set up and maintain replicated directories.
Starting up
To start WD Fusion UI:
- Open a terminal window on the server and log in with suitable file permissions.
- Run the fusion-ui-server service from the /etc/init.d folder:
rwxrwxrwx 1 root root 47 Apr 10 16:05 fusion-ui-server -> /opt/wandisco/fusion-ui-server/bin/fusion-ui-server
- Run the script with the start command:
[root@localhost init.d]# ./fusion-ui-server start
WD Fusion starts. Read more about the fusion-ui-server init.d script.
Starting fusion-ui-server:. [ OK ] - Also you can invoke the service directly. e.g.
service fusion-ui-server stop/start
Shutting down
To shut down:
- Open a terminal window on the server and log in with suitable file permissions.
- Run the WD Fusion UI service, located in the init.d folder:
rwxrwxrwx 1 root root 47 Dec 10 16:05 fusion-ui-server -> /opt/wandisco/fusion-ui-server/bin/fusion-ui-server
- Run the stop script:
[root@redhat6 init.d]#  ./fusion-ui-server stop
stopping fusion-ui-server:                                   [  OK  ]
[root@redhat6 init.d]#
The process shuts down.
The shutdown script attempts to stop proceses in order before completing, as a result you may find that (from WD Fusion 2.1.3) shutdowns may take up to a minute to complete.
init.d management script
The start-up script for persistent running of WD Fusion is in the /etc/init.d folder. Run the script with the help command to list the available commands:
[root@redhat6 init.d]#service fusion-ui-server helpusage:./fusion-ui-server(start|stop|restart|force-reload|status|version) start Start Fusion services stop Stop Fusion services restart Restart Fusion services force-reload Restart Fusion services status Show the status of Fusion services version Show the version of Fusion
Check the running status (with current process ID):
[root@redhat6 init.d]# service fusion-ui-server status
Checking delegate:not running                              [  OK  ]
Checking ui:running with PID 17579                         [  OK  ]
Check the version:
[root@redhat6 init.d]# service fusion-ui-server  version
1.0.0-83
Managing Services through the WD Fusion UI
Providing that the UI service is running, you can stop and start WD Fusion through the Fusion Nodes tab.
WD Fusion UI Login
The UI for managing WD Fusion can be accessed through a browser, providing you have network access and the port that the UI is listening on is not blocked.
http://<url-for-the-server>:<UI port>
http://wdfusion-static-0.dev.organisation.com:8083/ui/
You should not need to add the /ui/ at the end, you should be redirected there automatically.

Login using your Hadoop platform's manager credentials.
Login credentials
Currently you need to use the same username and password that are required for your platform manager, e.g. Cloudera Manager or Ambari. In a future release we will separate WD Fusion UI from the manager and use a new set of credentials.
LDAP/Active Directory and WD Fusion login
If your Cloudera-based cluster uses LDAP/Active Directory to handle authentication then please note that a user that is added to an LDAP group will not automatically be assigned the corresponding Administrator role in the internal Cloudera Manager database. A new user is LDAP that is assigned an Admin role will, by default, not be able to login to WD Fusion. To be allowed to login, they must first be changed to an administrator role type from within Cloudera Manager.
There is no sync between Cloudera Manager and LDAP in either direction, so a user who loses their Admin privileges in LDAP will still be able to login to WD Fusion until their role is updated in Cloudera Manager. You must audit WD Fusion users in Cloudera Manager.
Administrators will need to change any user in the Cloudera Manager internal database (from the Cloudera Manager UI) to the required access level for WD Fusion. Please note the warning given above, that changing access levels in LDAP will not be enough to change the admin level in WD Fusion.
Authentication misalignment
There are four possible scenarios concerning how LDAP authentication can align and potentially misalign with the internal CM database:
- User has full access in CM, denied access in WD Fusion UI
- User is in the Full Administrator group in LDAP
- User is left as the default read-only in the internal Cloudera Manager database
- User has full access in CM, full access in WD fusion UI
- User is in the Full Administrator group in LDAP
- User is changed Full Administrator in the internal Cloudera Manager database
- User has read-only access in CM, denied access to WD Fusion UI
- User is removed from the Full Administrator group in LDAP and added to the read-only group
- User is left as the default read-only in the internal Cloudera Manager database
- User has read-only access to CM, Full access to WD Fusion UI
- User is removed from the Full Administrator group in LDAP and added to the read-only group
- User is set as Full Administrator in the internal Cloudera Manager database
Checking cluster status on the dashboard
The WD Fusion UI dashboard provides a view of WD Fusion's status. From the world map you can identify which data centers are experiencing problems, track replication between data centers or monitor the usage of system resources.
For more details on what each section of the Dashboard, see the Reference section for the Dashboard.

UI Dashboard will indicate if there are problems with WD Fusion on your cluster.
Server Logs Settings
The WD Fusion logs that we display in the WD Fusion UI are configured by properties in the ui.properties file.

Logging
Default paths:
logs.directory.fusion/var/log/fusion/server/Logs.directory.ihc/var/logs/fusion/ihclogs.directory.uiserver/var/log/fusion/ui
Configure log directory
By default the log location properties are not exposed in the ui.properties file. If you need to update the UI server to look in different locations for the log files then you can add the following properties (in ui.properties). To be clear these entries do not set alternate locations for WD Fusion to write its logs, it only ensures that the UI server can still read the logs in the event that they are moved.:
- logs.directory.fusion
- sets the path to the WD Fusion server logs.
- logs.directory.uiserver
- sets the path to the UI server logs.
- logs.directory.ihc
- sets the path to the ihc server logs.
The file is read by the UI server on start up so you will need to restart the server for changes to take affect. The ui.properties file is not replicated between nodes so you must currently set it manually on each node.
Logging at startup
At startup the default log location is /dev/null. If there's a problem before log4j has initialised this will result in important logs getting lost. You can set the log location to a filespace that preserve early logging.
Edit fusion_env.sh adding paths to the following properties:
- SERVER_LOG_OUT_FILE
- Path for WD Fusion server log output
- IHC_LOG_OUT_FILE
- Path for IHC server log output
Induction
Induction is the process used to incorporate new nodes into WANdisco's replication system. The process is run at the end of a node installation, although it is also possible to delay the process, then use the + Induct link on the Fusion Nodes tab.
Use this procedure if you have installed a new node but did not complete its induction into your replication system at the end of the installation process.
- Login to one of the active nodes, clicking on the Fusion Nodes tab. Click the + Induction button.

- Enter the fully qualified domain name of the new node that you wish to induct into your replication system.
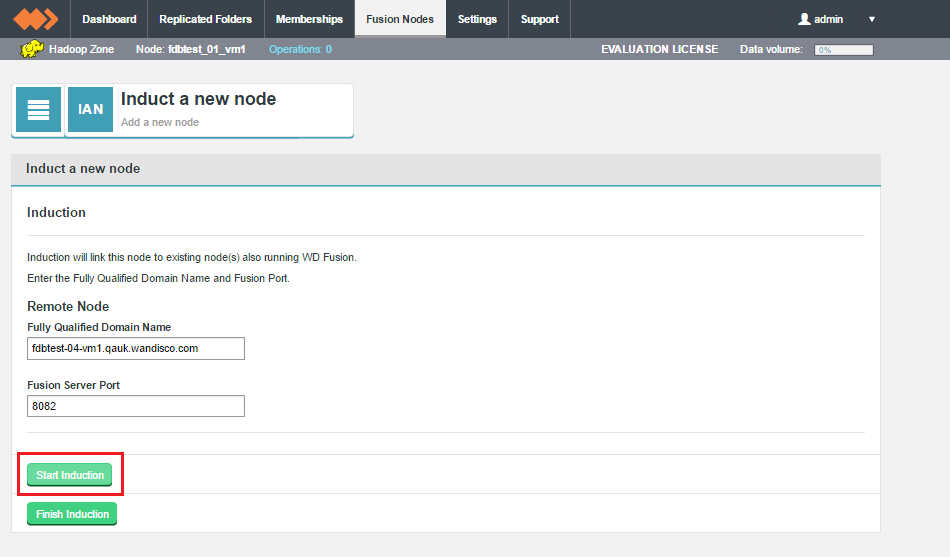
- Fully Qualified Domain Name
- The full domain name for the new node that you will induct into your replication system.
- Fusion Server Port
- The TCP port is used by the WD Fusion application for configuration and reporting, both internally and via REST API. The port needs to be open between all WD Fusion nodes and any systems or scripts that interface with WD Fusion through the REST API.
- When the induction process completes, the Fusion Node tab will refresh with the new node added to the list.
Induction Failure
The induction process performs some validation before running. If this validation failures you will quickly see a warning messages appear.
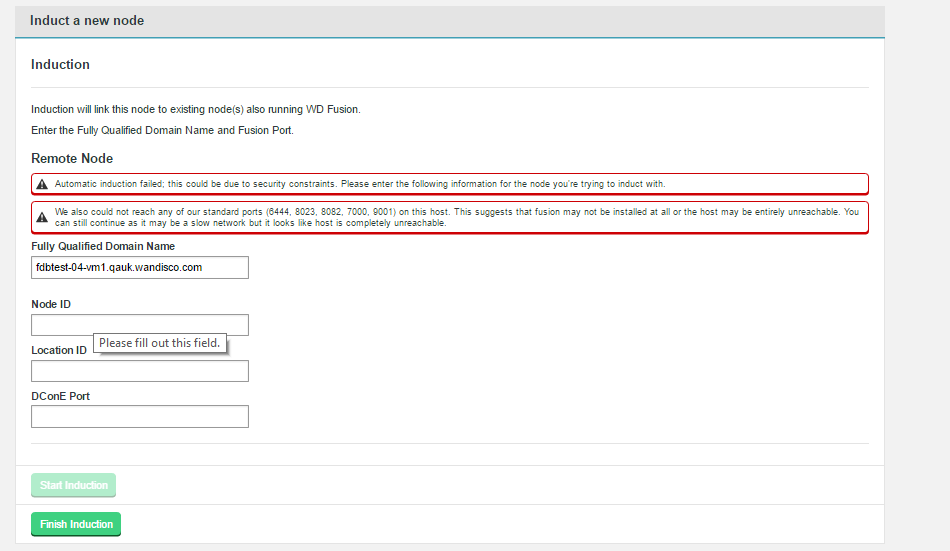
- Automatic Induction Failure
- If the induction process can't connect to the new new using the details provided, a failure will happen instantly. This could happen because of an error in the new node's installation, however it could also be caused by the node being kerberized.
- We also could not reach any of our standard ports
- If connections can't be made on specific Fusion ports, they will be listed here. If none of the standard ports are reachable then you will be warned that this is the case.
- Fully Qualified Domain Name
- the full hostname for the server.
- Node ID
- A unique identifier that will be used by WD Fusion UI to identify the server.
- Location ID
- This is the unique string (e.g. "db92a062-10ea-11e6-9df2-4ad1c6ce8e05") that appears on the Node screen (see below).
- DConE Port
- The TCP port used by the replication system. It needs to be open between all WD Fusion nodes. Nodes that are situated in zones that are external to the data center's network will require unidirectional access through the firewall.
- Read the logs
- Run Talkback then send the results to WANdisco's support team
- Common Problems
- Kerberos Troubleshooting
- Log locations:
/var/log/fusion/server- Primary log(s)
fusion-dcone.log.0
- this is the live log file for the running WD Fusion server process.- Historical logs:
- The following logs are listed for completeness but are not generally useful for monitoring purposes.
fusion dcone.log.x
- the log file is rotated once its file size reaches 200MB. By default, the last 100 log files are stored. The "x" represents an incrementing number, starting at 1.
Filenames are appended with an incrementing number starting at 1.
Rotation is presently defaulted at 200MB with a retention of 100 files, although this can be customised.
fusion-server.log
- a log of the application-level events, such as kerberos authentication, license validation.
fusion-server.log.yyyy-mm-dd
log_out.log
- this is the output redirected from STDOUT and STDERR that invoked java. This is used to capture exceptions that occur before logging could start. - Log locations:
/var/log/fusion/ui/- Primary log(s):
fusion-ui.log- Historical logs:
fusion-ui.log.x- Log location
-
/var/log/fusion/ihc/var/log/fusion/ihc/server - Primary log(s):
server/fusion-ihc-ZZZ-X.X.X.log
- THe live IHC process log files. The components of the filename are as follows:
ZZZ - Hadoop distribution marker (hdp, cdh, phd, etc). This will be "hdp" for a Hortonworks integrated cluster.
X.X.X - A matching cluster version number. This will be "2.2.0" for a Hortonworks 2.2 cluster.- Historical logs
server/fusion-ihc-ZZZ-X.X.X.log.yyy-mm-ddlog_out.log
This log file contains details of any errors by the process when reading from HDFS in the local cluster, such as access control violations, or network write errors when streaming to the WD Fusion server in any remote cluster.- PANIC
- SEVERE
- ERROR
- WARNING
- INFO
- Location to store the talkback to. Suggest /tmp if acceptable disk space is available.
Reserve plenty of storage
Note, WD Fusion talkbacks can exceed 300MB compressed, but well over 10GB uncompressed (due to logs)./tmpmay or may not be suitable. - Kerberos keytab location.
- User to perform kinit with when obtaining kerberos ticket.
- Whether you wish to perform a HDFS fsck, or not. Option 1 for yes, option 2 for no.
- Log into the Fusion server, If you're not logged in as root, use sudo to run the talkback script, e.g.
[vagrant@supp26-vm1 ~]$ sudo /opt/wandisco/fusion/server/talkback.sh ####################################################################### # WANdisco talkback - Script for picking up system & replicator # # information for support # ####################################################################### To run this script non-interactively please set following environment vars: ENV-VAR: FUSION_SUPPORT_TICKET Set ticket number to give to WANdisco support team FUSION_TALKBACK_DIRECTORY Set the absolute path directory where the tarball will be saved FUSION_KERBEROS_ENABLED Set to "true" or "false" FUSION_PERFORM_FSCK Set to "true" or "false" to perform a file system consistency check Which directory would you like the talkback tarball saved to? /tmp ===================== INFO ======================== The talkback agent will capture relevant configuration and log files to help WANdisco diagnose the problem you may be encountering. Retrieving current system state information Kerberos is enabled Kerberos is enabled. Please provide the absolute path to the keytab you wish to use to obtain a ticket: /etc/security/keytabs/hdfs.headless.keytab Please provide the corresponding username for the keytab located /etc/security/keytabs/hdfs.headless.keytab: hdfs Performing kinit as user: hdfs Gathering information from Fusion endpoints Protocol is: http Hostname is: supp26-vm1dddd Port is: 8082 retrieving details for node "supp26-vm0_2" retrieving details for node "supp25-vm1_59" retrieving details for node "supp25-vm0_61" retrieving details for node "supp26-vm1_20" Copying Fusion server log files, this can take several minutes. Copying Fusion IHC log files, this can take several minutes. Would you like to include hadoop fsck? This can take some time to complete and may drastically increase the size of the tarball. 1) Yes 2) No #? 2 Running sysinfo script to capture maximum hardware and software information... Gathering Summary info.... Gathering Kernel info.... Gathering Hardware info.... Gathering File-Systems info.... Gathering Network info.... Gathering Services info.... Gathering Software info.... Gathering Stats info.... Gathering Misc-Files info.... THE FILE sysinfo/sysinfo_supp26-vm1-20160428-132245.tar.gz HAS BEEN CREATED BY sysinfo tar: Removing leading `/' from member names TALKBACK COMPLETE --------------------------------------------------------------- Please upload the file: /tmp/talkback-201604281321-supp26-vm1.lcx.tar.gz to WANdisco support with a description of the issue. Note: do not email the talkback files, only upload them via ftp or attach them via the web ticket user interface. -------------------------------------------------------------- - Follow the instructions for uploading the output on WANdisco's support website.
- Make a backup copy of WD Fusion's applications config file
/opt/wandisco/fusion-server/applications.properties, then open the original in your preferred text editor. - Modify the property
executor.threads.Property Description Permitted Values Default Checked at... executor.threads The number of threads executing agreements in parallel. 1-Integer.MAX_VALUE 20 Startup WD Fusion Server snippet
Don't go alone
Any upward adjustment will clearly increase the resourcing costs. Before you make any changes to DConE properties, you should open up discussions with WANdisco's support team. Applying incorrect or inappropriate settings to the replication system may result in hard to diagnose problems. - Save your edited
applications.propertiesfile, then restart WD Fusion. - writerCheckPeriod
- The period of time (in seconds) between writer check events. Default: 60.
- writerCheckMultiple
- The number of check events that will fail before initiating an election. Default: 3.
- Setting the properties so that the period is very short will ensure that if a writer is lost, a new writer will be brought into action so quickly that there should be no impact on replication. However, very short periods are likely to result in a larger number of false alarms, where writer re-elections are triggered unnecessarily.
- Setting the properties so that the period is very long will ensure that a re-election only takes place if the current writer is really "out for the count", however, a long delay between the loss of the writer and a new writer picking up could be very detrimental in some situations, such as where very large numbers of small files are being replicated between zones.
- Log in to the Fusion UI and go to the Settings tab. Click Client Bypass Settings.
Emergency bypass via the UI.
- Tick the Enable fusion bypass checkbox. This will enable two entry fields for configuration:
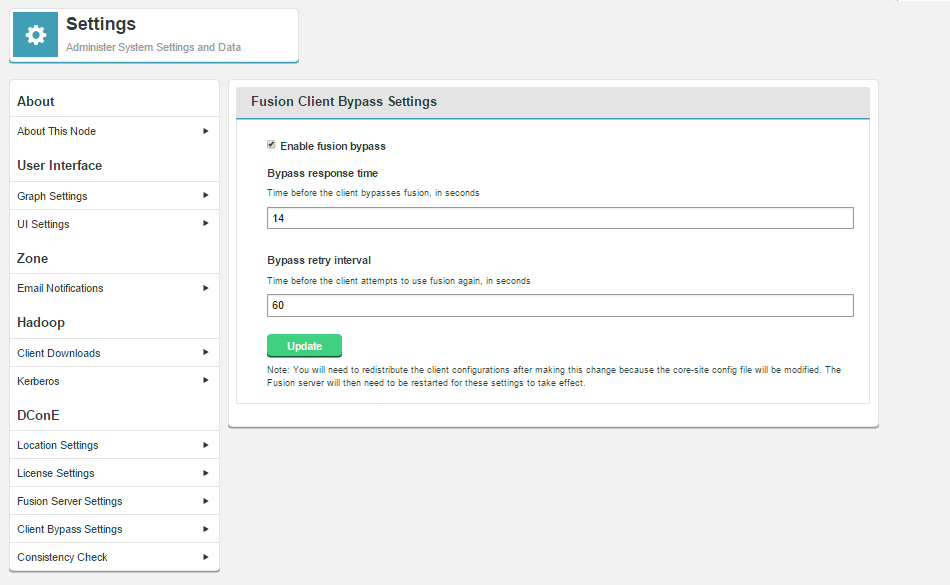
Emergency bypass via the UI.
- Bypass response time
- The time (in seconds) that will pass before the client will bypass WD Fusion. Default: 14.
- Bypass retry interval
- The time (in seconds) before the client attempts to use WD Fusion, again. Default: 60.
- Click Update to save your changes.
- Renew the local Kerberos ticket with "kinit -R". (This requires that the Kerberos ticket is renewable) This is fixed in JDK 6 Update 27 or later: http://www.oracle.com/technetwork/java/javase/2col/6u27bugfixes-444150.html
-
See:
CCacheInputStream fails to read ticket cache files from Kerberos 1.8.1
Kerberos 1.8.1 introduced a new feature by which configuration settings can be stored in the ticket cache file using a special principal name. - The script is placed on the node during the installation process.
- You must run the script as root or invoke sudo.
- Running the script without using an additional option performs the following actions:
Default uninstall
- Stops all WD Fusion related services
- Uninstalls the WD Fusion. IHC and UI servers
- Uninstalls any Fusion-related plugins (See Plugins)
- Uninstalls itself. You'll need to handle backups manually from this point
- Log in to the WD Fusion UI. Click on the Membership tab. Click on the Create New tab. The "New Membership" window will open that will display the WD Fusion nodes organized by zone.

Create Membership1
- Configure the membership by selecting which nodes should be acceptors. Acceptors vote on the ordering of changes.

Note how a two-node membership requires that one of the nodes be upgraded to a Distinguished Node.
For some guidance on the best way to configure a membership read Create Resilient Memberships in the reference section.

- Click Create to complete the operation. Click Cancel to discard the changes.
- APL
- Acceptor - the node will vote on the order in which replicated changes will play out.
Proposer - the node will create proposals for changes that can be applied to the other nodes.
Learner - the node will receive replication traffic that will synchronize its data with other nodes. - PL
- Proposer - the node will create proposals for changes that can be applied to the other nodes.
Learner - the node will receive replication traffic that will synchronize its data with other nodes. - Distinguished Node
- Acceptor + - the distinguished node is used in sitations where there is an even number of nodes, a configuration that introduces the risk of a tied vote. The Distinguished Node's bigger vote ensures that it is not possible for a vote to become tied.
- In each zone, create a directory in the hdfs file space. To avoid permission problems, ensure that the owning user/group are identical across the zones. Use Hadoop's filesystem command to complete the tasks:
hadoop fs -mkdir /user/hiver hadoop fs -chown -R hiver:groupname /user/hiver
- As user
hdfs, run the following commands on each data center:hadoop fs -mkdir /user/hiver/warehouse-replicated hadoop fs -chown hiver:hiver user/hiver/warehouse-replicated
This ensures that the a universal system user has read/write access to the hdfs directorywarehouse-replicatedthat will be replicated through WD Fusion. - Once the folder is in place on all nodes, login to WD Fusion's UI on one of the WD Fusion nodes and click on the Replicated Folders tab.
- Click on the + Create button.

Create Rule
- The replicated folder entry form screen will appear.

Create Rule
Navigate the HDFS File Tree (1), on the right-hand side of the New Rule panel to select your target folder, created in the previous section. The selected folder will appear in the Path entry field. You can, instead, enter the full path to the folder in the Path directory.
Next, select two or more zones from the Zones list (2). You then select a Membership from the dropdown selector. If there's no existing membership with the combination of Zones that you selected, then you will see the message:There are no memberships available matching your criteria.
In this case you can create a new membership, see 4.1 Create a membership and restart the Create Replicated Folder process. - You can now complete the creation of the Replicated folder by clicking on the Create button. However, there are some additional options available on the Advanced Options panel. Consider if you need to apply any Advanced Options for the folder.
Note that the allocated writer for this zone is listed under the a Advanced Options panel. This can be useful information in case you need to troubleshoot replication problems.

These include Preserve Origin Block Size, which is used for columnal storage formats such as parquet, Preserve Replication Factor which is used when want replica data to continue to use the replication factor that is set on its originating cluster, rather than the use the factor that applies on the new cluster. Exclude from replication ? lets you set an "exclude pattern" to indicate files and folders in your replicated folder that you don't want to be replicated. If you apply any Advanced Options you need to click the Update button to make sure that they are applied.Known Issue: Add exlusions after you have created a folderThe option Override Consistency Check Interval allows administrators to set a consistency check interval that is specific to the replicated folder space and different from the default value that is set in the Consistency Check section of the Settings tab.
If you need to set up exclusions, set them up after you have created the replicated folder. If you enable them during the folder's creation they will be ignored. This issue will be fixed in a coming release.
FUI-2414Known Issue: Now fixed
The minor fault with the Replicated folder Advanced option for Overriding the Consistency Check interval where enabling the option fixes the interval to 6 hours, regardless of what value you enter, has been fixed in version 2.6.6
FUI-1984
Path interpretation
If the path contains a leading slash "/", we assume it is an absolute path, if it contains no leading slash then we assume it is a relative path and the root directory will be added to the beginning of the exclusion.
- If you didn't complete a consistency check on the selected folder, you may do so now.

Replicate to Zones
- After the completion of a consistency check, the Consistency column will report the consistency status.

Replicated folder status
- Writer for this zone
- Indicates which node is set to handle writes for this zone.
- Path
- The file path for the replicated folder in question.
- Zones
- The zones that are replicated between, for the corresponding folder.
- Membership
- The membership used to define the replication.
- Advanced Options
- Various advanced options that can be set for a replicated folder. See Advanced Options.
- Source of truth
- From the available zones, you must choose the one that represents the most up-to-date state.
- Resolve
- Once you have selected from the available zones, click the Resolve button.
- Path
- Shows the path to be checked
- HDSF File Tree
- Use the HDFS File Tree to select the directory to be checked.
- Outcome
- Note: When running a custom consistency check, there may be a delay before results are shown. Stay on this page to see the results.
Please select a path and click "Check Now". - Outcome
- The Outcome panel will now report on the number of inconsistencies. You will be invited to "Click for a full report".
- Select the Source of truth from the drop-down. This will flag one of the available zones as most up-to-date / most correct in terms of stored data.
- Select from one of two Resolution types, Recursive or Preserve
- Recursive
- If checkbox is ticked, this option will cause the path and all files under it to be made consistent. The default is true, but is ignored if the path represents a file.
- Preserve
- If checkbox is ticked, when the repair is executed in a zone that is not the source zone, any data that exists in that zone but not the source zone will be retained and not removed. The default is false, i.e., to make all replicas of the path consistent by removing all data in the no-source zone(s) that does not exist in the source.
- path
- The path for which the list of repairs should be returned. The default value is the root path, "/".
- recursive
- If true, also get repairs done on descendants of path. This option is false by default.
- showAll
- Whether or not to include past repairs for the same file. The options are "true" to show all repairs on the given path, and "false" to show only the last repair.
- sortField
- The field by which the entries in the
RepairListDTOshould be sorted. The options are to sort by the "startTime" or "path" property. The default value is "path". - sortOrder
- The order in which the entries should be sorted according to the sort field. The options are to sort in ASC (ascending) or DESC (descending) order.
- return
- A RepairListDTO representing a list of repairs under path.
- Enable High Availability on your Hadoop clusters. See the documentation provided by your Hadoop vendor, i.e. - Cloudera (via QJM) or Hortonworks.
The HA wizard does not set the HDFS dependency on ZooKeeper
Workaround:
- Create and start a ZooKeeper service if one doesn't exist.
- Go to the HDFS service.
- Click the Configuration tab.
- In the Service-Wide category, set the ZooKeeper Service property to the ZooKeeper service.
- Edit WD Fusion configuration element '
fusion.underlyingFs' to match the new nameservice ID in the cluster-widecore-site.xmlin your Hadoop manager.
E.g, change:<property> <name>fusion.underlyingFs</name> <value>hdfs://vmhost08-vm0.cfe.domain.com:8020</value> </property>To:<property> <name>fusion.underlyingFs</name> <value>hdfs://myCluster</value> </property> - Click Save Changes to commit the changes.
- If Kerberos security is installed make sure the configurations are there as well: Setting up Kerberos with WD Fusion.
- You'll need to restart all Fusion and IHC servers once the client configurations have been deployed
- Consistency Status
- A status which links to the consistency check report. It can report Check Pending, Inconsistent, Consistent or Unknown.
- Last Check:
- Shows the time and date of the check that produced the current status. By default, Consistency checks are automatically started every 24 hours.
- Next Check:
- Shows the time and date of the next automatically scheduled Consistency Check. Remember, you don't need to wait for this automatic check, you can trigger a consistency check at any time through the Consistency Check tool.
- Start by completing a fresh Consistency Check. Select the inconsistent object using the corresponding check box, then click on the Consistency Check button. After a few moments you'll get an up-to-date report on inconsistency.

Consistency Check
- To fix an inconsistency, click on the Inconsistent link in the Consistency column.

Inconsistent
- The inconsistency is shown in terms of object properties.

Consistency Check
- Path:
- The absolute path for the object.
- Length:
- The size of the object.
- Is a directory:
- Identifies if the object is a directory (true) or a file (false).
- Owner:
- System account that owns the object.
- Group:
- System group associated with the object(s)
- Permission:
- File permissions for the object.
- Compare the various states of the inconsistent element across your cluster. You need to decide which zone(s) have a correct/up-to-date copy of the element, then select the zone under the Source of truth column. Click Resolve.
Confirm Consistency Check
- You'll get a confirmation prompt that will confirm which copies will be overwritten and which zone will source the file. Click Confirm to complete the fix or click Cancel to stop the process.

Consistency Check
- If you clicked Confirm then the fix operation will begin. The UI will indicate Fix requested.

Consistency Check
- Rechecking the Consistency will now confirm that the object is now consistent across all zones.

Consistency Check
- Username
- System user performing the transfer. (String)
- File name
- Name of the file being transferred. (String)
- Remote FS
- The file of the originating node. (URI)
- Origin
- The file's originating Zone. (String)
- Size
- The cumulative size of data transferred. (Long)
- Appends
- The number of appends that have been made to the file being transferred. (Long)
- AppendSize
- The size of the latest append.
- Remaining
- Remaining bytes still to be transferred for the latest append. (Long)
- Percent remaining
- Percentage of the file still to be transferred. (Double)
- Bytes/Sec
- The current rate of data transfer, i.e. Amount of file downloaded so far / elapsed download time. (Long)
- State
- One of "in progress", "incomplete", "completed", "appending", "append complete", "deleted" or "failed". (TransferState)
In progress: means we are performing an initial pull of the file.
Appending: means data is currently being pulled and appended to the local file.
Append completed: means all available data has been pulled and appended to the local file, although more data could be requested later.
Note: files can be renamed, moved or deleted while we pull the data, in which case the state will become "incomplete".
When the remote file is closed and all of its data has been pulled, the state will then change to "Complete".
If a file is deleted while we are trying to pull the end state will be "deleted".
If the transfer fails the state will be "failed". - Start Time
- The time when the transfer started. (Long)
- Elapsed Time
- Time that has so far elapsed during the transfer. Once the transfer completes it is then a measure of the time between starting the transfer and completing. (Long)
- Complete Time
- During the transfer this is an estimate for the complete time based on rate of through-put so far. Once the transfer completes this will be the actual time at completion. (Long)
- Delete Time
- If the file is deleted then this is the time the file was deleted from the underlying filesystem. (Long)
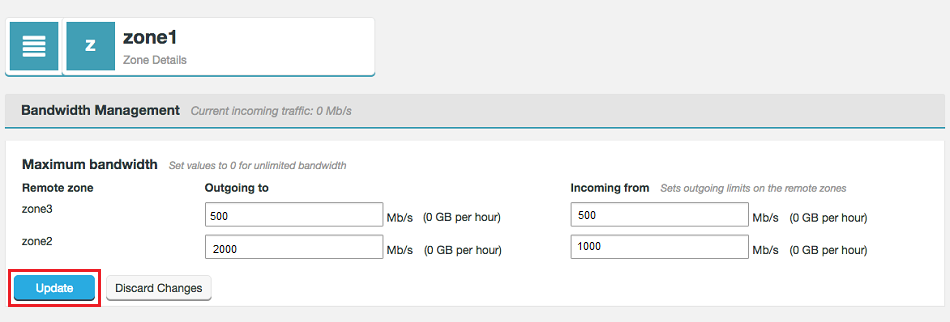
- Limit the rate of outgoing traffic to each other zone.
- Limit the rate of incoming traffic from each other zone.
- Click on the Set bandwidth limit button for each corresponding zone.

- The Maximum bandwidth dialog will open. For each remote zone you can set a maximum Outgoing to and Incoming from values. Entered values are in Megabits per second. These are converted into Gigabytes per hour and displayed in brackets after each entry field.
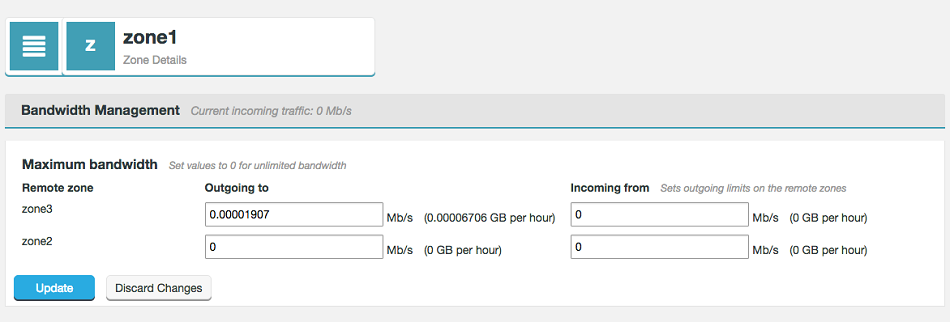
Maximum bandwidth entry dialog.
- Outgoing to
- The provided value will be used as the bandwidth limit for data coming from the target zone.
- Incoming from
- As it is only possible to actually limit traffic at source, the Incoming from value is applied at the target zone as the Outgoing to limit for data being sent to the present zone.
- When you have set your bandwidth values, click Update to apply these settings to your deployment.
Maximum bandwidth entry dialog.
- Log in to the WD Fusion UI. Click on the Settings tab.
- Click on Disk Monitoring at the top of the side menu.

Settings - Disk monitor
- Click Create.

Settings - Disk monitor
- Enter the required details for setting up a disk monitor.

Settings - Disk monitor
- File system path
- Enter the full path of the system directory that will be monitored for disk usage.
- Severity level
- Select a system log severity level (Severe, Warning, Info or Debug) that will correspond with the Disk Capacity Threshold.
Caution Assigning a monitor with Severe level will impact operation should its trigger Disk Capacity Threshold be met. The affected WD Fusion will immediately shut down to protect its file system from corruption. Ensure that Severe level monitors are set up with a threshold that corresponds with serious risk. Set the threshold too low and you may find WD Fusion nodes are shutdown needlessly.
- Disk Capacity Threshold (bytes)
- The maximum amount of data that can be consumed by the selected system path before the monitor sends an alert message to the log file.
- Message
- A human-readible message that will be sent to the log at the point that the Disk Capacity Threshold is reached.
- You can set a monitor to have multiple trigger points. Click + Add another severity monitor and add an additional Severity level, Disk Capacity Threshold and Message. You can have a separate monitor for each Log level.

Settings - Additional Disk monitors
- Log in to the WD Fusion UI. Click on the Settings tab.
- Click on UI Settings link on the side menu.
- Enter a new HTTP Port or HTTP SSL.

Settings - Change it
- Click Update. You may need to update the URL in your browser to account for the change you just made.
- Login to WD Fusion UI, click on the Settings tab.
- Click the Enable SSL for WD Fusion checkbox.

- Enter the details for the following properties:
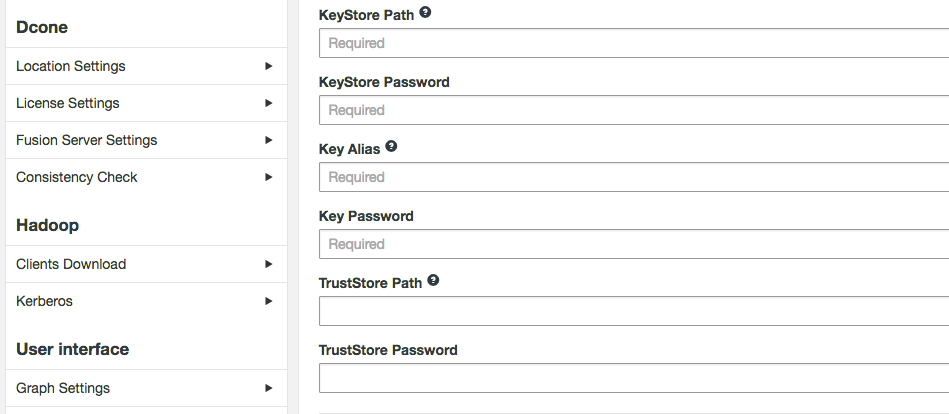
- KeyStore Path
- Path to the keystore.
e.g. /opt/wandisco/ssl/keystore.ks - KeyStore Password
- Encrypted password for the KeyStore.
e.g. *********** - Key Alias
- The Alias of the private key.
e.g. WANdisco - Key Password
- Private key encrypted password.
e.g. *********** - TrustStore Path
- path to the TrustStore.
/opt/wandisco/ssl/keystore.ks - TrustStore Password
- Encrypted password for the TrustStore.
e.g. ***********
- Click Update to save the settings. Repeat the steps for all WD Fusion servers.
- Create the keystores / truststores. Every Fusion Server and IHC server should have a key store with a private key entry / certificate chain for encrypting and signing. Every Fusion Server and Fusion Client must also have a truststore for validating certificates in the path specific in "
fusion.ssl.truststore". The keystores and truststores can be the same file and may be shared amongst the processes. - Fusion Server configuration
To configure Server-Server or Server-Client SSL, enter the following configurations to the
application.propertiesfile. e.g.
Server-Server or Server-Clientssl.enabled=true ssl.key.alias=socketbox ssl.key.password=*********** ssl.keystore=/etc/ssl/key.store ssl.keystore.password=**************
Configure the keystore for each server:
Server-to-Server or Server-to-IHCKey Value Default File ssl.key.alias alias of private key/certificate chain in key store NA application.properties ssl.key.password encrypted password to key NA application.properties ssl.keystore path to Keystore NA application.properties ssl.keystore.password encrypted password to key store NA application.properties
Configure the truststore for each server:
Key Value Default File ssl.truststore path to truststore Default application.properties ssl.truststore.password encrypted password to trust store Default application.properties - Fusion client configuration Server-Client only
Configure the truststore for each client:
Key Value Default File fusion.ssl.truststore path to truststore NA core-site.xml fusion.ssl.truststore.password encrypted password for truststore NA core-site.xml fusion.ssl.truststore.type JKS, PCKS12 JKS core-site.xml - IHC Server configuration (Server-IHC SSL only)
Configure the keystore for each IHC server:
Key Value Default File ihc.ssl.key.alias alias of private key/certificate chain in keystore NA .ihc ihc.ssl.key.password encrypted password to key NA .ihc ihc.ssl.keystore path to keystore NA .ihc ihc.ssl.keystore.password encrypted password to keystore NA .ihc ihc.ssl.keystore.type JKS, PCKS12 JKS .ihc - Enable SSL:
The following configuration is used to turn on each type of SSL encryption:
Type Key Value Default File Fusion Server - Fusion Server ssl.enabled true false application.properties Fusion Server - Fusion Client fusion.ssl.enabled true false core-site.xml Fusion Server - Fusion IHC Server fusion.ihc.ssl.enabled true false .ihc Enable SSL (HTTPS) for the WD Fusion Server
The manual steps for getting WD Fusion Server to support HTTPS connections:
- You need to add the following property to
application.properties.Type Key Value Default File Enable HTTPS support for Fusion core fusion.http.policy HTTP_ONLY, HTTPS_ONLY, BOTH_HTTP_HTTPS. If you enable HTTPS_ONLY, you need to make some matching changes to the WD Fusion UI server so that it is able to communicate with the core Fusion server. HTTP_ONLY application.properties Enable HTTPS for Fusion UI
Note that if you enable the Fusion Server to communicate over HTTPS-only, then you must also make the following changes so that the Fusion UI matches up:
target.ssl true target.port 443
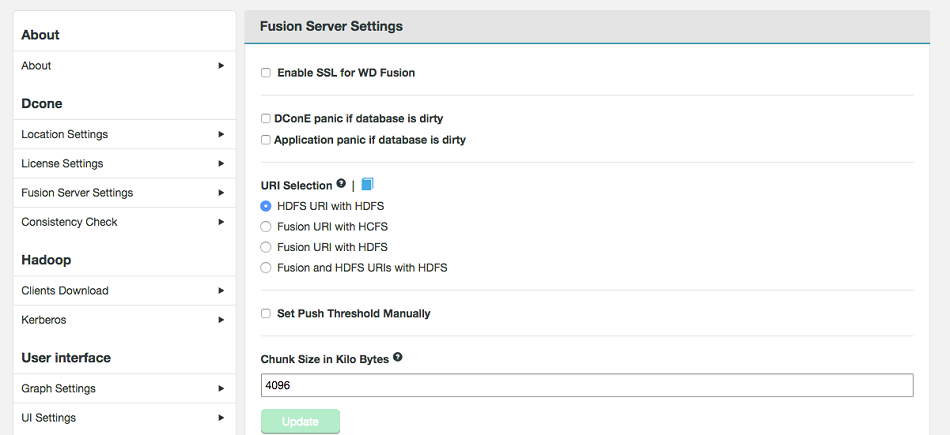
(This is the port that Fusion Server uses for accepting REST requests, over HTTPS). - Use HDFS URI with HDFS file system

This option is available for deployments where the Hadoop applications support neither the WD Fusion URI or the HCFS standards. WD Fusion operates entirely within HDFS.
This configuration will not allow paths with thefusion://uri to be used; only paths starting withhdfs://or no scheme that correspond to a mapped path will be replicated. The underlying file system will be an instance of the HDFS DistributedFileSystem, which will support applications that aren't written to the HCFS specification.- Use WD Fusion URI with HCFS file system
-

This is the default option that applies if you don't enable Advanced Options, and was the only option in WD Fusion prior to version 2.6. When selected, you need to usefusion://for all data that must be replicated over an instance of the Hadoop Compatible File System. If your deployment includes Hadoop applications that are either unable to support the Fusion URI or are not written to the HCFS specfication, this option will not work. - Use Fusion URI with HDFS file system

This differs from the default in that while the WD Fusion URI is used to identify data to be replicated, the replication is performed using HDFS itself. This option should be used if you are deploying applications that can support the WD Fusion URI but not the Hadoop Compatible File System.Benefits of HDFS.
The following advanced options provide a number of low level configuration settings that may be required for installation into certain environments. The incorrect application of some of these settings could cause serious problems, so for this reason we strongly recommend that you discuss their use with WANdisco's support team before enabling them.- Use Fusion URI and HDFS URI with HDFS file system

This "mixed mode" supports all the replication schemes (fusion://,hdfs://and no scheme) and uses HDFS for the underlying file system, to support applications that aren't written to the HCFS specification.- Notification emails
- Server config
- Enable Notification Emails
- Recipients
- Templates
- Example Notification Email
- Enter your SMTP properties in the Server configuration tab.
- Enter recipient addresses in the Recipients tab.
- Tick the Enable check-box for each trigger-event for which you want an email notification sent out.
- [Optionally] You can customize the messaging that will be included in the notification email message by adding your own text in the Templates tab.
Advanced Options
Only apply these options if you fully understand what they do.
The following advanced options provide a number of low level configuration settings that may be required for installation into certain environments. The incorrect application of some of these settings could cause serious problems, so for this reason we strongly recommend that you discuss their use with WANdisco's support team before enabling them.URI Selection
The default behavior for WD Fusion is to fix all replication to the Hadoop Distributed File System /
hdfs:///URI. Setting the hdfs-scheme provides the widest support for Hadoop client applications, so some applications can't support the available "fusion:///" URI or they can only run on HDFS. instead of the more lenient HCFS. Each option is explained below:Setting up Node Location
WD Fusion is designed to fit into deployments that have far-flung data centers. The Node Location setting is used to identify where in the world the data center is situated, using standard global positioning system coordinates. These coordinates will be used by any connected WD Fusion nodes to correctly place the node's location on the world map.

WD Fusion setting server location.
Set up email notifications
This section describes how to set up notification emails that will be triggered if one of the tracked system resources reaches a defined threshold.
Important: Email notification is disabled by default. You must complete the following steps before any messages will be sent.

Email Notification Settings are located in the Zone section of the settings
Complete the following steps to enable email notification:
- You need to add the following property to
For help troubleshooting problems, see Handling Induction Failure.
Additional entry fields are shown, so that you can retry the induction using a wider selection of node properties:
Node properties
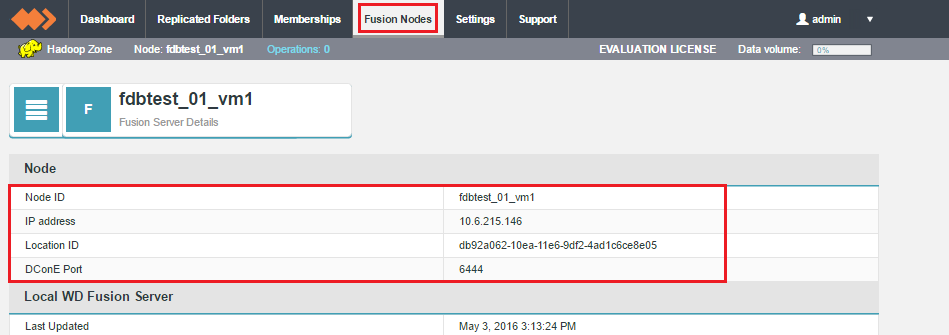
If you click on an individual node on the Fusion Nodes tab, you will drill down to a Node screen that displays all the node's settings.
3.2 Troubleshooting
This section details with how to diagnose and fix problems that many occur in deployment. It's important that you check the Release Notes for any Known issues in the release that you are using. See Release Notes.
Troubleshooting Overview
Read the logs
There are a number of log files that provide information that will be necessary in finding the cause of many problems.
The log files for WD Fusion are spread over three locations. Some processes contain more than one log file for the service. All pertinent log files are captured by running the WANdisco talkback shell script that is covered in the next section.
WD Fusion Server Logs
The logs on the WD Fusion server record events that relate to the data replication system.
WD Fusion UI Server Logs
The WD Fusion user interface layer, responsible for handling interactions between the administrator, WD Fusion and the Hadoop Management layer.
THe UI logs will contain errors such as failed access to the user interface, connectivity errors between the user interface and WD Fusion Server REST API and other syntax errors between the user interface and the WD Fusion server's REST API and other syntax errors whilst performing administrative actions across the UI.
Inter-Hadoop Connect (IHC) Server Logs
Responsible for streaming files from the location of the client write to the WD Fusion server process in any remote cluster to which hadoop data is replicated.
Log analysis
This is the standard format of the WANdisco log messages within Fusion. It includes an ISO8601 formatted timestamp of the entry, the log level / priority, followed by the log entry itself. Log levels we provide in order of severity (highest to lowest) that you may observe:For log analysis and reporting, logs with at the PANIC, SEVERE and ERROR levels should be investigated. The warning level messages indicate an unexpected result has been observed but one that hasn't impacted the system's continued operation. Additional levels may exist, but are used in cases when the logging level has been increased for specific debug purposes. At other times, other levels should be treated as informational (INFO).
Quickly picking out problems
One simple thing that can be done is to grep the log file for any instance of "exception" and/or "PANIC" - this will tell the administrator a great deal without much effort. Using something like:
cat /var/log/fusion/server/fusion-dcone.log.0 | egrep -i "exception|panic"
Talkback
Talkback is a bash script that is provided in your WD Fusion installation for gathering all the logs and replication system configuration that may be needed for troubleshooting problems. Should you need assistance from WANdisco's support team, they will ask for an output from Talkback to begin their investigation.
Talkback location
You can find the talkback script located on the WD Fusion server's installation directory:
$ cd /opt/wandisco/fusion/server/You can run talkback as follows:
$ sudo talkback.shIf a cluster has Kerberos security enabled (Talkback will detect this from WD Fusion's configuration), you may be asked for Kerberos details needed to authenticate with the cluster.
You will be asked to complete the following details:
Running talkback
To run the talkback script, follow this procedure:
We list any current known issues here, along with advice on fixes or workarounds:
Moving objects between mismatched filesystems
If you move objects onto the distributed file system you must make sure that you use the same URI on both the originating and destination paths. Otherwise you'd see an error like this:
[admin@vmhost01-vm1 ~]$ hadoop fs -mv /repl2/rankoutput1 fusion:///repl2/rankoutput2/
15/05/13 21:22:40 INFO client.FusionFs: Initialized FusionFs with URI: fusion:///, and Fs: hdfs://vmhost01-vm1.cluster.domain.com:8020. FileSystem: DFS[DFSClient[clientName=DFSClient_NONMAPREDUCE_-721726966_1, ugi=admin@DOMAIN.EXAMPLE (auth:KERBEROS)]]
mv: `/repl2/rankoutput1': Does not match target filesystem
If you use the fusion:/// on both paths it will work, E.g.
[admin@vmhost01-vm1 ~]$ hadoop fs -mv fusion:///repl2/rankoutput1 fusion:///repl2/rankoutput1
15/05/13 21:23:27 INFO client.FusionFs: Initialized FusionFs with URI: fusion:///, and Fs: hdfs://vmhost01-vm1.cluster.domain.com:8020. FileSystem: DFS[DFSClient[clientName=DFSClient_NONMAPREDUCE_-1848371313_1, ugi=admin@DOMAIN.EXAMPLE (auth:KERBEROS)]]
Note that since the non-replicated directory doesn't yet exist in ZONE2 it will get created without the files it contains on the originating zone. When running WD Fusion using the
fusion:///, moving non-replicated directory to replicated directory will not work unless you use of the fusion:/// URI.
You can't move files between replicated directories
Currently you can't perform a straight move operation between two seperate replicated directories.
Handling file inconsistencies
WD Fusion's replication technology ensures that changes to data are efficiently propagated to each zone. There are, however, a few cases where the consistency of objects in the distributed file system lose consistency. WD Fusion can be set to schedule periodic consistency checks, or an administrator can trigger a check from the Admin UI or via the REST API.
If an inconsistency is found then the administrator needs to use the repair functions available through the WDFusion UI or manually repair the issue using whatever system tools correspond with the Hadoop application. This may require that up-to-date files are manually copied over from one zone to overwrite the corrupted version of the files. In some cases files will need to be deleted/removed in order to restore consistency. You will need to follow the guidelines and documentation that correspond with your underlying applications, e.g. MapR, Hive etc.
The current implementation of the Consistency Check tool compares the size of files between zones. We're looking carefully at how we can implement a qualitative check that can specifically identify file corruption while not greatly impacting performance.
Please note that when very large files are repaired, it may appear that the process has stalled with different numbers of appends getting reported, post-completion. We recommend that you allow repair operations plenty of time to complete.
Username Translation
If any nodes that take part in a consistency check have the Username Translation feature enabled, then inconsistencies in the "user" field will be ignored.
Transfer reporting
When looking at the transfer reporting, note that there are situations in which HFlush/early file transfer where transfer logs will appear incorrect. For example, the push threshold may appear to be ignored. This could happen if an originating file is closed and renamed before pulls are triggered by the HFlush lookup. Note that although this results in confusing logs, those logs are in fact correct; you would see only two appends, rather than the number determinded by your push threshold - one in the very beginning, and one from the rename, which pulls the remainder of the file. What is happening is optimal; all the data is available to be pulled at that instant, so we might as well pull all of it at once instead of in chunks.
Fine-tuning Replication
WANdisco's patented replication engine, DConE, can be configured for different use cases, balancing between performance and resource costs. The following section looks at a number of tunable properties that can be used to optimize WD Fusion for your individual deployment.
Increasing thread limit
WD Fusion processes agreements using a set number of threads, 20 by default, which offers a good balance between performance and system demands.
It is possible, in cases where there are many Copy agreements arriving at the same time, that all available threads become occupied by the Copy commands. This will block the processing of any further agreements.
You can set WD Fusion to reserve more threads, to protect against this type of bottleneck situation:
Increase executor.threads property
Tuning Writer Re-election
Only one WD Fusion node per zone is allowed to write into a particular replicated directory. The node that is assigned to do the writing is called the writer. See more about the role of the writer.
Should the current writer suddenly become unavailable, then a re-election process begins for assigning the role to one of the remaining nodes. Although the re-election process is designed to balance speed against and system resource usage, there may be deployments where the processing speed is critical. For this reason, the reelection timing can be tuned with the following system:
Tunable properties
Setting the writer re-election period
Period of time between a writer going off-line and another writer is elected and starts picking up = writerCheckPeriod * writerCheckMultiple. i.e.i.e., the default is 3 minutes ( writerCheckPeriod 60s x writerCheckMultiple 3)
If you feel these default settings create cause the system to wait too long before kicking off a re-election then you can update them using an API call:
curl -X POST http://.../fusion/fs/properties/global?path=<mapped path>&writerCheckPeriod=<new period>&writerCheckMultiple=<new multiple>You can adjust these properties to be optimal for your deployment. However, consider the following pointers:
Handling Induction Failure
In the event that the induction of a new node fails, here is a possible approach for manually fixing the problem using the API.
Requirements: A minimum of two nodes with a fusion server installed and running, without having any prior knowledge about the other. This can be verified by querying <hostname>:8082/fusion/nodes
Steps:
Generate an xml file (we'll call it induction.xml) containing an induction ticket with the inductors details (Generally the inductor port should not change but this is the port that all DConE traffic uses. You can find this in your application.properties file as application_port)
<inductionTicket>
  <inductorNodeId>${NODE1_NODEID}</inductorNodeId>
  <inductorLocationId>${NODE1_LOCATIONID}</inductorLocationId>
  <inductorHostName>${NODE1_HOSTNAME}</inductorHostName>
  <inductorPort>6789</inductorPort>
</inductionTicket>curl -v -s -X PUT -d@${INDUCTION.XML} -H "Content-Type: application/xml" http://${NODE2_HOSTNAME}:8082/fusion/node/${NODE2_IDENTITY}MEMBERSHIP
Requirements: A minimum of two nodes that have been inducted.
Steps:
Generate an xml file (we'll call it membership.xml) containing a membership object. DConE supports various configuration of node roles but for the time being the Fusion UI only supports <Acceptor, Proposer, Learner> and <Proposer, Learner>. If you choose to have an even number of <Acceptor, Proposer, Learner> nodes you must specify a tiebreaker.
<membership>
  <membershipIdentity>${MEANINGFUL_MEMBERSHIP_NAME}</membershipIdentity>
  <distinguishedNodeIdentity>${NODE1_NODEID}</distinguishedNodeIdentity>
  <acceptors>
    <node>
      <nodeIdentity>${NODE1_NODEID}</nodeIdentity>
      <nodeLocation>${NODE1_LOCATIONID}</nodeLocation>
    </node>
    <node>
      <nodeIdentity>${NODE2_NODEID}</nodeIdentity>
      <nodeLocation>${NODE2_LOCATIONID}</nodeLocation>
    </node>
  </acceptors>
  <proposers>
    <node>
      <nodeIdentity>${NODE1_NODEID}</nodeIdentity>
      <nodeLocation>${NODE1_LOCATIONID}</nodeLocation>
    </node>
    <node>
      <nodeIdentity>${NODE2_NODEID}</nodeIdentity>
      <nodeLocation>${NODE2_LOCATIONID}</nodeLocation>
    </node>
  </proposers>
  <learners>
    <node>
      <nodeIdentity>${NODE1_NODEID}</nodeIdentity>
      <nodeLocation>${NODE1_LOCATIONID}</nodeLocation>
    </node>
    <node>
      <nodeIdentity>${NODE2_NODEID}</nodeIdentity>
      <nodeLocation>${NODE2_LOCATIONID}</nodeLocation>
    </node>
  </learners>
</membership>curl -v -s -X POST -d@${MEMBERSHIP.XML} -H "Content-Type: application/xml" http://${NODE_HOSTNAME}:8082/fusion/node/${NODE_IDENTITY}/membershipSTATEMACHINE
Requirements: A minimum of two nodes inducted together and a membership created that contains them (you'll want to make a note of the membership id of your chosen membership).
Steps:Generate an xml file (we'll call it statemachine.xml) containing a fsMapping object.
<replicatedDirectory>
  <uri>${URI_TO_BE_REPLICATED}</uri>
  <membershipId>${MEMBERSHIP_ID}</membershipId>
  <familyRepresentativeId>
    <nodeId>$NODE1_ID</nodeId>
  </familyRepresentativeId>
</replicatedDirectory>
Send the xml file to one of your nodes:
curl -v -s -X POST -d@${STATEMACHINE.XML} -H "Content-Type: application/xml" http://${NODE1_HOSTNAME}:8082/fusion/fsEmergency bypass to allow writes to proceed
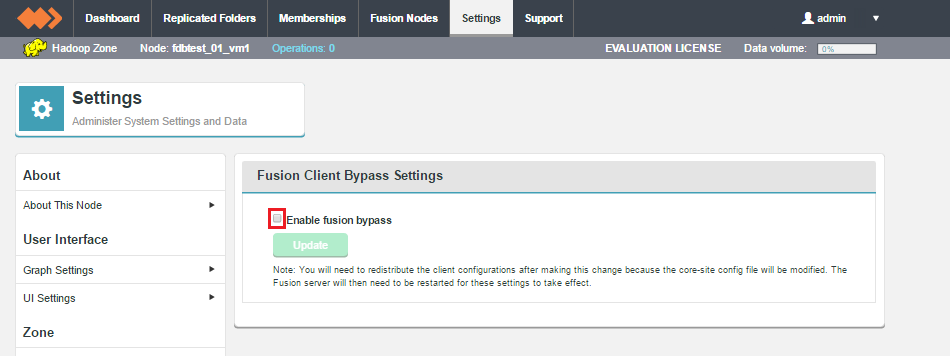
If WD Fusion is down and clients use the HDFS URI, then further writes will be blocked. The emergency bypass feature gives the administrator an option to bypass WD Fusion and write to the underlying file system, which will introduce inconsistencies between zones. This is suitable for when short-term inconsistency is seen as a lesser evil compared to blocked progress.
The inconsistencies can then be fixed later using the Consistency and Repair process(es). A client that is allowed to bypass to the underlying filesystem will continue to bypass for the duration of the retry interval. Long-running clients will automatically reload configurations at a hardcoded 60 second interval. Thus it is possible to disable and enable the bypass on-the-fly.
Enable/disable emergency bypass via the UI
Enable/disable emergency bypass via manual configuration change
In core-site.xml add the following properties:
<property>
<name>fusion.client.can.bypass</name>
<value>true or false; default is false</value>
</property>
<property>
<name>fusion.client.bypass.response.secs</name>
<value>integer number representing seconds; default is 14</value>
</property>
<property>
<name>fusion.client.bypass.retry.interval.secs</name>
<value>integer number representing seconds; default is 60</value>
</property>
The properties are also listed in the Reference Section.
Kerberos Troubleshooting
Kerberos Error with MIT Kerberos 1.8.1 and JDK6 prior to update 27
Prior to JDK6 Update 27, Java fails to load the Kerberos ticket cache correctly when using MIT Kerberos 1.8.1 or later, even after a kinit.
The following exception will occur when attempting to access the Hadoop cluster.
WARN ipc.Client: Exception encountered while connecting to the server : javax.security.sasl.SaslException:
GSS initiate failed [Caused by GSSException: No valid credentials provided (Mechanism level: Failed to find any Kerberos tgt)]
The workaround is:
Uninstall WD Fusion
In cases where you need to remove WD Fusion from a system, use the following script:
/opt/wandisco/fusion-ui-server/scripts/uninstall.sh
Usage
Example
sudo CONFIG_BACKUP_DIR=/data/my_config_backup LOG_BACKUP_DIR=/data/my_log_backup /opt/wandisco/fusion-ui-server/scripts/uninstall.sh -c -l -p
See below for a full explanation of each option:
Uninstall with config purge
Running the script with -p will also include the removal of any configuration changes that were made during the WD Fusion installation.
Use the purge (-p) option in the event that you need to complete a fresh installation.
As the purge option will completely wipe your installation, there's a backup option that can be run to back up your config files, which gives you an easier method for recovering your installation:
Backup config/log files
Run the script with the -c option to back up your config and -l to back up WD Fusion logs. The files will be backed up to the following location:
/tmp/fusion_config_backup/fusion_configs-YYYYMMDD-HHmmss.tar.gzYou can change the locations that the script uses for these backups by adding the following environmental variables:
CONFIG_BACKUP_DIR=/path/to/config/backup/dir
LOG_BACKUP_DIR=/path/to/log/backup/dir
Dry run
Use the -d option to test an uninstallation. This option lets you test the effects of an unstallation, without any actual file changes being made. Use this option to be sure that your uninstallation will do what you expect.
Help
Running the script with -h outputs a list of options for the script.
[sysadmin@localhost ~]$ sudo /opt/wandisco/fusion-ui-server/scripts/uninstall.sh -h
Usage: /opt/wandisco/fusion-ui-server/scripts/uninstall.sh [-c] [-l] [-p] [-d]
 -c: Backup config to '$CONFIG_BACKUP_DIR' (default: /tmp/fusion_config_backup).
 -d: Dry run mode. Demonstrates the effect of the uninstall without performing the requested actions.
 -h: This help message.
 -l: Backup logs to '$LOG_BACKUP_DIR' (default: /tmp/fusion_log_backup).
 -p: Purge config, log, data files, etc to leave a cleaned up system.
4. Managing Replication
WD Fusion is built on WANdisco's patented DConE active-active replication technology. DConE sets a requirement that all replicating nodes that synchronize data with each other are joined in a "membership". Memberships are co-ordinated groups of nodes where each node takes on a particular role in the replication system.
For more information about DConE and its different roles see the reference section's chapter called A Paxos Primer.
4.1 Create a membership
You will be prevented from creating more than 1 membership with a particular configuration.

Guide to node types
4.2 Replicated Folders
WD Fusion allows selected folders within your hdfs file system to replicated to other data centers in your cluster. This section covers the set up and management of replicated folders.
Create a replicated folder
The first step in setting up a replicated folder is the creation of a target folder:
Create Rule
Edit/ View Replicated Folder
If you click on the View link for a Replicated Folder, then you enter a tabbed UI:
View/Edit

The View/Edit tab lets you make changes to selected properties of the Replicated Folder:
Consistency Check
The Consistency Check tab offers access to the consistency repair tool.


You will see a confirmation message concerning your choice of repair. There is a checkbox that lets you choose to Preserve extraneous files, Click Confirm to conplete the repair.

After clicking Confirm, you will get a rundown of the state of each zone, after the repair has been completed.
Custom Consistency Check
Use the Custom Consistency Check to select a sub directory of the Replicated Directory and check that it is in a consistent state across all


File Transfers
The File Transfer panel shows the movement of data coming into the zone.

Repair
The repair tab provides a tool for repairing an inconsistency between the available zones. Run through the following procedure to perform a repair:

Checking repair status
It's possible to generate a report on the current state of a repair. Follow the procedure outlined below:
You can access repairs by invoking the following API mount point:
<node-hostname>:8082/fusion/fs/repairsParameters
The Repair status tool is currently only available through the command-line. In the next release the functionality will be added to the Fusion UI.
Configure Hadoop
Once WD Fusion has been installed and set up, you will need to modify your Hadoop applications so that when appropriate, they write to your replicated folder.

Configure Hadoop applications to write to the replicated file space.
Configure for High Availability Hadoop
If you are running Hadoop in a High Availability (HA) configuration then you should run through the following steps for WD Fusion:
Known issue on failover
Where High Availability is enabled for the NameNode and WD Fusion, when the client attempts to failover to the Standby NameNode it generates a stack trace that outputs to the console. As the WD Fusion client can only delegate the method calls to the underlying FileSystem object, it isn't possible to properly report that the connection has been reestablished. Take care not to assume that a client has hung, it may, in fact, be in the middle of a transfer.
4.3 Reporting
The following section details with the reporting tools that WD Fusion currently provides.
4.3.1 Consistency Check
The consistency check mechanism lets you verify that replicated HDFS data is consistent between sites. Read about Handling file inconsistencies.
Consistency Checks through WD Fusion UI
Username Translation
If any nodes that take part in a consistency check have the Username Translation feature enabled, then inconsistencies in the "user" field will be ignored.

Replication Rules table - indicates if inconsistencies are detected.
Consistency
Click on the report link to get more information about the current consistency check results.
Fix inconsistencies with the Consistency Check tool
WD Fusion's Consistency Check tool includes a feature for resolving any inconsistencies that are detected across the distributed file system. Use the following procedure to resolve any such inconsistencies:

Consistency Check

Consistency Check
4.3.2 File Transfer Report
As a file is being pulled into the local zone, the transfer is recorded in the WD Fusion server and can be monitored for progress.
Use the REST API filter by the replicated path and sort by ascending or descending "complete time" or "start time":
GET /fusion/fs/transfers?path=[path]&sortField=[startTime|completeTime]&order=[ascending|descending]
File transfer Report Output
Example output showing an in-progress and completed transfer:
<?xml version="1.0" encoding="utf-8" standalone="yes"?>
<fileTransfers>
    <fileTransfer>
        <startTime>1426020372314</startTime>
        <elapsedTime>4235</elapsedTime>
        <completeTime>1426020372434</completeTime>
        <username>wandisco</username>
        <familyRepresentativeId>
            <nodeId>dconefs5-1</nodeId>
            <dsmId>93452fe3-c755-11e4-911e-5254001ba4b1</dsmId>
        </familyRepresentativeId>
        <file>/tmp/repl/isoDEF._COPYING_<;/file>
        <remoteFs>hdfs://vmhost5-vm4.frem.wandisco.com:8020</remoteFs>
        <origin>dc1<;/origin>
        <size>4148166656</size>
        <remaining>4014477312</remaining>
        <bytesSec>3.3422336E7</bytesSec>
        <percentRemaining>96.77714626516683</percentRemaining>
        <state>in progress</state>
    </fileTransfer>

    <fileTransfer>
        <startTime>1426019512082</startTime>
        <elapsedTime>291678</elapsedTime>
        <completeTime>1426019803760</completeTime>
        <username>wandisco</username>
        <familyRepresentativeId>
            <nodeId>dconefs5-1</nodeId>
            <dsmId>93452fe3-c755-11e4-911e-5254001ba4b1</dsmId>
        </familyRepresentativeId>
        <file>/tmp/repl/isoABC</file>
        <remoteFs>hdfs://vmhost5-vm4.frem.wandisco.com:8020</remoteFs>
        <origin>dc1</origin>
        <size>4148166656</size>
        <remaining>0</remaining>
        <bytesSec>1.4221733E7</bytesSec>
        <percentRemaining>0.0</percentRemaining>
        <state>complete</state>
    </fileTransfer>
</fileTransfers>
Output key with data type
Record retention
Records are not persisted and are cleared up on a restart. The log records are truncated to stop an unbounded use of memory, and the current implementation is as follows:
For each state machine, if there are more than 1,000 entries in its list of transfers we remove the oldest transfers ,sorted by complete time, which are in a terminal state ("completed", "failed" or "deleted") until the size of the list is equal to 1,000. The check on the number of records in the list is performed every hour.
4.4 Deleting memberships
It is currently not possible to delete memberships that are no longer required. Currently, removing memberships would potentially break the replication system.
4.5 Bandwidth management
For deployments that are run under an enterprise license, additional tools are available for monitoring and managing the amount of data transfered between zones.
Enterprise License only The Bandwidth Management tools are only enabled on clusters that are running on an Enterprise license. See the Deployment Checklist for details about License Types.
Overview
The bandwith management tools provide two additional areas of functionality to support Enterprise deployments.
Any applicable bandwidth limits are replicated across your nodes and applied on a per-zone basis.
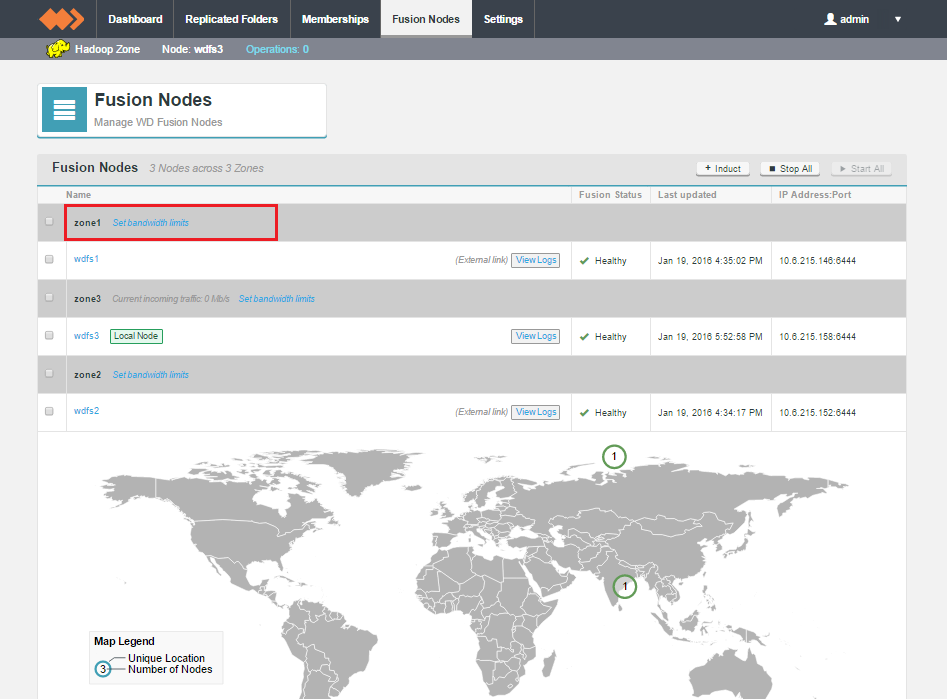
Fusion Nodes - when Enterprise license is in use.
The Fusion Nodes screen will display current incoming traffic for the local zone. You will need to log in to the WD Fusion UI on a node within each Zone to see all incoming traffic levels.
Setting up bandwidth limits
Use this procedure to set up bandwidth limits between your zones
5. Settings
Set up a Custom Disk Monitor
Use this procedure to set up a custom monitor in WD Fusion UI's Disk Monitor tool.
The Monitoring Data tool monitors the disk usage of the WD Fusion software, providing a basic level of protection against it consuming all disk space. The tool also lets you set up your own monitors for user-selected resources.
The disk monitor is no substitute for dedicated, system-wide monitoring tools. Instead, it is intended to be a 'last stand' against possible disk space exhaustion that could lead to data loss or corruption.
Read our Recommendations for system-wide monitoring tools.
Edit a Disk Monitor
You can make changes to an existing custom monitor by clicking on the Edit

Settings - Change it
Caution You can't delete or modify the default Monitor which protects the system from disk space exhaustion from the temporary files created in the WANdisco replication directory /DConE/consensusNode
Delete a Disk Monitor
You can delete a custom monitor by clicking on the Edit or Remove link on the existing custom monitor.

Settings - Remove it
On the edit screen, click Remove Monitor to remove the whole entire custom monitor. It is possible to remove individual rules from the monitor, although you need to remove them in reverse order of severity using the Remove bottom monitor button.

Settings - "Remove Monitor"
Change the UI Settings
You can change how you interact with WD Fusion UI through the browser. Use the following procedure to change either the HTTP or HTTP SSL port that is used to view the UI through a browser.
Changing the WD Fusion server settings
The server settings give you control over traffic encryption between WD Fusion and IHC servers.
Enable SSL for WD Fusion
The following procedure is used for setting up SSL encryption for WD Fusion. The encryption will be applied between all components: Fusion servers, IHC servers and clients.
The procedure must be followed for each WD Fusion server in your replication system, in turn.
Changing SSL Settings
Any changes that you make to the SSL settings must be applied, manually in the UI of every other WD Fusion node. Adding an update to the SSL settings will apply changes in the core-site file via the management endpoint (Cloudera Mananger, Ambari, etc). You may be required to make manual changes to configuration files and restart some services.
Setting up SSL
What follows is a manual procedure for setting up SSL. In most cases it has been superseded by the above Fusion UI-driven method. If you make changed using the following method, you will need to restart the WD Fusion server in order for the changed to appear in on the Settings tab.


