Installation Guide
This guide describes everything you need to deploy Git MultiSite:
- Pre-installation requirements
- A standard installation
- Node configuration
1. Before you install
Before installing Git MultiSite, make sure that you have sufficient hardware and that all required software is configured appropriately.
1.1 Skills requirements
This section describes the knowledge and technical requirements for deployment and operation of the WANdisco software. You should ensure that each of these sections is addressed before you begin the deployment.
| Technical skill requirements | |
|---|---|
System administration |
|
Apache administration (if applicable) |
|
Networking |
|
Git |
|
Gerrit (if applicable) |
|
If you're not confident about handling any of these tasks, you can request a supported installation from WANdisco.
A single administrator can manage all the systems running MultiSite, although it's a good idea to have someone at each site who is familiar with MultiSite Basics.
1.2 Deployment overview
As with any software implementation you should deploy WANdisco SVN MultiSite following a well-defined plan. This helps you keep control, understand the product, and find and fix any issues before production. We recommend including the following steps:
1. Pre-deployment planning: Identify the requirements, people and skills needed for deployment and operation. Agree a schedule and milestones. Highlight any assumptions, constraints, dependencies and risks to a successful deployment.
2. Deployment preparation: Prepare and identify server specifications, locations, node configuration, repository set-up, replication architecture, and the server and software configurations.
3. Testing phase: Actions for an initial installation and testing in a non-production environment, executing test cases, and verifying deployment readiness.
4. Production deployment: Actions to install, configure, test, and deploy the production environment.
5. Post-deployment operations and maintenance: Actions including environment monitoring, system maintenance, training and in-life technical support.
1.3 System requirements
This section describes how to prepare your Git servers for replication. You need to ensure that you've got a suitable platform, with sufficient hardware and compatible versions of the equired software that is configured appropriately. View this information as a set of guidelines, not as a fixed set of requirements.
You can run Git MultiSite nodes as virtual machines on the same physical hardware. Note that this will impact the ability to provide uptime in the event of hardware failure.
If you do want to use virtual machines, make sure your setup is configured to allow uninterrupted running if there is a hardware outage.
1.3.1 Hardware recommendations
| Hardware sizing guidelines | |||||||
|---|---|---|---|---|---|---|---|
| Size | #Users | Repository size (GB) | CPU speed (GHz) | #CPU | #Cores | RAM (GB) | HDD (GB) |
| Small | 100 | 25 | 2 | 1 | 2-4 | 8-16 | 100 |
| Medium | 500 | 100 | 2 | 2 | 4 | 16-32 | 250 |
| Large | 1000 | 500 | 2.66 | 4 | 4 | 32-64 | 750 |
| Very Large | 5000 | 1000 | 2.66 | 4 | 4-6 | 128 | 1500 |
1.3.2 Storage tips
- Use separate physical disks for Git and Git MultiSite.
- Use the fastest possible disks for storage. Disk IO is the critical path to improve repository responsiveness.
- We recommend that you use RAID-1 or RAID-2 solutions. We do not recommend RAID-0.
Knowledgebase
For more information about calculating storage capacity requirements, read the Knowledgebase article, Hardware Sizing Guide.
1.3.3 Processor tips
- Git MultiSite can run on a single 2GHz CPU, but for production you should run fast multi-core CPUs and scale the number of physical processors based on your peak concurrent usage.
- Aim to have no more than 15 concurrent Git users per CPU and 7 concurrent users per CPU core.
Example 1: A server with 4 physical single core processors is expected to support (15x1x4) = 60 concurrent users.
Example 2: A server with 4 physical processors, each being a quad core is expected to support (7x4x4) = 112 concurrent users.
1.3.4 Setup requirements
This is a summary of requirements. You must also check the more detailed Pre-installation checklist.
MultiSite servers require:
- The same operating system
- Java and Python installed
- A browser with network access to all servers
- A command line compression utility
- A unique license key file (provided by WANdisco: you will need one for each node and you may need to provide the server IP addresses)
Git installations require:
- WANdisco's modified distribution of Git, 1.8.5 or later
Make sure you don't overwrite the WANdisco git binaries with system versions. The WANdisco versions are required for replication to work correctly.
- Matching file and directory-level permissions on repositories
You must run Git and Git MultiSite on the same server.
A repository can belong to only one replication group at a time.
2. Installation checklist
Though you may have referred to the checklist before evaluating Git MultiSite, we strongly recommend that you reread it before deployment to confirm that your system still meets all requirements.
| System setup | |
|---|---|
Operating systems |
We've tested the following operating systems:
Go 64-bit
We don't support Git MultiSite on 32-bit architecture, this would impose serious limits on scalability. You are required to deploy on a 64-bit Operating System. During install you'll be asked which user and group you want to run MultiSite as. On Ubuntu this change does not apply system-wide, so some files have the default group set. This is not a problem, but something to consider when deciding on your OS.
|
| Git server | Required version Git MultiSite needs to use WANdisco's own Git distribution (version 1.8.5 or later), which includes modifications necessary to deploy Git with replicated repositories. Write access for system user The replicator user must have write permission for all repositories, because the replicator writes directly to the Git repository. Manage repository file ownership if using Git+SSH:// or file:// Accessing Git repositories via Apache is simplified because all user access is handled via the same daemon user. There are potential permission problems with Git+SSH or file:// when multiple users access the same repository. Tips:
Git Binaries
are now available from WANdisco. They provide the latest builds, including modifications required for Git MultiSite. Same location
All replicated repositories must be in the same location (same absolute path) and in exactly the same state before replication can start. |
Git client |
Any Git client compatible with a Git 1.8 remote repository. |
Hooks |
Hook scripts need to be replicated on all repository replicas |
System memory |
Minimum recommended: 8GB RAM, 16GB swapping container |
Disk space |
Git: Match to projects and repositories. MultiSite Transaction Journal: Equivalent of seven days of changes. To estimate your disk requirements, you need to quantify some elements of your deployment:
|
File descriptor/User process limits |
Ensure hard and soft limits are set to 64000 or higher. Check with the ulimit or limit command.Running lots of repositories
User process limits
When the replicator is not run as a root user the max user processes needs to be set to a high value otherwise your system won't be able to create the threads required to deploy all your repositories.Maximum processes and open files are low by default on some systems. We recommend that process numbers, file sizes and number of open files are set to unlimited. Temporary changes for current shell: -f The maximum size of files created by the shell(default option) Permanent changes: RHEL6 and later: Make the changes in both Ubuntu Changes for Ubuntu should be made in If your user does not see these increased limits you may need to edit further files. If you are logging in as the MultiSite user, add the following to If you If you run commands through |
| Journaling file system | Replicator logs should be on a journaling file system, for example, ext3 on Linux or VXFS from Veritas. Avoiding Data Loss
We have an article in our Knowledgebase that looks at a number of implementation strategies that will militate against potential data loss as a result of power outages - Data Loss and Linux |
| Java | Install JDK 7 Use Oracle Java
Our development and testing is done using Oracle JDK 7. While it may be possible to use other Java packages, we will not be able to support you unless you run with Oracle's JDK 7 or later versions.
|
Python |
Install version 2.3 or later. |
Browser Compatibility |
Set up and configuration requires access through a browser, what follows is a basic (not exhaustive) guide to which browsers are known to work:
Git MultiSite is not compatible with either Internet Explorer 6 or 7
While we understand that some users are still tied to earlier versions of Internet Explorer, it's not possible for us to provide backward compatibility for time immemorial. |
| Network settings | |
|---|---|
| Reserved ports | During installation a block of ports is reserved for use by MultiSite, these ports can't be manually edited after installation - make sure you get them right from the start. Required Ports dcone.port= An integer / between 1 - 65535 (Default: 6444) DConE port handles agreement traffic between sites content.server.port= An integer / between 1 - 65535 (Default: 4321) The content server port is used for the replicator's payload data: repository changes etc. gitms.local.jetty.port= An integer / between 1 - 65535 (Default: 9999) The jetty port is used for the MultiSite management interface. jetty.http.port= An integer / between 1 - 65535 (Default: 8082) The jetty port is used for the MultiSite management interface. jetty.https.port An integer / between 1 - 65535 (Default: 8445) The jetty port is used for the MultiSite management interface when SSL encryption is enabled. Make each port different
In contrast with earlier versions of MulitSite which used the same port for both the UI and replication traffic, Git MuliSite doesn't multiplex different traffic on a single port. You will need to assign a different port to each type of traffic. |
| Firewall or AV software | If your network has a firewall, ensure that traffic is not blocked on the reserved ports noted above. Configure any AV software on your system so that it doesn't block or filter traffic on the reserved ports. |
| Full connectivity | Git MultiSite requires full network connectivity between all nodes. Ensure that each node's server is able to communicate with all other servers that will host nodes in your installation. |
| VPN |
Set up IPsec tunnel, and ensure WAN connectivity.
|
| VPN persistent connections | Ensure that your VPN doesn't reset persistent connections for Git MultiSite. |
| Bandwidth |
Put your WAN through realistic load testing before going into production. You can then identify and fix potential problems before they impact productivity. |
| DNS setup | Use IP addresses instead of DNS hostnames, this ensures that DNS problems won't hinder performance. If you are required to use hostnames, test your DNS servers performance and availability prior to going into production. |
| MultiSite setup | |
|---|---|
| Replication Configuration |
Read our Replication Setup Guide for information on how to optimise your replication. |
| Voters follow the sun | Git users get the best performance if Git MultiSite gets agreement from the local nodee. For this reason you should schedule for the the voter node to correspond with the location in which developers are active (i.e. in office hours). |
Disk space for recovery journal |
Provision large amounts of disk space for multisite-plus/replicator/database, enough space to cover at least the number of commits within a two to four hours during your times of peak Git usage. |
| License Model |
Git MultiSite is supplied through a licensing model based on the numbers of both nodes and Git repository end-users. WANdisco generates a license.key file will be matched to your agreed usage requirements. Evaluation license Production license Customers entering production need production license file for each node, these license files are tied to the node server's IP address so care needs to be taken during deployment. In the event that a node needs to be moved to a new server with a different IP customers should contract WANdisco's support team and request that a new license be generated ideally before you transfer the node. Production license can be set to expire or they can be perpetual. Special node types Git MuliSite offers additional node types that provide limited functionality for special cases where a node only needs to perform in a limit role: Passive Nodes (Learner only): A passive node operates like a slave in a master-slave model of distribution. Change to its repository replicas only occur through inbound proposals, it never generates any proposals itself. Voter-only nodes (Acceptor only): A voter-only nodes operates in a fashion where they don't need to know the content of proposals, they cast votes based only on the basis of replication history: "have I already voted yes to a Global Order Number equal or larger than this one". These limited-function nodes are license differently from active nodes. Speak to WANdisco's sales team for more details. In short the IP addresses will be a fixed list but the node count and special node count may move between sets of nodes, as long as the number of each type of node is within the limit specified in the license.key. |
| Gerrit setup - applicable if you are planning to integrate Git MultiSite with Gerrit code review. | |
|---|---|
| Gerrit version | version 2.9.1 or later
Git MultiSite for Gerrit requires that you are running version 2.9.1 or later of Gerrit. You will need to upgrade to this or a later version before completing the installation of Git MultiSite. |
| Database | Any - You can run with any of Gerrit's database options. We have developed and tested Git MultiSite for Gerrit using MySQL and PostgreSQL
Configuration change: During installation of Gerrit's MultiSite components, you need to modify Gerrit's database settings to increase its maximum number of database connections. |
Replication Requirements |
You need to be aware of the following limits that apply to this version of Git MultiSite for Gerrit:
|
| Authentication |
OpenID not compatible - It's not possible to use Google's OpenID authentication. If you are planning to use HTTP then you need to ensure that you have an Apache web server running in front of Gerrit. |
| Caching |
Is disabled - Gerrit stores a lot of information from both the repositories and its database in memory. Placing Gerrit in a distributed environment immediately causes problems as Gerrit and repository changes outside of each instance will happen as matter of routine, so that cached data will never be trustworthy. For this reason we set the maximum number of cache items to 0, disabling cache storage for all entities. |
| System Resouces |
Protect the server against resource exhaustion: The integration of Gerrit into a Git MultiSite deployment will increase the demands on server resources. Take note of Git MultiSite's requirements for setting high File descriptor / User process limits. While these requirements are not changed by the addition of Gerrit, it does make resource management even more important. Gerrit Garbage Collection The system administrator should configure Gerrit to run a scheduled garbage collection. This can help ensure that that the server doesn't experience errors or performance downgrade as as result of system resources running out. Gerrit Garbage Collection |
| Plugins |
Gerrit supports a number of plugins for integrating additional applications. Currently we have successfully tested the plugins for Jenkins and JIRA. General Plugin information
|
| Integration with third-party applications |
Many Gerrit deployments are integrated with one or more third-party applications. While there are no hard and fast rules for how these will be affected by moving to a replicated environment, the following information may be useful: Git HooksGit MultiSite offers both standard and replicated hooks. The administrator must understand how these differ and which should be used for a given task. Gerrit event streamAt the moment the event stream only publishes events that occur directly on a node. Integrations that rely on the event stream (like the Jenkins plugin for Gerrit) must connect to every Gerrit node in order to function normally. |
3. Installation procedure
This Installation Guide describes setting up Git MultiSite for the first time. If you are upgrading from an earlier version of Git MultiSite you should also follow this procedure. Git MultiSite is a completely new class of product so it's not possible to follow a shortcut upgrade procedure.
3.1 Installation overview
This is an overview of the process:
- Double-check the Pre-installation checklist. Take time to make sure that you have everything set up and ready. This avoids problems during installation. In particular, check:
- Git authentication: Git installed, and using authentication.
- JDK: You need to run an Oracle JDK. We recommend JDK 7, but 6 works, with warnings.
- Java memory settings: The Java process on which Git MultiSite runs is assigned a minimum and maximum amount of system memory. By default it gets 128MB at startup and 4GB maximum.
- System resources: Ensure that your system is going to operate with a comfortable margin.
- Ensure that your repositories are copied into place on all nodes.
- Download and copy the MultiSite files into place.
- Run the setup, then complete the installation from a web browser.
3.2 Before you start
- Check through the Pre-installation checklist
- Ensure that you have WANdisco's latest Git binaries pre-installed. Git MultiSite edition requires FSFSWD libraries that are built into WANdisco's version of Git
- Repositories need to be created using the file system switch (--fs-type fsfswd)
- Ensure that the system user used for installing Git MultiSite has access to Java, the installation will otherwise fail.
Setting the LOG_FILE environmental variable
If you need to capture a complete record of installer messages, warnings, errors, then you need to set the LOG_FILE environment variable before running the installer.Run:
export LOG_FILE="opt/wandiscoscp/log/file.file"This file's permissions must allow being appended to by the installer. Ideally, the file should not already exist (or it should exist and be empty) and its directory should enable the account running the installer to create the file.
3.3 Start the installation
- Extract the setup file.
- Save the
wandisco-git-multisite.shinstaller file to your Installation site. - Make the script executable, e.g. enter the command:
chmod a+x wandisco-git-multisite.sh - Run the setup script.
[root@redhat6 ~]#chmod a+x git-multisite.sh[root@redhat6 ~]#./git-multisite.shVerifying archive integrity... All good. Uncompressing WANdisco MultiSite ....... :: :: :: # # ## #### ###### # ##### ##### ##### :::: :::: ::: # # # # ## ## # # # # # # # # # ::::::::::: ::: # # # # # # # # # # # # # # ::::::::::::: ::: # # # # # # # # # # # ##### # # # ::::::::::: ::: # # # # # # # # # # # # # # # :::: :::: ::: ## ## # ## # # # # # # # # # # # :: :: :: # # ## # # # ###### # ##### ##### ##### INFO: Using the following Memory settings: INFO: UI: -Xms128m -Xmx1024m INFO: Replicator: -Xms1024m -Xmx4096m Do you want to use these settings for the installation? (Y/n) -
Enter "Y" and click enter.
Which port should the MultiSite UI listen on? [8080]:
Running Gerrit?
If you are going to integrate Git MultiSite with Gerrit then make sure that you select a port that will not conflict. Gerrit also defaults to port 8080. -
Confirm the port you wish to run the admin interface on
We strongly advise against running Git MultiSite as the root user. Which user should Git MultiSite run as? -
Confirm the user who will run Git MultiSite.
This user will need to have read and write access to your git repos
-
Which group should Git MultiSite run as?
Confirm the group of the user running Git MultiSite
Installing with the following settings: MultiSite user: gitms MultiSite group: gitms MultiSite UI Port: 8080 MultiSite UI Minimum memory: 128 MultiSite UI Maximum memory: 1024 MultiSite Replicator Minimum memory: 1024 MultiSite Replicator Maximum memory: 4096 Do you want to continue with the installation? (Y/n) -
Confirm the configuration settings and enter Y to finish the install. In our example, our server runs as gitms with a group of gitms.
- Open a browser and go to the provided URL. If your server's DNS isn't running you can go to the next step at the following address:
e.g.http://<IP_Adress>:<admin port>/multisite-local
http://10.0.100.252:8080/
- The web installer begins with the Welcome screen Welcome to the installation of Git MultiSite.
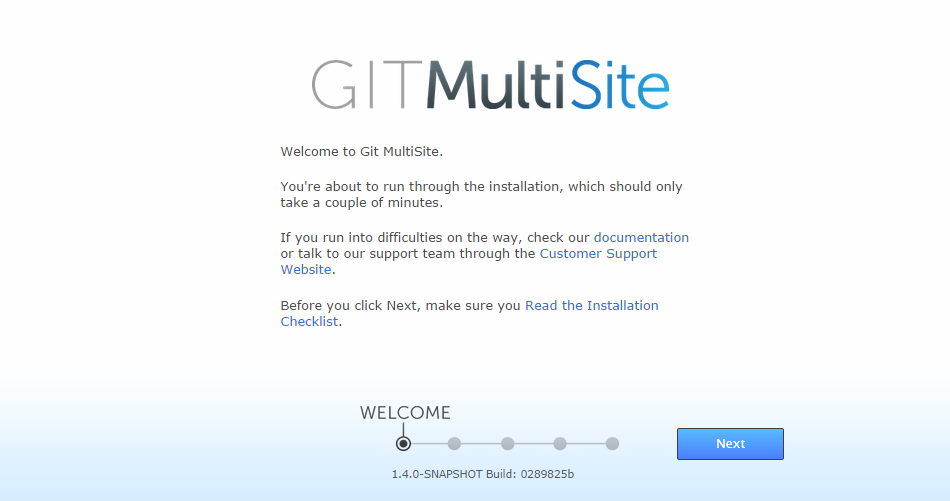
Set up > Start
Welcome to Git MultiSite.

    You're about to run through the installation, which should only take a couple of minutes.


    If you run into difficulties on the way, check our documentation or talk to our support team through the Customer Support Website.


    Before you click Next, make sure you Read the Installation Checklist
Click Next to begin the installation. - The next (Terms & Conditions) screen contains the WANdisco Master Subscription Agreement. To continue the installation click the I Agree button.

Set up > License agreement
- On the next (License Upload) screen you are prompted to browse for your product license key file. Click the Browse button and locate your file. You will have been sent this by the WANdisco sales team, contact them if you have any problems locating or using your license file.
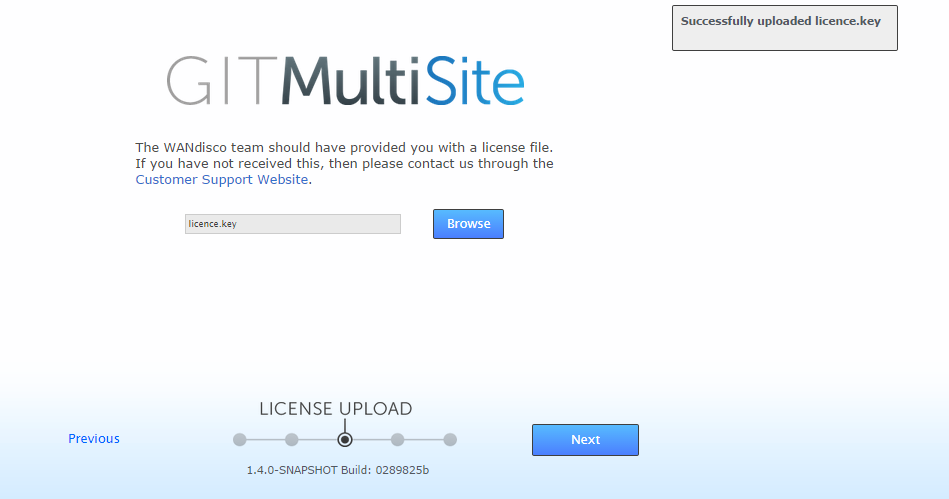
Set up > license.key file
- On the Administrator Setup screen enter the username plus an associated password that you will use to log in to Git MultiSite's UI. This information is only added during the installation of the first "inductor" node.
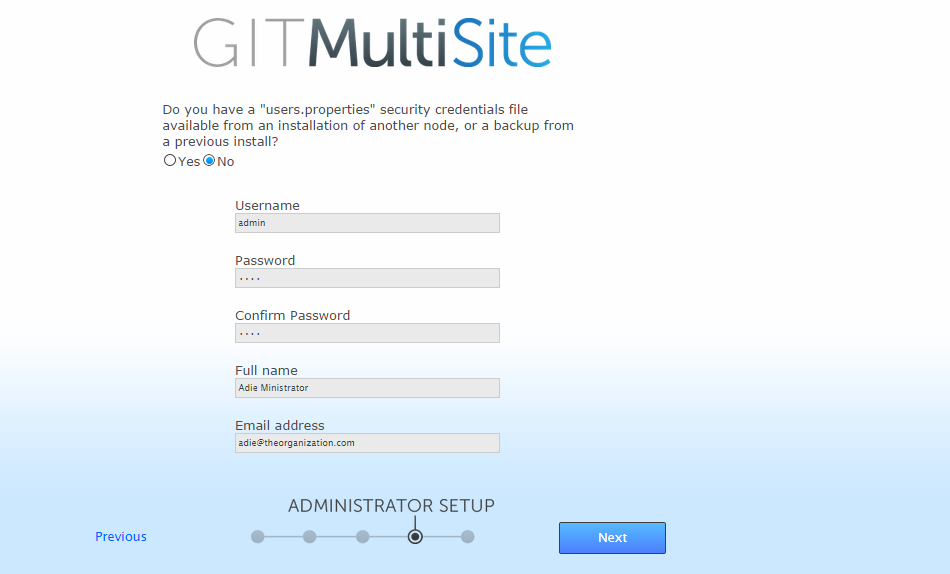
Set up > Admin settings, entered or uploaded in the users.properties file
- Username
- The administrator's username.
- Password
- The administrator's password.
- Confirm Password
- Enter your password again to confirm that it's been typed in correctly.
- User Interface HTTP Port
- You entered the port during the first part of the installation, it's now possible to choose an alternate port here.
This port is sometimes referred to as the jetty port.
For all subsequent node installations you should provide the users.properties file.
Dealing with the user.properites file
This properties file stores the unique information for the default admin user account. It is essential that this information exactly matches up between nodes. For this reason, it is only entered once during a deployment and then subsequently copied to all other nodes (in the form of the users.properties file).
The default location of the file is here:
/opt/wandisco/git-multisite/replicator/properties/users.properties
If something goes wrong and you don't have a valid users.properties file in your deployment, Git MultiSite can automatically create a new one if you follow the procedure to Create a new users.properties file.
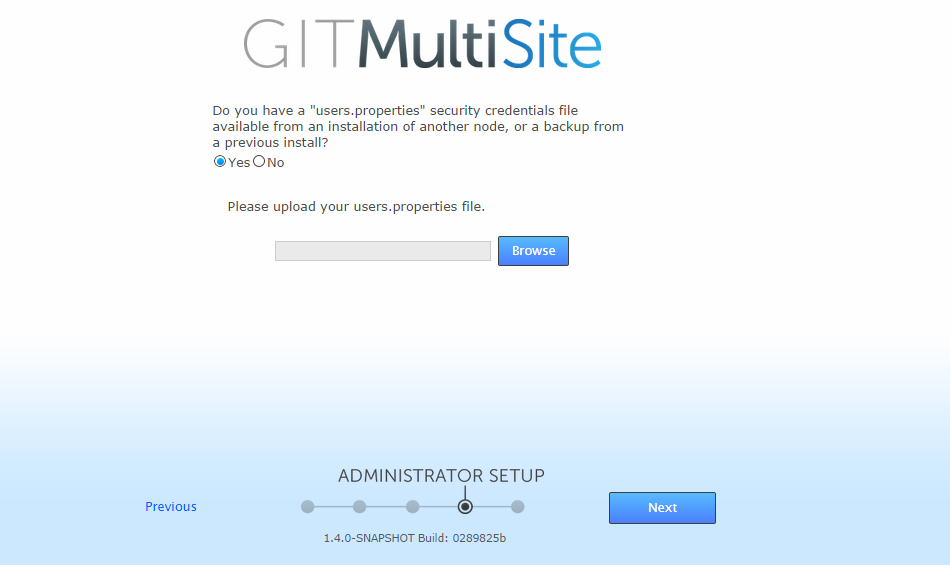
Set up > user.properties file for all nodes after the first node.
- The last screen in the setup process covers Server Settings.
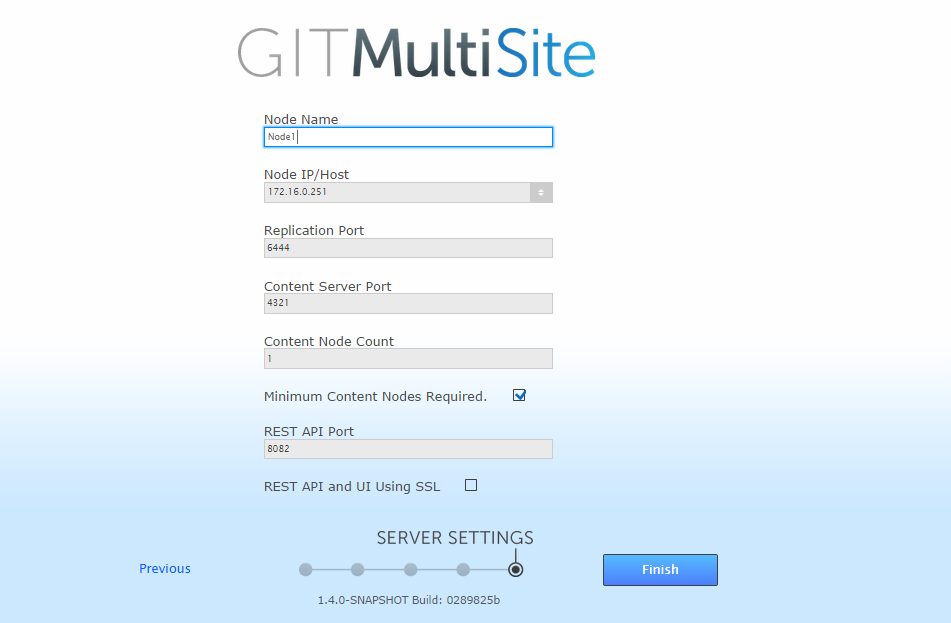
Set up > Server Settings.
- Node ID
The default name for this node.
Temporary limitation
Node names can not contain spaces or ".".- Node IP/Host
- The node's IP or hostname. If the server is multi-homed, you can select the IP to which you want Git MultiSite to be associated.
Enter FQDN in this field
We strongly recommend that you use fully qualified domain names for IP addresses. This can avoid SSL certification problems. - Replication Port
- Select the port that will be used for replicated Git repository data. (Default: 6444)
- Content Server Port
- Select the port that will be used to transfer replicated content (repository changes). (Default: 4321)This is different from the port used by WANdisco's DConE2 agreement engine.
- Content Node Count
- This setting gives you the ability to enforce a degree of resiliance. The value represents the number of nodes within a membership that must receive the content before a proposal is submitted for agreement. If the value is greater than the total learners in the current membership, it is adjusted to total learners in the current membership. The proposing node is not considered in the calculation.
- Minimum Content Nodes Required
- Ticking this checkbox will enforce the Content Node Count as a prerequisite for replication.
- REST API Port
- The port to be used for Git MultiSite's REST-based API. (Default: 8082)
- REST API UI Using SSL
- Check box for enabling the use of SSL for all API traffic.
- REST API SSL Port
- The port to be used for Git MultiSite's REST-based API when traffic is secured using SSL encryption. (Default: 8445)
- UI Port
- The port for HTTP access to the MultiSite administrative interface. (Default: 8080)
- UI SSL Port
- The port for HTTPS encrypted access to the MultiSite administrative interface. (Default: 8443)
- SSL Certificate Alias
- The name of your SSL Certificate file.
- SSL Key Password
- The password for your HTTPS service.
- SSL Key Store
- The name of the keystore file. The keystore contains the public keys of authorized users.
- SSL Key Store Password
- The password associated with the keystore.
- SSL Trust Store
- The location of your trust store file. The Truststore contains CA certifcates to trust. If your server's certificate is signed by a recognized Certification Authority (CA), the default truststore that ships with the JRE will already trust it (because it already trusts trustworthy CAs), so you don't need to build your own, or to add anything to the one from the JRE.
- SSL Trust Store Password
- The password for your trust store.
A word about trust stores and key stores
You might be familiar with the Public-key system that allows two parties to use encryption to keep their communications with each other private (incomprehensible to an intercepting third-party).
The keystore is used to store the public and private keys that are used in this system. However, iIn isolation, however, the system remains susceptible to the hijacking of the public key file, where an end user may receive a fake public key and be unaware that it will enable communication with an impostor.
Enter Certificate Authorities (CAs). These trusted third parties issue digital certificates that verify that a given public key matches with the expected owner. These digital certificates are kept in the truststore. An SSL implementation that uses both keystore and truststore files offers a more secure SSL solution.
- Click FINISH when you have entered everything. The installer will now complete the configuration. Once that's all done a START USING MULTISITE button will appear. Click the button to login for the first time.
- Time to login. Enter the username and password during step 12. Then click FINISHED - LET'S GO!.
- The first time you view the dashboard, it will contain mostly blank areas. You can view the reference section to learn what all the buttons and options mean.
Flush your browser cache
If you are reinstalling and using SSL then you should clear your browser cache before you continue. Previous SSL details are stored in the cache and will cause SSL errors if they are not flushed.
3.4 Repeat the installation process at all sites
Now repeat the installation process for every node that you wish to share your Git repositories.
You may benefit from creating an image of your initial server, with the repositories in place and using this as a starting point on your other sites. This helps ensure that your replicas are in exactly the same state.
All replicas must be in the same location (same absolute path) and in exactly the same state before replication can start.
4. Node induction
After installing Git MultiSite at all sites, you'll need to make the sites aware of each other through the node induction process. There's a particular way that you need to run through this process so get another coffee and don't skip this section.
4.1 Membership induction
It's important that nodes are connected together in specific sequence. Run through the following steps to ensure that your sites are all able to talk to each other:
- When Git MultiSite is installed on all your sites, select one node to be your Inductor. This node will accept requests for membership and share its existing membership information. It doesn't matter which node you select.
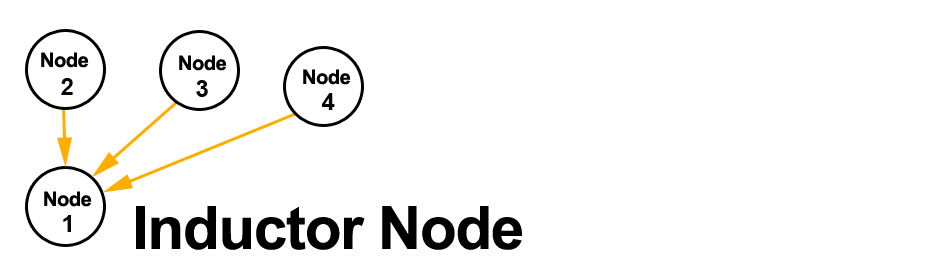
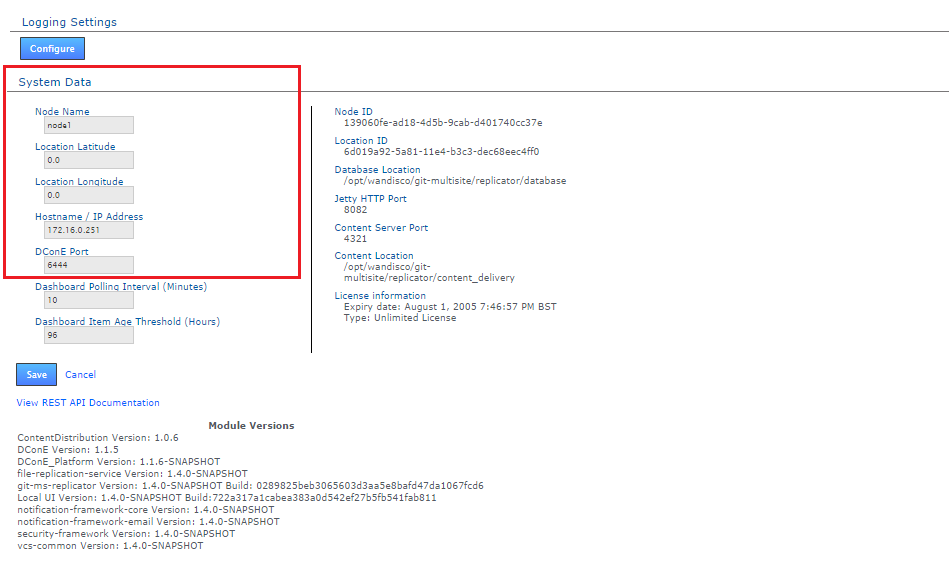
- Log in to this Inductor's admin console (http://<Inductor's IP>:8080/multisite-local/) and gather the following information, most is available from the Settings tab.
All your remaining sites are now classed as Inductees. - Select one of your remaining Inductee sites. Connect to its web admin console (http://<Inductee1:8080/multisite-local/) and go to the Nodes tab.
- Click on the CONNECT TO NODE button and enter the details that you collected from your Inductor node.
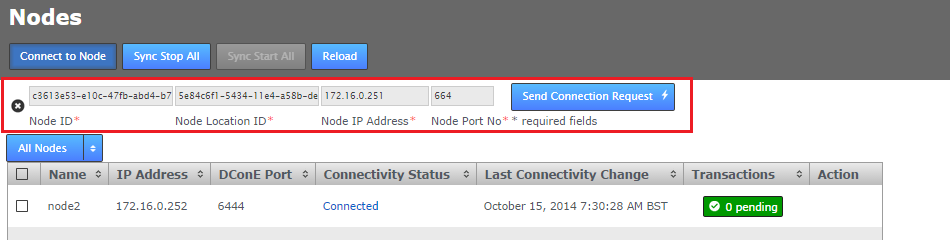
- Node Node ID *
- The name of the inductor node - you can verify this from the NODE ID entry on the Inductor node's Settings tab (see step 2, above.)
- Node Location ID *
- The reference code that is used to define the inductor node's location -you can verify this from the NODE ID entry on the Inductor node's SETTINGS tab (see step 2, above).
- Node IP Address *
- The IP address of the inductor node server.
- Node Port No *
- The DConE Port number (6444 by default), defined on the inductor node's SETTINGS tab.
When these details are entered, click the SEND CONNECTION REQUEST button. The inductor node will accept the request and add the inductee to its membership. You will need to refresh your browser to see that this has happened..
- Go back to step 3 and select one of your remaining inductees. Repeat this process until all the sites that you want to be included in the current membership have been connected to the inductor.
4.2 Create a replication group
Git MultiSite lets you share specific repositories between selected sites. This is done by creating Replication Groups that contain a list of sites and the specific repositories they will share.
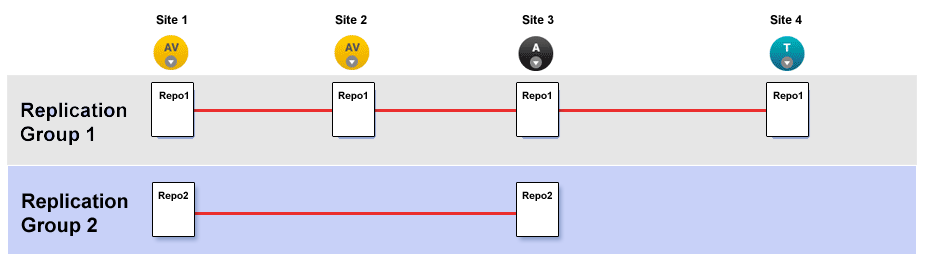
This illustration shows a collection of four sites that are running two replication groups. Replication Group one replicates Repo1 across all four sites, whilst Replication Group 2 replicates repo2 across a subset of sites.
Follow this procedure to create a Replication Group. You can create as many replication groups as you like. However, each repository can only be part of one active replication group at a time.
- When you have sites defined, click on the REPLICATION GROUPS tab. Then click on the CREATE REPLICATION GROUP button.

Create Replication Group
Local node automatically made the first member
It's not possible to create a replication group remotely - the node on which you are creating the group must itself be an member. For this reason, when creating a replication group, the first node is added automatically. - Enter a name for your Replication Group in the Replication Group Name field. Then enter an existing Node name in the Add Sites field - any existing sites that match your entry will appear and can be selected with a click. Instead of typing in a name you can click on the drop-down button and choose from a list of existing sites (that are not already members of the new group).
You can select any number of available Sites. Those sites that you select will appear as clickable buttons in the Add Node field.
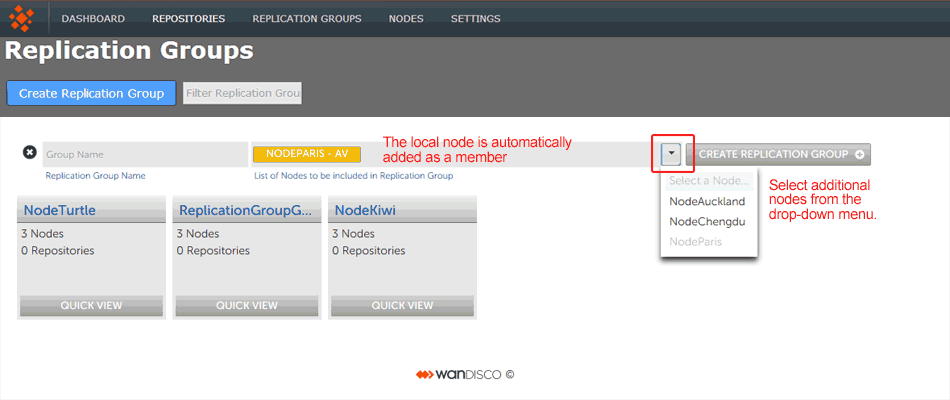
Enter a name and add some node.
- New sites are added as Active Voters (denoted with "AV"). You can change the type of a node by clicking on its label. For an explanation of what each node type does, view the Reference Section - Node Types

Change node type
Once you have added all sites and configured their type, click CREATE REPLICATION GROUP to see a group's details. - Replication Groups that you create will be listed on the REPLICATION GROUPS tab.
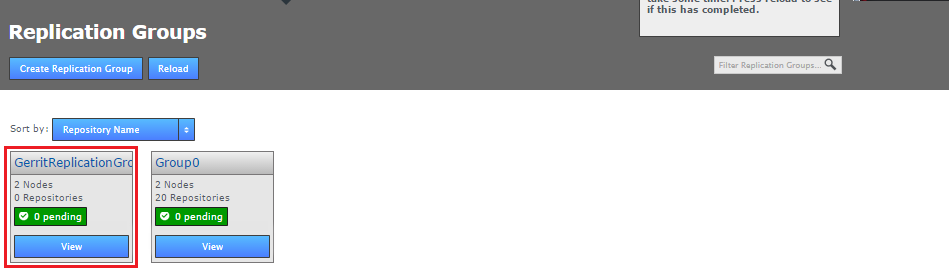
Groups boxes, click QUICK VIEW view your options.
Creating a resilient replication group
For a replication group to be resilient to node failures, you need to make sure your replication group has at least twice the number of acceptable failures plus one, i.e. for F failures, make sure there are 2F+1 nodes.
Examples:
1 failure requires 3 (2x1+1) nodes to continue operation
3 failures required 7 (2x3+1) nodes to continue operation
4.3 Add repositories
Before adding a repo, you should run a git fsck to ensure its integrity.
You may also wish to run a git gc before your git fsck for performance reasons.
When you have added at least one Replication Group you will be able to add repositories to your node. Here's how:
- Click the REPOSITORIES tab. Click on the ADD button.
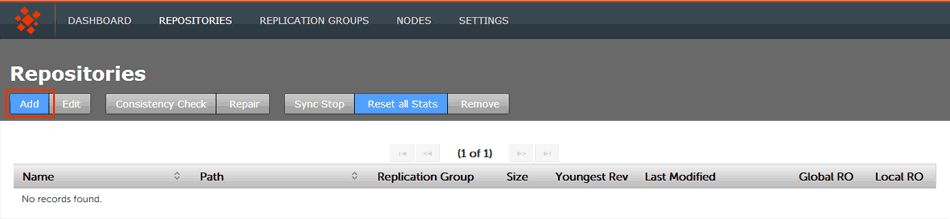
Repositories > ADD
- Enter the Repository's name, the file system path (full path to the repository) and use the drop-down to select the replication group. You can set the repository to be Read-only by ticking the Global Ready-only You can deselect this later. Click ADD REPO.
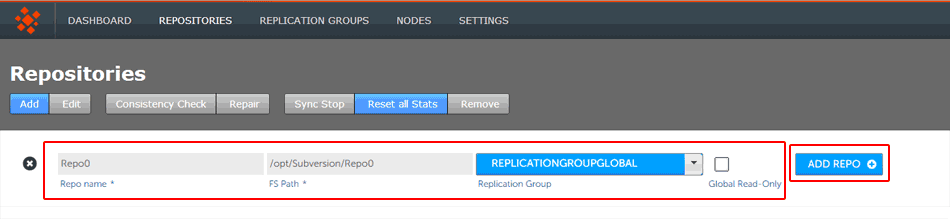
Repositories > Enter details then click ADD REPO
- Click the REPOSITORIES tab to see a list of the repositories added.
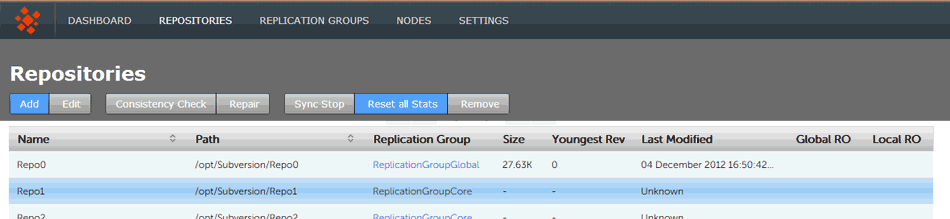
Repositories listed
The repositories list shows:
- Name
- The name of the repository - this will be the same as the folder name in the Git directory.
- Path
- The full path to the Repository.
- Replication Group
- The Replication Group in which the repository may be replicated.
- Size
- The file size of the repository.
-
- Youngest Rev
- The youngest (latest) revision in the repository. Comparing the youngest revisions between replicas is a quick test that a repository is in the same state on all sites.
- Last Modified
- The timestamp for the last revision, which provides a quick indicator for the last time a Git user made a change.
- Global RO
- Checkbox that indicates whether the repository is globally Read-only, that is Read-only at all sites.
- Local RO
- Checkbox that indicates whether the repository is locally Read-only, that is Read-only to users at this node. The repository receives updates from the replicas on other sites, but never instigates changes itself.
Table columns describe master branch, not the whole repository
The following columns of information describe the master branch.
Using Git MultiSite as a mirror destination?
If you're using Git MultiSite as a mirror of an existing repo data should only be sent from the original source repo using git push --mirror. Otherwise, the push will fail as MultiSite doesn't accept fast-forward pushes. This is because the mirror option is a forced command and the receiving repository is overwritten with each push.
Git configuration files for MultiSite repositories
Git MultiSite sets the following variables in your repository's configuration file. Make sure the settings aren't changed or removed:
- core.replicated
- receive.denyNonFastFowards
4.4 Using Git sub-modules
If you use sub-modules, they are typically defined using the full URL of the repository, for example:
git add submodule test2 git@192.168.1.30:/home/wandisco/repos/subrepo.gitThis adds the following into your .gitmodules file:
[submodule "test2"]
path = test2
url = git@192.168.1.30:/home/wandisco/repos/subrepo.git
It is possible to use them in this way, but this means that submodule activity will occur against a specific Git server. If the repository used as a submodule is being replicated through Git MultiSite, you will lose the benefits of using the repository on a local node.
To maintain the benefits of the replicated environment, specify the relationship to the sub-module using a relative path, such as:
git submodule add REPONAME ../RELATIVE-PATH-TO-REPOFor example:
git submodule add ../subrepo.git test2This would then add the following entry to your .gitmodules file:
[submodule "test2"]
path = test2
url = ../subrepo.git
Note: If you're using external sub-modules, you can continue to specify them using full URLs. This is only applicable to local sub-modules you want replicated.