Run the shutdown script ./shutdown in the svn-replicator/bin/ directory.
2. Setting up the replicator for production
2.1 Setting up MultiSite as a Windows service
WANdisco offers a configurable Java launcher for Windows based on WinRun4J. To set it up:
Apply these steps on all nodes.
- Shut down and reset all nodes.
- Open a command prompt that has administrator privileges.
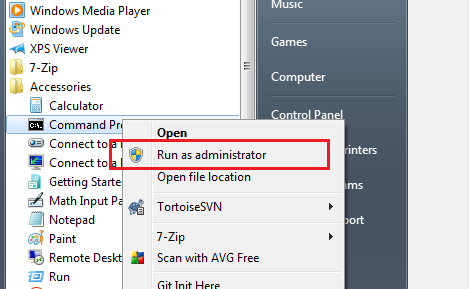
- Navigate to the svnreplicator/bin folder in the SVN MultiSite Installation directory.
- Start the service by running the executable that matches your server's architecture i.e. for 64-bit:
AccessControlWinService64.exe --WinRun4J:RegisterService
For 32-bit:
AccessControlWinService32.exe --WinRun4J:RegisterService
The service starts up as follows:
Directory of C:\Program Files\svn-replicator\bin
C:\Program Files\svn-replicator\bin>AccessControlWinService64.exe --WinRun4J:RegisterService
[info] Module Name: C:\Program Files\svn-replicator\bin\AccessControlWinService64.exe
[info] Module INI: C:\Program Files\svn-replicator\bin\AccessControlWinService64.ini
[info] Module Dir: C:\Program Files\svn-replicator\bin\
[info] INI Dir: C:\Program Files\svn-replicator\bin\
[info] Registering Service...

C:\Program Files\svn-replicator\bin>
- Check that the service is running by viewing the Windows Service Manager:
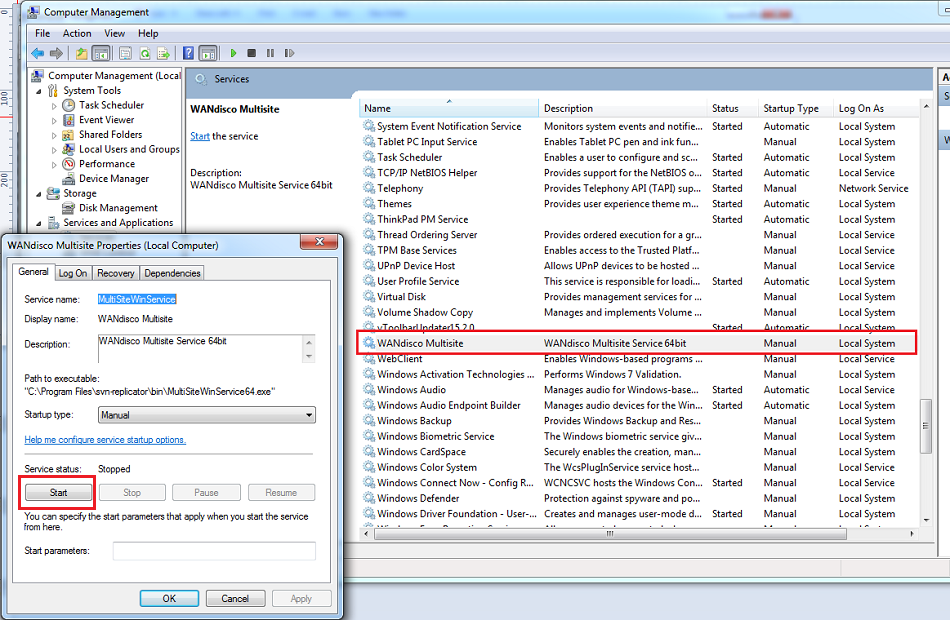
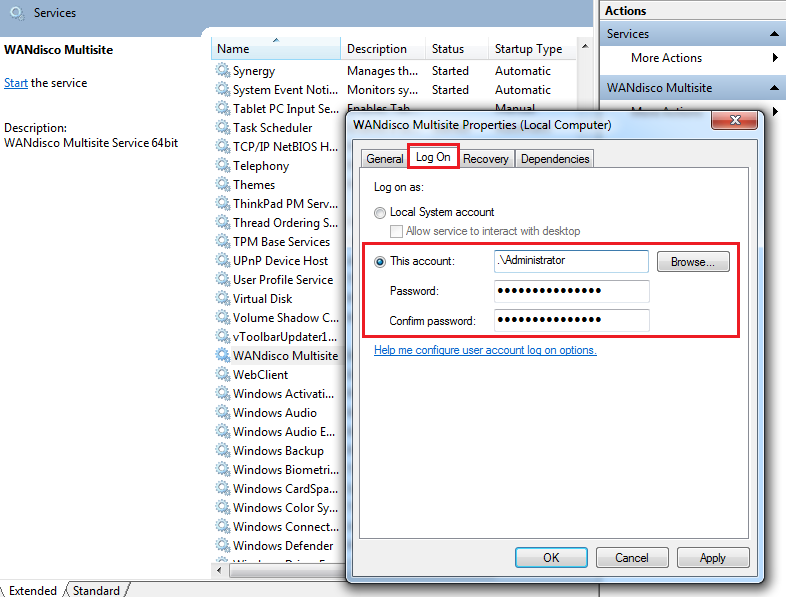
- You may need to provide account login details, especially if the server isn't run with full admin privileges. Click the Log On tab, then provide log on credentials for the required account. When added, click Apply.
- Right click the service and select Start.
2.2 Setting up MultiSite as a Linux/Unix service
Your installation provides the following scripts:
- RHEL/CentOS: svn-replicator/utils/init.d/generic/svnreplicator-init.d-sample
- SUSE: svn-replicator/utils/init.d/suse/susesvnreplicator-init.d-sample
- Debian/Ubuntu: svn-replicator/utils/init.d/debian/debiansvnreplicator-init.d-sample
Apply these steps on all nodes.
- Make sure that your MultiSite installation is in a directory called svn-replicator.
- Copy the relevant script to /etc/init.d/svnreplicator.
- Make the script executable to the root user.
- Edit the script to set the correct values for the following variables:
export JAVA_HOME=/usr/java/default
WD_USER="root"
WD_INSTALL_DIR="/opt/wandisco/svn-replicator"
where:
- JAVA_HOME is the location of the Oracle JDK installation.
- WD_USER is the user that will run the Java svnreplicator process.
- WD_INSTALL_DIR is the location of the MultiSite installation.
- Activate the scripts to start on boot and stop on shutdown per the OS-provided utilities (chkconfig, update-rc.d).
2.3 Toggling the quorum check
SVN MultiSite verifies if a network quorum is reachable when a write command is submitted. If the quorum is unreachable, by default, the write command is aborted and the following message appears on the Subversion client console:
Check the Network connectivity, failed to reach a minimum quorum of nodes. Aborting the svn write operation.
To turn off the quorum check, edit the prefs file svn-replicator/config/prefs.xml. Set the parameter, AlwaysVerifyQuorum to false in the file. For example:
<SVNProxy>
<AlwaysVerifyQuorum>false</AlwaysVerifyQuorum>
....
</SVNProxy>
If the check is turned off and quorum is unreachable, the write transaction is applied to the WANdisco SVN MultiSite's transaction journal and stays in a pending state until network connectivity and quorum is restored.
Alert
With singleton quorum, if the current node is also the distinguished node, the quorum check always succeeds irrespective of network connectivity to other nodes.
2.4 About Watchdog mode
By default, SVN MultiSite starts in watchdog mode. Whenever the replicator goes down, the watchdog mode restarts it. In watchdog mode, the replication process automatically disassociates from the terminal and becomes a daemon process, so you should not try running it in the background (with &).
Note
Watchdog mode is not supported in Windows. Use Windows Cygwin.
You can turn off watchdog by entering:
-nowdog
If MultiSite cannot start up, for example if it terminates several times in quick secession, watchdog starts the the node in read-only mode:
$ ./bin/svnreplicator -h
Usage: svnreplicator [-v] [-verbose] [-nowdog] [-pause time] [-email email-address]
| -v |
Print the svnreplicator version |
| -verboseVerbose |
Console messages go to STDOUT/STDERR instead of logs/console.txt |
| -nowdogTurn off |
Watchdog mode. WANdisco will not restart automatically if it terminates. Use this option for testing. |
| -pauseTime |
Number of seconds that the watchdog pauses for, before restarting service. Defaults to 0 seconds. |
| -emailSpecify |
An email address to send an alert to, whenever the Watchdog restarts or shuts down WANdisco. WANdisco generates an email per local replicator activity. If the email settings were not set up during installation, see Email Settings, described in Using the Admin Console.
Use the -email option to generate email alerts whenever MultiSite restarts. For examples: $ svn-replicator/bin/svnreplicator -pause 5 -email "admin@blueandgold.com, scmuser@blueandgold.com" |
2.5 Using SSL
You can set up SVN MultiSite to use SSL encryption. First, run through the following steps after extracting the SVN MultiSite files (but before running setup).
- Open a terminal and navigate to <INSTALL_DIR>/svn-replicator/config.
- Within /config make a new directory called ssl:
-rw-rw-r-- 1 User User   512 2010-03-12 19:03 license.key
-rw-r--r-- 1 User User  3327 2010-05-21 14:12 log.properties
-rw-r--r-- 1 User User   579 2010-05-21 14:12 mailconfig.properties
drwxr-xr-x 5 root root  4096 2010-06-18 12:39 membership
drwxr-xr-x 2 root root  4096 2010-06-18 12:39 passwd
drwxr-xr-x 3 root root  4096 2010-06-18 12:33 prefs
-rw-r--r-- 1 User User  2005 2010-05-21 14:12 prefs-template-failover.xml
-rw-r--r-- 1 User User  3047 2010-05-21 14:12 prefs-template.xml
-rw-r--r-- 1 User User 92160 2010-06-11 14:26 reports.tar
drwxr-xr-x 3 root root  4096 2010-06-18 12:39 scm
drwxr-xr-x 6 root root  4096 2010-06-18 12:39 security
-rw-r--r-- 1 User User    72 2010-05-21 14:12 svnerr.catalog
-rw-r--r-- 1 User User   625 2010-05-21 14:12 svnokerr.catalog

User@Fed11-2 config]$ mkdir ssl
- Go into the new directory:
cd ssl
- Copy your private key into the directory. If you don't already have keys set up, you can use Java's keygen utility, using the command:
keytool -genkey -keyalg RSA -keystore wandisco.ks -alias server -validity 3650 -storepass <YOUR PASSWORD>
| -genkey |
Switch for generating a key pair (a public key and associated private key). Wraps the public key into an X.509 v1 self-signed certificate, which is stored as a single-element certificate chain. This certificate chain and the private key are stored in a new keystore entry identified by alias. |
| krw-r--reyalg RSA |
The key algorithm, in this case RSA is specified. |
| wandisco.ks |
File name for your private key file that will be stored in the current directory. |
| - alias server |
Assigns an alias "server" to the key pair. Aliases are case-insensitive. |
| -validity 3650 |
Validates the keypair for 3650 days (10 years). Default is 3 months. |
| - storepass <YOUR PASSWORD> |
This provides the keystore with a password. |
Note
If no password is specified on the command, you are prompted for it. Your entry is not masked so you (and anyone else looking at your screen) will be able to see what you type.
Most commands that interrogate or change the keystore need to use the store password. Some commands may need to use the private key password. Passwords can be specified on the command line (using the -storepass and -keypass options). However, do not specify a password on a command line or in a script unless it is for testing purposes, or if you are on a secure system.
The utility prompts you for the following information:
What is your first and last name?  [Unknown]:
What is the name of your organizational unit?  [Unknown]:
What is the name of your organization?  [Unknown]:
What is the name of your City or Locality?  [Unknown]:
What is the name of your State or Province?  [Unknown]:
What is the two-letter country code for this unit?  [Unknown]:
Is CN=Unknown, OU=Unknown, O=Unknown, L=Unknown, ST=Unknown, C=Unknown correct?  [no]:  yes

Enter key password for <mykey>
(RETURN if same as keystore password):
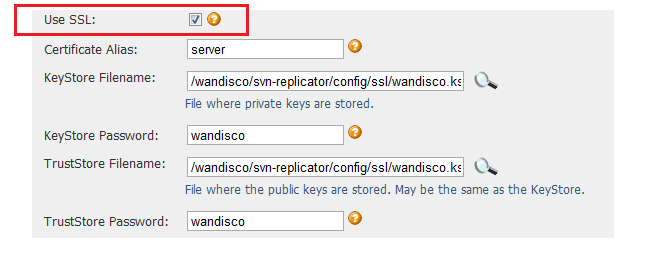
- With the keystore now in place, the setup automatically picks the file up if you tick the Use SSL checkbox during the installation or after installation. See SSL Settings.
Changes in these values require a restart. Any invalid value restarts the replicator and no DConE traffic flows.
Note
SSLv3 is supported, though not enforced. If your browser setting has SSLv3 disabled, you get a handshake error message. If it has both SSLv3 and TLS enabled, then, depending on the browser, it tries to switch from TLS to SSLv3 during the handshake. If you receive a handshake error message in your browser, make sure that TLS is disabled and only SSLv3 is enabled. All current browsers support SSLv3.
2.6 Setting the server key
In the keystore, the server certificate is associate with a key. By default, we look for a key named server to validate the certificate. If you use a key for the server with a different name, enter this in the SSL settings.
2.5.1 SSL Troubleshooting
A complete debug of the SSL logging is required to diagnose the problems. To capture the debugging, run the java process with:
'-Djavax.net.debug=all' flag.
To enable the logging of SSL implemented layer, turn the logging to FINEST for 'com.wandisco.platform.net' package.
2.7 Using SSL for both LDAP and emails
Note
If you're specifying secure email (using a truststore) and LDAP authentication over SSL (using a truststore), the same truststore must be used for both sets of certificates. If different truststores are used then the LDAP truststore overwrites the email truststore and secure emails stop working.
3. Changing prefs.xml settings
SVN MultiSite's settings are stored within a prevayler database. However, some settings (for all nodes in the replication group) are stored within a preference file (prefs.xml) which is located in the <WANDISCO/svn-replicator/config directory.
Alert
If you make changes that affect more than one node, you must change each node's specific file. If your change only effects just one node, you can change just that node's prefs.xml file.
3.1.1 Changing prefs.xml file on a single node
On the node on which you want to make the change:
- Go to the Proxy tab and click Shut Down Node.
- Make the change to the node's prefs.xml file and save the changes.
- Restart the node by running the command:./svnreplicator
The changes you made in the prefs.xml file are now in effect.
3.1.2 Changing all nodes' prefs.xml files
- Perform a synchronized stop. See Performing a Synchronized Stop. That procedure includes resuming MultiSite.
- Make the desired changes to each node's prefs.xml file.
- Restart WANdisco at all servers. Click Resume.
3.2 Performing a synchronized stop
Alert
Previously, all nodes in a replication group needed to be available to perform a synchronized stop. Now it's possible to synchronize stop a subgroup of nodes which is useful if you need to bring your replication group to a stop even if you don't have all nodes up and working. However, this action should only be used as a final resort and requires additional work to ensure that sync is maintained. All Sync stops make Subversion read-only. You'll need to warn your Subversion users of some down-time.
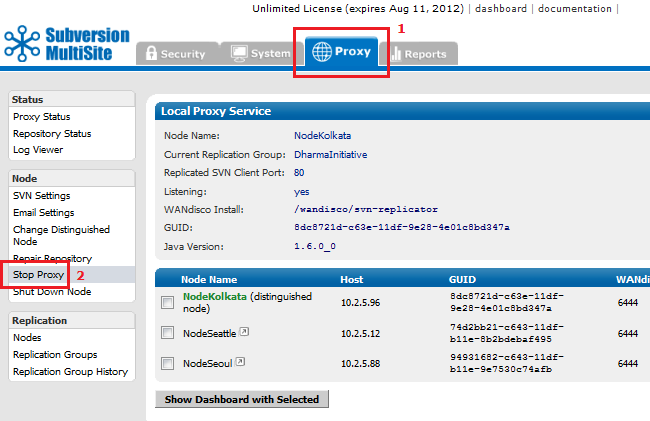
- Go to the Proxy tab on the Admin Console. On the side menu click Stop Proxy.
- Select the Synchronized stop radio button and ensure that All node checkboxes are ticked, then click Continue. If one or more of your nodes is down, and can't be quickly recovered, you can deselect the problem node and synchronize stop only the remaining nodes. See Selective Synchronized Stops
This procedure makes Subversion read-only. You'll need to warn your Subversion users of some down-time.
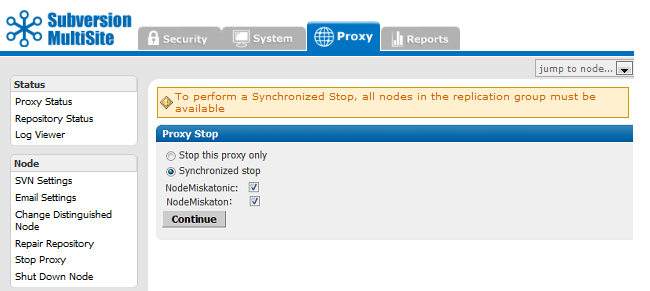
On nodes included in the synchronized stop: All in-flight transactions are completed and MultiSite stops listening. The Subversion servers go into read-only mode.
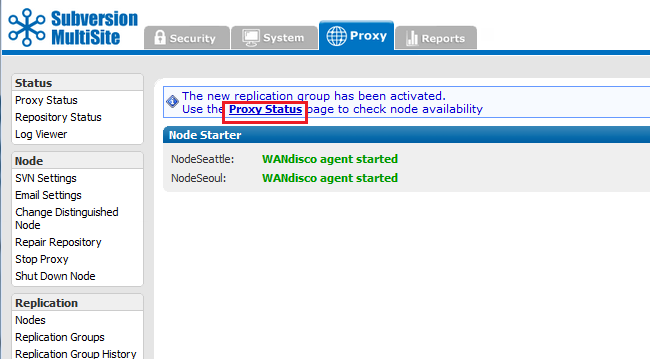
- Check the status of the nodes by clicking Proxy Status Refresh the Proxy tab and click Resume.

3.2.1 Selective synchronized stops
If you want to perform a synchronized stop on a subgroup of nodes, untick the node(s) that you do not wish to bring to a stop and click Continue.
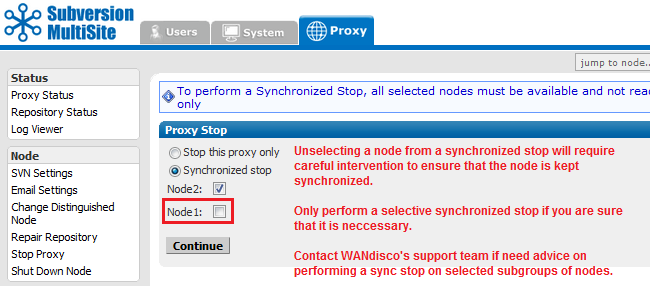
A warning box appears:
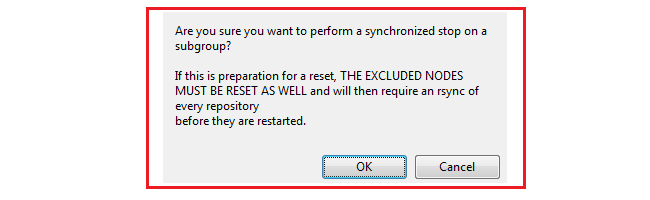
Alert
The purpose of a synchronized stop is to ensure that all repositories are maintained in exactly the same state, that one node doesn't process transactions that are not completed on another. Any node that is not stopped in sync with the rest of the replication group is more than likely going to fall out of sync, causing replication to stop.
All nodes that are not included in the synchronized stop must be reset to purge all queued traffic and all their repositories must be manually synchronized (using rsync) with the rest of the replication group.
3.3 Resuming from a synchronized stop
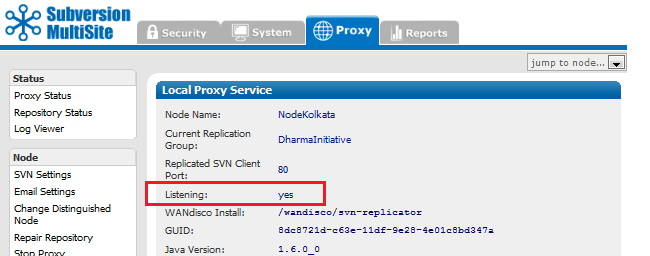
- To restart replication click the Proxy tab and click Resume.
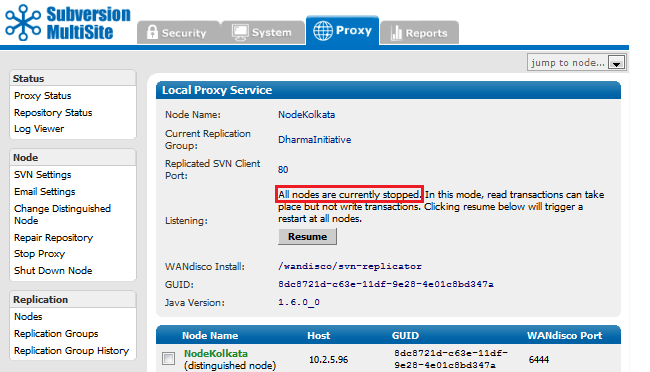
- The page refreshes, and you can see the Listening field now shows yes.
3.4 Verifying that the replicator is working
The quickest way to check replication is to add a new user through the Admin Console of one of your nodes. Then, jump to another node and confirm that the new user also appears there.
Another way to check replication is to verify there are commit transactions posted to the log file svn-replicator/logs/SVNProxyServer-prefs0.log. More about log files
3.5 Changing the distinguished node
3.5.1 What distinguishes the distinguished node?
The distinguished node has greater voting power within the quorum. In a singleton quorum the distinguished node decides transaction ordering and keeps the other nodes in sync.
In a singleton quorum, Subversion users who operate from the distinguished node get best performance because their local replicator never needs to wait for agreement to be reached on a distant node.
In a singleton quorum it's advantageous to change the distinguished node to correspond with the site where the most repository changes are taking place, i.e. operating within business hours. You can manually change the distinguished node at any time. You can also automate the process by setting up a Rotation Schedule.
The distinguished node is selected from the replication group, it can be any node.
Alert
Changing the distinguished node requires a unanimous quorum where agreement must be reached between all nodes.
See the Troubleshooting guide if one or more of your nodes become unreachable.
In the majority quorum the distinguished node acts as a tie breaker when there are an even number of nodes. For example, with a 4 node setup, in order to achieve a majority you would technically need 3 nodes. With the distinguished node's slightly heavier weighted vote, you can achieve a majority with only 2 nodes as long as one of the two is the distinguished node.
3.5.2 Manually changing the distinguished node
- Click the Proxy tab and then click Change Distinguished Node on the menu.
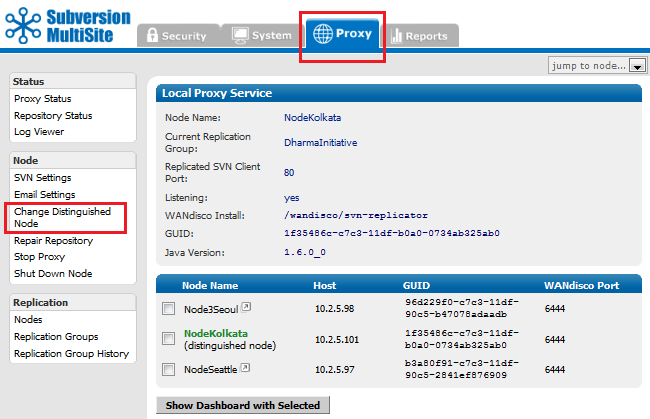
- Select the new distinguished node from the dropdown, then click Assign Selected Node.
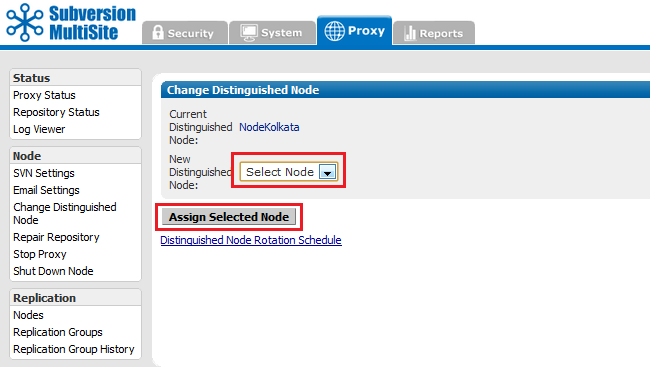
- The screen refreshes. Check that your selection now appears as the current distinguished node.

3.5.3 Scheduled rotation of the distinguished node
- Click the Proxy tab and then click Change Distinguished Node on the menu.
- Click the Distinguished Node Rotation Schedule link.
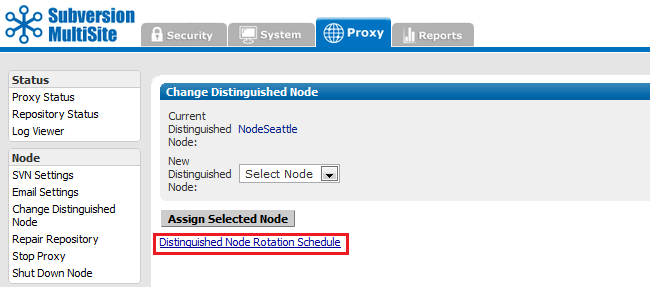
- Select the Controller Node. This node transmits the rotation command, according to it's local time.

For each node in the replication group you can assign a time at which it becomes the distinguished node. Assign a time to each available Node that you wish to be the distinguished. You can add or remove nodes using the 'plus' or 'cross' buttons. When you have set up a schedule click Update Rotation Schedule. You can remove a schedule by clicking Remove Rotation Schedule.
3.6 Using Subversion hooks for sending e-mails
Many administrators like to set up Subversion backend hooks that fire whenever a Subversion user commits a set of file changes. With a master/slave Subversion server setup, e-mails can be initiated once when the post-commit trigger fires.
You can set up Subversion hooks to send emails when Subversion users commit file changes. However, with MultiSite, these emails get duplicated, with a potential for spamming with notification emails.
To avoid this, set up one node as an "e-mail hub" by enabling the post-commit trigger to fire from a single node within the replication group.
Alternatively, you could use the time of day to fire the e-mail alerts from a specific node. For example, you could modify the post-commit trigger to send e-mails from India during 9:00 a.m. to 5:00 p.m. IST, and from the US during 9:00 a.m. to 5:00 p.m. PST.
Caution
If using asymmetrical e-mail hooks ensure that you don't disable the pre-commit trigger. That may cause a Subversion commit transaction to abort at some nodes but commit at other nodes causing a loss of sync.
Tip
Configure email setup to avoid long blockages or delays. The default SMTP service on node should be adequate. We recommend that you set up a local e-mail hub or a local SMTP agent/server. The local SMTP server should preferably be on the same host as the Subversion server. It should be set up to forward/relay e-mails to the organization-wide SMTP server. This ensures the e-mail hooks are a lot faster and just need to enqueue the e-mails to the local SMTP server. Test that your emails are delivered before going into production.
3.7 Changing the admin console username or password
Note
The default login username for the Admin Console is admin, and the password is user-defined during installation. That way, all nodes initially have the same login and password.
You can set up different login credentials for each node, however, you should ensure that all administrators who manage nodes are able to login to all nodes.
Tip
We recommend that you keep admin authorization simple, and have the same login and password for all nodes. This greatly simplifies managing replication.
To change the login at a particular node, enter the following in prefs.xml.
<Security>
<Admin>
<user>newlogin</user>
</Admin>
</Security>
3.7.1 Changing the admin password
- Click the Security tab then click Change Admin Password on the menu (under User Administration).
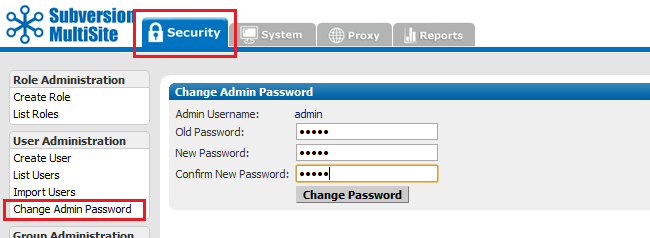
Note
This changes the password for this node only. The password does not get replicated.
Ensure that all node administrators throughout the replication group are informed about password changes.
- When the new password has been entered, click Change Password. The change is confirmed with an admin password updated message.
3.8 Setting up hooks
A hook is a script that gets triggered by a specified repository event, such as creation of a new revision or the modification of an unversioned property.
| Hook |
How to Integrate with WANdisco |
| start-commit |
Standard Subversion implementation.Must be present at all nodes, and must either execute identically at all nodes or fail identically at all nodes. |
| pre-commit |
This becomes the pre-replication hook. See the following Replication Hook section. |
| post-commit |
Standard Subversion implementation. Must be present at only one node. |
| pre-revprop-change |
Standard Subversion implementation. Must be present at all nodes, and must either execute identically at all nodes or fail identically at all nodes. |
| post-revprop-change |
Standard Subversion implementation.Must be present at only one node. |
3.8.1 Pre-replication hook
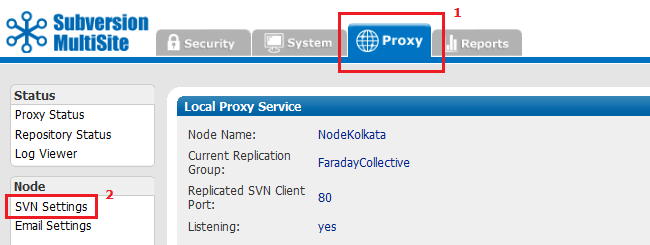
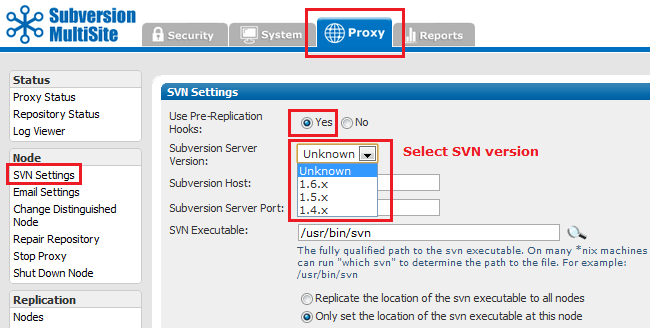
To use pre-replication hooks, SVN MultiSite needs to be set with the version of Subversion you are using. Go to the Proxy tab, select SVN Settings, and select the Yes radio button for Use Pre-Replication Hooks. Then specify the Subversion Server Version.
Before Subversion executes a pre-replication hook, MultiSite invokes it before forming a proposal. As per the SVN DAV specification, if the hook succeeds, nothing is communicated back to the client. The handling of the command proceeds normally. If the hook fails, stderr is packaged as an XML response to the client. The client then typically deletes the activity; i.e., cleans up any temporary files on the server side.
3.8.2 Configuration
There are two methods for invoking hooks scripts, globally (across a replication group), via the Repository settings screen in the admin console, or on a per-repository basis (See
3.8.3 Repository-Specific Hooks).
3.8.2.1 Global Hook Scripts
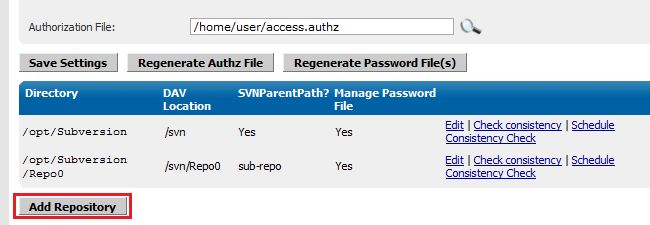
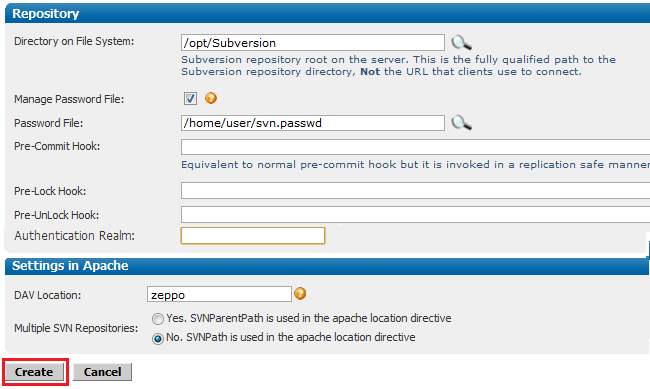
To invoke a hook script globally, go to the SVN Settings screen and click edit for the repository (see Admin Console Guide: SVN Settings). Within the repository settings screen entry fields for the three hook types that can be replicated.
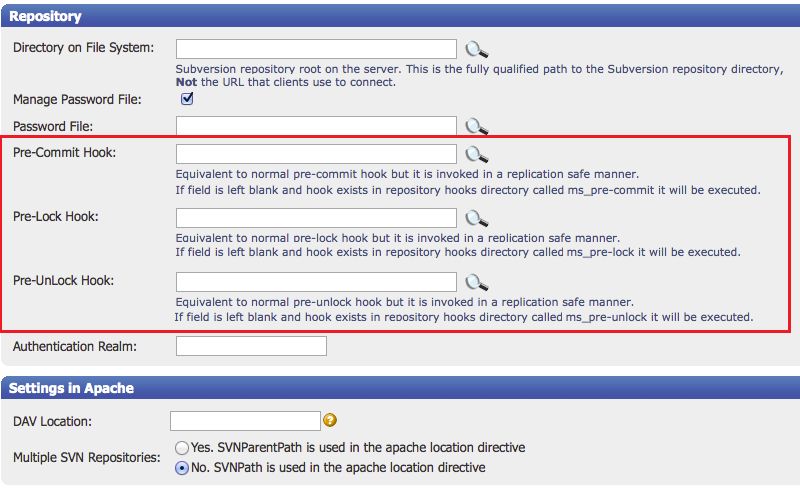
Pre-Commit Hook: Equivalent to normal pre-commit hook but it is automatically picked up and invoked in a replication safe manner.
If you leave the field blank and the hook exists in the repository hooks directory called ms_pre-commit, it is executed.
Pre-lock Hook: Equivalent to normal pre-lock hook (invoked when a user attempts to lock a resource) but it is automatically picked up and invoked in a replication safe manner. If you leave the field blank and the hook exists in the repository hooks directory called ms_pre-lock, it is executed.
Pre-Unlock Hook: Equivalent to normal pre-unlock hook (invoked when a user attempts to destroy an exclusive lock) but it is automatically picked up and invoked in a replication safe manner. If you leave the field blank and the hook exists in the repository hooks directory called ms_pre-unlock, it is executed.
Using ParentPath
When re-replication hooks are enabled within a ParentPath repository environment, they run for all child repositories, unless specific hooks are specified, for each child.

3.8.3 Repository-specific hooks
Three different Pre-replication hooks are supported on a per-repository basis:
- pre-commit: Invoked before or after a commit is completed.
- pre-lock: Invoked when a user attempts to lock a path.
- pre-unlock: Invoked when a user attempts to destroy an exclusive lock.
MultiSite recognizes that a hook script is aimed for pre-replication if it is prepended with "ms_". E.g:
ms_pre-commit.pl
ms_pre-lock.pl
ms_pre-unlock.pl
This renaming stops Apache running the scripts. Instead, MultiSite checks if Use Pre-Replication Hooks is enabled in the SVN Settings. If it is enabled, the above 'ms_' prepended scripts are run.
3.8.4 Managing Environmental variables in Windows deployments
Running hook scripts on Windows can be problematic, a common cause of problems is not having the right environmental variables. To reduce the potential for problems running hooks on Windows, ensure that your server's environment includes a minimum set of variables in the enviroment.
- PATH
- COMPUTERNAME
- HOMEDRIVE
- HOMEPATH
- PATHEXT
- PROMPT
- TEMP
- TMP
- USERNAME
Useful secondary variables, often required by batch scripts:
Check the system's environmental variables using the following command in the Command prompt:
C:\Users\svnadmin> echo %PATH%
C:\ProgramData\Oracle\Java\javapath;C:\Program Files (x86)\WANdisco\uberSVN\bin;C:\Program Files (x86)\NVIDIA Corporation\PhysX\Common;C:\Windows\system32;C:\Windows
;C:\Windows\System32\Wbem;C:\Windows\System32\WindowsPowerShell\v1.0\;C:\Program Files (x86)\Java\jdk1.6.0_26\bin;C:\Program Files (x86)\Mozilla Firefox\firefox.exe;
C:\Program Files\Java\jdk1.6.0_26\bin;C:\Program Files\Apache Ant\bin;C:\Program Files\TortoiseSVN\bin;C:\Users\Katherine\Desktop\ec2-api-tools\bin;C:\strawberry\c\b
in;C:\strawberry\perl\site\bin;C:\strawberry\perl\bin;C:\Program Files (x86)\QuickTime\QTSystem\;C:\Program Files (x86)\Git\cmd;C:\Program Files (x86)\Git\bin;C:\Has
hiCorp\Vagrant\bin;C:\adb
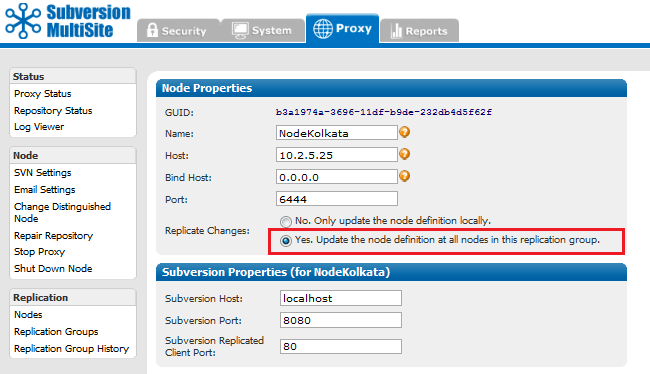
3.9 Selective replication
By default, MultiSite replicates all SVNROOTS associated with a Subversion repository. However, you can specify a set of SVNROOTS that you do not want to replicate. Use Excludes for SVNROOTS in the prefs.xml file to identify the repositories you do not wish to have replicated. For example:
<SVNProxy>
....
<ExcludeRepositories>/exclude,/dir0</ExcludeRepositories>
....
</SVNProxy>
If MultiSite cannot find the entry, it's included in the replication. There are no wildcard (regular) expressions. For Apache and SVNPath, the syntax must match what is listed in the Location directive. For Apache and SVNParentPath, the syntax must match what is listed in the Location directive and Path to the repository.
All the included roots go through the same agreement manager. For example, say you have three repositories.
/repos/rep1
/repos/rep2
/repos/rep3
For SVNPath, the Location directive is:
<Location/rep1>
SVNPath /repos/rep1
</Location/rep1>

<Location/rep2>
SVNPath /repos/rep2
</Location/rep2>

<Location/rep3>
SVNPath /repos/rep3
</Location/rep3>
For SVNParentPath, the Location directive is
<Location/repository>
SVNParentPath /repos
</Location/repository>
To exclude the first repository, rep1, for SVNPath, you would exclude rep1: for SVNParentPath, you would exclude /repository/rep1.
Note
You must name a repository after the / character. Subversion does not support a location named with just the / character.
4. Updating Apache or Subversion in WANdisco deployment
This procedure requires that your MultiSite deployment, including Subversion servers, are offline during the time it takes to upgrade at each node. Please plan this procedure accordingly.
- Ensure MultiSite supports the version you want to upgrade to. Check on the Deployment checklist.
- Test the new version of Apache or Subversion in a test environment.
- Once you are ready to deploy the new version in your production environment, perform a synchronized stop. See Performing a Synchronized Stop.
- Update each of the nodes.
- Resume MultiSite.
- Perform some tests at each node to confirm the update has completed successfully.
5. Upgrading SVN MultiSite
To upgrade your SVN MultiSite to a later build or version, follow these instructions. Instructions in the Deployment Guide 3. Installation section are for a first-time installation.
The correct way to upgrade Subversion MultiSite depends which versions you are moving between. Use the list below to ensure that you upgrade in the right way.
Upgrade from SVN MultiSite 3.6 or earlier
See our Knowledgebase articles on Installation and Upgrade
Upgrade tips
Upgrading within a version, e.g. 4.0 build x --> 4.0 build y, use Upgrade with Script
Upgrading between versions, e.g. 4.0 --> 4.2, use Upgrade from backup.
Select your upgrade path:
Use this procedure if you are upgrading from the 4.0 version of SVN MultiSite. Note that you may need to complete an upgrade to the latest version of 4.0 before you can attempt to upgrade to version 4.2
Use this procedure if you are upgrading from SVN MultiSite version 4.1.
Use this procedure if you are already running version 4.2 but need to upgrade to the latest build. This procedure is shorter as you can use an upgrader script that ships with SVN MultiSite instead of completing a fresh installation, then importing your data.
6. Authz notifier utility
The Authz Notification utility, authznotifier.jar, passes the location of the diff file containing the changes between the existing and newly updated Authz file to the replicators, along with the output of the md5sum tool on the existing Authz file.
6.1 Usage
The authznotifier.jar file is located in the svn-replicator/lib directory.
Authz notifier, when not using SSL encryption, runs using the following command:
java -Dauthznotifier.nossl=true -jar authznotifier.jar </path/to/admin/password-file> </path/to/diff>
<md5-value> [-patchtool </path/to/patch>] [-md5sumtool </path/to/md5sum>]
Example:
java -Dauthznotifier.nossl=true -jar authznotifier.jar /sec/pass.file /home/scm/diff.out "2889b653854f68872fbb6c771348f3d9 /home/scm/svn.auth"
Authz notifier, when using SSL encryption, runs using the following command:
java -jar authznotifier.jar </path/to/admin/password-file> </path/to/diff>
<md5-value> [-patchtool </path/to/patch>] [-md5sumtool </path/to/md5sum>]
Example:
java -jar authznotifier.jar /sec/pass.file /home/scm/diff.out "2889b653854f68872fbb6c771348f3d9 /home/scm/svn.auth"
- path/to/admin/password-file
- The full path to the password file.
- path/to/diff
- The full path to the diff file. The diff file is generated by running the command:
diff <original-authz-file> <new-authz-file> > diff.out
- md5-value
- The result of running md5sum on the full path to the original Authz file. e.g. md5sum /path/to/original-authz-file
- patchtool
- [OPTIONAL] The full path to an optional tool that would apply the patch.
Defaults to /usr/bin/patch
- md5sumtool
- [OPTIONAL] The full path to a tool for generating new md5sum values, e.g. /usr/bin/md5sum
Defaults to /usr/bin/md5sum
MD5 handling
To improve consistency and usability, particularly for Windows, WANdisco calculates MD5s and patches for authz notifications internally. However, this requires that the patch is in Unified format. If this is generated through GNU diff, this is the -u option. Any patch that cannot parse results in the notification being rejected and the nodes becoming read-only and the error message "Diff does not appear to be in unified format" in the logs.
If you use a different format, you should specify an appropriate patch program and options via the -patchtool argument noted in the key.
Password file
The password file should be in plain text and contain MultiSite's admin authentication details in the following format:
Username
Password
Or, if you use the default 'admin' username, then the password file can just contain the password.
Port
To use a different port, invoke Java with -Dauthznotifier.port=xxxx.
For example:
java -Dauthznotifier.port=xxxx -jar authznotifier.jar /path/to/password-file
</path/to/diff> <md5-value> [-patchtool </path/to/patch>] [-md5sumtool </path/to/md5sum>]
6.2 Disabling LDAP for admin authentication
A stand-alone utility is now provided that can unset the use of LDAP for
admin authentication. It can be run from the /svn-replicator/utils directory
using the following command:
perl ldapadminreset
The script calls the replicator switching off LDAP admin authentication and also removing the admin flag from any authorities. Also a user account is created with sysadmin privileges and a specified password to ensure that there is a means for an administrator to login.
This can be changed by creating a file called ldapreset.properties (situated in the "/config" folder), this file can have three values (all optional):
- ldapResetKey
- Key sent to the shutdown listener - default LDAP_RESET
- ldapResetUser
- Username to create/reset - default admin
- ldapResetPassword
- Password to give the above user - default password
6.3 LDAP admin authentication URL syntax
The LDAP Admin login functionality lets you specify an LDAP group or subtree that contains users who can login as administrators. The format of the URL is:
ldap(s)://host:port/basedn?attribute?scope?filter
ldap: For regular LDAP, use the string ldap. For secure LDAP, use ldaps instead.
host:port: The name/port of the LDAP server.
basedn: The DN of the branch of the directory where all searches should start from. This would typically specify a group populated with admin users
attribute: The attribute to match user names against. If you give no attribute, the default is to use uid. We recommend that you choose an attribute that will be unique across all entries in the subtree you will be using.
scope: The scope of the search. Can be either one, sub or obj. The default is to use a scope of sub
- -one: Entities are searched below the DN one level only. If an entity with a matching attribute=username is found then the user is considered an admin.
- -sub: Entities are searched below the DN throughout the entire subtree. If an entity with a matching attribute=username is found then the user is considered an admin.
- -obj: A specific object is being identified by the DN. If this object is located AND a matching attribute=username is found then the user is considered an admin.
filter: A valid LDAP search filter. If you do not provide this filter, it defaults to (objectClass=*), which searches for all objects in the tree.
Note
When a user is deemed to be an admin based on the criteria above, authentication is carried out against the LDAP Authority system. Therefore, it is important to define a relevant LDAP authority.
6.4 LDAP timeouts
MultiSite's pre-replication authentication operates with some timeout values which may need to be modified to match your environment.
From Build xxxx these timeout values are set from the LDAP Settings screen, under the Security Tab (providing you have the Access Control add-on for MultiSite enabled).

View more about LDAP Timeout settings.
In versions of SVN Multisite 4.2 released before July 2013, LDAP timeouts were set through the JAVA initialization reputils.pm file:
- ldapauth.timeout
- Use this property to set the timeout for LDAP (in milliseconds), the default value is 15000 (15 seconds).
- ldapauth.cachettl
- Use this property to set the length of time that credentials are cached if they have been successfully authenticated against the LDAP service. The default is 600,000 (600 seconds).
To override these defaults, ensure that the following statements are appended to SERVER_JVM_ARGS: in the <WANdisco Installlation>/bin/reputils.pm file:
$SERVER_JVM_ARGS .= " -Dldapauth.timeout=<LDAP timeout> -Dldapauth.cachettl=<Cache expiry time>";
Both timeouts are in milliseconds
Example LDAP timeout error as it appears in the log:
Mon Feb 28 15:27:24 GMT 2011 1298906844401 org.nirala.util.services.ldap.LDAPAuthenticator getLdapContext
WARNING: [request-handler-1] LDAP response read timed out, timeout used:1ms. Mon Feb 28 15:27:24 GMT 2011
1298906844402 org.nirala.util.services.ldap.LDAPAuthenticator isUserAuthed WARNING: [request-handler-1]
LDAP Authorization failed: null Mon Feb 28 15:27:24 GMT 2011 1298906844402 org.nirala.util.services.ldap.
LDAPAuthenticator isUserAuthed INFO: [request-handler-1] LDAP Auth - User: test@wandisco.com
Authenticated: false
MultiSite's pre-replication authentication operates with some timeout values which may need to be modified to match your environment. These timeout values are set from the LDAP Settings screen, under the Security Tab (providing you have the Access Control add-on for MultiSite enabled).
6.5 Running with multiple LDAP authorities
If you run with multiple LDAP authorities, there are two different use cases that are worth considering.
6.5.1 Stop nodes from checking non-local LDAP services
It's common to have a local LDAP service running so that authentication isn't dependent on WAN connectivity or subject to WAN latency. If this is the case you'd want to login to each Node's admin console and set all the non-local LDAP services to Disable Locally from the corresponding Actions options.

6.5.2 Use non-local LDAP services for LDAP High Availability
Providing that you are happy to mirror your entire Subversion user base across your LDAP authorities, you can ensure High Availability by enabling the following LDAP Settings:
- Continue onto next LDAP authority on user not found: If the priority authority doesn't return a user (because the authority is down) then the next authority in the ordered list is checked.
- Continue onto next LDAP authority on user authentication failure: If a user fails authentication, the user is rechecked on all other available authorites (providing they have not been disabled on the node.
7. Access Control
WANdisco's Access Control replaces Apache Subversion's own access control features to provide full authorization, authentication and audit capabilities that are essential for using Subversion within an enterprise environment. Take control of your organization's Subversion repositories through an easy-to-use web interface. You no longer need to manage user access through the manual editing of Authz files.
WANdisco's Subversion Access Control offers the following capabilities:
- Managing Subversion access across multiple SVNROOTs and modules
- Set repository authorization permissions using hierarchical groups, called Teams
- Bundle specific repository permissions for a subset of team members using subteams
- Delegate control of specific repository resources to Team Leaders using subteams
- Build access rules using Perl-style regular expressions.
Subversion Access Control is part of the SVN MultiSite proxy that sits between Subversion users and the Subversion server. Subversion users connect to Access Control using the standard port 80. Access Control relays user interactions to the Subversion server using port 81. Subversion users never have direct access to Subversion, allowing administrators to maintain exclusive control.

How Access Control works with Subversion.
7.1 Access Control model
Access Control uses Apache's mod_authz_svn module to apply path-based authorization of Subversion repositories through an Authz configuration file. Path-based authorization uses the repository's directory structure as the basis for permitting or denying specified users or groups of users read and or write access to repository files and folders. Through sets of user-created rules, precise control can be applied to what a user can access or overwrite. The limitation of path-based authorization is that once a user is granted permission to access and write to a particular path (directory), it's only possible to limit authorization to a specific file using rules based on regular expressions.
To some extent, running with path-based authorization should therefore dictate how repository files are arranged, ensuring that sensitive material is secured within subdirectories.
Specific permissions overrule inherited permissions
Access Control tries to match the path itself, and then the parent of the path, then the parent of that, and so on. The net effect is that mentioning a specific path in the access file always overrides any permissions inherited from parent directories.
7.2 Creating users
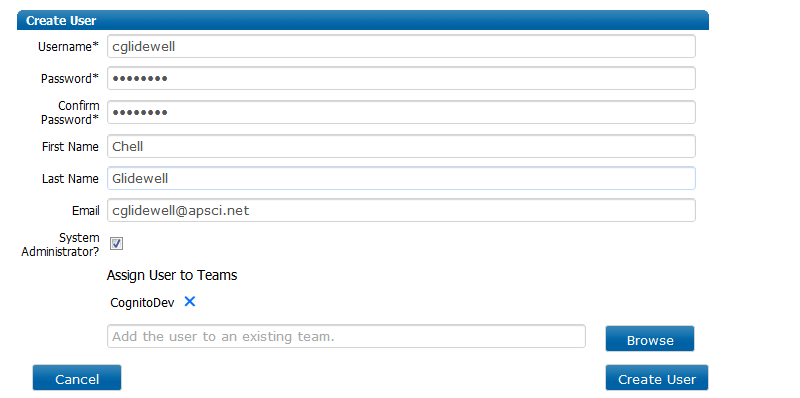
Use this procedure to manually add new Subversion users to Access Control. To add users in bulk, see 7.3 Importing Users.
- Log in to the admin console and click create User on the side menu of the Security tab.

- Enter the new user's details into the form.
If you are logged in as a system administrator you are able to create additional users with system administrator privileges by ticking the "System Administrator" check box. This option is not available to team leaders. For more information, see Create Users.
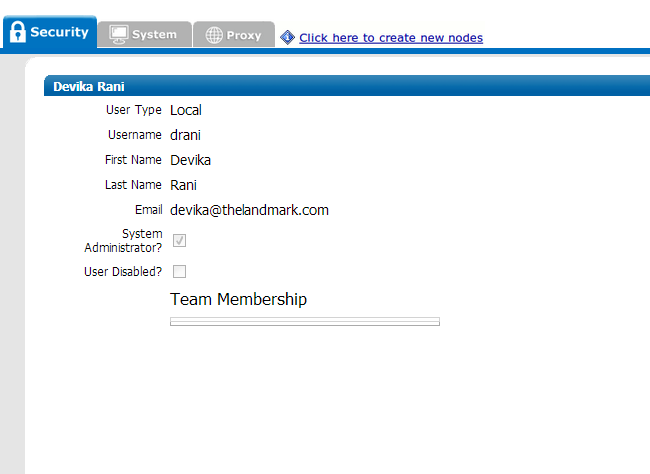
Local User: Users are flagged as local if they are added through the admin console, either through the Create User form or the Import Users tool.
LDAP: Users are flagged as LDAP if they were added through an LDAP query.
7.3 Listing users
The Users List shows all the users that have been entered into SVN MultiSite, including users who have been entered throught he admin console form, through LDAP or through a csv import.
Users are listed with the teams they are currently members of, along with an "Actions" buttom that allows an administrator to Edit, Delete or Disable the applicable user.
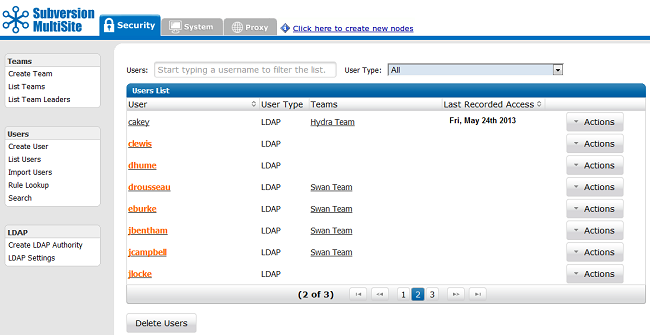
User: List of usernames. Users with Admin permissions are colored orange.
User Type: Indicates whether a user is an Admin, imported via LDAP or has been added locally (either through data entry into the admin console or through a csv file import).

Teams: Shows any teams of which the user is a member.
Last Recorded Access: This column shows the date that each user last interacted with repository data. Recording is only done, and this field is only displayed if you Enable User Access Tracking. Recording follows these rules:
- User reads are only recorded on the local site.
- Access logs are recorded a maximum of once every 24 hours
Actions: A drop-down list of available actions that can be applied to each user:
- Delete Users: Select multiple users to delete.
- Disable Users: Select multiple users to disable.
- View User:
7.4 Importing users
The option is available to bulk import users in a comma delimited file, instead of entering them individually using the Create User screen.
Alert
If "global" case insensitivity is enabled from the System Settings screen then usernames included in the authz file will be forced into lowercase. Note: usernames displayed in the admin UI will not be affected and remain in the case they have been entered/imported.
- Create a comma delimited (CSV) file containing your users, using the following format:
<username>,<first name>,<last name>,<email address>,<password>,<UserType>[, [Parent/Team/Names/]TeamName]
- Log into the admin console and click Import users on the side menu of the Security tab.
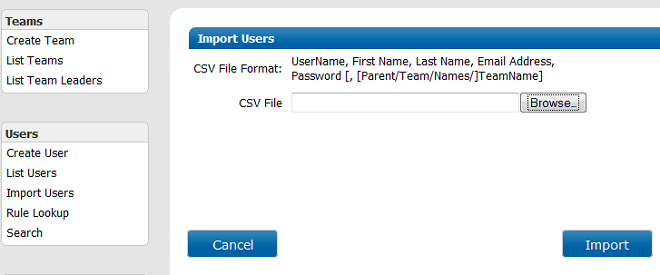
- Click the Browse button and navigate to your import file. When selected, click the Import button. A growl message window appears, that indicates the status of the import.
Local user
Imported users count as Local Users and are editable from within SVN MultiSite. It isn't possible to place an imported user under LDAP control, although from build: #3296 it is possible for LDAP users to create local users and teams can support mixed users (LDAP and Local working within the same team) although with this arrangement it is not possible for a local users to be team leaders.
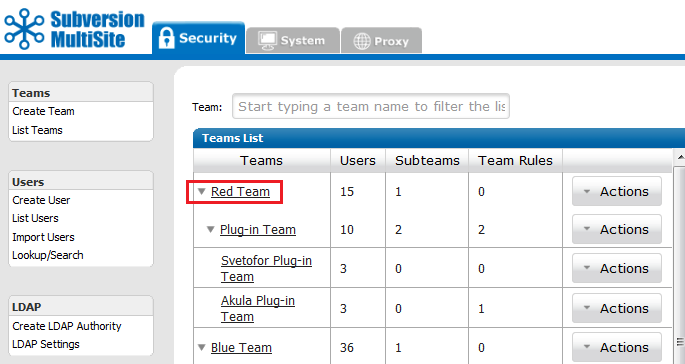
7.5 Creating teams
Teams are the basic unit of organisation within Access Control. All access policies are applied to teams. To apply permissions to a single user, you need to add the user to a team, even if the team is used only for that one user.
Teams can contain mixed user types
A team leader who is managed by LDAP can add local user accounts to their team. This can be useful if you need to add build bots using local service accounts to a team that is otherwise managed with an LDAP authority. Also, a local user can be a team leader. (Before build #3296, local users would be removed from the team after a polling of the LDAP service.)
- Click the Security tab and then the Create Team link.
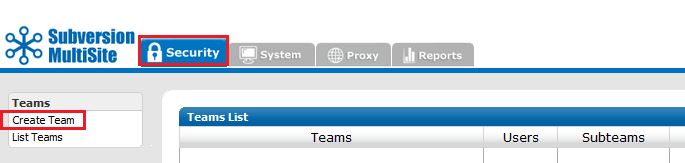
- Enter the new team's details, including a name, a description then add users and resources.
- You can build a team from users who have been created locally - enter their names or click Browse to select them.
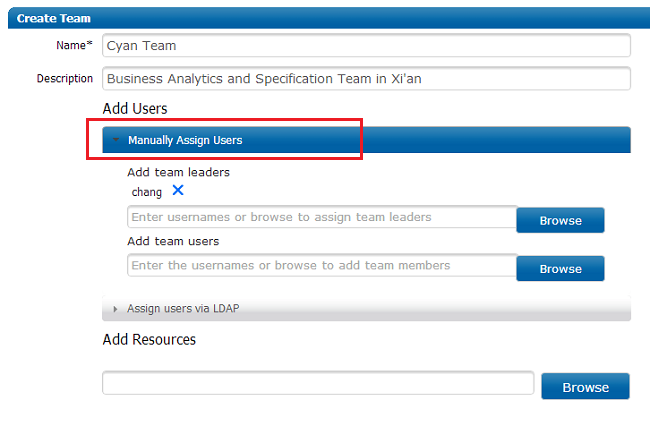
- If you've added LDAP Authorities you can add users through LDAP, either as an entire authority or selectively by applying a filter to the LDAP query.
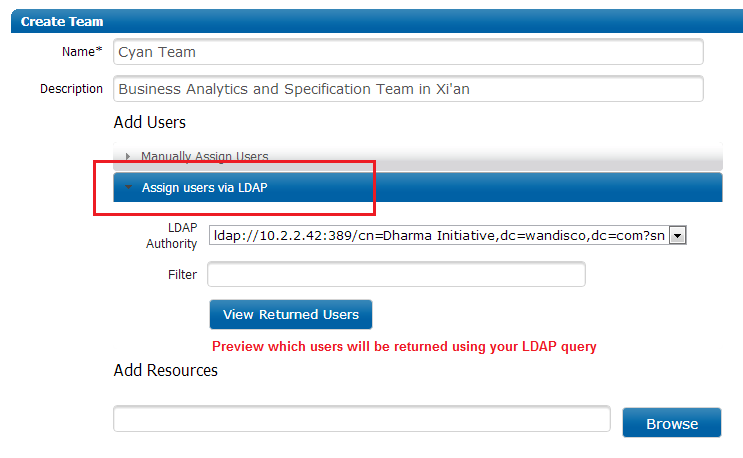
- Click Create Team when you're ready. Read more about the Create Team screen in the Admin Console Guide.
Team names must be globally unique
All teams must have a unique name within Access Control. Currently, you cannot have two teams with the same name, even if they are located within different directories.
7.6 Creating rules
Team rules define how a user "X" who is a member of team "Y" can interact with repository resource "Z". A single rule is useful but the real power of Access Control is shown when applying complex policies through several rules. The procedure below runs through the creation of the rule, and explains how it's applied.
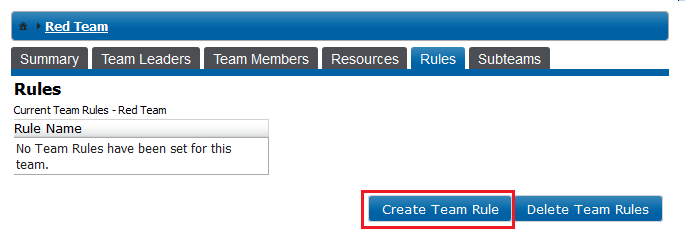
- Log in to the admin console and click the name of the team for which you wish to add a new access rule. In this example we'll create a rule for senior Red Team developers that ensures that they have read/write access to all the Red Team code. For extra security, application of the rule is restricted to the IP range from which only these developers access Subversion.
- On the Team screen, click the Rules tab.
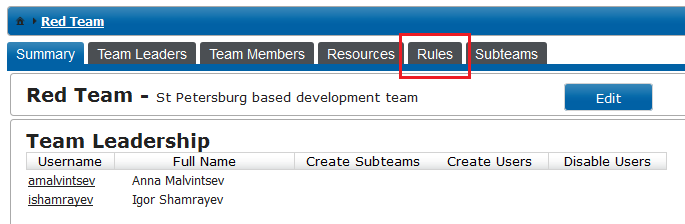
- On the Rules tab click the Create Team Rule button.
- On the Rules tab, enter the following details:
Rule Name*: (Required Field) A name for the rule. In this example we'll name the rule ReadWriteAllGreenCode. If you are planning on creating a lot of rules it's worth adding a reference that describes the context of the rule - maybe define the group of users to which it wil apply.
Users this rule applies to: Enter or browse for users that this team rule is applied to. The available users are limited to the team's members.
Define Resources/Paths/Regular Expressions for this rule: Enter or browse for repository resources, or type in a regular expression that defines the parameters for resources that should be added. In this example all directories within the zelenyj directory are added, along with Read/Write permissions.
Authz and regular expression based Access Control rules
If you use Authz to manage user authorization through Apache you need to be aware that Access Control rules that use regular expressions to define resources are not supported by Authz so won't be written to the Authz file.
File level Access Control
Although Access Control usually sets permissions on a directory level it is possible to set rules that apply to individual files, or a set of files that match criteria that you build into a regular expression.
IP Addresses this rule applies to: Enter an IP address or an address pattern defined in a regular expression to apply the rule on the basis of the connecting user's IP address. In the example we'll use a regex that limits application of the rule to a small IP range that corresponds with the assigned users. This ensures that, even if unauthorized users gain one of the team member's access credentials, the access rule is not applied unless they access from the authorized user's IP.
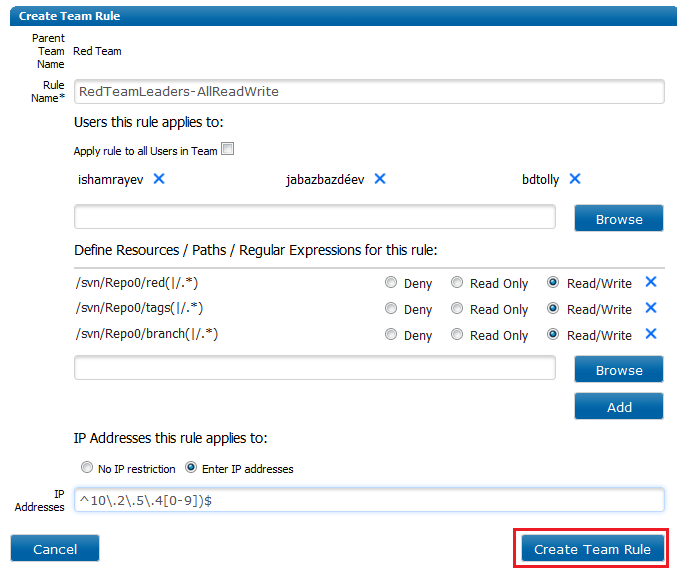
- When you have added all the rule details, click Create Team Rule.
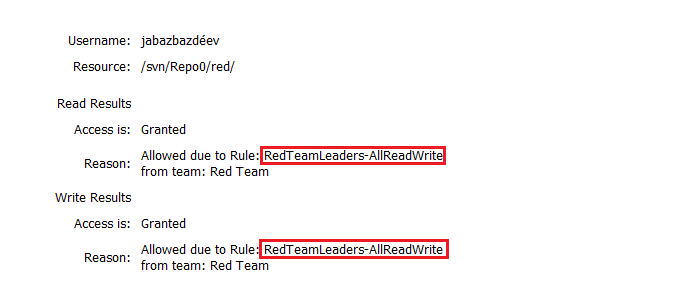
- Check that the new rule now appears on the Rules panel on the team Summary tab.

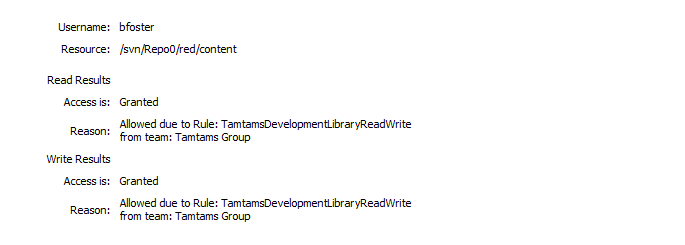
- Team rules can conflict causing unexpected results, so Access Control lets you test that a user has the right access and authorization for a given resource. In this case, one of the user's tied to the rule is checked against the "red" directory. The user's Read/Write access as a result of the application of rule RedTeamLeaders-AllReadWrite is confirmed.
7.7 Creating subteams
Subteams are teams that have been created under a parent team. The users and repository resources available to a subteam are limited by those that appear in the parent team (which could itself be a subteam). Subteams allow system administrators to delegate responsibility for managing user access for a segment of their repository resources, without having to hand out total control of the repository to subordinates. This is very helpful for organisations working with satellite development sites where managing day-to-day access changes can be made difficult by the distance and time-zone difference between sites.
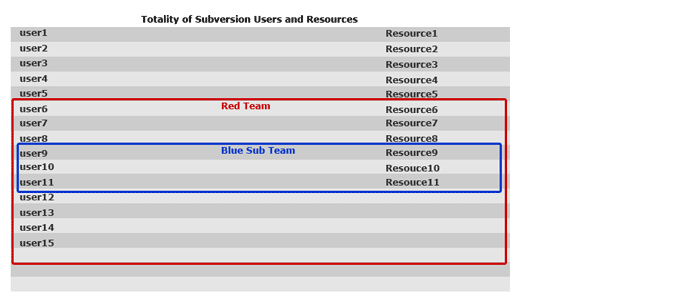
7.7.1 How subteams work
- A team can consist of any available users and repository resources.
- A subteam can only consist of users and repository resources that are available to the parent team.
- System administrators can recursively create subteams (subteams within subteams within subteams, etc) to an unlimited extent.
- The Team Leader of a subteam can only create a subteam if they are given the Create Subteam permission.
- The delegation of repository resources, through subteams, can be limited by ensuring that the team leaders are not given the create Subteam permissions, if their team is not suitable for further delegation.
- Log in to the admin console and click the Actions drop-down button that corresponds with the team for which you want to create a subteam. From the Actions, select Create Subteam.
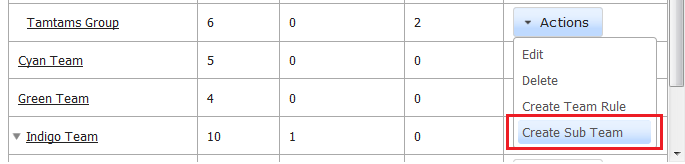
Note: You can also create a subteam from a team's screen by clicking on the Subteam tab.
- On the Team or subteam screen, click the Create Subteam button.
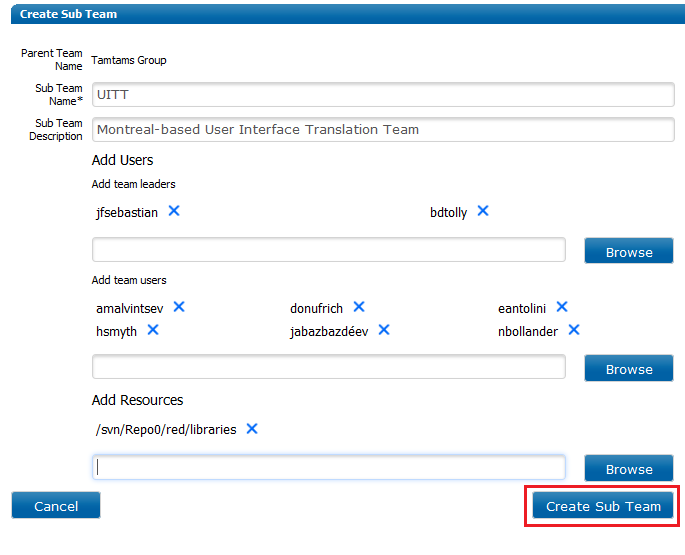
- Complete the subteam entry fields, following the same process that was used for setting up parent teams. See Create Team.
- When all the users and resources have been added, click Create Subteam.
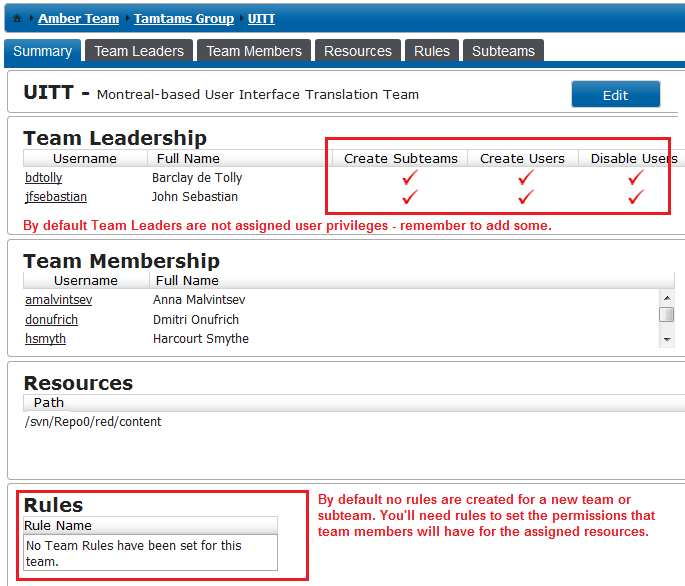
- The subteam has now been created. The screen updates to show you the summary tab of your new subteam. Remember, unless you create some rules for the new subteam, it doesn't affect how the team members interact with Subversion. So once a subteam has been created, you'll need to add rules. See Creating Team Rules.
7.8 Testing user access
A Subversion user environment that requires complex access policies across large numbers of repository resources can require the creation of a lot of team rules. When users belong to multiple teams and have their access controlled by many rules it's possible for a user's access to a particular resource be mistakenly blocked. The Lookup/Search tool lets users identify which rules prevail for a given resource.
- Log in to the admin console and click the Lookup/Search link.
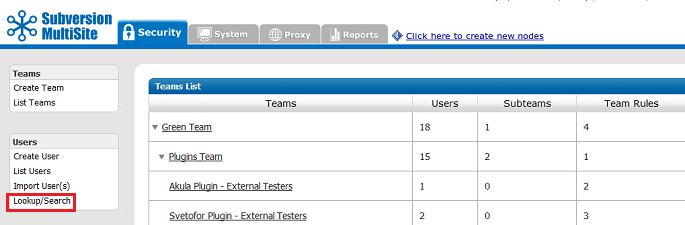
- Enter the username of the user that you want to test, and the repository resource that you want to check against for access rules. Then click Lookup.
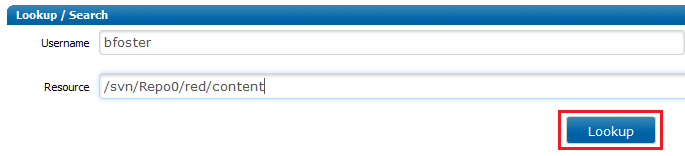
- The Lookup results display at the bottom of the screen. They show whether your selected user has either read or write permissions for the specified resource and from which rule and which team the rule is applied.
7.8 Exporting and importing Access Control settings
SVN MultiSite's Export Settings tool, situated under the System tab is used to backup all of SVN MultiSite's settings (although not the Subversion repository data). This includes the users, teams and rules. See Export Settings.
8. Batch Access Control updates
8.1 Introduction
Many operations in Subversion Access Control require that the Authz and the Subversion password files be regenerated. In a rapidly changing MultiSite environment, the number and frequency of user, team and rule changes can degrade performance (chiefly from a basic disk I/O perspective).
If you need to ensure that performance is not affected by Access Control traffic, the answer is to use the Batch Access Control Updates feature.
Important note
When Access Control Batch Updates is enabled, changes to users, teams and rules are not instant. To see how Access Control is currently behaving, excluding changes that only take effect after the next scheduled password/Authz rewrite, use the Current View.
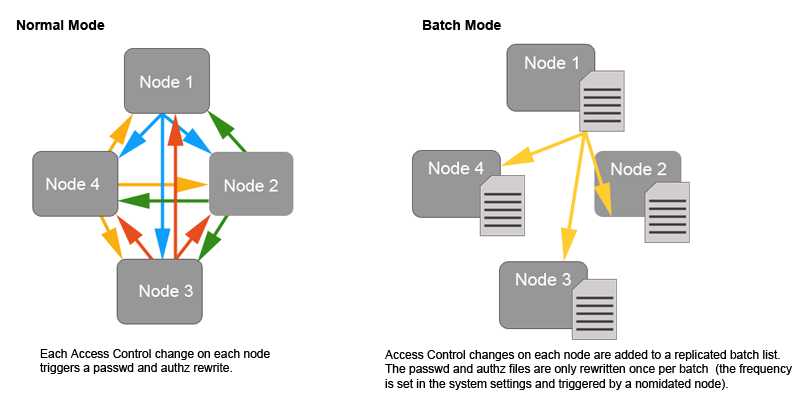
8.1.1 Apply changes in batches
When Batch Access Control Updates is enabled, all Access Control changes that would result in a regeneration of the password or Authz files
(see the list below) are batched up to be replicated to the other MultiSite nodes at a user-defined frequency (default is 60 minutes).
8.1.2 Access Control Changes that can be batched
- Create/delete users
- Create/modify/delete teams
- Create or modify rules (apply a change to access permissions for either a individual users or teams)
8.1.3 Not affected
- Creation/modification of LDAP Authorities
WARNING:
Changes to LDAP Authorities do not trigger password / Authz file rewrites. However when an authority is run, any resulting user or team changes do.
8.2 Batch Mode vs Enforce Mode
When Batched Updates are enabled the admin console can be viewed in two separate modes:
Pending: When Batched Updates is enabled, the admin console presents a view of Access Control that includes objects (users, teams and rules) that are not yet enforced, because they're waiting to be applied in the next batch update. Use this mode to make access control changes, which are immediately added to the current waiting batch.
Pending Mode actually shows you how access control will be applied when the current batch has been updated. This makes it difficult for troubleshooting and testing, where you would only want to see objects as they are actually applied to users here and now.
Current: The Current view is available for looking at Access Control with all pending changes filtered out, this is specifically for troubleshooting and testing. Most Access Control creation or edit tools are disabled - it wouldn't make sense to create Access Control objects (users,teams or rules) in this mode as they wouldn't appear until the current batch was run.
If you need to make Access Control changes, switch back to the Pending Mode, or disable the Batched Updates feature.
8.3 How to enable batch Access Control updates
This procedure shows you how to enable batch Access Control updates and then how to manage them:
- From the admin console, click the System tab.
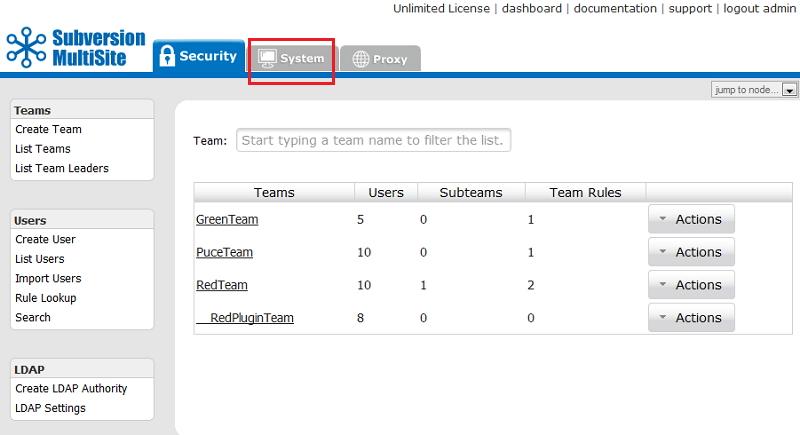
- On the System screen side menu, click the System Settings button.
- On the System Settings screen, click the check box for Run batch Access Control updates. Select which of your nodes will initiate the batch. This node will trigger the passwd and Authz regeneration, according to the Access Control update frequency which you set as described below.
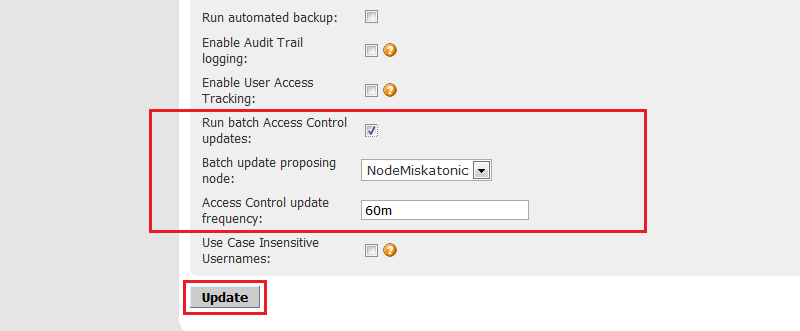
The default frequency is 60m, so that any Access Control change takes a maximum of one hour to take effect. Set a higher frequency to reduce the maximum delay for Access Control changes, with a corresponding impact on performance. Click Update to save your changes.
8.4 How to manage batch Access Control updates
When batch Access Control updates are enabled, all nodes show the pending changes at the bottom of the side menu on the Security tab.

8.5 View pending changes
You can click View Pending Changes for a list of all Access Control changes that have so far been added to the next batch. Pending User, Team and Rule changes are listed separately.
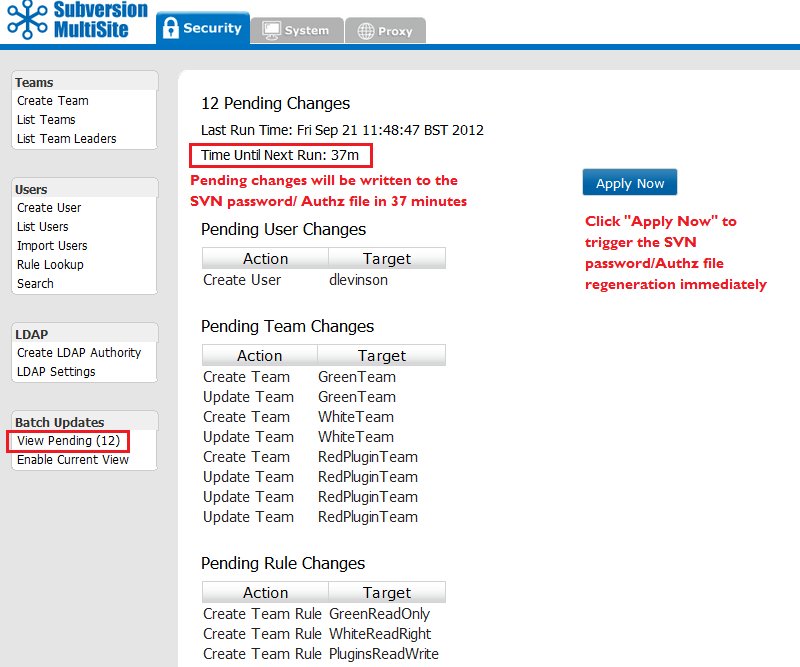
At any time you can override the countdown to the next run by clicking the Apply Now button. All listed changes are applied immediately and the countdown to the next batch starts.
8.6 Enable current view
Enabling Current View updates Access Control so that any change still waiting in the current batch (and therefore has not yet taken effect) is not displayed. This view makes troubleshooting and testing easier because you only see users, teams and rules as they are currently enforced through the Access Control model.
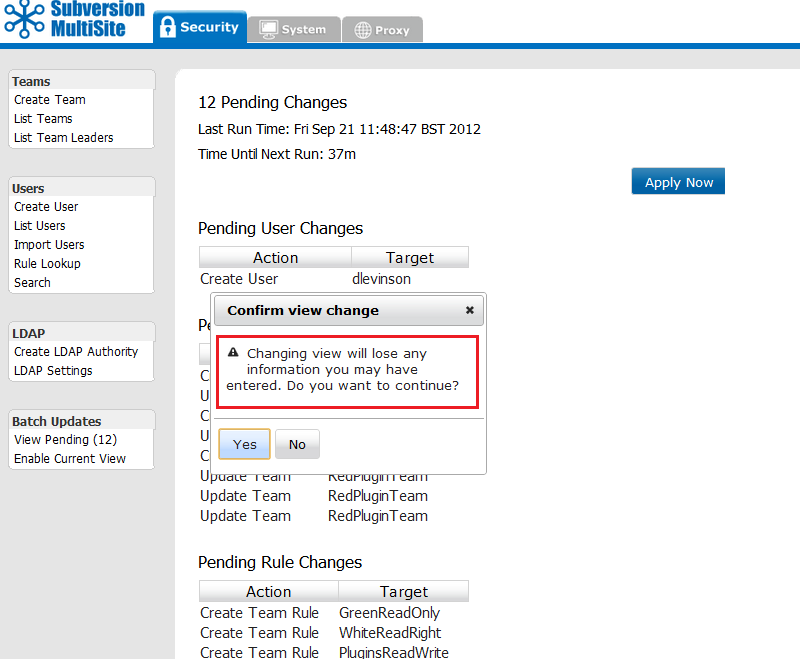
Confirm View Change Moving to the current view immediately blanks any information that has been entered into an open admin console screen. So, on clicking Enable Current View you'll get a warning and a prompt to continue. Unless you are currently entering settings on-screen you can click Yes.

Viewing: [Current]
A red label appears at the top of the admin console when the "Current View" is enabled. This is to remind you that access control is currently in a viewing only mode.

In the Current View the menu loses all options that result in Access Control changes (creating/importing users, teams etc.). To make such changes you need to change back to the Pending view or normal mode (by disabling the Access Control Batch updates).
Troubleshooting Guide
1. Finding the last committed transaction
Even though committed transactions are always in the same order for each node, the timing of the commits usually varies from node to node. So unless there are no Subversion users logged in, you probably are going to have variations per node for committed transactions.
- Go to any node's Dashboard and enter:
http://<IP address>:<WANdisco port number>/dashboard2
You see all the nodes on the Dashboard to compare the listed transactions.
- Click a Tx Id (transaction ID) to see more details about the WebDAV command and its transaction number.

2. Using Repair Repository
Repair Repository repairs corrupted repositories. Previously, repairing a repository required all nodes in the replication group to be stopped, making all repositories read-only until the repair was completed.
2.1 Repository repair overview
This section describes the sequence of events in a typical repository repair. For a step-by-step procedure of how to repair a repository see the Repository Repair Procedure.
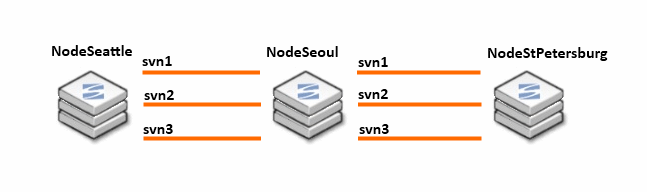
- This example shows a 3-node replication group, including NodeSeattle, NodeSeoul and NodeStPetersburg. Each node hosts 3 Subversion repositories, svn1, svn2 and svn3.
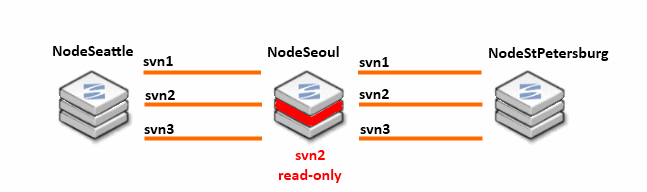
- On NodeSeoul, svn2 repository has a problem and becomes read-only. Users of the svn2 repository on other nodes in the replication group can continue to work, but their changes cannot be replicated to NodeSeoul.
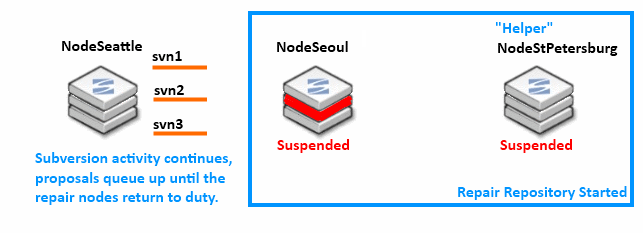
- The administrator works to repair the fallen svn2 repository by using the Repair Repository procedure. They select NodeStPetersburg as the helper node and begin the repair. Both NodeSeoul and NodeStPetersburg are suspended from the replication group. The users of these nodes are unable to write to any of the repositories.
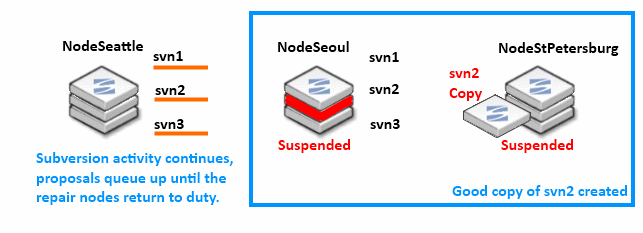
- From the helper node, the administrator can make a copy of the repository that needs repairing or use rsync between the two nodes. In this example, we make a copy of svn2. An alternative to copying svn2 is to use the rsync program to transfer missing or corrupted revisions from the helper node, NodeStPetersburg, to NodeSeoul.
- With a copy of the repository made, the administrator can reactivate the Helper node, allowing its repositories to catch up with changes made on NodeSeattle. The good copy of svn2 can then be transferred to NodeSeoul where it overwrites the read-only version of svn2.
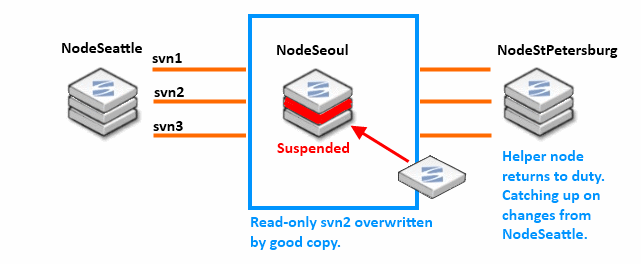
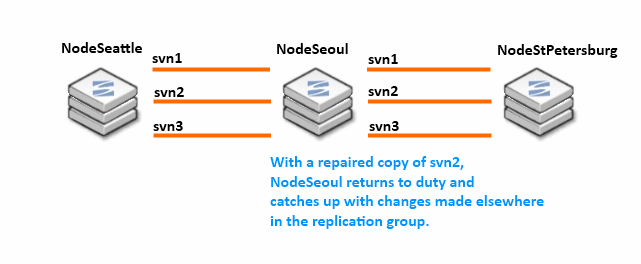
- The Repository repair procedure is now complete: NodeSeoul has an up-to-date copy of svn2, and is released from the repair process. All repositories on all nodes are replicating again.
2.2 Repository repair procedure
This is a step-by-step guide to repairing a repository. Before proceeding, you may find it useful to read how the nodes and repositories change their state in the Repository repair overview.
WARNING: wait until repair is complete
After starting a repository repair you must not navigate away from the repair browser session or open up a new session on the node. To ensure that the repair doesn't fail or stall, don't perform any other action on the node until the repair has been completed.
- If you have applied the relevant email settings, you will receive an email warning that a repository has been placed in read-only mode.
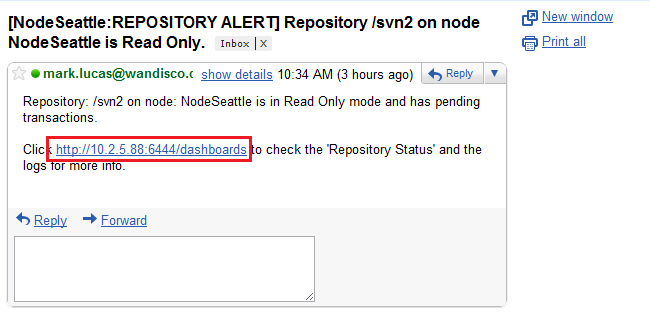
- View the dashboard on the admin console. Click the link One or more repositories are in read-only mode.
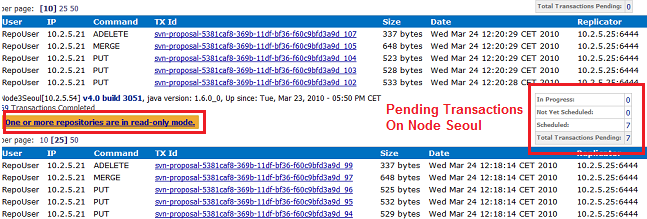
- The Repository status screen lists all the repositories on the node. If you have trouble finding the read-only repository, click the Show Read-Only link. Note the name of the repository that is read-only. In the example, svn2 is read-only after a failed retry.
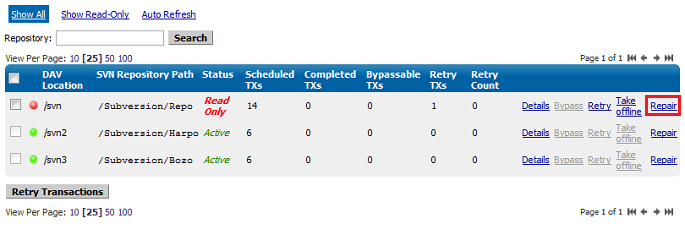
- To start the repair, select a "helper" from one of the remaining nodes.
Alert
The Helper Node must have an up-to-date copy of the repository under repair, and must also not be currently involved in another repair.
- From the drop-down boxes, select the node to use as the helper and the node that hosts the repository to be repaired.
Tip
If you start a repair using the "repair" link on the status screen, shown above, you'll only need to select the helper node. If you start the repair by following the Repair Repository link (side menu) then you also need to select the node on which the repair will be done.
- Read the following:
VERY IMPORTANT:
Use the repair tool properly, otherwise you may worsen the situation and require additional repairs:
- Inform Subversion users working on either the helper node or affected node that they cannot commit to any repositories hosted on their node during the repair. If they need to continue working then they might be able to perform an "SVN relocate" of their working copy so that their commits go to a different node during the repair.
- Repair only one repository at a time and ensure that it is completed before starting another.
- While using the repair tool, don't navigate away, start another repair or use other admin console features until the repair is complete. We recommend that you arrange exclusive access to the admin console on all nodes during the repair.
If you navigated away during a repair:
- Navigate to the Helper Node.
- Go to the Proxy tab and click the Helper Node link. If you, instead, navigated to the node under repair, you are now directed back to the Helper Node anyway.
You can now continue with the repair process.
- Click Continue. You see a summary of your selection.
- Check your selection, then click Suspend {helper Node} and {node to be repaired}.
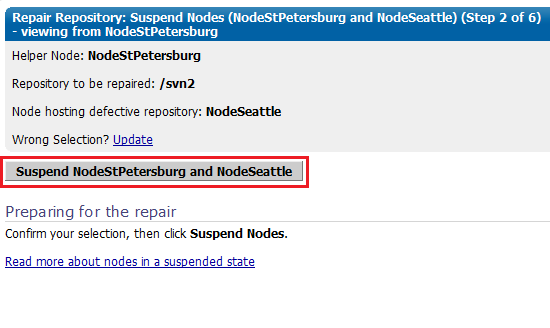
Both the helper node and the node being repaired are suspended until the repair is complete.
Suspended nodes are:
- Still accessible via the admin console.
- Placed in a read-only mode until reactivated.
- Not flagged as read-only when viewed from the other nodes.
- Not able to interact with any other nodes in the replication group.
Effect on the remaining active nodes in the replication group:
While a repair is underway you cannot perform any global actions on the replication group, i.e. any actions that depend on interaction with other nodes in the replication group, such as consistency checks, emergency quorum reconfigurations, scheduled distinguished node rotation,etc).
A progress bar appears. When it reaches 100%, all in-flight proposals have completed and both nodes are suspended. No further traffic is accepted until the repair procedure is completed or cancelled.
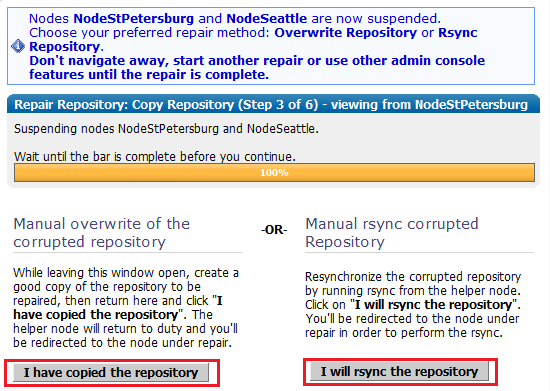
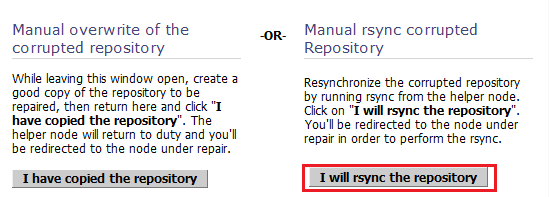
- Choose how to complete the repair from:
Manual overwrite of the corrupted repository
or
Manual rsync corrupted repository
2.3 Overwriting a corrupted repository
With this option you take an up-to-date copy of the repository from the helper node, then click I have copied the repository. The helper node is returned to duty and catches up with the remaining active nodes.
During a repair, don't close the admin console session or navigate away from the screen. You shouldn't start a repair if another repair is underway on other nodes in your replication group.
Note
To ensure that no actions are triggered that might cause the repair to fail, we strongly recommend that you organise exclusive access to the admin consoles of your nodes during a repair.
This section describes one way to copy the repository:
- Leave the admin console open because you'll return to it later.
- Open a terminal window, create a backup of the repository to be repaired, then create a tar archive:
root@Fed11-2 Subversion]# ls -l
total 12
drwxr-xr-x 7 apache apache 4096 2010-03-24 11:13 Bozo
drwxr-xr-x 7 apache apache 4096 2010-03-24 11:11 Harpo
drwxr-xr-x 7 apache apache 4096 2009-11-05 17:26 Repo
[root@Fed11-2 Subversion]# mkdir backup
[root@Fed11-2 Subversion]# tar cvf RepoBozoBackup.tar Bozo
- Move the tar file into the backup directory:
backup  Bozo  Harpo  Repo  RepoBozoBackup.tar
[root@Fed11-2 Subversion]# mv RepoBozoBackup.tar backup
- When you have copied the repository you can return to the admin console and click "I have copied the repository".
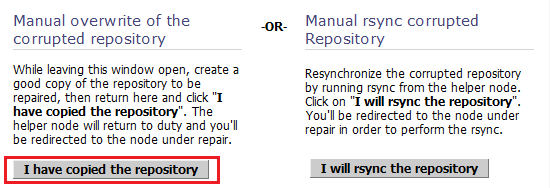
The helper node is no longer suspended and automatically catches up on any repository changes that occured while it was suspended. You are redirected to the node that is hosting the repository to repair, which remains suspended.
- While leaving the admin console screen open, transfer the repository copy that you made in step 1 from the helper node to the node currently under repair (which you are currently viewing in the admin console).
- Overwrite the corrupted repository with the copy that you have just transferred onto the node. If you prefer, and have enough disk space, just move the corrupted repository out of the way and copy the replacement in its place.
- From a terminal window, delete the repository's cache file.
<repository_name>/db/rep-cache.db
This step is not essential and could result in the repository becoming slightly larger. However it removes the risk that the repaired repository will not match with the cache file.
- Restart Apache. This frees up file handlers that are holding the rep-cache.db file open as well as clearing any in-memory cache data that could point to references that don't exist in the repaired repository.
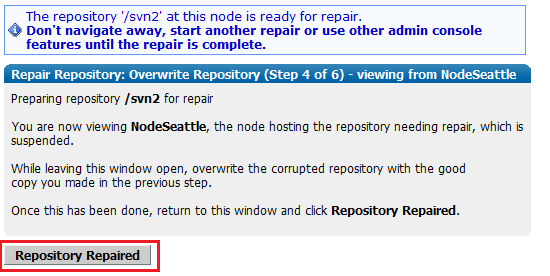
- From the admin console window, click Repository Repaired.
Using SVN 1.7 or later?
We recommend that you force Apache to restart by using your startup scripts. In Subversion 1.7 and later there may be open file handlers that point to files that no longer exist or have been replaced during the rsync.
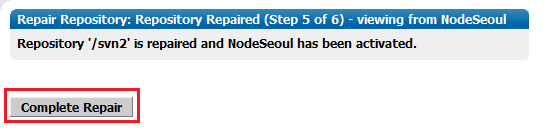
With the repository repaired, the node is returned to duty and catches up on any repository changes that have occurred since it was suspended.
- Click Complete Repair.
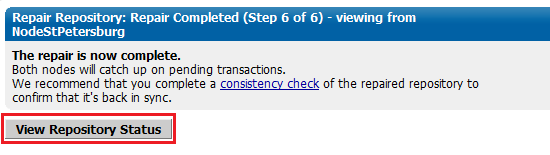
The repair is now complete.
- We recommend that you do a consistency check of the repaired repository to confirm that it's up-to-date. You can check the status of the repositority by clicking View Repository Status.
2.4 Fixing a corrupted repository with rsync
With this repair option you'll use the rsync command to synchronize the out-of-date repository with the good copy on the helper node.
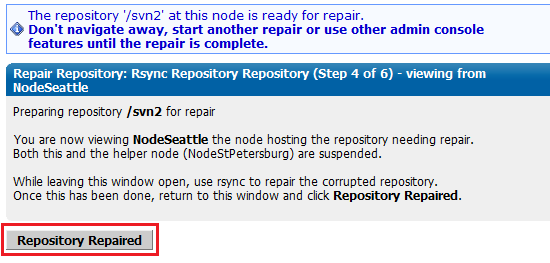
- Click I will rsync the repository.
- At this point both nodes are suspended, allowing you to complete an rsync of the out-of-date repository. For more information see 2.7 Using rsync to repair a repository.
- When the rysnc has been completed, it's a good idea to do a verification of the repository, you can use:
svnadmin verify <REPOSITORY NAME> -r <REVISION NUMBER>

- With the rsync completed, the repository is now repaired. Return to the admin console session and click Repository Repaired.
Using SVN 1.7 or later?
We recommend that you force Apache to restart by using your startup scripts. In Subversion 1.7 and later there may be open file handlers that point to files that no longer exist or have been replaced during the rsync.
- The node hosting the repository that has been repaired is now returned to duty. However, the helper node remains suspended. To return the helper node to duty, click Activate Helper Node.
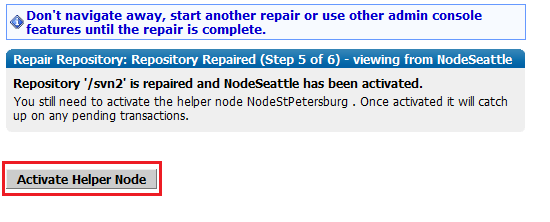
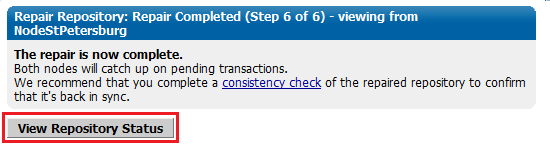
- The repository repair is now complete. We recommend that you do a consistency check of the repaired repository to confirm that it's up-to-date. You can check the status of the repositority by clicking View Repository Status.
2.5 Disabling access to Subversion nodes
Alert
This makes Subversion read-only. You may need to warn other Subversion users.
Temporarily disable Subversion access at selected nodes
You can stop transactions at one or more nodes. For a description of stopping one node, not all, see WANdisco is Listening.
- Open the admin console.
- Select the Proxy tab and click Stop Proxy.
- Select Stop this proxy only.
- Repeat steps 2 and 3 for each node you want to stop.
- To start a node, click Start Proxy. The replication group catches up with the re-started node on any transactions that occurred between the nodes that continued to synchronize.
- Re-start each node that you stopped.
2.5.1 Disabling Subversion access (all nodes)
To stop all nodes at once, run a synchronized stop.
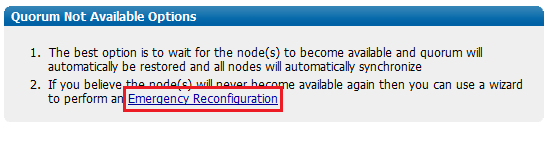
2.6 Emergency reconfiguration of quorum
Alert
Use this procedure only if the distinguished node (in a singleton quorum) has become permanently unavailable.
The procedure creates a new replication group that excludes the unreachable node.
Important: Don't attempt an emergency reconfiguration without help
If you need to perform a permanent removal of a node (an emergency reconfiguration) then you should contact WANdisco's support team for assistance. The operation poses several risks to the overall operation of Access Control Plus. Therefore, we recommend that you do not attempt the procedure by yourself.
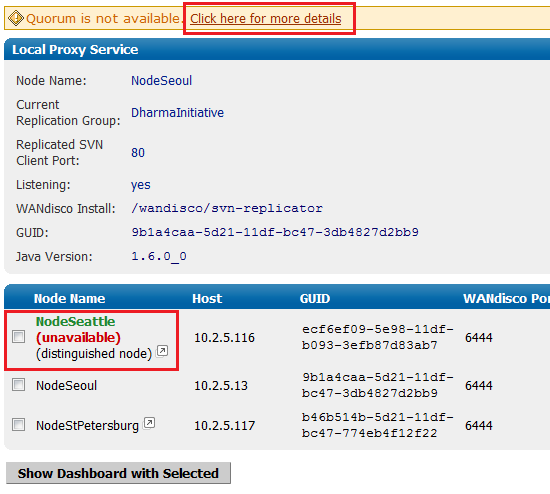
If a quorum can't be formed, an alert appears at the top of the admin console. Follow the Click here for more details link.
Use this emergency reconfiguration procedure only when recovering the distinguished node would take an unacceptable amount of time.
Using a Singleton Quorum: If the distinguished node is periodically unreachable, try using Change Distinguished Node when it is available.
Using a Majority Quorum: If the quorum is periodically available, wait for the it to become available and recreate the replication group, using a singleton quorum, instead of using the emergency procedure. You can change back to the majority quorum after stabilising your nodes.
Caution
We recommend that you avoid using this procedure because of the potential for data loss. If the distinguished node is unreachable by other nodes it could still be processing transactions on its own. I.e. with singleton quorum, the distinguished node can operate alone. Therefore, if the other nodes form a new quorum that excludes the distinguished node, any transactions made at the distinguished node, since it became unavailable to the other nodes, are lost.
- Ensure that Subversion users at the nodes which will not be in the new replication group after the emergency quorum reconfiguration, are notified that they won't be able to make changes to any repositories.
- It is essential that the unreachable distinguished node is properly shutdown and has had a reset performed. The emergency quorum reconfiguration cannot be completed (specifically a new Replication Group cannpt be created) if the distinguished node is brought back up during the procedure.
- Be prepared to manually start any nodes. You may be directed to do so during the procedure.
- Read the message. If you decide to continue, click Emergency Configuration.
- Read the next warning message about possible data loss. You can try again to recover the distinguished node. Otherwise click I Understand, Continue.

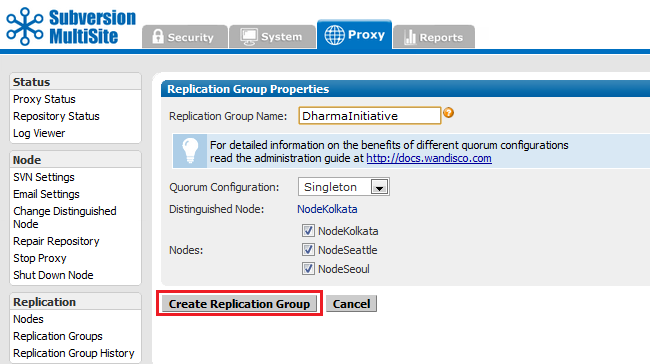
- Tick the checkboxes next to the nodes to add to the new replication group.
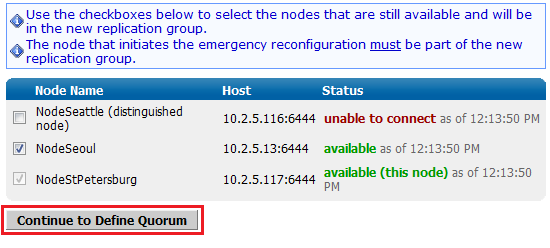
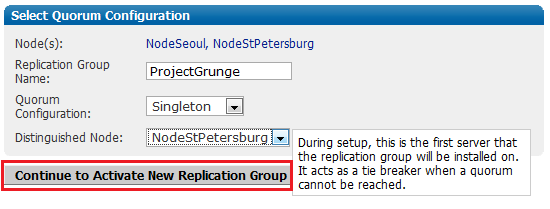
- Name the new replication group and click Continue to Define Quorum.
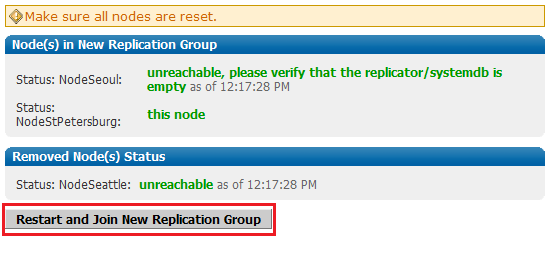
- When all the nodes are reset, click Continue.
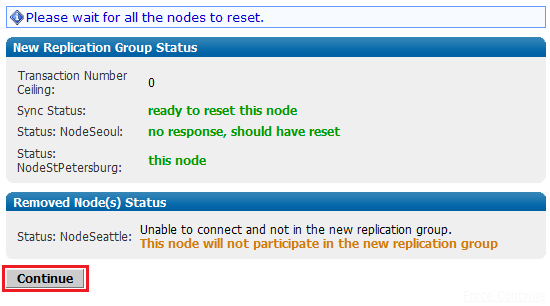
- Verify that the systemdb has been deleted at the other nodes, i.e. not the one that you're on now. Click Restart and Join New Replication Group.
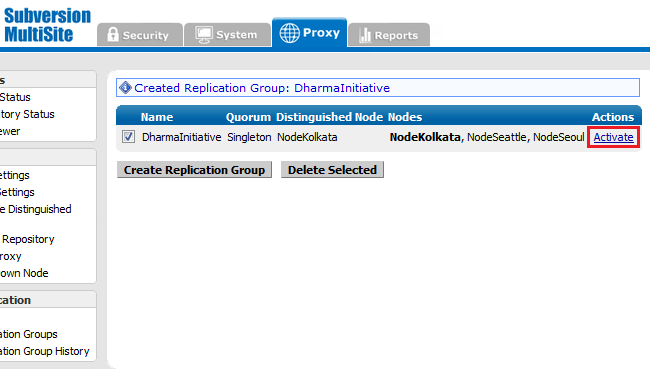
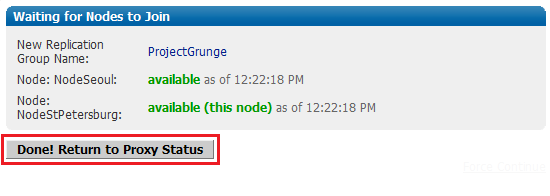
- After a few moments, you see that all nodes confirm that they have joined the new replication group. The repositories hosted on these nodes are now in synch. Click "Done! Return to Proxy Status".
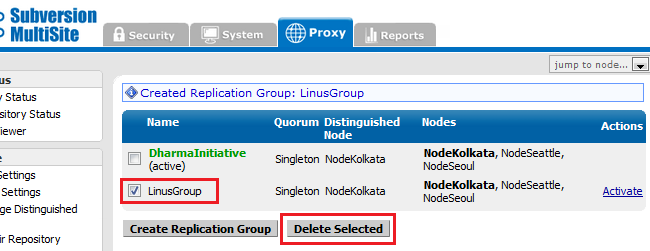
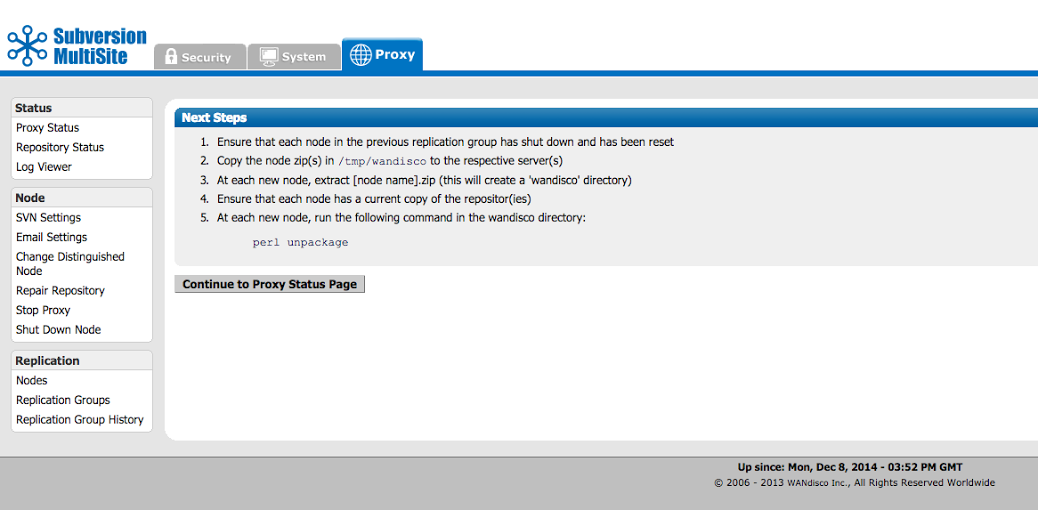
- The Emergency Reconfiguration is now complete. You can restore and reintroduce nodes that have been removed from the replication group: use the same procedure as for adding brand new nodes. See 1.1 Adding a Node to the Replication Group. Decide whether to clean up the retired node and replication group.
2.7 Using rsync to repair a repository using an out-of-date copy
Use this process to fix a corrupted or out-of-sync repository by restoring it to a replica of the repository that is known to be in a good state.
From the machine with the master repository, enter:
rsync -rvlHtogpc /path/to/local/repo/ remoteHost:/path/to/remote/repo
For example:
rsync -rvlHtogpc /Subversion/Repo/ root@172.7.2.33:/Subversion/Repo/
Then enter an additional rsync that ensures that contents of the locks directory are identical (by deleting locks that are not present on the originating server):
rsync -rvlHtogpc --delete /path/to/local/repo/db/locks/ remoteHost:/path/to/remote/repo/db/locks/
For example:
rsync -rvlHtogpc --delete /Subversion/Repo/db/locks/ root@172.7.2.33:/Subversion/Repo/db/locks/
2.8 Offline mode
The offline mode enables you to stop the Java heap from being swamped by marking the failed transaction as eligible for garbage collection. As a result, all nodes can invoke garbage collection and clear the queued transactions. The node with the read-only repository no longer needs to keep the buckets as active, which frees up the heap. However, the trade-off is that the repository can no longer automatically recover. Instead, a repository repair is required to get it back into sync.
How read-only repositories can lead to performance problems
If a transaction fails on one node, and is not bypassed, the repository is placed in a read-only mode to stop the failure from halting replication between the replicas on the other nodes. Subsequent transactions between the other replicas stack up until the read-only replica is again writable. Garbage collection is stalled and, on the node with the read-only repository, all buckets subsequent to the failed transaction remain active and continue to eat into the Java heap. In a heavy traffic environment this can lead to Java heap overflows unless the repository is quickly recovered or taken offline.
Knowledgebase
For more information about SVN MultiSite's Garbage Collection, see Garbage Collection.
2.8.1 Automatic offline mode
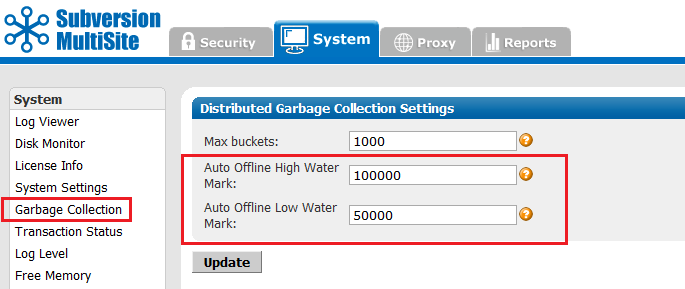
A read-only repository switches offline if the number of transactions exceeds a threshold. Control this threshold from the Garbage Collection screen, via the admin console's System tab.
For an description of Garbage Collection, see the Admin Console Guide - 4.5 Garbage Collection.
The threshold is called the Auto Offline High Water Mark. Default is 100,000 transactions. You can increase this number if there's sufficient Java heap space to handle large amounts of queued transactions. If necessary, to save Jave space, you can reduce the threshold so that a read-only repository is taken offline sooner.
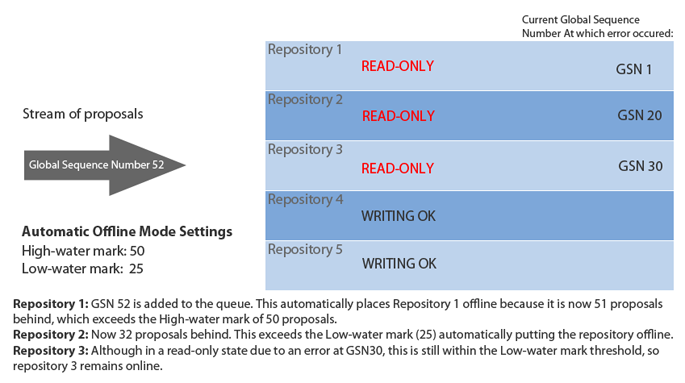
Example of automatic offline mode
2.8.2 Manual offline mode
You can make a read-only repository offline through the admin console. The option to take a repository offline coincides with the option to attempt a bypass of a failed transaction.
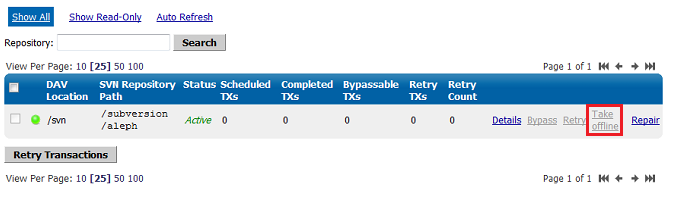
From the Proxy tab, click Repository Status.
3. Talkback script
When you contact WANdisco with a problem, WANdisco support asks you for the talkback file. Run the file by going to svn-replicator/bin and entering:
perl talkback
Enter the pathname to SVNROOT when prompted. The output looks like this:
Please open a ticket by visiting http://support.wandisco.com and upload the /talkback-<machine name>.zip, with a description of the issue.
Do not email the talkback files
Attach them via the web case interface. The .zip file is located at the root directory. Do not email the .zip file. Attach them to your case. Read our Knowledgebase article about How to raise a support case.
3.1 Windows systems
If you use Windows, you need to download and install some third-party software, PsExec, from Microsoft.
For jvm/jdks 6 and later:
Note: This utility is unsupported and may or may not be available in future versions of the JDK. If you are running on Windows then you need to enable some of the features of the talkback script by installing the above noted extra package and setting your %PATH% variable appropriately. Also, make sure that the PATH environment variable contains the location of jvm.dll used by the target process or the location from which the Crash Dump file was produced. For example, set PATH=<jdk>\jre\bin\client;%PATH%.
4. Connection request timeout messages
Sometimes in the WANdisco logs, you see connection request timeout information messages logged. These are informational messages. Ignore them unless connection is guaranteed in xxx milli-seconds and happens often.
In normal operation of MultiSite, two connections are established between each of the replicated machines: MultiSite connection and a DFTP connection. These two connections were established when MultiSite started and are used when required. A keep-alive signal is periodically sent on the WANdisco port. There is no traffic on DFTP until a file transfer begins.
Some lesser routers in the path of the two end points will close an established connection if there is no traffic on the connection without notifying the end points. When end points sent data on this stale connection, they hang forever. To deal with these lesser routers, MultiSite does not keep the DFTP open in its connection pool forever. MultiSite establishes a DFTP connection from receiver to sender when a file transfer was required. This solved the problem dealing with lesser routers.
Some companies have a corporate policy that network connections can only be established in one direction. To deal with this scenario, the replicated machines establish a DFTP connection to other nodes periodically and tear them down if there is no traffic within a known interval. When a connection is established, any side is free to use the connection regardless of which side initiated the connection. A connection in use is never torn down until it is available as a free connection. This is the current implementation.
It takes between 300 to 400 milli-seconds to establish a network connection even on a slow WAN. By default, MultiSite waits for 500 milli-seconds before giving up that a connection cannot be established to a peer machine and prints this informational message. What if the establishments of connection always take 501 milli-seconds. In this case, a connection is never established. To solve this problem, the timeout value is adjusted in 10% increments of the last timeout, starting at 500 milli-seconds, to a maximum of 10 seconds for each timed out connection.
When a successful connection is made, this timeout value is used for subsequent connection establishment unless an adjustment is required for failed attempts.
5. VPN, NAT, firewall timeouts
This section is useful if you are experiencing issues with slow commits on the non-distinguished node or if you have port-forwarding in your environment.
In a multi-site configuration, most nodes are connected through a WAN. Often, VPN and NAT devices are used to do IP translation and port forwarding. These devices need to maintain state to do the port forwarding on-the-fly. This state can grow if not cleaned out. Many devices simply reset the internal state after an inactivity timeout. For example, some Cisco NAT routers reset state after 7200 seconds or 2 hours.
The MultiSite replicator uses persistent TCP connections between the replicators. If these TCP connection are going through a NAT or port forwarding device, it's important to tune the VPN and/or the TCP stack at the replicator host machine. Many NAT devices have buggy implementation that resets the internal state without resetting the TCP connections.
In such a situation, the replicators may see a connection as established but no communication actually happens. The symptoms include a slow commit that is blocking WAN communication. You can run netstat -a | grep <DConEPort> to see if the TCP send queues are backing up. That, in conjunction with slow commits that appear to be hanging, or frozen, typically indicates the NAT is not gracefully resetting TCP connections.
You can further confirm this by using tcpdump or ethereal to check for excessive retransmissions on the DConENet connections. You could also look at your VPN/NAT device log to see if it reset any DConENet connections that appear to be in an ESTABLISHED state via the netstat -a command.
These are a few ways of addressing the issue:
6. A node is in read-only mode
If any nodes are in read-only mode,
- Go to the Dashboard. You see the Problem Transactions listed for each node.
- Click the Problem Transactions link. The System tab displays a message, noting the bypassable transactions and the non-bypassable transactions.
- If there are no bypassable transactions, and you do not know why, see How Do I Get WANdisco Support?
- If there are bypassable transactions, there may be more than one. Click each transaction.
- Read the returned message that confirms the bypass status of the transactions.
- Verify that the Dashboard does not report any nodes in read-only mode.
7. Update Apache or Subversion
This procedure requires that your MultiSite deployment, including Subversion servers, is offline during the time it takes to upgrade at each node. Therefore, plan this procedure accordingly.
- Ensure MultiSite supports the version you want to upgrade to. Check on the deployment checklist.
- Test the new version of Apache or Subversion in a test environment.
- When you are ready to deploy the new version in your production environment, perform a synchronized stop. See Performing a Synchronized Stop.
- Update each of the nodes.
- Resume MultiSite.
- Perform some tests at each node to confirm that the update has completed successfully.
8. Missing license key file
SVN MultiSite depends on a license key file being present in the svn-replicator/config directory for each node. Get a valid license from WANdisco and copy the file to the config directory. MultiSite won't start without the license file.
8.1 I get a severe exception
I get a SEVERE exception, and replicator is aborting the Subversion transaction and shutting down.
You may get a message in the logs/SVNProxy*.log file similar to:
svn: Commit failed (details follow):
svn: File not found: transaction '10-d', path '/development/Hello.txt'
This means the replicator has detected an out-of-sync condition. Remember, the replicator continuously monitors your repository for any out-of-sync issues. If it detects this has occurred, it triggers an automatic shutdown to prevent further corruption.
This could happen if someone accidentally committed directly to Subversion, bypassing the replicator, and ramped up the version in one node without giving the replicator any chance of replicating. This can be easily resolved by following the reset procedure outlined in I Directly Committed to Subversion, How Do I Rsync?.
Follow all precautions to avoid bypassing the replicator:
- Ensure only svnreplicator host/IP address is allowed to connect to the Subversion server.
- Protect direct logins in Subversion replicator or Subversion server box from end user.
Admin Console Guide
SVN MultiSite has a browser-based admin console for managing replication groups, setting changes and viewing system logs.
Connect to the admin console through a web browser, using your server's hostname or IP address, along with the administration port (defaults to 6444). For example:
http://10.2.5.101:6444 (http://(Server IP):(Admin port)
1. Admin console key
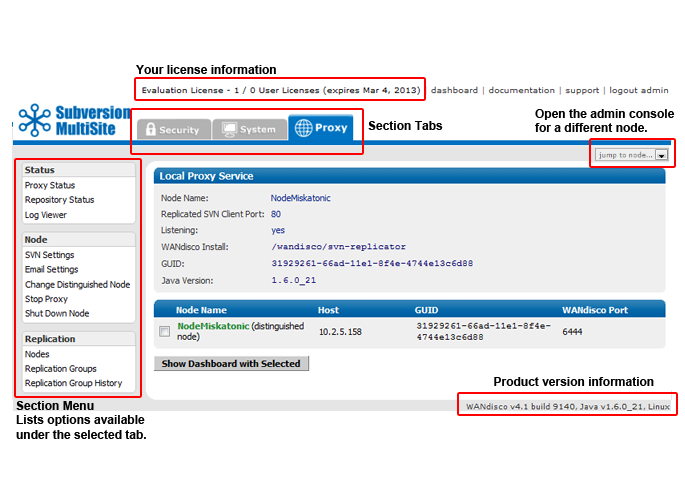
The admin console screen consists of the following elements:
Top menu bar: includes the product license and any expiry date, along with links to documentation and support.
Section tabs: The admin console's different sections are separated onto individual tabs:
Note
The layout and features available in Admin Console vary depending on your license agreement. Therefore, you may not see all the elements described in this guide.
- Security appears if you have a license for the Access Control feature that may be bundled with SVN MultiSite. If not, the tab is called Users and provides functions relating adding and managing Subversion users.
- System: Various housekeeping features are handled within the System Tab. This includes a log viewer and settings exporter.
- Proxy: The proxy tab is the business end of the admin console. It provides access to the Subversion settings and controls to the MultiSite proxy.
Jump to node...: This drop-down link will open the admin console for one of the other nodes. You can identify which node you're viewing by checking the webpage's title.
Section menu: Appears on the left-hand side and contains links to features that are specific to the tab.
Product version line appears at the bottom of the screen and shows the product version and build, the version of Java installed and the operating system.
2. Login
Several links are available on the authentication screen, even if you don't log in.
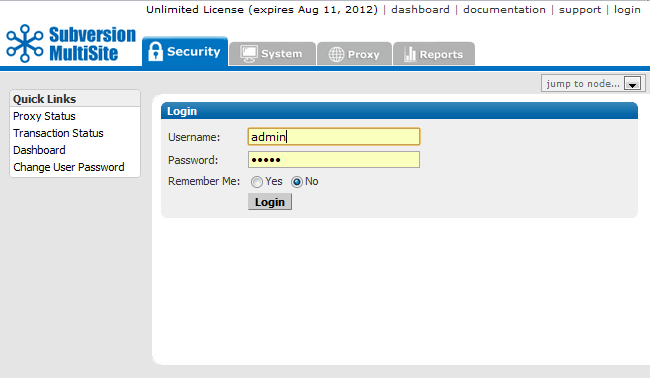
Quick links
Proxy Status: Proxy Status Displays the node's status in the tab's main panel.
Transaction Status: Lets you check on the status of individual transactions.
Dashboard: Lists DAV traffic.
Change User Password: Follow this link to change the password of a User. It is not used for changing the Admin password.
3. Security
The security tab handles all user related functionality.
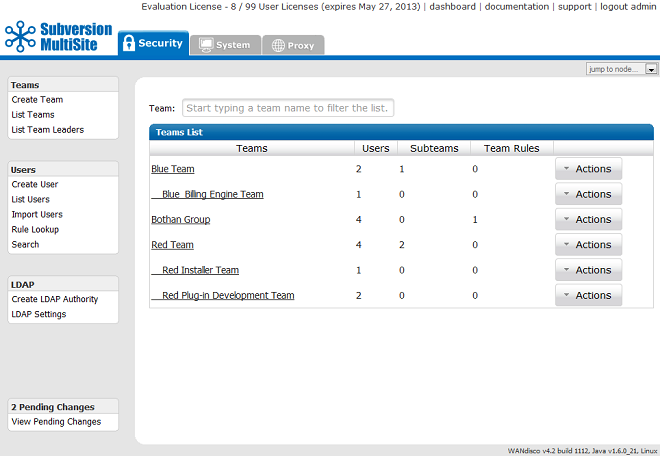
Tip
The Security tab provides features that are available when the Access Control product has been bundled with SVN MultiSite. The documentation for using Access Control is in the User Guide.
3.1 Create team
In Access Control a team is a group of users who are associated with a resource or collection of resources. Teams underpin how user authorization is managed in Access Control.
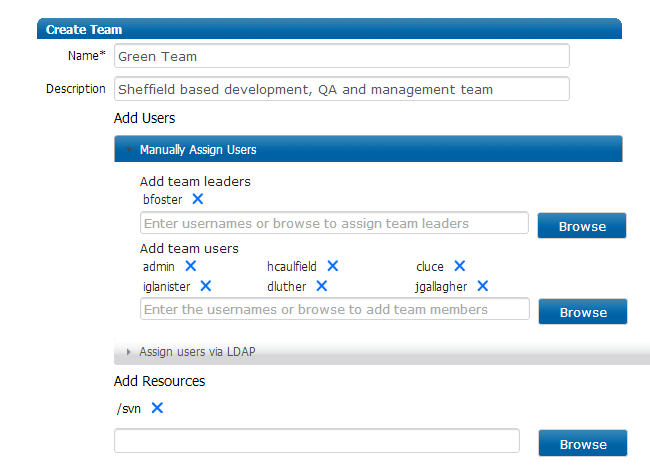
Name*: A name by which Access Control will refer to the team. A Team name can consist of letters numbers and spaces.
Team names must be globally unique
All teams must have a unique name within Access Control. Currently, you cannot have two teams with the same name, even if they are located within different directories.
Description: A description of the team. This can help distinguish the team, possibly referring to the team's purpose or location.
Add users: Select local users either through Manually Assign Users or click Assign users via LDAP to select an LDAP authority.
Manually Assign Users: Enter usernames into the "Add Users" entry field, will make the user appear. Entering a letter into the field will result in all users whose usernames begin with that character being listed under the entry field.

If you prefer, instead of entering the username of each user you wish to add to the team, you can click the Browse button and select from all available users by ticking check boxes. Tick those users that you want in the team, or if you're adding a lot of users it maybe be faster to click Select All then untick users that you don't want to add. When you've finished selecting users, click the Save button.
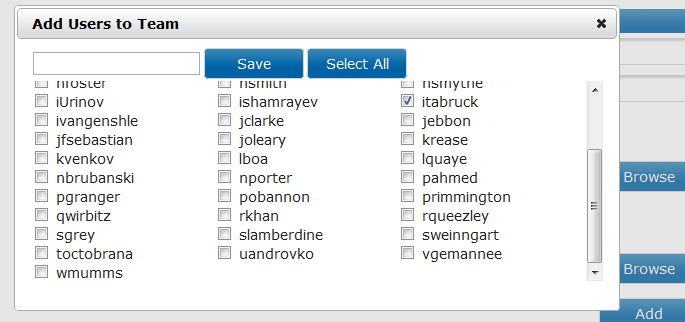
Add Resources: Resources are repository folders. Browse the repository and select a folder, or type in the directory path and click the Add button.
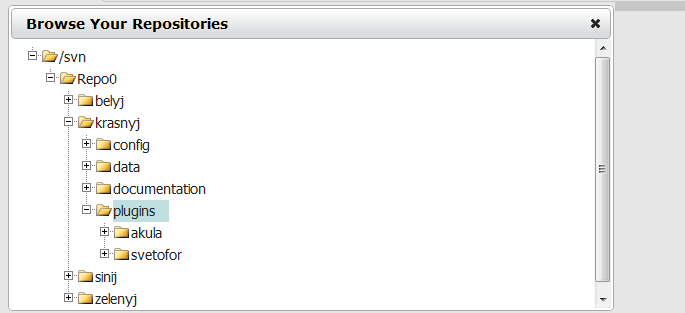
Adding a resource to a team doesn't automatically provide the team's members with authorization to access the resource, first Team Rules must be created that will set the specific permissions for selected team members.
3.2 List teams
Teams List is the default screen of the Security tab. All teams and subteams are listed, along with the number of users in the team, the number of subteams and the number of team rules that apply to the team /subteam. You can view a team by clicking on it's name. You can edit a team's settings by clicking on the Actions drop down and then clicking Edit.
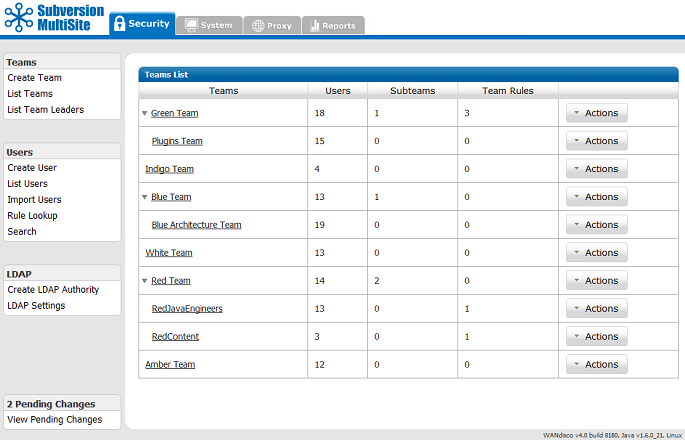
3.2.1 View Team
To view details of a team, click the team's name on the List Teams screen. This shows the team's summary tab which shows the teams details. The summary screen doesn't allow any changes to the team to be made directly, instead, click the tab that correspond to the property that you wish to change.
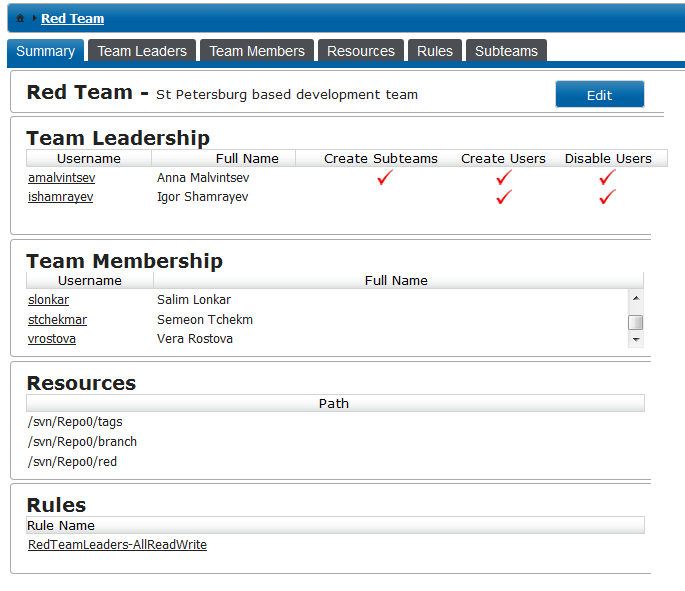
Team Leaders: Lists users who have been assigned as Team Leaders to the team. Team Leaders are able to manage the team's settings, adding or removing users, team leaders or repository resources.
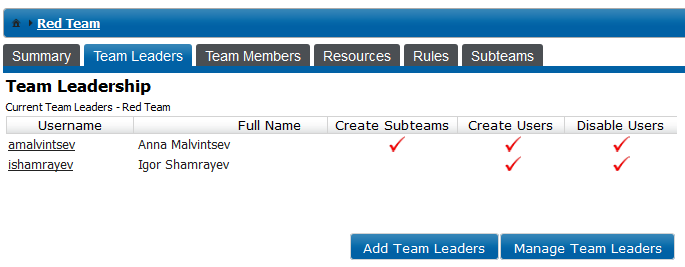
Add Team Leaders: Open a dialog box for adding additional team leaders.
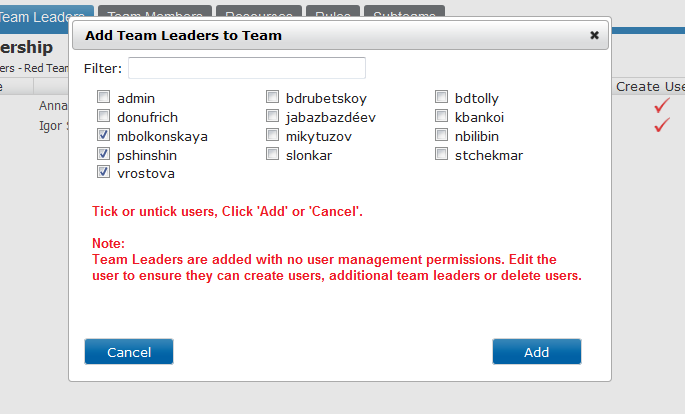
Default team leader permissions
When you make a user into a team leader, you enable them to change the team's setup. However, they need to be further assigned specific permissions to Create Users, Create Subteams and Disable users. See the next section for how to enable Team Leader User permissions.
Local users not eligible for team leadership when the team is managed via LDAP
You cannot promote a local type user to a team leader position if the group contains LDAP users, i.e. is managed by an LDAP authority.
Manage Team Leaders: Open a dialog box for changing team leaders' permissions, or removing team leader status.
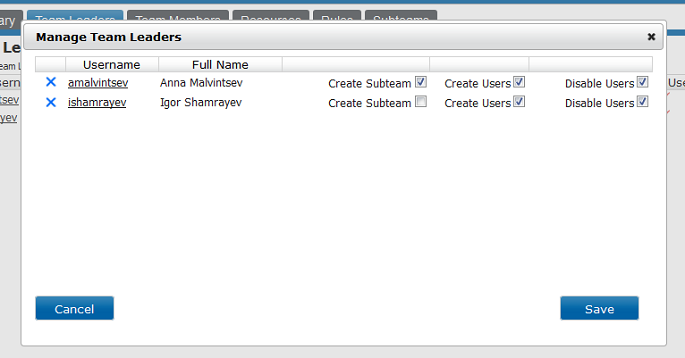
From the Manage Team Leaders dialog you can remove a user's team leader permissions or enable/disable the following user permissions:
Create Subteam: Enable the team leader to further delegate a team by creating a subteam, assigning users, team leaders and repository resources from those available in the parent team.
Create Users: Enable the team leader to add new user accounts.
Disable Users: Allow the team leader to disable Users. A disabled user will appear within the team's user list, but will be prefixed with a (D). A disabled user will have all SVN permissions removed. It's not possible to selectively disable a user's access, a disabled users will be disabled in all teams.
Disabled users are not counted towards the user limit of your license
lose to the user limit of your product license? (User limit is noted at the top of the admin console.) You can make room by disabling inactive users. It's possible to "hot bunk" users in this way, although you'll need to upgrade your license to increase the number of concurrent users.
Team Members: Team Members lists all users who are currently assigned to the team.
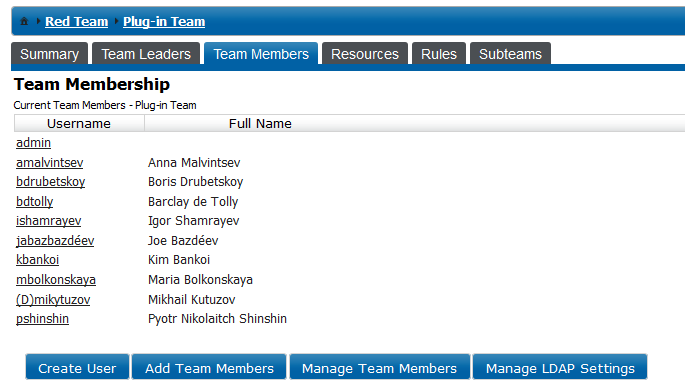
Create user: Create a new new users that will automatically be added to the team. See Create User for information.
Add Team Members: Add an available user to the team. Only users who are present in the parent team can be added.
Manage Team Members: The Manage Team Members dialog contains tabs to Enable Users, Disable Users and Remove Users.
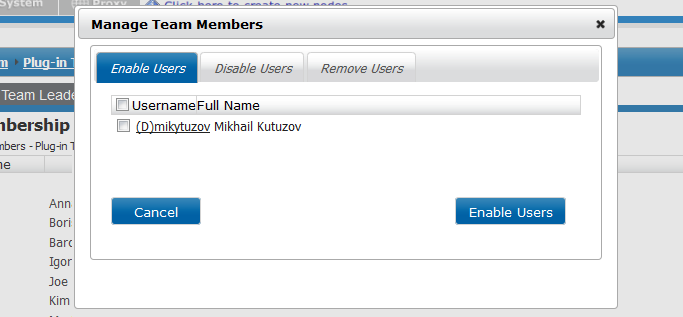
Manage LDAP Settings: This option is available if you have at least one LDAP server added.
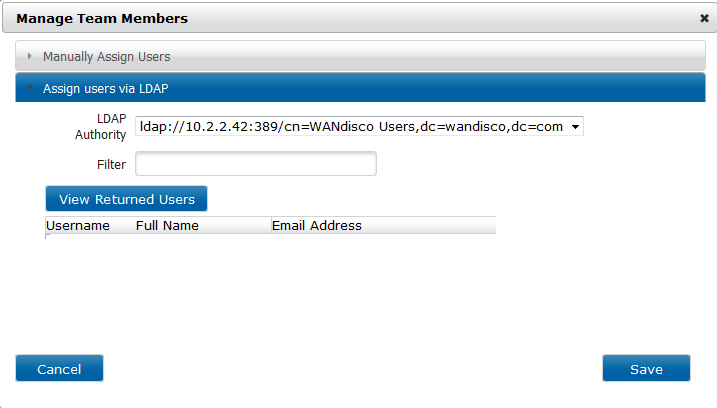
Resources: The resources tab lists all repository directories that are associated with the team. Team members do not have access to these resources by default; a team leaders or system administrators must first create rules that specify which team members can access the resource, along with a file permission (write access or read-only).
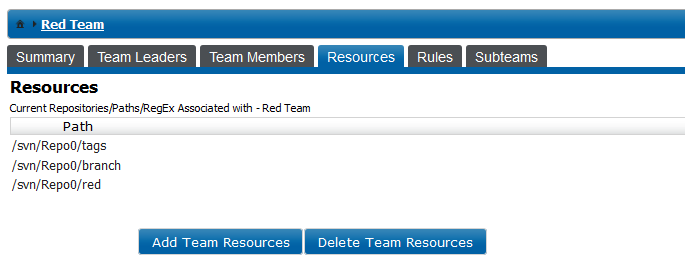
The Resources tab has two buttons:
- Add Team Resources: Opens a browse window to the repository file system from where a directory can be selected.

- Delete Team Resources: Directories can be removed by clicking on the blue crosses:
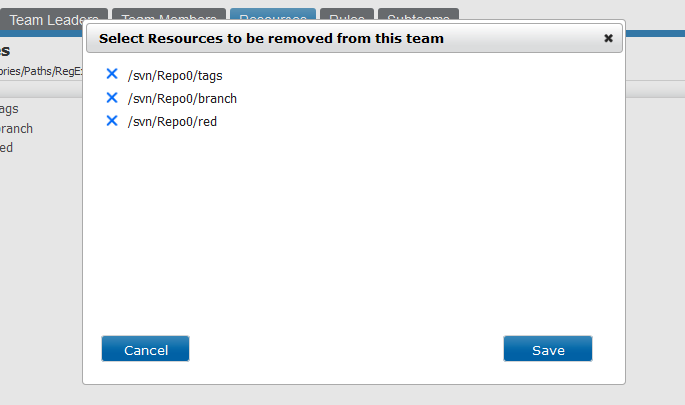
Rules: The Rules tab shows all existing rules associated with the team. You can view a rule's settings by clicking on the team's name. You can create a new rule by clicking onCreate Team Rule or delete a rule by clicking on Delete Team Rules, then selecting the rules that you wish to delete.
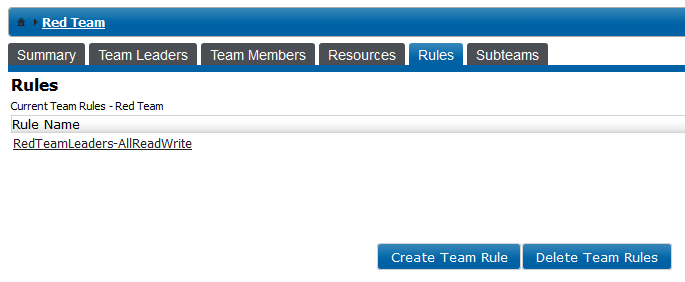
Subteams: The Subteams tab lists all subteams that have been created under the current team. The list of subteams will work as a 'tree view', allowing you to toggle the visibility of subteams by clicking on the parent team.
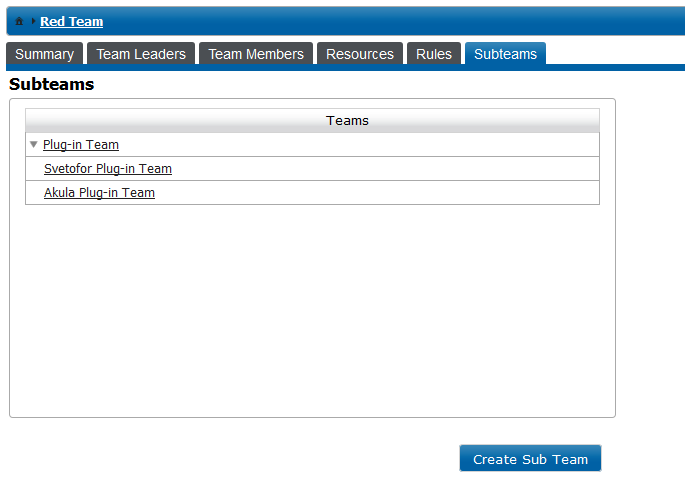
You can subdivide teams into smaller 'Subteams', which allows you to delegate areas of team responsibilities to deputies. A subteam can only consist of users from the parent team, plus whatever resources are available in the parent team. Click Create Subteam if you would like to delegate some of your users.
Create Team Rule: Rules are used to control how team members (either all of them, or a subset) are able to interact with the team's allocated repository resources.
Denied by default
In the absence of any team rules, all team members are denied access to all repository resources. This might seem like 'bunker mentality' but it's the only sensible strategy for ensuring that a repository's data is secured against unauthorized access.
Team Setting Tabs: The tabbed side panel lists the team's members, the subteams and the associated Team Rules. You can edit these settings by clicking on the Edit button at the bottom of the main panel.
Edit: Click the Edit button to make changes to the Team. Clicking this button has the same effect as clicking on the Edit Action on the Team List screen.
3.3 Create users
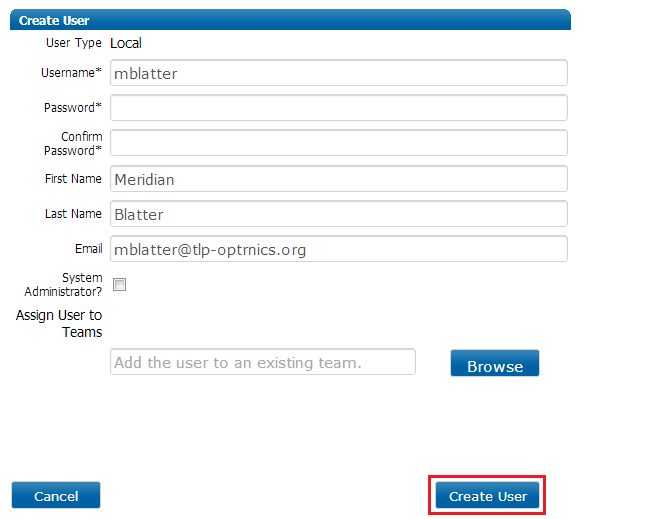
Use the Create User screen to add new Subversion users. Users that you create here can be assigned to teams or subteams, from which they will inherit the teams/subteams repository access permissions.
Username: Choose a username for the new user. This will be used for their Subversion access.
LDAP User: Tick this checkbox to indicate that a user's details are controlled via the LDAP service. When selected the users personal details will not be hidden on the form.
WANdisco Password: Choose a password for the new user - they can change this when they first log in.
Confirm WANdisco Password: Enter the password again to confirm that you've typed it correctly.
First Name: Last Name.
Email: The user's email address - this will be used to send any relevant system messages to them.
System Administrator: Tick the System Administrator check box to assign administrator permissions to the new user. As a system administrator the new user will have full access to the product, and will be able to add new users themselves, and also add/modify Subversion repositories.
Auditor: You can create a type of System Administrator account that limits its user to only viewing the setup of Subversion access, i.e. suitable for an auditing role:
- Go to the Create User screen and click the System Administrator checkbox.
- Click the Restrict Administrator to Audit Privileges? checkbox.
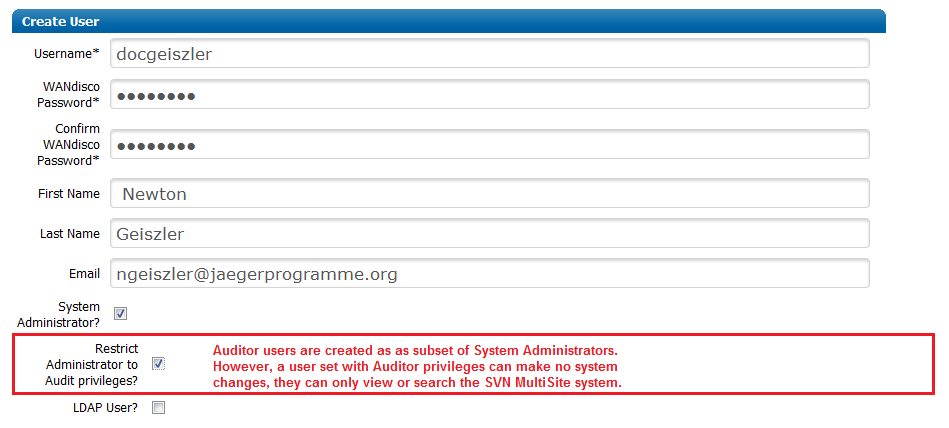
The Auditor user type can only be set at the time that the user is created. It is not possible to switch an Auditor user back to a full System Administrator or standard system user. You can still edit the user's personal details, just not their access permissions.
If you need to change a user back ...
If absolutely necessary, you can delete and recreate the user's account, then set regular or System Administrator privileges.
The Auditor account type is intended for use by users who need to be able to review the setup of SVN MultiSite without being able to make changes to it themselves.
Auditors can:
- View Rules
- View Team
- View Users
- Search the system
Auditors cannot:
- View system (SVN or proxy) details
- Be given given repository write permissions
- Be a member of a team
- Change anything
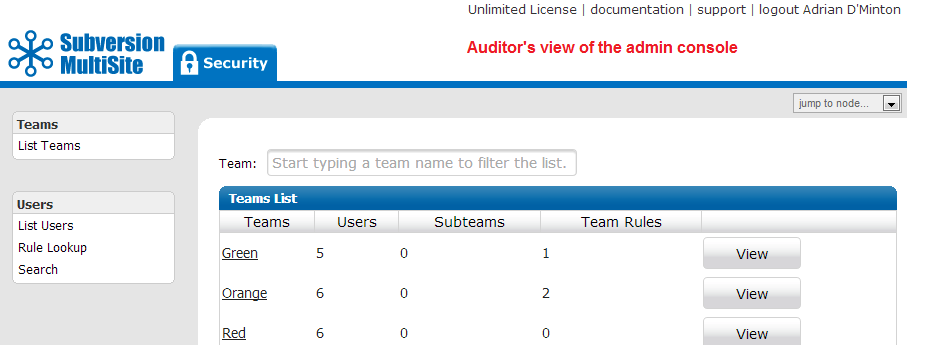
An Auditor gets a restricted view of the admin console that is limited to the Security Tab. Settings within the Security Tab are limited to "view" only.

In the User List Auditor users are highlighted in orange.
Assign User to Teams: Enter a team name, or browse for a team using the Browse button if you would like to immediately add the the new user to an existing team. You can remove the user from any team by clicking on the blue cross that appears after any selected team names.
3.4 Import users
You can import users instead of entering them manually through the Create User screen. Use a comma delimited (CSV) format for the import, with the following fields:
<username>,<first name>,<last name>,<email address>,<password>,<UserType>, [Parent/Team/Names/]TeamName]
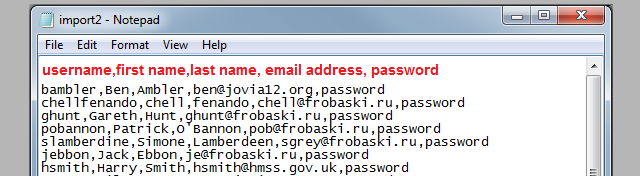
Click Choose File and navigate to your import file. When selected click the Import button. A message window appears, indicating whether the import was successful.
Alert
If "global" case insensitivity is turned on within the System Settings screen then all users imported from a CSV file will be forced into lowercase. If the case insensitivity is disabled in SVN MultiSite then users are imported as they are in the import file.
Caution: importing users to subteams
You can import users straight into teams by including an optional team name field (see the format, below). This will allow you to import to either top level teams or subteams if the subteam has a unique name.
Unique team names are only enforced at the top level and within each parent team. It's therefore possible to have two teams called "QA", so long as they are subteams for different parent teams. Importing a user to "QA" team when there is more than one "QA" team will result in the user being placed unpredictably into one of the teams.
3.5 Rules lookup
The Rules Lookup tool lets you test a user's access permissions for a specified repository resource. For users who are members of multiple teams and to whom numerous team rules are applied, the Lookup/Search greatly simplifies the verification of their access permissions.
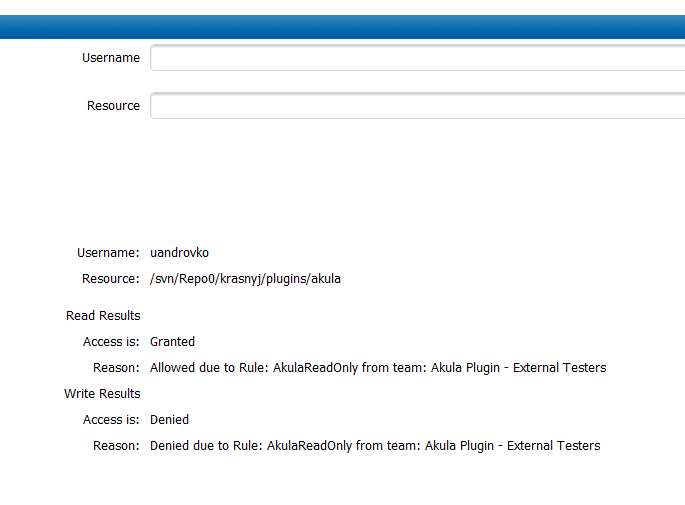
Username: Enter a username on which to perform a permissions review.
Resource: Enter a repository resource / path for which you want to test the above user's access.
Click Lookup to initiate the test. The results are presented as a Read Results and a Write Results. Each result will indicate whether access is granted or denied, and from which rule the permission was granted, and from which team the rule was applied. This is enough information to help you fine-tune permissions without a lot of blind trial-and-error changes.
3.6 Search
The Search tool offers system administrators and team leaders a tool for search through Access Control data for any users, teams, rules and permissions.
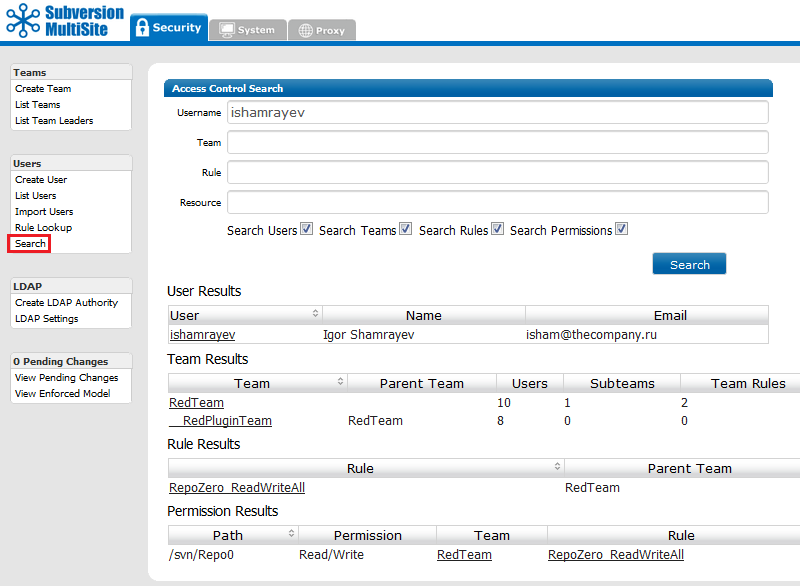
Username: Enter a username on which to perform a search.
Team: Enter a Team name or fragment on which to perform a search.
Rule: Enter a rule name or fragment on which to perform a search.
Resource: Enter a resource name on which to search.
Filter checkboxes: Select from the available filters to help limit your search: Search Users, Search Teams, Search Rules and Search permissions
3.7 Create LDAP authority
You can set up a number of LDAP authorities, if your organisation is runs from more than one LDAP server. Use the Create LDAP Authority screen to define your authorities as well as the order in which they are queried.
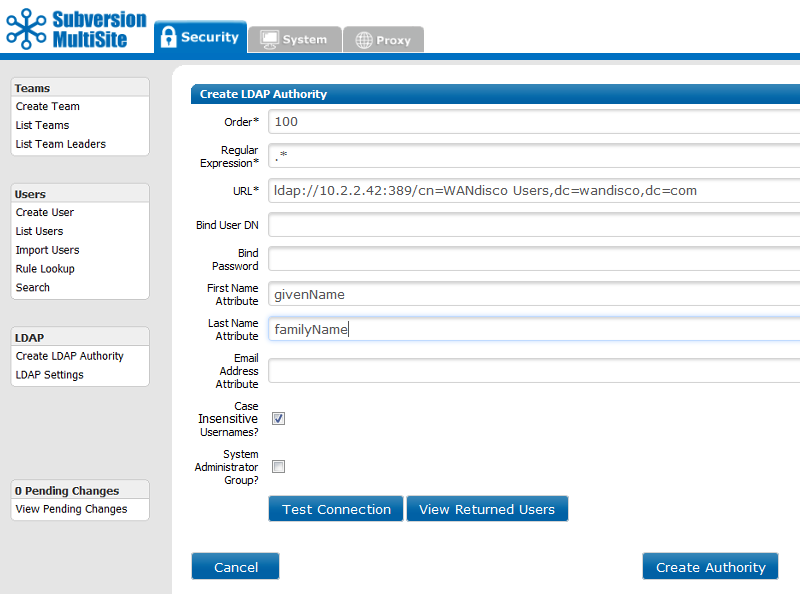
Order: The priority given to the LDAP URL. e.g. A Location Order of 1 means that Access Control will look within that defined authority for a user first. If unsuccessful then Access Control will then check the authority with the next order number (e.g. 2).
Regular Expression: Enter a regular expression to set a pattern for matching against available LDAP authorities. The expression, is applied locally to limit unnecessary queries against available LDAP authorities. For instance, setting an expression that specifies a top-level domain can ensure that authentication of a user (whose username is their email address) doesn't need to run through all LDAP authorities, but instead can be checked only against those servers that match the the regular expression - in this case, the same top-level domain.
URL: The URL for the LDAP authority, using the format ldap(s)://hostport/basedn?attribute
Bind User DN: (Optional)
Bind Password: (Optional)
First Name Attribute: (Optional)
Last Name Attribute: (Optional)
Email Address Attribute: (Optional)
Case Insensitive Usernames?: Tick this checkbox if you need MultiSite to stop distinguishing between usernames that differ only by their case pattern.
For example, with the "Case Insensitive Usernames?" unticked (it is by default), MultiSite will treat username "MelissaJones" and username "melissajones" as two distinct users. Support for username case insensitivity is a feature that may be required when Active Directory.
System Administrator Group?: Tick this checkbox if the authority will return users who are System Administrators (able to access the MultiSite admin console).
3.7.1 Support for Active Directory Nested Groups
Active directory enables you to define groups that are themselves members of a parent group. This provides the administrator with a useful organizational structure.
You can handle Active Directory nested groups using a query (based on the LDAP_MATCHING_RULE_IN_CHAIN OID).
When we run an LDAP query to find all the members of a group, we treat all those members as users.
If a group is returned as a member, we run another query to find out the users that are a member of the included group. ascii example:
sanramon (group synchronized to team in access control)
+- Jon (user)
+- Kev (user)
+- support (group)
+- Gaz (user)
Looking at the above heirarchy which shows the "San Ramon" (sanramon) team, and set a filter to get all users that are members of the 'sheffield' group. Access control will normally create three users in the team: Jon, Kev and support. What this query does is create three users: Jon, Kev and Gaz (through a recursive search of the 'support' group).
For example:
ldap://10.2.2.45:389/CN=Users,DC=sr,DC=wandisco,DC=com?
AMAccountname?sub?(memberOf:1.2.840.113556.1.4.1941:=CN=shef_devs_grp,OU=Belfast,DC=sr,DC=wandisco,DC=com)
3.8 LDAP settings
The LDAP settings screen contains all the settings for any LDAP services that you use with SVN MultiSite. By default, LDAP is not activated. Click Yes to Use LDAP for login authentication.
Toggle changes are immediate: Changes to this toggle setting are immediate, you don't need to click Save LDAP Settings for activating or disabling LDAP, only for making changes to the LDAP Settings.
Mixed Mode Login, supporting local and LDAP users at the same time
SVN MultiSite supports user login through both internally managed and LDAP managed accounts. To use mixed mode login, after adding an LDAP Authority, click on the option Allow both LDAP and Local Login.
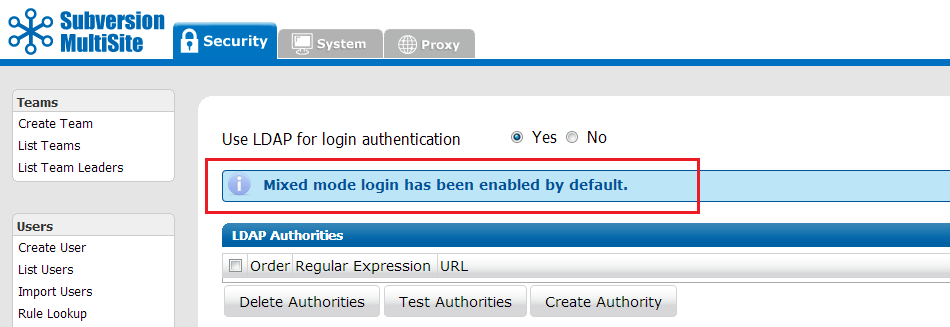
As the switch to enable LDAP is immediate and occurs before the first LDAP authority is actually set up, it is necessary to enable Mixed Mode when LDAP is first selected. Otherwise, leaving the admin console before setting up an authority could result in you getting locked out of the admin console.
Running with multiple LDAP Authorities
When you enable multiple LDAP authorities, take care that you properly set how SVN MultiSite behaves when handling user logins.
You can set up LDAP so that you effectively block access to the SVN MultiSite admin console. For example, setting up an additional, lower order LDAP authority to handle your admin login, but not enable the features:
Continue onto next LDAP authority on user not found
Continue onto next LDAP authority on user authentication failure
If you get locked out, use the LDAP reset script to Disable LDAP for Admin Authentication.
When enabled, all LDAP authorities are listed, with the following options:
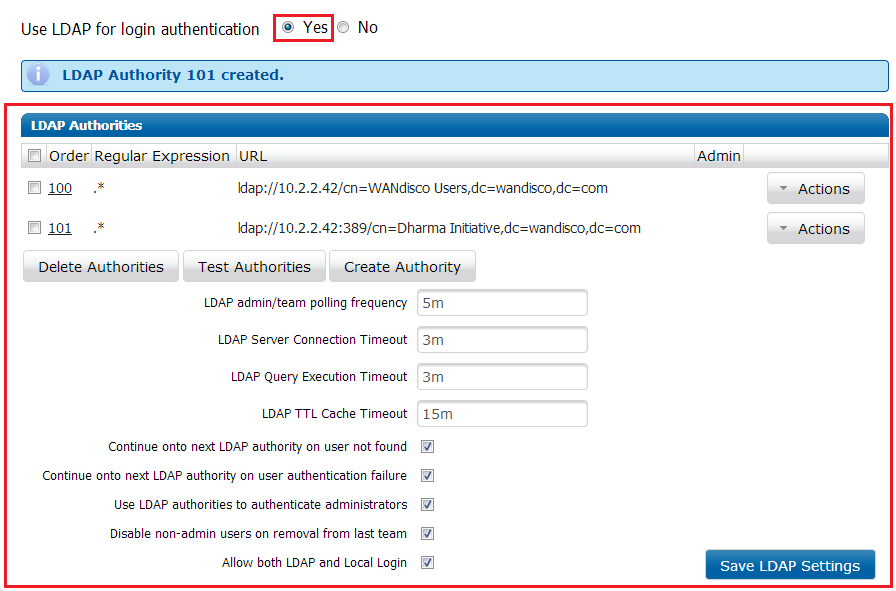
Order: LDAP authorities are listed in the order of execution that you set when defining the authorities' properties.
Regular Expression: Lists any regex that are applied to the search.
URL: The URL of the authority.
Admin: Authorities that are set to return Admins will show a tick.
Delete Authorities: Button to delete one or more selected LDAP authorities from the list.
Removing the last authority will disable LDAP authentication
If you delete the last LDAP Authority SVN MultiSite will automatically switch back to local authentication to ensure that it is still possible for users to authenticate with Subversion or login to the SVN MultiSite admin console.
Test Authorities: To test the connection to one or more authorities, tick the authorities check box and click Test Authorities.
Create Authority: To create a new LDAP authority, click the Create Authority button.
Actions: You can perform the following actions on each authority by clicking on the Actions drop-list:
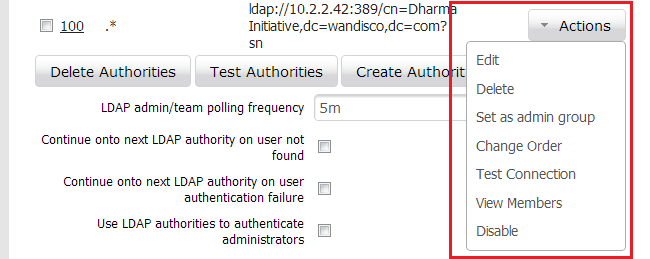
Edit: Edit the authority settings.
Set as Admin Group/Unset Admin Group: Sets or unsets the authority as the admin group.
Change Order: Change the authority's order number to make it execute earlier or later.
Test Connection: Perform a test connection to the authority.
View Members: Connect to the first matching authority and retrieve the selected group members.
Disable Locally: Disable the first matching authority on the current MultiSite node.
Disable Globally: Disable the first matching authority and replicate the action to all other nodes.
Warning
When you disable an LDAP authority Globally it can take a minute to propagate to other nodes. Until propogation is completed, users will still have access to repositories that correspond with the disabled authority.
Warning
Authorities that are set for Administrators have a more limited set of Actions. This is to ensure that you can't lock administrators out of the admin console.
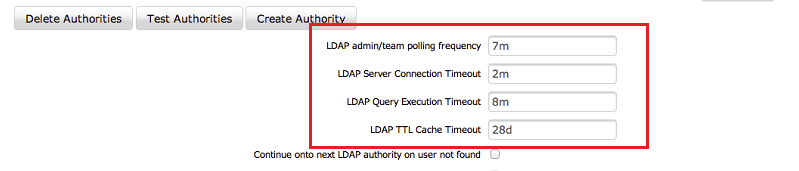
LDAP admin/team polling frequency: The frequency (in minutes) that MultiSite performs a check of the status of the admins / team members. (Default is 7 minutes)
LDAP Server Connection Timeout: The timeout value that will apply to SVN MultiSite's attempts to connect to an LDAP server. Default is 2 minutes.
LDAP Query Execution Timeout: The timeout value applied to any LDAP Queries. Default is 8 minutes.
LDAP TTL Cache Timeout: The timeout value lets you set the timeout on the LDAP auth cache. Default is 28 days.
You can set timeout settings seconds (s), minutes (m) and hours (h). It's also possible to specify a time in days (d), although this is probably only meaningful for setting the LDAP TTL Cache Timeout.
Continue onto next LDAP authority on user not found: Tick to enable MultiSite to run through all available authorities should a user's credentials are not present on the first authority.
Continue onto next LDAP authority on user authentication: Tick to enable MultiSite to run through all available authorities should a user's authentication fail on the first authority.
Use LDAP authorities to authenticate administrators: Tick to enable MultiSite to authenticate its administrators (users who have access to the MultiSite admin console) via LDAP. This will automatically be ticked and not editable if System Administrator Group? has been ticked in the authority's settings.
Default Non-admin user(s) action on removal of last team: Select the default action to be applied to user(s) who no longer belong on any team. You can select:
No-Action leaves the user in place and enabled.
Disable leaves the user on the system but disables them so that they can't be reassigned to a team until re-enabled.
Remove completely removes the user from the system.
Disabled users remain disabled
LDAP-managed users who are disabled on the system, either manually or because they're no longer members of a team now remain disabled if they are are added back into a team.
When disabled users are added back into a team an adminstrator will need to manually re-enable them, either via the Actions drop-down on the Users screen, the individual user's screen or through the API.
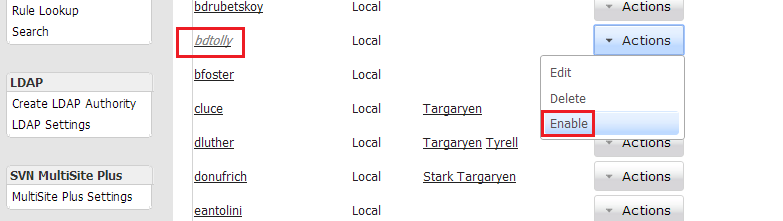
Allow both LDAP and Local Login: Tick to allow users to be managed both local (created and managed via the admin console) and through an enabled LDAP Authority.
Auto-create users on first successful login: Tick to ensure that when an existing (Created outside of MultiSite) Subversion users first authenticates, they're automatically added to SVN MultiSite's internal user lists or Access Control if it is enabled.
LDAP users are already authenticated: Tick this option if users are already authenticated before they hit the proxy, e.g. by Kerberos authentication. When ticked LDAP pre-replication authentication will be disabled.
An additional option appears when you tick LDAP users are already authenticated:
Re-write the basic authentication header Select this option if your Apache configuration is not setting the dummy password in the Basic Authentication header to be the same as that used by the replicator when managing the password file. Deselecting this option further locks down repository access within Subversion MultiSite as administrators will need to know the dummy password created by Apache in order to access repositories. There's more information on the requirement for dummy passwords in the section on LDAP Authentication.
Kerberos
This feature is intended for a very specific use case and should not be enabled unless you are properly set up for handling pre-replication authentication in the manner of Kerberos. Deployment would require setting up proxypass to allow seperate instances of Apache to handle front-end (Kerberos authentication) and back-end traffic (basic Apache authentication) used WANdisco's replication traffic, including the htpassword and Authz.
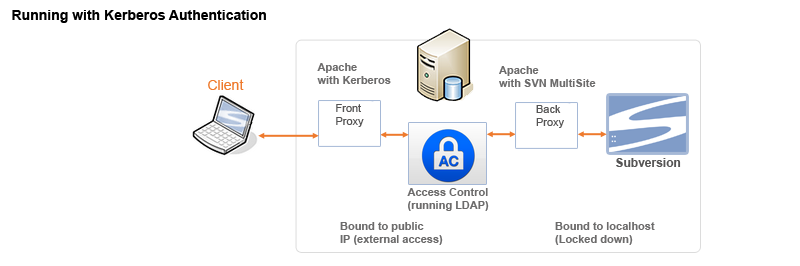
Click SAVE LDAP Settings to save any changes you make on the LDAP Settings screen.
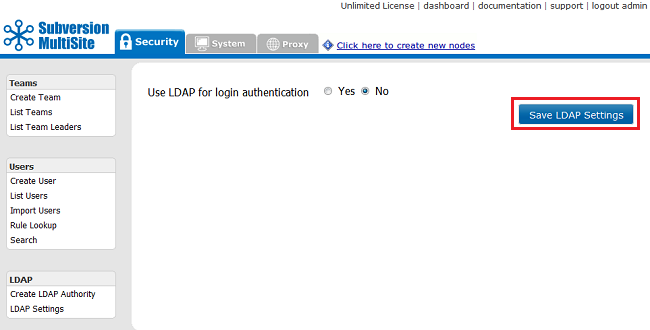
After entering and saving LDAP Authority settings it is possible to switch back to not using LDAP while retaining your LDAP settings. Coming back to the LDAP Settings screen and selecting "Yes" will re-enable your earlier settings, you don't need to enter them again.
3.9 Pending changes
You can now set MultiSite to batch up user, team or rules changes that require modifications to the Authz or htaccess files - modifying these files results in the need for a global transaction which, in large numbers, can result in a drop in performance. This feature is aimed at large scale deployments where large numbers of concurrent file regenerations could result in hardware/disk i/o bottlenecks.
The Pending Changes lists all actions that have been placed in the next batch, along with an indicator of how long until these batch will be replicated to the other nodes.

Click View Pending to see all pending changes (the current number of changes are listed in brackets), the time of the last batch and the time when the current batch will be run (triggering password/Authz file rewrites). Any pending changes will be listed in a table that shows the "Action"(type of change) and the corresponding target user or group.
4. System
The system tab provides access to logging and backup features.
4.1 Log viewer

MultiSite log files can be viewed from here.
console.txt: Logs from the operating system concerning the status of MultiSite's running processes.
reset.log: Logs instances where MultiSite has been reset.
SVNProxyServer-prefs.log.(time-stamp): The MultiSite log file contains most of the activities of the replicator.
user-import.log: Logs instances where users have been imported.
WebProxy.log.(time-stamp): Logs errors and changes applicable to the MultiSite replicator.
user-import.txt: Logs each user import that has been completed on the node.
4.1.1 Limiting log lines
Logs can be generated over multiple lines, which can make reading/performing greps difficult.
To limit each log to a single line:
- Set the following line in the svn-replicator/config/log.properties file:
org.nirala.trace.WandiscoLoggingFileHandler.formatter = org.nirala.trace.SingleLineFormatter
- Replace any other formatter for this handler.
- Apply the above change to all nodes.
- Perform a synchronized stop, then restart all nodes.
4.2 Disk monitor
You can use the disk monitor to lessen the chance of a node running out of disk space, which would result in the loss of replication or data corruption.
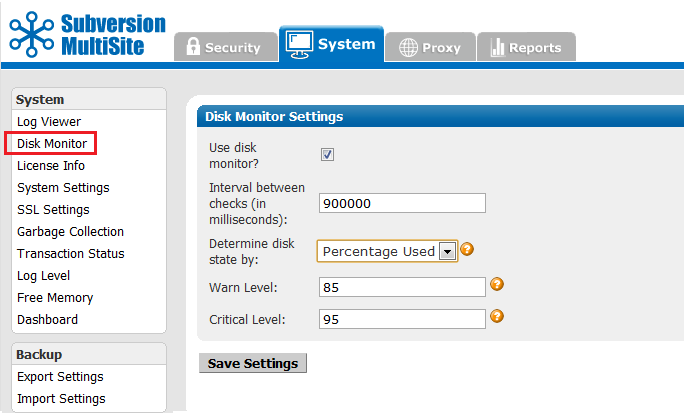
Use disk monitor: Tick the checkbox to have the disk monitor running.
Interval between checks (in milliseconds): 900000 (15 minutes) is the default interval time between checks.
Determine disk state by: Choose to measure disk usage either by percentage used or bytes free (in bytes, or append KB, MB or GB).
Warn Level: State the level of usage (either as a percentage or bytes free) at which point an alert email will be sent, and resent each time the disk monitor completes a check. So, if you set the Interval between checks to 900000 milliseconds, a warning email will be triggered every 15 minutes.
Critical Level: State the level of usage (either as a percentage or bytes free) at which the node will send an alert email and then shutdown. This prevents the data on the node from being corrupted.
Click the Save Settings button to save any changes you make.
Alert
You MUST restart the node so that any changes you make take effect.
4.3 License info
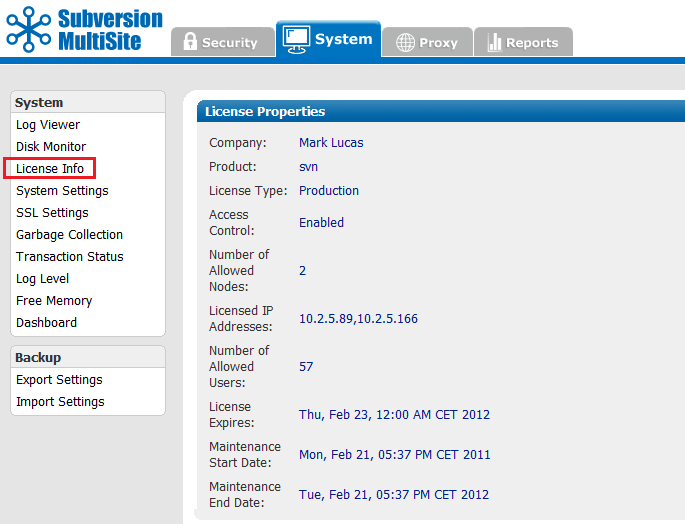
The License Info page contains the details of your WANdisco product license, useful for confirming the details of a number of license-specific features.
Company: Your company name.
Product: The product type. This is currently either svn (Subversion) or (CVS).
License Type: This indicated whether the license is either for evaluation or production.
Access Control: Shows if Access Control has been enabled on the product. With Access Control enabled, the User's tab is renamed "Security" and is expanded to include many additional features for Access Control.
Number of Allowed Nodes: Number of replicator instances that have been licensed.
Licensed IP Addresses: The IP addresses of each node.
Number of Allowed Users: Total number of possible users that are covered under the license.
License Expires: The date on which the current license will expire.
Maintenance Start Date: The first date covered by the current maintenance contract.
Maintenance End Date: The final date covered by the current maintenance contract.
4.4 System settings
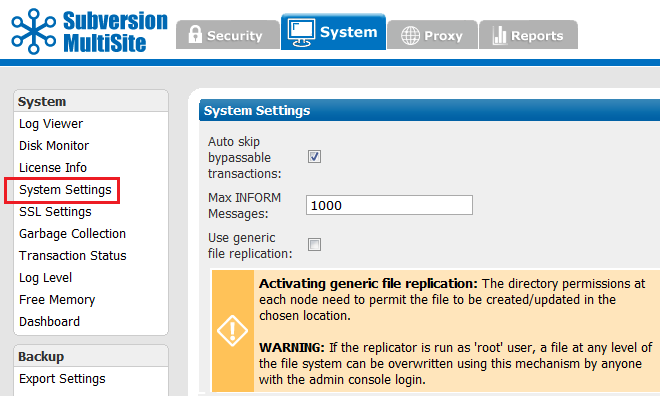
The system settings screen provides a number of extra controls that allow you to fine-tune MultiSite for potential performance improvements.
Auto skip bypassable transactions: Tick the box to force the replicator to automatically skip bypassable transactions.
Note
A transaction is bypassable so long as it fails on all nodes within the replication group. In spite of the failure, all repository replicas remain in sync, allowing replication to continue.
Max INFORM Messages: This is a an advanced tunable parameter that can limit network notification traffic in situations where a node is pulling in a large number of changes, such as while recovering from a brief network outage. Default value: 1000, For Unlimited INFORM Messages use the setting "-1".
The default value of 1000 is optimal for the majority of network configurations and file sizes, but can be tuned to make best use of higher or lower bandwidth networks handling varying file sizes.
Once the value is altered at one node, it is replicated to other nodes that are part of the replication group. We recommend that you consult with our support team before changing this setting.
HTML format failed pre-replication hook output: The labelling of the output of failed pre-replication hook scripts can cause problems. Untick the checkbox to removed the extra formatting, which will make outputs less human-readable but will support scripts that were written around the previous output.
Use generic file replication: Use this checkbox to activate the RESTful API function that allows for generic file replication.
Caution
Turning on this feature allows you to replicate files within your file system, i.e. files outside of your repositories, such as Authz or Apache configuration files. Take care when activating this feature because it allows the admin console user to overwrite any file.
Automatically send problem repos offline on global transaction: Tick this option to ensure that any repositories that fail to complete a global transaction are placed in a read-only mode, so that they don't risk halting all of the whole replication group.

Limit commit size: The commit of a very large file can easily clog DFTP transfer between nodes, which will hold up all other traffic behind a single PUT operation. It's possible to mitigate against attempts to commit giant files using pre-replication hook scripts, however, hooks don't fire commits until the MERGE command is sent, which can be too late to stop the disruption.

Instead, use this check box to set the Maximum commit size. When switched on, the default is 1024 MB (1GB). You can use the units: "KB", "MB" or "GB" to denote your filesize.
Pending transaction warn level: Email notification is now sent out when there are more than 50,000 pending transactions on a node. The number of pending transactions that triggers the notification can be configured here.

Enable Access Control prevayler snapshot: Access Control and MultiSite's internal settings are stored within a prevayler database that uses journaling to store all changes. When used in large organizations this approach can consume a very large amount of diskspace. Enable the prevayler snapshot to take periodic (running at Midnight each day) copies of the database instead of recording all changes. Choose which node you want to perform the snapshot.

Run automated backup: This automates the export setting tool so that MultiSite's backup files are created each day, running at midnight (using the local time of the node that you select). Use the Number of backups to retain field to limit the number of backups that the system keeps before it begins cycling.

Enable Audit Trail logging: Enable this option to record all SCM activity in the AuditTrail logs. This feature is switched off by default as it creates some additional overhead in transaction processing.

Enable User Access Tracking:
Enabling this option will save timestamps against each user indicating the last time they interacted with the repository, which can be useful for user management.
User updates are greatly increased
Switching on the Enable access control prevayler snapshot setting is highly recommended when you use this feature.

Use Case Insensitivity Usernames:
This is a system-wide control for handling usernames in a case insenstive manner. The setting can instead be applied on a per-LDAP authority basis by using the setting in the Create LDAP Authority screen.

Run batch Access Control updates:
This option allows you to store up changes that need to be made to the htpasswd and Authz files and fire them off in a global transaction at a frequency that you set in the Access Control update frequency field. Use the Batch update proposing node to choose which node in your replication group will control the batch and handle the update. In a large scale implementation with many repositories, users and teams the use of this feature can greatly improve performance.

Don't disable SSL while batched changes are pending
When batching Access Control updates ensure that there are no pending changes before you disable SSL encryption. If SSL is disabled while changes are pending, after restarting, the node will become read-only.
If this occurs you can return the node to operation by performing a reset.
4.5 SSL settings
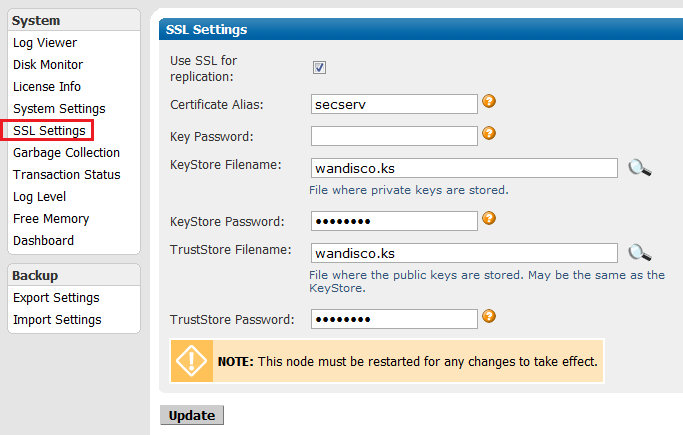
The SSL Settings screen controls all settings related to the keystore and truststore management, used when the secure socket layer protocol is used to encrypt traffic between the replicator and clients.
Keystores and Truststores
You might be familiar with the Public-key system that allows two parties to use encryption to keep their communication with each other private (incomprehensible to an intercepting third-party). The keystore is used to store the public and private keys that are used in this system. However, in isolation, the system remains susceptible to the hijacking of the public key file, where an end user may receive a fake public key and be unaware that it will enable communication with an impostor. Enter Certificate Authorities (CAs). These trusted third parties issue digital certificates that verify that a given public key matches with the expected owner. These digital certificates are kept in the truststore. An SSL implementation that uses both keystore and truststore files offers a more secure SSL solution.
Use SSL for replication: Tick the checkbox to enable SSL encryption for your replication traffic.
Don't disable SSL while batched changes are pending
When batching Access Control updates ensure that there are no pending changes before you disable SSL encryption. If SSL is disabled while changes are pending, after restarting, the node will become read-only.
If this occurs you can return the node to operation by performing a reset.
KeyStore Filename: The file in which private keys are stored. Click on the spyglass icon if you need to browse for the file.
KeyStore Password: Optional password to control access to the KeyStore. All keys in the keystore must have the same password.
TrustStore Filename: This is the file in which digital certificates are stored. This can be the same as the KeyStore. Click on the spyglass icon if you need to browse for the file.
TrustStore Password: Password to control access to the TrustStore.
For more information about running SVN MultiSite with SSL, see 2.7 Using SSL.
4.6 Garbage collection
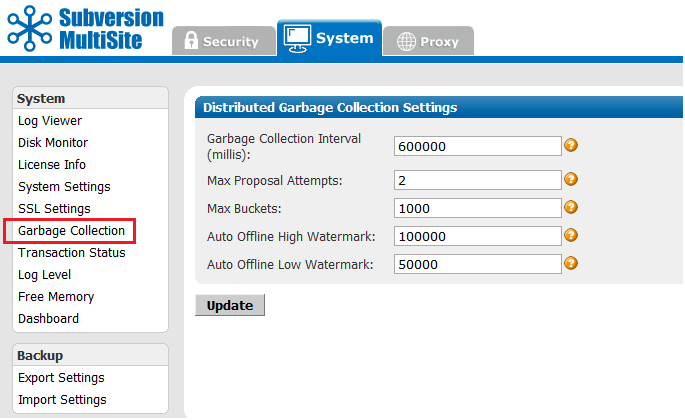
The Garbage Collection option lets you tune MultiSite's memory recycling system - the process by which objects that are no longer required are deleted to free up resources.
Knowledgebase
For a detailed explanation of how SVN MultiSite's Garbage Collection works, see the article Garbage Collection.
Garbage Collection Interval (ms): The frequency of garbage collection in milliseconds (default 10 minutes or 600,000ms). Changes will take effect after the next scheduled garbage collection completes.
Max Proposal Attempts: The number of times a transaction execution should be attempted before suspending the proposal (default 2).
Max Buckets: The maximum number of buckets to clear in a single garbage collection. (default 1000) This setting can help prevent the system from being overwhelmed if a large number of transactions have built up.
Auto Offline High Watermark: The number of transactions between a problem transaction and the most recent one where the repository should be taken offline and all proposals against it discarded to prevent it occupying excessive heap space (default 100 000).
Auto Offline Low Watermark: After auto-offlining is triggered, the difference between the oldest remaining problem transaction and the most recent transaction when auto-offlining can cease (default 50 000). Troubleshooting section: 2.8 Offline mode.
4.7 Transaction status
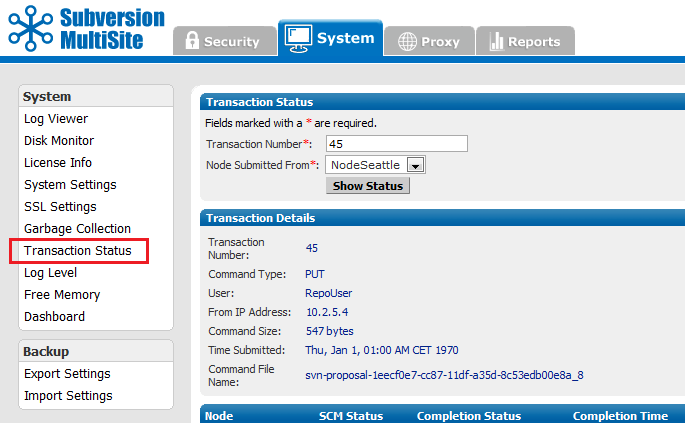
The Transaction Status option lets you query individual transactions to check on their status:
Transaction Number: The transaction's reference number.
Node Submitted From: The originating node of the transaction.
4.8 Log level
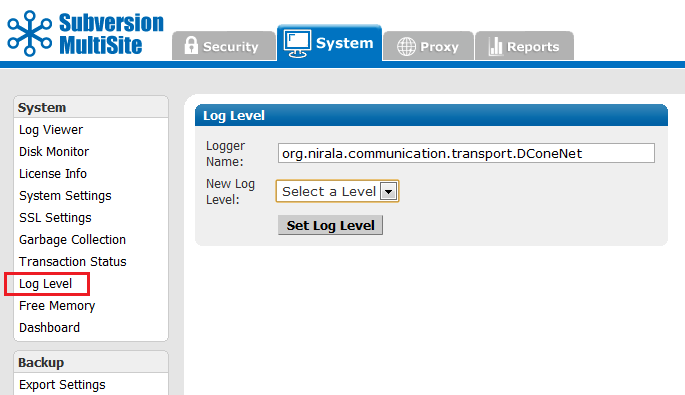
MultiSite uses one log, and the default level is info. The levels vary from severe, where you get only the most severe warnings, to finest, which logs every action.
Logger Name: References the logger object's name.
New Log Level: The following message levels are available:
- Severe
- Serious failure
- Warning
- Potential problem
- Info
- Informational messages
- Config
- Static configuration messages
- Fine
- Provides tracing information
- Finer
- Provides additional tracing information
- Finest
- Provides highly detailed tracing message
4.9 Free memory
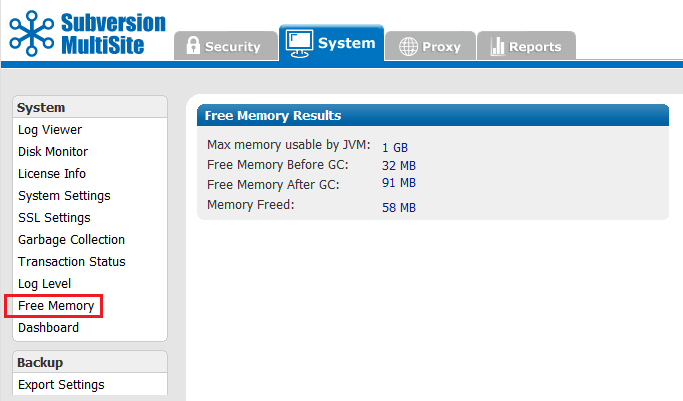
This command frees the memory for the current node. (GC stands for garbage collection.) The command occurs when you click the menu selection. The display shows information about the command that was just performed.
Max memory used by JVM: The maximum memory that JVM can use on the current node.
Free memory before GC: The amount of free memory before you ran this command.
Free memory after GC: The amount of free memory after you ran this command.
Memory freed: The total amount of memory freed at the command's completion.
4.10 Dashboard
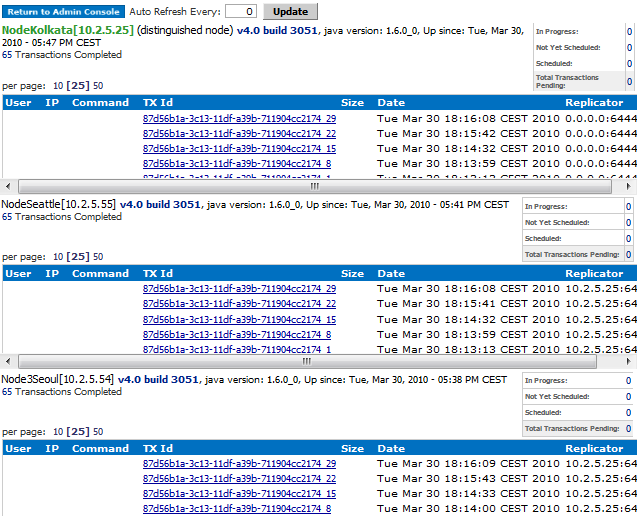
Dashboard provides a list of replicated transactions.
Dashboard refreshes
By default, the Dashboard doesn't refresh automatically. Click Update to force a refresh, or set an automatic refresh by entering a refresh rate, in seconds in the Auto Refresh Every box.
Transaction Counters
At the top right of the Dashboard is a box containing various counters which show:
In Progress: SVN MultiSite counts all the Subversion transaction requests that it receives as "In Progress". These are transactions that are still replicating and are considered 'in flight'.
Not Yet Scheduled: SVN Transactions that are proposed and are waiting for agreement before they can be replicated.
Scheduled: Counts the transactions that have been agreed and are queued ready for replication.
Total Transaction Pending: Combines those transactions awaiting agreement as well as those that are in flight.
As soon as MultiSite receives a Subversion transaction request, that transaction joins the replication group's queue. There is one queue for the replication group. Pending transactions are not displayed, but are counted in the Total Transactions Pending box in the upper right.
When MultiSite finishes processing a transaction, its displayed in the TX Id field. The Replicator field shows the node from where the transaction originated.
E.g. 0.0.0.0:6444 means the local node originated the transaction.
4.11 Export settings
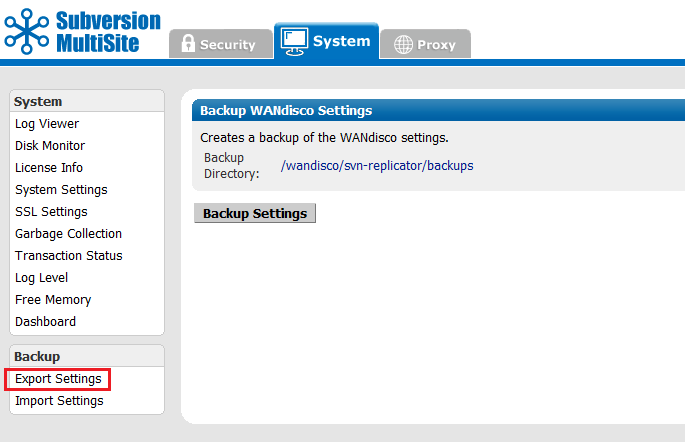
Export Settings: Allows you to export settings, including all users, for later importation into a WANdisco product.
The export routine creates a directory containing the files necessary to import user settings back into MultiSite.
Backup directories use a name string YYYY-MM-DD.HH-MM-SS::XXXXXXXX-XXXX-XXXX-XXXX-XXXXXXXXXXXX, e.g:
2012-01-23.16-21-03::2775e033-45b1-11e1-acb4-21d651998aa9
A typical backup directory looks like this:
File properties                                                                Unique or shared
-rw-r--r-- 1 root root 62251 Jan 23 16:21 access-control.xml                   Common to Replication Group
-rw-r--r-- 1 root root   101 Jan 23 16:21 ExcludeUsersDB.xml                   Common to Replication Group
-rw-r--r-- 1 root root   579 Jan 23 16:21 mailconfig.properties                Common to Replication Group
-rw-r--r-- 1 root root     6 Jan 23 16:21 MembershipConfigurationRegistry.xml  Node Specific
-rw-r--r-- 1 root root    87 Jan 23 16:21 NewUsersDB.xml                       Common to Replication Group
-rw-r--r-- 1 root root   814 Jan 23 16:21 NodeRegistry.xml                     Node Specific
-rw-r--r-- 1 root root  1238 Jan 23 16:21 NonResettableDynamicPreferences.xml  Node Specific
-rw-r--r-- 1 root root  2789 Jan 23 16:21 prefs.xml                            Node Specific
-rw-r--r-- 1 root root   162 Jan 23 16:21 RepoSettings.xml                     Common to Replication Group
-rw-r--r-- 1 root root  1162 Jan 23 16:21 Repos.xml                            Common to Replication Group
-rw-r--r-- 1 root root     6 Jan 23 16:21 ViewRegistry.xml                     Node Specific
After a successful export you see a confirmation message that verifies the location and name of an export directory.
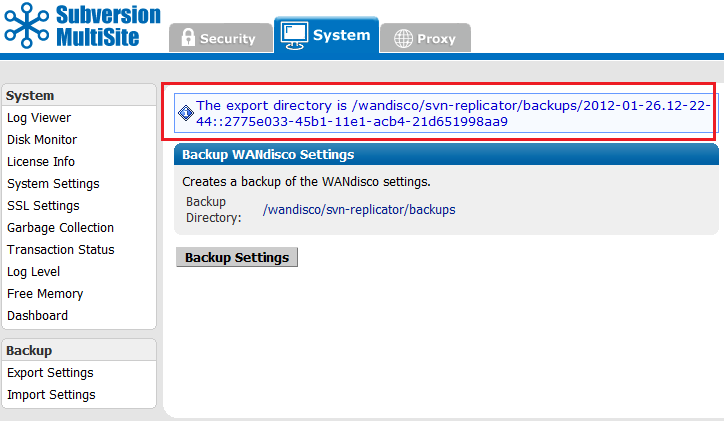
4.12 Import settings
Important
This section applies when upgrading from SVN MultiSite 4.0 to 4.2.When upgrading between builds of 4.2 use the Temporary Import Procedure.

Use the Import Settings screen to import either a backup.xml file (used for MultiSite 4.0 or earlier) or an access-control.xml file, located within a backup directory (introduced in MultiSite 4.1). These backups let you import previously backed-up user settings.
Important
All files for use with WANdisco MultiSite should use UTF-8 encoding (and/or single-byte encoding if there are no none-ASCII characters). Any other encoding e.g. Unicode will not be parsed correctly.
4.12.1 Import a backup
- From the admin console, click the System tab.
- Click the Import Settings link.
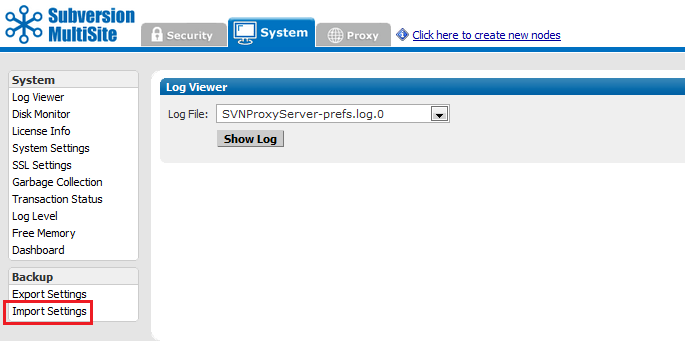
- Enter the path to the access-control.xml file in the backup directory (or backup.xml file from MultiSite 4.0 or earlier).
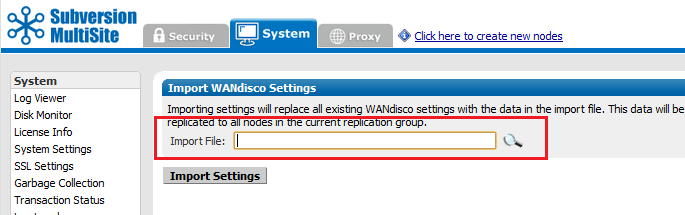
Don't import the whole exported directory
You can only import the whole export directory in a single node environment, e.g. when deploying Stand-alone Access Control.
- If you're unsure of the path, click the spyglass button and browse to the access-control.xml file.
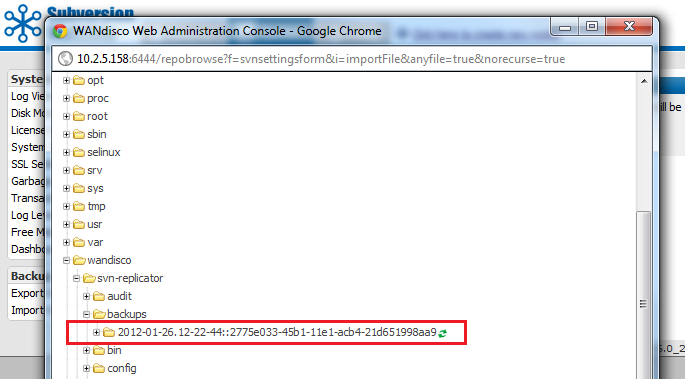
- Click Import Settings. Backed-up user data is now imported back into MultiSite.
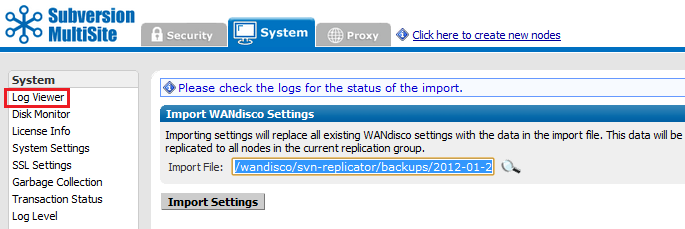
4.12.2 4.2 to 4.2 Alternate import procedure
4.2 to 4.2 upgrades
This is an alternative to using the upgrade script, although in both cases a full reset and shutdown is required.
4.0 to 4.2 Import Procedure: Remember that completing an upgrade between two different product versions requires that you complete an export of your user settings, then apply these to a fresh installation.
- Perform a synchronized stop.
- Reset all nodes: navigate to <path>/svn-replicator/bin: and run:
./reset
- Confirm the location of your SVN MultiSite backup directory, e.g. <path>/svn-replicator/backups/<chosen backup folder>.
- Create an empty file in <path>/svn-replicator/config/ called restore.properties.
- Open the new file and the line:
backup.location=<absolute-path-of-the-backup-directory-as-noted-in-step-3>
- Save the file.
- On the node that you are importing the backup, restart the replicator using the command:
./svnreplicator
The replicator restore.properties file will trigger the import of the backed up settings.
- The replicator starts up with all backed-up settings in place.
5. Proxy
The Proxy tab handles proxy settings which alter the way that MultiSite works between Subversion and users.
5.1 Proxy status
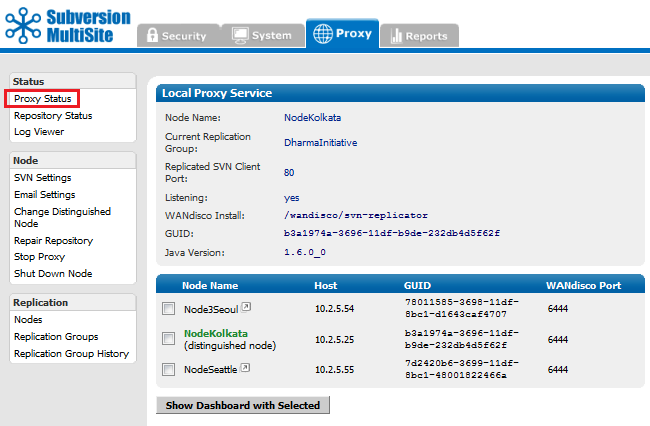
Proxy Status: Displays the node's status in the tab's main panel.
5.2 Repository status

Repository Status: gives you the status of all repositories that are hosted on the node.
Show All: Click on Show All to display all hosted repositories.
Show Read-only: Click on Show Read-only to show only those hosted repositories that are in read-only mode.
Auto Refresh: The Repository Status screen will automatically refresh every xxx seconds. Click on Auto Refresh: to turn this feature off.
Repository Search: Use this entry box to search for a particular repository.
For each Subversion repository there is a table entry that includes the following information:
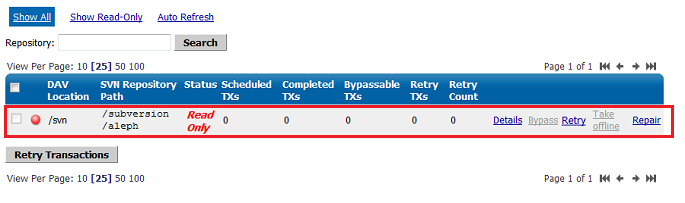
Tick the checkbox to select multiple repositories for the Retry Transactions command.
DAV Location:The directory used for access to the repository.
SVN Repository Path: The absolute path to the Subversion repository.
Scheduled TXs: Number of transactions that are scheduled for replication.
Completed TXs: Number of transactions that have been completed.
Bypassable TXs: Number of transactions that can be bypassed. These are transactions that have failed on the node, but can be ignored by the replicator because the transaction has failed on all nodes in the replication group. To force the replicator to bypass the transactions, click on Bypass. You can choose to have any bypassable transactions, bypassed automatically by using the Auto skip bypassable transactions checkbox, situated on the System Settings.
Retry TXs: Number of transactions that can be retried. If write access to the repository was briefly lost, the retry command allows you to replay the transactions and hopefully bring the repository back up-to-date.
Retry Count: Number of attempted retries that have been made.
Details: Click to view the dashboard for the corresponding node.
Bypass: Click to attempt to Bypass the transaction. This command will only be available if the transaction can be bypassed.
Retry: Click to retry any pending transactions.
Take offline: Click to sideline the repository by putting it into the offline mode. This tells the other nodes to press on, and not queue up subsequent proposals. When a repository has been taken offline, it can never catch up and will require a Repository Repair.
Repair: Click to being a repository repair. There's a full explanation of how to complete a repository repair in Repair Repository.
5.3 Log viewer
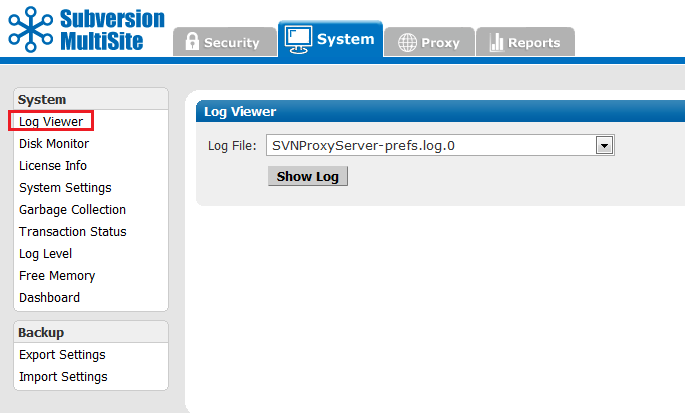
Log Viewer: You can view the logs, including the main log SVNProxyServer-prefs.log.0
5.4 SVN settings
These settings control how Subversion is set up and include host and authorization details.
LDAP settings
From SVN MultiSite 4.2 the LDAP settings have been moved from the SVN Settings screen to the Security Tab.
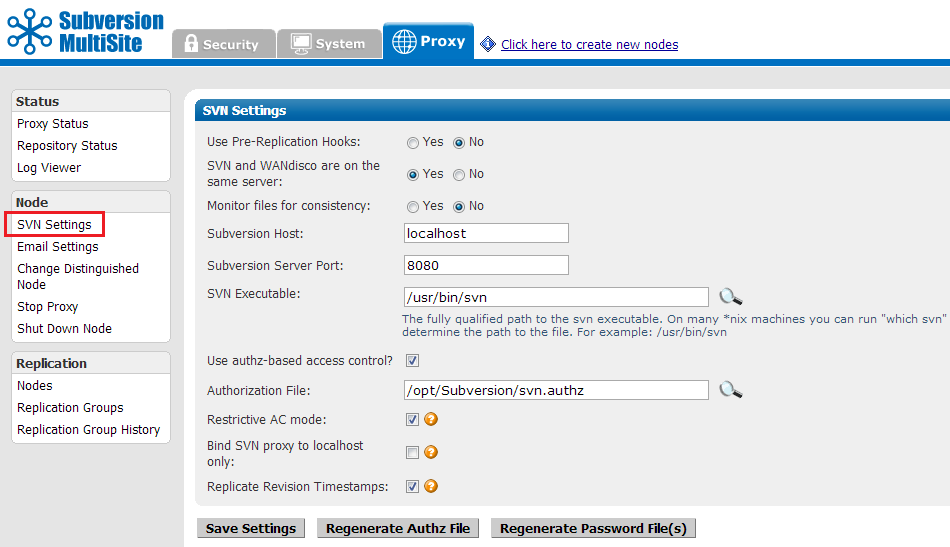
Use Pre-Replication HooksIndicates whether pre-replication hooks are being used. (Default: No). A pre-replication hook is a script that gets triggered by a specified repository event, which runs before the event is replicated to the other nodes. If you are using pre-replication hooks, select Yes.
Knowledgebase
You must select the version of Subversion you are using, otherwise pre-replication hooks will not work. See Setting up hooks.
SVN and WANdisco are on the same server:There are significant benefits from running both Subversion and MultiSite on the same host, for example, MultiSite can manage the Subversion password.
Monitor files for consistency: SVN MultiSite is able to monitor the files that it controls, chiefly the SVN password file and the Authz file. When Monitor files for consistency is enabled these files are checked for consistency across all nodes within a replication group. The following actions are taken when monitoring is enabled:
- File Monitor On: password file
- Isolated file change - change is reverted and logged
- Isolated file Deletion - file rewritten and logged
- User added via admin console - ensures user is added to password file
- File Monitor On: Authz file
- Isolated file change - change is reverted and logged
- Isolated file dletion - file rewritten and logged
- Permission change in admin console - permission change applied to Authz file
Subversion Host: The IP address of the Subversion Server. If Subversion is running locally you can put 'localhost'.
Subversion Server Port: The port on which Subversion is actually running (8080 by default).
SVN Executable: The fully qualified path to the svn executable. On Linux you can run which svn to determine the path to the file.
Replicate the location of the svn executable to all nodes: It's best to have your nodes set up in exactly the same way. However, if you need to run Subversion from different locations on each node, select Only set the location of the svn executable at this node.
Use Authz-based access control?: If you intend to use Apache's Authz authorization, tick the check box.
Authorization File:If you have selected to use Authz, enter the path to the authorization file here.
Restrictive AC Mode: When Access Control uses Authz there are two available modes for applying access control rules, by default Access Control is restrictive and gives more weight to access restrictions. This ensures that a user in a situation with conflicting rules doesn't get the benefit of the doubt as the "deny" rule always takes precedence.
I.e: the order in which rules are applied is DENY, READ-ONLY, READ-WRITE.If you prefer that Access Control behave like mod_authz_svn then untick Restrictive AC Mode. In which case Access Control applies rules in the opposite way: READ-WRITE, READ-ONLY then DENY. So that in a rules conflict, the most favorable rule is applied.
Bind SVN proxy to localhost only: The SVN MultiSite will bind to the localhost, HTTP/Jetty server will use the node settings. SVN MultiSite will be "locked down" and not directly accessible to users. This setting can be used if you plan to use a seperate instance of Apache in front of SVN MultiSite - for example, running with Kerberos security.
Replicate Revision Timestamps: Enable this setting if you need to ensure that timestamps on revisions are the same across all replicated repositories. Running with this setting will require you to enable the following pre-revprop-change Hook.
Save Settings: Click to save your settings.
Regenerate Password File(s): Regenerate the SVN password file.
Regnerate Authz File: This rebuilds the Authz file from Access Control's database.

Regenerate Authz after adding new repositories
The Rest API will let us create rules with valid repo paths, even before the repository itself is in place. When these rules are created, Authz is not updated as Access Control first checks to see that the repository exists.
When a repository has been added on system, you need to come to the SVN setting screen and perform a manual Authz/password regeneration in order for it to include any rules that apply to new repositories.
Repository Directory and DAV Location: You can Edit, Delete or Check the consistency of the Subversion Repository.
Add Location: Click to add an additional location to the directory in which you are managing repositories.
Edit Repository:
 The edit repository screen lets you modify a number of repository specific settings.
Directory on File System: This is the fully qualified path to the Subversion repository. Not the URL used by clients. You can search for the location by clicking on the magnifying glass button.
Manage Password File: Tick the checkbox to have MultiSite control your Subversion password file. You can only use this feature if both MultiSite and Subversion are located on the same server.
Pre-Commit Hook: Equivalent to normal pre-commit hook but it is automatically picked up and invoked in a replication safe manner.
If field is left blank and hook exists in repository hooks directory called ms_pre-commit it will be executed.
Pre-lock Hook: Equivalent to normal pre-lock hook (invoked when a user attempts to lock a resource) but it is automatically picked up and invoked in a replication safe manner. If field is left blank and hook exists in repository hooks directory called ms_pre-lock it will be executed.
Pre-Unlock Hook: Equivalent to normal pre-unlock hook (invoked when a user attempts to destroy an exclusive lock) but it is automatically picked up and invoked in a replication safe manner. If field is left blank and hook exists in repository hooks directory called ms_pre-unlock it will be executed.
Authentication Realm: If left blank the realm will default to "wandisco". Enter an alternative realm, subject to your needs. The chief benefit of having the editable realm is that you can have a different authentication realm for each Subversion repository.
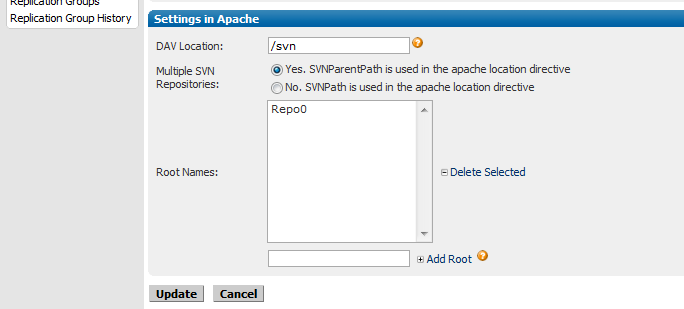
DAV Location: the directory in which WebDAV is located.
Multiple SVN Repositories: Choose whether you are using SVNParentPath or SVNPath in the Apache location directive.
If you select Yes, SVNParentPath is used in the apache location directive, you'll be presented with a entry box that allows you to select and edit available Root Names.
Consistency Check: Provides a basic check that replication is working properly by comparing Subversion revision information between nodes. Although this is a fairly superficial test of consistency, it will more often than not pick up on problems.
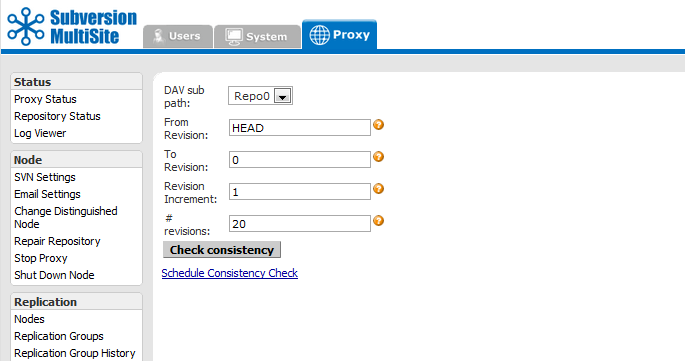
The following parameters are available, allowing for more selective checks to be performed:
DAV sub path: Select the Repository by its DAV sub path.
From Revision: The most recent revision to take the consistency check from. Can be specified by revision number or "HEAD" to indicate the latest in the repository.
To Revision: The oldest revision to include in the consistency check.
Revision Increment: The increment to display the revisions in e.g. display every 5th, 10th, 100th revision (1 to display all revisions in range, can be used to speed up result retrieval for large revision ranges).
# revisions: The maximum number of revisions to include in the consistency check.
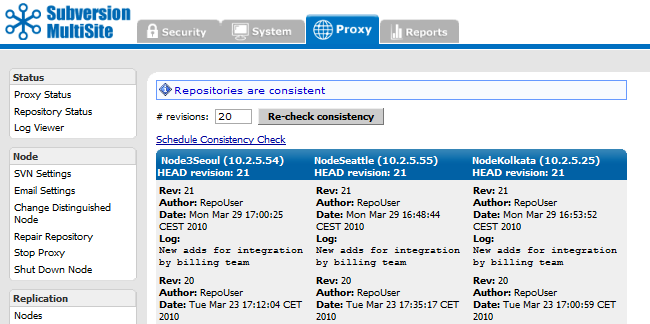
When a consistency check confirms that replicas are consistent the screen will appear as above
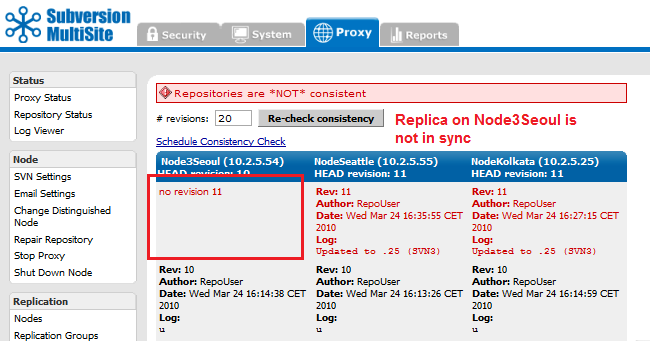
When a consistency check finds that there's an inconsistency between replicas the screen will appear as above.
Schedule Consistency Check: Consistency Checks can be scheduled to occur automatically: select a frequency from the dropdown, if applicable, select a sub path (If using SVNParentPath) then click Set Schedule.
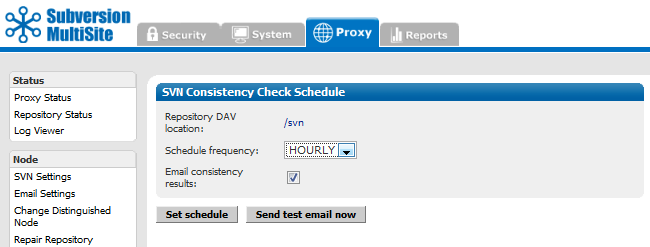
Repository DAV location: The DAV location assigned to the repository for which you will perform a consistency check.
Schedule Frequency: Daily or Hourly are available.
Email consistency results: Send the results of all checks using the email details entered into SVN MultiSite's Email Settings.
Email consistency check results only on failure: This option lets you limit the amount of email that get sent, in this case an email is only triggered after the consistency check identifies that consistency has been lost.
Set Schedule: Click this button to save the current settings.
Send test email now: Click this button to trigger an immediate tests, the results of which will be emailed (subject to which email option you selected).
5.5 Email settings
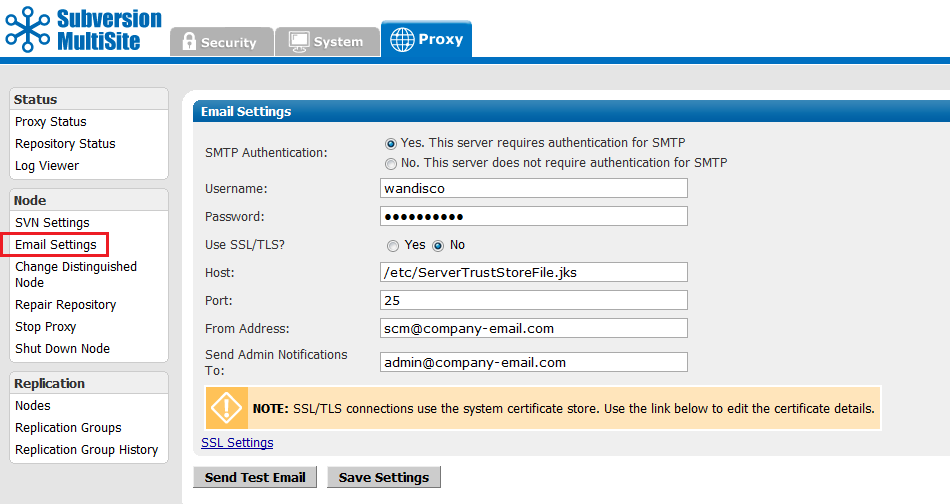
Email Settings: Email settings that Access Control uses to send status alerts.
5.6 Change distinguished node
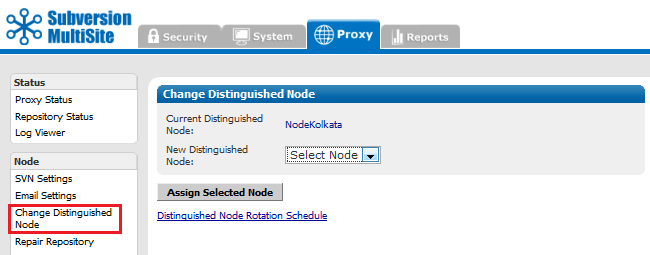
This option enables you to change the node in your replication group that holds distinguished status.
Change the distinguished node immediately. Verify with Proxy Status.
Distinguished Node Rotation Schedule:
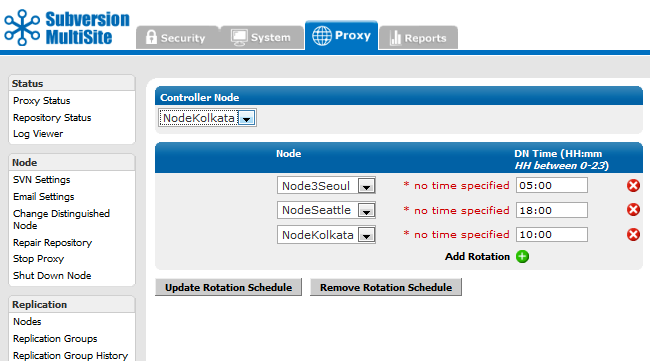
When running SVN MultiSite with a Singleton Quorum, only one node in the replication group decides on the transaction order, this is called the distinguished node (DN). Subversion users who are local to the DN will experience the best possible performance as the proposals they generate will not be delayed while a far-flung node decides on transaction ordering.
Follow-The-Sun: In a global organization it makes sense to locate the distinguished node to wherever the most Subversion users are currently active, using the workflow that has become popularly known as "following the sun".
While it's possible to use the Change Distinguished Node tool to manually change its location, it's easier to automate the move as part of a scheduled rotation.
To understand how to set up a schedule rotation, read 3.5.3 Scheduled rotation of the distinguished node.
Interference: If you have a rotation schedule in place and had a need to manually change the location of the distinguished node, the next scheduled rotation will continue as normal.
Time: You can set up a rotation schedule from any node, however you need to select a Controller Node. This is the node that will create the proposal that sets the schedule. The Schedule times, as displayed on each node will be the 'local time' rather than the time at the controlling node.
If they want to continue working then they should svn relocate their working copy to another node during the repair (if another node exists).
Example: In a 3-node replication group with the nodes located in U.S.A, Europe and China the following schedule is set from the U.S. node (the U.S. Node being set as the controller):
European Node 02:00
Chinese Node 18:00
The European Node is the distinguished Node from 2am (U.S. Eastern Time) If viewed from the European node, the schedule will display 7.00, which is the equivalent local (Belfast) time. Likewise, the Chinese Node takes over the Distinguished Node at 6pm (U.S. time). Viewing the same schedule from the Chinese Node, the time displayed with be the equivalent local time: 6am.
Setting time
For consistency we recommend that all nodes have their clocks set to use GMT plus or minus a timezone offset. If the clock is set using a city location, then daylight savings may not be accounted for, causing apparent timing inconsistencies in the logs.
5.7 Repair repository
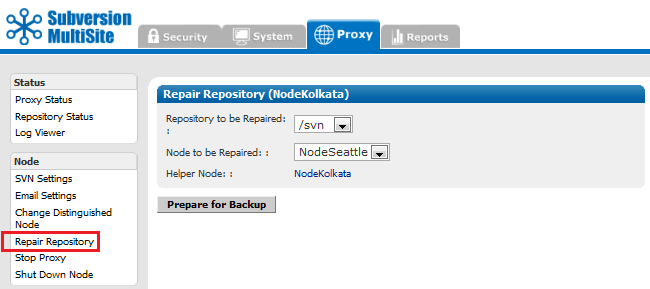
5.8 Start/Stop proxy
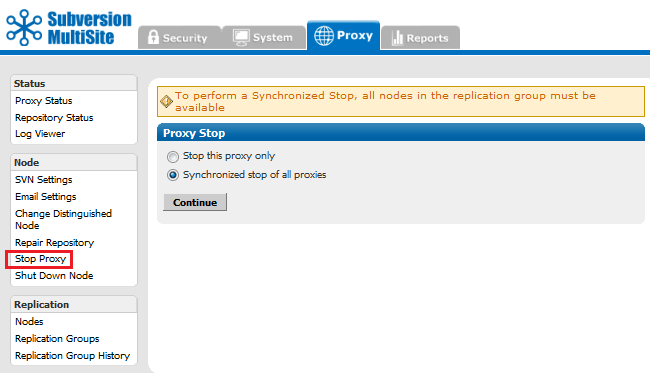
Start/Stop Proxy: Stops or Starts the SVN proxy. When stopped Subversion will not be available to clients.
Proxy stopped
When a node starts up for the first time the proxy remains stopped until manually started. This ensures that replication is started in a controlled fashion. This only applies to the first start-up, after which the proxy will start automatically.
5.9 Shut down node
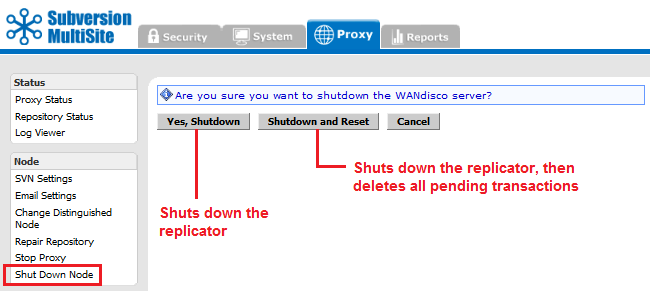
Shut Down Node: Shuts down MultiSite completely on the node.
To restart the node:
- Go to svn-replicator/bin
- Enter:
perl svnreplicator
Replication: Provides control over node and replication group settings.
5.10 Nodes
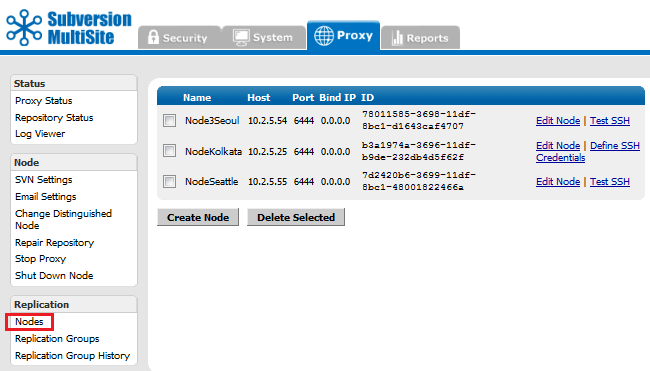
This option lists the available nodes. You can edit or create a new node.
Create / Edit Node:

5.11 Replication group
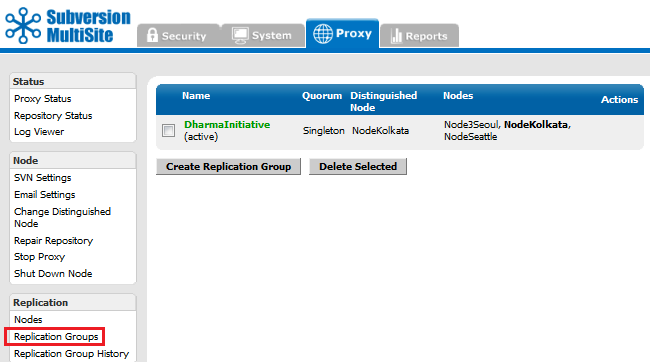
View or create new replication groups.
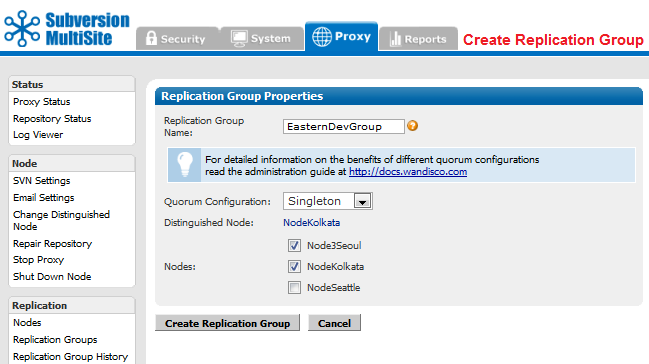
5.12 Replication group history
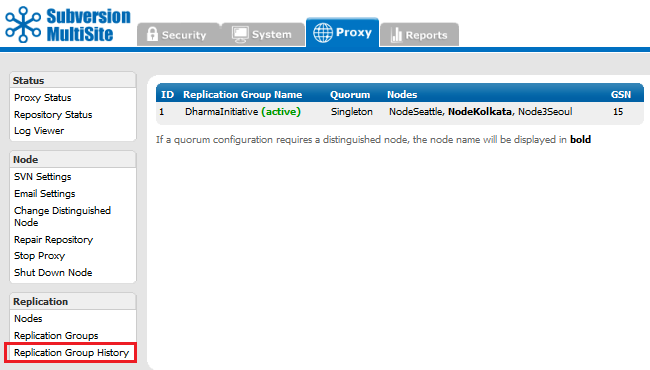
A table presents the current and any past active replication group activity.
Technical Guide
1. Introduction
This technical guide describes the underlying technology and technical concepts that relate to WANdisco's SVN MultiSite software.
We use terms like node and replication group and define them in the Glossary. This contains some industry terms, as well as WANdisco product terms.
2. MultiSite overview
Subversion is designed to run as a central server to which multiple Subversion clients connect. WANdisco's replication technology makes it possible to have multiple active replicas of a Subversion repository that are in synch. The Subversion replicas can be anywhere on a WAN - distributed throughout a company's campus or throughout the world. WANdisco users experience the performance of a local Subversion repository, with the semantics of a single shared Subversion repository. We call this "active replication with one-copy-equivalence."
Replication ensures that each replica acts as a hot backup to every other replica. If a local server experiences a problem that takes it offline, only local users are disrupted, the rest of the replication group continues as normal.
2.1 Example replication group
This figure shows a replication group with five Subversion servers.

WANdisco offers a High Availability solution based on Zeus Software that ensures no disruption in service. Even if a Subversion server failed, a Zeus cluster ensures that Subversion and repository data continue to be available.

SVN MultiSite acts as a proxy between the Subversion Server and clients. An instance of the proxy runs at each replica. All the communication paths involved in the operation of WANdisco are illustrated in diagram above.
3. WANdisco MultiSite concepts
All MultiSite nodes are synchronized at all times: each Subversion repository is a functional replica of the others. WANdisco replication technology is the concept of one repository, multiplied. Because there are multiple synchronized repositories, each replicated node is effectively a current hot backup, which makes disaster recovery easy to plan and implement.
The Subversion usernames and passwords on all repository hosts must match. This is required because MultiSite creates a peer-to-peer replication system. Any replica of the Subversion repository is accessible by every valid Subversion user. WANdisco offers the user the option of having MultiSite manage the Subversion password file.
4. How replication works
The sites in the replication group are continuously coordinating the Subversion write transactions users are making. The group establishes transaction ordering through the agreement of a quorum of replicas. When you install the first node, that node by default is the distinguished node with Singleton quorum. When you create the replication group that includes other nodes, you select the quorum type best suited to your configuration. For which quorum is best for particular situations, see Quorum Recommendations.
Singleton Quorum: Only one of the nodes in the membership decides on the transaction order. With Singleton Response quorum, the node that decides transaction ordering is called the distinguished node. The Singleton quorum offers the fastest response time for those users working at the distinguished node, because as soon as the distinguished node determines that a transaction can be processed in the correct order, the transaction is sent to Subversion. Any replicator except the distinguished node can go down, but the replication group continues. The replication group replays the missing transactions when that node rejoins the group. However, the Singleton quorum also represents a single point of failure, since replication halts if the distinguished node fails.
Majority Quorum: You specify that a majority of the sites must agree on transaction order before any transaction is committed. Having a majority quorum ensures that if one site goes down in a replication group, even the distinguished node, the other sites can continue uninterrupted, as long as a majority of the sites remain available. The replication group replays the missing transactions when that site rejoins the group.
In a majority quorum, the distinguished node's role is that of a tie-breaker. For example, in a four node replication group, three sites make the quorum (three sites must agree about transaction ordering). If two nodes want one transaction first, and the other two want another transaction first, then the distinguished node gets a weighted vote. The group with the distinguished node determines the transaction ordering. With an even number of nodes with majority quorum, you can schedule the distinguished node to rotate to different nodes around the world, to "follow the sun".
Unanimous Quorum: This requires that all replicators must be reachable to accomplish transaction ordering.
5. Replication example
This summarises what happens when a write transaction is received by any replicator in the replication group:
- The originating client sends the transaction to SVN MultiSite, which passes it along through the replication group.
- Transaction data is successfully received by the quorum (the distinguished node for Singleton quorum, or a majority of sites for Majority quorum). The quorum assigns the transaction a Global Sequence Number (GSN).
- After receiving the transaction, each SVN MultiSite passes the transaction data to its local Subversion server.
- Each local Subversion server processes the transaction.
- SVN MultiSite waits for Subversion to complete the transaction. SVN MultiSite only marks the transaction complete when Subversion returns a completion status. If for some reason replication goes down during this process (the replicator crashes, is stopped by an admin or the server it's running on shuts down), SVN MultiSite does not mark the transaction as complete, and it gets reprocessed upon replication restart.
6. WANdisco is listening
There is a field in the Admin Console that tells you whether WANdisco is accepting any incoming Subversion client requests. Replication still continues among the WANdisco sites, whether WANdisco is listening or not at one or more sites.

You can turn the listening on and off through the Admin Console (through the Start Proxy and Stop Proxy commands). Issuing the Stop Proxy command on a site puts that Subversion server in read-only mode.
The following illustration shows Sites 2 and 5 are not listening. (An administrator executed the Stop Proxy command for those sites.) Replication continues, and Sites 2 and 5 are still receiving and processing replicated transactions originating from the other sites. However, Subversion users at Sites 2 and 5 cannot make any write transactions. Once an administrator issues the Start Proxy command for Sites 2 and 5, the local Subversion users can again issue Subversion commands.

Maintenance
Follow your company guidelines regarding notifying Subversion users about maintenance.
7. Synchronized stop of all sites
When an administrator issues a synchronized stop command, the Subversion servers stop accepting write commands from clients. Pending transactions are processed, but no new write transactions are accepted. Subversion users continue to have read access to the repository, but cannot perform write operations, such as commit or lock.
When an administrator issues a resume command, the WANdisco proxies restart and begin accepting write transactions.

8. Handling node and network failure
8.1 Node failure
For Singleton Response quorum if a nodes goes down, replication continues at the remaining nodes, as long as the quorum* is reached, although users connecting to the downed node will be unable to write to repositories until the node is repaired (and the quorum reached).
In a Singleton Response quorum the distinguished node must be available.
As soon as a node comes back up, the replication group catches up the node on its missing transactions, so that all nodes are again synchronized.
For Majority Response quorum: say you have a five node replication group. One or two nodes could go down, and replication would continue at the other nodes, as long as a majority of nodes remain up. The one or two downed nodes go into read-only mode. As soon as a node comes back up, the replication group catches up the node on its missing transactions, so that all nodes are again synchronized.
8.2 Per-repository scheduling
SVN MultiSite 4.0/GA includes some changes to transaction scheduling and failure handling. In previous versions, a single scheduler handled all transactions on a node, so that in the event of a single repository becoming corrupted, and entering read-only mode, all the repositories hosted on the node would also become read-only.
Previous model: Transaction failures would result in the replicator restarting and retrying an arbitrary number of times. If the transaction still failed, a check would be made to see if the transaction was bypassable (this is so if it failed on all nodes). If the transaction is bypassable, replication would continue after a restart, if the transaction was not bypassable, the node would restart in read-only mode.
New model: Instead of a single scheduler per node, Subversion transactions now use a scheduler per svnroot, with AuthzProposal and UserPasswordProposal shared between all schedulers.
There are two key changes in behavior, as a result of this change:
- Failed transactions, or moving in or out of read-only mode no longer triggers the node to restart.
- Failed transactions will now only interfere other transactions going through the same scheduler, and with global transactions. This allows the other repositories to continue to replicate, greatly increasing resilience in environments where large numbers of repositories are hosted on a single node.
8.3 Network failure
If a network link goes down for one node, and outside connectivity is completely lost, there are two possible scenarios, depending on your quorum:
- If you have Singleton quorum, and the distinguished node's network link goes down, the distinguished node alone can make progress. The Subversion users local to the distinguished node continue working uninterrupted, while users at other sites in the replication group can make only read operations (like up, co, log, etc.) working with stale data.
- If you have Majority quorum, and one site's network link is lost, then users at that site can execute only read operations (like up, co, log, etc.) working with stale data. Providing that the remaining sites can still meet quorum (having a majority of sites responding), the other sites continue working uninterrupted
When connectivity is restored or the errored node is back online, the local node syncs up with the replication group automatically. First, the local node consults its local recovery journal (similar to a database redo log), and then, if necessary, attempts recovery from any of the quorum sites.
The recovery infrastructure and details of WANdisco fault-tolerance can be found at http://www.wandisco.com/get/?f=documentation/whitepapers/WANdisco_DConE_White_Paper.pdf.
9. LDAP authentication
Authentication is handled by the MultiSite replicator performing an LDAP login attempt from the originating node, using the credentials supplied by the user. As users successfully authenticate, they are added to the replicator's user database and added to the (replicated) Apache password file with a known common password.
Apache is configured to use the password file containing common passwords and the WebDAV requests are populated with an authentication string from that password file. The remainder of the replication work flow remains unchanged. The key difference is that the authentication credentials used by Apache will not change over time and thus authenticated transactions can be executed on each replicated node.
Caution
If you are using LDAP based authentication, do not make changes to users using the admin console User Administration screen.
LDAP passwords: Use only alphanumeric characters in LDAP passwords. Due to a bug in Apache/mod_svn_dav, the use of non-alphanumeric characters in passwords could result in replication failure.
9.1 Requirements
- Incoming requests must contain accessible username and password credentials.
- The LDAP server must be available for authentication to succeed.
- Only WANdisco is modifying the htpasswd file.
9.2 LDAP data flow

Copyright © 2010-2015 WANdisco, Inc.
All Rights Reserved
This product is protected by copyright and distributed under licenses restricting copying, distribution, and decompilation.

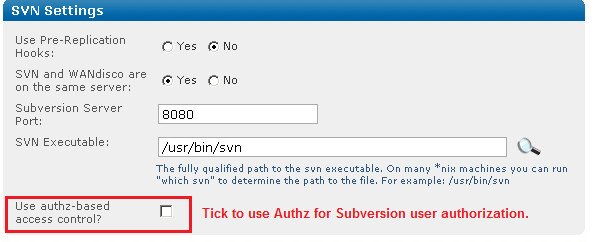
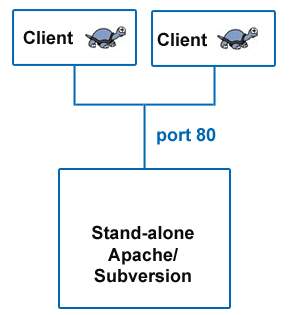
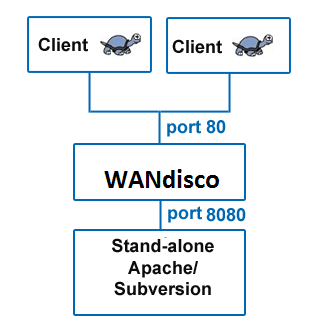
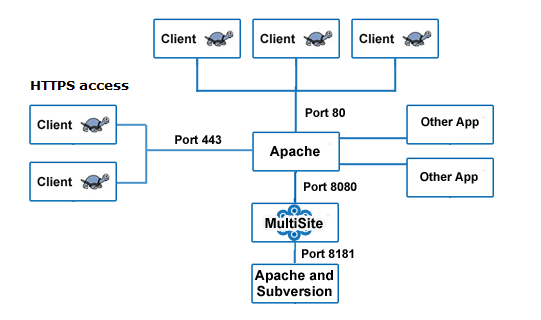
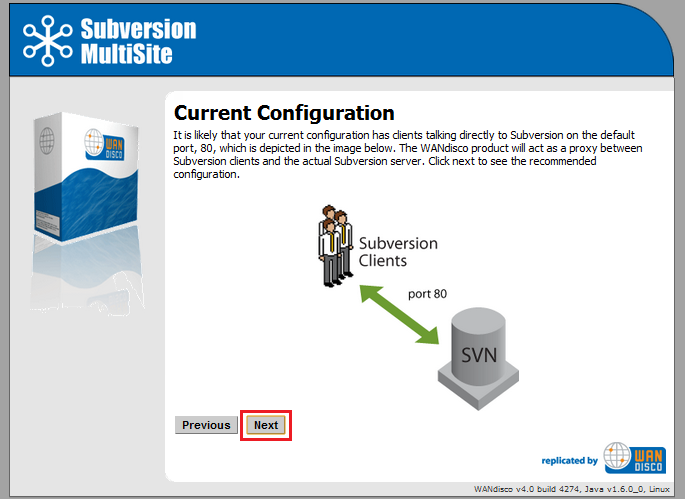
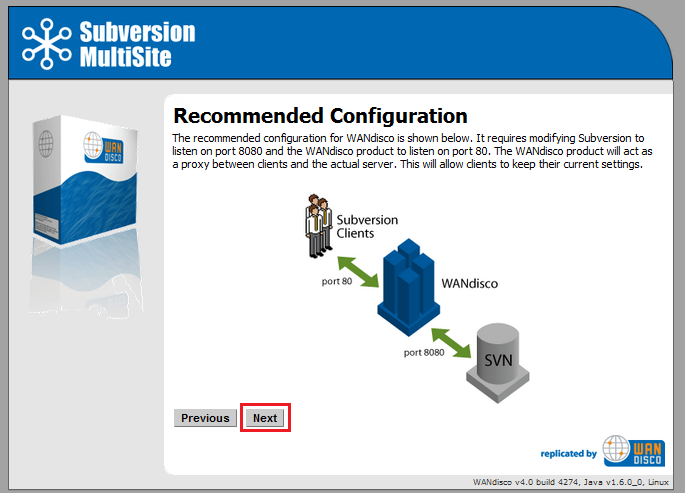
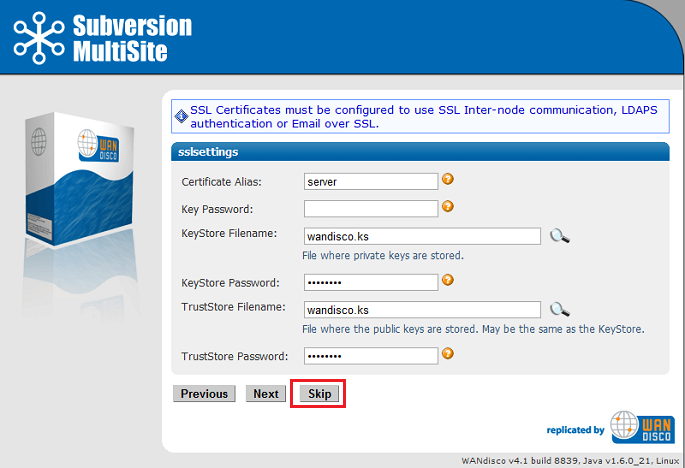
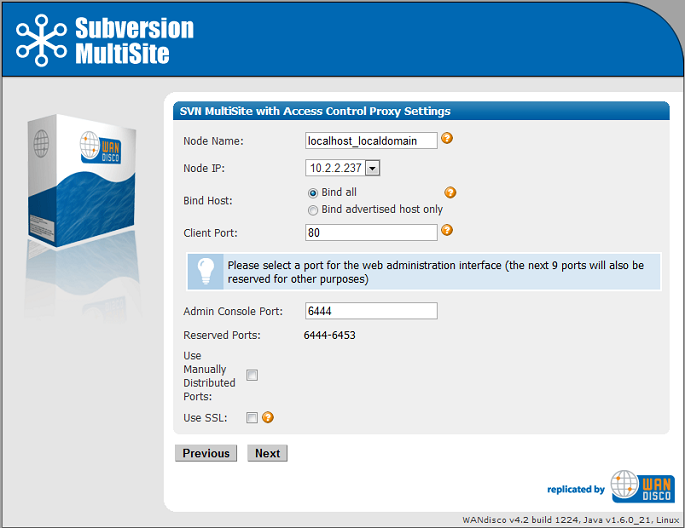
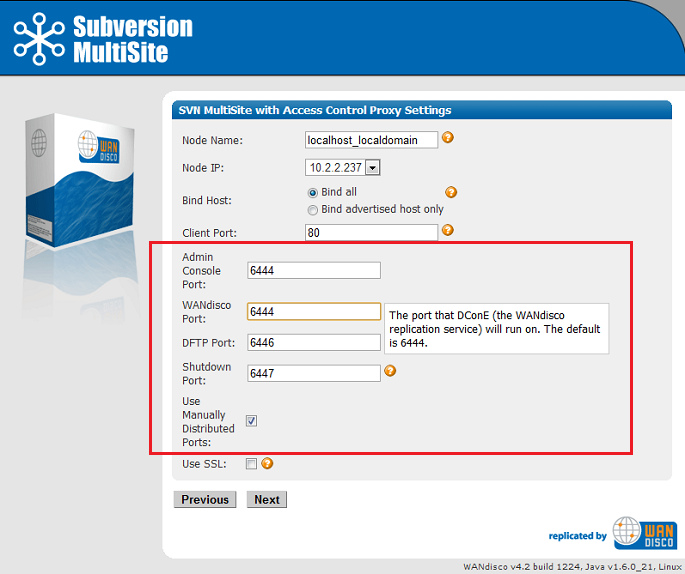
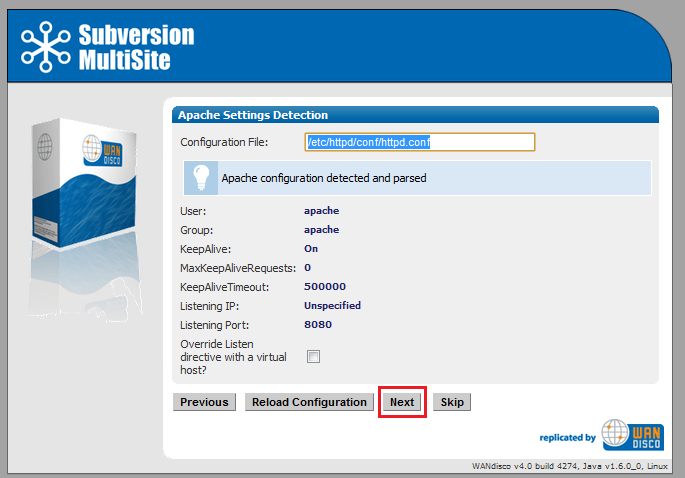

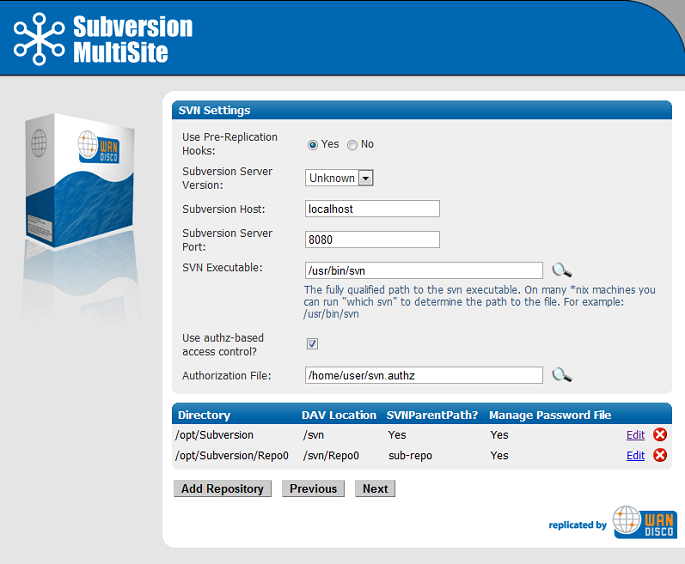
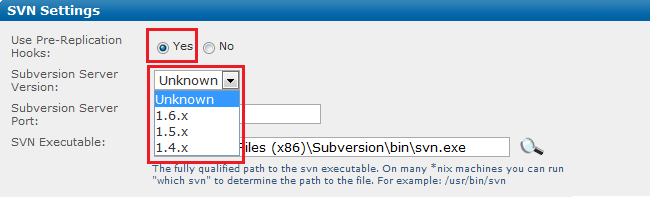
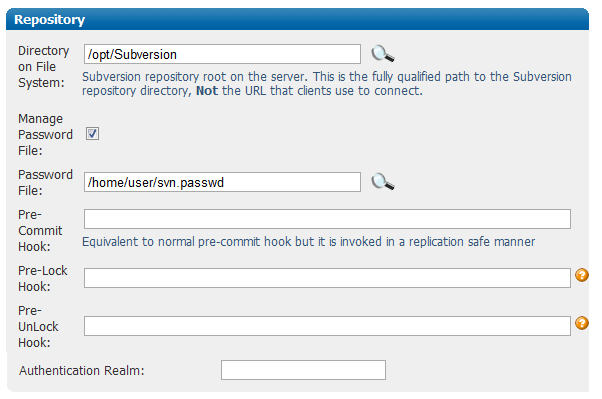
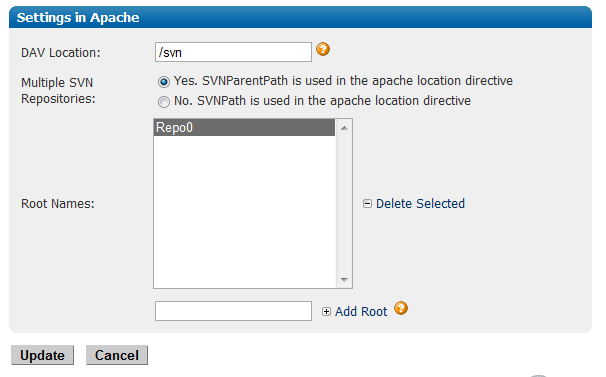

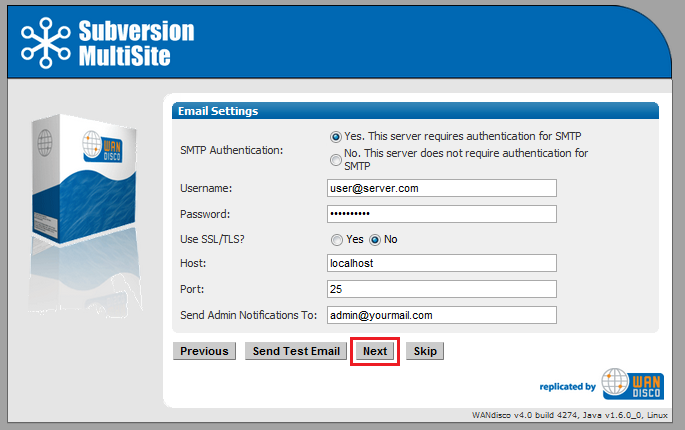
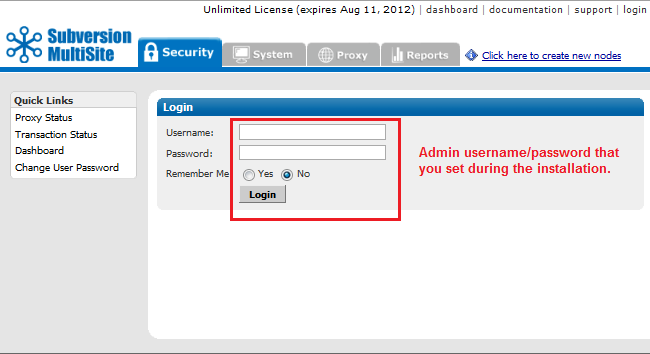
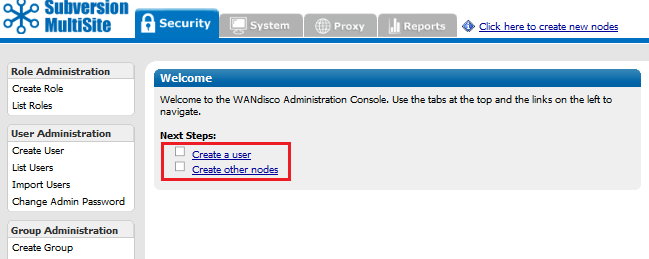 For more information see the guide to the