
Navigation:
wandisco.com |
Index |
Deployment |
Upgrade |
User Guide |
Technical |
API |
Glossary |
Mobile |
Release Notes
Follow this procedure if you're currently using SVN MultiSite 4.1. If you are using a different version of SVN MultiSite you should review this instructions in the chapter 5. Upgrading Subversion MultiSite.
This upgrade procedure involves the following steps:
Required Time: the upgrade process may take as little as 20-minutes per server. However, on larger deployments the time required may be longer. It may be worth running through the procedure to see if any of your steps will require extra time.
During most of this process Subversion will be in a read-only state so either complete the upgrade out of development hours and ensure that your developers are aware of the brief Subversion outage.
 Installing in order to perform an upgrade using SVN MultiSite's backup data?
Don't enable Authz during the installation - wait until the import is completed, then enable Authz from the Subversion Settings screen.
Enabling Authz during the installation can greatly impact the performance of the backup file import.
1.1 Open the Admin Console, on the left-hand menu click Stop Proxy.
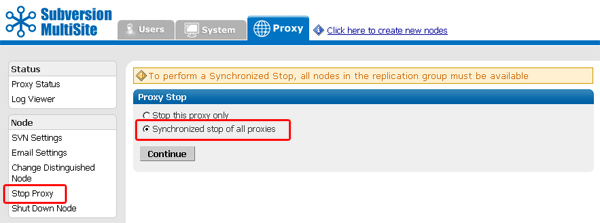
1.2 Check that radio button for "Synchronized Stop of all proxies", then click Continue. MultiSite will now wait for any remaining transactions to complete, after which all nodes will stop listening, stopping replication.
2.1 Open the Admin Console and click on the System tab.
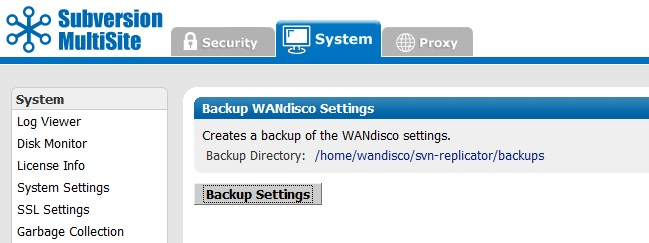
2.2 Click on Export Settings. Note the filename and location, then click on Backup Settings. Settings and user data will be exported to the resulting backup directory, the file that you will need to re-import is called access-control.xml
Using LDAP?
Near the end of the upgrade process you will need to reapply the settings for any LDAP authorities that you are using. You may benefit from making a record of these settings now.
IMPORTANT: When you add the the LDAP auths into 4.2. the Order field for each LDAP auth needs to be exactly the same as the corresponding ldap auths in the MS installation you are upgrading from.
3.1 Perform a reset on all nodes. A reset purges all temporary data which will ensure that all nodes will be in the same state after the upgrade.
Open a terminal and navigate to the <INSTALL>/svn-replicator/bin/ directory. Run reset, like so:
[root@localhost bin]# perl reset

      ===================== WARNING ========================
      This is an irreversible operation. It will delete the
      transaction logs for this replicator. You *must* run
      the reset command on all the replicators to ensure
      there is no lingering state.

Are you sure you want to reset the replicator transaction log - Y|N ? [N] : Y
Shutdown in progress .......May 20, 2013 11:01:17 AM org.nirala.trace.Logger info
INFO: Invoked from WANdisco installation at: /home/wandisco/svn-replicator
May 20, 2013 11:01:17 AM org.nirala.trace.Logger info
INFO: forceSyncPrevayler set to : false
Sending kill signal to 20851...
Done
Shutdown complete

Reset done.
Repeat this for all nodes.
4.1 Rename the svn-replicator directory to something like backup-svn-replicator etc. e.g.
mv svn-replicator backup-svn-replicator
This approach lets you quickly restore your working version should anything go wrong with the update - Just restore the name of your backed-up installation and restart.
 Back up the following configuration / environment files
SVN password fileAuthz filelicense.key file ready5.1 Decompress the new Subversion MultiSite installation file.
5.3 Copy your license key file from your backup to the new svn-replicator/config directory.
5.4 Go to /svn-replicator/bin/ and start the installation with the following command:
perl setup
Respond to the Yes / No prompt about accepting the default Java heap settings.
[root@localhost bin]# perl setup

=======================================================================
WANdisco java processes will start with the following memory settings:

         -Xms128m -Xmx2048m -ea -server -Djava.net.preferIPv4Stack=true

Change the environment variable WD_JVMARGS if you wish to start java differently
WARNING: if the host does not meet these specified memory requirements, you will
encounter problems starting the WANdisco processes.
Continue,  Y or N ? [Y] : y
5.5 The setup will now start up the browser-based installer. Open your browser and go to address shown at the end of the setup - that's your server's IP and specify the admin console port (6444 by default).
Change the environment variable WD_JVMARGS if you wish to start java differently
WARNING: if the host does not meet these specified memory requirements, you will
encounter problems starting the WANdisco processes.
Continue,  Y or N ? [Y] : y
May 20, 2013 10:57:37 AM org.nirala.trace.Logger info
INFO: Invoked from WANdisco installation at: /home/wandisco/svn-replicator
[I] using specified port: 6444
[I] Starting Subversion web installer

Point a web browser to http://172.16.2.39:6444/ to configure the product.
5.6. From the Welcome screen, click Continue.
5.7. Once you've read the WANdisco End User License Agreement, click I Agree to continue with the installation.
5.8. Enter a password for the default Admin Console account, the username for this account is admin. Click Next to continue.
5.9. The next two screens explain how MultiSite will act as a proxy between Subversion clients and the Subversion server. Click Next to continue.
5.10 By default, MultiSite will listen on port 80, while Subversion will listen on port 8080. The benefit of this setup is that Subversion end-user don't need to make any changes.
5.11
You'll confirm the proxy settings. These will be populated with the default settings noted in the previous screens.
perl setup <preferred port for Admin Console access>
Reserved Ports: MultiSite will reserve a block of 10 ports, you can either leave the default ports or enter ports that you prefer.
Use SSL: Tick the checkbox if you've already got keystore/truststore settings in place. See more about SSL Settings.
Once you've finished making any changes to the proxy settings, click Next to continue.
5.12
Setup will check the Apache config file for any settings that might cause problems for MultiSite.
If the httpd.conf file isn't found, enter its path into the Configuration File entry box, then click Reload Configuration.
Look out for warning boxes for where setup finds a problem. You'll need to manually edit the httpd.conf file, then click on Reload Configuration to have setup check your changes.
5.13 Setup now allows you to modify your Subversion settings. Watch for alerts that confirm the port and path that MultiSite will associate with Subversion.
SVN Settings
Use Pre-Replication Hooks: Select whether you are using Pre-Replication Hooks.
Subversion Host: Confirm the hostname of the server running Subversion. You'll benefit from making this the same location as MultiSite, e.g. 'localhost'.
Subversion Server Port: 8080 by default.
SVN Executable:This is the fully qualified path to the Subversion executable. Setup will try to fill this in automatically, otherwise type it into the entry box.
Use authz-based access control Click on the box if you are using Authz access control. See the following note about why you may wish to hold off selecting this option until later.
Installing in order to perform an upgrade using the backup.xml file?
Don't enable Authz during the installation - wait until the import is completed, then enable Authz from the admin console.
The import file that will recover your users and settings will not add your old LDAP authority settings. You must re-enter your LDAP authorities before completing the import.
Follow the instructions in the 3.7 Create LDAP Authority
In 4.2 Build: 3256 we introduced the ability to run with simultaneous LDAP and internal authentication. Adding this feature required a small change to the Access Control database with the addition of a 'user type' field that recorded whether a user was added internally or supplied from an LDAP service.
6.1 In order to import data from an earlier version of MultiSite you will need to first copy the backup (backup.xml or access-control.xml) file that you created in step 2 into the utils directory (<INSTALL-DIR>/svn-replicator/utils/) which contains three conversions scripts. You will need to apply the script that corresponds with the version of SVN MultiSite from which you are upgrading. i.e.
perl convertac41-42.pl backup.xml localOR
perl convertac41-42.pl backup.xml ldap
Running the conversion script will create a new file in the utils folder.
So you backed up your data, installed the latest version MultiSite, if it was neccessary, update your backup for import into the latest version of MultiSite. Now it's time to import your backed up data.
Use this procedure to restore user information, although any system settings will need to be manually applied. Important: if you're using LDAP then you should re-enter your LDAP authoritie before importing your users.
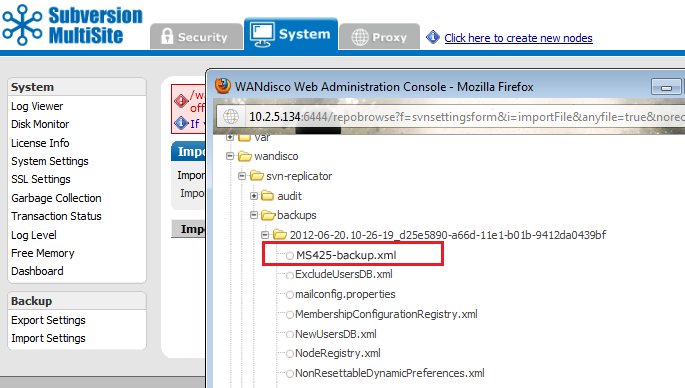
7.1 From the Admin Console, click on the System tab. Click on Import Settings. Click on the magnifying glass browse icon and navigate to the utils folder.

7.2. Select the new MS425-convert-access-control.xml file, then click on the Import Settings button.
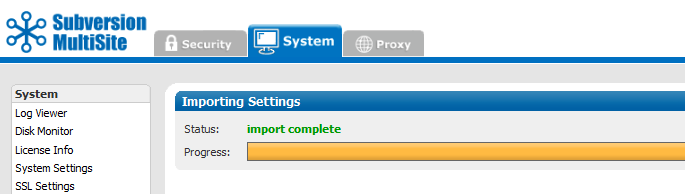
7.3 You'll see the import bar progress until you get an "import complete" message.
7.4 When the import is complete check that the users, teams and rules have been imported successfully from the previous MS installation. Test the individual node by trying an svn checkout with the the imported configuration. Also, manually add the svn repositories you are using under Proxy/SVN Settings.
Important All files for use with WANdisco MultiSite should use UTF-8 encoding (and/or single-byte encoding if there are no none-ASCII characters). Any other encoding e.g. Unicode will not be parsed correctly.
7.5.
You've now completed the upgrade. However, any backup that you have installed will only provide user / group definitions. The following settings need to be manually applied:
8.1 Once the latest of SVN MultiSite has been installed and your data updated and imported you should redeploy the other nodes using SVN MultiSite's packager where the installation of the other nodes can be handled from the admin console.
Copyright © 2010-2013 WANdisco
All Rights Reserved
This product is protected by copyright and distributed under
licenses restricting copying, distribution and decompilation.