Navigation:
wandisco.com |
Welcome |
Release Notes |
Install |
Upgrade |
Admin |
Reference |
API |
Glossary|
Latest Version
To start the SVN MultiSite Plus replicator, follow these steps:
lrwxrwxrwx 1 root root 37 May 9 10:37 svn-multisite -> /opt/svn-multisite-plus/bin/svn-multisite
[root@localhost init.d]#  ./svn-multisite start


20130520-164811 (24088) [INFO]: Starting WANdisco MultiSite Plus
20130520-164811 (24088) [INFO]: Started replicator (24100)
20130520-164811 (24088) [INFO]: Started ui (24110)
20130520-164811 (24088) [INFO]: Number of errors: 0
20130520-164811 (24088) [INFO]: Number of warnings: 0
To shutdown:
lrwxrwxrwx 1 root root 37 May 9 10:37 svn-multisite -> /opt/svn-multisite-plus/bin/svn-multisite
[wandisco@ip-10-0-100-7 bin]$  ./svn-multisite stop

20130520-165704 (24767) [INFO]: Stopping WANdisco MultiSite Plus
20130520-165704 (24767) [INFO]: Request received to shut down replicator
20130520-165704 (24767) [INFO]: replicator processes ended
20130520-165704 (24767) [INFO]: Request received to shut down ui
20130520-165704 (24767) [INFO]: Sending signal 15 to watched ui process (attempt 1)...
20130520-165707 (24767) [INFO]: Sending signal 15 to watched ui process (attempt 2)...
20130520-165710 (24767) [INFO]: ui processes ended
20130520-165710 (24767) [INFO]: Number of errors: 0
20130520-165710 (24767) [INFO]: Number of warnings: 0
The 'start-up' script for persistent running of SVN MultiSite can be found in the /etc/init.d folder.
Run the script with the help command to list the available commands:
[root@localhost init.d]# ./svn-multisite help
Usage: svn-multisite {start|stop|status|uistart|uistop|repstart|repstart}

  start      Start WANdisco Multisite service
  stop       Stop WANdisco Multisite service
  status     Display running WANdisco Multisite services
  uistart    Start WANdisco Multisite UI service
  uistop     Stop WANdisco Multisite UI service
  repstart   Start WANdisco Multisite Replicator service
  repstop    Stop WANdisco Multisite Replicator service
You can change SVN MultiSite Plus's login password at any time by following this procedure:
Login.
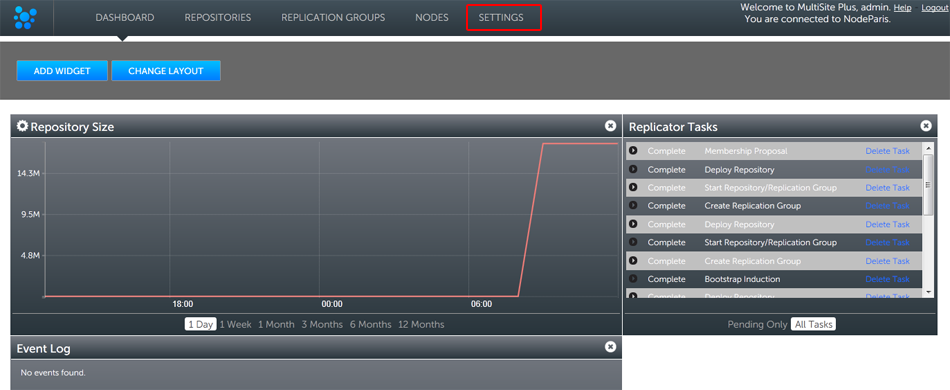
Settings.
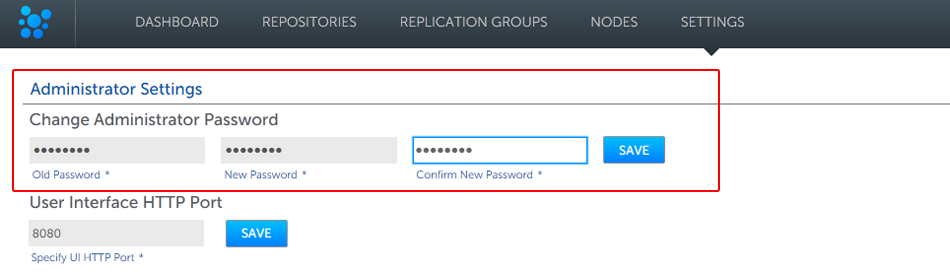
Changed password

Growl!
 Changing Username
It's currently not possible to change the Administration username. In order to change the username you would need to re-install SVN MultiSite Plus
Follow this procedure if you ever need to change your product license. You would need to do this if, for example, you needed to increase the number of subversion users or the number of replication nodes.
/opt/svn-multisite-plus/replicator
) and rename the license.key to license.20130625.
total 1120
drwxr-xr-x 2 root root   4096 Jun 19 17:21 content
drwxr-xr-x 5 root root   4096 Jun 19 17:21 database
drwxrwxr-x 4 root root   4096 Jun 19 17:13 docs
drwxrwxr-x 2 root root   4096 Jun 19 17:13 lib
-rw-r--r-- 1 root root    256 Jun 19 17:18 license.key <-
drwxrwxr-x 3 root root   4096 Jun 25 14:06 logs
drwxrwxr-x 2 root root   4096 Jun 19 17:13 properties
-rwxrwxr-x 1 root root 369538 Jun 18 16:37 svn-ms-replicator-fsfsrestore.jar
-rwxrwxr-x 1 root root 369526 Jun 18 16:37 svn-ms-replicator.jar
-rwxrwxr-x 1 root root 369535 Jun 18 16:37 svn-ms-replicator-updateinetaddress.jar
license.key and drop it into the /opt/svn-multisite-plus/replicator directory.perl /etc/init.d/svn-multisite repstartThis will trigger an SVN MultiSite replicator restart, which will force SVN MultiSite to pickup the new license file and apply any changes to permitted usage.
/opt/svn-multisite-plus/replicator/logs
) for more information.
PANIC: License is invalid com.wandisco.fsfs.licensing.LicenseException: Failed to load filepath>
It's possible to update a node's IP address/Hostname or assigned ports (for either DConE or content delivery). Use the following procedure:
<INSTALL-DIR>/svn-multisite-plus/replicator/properties/application.propertiesYou need to change either the of these lines in the file:
application.hostname=172.16.2.139or
application.port=6444or
content.server.port=4321After updating any or all of these properties, save the file.
event.hostname.<Node id>=<new IP or hostname>
content.hostname.<Node id>=<new IP or hostname>
Case sensitive!
The Node ID is case sensitive, you must make sure that you match the nodes actual case as the system won't currently warn you if you get it wrong.
event.port.<Node id>=<new port>
To change the Content Delivery port:
content.port.<Node id>=<new port>
java -jar svn-ms-replicator-updateinetaddress.jar -c <path to application.properties>
The Monitoring Data tool monitors the disk usage of SVN MultiSite's database directory, providing a basic level of protection against SVN MultiSite consuming all disk space. The tool also lets you set up your own monitors for user-selected resources.
Monitoring Data - not intended as a final word in system protection
Monitoring Data is no substitute for dedicated, system-wide monitoring tools. Instead, it is intended to be a 'last stand' against possible disk space exhaustion that could lead to data loss or corruption.
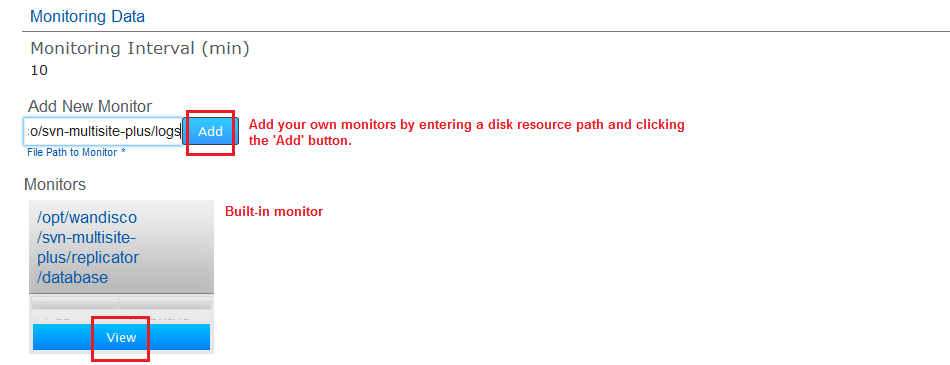
Click the "View" link to go to a monitor's settings.
By default MultiSite's database directory (/opt/wandisco/svn-multisite-plus/replicator/database) is monitored - this is the location of MultiSite's prevayler database where all data and transactions files for replication are stored.
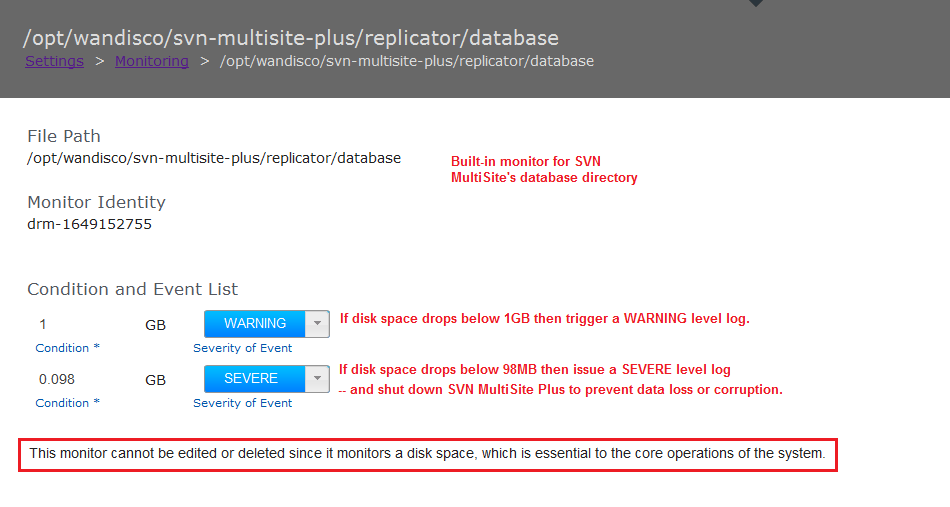
There is built-in monitor for /opt/wandisco/svn-multisite-plus/replicator/database which can not be deleted.
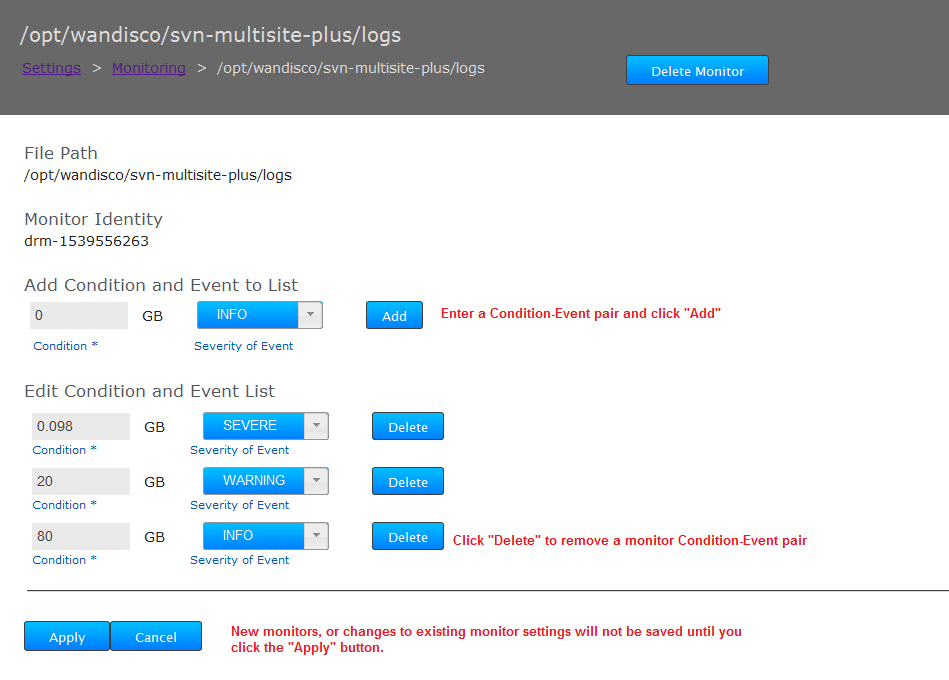
This built-in monitor runs on all nodes. Any additional monitors that you set up will monitor on a per-node basis. Monitors are not replicated so a monitor set up on one node is not applied to any other node.
Create additional resource monitors using the following procedure:
/opt/svn-multisite-plus/replicator/logs". Enter the path and click "Add".
Add resource path
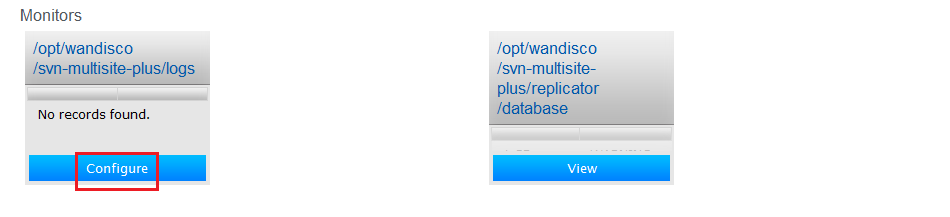
Configure
Settings
If the disk space available to a monitored resource is less than the value you have for a "Severe" event then the event is logged and MultiSite's replicator will shut down after a set interval of 10 minutes. You can configure the interval in application.properties file:
/opt/wandisco/svn-multisite-plus/replicator/properties/application.properties
Edits to property files require a replicator restart
Any change that you make to the application.properties file will require that you restart SVN MultiSite Plus's replicator.
Once shut down all Subversion repositories will become unavailable to users, you should immediately take action to make more disk space available, the replicator can be restarted using SVN MultiSite Plus's service as soon as the resource that triggered the shutdown has enough available disk space not to shut down again.
Monitors that you set up are stored within an XML file within the application's properties directory:
/opt/svn-multisite/replicator/properties/ms-resource-monitoring-elements.xml
In the event that this file can't be found, a substitute file is created in the temporary file space, "java.io.tmpdir". The default resource will then be applied:
db folder (/opt/wandisco/svn-multisite-plus/replicator/database)
0.1 GB - SEVERE
1.0 GB - WARNING
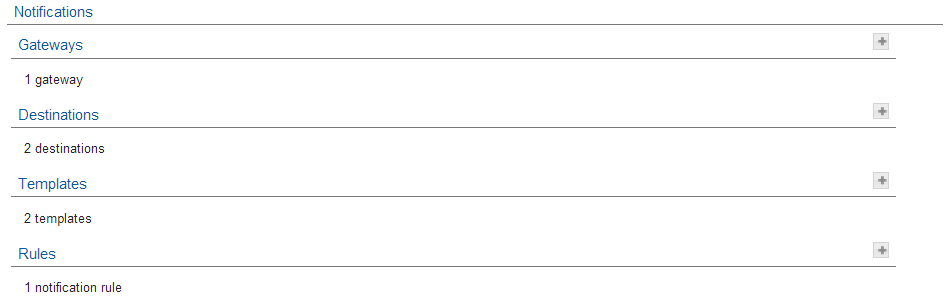
The email notification is a rules-based system to deliver alerts based on user-defined templates over one or more channels to destinations based on triggers that are activated by arbitrary system events. Put simply, email notification sends out emails when something happens within the SVN MultiSite Plus environment. Everything, the message content, trigger rules and destinations are all user-definable.
Automated alert emails
The Gateway section stores your email (SMTP) server details. You can set up multiple gateways to ensure that the loss of the server doesn't prevent alert notifications for being delivered.

Add Gateway
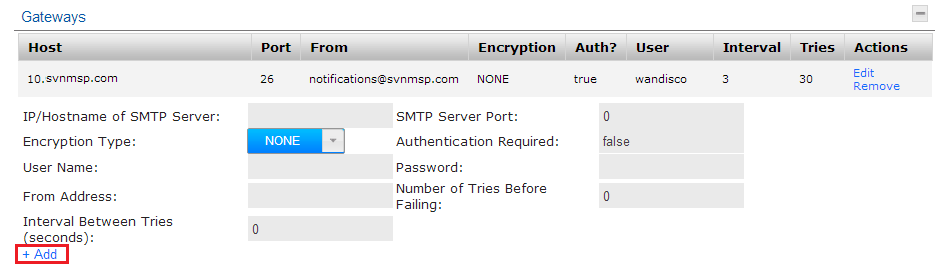
Enter settings
The destinations section stores the email address for your notification recipients.

Notification
The template section is used to store email messages. You can create any number of templates, each with its own notification message, triggered by one of a number of trigger scenarios that are set up in the Rule section.
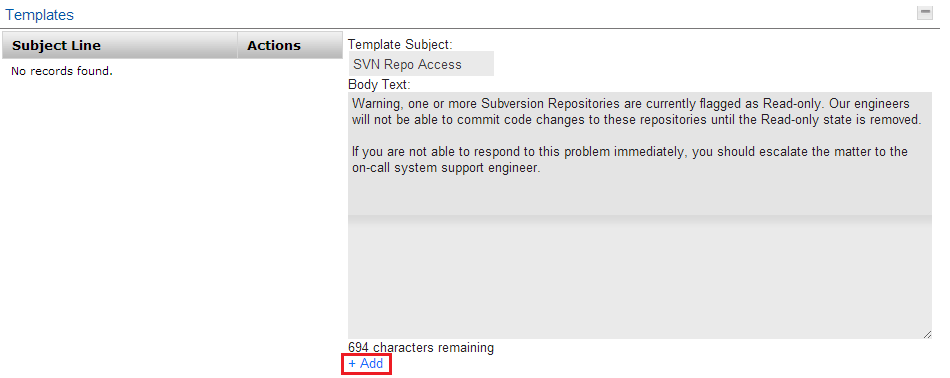
Notification
The Rule section is used to define which system event should trigger a notification, what message template should be used and which recients should be sent the notification.

Rules

Rule set
It's possible to back up SVN MultiSite's own database in case you need to quickly restore a node.
Only MultiSite Settings are backed-up
This procedure backs up SVN MultiSite's internal Prevayler database, it doesn't touch your SVN repository data or any other system files (such as Apache configuration, authz files etc.) that you should also be backing up.
curl --user <username>:<password> -X POST http://[node_ip_address]:8082/dcone/backupThis will create a backup folder in
[INSTALL-DIR]multisite-plus/replicator/db/backup/X.X.X_DConE_Backup directory.
java -cp ./fsfsrestore.jar com.wandisco.fsfs.backup.FsfsBackup -c ./properties/application.properties
Use this to back up the current state of all pervailers when SVN MultiSite Plus is shut down - you don't therefore need to start the replicator in order to create a backup of the database.
java -cp ./fsfsrestore.jar com.wandisco.fsfs.backup.FsfsClear -c ./properties/application.properties
This class clears selected prevaylers only, when the replicator is shut down. It does not clear all database instances, only those that are being restored during restore process.
Use the following procedure to restore SVN MultiSite Plus settings after reinstalling and starting a node:
java -jar fsfsrestore.jar path/to/application.properties path/to/back-up-folder
the first argument, path/to/application.properties is
<INSTALL-DIR>/svn-multisite-plus/replicator/properties/application.properties
path/to/backup by default is
<INSTALL-DIR>/svn-multisite-plus/replicator/db/backup/
FsfsBackup.class path/to/application.properties
To replicate Subversion repository data between sites, you first first tie the nodes together in the form of a replication network, this process starts with the adding (connecting) of nodes in a process we call induction.
You can also remove a node.
Unique Node Names
You can't reuse NodeIDs. If you have removed a node, you can't create a replacement that uses the old name. The replication network maintains a record of the old node and will block it from reintroduction.

Connect to Node
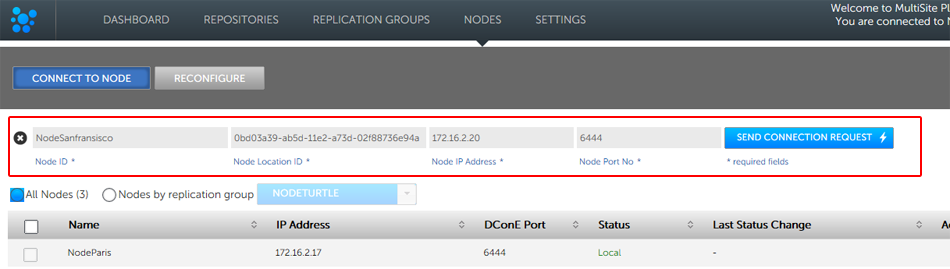
Enter the details from an existing, connected node.

System Data table, found on the Settings tab.
The removal of a node from the SVN MultiSite Plus replication network is useful if you will no longer be replicating repository data to its location and wish to tidy up your replication network settings.
No ties allowed
The option to remove a node should only appear if it is not currently a member of a replication group. You may need to remove and recreate replication groups in order make it eligable for removal.
Known issue:
NOTE: If a node is inducted but not in a replication group then it is possible (from that node) to remove other inducted nodes that are in a replication group. There's currently an issue in that a node isn't aware of the membership of replication groups of which it is not itself a member. This means that it is possible to remove a node that is a member of a replication group, if done from another node that doesn't have knowledge of the replication group.
Until we block this capability you should do a manual check of any nodes that you plan to remove to make absolutely sure that it is not a member of a replication group.
Once removed a node can't come back
Take care when removing nodes. In order to ensure that replication network is kept in sync, removed nodes are barred from being re-inducted. The only way that you can bring back a node is to perform a reinstallation of SVN MultiSite Plus using a new Node ID.

Nodes table under the Nodes tab

Ready to remove NodeSanFransisco.

Node removed.
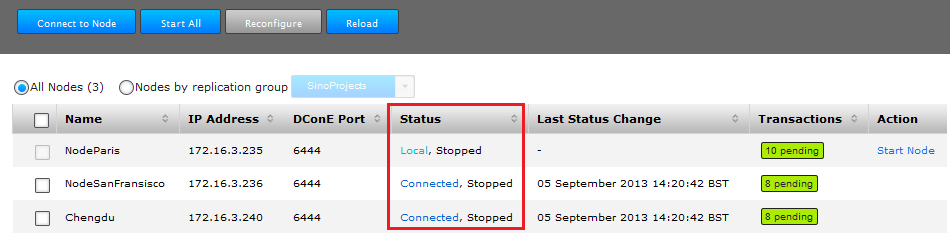
It's possible to bring all nodes to a stop through the use of a single button click (providing all associated repositories are replicating/writable).
A stop can't be synchronized if associated repositories are Local Read-only
Before starting a Sync Stop All, make sure that none of your nodes have repositories in a Local Read-only state.
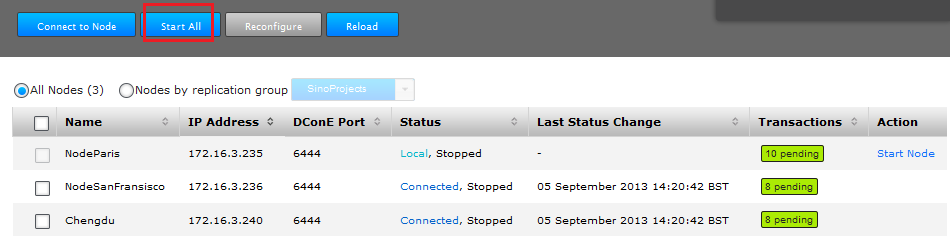
Here's how:
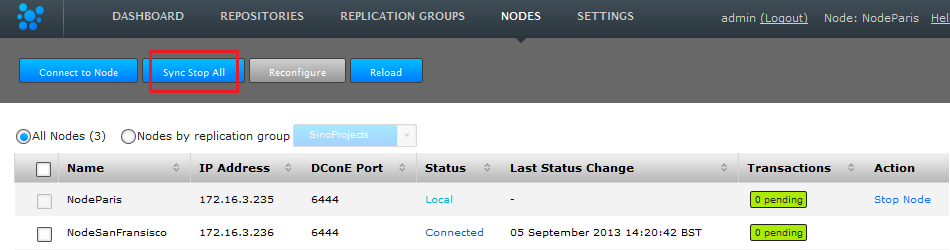
Stop all nodes.

Stopped!
Node removed.
Stopped!
Use the procedure to add a new Replication Group. You need to add a new replication group when you need to replicate between a new combination of sites - i.e. sites that are not currently replicating in an existing group. If you are, instead, looking to replicate a new repository between existing sites, it's possible to add new a new reposity to those sites. In this case see Add a new repository.

Creating a replication group.
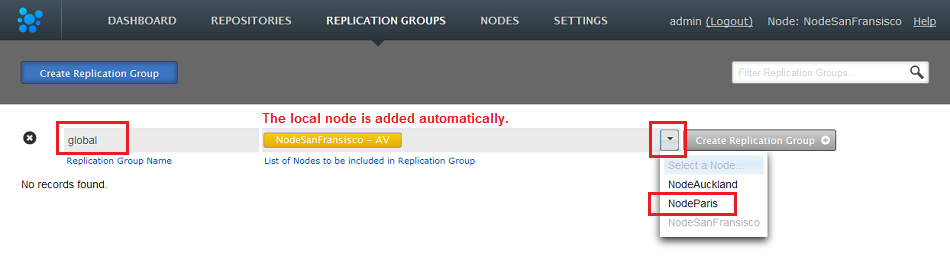
replication group details.
Replication Ground Rules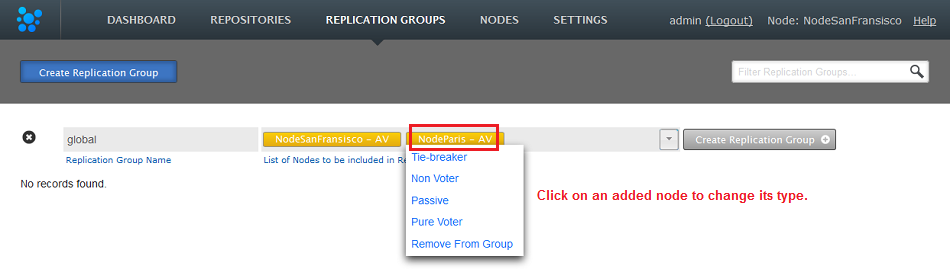
Click on node labels to change their type.
Advice on creating effective replication groups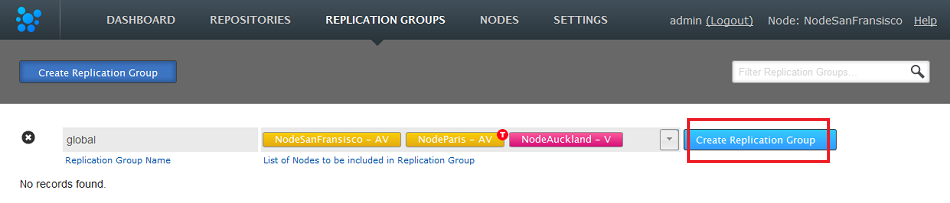
Create Replication Group.
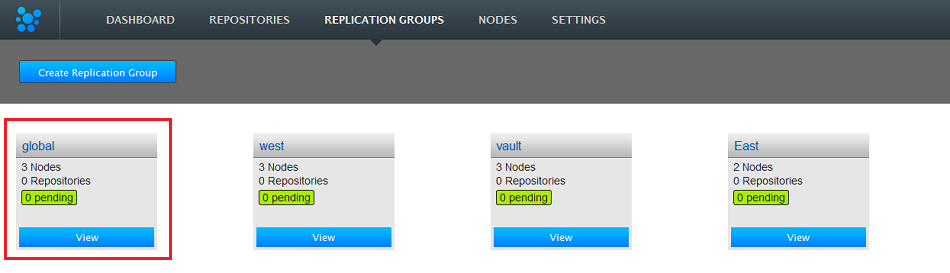
The new replication group now appears - if you are logged into one of its constituent sites.
It's possible to remove replication groups from SVN MultiSite Plus, although only if they they have been emptied of repositories. Run through the following procedure as an example.
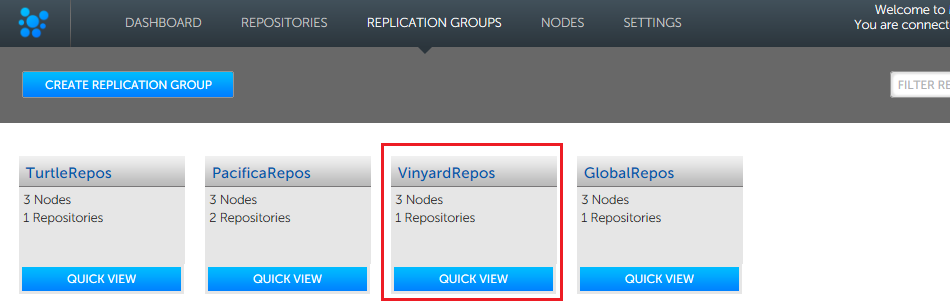
View
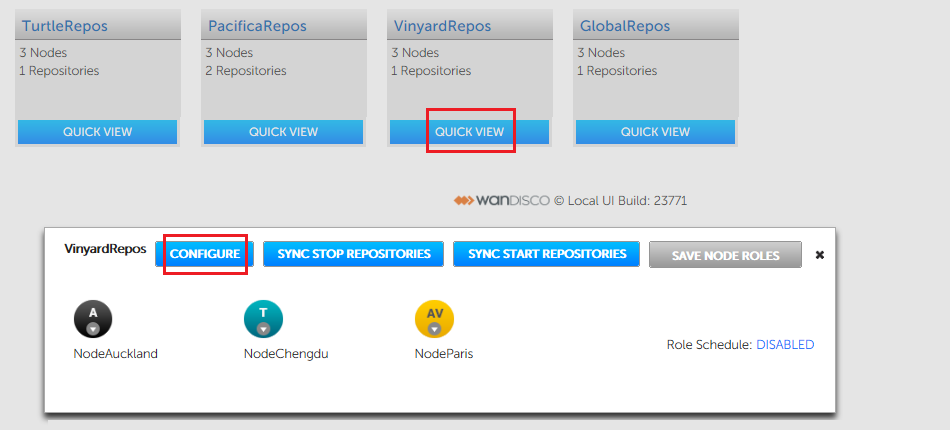
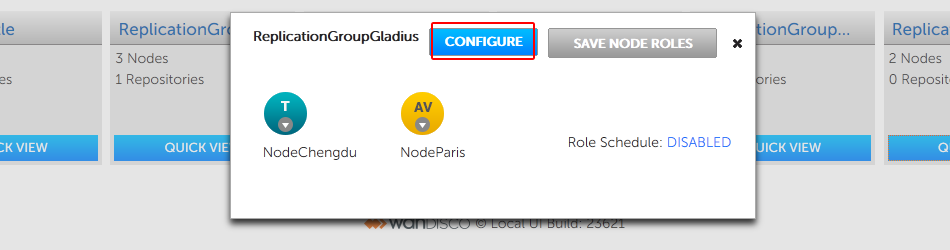
Configure
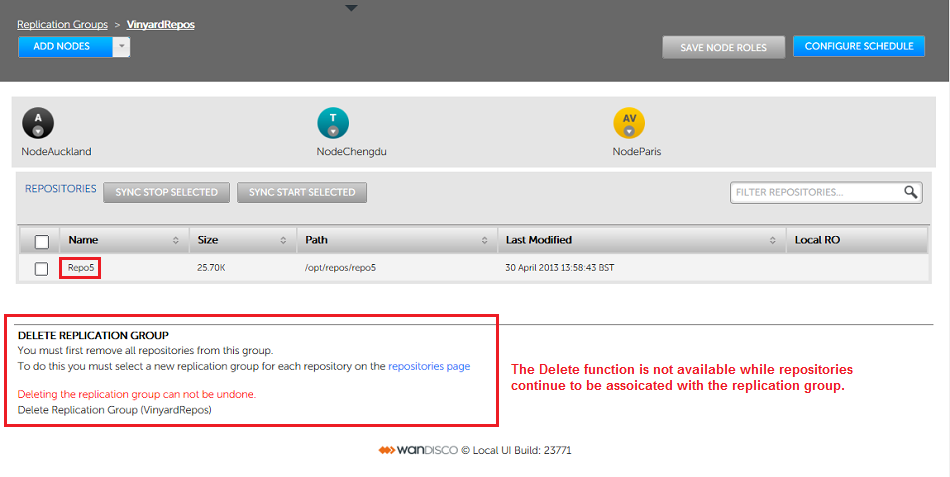
Repositories
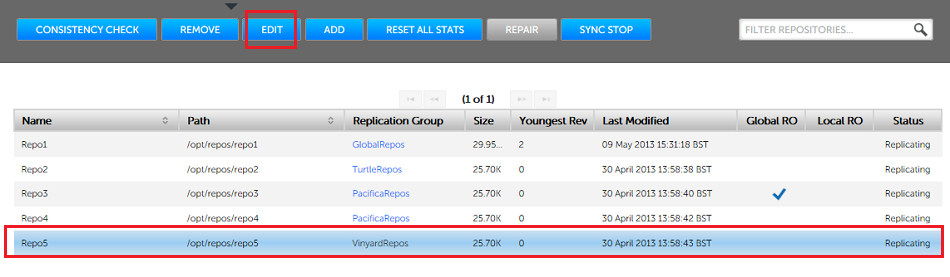
Select and Edit
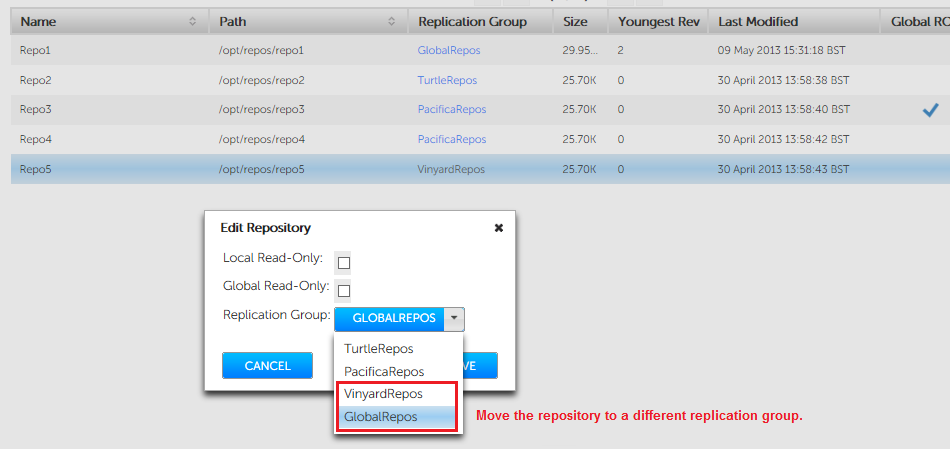
Edit

Move it
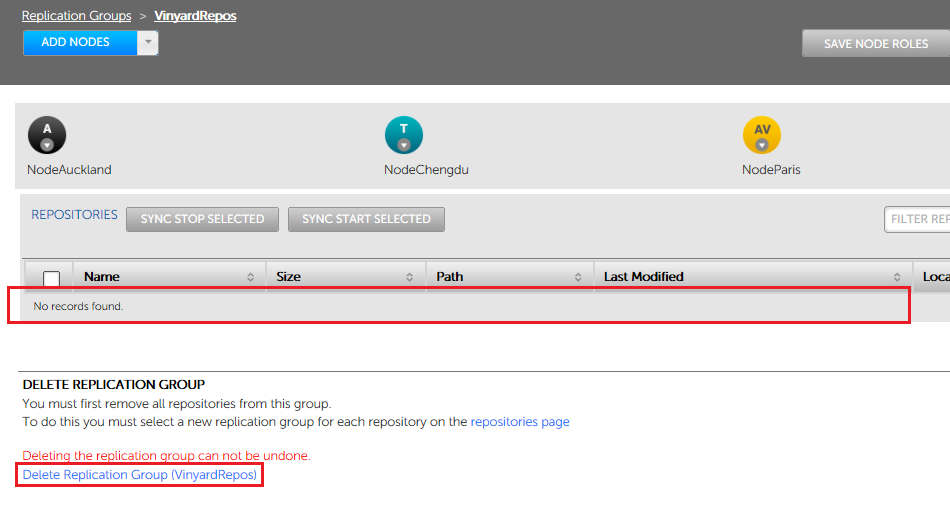
Click the Delete link button
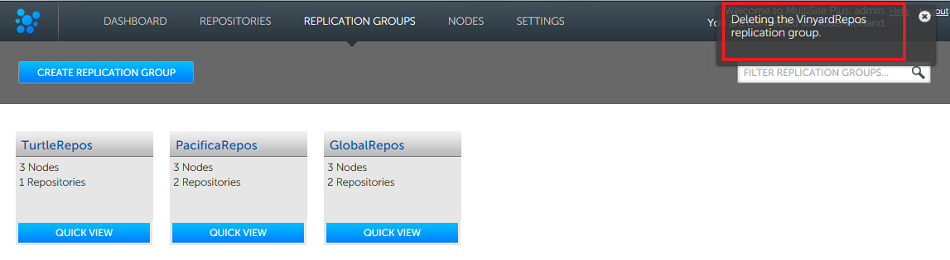
Deleting the replication group
Don't add a site during a period of high replication load
When adding sites to a replication group that already contains three or more sites, ensure that there isn't currently a large number of commits being replicated.
Adding a site during a period of high traffic (heavy level of commits) going to the repositories may cause the "adding node" process to stall.
It's possible to add additional sites to an existing replication group, so that there's minimal disruption to users. Here's the procedure:
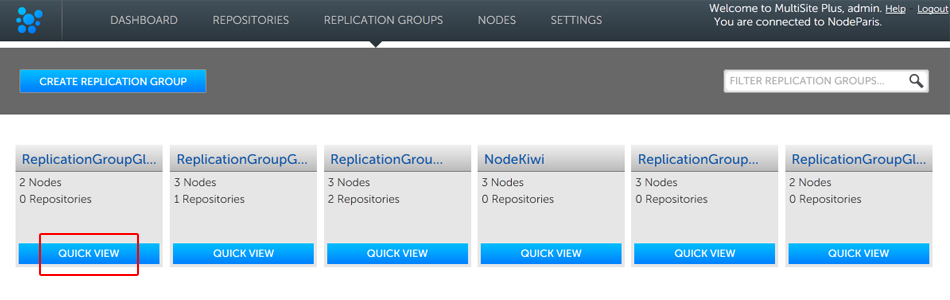
Replication Groups
Edit the replication group
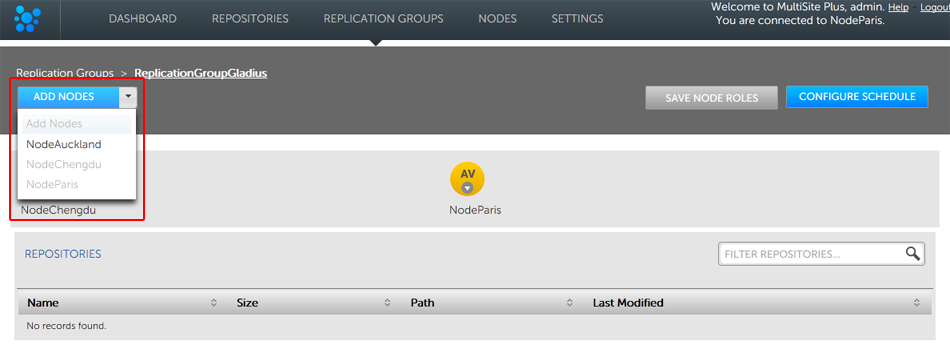
Add a site
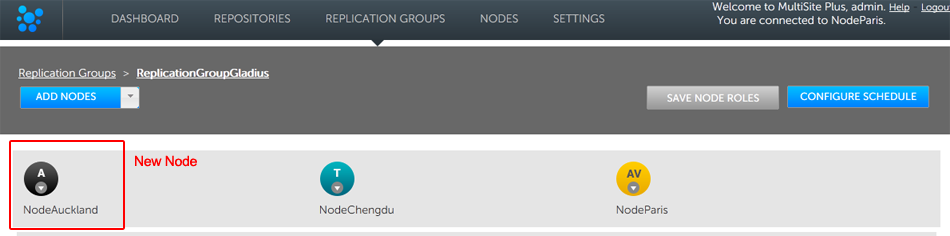
Adding Nodes

You are about to add "NodeAuckland" to the "ReplicationGroupGladius" replication group.
Please read through the following steps before you continue:

1. Click ADD NODES and choose an existing Node as a helper.
2. Copy the repositories replicated in the group from the helper to the new node. During this period these repositories will be read-only on the helper node.
3. Once a repository is in place, selecting it and clicking COMPLETE SELECTED will take it out of read-only on the helper and the new member nodes.

WARNING: Do not close your browser or log out during this process. If you do you'll need to complete the sync process for each individual repository via the REPAIR option on the repositories screen.
Click ADD NODES to confirm your selection and proceed with adding them.
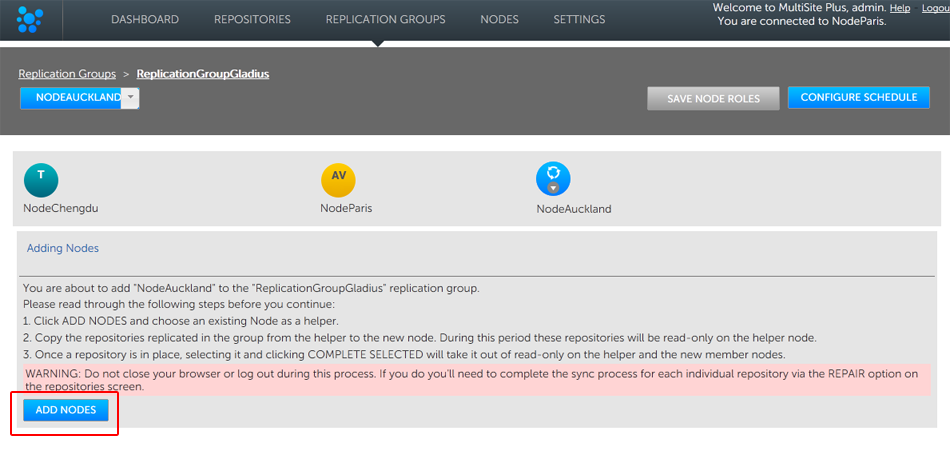
Adding Nodes process
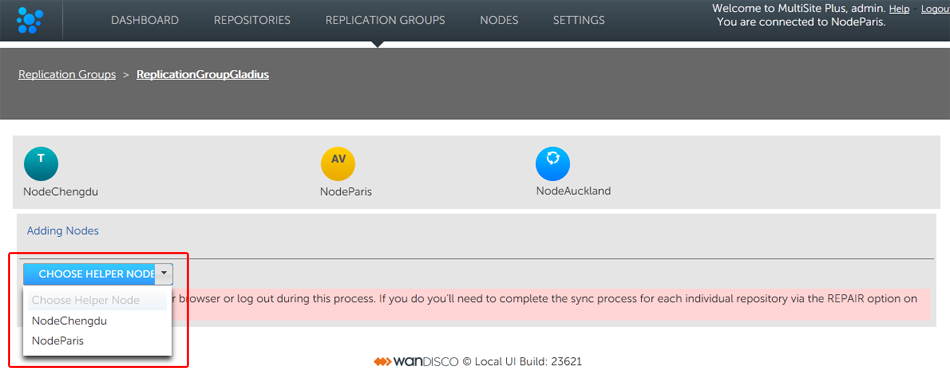
Helper chosen
READ-ONLY ALERT
Starting the Sync may cause a brief disruption to users on the helper node. You may wish to alert them or complete the work at a time where the disruption will be minimal.
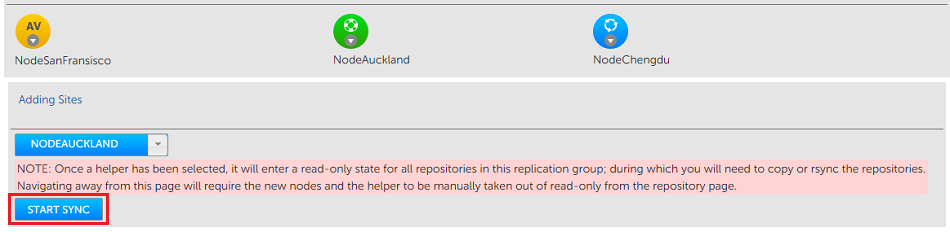
Start Sync
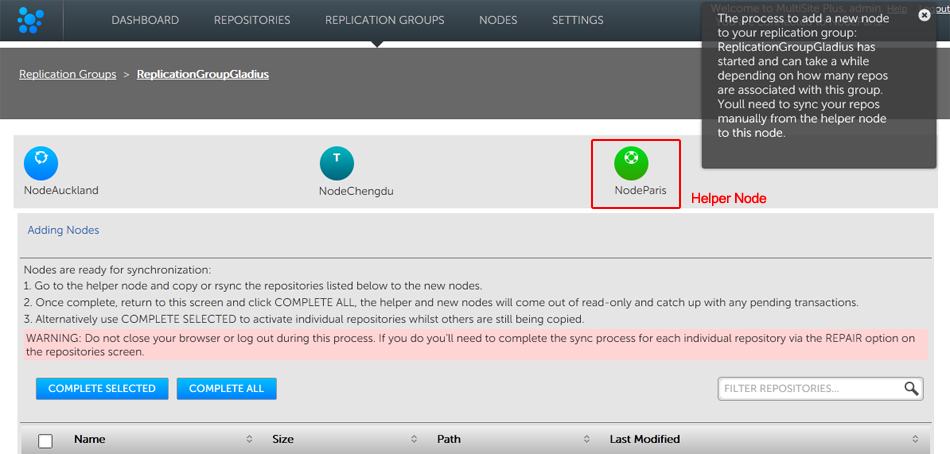
Complete Sync
Always copy, never create
Manually copy or rsync repositories, even if they're empty. If you instead use svnadmin create the resulting repository will have a universally unique identifier (UUID) that will not match with the other replicas, potentially causing problems.
Done!
It's possible to remove a node from a replication group. This functionality is required if the developers at one of your sites are no longer going to contribute to the repositories handled by a replication group. Removing a node from a replication group will halt further updates to its repository replicas.
 Remove stray repositories
In the event that you remove a node from a replication group, you should delete its copy of the repositories managed by the replication group. Having an out-of-date stray copy could result in confusion/users working from old data.
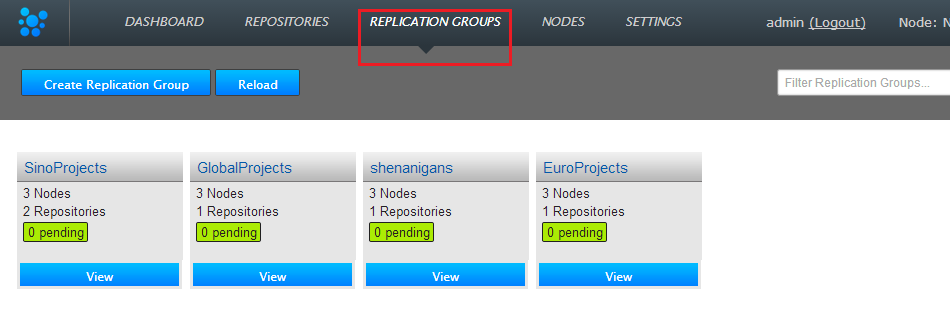
Login and go to REPLICATION GROUPS

View.
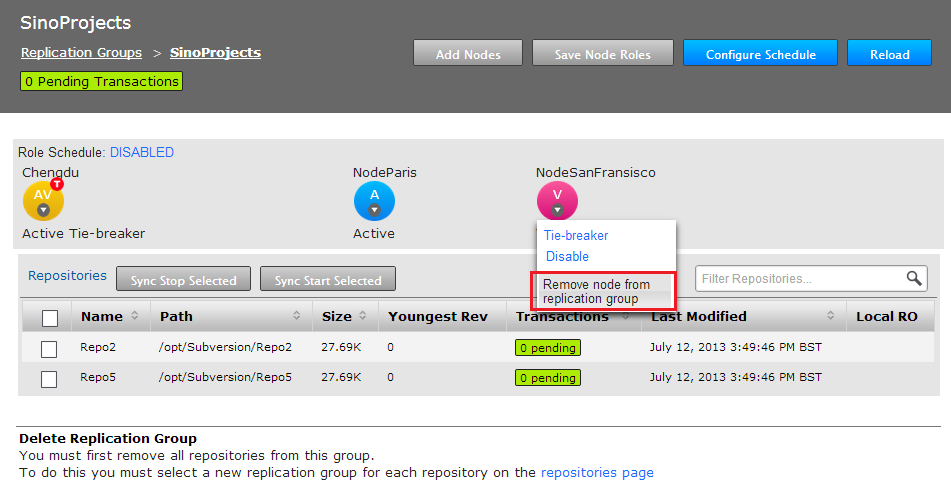
Remove!
Remove stray repositories
You will not be allowed to remove a node that is currently assigned as the "Managing Node". In order to remove the managing node, go to the Configure Schedule page and assign a different node as a Managing Node.
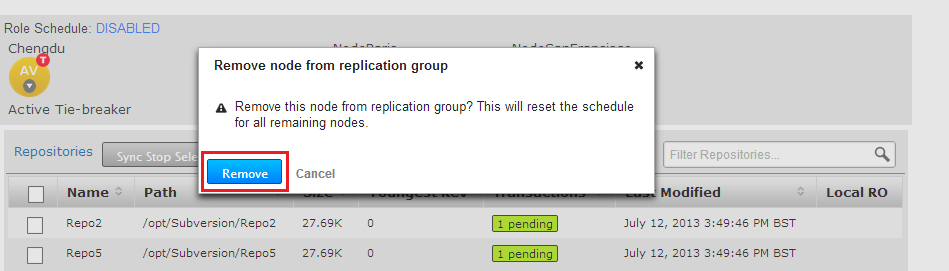
Remove. Really!

Reload to confirm the updated state.

Less one member node
You can schedule the member sites of a replication group to change type according to when and where it is most beneficial to have active voters. To understand why you may want to change your sites, read about Node Types
Schedule node type changes via the public APIUse the following API call
http://<ip>:8082/public-api/replicationgroup/{repgroupID}/schedule
e.g.
http://10.0.100.135:8082/public-api/replicationgroup/97913c04-bbad-11e2-877a-028e03094f8d/schedulePUT with
ReplicationGroupAPIDTO XML as body:
To make Node N3 a tie-breaker 'T' FROM 10:00 - 16:00 (GMT) every day of the week with Node N1 as tie-breaker 'T' afterwards: (N.B Times are in GMT -4 hours so 14 = 10:00 GMT)
Make a text file containing ReplicationgroupAPIDTO XML (as above) called schedule.xml
curl -u username:password -X PUT -d @schedule.xml http://[IP]:[PORT]/public-api/replicationgroup/97913c04-bbad-11e2-877a-028e03094f8d/schedule
<ReplicationGroupAPIDTO>
       <replicationGroupName>gsg</replicationGroupName>
     <replicationGroupIdentity>97913c04-bbad-11e2-877a-028e03094f8d</replicationGroupIdentity>
       <scheduledNodes>
           <dayOfWeek>1</dayOfWeek>
           <hourOfDay>14</hourOfDay>
           <schedulednode>
               <nodeIdentity>N1</nodeIdentity>
               <locationIdentity>c0e486a0-bbab-11e2-863b-028e03094f8e</locationIdentity>
               <isLocal>true</isLocal>
               <isUp>true</isUp>
               <lastStatusChange>0</lastStatusChange>
               <role>AV</role>
           </schedulednode>
           <schedulednode>
               <nodeIdentity>N3</nodeIdentity>
               <locationIdentity>5480f515-bbad-11e2-8301-028e03094f8c</locationIdentity>
               <isLocal>false</isLocal>
               <isUp>true</isUp>
               <lastStatusChange>0</lastStatusChange>
               <role>T</role>
           </schedulednode>
           <schedulednode>
               <nodeIdentity>N2</nodeIdentity>
               <locationIdentity>478c766f-bbad-11e2-877a-028e03094f8d</locationIdentity>
               <isLocal>false</isLocal>
               <isUp>true</isUp>
               <lastStatusChange>0</lastStatusChange>
               <role>AV</role>
           </schedulednode>
Download the full sample Schedule.xml file.
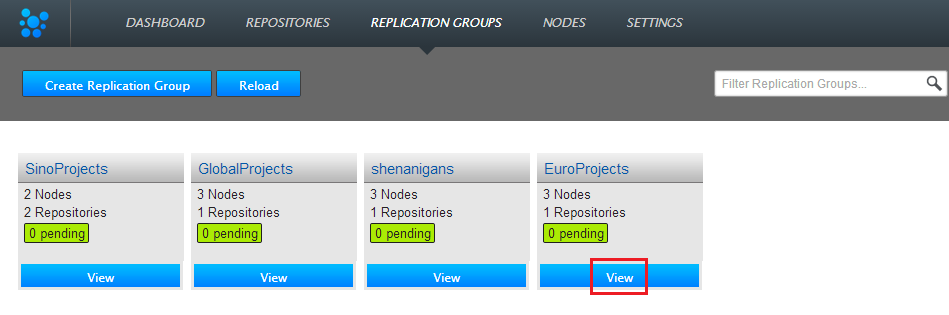
Scheduling is done through replication group settings.
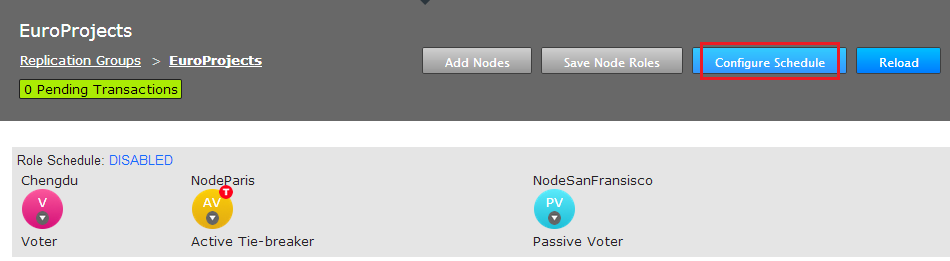
Configure.
Role Schedule: Disabled (for now).
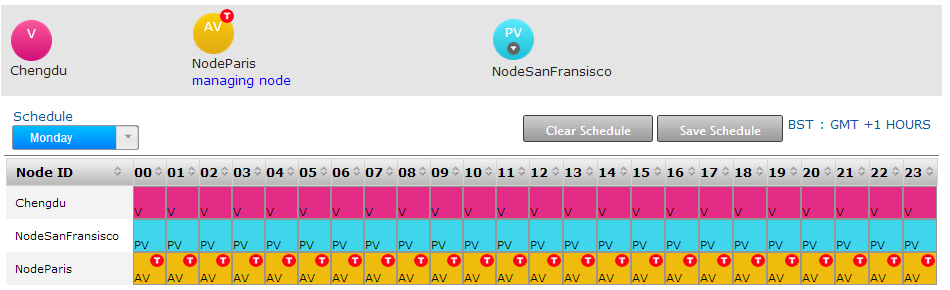
In the image below NodeSanFransisco is coded as blue which indicates that it is set as a Passive Voter. The hourly blocks associated with NodeChengdu are Magenta, indicating that it is set as a pure voter. The blocks for NodeParis are colored yellow, indicating that this node is set as an Active Voter.

Vanilla Scheduling - no changes to type over time.

New Schedule Form.
In this example NodeSanFransisco is changed to a Tie-breaking Passive Voter, then NodeAuckland is changed into a Tie-breaker.
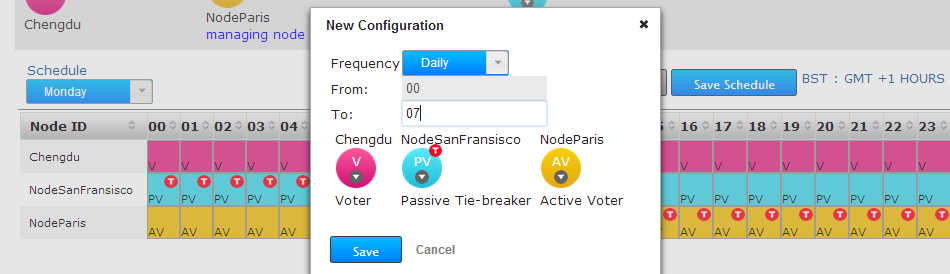
Swapping roles.
When all node changes have been made, click on the SAVE button to continue, or the CANCEL button if you change your mind.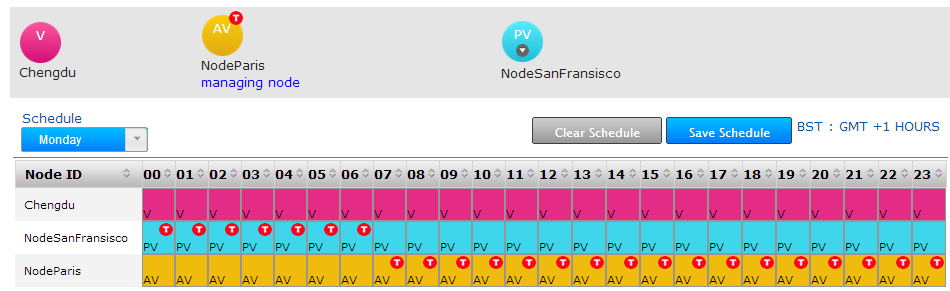
Swapping roles.
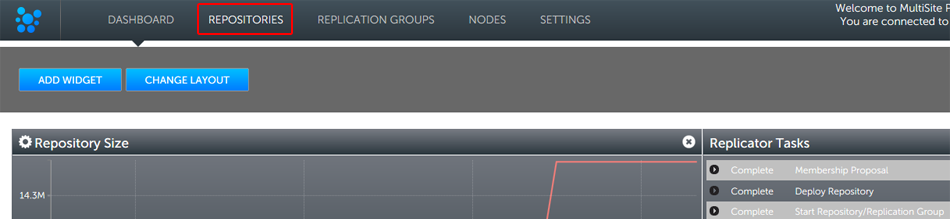
You can add additional repositories for replication through the admin UI. The repository first needs be present on all the nodes that will be part of the corresponding replication group. So the repository copies need to be introduced to the replication system in an identical state.

Login.

Enter repository details.

Replicating.
Repository stuck in Pending state
If a repository that you added gets stuck in the deploying state - you'll see this on the Dashboard, in the Replicator Tasks window - you can cancel the deployment and try adding the repository again. To cancel a deployment, go to the Replicator Tasks window and click on the Cancel Task link.
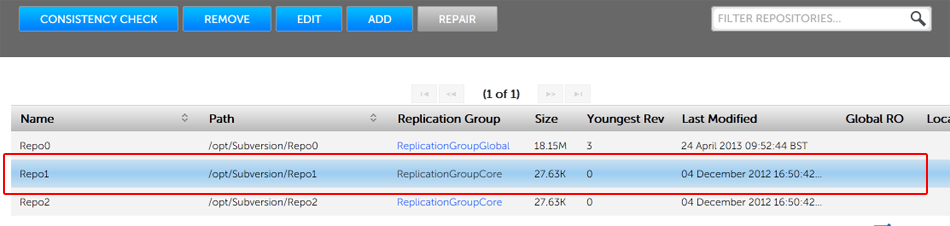
It's possible to remove repositories from SVN MultiSite Plus. Follow this quick procedure.
Login.
Repositories.
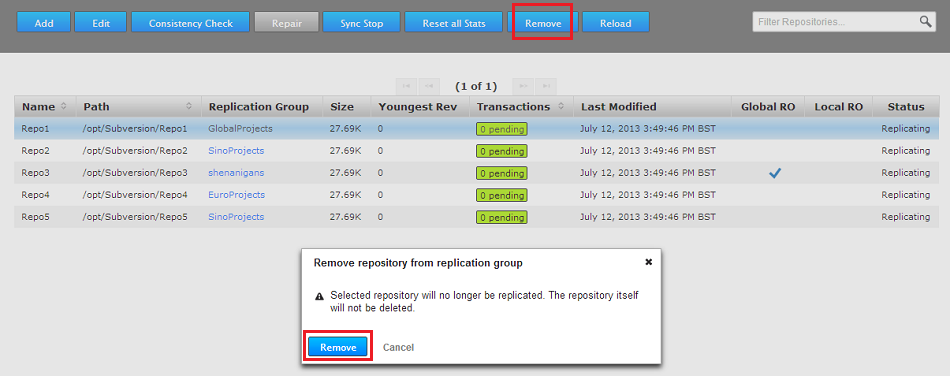
Remove.
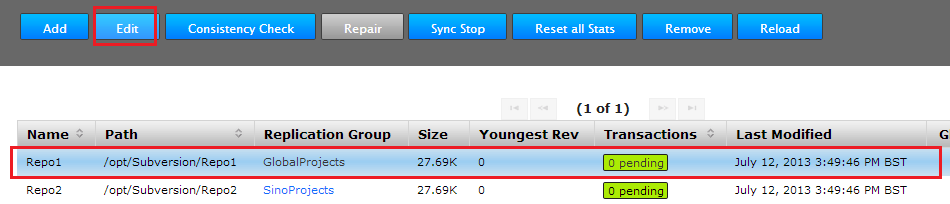
It's possible to Edit a repository properites after they have been set up in SVN MultiSite Plus. Follow this quick procedure.
Login.
Repositories.
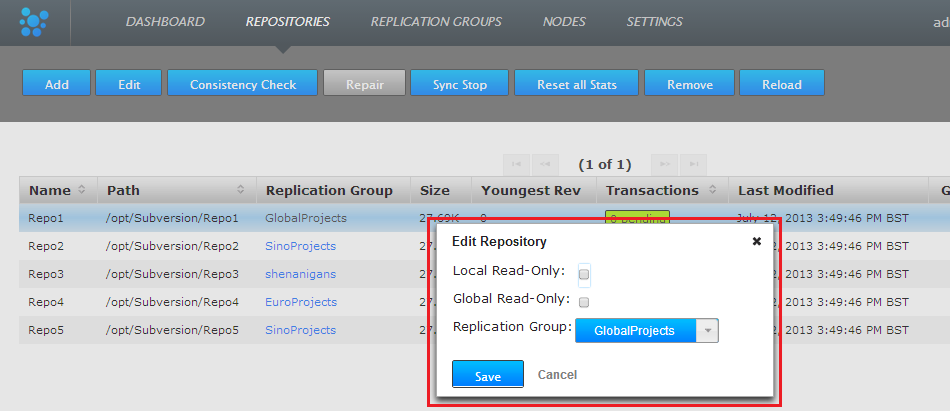
Edit Repository.
Important: Known problem concerning the moving of repositories between replication groups.
There's a problem that occurs if you move a repository to a replication group that contains one or more sites from an earlier replication group, in which the repository was previously replicated.
Currently, logic persists from the earlier replication group that will cause commits to the newly added repository to fail, and for commits to the repository replicas on other member sites to not be replicated.
We are addressing the problem as a matter of urgency, until a fix is in place do not move repositories into replication groups that contains sites that have previously handled replication of the repository.
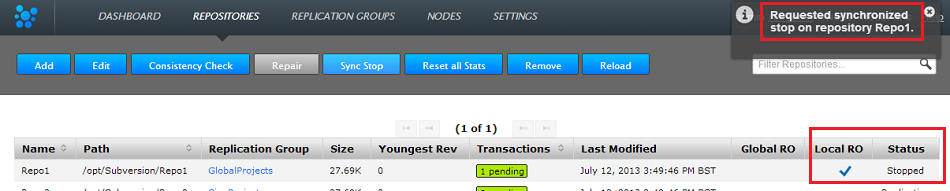
The Repository Synchronized Stop is used to stop replication between repository replicas, it can be performed on a per-repository basis or on a replication group basis (where replication will be stopped for all associated repositories).
To bring some or all nodes to a stop, use the Sync Stop All command found on the Nodes tab.
Repository Stops are synchronized between nodes using a 'stop' proposal to which all nodes need to agree. So that while not all nodes will come to a stop at the same time they do all stop at the same point.

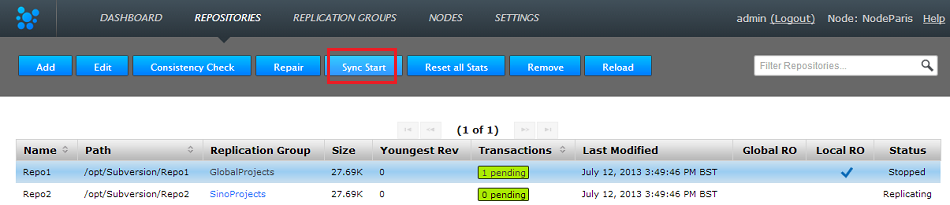
Restarting replication after performing a Synchronized Stop requires that the stopped replication be started in a synchronized manner.
SVN MultiSite Plus has two sets of logs, one set is used for application, the other logs replication activity:
These logs are used for troubleshooting problems with MultiSite's running:
drwxrwxr-x 2 wandisco wandisco 4096 Dec  5 14:20 logs

	-rw-rw-r-- 1 wandisco wandisco 32647705 Dec  6 09:50 replicator.log.20121205-142035
	-rw-rw-r-- 1 wandisco wandisco   775889 Dec  6 15:00 replicator.log.20121206-101206
	-rw-rw-r-- 1 wandisco wandisco     1666 Dec  5 13:21 setup.20121205-132141
	-rw-rw-r-- 1 wandisco wandisco     1674 Dec  5 13:53 setup.20121205-135328
	-rw-rw-r-- 1 wandisco wandisco      157 Dec  5 14:20 setup.20121205-142034
	-rw-rw-r-- 1 wandisco wandisco     1979 Dec  5 14:20 startup.20121205-142035
	-rw-rw-r-- 1 wandisco wandisco     1980 Dec  6 10:12 startup.20121206-101206
	-rw-rw-r-- 1 wandisco wandisco       94 Dec  6 09:57 stop.20121206-095714
	-rw-rw-r-- 1 wandisco wandisco     5136 Dec  6 10:26 ui.launch.log
	-rw-rw-r--. 1 wandisco wandisco  371282 Jan 23 10:00 fsfswd.0
	-rw-rw-r--. 1 wandisco wandisco       0 Jan 18 10:40 fsfswd.0.lck
	-rw-rw-r--. 1 wandisco wandisco 1054726 Jan 23 06:29 fsfswd.1
	-rw-rw-r--. 1 wandisco wandisco 1055024 Jan 17 11:38 fsfswd.10
	-rw-rw-r--. 1 wandisco wandisco 1049842 Jan 17 11:38 fsfswd.11
	-rw-rw-r--. 1 wandisco wandisco 1050660 Jan 17 11:38 fsfswd.12
	-rw-rw-r--. 1 wandisco wandisco 1049618 Jan 17 11:37 fsfswd.13
	-rw-rw-r--. 1 wandisco wandisco 1049228 Jan 17 11:37 fsfswd.14
The fsfswd.xx logs record all actions taken by the replicator and a good starting point in the investigation of replication problems.
drwxrwxr-x. 2 wandisco wandisco    4096 Jan 17 11:43 stats

	-rw-rw-r--. 1 wandisco wandisco  22 Jan 17 11:43 111f4016-a23a-49d6-9769-ced78a250539
	-rw-rw-r--. 1 wandisco wandisco  22 Jan 17 11:43 420aa491-1bbb-4a6c-9cff-e8b60e911dd9
The Stats files are where the repository statistics used by Dashboard widgets are stored. These files are not intended to be readible by users.
drwxrwxr-x. 2 wandisco wandisco   12288 Jan 23 09:40 thread-dump

        -rw-rw-r--. 1 wandisco wandisco 55395 Jan 17 06:34 thread-dump-2013-01-17.06-34-00
        -rw-rw-r--. 1 wandisco wandisco 79150 Jan 17 07:34 thread-dump-2013-01-17.07-34-01
        -rw-rw-r--. 1 wandisco wandisco 79162 Jan 17 08:34 thread-dump-2013-01-17.08-34-01
The thread-dump directory contains thread dumps that the replicator periodically writes to help with troubleshooting.
You can change the current logging level by editing the logger properties file
install-dir>/svn-multisite-plus/replicator/properties/logger.properties.
You can see a sample logger.properties file.
The consistency Check gives you a quick and easy check whether a selected repository remains in the same state across the nodes of a replication group. Follow these steps to check on consistency:
Limits of the Consistency Checker
The Consistency Check will tell you the last common revision shared between repository replicas. Given the dynamic nature of a replication group it's possible that there will be in-flight proposals in the system that have not yet been agreed upon at all nodes. For this reason it isn't possible for a consistency check to be completely authorative.

Go to the repository
Consistency Check is done on a per node basis
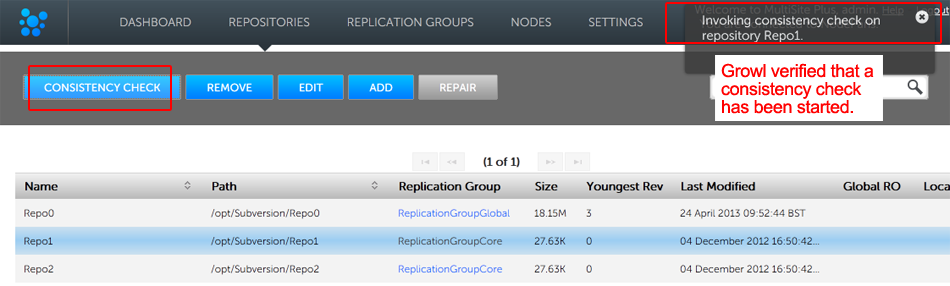
Consistency check in action
Known Issue: Don't run a consistency check if the repository has been removed from one of the nodes.
There's currently a problem with running a consistency check on a repository if the replica on one or more or more nodes has been deleted. In this situation a "Highest Common Revision" task will appear on the dashboard and will remain permanently in a 'pending' state. Until we resolve this problem you shouldn't run the consistency checker on a repository if it has been removed from the file system of any of your nodes.
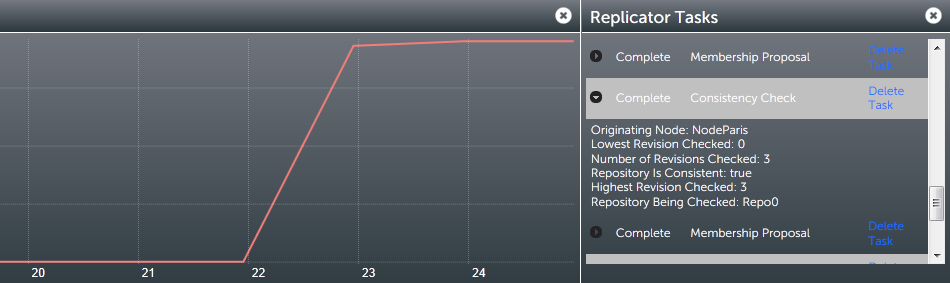
Repository replicas need to be identical - are they?
It's also possible to check the results of a consistency check by viewing the replicator's log file (fsfswd.##). See Logs
This section provides advice on getting your repository data distributed prior to starting replication.
These are things are a recap of the installation checklist, you must have them in place in order for replication to run effectively:
It's simple enough to make a copy of a small repository and transfer it to each of your sites. However, remember that any changes made to the original repository will invalidate your copies unless you perform a syncronzation prior to starting replication.
If a repository needs to remain available to users during the proccess, you should briefly halt access, in order to make a copy. The copy can then be transferred to each site. Then, when you are ready to begin replication, you need use rsync to update each of your replicas. Fore more information about rsync, see Synchronizing repositories using rysnc.
If you are creating brand new repositories, don't create them at each site, instead create the repository once, then rsync it to the other sites. You need to do this to ensure that each replica has the same UUID.
If you do create repositories at each site instead of using rysnc, you can use Subversion's UUID command to get them all matching:
You can confirm the UUID of a repository using the svnlook uuid command:
[root@ip-10-0-100-6 Subversion]# svnlook uuid Repo0
67d41b33-3c7c-4ba0-8af1-119dbb0d42ba
You can use the Set UUID command to ensure that a new repository that you've created has a UUID that matches with the other replicas:
$ svnadmin setuuid /opt/Subversion/Repo0 67d41b33-3c7c-4ba0-8af1-119dbb0d42ba
There are a number of situations where a repository may be corrupted or lose sync with its other copies -- this could be the result of file/permission changes on the server. In such an event the node on which this copy is situated will stop replicating data for that repository (other repositories will be unaffected and should continue to replicate.) SVN MultiSite Plus has a repair tool that can be used to quickly get the repository repaired and replicating again.
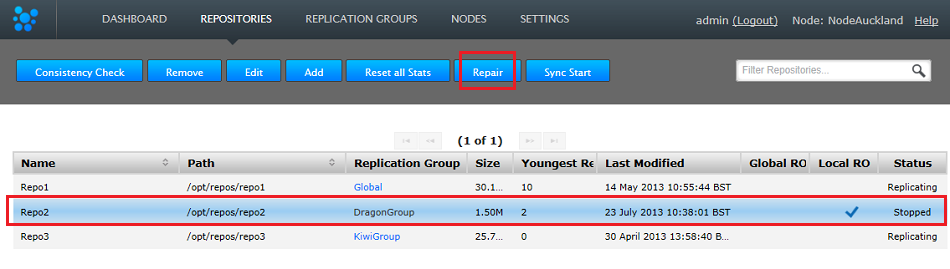
Out of sync
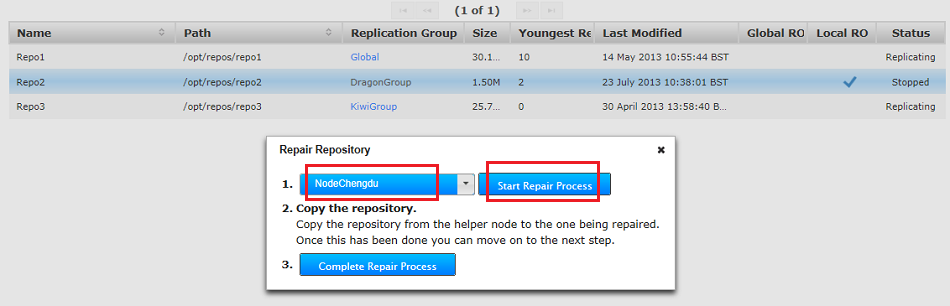
Start the repair!
[root@localhost repos]#  rsync -rvlHtogpc /opt/repos/repo2/ root@172.16.2.41:/opt/repos/repo2

The authenticity of host '172.16.2.41 (172.16.2.41)' can't be established.
RSA key fingerprint is 9a:07:b2:bb:b6:85:fa:93:41:f0:01:d0:de:8f:e1:5d.
Are you sure you want to continue connecting (yes/no)? yes
Warning: Permanently added '172.16.2.41' (RSA) to the list of known hosts.
root@172.16.2.41's password:
sending incremental file list
./
README.txt
format
conf/
conf/authz
conf/passwd
conf/svnserve.conf
db/
db/current
db/format
db/fs-type
db/fsfs.conf
db/min-unpacked-rev
db/rep-cache.db
db/txn-current
db/txn-current-lock
db/uuid
db/write-lock
db/revprops/
db/revprops/0/
db/revprops/0/0
db/revprops/0/1
db/revprops/0/2
db/revprops/0/3
db/revs/
db/revs/0/
db/revs/0/0
db/revs/0/1
db/revs/0/2
db/revs/0/3
db/transactions/
db/txn-protorevs/
hooks/
hooks/post-commit.tmpl
hooks/post-lock.tmpl
hooks/post-revprop-change.tmpl
hooks/post-unlock.tmpl
hooks/pre-commit.tmpl
hooks/pre-lock.tmpl
hooks/pre-revprop-change.tmpl
hooks/pre-unlock.tmpl
hooks/start-commit.tmpl
locks/
locks/db-logs.lock
locks/db.lock

sent 1589074 bytes  received 701 bytes  167344.74 bytes/sec
total size is 1585973  speedup is 1.00
[root@localhost repos]#
<repository_name>/db/rep-cache.dbThis step is not essential and could result in the repository becoming slightly larger, however it removes the risk that the repaired repository will not match with the cache file.
Back in sync
If for any reason repositories are corrupted or unable to automatically catch up it's usually possible to use rsync to get them back into sync.
Before you resync
To rsync you'll need to copy data from a repository replica that is up-to-date, before you do so it's good practice to perform an SVN verify on the repository to be absolutely sure of it's integrity.
svnadmin verify <Repository-path>
From the site with the up-to-date repository, type the following commands:
rsync -rvlHtogpc /path/to/local/repo remoteHost:/path/to/remote/repo
For example:
rsync -rvlHtogpc /Subversion/Repo root@172.7.2.33:/Subversion
Then follow up with an additional rsync that will ensure that contents of the locks directory are identical (by deleting locks that are not present on the originating server)
rsync -rvlHtogpc --delete /path/to/repo/db/locks <Repository Name> remoteHost:/path/to/repo/db
For example:
rsync -rvlHtogpc --delete /Subversion/Repo/db/locks root@172.7.2.33:/Subversion/Repo/db
Knowledgebase
You can read a more detailed step-by-step guide to using rsync in the Knowledge Base article Reset and rsync Subversion repositories.
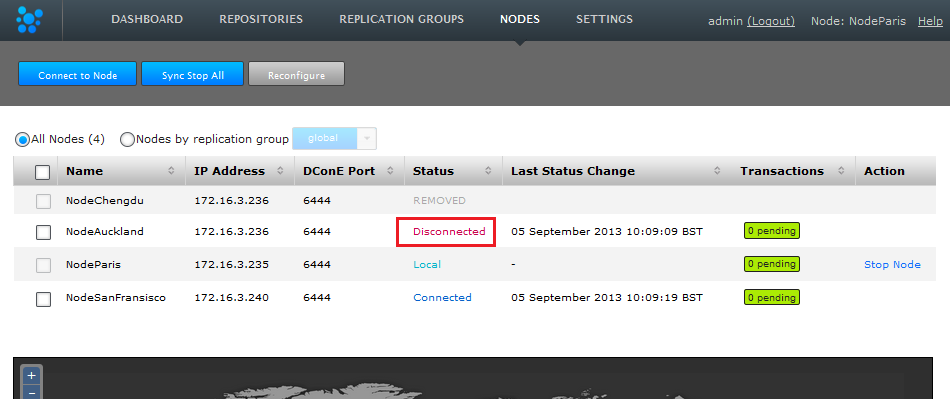
It's possible for SVN MultiSite Plus to recover from the brief outage of a member site, which should be able to resync once it is reconnected. The crucial requirement for MultiSite's continued operation is that agreement over transaction ordering must be able to continue. Votes must be cast and those votes must always result in an agreement - no situation must arise where the votes are evenly split between voters.
If after the loss of a site, a replication group can no longer form agreements then replication is halted. If the lost site was a voter, and there aren't enough remaining voters to form an agreement, then either the lost site must be repaired/reconnected, or the replication group must undergo emergency reconfiguration.
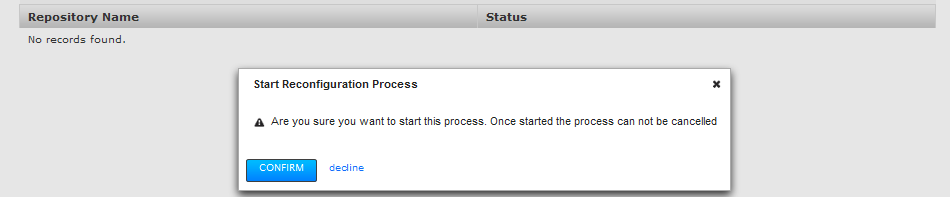
The emergency reconfiguration process can't be undone, and it represents a big shakeup of your replication system. Only complete an emergency reconfiguration if the lost site can not be repaired or reconnected in an acceptable amount of time.
 Gone but not forgotten
After a lost node has been removed and a replication group reconfigured, the lost node should not be allowed to come back online. Whilst the DConE replication engine will not be phased by a rogue node,however, its presense could result in confusion as local developers mistakenly commit changes to a repository copy that will no longer receive updates from the other replicas. You should ensure that you perform a cleanup after completing an emergency reconfiguration.
Last Node Standing
Any replication group which has its membership reduced to one node will continue to exist after the emergency reconfiguration as a non-replicating group. Once you have set up a replacement node you should be able to add it back to the group to restart replication.
So, having confirmed that an emergency reconfiguration is required, follow this procedure:
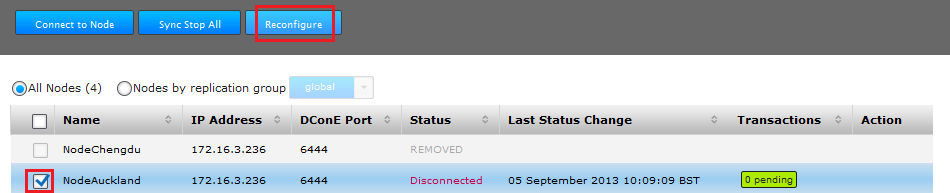


How Reconfiguration Works
The emergency reconfiguration process seeks to recreate functional replication groups using the remaining member sites. In siutations where a replication group only contained two sites, including the lost site, then a reconfiguration is not possible, in this scenario a new replication group will need to be created once a replacement site has been inducted.

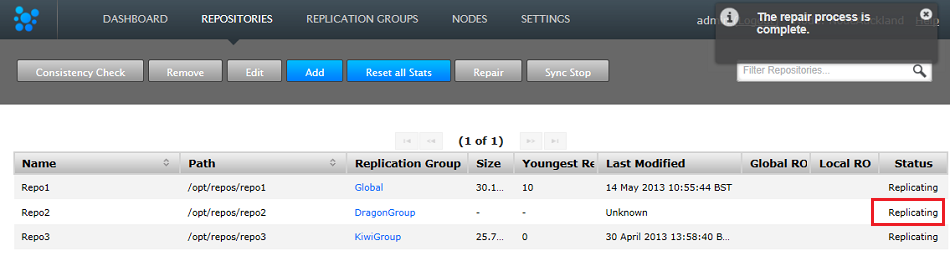
It's possible that a problem with a single transaction can result in a repository being put into a read-only mode. Causing the replication of this repository at just one node. If possible, use the following procedure to get replication started again:
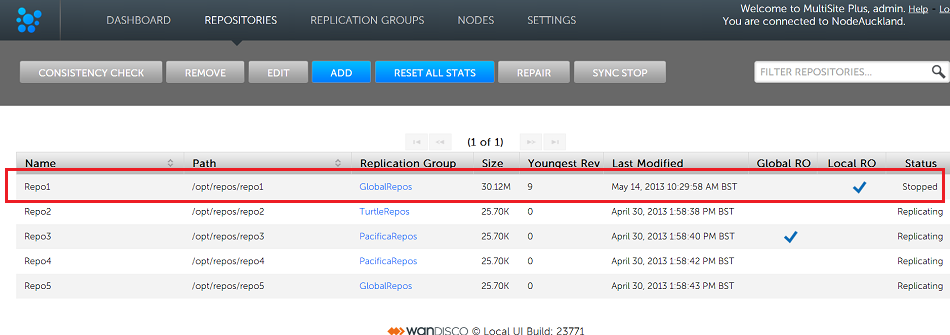
Repository Repo01 is flagged as local read-only
Providing there are still enough nodes to reach agreement, repository changes at the other nodes can continue to be made.Talkback is a bash script that is provided in your SVN MultiSite Plus installation for use in the event that you need to talk to the WANdisco support team.
Run Talkback using the following procedure:
/opt/wandisco/svn-multisite-plus/bin/talkback
[root@localhost bin]# ./talkback
      ===================== INFO ========================
      The talkback agent will capture relevant configuration
      and log files to help WANdisco diagnose the problem
      you may be encountering.

Is the replicator currently running [Y/n]: y
Please enter replicator admin username: adminUIusername
Please enter replicator admin password: thepasswordhere

retrieving details for repository "Repo1"
retrieving details for repository "Repo3"
retrieving details for repository "Repo4"
retrieving details for repository "repo2"
retrieving details for node "NodeSanFransisco"
retrieving details for node "NodeAuckland"
retrieving details for node "NodeParis"

Please enter your WANdisco support FTP username (leave empty to skip auto-upload process):
Skipping auto-FTP upload

TALKBACK COMPLETE

---------------------------------------------------------------
 Please upload the file:

     /opt/wandisco/svn-multisite-plus/talkback-201307171524-localhost.localdomain.tar.gz

 to WANdisco support with a description of the issue.

 Note: do not email the talkback files, only upload them
 via ftp or attach them via the web ticket user interface.
--------------------------------------------------------------
Note that you'll need to talk to Support about setting up access to WANdisco's Support FTP space.
Don't send talkback files via email
If you're not using our secure FTP you can upload your talkback output files to our support website. Just attach them to your case. Read our Knowledgebase article about How to raise a support case.
replicator
        config
            application
            license
            logger.properties
            ms-resource-monitoring-elements.xml
            ms-resource-monitoring-elements.xml.old
            replicator-api-authorization.properties
            svnok.catalog
            ui.properties
        nodes
            NodeAuckland
                connection-test
                location.xml
                node.xml
            NodeParis
                connection-test
                location.xml
                node.xml
            NodeSanFransisco
                connection-test
                location.xml
                node.xml
        recent-logs
            fsfswd.0.log
            replicator.log.20130716-105414.211
            svn-multisite
            thread-dump-2013-07-16
            ui.log.20130716-105414

        repositories
            Repo1
                info
                membership.xml
                replicationGroup.xml
                repository.xml
                statemachine.xml
                stats.xml
        application
        license.xml
        locations.xml
        md5s
        memberships.xml
        nodes.xml
        replicationGroups.xml
        replicator-file-list
        repositories.xml
        statemachine.xml
        tasks.xml

system
    logs
    file-max
    file-nr
    limits.conf
    netstat
    processes
    services
    sysctl.conf
    sys-status
    top
Copyright © 2010-2013 WANdisco plc.
All Rights Reserved
This product is protected by copyright and distributed under
licenses restricting copying, distribution and decompilation.
SVN MultiSite Plus
Last doc build: 15:39 - Wednesday 11th September 2013