1. Introduction
Welcome to the User Guide for WANdisco’s Git MultiSite 1.9.
To view User Guides for previous versions of Git MultiSite visit the Archive.
Git MultiSite, referred to as GitMS, is the core of WANdisco’s enterprise Git product line.
GitMS applies WANdisco’s unique, patented replication technology to enable LAN-speed collaboration between globally distributed teams using Git, allowing them to work together as if they were all in one office, even when separated by thousands of miles. GitMS eliminates the pitfalls of a central master repository server model, allowing enterprises to realize the benefits of distributed version control without the administrative overhead. The result is shorter development cycles, higher quality, and lower costs.
With GitMS, all replicas of the master repository servers are peers, providing global disaster recovery and business continuity, eliminating downtime for unplanned outages due to network or server failure as well as scheduled maintenance. Downtime, data loss, and slow performance are no longer problems. Merge conflicts and other issues are identified and resolved as soon as they occur, instead of days later. Features include:
-
Git replication, mirroring, and clustering for enterprise performance and 24-7 availability.
-
A central Git server is no longer a single point of failure or performance bottleneck, and the effects of WAN latency are greatly reduced.
By combining WANdisco’s patented replication technology and intelligent load balancing software, Git can be deployed in an active-active WAN cluster that delivers optimum performance, scalability, and availability, with built-in continuous hot backup. GitMS may be integrated with open source software components that require user-level documentation. Where applicable, we provide links to the open source vendor’s documentation.
1.1. GitMS with Gerrit
WANdisco’s GitMS can be integrated with Gerrit, the open source code review tool, in the product GerritMS. When equipped with Git and Gerrit, software development teams have a solid workflow for centralized Git usage. Code changes can be submitted by authorized users, and reviewed, approved, and automatically merged in. This greatly reduces the workload of the repository maintainers.
For information see the GerritMS Manual.
1.2. Get support
See our online Knowledge base which contains updates and more information.
We use terms like node and replication group, and define them in the Glossary. This contains some industry terms, as well as WANdisco product terms.
If you need more help, raise a case on our Community Support portal.
If you find an error, or if you think that some information needs improving, raise a case or email docs@wandisco.com.
1.3. Symbols in the documentation
In this document we highlight types of information using the following boxes:
|
Alert
The alert symbol highlights important information.
|
|
Tip
Tips are principles or practices that you’ll benefit from knowing or using.
|
|
Stop
The STOP symbol cautions you against doing something.
|
|
Knowledge base
The i symbol shows where you can find more information in our online Knowledge base.
|
1.4. Release Notes
View the Release Notes. These provide the latest information about the current release, including lists of new functionality, fixes, known issues and software requirements.
2. Installation Guide
This guide describes how to install Git MultiSite (GitMS):
-
Pre-installation requirements
-
A standard installation
-
Node configuration
|
Don’t skip this section!
Overlooked requirements are a common cause of setup problems that are difficult to diagnose.
These problems may take a lot more time to fix than you will take to check the list. |
2.1. Technical skills requirements
Make sure that you can meet the knowledge and technical requirements for the deployment and operation of the WANdisco software before you begin.
If you would like help assessing your requirements, request a supported installation from WANdisco.
One administrator can manage all the systems running GitMS. However, we recommend that you have someone at each site who is familiar with GitMS Basics.
2.1.1. System administration
-
Unix operating system installation
-
Disk management
-
Memory monitoring and management
-
Command line administration and manually editing configuration files
2.1.2. Apache administration (if applicable)
-
Familiarity with Apache web server architecture
-
Management of
httpd.conf / Apache2configuration file management settings -
Start/stop/restart administration
-
User authentication options
-
Log setup and viewing
2.1.4. Git
-
Familiarity with Git administration in order to manage Git repositories via the command line
-
Repository creation and/or file system copying and synchronization
-
Familiarity with WANdisco’s replication architecture
-
Understanding of the installation procedure relevant to your OS
-
Concept of Node types and Replication groups
2.2. Deployment overview
We recommend that you follow a well-defined plan for your WANdisco GitMS deployment. This helps you keep control, understand the product, and find and fix any issues before production. We recommend that you include the following steps:
-
Pre-deployment planning: Identify the requirements, people, and skills needed for deployment and operation. Agree on a schedule and milestones. Highlight any assumptions, constraints, dependencies, and risks to a successful deployment.
-
Deployment preparation: Prepare and identify server specifications, locations, node configuration, port availability and assignments, repository set-up, replication architecture, and the server and software configurations.
-
Testing phase: Actions for an initial installation and testing in a non-production environment, executing test cases, and verifying deployment readiness.
-
Production deployment: Actions to install, configure, test, and deploy the production environment.
-
Post-deployment operations and maintenance: Actions including environment monitoring, system maintenance, training, and in-life technical support.
2.3. System requirements
This section describes how to prepare your Git servers for replication. You need to ensure that you’ve got a suitable platform, with sufficient hardware and compatible versions of the required software that is configured appropriately. Use this information as a guide, not as a fixed set of requirements.
|
We strongly recommend against using virtual machines (VMs) to host GitMS services, mainly due to over-subscription performance issues. However if you do want to use virtual machines, please avoid placing more than a single replicator on any single VM-host to avoid a single hardware failure from causing a multi-replicator outage. |
2.3.1. Hardware sizing guidelines
| Operational Size | #Users | Number of Repositories | #Cores | RAM (GB) |
|---|---|---|---|---|
Small |
100 |
25 |
4 |
8-16* |
Medium |
500 |
100 |
10 |
16-32 |
Large |
1000 |
500 |
16-24 |
32-64 |
Very Large |
5000 |
1000 |
24-48 |
128+ |
-
* For small deployments with only GitMS it should be possible to run with 8GB of system memory. However, if you are going to run additional services on the system then they must be sized separately and added to the total.
-
For GitMS deployments with large numbers (i.e. more than hundreds) of users or large numbers of repositories (i.e. more than hundreds) or a combination of both, you should increase the minimum memory requirement to 32GB or 48GB or larger.
-
For larger GitMS deployments that include Gerrit the RAM requirements could be significantly larger than those in the table above since, in general, Gerrit consumes more RAM than GitMS and Percona requires additional RAM as well.
2.3.2. Storage
-
Use separate physical disks for Git and GitMS.
-
Use the fastest possible disks for storage. Disk IO is the critical path to improve repository responsiveness.
-
We recommend that you use RAID-1 or RAID-6 solutions. We do not recommend RAID-0.
To estimate your disk requirements, you need to quantify some elements of your deployment:
-
Overall size of all of your Git repositories
-
Frequency of commits in your environment
-
Types of files being modified: text, binaries (Git clients only send deltas for text)
-
Number and size of files being changed
-
Rate that new files are being added to the repository
-
Git Garbage Collection settings
|
Knowledge base
For more information about calculating storage capacity requirements, read the Knowledge base article, Hardware Sizing Guide.
|
Disk space for recovery journal
Provision large amounts of disk space for multisite-plus/replicator/database, enough space to cover at least the number of commits within a two to four hours during your times of peak Git usage. This is especially important if your development model includes binaries within your Git repositories.
Backups
| Never restore an GitMS node directly into operation using a prior backup. For the correct recovery steps, see Remove a Node. |
GitMS replication does not provide a replacement for a periodic backup policy. Repository replication is not a backup solution. Unlike backups, replicated repositories are not static snapshots that incoming changes can’t negatively impact. Any errors written to single copy of a repository may be replicated to all copies. A periodic backup may safeguard against such errors being unrecoverable.
-
Repair errors in a single repository replica: See Repair an out-of-sync repository.
-
Repair errors replicated to all replicas: see Recover from replicated repository errors.
GitMS itself is a replicated application. As such, it contains critical up-to-date data and meta-data. While a backup of this information might be useful for a recovery procedure, it is critical to Never restore Git MultiSite data from a backup directly into operation. Doing this could cause severe and unrecoverable damage to the replication ecosystem.
2.3.3. Processor tips
-
GitMS can run on a single 2GHz CPU, but for production you should run fast multi-core CPUs and scale the number of physical processors based on your peak concurrent usage.
-
Aim to have no more than 15 concurrent Git users per CPU and 7 concurrent users per CPU core.
-
Example 1: A server with 4 physical single core processors is expected to support (15x1x4) = 60 concurrent users.
-
Example 2: A server with 4 physical processors, each being a quad core is expected to support (7x4x4) = 112 concurrent users.
-
2.4. Setup requirements
This is a summary of requirements. You must also check the more detailed Installation checklist.
2.4.1. GitMS servers
This section summarizes requirements:
-
The same operating system
-
Java and Python installed, with identical versions everywhere
-
A browser with network access to all servers
-
A commandline compression utility
-
A unique license key file provided by WANdisco. You will need one for each node and you may need to provide the server IP addresses.
2.4.2. Git installations
Git installation requires:
-
WANdisco’s modified distribution of Git. Each version of GitMS is tied to a specific Git version. For more information please see the GitMS release notes.
-
Matching file and directory-level permissions on repositories.
-
Ensure that you disable Git’s own "auto-GC" garbage collection as it is not suited to WANdisco’s distributed system.
Disable auto-GC with the following command.
git config --global --replace-all gc.auto 0
Tips for installation:
-
Make sure you don’t overwrite the WANdisco Git binaries with system versions. The WANdisco versions are required for replication to work correctly.
-
You must run Git and GitMS on the same server.
-
A repository can belong to only one replication group at a time.
2.4.3. Repository consistency
Repositories should start out as identical at all sites.
A tool such as rsync can be used to guarantee this requirement.
The exception is the hooks directory which can differ as variances in site policy may require different hooks.
Note: If using GerritMS then do not install Git hooks since Gerrit has its own hook mechanism.
In addition to the normal Git hooks, GitMS supports replicated hooks. See hooks for more information.
2.5. Installation checklist
Though you may have referred to the checklist before evaluating GitMS, we strongly recommend that you re-read it before deployment to confirm that your system still meets all requirements.
|
Net-tools requirement
If you are using GitMS 1.9.4 on CentOS7/RHEL7 there is an dependency on the net-tools package. If you do not already have this installed then it will automatically installed during your GitMS installation. This is a dependency so please ensure it is not removed after installation. If you are using a tarball installer then the net-tools package needs to be manually installed before installing GitMS. If it is not installed then you will see the error message: bash-4.2$ ./installer.sh no netstat command available, please install net-tools package and re-run installer |
2.5.1. System setup
Operating systems
See the Release Notes for which operating systems are supported for your GitMS version.
Git server
Required version
GitMS needs to use WANdisco’s own Git distribution which includes modifications necessary to deploy Git with replicated repositories.
The GitMS installer does not update the Git version.
You must do this before running the GitMS installer.
See the Release Notes for the version required for your specific GitMS release.
Write access for application account
The replicator application account must have write permission for all repositories, because the replicator writes directly to the Git repository.
| For more information on how to set up SVN MultiSite and GitMS on the same server if they are both using Apache, see the Knowledge base article on System accounts for running MultiSite. |
Manage repository file ownership if using Git+SSH://
Accessing Git repositories via Apache is simplified because all user access is handled via the same daemon user. There are potential permission problems with Git+SSH when multiple users access the same repository.
Additional Git technologies required
JGit, the Java library from Eclipse, and C-Git, the git implementation written in C, are both required by GitMS.
The necessary version of JGit is included in the GitMS install but C-Git binaries need to be installed additionally.
See the Release Notes for the versions for your specific GitMS release and Git binaries for how to install.
Tips:
-
All replicated repositories must be in the same location, i.e. the same absolute path, and in exactly the same state before replication can start.
-
Simplify account management by putting SSH accounts into a single group. You can then ensure that the group has read/write permissions for the repositories.
The best way to manage this is via a single application account using a generatedauthorized_keysfile, for example use WANdisco’s Access Control Plus product. -
Use wrapper scripts for certain commands.
-
Git binaries are now available from WANdisco. They provide the builds, including modifications required for GitMS.
-
Make sure you install the correct binaries for your version of GitMS. See the Release Notes for your specific version for details of the version number.
-
-
Ensure that the prevailing umask is set to provide suitable permissions (002 instead of the default 022).
-
For information about setting umask when integrating with Gitolite see the Gitolite Integration Guide.
-
Git client
Any Git client compatible with a Git 1.8 remote repository. This minimum requirement is for Git 1.7.
Hooks
Normally we recommend that all hook scripts be duplicated exactly on all repository replicas however in some circumstances this is not possible. See hooks for more information.
File systems
Supported file systems include:
-
ext4
-
VXFS from Veritas
-
XFS on RHEL/CentOS 7
-
XFS version 2.8.10 (or newer) combined with Kernel version 2.6.33 (or newer) - this requirement is met by RHEL7.2 and above
-
Write barriers should always be enabled.
|
Avoid data loss
See our Knowledge base article, Data Loss and Linux, that looks at several implementation strategies that militate against potential data loss as a result of power outages.
|
File descriptor/User process limits
Ensure hard and soft limits are set to 64000 or higher. Check with the ulimit or limit command.
|
Running lots of repositories
When the replicator is not run as a root account, the max user processes needs to be set to a high value otherwise your system will not be able to create the threads required to deploy all your repositories.
|
User process limits:
Maximum processes and open files are low by default on some systems. We recommend that process numbers, file sizes, and number of open files are set to unlimited.
Temporary changes for current shell:
This is only for the root account.
ulimit -u unlimited && ulimit -f unlimited && ulimit -n 64000
-f - The maximum size of files created by the shell, default option
-u - The maximum number of processes available to a single user
-n - The maximum number of open files for a single user
Permanent changes:
Make the changes in both /etc/security/limits.conf and /etc/security/limits.d/90-nproc.conf. Add the following lines, changing "gitms" to the username the software will run as:
    gitms soft nproc 65000
    gitms hard nproc 65000
    gitms soft nofile 65000
    gitms hard nofile 65000
|
If you do not see these increased limits, you may need to edit more files.
If you are logging in as the GitMS user, add the following to session required pam_limits.so If you session required pam_limits.so If you run commands through |
Systemd default limit of concurrent processes
Some distributions of Linux, including RHEL7, Ubuntu 16, etc, now install with tighter defaults concerning the maximum number of concurrent processes handled by systemd. For up to date information see the GitHub page for systemd news.
In the context of GitMS - which can need very high thread counts - the value should be the same as that assigned for nproc above, for example:
-
In
system.conf, set TasksMax=64000 -
In
logind.conf, set UserTasksMax=64000
This is necessary only if the "pids" cgroup controller is enabled in the kernel.
Java
Install the JRE/JDK version shown in the Release Notes for your GitMS version.
-
Install JDK/JRE (from Oracle) and define the JAVA_HOME environment variable to point to the directory where the JDK/JRE is installed.
-
Add $JAVA_HOME/bin to the path and ensure that no other java (JDK or JRE) is on the path:
  $ which java
  /usr/bin/java
  $export JAVA_HOME="/usr"
-
You can run with the JRE package instead of the full JDK. Check this by running java -server -version. If it generates a not found error, repeat Steps 1 and 2. If you have package management problems or conflicts with the JDK version you are downloading (for example, rpm download for Linux), you may want to use the self-extracting download file instead of the rpm (on Linux) package. The self-extracting download easily installs in any directory without any dependency checks.
Python
See the Release Notes for which version is needed.
Browser compatibility
Setup and configuration requires access through a browser. The browsers listed in the Release Notes are known to work.
2.5.2. Network settings
Reserved ports
During installation a block of ports is reserved for use by GitMS. We suggest that you do a port survey of all machines which will be hosting GitMS prior to making the required port assignments.
Required ports
- dcone.port= An integer between 1 - 65535, default=6444
-
-
DConE port handles agreement traffic between sites
-
- content.server.port= An integer between 1 - 65535, default=4321
-
-
The content server port is used for the replicator’s payload data: repository changes etc.
-
- gitms.local.jetty.port= An integer between 1 - 65535, default=9999
-
-
The jetty port is used for the GitMS management interface.
-
- jetty.http.port= An integer between 1 - 65535, default=8082
-
-
The jetty port is used for the GitMS management interface.
-
- jetty.https.port An integer between 1 - 65535, default: 8445
-
-
The jetty port is used for the GitMS management interface when SSL encryption is enabled.
-
Firewall or AV software
If your network has a firewall, ensure that traffic is not blocked on the reserved ports noted above. Configure any AV software on your system so that it doesn’t block or filter traffic on the reserved ports.
Full connectivity
GitMS requires full network connectivity between all nodes. Ensure that each server can communicate with all other servers that will host nodes in your installation (from each to all others on all ports).
Bandwidth
Put your WAN through realistic load testing before going into production. You can then identify and fix potential problems before they impact productivity.
DNS setup
Use IP addresses instead of DNS hostnames, this ensures that DNS problems won’t hinder performance. If you are required to use hostnames, test your DNS servers performance and availability prior to going into production.
NTP
You should deploy a robust implementation of NTP, including monitoring, as NTP will not auto-correct if the time is too far off-set from the current time.
This is an important requirement because without nodes being in sync there are a number of problems that can occur.
E.g. REST API created artifacts, when deploying with GerritMS, will be improperly created, resulting in potential time reporting errors.
Load balancing
The use of a correctly configured load balancer can greatly benefit performance in situations where there could be large numbers of concurrent Git users.
The load-balancer should direct session requests to the same server based solely on the source IP address of a packet.
Once the choice of server has been made the load-balancer should only change to a different server if the original chosen server is no longer communicable.
Therefore, GitMS requires that any load balancing solution has the following features:
-
Stateless session persistence - Any potential Git load-balancer needs the ability to handle stateless session persistence within its load balancing algorithm. This is because each commit needs to go to the same backend node in its entirety or the commit will fail. We achieve this by ensuring the client is bound to a particular back-end node.
-
Client’s IP Address - Not always an option, but this IP-based persistence is easy to manage when the network is stable with static IPs.
-
Cookie-based persistence - Git command line clients can’t read cookies so for a load balancer to use cookies for the binding they would need to be able to use sticky cookies that are not reliant on the client honoring them.
-
-
Node health-checking - Another vital requirement is the support for a health check mechanism - whereby the load-balancer makes periodic checks on the connected nodes to make sure that it isn’t passing traffic to an off-line or overloaded server. Any prospective load-balancer should support HTTP status code (application-layer) checks.
-
The load-balancer sends HTTP GET or HEAD requests to back-end nodes. Watching for 'unhealthy' response codes offers greater reliability and flexibility than doing your checks before the network layer.
Time synchronization with NTP
You should deploy a robust implementation of NTP, including monitoring as NTP will not auto-correct if the time is too far off-set from the current time. This is an important requirement because without nodes being in sync there are a number of problems that can occur. Most importantly, time-stamps on commits will not match the time-stamp on the originating commit node if system times are not in sync. A lack of time sync may result in Git date to revision computations failing or generating inaccurate results.
2.5.3. GitMS setup
System User Account
Take careful note of this requirement as many installation problems are caused by running applications with unsuitable or incompatible system accounts.
In most cases you can install GitMS with any system account with suitable permissions, e.g. "wandgit", however, you must ensure the account belongs to the group "apache".
Read a detailed explanation of why this is required: System accounts for running GitMS.
Replication configuration
Read our Replication section for information on how to optimize your replication.
Voters follow the sun
Users will get the best performance if GitMS gets agreement from the local node. For this reason you should schedule for the voter node to correspond with the location in which developers are active (i.e. in office hours).
There are negative high availability implications if a single site is chosen as a voter. You may want to consider multiple nodes per location and then rotate the voting population to be close to your workers during their daytime. Please contact support for more information.
License Model
GitMS is supplied through a licensing model based on the numbers of both nodes and Git repository end-users. WANdisco generates a license.key file will be matched to your agreed usage requirements.
Evaluation license
To simplify the process of pre-deployment testing GitMS is supplied with an evaluation license. This type of license imposes no restrictions on use but it time-limited to an agreed period.
Production license
Customers entering production need a production license file for each node, these license files are tied to the node server’s IP address so care needs to be taken during deployment.
If that node needs to be moved to a new server with a different IP you should contact WANdisco’s support team and request that a new license be generated, ideally before you transfer the node.
The IP addresses are a fixed list however, the node count and special node count may move between sets of nodes, as long as the number of each type of node is within the limit specified in the license.key.
Production licenses can be set to expire or they can be perpetual.
Special node types
GitMS offers additional node types that provide limited functionality for special cases where a node only needs to perform a limit role:
-
Passive Nodes (Learner only): A passive node operates like a slave in a master-slave model of distribution. Changes to its repository replicas only occur through inbound proposals, it never generates any proposals itself.
-
Voter-only nodes (Acceptor only): A voter-only node does not need to know the content of proposals. It votes based only on the basis of replication history: "Have I already voted yes to a Global Order Number equal to or larger than this one?".
These limited-function nodes are licensed differently from active nodes.
For more details contact WANdisco’s sales team.
Removing GitMS
In the event that you need to remove GitMS, your replicated repositories can continue to be used in a normal, non-replicated setting. Furthermore, the repositories will not contain any WANdisco proprietary artifacts or formats. See Removing GitMS.
2.5.4. Gerrit setup
If you are planning to integrate GitMS with Gerrit code review then please see the GerritMS manual for more information.
2.6. Installation
This Installation Guide describes setting up GitMS for the first time.
If you are upgrading from an earlier version of GitMS see the Upgrade Guide.
2.6.1. Installation overview
This is an overview of the process:
-
Double-check the Installation checklist. Take time to make sure that you have everything set up and ready. This avoids problems during installation. In particular, check:
-
Git authentication: Git is installed, and using authentication.
-
JDK: You need to run an Oracle JDK. Please use JDK 7 or JDK 8.
-
Java memory settings: The Java process on which GitMS runs is assigned a minimum and maximum amount of system memory. By default it gets 128MB at startup and 4GB maximum.
-
System resources: Ensure that your system is going to operate with a comfortable margin.
-
-
Ensure that your repositories are copied into place on all nodes.
-
Download and copy the GitMS files into place.
-
Run the setup, then complete the installation from a web browser.
2.6.2. Before you start
-
Read through the Installation checklist thoroughly.
-
Ensure that you have the correct version of WANdisco’s Git binaries installed. GitMS edition requires changes that are built into WANdisco’s version of Git.
Git binary versionsIt is crucial that the Git binaries are the correct ones for your version of GitMS. For more information see the release notes for your version of GitMS.
If you are adding a new node to an existing ecosystem, make sure that you install the same version of Git as is on the existing nodes. -
Ensure that the system user used for installing GitMS has access to Java, otherwise the installation fails.
Set the LOG_FILE environmental variable
If you need to capture a complete record of installer messages, warnings, and errors, then you need to set the LOG_FILE environment variable before running the installer. Run:
export LOG_FILE="/tmp/GitMS_install.log"
This file’s permissions must allow being appended to by the installer. Ideally, the file should not already exist, or it should exist and be empty. Also its directory should enable the account running the installer to create the file.
Install with ACP auditing functionality
If you are installing GitMS where the account access auditing functionality for ACP is required then the following information will be required during installation:
-
Flume Receiver Hostname or IP address
-
Flume Receiver Port
For more information about installing Account Access Auditing, see the ACP installation instructions and How to do a manual set up for audit logging.
For information on how to how to upgrade the ACP Flume sender delivered with ACP1.9.0 and how to set up SSL, see the How to upgrade the ACP sender delivered with ACP1.9.0 and how to set up SSL.
Commands for start and stop are platform dependent
The platform you are using will affect which commands you need to use to, for example, start and stop GitMS.
As of GitMS 1.9.5 SystemD commands are used for platforms that support only SystemD (without compatibility mode).
On all other platforms the SysV commands are used.
See the list below for which commands you need to use:
-
SLES 12 - use the
SystemDcommands. -
All other platforms - use the
SysVcommands - supported platforms can be found in the release notes.
If you have any queries about your specific set up please contact support.
Command examples
- Startup
-
SysV -
service git-multisite start
SystemD -systemctl start wdgitms.target - Shutdown
-
SysV -
service git-multisite stop
SystemD -systemctl stop wdgitms.target - Restart
-
SysV -
service git-multisite restart
SystemD -systemctl restart wdgitms.target - Status
-
SysV -
service git-multisite status
SystemD -systemctl status wdgitms\*
For more details on commands see here.
2.6.3. Install GitMS
These steps describe how to do an interactive installation. If you would like to use a non-interactive installation see the next section.
-
Extract the setup file.
-
Save the installer file to your Installation site.
-
Make the script executable, e.g. enter the command:
chmod a+x GitMS-<version>-rhel6-installer-rpm.sh
Workaround if /tmp directory is "noexec"Running the installer script will write files to the system’s
/tmpdirectory. If the system’s/tmpdirectory is mounted with the "noexec" option then you will need to use the following argument when running the installer:
--target <someDirectoryWhichCanBeWrittenAndExecuted>
E.g../GitMS-<version>-rhel6-installer-rpm.sh --target /opt/wandisco/installation/
-
Run the setup script:
[root@redhat6 ~]# chmod a+x GitMS-1.7.2.3-6f8cc8db-rhel6-installer-rpm.sh [root@redhat6 ~]# ./GitMS-1.7.2.3-6f8cc8db-rhel6-installer-rpm.sh Verifying archive integrity... All good. Uncompressing WANdisco MultiSite ....... :: :: :: # # ## #### ###### # ##### ##### ##### :::: :::: ::: # # # # ## ## # # # # # # # # # ::::::::::: ::: # # # # # # # # # # # # # # ::::::::::::: ::: # # # # # # # # # # # ##### # # # ::::::::::: ::: # # # # # # # # # # # # # # # :::: :::: ::: ## ## # ## # # # # # # # # # # # :: :: :: # # ## # # # ###### # ##### ##### ##### -
Enter
Yto continue:Welcome to the WANdisco Git MultiSite installation You are about to install WANdisco Git MultiSite version 1.9.0.1-598 Do you want to continue with the installation? (Y/n)
-
Prerequisites will then be checked - java, perl and git.
-
Enter
Yand press Enter to confirm these settings:INFO: Using the following Memory settings: INFO: UI: -Xms128m -Xmx1024m INFO: Replicator: -Xms1024m -Xmx4096m Do you want to use these settings for the installation? (Y/n)
Don’t sudoInstead the administrator should login (or sudo) to the "root" account and run the installation from there. This is because "sudo cmd" will not modify the PATH properly to include the/sbindirectory, whereas using sudo to get to a shell’s command prompt will do so. -
Confirm the port that you want to run the admin interface on:
Which port should the MultiSite UI listen on? [8080]:
Running Gerrit?If you are going to use GerritMS then make sure that you select a port that will not conflict. Gerrit also defaults to port 8080. -
Confirm the account which will run GitMS. See the Knowledge base article for more information.
-
This account will need to have read and write access to your git repos
We strongly advise against running Git MultiSite as the root user.

  Which user should Git MultiSite run as?
-
-
Warnings may then be triggered.
WARNING: The user <your username> can spawn less than 64000 user processes (ulimit -u). This number needs to be higher to prevent issues with handling large numbers of repositories.
Choose another user? (y/N)
Do you want to continue with the installation? (Y/n)
WARNING: The user <your username> can open less than 64000 files (ulimit -n). This number needs to be higher to prevent issues when handing large numbers of repositories.
Choose another user? (y/N)
Do you want to continue with the installation? (Y/n)
-
Confirm the group which will run GitMS:
Which group should Git MultiSite run as?
-
Confirm umask
What umask should Git MultiSite use? [022] (Y/n)
-
Confirm auditing
Do you wish to install auditing components for use with Access Control Plus? (Y/n)
-
If the answer is
Ythen steps below will follow, if not then installation will skip step 21.Confirm the maximum memory size for Flume
Please enter the maximum memory size for flume process in megabytes [256]:
-
Enter Flume install information
Please enter Flume installation location. We recommend the use of a separate file system with sufficient disk space for several days of auditing events. [/opt/wandisco/flume-git-multisite]:
-
Confirm if you want to monitor the GitMS log
Do you want to monitor a Git Multisite log? (Y/n)
-
Confirm the log file location, hit return to accept the default
Location of Git MultiSite log. [/opt/wandisco/git-multisite/replicator/logs/gitms.log]:
-
Enter Flume details.
Note - if SSL will be enabled you need to use a Fully Qualified Domain Name (FQDN) not an IP address.Please enter Flume Receiver connection details. Flume Receiver Hostname or IP address [localhost]: <FQDN> A port must be set Flume Receiver Port [8441]: <custom flume receiver port or just hit return to accept default 8441>
-
Confirm if you are using SSL
Is SSL enabled (Y/n) Y
-
If you are using SSL then you will need to give the following information. The passwords should be inputted as clear text, not in the encrypted form.
Location of keystore: <Directory Path to your keystore file>
Keystore password:
Location of truststore: <Directory Path to your keystore file>
Truststore password:
-
A settings summary is shown. Confirm the configuration settings and enter
Yto finish the install.Installing with the following settings: MultiSite user: <your username> MultiSite group: <your groupname> MultiSite umask: 0022 MultiSite UI Port: 8080 MultiSite UI Minimum memory: 128 MultiSite UI Maximum memory: 1024 MultiSite Replicator Minimum memory: 1024 MultiSite Replicator Maximum memory: 4096 Git MultiSite will be installed to: /opt/wandisco/git-multisite Do you want to continue with the installation? (Y/n)
The default install location is
/opt/wandisco. You can install to a non-default location if needed.Review the output of the installerIn GitMS 1.9.4, the output of the whole install log will be printed in the terminal. In other versions only the warnings and errors are shown. Please review the output to make sure that nothing untoward occurred during installation. For example, look for ERROR, WARNING, and other unexpected messages in that text output. Using the "script" command will help to enable searching using an editor, rather than visually scanning the output. -
Open a browser and go to the provided URL to finish the installation. If your server’s DNS isn’t running you can go to the next step at the following address:
http://<IP_Address>:<admin port>/
e.g.
http://10.0.100.252:8080/-
Flush your browser cache
If you are reinstalling and using SSL, then you should clear your browser cache before you continue. Previous SSL details are stored in the cache and will cause SSL errors if they are not flushed.
-
-
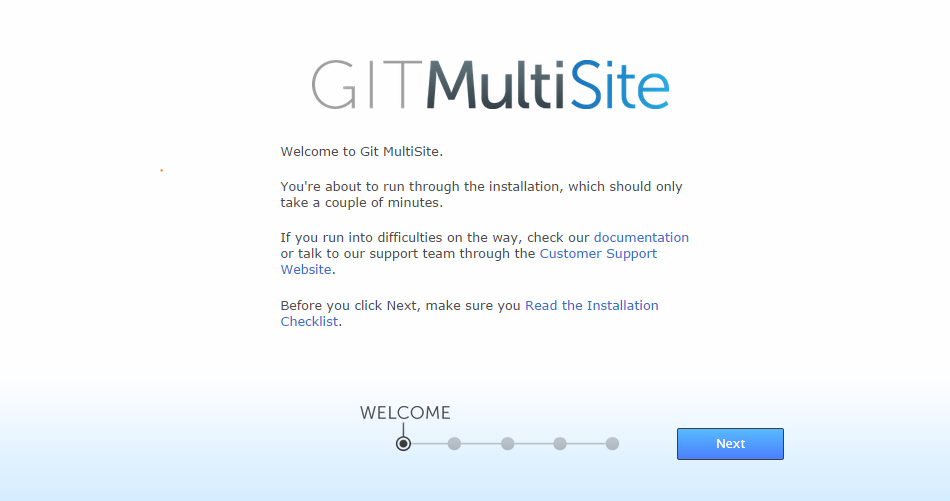
The web installer begins with the Welcome screen:
 Set up > Start
 -
Click Next to begin the installation.
-
The next screen contains the WANdisco End User Agreement and Terms & Conditions. To continue the installation click the I Agree button.
-
On the next screen, License Upload, you are prompted to browse for your product license key file. Click the Browse button and locate your file. You received this from the WANdisco sales team. Contact them if you have any problems locating or using your license file.
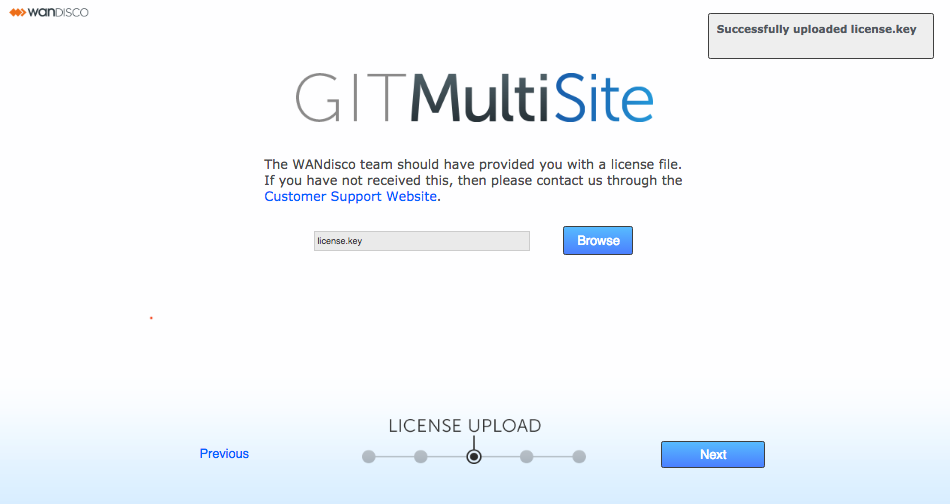 Set up > license.key file
 -
On the Administrator Setup screen enter the username plus an associated password that you will use to log in to GitMS’s UI. This information is only added during the installation of the first "inductor" node.
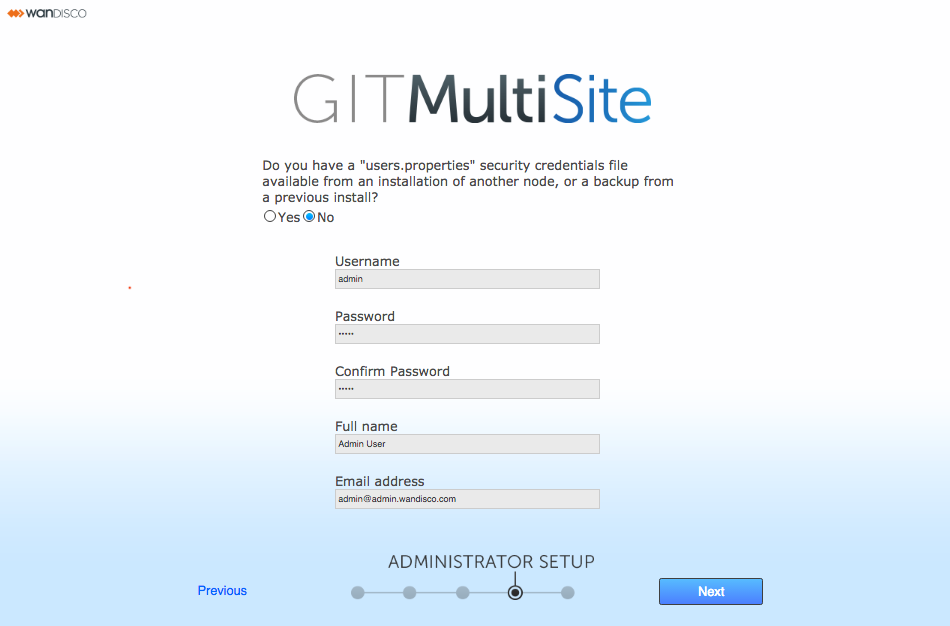 Set up > Admin settings, entered or uploaded in the
users.propertiesfile- Username
-
The administrator’s username.
- Password
-
The administrator’s password.
- Confirm Password
-
Enter your password again to confirm correct entry.
- Full Name
-
The User’s full name.
- For all subsequent node installations you should provide the users.properties file
-
-
This properties file stores the unique information for the default admin user account. It is essential that this information exactly matches up between nodes. For this reason, it is only entered once during a deployment and then subsequently copied to all other nodes in the form of the
users.properties file. -
The default location of the file is:
/opt/wandisco/git-multisite/replicator/properties/users.properties
-
If something goes wrong and you don’t have a valid users.properties file in your deployment, GitMS can automatically create a new one if you follow the procedure to Create a new users.properties file.
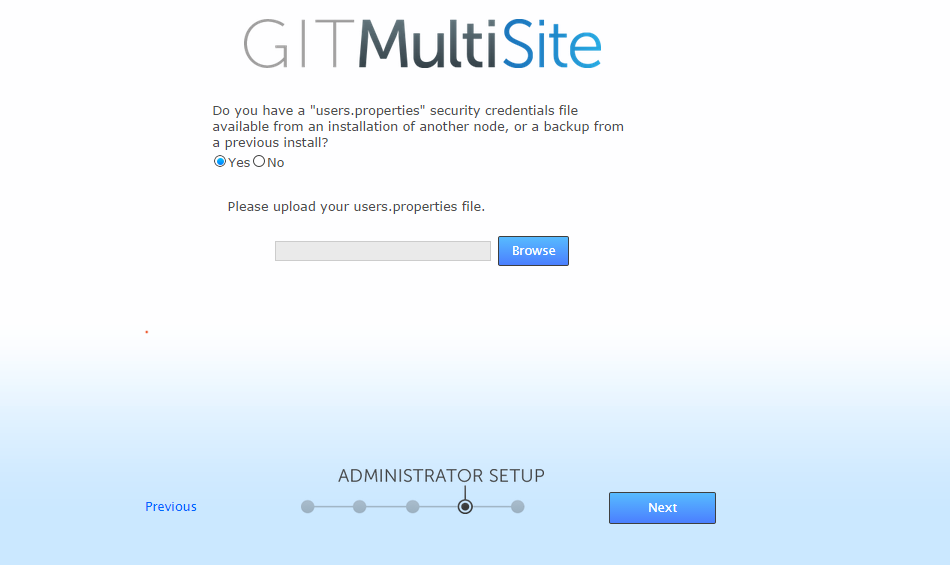 Set up >
user.propertiesfile for all nodes after the first node
-
-
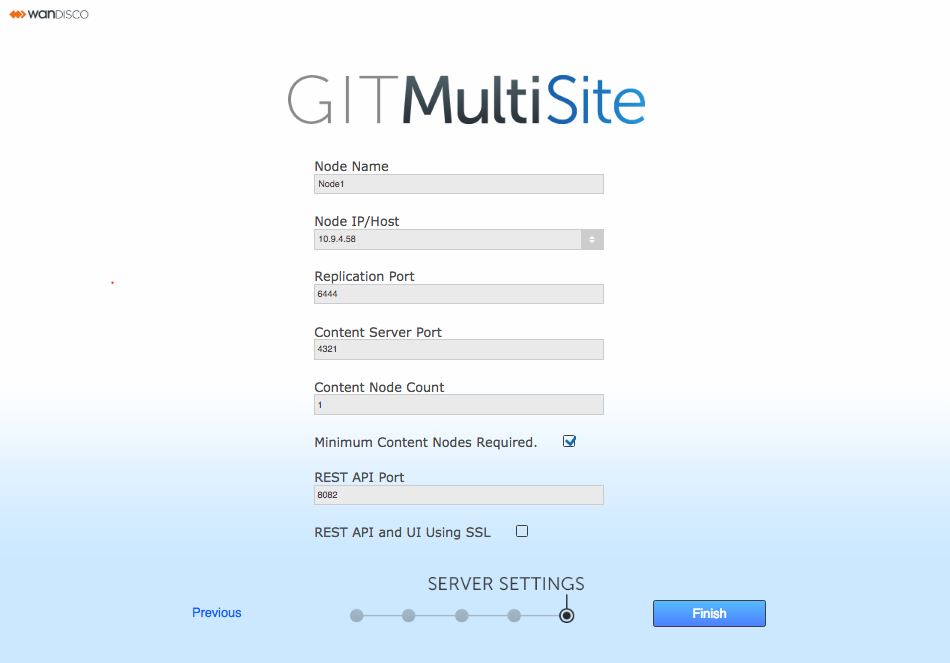
The last screen in the setup process covers Server Settings:
 Set up > Server Settings
- Node ID
-
The default name for this node. It is used to identify the node within the application and will not be used as a host name.
Temporary limitationNode names cannot contain spaces or periods. - Node IP/Host
-
The node’s IP or hostname. If the server is multi-homed, you can select the IP to which you want GitMS to be associated.
Enter FQDN in this fieldIf you are configuring GitMS to use SSL (or will eventually do so) then you must use a fully qualified domain name for this field. If you choose a hostname only then the hostname must resolve properly to this host on all other Git MultiSite nodes. - Replication Port
-
Select the port to use for WANdisco’s DConE agreement engine. Default=6444.
- Content Server Port
-
Select the port to use to transfer replicated content (data for repository changes). Default=4321. This is different from the port used by WANdisco’s DConE2 agreement engine.
- Content Node Count
-
This setting gives you the ability to choose the degree of resilience. The value represents the number of nodes within a membership that must receive the content before a proposal is submitted for agreement. If the value is greater than the total learners in the current membership, it is adjusted to total learners in the current membership. The proposing node is not considered in the calculation.
- Minimum Content Nodes Required
-
Ticking this checkbox will enforce the Content Node Count as a prerequisite for replication.
- REST API Port
-
The port to be used for GitMS’s REST-based API. Default=8082.
- REST API & UI Using SSL
-
Check box for enabling the use of SSL for all REST API and UI traffic. If this box is checked more options appear.
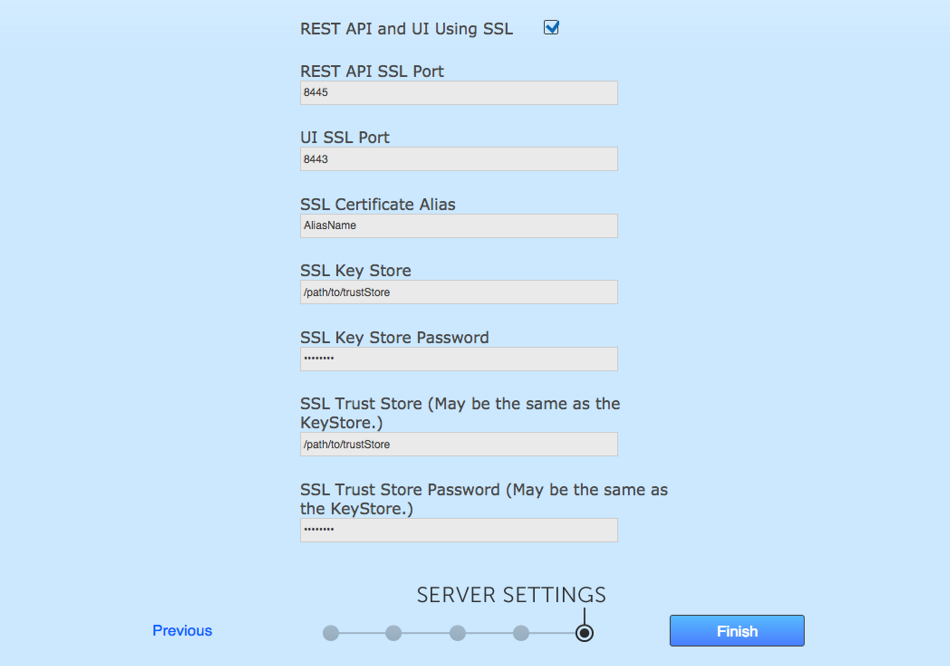 SSL Set up
 - REST API SSL Port
-
The port to be used for GitMS’s REST-based API when traffic is secured using SSL encryption. Default=8445.
- UI SSL Port
-
The port for HTTPS encrypted access to the GitMS administrative interface. Default=8443.
- SSL Certificate Alias
-
The name of your SSL Certificate file.
- SSL Keystore
-
The name of the keystore file. The keystore contains the public keys of authorized users.
- SSL Keystore Password
-
The password for your HTTPS service.
- SSL Truststore
-
The location of your truststore file. The truststore contains CA certificates to trust. If your server’s certificate is signed by a recognized Certification Authority (CA), the default truststore that ships with the JRE will already trust it because it already trusts trustworthy CAs. Therefore, you don’t need to build your own, or to add anything to the one from the JRE.
- SSL Truststore Password
-
The password for your truststore.
Truststores and keystoresYou might be familiar with the Public key system that allows two parties to use encryption to keep their communications with each other private (incomprehensible to an intercepting third-party).
The keystore is used to store the public and private keys that are used in this system. However, in isolation, however, the system remains susceptible to the hijacking of the public key file, where an end user may receive a fake public key and be unaware that it will enable communication with an impostor.
Enter Certificate Authorities (CAs). These trusted third parties issue digital certificates that verify that a given public key matches with the expected owner. These digital certificates are kept in the truststore. An SSL implementation that uses both keystore and truststore files offers a more secure SSL solution.
-
Click Finish when you have entered everything. The installer now completes the configuration.
 Finishing
 -
Click the Finished - Let’s go button that appears. Click the button to log in for the first time.
-
Log in. Enter the username and password chosen earlier in the process then click Let’s do this.
 Log in
 -
Next, read the latest WANdisco Subscription Agreement. Click I Agree to continue.
-
The first time you view the dashboard, it contains mostly blank areas. Read the Reference Guide to learn what the buttons and options mean. You can now set up some of your settings, such as SSL. However, we recommend that you wait to perform advanced admin account management until you have completed induction.
2.6.4. Non-interactive installation
You can also install GitMS with an unattended (scripted) install. Set the following environment variables:
- GITMS_USER
-
The system account that runs GitMS.
- GITMS_GROUP
-
The system group that GitMS runs in.
- GITMS_UMASK
-
Set your required Umask settings. We validate your entry so that it must be a 3-digit number that begins with a zero, e.g. 026. Note: The first digit signifies the base of the number (octal) so 0777 is a 3-digit number. The product installs using 0022 (or 022), but always shows 4-digits when installing.
- GITMS_UI_PORT
-
The TCP port that the browser UI initially uses. You can change this during the browser-based setup. Default is 8080.
The configurator will load on this following install.
|
Auditing environment variables
If you are installing or upgrading and will be using the ACP auditing functionality, read this section now.Read this section before continuing. |
For a scripted start to the installation run:
export GITMS_USER=(user_to_Run_GitMS)
export GITMS_GROUP=(Group_to_Run_GitMS)
export GITMS_UMASK=(Umask to apply): default 022
export GITMS_UI_PORT=(PortToHostUI): default 8080
export ENABLE_AUDITING=(true/false)
If you are installing GitMS where the account access auditing functionality for ACP is required (ENABLE_AUDITING=true), make sure that you set the following variables:
-
ENABLE_AUDITING=true/false: True to install auditing -
FLUME_INSTALL_DIR=/opt/wandisco/flume-git-multisite: Flume install location for acp-flume-sender.-
Make sure that you do not set the Flume install var to a directory that is unaccessible, i.e. one that is not writable by anyone, including root.
-
-
ACP_AVRO_HOST=(ACP_Flume_Address): Flume receiver IP (ACP Flume install) -
ACP_AVRO_PORT=(ACP_Flume_Port): Flume receiver port (ACP Flume install) -
FLUME_GITMS_LOG=/opt/wandisco/git-multisite/replicator/logs/gitms.log: Path to GitMS log, the default is shown. -
FLUME_INSTALL_DIR=/opt/wandisco/flume-git-multisite: Full path where Flume is to be installed, the default is shown. -
FLUME_MAX_MEMORY=256 -
FLUME_AVRO_SSL=true/false: true/false to enable/disable SSL
If FLUME_AVRO_SSL=true you also need to set:
-
FLUME_AVRO_KEYSTORE_LOC: Full Path to Flume Keystore -
FLUME_AVRO_KEYSTORE_PASS: FlumeKeyStorePass -
FLUME_AVRO_TRUSTSTORE_LOC: Full Path to TrustStoreFile -
FLUME_AVRO_TRUSTSTORE_PASS: FlumeTrustStorePass
Note - The Keystore and Truststore passwords need to be given as clear text not as encrypted passwords.
For more information about installing Account Access Auditing, see the ACP installation instructions.
The installation then runs without user interaction. When installation is complete, the browser-based UI starts. You then need to complete the node set up from step 22.
Installing with tarball installer
If you wish to run the tarball installer please run the same script as above but with the following extra parameters:
export WAND_HOOK_PATH=(Path to git binaries): only change if tarball binaries, if rpm use /usr/bin
export MSP_PREFIX=(Path for tarball to install under): default is /opt/wandisco/git-multisite
export MSP_INIT=1
2.6.5. Manual setup for audit logging
Use this procedure to account for some configuration relating to the audit feature that is currently missing from the installer.
Sender configuration
- Setting sources
-
This value sets the sources that flume will monitor: acpSender.sources = gitmsSource
- Setting Log location
acpSender.sources.gitmsSource.type = exec
acpSender.sources.gitmsSource.command = tail -F /opt/wandisco/git-multisite/replicator/log/gitms.log
acpSender.sources.gitmsSource.restart = true
acpSender.sources.gitmsSource.channels = memChannel
| The system account that runs GitMS MUST have permissions to read all the files that you configure to monitor. |
For more information see the ACP manual’s section on configuring the Flume Receiver.
2.6.6. Repeat installation for all nodes
Repeat the installation process for every node required to share your Git repositories.
At step 18, as subsequent nodes are not the first GitMS installation, select "Y" to re-use the users.properties file from the first installation.
-
Open a terminal session to the first node.
-
Navigate to the location of the first node’s users.properties file. The default location is /opt/wandisco/git-multisite/replicator/properties/users.properties.
-
Copy the file to the /tmp directory of each subsequent node server.
-
During each subsequent installation, select "Y" and provide the path to the local copy of the users.properties.
Do you want to use an existing users.properties file (Y/n)? : Y
Please enter the location of users.properties file you wish to use

Path to the users.properties file: /tmp/users.properties
You may benefit from creating an image of your initial server, with the repositories in place and using this as a starting point on your other nodes. This helps ensure that your replicas are in exactly the same state. For example capture a tar-ball image that can be copied to each machine and extracted, or alternatively you can use rsync.
|
Same location
All replicas must be in the same location, i.e. the same absolute path, and in exactly the same state before replication can start.
|
2.7. Node induction
After installing GitMS, you need to make the nodes aware of each other through the node induction process. Carefully follow the steps in this section.
2.7.1. Membership induction
You must connect nodes in a specific sequence. Follow these steps to ensure that your nodes can talk to each other:
-
Select one node to be your Inductor. This node will accept requests for membership and share its existing membership information. You can select any node.
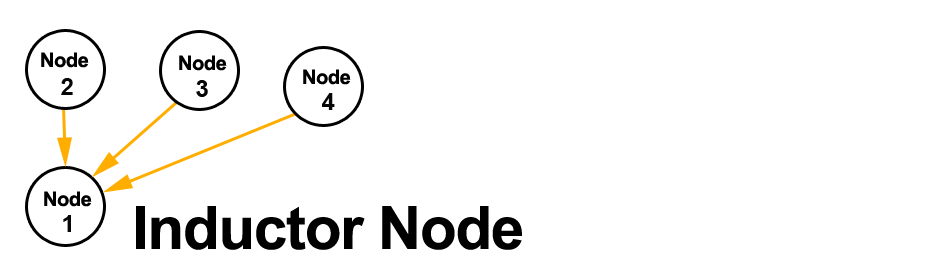 Node diagram
 -
Log in to this Inductor’s admin console, http://<Inductor’sIP>:8080/multisite-local/, and get the following information, from the Settings tab.
- Node ID
-
The UUID of the inductor node.
- Node Location ID
-
The reference code that defines the inductor node’s location.
- Node IP Address
-
The IP address of the inductor node server.
- Node Port No
-
The DConE Port number, 6444 by default.
 Settings
All your remaining nodes are now classed as inductees.
-
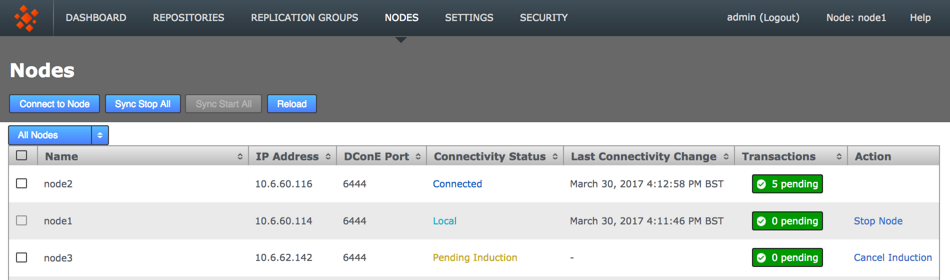
Select one of your remaining inductee nodes. Connect to its web admin console, http://<Inductee1:8080/multisite-local/, and go to the Nodes tab.
-
Click the Connect to Node button and enter the details that you collected from your inductor node.
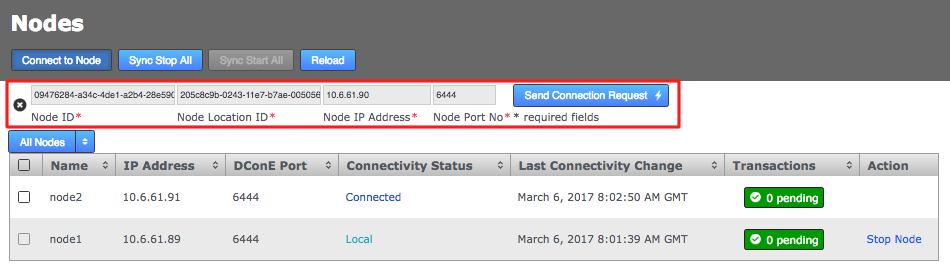 Nodes
NodesWhen you have entered these details, click the Send Connection Request button. The inductor node accepts the request and adds the inductee to its membership. Refresh your browser to see that this has happened.
-
Check that all of the inducted nodes in your current ecosystem agree this node is completely inducted.
-
After they all agree, go back to step 3 and select one of your remaining inductees. Repeat this process until all the nodes that you want to be included in the current membership have been connected to the inductor.
2.7.2. If induction fails
If the induction process fails, you may be left with the inductee in a pending state:
-
From the Nodes tab, review the state of your prospective node. During the induction process a prospect will display a Connectivity Status of Pending Induction. The process should complete within a few seconds, providing that there isn’t a network connection problem.
If the node appears to be stuck in the pending state then click the Cancel Induction link.
 Pending Nodes can be cancelled
 -
A growl message confirms that the induction was cancelled successfully. Click the Reload button to clear the cancelled induction.
 Growl confirms confirmation
 -
Repeat the induction procedure after confirming:
-
You are entering the correct details for the inductee node.
-
There isn’t a network outage between nodes.
-
There isn’t a network configuration problem, such as a firewall blocking the necessary ports.
-
There isn’t an admin account mismatch between nodes - this occurs if you don’t use the correct procedure for installing a second or subsequent node. If the admin account doesn’t match because nodes were not installed using the first node’s user.properties file then you should follow Matching a node’s admin settings.
-
There isn’t a product license problem. Should the license file clash between two nodes, or be missing from a node this could cause induction to fail. License problems are noted in the Application Logs.
-
2.7.3. Match a node’s admin settings
Ensure that all nodes start with a common admin account by importing the admin settings from the first installed node during the installation of all subsequent nodes. If a node is accidentally installed without this match you can use the following procedure to resync them. You’ll need to follow this if you wish to induct the mismatched node into a replication network that includes the other nodes.
-
Log in to your first node, click on the Security tab and click Export Security Settings to perform a security (user) settings export.
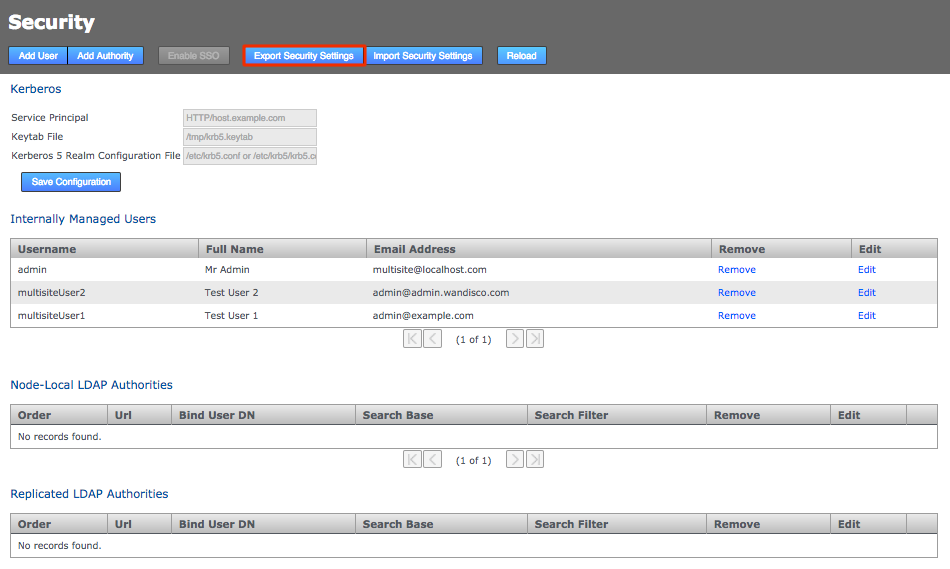 Security tab
 -
Access the same node using a terminal window. Copy the exported settings file (
/opt/wandisco/git-multisite/replicator/export/security-export.xml) to a location on the node you’re fixing. You may need to create a directory. E.g./opt/wandisco/git-multisite/replicator/import/security-export.xml
-
Log in to the admin UI of the node that you’re fixing to enable induction. Click on the Security tab then click the Import Security Settings button.
Enter the path to the copied across security-export.xml file then click Check.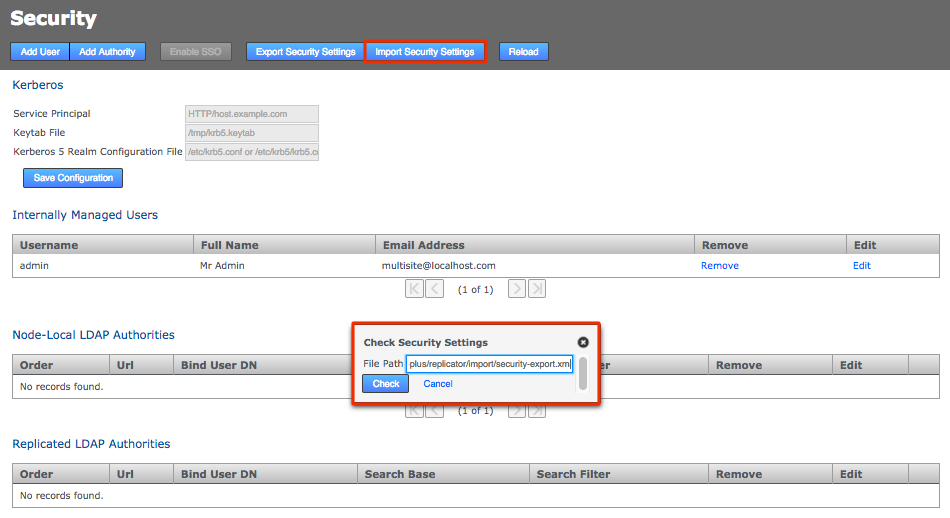 Import Security Settings
 -
You’ll be presented with a Diff report that shows you what differences exist between the current user settings and those in the exported file.
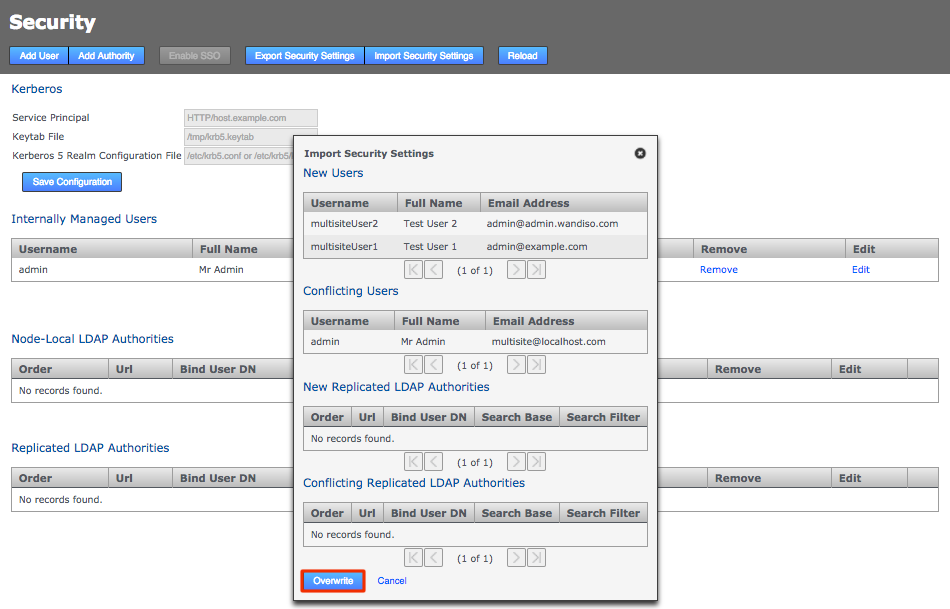 Enter Security Settings
Click Overwrite. The admin user settings will now match those used in the other nodes.
-
Now that the admin user account details are matching again you’ll be able to complete an induction of the corrected node into a replication network.
2.7.4. Create a replication group
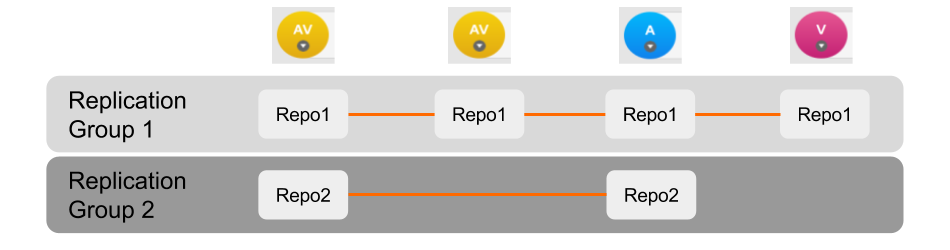
GitMS lets you share specific repositories between selected nodes. Do this by creating Replication Groups that contain a list of nodes and the specific repositories that they will share. For example, this figure shows 4 nodes running 2 replication groups. Replication Group 1 replicates Repo1 across all four nodes, while Replication Group 2 replicates repo2 across a subset of nodes.
Follow this procedure to create a replication group. You can create as many replication groups as you like. However, each repository can only be part of one active replication group at a time:
-
When you have nodes defined, click the Replication Groups tab. Then click on the Create Replication Group button.
 Create replication groupLocal node automatically made the first memberYou cannot create a replication group remotely. The node on which you are creating the group must itself be a member. For this reason, when creating a replication group, the first node is added automatically.
 -
Enter a name for the group, then click the drop-down selector on the Add Nodes field. Select the nodes that you want to replicate between. The local node will automatically be added as you can’t create a replication group remotely.
Note the warnings that may appear if the combination of nodes is incorrect.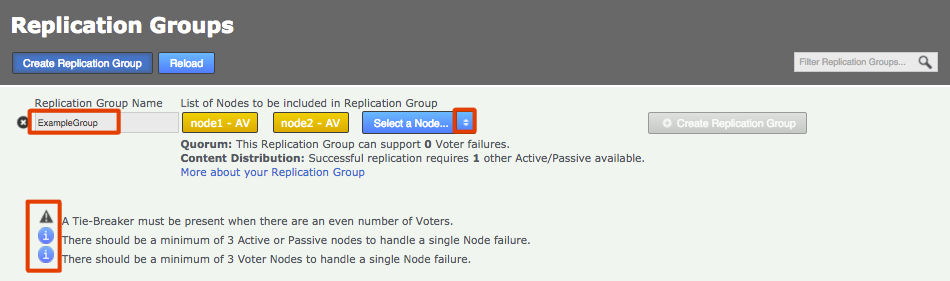 Enter a name and add some nodesReplication Ground Rules
-
A node can belong to any number of replication groups.
-
A repository can only be part of a single active replication group at any particular time.
-
You can change membership on the fly, moving a repository between replication groups with minimal fuss.
-
-
Click each node label to set its node type. New nodes are added as Active Voters, denoted by "AV".
Voter-only nodes can only be added during the creation of a replication group, they cannot be added later.
For an explanation of what each node type does, see the section Guide to node types.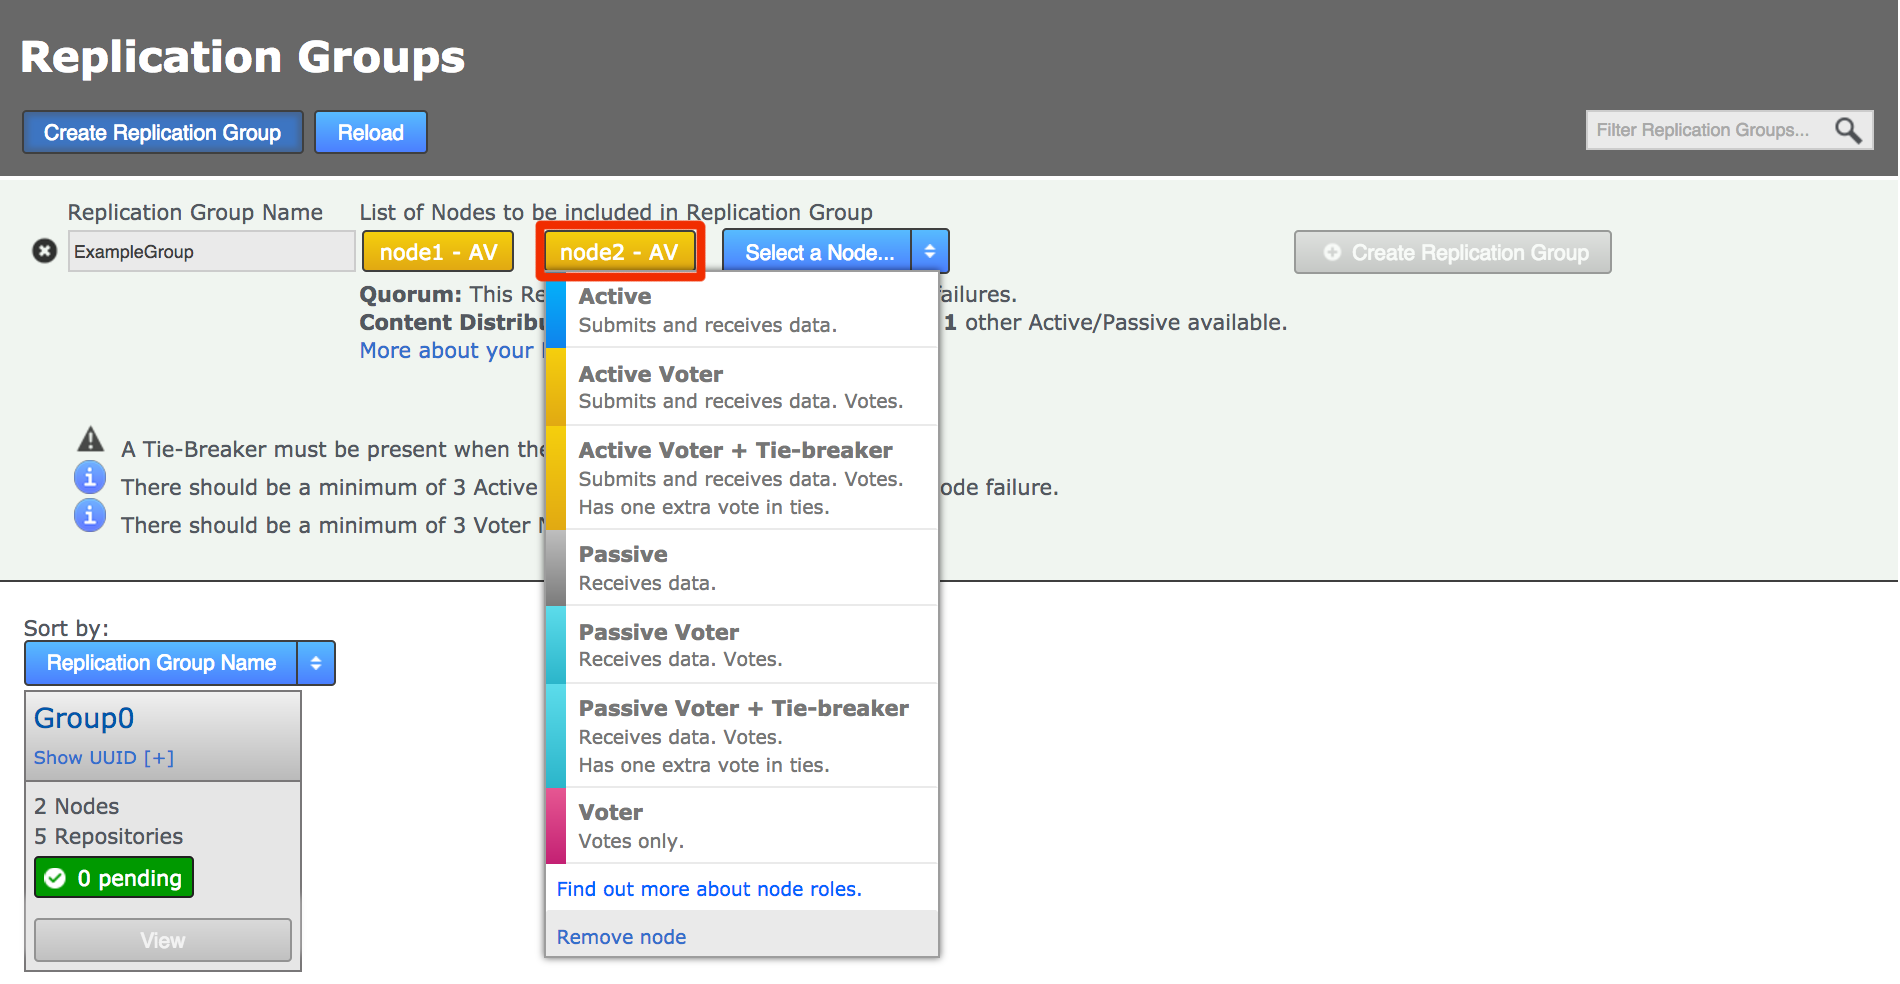 Change node typeCreate a resilient replication groupFor a replication group to be resilient to node failures, make sure that it has at least twice the number of acceptable failures plus one. I.e. for F failures, make sure there are 2F+1 nodes.
For example:
1 failure requires 2x1+1=3 nodes to continue operation
3 failures required 2x3+1=7 nodes to continue operation See creating resilient replication groupsWhen you have added all nodes and configured their type, click Create Replication Group.
-
Newly created replication groups appear on the Replication Group tab, but only on the admin UI of nodes that are themselves members of the new group.
 The new replication group appears if you are logged into one of its constituent nodes
Click View to view your options.
|
Important: Don’t cancel replication group creation tasks
If you create a new replication group, then find that the task is stuck in pending because one of your nodes is down, do not use the Cancel Tasks option on the Dashboard’s Pending Tasks table.If, when all nodes are up and running, the replication group creation tasks are still not progressing, please contact the WANdisco support team for assistance. |
2.7.5. Add repositories
When you have added at least one Replication Group you can add repositories to your node.
Before adding a repo, you must run a git fsck to ensure its integrity.
|
You can also run a git gc before your git fsck to potentially improve performance.
|
-
Click the Repositories tab, then click Add.
 Repositories > Add
 -
Enter the following information, then click Add Repo:
- Repo name
-
Choose a descriptive name. This doesn’t need to be the folder name, it can be anything you like.
- FS Path
-
The local file system path to the repository. This needs to be the same across all nodes.
- Replication Group
-
The replication group in which the repository is replicated. It is the replication group that determines which nodes host repository replicas, and what role each replica plays.
- Deny NFF
-
If you would like to allow non-fast-forward changes on the repository, untick this box.
- Global Read-only
-
Check box that lets you add a repository that will be globally read-only. You can deselect this later.
In this state GitMS continues to communicate system changes, such as repository roles and scheduling, however, no repository changes will be accepted, either locally or through proposals that might come in from other nodes. - Create New Repository
-
If the repository already exists it must be tested before you place it under the control of GitMS. If it doesn’t already exist then tick the Create New Repository box to create it at the same time as adding.
 Repositories > Enter details > Add RepoTake care when naming repositories.Follow any relevant best practices when naming repositories. For example, there’s a known issue with Git running on MacOS where repositories that have the hash "#" in their name will fail operations, such as Git Clone. (NV-5280)Repository stuck in Pending stateIf a repository that you added gets stuck in the deploying state, you see this on the Dashboard, in the Replicator Tasks window. You can cancel the deployment and try adding the repository again. To cancel a deployment, go to the Replicator Tasks window and click the Cancel Task link.
-
Click the Repositories tab to see a list of the repositories added.
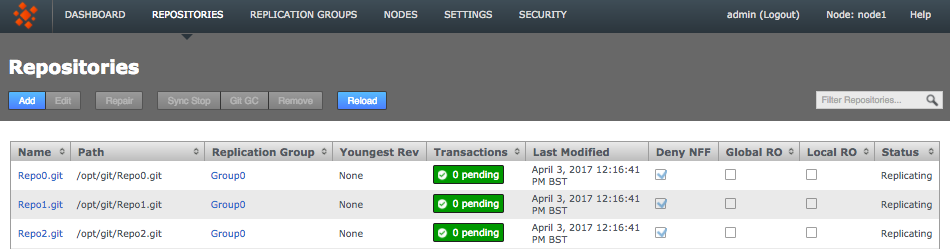 Repositories listed
Information in the repositories list describes the master branch, not the whole repository.
See the Reference section for more details on the Repository list.
|
Git configuration files for GitMS repositories
GitMS sets the following variables in your repository’s configuration file. Make sure the settings aren’t changed or removed:core.replicatedreceive.denyNonFastFowards
|
2.7.6. Using Git submodules
If you use submodules, they are typically defined using the full URL of the repository, for example:
git add submodule test2 git@192.168.1.30:/home/wandisco/repos/subrepo.git
This adds the following into your .gitmodules file:
[submodule "test2"]
  path = test2
  url = git@192.168.1.30:/home/wandisco/repos/subrepo.git
In this way, submodule activity will occur against a specific Git server.
If the repository used as a submodule is being replicated through GitMS, you lose the benefits of using the repository on a local node. To maintain the benefits of the replicated environment, specify the relationship to the submodule using a relative path, such as:
git submodule add REPONAME ../RELATIVE-PATH-TO-REPO
For example:
git submodule add ../subrepo.git test2
This adds the following entry to your .gitmodules file:
[submodule "test2"]
  path = test2
  url = ../subrepo.git
Note: If you’re using external submodules, you can continue to specify them using full URLs. This is only applicable to local submodules you want replicated.
3. Upgrade Guide
This section describes upgrades and rollbacks for GitMS.
GitMS is a completely new class of product so it’s not possible to follow a shortcut upgrade procedure.
|
Upgrading GerritMS
If you are using GitMS in conjunction with Gerrit then read the Upgrade Guide in the GerritMS manual before continuing.
|
|
Logging configuration warnings during upgrade
If you see the following message during upgrade then you need to determine if any changes were made to the configuration file. These changes then need to be added to the new configuration file and it copied into place. See the release notes for more information if changes are required. WARNING: Custom changes to logging configuration have been detected. The previous logging configuration has been left in place. Please merge the changes from the latest version into your local configuration It is possible that changes were not made as our code does have the potential for false positives. This is something we will fix in a future release. See the release notes for more information. |
3.1. Upgrade to latest version
Before upgrading GitMS or associated binaries you need to block access to all replicated Git Repositories. You can do this by removing the AuthZ file for example. Don’t re-enable repository access until you have completed the upgrade.
3.1.1. Upgrade Git binaries
You need to upgrade C-Git binaries before upgrading GitMS. To do this follow these steps:
-
Stop GitMS on all nodes.
-
Upgrade Git binaries on all nodes - see Git binaries for more information.
-
Start GitMS on all nodes.
-
Follow the GitMS upgrade instructions below.
3.1.2. Assumptions
-
You have root access on each node and also access to the operating system account that GitMS is running under, typically this is the "gitms" account.
-
The procedure assumes that you are not changing your replication configuration. You’re not adding or removing nodes from the replication group.
3.1.3. Procedure
| If your upgrade of the initial node fails for any reason, then you must contact WANdisco Support immediately, without trying to upgrade any other nodes. |
| If you are running with Access Control/Flume and following on from a previous installation/upgrade that was done using root, all subsequent upgrades also need to be run using root. |
To upgrade to the latest version:
-
Connect to each node in the existing replication system, by command line, as root.
-
To prevent accidental startup during upgrade run the following command:
SysV -
chkconfig git-multisite off
SystemD -systemctl disable wdgitms.target -
GitMS needs to be stopped so a backup can be made which is the same at all sites in the eco-system. To do this to the GitMS UI and click on the sync stop button on the repositories tab.
-
Backup your databases on each node using the following command:
curl --user <admin user>:<admin password> -X POST http://<node ip address>:8082/api/backup
-
Make a backup of the replicator database to allow for rollback. Use the following command with an appropriate timestamp, for example 20170324T12:12:12.
tar -cjf /path/to/your/backup/directory/<YYYYMMDDThh:mm:ss>.gitms.db.backup.tbz -C /opt/wandisco/git-multisite/replicator/database .
-
Copy the latest installer script to each Node and run it as root.
For the question:Is this the first node? y/n:
Answer
nfor all nodes, all nodes can be upgraded in parallel.No sync stop?If you are using a different upgrade procedure to the one described here, which does not include a 'sync stop' step then:
Select one node and run the upgrade on this node to completion.
Typeyto the question:Is this the first node? y/n:
When this is complete you can then upgrade all the other nodes in parallel by typing
nto answer this question.
Do not bring up any node until ALL of the nodes have been upgraded. -
Exit from your gitms account back to the root account.
-
If you are upgrading to GitMS 1.9.4, and the logging configuration was modified in the previous version, then after upgrade has completed you will see the following warning:
IMPORTANT: For gitms release 1.9.4, please ensure that you add the following to the log4j.properties file before restarting gitms. This additional log configuration stops spamming of the gitms.log file:

# CryptoFactory
log4j.logger.com.wandisco.security.crypto=INFO
# jsonpath
log4j.logger.com.jayway.jsonpath=INFO
You need to add this property to to the
log4j.propertiesfile before restarting GitMS. -
After all nodes have been upgraded, start GitMS by running the following:
SysV -
service git-multisite startthenchkconfig git-multisite on
SystemD -systemctl start wdgitms.targetthensystemctl enable wdgitms.target -
Finally, check the following:
-
All nodes have running replicators.
-
Replicator and GUI versions are showing the newly installed version.
-
You can push to a repository successfully.
-
The pushed change is replicated across the entire replication group.
-
-
Repository access can now be re-enabled, for example by re-instating the AuthZ file.
3.2. Rollback to previous version
If you need to roll back to the previous version of GitMS, use the following procedure:
-
Log in as root on each node.
-
GitMS needs to be stopped so a backup can be made which is the same at all sites in the eco-system. To do this first run the following command:
SysV -
chkconfig git-multisite off
SystemD -systemctl disable wdgitms.target -
On each node, uninstall the current version using the following script:
#This script removes the install of git-multisite to be able to install cleanly
service git-multisite stop
echo "Removing Git-Multisite RPMS"
yum remove -y git-multisite git-multisite-gui git-multisite-hook git-multisite-all
echo "Removing Git-Multisite Directory"
rm -rf /opt/wandisco/git-multisite
cd /tmp
rm -rf *
cd
-
Uninstall the C-Git binaries associated with the current GitMS version, see Uninstall binaries.
-
Install the correct binaries for the GitMS version you are about to install. See Git binaries for more information.
-
On each node, re-install the previous version.
-
On each node, stop the git-multisite service:
SysV -
chkconfig git-multisite offthenservice git-multisite stop
SystemD -systemctl disable wdgitms.targetthensystemctl stop wdgitms.target -
Remove the contents of the GitMS database directory:
rm -r /opt/wandisco/git-multisite/replicator/database/*
-
Change to the gitms user:
su gitms
-
On each node, copy the content of your backed up database directory into place, using the correct timestamp for your backup:
cd /opt/wandisco/git-multisite/replicator/database
tar xjf /path/to/your/backup/directory/<YYYYMMDDThh:mm:ss>.gitms.db.backup.tbz
-
Check the database directory and all its contents are owned by gitms:gitms and permissions are set to 755
-
Exit from your gitms account back to the root account
-
Restart the git-multisite service:
SysV -
service git-multisite startthenchkconfig git-multisite on
SystemD -systemctl start wdgitms.targetthensystemctl enable wdgitms.target -
Finally, check the following:
-
All nodes have running replicators
-
Replicator and GUI versions are showing the version rolled back to.
-
You can push to a repository successfully
-
The pushed change is replicated across the entire replication group
-
4. Administrator Guide
4.1. Running GitMS
This guide describes how to use GitMS.
4.1.1. Start up
To start the GitMS replicator:
-
Open a terminal window on the server and log in with suitable file permissions.
-
Run the start script:
SysV -
service git-multisite start
SystemD -systemctl start wdgitms.target -
The two components of GitMS, the replicator and the UI, start up. See below for more details on the startup script.
4.1.2. Shut down
To shutdown:
-
Open a terminal window on the server and log in with suitable file permissions.
-
Run the stop script:
SysV -
service git-multisite stop
SystemD -systemctl stop wdgitms.target -
Both the replicator and the UI processes shut down. See below for more details on the startup script.
4.1.3. Startup Script Commands
The startup script for persistent running of GitMS is in the /etc/init.d folder of SysV or /usr/lib/systemd/system if using SystemD.
Run the script with the help command to list the available commands.
As of GitMS 1.9.5 SystemD commands are used for platforms that support only SystemD (without compatibility mode).
On all other platforms the SysV commands are used.
See the sections below for these different commands, and here for more information on platform specific commands.
SysV commands
| Service Command | Behavior |
|---|---|
start |
Start the application |
stop |
Stop the application |
restart |
Restart the application |
uistart |
Start the UI |
uistop |
Stop the UI |
repstart |
Start the Replicator |
repstop |
Stop the Replicator |
status |
Show whether the application is running or not |
version |
Display the application version |
Example: service git-multisite restart
SystemD commands
| Systemctl Command | Behavior |
|---|---|
start |
Start the service |
stop |
Stop the service |
restart |
Restart the service |
status |
Show whether the service is running or not |
Example: systemctl start wdgitms.target
This starts both the UI and the replicator.
To call the UI only, replace wdgitms.target with wdgitmsui.service, and for the replicator use wdgitmsrep.service.
Note: To obtain version information for GitMS on a SystemD governed system, please execute /opt/wandisco/git-multisite/bin/git-multisite version.
4.1.4. Change the admin console password
You can change GitMS’s login password at any time:
-
Log in to the GitMS admin console.
Login -
Click the Security tab.
 Security
 -
On the security tab screen you see the Internally Managed Users table. Click the Edit link that corresponds with the Admin account. In the Edit User window that opens, enter a new password. Repeat the entry in the box immediately below.
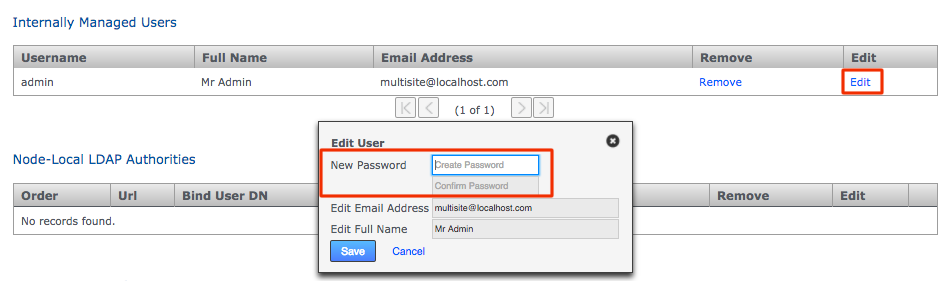 Changed password
 -
Click Save to store the new password. The new password has been accepted if you see a growl message on screen.
 GrowlChanging UsernameYou cannot currently change the Administration username. To change the username you would need to add a new administrative account with the desired name and then remove the original account name.
4.1.5. Update your license.key file
Follow this procedure if you need to change your product license, e.g. if you need to increase the number of Git accounts (users) or the number of replication nodes.
-
Log in to your server’s command line, navigate to the properties directory:
/opt/wandisco/git-multisite/replicator/propertiesand rename thelicense.keytolicense.20130625:total 16 -rw-r--r-- 1 wandisco wandisco 1183 Dec 5 15:58 application.properties -rw-r--r-- 1 wandisco wandisco 512 Dec 5 15:05 license.key -rw-r--r-- 1 wandisco wandisco 630 Dec 17 15:43 logger.properties -rw-r--r-- 1 wandisco wandisco 630 Dec 17 15:45 log4j.properties -
Get your new
license.keyand drop it into the/opt/git-multisite/replicator/propertiesdirectory. -
Restart the replicator by running the GitMS script with the following argument:
/etc/init.d/git-multisite restart
This triggers a GitMS replicator restart, which forces GitMS to pick up the new license file and apply any changes to permitted usage.
|
If you don’t restart
If you follow the above instructions but don’t do the restart, GitMS continues to run with the old license until it performs a daily license validation (which runs at midnight).
If your new license key file is valid and is in the right place, then GitMS updates its license properties without the need to restart.However, if the license file is somehow corrupt, or belongs to a different WANdisco product, then GitMS will shutdown. We therefore recommend restarting GitMS during working hours to avoid needing to come in after midnight if there is an issue. |
If you have problems, check the replicator log (/opt/git-multisite/replicator/logs/gitms.log) for more information.
No message will appear on the dashboard as the system will not start with a bad license.
Licensed user limit
To make it easier to manage growing numbers of GitMS accounts (users) we provide an alert system that will warn administrators when GitMS is close to exhausting the maximum number of licensed users.
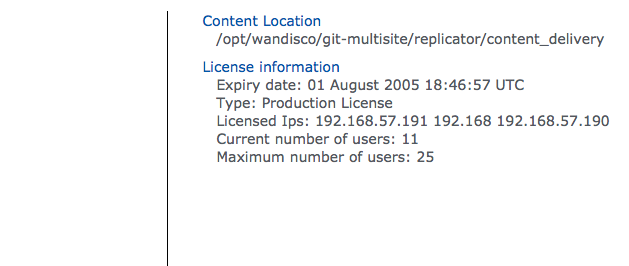
A warning is displayed on the dashboard and emails are also sent out. Emails are subject to administrator email addresses being entered during account setup and the notification system being configured. See Set up email notifications for details of how to do so.
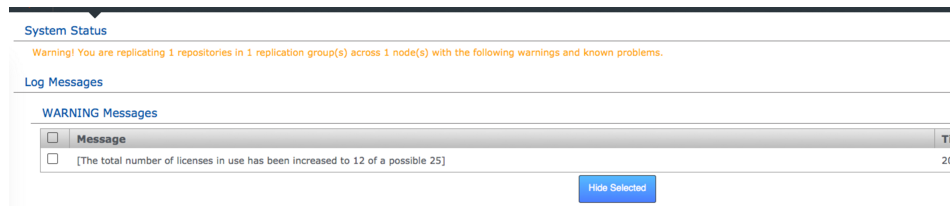
The default threshold is 5, so that if your number of available accounts on your license reaches 5 or less you will be receive a warning on the dashboard, as well as email warnings to all administrators.
Increase the threshold
You can increase the threshold at which a warning is sent. You should do this if your deployment could see a sudden, large increase in Git accounts.
-
Open a terminal session on one of your nodes. Ensure you have suitable permissions for editing.
-
Open the
/opt/wandisco/git-multisite/replicator/properties/application.propertiesfile. -
Look for the following property:
license.account.warning.threshold=5
The default number of available accounts is 5, which is the minimum recommended value. It is possible to set the threshold lower but you are more likely to need to set a higher number to have GitMS warn that available accounts are running low. Note that once the threshold is reached a warning will be sent whenever further accounts are added or if the number of accounts begins to lower.
-
Save the file and restart the node.
What happens if the user limit is exceeded
If the number of accounts (users) in GitMS exceeds the license limit then a warning is sent, and will be repeatedly sent each day, instructing the administrator to remedy the situation, either by adding more accounts to the GitMS license, or by removing accounts from GitMS. From the point that the available accounts runs out, a week long grace period starts in which the administrator can remedy the situation. After this any accounts added after the limit breach will lose their write access to the Git repositories.
4.1.6. Update a node’s properties
The System Data section of the Settings tab lists editable properties that you can quickly update by re-entering, saving, and allowing the GitMS replicator to restart.
Note: This may cause a brief disruption for users because in-flight commits will fail.
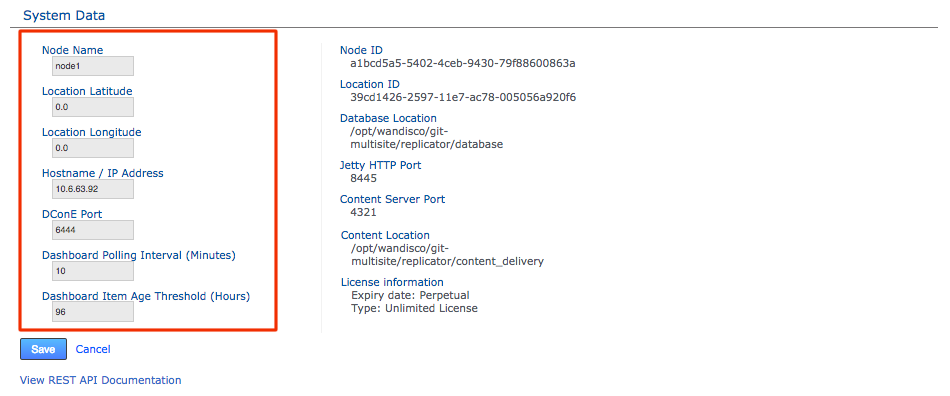
- Node Name
-
This is the human-readable form of the node’s ID. You can change the Node Name and reuse it after it has been removed from the replication network. You cannot have two nodes with the same name, but you can reuse a previously removed node name.
- Location Latitude
-
Enter the node’s latitude here.
- Location Longitude
-
Enter the node’s longitude here.
- Hostname / IP Address
-
Enter/update the hostname or underlying IP address.
Changing this property instigates a Replicator restart and requires a manual UI restart.If SSL is configured then after an IP address change all nodes must be manually restarted. Only change one nodeThe UI can only be used to change the IP address of a single node at one time. If you need to change the address of multiple nodes see the KB article on How to use updateinetaddress.jar to change IP address. Please contact WANdisco support for assistance if you want to carry out this procedure. - DConE Port
-
The TCP port used for DConE agreement traffic. Do not confuse this with the Content Distribution port which carries the payload repository data.
Changing this property initiates a Replicator restart and requires a manual UI restart. - Dashboard Polling Interval (Minutes)
-
Sets how often the dashboard messaging is updated. The messaging is populated by Warnings and Errors that appear in the replicator logs file. The default frequency is every 10 minutes.
- Dashboard Item Age Threshold (Hours)
-
Sets how long dashboard messages are maintained. After this amount of time messages are flushed from the dashboard. The default is 96 hours (4 days).
After entering a new value, click Save. A growl message confirms that the change is being replicated. This results in a restart of the replicator which may cause brief disruption of users.
Other property changes
You can also modify other properties in the application.properties configuration file.
By default it is located in /opt/wandisco/git-multisite/replicator/properties/application.properties.
|
Take care when making changes to "hidden" properties
An error can affect product behavior and be difficult to trace. In most situations, you should only make changes with the assistance of WANdisco’s support team.
|
Thread dumps
Please turn off thread dumps unless asked to enable them by WANdisco support.
To do this edit the application.properties file and set threaddump.enabled=false.
Content delivery port
To change the Content Delivery port:
-
Use the command:
content.port.<Node id>=<new port> -
When the file is in place, run the following command (on all the nodes except the one you have changed):
java -jar git-ms-replicator-<version_number>-updateinetaddress.jar -c <path to application.properties>
-
Go back to the node with the updated properties and Restart GitMS.
-
Log in to the updated node and check its System Data at the bottom of the Settings tab. Do some test commits to ensure that replication continues successfully.
Task garbage collection
Two configurable properties control how often the task garbage collection process runs. These properties are set during installation. To modify their values, add them to the application.properties file:
- task.removal.interval
-
This controls how often the task garbage collection process should run. The default is 96 hours, noted in milliseconds (345600000 ms = 96 hours).
- task.expired.interval
-
This controls how old a successfully run task must be before it is made available for garbage collection. The default is 96 hours, noted in milliseconds (345600000 ms = 96 hours).
Recommended Settings
Summary: For large deployments reduce the time from 96 to 24 hours
The recommended settings are suitable for most deployments.
However, for deployments with very large numbers (thousands) of repositories and where repository consistency checks are automated, then we recommend that you reduce the setting times, initially to 24 hours (86400000 ms).
Shorter periods result in a corresponding reduction in your ability to troubleshoot problems that involve replicator task history. If you notice large numbers of failed tasks accumulating over time or have any concerns about what settings are right for your specific deployment, contact WANdisco’s support team.
Example
For a deployment that replicates several thousand repositories and schedules daily consistency checks it’s decided to reduce the task expiry to 48 hours and the garbage collection frequency to 24 hours.
The settings would therefore be:
task.removal.interval=86400000L
task.expired.interval=172800000L
| Make sure that you add an "L" to the end of your value. |
Garbage collection threshold
There’s a tunable property called gitms.gc.threshold that will cause git garbage collection to be invoked if the pushed packfile is larger than the specified value. The default value is 100MiB, although it is expressed as bytes with a required trailing capital 'L', i.e.
gitms.gc.threshold=104857600L
Node content distribution timeouts
Two configurable properties enable you to balance best possible performance against the tolerance of a poor WAN connectivity.
- socket.timeout
-
socket.timeout=90000This is the time, in milliseconds, that a read() call on a socket will wait before timing out. Default value is 15 minutes (90,000 milliseconds).
Not less than 10 minutesDO NOT set socket.timeout to less than 10 minutes (60,000 milliseconds) or you may encounter problems. - content.pull.timeout
-
content.pull.timeout=300000This sets how long the Content Distribution system waits for new content to be pulled fully over from a remote node. The default value is 5 minutes (300,000 milliseconds). This default is set with the assumption that there are no problems with the deployment’s WAN connectivity.
-
Increasing the timeout: This may help if poor connectivity causes the replicator to repeatedly give up on content distribution that would have eventually transferred if there was enough time, i.e. not as a result of a slow network rather than something that has caused a permanent error.
-
Decreasing the timeout: We recommend that you do not decrease the timeout value because this is not designed to boost performance, although that may occur in some situations. We recommend that you consult the WANdisco Support team if you want to drop the timeout value below 5000 (5 seconds).
-
Consistency check timeouts
From GitMS 1.9.4 onwards the setting gitms.cc.wait.time can be added to the application.properties file.
This value tells the replicator (in seconds) the maximum time to wait for a consistency check result from all nodes.
The default value is 10 seconds if it is not added to the application.properties file.
For example:
gitms.cc.wait.time=15
4.1.7. Set up data monitoring
The Monitoring Data tool monitors the disk usage of GitMS’s database directory, providing a basic level of protection against GitMS consuming all disk space. The tool also lets you set up your own monitors for user-selected resources.
|
Monitoring Data - not intended as a final word in system protection
Monitoring Data is no substitute for dedicated, system-wide monitoring
tools. Instead, it is intended to be a 'last stand' against possible
disk space exhaustion that could lead to data loss or corruption.Read our Recommendations for system-wide monitoring tools. |
Default settings
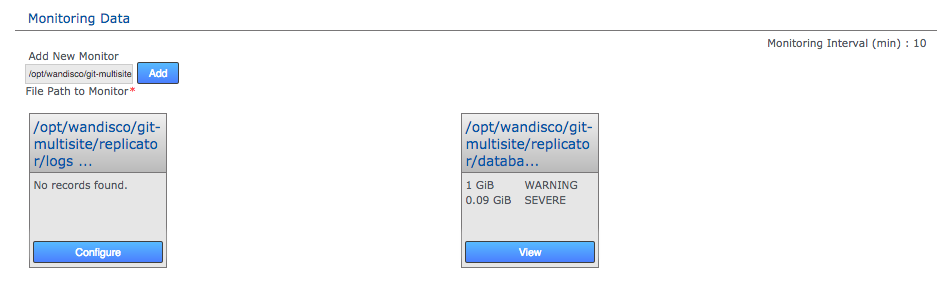
By default GitMS’s database directory (/opt/wandisco/git-multisite/replicator/database) is monitored - this is the location of GitMS’s prevayler database where all data and transactions files for replication are stored.
This built-in monitor runs on all nodes. Any additional monitors that you set up will monitor on a per-node basis. Monitors are not replicated so a monitor set up on one node is not applied to any other node.
Additional monitors
As well as GitMS’s own database folder, there are several directories that might grow very large and potentially consume all available file space.
Consider monitoring the following GitMS directories:
-
/opt/wandisco/git-multisite/replicator/content -
/opt/wandisco/git-multisite/logs -
/opt/wandisco/git-multisite/replicator/logs
Also monitor /path/to/authz. If you are using AuthZ to manage authorization and your AuthZ file is situated on a different file system from GitMS, then we recommend that you set up monitoring of the AuthZ file.
For most deployments all these directories will reside on the same file system, so our default monitor would catch if any of them were consuming the available space. However, there are two scenarios where we’d recommend that you set up your own monitor for the content directory:
-
You wish to set a higher trigger amount than the default monitor (1GiB for warning, 0.09GiB for emergency shutdown).
-
You have placed the content directory on a different filesystem with its own capacity that wouldn’t be tracked by the default monitor.
In either case you should follow up the setting up of a monitor with a corresponding email notification that will be sent if some or all of your monitor’s trigger conditions are met.
Create additional resource monitors using the following procedure:
-
Log in to the Administrator user interface.
-
Click the Settings link on the top menu bar.
-
Monitoring Data is situated below the Administrator Settings. Enter the full path to the resource that you wish to monitor. For example, you might wish to monitor the replicator logs:
/opt/wandisco/git-multisite/replicator/logs. Enter the path and click Add. Add resource path
 -
The new resource monitor appears as a new box - it will display No records found, indicating that it doesn’t yet have any monitoring rules set. Click its corresponding Configure link.
 Configure
 -
The screen will update to show the Resource Monitoring screen for your selected resource.
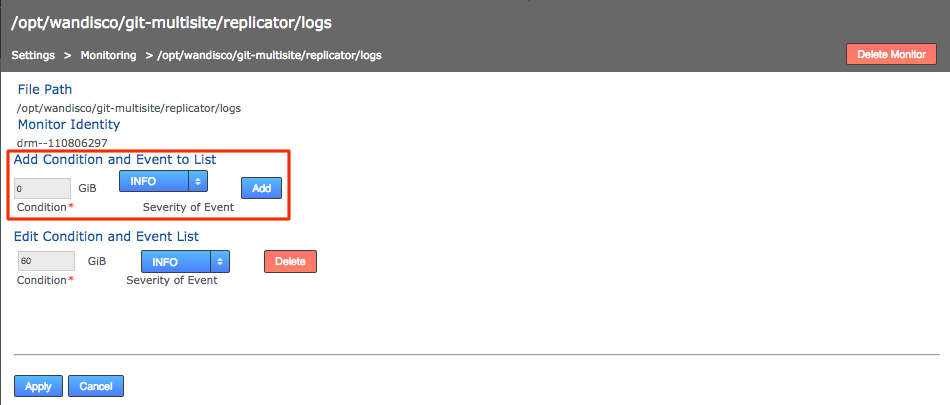 Settings
- File Path
-
The full path for your selected resource (it must be a directory)
- Monitor Identity
-
The unique string that will identify the monitor
- Edit Condition and Event List
-
Lists current resource monitors, initially this will state "No records found"
-
Add Conditional and Event to list.
- Storage amount entry field
-
Enter an amount of disk space in Gigabytes. e.g. 0.2 would be equal to 200 Megabytes of storage.
- Select an Event from the dropdown:
-
- SEVERE
-
Initiates a shutdown of GitMS and will also write a message to the log and the SEVERE logging level. See When a Shut down is triggered for more information.
- WARNING
-
Writes a message to the log and the WARNING level of severity.
- DEBUG
-
Writes a message to the log and the DEBUG level of severity.
- INFO
-
Writes a message to the log and the INFO level of severity.
-
When you have added all the trigger points and events that you require for the resource, click Update. You can then navigate away: Click Resource Monitoring on the breadcrumb trail to return to the settings screen.
When a shutdown is triggered
If the disk space available to a monitored resource is less than the value you have for a SEVERE event then the event is logged and GitMS’s replicator will shut down after a set interval of 10 minutes. You can configure the interval in the application.properties file in /opt/wandisco/git-multisite/replicator/properties/application.properties.
- resourcemonitor.period.min=10L
-
Value is in minutes. See Content Distribution Policy.
Tunable settings
Change the threshold used to trigger low disk space warnings.
You can set the following values in the application.properties, then restart the replicator:
- monitor.threshold.severe
-
Set the level at which the replicator will immediately shutdown when monitoring the database directory (see above). The value cannot be below 100MiB. Give the storage amount in bytes, remembering to add an "L" to the end to signify long value, e.g. 1000000000L = 953.67MiB.
- monitor.threshold.warning
-
Sets the threshold for a notification warning if the free disk space drops below the specified value. Given in bytes, as noted above.
|
Edits to property files require a replicator restart
Any change that you make to the application.properties file will require that you restart GitMS’s replicator.
|
When shut down, all Git repositories become unavailable to users. You should immediately make more disk space available. The replicator can be restarted using GitMS’s service as soon as the resource that triggered the shutdown has enough available disk space not to shut down again.
Overriding the forced shutdown
You may need to override the forced shutdown if you can’t start a node to resolve the cause of the forced shutdown. For example, you might have mistakenly created a data monitor that triggers a severe log message if there’s less disk space than the disk’s actual capacity. You then cannot free up space, apart from swapping for a bigger disk.
To unlock the forced shutdown.
-
Log in to the locked node using a terminal.
-
Navigate to the properties folder. By default this is here:
/opt/wandisco/git-multisite/replicator/properties/application.properties
-
Create a backup, then edit the file, changing the line:
monitor.ignore.severe=false
to say
monitor.ignore.severe=true
Save the change to the file.
-
Restart the replicator (see Starting up). During the restart the replicator will now ignore the severe warning (which are still written to the log file) allowing you to delete the offending monitor.
You cannot use this procedure to override the default monitor. Its emergency shutdown limit of <100MiB always shuts down the replicator.
4.1.8. Set up email notifications
Email notification is a rules-based system for delivering alerts (based on user-defined templates) over one or more channels to destinations that are based on triggers that are activated by arbitrary system events. Put simply, email notification sends out emails when something happens within the GitMS environment. The message content, trigger rules and destinations are all user-definable.
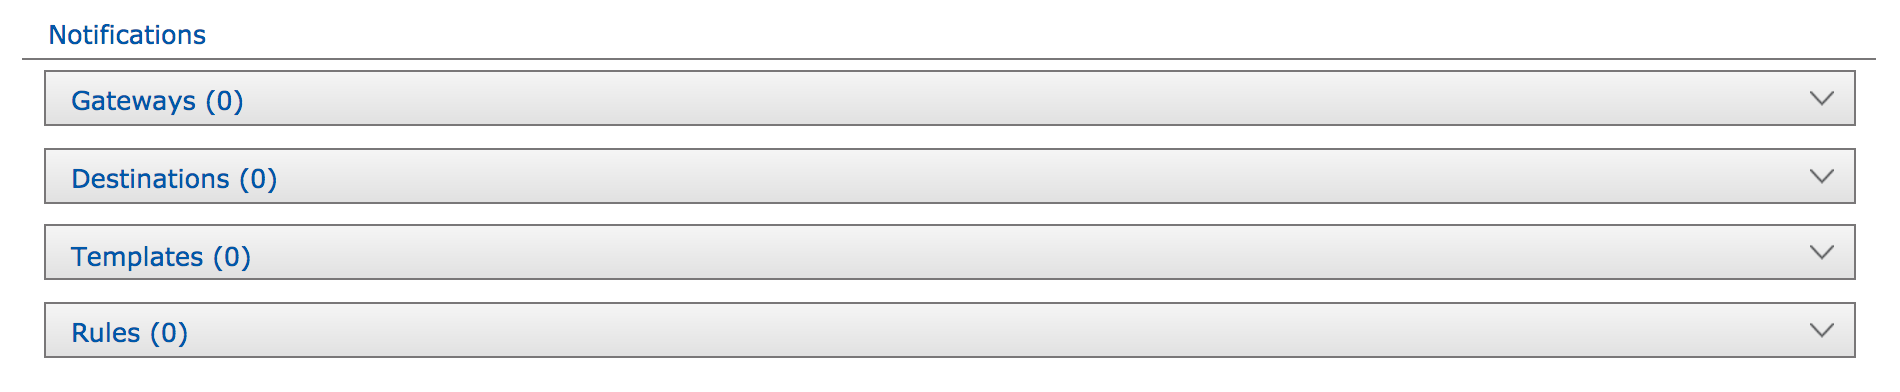
Read about how to:
Set up a gateway
The Gateway settings panel stores your email (SMTP) server details. You can set up multiple gateways to ensure that the loss of the server doesn’t prevent alert notifications from being delivered.
-
Log in to the admin UI, then click the Settings tab.
-
Click the Gateway section of the Notifications area.
 Add Gateway
 -
Enter your email gateway’s settings:
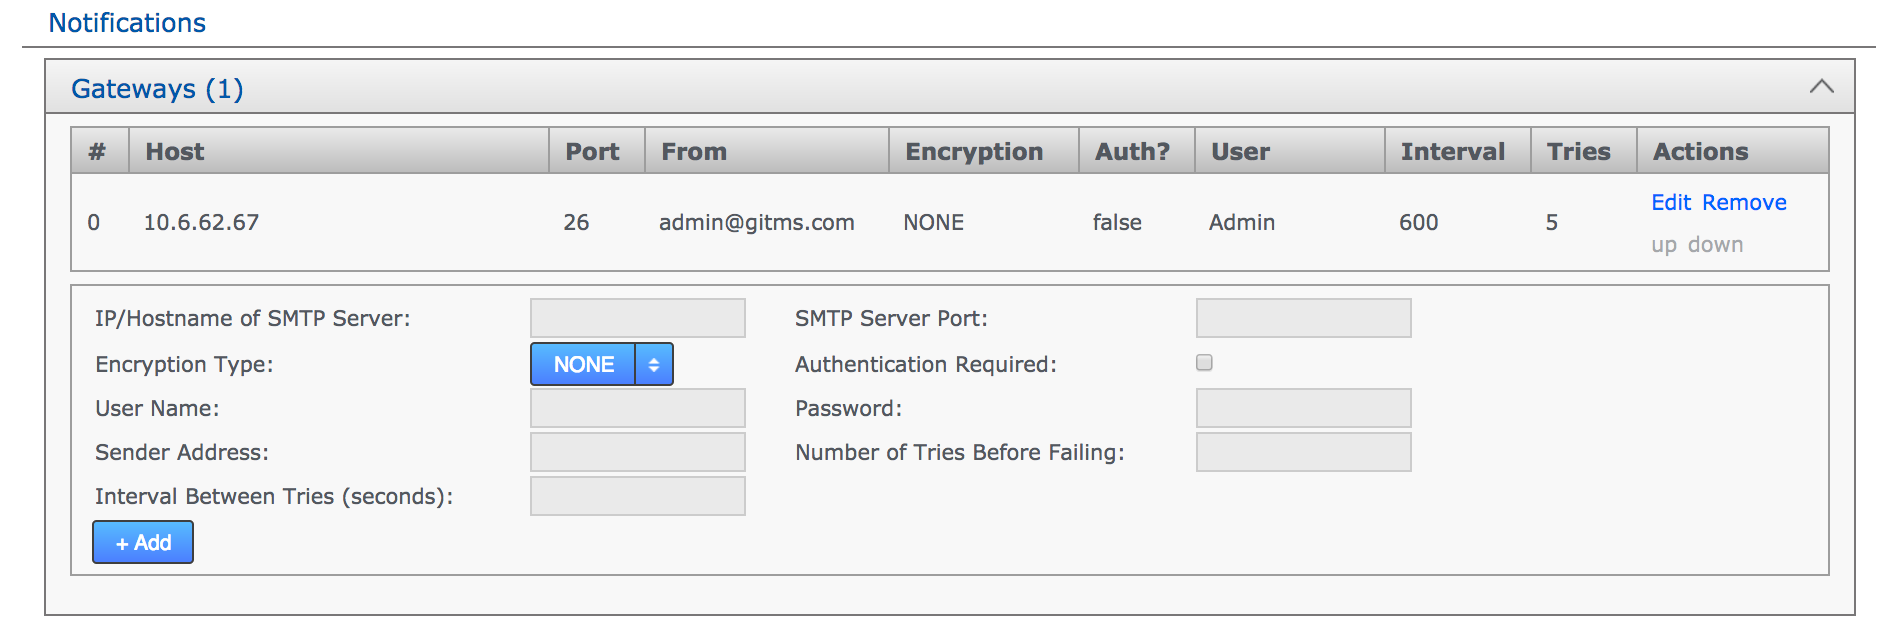 Enter settings
- IP/Hostname of SMTP Server
-
Your email server’s address.
- SMTP Server Port
-
The port assigned for SMTP traffic (Port 25 etc).
- Encryption Type
-
Indicate your server’s encryption type - None, SSL (Secure Socket Layer) or TLS (Transport Layer Security). SSL is commonly used. For tips on setting up suitable keystore and truststore files see Setting up SSL Key pair.
Keystores?If you’re not familiar with the finer points of setting up SSL keystores and truststores it is recommended that you read the following Knowledge base articles: Using Java Keytool to manage keystores and How to create self signed certificates and use them in test environments. - Authentication Required
-
Indicate whether you need a username and password to connect to the server - requires either true or false.
- User Name
-
If authentication is required, enter the authentication username here.
- Password
-
If authentication is required, enter the authentication password here.
- Sender Address
-
Provide an email address that your notifications will appear to come from. If you want to be able to receive replies from notifications you need to make sure that this is a valid and monitored address.
- Number of Tries Before Failing
-
Set the number of attempts GitMS makes to send out notifications.
- Interval Between Tries (Seconds)
-
Set the time (in seconds) between your server’s attempts to send notifications.
-
Click the +Add button. Your gateway appears in the table.
You can add any number of gateways. GitMS exhausts the "Number of Tries Before Failing" for each registered gateway before moving on down the list to the next. You can use the Test button to verify that your entered details will connect to a mail gateway server.
Set up a destination
The destinations panel stores the email addresses for your notification recipients.
-
Click the Destinations line.
 Click Destinations
 -
Enter an email address for a notification recipient. Click the +Add link.
 Email addresses you target for alerting
 -
The destination will appear in a table. Click the Edit or Remove links to change the address or remove it from the system.
Set up a template
The template section stores email messages. You can create any number of templates, each with its own notification message, triggered by one of a number of trigger scenarios that are set up in the Rule section.
-
Click + on the Template line.
-
Enter a Template Subject line which will be the subject of the notification email.
-
Enter some Body Text which will be the message that is sent out when the notification is triggered. The message has a 1024 character limit. You can track the available number of characters at the bottom of the text box.
-
When you’ve entered the message, click + Add to save the message template.
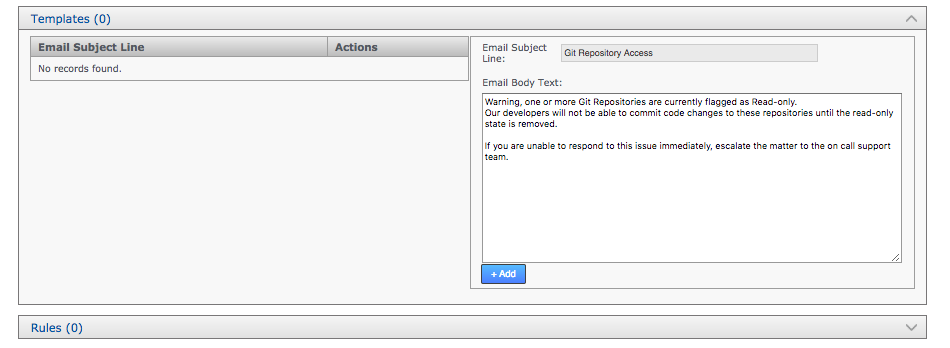 Template
For example if an Admin wanted to receive an email when a new repository is deployed the the body text could be:
Hi Admin,
RepositoryDeployedEvent occurred {timestamp).
The repository deployed was {event.repository.name} and its path is {event.repository.fSPath}
Regards,
Replicator
In the rules, the template needs to trigger in the event Deploy Repository Succeeded, and the event selected determines which variables are available in the message body - for more information see events and variables.
Set up a rule
The Rule section defines which system event should trigger a notification, what message template should be used and which recipients should be sent the notification.
-
Click + on the Rule line.
-
Choose an event from the Event drop-down list:
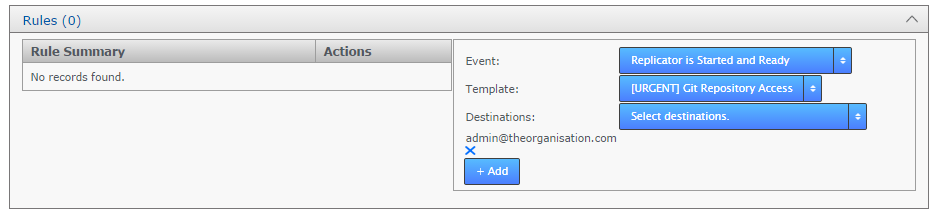 Rules
Rules -
Choose a Template from the drop-down list. These are the templates that you have already set up under the Templates section.
-
Choose destinations for your notification from the available destination email addresses. You can make multiple selections so that a message is sent to more than one recipient address.
-
Click + Add to save your rule.
Events and variables
When writing email notification templates, you can insert variables into the template that will be interpolated when the notification is delivered. The variables available depend on the event type selected. The following variables are available for all event types:
{node} - This returns the node name.
{timestamp} - This returns the time at which the event is received (not the time at which the notification is delivered).
{event} -This returns the raw dump of the event.
All events are now listed along with a brief description and the additional variables available for each specific event:
- Disk Monitor Info
-
Disk Storage has dropped below the Info level. This will trigger if any data monitor message is written to the logs at the INFO level.
{event.message} - This returns information about the disk monitoring threshold that was exceeded.
{event.resource} - This returns the resource on disk that is being monitored. - Disk Monitor Severe
-
Disk Storage has hit the Severe level. This will trigger if any Severe level data monitor message is written to the logs. At this level, Git MultiSite will have shutdown to ensure that disk space exhaustion doesn’t corrupt your system and potentially your Git repositories. For more information about disk warning messages, see the Setting up data monitoring section.
{event.message} - This returns information about the disk monitoring threshold that was exceeded.
{event.resource} - This returns the resource on disk that is being monitored. - Disk Monitor Warning
-
Disk Storage has dropped below the Warning level.This will trigger if any data monitor message is written to the logs. For more information about disk warning messages, see the Setting up data monitoring section.
{event.message} - This returns information about the disk monitoring threshold that was exceeded.
{event.resource} - This returns the resource on disk that is being monitored. - Generic file replication error occurred
-
An error occurred in the system that handles the replication of system files.
{event.message} - This returns information on the triggering event.
- Repository exited Global Read-Only
-
A repository that was flagged as Global Read-Only has now returned to replication.
{event.repository} - This returns the repository object.
{event.repository.name} - This returns the user-specified name of the repository to which the event pertains.
{event.repository.fSPath} - This returns the location on-disk of the repository that the event pertains to.
{event.repository.dsmId} - This returns the deterministic state machine ID in which the event occurred.
{event.repository.state} - This returns the repository state.
{event.repository.globalReadOnly} - This will be True if the repository Global Read only. - Repository entered Global Read-Only
-
A repository that has been replicating successfully is now flagged as Global Read-only.
{event.repository} - This returns the repository object.
{event.repository.name} - This returns the user-specified name of the repository to which the event pertains.
{event.repository.fSPath} - This returns the location on-disk of the repository that the event pertains to.
{event.repository.dsmId} - This returns the deterministic state machine ID in which the event occurred.
{event.repository.state} - This returns the repository state.
{event.repository.globalReadOnly} - This will be True if the repository Global Read only. - License is about to expire
-
The user license for the node is about to expire.
{event.message} - This returns information on the triggering event.
- License has expired
-
The user license for the node has now expired.
{event.message} - This returns information on the triggering event.
- License is nearing the maximum number of users
-
The number of active accounts (users) is close to the license limit.
{event.message} - This returns information on the triggering event.
- User License Limit Reached
-
The number of active accounts (users) has now reached the licensed limit.
{event.message} - This returns information on the triggering event.
- Repository Local Read-Only Event
-
A repository has entered Local Read-Only mode.
{event.repository} - This returns the repository object.
{event.repository.name} - This returns the user-specified name of the repository to which the event pertains.
{event.repository.fSPath} - This returns the location on-disk of the repository that the event pertains to.
{event.repository.dsmId} - This returns the deterministic state machine ID in which the event occurred.
{event.repository.state} - This returns the repository state.
{event.repository.localReadOnly} - This will be True if the repository is Local Read only. - Repository exited Local Read-Only
-
A repository that was in Local Read-Only mode has now left the mode.
{event.repository} - This returns the repository object.
{event.repository.name} - This returns the user-specified name of the repository to which the event pertains.
{event.repository.fSPath} - This returns the location on-disk of the repository that the event pertains to.
{event.repository.dsmId} - This returns the deterministic state machine ID in which the event occurred.
{event.repository.state} - This returns the repository state. - Repository entered Local Read-Only
-
A repository has entered the local Read-Only mode.
{event.repository} - This returns the repository object.
{event.repository.name} - This returns the user-specified name of the repository to which the event pertains.
{event.repository.fSPath} - This returns the location on-disk of the repository that the event pertains to.
{event.repository.dsmId} - This returns the deterministic state machine ID in which the event occurred.
{event.repository.state} - This returns the repository state. - Replicator is Started and Ready
-
The replicator component of a node is up-and-running and ready to replicate data.
{event.message} - This returns information on the triggering event.
- Deploy Repository Checks Failed
-
A repository added to Git MultiSite has failed to deploy, in which case the repository will not be replicated.
{event.repository} - This returns the repository object.
{event.repository.name} - This returns the user-specified name of the repository to which the event pertains.
{event.repository.fSPath} - This returns the location on-disk of the repository that the event pertains to.
{event.repository.state} - This returns the repository state. - Deploy Repository Checks Succeeded (Deprecated)
-
A repository added to MSP has successfully deployed. Such an event might be sent to a mail group received by SVN users, telling them that their repository is now accessible.
This event has been deprecated. We strongly advise that you don’t use/stop using this notification as it is likely to be removed in a future version of MSP. {event.repository} - This returns the repository object.
{event.repository.name} - This returns the user-specified name of the repository to which the event pertains.
{event.repository.fSPath} - This returns the location on-disk of the repository that the event pertains to.
{event.repository.dsmId} - This returns the deterministic state machine ID in which the event occurred.
{event.repository.state} - This returns the repository state. - Deploy Repository Succeeded
-
A repository has been successfully added to Git MultiSite.
{event.repository} - This returns the repository object.
{event.repository.name} - This returns the user-specified name of the repository to which the event pertains.
{event.repository.fSPath} - This returns the location on-disk of the repository that the event pertains to.
{event.repository.dsmId} - This returns the deterministic state machine ID in which the event occurred.
{event.repository.state} - This returns the repository state. - Global Read-Only Due To Admin Action
-
In case of any repository entering a global read-only mode as a result of administrator interaction through the admin UI.
{event.repositoryIdentity} - This returns the repository ID
{event.globalReadOnly} - This will be True if the repository Global Read only.
{event.reason} - This returns a message indicating why the repository went read only. - Any Repository Global Read-Only Event
-
In case of any repository entering a global read-only mode.
{event.repository} - This returns the repository object.
{event.repository.name} - This returns the user-specified name of the repository to which the event pertains.
{event.repository.fSPath} - This returns the location on-disk of the repository that the event pertains to.
{event.repository.dsmId} - This returns the deterministic state machine ID in which the event occurred.
{event.repository.state} - This returns the repository state.
{event.repository.globalReadOnly} - This will be True if the repository Global Read only.
{event.repository.globalReadOnlyReason} - This returns a message indicating why the repository went read only.
{event.message} - This returns information on the triggering event. - Global Read-Only Due To Consistency Check Failure
-
In case of any repository entering a global read-only mode as a result of failing a consistency check with its replicas.
{event.repositoryIdentity} - This returns the repository ID
{event.globalReadOnly} - This will be True if the repository Global Read only.
{event.reason} - This returns a message indicating why the repository went read only. - Repository is Sidelined
-
A repository has entered the sidelined mode and has been dropped from the replication system.
{event.repository} - This returns the repository object.
{event.repository.name} - This returns the user-specified name of the repository to which the event pertains.
{event.repository.fSPath} - This returns the location on-disk of the repository that the event pertains to.
{event.repository.dsmId} - This returns the deterministic state machine ID in which the event occurred.
{event.repository.state} - This returns the repository state.
{event.repository.globalReadOnly} - This will be True if the repository Global Read only.
{event.repo.globalReadOnlyReason} - This returns a message indicating why the repository went read only. - Repository is Unsidelined
-
A repository has left the sidelined mode and can be recovered using the standard repair procedure.
{event.repository} - This returns the repository object.
{event.repository.name} - This returns the user-specified name of the repository to which the event pertains.
{event.repository.fSPath} - This returns the location on-disk of the repository that the event pertains to.
{event.repository.dsmId} - This returns the deterministic state machine ID in which the event occurred.
{event.repository.state} - This returns the repository state.
{event.repository.globalReadOnly} - This will be True if the repository Global Read only.
{event.repository.globalReadOnlyReason} - This returns a message indicating why the repository went read only.
4.1.9. Gerrit client authentication
This section is relevant if you are using GitMS with Gerrit.
GitMS defaults to calling Gerrit as an anonymous user. If the user is anonymous then, due to Gerrit issues, not all accounts may be visible and there will be a limit of 500 items returned per query. For accurate license reporting in GitMS you will need to configure a daemon account with sufficient access to be able to see all of the GerritMS account information.
To do this, the following properties need to be added to the application.properties file, and GitMS restarted.
-
gerrit.license.auth.enabled: This needs to be set to true to enable authenticated access to Gerrit REST API from GitMS. Defaults to false if the property not set, this means anonymous user access is used. -
gerrit.license.auth.type: Either digest or basic, depending on the user authentication method being used by Gerrit. -
gerrit.license.username: This needs to be a Gerrit admin user account name that has visibility of all Gerrit users on system to ensure that license picks up everyone -
gerrit.license.password: The password of the Gerrit admin user that is being used for licensing. This value needs to be encrypted using the wd_cryptPassword.jar.
If the properties are not configured correctly, then the error message Failed to start gerrit user licensing thread will be displayed on the GitMS dashboard.
4.2. Manage access to GitMS
GitMS supports the following mechanisms to manage access to its admin UI:
-
Internally Managed users are admin accounts that are set up from within GitMS’s Admin UI.
-
LDAP Authorities: You can have GitMS query LDAP services and filter for a suitable group from which to populate admin accounts (users).
-
Kerberos Security: If your organization uses a Kerberos authentication system you can set up MultiSite to use it.
You can set up multiple administrator accounts to access the GitMS admin console. You can set up the accounts from the admin UI (via the Security tab). These users can then log in to any node’s admin UI by providing their username and password.
This section describes how to set up multiple accounts, set up managing LDAP authorities, and export/import the resulting data.
4.2.1. Add additional accounts (users)
-
Log in to the Admin UI using an existing admin account.
Log in -
Click the Security tab, then click Add User.
 Add User
 -
Enter details for the new administrator, then click the Add User button at the end of the entry bar.
 Click Add User to save their details
 -
You see a growl message confirming that the user has been added. They are listed on the Internally Managed Users after clicking the Reload button (or refreshing your browser session).
 New user appears
4.2.2. Remove or edit user details
You can modify any user details by clicking their corresponding Edit button on the Internally Managed Users table

4.2.3. LDAP authorities
GitMS supports the use of LDAP authorities for managing admin logging accounts.
When connecting GitMS to available LDAP authorities it is possible to classify the authority as Local, i.e. specific to the node in question or not. If not local, the authority details are replicated to the other nodes within the replication network.
You can run multiple LDAP authorities that are of mixed type, i.e. using some local authorities along with other authorities that are shared by all nodes. When multiple authorities are used, you can set the order that they are checked for users.
The standard settings are supported for each configured LDAP authority: URL, bind user credentials, search base and search filter. Note that the bind user’s password cannot be one-way encrypted using a hash function because it must be sent to the LDAP server in plain text, so for this reason the bind user should be a low privilege user with just enough permissions to search the directory for the user being authenticated. Anonymous binding is permitted for those LDAP servers that support anonymous binding.
Add authority
Use the Add Authority feature to add one or more LDAP authorities, either local to the node or connected via WAN. Locally LDAP services are treated as having precedence. When Internally managed users are enabled they are first checked when authenticating users - see Admin Account Precedence
To add an authority:
-
Log in to the admin UI, click the Security tab.
-
Click Add Authority.
 Add Authority
 -
The Authority entry form appears. Enter the following details:
 Add Authority
- URL
-
Enter your authorities URL. You need to include the protocol ldap:// or ldaps://
Example (Active Directory:)ldap://<server IP>:389
- Bind User DN
-
Enter a LDAP admin user account that will be used to query the authority
Example (Active Directory:)cn=Administrator,cn=Users,dc=windows,dc=AD
- Search Base
-
Enter the Base DN, that is the location of users that you wish to retrieve.
Example (Active Directory:)CN=Users,DC=sr,DC=wandisco,DC=com
- Search Filter
-
Optionally add a query filter that will a select user based on relevant LDAP attributes. Currently the search filter must be created so that it filters LDAP query result into unique result. A work around might look something like:
Example: (Active Directory)(&(memberOf=[DN of user group])(sAMAccountName={0}))This dynamically swaps the {0} for the ID of the active user. For more information about query filter syntax, consult the documentation for your LDAP server.
- Is Local?
-
Tick this checkbox if you want the authority to only apply to the current node and not be replicated to other nodes (which is otherwise done by default).
-
Click the Add Authority. This will save the authority settings that you have just entered. You can click the Test button to verify that the details will successfully connect to the authority without yet adding the authority.
-
When running with multiple authorities, you should determine the order by which GitMS polls the authorities. Use the "+-" symbols at the end of each authority entry to push it up (+) or down (-) the list.
 Order authorities
Edit authority
Modify an existing authorities settings:
-
Log in to the admin UI, click the Security tab.
-
Click the edit link on the line that corresponds with the authority that you wish to edit.
 Edit authorities link
 -
Update the settings in the popup box, then click Save.
 Edit authorities box
Kerberos security
This section describes the basic requirements for integrating GitMS with your existing Kerberos systems. The procedure requires the following:
-
A Key Distribution Center
-
A Workstation setup on each node
-
A machine with a suitably configured browser.
|
Ensure that time synchronization and DNS are functioning correctly on all nodes before configuring Kerberos.
A time difference between a client and the master Kerberos server that exceeds the Kerberos setting (5 mins default) automatically causes authentication failure.
|
Configuration
This procedure assumes that you have already set up your DNS service and master Key Distribution Center.
-
On each node, add the service principal:
# kadmin -p root/admin -q "addprinc -randkey HTTP/node1.example.com"
# kadmin -p root/admin -q "ktadd -k /opt/krb5.keytab HTTP/node1.example.com"
# chmod 777 /opt/krb5.keytab
-
Each node should have installed the add-on JCE Java 7 or Java 8 Unlimited Strength Jurisdiction Policy Files. These can be downloaded from Oracle, subject to your local import rules concerning encryption technology. Once downloaded, extract to the the Java security library, i.e.
$JAVA_HOME/lib/security/
-
At this point you can install GitMS on each node. If that’s already done, then configure the Kerberos settings under the Security tab.
 Edit Kerberos box
- Service Principal
-
This unique name for an instance of a service, such as HTTP/node1.example.com
- Keytab Location
-
This is the location of the keytab, a file containing pairs of Kerberos principals and encrypted keys (often derived from the Kerberos password). It’s used for logging into Kerberos without being prompted for a password.
- Kerberos Config Location
-
The krb5.conf file contains Kerberos configuration information, including the locations of KDCs and admin servers for the Kerberos realms of interest, defaults for the current realm and for Kerberos applications, and mappings of hostnames onto Kerberos realms. Normally, you should install your krb5.conf file in the directory /etc. i.e. /etc/krb5.conf
-
Save the settings and log out.
-
Return to the node in your browser, this time you should log in automatically.
4.3. Nodes
This section describes the functions that manage repository data replication.
4.3.1. Add a node
To replicate Git repository data between sites, you first first tie the sites together. Start by adding (connecting) nodes in an induction process:
-
Log in to the GitMS admin console of the new node that you are connecting to your existing servers.
-
Click the Node tab.
-
Click the Connect to node button.
 Connect to node
 -
Enter the details of an existing node. You can get these details from the Settings tab of the existing node.
Enter details from an existing, connected node- Node ID
-
This is the Node UUID.
- Node Location ID
-
A unique string that a node creates for use as in identifier.
- Node IP Address
-
The IP Address of the node’s server.
- Node Port No
-
The TCP port that the node uses for DConE, which handles agreement traffic. The default is 6444. See Reserved Ports.
-
Click the Send Connection Request button. The new node appears on the active list of nodes.
The new node may get stuck in a pending state. A common cause for this is a firewall blocking communication.
4.3.2. Remove a Node
The removal of a node from the GitMS replication group is useful if you will no longer be replicating repository data to its location and wish to tidy up your replication group settings.
Requirements for node removal
| Don’t skip this section. If you need to remove a node, make sure that you take note of the following rules and requirements. If you proceed with node removal without fully considering the this section, you may make things worse. |
Removing more than one downed node requires support assistance
If you lose two or more nodes in a single ecosystem/deployment, please contact WANdisco Support.
Node must not be a member of a replication group
Before removing a node, ensure that it is not currently part of a replication group. If it is part of a replication group, you will need to remove it from the replication group before you proceed.
-
See Remove a node from a replication group
When removing a downed node from a replication group, ensure that you do so from a node that is itself a member of the replication group.
Known issue:
It’s currently possible to remove a node from a replication group using a node that is inducted but is not itself a member of the replication group. This must never be done because nodes do not carry membership information for replication groups that they are not themselves a member; the action will fail and may further complicate recovery.Until this capability is blocked, make sure that you remove nodes from a replication group using one of the remaining member nodes.
Never restore a removed node
Take care when removing nodes. To ensure that replication network is kept in sync, removed nodes are barred from being re-inducted. The only way that you can bring back a node is to perform a reinstallation of GitMS using a new Node ID.
-
Log in to the GitMS admin console of any connected node.
-
Click the Nodes tab.
-
Nodes that are eligible for removal have the Remove Node option available in the Action column. Nodes are eligible for removal if they have been removed from all replication groups.
-
Click the Remove Node button.
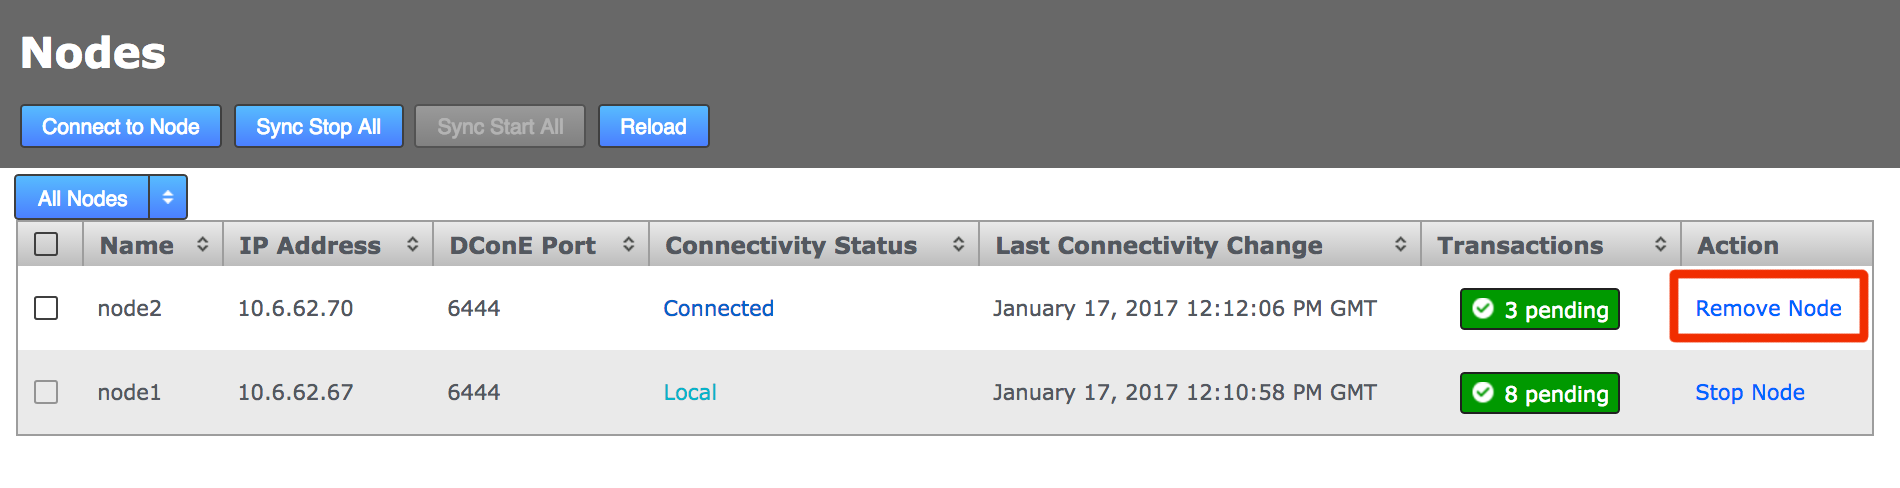 Ready to remove Node
 -
Confirm that you want to remove the node. Don’t forget that this action is irreversible. You must be sure that you want to permanently remove the node.
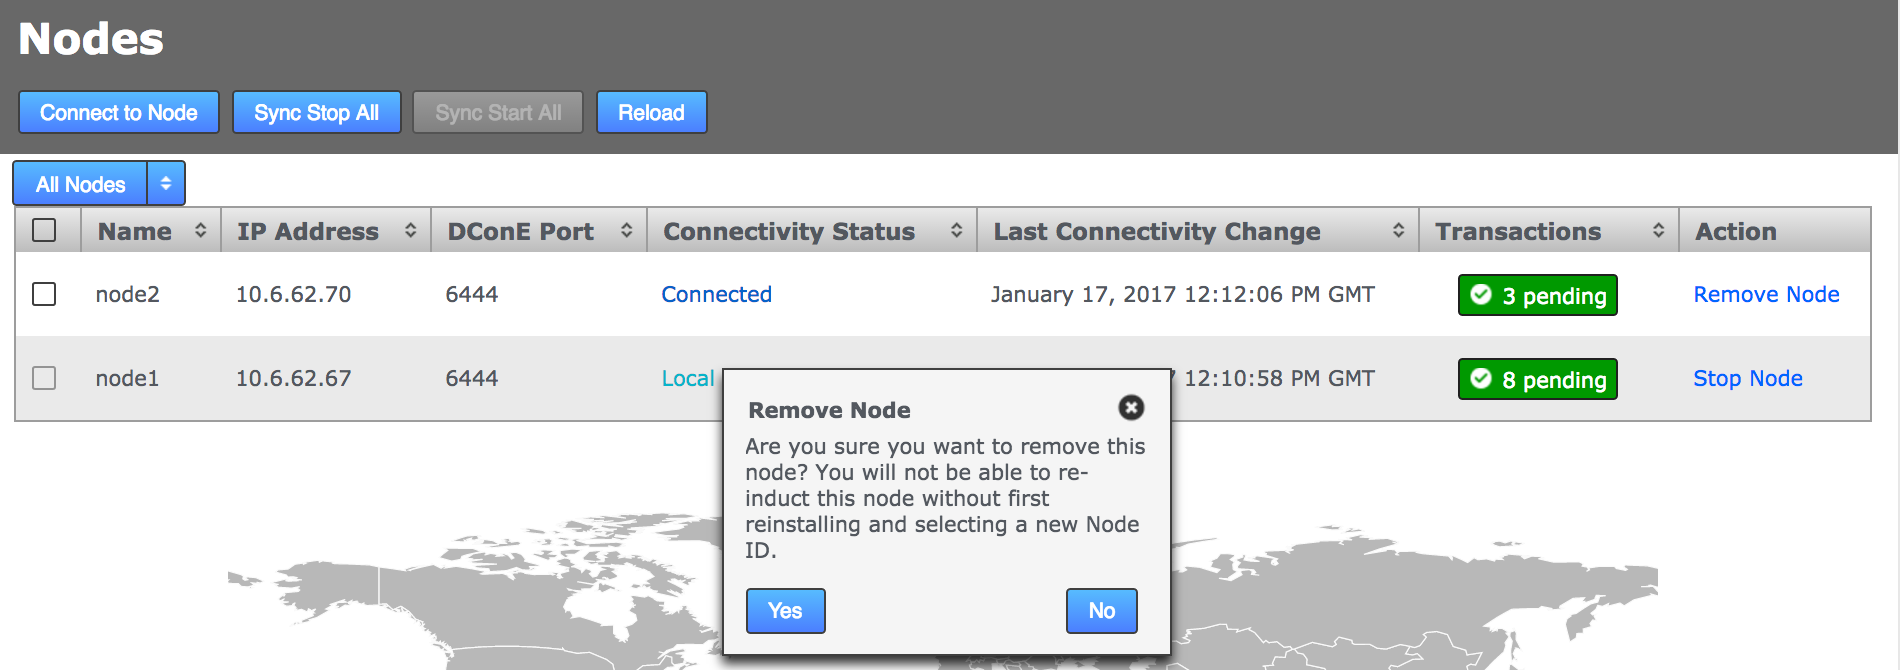 Confirm removal
 -
After a reload you can still see the removed node if you click the Display Removed Nodes button.
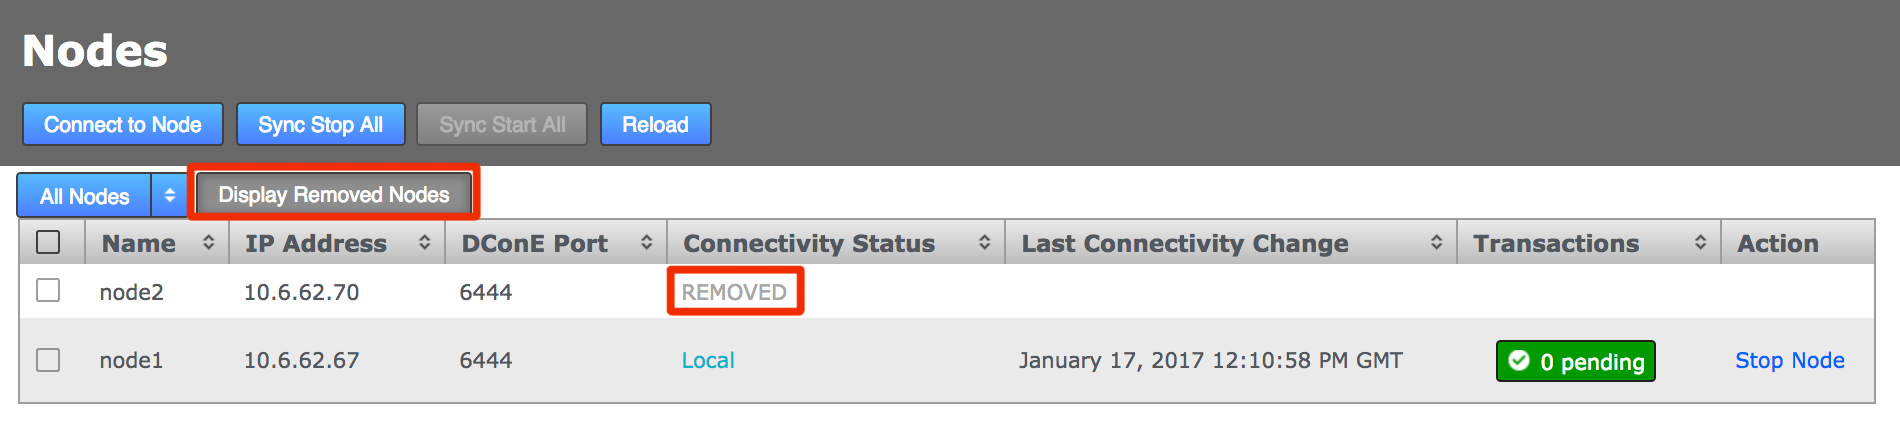 Node removedKnown issue - node removal leaves pending task
If you remove a node which had an untrusted SSL certificate then a pending task will appear on the dashboard of the node that was used to remove it, even though the Nodes page shows it as removed.
To clear this pending task message from the system dashboard:
-
Verify that the node has successfully been removed at all sites.
-
Once you are certain the node has been removed you can remove the task from the dashboard by clicking Cancel Task.
The pending task will now become a failed task.
-
4.3.3. Stop all nodes
You can bring all nodes to a stop with a single click (if all associated repositories are replicating/writable).
|
A stop can’t be synchronized if associated repositories are Local Read-only
Before starting a Sync Stop All, make sure that none of your nodes have repositories in a local read-only state.This may mean looking at the UI of multiple nodes if your ecosystem contains replication groups that are not visible from all nodes. |
-
Log into the admin UI and click the Nodes tab.
-
Click the Sync Stop All button.
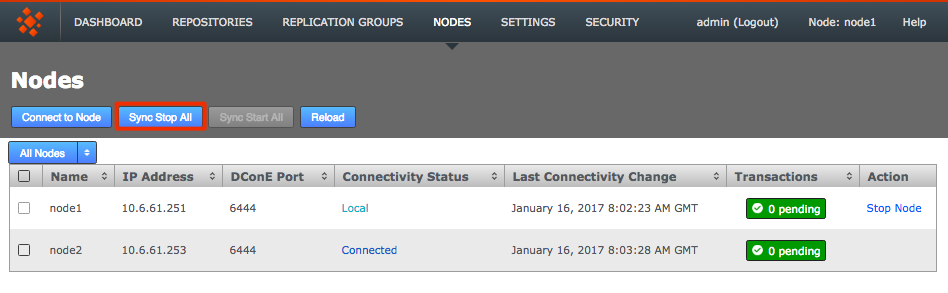 Stop all nodes
You get a growl message confirming the stop has been triggered. You see the results when you refresh your browser session.
 Stopped
 -
On the Node table all nodes show as Stopped. In this state you can do maintenance or repairs without risking your replication getting out-of-sync.
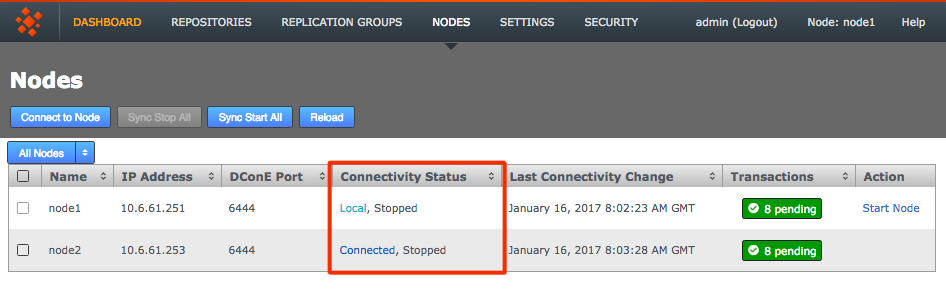 Node removed
 -
The Sync Stop All button has changed to Start all. However, you can start selected nodes by logging in to the admin console of each node that you want to start. Use the Start Node link that appears in the Action column of the nodes table.
|
We strongly recommend that you watch the log messages and confirm that all nodes report as stopped. If you suspect that one or more nodes are not going to stop you should investigate immediately. The Dashboard messages should report the stop, for example: Aborted tasksType PREPARE_COORDINATE_STOP_TASK_TYPE Delete Task Originating Node: Ld5UYU tasksPropertyTASK_ABORTING_NODE: Ld5UYU tasksPropertyTASK_ABORT_REASON: One or more replicas is already stopped. The replica was: [[[Ld5UYU][bf0c6395-77b6-11e3-9990-0a1eeced110e]]] Look for the message: Aborted tasksType PREPARE_COORDINATE_STOP_TASK_TYPE In the replicator.log file you might see the error type: DiscardTaskProposal <task id etc> message: One or more replicas is already stopped. |
4.3.4. Start all nodes
-
If all nodes have been brought to a stop, click the Start All button to start them replicating again.
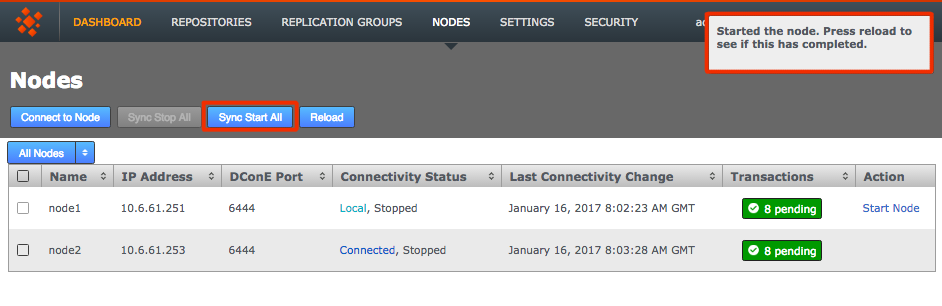 Stopped
 -
After a browser refresh, all nodes will now show as running.
4.3.5. Disconnected/offline nodes
If a node is disconnected you can see this from the UI:
-
When you click the Replication Groups tab, you can see the groups with nodes that are offline:
 Replication groups
 -
When you click View to see a replication group, you are warned that functionality is reduced when a node is disconnected, plus you see which nodes are connected/disconnected:
 Nodes
Nodes -
If you try to create a new replication group that includes a disconnected node you are warned that the node is unavailable and the group is pending:
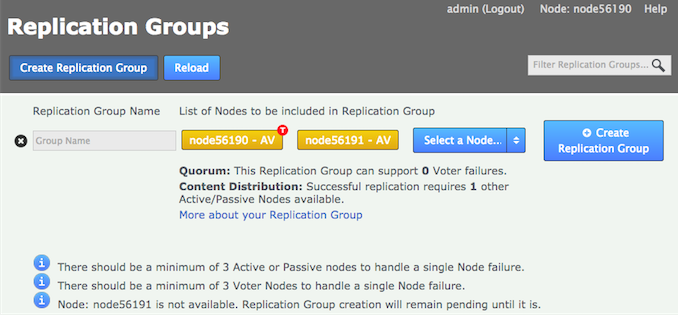 Replication groups
 -
You cannot add a new node to an existing replication group while a member node is disconnected. You get this message in the UI log on the dashboard:
Replication group schedule cannot be updated with a new node whilst a member is disconnected.
4.4. Replication groups
To replicate a Git repository between a set of nodes, you first need to associate those nodes by adding them to a replication group.
The Replication Groups tab will also show you if there are any disconnected nodes. See Disconnected/offline nodes.
4.4.1. Create a replication group
You need to create a new replication group if you need to replicate 1 or more repositories to a combination of nodes that does not already exist as a replication group.
Before you create a new group, review your current replication groups to make sure the desired combination doesn’t already exist.
If it does then simply Add a new repository.
If you do need to create a new replication group then follow the steps here.
4.4.2. Delete a replication group
You can remove replication groups from GitMS, as long as they they have no associated repositories. For example:
-
The replication group OldGroup needs to be removed from GitMS. It currently has a single repository associated with it. Click the View to see which one.
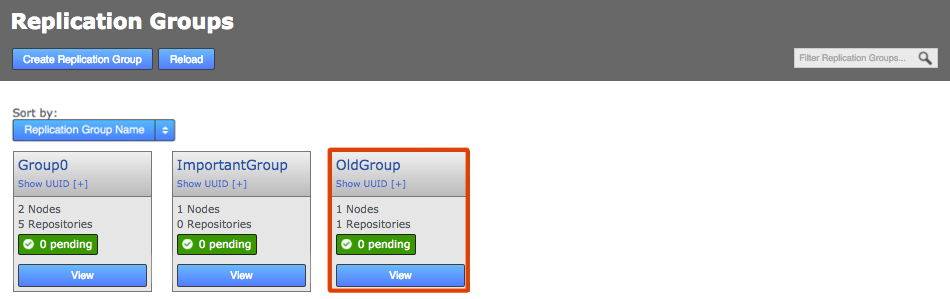 View
View -
On the Replication Group screen we can see that OldRepo is associated with the group and so the Delete Replication Group is disabled. You can go to the repositories screen to remove the association.
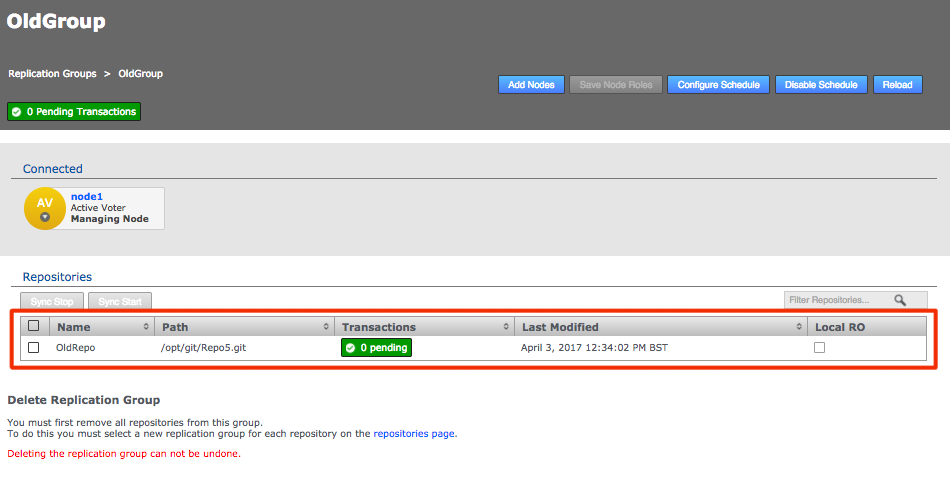 Repositories
 -
On the Repositories screen, click on the associated repository (turns yellow), in this example OldRepo, then click the Edit button.
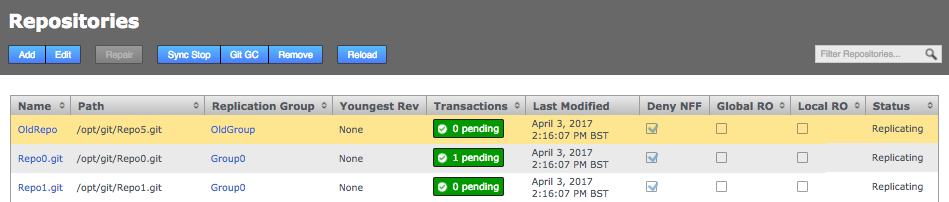 Select and Edit
 -
On the Edit Repository box, use the Replication Group drop-down to move the repository to a different Replication Group. Then click Save.
 Edit
Edit -
Repeat this process until there are no more repositories associated with the Replication Group that you wish to delete. OldGroup only had a single repository, so it is now empty and can be deleted. Click View.
 Move it
 -
Now that Replication Group OldGroup is effectively empty of replication payload the Delete link is enabled. Click the link Delete Replication Group (OldGroup) to remove the replication group, taking note that there is no undo - although no data is removed when a replication group is deleted, so it should be easy enough to recreate a group if necessary.
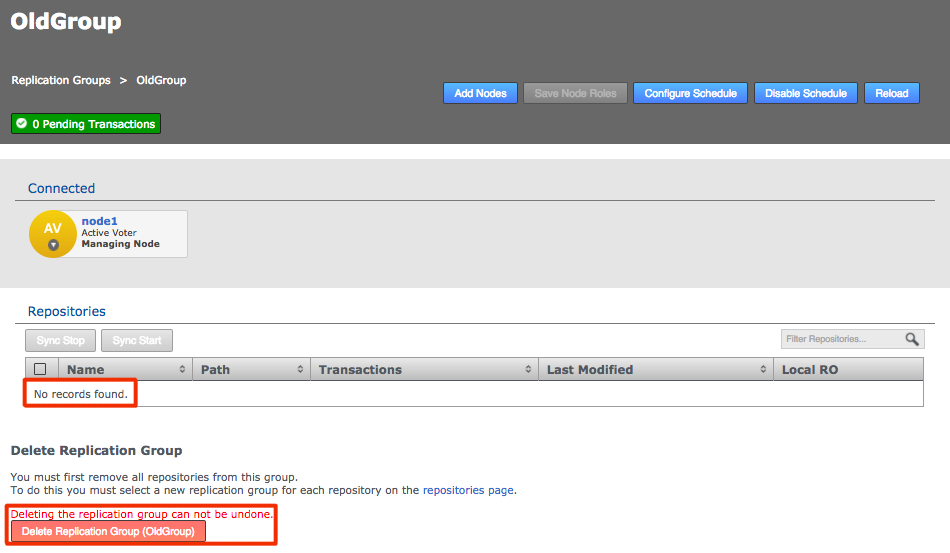 Click the Delete link button
 -
A growl will appear confirming that the replication group has been deleted.
 Deleting the replication group
4.4.3. Add node to replication group
|
Don’t add a node during a period of high replication load
When adding nodes to a replication group that already contains three or more nodes, ensure that there isn’t currently a large number of commits being replicated. Adding a node during a period of high traffic (heavy level of commits) going to the repositories may cause the process to stall. |
To add additional nodes to an existing replication group, so that there’s minimal disruption to users:
-
Log in to a node, click the Replication Groups tab. Go to the replication group to which you will add a new node, click its View.
 Replication Groups
 -
The replication group screen will appear. Click Add Nodes.
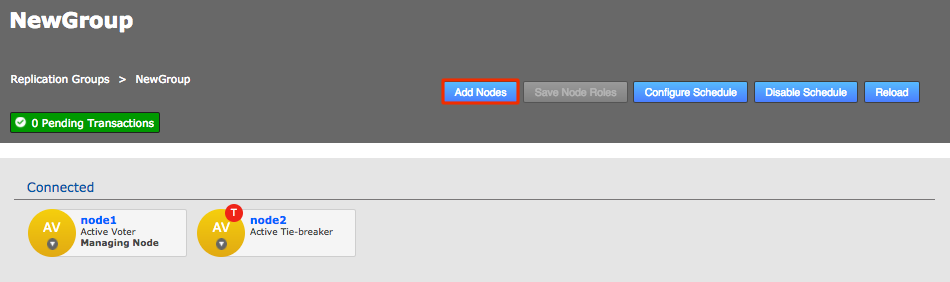 View the group settings
 -
Select the node to add from the Select a Node dropdown list. All so read the additional on screen instructions.
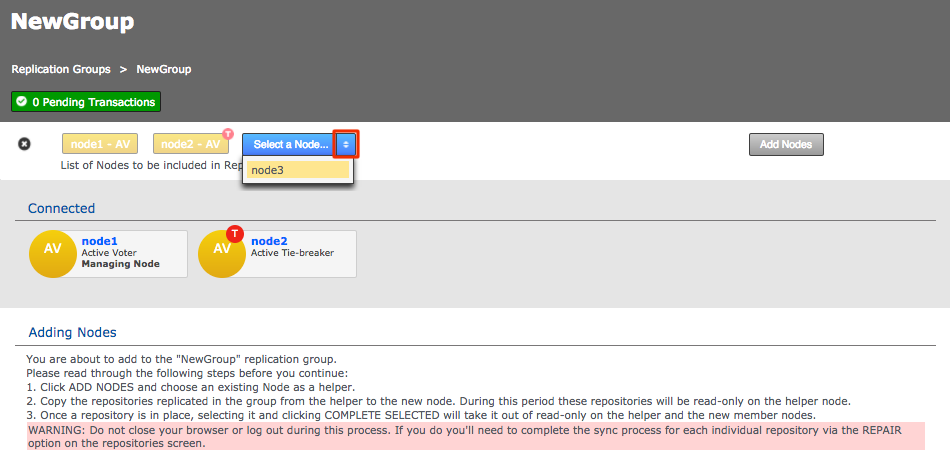 SelectWhy is the Add Nodes button is disabled?
The Add Nodes button may be grayed out if the current replication group configuration won’t support the addition of a new voter node.
It is also possible that a configuration that is scheduled in the future may block the addition of a new node. Check the schedule if you think that you should otherwise be able to add a new node to the replication group.
-
When there are no further nodes to add to the group, click the Add Nodes button.
 Add nodes
 -
Select a Helper node from which you will sync repository data. Then click Start Sync. Note the warning about not closing the browser or logging out during this process otherwise you’ll need to perform a long repair procedure.
 Helper node
 -
A growl message appears to confirm the new node is being added.
 Start sync
 -
You now need to manually synchronize the repositories from the helper node, which is temporarily offline until this process is finished. This can be done using rsync.
The process lets you either do a complete sync or select specific repositories that you wish to sync. Assuming that you have synced all repositories you click Complete All. The helper node is then released from the process, allowing it to catch up with any transactions that were held off while it was taking part in the procedure. The newly added node will, in parallel, catch up with any transactions that were held off while being synchronized from the helper node.
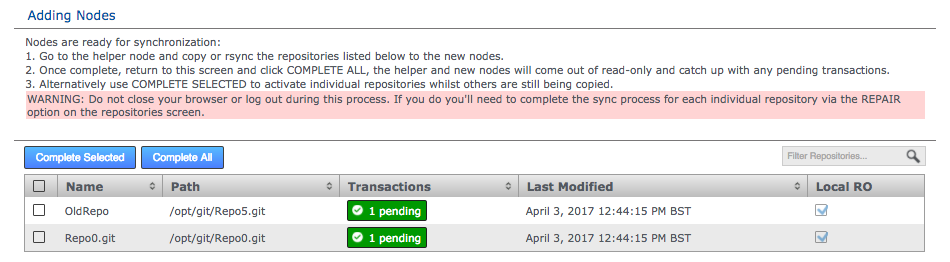 Complete all
 -
A growl message confirms that the new node is added to the replication group.
 New node
 -
Return to the Replication Group screen and you can see the new node count.
 Adding new node complete
Editing a node type
Nodes already added to a replication group can be edited by clicking View.
Nodes can be changed to any type, provided the configuration allows, except Voter-only which has to be designated during Replication Group creation.
4.4.4. Remove node from replication group
You can remove a node from a replication group, for example if the developers at one of your nodes are no longer going to contribute to the repositories handled by a replication group. Removing a node from a replication group stops more updates to its repository replicas.
|
Remove stray repositories
If you remove a node from a replication group, you must delete its copy of the repositories managed by the replication group. An out-of-date stray copy can result in confusion or users working from old data.
|
You cannot remove a node that is currently assigned as the Managing Node. To change the managing node, go to the Configure Schedule page and assign a different node as the Managing Node. See Changing the managing node for more information.
-
Log in to one of your nodes. The node needs to be a member of the relevant Replication Group, otherwise it does not appear on the tab. Click the Replication Groups tab, then click the View button for the Replication Group from which you plan to remove a node.
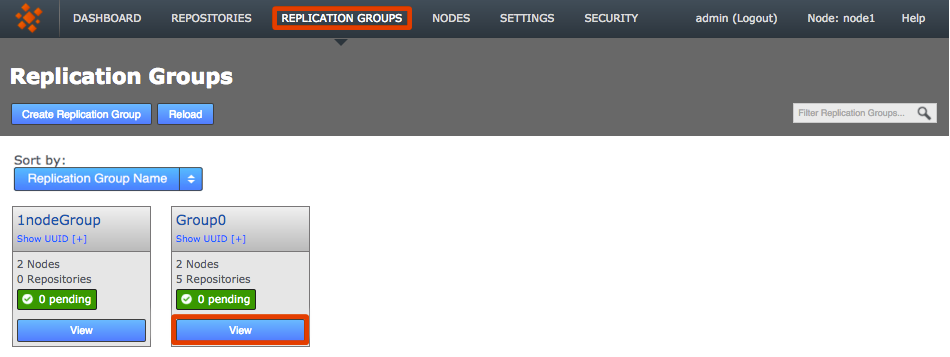 View Replication Groups
 -
Click the node that you want to remove from the group. Providing that the removal of the node doesn’t invalidate the remaining configuration you see a Remove node link in the drop-down menu. Click the link.
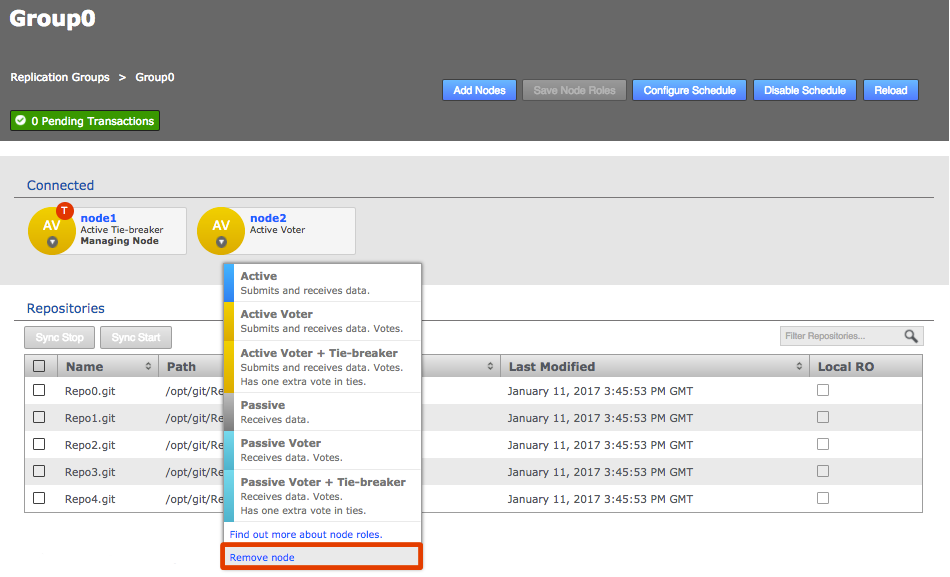 Remove
 -
A dialog opens asking you to confirm the removal of the selected node from the Replication Group. Click Remove.
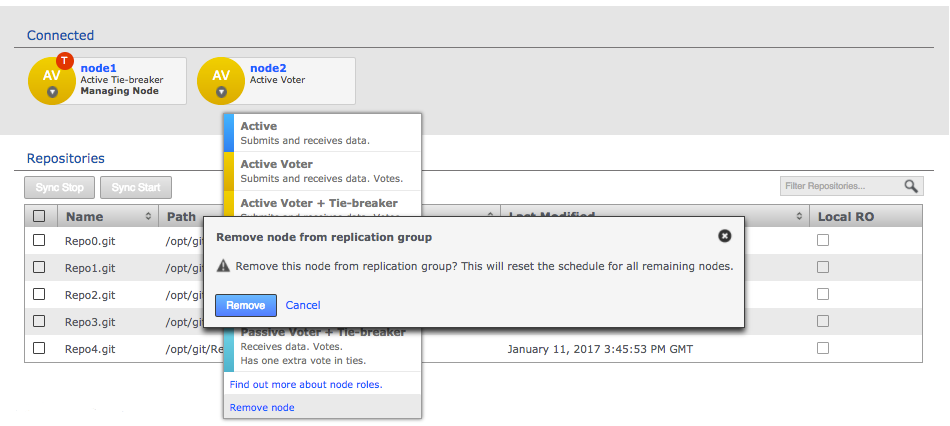 Confirm remove
 -
A growl message confirms that the removal is in progress. Click the Reload button to ensure that the action has been completed on all nodes.
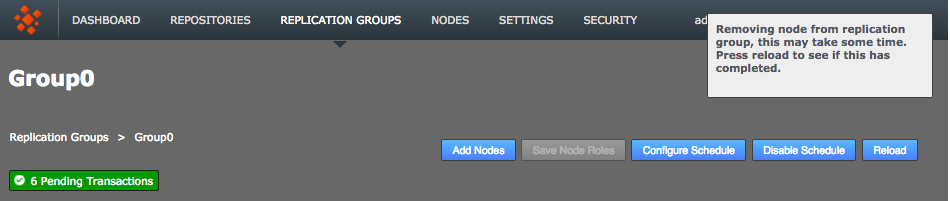 Reload to confirm the updated state
 -
The node is removed from the Replication Group. On the Replication Groups panel you now see that the number of nodes has reduced by one.
 Less one member node
4.4.5. Schedule node changes: follow the sun
You can schedule the member nodes of a replication group to change type according to when and where it is most beneficial to have active voters. To understand why you may want to change your nodes read about Node Types.
The following steps show how to do this through the UI. Node changes can also be scheduled through the API.
-
Log in to a node, then click the Replication Groups tab. Click the View link for the replication group that you wish to make a schedule.
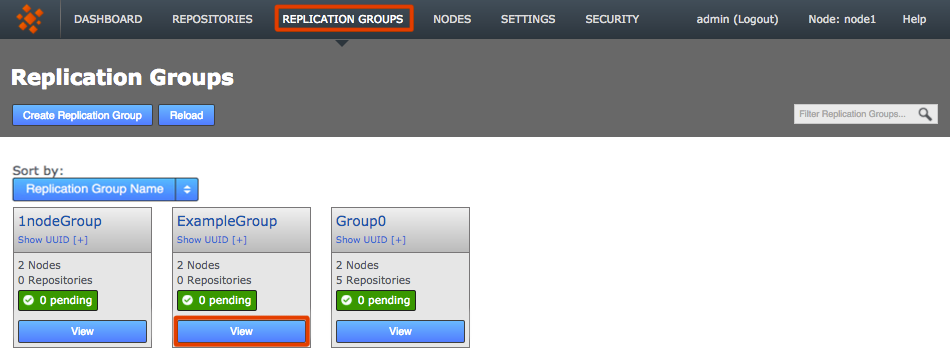 Scheduling is done through replication group settings
 -
Click the Configure Schedule button.
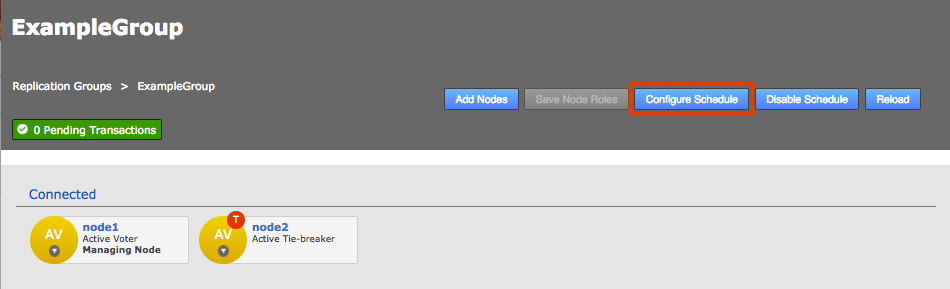 ConfigureMembership views show what is scheduled, not necessarily what is currently activeThe roles and membership displayed is based upon the agreed schedule. It is the setup that should be in place if everything is running smoothly. It may not accurately represent the state of the replication group, due to a delay in processing on a node or if a process has hung. This is not a cause for concern but you must be aware that the displayed membership is an approximation based on the information currently available to the local node.
 -
The replication groups Schedule screen will appear. The main feature of the screen is a table that lists all the nodes in the replication group, set against a generic day (midnight to midnight) that is divided into hourly blocks. Each hourly block is color-coded to indicate the specific node’s type. To change the schedule, click a block.
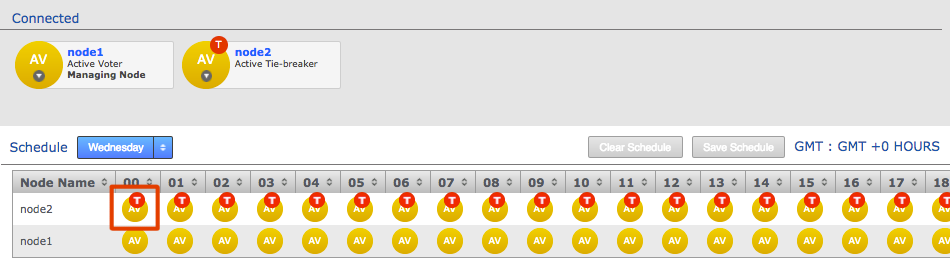 Role Schedule
 -
The New Scheduled Configuration form lets you modify any hours for any available node.
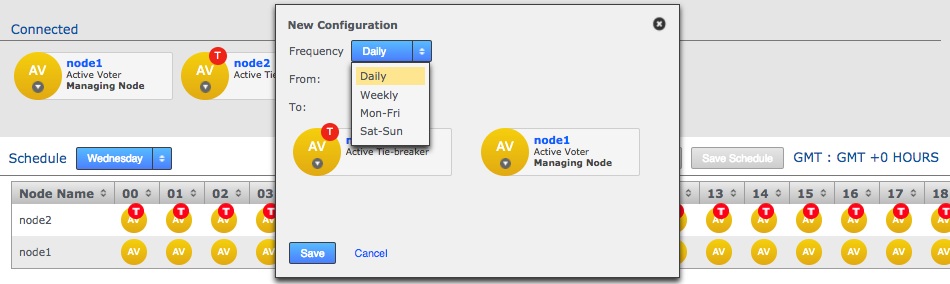 New Schedule form
- Frequency
-
Select from the available frequency patterns: Daily, Weekly, Monday-Friday or Saturday to Sunday.
- From
-
The starting hour for the new schedule, e.g. 00 for the start of the day.
- To
-
The hour at which the scheduled changes end, e.g. 24 would effectively end the scheduled change at midnight.
-
Click the node icon to change its type.
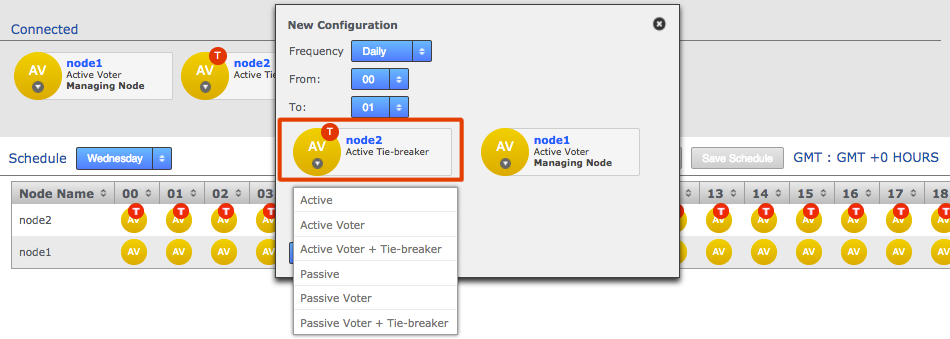 Swapping roles
When all node changes have been made, click the Save button to continue, or the Cancel button if you change your mind.
-
The schedule view will now change to show the changes that you make. You must click the Save Schedule button for the changes to be applied.
With all necessary changes made, you need to review the change to the schedule table and then click Save Schedule button. Any mistakes in node role combinations selected will be detected at this time, and if there are any then the save will fail.
| Git MultiSite does not provide detailed feedback as to what the mistake is in configuration. If you see the Growl message "Unable to update replication group" then re-check your selected roles to verify that they meet role requirements. |
Use the Clear Schedule button to blank out settings that you have changed, returning to the default schedule.
Changing the managing node
There may be circumstances in which you need to change the schedule managing node, for example if the current node will be undergoing maintenance and therefore will be unable to rotate the voting population at the normal time.
To change which node is the managing node (schedule manager), click on the node you want to be the new managing node and select Make Schedule Manager.

|
Changing role of the managing node
You can change the managing node to Active, Active Voter and Active Voter Tiebreaker, though not to any passive roles.
If you want to make a managing node into a passive node you must switch the manager to an active node (A, AV, AVT) because the manager needs to be able to propose schedule changes and therefore be active.
|
Disable the schedule
If you need to stop any and all scheduled rotations, e.g. in an emergency to prevent losing quorum:
-
Click the Replication Groups tab, then select your group. Click Disable Schedule.
 Disable schedule
 -
A growl message message appears to confirm the schedule has been disabled. To re-enable schedule later you click Enable Schedule.
 Growl Message
4.4.6. Single-node configurations
No replication takes place when you have a single node replication group. In a single node replication group the node must be an Active Voter. All other features work normally.
You may have a single-node configuration in the following situations:
-
If all other nodes in the replication group were removed properly. This could happen naturally during a transition from a 2 node replication group to a different 2 node replication group.
-
If a single node replication group was desired for any reason. For example, to support WANdisco Access Control Plus’s standalone mode for Git.
-
If the other nodes in a replication group were inappropriately removed: contact WANdisco Support.
Note: When changing a single node replication group into a multi-node replication group the only helper node will be the original single node. During the synchronization period the repositories in the new replication group will be read-only.
4.5. Repositories
4.5.1. Add a repository
When you have added at least one Replication Group to your ecosystem you may then begin adding repositories.
For detailed instructions see Add Repositories.
For information on automated repository deployment see the API section.
4.5.2. Remove a repository
To remove repositories from GitMS follow this procedure.
If this implementation of GitMS is integrated with Access Control Plus then start the removal process with the following 2 steps and then continue on with the normal process below.
-
Remove all references to the repository as a resource from ACP
-
Generate AuthN/AuthZ files from ACP and verify distribution to all GitMS nodes
If this implementation of GitMS is not integrated with Access Control Plus then start by disabling access to the repository that is to be removed by denying Authorization.
How to remove a repository:
-
Log in to the admin console of one of your nodes. The node must be a member of a replication group in which the repository is replicated, otherwise it is not listed. Click the Repositories tab to see it.
 Login
Login -
On the Repositories tab, click the line of the repository that you want to remove.
When the repository is highlighted (in yellow), the Remove button becomes available. Click it.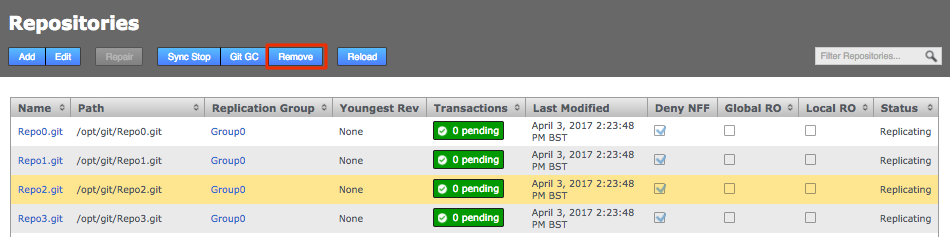 Repositories.
 -
A dialog box appears. This confirms that removing a repository from a replication group stops any changes that are made to it from being replicated. However, no repository data is deleted.
 Remove
You can also remove a repository using the button on the Repository Information screen:
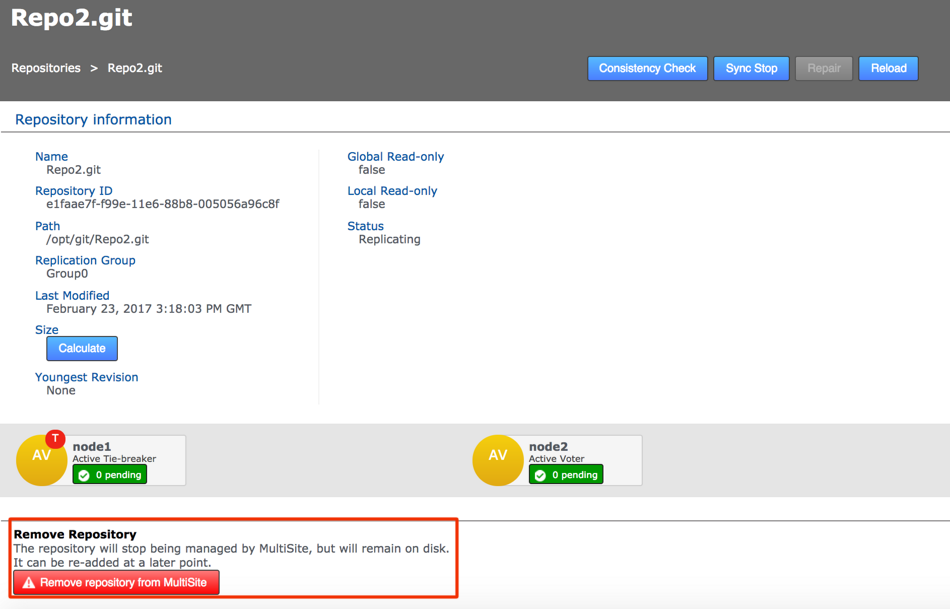
4.5.3. Edit a repository
To edit a repository’s properties after they have been set up in GitMS:
-
Log in to the admin console of one of your nodes. The node must be a member of a replication group in which the repository is replicated, otherwise it is not listed. Click the Repositories tab to see it.
Log in -
On the Repositories tab, click the line that corresponds with the repository that you want to edit. Then click the Edit button.
 Repositories
 -
You now see the Edit Repository box appear.
 Edit Repository
 -
You can also click the repository’s name to go directly to the Information screen. Here you can trigger a consistency check, bring the repository to a coordinated stop or start a repair if a problem has been detected. The size of the repository can also be calculated.
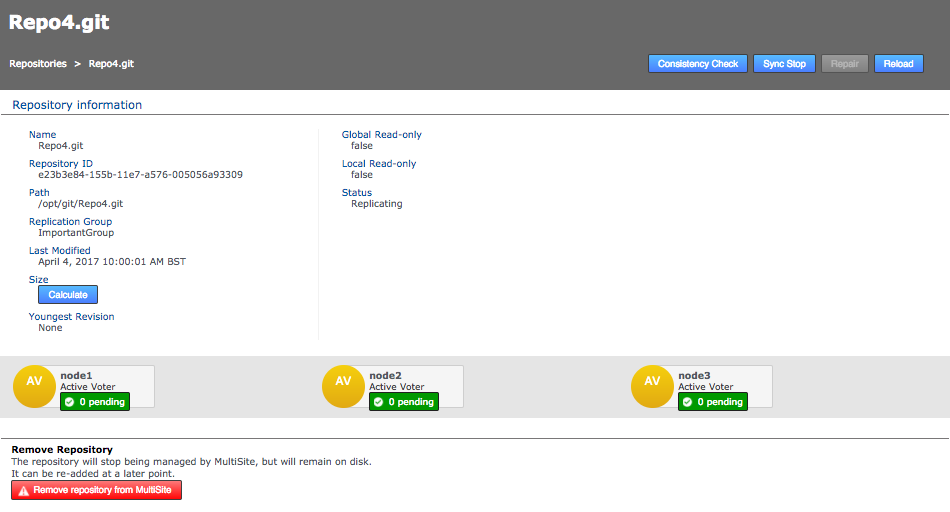 Repository Information
- Consistency Check
-
Compare all repository replicas against each other as part of a coordinated proposal in order to verify that each replica is identical.
- Sync Stop
-
Bring replication of the repository to a stop across all nodes.
- Repair
-
Use the repair button to initiate a repository repair procedure. This button will only be active if the system has detected that the repository is inconsistent, or replication has failed for some reason.
- Reload
-
For a refresh of the repository information to pick up any changes that may have occurred since loading the screen.
- Size
-
Click to calculate the filesize of the repository, noted here in KiB.
- Remove Repository
-
Use this tool to remove a repository from GitMS’s control. Note that the repository data is not moved or deleted, but it is not tracked by GitMS.
Move a repository to another replication group
You can move a repository to another replication group by using the repository edit box.
|
Additional nodes
If you are moving to a replication group with additional nodes then performing the 2 rsync steps below is crucial.
|
-
Use rsync to ensure the repositories are at all new nodes.
-
Login to the GitMS UI. Click on the Repositories link. Click on the line corresponding with the repository that you want to move. The line is now highlighted (yellow) and additional options available.
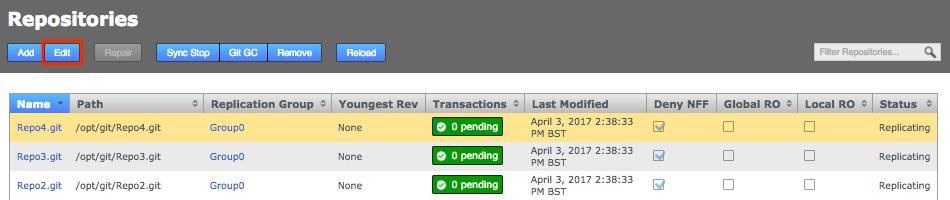 Repository tab
 -
Click Edit to bring up the repository edit dialog box. The box contains a drop-down selector for available replication groups. Select the new replication group, then click Save.
 Edit Repository
 -
The new replication group will now appear against the repository.
 New Replication Group
 -
Now follow the repository repair procedure which includes a final rsync. This allows the repository to be continually available for write operations on one of the other two nodes in the replication group, while the other is used for the source of the rsync.
4.5.4. Repository synchronized stop
Use the repository Sync Stop function to stop replication between repository replicas. You can do this either:
-
On a per-repository basis
-
On a replication group basis where replication will be stopped for all associated repositories
To stop all nodes, use the Sync Stop All command via the Nodes tab.
Repository stops are synchronized between nodes using a stop proposal to which all nodes need to agree.
Although not all nodes stop at the same time they do all stop at the same point.
-
Log in to the GitMS UI and click the Repositories tab. Click the repository that you want to stop replicating.
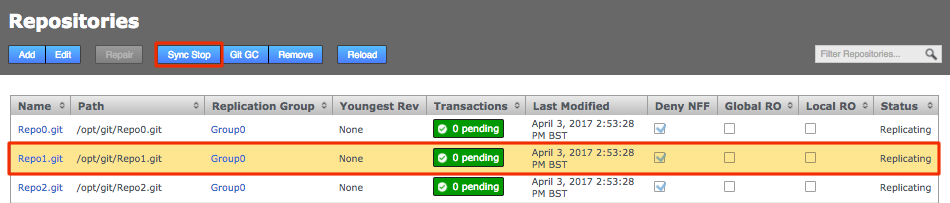 Stop Sync
 -
With the repository selected, click the Sync Stop button. A growl message confirms that a synchronized stop has been requested. Note that the process may not be completed immediately, especially if there are large proposals transferring over a WAN link.
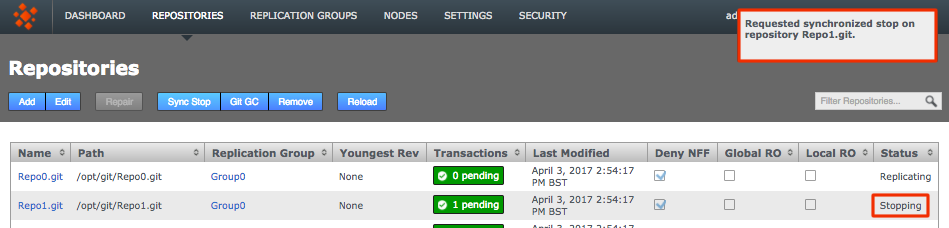 Sync stopping
 -
When a sync is successfully stopped, the repository has a status of Stopped and is Local RO (locally read-only) at all nodes. You made need to refresh the screen to see this.
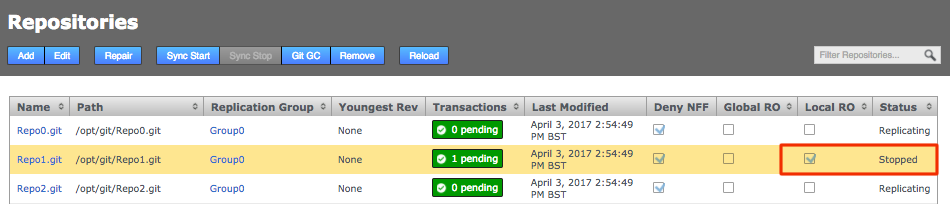 Sync stopped
4.5.5. Repository synchronized start
When you restart replication after a Synchronized Stop, you must start the stopped replication in a synchronized way.
-
Click a stopped repository and click the Sync Start button.
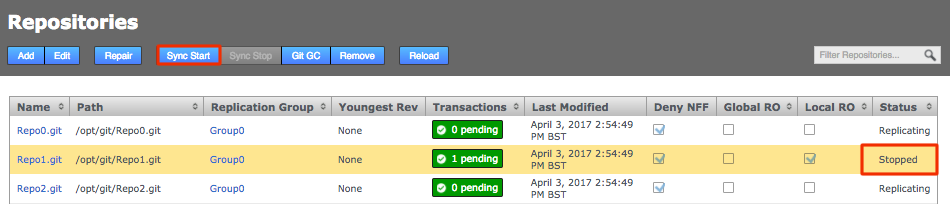 Sync start
 -
The repository will stop being Local Read-only on all nodes and will resume replicating.
4.5.6. Stop repositories on a node
In some situations you may need to stop writes to the local repository replica. You can do this in the following ways:
-
Stop the Node: This takes the node offline and it will therefore no longer be able to process any changes. It is an Action on the Nodes tab on the UI.
-
Stop proposal outputs on a node via API call: Use the API to stop all repositories on a node.
4.5.7. Reuse a repository
|
Take care when reusing a Git repository.
You need to edit the Git configuration file.
|
You might reuse a repository after improperly removing it from replication, by copying it from backup/restore for example.
If so, you need to hand edit the Git configuration file (in repo/config) to change replicated = true to replicated = false or remove the line.
Do this before putting it in place on any replicated server as a local, i.e. non-replicated, repository.
4.6. Git Garbage Collection
The Git Garbage Collection tool (GitGC) triggers a clearout of temporary files associated with proposals that have been successfully played out on each node in the repository’s replication group.
The Git GC button will propose a distributed transaction that will perform Git Garbage Collection on a repository.
The GC will be done after the previous Git repository modification events and before any newer ones, the state of the repository will therefore be fixed except for the Git GC operations itself. This provides a more reliable cleanup operation as the age of artifacts within the Git repository will be relative to the time each transaction was executed.
The default command run (see below for more options) by GitMS is git gc --quiet.
If there is any output on STDOUT or STDERR they will be interleaved and found in the replicator’s log file (gitms.log).
Not all Git repository replicas will necessarily be processed at the same time. The times of execution can be different from replica to replica due to variations in data delivery, application availability and network connectivity. It is critical not to run too many different repository family GC operations at the same time since each will run in parallel with the others and this could over-consume resources on your servers. The best practice is to run them one at a time.
All other behavior can currently be configured via the repository’s config file.
|
Configuring behavior
The repository’s config file must be identical for all replicas of the repository for all "operational" configuration parameters. These are any parameters that will change the behavior of Git commands working on the server’s repository. Generally this means they should simply be identical. Changes to configuration must occur during a global outage, while the repository is in GRO state, or via the REST API endpoint that creates an agreement that will change the repository’s configuration at all replicas of the family at a specific point in the repository write-modification agreement stream. The REST API for modifying repository configuration was added in GM 1.9.4, however, there is an issue that stops the REST API from working properly when using Java 8. The issue was fixed in Git MultiSite 1.9.6. If you have any questions about Git MultiSite Garbage Collection requirements, contact WANdisco Support |

Command line JGit GC for Gerrit Repositories
From GitMS 1.9.4 an alternate GC is available and should be used whenever Gerrit repositories are being coordinated.
To enable this you need to add a property in application.properties which contains the full path to the command you want to run e.g.
gitms.gc.command=/path/to/git/gc/command
Once set, this command will be run when clicking the Git GC button.
Note: the command run is always given the --quiet option (and that option only). Because this property is set via the "application.properties" file it must be set on all of your servers. And then GitMS must be restarted for it to take effect.
For instance, the command for the standard Git GC would be:
#!/bin/bash --noprofile
git "$@"
There is no --quiet option for JGit GC.
To simulate it you will need to throw away all output unless there is an error.
See the example script below for how to do this.
If this is not done then the GitMS log files will fill up unnecessarily quickly.
Alternatively, you can log the output (via redirect) to a JGit GC specific log file that is rotated independently of the GitMS log files.
We have tested with the following JGit versions: 4.11.0.201803080745-r or 5.0.0.201806050710-rc3. Newer versions of JGit should be carefully chosen for stability and lack of concurrency bugs. See the JGit release notes for more information. The path to these must be explicit.
#!/bin/bash --noprofile
myname=${0##*/}
tf=/tmp/${myname}.$$
touch ${tf}
trap "cat ${tf} 1>&2; rm -f ${tf}; trap - 0 1 2 3 15; exit 1" 0 1 2 3 15

# There is no "--quiet" for jgit's GC so simulate:
if /usr/local/bin/org.eclipse.jgit.pgm-4.0.1.201506240215-r.sh gc > ${tf} 2>&1; then
    ExitValue=0
else
    echo "JGit GC exited $? with the following output:" 1>&2
    cat ${tf} 1>&2
    ExitValue=1
fi

rm -f ${tf}
trap - 0 1 2 3 15
exit $ExitValue
A coordinated repository GC can be initiated via the GitMS user interface or via the REST API endpoint "/repository/{repositoryId}/git-gc".
| As discussed previously, be very careful to make sure not to run more coordinated repository GC operations in parallel than your server can support (probably only 1). |
|
Important information about coordinated Garbage Collection
Running even a single repository coordinated Garbage Collection(GC) operation at a time can be a complex task due to the seemingly asynchronous nature of when each repository replica will run the operation. Yes, they will always run the coordinated operations in the same order, but different systems can have different capabilities, and the slower systems may run at a significantly later time than the faster systems. Consider what happens when one of the server nodes goes down. All of the pending operations will queue up for all the repositories served there. When it comes back up, if there are ten different repositories worth of GC operations to catch up, then those ten may be run in parallel (and likely one or more of them will fail due to resource issues). If RAM runs out, then such a stressor will cause the Linux kernel memory daemon to Be very careful that all replica GCs are finished before starting the next replica family GC. |
4.7. Running GitMS with Apache
This section describes how to set up Apache with GitMS, however it makes assumptions on how you want your server to be setup.
Please consult with WANdisco support to discuss different setup, installation and operational options and tradeoffs.
| Using mod_dav or WebDav to administer GitMS is not supported. |
4.7.1. Before you start
Note the following requirements:
-
Java JDK - see the release notes for supported JDK versions.
-
Apache HTTP Web Server
-
Git - see the release notes for supported version.
-
GitMS (installed and configured for replication, using gitms as the user):
Ensure that at least one repository has been replicated successfully. -
-
This is not a requirement but will make things easier as it generates appropriate Authorization files, saving you the time consuming and error prone task of creating them by hand.
-
Choosing the right account to run the Git service as:
-
If you are using ONLY Apache to access both GitMS and SVN MSP then you can use just one account.
-
If you are deploying ONLY GitMS (and not SVN MSP) then you can use just one account.
-
If you are using both Apache and SSH to access both GitMS and SVN MSP then you must use two accounts, one for GitMS and the other for Apache/SVN MSP, because a single account can only have a single
authorized_keysfile.
For more information, please see our Knowledge base article discussing this topic.
| Running the GitMS account as the "Apache" account can cause problems. For production we recommend that you set up a dedicated "normal" user account (UID >= 500 on Red Hat). |
In some cases you may need to run GitMS using the apache account, for example if you are deploying with both Git and SVN repository replication.
To make the apache user account suitable for running GitMS you need to ensure that:
-
The account has a valid shell.
-
Apache doesn’t invoke the SuexecUserGroup directive, which ensures that
apacheuser is set to run CGI programs. -
Repositories should be set to be owned by
apache.
4.7.2. Install Apache
Install mod_SSL using a suitable command for your set up.
Next, ensure that Apache starts on system restart:
chkconfig httpd on
service httpd start
4.7.3. Configure SELinux
| If running SELinux, it is easiest if the repositories are located in in the home directories on each machine. |
In general, we recommend that SELinux is turned off. However, if SELinux is required then:
-
Enable access to home directories, i.e. /usr/home/gitms:
setsebool -P httpd_enable_homedirs on
-
Install semanage:
usermod -a -G apache gitms
yum -y install policycoreutils-python
-
Allow httpd read/write access to /home/gitms:
chcon -R -t httpd_sys_rw_content_t /home/gitms
chcon -R -t httpd_sys_rw_content_t /opt/wandisco/git-multisite/replicator/content_delivery
-
Allow the update script to make a network connection to the Java service:
setsebool -P httpd_can_network_connect on
setsebool -P git_system_enable_homedirs on
4.7.4. Configure IPTables
In general, we recommend that iptables are turned off.
If required then /etc/sysconfig/iptables should look like:
*filter
:INPUT ACCEPT [0:0]
:FORWARD ACCEPT [0:0]
:OUTPUT ACCEPT [11:12222]
-A INPUT -m state --state RELATED,ESTABLISHED -j ACCEPT
-A INPUT -p icmp -j ACCEPT
-A INPUT -i lo -j ACCEPT
-A INPUT -p tcp -m state --state NEW -m tcp --dport <port selected> -j ACCEPT
-A INPUT -p tcp -m state --state NEW -m tcp --dport <port selected> -j ACCEPT
-A INPUT -j REJECT --reject-with icmp-host-prohibited
-A FORWARD -j REJECT --reject-with icmp-host-prohibited
COMMIT
# Completed on Mon Mar 27 13:52:30 2017
Increased the OUTPUT ACCEPT from 2222 to 12222 (allows outgoing connections up to port 12222)
Allow incoming connections on <port selected> and <port selected>.
The ports to be enabled are those previously selected - see network settings for more information.
4.7.5. Create your HTTP password file
htpasswd -c /var/www/passwd username
Change the ownership of the passwd file:
chown apache:apache /var/www/passwd
4.7.6. Create git-http-backend wrapper script
To create this, first create the git-http-backend script.
Create git-http-backend script
Create a script called git-http-backend as follows:
# !/bin/bash
GIT_PROJECT_ROOT=/home/gitms/repos
# This value should be configured to match the base location of repos on disk
export GIT_BASEDIR=$GIT_PROJECT_ROOT
export GIT_HTTP_EXPORT_ALL=true
# Execute gitms_shell script
exec /opt/wandisco/git-multisite/bin/gitms_shell $REMOTE_USER
This script location should match where you set it to be called from in the repo.conf file on the ScriptAlias line - we have used /var/www/bin/git-http-backend.
It is important to ensure that this script is executable, and the script and directory it is in are both owned by the gitms user - not apache.
This script is run by suexec, and will therefore run as the user that owns it, which we require to be gitms:
chmod +x /var/www/bin/git-http-backend
chown -R gitms:gitms /var/www/bin
Creating the git-http-backend wrapper script
The script executed by suexec must be under /var/www:
mkdir -p /var/www/bin
Add the following to /var/www/bin/git-http-backend:
#!/bin/bash
GIT_PROJECT_ROOT=/home/gitms/repos
# This value should be configured to match the base location of repos on disk
export GIT_BASEDIR=$GIT_PROJECT_ROOT
# This should be set to the gitms users home directory - reset here because SUexec strips it out
export HOME=/home/gitms
export GIT_HTTP_EXPORT_ALL=true
# Execute gitms_shell script
exec /opt/wandisco/git-multisite/bin/gitms_shell $REMOTE_USER
The script and the directory it is in must be owned by the user who will be executing the script:
chown -R gitms:gitms /var/www/bin
chmod 0755 /var/www/bin
Make the wrapper script executable:
chmod +x /var/www/bin/git-http-backend
Tell selinux that /var/www/bin has httpd executable scripts:
semanage fcontext -a -t httpd_sys_script_exec_t /var/www/bin
restorecon /var/www/bin
4.7.7. Add Apache config
Copy the following into /etc/httpd/conf.d/repo.conf:
<VirtualHost *:80>
DocumentRoot /home/gitms/repos
ServerName git.example.com

<Directory "/home/gitms/repos">
Allow from All
Options +ExecCGI
AllowOverride All
</Directory>

<Location /repos>
AuthType Basic
AuthName "Private Git Access"
AuthUserFile "/var/www/passwd"
Require valid-user
</Location>

SuexecUserGroup gitms gitms
ScriptAlias /repos /var/www/bin/git-http-backend
</VirtualHost>
4.7.8. Allow Git pushes
Change to the directory your repo is located in:
su - gitms -s /bin/bash
cd /home/gitms/repos/bar.git
git config http.receivepack true
git config core.sharedRepository group
Do this in each repo and on all replicas.
4.7.10. HTTPS support: Generate certificates
You can use tools such as easy-rsa to generate certificates.
You need to have the Epel rep installed to use this:
wget http://dl.fedoraproject.org/pub/epel/6/i386/epel-release-6-8.noarch.rpm
rpm -Uvh epel-release-6-8.noarch.rpm
yum install easy-rsa
cp -r /usr/share/easy-rsa/2.0 .
cd 2.0/
source vars
./clean-all
./build-ca
./build-key-server git-http1     (when prompted for the CommonName use the system IP address if the system does not have a register DNS name)
./build-key-server git-http2
./build-key-server git-http3
This generates three server certs/keys as well as the ca cert/key in the ./keys directory.
Copy a cert and key into /etc/apache on each node.
cp ./keys/git-http1.crt /etc/httpd
cp ./keys/git-http1.key /etc/httpd
chown apache:apache /etc/httpd/git-http1.crt /etc/httpd/git-http1.key
4.7.11. Modify Apache config to support SSL
Edit /etc/httpd/conf.d/repo.conf:
<VirtualHost *:443>
DocumentRoot /home/gitms/repos
ServerName git.example.com
SSLEngine on
SSLCertificateFile /etc/httpd/git-http1.crt
SSLCertificateKeyFile /etc/httpd/git-http1.key

<Directory "/home/gitms/repos">
Allow from All
Options +ExecCGI
AllowOverride All
</Directory>

<Location /repos>
AuthType Basic
AuthName "Private Git Access"
AuthUserFile "/var/www/passwd"
Require valid-user
</Location>

SuexecUserGroup gitms gitms
ScriptAlias /repos /var/www/bin/git-http-backend
</VirtualHost>
Restart service:
service httpd restart
4.7.12. Add the CA certificate to client system
The server certificate generated will not be recognized by your client.
You can either:
-
Turn off strict SSL checking:
git config --global http.sslVerify false
-
Add the CA certificate to the client machine. You need to add the ./keys/ca.crt file to the set of CA certificates that the client system accepts. For more information see our Knowledge base article.
4.8. GitMS authentication and authorization
GitMS authentication is performed by a third party service. When the authentication is complete, details of the requested git operation and a username are passed back to GitMS.
The operation and username are then checked internally by GitMS to ensure sufficient permissions are available to perform the operation.
Authentication can use either:
-
SSH
-
HTTP with an authentication mechanism such as htpasswd or LDAP
4.8.1. Authentication
Authentication can be by either SSH directly or via an HTTP authentication mechanism. It is normal to only use one or the other, but it is possible to use both in parallel. This section describes examples of using either SSH or Apache for authentication.
SSH - Authentication via SSHD
SSH authentication is available for Git and supported by GitMS. It is simple to set up and is attached to a service which is often already enabled. Occasionally, firewall rules may block clients and and so this may not be popular with Windows users.
Requirements
SSH authentication is done using the SSH daemon and public/private keypairs. Requirements are as follows:
-
Git operations are run through a single shared user account.
-
The user account is the same as the account that runs the GitMS service, for example, gitms.
-
All authentication is done by public/private keypairs. No password or certificate based authentication.
-
The ssh daemon uses the authorized_keys file in
~/.ssh/to do the public key lookup. -
The shared user account must have a regular shell login in
/etc/passwd. Using, for example,git-shell, causes the command GitMS relies on to fail.
Authorized keys
GitMS requires use of the 'command' keyword to be attached to each key in the authorized_keys file.
This associates a username with the key used to log in by using it as an argument to the gitms_shell script.
By default, the script is found in /opt/wandisco/git-multisite/bin/gitms_shell, but this can vary between installations.
For example:
command="/opt/wandisco/git-multisite/bin/gitms_shell user1" ssh-rsa <SSH_KEY>
If your script is in a different location, update this line accordingly.
If you’re running both Gitolite and GitMS over SSH see the Gitolite Integration section for more details.
HTTP(S) - Authentication through Apache
Apache authentication allows users to communicate via the HTTP(S) protocol. This is beneficial in environments with heavily restricted firewalls, as the usual ports 80 and 443 are used for communication.
Git has two HTTP-based protocols, Git over HTTP and Smart HTTP. GitMS only supports the Smart HTTP protocol, because of its better functionality, especially in speed of operation.
The information given here assumes that:
-
GitMS is already set up and configured for replication.
-
GitMS runs with the gitms user and gitms group.
-
The base directory for managed repositories is
/home/gitms/repos/. -
The
apache2+suexecpackage is installed. -
If an htpasswd file is required, it is stored in
/var/www/passwd. -
Apache runs as user apache.
-
Apache configuration is in its default directory,
/etc/httpd/conf.d/.
You can configure Apache to authenticate against either an internal file (htpasswd) or an LDAP directory service.
Authentication by htpasswd
-
Create the htpasswd file:
htpasswd -c /var/www/passwd <username>
Only use the
-coption when you first create an htpasswd file. If you use this to reference a pre-existing file, any details in the file are overwritten with the username you specify. -
Add users to an existing file:
htpasswd /var/www/passwd <username>
-
Configure htpasswd. Add the
repo.conffile in the/etc/httpd/conf.d/directory with the following contents:<VirtualHost *:80> # 80 is the port the webserver will bind to DocumentRoot /home/gitms/repos # The base directory for repositories managed by GitMS ServerName git.example.com RewriteEngine On RewriteCond %{REMOTE_USER} ^(.*)$ RewriteRule ^(.*)$ - [E=R_U:%1] RequestHeader set X-Remote-User %{R_U}e <Directory "/home/gitms/repos"> Allow from All Options +ExecCGI AllowOverride All </Directory> <Location /repos> # This matches the location in the requesting url, # for example, matches against request http://<ip>/repos/ AuthType Basic AuthName "Private Git Access" AuthUserFile "/var/www/passwd" Require valid-user </Location> SuexecUserGroup gitms gitms ScriptAlias /repos /var/www/bin/git-http-backend # This script alias redirects matches made # earlier to a script we will create later </VirtualHost>
Authentication by LDAP
Apache can use an LDAP directory to authenticate against. Unlike htpasswd, you do not have to maintain a separate passwd file.
Add a file called repo.conf in the /etc/httpd/conf.d/ directory with the following contents:
<VirtualHost \*:80>
DocumentRoot /home/gitms/repos
ServerName git.example.com
RewriteEngine On
RewriteCond %{REMOTE_USER} ^(.*)$
RewriteRule ^(.*)$ - [E=R_U:%1]
RequestHeader set X-Remote-User %{R_U}e

<Directory "/home/gitms/repos">
Allow from All
Options +ExecCGI
AllowOverride All
</Directory>

<Location /repos>
AuthType Basic
AuthName "Git Repos"
AuthBasicProvider ldap
AuthzLDAPAuthoritative off
AuthLDAPURL "ldap://LDAP-IP:389/CN=CN-details,DC=DC-details,DC=DC-details?uid"

If the LDAP directory requires a bind user and password:
AuthLDAPBindDN "CN=Administrator,CN=Users.DC=sr,DC=wandisco,DC=com"
AuthLDAPBindPassword password

Require valid-user
</Location>

SuexecUserGroup gitms gitms
ScriptAlias /repos /var/www/bin/git-http-backend
</VirtualHost>
Configuration using HTTPS
You can set up Apache to use HTTPS rather than HTTP. This is preferred in Enterprise settings due to the security benefits.
Using HTTPS with htpasswd
Add a file called repo.conf in the /etc/httpd/conf.d/ directory with the following contents:
<VirtualHost \*:443>
DocumentRoot /home/gitms/repos
ServerName git.example.com
RewriteEngine On
RewriteCond %{REMOTE_USER} ^(.*)$
RewriteRule ^(.\*)$ - [E=R_U:%1]
# The following two lines will redirect port 80 (HTTP) to 443 (HTTPS)
# if SSL/TLS is always required:
RewriteCond %{HTTPS} off
RewriteRule (.*) https://%{HTTP_HOST}%{REQUEST_URI}
RequestHeader set X-Remote-User %{R_U}e
SSLEngine on
SSLCertificateFile /etc/httpd/git-http1.crt
SSLCertificateKeyFile /etc/httpd/git-http1.key

<Directory "/home/gitms/repos">
Allow from All
Options +ExecCGI
AllowOverride All
</Directory>

<Location /repos>
AuthType Basic
AuthName "Private Git Access"
AuthUserFile "/var/www/passwd"
Require valid-user
</Location>

SuexecUserGroup gitms gitms
ScriptAlias /repos /var/www/bin/git-http-backend
</VirtualHost>
Using HTTPS with LDAP
Add a file called repo.conf in the /etc/httpd/conf.d/ directory with the following contents:
<VirtualHost \*:443>
DocumentRoot /home/gitms/repos
ServerName git.example.com
RewriteEngine On
RewriteCond %{REMOTE_USER} ^(.*)$
RewriteRule ^(.\*)$ - [E=R_U:%1]
#  The following two lines will redirect port 80 (HTTP) to 443 (HTTPS)
# if SSL/TLS is always required:
RewriteCond %{HTTPS} off
RewriteRule (.\*) https://%{HTTP_HOST}%{REQUEST_URI}
RequestHeader set X-Remote-User %{R_U}e
SSLEngine on
SSLCertificateFile /etc/httpd/git-http1.crt
SSLCertificateKeyFile /etc/httpd/git-http1.key

<Directory "/home/gitms/repos">
Allow from All
Options +ExecCGI
AllowOverride All
</Directory>

<Location /repos>
AuthType Basic
AuthName "Git Repos"
AuthBasicProvider ldap
AuthzLDAPAuthoritative off
AuthLDAPURL "ldap://LDAP-IP:389/CN=CN-details,DC=DC-details,DC=DC-details?uid"

# If the LDAP directory requires a bind user and password:
AuthLDAPBindDN "CN=Administrator,CN=Users.DC=sr,DC=wandisco,DC=com"
AuthLDAPBindPassword password

Require valid-user
</Location>

SuexecUserGroup gitms gitms
ScriptAlias /repos /var/www/bin/git-http-backend
</VirtualHost>
Configuration of SELinux
If you are running SELinux, additional configuration is required, as follows:
#enable access to home directories, i.e. /home/gitms
setsebool -P httpd_enable_homedirs on

usermod -a -G apache gitms

#install semanage
yum -y install policycoreutils-python

#allow httpd read/write access to /home/gitms
chcon -R -t httpd_sys_rw_content_t /home/gitms

#allow httpd read/write access to /home/gitms
chcon -R -t httpd_sys_rw_content_t /opt/wandisco/git-multisite/replicator/content_delivery

#allow the update script make network connection to the Java service
setsebool -P httpd_can_network_connect on

setsebool -P git_system_enable_homedirs on

#configure selinux for suexec on git-http-backend
semanage fcontext -a -t httpd_sys_script_exec_t /var/www/bin
restorecon /var/www/bin
Install GitWeb
GitWeb is an optional open source component that provides read-only access to your Git repositories via a Web interface.
It allows you to review recent commits, logs, history, and other metadata about the git repositories.
-
Install gitweb from yum:
yum install gitweb
-
Locate gitweb installation files, e.g. in their own folder:
mkdir /var/www/gitweb
-
Copy gitweb.cgi, gitweb.perl and the static directory into here.
-
Set permissions (because you are using suexec, this must be wandisco):
chown -R wandisco:wandisco /var/www/gitweb
-
Modify /etc/gitweb.conf to reflect site changes:
our $projectroot = "/opt/repos";
our @git_base_url_list = qw(http://<server-ip-or-name>/gitweb)
Save changes.
-
Configure Apache to use gitweb (see Appendix A example) and restart Apache after making any changes.
-
Browse to http://<server-ip-or-name>/gitweb to verify installation and configuration.
Example GitWeb Configuration:
#GitWeb Configuration
Alias /gitweb /var/www/gitweb

<Directory /var/www/gitweb>
  Options +ExecCGI
  AddHandler cgi-script.cgi
  DirectoryIndex gitweb.cgi
</Directory>
Final step: After you’ve finished updating your configuration, the last step is to restart apache:
service httpd restart
4.9. Authorization
4.9.1. GitMS configuration
Authorization is not enabled by default.
To change this, and any other authorization settings, edit the application.properties file.
The location is /opt/wandisco/git-multisite/replicator/properties/ for default installations.
Changes must be done on all GitMS nodes, and GitMS restarted after changes have been made (service git-multisite restart).
# enable/disable authz module
# Default:
# gitms.authz.enabled=false
gitms.authz.enabled=true

# Set the file location of the authz file
# Default: /opt/wandisco/git-multisite/replicator/properties/auth.authz
# gitms.authz.file=/opt/wandisco/git-multisite/replicator/properties/auth.authz
gitms.authz.file=<filepath>

# Set the default permissions policy to DENY or ACCEPT
# for requests without a specific rule
# Default:
# gitms.authz.policy=DENY;
gitms.authz.policy=<policy>

# Set the polling period to detect changes in the AuthZ file
# NOTE: The trailing L is important, as it indicates this
# number is a Long value
# Default:
# gitms.authz.poll.timer=50L
gitms.authz.poll.timer=<numberInMilliseconds>
4.9.2. AuthZ File format
In most cases the AuthZ file will be a generated file written from ACP. An example AuthZ file is available here.
If you were to manually write the AuthZ file, this is the format it must take:
Begin with the following header:
# Git AuthZ Version:1.0
To define teams, add entries such as:
[groups]
team1 = user1, user2
team2 = user3, user4
To define rules against individual repositories, the repository path is used as a unique identifier, which is added in square brackets. For example:
[/home/gitms/repos/Repo1.git]
user1 = R+W+
@team1 = R+W+C+D+M+
AuthZ rules are applied to users and teams using the following tokens:
| Type | Default | Description | Requirements |
|---|---|---|---|
R |
R- |
Read privileges |
|
W |
W- |
Write privileges |
R+ |
C |
C- |
Create privileges |
R+W+ |
D |
D- |
Delete privileges |
R+W+ |
N |
N- |
Non-Fast-Forward privileges |
R+W+ |
M |
M+ |
Merge privileges |
R+W+ |
Note: To create a branch or tag, a user must have both Read, Write and Create access, i.e. R+W+C+.
If there is an 'illegal combination', for example R-W+, this will be treated as no access as R+ is required for W+.
Rules can also be applied at branch or tag level, as follows:
| For a branch-level or tag-level rule to be effective, at least read access is required at the repository level. |
A branch example:
[/opt/gitRepos/Repo1.git:BRANCH/secure]
rick = W-
A tag example:
[/opt/gitRepos/Repo1.git:TAG/Rel1.0]
rick = W-
A complete example:
# Git AuthZ Version:1.0
[groups]
team1 = wayne, rick
team2 = wayne, allan

[/home/gitms/repos/Repo1.git]
rick = R+W+
@team2 = R+W+C+D+

[/home/gitms/repos/Repo1.git:BRANCH/secure]
rick = W-
AuthZ rule application
The AuthZ rules have 2 hierarchies which determine whether a user has a requested level of access:
-
Resource-level hierarchy (Repo→Branch|Tag)
-
User-level hierarchy (User→Team)
If there is a rule conflict then the rule that takes precedence is the rule that matches, and is the furthest down in the AuthZ file. The AuthZ file is automatically sorted, but priorities can be applied if you wish to deviate from the default sort order. In our above example, "rick" would have Read and Write access to the whole repo, except for the "secure" branch, on which he wouldn’t have write access.
For a branch-level rule to be effective, at least read access is required at the repository level.
Apply these rules as follows. If a user called Tom is requesting Write access to branch master on repo Repo1.git, the AuthZ rule resolution is:
-
Determine that the repo Repo1.git exists on the local node. If not, error out.
-
Lookup Tom’s rules for branch master on Repo1.git.
-
If rules exist for Tom which grant/deny the access he needs, apply them.
-
If rules do not exist for Tom, check each of the teams Tom is a part of.
-
Tom may be a part of multiple teams which have conflicting rule permissions. One could grant, and one could deny access. In the case where the permissions conflict at the same point on the hierarchy, we always pick the most permissive rule.
-
If Tom’s teams have no rules for the master branch either, we move up the Resource hierarchy and check the permissions assigned against Repo1.git.
-
If Tom has permissions assigned against Repo1.git, apply them.
-
If no relevant rules exist for Tom, check again for each of the teams he is a part of.
-
If no permissions exist at this point, apply the default policy permissions. (gitms.authz.policy)
| If read access is provided for a repository, all branches and tags are readable, even if a rule is added at branch level to deny access. |
Wildcards
Git wildcards enable you to reserve branch-name and tag-name name spaces for different accounts or teams of accounts. Git wildcards do not specify AuthZ for sub-repository paths, but do specify AuthZ for branch-paths and tag-paths.
When establishing priorities, the rule which takes precedence is the rule that matches and is the furthest down in the AuthZ file. Explicit matching takes precedence over wildcards, see below for the wildcards available.
Git Wildcard Atoms:
A directory entry (DE) is either a directory or a file, and makes up the refs/heads/<branch-path> or refs/tags/<tag-path>.
This table shows the wildcard atoms available:
| Matches | Wildcard |
|---|---|
Match one DE: |
* |
Match zero or more DEs: |
** |
Match any DE starting with "Text": |
Text* |
Match any DE ending with "Text": |
*Text |
Match any DE with mixtures of 3 and 4: |
red*blue*green |
| If you have branch called X then you cannot have a branch called X/anything. This is due to an implementation detail in Git. This is true anywhere in the branch-path so be careful when designing your policies. |
Account-Specific Branches
From GitMS 1.9.0 onwards there is an additional matching capability for branches - Account-Specific Branches.
The initial branch path can be anything but it needs to be followed with exactly <ACCOUNT>, the <ACCOUNT> token must be last.
During an authorization, where an account context is clear, the token <ACCOUNT> is expanded to the "account name" requesting the access.
Example
Branch path: personal/<ACCOUNT>
In this example, if the account name was "bobhoward" then the following branch paths would match (and provide the permissions associated by the Rule):
-
personal/bobhoward/taskA
-
personal/bobhoward/special
-
personal/bobhoward/SecretSquirrel
This means that "bobhoward" should never directly use a branch by the name of "personal/bobhoward". As per the warning above, the use of these longer branch path names would be prevented.
Logging
The GitMS replicator makes several log entries relating to AuthZ activities.
| Activity | Log entry |
|---|---|
Detected an AuthZ file change |
|
When an AuthZ file change is detected |
|
When there has been an error parsing the new AuthZ file |
|
When the new AuthZ file has been successfully parsed |
|
Authorization request received |
|
Request received - authorization disabled |
|
Request received - authorization enabled |
|
Request received - authorization configuration error |
|
Authorization response |
|
Permissions Specified in AuthZ and applied |
|
No specific permissions found - using default policy |
|
No matching user found - using default policy |
|
| Note: Logging descriptions are subject to change between versions and patches. |
4.10. Submodule Verification
GitMS 1.9.5 introduces submodule verification. This verification runs as part of the GitMS rp-git-update hook by default, but can be disabled if required.
4.10.1. Disabling Submodule Verification
Follow the steps below to disable submodule verification. In order to implement a uniform policy, the changes must be made in parallel on all Git MS nodes at the same time. This is preferably done during a service period where all instances of GitMS are stopped.
Below are the steps for disabling submodule verification if you are using SSH or HTTPD.
If you are using other HTTP setups, use an appropriate method to expose the variable WD_DISABLE_SUBMODULE_VALIDATION=1 to Git.
4.11. Removing GitMS
In the event that you need to remove GitMS, your replicated repositories can continue to be used in a normal, non-replicated setting. Furthermore, the repositories will not contain any WANdisco proprietary artifacts or formats.
Removal procedure
-
Perform a consistency check of all replicas or take steps to confirm that you repository data is up-to-date and is not corrupt.
-
Save the following snippet of shell script onto every node that you need to remove GitMS from:
#This script removes Git MultiSite from a single node
echo "Removing Git-Multisite RPMs"
yum remove -y git-multisite git-multisite-gui git-multisite-hook git-multisite-all
echo "Removing Git-Multisite Install Directory"
rm -rf /opt/wandisco/git-multisite
killall java
cd /tmp
rm -rf *
cd
-
Run the script as root user, on each node.
-
Perform a cleanup of all redundant repository copies.
5. Troubleshooting Guide
5.1. Logs
GitMS logs Git and replication events in several places:
- Admin UI: Growl messages
-
The growl messages provide immediate feedback in response to a user’s interactions with the Admin UI. Growls are triggered only by local events and will only display on the node (and in the individual browser session) in which the event was triggered.
GrowlGrowl messages appear in the top right-hand corner of the screen and will persist for a brief period (15 seconds in most cases) or until the screen is refreshed or changed.
Always check the dashboardIf you are troubleshooting a problem we strongly recommend that you check the Dashboard as well as the log files. While we added the growl messaging as way giving administrators an immediate alert for events as they happen, they are not intended to be used as the main method of tracking failures or important system events.
GitMS has two locations where logs are stored, one area for the overall application and one area for replication activity.
5.1.1. Application logs
/opt/wandisco/git-multisite/
The main logs are produced by the watchdog process and contain messaging that is mostly related to getting GitMS started up and running. Logs are rotated when they hit 100MB in size.
- flume.YYYYMMDD-hhmmss.log
-
logging of Flume sender events (only if you have installed the Flume component).
- ui.YYYYMMDD-hhmmss.log
-
startup/everything to do with the UI, including in-use logging. lightweight.
-rw-r--r-- 1 wandisco wandisco   88 Jan 15 16:53 multisite.log
-rw-r--r-- 1 wandisco wandisco  220 Jan 15 16:53 replicator.20140115-165324.log
-rw-r--r-- 1 wandisco wandisco 4082 Jan 15 16:53 ui.20140115-164517.log
-rw-r--r-- 1 wandisco wandisco 1902 Jan 15 16:53 watchdog.log
- multisite.log
-
Basic events that relate to the starting up/shutting down of Git MultiSite.
e.g.
2017-01-15 16:45:17: [3442] Starting ui
2017-01-15 16:53:24: [3571] Starting replicator
- replicator.YYYYMMDD-hhmmss.log
-
Events relating to the start up and shutdown of the replicator, and also logging. This log never includes information about the actual operation of the replicator, for that you need to see the log files located in the replicator’s own logs directory (see below).
- watchdog.log
-
Logs the running of the watchdog process which monitors and maintains the running of the GitMS processes.
5.1.2. Replicator logs
The logging for replication activity is stored within the replicator directory in the GitMS installation, i.e. /opt/wandisco/git-multisite/replicator/logs.
These logs take the following form:
-rw-r--r-- 1 wandisco wandisco 296785 Jan  6 14:36 gitms.log
-rw-r--r-- 1 wandisco wandisco     54 Jan  6 07:34 logrotation.ser
drwxr-xr-x 2 wandisco wandisco   4096 Jan  6 07:30 recovery-details
drwxr-xr-x 2 wandisco wandisco   4096 Jan  6 14:34 thread-dump
The logging system has been implemented using Simple Logging Facade for Java (SLF4J) over the log4J Java-based logging library. This change from java.util.logging has brought some benefits.
This change lets us collate data into specific package-based logs, such has a security log, application log, DConE messages etc.
Logging behavior is mostly set from the log4j properties file: /opt/wandisco/git-multisite/replicator/properties/log4j.properties
# Direct log messages to a file
log4j.appender.file=com.wandisco.vcs.logging.VCSRollingFileAppender
log4j.appender.file.File=gitms.log
log4j.appender.file.MaxFileSize=100MB
log4j.appender.file.MaxBackupIndex=10
log4j.appender.file.layout=com.wandisco.vcs.logging.EpochPatternLayout
log4j.appender.file.layout.ConversionPattern=%d{ISO8601} %e %-5p %c{1} %m%n
log4j.appender.file.append=true

# API Framework
log4j.logger.org.springframework=INFO
# Jetty Framework
log4j.logger.org.eclipse=INFO
# Apache Framework
log4j.logger.org.apache=INFO

# Root logger option
log4j.rootLogger=ALL, file
This configuration controls how log files are created and managed. A change to log4j configuration currently requires a replicator restart to take affect.
-
The log file name is
gitms.log. -
The maximum size of a log file is set at 100MB.
-
The maximum number of logs is limited to 10.
-
The VCSRollingFileAppender offers some benefits over Log4j’s default RollingFileAppender. It has a modified rollover behavior so that the log file
gitms.logis saved out with a permanent file name (rather than being rotated). Whengitms.logreaches its maximum size it is saved away with the namegitms.log.<Date>. The date/time stamp is in ISO-8601 format. -
When the maximum number of log files is reached, the oldest log file is deleted.
Additional log destinations (appenders)
Apache log4j provides Appender objects are primarily responsible for printing logging messages to different destinations such as consoles, files, sockets, NT event logs, etc.
Appenders always have a name so that they can be referenced from Loggers.
You can learn more about setting up appenders by reading through the Apache documentation.
We strongly recommend that you work with our support team before making any significant changes to your logging.
|
Debug is chatty
If you enable the debug mode you should consider adjusting your log file limits (increasing the maximum file size and possibly the maximum number
of files).
|
|
Send logging
If it is possible, consider placing the log files an a separate file
system.
|
5.1.3. Logging levels
- ALL
-
Provides a boggling level of trace information for troubleshooting hard to identify problems.
- DEBUG
-
Provides a standard level of trace information.
- INFO
-
Interesting runtime events (startup/shutdown). Expect these to be immediately visible on a console, so be conservative and keep to a minimum.
- WARNING
-
A message level indicating a potential problem.
- SEVERE
-
Message level indicating a serious failure.
5.1.4. Logger settings tool
It’s possible to change the logging levels - either temporarily to help in a current investigation, or permanently if you desire to change your ongoing logging.
The logging settings tool enables you to change the levels through the UI but it is also possible to modify log settings directly by editing the logger properties file:
/opt/wandisco/git-multisite/replicator/properties/logger.properties
Once you’ve made a change, you will need to restart the replicator in order for the change to take effect.
Log changes are not replicated between nodes. This allows each node to have its own logging setup but you will have to manually replicate any changes if needed.
The Logging settings tool is on the Settings tab. Loggers are usually attached to packages. Here, the level for each package is specified. The global level is used by default, so levels specified here act as an override that takes effect in memory only, unless saved to the logger properties file.

Edit global logger settings
The global level is the default for all packages.
-
Login to the admin console, click on the Settings tab.
-
Scroll down the settings till you reach the Logging Settings block.
 Edit Logging Settings
 -
Click on the Configure button.
-
The Logging Settings Config page will open. Click on the drop-down menu to change the current global logger setting. This change will be applied to all loggers that have not been specified in the edited Logger settings. Loggers that you Add or Edit (specify) will always override this global setting.
 Edit Global Logger Settings
 -
Click Save to apply changes to the logger.properties file, then restart the replicator for changes to take effect.
Add or edit logger settings
-
Login to the admin console, click on the Settings tab.
-
Scroll down the settings till you reach the Logging Settings block.
Edit Logging Settings -
Click on the Configure button.
-
The Logging Settings Config page will open, it has the following sections:
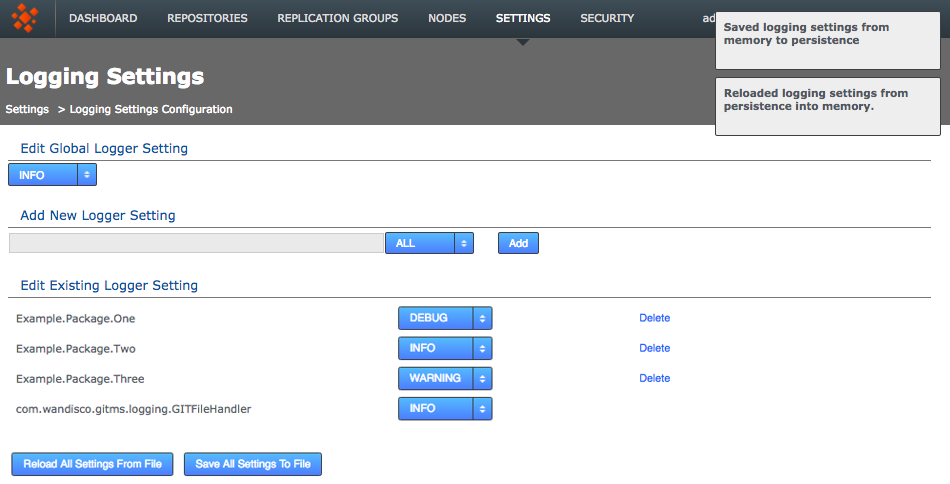 Logging Settings page
- Add New Logger Settings
-
Enter the name of the logger, assign its level then click the Add button.
- Edit Existing Logger Settings
-
Use the corresponding drop-down list to change the level of any of the existing loggers or click the Delete button to remove the logger. Note that you cannot delete the
com.wandisco.gitms.logging.GITFileHandlerlogger setting.All changes thus far are immediate in effect and in-memory only. Changes are not persisted after replicator restart unless you use the save or reload button:
- Reload All Settings From File
-
Click Reload button to ditch all changes by reloading the logger settings from the <install-dir>/replicator/properties/logger.properties. file.
- Save All Settings To File
-
Click Save to apply your changes to the above logger.properties file.
-
Once you have saved or reloaded the Logger Settings, appropriate growl messages will appear in the top right.
5.2. Setting your timezone
If your timezone is set incorrectly you may experience replication issues.
If you are using CentOS6 then you can set the timezone by changing the file /etc/localtime.
However if using CentOS 7, RHEL 7 or SLES 12 you must use the timedatectl command.
See the Knowledge base article Setting the timezone on Linux for more information.
5.3. Consistency check
Consistency check is done on a per repository basis.
It enables you to check whether a selected repository remains in the same state across the nodes of the replication group in which the repository resides.
Follow these steps to check on consistency:
|
Limits of the Consistency Checker
The Consistency Check tells you the last common revision shared between repository replicas. Given the dynamic nature of a replication group, there may be in-flight proposals in the system that have not yet been agreed upon at all nodes. Therefore, a consistency check cannot be completely authoritative as it does not include any changes that occur after the consistency check is scheduled.
If you run a consistency check for a repository that does not exist, the dashboard displays You will receive a consistency error if you run a consistency check when there is no quorum. Consistency checks cannot verify consistency without a quorum and so shouldn’t be run. Consistency checks will not complete until all nodes in a replication group have provided the requested data for the specified repository. Therefore, all nodes in the replication group should be up. If one or more nodes are down then the consistency check will complete when those nodes come back up. |
-
Log in to a node, and click the Repositories tab.
Go to the repository -
Click one of the listed repositories.
 Click a repository
 -
Click the Consistency check.
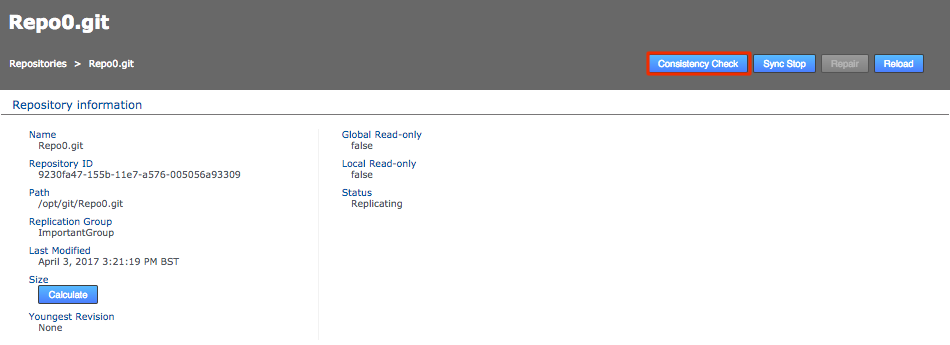 Start consistency check
 -
Results appear on the screen.
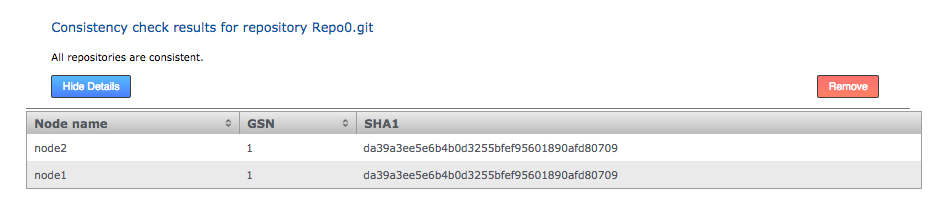 Consistency check results
From GitMS 1.9.4 onwards the property gitms.cc.wait.time can be used to set the maximum time to wait for a consistency check result from all nodes.
For more information on how to set this property see here.
|
Log results
It’s also possible to check the results of a consistency check by viewing the replicator’s log file (gitms.log). See Logs
5.3.2. Inconsistency: causes and cures
WANdisco’s replication technology delivers active-active replication that, subject to some external factors, ensures that all replicas are consistent. However, there are some things that can happen that break consistency that would result in a halt to replication.
-
Temporary removal of a repository from a node, then adding it back incorrectly.
Fix: Ensure that an rsync is performed between your restored repository and the other replicas. Don’t assume that nothing has changed even if the repository has been off-line. -
The Consistency Check would not be expected to deal with consistency issues that pre-dated the revision at which replication was started.
Fix: Ensure consistency between replicas before you start replicating a repository. -
Restoring a backup of a repository from a VM snapshot can introduce differences.
Fix: Repeat the repository restoration, account for factors such as the use of Change Block Tracking (CBT). Make sure to rsync the restored repository from a single recovered copy.While you can restore a repository from a VM snapshot, never restore a replicated node from a VM snapshot. If restoring a repository from a VM snapshot take caution to boot the VM into single use and prevent the Git MultiSite application from starting (e.g. mv /opt/wandisco/git-multisite/opt/wandisco/git-multisite.DONOTSTART). -
Manipulation of file/folder permissions outside of Git’s control will lead to divergence that will force the affected replica to become read-only.
Fix: The easiest to fix as it is correcting the file/ownership errors. This will generally result the replicas re-syncing and automatically coming out of Read-only mode.
Loss of consistency is generally caused by external factors such as environmental differences, system quirks or user error.
5.3.3. A note about replica size and consistency
It is possible that repository replicas that are consistent between nodes have different reported on-disk size footprint. This difference should not be a cause for concern and can be explained by a number of factors that mostly relate to house keeping and actions that don’t need to be synchronized. These can include:
-
Aborted transactions, still waiting to be cleaned up.
-
The local use of various repository admin tools that create or change repository files.
-
Collection timing skew; different revision numbers.
5.4. Copying repositories
This section describes how to get your repository data distributed before replication.
Repositories should start out as identical at all sites. A tool such as rsync can be used to guarantee this requirement. The exception is the hooks directory which can differ as variances in site policy may require different hooks. For more information see hooks.
5.4.1. Copying existing repositories
It’s simple enough to make a copy of a small repository and transfer it to each of your nodes. However, remember that any changes made to the original repository will invalidate your copies unless you perform a syncronization prior to starting replication.
If a repository needs to remain available to users during the process, you should briefly halt access, in order to make a copy. The copy can then be transferred to each node. Then, when you are ready to begin replication, you need use rsync to update each of your replicas.
5.5. Repair an out-of-sync repository
There are several situations where a repository may be corrupted or lose sync with its other copies. For example, it could be the result of a temporary file system full state, or a file system corruption causing lost data. If this happens, the node with this copy stops replicating data for that repository. Other repositories are unaffected and continue to replicate. You can use GitMS’s repair process to quickly repair the repository and continue replicating. Make certain to fix the underlying file system problem before continuing or the corruption may well re-occur.
|
No option to repair?
If an existing repository is added to a Replication Group that contains Passive nodes or a repository on a Passive node enters an Local
Read-only state, then the UI will not offer a repair option, being unable to coordinate with the repository copy on the Passive node.
The answer is to temporarily change the passive node into an active node:
Read more about the Replication Group settings. |
-
Before starting the repair, ensure that you have addressed the underlying cause of the corruption. If not, you may find that you repeatedly need to complete the repair, causing additional disruption.
-
Login to a node, click on the Repositories tab. A repository that is out-of-sync will be flagged as Local RO (Read-only) which signifies that other replica may continue to update. Note that the Status for Repo7 is marked as Stopped instead of Replicating. Click on the Repair button.
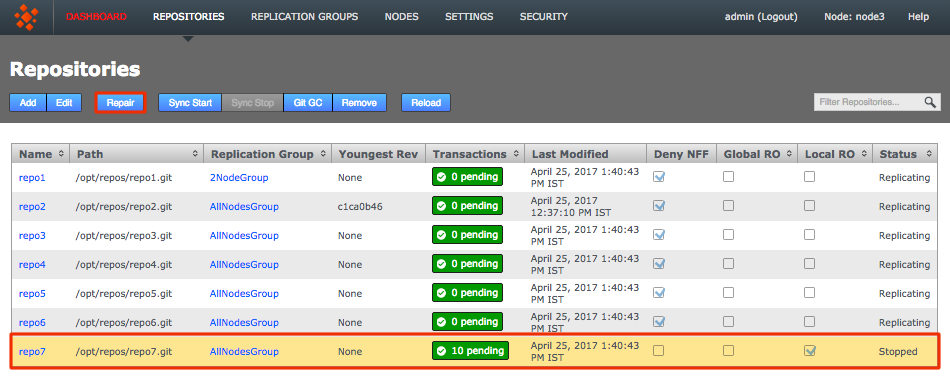 Out of sync
 -
The Repair Repository window will open. This runs through a three step procedure. First, select a 'helper node' from the nodes that remain in replication. It may be worth while doing a test before you choose the helper to ensure that its copy of the repository is in fact the latest version. Once selected, click the Start Repair Process button. This will briefly take the selected node offline, to ensure that changes don’t occur to the repository while you conduct the repair. At this point you need to login and handle the repair manually.
 Start the repair
 -
Use the good copy of the repository on the helper node, overwriting the out-of-date/corrupted copy. We recommend using rsync for this task.
Hooks will be overwrittenTake note that when restoring a repository using rsync, you will also copy across the helper repository’s hooks, overwriting those on the destination node.
Need to maintain existing hooks? Before doing the rsync, copy the hooks folder to somewhere safe. Then when you’ve completed the rsync, restore the backed-up hooks.
[root@localhost git]# rsync -rvlHtogpc /opt/git/repo7.git root@10.9.4.159:/opt/git/
root@10.9.4.159's password:
sending incremental file list
repo7.git/
repo7.git/objects/
repo7.git/objects/08/
repo7.git/objects/08/fa72246659d17fafd61617255042017eb2fbb9
repo7.git/objects/10/
repo7.git/objects/10/f04c8bcb7ae569ada1b6412ac5b85a7728a42a
repo7.git/objects/18/
repo7.git/objects/18/f40c49924ed22a4fc30f94fbc2ba599188f33b
repo7.git/objects/1f/
repo7.git/objects/1f/cb8b0d30c6ebe7951f35b4ee65dacb0b7a9e49
repo7.git/objects/25/
repo7.git/objects/25/15d3df6b9ae334904d229067775572aa7345ff
repo7.git/objects/29/
repo7.git/objects/29/ba88d9b257a1bda7551805c6550cf35005453e
repo7.git/objects/2a/
repo7.git/objects/2a/bb352db18fdbc2cfc79213dcb016ed740ca327
repo7.git/objects/2d/
repo7.git/objects/2d/e39247ff1a2fdfad5244bb03dc79b225c19ae9
repo7.git/objects/64/
repo7.git/objects/64/206279f16db341667899f524ee183182335d7a
repo7.git/objects/96/
repo7.git/objects/96/d3dabe19450a166a21e9acf354d0c7b1e4f48e
repo7.git/objects/a8/
repo7.git/objects/a8/48ac3ed65cb2bc3bb7cd5ddc864dbf4c4b0ead
repo7.git/objects/c5/
repo7.git/objects/c5/10abf4c7c3e0dc4bf07db9344c61c4e6ee7cbc
repo7.git/objects/de/
repo7.git/objects/de/5640a6a3e263dc9343abd2e18db7957c435eb4
repo7.git/objects/pack/
repo7.git/refs/heads/
repo7.git/refs/heads/master

sent 8334 bytes  received 766 bytes  2600.00 bytes/sec
total size is 4103  speedup is 0.45
[root@localhost git]#
Once the repository is updated you should check that the fixed repository now matches the version on your helper node.
-
At this point, complete the repair process. Go back and click the Complete Repair Process button.
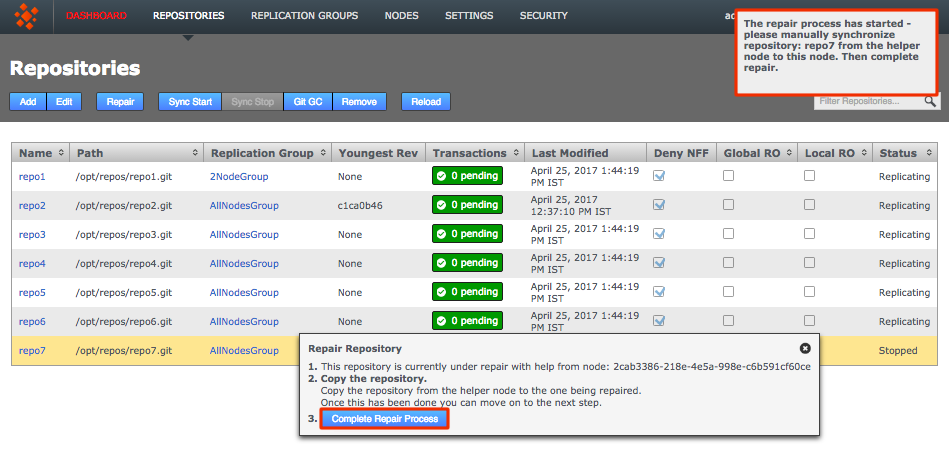 Complete
 -
Looking back at the Repositories tab you’ll now see that the problem repository is once again replicating.
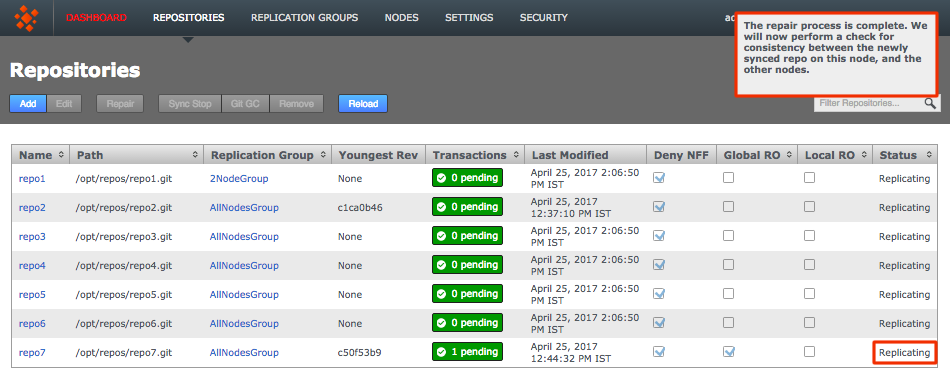 Back in sync
5.6. Recover from node disconnection
GitMS can recover from a brief disconnection of a member node. It should be able to automatically resynchronize when the node is reconnected. The crucial requirement for GitMS’s continued operation is that agreement over transaction ordering must be able to continue. Votes must be cast and those votes must always result in an agreement. No situation must arise where the votes are evenly split between voters.
If, after a node disconnection, a replication group can no longer form agreements then replication is stopped. If the disconnected node was a voter and there aren’t enough remaining voters to form an agreement then either the disconnected node must be repaired and reconnected, or the replication group must undergo emergency reconfiguration (EMR).
5.6.1. EMR
If you need to permanently remove a node from one of your replication groups, i.e. an emergency reconfiguration (EMR), then you must contact WANdisco’s support team for assistance. The operation poses several risks to overall operation. Therefore we recommend that you do not attempt the procedure without help from WANdisco support.
EMR is a final option for recovery
The EMR process cannot be undone, and it involves major changes to your replication system. Only consider an EMR if the disconnected node cannot be repaired or reconnected in an acceptable amount of time.
Note: If EMR is used to remove a node you may be left with a pending task of type tasksTypeREMOVE_STATE_MACHINE_TASK.
If this is the case then:
-
Cancel the active/pending task (type is
tasksTypeREMOVE_STATE_MACHINE_TASK) -
Restart the node where the pending task existed.
|
Gone but not forgotten
After a disconnected node has been removed and a replication group reconfigured, the disconnected node should not be allowed to come back
online.
The DConE replication engine is unaffected by the presence of a rogue node.
However, an inactive repository may be mistaken for an active repository, although it will receive no more updates from the other replicas.
You must perform a cleanup after completing an emergency reconfiguration.
|
|
Last node standing
Any replication group which has its membership reduced to one node will continue to exist after the emergency reconfiguration as a
non-replicating group. When you have set up a replacement node you should be able to add it back to the group to restart replication.
|
|
Only one at a time
The EMR procedure needs to be co-ordinated between sites/nodes.
You must not start an EMR if an EMR procedure has already started from another node.
Running multiple EMR procedures at the same time can lead to unpredictable results or cause the processes to get stuck.
|
5.6.2. Recovering Sidelined Repositories
The sidelining feature is used for putting a repository into the offline mode. This tells the other nodes to press on, and not queue up subsequent proposals. When a repository has been taken offline, it can never catch up and will require a Repository Repair.
| Why sideline? Without the sidelining feature, any replica that remained offline could cause the remaining nodes to exhaust their storage. This is because they would attempted to cache all the continuing repository changes, so that they could automatically "heal" the offline repository, should it come back online. |
Use the following procedure to free a repository from a sidelined state:
-
Click on the sidelined repository, then click Repair.
 Sidelined Repository
 -
The repair dialog with sidelining-related options opens. Start by clicking Prepare to Unsideline.
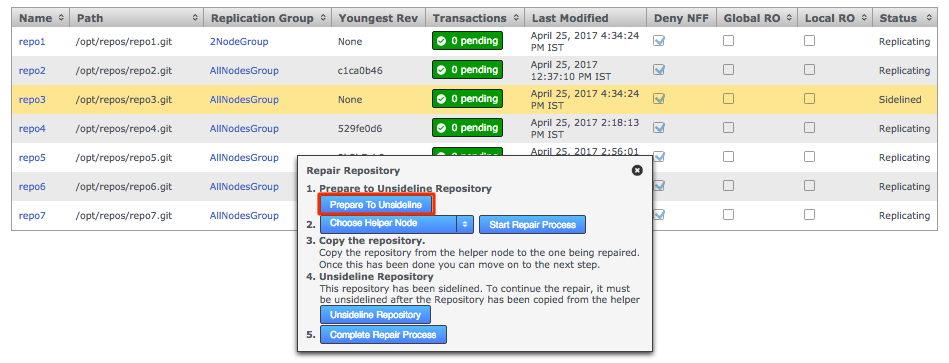 Unsideline
 -
Choose the Helper Node from the Choose Helper Node dropdown then click the Start Repair Process.
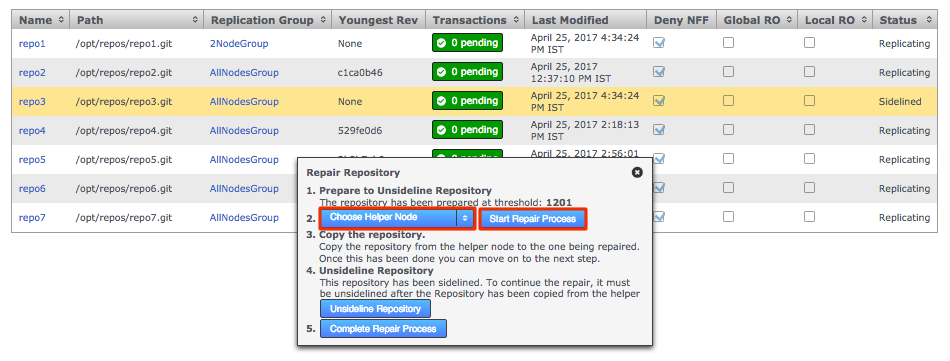 Chose Helper Node and Start Repair
 -
Now use rsync to copy the repository from the helper to the broken node.
-
When the rsync has completed, click on Unsideline Repository.
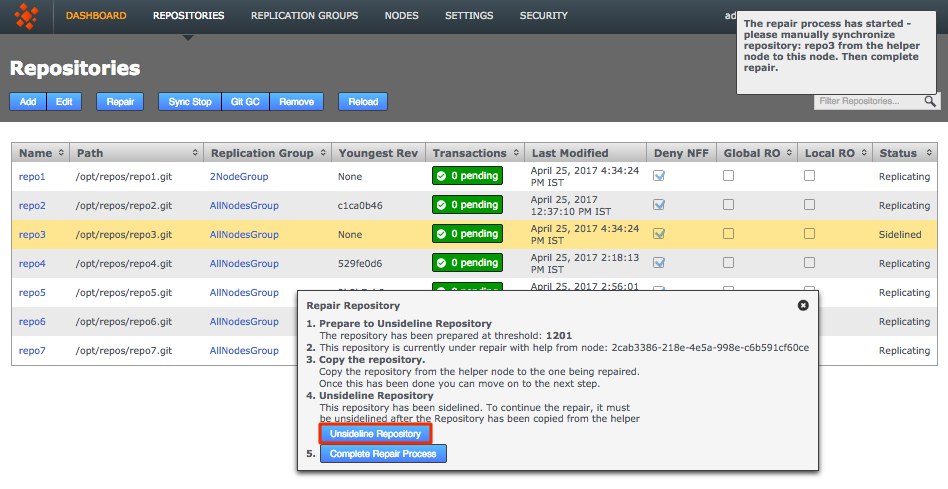 Unsideline
 -
Click on Complete Repair Process and trigger the Consistency Check.
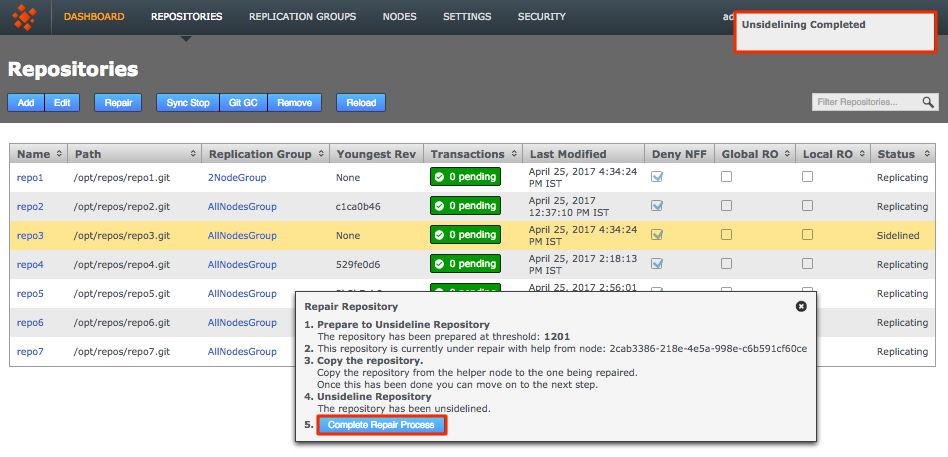 Unsideline
 -
A Growl message will appear saying that the helper process has completed and a consistency check will be carried out, if this is check fails the repo will go Global Read-only. You can check this by refreshing the page. The repository will show up as replicating again.
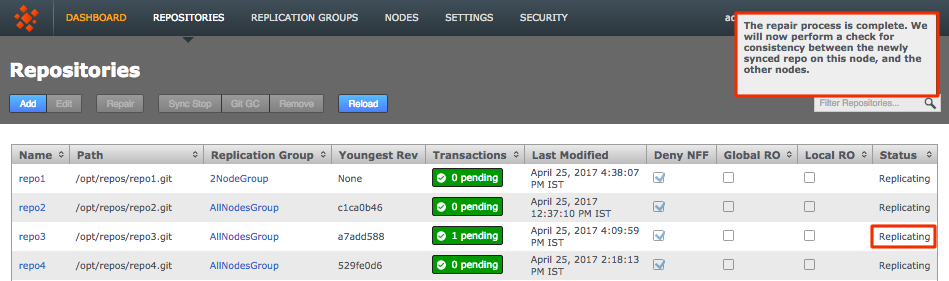 Growl - Completed
5.7. Recover from replicated repository errors
If a replicated Git repository becomes corrupted or receives updates that cause errors, these may be replicated to all nodes, so that it is not possible to use the usual repair procedure. In such a case, use the following steps:
-
Set a pre-commit hook to prevent subsequent update on all nodes where the repository is present. See Hooks.
-
Remove the repository from replication. See Remove a repository.
-
Obtain an acceptable copy of the repository either from backup.
-
Repeat the above steps on all nodes that replicate the restored repository. Do not remove the pre-commit hook.
-
Add the repository to replication. See Add repository.
-
Remove the pre-commit hook from all replicas of the repository.
5.8. Run Talkback
Talkback is a bash script that is provided in your GitMS installation in case you need help from the WANdisco support team.
Manually run talkback using the following procedure. You can run talkback without interaction if you set up the variables noted in step 3:
-
Log in to the server with admin privileges. Navigate to the GitMS binary directory:
cd /opt/wandisco/git-multisite/bin/
-
Run talkback.
# ./talkback
-
You will need to provide some information during the run. Make a note of the environmental variables named below. You can then use these to modify how the talkback script runs:
Replicator admin accountThe admin account details required below are for the admin account for the application, NOT the local system account.# ./talkback ===================== INFO ======================== The talkback agent will capture relevant configuration and log files to help WANdisco diagnose the problem you may be encountering. ls: cannot access /opt/wandisco/git-multisite/replicator/gfr/bin/acp: No such file or directory Gathering Gerrit info.... Is the replicator currently running [Y/n]: Y Please enter replicator admin username: admin Please enter replicator admin password: retrieving details for node "8bbe11fe-8060-4553-99d0-6cff75455e58" retrieving details for node "e8e85c2c-dbb7-451a-87a3-f11fa9dc1871" Running sysInfo script to capture maximum hardware and software information... Gathering Summary info.... Gathering Kernel info.... Gathering Hardware info.... Gathering File-Systems info.... Gathering Network info.... Gathering Services info.... Gathering Software info.... Gathering Stats info.... Gathering Misc-Files info.... THE FILE sysInfo/sysInfo_10.6.61.38-20150106-151215.tar.gz HAS BEEN CREATED BY sysInfo Please enter your WANdisco support FTP username (leave empty to skip auto-upload process): Skipping auto-FTP upload TALKBACK COMPLETE Please upload the file: /opt/wandisco/git-multisite/talkback-201501061509-daily-gerrit-static-1.qauk.wandisco.com.tar.gz to WANdisco support with a description of the issue. Note: do not email the talkback files, only upload them via ftp or attach them via the web ticket user interface.
5.8.1. Uploading talkback files
If you need help from WANdisco support you may need to send them your talkback output files.
DO NOT send these files by email.
From GitMS 1.9.3 onwards you can automate uploading talkbacks using the Auto SFTP tool. See Using the Auto SFTP tool.
If running an earlier version of GitMS the best way to share your talkback files is via SFTP, but small files (<50MB) can also be uploaded directly at customer.wandisco.com.
For information on how to upload talkback files, see the Knowledge base article How to upload talkback files for support.
Information can also be found at customer.wandisco.com but you will need a valid WANdisco License Key to access this information.
Using the Auto SFTP tool
This is available from GitMS 1.9.3 onwards.
Requirements:
-
The email address of your WANdisco support engineer - we advise that you copy/paste the support engineer’s e-mail from a recent communication.
-
The specific path to your WANdisco License File.
-
The filename of the file to be uploaded.
-
You must run this tool as the GitMS user or sudo/root.
-
Max Connections: HTTPS = 4, SFTP = 1
-
Binaries: awk, curl, echo, grep, md5sum, sed, sftp, sleep, ssh-keygen, stat (Unix - Not OS X), tr
As the GitMS user or sudo/root run the tool:
./autosftp -e wandiscoSupportEngineerEmail [-L <licenseFilePath>] <filename>
The Auto SFTP tool determines the file size. If it is smaller than 50,000,000 Bytes it is uploaded via HTTP. If it larger then SFTP is used.
If you have a large file but SFTP is disabled then you must manually make smaller files and then use the Auto SFTP tool. To make the files smaller use:
split -db 50000000 <filename> <filename>
More information about running the tool can be found using ./autosftp -H.
5.9. Replication over a bad WAN link
Note: Nodes that are out of sync eventually recover.
GitMS runs with a smart commit strategy and ignores all read operations so that activities like checkouts have no impact on WAN traffic. This, along with network optimization, can provide LAN-speed performance over a WAN for write operations at every location, while keeping all the repositories in sync. If a node is temporarily disconnected, or experiences extreme latency, low speeds or high lost packet rates, a node may become temporarily out of sync while transactions are queued up.
If this happens, the node will eventually catch up without administrator intervention. However, do monitor the state of your WAN connectivity to be certain that replication will be able to catch up.
|
Contingencies
If connectivity drops to almost zero for a prolonged period then this result in the node becoming isolated and increasingly out-of-sync.
If this happens, you must monitor traffic, contact WANdisco’s support team and start considering contingencies.
For example, consider making network changes or removing the isolated node from replication, potentially using the Emergency Reconfiguration procedure
|
5.10. Disable external authentication
In the event that you need to disable LDAP or Kerberos authentication and return your deployment to the default internally managed users, use the following procedure.
-
Open a terminal on your node. Navigate to the replicator directory.
$ cd /opt/wandisco/git-multisite/replicator/
-
Run the following command-line utility.
$ java -jar resetSecurity.jar
-
You’ll be asked for new administrator credentials then prompted to restart the replicator in order for the change to be applied. Make sure to provide an account name that has not already been used (along with its password).
-
Now login using the original authentication form and the new administrative account name:
 Login
Login
5.11. Create a new users.properties file
In the event that you need to create a fresh users.properties file for your deployment, follow this short procedure:
-
Shut down all nodes and ensure the GitMS service has stopped
-
On one node, open the
application.propertiesfile in a text editor. Default location:/opt/wandisco/git-multisite/replicator/properties/application.properties
-
Add the following entries to the file:
application.username=admin
application.password=yourPassword
-
Save the file, then restart the GitMS service on that node.
-
Copy the newly created
/opt/wandisco/git-multisite/replicator/properties/users.propertiesfile to all other nodes. -
Restart the GitMS services on all nodes.
-
Again, edit
application.properties. This time, remove the entries added in step 3 (application.usernameandapplication.password).
6. Reference Guide
This chapter runs through everything you need to know to get GitMS deployed. First we’ll cover all the things that you need to have in place before you install. We’ll then cover a standard installation and setup. Finally we’ll look at some possible problems you might experience with some troubleshooting tips.
6.1. Benefits of running with GitMS
LAN-speed Performance Dramatically Shortens Development Cycles and Reduces Cost
-
WANdisco’s patented replication technology, Distributed Coordination Engine (DConE), fulfills Git’s distributed promise for developers at every location.
-
Every developer pushes to a local master repository for maximum performance.
-
Peer-to-peer architecture with no single point of failure eliminates the performance and scalability bottleneck of a central master repository server.
-
Enables global collaboration – no geographic limitations.
-
New nodes can be added on the fly to support new locations or increased load.
-
Immediate active-active replication eliminates WAN latency and ensures repositories are always in sync, enabling fast conflict resolution.
-
Developers at remote sites no longer hold back commits until the end of the day/week as they may have in the past due to poor network performance.
-
Update conflicts and other problems are found and fixed as they occur, so less time is spent on QA and rework.
Zero Downtime and Zero Data Loss
-
WANdisco’s unique replication technology turns distributed repositories into replicated peers, providing continuous hot-backup by default.
-
Every GitMS node is fully replicated and writable, providing an out-of-the-box High Availability / Disaster Recovery (HA/DR) solution.
-
Recovery is automatic after a server outage (planned or unplanned), eliminating lost productivity during maintenance or server crashes. In addition, the risk of human error from manual recovery procedures is completely eliminated.
Enables Continuous Availability for Global Software Development
-
WANdisco’s unique replication technology turns Git repositories distributed over a WAN into replicated peers, providing continuous hot-backup by default, as part of normal operation.
-
Hot deploy features make it possible to add new Git repositories to a multi-site implementation, or take existing servers offline for maintenance without interrupting usage for other sites.
-
When new repositories are added, or existing servers are brought back online they automatically sync with others.
Easy to Administer
-
All sites can be administered from a single location.
-
New replicated and fully readable and writeable Git nodes can be quickly set up with no custom coding.
-
Built-in self-healing capabilities make disaster recovery automatic without any administrator involvement.
6.2. UI tabs
6.2.1. Dashboard
The dashboard provides administrators with a service status for GitMS and displays any urgent issues. Past issues will stay on the Dashboard for a maximum of 96 hours (or as defined by the Dashboard Item Age Threshold).
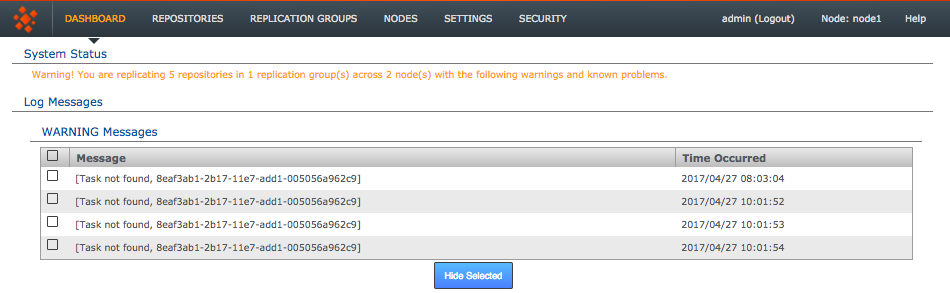
- System Status
-
A single line status message that indicates whether replication is running successfully or not.
In addition to System Status, one or more of the following sections may appear depending on the status of your Git MultiSite eco-system.
- Log Messages
-
- Replication Groups
-
The status of each running replication group is listed. Click on the dropdown button to indicate which nodes are at fault.
- Pending Tasks
-
List all tasks that are currently pending. It is possible to cancel tasks by clicking on the corresponding button.
- Failed Tasks
-
Lists the replicator tasks that have failed, along with the task’s unique Id, which can be used to search the logs for more details.
- Disconnected Nodes
-
Logs all nodes that have been disconnected, when they were disconnected and for how long. If the duration field is empty then the outage still exists. Any outages that occurred to the node from which the UI is logged into will not be listed.
The left hand checkboxes can be used to select messages you wish to hide.
6.2.2. Repositories
Use this tab to manage your replicated Git repositories.
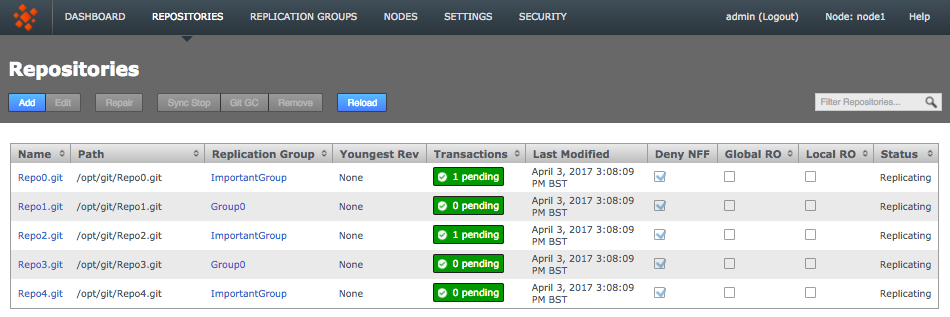
Repository table
All repositories that you add to GitMS appear on the repository table.
- Name
-
The repository name
|
Known issue: duplicate repository names allowed
You can currently add multiple repositories with the same name, although they need different paths. Ensure that you don’t use the same
name for multiple repositories because this is bad practice.
|
- Path
-
The local path to the repository. This needs to be the same across all sites
- Replication Group
-
The replication group in which the repository is replicated
- Youngest Rev
-
SHA1 for the most recent reference pushed to the repositories master branch.
- Transactions
-
Lists any pending transactions. The transactions link to the last transactions played out for the repository:

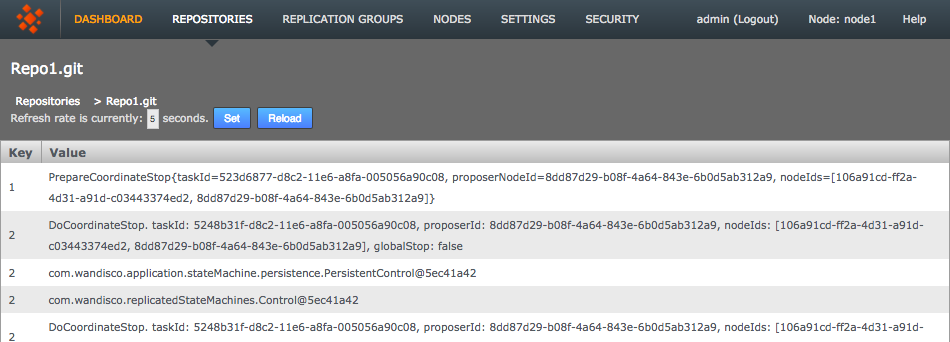
- Last Modified
-
The date and time of the last modification to the master branch of the repository
- Deny NFF
-
Indicates if non-fast-forward changes are allowed or denied. The default is deny.
- Global RO
-
Indicates if the repository is globally read-only
|
Stops any further commits from Git users
The term Global Read-only doesn’t accurately reflect what happens at the repository-level.
When a repository enters a Global Read-only state it will no longer accept any commits from Git clients.
However, proposals that are flying around within the state machine can still be written.
It is this state that allows nodes to reach a synchronized stop.
|
- Local RO
-
Indicates if the repository is locally read-only. A locally read-only repository is completely locked down, it does not accept new commits from Git clients but does accept further changes from within the replication system.
- Status
-
Indicates whether the repository is replicating or has stopped. A stopped repository will be in a read-only state, either globally or locally
|
Under control
Remember that this table doesn’t automatically show all the repositories on the server, only those repositories that have been added. See Add Repositories.
|
- Filter Repositories
-
You can use this search box to filter the list of available repositories, useful if you’re running with a large number of repositories.
Add repository
Click Add in order to add or create a new repository to GitMS.
If the repository already exists it’s integrity must be verified, for example using git fsck, before you place it under the control of GitMS.
Each node in the Replication Group you add the new repository to should have an identical copy in exactly the same directory path.
If it doesn’t already exist then tick the Create New Repository box to create it at the same time as adding.
For more detail see Add Repositories.
- Repo name
-
Choose a descriptive name. This doesn’t need to be the folder name, it can be anything you like.
- FS Path
-
The local file system path to the repository. This needs to be the same across all nodes.
- Replication Group
-
The replication group in which the repository is replicated. It is the replication group that determines which nodes hold repository replica, and what role each replica plays.
- Deny NFF
-
Checkbox to determine if non-fast-forward changes are allowed or denied. The default is deny.
- Global Read-only
-
Check box that lets you add a repository that will be globally read-only. In this state GitMS continues to communicate system changes, such as repository roles and scheduling, however, no repository changes will be accepted, either locally or through proposals that might come in from other nodes - which in most cases shouldn’t happen as by definition the repository should also be read-only at all other nodes.
-
You can think of the Global Read-only flag as quick means of locking down a repository, so that no commits will be accepted at any node.
-
- Create New Repository
-
If the repository doesn’t already exist then tick this box to create it at the same time as adding.
- Add Repo
-
Click the Add Repo button when you have entered all the required fields for the repository that you are adding. You can cancel the addition of the repository by clicking on the circular cross icon that appears on the left-hand side of the entry fields.
Edit repositories
You can make changes to repository settings after it has been added. See the admin chapter for more details.
-
Click anywhere on the Repository’s bar, highlighting it in yellow. Click the Edit button on the repositories menu bar, which has now turned blue.
-
Click on the Repositories tab and then click on a Repository Name. The repository’s information screen opens.
- Consistency Check
-
Compare all repository replicas against each other as part of a coordinated proposal in order to verify that each replica is identical.
- Sync Stop
-
Bring replication of the repository to a stop across all nodes.
- Repair
-
Use the repair button to initiate a repository repair procedure. This button will only be active if the system has detected that the repository is inconsistent, or replication has failed for some reason.
- Reload
-
For a refresh of the repository information to pick up any changes that may have occurred since loading the screen.
- Repository Information
-
- Name
-
The name of the repository assigned when it was placed under GitMS control.
- Repository ID
-
The UUID of the repository.
- Path
-
The absolute path to the repository on each node.
- Replication Group
-
The group of nodes with repositories to be replicated.
- Last Modified
-
The timestamp of the last modification to the repository.
- Size
-
Click to calculate the filesize of the repository, noted here in KiB.
- Youngest Revision
-
The SHA1 of the most recent commit on the Git repository’s master branch.
- Global Read-only
-
Enable or disable the repository Global Read-only setting. When enabled, the repository will not be writable either locally or globally. This is used to lock a repository from any changes.
- Local Read-only
-
Enable or disable the repository Local Read-only setting. When enabled, the repository will not be writable, either for local users or for the replication system (that would push changes made to the repository on other nodes). However, changes that come from the other nodes are stored away to be played out as soon as the read-only state is removed.
- Status
-
Tells you if the repository is replicating or not.
- Remove Repository
-
Use this tool to remove a repository from GitMS’s control. Note that the repository data is not moved or deleted, but it is not tracked by GitMS.
Repair
The Repository Repair tool is used when a repository on one of your nodes has been corrupted or similarly requires repair or replacement. Selecting a repository to repair, the tool asks to you select a helper node. This node briefly stops replicating because the helper node will be used to copy or rsync an up-to-date replica of the broken repository onto the current node.
Sync stop
The Sync Stop tool lets you bring replication to a stop for a selected repository. The tool is required to ensure that when replication has stopped all repository replica remain in exactly the same state. This requirement is complicated within distributed systems where proposals may be accepted on some nodes while still in-flight to other nodes. See Performing a synchronized stop.
Git GC
The Git GC button sets off a Git Garbage Collection operation of a selectee repository on all nodes. For more information, see Git Garbarge Collection
Remove
Use the remove button after selecting a repository to remove the selected repository from GitMS’s control. The repository data will not be deleted but once deleted, changes made to the repository locally will no longer be replicated to other nodes. See Removing Repositories
6.2.3. Replication Groups
Replication Groups are units of organization that we use to manage replication of specific repositories between a selected set of nodes. In order to replicate a Git repository between a specific set of nodes you would need to combine that set of nodes into a Replication Group.
Example replication groups
Example 1
An organization has developers working in Chengdu and San Fransisco who need to collaborate on projects stored in three Git repositories, Repo0, Repo2 and Repo4.
An administrator in the Chengdu office creates a replication group called ImportantGroup.
The MSP nodes corresponding with each of the two sites are added to the group.

The Chengdu office is the location of largest development team, where most repository changes occur. For this reason the node is assigned the role of Tie-breaker. If there is disagreement between the nodes in the group over transaction ordering, NodeChengdu will carry the deciding vote.
The node in San Fransisco hosts a standard active-voter node. Changes to the local repository are replicated to NodeChengdu, changes made on the Chengdu node are replicated back to San Fransisco.
For more information see Creating a replication group and Add a node to a Replication Group.
Example 2
The organization also has developers in Sheffield and Belfast who collaborate on projects stored in two Git repositories, Repo1 and Repo3.
An administrator in Sheffield creates a replication group called NewGroup.
The MSP nodes corresponding to the Sheffield and Belfast offices are added to the group along with NodeChengdu.
As there are an odd number of voter nodes in this Replication Group, a tiebreaker node is not needed.
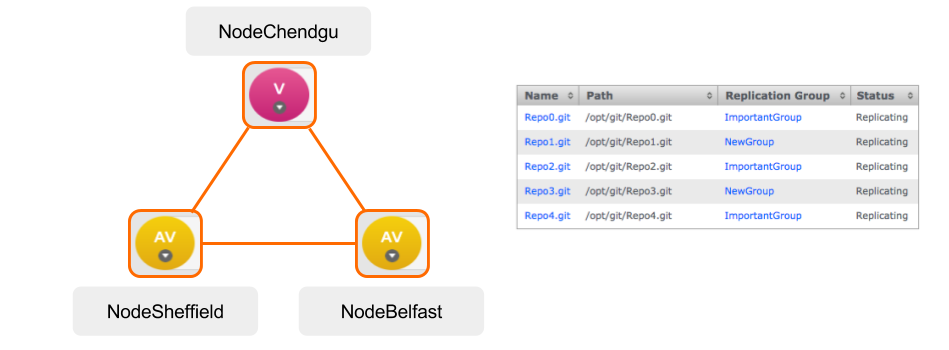
The Chengdu node is added to the group as a Voter (only) as it is a management node that plays no active part in development. This means that NodeChengdu takes part in the vote for transaction ordering, even though the payload of those transactions are not written to repository replicas stored at the Chengdu office. The purpose of NodeChengdu is simply to add resilience to the replication system, in the event of a short-term disruption to traffic from one of the other two nodes, agreement can still be reached and replication could continue.
|
Cannot change voter nodes
Voter nodes must be added to a Replication Group during the creation of the group.
They cannot be added later and the role of a node be changed to or from Voter (only).In order to change a node role to or from Voter (only) you need to create a new replication group with the new roles for the nodes and the move the repositories from the old to the new replication group. This will require a repository repair process be used if the new replication group has an Active role where it had been Voter (only). |
The organization might choose to make the Chengdu node Passive instead.
With NodeChengdu running a passive node, replicas of Repo1 and Repo3 would also be stored in Chengdu (Voter only nodes have no local repository).
While Passive nodes cannot modify the repository, they can provide read-only access to their repositories to Git clients.
Having Passive nodes in your system will effect, for example Consistency Checking, therefore the use of Passive nodes should be verified with WANdisco support first.
Types of node
Another element controlled by replication groups is the role that each repository replica plays in the replication system. See more about Types of Nodes.
Create replication group
You can create a replication group providing that you have at least one node connected.
For information see creating a replication group.
View
You can view and partly edit a replication group by clicking on the view button.
-
Click the View button.
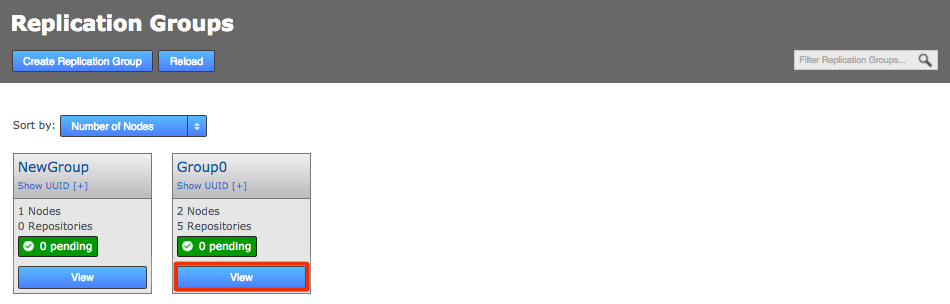 View Replication Group
 -
The replication group’s screen will open showing the member nodes of the group.
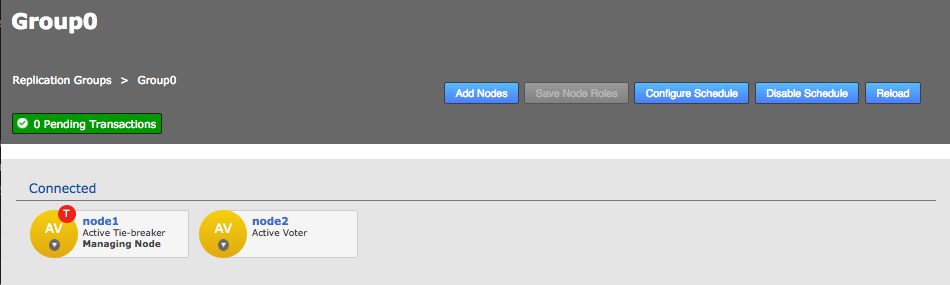 Replication Group details
 -
Each node is displayed as a color-coded circle. Click on the circle to see what other node types are available. Read more about node types.
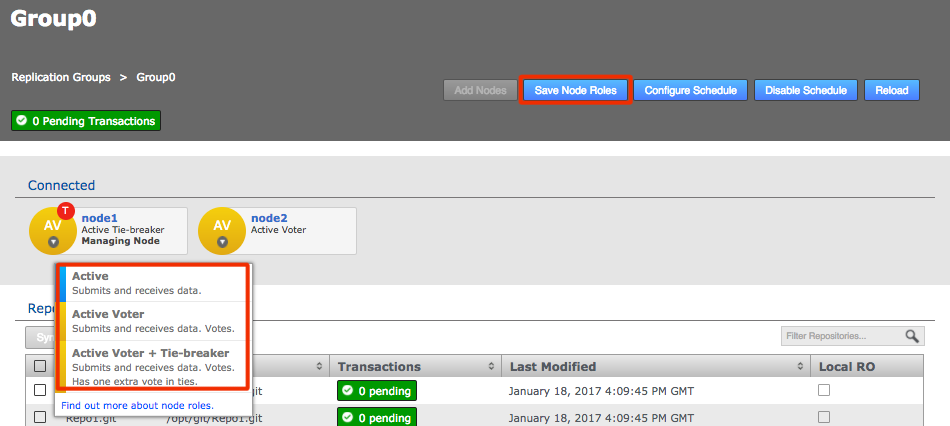 Change node type
 -
The Configuration screen provides access to the each node’s type, along with a list of repositories and a link to the Configure Schedule screen.
- Add Nodes
-
You can add additional nodes to a replication group. Click on the Add Nodes button to start the procedure, you can read more about Adding a node to a replication group
- Save Node Roles
-
Use this button to save any changes that you make to the member nodes.
- Configure Schedule
-
The Schedule screen lets you set the roles of nodes to change over time, specifically changing according to a schedule.
- Disable Schedule
-
Stop any scheduled role changes that are not already in progress. This is normally done to prevent moving roles to nodes that are known to be down (e.g. during system maintenance).
- Reload
-
Refresh the data on the page.
Why change a node’s role?
At the heart of WANdisco’s DConE2 replication technology is an agreement engine that ensures that Git operations are performed in exactly the same order on each replica, on each node. Any node that has the role of voter becomes part of the agreement engine and together with other voters determine the correct ordering. If there’s high latency between any voters this may adversely affect replication performance. Fortunately it isn’t a requirement that every node takes part in forming agreements. An Active only node can still create proposals (i.e. instigate repository changes) but the agreement engine doesn’t need to wait for its vote. Read more about how replication works in the Replication Section.
Follow the Sun
To optimize replication performance it’s common for administrators to remove voter status from a node after their staff leave for the day - a practice commonly known as "Follow The Sun" where far-flung organizations transfer roles and privileges between locations so that those privileges are always held by nodes at actively staffed sites.
- Role Schedule
-
The Role Schedule window shows all the nodes in the replication group, along with each node’s current roll (denoted by colored circular buttons).
If you change any nodes you need to click the Save Schedule button. Any mistakes in node role combinations selected will be detected at this time, and if there are any then the save will fail.
Use the Clear Schedule button to blank out settings that you have changed, returning to the default schedule.
To see how to set up a schedule, read How to configure a schedule.
6.2.4. Nodes
The Nodes tab is where information on the functions that manage repository data replication can be found.
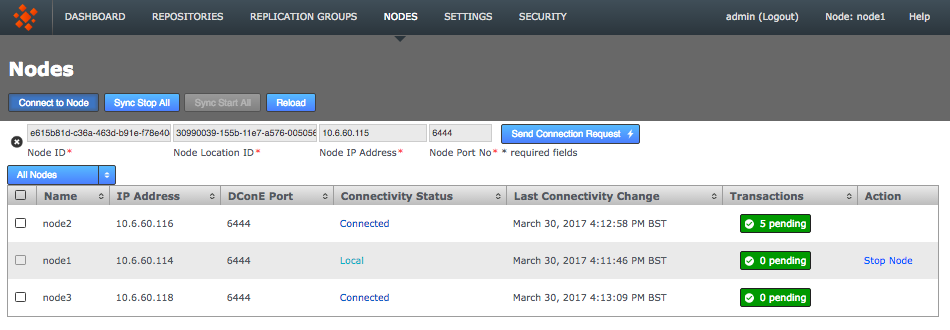
- Connect to Node
-
The following information is needed to connect to a Node and can be found on the Settings tab:
- Node ID
-
The UUID of the inductor node.
- Node Location ID
-
The reference code that defines the inductor node’s location.
- Node IP Address
-
The IP address of the inductor node server.
- Node Port No
-
The DConE Port number, 6444 by default.
- Sync Stop All
-
Brings all nodes to a stop, if all associated repositories are replicating/writable.
- Sync Start All
-
Re-starts nodes. This button is only available if nodes are stopped.
- Reload
-
For a refresh of the information to pick up any changes that may have occurred since loading the screen.
- Name
-
Name assigned to the node.
- Connectivity Status
-
Displays the node’s status for example connected, local and stopped.
- Last Connectivity Change
-
Date and time of the most recent change.
- Transactions
-
A clickable button showing any pending transactions.
- Action
-
Displays actions available, for example start node or stop node.
Clicking Stop Node here takes the node offline and it will therefore no longer be able to process any changes. Once the node is stopped, Start Node will appear in the Action column.
6.2.5. Settings
The server’s internal settings are reported on the Settings tab, along with a number of important editable settings.
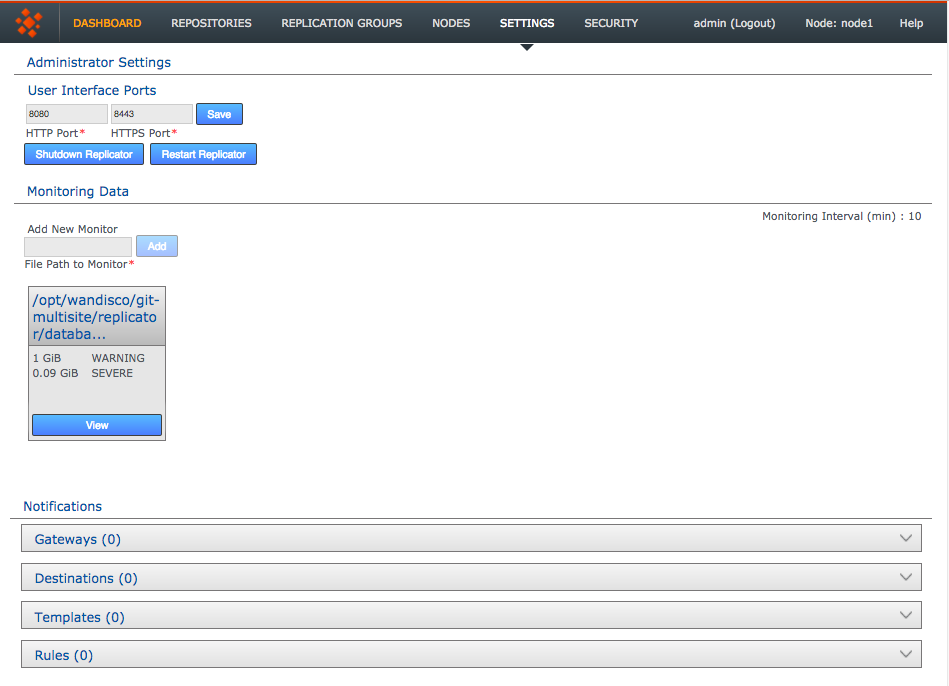
Administrator Settings
- User Interface HTTP Port
-
Change the port that you want to use to access the User Interface. Just enter a valid port number and clock Save.
- Shutdown Replicator
-
Only shut down the replicator if absolutely necessary.
The only way to restart the replicator is to login to the host machine and start git-multisite, for example by using service git-multisite repstart.
|
- Restart Replicator
-
Restarting the replicator is often a better choice than shutdown.
Monitoring Data
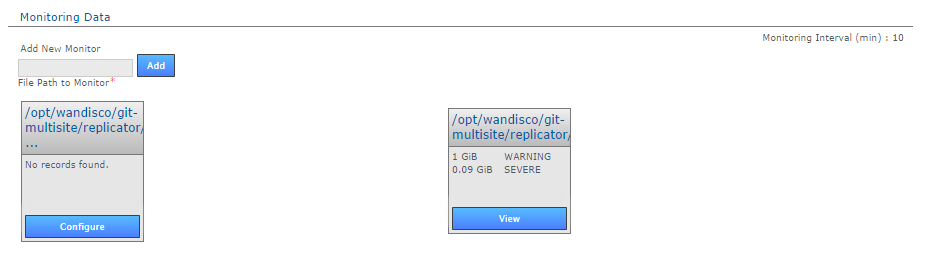
The Monitoring Data settings provide a basic tool for monitoring available disk storage for GitMS’s resources.
- Monitor Interval (mins)
-
If the disk space available to a monitored resource is less than the value you have for a "Severe" event then the event is logged and GitMS’s replicator will shut down after this interval, currently set at 10 minutes by default. You can configure the interval in application.properties file:
/opt/wandisco/git-multisite/replicator/properties/application.properties
resourcemonitor.period.min=10
Value is in minutes, and only run through the UI. It is not handled directly by the replicator.
- Add New Monitor
-
Enter the path to a resource that you wish to monitor, then click Add.
- Resource Monitors
-
This section lists all resources currently being monitored. Click Configure to change monitor settings, Delete to remove a monitor. The default monitor protects the replicator itself against running out of space and cannot be edited or deleted.
If you want to increase the minimum required disk space before the replicator shuts down this change is made in the application.properties file. See here for more information.
For more information about setting up monitors, read Setting up resource monitoring.
Notifications
The notifications system enables you to create event-driven alert emails. Set up one more gateway (mail servers), add destination emails to specify recipients, create email templates for the content of the alert emails, then set the rules for which event should trigger a specific email. For more information see Setting up email notifications
Gateways
The Gateways section stores the details of those email relay servers that your organization uses for internal mail delivery. You can add any number of gateways. GitMS attempts to deliver notification emails using each gateway in the order on the list, #0, #1, #2, etc.
GitMS attempts delivery via the next gateway server when it has attempted delivery a number of times equal to the Tries number. It reattempts delivery after waiting a number of seconds equal to the Interval setting.
|
How GitMS gives up on delivering to a gateway
Example: Gateway #0 is offline.
With Tries set to 5 and Interval set to 600, GitMS attempts delivery using the next gateway (#1) after 600s x 5 = 50 minutes.If you have more than one Gateway you would want to use a smaller interval. The last Gateway should be configured to try harder by using a larger number of Tries and/or a larger Interval. |
- IP/Hostname of SMTP Server
-
Your email server’s address.
- SMTP Server Port
-
The port assigned for SMTP traffic (Port 25 etc).
- Encryption Type
-
Indicate your server’s encryption type - None, SSL (Secure Socket Layer) or TLS (Transport Layer Security). SSL is a commonly used. For tips on setting up suitable keystore and truststore files see Setting up SSL Key pair.
If you’re not familiar with the finer points of setting up SSL keystores and truststores it is recommended that you read the following articles: Using Java Keytool to manage keystores and How to create self signed certificates and use them in test environments. - Authentication Required
-
Indicate whether you need a username and password to connect to the server. Requires either true or false.
- User Name
-
If authentication is required, enter the authentication username here.
- Password
-
If authentication is required, enter the authentication password here.
- Sender Address
-
Provide an email address that your notifications will appear to come from. If you want to be able to receive replies from notifications you need to make sure this is a valid and monitored address.
- Number of Tries Before Failing
-
Set the number of tries that GitMS makes to send out notifications for this Gateway.
- Interval Between Tries (Seconds)
-
Set the time (in seconds) between GitMS’s attempts to send notifications to this Gateway.
Destinations
The Destinations panel stores email addresses for notification recipients. Add, edit, or remove email addresses.
Templates
The templates panel stores email content. You create messaging to match the events that you want to send user notifications for.
- Template Subject
-
Use this entry field to set the subject of the notification email. This subject should describe the event for which the email will be triggered.
- Body Text
-
Enter the actual message that you want to send for a particular situation/event. The body text can include keywords that will be expanded when the notification is sent. Which keywords are allowed depend on the type of notification event, see events and variables.
Rules
Use the Rules panel to set up up your notification emails. Here you associate email templates and destination emails with a particular system event. For example, you may create an email message to send to a particular group mailing list if a repository goes into Read-only mode. Selecting descriptive subjects for your templates will help you to select the right templates here.
- Event
-
Choose from the available list of trigger events.
- Template
-
Choose or create an email message
- Destination
-
Choose the email addresses to be notified
Logging Setting
Logging Setting lets you quickly add or modify Java loggers via the admin console, rather than making manual edits to the logger file:
<install-dir>/replicator/properties/logger.properties.
Loggers are usually attached to packages. Here, the level for each package is available to modify or delete. The global level is used by default, so changes made here override the default values. Changes are applied instantly but in-memory only and are forgotten after a restart of the replicator (unless they are saved). For information about adding or changing loggers, see Logging Setting Tool.
System Data
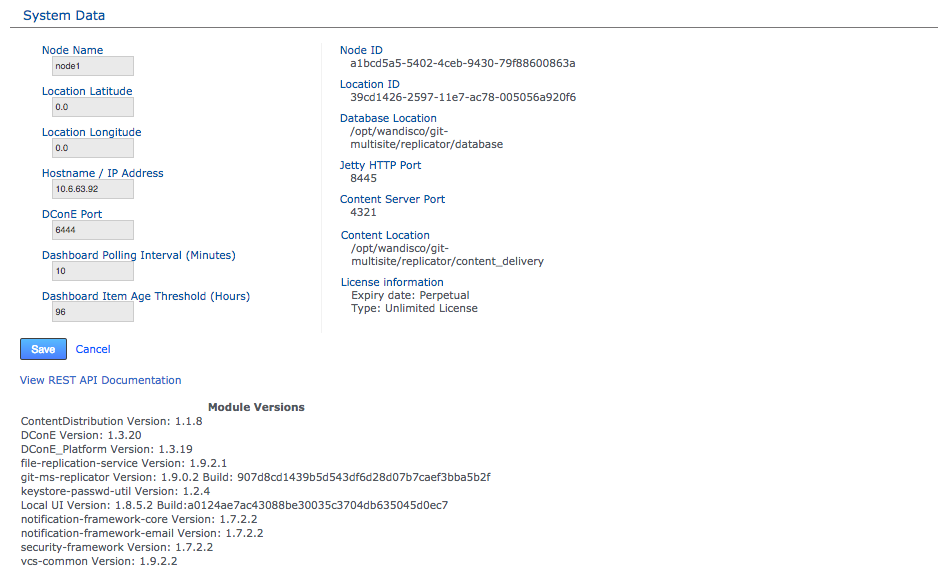
The System Data table provides information on modifiable and read-only settings.
The modifiable settings are listed below. For information on updating these settings see Update a node’s properties.
- Node Name
-
This is the human-readable form of the node’s ID.
- Location Latitude
-
The node’s latitude.
- Location Longitude
-
The node’s longitude.
- Hostname / IP Address
-
The Hostname / IP address of the server hosting the node.
- DConE Port
-
The TCP port used for DConE agreement traffic. Do not confuse this with the Content Distribution port which carries the payload repository data. The Default is 6444.
- Dashboard Polling Interval (Minutes)
-
Sets how often the dashboard messaging is updated. The messaging is populated by Warnings and Errors that appear in the replicator logs file. The default frequency is every 10 minutes.
- Dashboard Item Age Threshold (Hours)
-
Sets how long dashboard messages are maintained. After this amount of time messages are flushed from the dashboard. The default is 96 hours (4 days).
The read-only settings that were either provided during setup or have since been applied are:
- Node ID
-
A unique string that is used to identify the DConE location of the server (e.g. during induction).
- Location ID
-
A unique string that is used to identify the location of the server (e.g. during induction).
- Database Location
-
The full path to GitMS’s database. By default this will be <install-dir>/replicator/database.
- Jetty HTTP Port
-
The HTTP port is used for browser access to the User Interface.
- Content Server Port
-
The port that will be used to transfer replicated content (repository changes). This is different from the port used by WANdisco’s DConE agreement engine.
- Content Location
-
The directory in which replication data is stored (prior to it having been confirmed as replicated).
- License information
-
Details of GitMS product license, e.g. the date of expiry.
View REST API Documentation - This link takes you to your node’s local copy of the API documentation.
The link goes to the following location: http://<Node IP>:8080/apidocs/.
This documentation is generated automatically and ties directly into your server’s local resources.
There is a copy of the latest API documentation available in this admin guide, note though that it has been lifted from an installation and will link to resources that will not be available on the website (resulting in dead links).
The module versions provides a list of the component parts of the GitMS application. This is useful if you need to verify what version of a component you are using - such as if you need to contact WANdisco for support.
6.2.6. Security
Use the Security tab to manage admin accounts, either entered manually into GitMS or managed through an LDAP authority, or managed via a Kerberos Authority. On the tab is an entry form for adding administrative accounts, along with LDAP Settings for binding GitMS to one or more LDAP services.
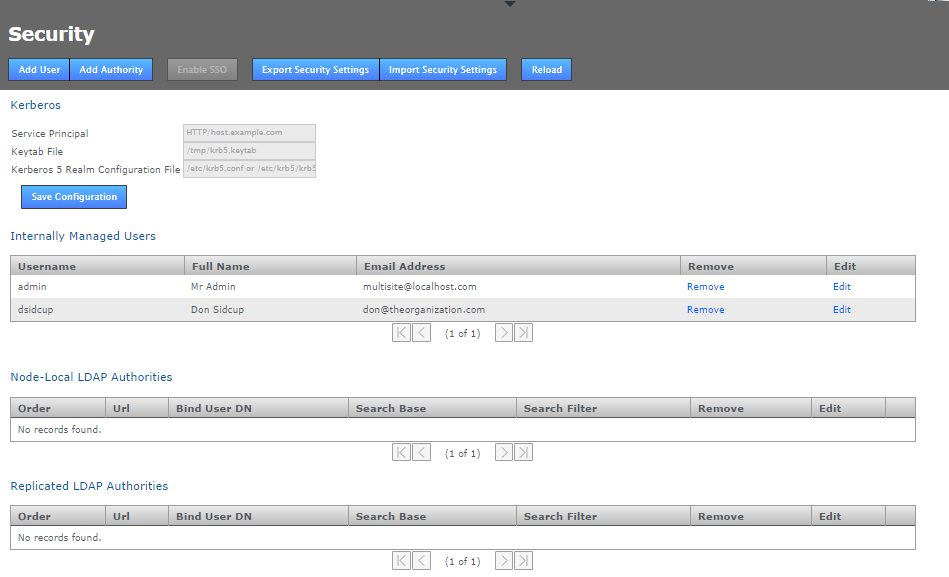
- Add User
-
Enter the details of an additional administrator who will be able to log in to the GitMS Admin UI. See Adding additional users for more information.
- Add Authority
-
Enter the details of one or more LDAP authorities for managing administrator access. See Adding LDAP authorities for more information.
- Disable Managed Users
-
This feature lets you block access to the GitMS Admin UI by non-LDAP users. This button does not become visible until you add an LDAP authority. See Disabling (Internally) Managed Users below.
- Enable SSO
-
This button will only be available to click if you have entered valid Kerberos settings. When enabled, it places GitMS’s admin console into Single Sign-on mode. When enabled accessing the admin UI will use Kerberos instead of the username and password login form. In the enabled state the button will change to say Disable SSO.
- Export Security Settings
-
The data entered into the Securities tab can be backed up for later re-importing by clicking the Export Security Settings button. The data is stored in /opt/wandisco/git-multisite/replicator/export/security-export.xml which should be included in any backup procedures you are running. You will need access to the file from your desktop during a re-import.
- Import Security Settings
-
Click the Import Security Settings button if you need to restore your Security settings, such as after a re-installation of GitMS. The import will proceed providing that you can enter a file path to the security-export.xml file.
| You will need to import the exported security settings to any newly installed node before attempting induction. |
- Reload
-
Click the reload button to refresh the Admin UI screen, you will need to do this in order to view any changes that you make.
Admin account precedence
GitMS uses the following order of precedence when checking for authentication of users:
-
First: Internally managed users if they are enabled. See Disable Managed Users
-
Second: Local LDAP authorities by order
-
Third: Global LDAP authorities by order
This provider implementation tries to authenticate user credentials against either the list of internally managed users, or against any number of LDAP authorities, or both, depending on how the application is configured.
When authenticating against LDAP authorities, each one is tried in sequence until one either grants access or they all deny access. If they all deny access, only the error from the last authority tried is returned.
|
Admin Accounts
|
Disable internally managed users
Click the Disabled Managed Users button if you want to control access to GitMS exclusively through LDAP. Once clicked, any Internally managed users will no longer be able to log into the Admin UI after they next log out. From that point only LDAP managed users will have access to the GitMS Admin UI.
|
Re-enable Internally Managed users
If, after disabling Internally Managed Users you need to enable them again - should there be a problem with your LDAP authorities - then it is possible to enable access again by logging into the node via a terminal window (with suitable permissions), navigate to the following directory: /opt/wandisco/git-multisite/replicator and run the reset script: java -jar resetsecurity.jar Any internally managed users who remain in GitMS’s database will have their access restored. |
Internally managed users

This table lists admin users who have been entered through the Admin UI or imported using the Import Security Settings, along with the first admin account.
Admin Account #1
Note that the first admin account is the one set up during the installation of your first node. The credentials specified during this installation are stored to the users.properties file which is then used during the installation of all subsequent nodes.
|
Admin Account Mismatch
The users.properties file ensures that exactly the same username/password is used on all nodes during installation.
If there’s a mismatch then you wouldn’t be able to connect the nodes together (through the Induction process).
Rather than clean-up and reinstall you can fix this by manually syncing the password files.
|
Admin Account #1 can be removed but the last admin account remaining on the system will not be deletable to ensure that it isn’t possible for an administrator to be completely locked out of the admin UI.
Kerberos
Support for the Kerberos protocol is now included. When enabled, Kerberos handles authentication for access to the admin UI, where the administrator is automatically logged in if their browser can retrieve a valid Kerberos ticket from the operating system.
|
You can’t mix and match log-in type
When Kerberos SSO is enabled only users who are set up for Kerberos will be able to access the admin UI.
The username and password login form will be disabled.
If you ever need to disable Kerberos authentication this can be done using the authentication reset script (wd_resetsecurity.jar) which will return your deployment to the default login type.
|
- Service Principal
-
A service principal name (SPN) is the name that a client uses to identify a specific instance of a service.
For example:
HTTP/host.example.com
- Keytab File
-
The keytab is the encrypted file on disk where pairs of Kerberos principals and their keys are stored.
For example:
/tmp/krb5.keytab
- Kerberos 5 Realm Configuration File
-
The krb5 configuration file location of the replicator host’s Kerberos 5 realm configuration.
For example:
/etc/krb5/krb5.conf
|
Never replicated, always configured 'per-node'
Kerberos configuration is not replicated around the replication network because each node in the network needs its own host-specific configuration. This configuration is node-local only. The configuration needed is the host-specific service principal name, noted in the settings above. e.g. On most systems the location of the host’s encrypted key table file will be something something like: /etc/krb5.keytab The location of the host’s Kerberos 5 realm configuration may be something like: /etc/krb5.conf or /etc/krb5/krb5.conf |
LDAP Authorities
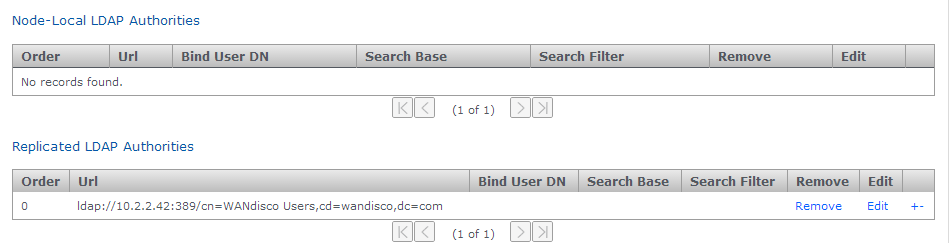
- Node-Local LDAP Authorities
-
If chosen, then only the local node will use the LDAP authority for authentication.
- Replicated LDAP Authorities
-
If replicated is chosen, all nodes in the replication network can use the LDAP authority for authentication.
Mixing local and replicated authorities
Both kinds of authority are supported simultaneously, with the node-specific LDAP authorities taking precedence over replicated authorities in order to support the use-case where, for example, a particular node may prefer to use a geographically closer LDAP directory. Replicated LDAP authorities are replicated to other nodes and therefore are expected to be usable at all GitMS nodes. Also, if multiple LDAP authorities of either type are configured then the order in which they are consulted is also configurable, using the +/- buttons at the end of each entry.
- Order
-
LDAP authorities are listed in the order of execution that you set when defining each authority’s properties.
- Url
-
The URL of the authority. The protocol "ldap://" or "ldaps://" are required.
- Bind User DN
-
Identify the LDAP admin user account that GitMS will use to query the authority.
- Search Base
-
This is the Base DN, that is the location of users that you wish to retrieve.
- Search Filter
-
A query filter that will select users based on relevant LDAP attributes. For more information about query filter syntax, consult the documentation for your LDAP server.
- Remove
-
Click to remove the authority from GitMS.
- Edit
-
Click to make changes to the authority’s settings.
The usual configuration options are supported for each configured LDAP authority: URL, search base and filter and bind user credentials.
|
Just enough permissions
The bind user’s password cannot be one-way encrypted using a hash function because it must be sent to the LDAP server in plain text.
For this reason the bind user should only have enough privileges to search the directory for the user being authenticated.
Anonymous binding is permitted for those LDAP servers that support anonymous binding.
|
LDAP Home or away
When adding an LDAP authority, the configuration can be selected to be either replicated or node-specific.
Replicated LDAP Authorities
If node-specific is chosen, then only the local node will use the LDAP authority for authentication. Both kinds of authority are supported simultaneously, with the node-specific LDAP authorities taking precedence over replicated authorities in order to support the use-case where a particular node may prefer to use a geographically closer LDAP directory, for example. Also, if multiple LDAP authorities of either type are configured then the order in which they are consulted is also configurable.
6.3. Architecture overview
This figure shows the GitMS architecture, how the application is split up, and how the component parts communicate with each other and the outside world.
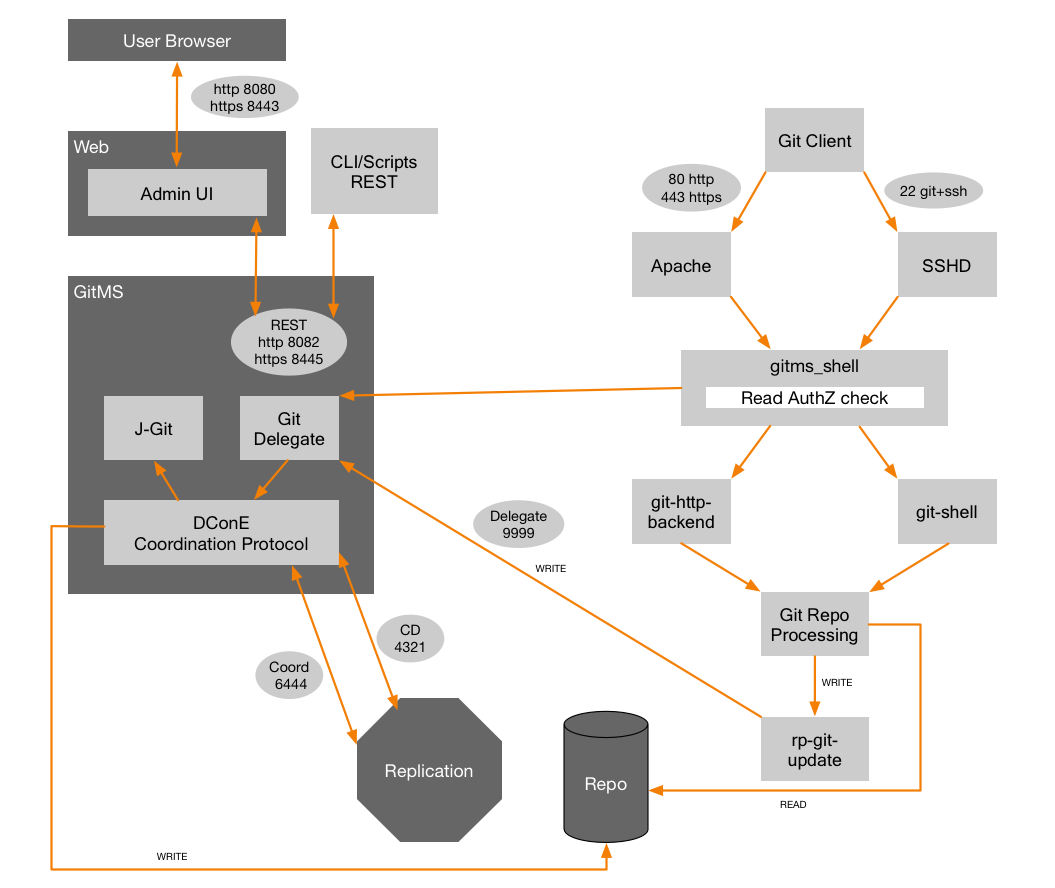
Key points
-
Admin UI and Replicator are run in separate Java processes.
-
The Admin UI interacts with the application thought the same API layer that is available for external interactions. This layer enforces separation of concerns and handles authentication and authorization of all user interactions.
-
The DConE2 Coordination protocol handles the agreement of transaction ordering between nodes via port 6444. The delivery of the actual replicated content (Git commits etc) is handled by the Content Distribution layer on port 4321.
-
The ports shown in the diagram above are the default or recommended ports, all of which can be changed if this is necessary for your set up.
6.4. Install directory structure
GitMS is installed to the following path by default:
/opt/wandisco/git-multisite/
You can install the files somewhere else on your server, although this guide assumes the above location when discussing the installation.
Inside the installation directory are the following files and directories:
[root     root    ]  ├── bin
[wandgit  wandisco]  ├── config
[root     root    ]  ├── flume
[root     root    ]  ├── lib
[wandgit  wandisco]  ├── local-ui
[wandgit  wandisco]  │   └── ui-logs
[wandgit  wandisco]  ├── logs
[root     root    ]  ├── replicator
[wandgit  wandisco]  │   ├── content
[wandgit  wandisco]  │   ├── content_delivery
[wandgit  wandisco]  │   ├── database
[wandgit  wandisco]  │   │   ├── application
[wandgit  wandisco]  │   │   │   └── resettable.db
[wandgit  wandisco]  │   │   ├── DConE.application.db
[wandgit  wandisco]  │   │   └── recovery
[wandgit  wandisco]  │   │       ├── application.integration.db
[wandgit  wandisco]  │   │       ├── DConE.system.db
[wandgit  wandisco]  │   │       └── DConE.topology.db
[root     root    ]  │   ├── docs
[wandgit  wandisco]  │   ├── export
[root     root    ]  │   ├── gfr
[root     root    ]  │   │   ├── bin
[root     root    ]  │   │   │   └── acp
[wandgit  wandisco]  │   │   ├── lib
[wandgit  wandisco]  │   │   ├── log
[wandgit  wandisco]  │   │   ├── tmp
[wandgit  wandisco]  │   │   └── var
[wandgit  wandisco]  │   ├── hooks
[root     root    ]  │   ├── lib
[wandgit  wandisco]  │   ├── logs
[wandgit  wandisco]  │   │   ├── recovery-details
[wandgit  wandisco]  │   │   ├── tasks
[wandgit  wandisco]  │   │   └── thread-dump
[wandgit  wandisco]  │   └── properties
[wandgit  wandisco]  ├── tmp
[root     root    ]  ├── ui
[wandgit  wandisco]  └── var
[wandgit  wandisco]      └── watchdog
6.5. Properties files
The following files store application settings and constants that may need to be referenced during troubleshooting. If you want to make changes to these files, contact WANdisco Support.
- /opt/wandisco/git-multisite/replicator/properties/application.properties
-
This file contains settings for the replicator and affects how GitMS performs. View sample.
|
Temporary requirement:
If you (probably under instruction from WANdisco’s support team) manually add either connectivity.check.interval or sideline.wait to the applications property file then you must add an "L" (Long value) to the end of their values so they are converted correctly.
View our sample application.properties file to view all the properties that are suffixed as "Long".
|
- /opt/wandisco/git-multisite/replicator/properties/logger.properties
-
This file handles properties that apply to how logging is handled. View sample.
- /opt/wandisco/git-multisite/replicator/properties/log4j.properties
-
This file View sample.
- /opt/wandisco/git-multisite/replicator/properties/users.properties
-
Contains the admin account details which will be required when installing second and subsequent nodes. View sample.
- /opt/wandisco/git-multisite/local-ui/ui.properties
-
Contains settings concerning the graphical user interface such as widget settings and timeout values. Stored in this file is the UI Port number and is considered the defacto recording of this value, superseding the version stored in the main config file /opt/wandisco/git-multisite/config/main.conf. You can view a sample.
6.6. Setting up SSL key pair
GitMS supports the use of Secure Socket Layer (SSL) encryption for securing network traffic. Currently you need to run through the setup during the initial installation.
| Follow these steps before starting the GitMS installation. |
Using stronger and faster encryption
Java’s default SSL implementation is intentionally weak to avoid the import regulations associated with stronger forms of encryption.
However, stronger algorithms are available to install, placing the legal responsibility for compliance with local regulation on the user.
See Oracle’s information on the Import limits of Cryptographic Algorithms for JDK7 and JDK8.
|
Use self signed certificates in test environments
In production environments, certificates purchased from commercial Certificate Authorities are normally required, however in testing environments you can use self signed certificates.
For more information see the Knowledge base article How to create self signed certificates and use them in test environments.
|
If you need stronger algorithms, e.g. AES which supports 256-bit keys, then you can download Java Cryptography Extension (JCE) Unlimited Strength Jurisdiction Policy Files that can be installed with your JDK/JRE. These are available for download from the Oracle website.
-
Create a new directory in which to store your key files. This directory can be anywhere, although in this example we store them in the git-ms-replicator file structure: open a terminal and navigate to
<INSTALL_DIR>/git-ms-replicator/config. -
From within the
/configfolder make a new directory called ssl:-rw-rw-r-- 1 wandisco wandisco 5 Dec 5 13:53 setup.pid [User@Fed11-2 config]$ mkdir ssl -
Go into the new directory:
cd ssl
-
Copy your private key into the directory. If you don’t have keys set up, you can use JAVA’s keygen utility, using the command:
keytool -genkey -keyalg RSA -keystore wandisco.ks -alias server -validity 3650 -storepass <YOUR PASSWORD>
Knowledge baseRead more about the Java keystore generation tool in the KB article Using Java Keytool to manage keystores.- -genkey
-
Switch for generating a key pair (a public key and associated private key). Wraps the public key into an X.509 v1 self-signed certificate, which is stored as a single-element certificate chain. This certificate chain and the private key are stored in a new keystore entry identified by alias.
- -keyalg RSA
-
The key algorithm, in this case RSA is specified.
- keystore.jks
-
This is the file name for your private key file that will be stored in the current directory. You can chose any name but use it consistently.
- -alias server
-
Assigns an alias "server" to the key pair. Aliases are case-insensitive.
- -validity 3650
-
Validates the keypair for 3650 days (10 years). The default would be 3 months
- -storepass <YOUR PASSWORD>
-
This provides the keystore with a password.
Note: If no password is specified on the command, you are prompted for it. Your entry is not masked so you, and anyone else looking at your screen, can see what you type.
Most commands that interrogate or change the keystore will need to use the store password. Some commands may need to use the private key password. Passwords can be specified on the command line (using the
-storepassand-keypassoptions).
However, do not specify a password on a command line or in a script unless it is for testing purposes, or you are on a secure system.The utility prompts you for the following information:
 What is your first and last name?  [Unknown]:
 What is the name of your organizational unit?  [Unknown]:
 What is the name of your organization?  [Unknown]:
 What is the name of your City or Locality?  [Unknown]:
 What is the name of your State or Province?  [Unknown]:
 What is the two-letter country code for this unit?  [Unknown]:
 Is CN=Unknown, OU=Unknown, O=Unknown, L=Unknown, ST=Unknown, C=Unknown correct?  [no]:  yes

 Enter key password for <mykey>
 (RETURN if same as keystore password):
-
With the keystore now in place, the setup picks the file up if you provide the relevant details during the installation process:
SSL Set upChanges in these values require a restart. Any invalid value restarts the replicator and no DConE traffic flows.
6.6.1. Setting the server key
In the keystore, the server certificate is associated with a key. By default, we look for a key named server to validate the certificate.
If you use a key for the server with a different name, enter this in the SSL settings.
6.6.2. Enabling SSL post-installation
Once the keystore is in place, SSL can be enabled post-installation.
To do this you need to edit the application.properties file:
/opt/wandisco/git-multisite/replicator/properties/application.properties
ssl.debug=true
ssl.enabled=true
ssl.keystore=/opt/wandisco/git-multisite/ssl/keystore.jks
ssl.keystore.password=
ssl.key.alias=
ssl.key.password=
ssl.truststore=/opt/wandisco/git-multisite/ssl/cacerts.jks
ssl.truststore.password=wandisco
- ssl.enabled
-
Switch for enabled SSL. Value: true
- ssl.keystore
-
The absolute path to the keystore.
- ssl.keystore.password
-
The password for the keystore - this password must be encrypted. See Encrypting passwords.
The ssl.keystore.password and the ssl.key.password must be identical. This is a java requirement. - ssl.truststore
-
The absolute path to the truststore. This may be the same as the keystore.
- ssl.truststore.password
-
The password for the truststore - this password must be encrypted (see Encrypting passwords). If the same file is being used for the keystore and the truststore then the password must be the same for both.
|
Repeat for Flume files
You also need to repeat this process to update passwords in the Flume files.
For more details on this see the KB article on
How to upgrade the ACP sender delivered with ACP1.9.0 and how to set up SSL.
|
Encrypting passwords
When updating passwords in the application.properties file or the acp_sender.conf file, the passwords need to be an encrypted version, not clear text.
We’ve provided a tool to handle password encryption:
wd_cryptPassword.jar
Use the tool as follows:
cd <product-installation-directory>
java -jar wd_cryptPassword.jar <password-to-encrypt>
A restart is needed once these changes have been made.
6.6.3. SSL troubleshooting
A complete debug of the SSL logging is required to diagnose the problems.
To do this use the Logger Setting Tool on the Settings tab. There are 2 options:
-
Set the Global Logger Setting to Debug - this will be reset to Info following a replicator restart unless you clink Save All Settings to File.
-
Add a new logger setting called
javax.netand set to Debug.
6.7. Replication strategy
GitMS provides a toolset for replicating Git repository data in a way that maximizes performance and efficiency while minimizing network and hardware resource requirements. The following examples give a starting point for deciding on the best means to enable replication across your development sites.
6.7.1. Replication model
In contrast to earlier replication products, GitMS is implemented to completely avoid proxying any repository read data.
Note: There’s a subtle but important distinction between "proxying data", where the proxy obtains the data and then passes it along, versus enabling/disabling data access (AuthZ). To be clear, we do NOT copy the data from Git and provide it to the client, we enable the access if configured to do the AuthZ check and if the account making the access has appropriate rights to the data requested.
Per-Repository Replication
GitMS replicates data on a per-repository basis. This way each site can host different sets of replicated repositories.
Dynamic membership evolution
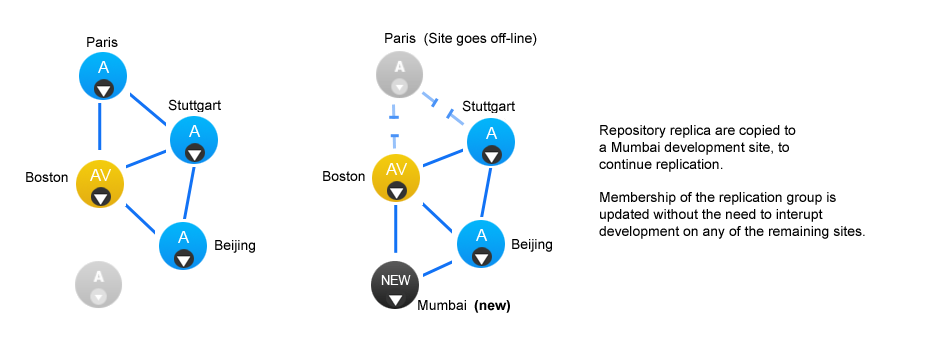
A repository can only replicate to the member nodes of a single replication group at any one time, although it is possible to move a repository between replication groups as required - this is done on-the-fly, nodes can be added or deleted without the need to pause all replication (with a synchronized stop).
GitMS offers a great deal of flexibility in how repository data is replicated. Before you get started it’s a good idea to map out which repositories are needed at which locations.
6.7.2. WANdisco replication and compression
There are a number of WAN network management tools that offer performance benefits by using data compression. The following guide explains how data compression is already incorporated into WANdisco’s replication system, and what effect this built-in compression may have on various forms of secondary compression.
Network management tools may offer performance benefits by on-the-fly compression of network traffic, however it’s worth nothing that WANdisco’s DConE replication protocol is already using compression for replicated data. Currently Zip compression is used before content is distributed using the Content Distribution component of DConE.
Traffic Management systems that provide WAN optimization or "WAN Acceleration" may not provide expected benefits as a result of WANdisco’s compression. The following list highlights where duplication or redundancy occurs.
- Compression
-
Encoding data using more efficient storage techniques so that a given amount of data can be stored in a smaller file size.
WANdisco effect: As replicated data is already compressed, having a WAN accelerator appliance compress the data again is a waste of time - however, as long as it can "fill the pipe", i.e. keep the throughput of traffic faster rate than the network can consume it then its not going to negatively impact data transfer. - Deduplication
-
Eliminating the transfer of redundant data by sending references instead of the actual data. By working at the byte level, benefits are achieved across IP applications. In truth, Data-deduplication offers the most benefit when there’s a lot of repetition in the data traffic.
WANdisco effect: Because the data is already compressed then data-deduplication (by whatever WAN optimization solution) will not be effective. When data is compressed any small change at the start of the data stream propagates through the data stream and defeats data-deduplication. You can read more about this effect in this external article - rsyncable-gzip. - Latency optimization
-
Various refinements to the TCP implementation (such as window-size scaling, selective Acknowledgement etc.
WANdisco effect: DConE does not use TCP / network layer techniques. This form of optimization won’t have any impact on WANdisco Replication.
6.7.3. Creating resilient replication groups
GitMS is able to maintain repository replication (and availability) even after the loss of nodes from a replication group. However, there are some configuration rules that are worth considering:
Rule 1: Understand Learners and Acceptors
The unique Active-Active replication technology used by GitMS is an evolution of the Paxos algorithm, as such we use some Paxos concepts which are useful to understand:
-
Learners:
Learners are the nodes that are involved in the actual replication of Git repository data. When changes are requested to be made on a repository replica, that change is ordered by the WANdisco Paxos implementation and delivered to each learner in the agreed sequence.
Learner Nodes are required for the actual storage and replication of repository data. You need a learner node at any location where Git users are working or where you wish to store hot-backups of repositoriesTypes of Nodes that are learners: Active, Passive
-
Acceptors:
All changes being made on each repository in exactly the same order is a crucial requirement for maintaining synchronization. Acceptors are nodes that take part in the vote for the order in which proposals are played out.
Acceptor Nodes are required for keeping replication going. You need enough Acceptors to ensure that agreement over proposal ordering can always be met, even accounting for possible node loss. For configurations where there are a an even number of Acceptors it is possible that voting could become tied. For this reason it is required to make a voter node into a tiebreaker which has slightly more voting power so that it can outvote another single voter node.Types of nodes that are Acceptors: Voter Only
Nodes that are both an Acceptor and Learner: Active Voter, Passive Voter
Rule 2: Replication groups should have a minimum membership of three learner nodes
Two-node replication groups are not fault tolerant, you should strive to replicate according to the following guideline:
-
The total number of nodes required in order to survive the failure of N nodes is 2N+1.
So in order to survive the loss of a single node you need to have a minimum of 2x1+1= 3 nodes
In order to keep on replicating after losing a second node you need 5 nodes.
Rule 3: Learner Population - resilience vs rightness
-
During the installation of each of your nodes you are asked to provide a Content Node Count number, this is the number of other learner nodes in the replication group that need to receive the content for a proposal before the proposal can be submitted for agreement.
Setting this number to 1 ensures that at least one other node has the content before the change proposal is voted upon. This prevents a freeze in replication if the originating node goes down after the vote has been taken but before the data has been completely delivered to another node.
Setting this number to more than 1 simply increases the resiliency of the system.
The higher the number the slower the system will respond to requested changes, as the vote will not be taken until that number of learner nodes have the data for the proposal.
Rule 4: 2 nodes per site provides resilience and performance benefits
Running with two nodes per site provides two important advantages.
-
Firstly it provides every site with a local hot-backup of the repository data.
-
Enables a site to load-balance repository access between the nodes which can improve performance during times of heavy usage.
-
Providing the nodes are Voters, it increases the voter population and improves resilience for replication.
6.7.4. Content distribution policy
WANdisco’s replication protocol separates replication traffic into two streams, the coordination stream which handles agreement between voter nodes, and the content distribution stream through which Git repository changes are passed to all other nodes (that is active/passive nodes that store repository replicas).
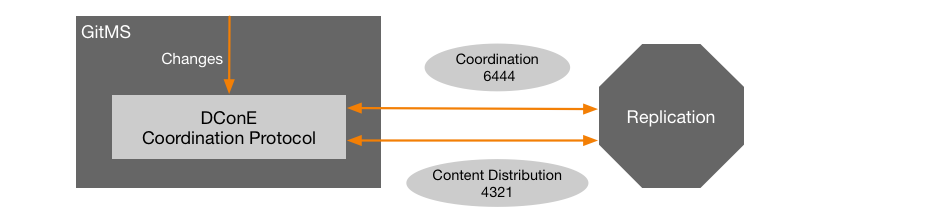
Content in this setting is the the data required for an agreement to be delivered (i.e. the repository change to be made). The content distribution policy determines how many other nodes must have this content before the voting process is initiated. Without this, if an agreement is scheduled and the node(s) that have the content are lost before the other nodes can obtain that content then a disaster recovery will be required as the content is no longer available.
3 Paxos roles are used in content distribution:
- Acceptor
-
Votes on proposals
- Proposer
-
Creates proposals, resolves proposal conflicts (e.g. propose to make a change to a repository)
- Learner
-
Delivers/executes proposals (e.g. updates a repository) - node with a repository replica
Proposals turn into agreements when they have sufficient votes from acceptors. The agreements are in a fixed order relative to each other and are delivered at each node in that fixed order.
GitMS lets you apply different policies to content distribution on a per-node basis.
Contact WANdisco support if you have any questions about the Content Distribution policy.
Changing content distribution policy
In GitMS there are 2 settings that govern the behavior of the Content Distribution Policy. Their names and defaults are:
content.min.learners.required=true
content.learners.count=1
These settings are modified on a per-node basis via the application.properties file.
/opt/wandisco/git-multisite/replicator/properties/application.properties
A restart of the application is required after any change is made to the application.properties file.
Reliable Policy
The "Reliable Policy" is the default setting.
content.push.policy=reliable
The content.learner.count represents the number of learner nodes excluding the originating node that must have the data before any repository change will be put to the vote.
-
If
content.learner.countis larger than the number of non-originating replicas then it will automatically be reduced to the number of non-originating replicas.
If content.min.learners.required is true and there are an insufficient number of available replicas (based on the content.learner.count value) then the repository modification will fail without being put to a vote.
If content.min.learners.required is false then the value of content.learner.count will be adjusted to the number of non-originating available replicas.
However, if the number of non-originating available replicas is zero and content.learner.count is non-zero then the repository modification will fail.
If content.learner.count=0 there is no requirement to deliver the content to any other node and disaster recovery could be needed as described above. We strongly suggest that you do not set this value to less than 1.
|
The number of simultaneous failures that can occur without requiring disaster recovery is strictly governed by the content.learner.count value.
The default number is 1 so either the originating node OR the non-originating node that had the content delivered could be lost, but not both, before disaster recovery would be necessary.
If both nodes in this case were down for maintenance then the other nodes would be stalled until one of the 2 nodes that have the content are once again available - at least for that repository family.
Examples:
content.learner.count=5
content.min.learners.required=true
During an outage there are only 4 learner nodes available in the replication group - requests to modify the repository will fail because there aren’t enough available learner nodes to validate a content distribution policy check.
content.learner.count=5
content.min.learners.required=false
During an outage there are now only 4 learner nodes in the replication group - requests to modify the repository will be successful because GitMS will automatically drop the required learner count to ensure that the required learner count doesn’t exceed the total number of learner nodes in the group.
Steps for a policy change
Use this procedure to change between the above Content Distribution policies.
-
Make a back up and then edit the
/opt/wandisco/git-multisite/replicator/properties/application.propertiesfile (Read more about the link::#_properties_files[properties files]). -
Change the value of
content.min.learners.required, make it "true" for reliability, "false" for speed (default is true). -
Save the file and perform a restart of the node.
Set policy on a per-state machine basis
When editing the property, add the state machine identity followed by .content.push.policy. e.g.
<machine_identity_name>.content.push.policy=reliable
The system assigns policy by looking up the state machine policy followed by content.push.policy. If none are available, "reliable" is chosen.
content.thread.count
Content Distribution will attempt parallel file transfer if there are enough threads available.
The number of threads is controlled by a configuration property content.thread.count which is written to the application.properties file.
content.thread.count=10
The default value is 10. This provides plenty of scope for parallel file transfer. However, as each thread consumes system overhead in the form of a file descriptor and some memory space, servers that are under regular heavy load should lower the count to 2.
Change the content maximum idle time
content.max.idle.time=2147483647
Set this in milliseconds. If content connection, either push or pull, is idle for this time, it is considered unreliable and closed. A new connection is then opened when needed. TCP/IP itself does not time-out the connections, however many network components (routers and firewalls) do. This timed-out connection then can behave as dead-hole, which blocks writes for tens of seconds timeouts. This can lead to spikes in transmission (push or pull) times after a period of inactivity (or even during activity if the number of connections is large and under-utilized).
Set the content.max.idle.time to, for example, 10 minutes, or whatever expiration the network infrastructure uses.
We recommend that you set this to whatever your routers/firewalls are set to.
This can avoid delays.
If you set the value too low, connections may be closed unnecessarily and cause delays on new connection creation (roughly 1 RTT, but more for ssh connections).
You should set, or lower, this value if you get a large number of Failed to send info logs from PrioritizingSender, occurring especially after some time of commit inactivity.
6.7.5. Replication lag
There are some time-sensitive activities where you need to work around replication lag. For example:
-
You have a 2-node replication group, NodeA and NodeB, and Repository Repo01 is replicated between them.
-
A commit to NodeA puts Repo01 at Revision N. The proposal for this commit is agreed but NodeB is still waiting for the changes to arrive so lags slightly behind NodeA at revision N-1.
-
A user on NodeB creates a tag from the master branch.
http://nodeB/repo01/trunk http://nodeB/repo01/tags/TAG_X. -
This tag does not include changes that occurred in the latest revision. WANdisco’s replication technology ensures that all nodes are in the same state in the short to medium term. However, at any moment changes may be in transit. A larger volume of traffic and less available network capacity increases this still in transit state.
This lag is unavoidable in a real-world application and all replicas should soon be back in sync.
6.8. Guide to node types
Each replication group consists of a number of nodes and a selection of repositories that will be replicated.
The different node types are:
- Active
-

An Active node has users who are actively committing to Git repositories, which results in the generation of proposals that are replicated to the other nodes. However, it plays no part in getting agreement on the ordering of transactions.
Active nodes support the use of the Consistency Checker tool. - Active Voter
-

An Active Voter is an Active node that also votes on the order in which transactions are played out. In a replication group with a single Active Voter, it alone decides on ordering. If there’s an even number of Active Voters, a Tiebreaker will have to be specified.
Active nodes support the use of the Consistency Checker tool. - Passive
-

A node on which repositories receive updates from other nodes, but doesn’t permit any changes to its replicas from Git clients - effectively making its repositories read-only. Passive nodes are ideal for use in providing hot-backup.
Passive nodes do not support the reliable use of the Consistency Checker tool.
Please check with WANdisco support before using a Passive node. - Passive Voter
-

A passive node that also takes part in the vote for transaction ordering agreement.
Use for:
-
Dedicated servers for Continuous Integration servers that do not update repositories
-
Sharing code with partners or sites that won’t be allowed to commit changes back
-
In addition, these nodes could help with HA as they add another voter to a site.
-
Passive nodes do not support the reliable use of the Consistency Checker tool.
-
Please check with WANdisco support before using a Passive node.
- Voter (only)
-

A Voter-only node doesn’t store any repository data, it’s only purpose is to accept transactions and cast a vote on transaction ordering. Voter-only nodes add resilience to a replication group as they increase the likelihood that enough nodes are available to make agreement on ordering.
Voter-only nodes can only be added during Replication Group creation. Nodes within an existing Replication Group cannot be changed to a Voter-only node, nor can nodes be added as Voter-only. The Voter-only node’s lack of replication payload means that it can be disabled from a replication group, without being removed.

A disabled node can be re-enabled without the need to interrupt the replication group.
- Tiebreaker
-

If there are an even number of voters in the Replication Group the Tiebreaker gets the casting vote. The Tiebreaker can be applied any type of voter: Active Voter, Passive Voter or Voter. The Tiebreaker is only available for a replication group that has an even number of voter nodes. Also, if a replication group that is equipped with a tiebreaker node subsequently changes so that it has an odd number of voter nodes, either by gaining or losing a node, then its tiebreaker node automatically loses the tiebreaker designation and gets the same voting power as any other voter node.
- Helper
-

When adding a new node to an existing replication group you will select an existing node from which you will manually copy or rsync the applicable repository data. This existing node enters the 'helper' mode (see example symbols above) in which the same relevant repositories will be read-only until they have been synced with the new node. By relevant we mean that they are replicated in the replication group in which the new node is being added.
- New
-

When a node is added to an existing replication group it enters an 'on-hold' state until repository data has been copied across - see the example symbols above. Until the process of adding the repository data is complete, New nodes will be read-only. Should you leave the Add a Node process before it has completed you will need to manually remove the read-only state from the repository.
Acceptors, Proposers and Learners?
The table below shows which node roles are acceptors, proposers or learners.
| Node Type | Acceptor | Proposer | Learner |
|---|---|---|---|
Active (A) |
N |
Y |
Y |
Active Voter (AV) |
Y |
Y |
Y |
Passive (P) |
N |
N |
Y |
Passive Voter (PV) |
Y |
N |
Y |
Voter Only (V) |
Y |
N |
N |
Key
Learners are either Active or Passive nodes:
Learns proposals from other nodes and takes action accordingly. Updates repositories based on proposal (replication).
Proposers are Active nodes:
To be able to commit to the node the node must be able to make proposals.
Acceptors are Voters:
Accepts proposals from other nodes and whether or not to process or not (ordering/achieve quorum).
6.9. Disk Usage and Replicated Pushes
If a file, or set of files, is repeatedly added and removed in Git, the node that is pushed to will store the changes using deltas, resulting in only minor changes to the repository’s size.
If the change is replicated by a push, then it is possible that new blobs will be stored when the file(s) are re-added to the system, meaning the repository size will increase roughly by the size of the file(s) added multiplied by the number of additions.
Garbage collection (either routine automated housekeeping or manual git gc usage) will reduce the amount of disk space used, to roughly that of the node the changes were originally pushed to. In a replicated environment, please use the Git GC operation on your GitMS Repositories page. See Git GC for more details.
This can also be initiated by using the REST API.
By using this mechanism a garbage collection event will be scheduled between repository modifications.
This prevents the Git GC from causing repository damage by racing with repository modifications.
If a repository is cloned rather than pushed, the usage will also reflect the lower figure.
6.10. Working with non-ASCII character sets
Commands such as git status use a different method of displaying non-ASCII characters.
To see the characters rather than escape codes (such as \266) use the following setting on your git client:
git config core.quotepath false
See the git-config manual page for more details.
6.11. Hooks
Hooks are script that are triggered by specific repository events, such as the receipt of an update, or an update having been accepted into the repository. As such they’re very useful for Git administrators who want to have more control over their repository environment. Deploying GitMS should have minimal impact on how hook scripts run on a deployment. For information on Git hooks visit kernel.org
If you are using GerritMS in conjunction with GitMS do not install Git hooks since Gerrit has its own hook mechanism.
Hooks are always installed manually at each replica by the Git Administrator. They are placed in each repository replica’s hooks directory depending on the policy for that replica. The easiest policy to design is one of complete uniformity; policies that do different things at different replicas are more difficult to create and administer. Therefore, generally we advise that hooks should be set up the same on all sites, although this is not a requirement for replication. If processes or policies differ from site to site then hooks will be need to be different.
All hook APIs are 100% compatible with unmodified Git hooks.
The following hooks which fire on a remote Git repository are currently supported. These will only fire on the actual Git repository replica to which the end-user pushed changes (called the originating node).
- pre-receive
-
This is the first hook to run on a remote repository when handling a push from a local repository. If it exits with non-zero status, none of the refs will be updated. This hook can be used to, for example, ensure references have required bug tracking identifiers.
- update
-
This script is run once per ref the pusher is updating, unlike pre-receive which is only run once even if pushing multiple refs. If the update script exits non-zero then only that reference is rejected; other references can still be updated. The hook takes three parameters: the name of the ref, the old object name, and the new object name.
- post-receive
-
This hook fires on the remote repository once all refs have been updated following a push from a local repository. This hook can be used to notify users that the process is complete. This hook gets both the original and updated values of the refs. Do not run anything here that may take a long time as the client cannot disconnect until the script has completed.
- post-update
-
This hook fires on the remote repository once all refs have been updated following a push from a local repository. Unlike a post-receive hook, this hook only knows which heads were pushed and not the values of the refs.
Additionally there are 2 replicated hooks that execute on every node except the originating node:
- rp-post-update
-
This hook is identical to the post-update hook except that it will only fire on the non-originating node. See the post-update hook above for possible usages.
- rp-post-receive
-
This hook is identical to the post-receive hook except that it will only fire on the non-originating node. See the post-receive hook above for possible usages.
If you are using post hooks to send notifications at every site for automation purposes then both the post-receive and rp-post-receive hooks need to be implemented.
However, if you are using post hooks for generating e-mail notification then only the post-receive hook should be installed at all sites for all repositories.
If you install the rp-post-receive hook as well as the normal post-receive hook then those receiving the e-mail notification will receive 1 e-mail per GitMS node - this is a potential e-mail storm so is not recommended.
|
6.12. Replicating Environmental Variables
Administrators can specify a subset of the node’s environmental variables for use with standard Git hooks.
The selected environmental variables are passed to the other replicated nodes via replicated hooks (specifically rp-post-update and rp-post-receive).
The set of environment variables from which you can choose are found in the process context of the post-receive hook on the node where the original push was made to.
The environmental variables are configured as a replicated property, with the key: gitms.hooks.env.
The value is a comma separated list of environment variables that the administrator wishes to capture.
This list is case sensitive, and should not contain spaces.
You can manually set the configuration per node by adding the correct values in application.properties and the restarting the node, but this would only affect that node.
To push replicated properties to the replication network, a rest call and a little XML is needed (the XML example for the contents of the xml_file_path file is below):
curl -u <username:password> --header "Content-Type: application/xml" --data @<xml_file_path> -X PUT http://<ip>:<rest_port>/api/configuration/replicated
For setting most variables you’d instead use the REST API, if you need to make changes to the application.properties file it may be worth checking with WANdisco’s support team before making the change.
XML format example (for the contents of the xml_file_path file)
    <?xml version="1.0" encoding="UTF-8" standalone="yes"?>
    <configuration>
        <property>
        <key>gitms.hooks.env</key>
        <value>NODE_NAME,GIT_DIR</value>
        </property>
    </configuration>
In this example, we’ve configured the replicator to take the values of NODE_NAME and GIT_DIR from the environment process context of the post-receive process on the originating node and pass them onto other nodes to use in their rp-post-update and rp-post-receive scripts.
Example hook scripts are provided below which can be placed in a repository to verify that the configuration is successful:
For rp-post-receive:
#!/bin/bash --noprofile

if true; then
    while read old new name; do
        echo "oldrev: $old"
        echo "newrev: $new"
        echo "refname: $name"
    done
    echo "ENV VARIABLES:"
    env
fi > /tmp/rp-post-receive.txt
For rp-post-update:
#!/bin/bash --noprofile

if true; then
    echo "Arguments: $*"
    echo "ENVIRONMENT VARIABLES:"
    env
fi > /tmp/rp-post-update.txt
Before configuring to copy the GIT_DIR and NODE_NAME environment variables, /tmp/rp-post-update.txt example output:
Arguments: refs/heads/master
ENVIRONMENT VARIABLES:
SHELL=/bin/bash
TERM=xterm
LC_ALL=en_GB.UTF-8
USER=gitms
NLSPATH=/usr/dt/lib/nls/msg/%L/%N.cat
PATH=/bin:/sbin:/usr/bin:/usr/sbin:/usr/local/bin:/usr/local/sbin
JAVA=/usr/bin/java
PWD=/home/gitms/repo1.git
XFILESEARCHPATH=/usr/dt/app-defaults/%L/Dt
HOME=/home/gitms
SHLVL=5
LOGNAME=gitms
_=/bin/env
And after having configured NODE_NAME and GIT_DIR to replicate, /tmp/rp-post-receive.txt example output:
oldrev: c1a4067286d5fdcd92ed98a6f8a6bbbd94434fc0
newrev: 27e3052234a1a8bd2d91d9860d389fb7aa7a953f
refname: refs/heads/master
ENV VARIABLES:
GIT_DIR=.
SHELL=/bin/bash
TERM=xterm
LC_ALL=en_GB.UTF-8
USER=gitms
NLSPATH=/usr/dt/lib/nls/msg/%L/%N.cat
PATH=/bin:/sbin:/usr/bin:/usr/sbin:/usr/local/bin:/usr/local/sbin
JAVA=/usr/bin/java
PWD=/home/gitms/repo1.git
XFILESEARCHPATH=/usr/dt/app-defaults/%L/Dt
HOME=/home/gitms
SHLVL=5
LOGNAME=gitms
NODE_NAME=Node-2
_=/bin/env
/tmp/rp-post-update.txt example output:
Arguments: refs/heads/master
ENVIRONMENT VARIABLES:
GIT_DIR=.
SHELL=/bin/bash
TERM=xterm
LC_ALL=en_GB.UTF-8
USER=gitms
NLSPATH=/usr/dt/lib/nls/msg/%L/%N.cat
PATH=/bin:/sbin:/usr/bin:/usr/sbin:/usr/local/bin:/usr/local/sbin
JAVA=/usr/bin/java
PWD=/home/gitms/repo1.git
XFILESEARCHPATH=/usr/dt/app-defaults/%L/Dt
HOME=/home/gitms
SHLVL=5
LOGNAME=gitms
NODE_NAME=Node-2
_=/bin/env
7. Gitolite Integration Guide
7.1. Running GitMS with Gitolite
With GitMS, you can run and replicate Gitolite, the popular authorization layer.
|
Authentication vs Authorization
|
Gitolite’s authorization rules are enforced based on the configuration of the gitolite.conf file in the gitolite-admin repository which is created during installation. Changes to this file are enforced when a push to this repo is received via the post-update hook within the repository.
As the rules are contained within a repository you can install GitMS to replicate this repo to allow the same authorization to be applied across multiple nodes. This section gives instructions for allowing GitMS to replicate Gitolite.
7.2. Requirements
System setup:
- GitMS
-
All current versions of GitMS support running with Gitolite.
- Git
-
You need to have Git Replicated binaries installed on all nodes. See the Release Notes for the versions for your specific GitMS release and Git binaries for how to install.
- Java
-
You can use either Oracle Java 7 or Oracle Java 8. The exact same version should be installed on all nodes.
- Security
-
Set up a git with no authorized keys file present or previous ssh configuration
Generate/copy over public SSH keys for the users you wish to use on Gitolite (do not include any git accounts, only end users). We recommend simple naming on these files eg. admin.pub, generated by ssh-keygen. Do not set a passphrase.
Setting umask
Setting the umask options for the replicator, the umask 027 gives 750 permissions on the created repositories.
This means that only the account that runs GitMS can write to them and, subsequently, all pushes to repositories need to come through this account, such as with suexec when using Apache.
Accounts in the same primary groups can read from the repository, although pushes are rejected.
For the GitMS account, the repository umask 027 works if Gitolite is controlled by the same system user, and Apache works if using susexec to run backend as GitMS.
However, without group write access other users cannot modify the repository.
| We recommend using permission 007 to give group ability to write to repository. |
Having the GitMS account in the same group as the repository owner: this is workable but breaks the ability to do garbage collection and causes issues later. 027 is not workable for group write access but does not appear to cause issues if using the GitMS user. We recommend that the GitMS account owns both processes. You can use members of GitMS’s group to push and use a repository with 007 as long as the GitMS account owns the repositories.
7.2.2. SELinux
If SELinux is installed, and you want to continue using it, there are two installation options for gitolite:
-
Add it to an already allowed directory such as
/var/lib/gitolite. -
Add permissions to SELinux to allow the home directory of user git to be written to by httpd.
Enter the following SELinux commands to allow gitolite over apache:
     # yum -y install policycoreutils-python
     # setsebool -P httpd_enable_homedirs on
     # usermod -a -G apache git
     # chcon -R -t httpd_sys_rw_content_t /home/gitms
     # chcon -R -t httpd_sys_rw_content_t /opt/wandisco/git-multisite/replicator/content_delivery
     # setsebool -P httpd_can_network_connect on
     # setsebool -P git_system_enable_homedirs on
     # semanage permissive -a httpd_sys_script_t
7.2.3. Configure IPtables
If IPtables is active it blocks http connections as well as the GitMS replicator/UI.
To allow these connections, add exceptions so that /etc/sysconfig/iptables looks like:
*filter
:INPUT ACCEPT [0:0]
:FORWARD ACCEPT [0:0]
:OUTPUT ACCEPT [11:12222]
-A INPUT -m state --state RELATED,ESTABLISHED -j ACCEPT
-A INPUT -p icmp -j ACCEPT
-A INPUT -i lo -j ACCEPT
-A INPUT -p tcp -m state --state NEW -m tcp --dport <port selected> -j ACCEPT
-A INPUT -p tcp -m state --state NEW -m tcp --dport <port selected> -j ACCEPT
-A INPUT -j REJECT --reject-with icmp-host-prohibited
-A FORWARD -j REJECT --reject-with icmp-host-prohibited
COMMIT
# Completed on Mon Mar 27 13:52:30 2017
Increased the OUTPUT ACCEPT from 2222 to 12222 (allows outgoing connections up to port 12222)
Allow incoming connections on <port selected> and <port selected>.
This increases the OUTPUT ACCEPT from 2222 to 12222 which allows outgoing connections up to port 12222.
7.3. Install and set up GitMS
-
Download and install your preferred version of GitMS (tarball or Rpm) under the git user and git group.
-
When nodes are inducted to each other create a replication group including both nodes.
-
Add the gitolite-admin repo to the replication group.
-
To allow for enforcement of access-control changes in Gitolite, the Gitolite environment variables must also be replicated.
7.3.1. Set up GitMS to replicate Gitolite variables
To allow GitMS to send the environment variables for gitolite across both servers the application.properties file must be updated there are 3 ways this is done listed below.
Direct edit of application.properties file
-
Open the applications.properties file for GitMS in <gitms_installation_folder>/replicator/properties/application.properties (default install is /opt/wandisco/git-multisite/).
-
Add the following line to the bottom of the file on each server:
gitms.hooks.env=GL_USER,GL_TID,GL_LOGFILE,GL_ADMIN_BASE,GL_REPO,GL_BINDIR,GL_LIBDIR
-
Restart the replicator for each node.
Curl command sent to replicator
-
Send a curl command to the replicated settings endpoint to allow the changes to be replicated out to all members inducted to the node where the command was sent.
-
Issue the following command via curl:
# curl --header "Content-Type: application/xml" -X PUT -data @replicated_config.xml http://<ServerIP>:8082/api/configuration/replicated
Where replicated_config.xml is a xml with the environmental variables to be replicated. As shown below:
 <configuration>
   <property>
      <key>gitms.hooks.env</key>
      <value>GL_USER,GL_TID,GL_LOGFILE,GL_ADMIN_BASE,GL_REPO,GL_BINDIR,GL_LIBDIR</value>
   </property>
        </configuration>
These settings will be passed out across all nodes.
Confirm this by checking the applications.properties file of each node.
Using replicated settings script
You can use this script to send settings out to all inducted nodes as follows:
# ./replicated_settings -a <Path_to_applications.properties> -k gitms.hooks.env -v GL_USER,GL_TID,GL_LOGFILE,GL_ADMIN_BASE,GL_REPO,GL_BINDIR,GL_LIBDIR
Run this locally on one of your Gitolite servers.
See script - replicated_settings.sh.
7.3.2. Changes to gitolite-admin repo to allow replication
To allow the post-update scripts of gitolite to be run on receipt of a replicated upgrade you need to edit the gitolite-admin repo:
-
cdto the hooks folder of gitolite-admin.git repo which should be in: $HOME/repositories/gitolite-admin.git/. -
symlink the available post-update script to rp-post-update with:
# ln -s post-update rp-post-update
-
You can either repeat this command in each version of the repository or rsync it to all other servers.
-
Use the
ls -lcommand to show something similar to this output:# lrwxrwxrwx. 1 git git 52 Jul 30 08:40 post-update -> /home/git/.gitolite/hooks/gitolite-admin/post-update # lrwxrwxrwx. 1 git git 11 Jul 30 11:23 rp-post-update -> post-update # lrwxrwxrwx. 1 git git 39 Jul 30 08:40 update -> /home/git/.gitolite/hooks/common/update
-
Clone the gitolite-admin repo using this command as admin user on client to begin configuring Gitolite:
# git clone git@<server_address>:gitolite-admin
-
Changes made should now be replicated and enforced by all instances of Gitolite in the replication-group.
7.4. Deploy over SSH
|
SSH and Gitolite
If you’re running both Gitolite and GitMS over SSH, both applications may attempt to use the same system account for SSH, this would introduce the risk of conflicts. We therefore recommend that you set up separate system accounts for GitMS and Gitolite.
|
To run Gitolite and GitMS over SSH:
-
Log into the git user in the home directory and create a bin folder.
-
Add this folder to $PATH by appending this line to .bashrc or .bashrc_profile of git user:
# export PATH=$PATH:$HOME/bin
You may need to do
source .bashrc, or log out and log back in, to get changes to take effect. echo $PATH should show your new bin folder at the end. -
Scp the admin.pub key from the client machine to git user’s home directory on the Gitolite server.
-
Get the Gitolite installation folder via Git with:
# git clone git://github.com/sitaramc/gitolite
-
As the git user, run the following commands from home directory:
 #  gitolite/install -ln
 #  gitolite setup -pk $HOME/admin.pub  ( or key of which ever user wish to make first admin )
-
Repeat this on both nodes with the same admin.pub key. You should have a repositories folder in home directory with two repos present: gitolite-admin.git and testing.git
-
To test that the setup is correct, from client machine, run this command as admin user:
# git clone git@<serveraddress>:gitolite-admin
You should be able to successfully clone out the gitolite-admin repo. This repo will have a single commit in git logs for Gitolite setup:
 #  cd gitolite-admin
 #  git log
 #  commit 21729090fb8c5cc55a6050f728a85b99f352e177
 #  Author: git on gitolite.domain <git@gitolite.domain>
 #  Date:   Wed Jul 30 08:40:10 2014 -0400
 #
 #  gitolite setup -pk /home/git/admin.pub
-
As this commit is different on each node, you need to get the repository in a consistent state by rsyncing the node between each server. From /home/git/repositories run:
# rsync -r gitolite-admin.git root@<otherServerIP>:/home/git/repositories/gitolite-admin.git
-
Then on the other server change ownership of the repo to git:git
# chown -R git:git gitolite-admin.git
-
cd into the admin repo and check the git log again the commit message should match the other version of the gitolite-admin repo.
7.5. Deploy over HTTP
7.5.1. Starting requirements
Make sure that you have installed and set up GitMS and Gitolite before working through this section.
7.5.3. Create passwd file
-
htpasswd -c /var/www/gitolite.passwd <Username>
-
Change the ownership of the passwd file:
chown apache:apache /var/www/gitolite.passwd
7.5.4. Set up Gitolite to authenticate over HTTP
-
Edit
.gitolite.rcin the gitolite installation directory, /home/git, in the example. -
Add the following line to the top of the file:
$ENV{PATH} .= ":/home/git/bin";Replace "/home/git/bin" with the bin directory of gitolite.
-
Create folders in the httpd home folder. This defaults to /var/www/ on centos and oracle linux:
# mkdir /var/www/git /var/www/bin
-
Correct the permissions and ownership of the new folders:
 # chown -R apache:apache /var/www/git
 # chown -R git:git /var/www/bin
 # chmod -R 0755 /var/www/git /var/www/bin
-
In the /var/www/bin folder create "gitolite-suexec-wrapper" script and add the following lines:
 #!/bin/bash
 #
 # Suexec wrapper for gitolite-shell
 #

 export GIT_PROJECT_ROOT="/home/git/repositories"
 export GITOLITE_HTTP_HOME="/home/git"

 ${GITOLITE_HTTP_HOME}/gitolite/src/gitolite-shell
where GIT_PROJECT_ROOT is the repositories directory for gitolite and GITOLITE_HTTP_HOME is the directory that contains Gitolite.
-
Give this script the permissions 0700:
 # chmod 0700 gitolite-suexec-wrapper
 # chown git:git gitolite-suexec-wrapper
-
Create gitolite.conf in the /etc/httpd/conf.d folder and add the following lines:
 <VirtualHost *:80>
     ServerName        git.example.com
     ServerAlias       git
     ServerAdmin       you@example.com

     DocumentRoot /var/www/git
     <Directory /var/www/git>
         Options       None
         AllowOverride none
         Order         allow,deny
         Allow         from all
     </Directory>

     SuexecUserGroup git git
     ScriptAlias /git/ /var/www/bin/gitolite-suexec-wrapper/
     ScriptAlias /gitmob/ /var/www/bin/gitolite-suexec-wrapper/

     <Location /git>
         AuthType Basic
         AuthName "Git Access"
         Require valid-user
         AuthUserFile /var/www/gitolite.passwd
     </Location>
 </VirtualHost>
Allow git pushes
-
Change to the directory were the repo is:
 su - gitms -s /bin/bash
 cd /home/gitms/repos/bar.git
 git config http.receivepack true
 git config core.sharedRepository group
-
Do this in each repo and on all replicas, i.e. each version of repo1 on each node.
-
Restart Apache:
# service httpd restart
You should now be able to authenticate through Apache and apply authorization rules to users coming in over http.
7.5.5. Deploy over HTTPS
To allow authentication of users over HTTPS begin by following the setup steps for HTTP.
7.5.6. Generate certificates
An easy tool to generate certificates is easy-rsa. You need to have the Epel rep installed to use this:
 # wget http://dl.fedoraproject.org/pub/epel/6/i386/epel-release-6-8.noarch.rpm
 # rpm -Uvh epel-release-6-8.noarch.rpm
 # yum install easy-rsa
 # cp -r /usr/share/easy-rsa/2.0 .
 # cd 2.0/
 # source vars
 # ./clean-all
 # ./build-ca
 # ./build-key-server gitolite1 (when prompted for the CommonName use the system IP address if the system does not have a register DNS name)
Copy a cert and key into /etc/apache on each node:
 # cp ./keys/gitolite1.crt /etc/httpd
 # cp ./keys/gitolite1.key /etc/httpd
 # chown apache:apache /etc/httpd/gitolite1.crt /etc/httpd/gitolite1.key
Add conf file for HTTPS
-
In the apache conf files add a conf file for https in /etc/httpd/conf.d/gitolitehttps.conf.
-
Add the following lines to this file:
<VirtualHost *:443> DocumentRoot /var/www/git ServerName git.example.com RewriteEngine On RewriteCond %{REMOTE_USER} ^(.*)$ RewriteRule ^(.*)$ - [E=R_U:%1] RequestHeader set X-Remote-User %{R_U}e SSLEngine on SSLCertificateFile /etc/httpd/gitolite1.crt SSLCertificateKeyFile /etc/httpd/gitolite1.key DocumentRoot /var/www/git <Directory /var/www/git> Options +ExecCGI AllowOverride none Order allow,deny Allow from all </Directory> SuexecUserGroup git git ScriptAlias /git/ /var/www/bin/gitolite-suexec-wrapper.sh/ ScriptAlias /gitmob/ /var/www/bin/gitolite-suexec-wrapper.sh/ <Location /git> AuthType Basic AuthName "Git Access" Require valid-user AuthUserFile /var/www/gitolite.passwd </Location> </VirtualHost> -
Restart Apache:
# service httpd restart
7.5.7. Add the certificate to client machines
The server certificate generated will not be recognized by your client. Either:
-
Turn off strict SSL checking:
git config --global http.sslVerify false
-
Add CA certificate to the client machine by adding the
./keys/ca.crtfile to the set of CA certificates the client system accepts. See How do I install a root certificate?
7.6. Tips and warnings
-
When using Gitolite with http, any repository that you want to allow access over apache must have R=daemon added to its permissions. You can then add the Apache users' individual permissions to the repo.
-
Following installation of Gitolite, you may need to run this command to set the same permissions on new Gitolite folders as the rest of home directory.
# restorecon -R -v /home
-
If you create a repository via Gitolite, this will be created on all nodes as a bare repo. You can then add this repository to GitMS and replicate it either in the same group as admin repository or in a separate group with its own node roles and schedule.
-
Gitolite’s documentation currently states no SELinux rules to allow gitolite over httpd. To do this, install it in a directory already allowed under SELinux from gitolite documentation: If your server is running SELinux, and you install gitolite to
/var/gitoliteor another location unsupported by default SELinux policies, then SELinux will prevent sshd from reading .ssh/authorized_keys. Consider installing gitolite to/var/lib/gitolite, which is a supported location by default SELinux policies.
8. REST API
GitMS offers increased control and flexibility through the support of a RESTful (Representational State Transfer) API for accessing a set of resources through a fixed set of operations.
8.1. Online documentation
You can review a copy of the bundled API documentation.
This documentation is taken straight from a live installation.
Given that the documentation is automatically generated, it frequently links to local files and resources that will not be available here.
There are also a link in the product (on the Settings tab) to the live API documentation.
8.2. Prerequisites
Provided examples use Curl on the command line, but many other delivery mechanisms can achieve the same thing against a Restful API will.
8.3. Authentication
Provided examples show the use of admin:password credentials for clarity. Clearly you shouldn’t use this approach for production. It can be beneficial to create a suitably permissioned user exclusively for API duties.
-
All calls use the base URI:
http(s)://<server-host>:<PORT>/api/<resource>
-
The Internet media type of the data supported by the web service is application/xml.
-
The API is hypertext driven, using the following HTTP methods:
| Type | Action |
|---|---|
POST |
to create a resource on the server |
GET |
to retrieve a resource from the server |
PUT |
to modify the state of a resource |
DELETE |
to remove a resource |
8.4. REST API Examples
8.4.1. Automated repository deployment
Repository deployment is a multi-step process that will take longer depending on the number of nodes in the replication group, and the latency between those nodes and the loading on those nodes. Currently, the taskId returned from the repository deployment REST API call does not cover all of the steps, so waiting for that task to complete is insufficient to know that the repository is completely deployed. If a repository is accessed before the deployment is complete the access can fail with a number of different errors.
To deploy a repository to GitMS, the repository must be added to an existing replication group. To perform this action, follow these steps:
-
You first need the replication group ID. To get this, call the following:
curl -u admin:pass <IP>:<API:PORT>/api/replication-groups/
This will return an xml containing the replication group list.
-
Find the replication group that you want to deploy the repository to, and copy the replication group ID. It will be in the format of this example:
<replicationGroupIdentity>81c333e9-15ef-11e7-8a90-0800270bd1ba</replicationGroupIdentity> -
Create an xml file containing the following DTO and call it: createRepo.xml this will be needed to perform the deployment call. An example git repository DTO is in the example below.
<git-repository> <name>testRepoOne</name> <fileSystemPath>/opt/git/testRepoOne.git</fileSystemPath> <replicationGroupId>c2794e20-0d4a-11e7-8387-0800277f5717</replicationGroupId> <denyNonFastForwards>true</denyNonFastForwards> </git-repository> -
To deploy this repository to GitMS, add the replication group ID and created xml file to the following call, along with correct user credentials, IP and PORT.
In this example we are creating a brand new repository with createEmptyRepo=true. If you are not creating a new repository this is not needed.curl -u <USERNAME>:<PASSWORD> -X POST -H Content-Type:application/xml -d @createRepo.xml "http://<IP>:<API-PORT>/api/repository?replicationGroupId=<REPLICATION-GROUP-ID>&createEmptyRepo=true"
|
Temporary solution for automated repository management
To ensure that your automation does not prematurely access a repository that has not completed deployment, wait until the deployment task is completed and then, in a sleep/poll loop, query the repository state via REST API and wait for the repository state to become active.
Your automation can then continue.
|
8.4.2. How to stop and start proposal outputs on a node
Stop proposal outputs on a node
This command immediately stops the output of proposals on all repositories on the node on which it is invoked (with no coordination):
PUT: <server>:<port>/api/replicator/stopall
Stopping the fewest objects will have the smallest impact and so it may be preferable to stop repository modification rather than the whole node.
8.4.3. How to stop and start the modification of a repository
Stop repository modification
With this method, proposals are still delivered to the node and the node can still participate in voting, but the proposals are not executed until the output is restarted.
This is supported in the API with the RepositoryResource methods:
PUT <server>:<port>/api/repository/{repositoryId}/stopoutput
Read more about stopoutput.
This command takes one argument, NodeListDTO nodeListDTO, which is the list of nodes where the repo output will be stopped. In this case the list only includes NodeX.
Note that while the output is stopped it shows in the UI as LocalReadOnly.
Start repository modification
PUT <server>:<port>/api/repository/{repositoryId}/startoutput
Read more about startoutput.
This command takes one argument, NodeListDTO nodeListDTO, which is the list of nodes where the repo output will be started. In this case the list only includes NodeX.
PUT: <server>:<port>/api/replicator/stopall
8.4.4. Pending transactions
Get pending transaction count
To get the count of pending transactions at a node via API the Node ID is required for the cURL command.
The node ID can be found on the Settings screen and will look something like 999aacc5-af77-43e7-a8de-9a921a45thuc.
The node ID can also be found by using the /api/nodes REST API endpoint.
The cURL command will look like (change to https for SSL API):
curl -u <username>:<password> http://<nodeIP>:<apiPort>/api/node/${NODE_ID}/pendingTransactions
This will return the number of pending transactions for the specified node.
A working example would be:
curl -u admin:pass http://10.0.2.50:8082/api/node/999aacc5-af77-43e7-a8de-9a921afg6lei/pendingTransactions
Which gives the output:
3prompt$
The number of pending transactions are returned, in this case 3.
8.4.5. GET
Parameters
-
withRemoved-
Default value:
false -
Set to
trueto include removed nodes in the response -
Set to
falseto omit removed nodes in the response
-
Output
The HTML response code is included in the section headings describing the various types of output.
200 - Success
Success returns an XML-formatted document that describes each node.
The XML document is a tree of nodes. Each node has the following elements:
-
nodeIdentity- The node’s unique ID -
locationIdentity- The node’s unique location ID -
isLocal- A boolean indicating whether the node is local to the node that is serving the request -
isUp- A boolean indicating whether the replicator on the node is running -
isStopped- A boolean indicating whether the replicator on the node is not handling requests -
lastStatusChange- A UNIX epoch timestamp indicating when the node’s status last changed
Each node also has a list of attributes. Each attribute has a key and a value. Common and useful attributes include:
-
eco.system.membership- The unique ID of the node’s ecosystem membership -
eco.system.dsm.identity- The unique ID of the node’s ecosystem state machine -
node.name- The common (display) name for the node, as seen in the user interface
Usage examples
In the following examples we use:
admin as an administrator account name
pass as the credential for the admin account
http://192.168.56.190 as the IP address of the MSP node
8082 as the REST port
Default
curl -u admin:pass http://192.168.56.190:8082/api/nodes
Returns a list of non-removed nodes.
<?xml version="1.0" encoding="UTF-8" standalone="yes"?>
<nodes>
  <node>
    <nodeIdentity>abb21772-5544-43e2-9cb9-ff1node56191</nodeIdentity>
    <locationIdentity>3027fc8f-064e-11e4-b8d2-080027ec317a</locationIdentity>
    <isLocal>false</isLocal>
    <isUp>true</isUp>
    <isStopped>false</isStopped>
    <lastStatusChange>1411397169893</lastStatusChange>
    <attributes>
      <attribute>
        <key>eco.system.membership</key>
        <value>ECO-MEMBERSHIP-190823c6-0658-11e4-a747-0800279336f8</value>
      </attribute>
      <attribute>
        <key>eco.system.dsm.identity</key>
        <value>ECO-DSM-d33204f1-0648-11e4-aaa1-080027b651cd</value>
      </attribute>
      <attribute>
        <key>node.name</key>
        <value>node56191</value>
      </attribute>
    </attributes>
  </node>
  <node>
    ...
  </node>
  <node>
    ...
  </node>
</nodes>
Include removed nodes in output
curl -u admin:pass http://192.168.56.190:8082/api/nodes?withRemoved=true
<?xml version="1.0" encoding="UTF-8" standalone="yes"?>
<nodes>
  <node>
    <nodeIdentity>abb21772-5544-43e2-9cb9-ff1node56191</nodeIdentity>
    <locationIdentity>3027fc8f-064e-11e4-b8d2-080027ec317a</locationIdentity>
    <isLocal>false</isLocal>
    <isUp>false</isUp>
    <isStopped>true</isStopped>
    <lastStatusChange>1411397169893</lastStatusChange>
    <attributes>
      <attribute>
        <key>eco.system.membership</key>
        <value>ECO-MEMBERSHIP-190823c6-0658-11e4-a747-0800279336f8</value>
      </attribute>
      <attribute>
        <key>eco.system.dsm.identity</key>
        <value>ECO-DSM-d33204f1-0648-11e4-aaa1-080027b651cd</value>
      </attribute>
      <attribute>
        <key>node.name</key>
        <value>node56191</value>
      </attribute>
    </attributes>
  </node>
  <node>
    ...
  </node>
  <node>
    ...
  </node>
</nodes>
Invalid authentication
curl -u admin:wrongpass http://192.168.56.190:8082/api/nodes
<?xml version="1.0"?>
<html>
  <head>
    <meta http-equiv="Content-Type" content="text/html;charset=ISO-8859-1"/>
    <title>Error 401 No client with requested id: admin</title>
  </head>
  <body>
    <h2>HTTP ERROR: 401</h2>
    <p>Problem accessing /api/nodes. Reason:
<pre>    No client with requested id: admin</pre></p>
    <hr/>
    <i>
      <small>Powered by Jetty://</small>
    </i>
  </body>
</html>
8.5. Node Induction
8.5.1. Perform a node induction
To induct 2 more more nodes using API:
| The example set out below deals with a 2-node induction for simplicity, so that two individual nodes become a 2-node ecosystem. However, an induction of nodes that are already part of their own multi-node ecosystems will produce a new ecosystem that combines all nodes. |
-
Prepare a payload XML file with the following XML stanza:
INDUCTION XML<inductionTicket> <inductorLocationId>${LOCATION_ID}</inductorLocationId> <inductorNodeId>${NODE_ID}</inductorNodeId> <inductorHostName>${INDUCTOR_HOST}</inductorHostName> <inductorPort>${INDUCTOR_DCONE}</inductorPort> </inductionTicket>The included properties are described below:
- ${LOCATION_ID}
-
The Location ID of the first node from which we are inducting. You can capture the Location ID from the REST API’s Nodes page. e.g.
- ${NODE_ID}
-
The Node ID of the inductor, i.e., the first node that we’re inducting from (the inductor). This can be found on the Settings page and will look something like "999aacc5-af77-43e7-a8de-9a921a45thuc". Can also be found in the /api/nodes page.
- ${INDUCTOR_HOST}
-
The IP/hostname of the inductor.
- ${INDUCTOR_DCONE}
-
The DConE port: this is chosen during installation and needs to be the same across the nodes. Default value is 6444.
Each inductee node will need the above Induction XML.
-
Run the following cURL command (change to https for SSL encrypted API):
curl -u <username>:<password> -X PUT -d "${ABOVE_XML}" --header 'Content-Type: application/xml' http://<nodeIP>:<apiPort>/api/node/${NODE_ID_TO_BE_INDUCTED}The included properties are described below:
- ${NODE_ID_TO_BE_INDUCTED}
-
The Node ID of the node that we’re using to invite induction (inductee).
An example of inducting Node2 (999aacc5-af77-43e7-a8de-9a921aimz3k4) from Node1 (999aacc5-af77-43e7-a8de-9a921apg0sby) would be:
curl -u admin:pass -X PUT -d '<inductionTicket><inductorLocationId>57b331ba-38f2-11e4-8958-3a2a7398d235</inductorLocationId><inductorNodeId>999aacc5-af77-43e7-a8de-9a921apg0sby</inductorNodeId><inductorHostName>172.16.2.50</inductorHostName><inductorPort>6444</inductorPort></inductionTicket>' --header 'Content-Type: application/xml' [http://172.16.2.0:8082/api/node/999aacc5-af77-43e7-a8de-9a921aimz3k4]Note that the NODE_ID in the XML (the first Node we’re inducting from) is different from the NODE_ID of the URL (the Node we’re inducting to).
This cURL command is repeated with the same XML and different NODE_ID in the URL for each node that needs to be inducted.
Please note to leave enough time to complete an induction before attempting another induction, otherwise the second induction will be aborted.
http://10.0.2.0:8082/api/nodesThis returns the following information:
  <nodes>
      <node>
          <nodeIdentity>[red]#156d2cd8-0929-4333-a84e-350e6be44e4b </nodeIdentity>
          <locationIdentity>[red]#7b212e2f-486b-11e4-90b8-22564bb81bc7</locationIdentity>
          <isLocal>true</isLocal>
          <isUp>true </isUp>
          <isStopped>false</isStopped>
          <lastStatusChange>1412058720321</lastStatusChange>
        <attributes>
              <attribute>
                  <key>eco.system.membership</key>
                  <value>
                    ECO-MEMBERSHIP-df34fdfc-486b-11e4-adb1-aa7004f22f33
                  </value>
              </attribute>
              <attribute>
                  <key>node.name</key>
                  <value>node1</value>
              </attribute>
              <attribute>
                  <key>eco.system.dsm.identity</key>
                  <value>ECO-DSM-7b86a6c0-486b-11e4-90b8-22564bb81bc7</value>
              </attribute>
          </attributes>
      </node>
    ...
  </nodes>
You can also find the LocationID on the Settings screen of the admin UI.
- ${NODE_ID}
-
The Node ID of the first node from we are inducting. This can also be found on the API’s
/api/nodesscreen (see above). It’s also available on the Settings screen of the admin UI. - ${INDUCTOR_HOST}
-
The IP/hostname of the first node from which we are inducting.
- ${INDUCTOR_DCONE}
-
The DConE port: this is chosen during installation and needs to be the same across all nodes. Default value is 6444.
Each node (apart from the first node from which we are inducting) will need the above XML.