-
1. Introduction
Welcome to the User Guide for Access Control Plus 1.9.
To view User Guides for previous versions of Access Control Plus visit the Archive.
Access Control Plus, referred to as ACP, delivers a single, easy-to-use point-and-click solution that fully protects valuable source code across all of your Subversion and Git repositories. It is designed to work in conjunction with our SCM replication products or as a standalone solution. Integration with LDAP and Active Directory ensures that users are automatically assigned to the Subversion and/or Git teams that correspond to their authentication server groups. Security administrators can delegate authority to team leads to further reduce administrative overhead.
For more information about Subversion MultiSite Plus (SVN MSP), Git MultiSite (GitMS), and our replication technology see:
1.1. Get support
See our online Knowledgebase which contains updates and more information.
We define some industry terms, as well as Cirata product terms in our Glossary.
If you need more help raise a case on our support website.
If you find an error or if you think that some information needs improving, raise a case.
1.2. Symbols in the documentation
In this document we highlight types of information using the following boxes:
|
Alert
The alert symbol highlights important information.
|
|
Tip
Tips are principles or practices that you’ll benefit from knowing or using.
|
|
Stop
The STOP symbol cautions you against doing something.
|
|
Knowledgebase
The i symbol shows where you can find more information in our online Knowledgebase.
|
1.3. Release Notes
View the Release Notes. These provide the latest information about the current release, including lists of new functionality, fixes, known issues and software requirements.
2. Deployment Guide
This guide describes integrating Access Control and/or replication technology into your SCM platform. This document cannot address every possible set of conditions so take care to anticipate problems. Contact our Support Team team with any questions or concerns.
2.1. Deployment checklist
|
Important
Don’t skip this section! Overlooked requirements are a common cause of setup problems that are difficult to diagnose.
These problems may take a lot more time to fix than you will take to check the list.
|
2.1.1. Hardware and Operating System
Operating systems
See the Release Notes for which operating systems are supported for your ACP version.
|
Runlevel differences between supported operating systems
Read our Knowledge base article about How Linux Runlevels apply to our version control system products.
|
System memory
Memory recommendations
| Hardware sizing characteristics | Java Heap | ||
|---|---|---|---|
<500 users |
<10 repos |
<100 teams |
2GB |
500 < users < 1500 |
10 < repos < 100 |
100 < teams < 200 |
3GB |
1500 < users < 3000 |
100 < repos < 400 |
200 < teams < 400 |
4GB |
3000 < users < 4000 |
400 < repos < 800 |
400 < teams < 800 |
6GB |
Bigger |
8GB+ |
||
Note: We do not recommend using the minimum
By default, ACP’s Java process is allocated the following heap space:
-Xms128m -Xmx2048m
In case of problems getting ACP running, you may need to alter the heap.
If you need to reduce the heap size you won’t be operating with a comfortable margin: consider increasing your server’s system memory.
Running with other apps: In production you must always ensure that your system operates with a comfortable margin. The above memory recommendations do not take into account other applications that you may run on the server, e.g. running ACP with either the Git or SVN MultiSite products. We recommend that you complete load testing and specify your server’s memory based on peak usage.
|
GB or GiB
We should clarify how we refer to measures of memory and data.
Cirata ALM products (such as ACP) have adopted the binary prefixes as provided by the International Electrotechnical Commission.
We therefore use Mebibyte (1,048,576 bytes) instead of Megabytes (1,000,000 bytes) within our products.
However, we’ll still refer to Megabytes and Gigabytes where these are more commonly understood - such as in the above table.
If you’re not familiar with the difference between binary prefixes and the SI prefixes then we recommend that you read this Wikipedia article.
|
Disk space
Subversion: Match to projects and branches.
Checkouts: You need sufficient disk space to handle large, in-transit checkouts which may get buffered to a tmp directory beneath the replicator installation until that checkout has been completed.
Reserved ports
ACP requires that several TCP ports are reserved for its exclusive use:
-
application.port=6444: DConE port handles agreement traffic which coordinates replication between sites:
-
content.server.port=6445: Used for the replicator’s payload data: account / access control changes etc.
-
jetty.http.port=8082: Used for the ACP UI / management interface.
Plan your ports
While default ports are assigned automatically if you don’t select them, we do not recommend that you work with the defaults.
Start your production deployment by selecting ports and verifying that they are available at all sites.
Repeat with Cirata MultiSite products:
If you are running with GitMS or SVN MSP you should repeat this step for that application, making sure there are no port reservation conflicts.
Unsafe ports
If you select custom ports for your deployment, make sure that you consider which TCP ports may be blocked by your browser. Most browsers will block the ports that are associated with common or critical non-HTTP-based network protocols to prevent denial of service attacks. If you assigned a blocked port to your ACP jetty.http.port then you may be unable to access the ACP UI due to your browser returning an "ERR_UNSAFE_PORT" or similar error.
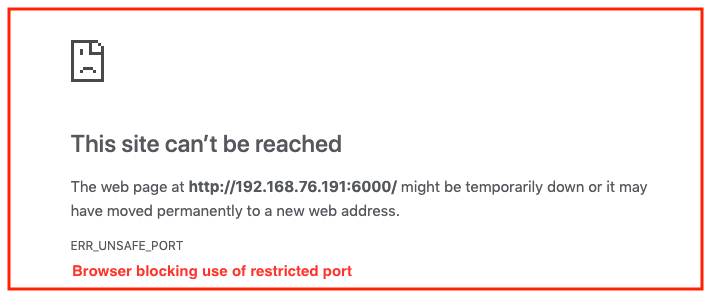
You need to check the list of restricted ports for all browsers that you may use, as each browser maintains its own list. See Example Chrome Restricted ports.
Firewall or AV software
If your network has a firewall, ensure that traffic is not blocked on the reserved ports noted above. Configure any AV software on your system so that it doesn’t block or filter traffic on the reserved ports. All ACP nodes must be able to talk to all other ACP nodes using all the Reserved ports, noted above.
Full connectivity
ACP requires full network connectivity between all nodes. The reserved port on each node must be accessible to all other nodes, so each application instance needs to communicate with every other application instance on each and every listed port above).
VPN persistent connections
If working in SVN MSP, GitMS or combined mode, ACP requires connectivity. If it cannot detect connection loss, then this may cause loss of quorum. ACP uses the MSP/GitMS API to both poll in repos and to push out to the GFR script on each host (using the MSP/GitMS API). However, these are HTTP calls and, as such, are not overly sensitive to loss of a persistent connection.
Bandwidth
Put your WAN through realistic load testing before going into production. You can then identify and fix potential problems before they the impact productivity.
DNS setup
Not using SSL: Use IP addresses instead of DNS hostnames, this ensures that DNS problems won’t hinder performance. If you are required to use hostnames, test your DNS servers performance and availability prior to going into production.
Using SSL You will need to use Fully Qualified Domain Names (FQDNs), since the server certificates are specified to domain names not IPs.
|
Changing a node’s IP address
The UI can only be used to change the IP address of a single node at one time.
If you need to change the address of multiple nodes see the KB article on How to use updateinetaddress.jar to change IP address.
Please contact Support for assistance if you want to carry out this procedure.
|
File descriptor limit
Ensure hard and soft limits are set to 66000 or higher. Check with the ulimit or limit command.
| Maximum processes and open files are low by default on some systems. If you are deploying ACP with other Cirata products then we strongly recommend that process numbers, file sizes, and number of open files are set to unlimited. |
Permanent changes
Make the changes in both /etc/security/limits.conf and /etc/security/limits.d/90-nproc.conf.
For Centos/RHEL 7 the file to edit may be /etc/security/limits.d/99-acpuser-limits.conf.
Add the following lines, changing "acpuser" to the username the software will run as:
acpuser soft nproc 66000
acpuser hard nproc 66000
acpuser soft nofile 66000
acpuser hard nofile 66000|
If you do not see these increased limits, you may need to edit more files.
If you are logging in as the ACP user, add the following to session required pam_limits.so If you session required pam_limits.so If you run commands through |
File systems
Supported file systems include:
-
ext4
-
VXFS from Veritas
-
XFS on RHEL/CentOS 7
-
XFS version 2.8.10 (or newer) combined with Kernel version 2.6.33 (or newer) - this requirement is met by RHEL7.2 and above
-
Write barriers should always be enabled.
Journaling file system
Replicator logs should be on a journaling file system, for example, ext4, or VXFS from Veritas.
Write barriers should be enabled.
Maximum user process limit
At least three times the number of Git or SVN users.
Systemd default limit of concurrent processes
Some distributions of Linux, including RHEL7, Ubuntu 16, etc, now install with tighter defaults concerning the maximum number of concurrent processes handled by systemd.
For up to date information see the GitHub page for systemd news.
In the context of ACP - which can need very high thread counts - the value should be the same as that assigned for the hard and soft limits above. For example the assignments:
-
In
system.conf, set TasksMax=66000 -
In
logind.conf, set UserTasksMax=66000
The above is necessary only if the "pids" cgroup controller is enabled in the kernel.
2.1.2. Applications/Tools
Component compatibility
When upgrading ACP, you must upgrade the Generic File Replication scripts to the version that matches the ACP version. Contact Support for more information.
Java
Install the JRE / JDK version shown in the Release Notes for your ACP version.
|
Standalone mode is available for SVN only
Currently the Standalone mode is not able to support Git.However, a form of "Git Standalone" is supported by using a single-system instance of GitMS (with a non-replicated Replication Group). Please contact Sales (or support). |
Apache server
You will need to configure an Apache server to handle repositories appropriately. See specific Git and SVN details in the corresponding guides:
For more information see the Knowledgebase article Apache configuration for LDAP authentication. Currently this article only applies to SVN users with Apache 2.2.
SSH for Git or SVN
SSH authentication is supported by GitMS and SVN MSP.
ACP accounts can support multiple multiple SSH keys, managed through the Account screen and or through LDAP.
|
To use SSH for both Git and SVN use two accounts
Make sure that you install GitMS using one account and install SVN MSP using a different account.
Do this because the ~account/.ssh/authorized_keys file can only point to either of Git or SVN.
|
It is easy to set up and is attached to a service that is often already enabled. Occasionally, firewall rules may block clients.
-
See how to set up SSH for Git in the Git MS User Guide
-
See how to set up SSH for SVN in the SVN MSP User Guide
2.2. Deployment modes
The deployment mode is completely controlled by the license.key file.
If you need to run in a different deployment mode, or change any other aspect of your license, contact Support.
- Integration with SVN MSP
-
See SVN MSP User Guide.
- Integration with GitMS
-
See GitMS User Guide.
- Integration with both (SVN and GitMS)
-
Running ACP in this mode enables combined management of Git and Subversion teams and resources. See both MultiSite deployment guides.
- Standalone mode
-
In standalone mode only Access Control data is replicated between nodes. Each ACP node only manages access to local repository data. Generated password/AuthZ files are stored directly on the Access Control nodes.
2.2.1. License model
See License Management.
2.2.2. Wildcard support
If you are installing ACP, either for the first time or as an upgrade, you can enable the use of wildcards. See Enable wildcard support.
2.3. Installation Procedure
When you’ve checked through the deployment checklist and you’re confident that your system meets all the requirements, follow the steps in this section to install ACP.
- Release Notes
-
Don’t forget to check the Release Notes for the current version. They may refer to known limitations that affect you. See Release Notes.
|
Help
If you have problems, see the information on our Knowledgebase before contacting Support.
|
-
Download the ACP installation script scm-access-control-plus_XXX_installer.sh from the Cirata File Distribution website, plus the necessary license key. The installer file’s name is now specific to the platform/package type.
-
Create a home directory for the installation, e.g. /opt/wandisco.
-
Ensure that the license.key file is placed on your server. You need to provide a path to it during installation. Before you start, make sure the license matches the version of Access Control that you need.
-
Ensure that the installation script is executable, e.g., enter the command:
chmod a+x ACP-INSTALLER-FILE.EXTENSION
TipYour installer’s file name will vary by platform and package type,
e.g. "ACP-1.7.4.1-0100-suse11-installer.sh"Setting the LOG_FILE environmental variableIf you need to capture a complete record of installer messages, warnings, errors, then you need to set the LOG_FILE environment variable before running the installer. Run:
export LOG_FILE="/tmp/acp_installer_log.txt"
This file’s permissions must allow being appended to by the installer. Ideally, the file should not already exist (or it should exist and be empty) and its directory should enable the account running the installer to create the file. This environment variable must be set in the shell process that will be used to run the installation script.
-
Run the installation script.
Running ApacheRun ACP with the same user and group that is used for Apache. This will help prevent permission problems.Workaround if /tmp directory is "noexec"Running the installer script will write files to the system’s /tmp directory. If the system’s /tmp directory is mounted with the "noexec" option then you will need to use the following argument when running the installer:
--target <someDirectoryWhichCanBeWrittenAndExecuted>
e.g.
scm-access-control-plus_rpm_installer.sh --target /opt/wandisco/installation/Non-interactive installationYou can complete an installation without user interaction. See Non-interactive installation.Verifying archive integrity... All good. Uncompressing WANdisco Access Control Plus.......... :: :: :: # # ## #### ###### # ##### ##### ##### :::: :::: ::: # # # # ## ## # # # # # # # # # ::::::::::: ::: # # # # # # # # # # # # # # ::::::::::::: ::: # # # # # # # # # # # ##### # # # ::::::::::: ::: # # # # # # # # # # # # # # # :::: :::: ::: ## ## # ## # # # # # # # # # # # :: :: :: # # ## # # # ###### # ##### ##### ##### Welcome to the WANdisco Access Control Plus installation You are about to install WANdisco Access Control Plus version 1.9.2 Do you want to continue with the installation? (Y/n) YFrequent changes are made to the installerPlease note that small changed in wording and flow may occur between product versions. These instructions provide an example flow that may vary slightly with your installation. -
Enter Y to continue. The installer checks for prerequisite applications.
-
If there’s a problem with Java, recheck the deployment checklist for information about their requirement. When Java is confirmed as installed, heap settings are applied for running ACP.
Checking prerequisites:

INFO: Using the following Memory settings:

INFO: -Xms128m -Xmx2048m

Do you want to use these settings for the installation? (Y/n) Y
Use the default settings and enter Y. For production, match these settings to your requirements. In this case, enter N and type in the start and maximum heap values.
Changing Java heap after installationThe Java heap settings are stored in the configuration file
/opt/wandisco/scm-access-control-plus/main.config, e.g:# Access Control Plus configuration # DO NOT DELETE ACP_USER=wandisco ACP_GROUP=wandisco ACP_MEM_LOW=128 ACP_MEM_HIGH=2048
After making changes to the JAVA heap, you must restart the server for the changes to take effect.
-
The installer confirms TCP ports that it requires:
Which port should ACP listen on? [8082]:
Which port should DConE listen on? [6444]:
Which port should the Content Delivery service listen on? [6445]:
You can use the default values. However, we strongly recommend that you allocate ports as part of a detailed site survey so that you can be sure that there are no conflicts and that all required ports are available on all sites.
-
Enter the path to your license.key file, then press Enter:
A license file is required to use Access Control Plus
Path to the license file: /opt/wandisco/license.key
-
Enter a name for the ACP Node. This is used to refer to this particular instance of ACP. Choose a unique name consisting of numbers and letters:
Node name: node70
-
Select an IP address for the Node. If you have multiple network interfaces on the machine, the installer will prompt:
There are multiple addresses configured on this host:

[0] 10.9.4.150
[1] 192.168.122.1

Which address should Access Control Plus use? [0]
-
Enter system user and group details for running ACP. Note the warning about not using root user. In this case we’ve created a specific user and group to use with our SCM-related services and applications:
-
Confirm if you are using SSL (from ACP 1.9.2 onwards)
Do you want to enable SSL in ACP (Y/n)? y
-
If you are using SSL then you will need to give the following information. The passwords should be input as clear text, not in the encrypted form.
Which port should ACP SSL listen on? [8084]:
Please enter your SSL key alias: server
Location of keystore: /opt/ssl/wandisco.ks
Key store password:
Location of truststore: /opt/ssl/wandisco.ks
Trust store password:
-
The next option configures the node for operating as part of a replication group. If you are installing a single ACP node, select Y. If you are installing multiple ACP nodes for replication, you need to decide which node will have this option enabled:
One of your Access Control Plus nodes needs to be configured as a state machine creator. This MUST only be configured on ONE node.

Configure this node as the statemachine creator? (y/N) y
Remember, once you have assigned a single node, choosing Y, all other nodes must have N selected.
-
Enter the details for an administrator account. You use these details to access the Access Control admin console:
Access Control Plus needs an admin user to be configured

First Name: Adie
Last Name: Ministrator
Username: admin
Email Address: adie@theorganization.com
Enter a password for admin:
Confirm the password for admin:
-
You are given a summary of your entries. Check them and enter Y if you are happy to continue:
Installing with the following settings:

System user:                 wandisco
System group:                wandisco
Node name:                   node70
Application Port:            8082
DConE Port:                  6444
Content Delivery Port:       6445
Application Hostname:        10.0.5.96
License:                     /opt/wandisco/license.key
Admin user:                  admin
Application Minimum memory:  128
Application Maximum memory:  2048
Statemachine Creator:        true

Do you want to continue with the installation? (Y/n) y
-
The installation completes and confirms a restart:
Restarting scm-access-control-plus services...
Stopping scm-access-control-plus:[  OK  ]
Starting scm-access-control-plus:[  OK  ]
Installation Complete
[root@redhat6 wandisco]#
At this point the ACP is running. Open a browser and point it at http://<serviceIP>:8082/ui.
If you chose a different application port earlier in the process then you need to use it instead of the default "8082".
-
You are presented with the Access Control Plus End-user Agreement. Read through the agreement, then click Accept to continue.
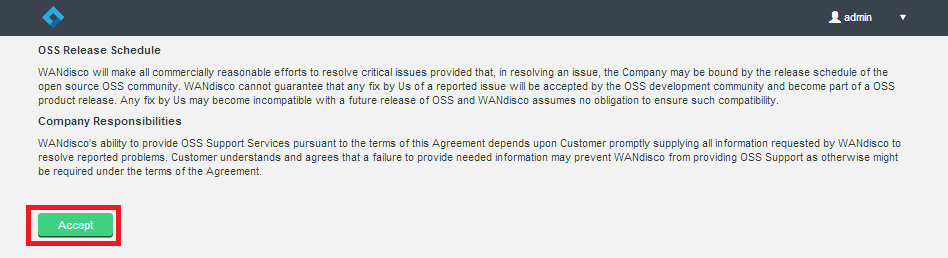 End user agreement
 -
Log in for the first time. Enter the username and password that you provided earlier. Then click Let’s do this
 Login
LoginYou see ACP’s Management Screen. This summarizes the accounts, teams and SCM repositories that ACP manages, and rules that dictate the SCM resources that account holders can access.
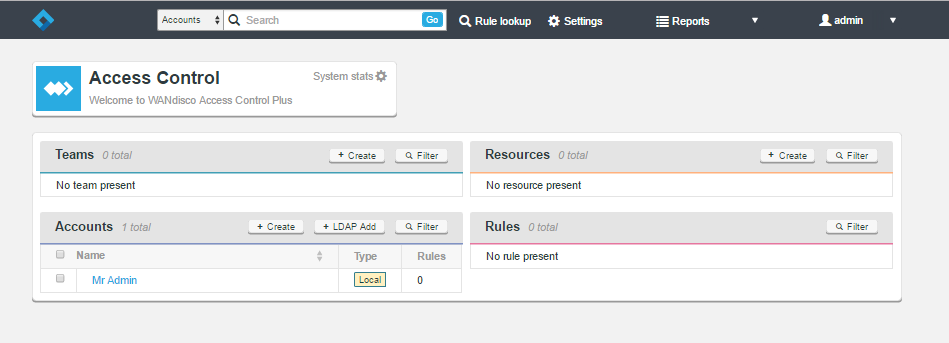 Management screen
2.4. Install auditing function
For more information see the Auditing section.
2.4.1. At first ACP install
If you select to install Auditing you won’t see the login screen until you complete additional Auditing setup questions.
|
Make sure that you are certain that you want to install these components.
For example, currently, when enabling global wildcards you receive no warning that this action cannot be reversed. You receive the message:Enter y. |
-
During the ACP installation you are asked:
Do you wish to install auditing components for use with Access Control Plus? (Y/n)
-
Confirm the details, using defaults as appropriate, to create an Apache log file and use Flume to send/receive the log details.
- Notes
-
-
You only need to install the ACP "flume receiver" auditing component on one node.
-
A logger account is created during install. You need to provide a account name and password for this.
-
By default, the Flume process is run as the WANdisco account. For the sender (installed on GitMS and SVN MSP) to be able to capture the auditable events it needs to have access to the correct log file. If for example the Apache access_log is owned by root, the service user cannot read it!
-
|
Workaround
It’s actually true that the Apache access_log (or ssl_access_log) can be read by the MultiSite Plus account.
The problem is that the normal permissions on the /var/log/httpd directory enable only root.Workaround: Change the group of the /var/log/httpd directory to be the same as the one that the MultiSite Plus account has as its primary group and then chmod 0750 /var/log/httpd . |
You need to set at least one log location per product, otherwise Flume will not monitor any logs at all.
GitMS uses:
-
FLUME_GITMS_LOGis the log location of the GitMS log to monitor
SVN MSP uses:
-
SVN_ACCESS_LOG=<svnServe log location> -
SVN_WEBDAV_LOG=<apache log location - normally /var/log/httpd/access_log>Note: If you configure an "svnserve" log file for auditing, make sure that it exists (else the auditing daemon aborts).
Make sure that, whichever account is running, the flume_sender can actually read the log file permissions (normally wandisco or Apache account).
For both products you will need to set the following environment variables:
-
FLUME_INSTALL_DIR: Flume install location for acp-flume-receiver -
ACP_USER_ID: Logger account ID to connect flume→acp -
ACP_USER_PASSWORD: Logger account password to connect flume→acp -
ACP_USER_EMAIL: Logger account email -
ACP_AVRO_HOST: Flume receiver IP -
ACP_AVRO_PORT: Flume receiver port -
FLUME_ACP_HOST: ACP IP for Flume to connect to -
FLUME_ACP_PORT: ACP rest port for Flume to connect to -
FLUME_AVRO_SSL: true/false to enable/disable SSL
If FLUME_AVRO_SSL=true you also need to set:
-
FLUME_AVRO_KEYSTORE_LOC: Full Path to Flume Keystore -
FLUME_AVRO_KEYSTORE_PASS: FlumeKeyStorePass -
FLUME_AVRO_TRUSTSTORE_LOC: Full Path to TrustStoreFile -
FLUME_AVRO_TRUSTSTORE_PASS: FlumeTrustStorePassMake sure that you are certain that you want to install these components.The query regarding "SVN access log" applies to SVNServe. Unless you have SVNServe set up with logging enabled, then answer "n" to this question.Please enter Flume installation location. We recommend the use of a separate file system with sufficient disk space for several days of auditing events. [/opt/wandisco]: Do you want to monitor an Apache log? (Y/n) y Location of Apache access log. [/var/log/httpd/access_log]: Do you want to monitor an SVN Access log? (Y/n) y Location of SVN access log. [/var/log/httpd/access_log]: Please enter Flume Receiver connection details. Flume Receiver Hostname or IP address: 192.168.58.190 Flume Receiver Port: 8441 Is SSL enabled? (y/n) n ACP Logger User: logger ACP Logger User Password: ACP Logger User Email Address: l@l.com
The monitoring questions above (regarding Apache, SVNServe, etc.) enable auditing for the standalone license of ACP. Instances of ACP talking to either one or both of GitMS and MultiSite Plus should not require ACP’s monitoring because they should be monitored by the Flume installed by those products.
Note: If you set up SVNServe later, you need to modify the sender config file, for example for SVN, /opt/wandisco/flume-svn-flume-sender/conf/acp_sender.conf:
-
Change:
acpSender.sources = svnWebdavSource
to:
acpSender.sources = svnWebdavSource svnServeSource
-
Add the following sections as applicable
acpSender.sources.svnServeSource.type = exec
acpSender.sources.svnServeSource.command = tail -F <svnServe-log-location>
acpSender.sources.svnServeSource.restart = true
acpSender.sources.svnServeSource.channels = memChannel
-
Save the file.
-
Restart the SVN Flume sender
If you want to then disable SVNserve, remove "svnServeSource" from this line:
acpSender.sources = svnWebdavSource svnServeSource
-
2.4.2. Non-interactive "silent" mode
One of the final steps you must implement is to call the following REST API after EULA acceptance, and with all ACP nodes operational:
curl -u admin:pass -X PUT localhost:8082/api/settings/createauditstatemachine
Note: This call outputs a task id, and you need to follow it to make sure that it finishes. To do that, you make the following call, until the status returns isDone=true:
curl -u admin:pass -X GET /api/task/<returnedTaskID>
When the task is complete, after approximately 30 seconds to a minute, you must do the following check at all ACP nodes:
curl -u admin:pass -X GET /api/settings/auditstatemachineid
If the call returns null on all of your nodes then you must:
-
On one of the nodes that returned null, make a REST call to:
curl -u admin:pass -X PUT /api/settings/resetproposedauditdsmid
Make sure that a task id is returned.
-
Then make a REST call to:
curl -u admin:pass -X GET /api/task/<returnedTaskID>
Confirm that the task has completed.
-
At this point you must start the procedure over.
If the call returns a mix of nulls and non-nulls, then call Cirata Support.
2.4.3. With ACP Upgrade to 1.5
During the installation you must set the ENABLE_AUDITING variable. If you set this variable to TRUE then you also need to set the variables listed in Install Auditing Function.
2.4.4. Flume receiver
Flume location can be set on install. It defaults to: /opt/wandisco/flume-<product-name> so is
/opt/wandisco/flume-svn-multisite-plus or
/opt/wandisco/flume-git-multisite or
/opt/wandisco/flume-scm-access-control-plus:
If using Cirata-supplied SystemD unit files, then run:
systemctl start|stop wdacpflumeIf using "init.d" scripting, then run the following command:
service flume-agent start|stop|
Note
You only need to use this if you need to stop the auditing separately from the system. System startup/shutdown automatically starts/stops the Flume components as well as ACP.
|
2.4.5. FLUME_MAX_MEMORY
When upgrading from ACP 1.5.1.1, the environmental variable FLUME_MAX_MEMORY is not currently set correctly. You need to set the value in /opt/wandisco/scm-access-control-plus/config/main.conf.
Default value: 256m, (MiB RAM) Recommended value: 256m
|
Note
You need to set the variable in the main.conf, if you set the variable only through the console, the upgrade will work but afterwards, flume-agent will not start.
|
Memory sizes in the 'main.conf' file are in MiB but must be integers. Do not append the 'm'.
You will need to set a value that is higher than the default if you find that Apache, svnserve, etc. logfile entry rate is high. We recommend that you find what value works for your deployment; If set too low the Flume log file will show an error and the Flume agent will have exited.
2.5. Install Generic File Replication RPMs
On all replicating nodes where you have SVN MSP and/or GitMS installed, you need to install the relevant RPMs for Generic File Replication. The GFR installer follows the same naming convention as your main installer file, except that it will include "GFR" in its name, e.g. ACP-GFR-git-1.7.4.1-0100-installer-rpm. If you do not install the RPMs you will need to review your MultiSite log files for indications what what’s missing.
The RPMs contain the receiver scripts noted in the Generic File Replication for MultiSite section.
2.5.1. SVN MultiSite Plus
On all nodes:
-
Make the RPM executable
chmod 777 <GFR-INSTALLTER-FILE>
-
Install the RPM:
rpm -ivh <GFR-INSTALLER-FILE>
You see the following output:
Preparing...                ########################################### [100%]
   1:acp-gfr-scripts-svn    ########################################### [100%]
-
To verify the RPM executed successfully, navigate to the directory where SVN MSP is installed and check that the ACP GFR scripts are present. For example:
[root@node1 bin]# cd /opt/wandisco/svn-multisite-plus/replicator/gfr/bin
[root@node1 bin]# ls
acp  acp_gfr_main.sh  acpLockAndRun  postDeliveryAZPW
NoteThe postDeliveryAZPW file listed above is not part of the GFR scripts. -
Login to ACP and generate a set of AuthZ and password files.
-
Check that the ACP AuthZ and password files are replicated across all Git nodes correctly.
2.5.2. Git MultiSite
On all nodes:
-
Make the RPM executable:
chmod 777 <GFR-INSTALLER-FILE>
-
Install the RPM:
rpm -ivh <GFR-INSTALLER-FILE>
You see the following output:
Preparing...                ########################################### [100%]
   1:acp-gfr-scripts-git    ########################################### [100%]
-
To verify the RPM executed successfully, navigate to the directory where GitMS is installed and check that the ACP GFR scripts are present. For example:
[root@node2 bin]# cd /opt/wandisco/git-multisite/replicator/gfr/bin
[root@node2 bin]# ls
acp  acp_gfr_main.sh  acpLockAndRun  postDeliveryAZPW
-
Check that the ACP AuthZ and password files are replicated across all Git nodes correctly.
2.6. Non-interactive GFR Installation
It’s possible to install the GFR scripts using the Non-interactive installation method. This is done by setting a specific GFR installation variable, using the following steps:
-
Open a terminal session on the installation server.
# export NON_INTERACTIVE=true # ./ACP-GFR-svn-1.9.x.y-z-installer.sh Verifying archive integrity... All good. Uncompressing WANdisco Scripts for Generic File Replication............. Welcome to the WANdisco Scripts for Generic File Replication installer The scripts will be installed to /opt/wandisco/svn-multisite-plus/replicator/gfr/bin Scripts installed to /opt/wandisco/svn-multisite-plus/replicator/gfr/bin -
Check that the scripts have been installed correctly. As indicated, the default location is /opt/wandisco/svn-multisite-plus/replicator/gfr/bin.
2.7. Uninstall Procedure
If there’s ever a need to remove ACP from a system, use the following steps:
Stop and shutdown ACP
-
If using Cirata-supplied SystemD unit files, then run:
systemctl stop wdacp wdacpflume -
If using "init.d" scripting, then run the following command:
service scm-access-control-plus stop
Uninstall ACP
-
If ACP was installed using a ".sh" installer, then use your operating system package manager, for example:
RHEL
yum erase scm-access-control-plus
Remove any remaining file system directories for ACP
-
If ACP was installed using a ".sh" installer, then run the following command:
rm -rf /opt/wandisco/scm-access-control-plus" -
If ACP was installed using a "tar-ball" installer, then run:
rm -rf /path/to/ACP/install/directory
If using Cirata-supplied SystemD unit files:
-
Run the following command:
systemctl disable wdacp wdacpflume -
Remove the two unit "service" files from the SystemD unit file directory. The default path to the directory is normally "/usr/lib/systemd/system" (on some Linux distros it is in "/lib/systemd/system").
3. Setting Up
After installing you need to set up ACP to work to your deployment requirements. Different deployments require different steps. Below are checklists for some example deployments.
3.1. Standalone mode
In Standalone mode there’s no integration with an SCM replication product (e.g. GitMS).
In this example you run with multiple ACP nodes, using LDAP authentication and SSL end-to-end encryption of traffic. Click each step to be taken to the relevant sections. Ignore or replace steps that aren’t required. For example, if you are not running with LDAP, you might replace that step with Adding Accounts.
Follow the links in these steps if you are deploying in Standalone mode:
-
Induction: Connecting your nodes
-
LDAP: admin: Enable LDAP Auth
-
Email notifications: Set up email notification
-
Repositories templates: Create repositories templates
-
Resources: Add resources
-
Teams: Create a team
-
Rules: Create a rule
If you are running with only one Access Control node, you can drop the Induction step.
3.2. Access Control Plus with MultiSite
Follow the links in these steps if your are deploying with a MultiSite product:
-
Induction: Connecting your nodes
-
Git/SVN MSP: Connect to MultiSite
-
LDAP: admin: Enable LDAP Auth
-
Email notifications: Set up email notification
-
Repositories templates: Create repositories templates
-
Resources: Add resources
-
Teams: Create a team
-
Rules: Create a rule
ACP is now installed. Before you start setting up accounts, teams, etc. you should run through the Settings screen. First, check off what other elements on your platform need to be integrated into ACP.
3.3. Setting up LDAP
It is common practice to use one or more LDAP authorities for managing which employees need accounts created in ACP. You connect any number of LDAP authorities, adding them through the Settings screen.
Local users are exempt from updates and removal for synchronization of team admins and team members. This means that a local account which appears in an authority won’t suddenly be added to a team or be made into a sys admin. Instead a message is logged to indicate that this account has been skipped. The sys admin must then ensure that the local account is removed.
3.4. Access Control Settings
-
From the admin console, click the Settings link on the menu bar.
 Settings
 -
The settings are displayed in an accordion-style menu. Click either the links on the side menu or the title bars in the right-hand panel.
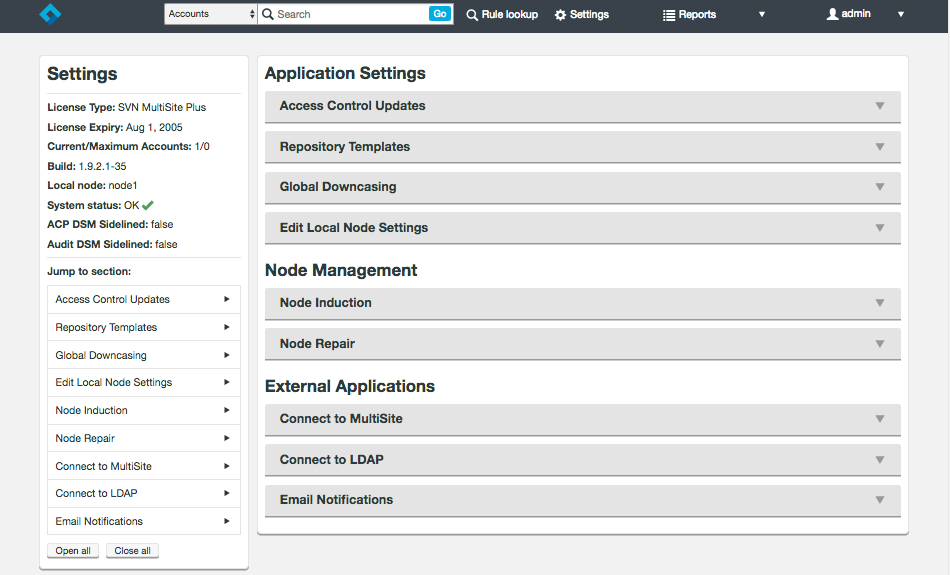 Setting Menu
Full details on setting up each section are provided in the Settings reference guide. Apply settings suitable for your deployment of ACP. The product’s appearance and functionality differs depending on whether you are running it in a standalone mode or in conjunction with Cirata GitMS or SVN MSP products.
3.5. Application Settings
These settings extend ACP’s functionality:
- Access Control Updates
-
This option contains settings for running ACP in Batch updates mode. For more information see the reference section on Batch updates.
- Repository Templates
-
This option defines Git or SVN repositories. For ACP to manage access to a repository, you must add a template that corresponds with an existing repository, along with appropriate references to an authentication or authorization files. See Adding repository templates, Managing Repository Templates.
- Global Downcasing
-
If the LDAP Authority that ACP will be talking to is Active Directory then the Global Downcasing setting should be turned on. Otherwise you should leave it off. Once turned on it should not be turned off without consulting Support.
3.6. Node Management
These settings control how ACP communicates with other ACP nodes on the replication network, specifically when ACP is used with the Cirata DConE replication protocol.
- Node Induction
-
The Node Induction option describes how to connect this particular instance of ACP to a replication network. Again, this applies to deployments where multiple instances of ACP are running, which would allow redundancy. This is also used to remove ACP nodes that have experienced an unrecoverable failure. See Inducting a node.
| Known Issue: Induction details should never be changed once induction has been started. In order to make a change, first, stop the ongoing induction. You can then restart the induction with any necessary changes. [ACP-2882] |
- Node Repairs
-
Node Repairs enables the correction of ACP nodes in the rare case where some divergence in the account or auditing information has occurred. The "repair" operation essentially copies the most up-to-date ACP account, team, rules, etc. data from a "known good node" to a "known bad node". Support should be contacted before running a repair. See Running a node repair.
3.7. External Applications
These connect ACP to supporting systems for additional functionality.
- Connect to MultiSite
-
If you are running ACP with Cirata GitMS or SVN MSP products then you need to enter the necessary details for ACP to talk to MultiSite via its REST API interface. See Connect to MultiSite.
- Connect to LDAP
-
Most deployments use an existing LDAP authority to manage their employee system accounts. This option lets you connect to multiple LDAP authorities and set up queries to filter for accounts that need access to SCM resources. See Adding an LDAP Authority, Manage LDAP Authorities.
- Email Notifications
-
Set the Email Notifications to connect to an available relay server so that ACP can send notification emails to administration staff. See Enable email notifications.
|
Don’t ignore email notification
Important product alerts and logging depend on the email notification system.
Please make sure that you complete its configuration.
|
4. Non-interactive Installation
You can start installing a node without terminal access to the server, known as a silent or scripted installation.
When the installation has finished you can complete the configuration of the node through a browser (interactive-style) or script the configuration using REST API calls.
Note, however, that induction of the nodes still requires interaction with the admin UI.
|
List environment variables
From ACP 1.9.2 onwards you can print a list of your environment variables using:./scm-access-control-plus_rpm_installer.sh - --printvars
|
For a scripted installation the following script must be run with the environmental variables set:
export ACP_USER=(user_to_Run_ACP)
export ACP_GROUP=(Group_to_Run_ACP)
export ACP_PORT=(Port to host UI/API): default is 8082
export ACP_DCONE_PORT=(DConE Port): default is 6444
export ACP_CONTENT_PORT=(Content delivery port): default is 6445
export ACP_NODE_NAME=(Name for current ACP node): Each install needs to be unique
If creating the initial Admin account (user) you also need to set:
export ACP_ADMIN_USER=(Username for new admin user)
export ACP_ADMIN_FIRST_NAME=(Real name for new admin user)
export ACP_ADMIN_LAST_NAME=(Real name for new admin user)
export ACP_ADMIN_EMAIL=(Email for new Admin user)
export ACP_ADMIN_PASSWORD=(Password for new Admin user)
export ACP_MEM_LOW=(Min Memory for ACP Process): default is 128
export ACP_MEM_HIGH=(Max Memory for ACP Process): default is 2048
export ACP_LICENSE_FILE=(Full path to ACP License file)
export ACP_HOSTNAME=(Address to host ACP on)
export GITMS_UMASK=(Umask to apply): default is 022
export ACP_STATEMACHINE_CREATOR=(true/false): If this machine is the state machine creator, should only be true on first node.
export ENABLE_AUDITING=(true/false): true if Flume auditing should be installed
If using SSL you also need to set:
export ACP_SSL_ENABLED=true
export ACP_SSL_PORT=(port ACP SSL listens on): default is 8084
export ACP_KEYSTORE_LOC=(Path to your keystore)
export ACP_KEYSTORE_PASS=(Keystore password)
export ACP_TRUSTSTORE_LOC=(Path to your truststore)
export ACP_TRUSTSTORE_PASS=(Truststore password)
export ACP_SSL_KEYSTORE_ALIAS=(Keystore alias)
If ENABLE_AUDITING=true you also need to set:
export FLUME_INSTALL_DIR=/opt/wandisco/flume-scm-access-control-plus: Full Path to where Flume should be installed, default is shown
export FLUME_MAX_MEMORY=(Max memory for flume process): Default is 256
To create a new Logger user in ACP you also need to set:
export ACP_USER_ID=(Logger user ID for the new logger user to connect flume->acp )
export ACP_USER_PASSWORD=(password for new logger user)
export ACP_USER_EMAIL=(Email for new logger lser)

export ACP_AVRO_HOST=(Flume receiver IP. Address to host Flume on should match ACP Host)
export ACP_AVRO_PORT=(Port to host Flume on default is 8441, this is port provided to GitMS and ACP)
export FLUME_ACP_HOST=(Address for flume to connect to acp, default is the same as ACP host)
export FLUME_ACP_PORT=(Port for flume to connect to ACP should match ACP Port)
export FLUME_AVRO_SSL=(True/false if flume is to have ssl enabled)
If FLUME_AVRO_SSL=true you also need to set the following:
export FLUME_AVRO_KEYSTORE_LOC=(Full Path to Flume Keystore)
export FLUME_AVRO_KEYSTORE_PASS=(FlumeKeyStorePass)
export FLUME_AVRO_TRUSTSTORE_LOC=(Full Path to TrustStoreFile)
export FLUME_AVRO_TRUSTSTORE_PASS=(FlumeTrustStorePass)
The installation then runs without user interaction. When completed, the browser-based admin console starts. You then need to complete the node setup from the restart stage.
|
Note
The silent install is halted by the request to set the ENABLE_AUDITING variable to true or false.
|
5. Upgrades
This section describes what you need to consider to upgrade an existing copy of Cirata Access Control / ACP. We cannot address every set of conditions so take care to consider all possible problems. If you have any questions or concerns, contact Support team.
You should check that the different application components are compatible with each other.
| When upgrading ACP, GitMS or SVN MSP, you must upgrade the Generic File Replication script to match your version of these products. |
We recommend that you contact Cirata to discuss supported configurations.
|
Specify node.name
When upgrading from ACP 1.9.0 or 1.9.1 to ACP 1.9.2 (or above) you must verify that the 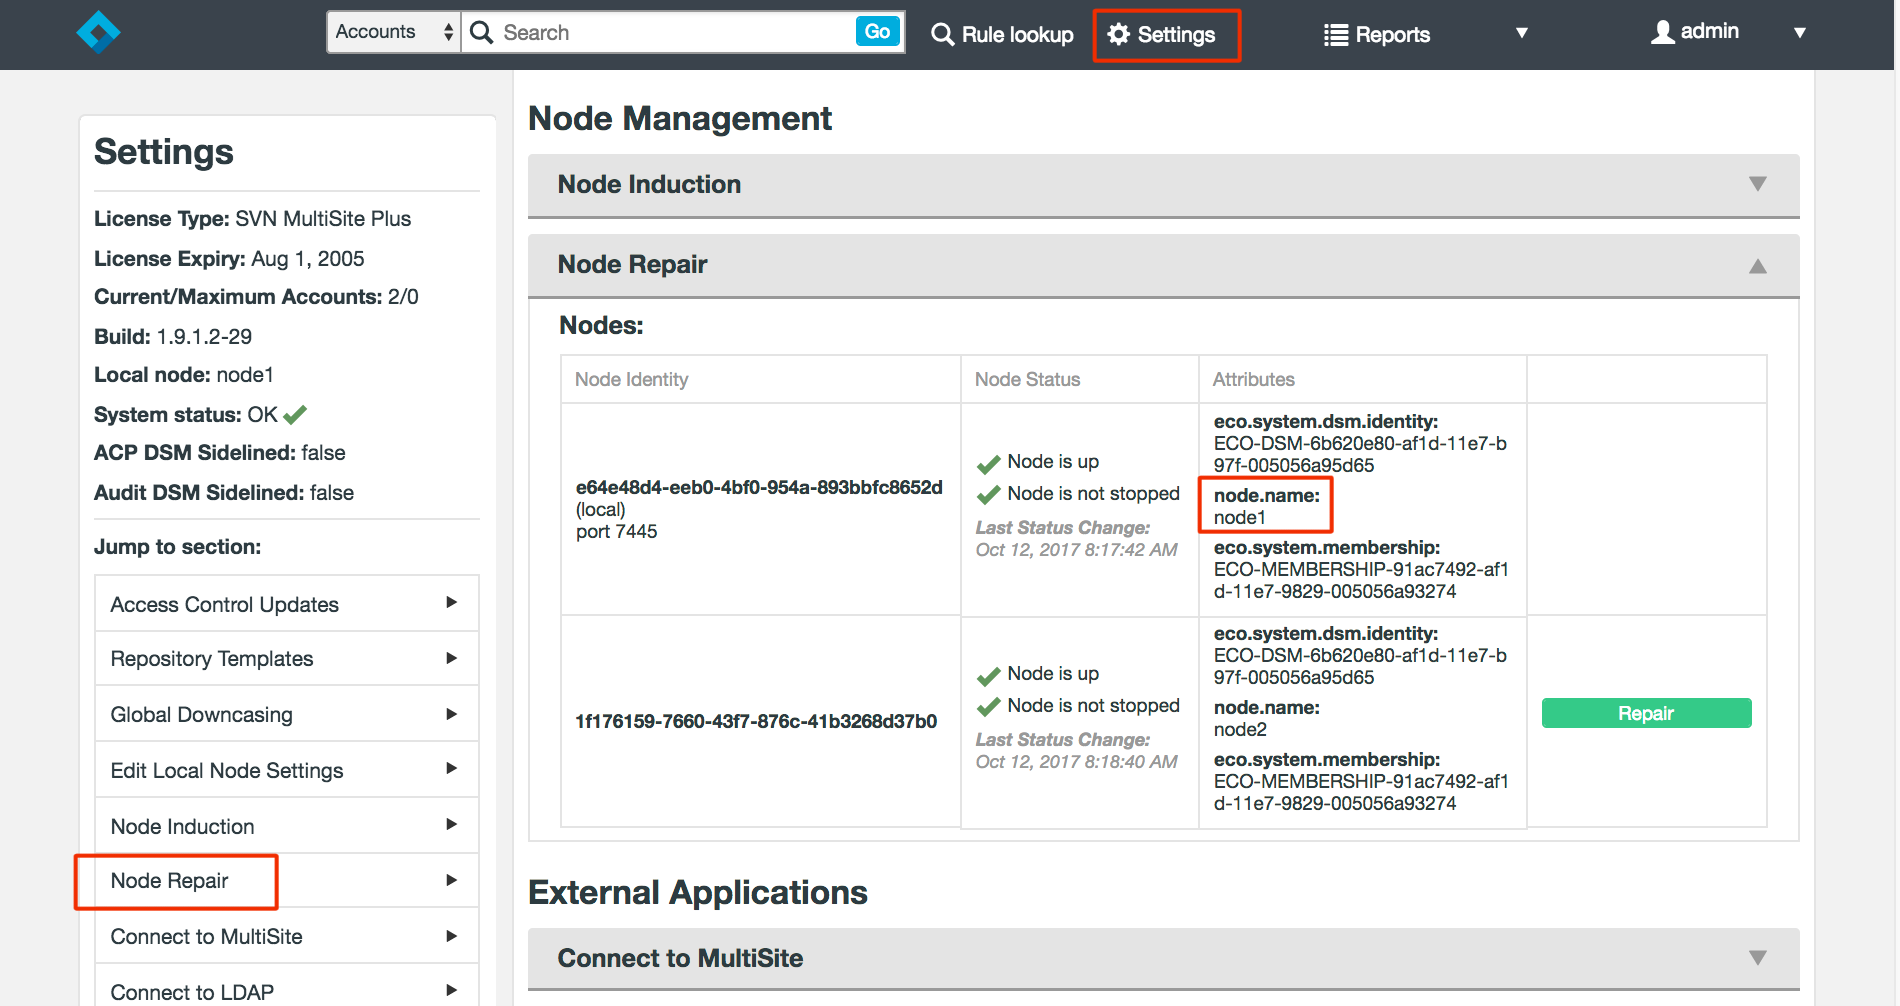
Local node.name
|
5.1. Upgrade paths
You will need to set several environment variables when you upgrade to ACP 1.5 and enable the auditing functions. See Install auditing function.
To upgrade from Access Control 4.2 to ACP you must contact Support team. This is necessary to complete the validation using new scripts.
5.2. Upgrade Overview
This section gives an overview of the upgrade procedure. The procedure starts with creating a import file by invoking the export script in the current installation. This stores system and user settings in an external XML file for later re-importation. Next, the upgrade script is run. This takes the latest JAR files and places them into the current install. The final post-install portion performs any necessary changes to database structure and restores the previous installation’s settings.
The Pre-installation step invokes the backup script which stores the system and user settings that are imported into the latest version.
|
Upgrading deployments that were installed via tar-ball rather than package manager.
If you originally installed ACP using a tar-ball and now plan to are install to ACP 1.9.2 and the installation was not done to the default '/opt/wandisco/scm-access-control-plus'
location, then you must identify the location by setting it as the enviromental variable, "MSP_PREFIX".
|
5.2.1. Installing Flume while upgrading
If you are running a version of ACP that didn’t include Flume, it’s possible to install Flume during an upgrade of ACP. The procedure differs a little from that used when installing both ACP and Flume from scratch. For that, see Install Auditing Function.
5.3. Pre-upgrade: turn off batch updates
Perform the upgrade during a time when you can halt changes to ACP configurations (e.g. stop changing teams, rules, accounts, etc.). If you are running with Batch Mode on, this needs to be disabled and ACP will need enough time to catch up with all batched operations. Because Batch Mode is being turned off, all automation scripting should be turned off as well (halt any scripting that talks to ACP via the REST API) prior to turning off Batch Mode.
|
Disable batch updates before shutting down for upgrade
You must complete these steps before shutting down. We recommend that you disable batch updates at least 1 hour before you shut down the application.
|
-
Login to ACP.
-
Click Settings.
-
Click Access Control Updates.
-
Click the Disable Batch Updates button.
| After an upgrade you must re-enable batch mode (an upgrade installation disables batch mode so that the upgrade progresses). |
| If you perform an import from an earlier version of Access Control you must ensure that ACP does not poll the LDAP authorities during the process. You can do this by setting the Synchronization Period to 999 (minutes) Just for the duration of the import. |
|
Changing a node’s IP address
The UI can only be used to change the IP address of a single node at one time.
If you need to change the address of multiple nodes see the KB article on How to use updateinetaddress.jar to change IP address.
Please contact Support for assistance if you want to carry out this procedure.
|
5.4. Upgrade procedure
Having completed the necessary pre-upgrade steps, it’s now time to complete the upgrade. You’ll need to have downloaded the installer for the latest version of ACP. Place the script on your server and run through the following steps:
-
Open a terminal window and log in to the server.
-
Get the latest installer file and make sure it is executable:
chmod a+x ACP-INSTALLER-FILE.EXTENSION
-
Run the installer: After providing ACP admin credentials, the installer script verifies that there’s an existing installation and completes the necessary back up of settings:
[root@redhat6 wandisco]# ./ACP-INSTALLER-FILE.EXTENSION
Verifying archive integrity... All good.
Uncompressing WANdisco Access Control Plus..........
Running in non-interactive mode, installing with user 'wandisco' and group 'wandisco'. Output will be logged to the daemon.info syslog facility
Please enter the username of an administrative user: admin
Please enter the password for 'admin':
Checking credentials: OK
State machines are stopped
Backing up platform: OK
Backing up ACP: OK
Backup complete
-
The installer performs the upgrade. In most cases the installer handles everything:
Stopping scm-access-control-plus:.[  OK  ]
Upgrading from version 1.0.1
Starting upgrade of backup found in /opt/wandisco/scm-access-control-plus/database/backup/2014-07-28T13:30:19Z_DConE_Backup

Transformation complete
Jun 27, 2014 4:26:43 PM com.wandisco.acp.backup.Restore main
. . . . . . . .
Please run '/opt/wandisco/scm-access-control-plus/bin/replace-link' once all nodes have been upgraded. This will automatically start the replicator.
Stopping scm-access-control-plus services...
Stopping scm-access-control-plus:[  OK  ]
|
Do not run replace-link yet - repeat the upgrade on all nodes
At the end of the upgrade you see a message about running replace-link. Do not run this yet. First you need to repeat the upgrade on all your nodes.
|
5.5. Post upgrade: bring nodes back up
When all nodes have been upgraded, bringing them back up by running:
service scm-access-control-plus start
5.6. Enable Wildcard support
With ACP, along with MSP or GitMS installed:
| Wildcard support is only available from ACP 1.9.2 onwards if using Git, all ACP 1.9.x versions support SVN wildcards. |
-
Click Settings then Connect to MultiSite.
-
Click the check box Enable Wildcards.
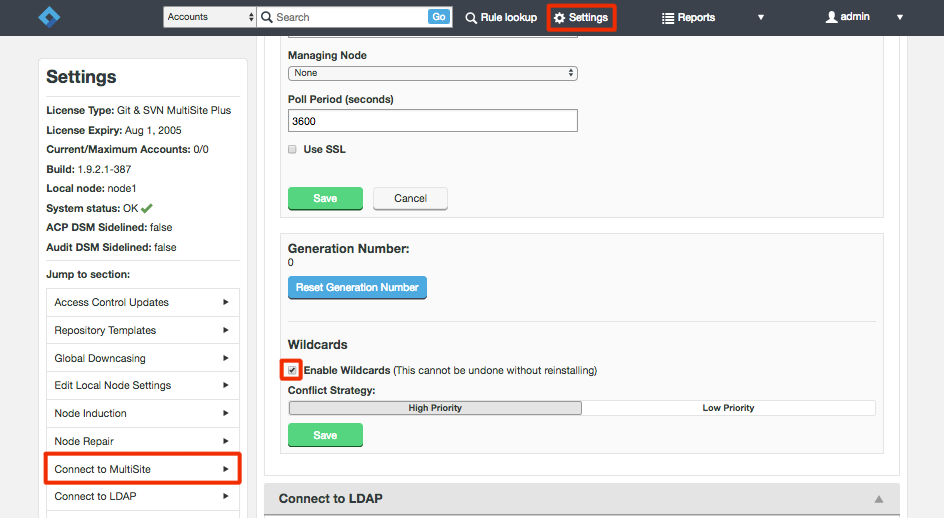 Enable Wildcards
Note:
This cannot be undone without reinstalling
-
Select either:
-
Low Priority
-
High Priority
Default is High Priority. See Setting priorities
-
-
Click Save.
The wildcards option is now enabled for rules applying to MSP or GitMS repositories. Note that you can change the priority setting at any time.
| Remember: You cannot disable wildcard support when wildcard rules have been set. |
5.7. Rollback Procedure
If you need to roll back from an attempted upgrade and return to your current installation, for example going back from 1.5 to 1.1.1:
-
From the /opt/wandisco/scm-access-control-plus/backups directory, copy the file similar to scm-access-control-plus-backup_20141217154840.tar.gz to somewhere safe.
-
Uninstall the current version of ACP.
[root@redhat6 init.d]# yum remove scm-access-control-plus
Loaded plugins: product-id, rhnplugin, security, subscription-manager
Updating certificate-based repositories.
Setting up Remove Process
Resolving Dependencies
--> Running transaction check
---> Package scm-access-control-plus.noarch 0:1.0.1-1711 will be erased
--> Finished Dependency Resolution
epel/metalink                                            |  27 kB     00:00
epel                                                     | 4.4 kB     00:00
epel/primary_db                                          | 6.3 MB     00:00

Dependencies Resolved

=============================================================================
Package    Arch   Version    Repository                                  Size
=============================================================================
Removing:
scm-access-control-plus
noarch 1.0.1-1711 @/scm-access-control-plus-1.0.1-1711.noarch  55 M
=============================================================================
Transaction Summary
=============================================================================
Remove        1 Package(s)

Installed size: 55 M
Is this ok [y/N]: y
Downloading Packages:
Running rpm_check_debug
Running Transaction Test
Transaction Test Succeeded
Running Transaction
Erasing    : scm-access-control-plus-1.0.1-1711.noarch                    1/1
Stopping scm-access-control-plus services...
Stopping scm-access-control-plus:[  OK  ]
Installed products updated.
Verifying  : scm-access-control-plus-1.0.1-1711.noarch                    1/1

Removed: scm-access-control-plus.noarch 0:1.0.1-1711

Complete!
-
Re-install the previous version of ACP.
-
Stop the replicator.
-
Ensure that the permissions are correct.
-
Run the rollback script.
cd /opt/wandisco/scm-access-control-plus/bin
./rollback
-
Repeat the rollback procedure on each node.
-
When all nodes have been rolled back, start ACP via the scm-access-control-plus service start as usual.
Your nodes will start up, returning production to the earlier version of ACP.
5.8. Import Access Control 4.2 backup data
A deployment from Access Control/Subversion MultiSite 4.2 assumes that you are running with the latest 4.2 versions.
|
IMPORTANT
This section provides an overview of the procedure. However, you should contact Support before attempting to follow it.
|
5.8.1. Pre-install
-
On your Access Control/SVN MSP 4.2 deployment, perform a sync stop.
-
Run the Export tool, creating a backup directory.
WARNINGWhen you import this exported 4.2 data, the existing ACP data will be removed, including the local admin account. You should ensure that there is a local admin account present on your 4.2 deployment prior to completing this export. Furthermore, ensure that you don’t disable local accounts on ACP prior to re-importing the data.
Should you get locked out of an admin account for ACP you can run the protocol here. This will enable you to create a new admin account.
-
You may need to perform a cleanup of the export. Contact Support to confirm if this will be necessary.
-
Shutdown Access Control/SVN MultiSite 4.2. You may wish to save the installation to an archive so that it’s no longer present on the server.
-
If you’re installing SVN MSP then delete your current installation of Subversion. The latest version of MultiSite requires that you install a modified version of SVN.
5.8.2. Install Access Control Plus
-
Run through the instructions provided in the Deployment Guide.
-
When the installation and node induction is complete you can run the special import script that is available in the ACP installation which handles 4.2 backup files. Login to the server via a terminal and navigate to the bin directory, by default this is /opt/wandisco/scm-access-control-plus/bin/.
-
Providing that you have logged on with appropriate permissions, you can run the script as follows:
-
You will need to provide ACP admin login credentials. You’ll then be asked for a the absolute path to the 4.2 backup. e.g.:
-
You can confirm the import was successful by viewing the available accounts in ACP.
5.9. Install Auditing (through Apache Flume)
| These steps are only for a first-time installation of Flume or during an upgrade of ACP. |
5.9.1. Installation overview
There are two ways to install flume:
-
Interactive (manual)
-
Non-interactive (silent)
5.9.2. Interactive
Use ACP’s installer to handle the upgrade, the installer will detect that you are performing an upgrade and that Flume is not yet installed. The installer will ask:
Do you wish to install auditing components for use with Access Control Plus? (Y/n)
Just answer the brief series of question to install Flume.
5.9.3. Non-interactive
For the non-interactive upgrade, to install Flume for a first time for ACP you will need to set the following variables:
|
variables
ENABLE_AUDITING=trueFLUME_INSTALL_DIR # Flume install location for acp-flume-receiver ACP_USER_ID # Logger user ID to connect flume→acp ACP_USER_PASSWORD # Logger user password to connect flume→acp ACP_USER_EMAIL # Logger user email ACP_AVRO_HOST # Flume receiver IP ACP_AVRO_PORT # Flume receiver port FLUME_ACP_HOST # ACP IP for Flume to connect to FLUME_ACP_PORT # ACP rest port for Flume to connect to FLUME_AVRO_SSL # true/false to enable/disable SSL FLUME_AVRO_KEYSTORE_LOC # Only required if FLUME_AVRO_SSL=true, keystone location FLUME_AVRO_KEYSTORE_PASS # Only required if FLUME_AVRO_SSL=true, keystone password FLUME_AVRO_TRUSTSTORE_LOC # Only required if FLUME_AVRO_SSL=true, truststore location FLUME_AVRO_TRUSTSTORE_PASS # Only required if FLUME_AVRO_SSL=true , truststore password INSTALL_FLUME_ON_UPGRADE=set # to true if first install of flume on an upgrade |
Example
An example of these exports would be like the following (excluding the use of SSL)
export ENABLE_AUDITING=true
export FLUME_INSTALL_DIR=/opt/wandisco/flume-scm-access-control-plus
export ACP_USER_ID=logger
export ACP_USER_PASSWORD=logger
export ACP_USER_EMAIL=logger@logger.com
export ACP_AVRO_HOST=localhost
export ACP_AVRO_PORT=8441
export FLUME_ACP_HOST=localhost
export FLUME_ACP_PORT=8441
export FLUME_AVRO_SSL=false
export INSTALL_FLUME_ON_UPGRADE=true
Once you have exported these variables, run the upgrade.
6. Administration
6.1. Housekeeping
The following section details basic day-to-day tasks that may be required when running ACP.
6.1.1. Starting up
To start ACP:
-
Open a terminal window on the server and log in with suitable file permissions.
-
Run the scm-access-control-plus service from the /opt/wandisco:
lrwxrwxrwx 1 root root 65 Apr 24 11:43 scm-access-control-plus -> /opt/wandisco/scm-access-control-plus/bin/scm-access-control-plus
-
Run the service using the following command
[root@localhost /opt/wandisco]#  service scm-access-control-plus start


Starting scm-access-control-plus:.                         [  OK  ]
ACP starts. Read more about the svn-multisite init.d script.
6.1.2. Shutting down
To shut down:
-
Open a terminal window on the server and log in with suitable file permissions.
-
Run the svn-multisite service:
lrwxrwxrwx 1 root root 65 Apr 24 11:43 scm-access-control-plus -> /opt/wandisco/scm-access-control-plus/bin/scm-access-control-plus
-
Run the stop script:
[root@redhat6 /opt/wandisco]#   service scm-access-control-plus stop

Stopping scm-access-control-plus:.                         [  OK  ]
The process shuts down.
6.1.3. Reporting problems: talkback
Cirata uses a talkback agent to capture log information to help investigate problems. When you report a problem to Support, run talkback and attach the output file.
-
Run talkback from
/opt/wandisco/scm-access-control-plus/bin. Talkback retrieves node details and gathers information. You see a message like:THE FILE sysInfo/sysInfo_10.2.5.52-20150122-173254.tar.gz HAS BEEN CREATED BY sysInfo Please enter your WANdisco(Cirata) support FTP username (leave empty to skip auto-upload process):
-
Share your files with support. The best way to share your talkback files is via SFTP, but small files (<50MB) can also be uploaded directly at customer.cirata.com. DO NOT send these files by email.
For information on how to upload talkback files, see the Knowledgebase article How to upload talkback files for support.
Information can also be found at customer.cirata.com but you will need a valid Cirata License Key to access this information.
6.1.4. init.d management script
The start-up script for persistent running of ACP is in the /etc/init.d folder. Run the script with the help command to list the available commands:
[root@redhat6 /opt/wandisco/]# service scm-access-control-plus help
usage: /etc/init.d/scm-access-control-plus (start|stop|restart|force-reload|status|version)

start         Start Access Control Plus services
stop          Stop Access Control Plus services
restart       Restart Access Control Plus services
force-reload  Restart Access Control Plus services
status        Show the status of Access Control Plus services
version       Show the version of Access Control Plus
Check the running status (with current process ID):
[root@redhat6 /opt/wandisco/]# service scm-access-control-plus status
Checking scm-access-control-plus:running with PID 29516    [  OK  ]
Check the version
[root@redhat6 /opt/wandisco/]# service scm-access-control-plus version
6.1.5. Forgotten Password
If an administrator loses their password and no other administrative account is available to reset it, then you can recover access to ACP by running the "reset security" process below. The result of this process will be a new local administrative account with a known password.
| If you had setup ACP to only allow LDAP accounts (no local accounts) then at the end of this procedure both LDAP and local accounts will be allowed. Once you enable proper LDAP administrative access you can once again disable local accounts. |
-
Open a terminal on your node and navigate to the replicator directory:
$ cd /opt/wandisco/scm-access-control-plus
-
Run the following command-line utility:
[root@redhat6 scm-access-control-plus]# java -jar scm-access-control-plus-resetSecurity.jar
-
Respond to each prompt. It is important to note that the account name specified to the "username" prompt cannot already exist, it needs to be a new account name.
Enter full path to the replicator properties folder: /opt/wandisco/scm-access-control-plus/properties
Enter your username: newaccount
Enter your new password:************
Confirm your new password:************
Enter your first name: New
Enter your last name: Account
Enter your email address: admin@theadmin.com
A new user has been created, in order for this to take effect you will need to restart this node.
[root@redhat6 scm-access-control-plus]#
-
When you’ve entered everything, restart ACP to create the new account.
Note - if there are any errors, for example the username has been used before, then the account will not be created and an error will be logged. -
Log in using your new details.
 Log in
6.1.6. Searching Access Control Plus
Use the ACP Search tool to find Accounts, Teams, Rules and Resource permissions.
-
Enter a search term into the entry field and select from the available categories. The search domain is within the ACP domain and not within the repositories themselves. That means, for example, that when you search for Resource Permissions, the search will be limited to the Resources and Resource refinements found within ACP.
 Search
Search by:
-
Accounts
-
Teams
-
Rules
-
Resources
-
-
The tool provides the following capabilities:
-
A filter panel will open with the results of your search. Initial results of your search will include up to 10 items for each category (i.e. Accounts, Teams, Rules and Resource Permissions).
-
You can refine your search by adding additional search criteria. You can eliminate entire categories by unticking the corresponding checkbox.
-
The '%' (percentage sign) can be used as a wildcard that means "match everything" For more about this, see wildcards.
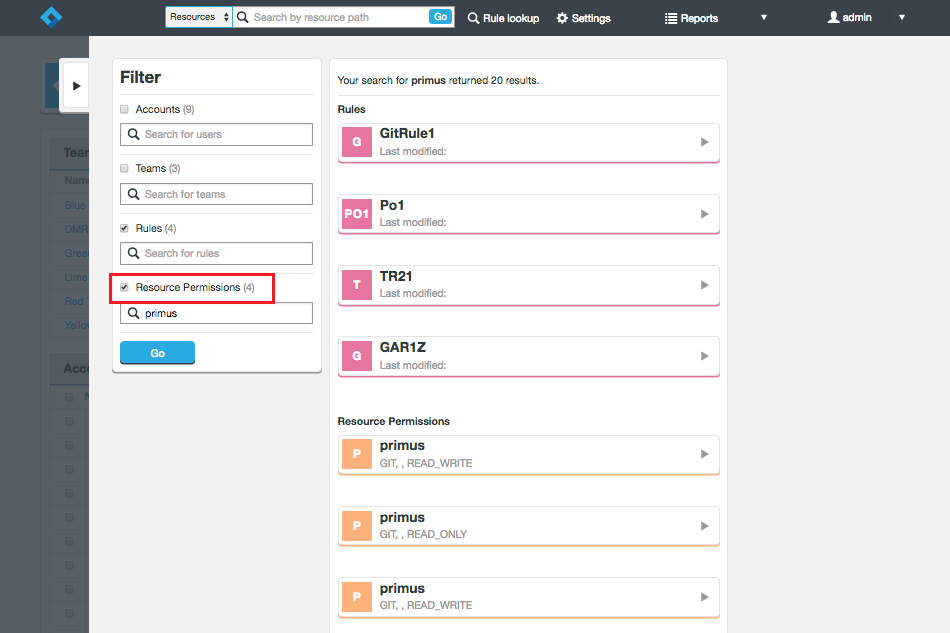 Search results
-
6.1.7. Searching tips
-
Currently search results will only display the first 10 of however many "Accounts", "Teams", "Rules" or "Resource Permissions" are returned (for each category).
-
Search by repository name, without using refinements for high-level searches that don’t require sub-repository paths. e.g., Search svn-repo1 for everything
Resources: svn-repo1
-
Search by refinements (or portions thereof by using the '%' wildcard).
Search for refinements where the repository is svn-repo and the refinements contain "/source" somewhere within them.
Resources: svn-repo1:%/source
-
Use wildcards to created advanced filters when searching.
|
Asterix is not a search wildcard
Take note that the asterisk (*) used in wildcard rules are not used as wildcards in the search (when input into the "Resources" field) - they are treated as literal characters and will match rules that have an asterisk in that position.
So if there is a rule that has a wildcard refinement or a rule where the asterisk character is explicitly marked as not a wildcard, then you might search for such a rule by putting '%:/branches/*' into the Resources field.
In this case the percent sign (%) is a wildcard in the search (matching everything) and the asterisk is a literal (only matching an asterisk).
|
Search for refinements where the repository is git-repo1 and the refinements are the type "TAG".
Resources: git-repo1:/TAG/
|
Searching on Git deployments
When performing searches on Git deployments, if you need to search for references to Branches or Tags, you must add the following to your search patterns:
/BRANCH/mybranch
/TAG/mytag |
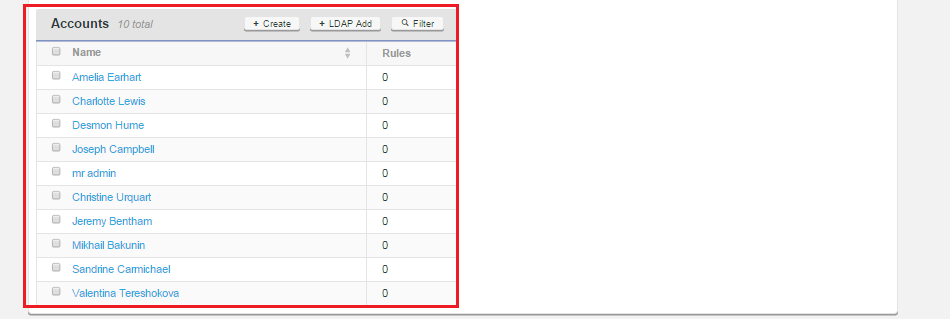
6.2. Accounts
The Accounts panel lists all connected accounts.
- Type
-
Type of account. Local accounts are imported from a file or entered into the ACP admin screen. LDAP-based. accounts are added using LDAP queries. Accounts that are LDAP-based.
- Rules
-
Number of rules that apply to the account.
An account is a collection of information that tells ACP which resources the account holder can access and what level of access they should have. Accounts are the fundamental building blocks for ACP, although the ACP model actually handles permissions only on a per-team basis, not directly on individual accounts.
|
Your license allows a maximum number of accounts
A user license is consumed for each account that is in a least 1 team and is not disabled. If the number of accounts that meet these two conditions ever exceeds your license limit, you will receive warnings to remove or disable accounts. If you ignore the warnings for 10 days then ACP will go into read-only mode. Then only administrators, or team leads with appropriate privileges, can remove or disable accounts. See Remove Account.
|
6.2.1. Create an account
There are three methods for four routes to create an account. This procedure describes steps to follow after clicking Create User on the Accounts pane that appears on the master screen. You can also create an account from within the Create Team procedure. Usually you will add accounts by setting up a query to an available LDAP authority. To add accounts using LDAP, see Connect to LDAP.
-
Log in to ACP. Click the + Create button on the Accounts panel.
 Create an account
 -
An entry table opens. Enter the account holder’s details, as described below.
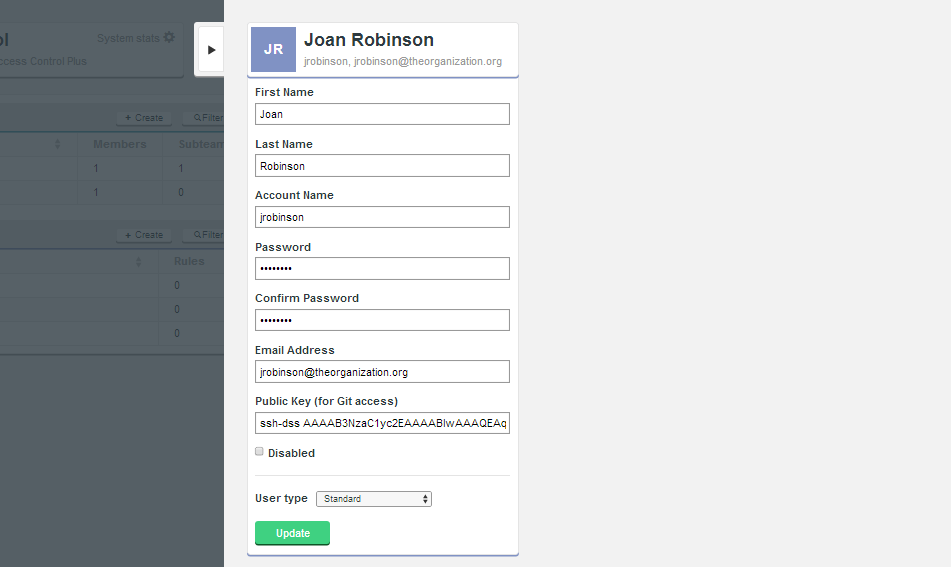 Enter account details
- First Name
-
The account holder’s first name.
- Last Name
-
The account holder’s last name.
- Account Name
-
The account name that ACP will use internally to refer to the account holder.
- Password
-
The password for the account (obfuscated entry).
Caution: passwords cannot contain only numbersPasswords can be alphanumeric, containing a mix of letters and numbers, or only letters. - Confirm Password
-
A repeat entry of the password to confirm it was correctly entered.
- Email Address
-
The email address associated with the account holder.
- Public Keys (for Git or SVN access)
-
The account holder’s public key when running with Git or SVN that is using SSH authentication. When you copy this into the form ensure that you add no breaks. A key is one unbroken line of characters.
It’s now possible to have zero or more public keys from LDAP and zero or more locally defined public keys. Public keys loaded directly from the LDAP Authority for the account are not editable by the user (they will need to get their LDAP authorities to update those keys and then ACP will get those updates).SSH KeysTo enter or change SSH keys, all users need to use their self-service page. - Disabled (Checkbox)
-
Use this checkbox to disable the account. When ticked the account holder is completely locked out. All authorization is disabled. This feature offers administrators a means of removing access without completely removing an account or messing with rules. The account is effectively disabled from the moment the screen is updated, unless you have batched updates.
- User types
-
User type dropdown:
 User types
The User type drop-down menu sets one of the following account types:
- Standard
-
A standard account holder supports all levels of access on all available resources, subject to the rules that apply to the teams for which the account is a member.
- Audit User
-
Error message:Currently you cannot select this user type. If you do, you receive an error message. This is a known error that we will fix in future.
An Auditor account can never be granted write permissions. This provides administrators with complete confidence when adding accounts for employees who need access to repository data but who are not qualified to make changes.
- Application Administrator
-
This account type is specifically for SCM administrators who will themselves manage ACP. Administrators can access the admin console and have permissions to change all ACP settings.
- Create/Update (button)
-
During account creation this button is labelled "Create". Use this button to submit the account details (newly entered or updated) into the form, or for that matter any changes that are made during the edit of an existing account.
-
After entering the account holder’s details, click Update to save the changes to ACP’s internal database. The account is ready to add to teams, which will then enable you to apply rules to it, which ultimately provide access control for available SCM resources.
Access to nothing by defaultAll accounts are created with no access to any resources. For an account to gain access to a repository it must first become a member of a team, then that team must have a rule set up that associates repository resources along with permission levels. For more details see the section about Rules.
6.2.2. + LDAP Add
Use the + LDAP Add to add an LDAP group by searching the available LDAP authorities. The search is currently limited to account names, so it’s not possible to search using name fields (surname, firstname etc).

| Note that currently, a wildcard search will only provide a single result, even if a search should find more than single match. This issue will be fixed in a later version. |
6.2.3. Edit an account
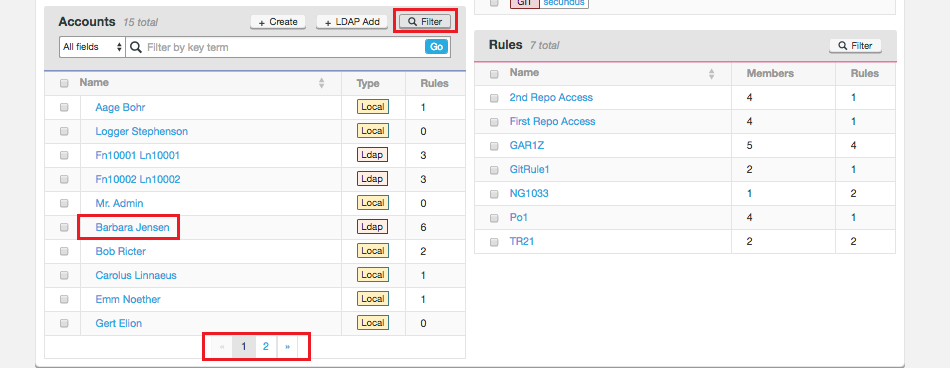
To edit an existing account:
-
Log in to ACP and find the account that you want to change:
 Edit Account
Search by filter: Click Filter to show a search entry box. You can select from Name, Username, Email) for the search.
Selecting an account: Click on the Account holder’s name to bring up the account screen.
An account screen shows the account’s team memberships and access privileges:
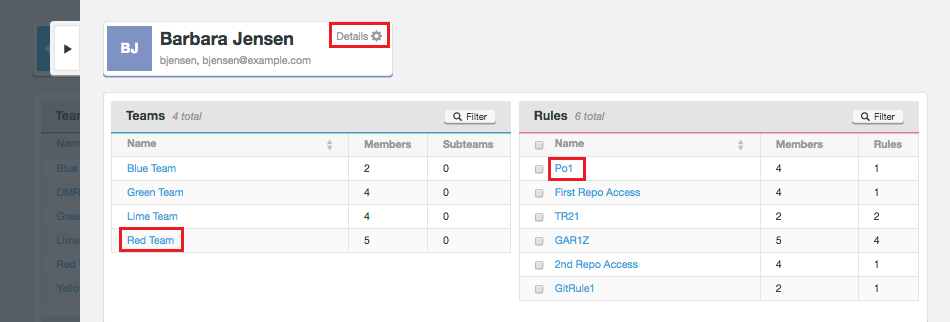 Teams and access privileges
 -
To return to the account’s entry form and make edits click Details. The main panel lists teams of which the account is a member and lists all rules that currently apply to the account.
Change teams membership: From the teams table click a Team name to remove the account from that team or subteam. Change a rule: Click any rule in the Rules table to remove the account from the rule.
Change a rule: Click any rule in the Rules table to remove the account from the rule.
-
When you wave finished working with the account screen, click the tab on the left of the panel to close the screen.
 Close Account screen
LDAP-based users
|
The Edit screen is renamed Details for LDAP users because you cannot edit an LDAP-based user through ACP. If you need to modify an LDAP user you need to go through your LDAP service. The sole exception to this are any "local" SSH public keys. They can be added, modified and/or removed. |

|
Important: When LDAP authority tries to enter in an account that has a username that already exists on the system
When LDAP sync discovers there is already existing account with the same username it will log a warning and not will synchronize this account. The existing account name can be local (entered into ACP directly) or from different LDAP authority. However, if the user exists in LDAP and can authorize against SVN, then it will get in and AuthZ will apply any rules.
|
|
In version 4.2:
As only usernames were used to match users a conflict would not be detected. In this situation users with duplicate usernames would be synchronized.Solution: If Apache is suitably configured, the local accounts, via the passwd file would get precedence, so it should work OK for local users. However, if the username conflict is between two LDAP authorities then you currently still can get the clash. It is therefore best to only have 1 LDAP authority. Do not create multiple LDAP authorities to access multiple replicas of the same LDAP service like you might have done in 4.2. This is both unnecessary by the architecture of ACP+MSP but is also known to cause severe difficulties. |
6.2.4. Adding public SSH keys
Public SSH keys can be managed from:
-
ACP admin console (by admin or account holder)
-
LDAP authorities
-
Combination of local and LDAP
Keys coming from LDAP are not modifiable through the ACP admin console, you will need to make changed through the LDAP authority.
An administrator can add/change/remove any SSH keys associated with an account except those coming from LDAP. An account owner (user) can add/change/remove any of their own account’s SSH keys except those coming from LDAP.
|
IMPORTANT
Accounts that are LDAP_based can have SSH keys added locally (via the ACP admin console), but only if SSH keys have not been set through LDAP. LDAP keys that are added locally will always be editable.
|
Following the above stated rules, use this procedure to add any number of public SSH keys to an ACP account.
-
Click on the account (local or LDAP) onto which you wish to add a public SSH key.
 Select Account
 -
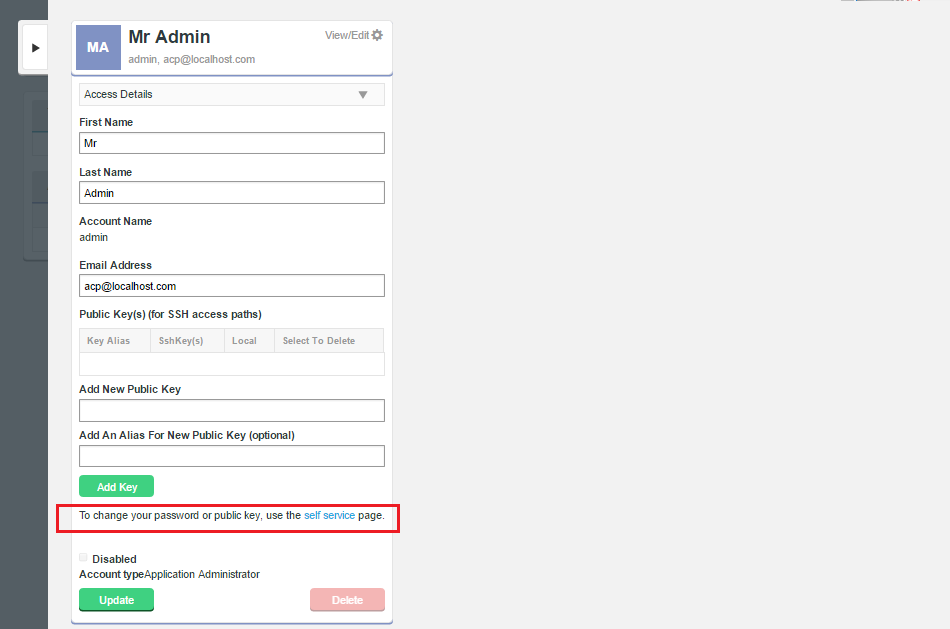
Click on View/Edit link.
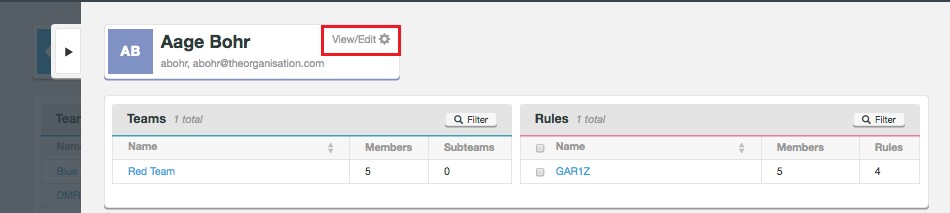 Edit Account
 -
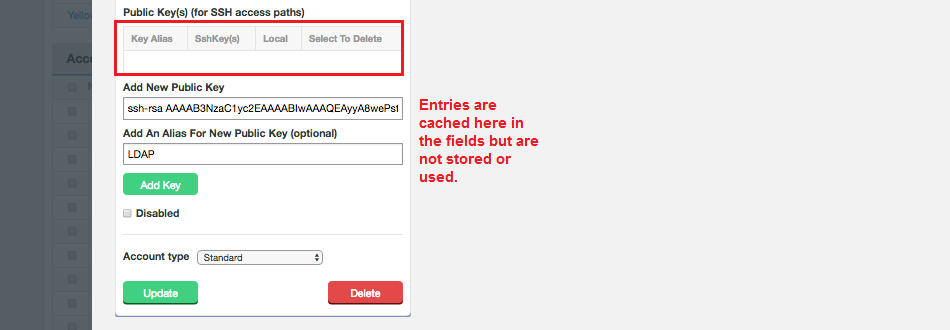
The Account form includes a Public Key(s) (For SSH access paths) table. The table supports any number of separate SSH keys for accessing whatever resources.
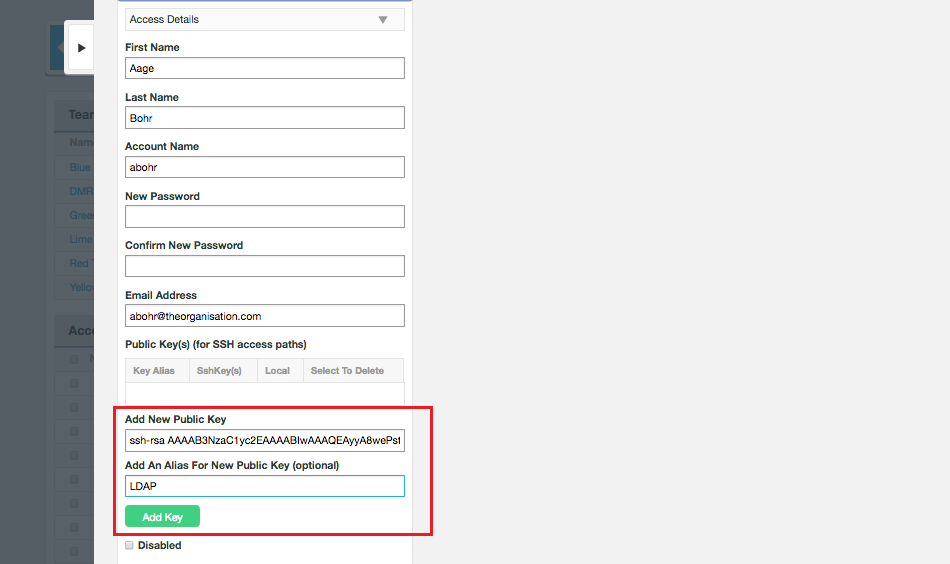 Add Public Key
- Add New Public Key
-
Enter a public key into the field. Remember, no spaces!
- Add An Alias For New Public Key (optional)
-
Enter an Alias to give your key a meaningful reference name, e.g. "LDAP" for a key used for accessing an LDAP resource.
Click Add Key to save the new key to the account.
-
The public key will now show up in the Public Key(s) table.
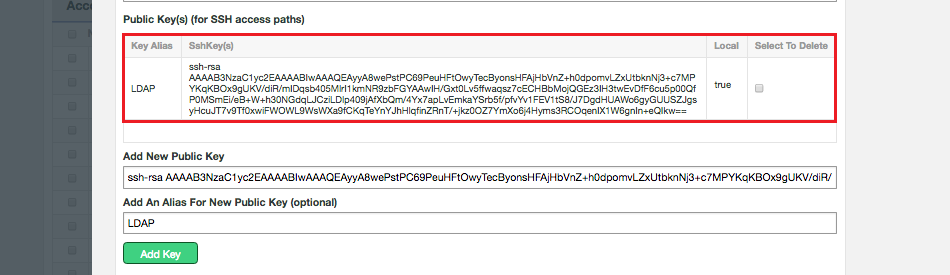 View Public Key
- Key Alias
-
Reference name given to a locally added key to help you remember what it is for. This is especially useful if the account is to support multiple SSH keys.
- SshKey(s)
-
The public SSH Key.
- Local
-
Identifies if the key is controlled locally (true) or managed by LDAP (false).
- Select to Delete
-
Checkbox for selecting a key for deletion. See the next section for more information.
6.2.5. Removing public SSH keys
Follow this procedure for removing public SSH keys from an account.
-
Navigate to an existing public key that you wish to delete. Click on the corresponding Select to Delete checkbox and click the Delete SSH Key(s)
 Delete SSH Key
You can delete multiple SSH keys at once by selecting multiple keys to delete.
-
A message Account successfully updated will appear. Click Close.
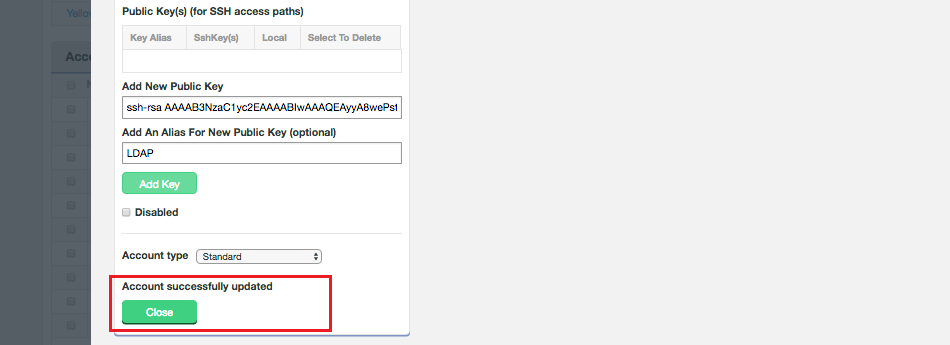 Close
Close -
The SSH key(s) that you have deleted will no longer appear on the Public key(s) table.
 SSH key has been deleted
6.2.6. Audit accounts
Audit accounts are accounts that can see everything but do nothing. They are used by auditors to validate ACP configuration etc. They can also be used by scripts that only read ACP data.
6.2.7. Audit Logging accounts
When you install the auditing function, you are asked for the name of the Account Access Logging service account. The logging service account is created during installation and is from now on referred to as logger. The logger account is used to log account access information from monitors on the log files which contain information about accounts accessing the SCM system. Logging this information is the only thing that the logger account can do, and it is only logging service accounts which can use the logging REST API. It is not possible to log in to the UI using the logger account. You will see the message:
For security reasons, the logger user cannot log into the UI, please log in again as a more privileged user.
Best practice is to:
-
Create a new logging service account.
-
Update all of the ACP Flume receivers to use the new credentials.
-
Remove the original logging service account.
Two jar files are delivered which enable the maintenance of the logging service account. They cannot be used through the UI:
-
scm-access-control-plus-manageLoggerUser.jar - lets you create/update/delete logger users.
-
scm-access-control-plus-flumeReceiverConfig.jar - lets you update the username and password in the Flume configs.
Using the scm-access-control-plus-manageLoggerUser.jar
The scm-access-control-plus-manageLoggerUser.jar lets the administrator create, update or delete Audit logger users.
To execute the jar you need to be using the root account or the ACP application account.
The admin account name and password are also needed.
The scm-access-control-plus-manageLoggerUser.jar reads the ACP SSL configuration information from the ACP application.properties file to decide if SSL is needed to connect to the REST API i.e. whether the jetty.http.port or jetty.https.port property is used.
|
Ensure you enter the correct admin details
Admin account credentials must be entered correctly.
If incorrect details are given then the tool will fail and create a traceback.
|
Before using the jar you need to change directory into the ACP install directory, e.g. cd /opt/wandisco/scm-access-control-plus.
If you use the command without any arguments then you get a help message showing the available options:
acpapp$ java -jar scm-access-control-plus-manageLoggerUser.jar

ACP Hostname and API Port is <your.address:port>
Command not specified
usage: java -jar scm-access-control-plus-manageLoggerUser.jar [-c <arg>]
 -c,--command <arg>   (Mandatory) Command you wish to perform. (Options
                      are: (C) create local logger account; (L) create
                      LDAP logger account; (U) update password; (D)
                      disable logger account; (R) remove logger account;)
|
Create LDAP logger account
This option is only available in ACP 1.9.2 and above - see Create LDAP logger account.
|
For example, to create an account:
acpapp$ java -jar scm-access-control-plus-manageLoggerUser.jar -c C

ACP Hostname and API Port is <your.address:port>
Enter your ACP Admin username: admin
Enter your ACP Admin password:
Enter the new users username: tomb
Enter the Logger users new password:
Confirm the Logger users new password:
Enter the new users first name: tom
Enter the new users last name: baird
Creating user: tomb
Created user.
If you have SSL enabled this will be stated in the output.
To update the flume_acp_receiver.properties file with this new account you now need to use the scm-access-control-plus-flumeReceiverConfig.jar.
Using the scm-access-control-plus-flumeReceiverConfig.jar
Once you have created a new logger account in ACP using the scm-access-control-plus-manageLoggerUser.jar, you need to run the scm-access-control-plus-flumeReceiverConfig.jar tool.
This updates the logger account properties in the flume_acp_receiver.properties file, to be that of the new logger account.
In most cases you need to be the root user to execute the jar as the flume_acp_receiver.properties needs to be modified.
However, if you installed using the tar-ball installer with a non-root service account, then only this account will be needed, not the root.
Before using the jar you need to change directory into the ACP install directory, e.g. cd /opt/wandisco/scm-access-control-plus.
Running the scm-access-control-plus-flumeReceiverConfig.jar tool without passing in any options will return the following output:
root# java -jar scm-access-control-plus-flumeReceiverConfig.jar
Receiver location not specified
usage: java -jar scm-access-control-plus-flumeReceiverConfig.jar [-r
       <arg>]
 -r,--receiver <arg>   (Mandatory) The location of the receiver you wish
                       to update*
Running scm-access-control-plus-flumeReceiverConfig.jar -r <location of the receiver you wish to update> returns the following output:
root# java -jar scm-access-control-plus-flumeReceiverConfig.jar -r /opt/wandisco/flume-scm-access-control-plus/conf/flume_acp_receiver.properties
Current name is:LoggerUser Please enter a new name or leave blank if you do not wish to change it:AutoUser1
New name is:AutoUser1 Do you accept [y/N]y
Enter new password:
Verify new password:
Success!
Once the flume_acp_receiver.properties file has been updated, restart their ACP flume receiver service to make sure these changes are picked up - service flume-agent restart.
Create LDAP logger account
From ACP 1.9.2 onwards you can create LDAP logger accounts.
This uses both the scm-access-control-plus-manageLoggerUser.jar and the scm-access-control-plus-flumeReceiverConfig.jar.
Before using the jar you need to change directory into the ACP install directory, e.g. cd /opt/wandisco/scm-access-control-plus.
First you need to create an LDAP logger account in ACP using scm-access-control-plus-manageLoggerUser.jar.
|
Ensure you enter the correct admin details
Admin account credentials must be entered correctly.
If incorrect details are given then the tool will fail and create a traceback.
|
For example if you run the command with SSL disabled:
acpapp$ java -jar scm-access-control-plus-manageLoggerUser.jar -c l
ACP Hostname and API Port is <your.address:port>
Enter your ACP Admin username: admin
Enter your ACP Admin password:
Enter LDAP Authority: LDAP1
Getting LDAP Authority: LDAP1
Got the LDAP authority LDAP1
Enter a username for your LDAP logger account: AutoUser1
Getting LDAP User: AutoUser1
Querying the authority to see if the user exists in that authority
Got a matching user
Created LDAP logger user.
TO COMPLETE THIS PROCESS, PLEASE CARRY OUT THE MANUAL STEPS LISTED IN THE DOCS AT SECTION 'Audit Logging accounts'.
To complete the process you will need to update the LDAP logger account details in the flume_acp_receiver.properties file and update the local logger account.
To update the logger account properties in the flume_acp_receiver.properties:
-
Now the new LDAP logger account has been created in ACP, you need to run the
scm-access-control-plus-flumeReceiverConfig.jartool. Run:scm-access-control-plus-flumeReceiverConfig.jar -r <location of the receiver you wish to update>
The following output is returned:
root# java -jar scm-access-control-plus-flumeReceiverConfig.jar -r /opt/wandisco/flume-scm-access-control-plus/conf/flume_acp_receiver.properties
Current name is:LoggerUser Please enter a new name or leave blank if you do not wish to change it:AutoUser1
New name is:AutoUSer1 Do you accept [y/N]y
Enter new password:
Verify new password:
Success!
-
Restart the ACP flume receiver service to ensure these changes are picked up -
service flume-agent restart. -
Remove the original local logger account from ACP.
-
To move to an "all LDAP account" setup, turn off Allow Local Users in the ACP settings.
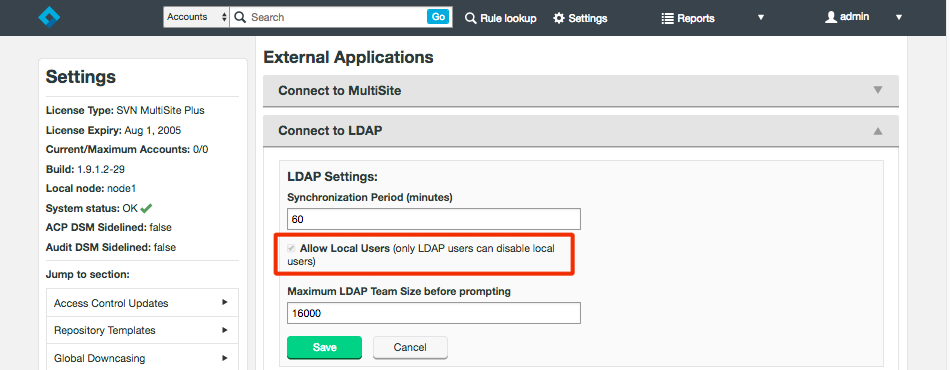 Turn off Allow local users
To update the local logger account:
-
To update the a local account, repeat the steps above. However the final step is not necessary, do not turn off Allow Local Users in the ACP settings.
6.2.8. Query audit database
Using command line
Use curl commands to query the database accounts. For example, to query the last access by a particular user, you need to look up the account’s ID via an API query then use the ID:
curl --user admin:pass http://192.168.58.190:8082/api/audit/<account_id>
You see a report similar to:
<auditrecord>
  <dateCreated>1455132322046</dateCreated>
  <dateLastModified>1455132322046</dateLastModified>
  <id>041e7448-f2dc-42b6-8994-1fd786bda0f5</id>
  <accessTime>2016-07-11T17:09:37+02:00</accessTime>
  <accessType>READ</accessType>
  <accountName>acct10001</accountName>
  <historicRepositoryLocation>/opt/repo/first</historicRepositoryLocation>
  <historicRepositoryName>first</historicRepositoryName>
  <historicRepositoryType>SVN</historicRepositoryType>
  <repositoryLocation>/opt/repo/first</repositoryLocation>
  <repositoryName>first</repositoryName>
  <repositoryType>SVN</repositoryType>
</auditrecord>
Note the reference to accountName, rather than accountID. Also the "historic" entries, which are indicated in cases where the repository moves over the course of its lifetime.
To query when a user accessed a particular repository:
curl --user admin:pass http://192.168.58.190:8082//api/audit/<user_account_id>/repo/<repo_name>
To query the last access by all users:
curl --user admin:pass http://192.168.58.190:8082/api/audit/all
Accounts which have not accessed the repositories are reported with a timestamp of 0 (with the year 1969 or 1970).
|
Audit does not monitor SVN commits using file://
Commits over file:// do not generate anything in the logs that auditing monitors. This means that nothing is sent to the auditing mechanism to report to the user.
|
|
More information about the REST API
Read the RESTful API Guide.
|
6.2.9. Using UI
Use the dashboard Reports tab to query the audit database from the UI:

You can choose from the following types of report:
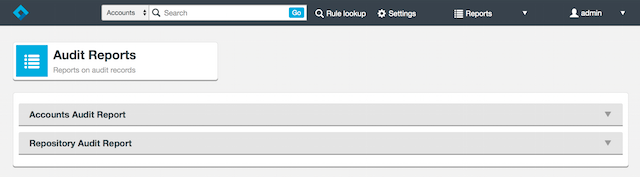
-
Select Accounts Audit Report to list the last access time for all accounts:
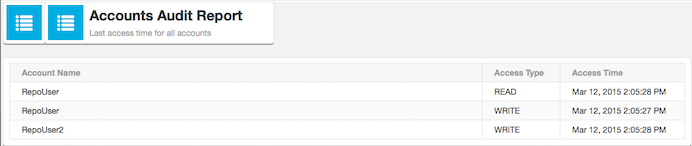 Accounts Audit Report
 -
Select Repository Audit Report to list the last access time for all the repositories:

Note: You may see a message warning that the report could take a long time, i.e. a few seconds:
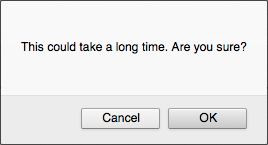
Confirm that you want to continue.

For example, there may be a Priority Conflicts report:
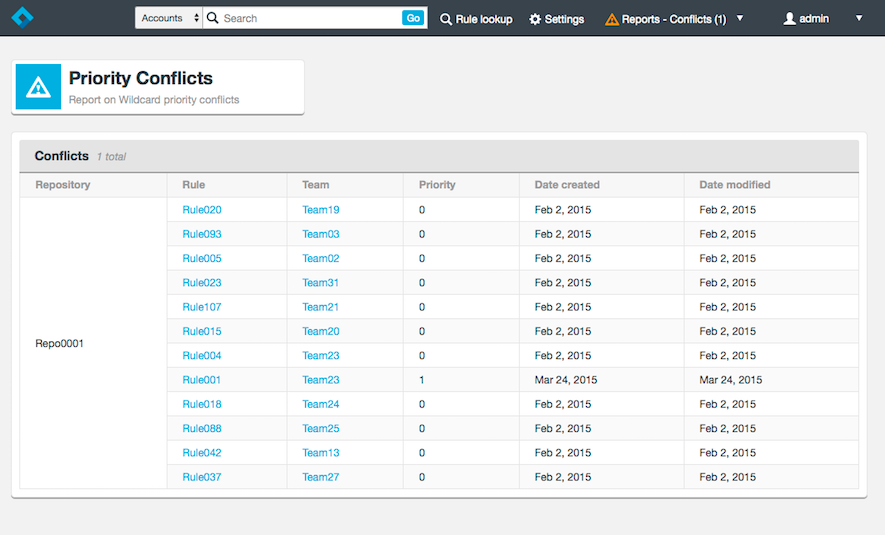
To report on the last access time by an account, as an administrator, from the dashboard Accounts section select an admin, then click View/Edit dropdown for Access Details:
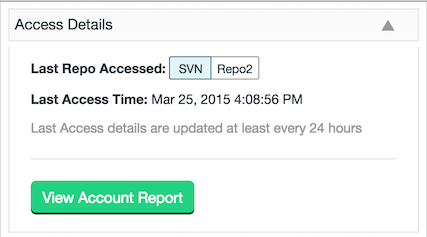
Click View Account Report to show the last access time for a single account:

6.2.10. Conflict reports
Any conflict report is shown in the Reports menu. If there are any current conflicts in the system then a report of those conflicts can be found in the reports dropdown. The triangle-with-exclamation-point icon signifies that there are existing conflicts.
|
Conflicts explained
When creating a rule, if the rule to be created causes any priority conflicts, the user will be made aware that conflicts exist and ask to confirm their action.
|
6.2.11. Remove an account
|
Important: Benefits of not removing accounts
ACP lets you quickly and easily remove accounts, either manually or through LDAP. Many customers prune their ACP account pools to make group creation and management more manageable, especially in large organizations that have a rapid turnover of teams. However, there are some good reasons to avoid the outright removal of accounts: |
-
You can free up licenses by disabling accounts instead of deleting them.
-
An account’s history is lost when it is deleted. Don’t delete accounts if you need to store historical data for all accounts.
-
Should a user return to a team it is easier to re-enable an account than it is to recreate it. You may need to remove accounts if you exceed the maximum number for your license. Consider disabling accounts or removing them from all teams instead of removing them in case the account holder needs access restored in future.
To remove an account from ACP:
-
Log in to the admin console. From the management screen, find the account that you want to remove.
 Select Account
 -
Tick the check box to the left of the Account holder’s name, then click the - Remove button on the top of the Accounts pane.
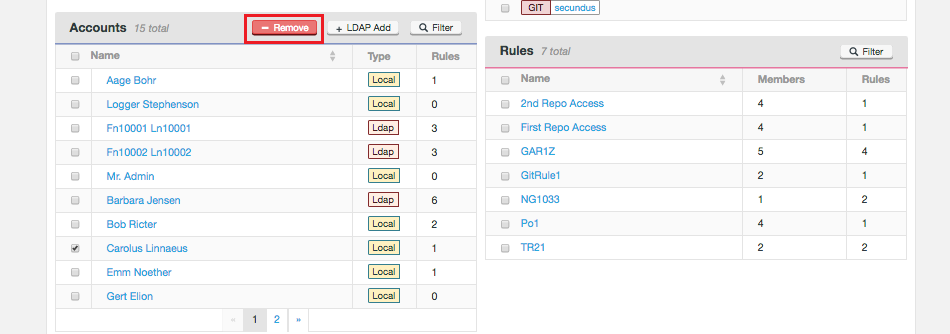 Remove Account
A pop-up warning asks "Are you sure?".
Important: No undo for account removalBe sure that you want to remove the account. There is no restore function. -
If you are sure, click OK.
The account is completely removed from ACP. It no longer appears on the accounts list, or in any teams or rules. If the account is an LDAP account and that account is a member of an LDAP group that is used to define an ACP Team via an LDAP query then that account will be re-created and re-instantiated into the team upon next LDAP poll.
If you need to check the account’s particulars to ensure that you are removing the correct account, go to the accounts details screen, you’ll find a Delete button at the bottom. This does the same thing as the remove link on the main management screen.
|
Before removing LDAP-based accounts
We recommend that you remove the LDAP team queries before removing those LDAP accounts included in those teams.
This will ensure that the removed account is not automatically re-added.
|
6.2.12. Disable an account
Disabled accounts remain stored in ACP. They are, however, unable to log in or interact with any repository resources. You can quickly add back a disabled account by re-enabling it.
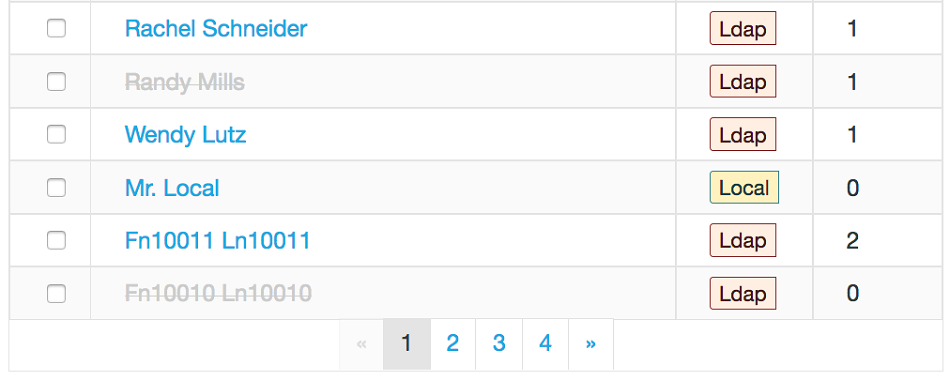
|
Disabled accounts are not counted towards the licensed number of users
You can store users in a disabled state even if you need to make room for additional users within the limit of your current license.
|
-
Log in to the admin console. From the management screen, locate the account that you wish to disable.
-
Click the account holder’s name to open up the Account page.
-
Click the Edit button to view the account’s basic details. From the accounts details screen, tick the Disabled check box, then click the Update button. Disabled accounts display with greyed out strike-through text.
6.3. Teams
Teams make organizing account permissions much simpler. They allow you to apply rules to many accounts at the same time, rather than for each individual account. Another benefit is the ability to delegate administration to a team administrator
|
Audit accounts are now automatically removed from teams
The Audit account is strictly reserved for special use cases and are not intended to have access to repository data.
Earlier versions of the product did not guard against audit accounts being placed on teams, where they may inherit repository file access.
For this reason, upgrading to ACP 1.9 will automatically remove all audit accounts from any teams they have been assigned to.
|
6.3.1. Create a team
Use this procedure to set up a new ACP team. This is the same method as for adding accounts manually. You can also manage your team structure through LDAP, setting up a query that filters for the specific account holders that you need for a particular team. For more information see Adding an LDAP-based team.
-
Log in to the admin console.
-
On the Teams panel, click the + Create button.
 Create
 -
Complete the entry form for your new team.
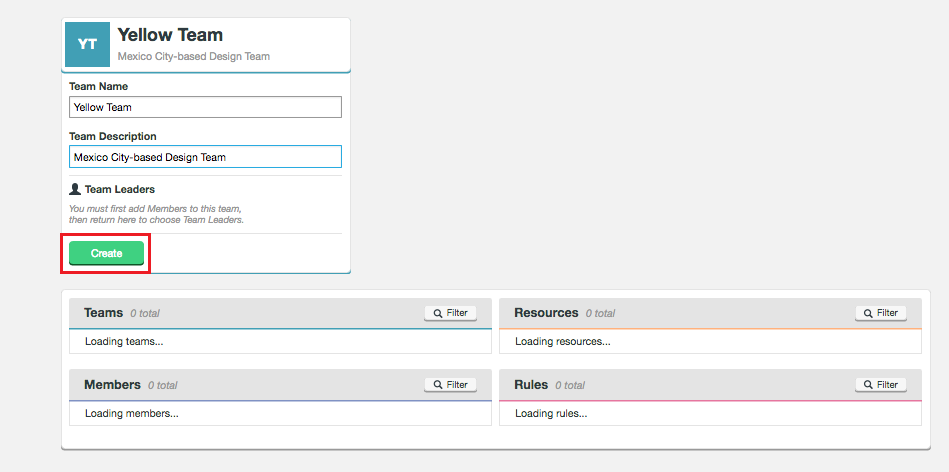 Enter Team info
- Team Name
-
Name for the team.
- Team Description
-
Enter a description for the team.
- Team Leaders
-
During the team creation process this section is not available.
- Create (button)
-
Click the button to save the new team.
-
The team’s screen now appears. From here you define the team in terms of it’s Subteams, Members, Resources, and Rules.
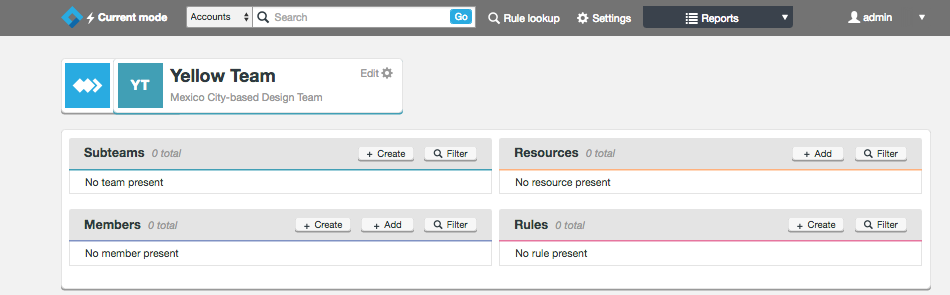 Team Screen
Subteams
Subteams are themselves teams of accounts. Subteams differ from teams in that they can only be formed as a subset of their parent team’s accounts and available resources. The main benefit of subteams is that they allow administrators to dole out portions of accounts to subordinate team leaders who are able to manage their subteam, without having wider access to members and resources that fall outside of their responsibility. This means that administrators can delegate day-to-day user creation, user removal, etc. to team leaders, and still limit full SCM access.Members
Accounts that are added to a team become Members. You can add existing accounts using the + Add button, then selecting accounts. From the screen you can also create a new member using the +Create button, which opens up the Create Account panel.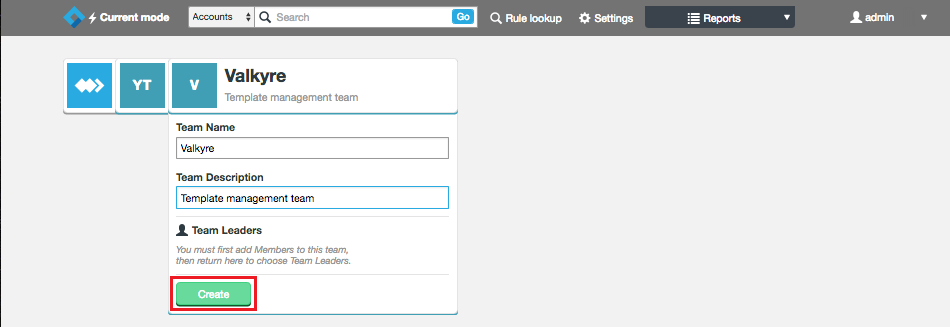 New members
Resources
Resources are representations of repository templates. If you create a team you’ll not be able to add resources until you have established some Repository Templates from the Settings section.
Resources are repositories that have been associated with repository Templates (or refinements thereof).
6.3.2. Adding an LDAP-based team
Follow this procedure to create a team that is populated from an LDAP authority.
6.3.3. Expected LDAP account behavior
A disabled LDAP-managed account will NOT be re-enabled if manually associated with a new team. In this scenario an administrator must re-enable the account by hand.
6.3.4. Mix and Match
When LDAP-based accounts have been added to ACP, they appear within the Accounts pane and can be added to any team. However, it’s easier to track and manage LDAP users if they’re enabled through their own team, where the team is set up to get its members from an authority. However, so long as you tick the checkbox Allow local users, you can also add local users to an LDAP-managed team.
6.3.5. Add an LDAP-based team
-
Log in to ACP. If you have not done so already, add an LDAP authority, in this case the one from which you will be pulling accounts.
-
On the Teams pane, click the + Create button.
 Create team
 -
Fill out a Team Name and Team Description, then click the Create button.
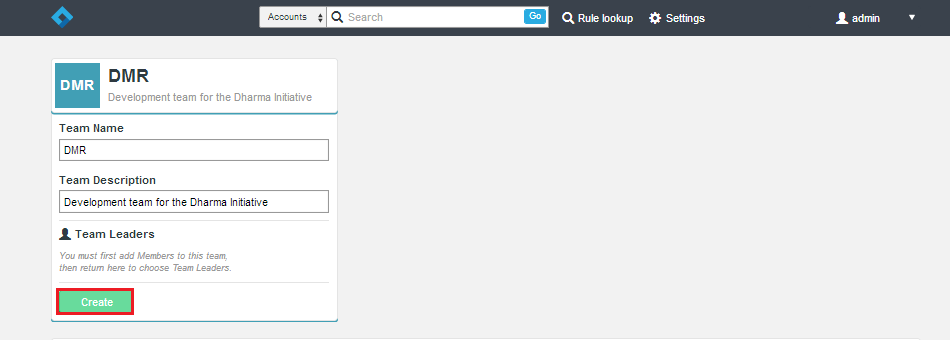 Add Team info
 -
The Team is created. Now click the Edit link.
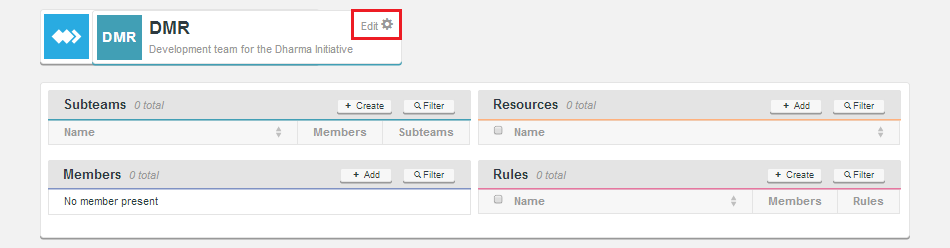 Edit team
 -
From the Team edit window, enter the relevant details for an LDAP authority that you wish to associate with the team. Select the authority from the dropdown. You’ll need to add one. When you have entered those details, click Update. It is intended that you use a single LDAP authority and filter the relevant accounts using queries. Please note that Active Directory and OpenLDAP use different methods to startup the LDAP Authority and different formats for the queries but they both work.
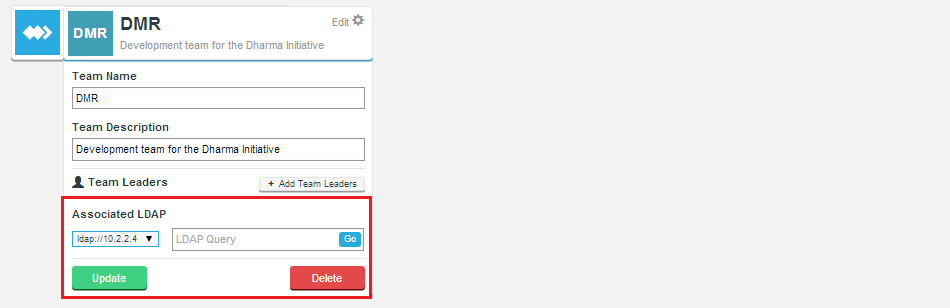 Add LDAP details
 -
Click Close.
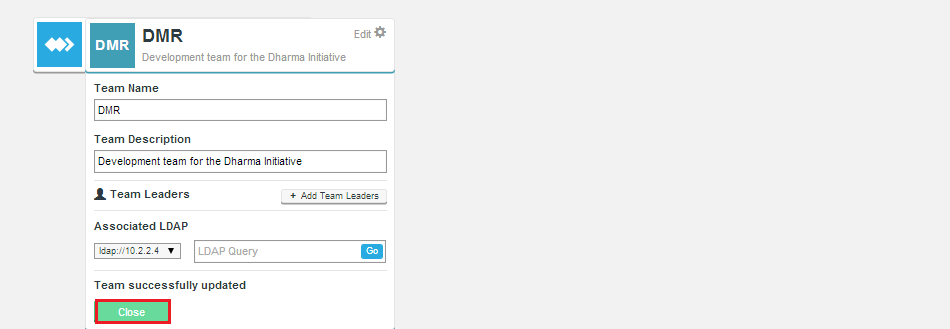 Close once updated
 -
You are returned to the master screen. The team should now be populated from LDAP.
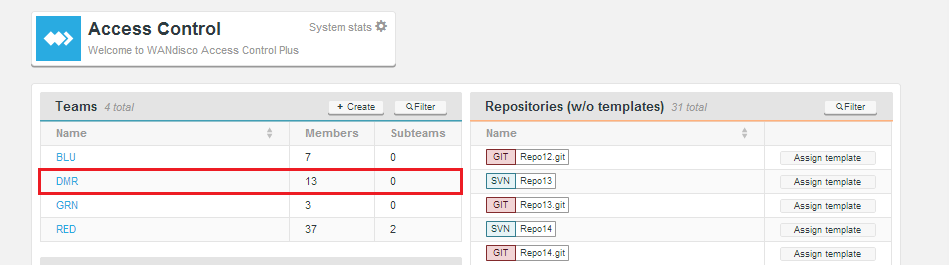 See team detailsPolling for LDAP accounts can take some time.When adding teams from an LDAP authority, consider that it may take a little time for the new accounts to be imported. Don’t panic if accounts don’t appear immediately. You may need to wait a while before refreshing the team page.
 -
Return to the team by clicking its name. You can now select which users from LDAP are added to the group. Also add any other team components (Resources, Rules, subteams etc) that you need.
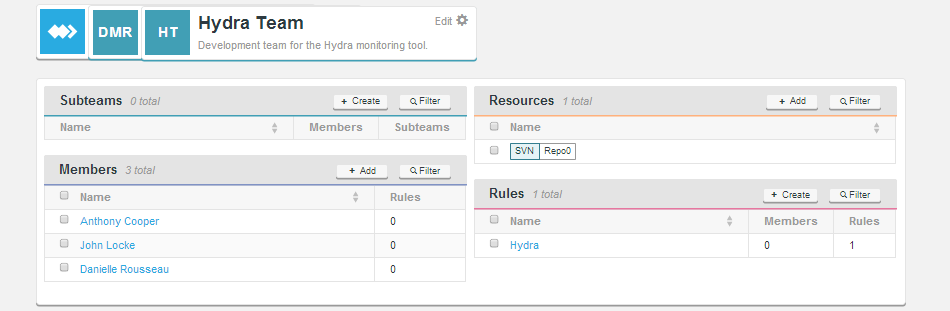
6.3.6. Remove an LDAP-based association from a team
From ACP 1.9 it’s possible to remove LDAP-based team members from a team. Previously, you were required to delete then recreate the team.
-
Navigate to a team with an LDAP association that you wish to break.
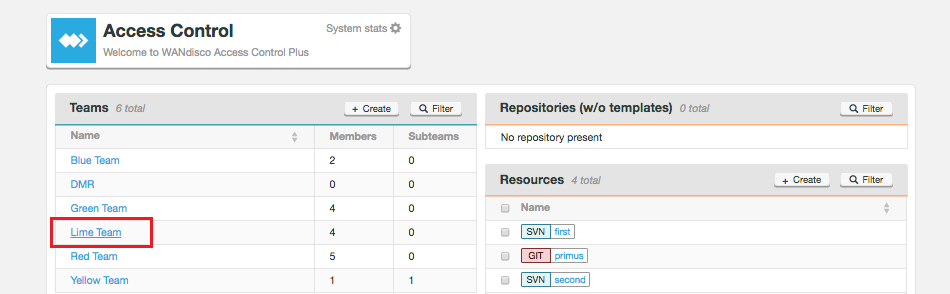 Select team
 -
Click on the Team’s Edit link.
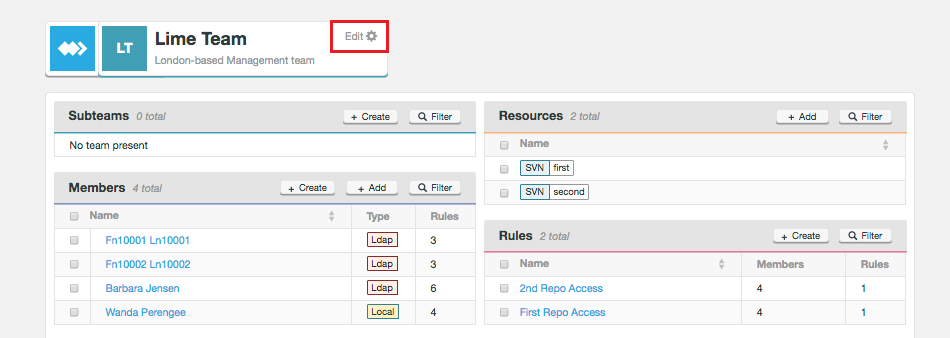 Edit
Edit -
Click on the Associated LDAP dropdown.
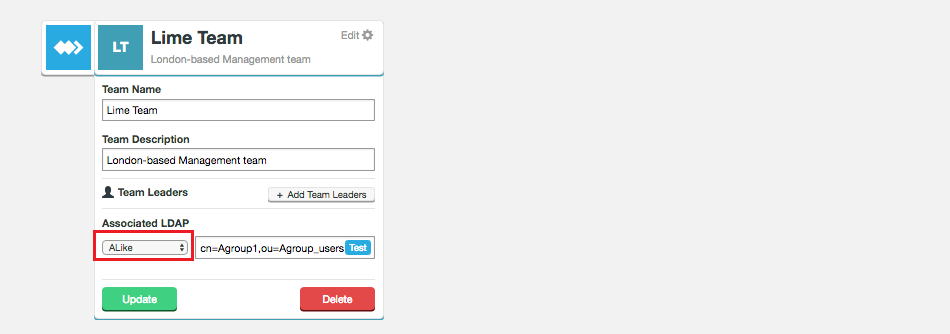 Select associated LDAP
 -
From the dropdown, select No LDAP authority.
 Select 'No LDAP authority'
 -
Select whether to remove all LDAP-based users from the team. Check the Remove the associated LDAP users? checkbox to remove team members. If left unticked then after the LDAP association is broken, LDAP users will be left on the team. Click Update.
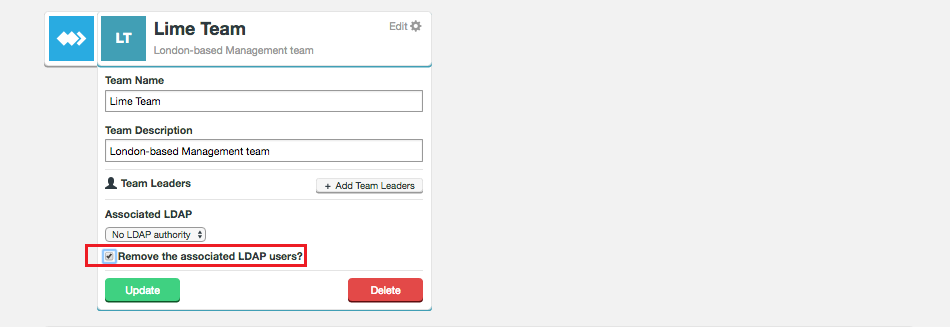 Tick box
 -
If you selected to remove users you will be prompted to confirm your choice. Click Confirm.
 Confirm
 -
You will receive a confirmation message Team successfully updated
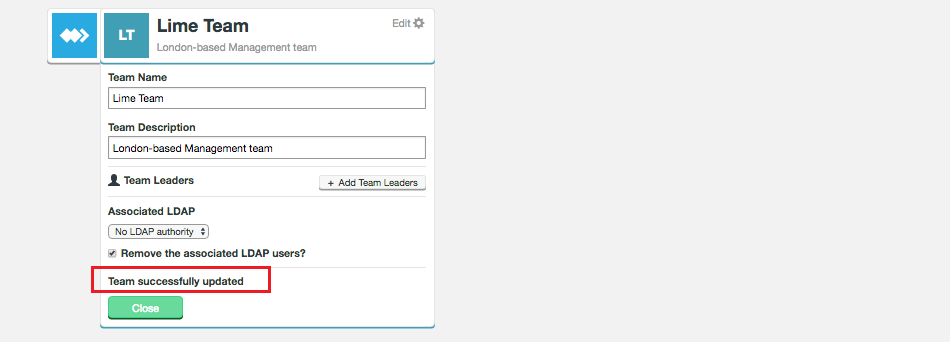 Confirmation
6.3.7. Edit a team
-
Log in to the admin console.
-
On the Teams pane, click the name of the team that you want to edit.
 Select team
 -
The team’s screen opens.
 Team’s screen
From here you can create additional Subteams, Add more resources, Add/Remove Members or Rules.
6.3.8. Add Team Leader
On the Team edit screen you can add team leaders for the team:
-
On the Edit Team dialog, click + Add Team Leaders button.
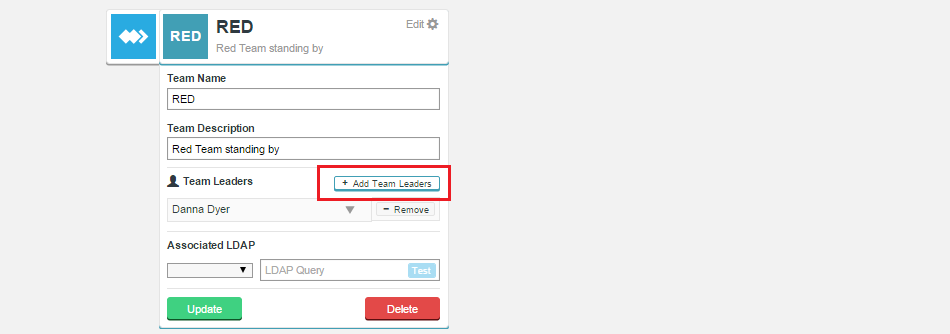 Add Team Leaders
 -
Select those team members that you wish to elevate to Team Leader positions by selecting them using the checkboxes.
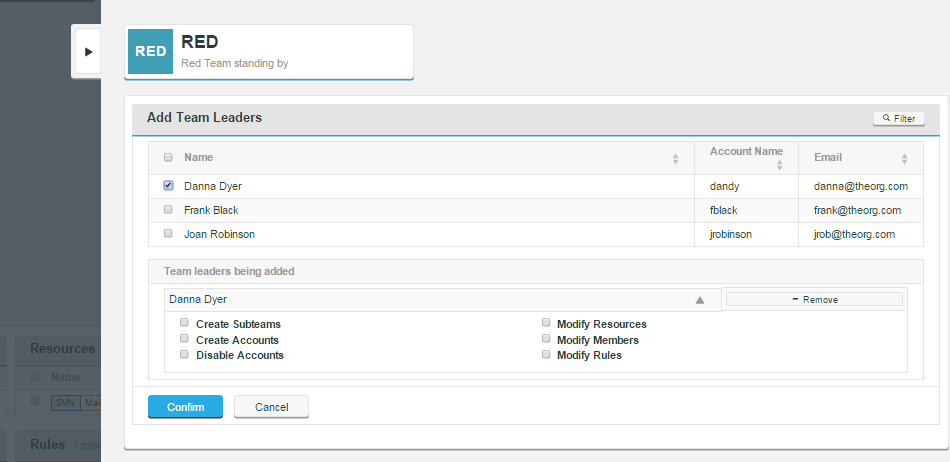 Select members
A permissions panel will be displayed for each account that you add. The panel will provide checkboxes for each of the following actions:
- Create Subteams
-
Account will be permitted to create subteams for those teams to which they belong.
- Create Accounts
-
Account will be permitted to create new accounts for their teams/subteams.
- Disable Accounts
-
Account will be permitted to disable accounts.
- Modify Resources
-
Account will be permitted to alter the properties of the team’s/subteam’s available resources.
- Modify Members
-
Account will be able to make changes to team/subteam membership.
- Modify Rules
-
Account will be able to make changes to any applicable rules.
6.3.9. Delete a team
Use the following procedure to remove a team from ACP.
-
Log in to the admin console.
-
Click the Team or Subteam that you wish to delete.
 Select team
 -
Click Edit to view the teams/subteams settings, then click Delete.
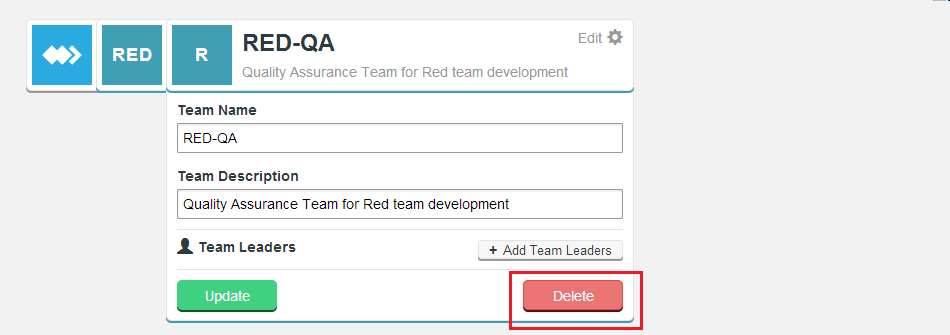 Delete
 -
You are prompted to confirm the deletion. You cannot undo deletions so Access.
 Confirm
 -
Control Plus always checks before deleting an object.
6.4. Resources
Resources are Repositories that have been activated by being associated with a repository Template.
6.4.1. Create resources
For SVN deployments, you can create "local" (non-replicated) resources. This is not possible for Git deployments because GitMS is the AuthZ enforcement mechanism for Git.
Use this procedure to create team resources, when not syncing with Cirata MultiSite products. If you are connecting to MultiSite then resources are created from whatever repositories that are automatically added. See Create a resource in a MultiSite Environment.
6.4.2. Create a resource in a MultiSite environment
Use this procedure to create additional resources, if syncing with Cirata MultiSite products. If you are connecting to MultiSite then resources are selected from whatever repositories that are automatically added.
May 26, 2015 8:55:55 PM com.wandisco.acp.repository.integration.RepositoryPollingThread
logVerboseWarningWhenPollingFails

WARNING: git-polling-thread1:[Error polling repositories from https://10.20.28.155:8082/api/ as user
admin, password is set, [com.wandisco.vcs.api.exception.VCSAPIConnectionException:
com.sun.jersey.api.client.ClientHandlerException: javax.net.ssl.SSLException:
Unrecognized SSL message, plaintext connection?
| Repositories (w/o templates) currently can’t be deleted until they are assigned a template. |
-
Log in to the admin console. On the main management screen, click the Assign template button of a repository that has been synced from GitMS and/or SVN MSP.
-
A window appears and lists the available Repository Templates that correspond with the relevant version control system. Select one of the available templates.
-
Click Save. You are returned to the main screen, with the new resource added to the list.
6.4.3. Edit a resource
You can easily edit resources by clicking on the resource’s name.
ACP supports repository resources in various configurations:
-
Replicated: managed and replicated through a Cirata MultiSite product
-
Non-replicated: stored in a MultiSite node and not replicated to other nodes
-
Standalone mode: Non-replicated "local repositories" are stored directly on the ACP server.
You can tell the type of a particular resource by checking the text under its title. It says either "Replicated" or "Non-replicated".
-
Change any of the editable values, then click Save.
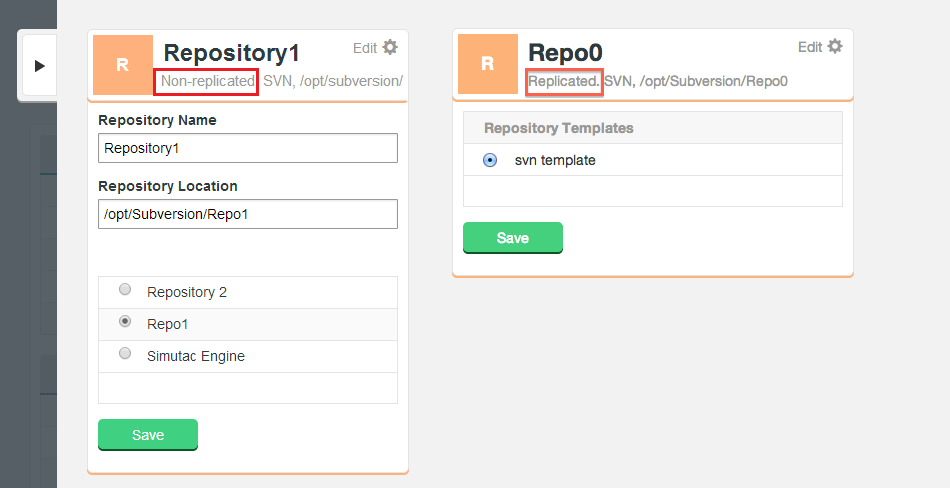 Edit
Edit
6.4.4. Refine a resource
You can refine a resource to specify a Subversion sub-repository path or a Git Branch or Git Tag:
-
Click the relevant Team, or create a team and add members.
-
Click Add in the Resources pane.
-
Click the checkbox to the left of the repository that you want to add a refinement to, then click Refine.
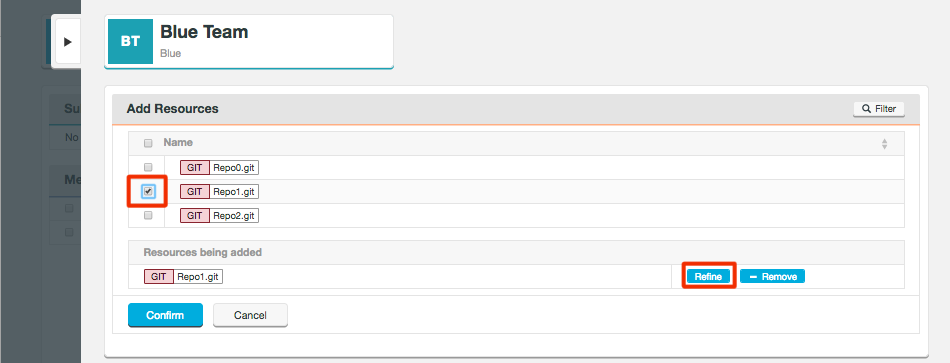 Refine resource
 -
Select path, branch or tag and then enter the value you want to add (the branch /project in this example) then click Add. This is confirmed in the Being added list.
If you want to use wildcards in your resources see Refinements with wildcards.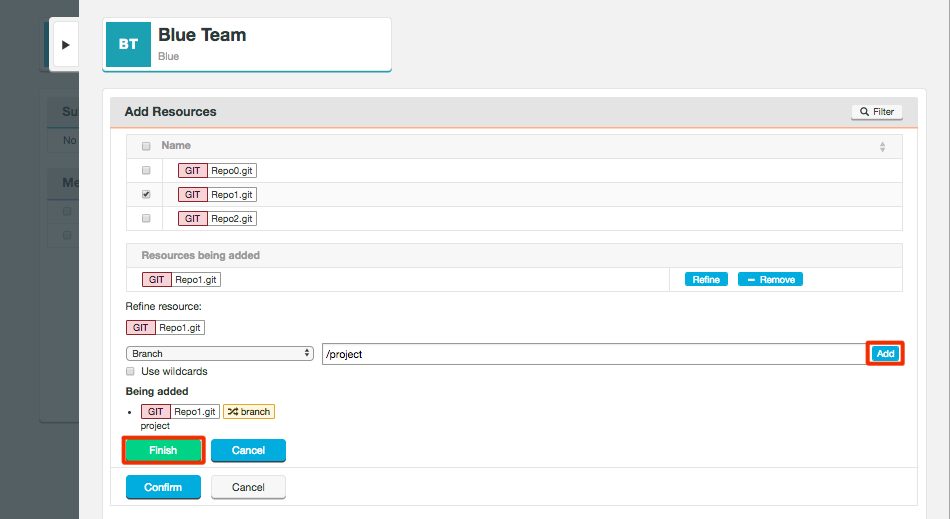 Refine resource
 -
Click Finish, then Confirm.
You can now add this resource to a rule for the team. See the Rules section.
6.4.5. Remove a resource
You can remove a resource from the main screen. Tick the checkbox for the resource you want to remove and click Remove.

Removing a repository
We need to avoid changes being made to the repositories after they are removed from replication, so only the repository instance on the server used by the Git/SVN client gets updated instead of the replica family - thereby diverging that instance from the replicas.
-
Remove all references to the repository as a resource from ACP.
-
Generate AuthN/AuthZ files from ACP and verify distribution to all MSP (or GitMS) nodes. See Authorization and Authentication file delivery.
-
Remove repository from your MultiSite product. Remove an SVN Repository / Remove a Git Repository.
6.5. Rules
Rules define which resources and permission levels are applied to accounts. Rules are always applied through an account’s team membership, never directly to accounts. Accounts can only have rules applied to them if they are first assigned to a team.
6.5.1. Using Rule lookup
The Rule lookup provides administrators with a means of testing what access and permissions apply to a specific account. Given that accounts can belong to multiple teams and have multiple rules applied, the Rule lookup tool can useful.
|
Don’t include trailing slashes in the Repository name field
Currently, the inclusion of a trailing slash, e.g., myRepositoryName/ will stop the lookup from working. This issue will be fixed in a future release.
|
-
Click the Rule lookup link on the top menu bar.
 Rule lookup
 -
Enter an account name, a repository name and resource path for which you want to test access.
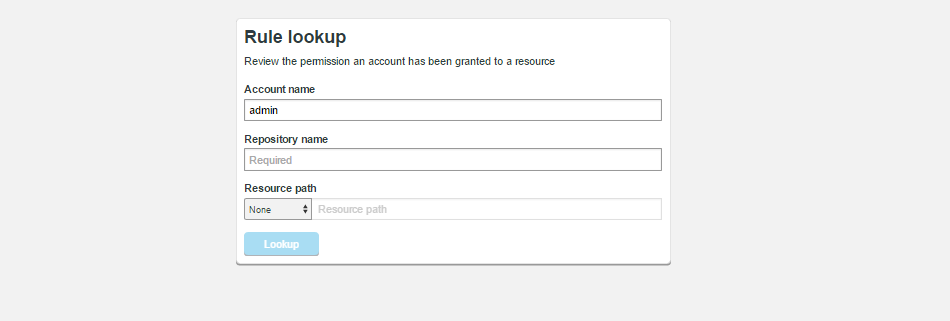 Rule lookupIf you deploy with both Git and SVN repositoriesAn additional entry field is listed that you use to select between SVN and GIT.
- Account name
-
The name of the account that you want to investigate.
- Repository name
-
The name of the repository that you wish to test against. IMPORTANT: Do not include a trailing slash.
- Resource path
-
The file system path to a specific part of the repository.
-
To check the whole repository leave this field as None.
-
To specify a path, select SVN Path for SVN repositories or Git Branch/Git Tag for Git repositories.
-
- Permissions
-
Those access permissions that apply to the selected account, for the selected repository resources will be listed in the Permissions table. For more information on permissions, see Create a rule.
Click the Lookup button to start the search. All rules that apply to the account for the specified resources are displayed in the Permissions table.
|
If you deploy with both Git and SVN repositories
An additional entry field is listed that you use to select between SVN and GIT.
|
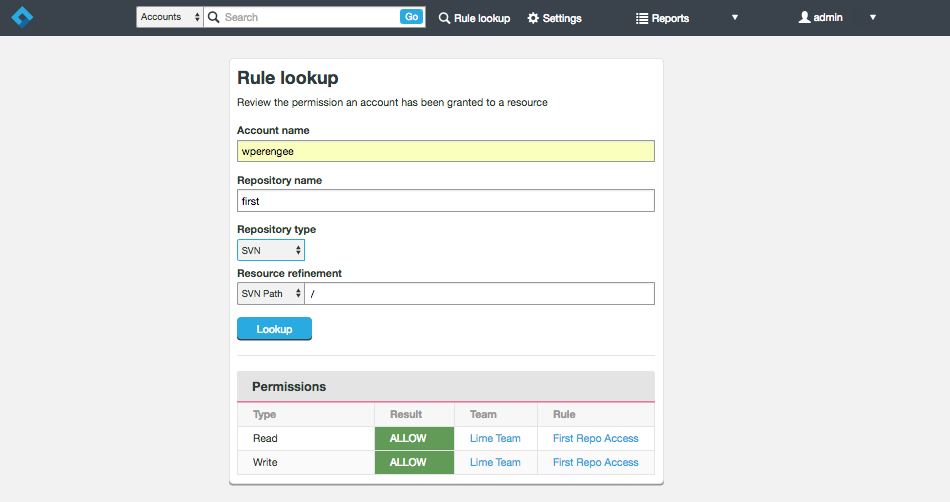
- Repository type
-
Select between the two available SCM system types.
- Resource refinement
-
When both Git and SVN are deployed then the Resource Path entry field is changed to Resource refinement.
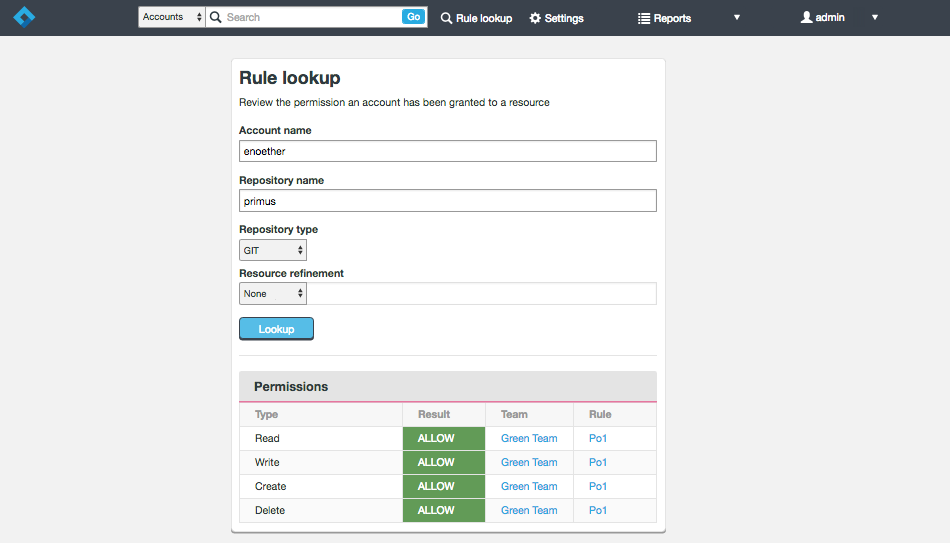
|
New in ACP 1.9
SVN wildcards and priorities are now honored when performing searches using the Rule Lookup tool.
|
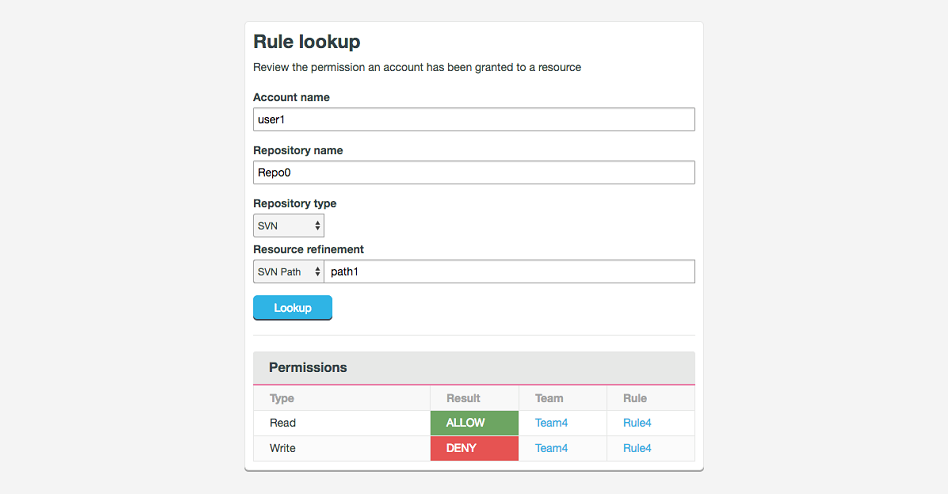
In the example, conflicts are being handled correctly now with most permissive rule on a path being displayed correctly on rule look up.
6.5.2. Create a rule
To create a new rule:
-
Log in to the admin console. As rules can only be assigned to a Team, click the Team’s name.
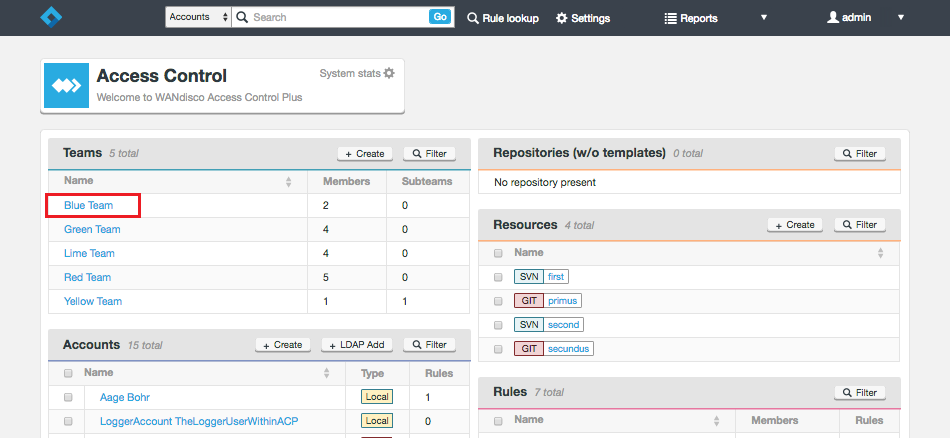 Select team
 -
On the Team screen, click the + Create button at the top of the Rules panel.
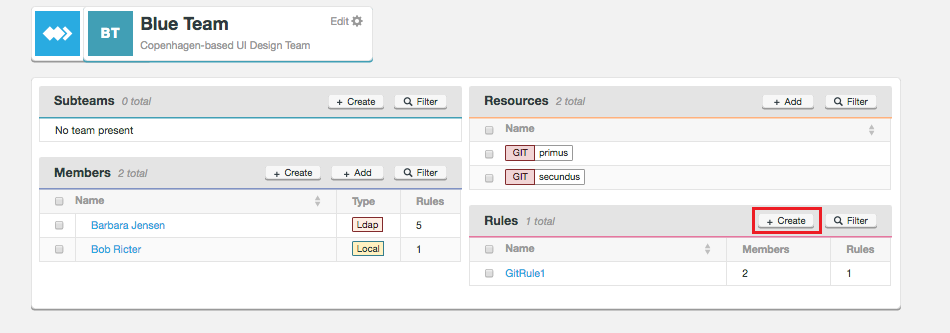 Create Rule
 -
Enter a name and click Create.
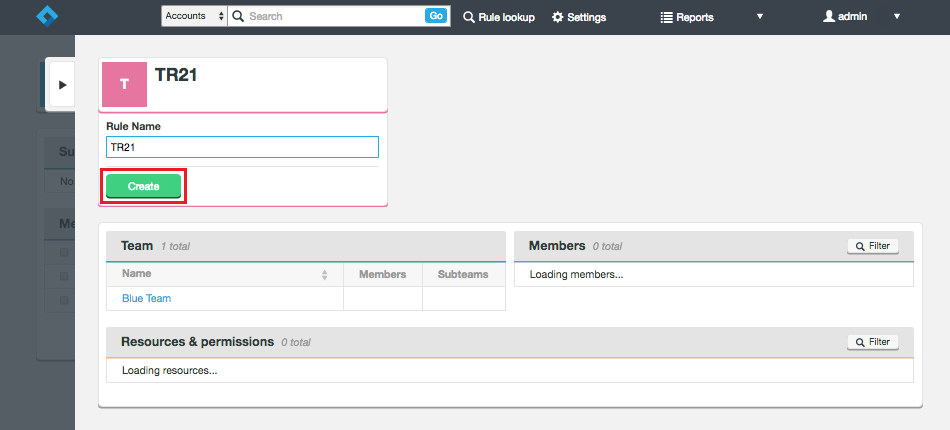 Enter name
 -
You now add accounts for which the rule you are creating will apply. You choose from the existing members of the Team you selected in step 1.
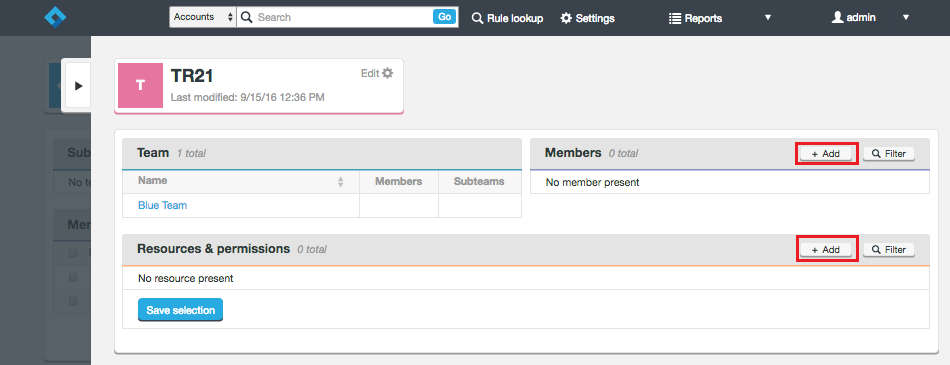 Add accounts
 -
You can Apply Rule to all current and future team members by ticking the top checkbox. You can select specific members for the rule by ticking their corresponding checkboxes.
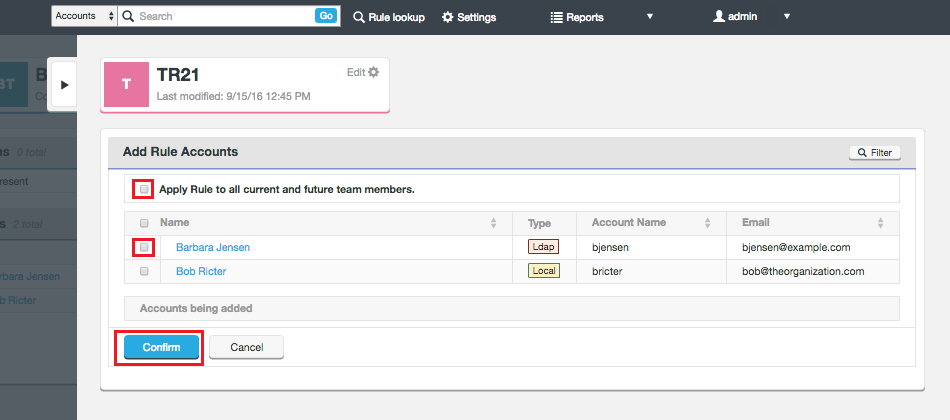 Specify membersImportant temporary limitationCurrently, when "This rule applies to all current and future team members" is checked for a rule, if we use the search box to look up an account, those rules will not show up as being associated with an account.
Workaround
Click on the account and then all their associated rules will be visible. If an account is manually added to a rule, the rule will show up in the search. -
Click Confirm to save your Member settings.
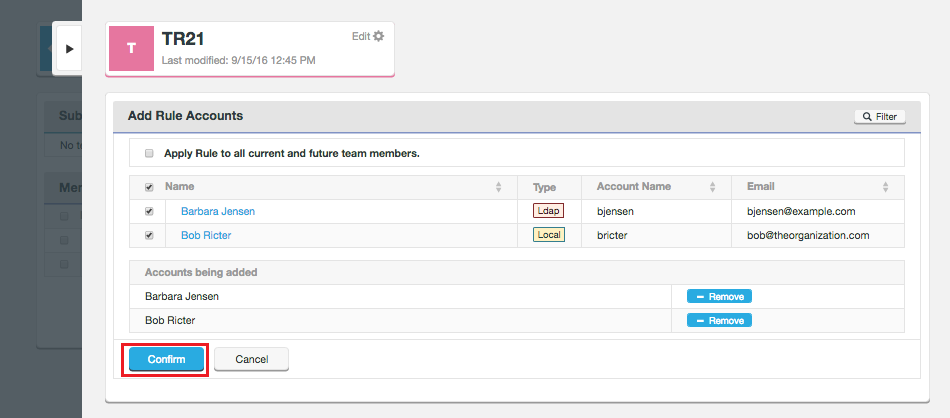 Confirm to apply rule
 -
All selected members will now appear on the rule screen. Now add some resources by clicking the + Add button at the top of the Resources panel.
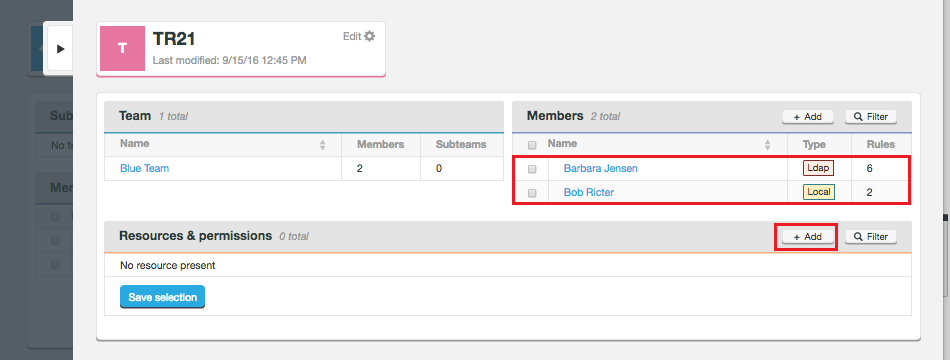 Add resources
 -
Tick the top checkbox to select all available resources for the team or select them one by one by ticking the corresponding checkbox for each applicable resource.
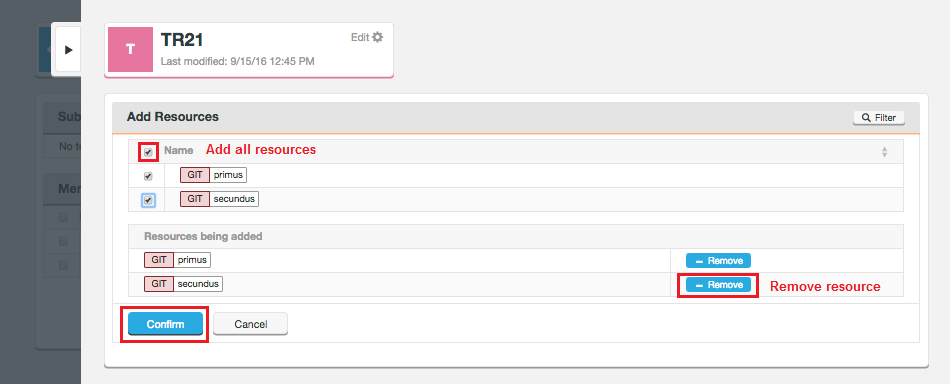 Remove resources
Any resources that are mistakenly added, can be removed using the - Remove button.
-
When all the resources that you want included in the rule are added, click Confirm.
 Confirm
 -
Finally, Select the permission types that you want to apply to each resource.
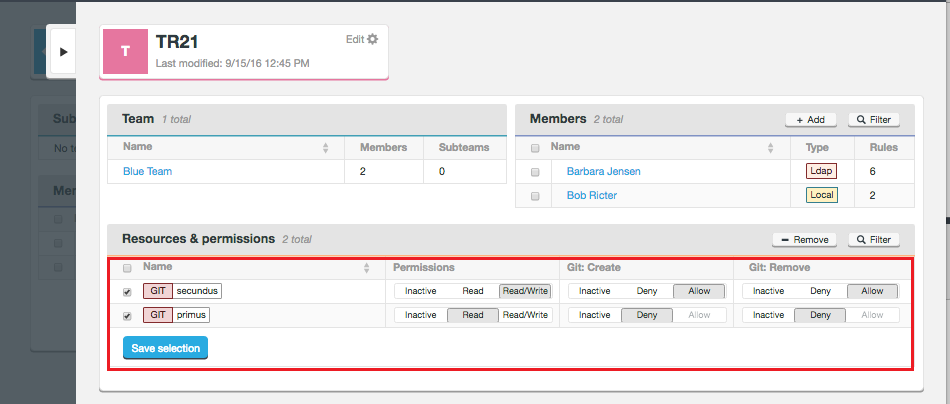 Select permissions
Permissions
- Inactive
-
Permission are not recorded for the selected resources.
- Read
-
Accounts have permission to access/read files
- Read/Write
-
Accounts have both read and write access to the selected resources.
|
Git deployments only
Additional permissions are set for Git:Create and Git:Remove.
|
6.5.3. Edit a rule
-
To edit a rule click its name on the main screen. This opens the Rule panel so that you can modify its properties.
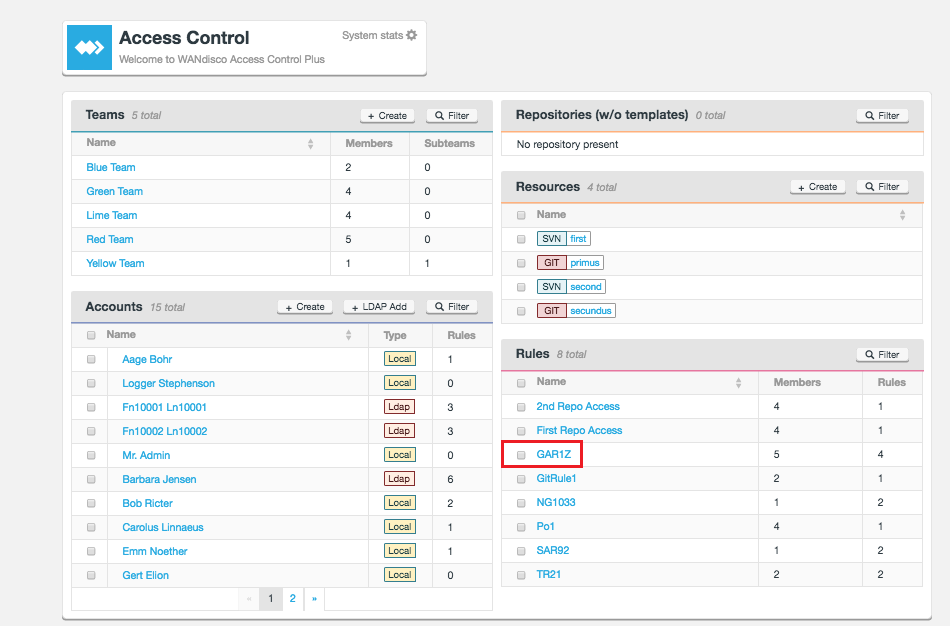 Select rule
 -
To edit a rule click its name on the main screen. This opens the Rule panel so that you can modify its properties.
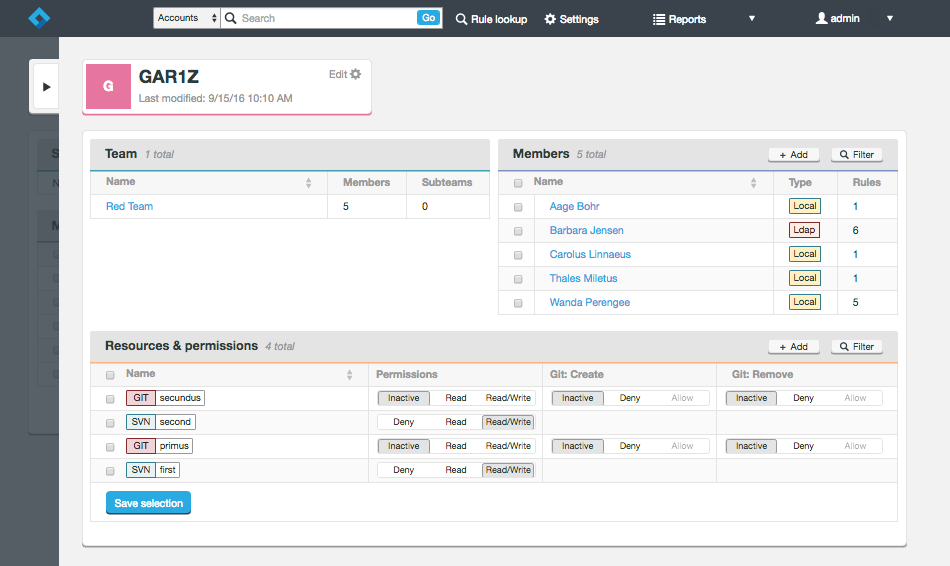 Rule panel
 -
Make a change to the Rule’s properties, such as turning on the "Apply Rules to all current and future team members"
 Make change
 -
Click the Save selection button.
 Save
Save
6.5.4. Delete a rule
-
To delete a rule, login to the ACP UI.
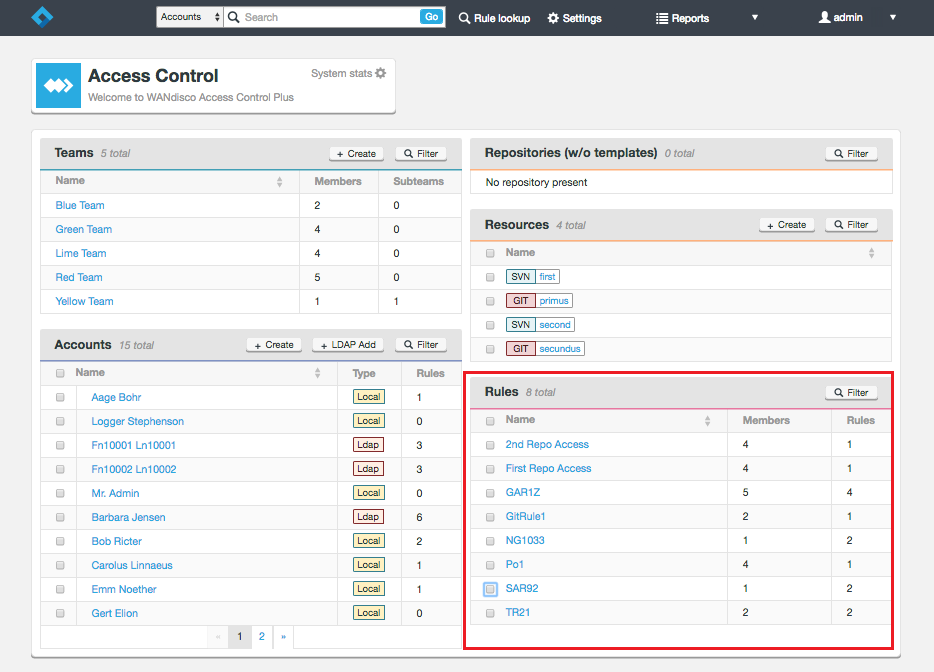 Rules panel
 -
Tick the checkbox that corresponds with the rule that you wish to delete, then click on the - Remove button.
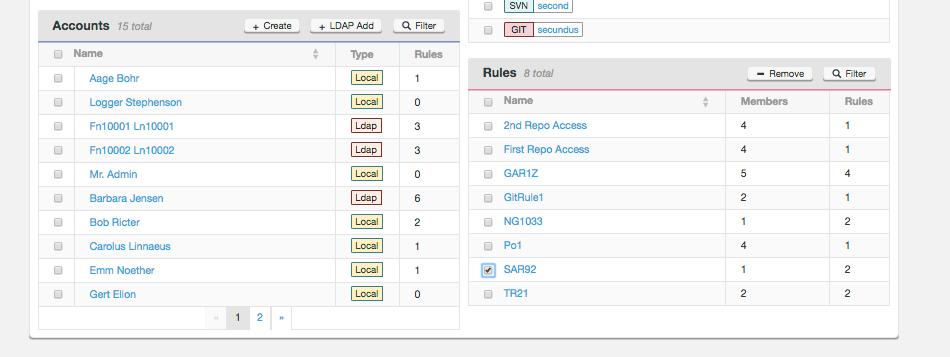 Select rule
 -
A prompt will appear. Click OK to confirm the deletion.
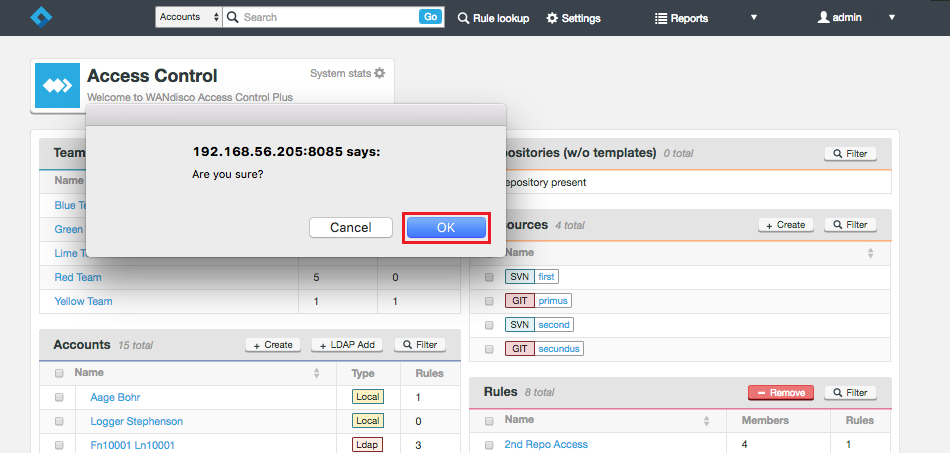 Confirm removal
6.5.5. Authentication failure instead of authorization error
When troubleshooting user access problems (in deployments that manage htpasswd/sshd files) you may notice that an active account for which only DENY rules currently apply will generate an authentication rather than authorization error on any Git/SVN access attempt. It’s as if the account didn’t exist or the wrong password was given, instead of not having the appropriate access permissions. This apparent quirk is by design. If an account doesn’t have access to any resources at all, we don’t bother writing it to the password or sshd rules file. In fact, if the account doesn’t have any associated rules then "Deny" rules are applied by default and the account will not be written to the AuthZ file either.
You should note that this does not occur if authentication is delegated to LDAP/AD or any method which does not use passwd/sshd files.
6.6. Enable/disable batch updates
Follow this procedure to enable Batch mode. Make sure you understand what it does and how it works before you do though.
|
WARNING
We strongly recommend that you use the Batch mode. This is especially critical if you are using the ACP REST API for automated configuration updates.
|
Batch updates is a mechanism that will improve performance in deployments that have large number of accounts, repositories and rules and/or deliver to many SVN MSP or GitMS nodes. See the Reference Guide for more information about Batch Updates Mode.
-
Log in to ACP and click the Settings link.
-
Click the Access Control Updates bar.
-
Tick the Enable checkbox. Confirm the switch period (in seconds) and select which node will manage the batching process. Ideally this should be the longest period that you can tolerate the AuthN/AuthZ files being behind changes to the ACP configuration - for example 1 hour. In large deployments this should not be set to less than 10 minutes.
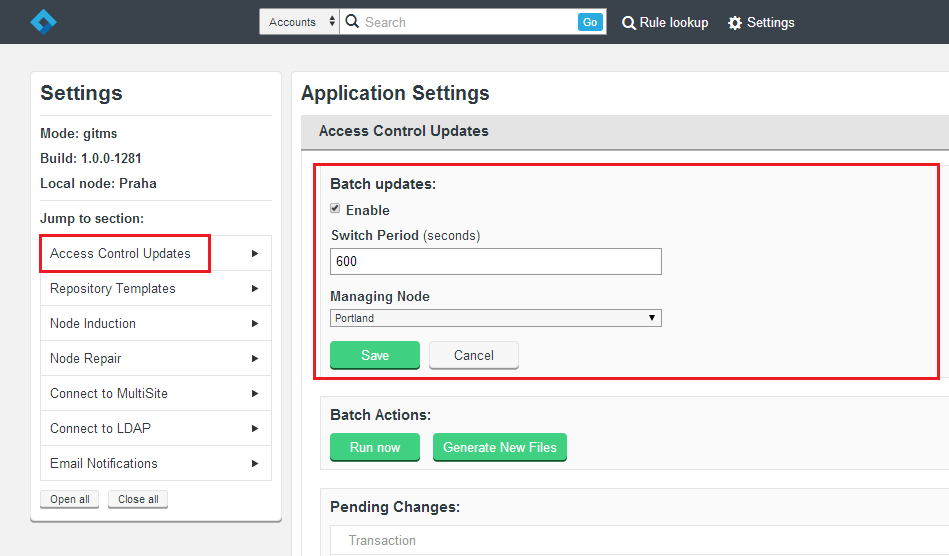 Batch updates
 -
Click on Save.
See Access Control Updates for more details.
6.7. Node Management
6.7.1. Connecting your Access Control Plus nodes
If you are deploying multiple ACP nodes, follow these steps so that the nodes communicate with each other correctly
|
Important
1. Nodes that are not the state machine creator are locked down until they are inductedYou won’t be able to create any objects (accounts, teams, rules, etc.) on the non-state machine creator nodes until you have completed the following procedure. 2. Don’t refresh the UI during an induction Do not reload the browser session or navigate away while you are using the browser to complete an induction. Doing so is likely to cause problems, possibly causing the induction to stall and/or fail. 3. There can be only one. When installing your nodes, remember that the step to assign one node as the state machine creator should only be answered Y on one of your nodes. It can be any node. It does not have to be the first one that you install. This procedure refers to the state machine creator node as the induction controller node. |
-
Repeat the Installation Procedure on your additional ACP nodes.
-
When all nodes have been installed and are running, log in to each node that you did not assign as the induction controller node. These nodes are in a waiting state, locked down until they have been inducted into the replication network.
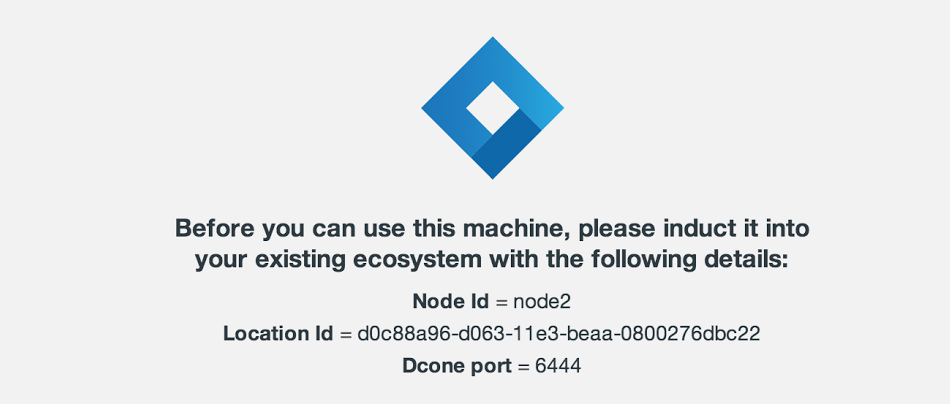 Need to induct node
You need to copy the above details into the induction controller node’s Inductor entry fields.
-
Log in to the Induction Controller Node, go to Settings, then click Node Induction, under Node Management.
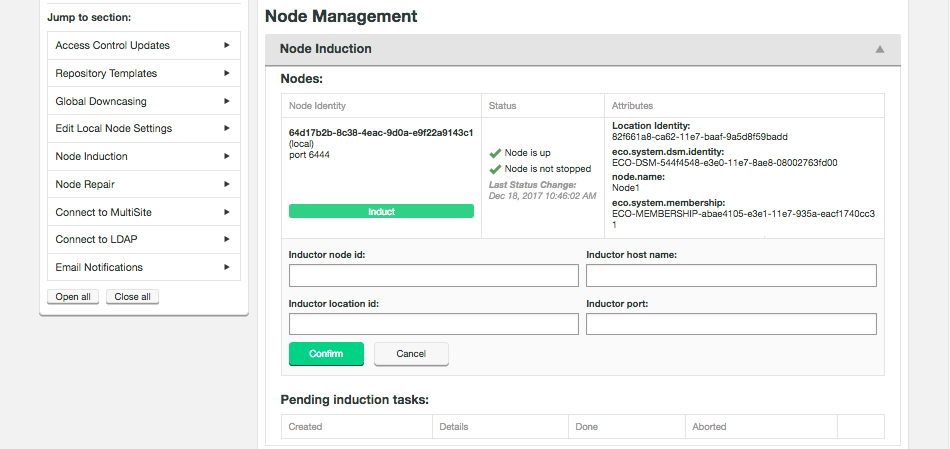 Node induction
 -
Copy the details of each node into the form. Ensure that the Inductor host name does not include the protocol prefix "http:/". When entered, click Confirm. The node appears in the list of pending nodes. Induction completes quickly.
Permit no actions until induction completesAlthough the induction process is usually very fast, if it takes a while make sure that there is no attempt to interact with the admin console screens until the induction controller node reports that the process has completed. Don’t refresh the browser session or navigate away from the UI until the induction is confirmed to have finished.Stuck in pending stateIf any node gets stuck in a pending state, you can cancel its induction and try again. See troubleshooting.
6.7.2. Node repair
Node repair is not used to handle the loss of one or more nodes when replication is setup. It is used to re-align the ACP accounts, teams, resources and rules should divergence occur. It essentially copies all of this data from the helper node to the target node.
Removing inducted nodes is done via the Node Induction page on the Settings area.
|
important
The Node Repair tool efficiently returns a divergent node back into alignment with the other nodes.
However, its misuse can worsen the situation.
Until we place blocks against potentially destructive actions, we strongly recommend that you don’t use the Repair Tool unless under direct instruction from Support.
|
6.8. Enable SSL encryption
ACP supports the use of Secure Socket Layer encryption (SSL) for securing network traffic. Currently SSL properties are not exposed through the admin console, instead you need to make edits to ACP’s applications properties file.
|
Problem: Access breaks when running Access Control with a MultiSite product (GitMS or SVN MSP)
In any deployment consisting of Multiple Cirata ALM products, SSL must either be turned ON or OFF in all products.
Not adhering to this requirement will mean that ACP will lose contact with the other Cirata ALM product(s) you use and be unable to deliver the required Authentication or Authorization files.
Do not change the SSL setting in one product without changing the SSL settings in all products.
|
/opt/wandisco/scm-access-control-plus/properties/applications.properties
If you plan to use SSL you need to run through the following steps before going into production.
6.8.1. Overview
SSL is enabled for both UI and the underlying Rest API (the administrator’s access to HTTP port will automatically redirect to HTTPS) AND for internal communication between nodes on 'application.port' and 'content.delivery port'. For this reason the switchover needs to be done on all nodes at once, otherwise those nodes that delayed their switch will no longer be able to talk to those nodes running with SSL.
6.8.2. Use stronger and faster encryption
Java’s default SSL implementation is intentionally weak so as to avoid the import regulations associated with stronger forms of encryption. However, stronger algorithms are available to install, placing the legal responsibility for compliance with local regulation on the user.
See Oracle’s page on the Import limits of Cryptographic Algorithms.
If you need stronger algorithms, i.e. AES which supports 256-bit keys, then you can download JCE Unlimited Strength Jurisdiction Policy Files that can be installed with your JDK/JRE.
| To follow this procedure you will need to create a keystore and a truststore. |
Keystores and truststores in a nutshell
You might be familiar with the public key system that allows two parties to use encryption to keep their communication with each other private (incomprehensible to an intercepting third-party).
The keystore is used to store the server certificates and the keys that enable access to them that are used in this system. However, in isolation, the system remains susceptible to the untrustworthy server certificates, where a server certificate and the client can then be unaware that it will communication with an impostor. Certificate Authorities, CAs, are trusted third parties that issue digital certificates that verify that a given server certificate is trustworthy. The information about which server certificates to trust is stored in the truststore. The truststore is like a keystore file, but used for certificates instead of keys. An SSL implementation requires the use of both truststore and keystore files.
6.8.3. SSL enabling procedure
-
Create a new directory in which to store your key files. This directory can be placed anywhere. In this example it is within the Access Control Plus file structure.
-
Open a terminal and navigate to
/opt/wandisco/scm-access-control-plus/config/.From within the /config folder make a new directory called ssl.-rw-rw-r-- 1 wandisco wandisco 29 Apr 5 16:53 main.conf [User@redhat6 config]$ mkdir ssl
-
Go into the new directory.
cd ssl
Copy your private key into the directory. If you don’t already have keys set up you can use JAVA’s keygen utility, using the command:
keytool -genkey -keyalg RSA -keystore wandisco.ks -alias server -validity 3650 -storepass <YOUR PASSWORD>
KnowledgebaseRead more about the Java keystore generation tool in the KB article link:[Using Java Keytool to manage keystores.- -genkey
-
Switch for generating a key pair (a public key and associated private key). Wraps the public key into an X.509 v1 self-signed certificate, which is stored as a single-element certificate chain. This certificate chain and the private key are stored in a new keystore entry identified by alias.
- -keyalg RSA
-
The key algorithm. In this case RSA is specified.
- wandisco.ks
-
This is the filename for your private key file that will be stored in the current directory.
- - alias server
-
Assigns an alias "server" to the key pair. Aliases are case-insensitive.
- -validity 3650
-
Validates the keypair for 3650 days (10 years). The default is 3 months.
- - storepass <YOUR PASSWORD>
-
This provides the keystore with a password.
No password specifiedIf no password is specified on the command, you are prompted for it. Your entry is not masked so you (and anyone else looking at your screen) will be able to see what you type.
Most commands that interrogate or change the keystore need to use the store password. Some commands may need to use the private key password. Passwords can be specified on the command line (using the -storepass and -keypass options).However, you should not specify a password on a command line or in a script unless it is for testing purposes, or you are on a secure system. When placed into the ACP properties file you first need to manually encrypt it, as described in the section below:
The utility prompts you for the following information:What is your first and last name? [Unknown]: What is the name of your organizational unit? [Unknown]: What is the name of your organization? [Unknown]: What is the name of your City or Locality? [Unknown]: What is the name of your State or Province? [Unknown]: What is the two-letter country code for this unit? [Unknown]: Is CN=Unknown, OU=Unknown, O=Unknown, L=Unknown, ST=Unknown, C=Unknown correct? [no]: yes Enter key password for <mykey> (RETURN if same as keystore password):
-
With the keystore now in place, you next need to make the edit to the application.properties file.
node.id=bouncer
application.hostname=172.16.5.94
application.port=6888
#content server port
content.server.port=6845
jetty.http.port=8882
database.location=/opt/wandisco/scm-access-control-plus/database
application.location=/opt/wandisco/scm-access-control-plus
content.location=/opt/wandisco/scm-access-control-plus/content
jetty.https.port=8084
ssl.enabled=true
ssl.debug=false
ssl.keystore=
ssl.keystore.password=

#Option SSL parameters

ssl.key.alias
ssl.key.password - SimpleCrypt encrypted
ssl.truststore
ssl.truststore.password - SimpleCrypt encrypted
- ssl.enabled
-
Switch for enabled SSL. Value: true
- ssl.debug
-
debugging mode. Don’t enable by default. Value: false.
- ssl.keystore
-
The absolute path to the keystore.
- ssl.keystore.password
-
The password for the keystore - this password must be encrypted using the SimpleCrypt class. We’ve provided a little utility to handle the encryption:
- ssl.key.alias
-
Specify an alias for the private key. This is the name used to identify the key inside the keystore.
- ssl.key.password
-
If it’s required. Password to the key stored in the keystore. Encrypt it as described above.
- ssl.truststore
-
Path to the truststore file
- ssl.truststore.password
-
Password for the truststore - must be encrypted as above.
|
Critical
The ssl key password must be identical to the ssl keystore password. JAVA’s implementation does not allow these 2 to be different.
|
Changes in any of these values require a restart of ACP. Any invalid value is likely to result in ACP not running properly.
|
SSLv3 Support
SSLv3 is supported (though not enforced). If your browser setting has SSLv3 disabled, you will get a handshake error message.
If it has both SSLv3 and TLS enabled then, depending on the browser, it will try to switch from TLS to SSLv3 during the handshake.
If you receive a handshake error message in your browser, make sure that TLS is disabled and only SSLv3 is enabled. All current browsers support SSLv3.
|
Encrypting passwords
When updating passwords in the application.properties file or the acp_sender.conf file, the passwords need to be an encrypted version, not clear text.
We’ve provided a tool to handle password encryption:
scm-access-control-plus-cryptPassword.jar
Use the tool as follows:
cd <product-installation-directory>
java -jar scm-access-control-plus-cryptPassword.jar <password-to-encrypt>
The tool will output the encrypted text to stdout. It will then need to be copied and pasted into the appropriate line in the configuration file. A restart is needed once these changes have been made.
6.8.4. Set the server key
In the keystore, the server certificate is associated with a key. By default, we look for a key named server to validate the certificate. If you use a key for the server with a different name, enter this in the SSL settings.
6.8.5. Export the certificate
Next, if using self-signed certificates, you need to export the certificate so that it can be added to the truststore as the trusted certificate. Again, using Java’s Keytool. Note that some administrators may want to simply combine all of their server certificates into a single keystore and then use that keystore as the truststore. The only thing they’ll need to do is
keytool -export -alias server -file <Cert-Name>.cert -keystore wandisco.ks
Enter keystore password:
Certificate stored in file <Cert-Name>.cert
After exporting the certificate use creates a keystore file named myTrustStore in the current working directory and imports the first certificate into the truststore with an alias of <Cert-Name-Alias>. The format of myTrustStore is JKS. Each additional run of the command adds additional certificates to the TrustStore. When completed, myTrustStore is available to be used as the truststore.
6.8.6. Auditing setting and SSL
If auditing is installed:
. Update the setting acp_agent.sinks.acpSink.acp_ssl_enabled in the <flume install dir>/receiver/conf/flume_acp_receiver.properties file to:
acp_agent.sinks.acpSink.acp_ssl_enabled = true
acp_agent.sources.avroSrc.ssl = true or false
acp_agent.sources.avroSrc.keystore = kestore file
acp_agent.sources.avroSrc.keystore-password = password for keystore
acp_agent.sources.avroSrc.truststore = truststore file
acp_agent.sources.avroSrc.truststore-password = password for truststore
<flume install dir>/receiver/stopFlume.sh
<flume install dir>/receiver/runFlume.sh
6.8.7. SSL Troubleshooting
A complete debug of the SSL logging will be required to diagnose the problems. To capture the debugging, run the java process with:
'-Djavax.net.debug=all' flag.
To enable the logging of SSL implemented layer, turn the logging to FINEST for the com.wandisco.platform.net package.
Problem: Access breaks when running Access Control Plus with a Cirata MultiSite product (GitMS or SVN MSP).
Example error message
May 26, 2015 8:55:55 PM com.wandisco.acp.repository.integration.RepositoryPollingThread logVerboseWarningWhenPollingFails
WARNING: git-polling-thread1:[Error polling repositories from https://10.20.28.155:8082/api/ as user admin, password is set, [com.wandisco.vcs.api.exception.VCSAPIConnectionException: com.sun.jersey.api.client.ClientHandlerException: javax.net.ssl.SSLException: Unrecognized SSL message, plaintext connection?
6.9. Connect to MultiSite
This section describes how to connect ACP to an existing GitMS or SVN MSP setup:
-
Log in to the admin console. Click the Settings link on the top menu.
-
Click the Connect to MultiSite bar in the External Applications section.
 Connect to MultiSite
 -
Enter the required MultiSite details:
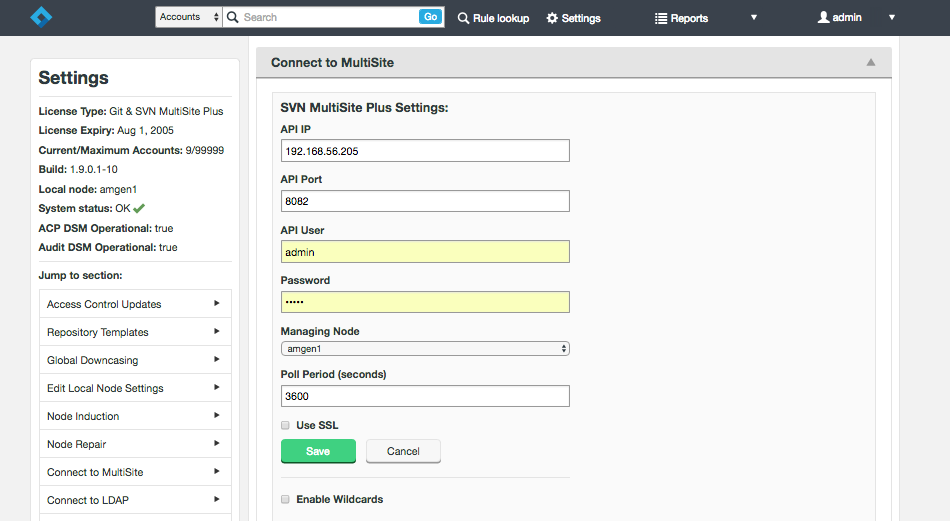 Enter SVN details
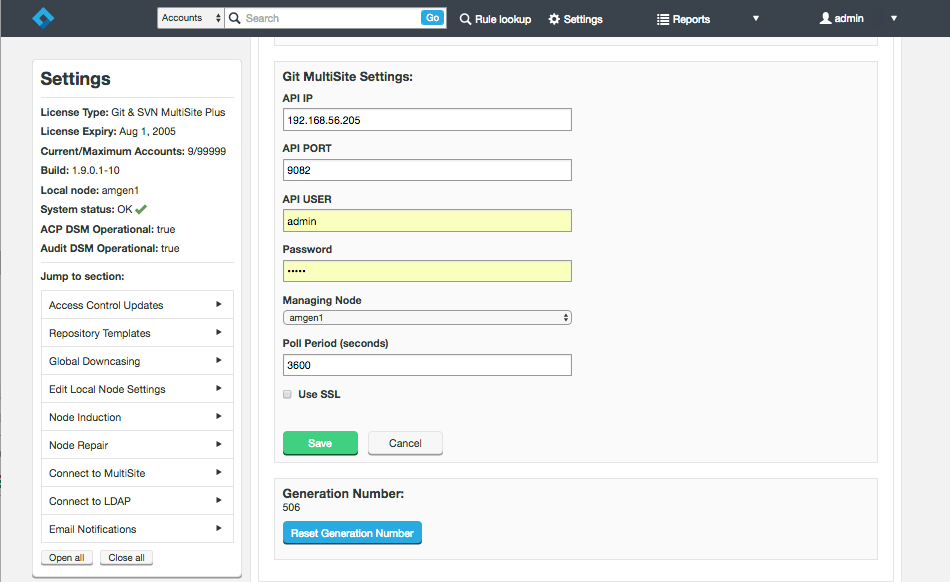 Enter Git details
- API IP
-
The IP address of the MultiSite node.
- API PORT
-
The port used for Rest API traffic (Default is 8082).
- API User
-
Username for ACP to use to access the MultiSite node.
- Managing Node (Drop-down)
-
Select which ACP node will manage communication with MultiSite.
- Poll Period
-
The frequency (in seconds) that ACP will check for changes on the MultiSite node. Default = 3600 (1 hour). Minimum = 60. First poll happens immediately on setting this value.
Don’t set this value too lowIf you have a large deployment, synchronization will be resource hungry. - Use SSL (checkbox)
-
Enable SSL encryption for the API traffic.
- Password
-
Password for the MultiSite account.
- Retype Password
-
Repeated password entry (to ensure you entered it correctly above.
- Save/Cancel (buttons)
-
Click Save to store the details, or Cancel to clear them. When you have added all the details, click Save.
-
Return to the main ACP screen. If there are Repositories being handled by MultiSite, they’ll be automatically synced with ACP, appearing in the Repositories panel.
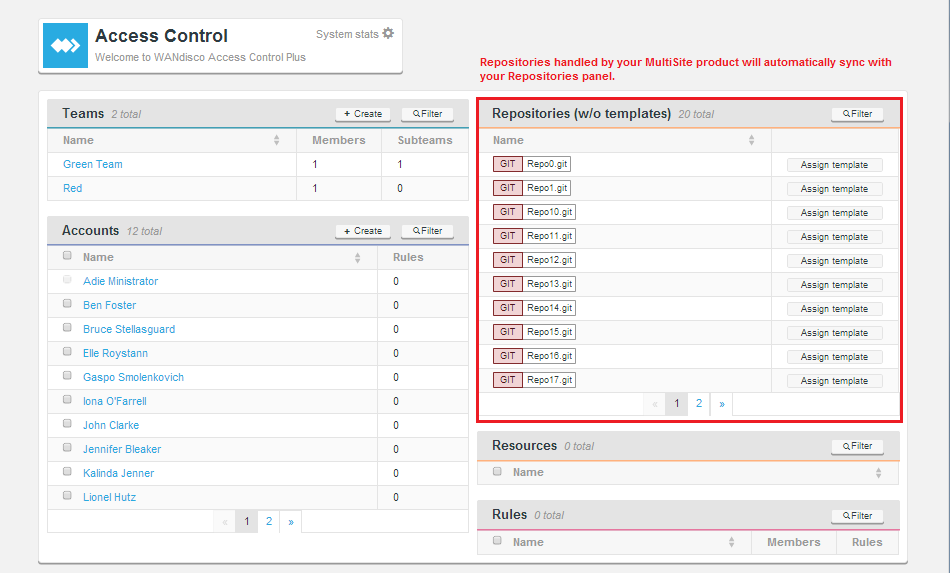 Repositories
At this point the repositories are known to ACP, but it still needs to be configured with authentication and/or authorization files for each repository using the Repository templates options.
6.10. Connect to LDAP
This section describes how to configure ACP to query one or more LDAP authorities in order to pull in accounts for your Git or Subversion users.
-
The "Group DN" attribute can now be a comma separated list.
-
The "Group DN" field is no longer required. Whether or not a customer’s environment requires the "Group DN" field very much depends on their LDAP schema.
6.10.1. Team LDAP query field
The following table shows you how the Group DN is used, when evaluating the Team LDAP query field.
| Contents of the Team LDAP query field: | Resulting evaluation: |
|---|---|
is a DN |
The DN will be used to define the team membership (without using the Group DN) |
is not a DN AND the Group DN is not empty |
Team LDAP query contents are considered a filter, applied to Group DN field |
Team LDAP query contents are not a DN AND the Group DN field is empty |
Team LDAP query contents are considered a filter and applied to the Account DN field |
Team LDAP query contents not a DN AND Group and Account DNs are empty |
Error message is emitted |
The result of this set of behaviors is a very high degree of flexibility which is required to support the vast range of possible LDAP schemas.
6.10.2. Example LDAP/AD deployments using "Team Query"
-
If your LDAP schema is such that all groups can be found as sub-entries of a single Group DN then you should fill this in. It will be used during the "Test" phase of defining the LDAP authority and will be used later when the filter specified in the Team LDAP query filed is tested and used.
-
If your LDAP schema is not flat, and your groups are DNs found scattered around the LDAP DIT (directory information tree) then you don’t need to fill in the Group DN Attribute. If you do fill it in then it will be used during the "Test" phase of defining the LDAP authority. It may be used later on as well but need not be (see above). In this case the Team query field will usually be a DN (but simple teams could be constructed by filters against the "Account DN").
6.10.3. LDAP Settings
The settings tell ACP how to use any available LDAP authorities that you connect up.
- Synchronization Period (minutes)
-
ACP reruns your LDAP queries with this frequency, picking up any changes that may have occurred within the LDAP service. Default = 60 (1 hour). Minimum = 1. First synchronization happens immediately on setting this value.
|
Do not set the period too low, or to zero.
You shouldn’t need to constantly hit your LDAP authority. If you have a large deployment, synchronization will be resource hungry. Please do not set this to less than 5 minutes in any environment other than one used for demonstration purposes.
|
| If you perform an import from an earlier version of Access Control you must ensure that ACP does not poll the LDAP authorities during the process. You can do this by setting the Synchronization Period to 999 (minutes) just for the duration of the import. |
- Allow Local Users
-
This checkbox is ticked by default. When ticked it is possible to field both LDAP-controlled and manually entered Accounts. Some organizations don’t permit manually entered accounts because they need to be sure that all accounts are managed through their LDAP. If this is the case, untick the checkbox when your LDAP accounts have been successfully imported.
| If you are running with Local Users disabled and your LDAP service fails, you can re-enable local users as part of the forgotten password process. This process automatically re-enables local users, allowing you to gain access to the admin console. |
6.10.4. Entering LDAP Authority details
This is the entry form for adding any number of LDAP Authorities. Multiple Authorities are checked in the order that matches their order number (see below). The lower the order number, the earlier the authority is checked.
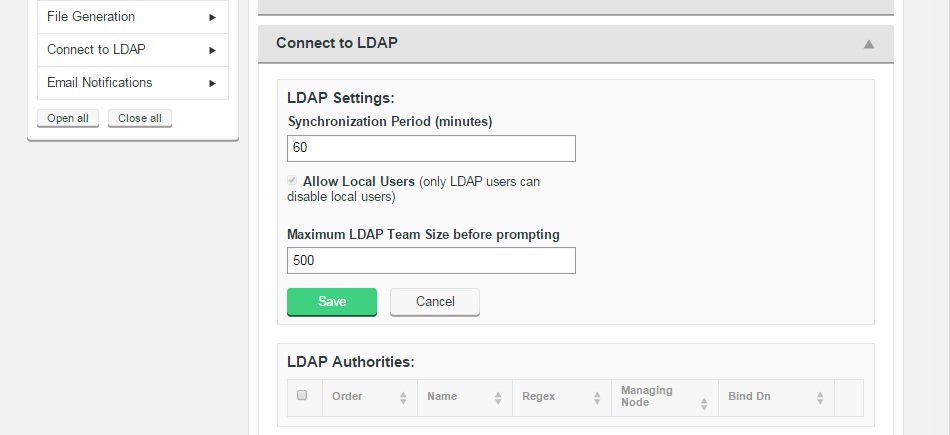
LDAP Settings
- Synchronization Period (minutes)
-
How long ACP waits before each poll of the LDAP service for updates. Default:60 minutes
- Maximum LDAP team Size before prompting
-
This property acts as a safety valve for when you create new teams in very large organizations. If an LDAP query generates a team that is larger than this number, you will be asked to confirmation before it is imported. This can be used to prevent the accidental creation of teams that contain hundreds of thousands of accounts that would negatively impact performance during
- LDAP Authorities
-
Lists the existing LDAP services that are connected to ACP. LDAP authorities are added using the Add LDAP Authority table.
Add LDAP Authority
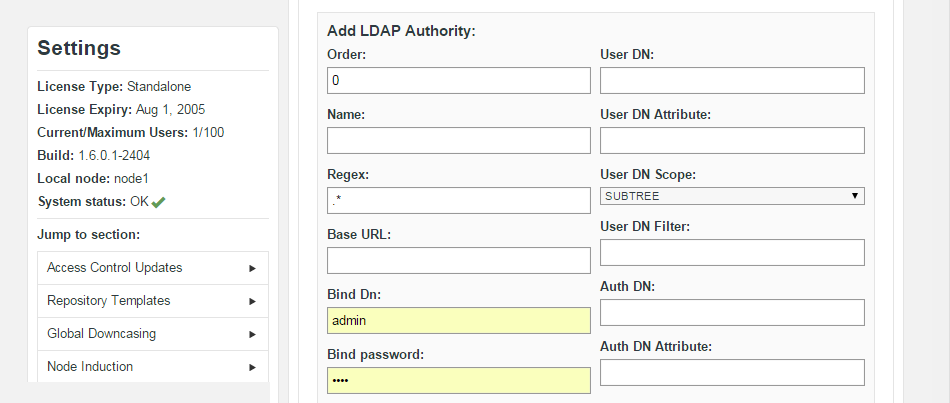
- Order
-
The priority given to the LDAP URL. For example, a location order of 1 means that Access Control will look within that defined authority for a user first. If unsuccessful then Access Control will then check the authority with the next order number, e.g. 2.
- Name
-
A given name for the authority. Names are only used as labels in ACP to make it easier to manage multiple LDAP authorities.
- Regex
-
Enter a regular expression to set a pattern for matching against the account name for the available LDAP authorities. The expression, is applied locally to limit unnecessary queries against available LDAP authorities. For instance, setting an expression that specifies a top-level domain can ensure that authentication of a user (whose username is their email address) doesn’t need to run through all LDAP authorities. Instead it can be checked only against those servers that match the regular expression, in this case, the .* match anything wildcard.
|
Using the Regex field:
In general the Regex field should be considered as Deprecated; please contact Support if you currently use anything other than ".*"
|
- Base URL
-
The base URL is the point in the LDAP "tree" where you start your searches. Using the format ldap(s)://hostport/basedn?attribute.
- Bind DN
-
The distinguishing Name is used by ACP to authenticate to LDAP in order to read LDAP groups, etc. In the case that the customer’s LDAP disallows unauthenticated LDAP queries.
- Bind password
-
Corresponding password for the administrator account.
User DN Settings
The User DN is for the Subversion accounts that ACP will pull in from LDAP, that will be used for building teams and for adding to the authz file. This includes both user accounts and service/application accounts.
- User DN
-
Distinguishing name for the account users.
- User DN Attribute
-
The name of the uid attribute for a user in the directory.
- User DN Scope
-
DN Scope determines how deeply into a directory searches are made. Combined with the Base DN and User DN filter to set the limits for which users are matched for authentication. Options are Base, One or Subtree.
- User DN Filter
-
LDAP Search string used to filter the directory for applicable accounts. For example, you can remove disabled or locked accounts from user account polling. See LDAP/AD filter for disabled and locked accounts.
Auth DN Settings
The Auth DN is used by ACP to authenticate LDAP accounts that are logging into ACP.
- Auth DN
-
The distinguished name of the a directory container that can be combined with the Auth DN Attribute and the Auth DN Attribute value (what the user typed for an account) to form a complete LDAP DN.
- Auth DN Attribute
-
Used to identify the LDAP account name’s type (e.g. "uid").
- Auth DN Scope
-
Auth DN Scope determines how deeply into a directory searches are made. Combined with the Base DN and User DN filter to set the limits for which accounts are matched for authentication. Options are Base, One or Subtree. See further explanation of the different scope options.
- Auth DN Filter
-
LDAP string that is used to filter a directory for valid accounts.
Group DN Settings
- Group DN
-
Group distinguished name identifies a container for applicable accounts in a directory.
- Group DN Attribute
-
The directory attribute that corresponds with the group distinguished name, used to authenticate against.
- Group DN Scope
-
Group DN Scope determines how deeply into a directory searches for groups are made. Options are Base, One or Subtree.
- Group DN Filter
-
LDAP string used to filter for valid groups.
- User Request Page Size
-
This property is only used in conjunction with Group DN-based LDAP queries. It is used to override the system default for the maximum number of user records that can be requested by a single userDN query. A request for a large number of users is split into multiple requests to safeguard server performance and stability.
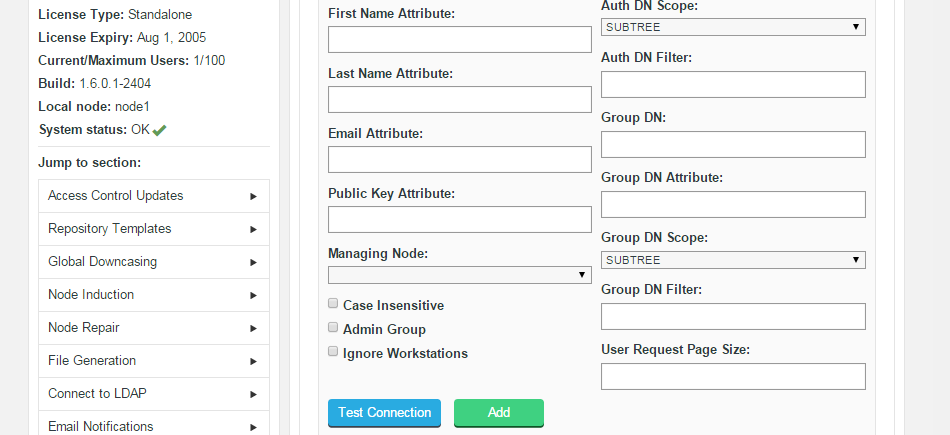
- First Name Attribute
-
Attribute used for an account holder’s first name.
- Last Name Attribute
-
Attribute used for an account holder’s last name.
- Email Address Attribute
-
Attribute that corresponds with a user’s email address.
- Public Key Attribute
-
Used with the LDAP service is encrypted, requiring ACP to be setup with an SSH key pair. As with any public key entry, make sure that no line breaks are introduced to the key, it should be one long string, no breaks.
- Managing Node
-
Identifies the node from which LDAP settings are managed.
- Case Insensitive (checkbox)
-
Tick this checkbox if you need MultiSite to stop distinguishing between usernames that differ only by their case pattern. For example, with the "Case Insensitive Usernames?" unticked (by default), MultiSite treats username "MelissaJones" and username "melissajones" as two distinct users. Support for username case insensitivity is a feature that may be required when Active Directory.
- Admin Group (checkbox)
-
Tick this checkbox if the authority will return "System Administrators" accounts that are able to access the MultiSite admin console.
- Ignore Workstations
-
This function is no longer applicable in ACP’s current form and will be removed in a future release. This feature allowed calls from workstations such as build servers to be ignored, when Access Control was based on a proxy architecture.
|
CAUTION
We strongly recommend that you do not add LDAP-based accounts that use the same account name.
Currently you can have two accounts with the same name, because accounts can be distributed across any number of authorities.
If you attempt to add two accounts that use the same account name, their addition fails and an error message appears in the logs that warns you: Incorrect result size: expected 1, actual 2.
|
6.11. Email notification
The mail notification system lets you connect ACP to an email gateway server. This enables it to send an alert email concerning important system events. It’s possible to add as many email gateways as you like, so that the loss of a single mail server need to result in the halting of notifications.
The following procedure shows you have to set up an email gateway.
-
Log in to the ACP admin console. Click the Settings link.
-
Click the Email Notifications bar.
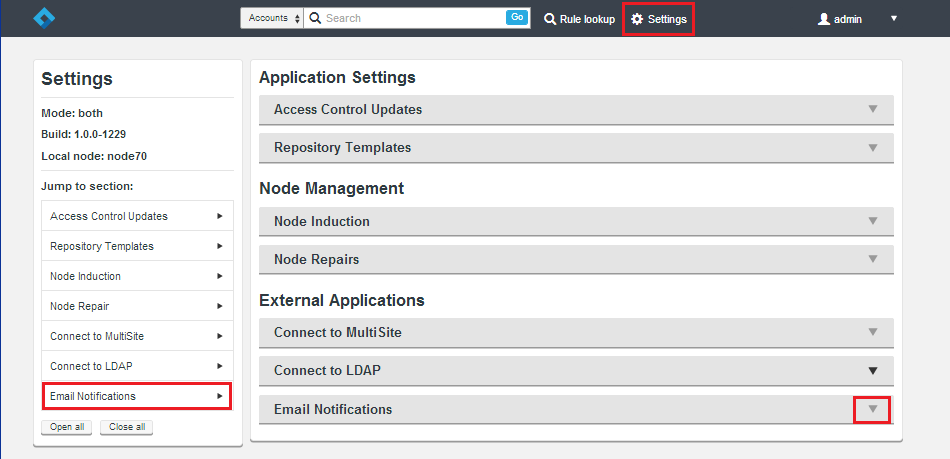 Select email notifications
 -
Fill out the entry form for your gateway.
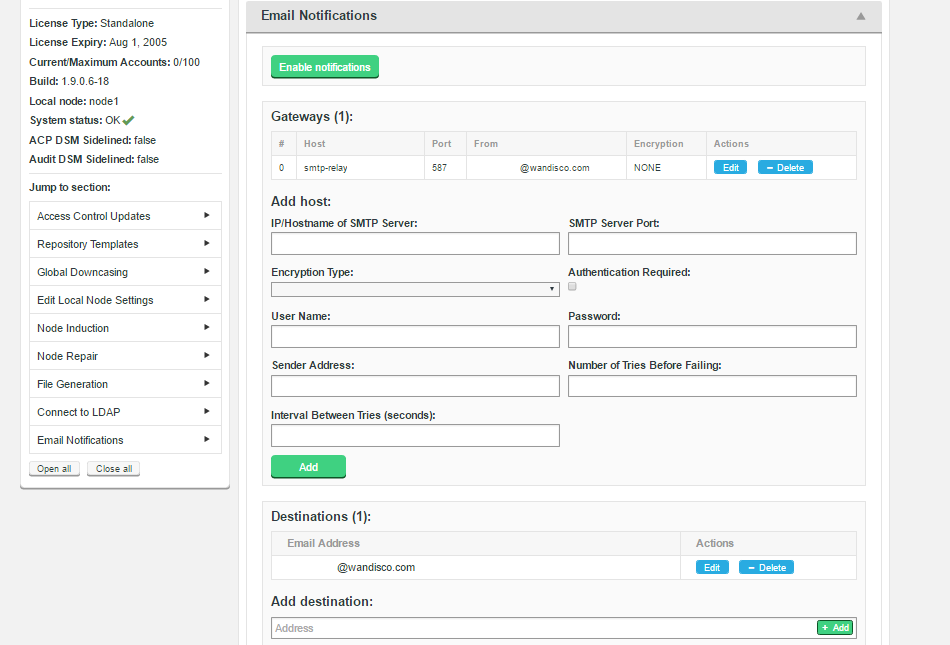 Enter information
- IP/Hostname of SMTP Server
-
Your email server’s address.
- SMTP Server Port
-
The port assigned for SMTP traffic (Port 25 etc).
- Encryption Type
-
Select your server’s encryption type: None, SSL (Secure Socket Layer) or TLS (Transport Layer Security). SSL is commonly used. For tips on setting up suitable keystore and truststore files see Setting up SSL Key pair.
If you’re not familiar with the finer points of setting up SSL keystores and truststores we recommend that you read: Using Java Keytool to manage keystores.
- Authentication Required
-
Show whether you need a username and password to connect to the server by entering either "true" or "false".
- User Name
-
If authentication is required, enter the authentication username here.
- Password
-
If authentication is required, enter the authentication password here.
- Sender Address
-
Provide an email address that your notifications will appear to come from. If you want to be able to receive replies from notifications you’ll need to make sure that this is a valid and monitored address.
- Number of Tries Before Failing
-
Set the number of attempts SVN MSP makes to send out notifications.
- Interval Between Tries (Seconds)
-
Set the time, in seconds, between your server’s attempts to send notifications.
-
When you’ve entered all the details, click the Add button.
 Add
Add -
When a gateway is in place you need to add a list of email addresses to where ACP will actually send notification emails. Enter addresses on the Add destination entry field and click + Add.
-
Before notifications can be sent, enable the service by ticking the Enable notifications by clicking the Enable notifications button.
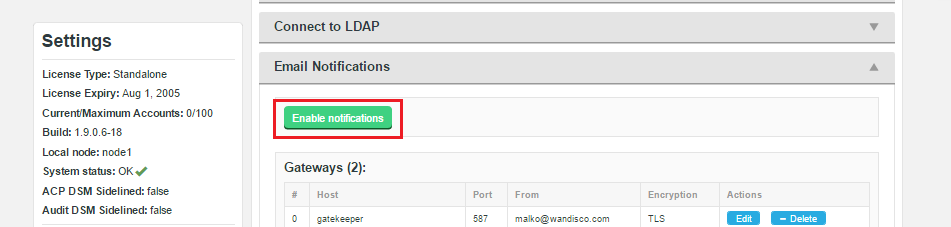 Enable notifications
You can reclick the button if you need to disable the feature, without removing or editing the gateway or destination settings.
6.12. Create a repository template
In ACP’s backend, you can manage and replicate the core password and/or AuthZ files. To do this you need to create a template that will contain the path location for these files, as well as a number of optional parameters. When set up, repositories that are added to Access Control can be assigned the template, telling ACP how to handle the repository’s necessary files.
| If you configure repository templates to send files, the files are sent even if they are not linked to repositories. |
To create a repository template:
-
Log in to the admin console. Click the Settings link on the top bar.
 Settings
 -
Click the Repository Templates bar under in the Applications Settings, near the top of the list. Click Create.
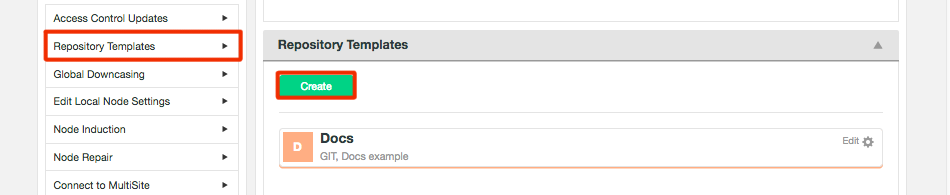 Create template
 -
Complete the small entry form:
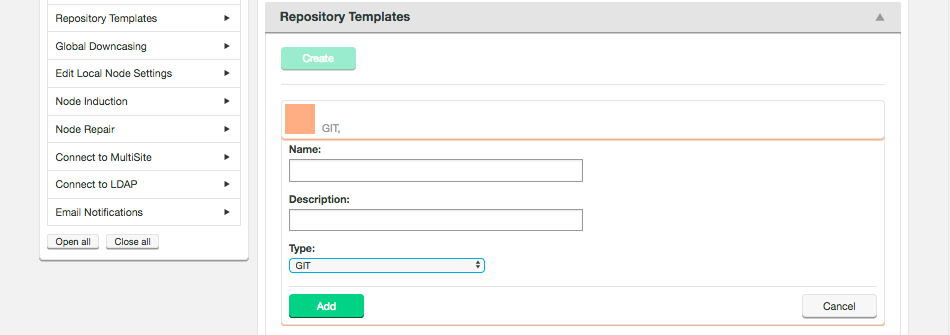 Add information
- Name
-
A useful label for the product to refer to this repository.
- Description
-
A description of the template to help you distinguish from it from potential others.
- Type
-
From the dropdown list select your SCM product: Git or SVN.
Never change the Type of a repository template!Do not add Generators to a repository template for more than one Type of repository. If you have accidentally started to create the wrong Type of template, always Delete the template and start over.
-
Click Add to save the entry form.
-
The screen is parsed, your selection detected and a Generators dropdown list appears. From this dropdown you can select multiple user access assets:
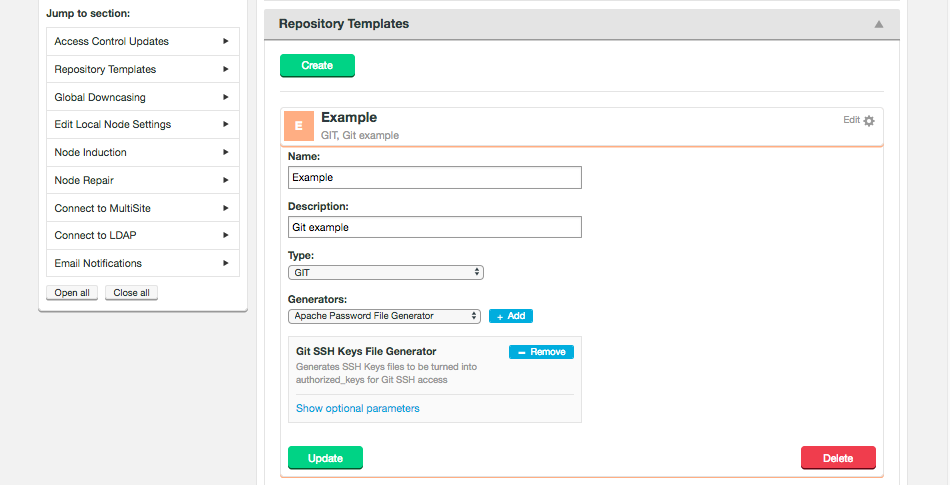 Select user access
- SSH Key File Generator
-
Generates an "authorized_keys" file that with be delivered to the specified hosts into the "~/ .ssh" directory of the account owning the repositories by GitMS (For Git) or by MSP (for replicated SVN) or by ACP (for standlone SVN), read more for SVN or Git.
- Apache Password File Generator
-
Generates Apache password files that will be delivered via the same mechanism as SSH Key File Generator files (see above). read more.
- SVN AuthZ File Generator
-
Generates the AuthZ file (under SVN), read more.
- GIT AuthZ File Generator
-
Generates the AuthZ file (under Git), read more.
Check that you have just 1 of each type of generatorMake sure that you create just 1 of each type of generator by navigating away and then back again. Click Remove to get rid of duplicate generators.
For more information on how these files are managed and distributed see Generic File Replication.
-
Enter the Target Location. Find location of generated file on target node. Absolute path.
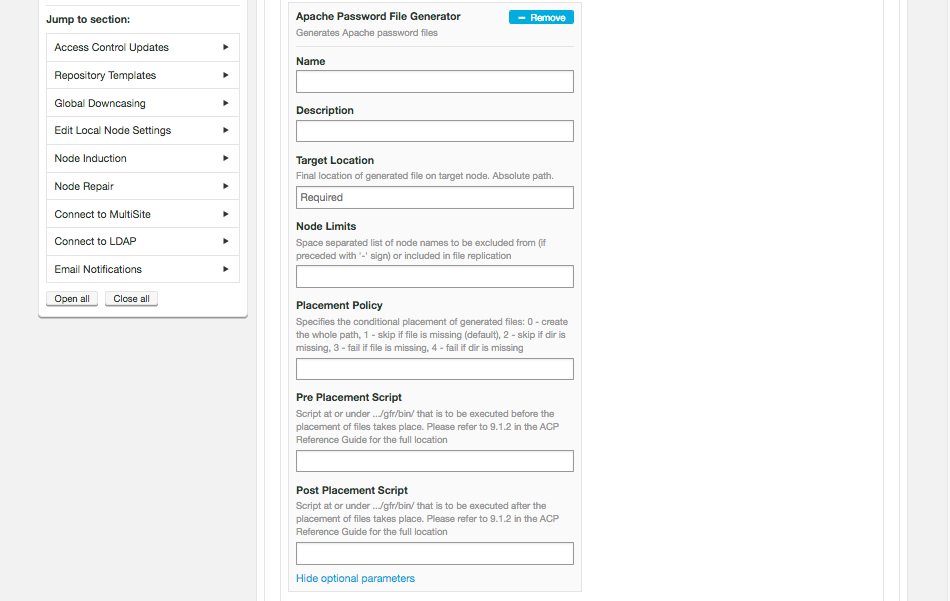 Enter the Target Location
Click on Show optional parameters to see a number of extra entry fields. When you have completed the entries you need, click on the Update button.
-
You can create any number of Repository Templates, reflecting how many separate collections of repositories you are running where each requires a different series of user management files.
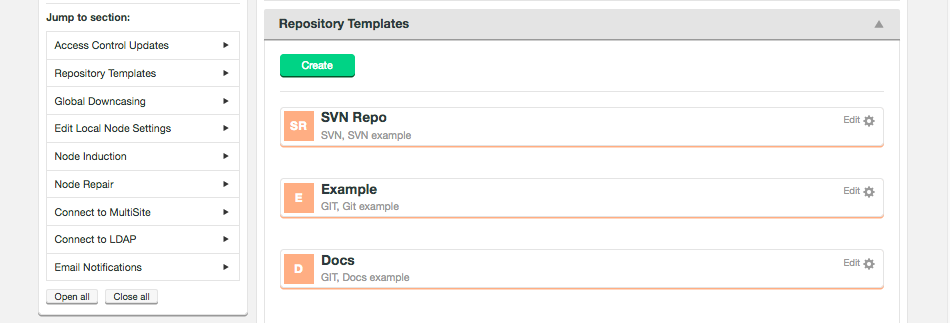 Create multiple templatesTake care when creating repository templates with the same paths!We recommend that you do not configure multiple repository templates with identical files and/or paths. You can do this if your configuration consists of non-overlapping system restrictions. For example, you can use the Advanced features so that repoTemplateA only delivers to systems A, C, E and repoTemplateB only delivers to systems B, D, F.
6.12.1. Repository template configurations
The Repository Template section covers the configuration of a number of different template types that are used to integrate SVN or Git repositories into ACP.
List of template types
SVN Auth File Generator
These settings set the target location of the AuthZ file and the common path segment of the SVN repositories:
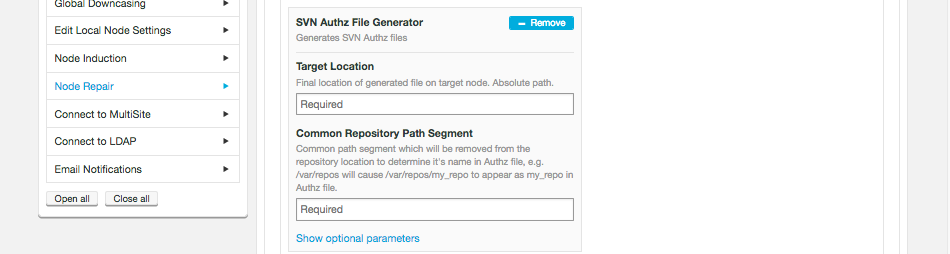
- Target Location
-
%l/conf/authz - Common Repository Path Segment
-
Common path segment which will be removed from the repository location to determine its name in AuthZ file. For example, a repository path "/var/repos/my_repo", declaring "/var/repos" as the Common Repository Path Segment will identify "my_repo" as the repository name to be written to the Authz file.
Important Clarification
The Common Repository Path is that part of the repository’s file path that should be stripped from the left-hand side (including a trailing slash ('/')). It’s not based on the Repo Name, as presented in the UI.No doubt, the confusion results from the fact that a repository name may look like a path because the use of the slash character is permitted. Correct and incorrect examples:
Repo Name Repo Path Common Repository Path Authz file entry repo-name
/svnrepos/svn-example1/repo-name
/svnrepos/svn-example1
repo-name (Correct)
/name/looking-like-a-path/repo-name
/svnrepos/svn-example1/repo-name
/name/looking-like-a-path/repo-name
/name/looking-like-a-path/repo-name (Incorrect, due to Related Known Issue, described below)
Related Known Issue:
If the stripped left-hand side does not match what is in the "common repository path" field then ACP currently, incorrectly uses the repository name, instead of the repository path in the header of the AuthZ file. This issue will be fixed in a future release, please ensure that you revalidate your repository names with this in mind.
SVN SSH Keys File Generator
This section looks at the options available when setting up a repository template for SVN SSH Keys File Generator.
|
Don’t create more than 1 authorized_keys generator unless you put in place appropriate pre-delivery scripting.
If multiple templates deliver their generated file into the same file system location then only the last written file will apply, resulting in possible AuthN or AuthZ failures.
The ability to have multiple generators of the same type, especially when the file to be delivered must be at a specific place in the file system, e.g. the "authorized_keys" file must be located in the ".ssh" directory of the account that GitMS/MSP/ACP are running as (ACP if running in "stand-alone" mode running no-replicated SVN repos), is predicated on using the "Node limits" tunable property or using a pre-placement script to combine multiply delivered data-files.
If you believe that you will need to support more than a single SSH Keys File Generator, contact Support.
|
This option generates SSH keys files to be turned into authorized_keys for SVN SSH access.
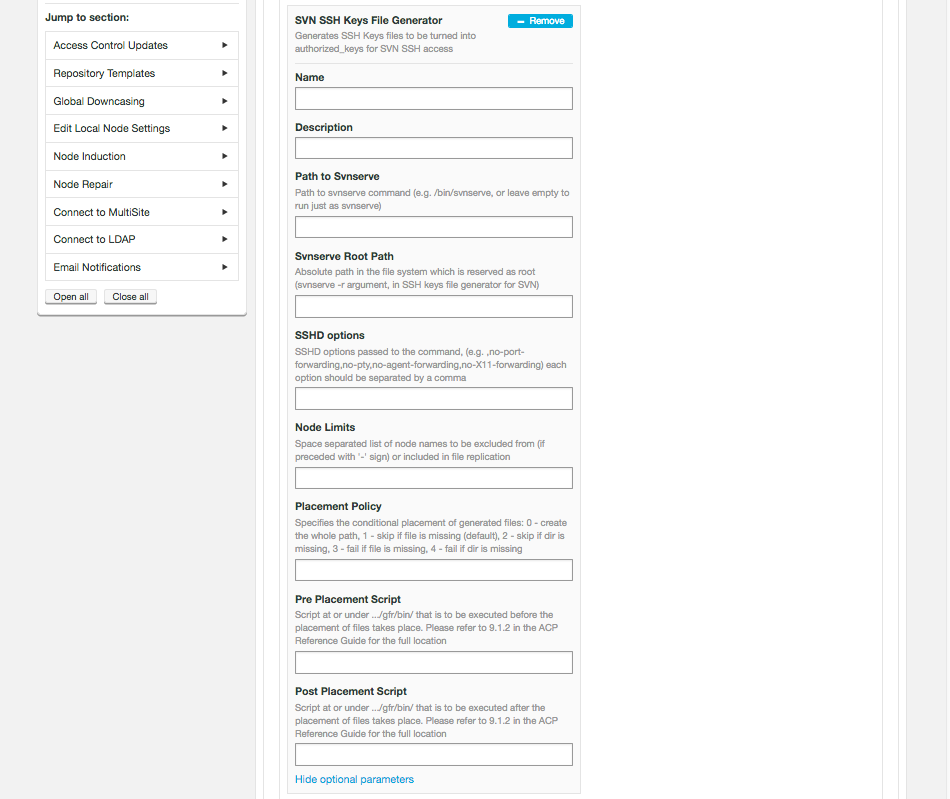
- Name
-
Enter a name for your File Generator, not for the file as the file name is completely contrained to be "authorized_keys" and its location in the file system is also completely constrained to be in the "~/.ssh" directory of the accountthat either GitMS/MSP/ACP are running as (depending on the delivery agent).
- Description
-
A description that you can use later to identify the purpose of your template.
- Path to svnserve
-
Path to svnserve command (e.g. /bin/svnserve, or leave empty to run just as svnserve.)
- Svnserve Root Path
-
Absolute path in the file system which is reserved as root (svnserve -r argument, in SSH keys file generator for SVN)
- SSHD Options
-
SSHD options passed to the command (e.g. ,no-port-forwarding,no-pty,no-agent-fowarding,no-X11-forwarding)
Note that the initial comma is critical. The above specific settings are often required by Security Policy in order to prvent misuse of the SSH access. - Node limits
-
Space separated list of node names to be excluded from (if preceded with '-' sign) or included in file replication.
- Placement Policy
-
Specifies the conditional placement of generated files: 0 - create the whole path, 1 - skip if file is missing, 2 - skip if dir is missing, 3 - fail if file is missing, 4 - fail if dir is missing (default value).
IMPORTANT:
The U.I. incorrectly states that "1 - skip if file is missing" is the default value. This is not true, the default is currently "4 - fail if dir is missing". - Pre Placement Script
-
Script at or under …/gfr/bin/ that is to be executed before the placement of files takes place. Please refer to Pre-placement scripts.
- Post Placement Script
-
Script at or under …/gfr/bin/ that is to be executed after the placement of files takes place. Please refer to Placement scripts.
Apache Password File Generator
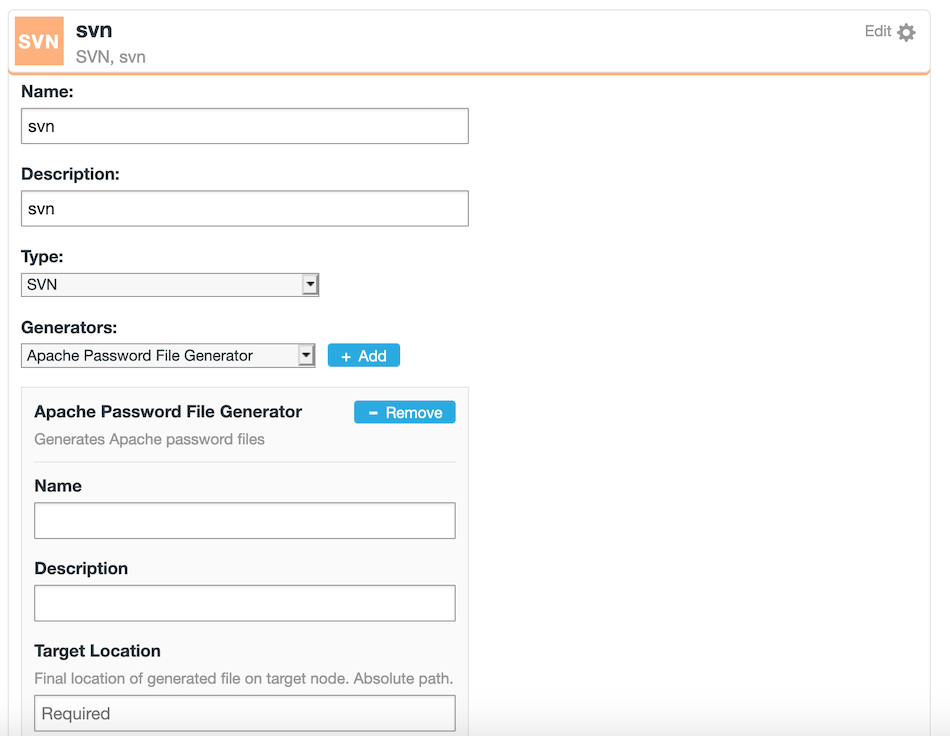
This panel applies all necessary settings for the Apache Password generator:
- Target Location
-
Final location of generated file on target node. Absolute path.
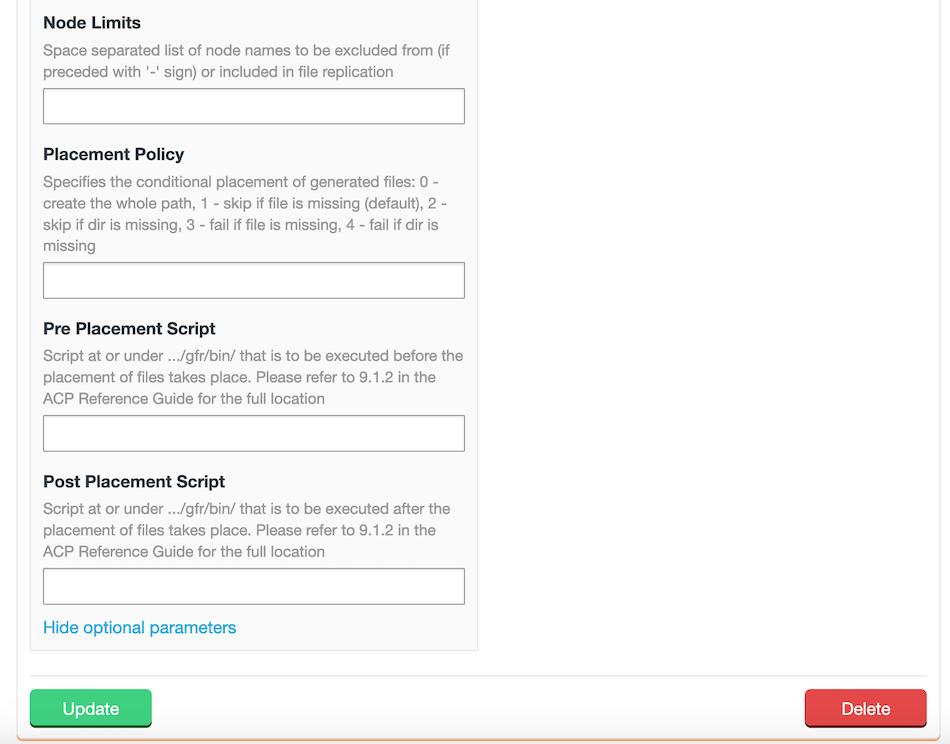
Optional Parameters
- Node Limits
-
Space separated list of node names to be excluded from (if preceded with '-' sign) or included in file replication.
|
Known Issue - Limitation on Node Limits
Currently, you can only specific negative limits, i.e. nodes where the files cannot be delivered. This can cause problems in that an added node will require that the various templates that are set up to use node limits to prevent collision will require a manual update.
|
- Placement Policy
-
Specifies the conditional placement of generated files:
0 |
Create the whole path |
1 |
Skip if file is missing (default) |
2 |
Skip if dir is missing |
3 |
Fail if file missing |
4 |
Fail if directory is missing |
- Pre Placement Script
-
Script at or under …/gfr/bin/ that is to be executed before the placement of files takes place. Please refer to 9.1.2 in the ACP Reference Guide for the full location. See Pre-placement directories.
- Post Placement Script
-
Post Placement Script:: Script at or under …/gfr/bin/ that is to be executed after the placement of files takes place. Please refer to Placement Scripts in the User Guide for a full location
- Common Repository Path Segment
-
/opt/svn/
Git AuthZ File Generator
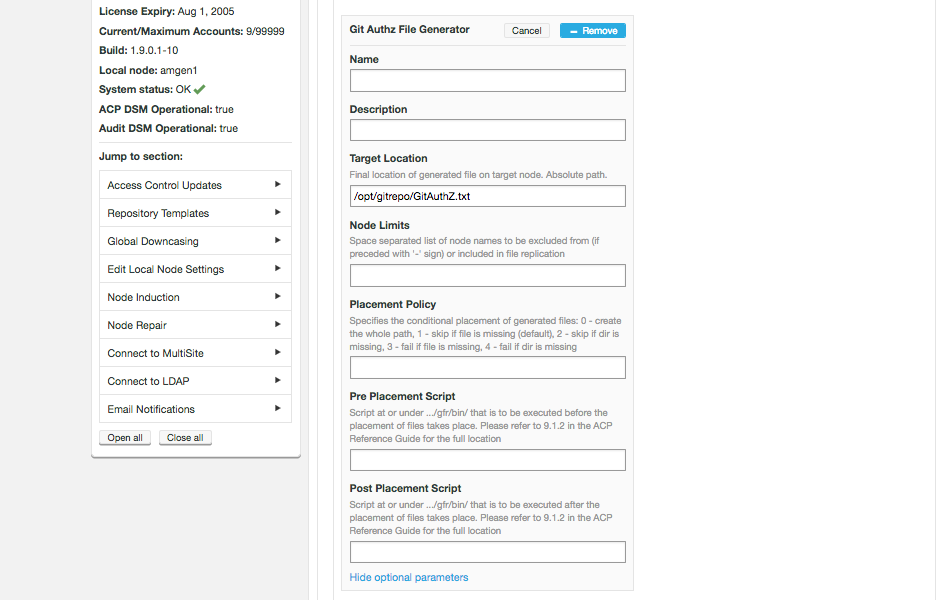
- Name
-
A name for the Git AuthZ file.
- Description
-
A brief description of the purpose of the file.
- Target Location
-
Final location of generated file on target node. Absolute path.
- Node Limits
-
Space separated list of node names to be excluded from (if preceded with '-' sign) or included in file replication.
- Placement Policy
-
Specifies the conditional placement of generated files:
0 |
Create the whole path |
1 |
Skip if file is missing (default) |
2 |
Skip if dir is missing |
3 |
Fail if file missing |
4 |
Fail id directory is missing |
- Pre Placement Script
-
Script at or under …/gfr/bin that is to be executed before the placement of files takes place. Please refer to Placement Scripts in the User Guide for a full location.
- Post Placement Script
-
Script at or under …/gfr/bin/ that is to be executed after the placement of files takes place. Please refer to Placement Scripts in the User Guide for a full location.
Git SSH Key File Generator
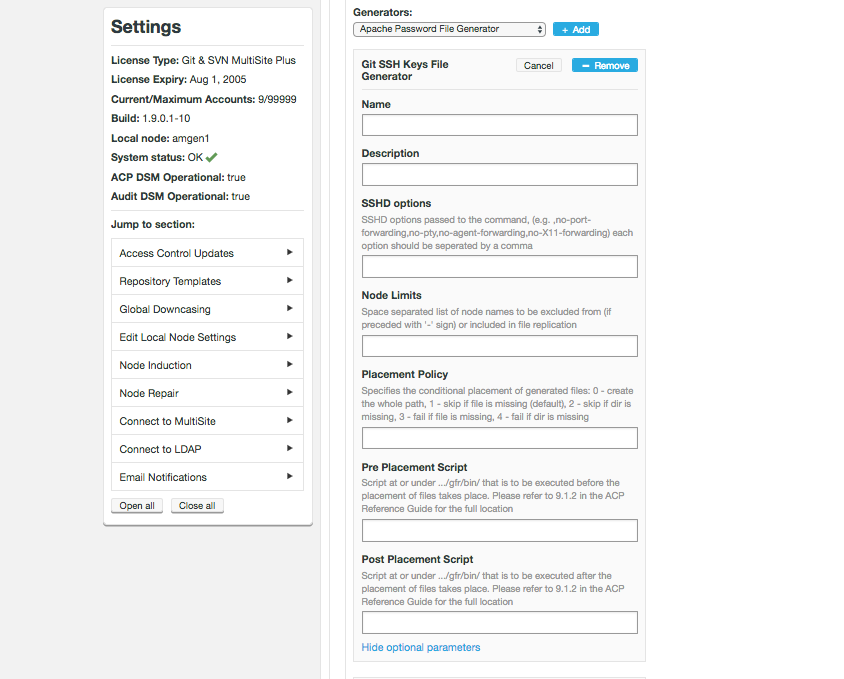
- Name
-
Name for the generator. Not for the file as the file name is completely constrained to be "authorized_keys" and its location in the file system is locked to "~/.ssh" directory of the account that either GitMS/MSP/ACP are running as (depending on the delivery agent).
- Description
-
A description that might help identify the purpose of the file.
- SSHD options
-
SSHD options passed to the command, see above comment about security policy.
- Node Limits
-
Space separated list of node names to be excluded from (if preceded with '-' sign) or included in file replication
- Placement Policy
-
Specifies the conditional placement of generated files:
0 |
Create the whole path |
1 |
Skip if file is missing (default) |
2 |
Skip if dir is missing |
3 |
Fail if file missing |
4 |
Fail if directory is missing |
- Pre Placement Script
-
Script at or under …/gfr/bin that is to be executed before the placement of files takes place. Please refer to Placement Scripts in the User Guide for a full location.
- Post Placement Script
-
Script at or under …/gfr/bin/ that is to be executed after the placement of files takes place. Please refer to Placement Scripts in the User Guide for a full location.
6.12.2. svnserve.conf
'svnserve.conf' controls the behavior of the SVNServe daemon on a per-repository basis. It is located in the conf subdirectory of the repository, e.g. '/opt/svn/repo/conf/svnserve.conf'.
[general]
anon-access = none
auth-access = write
authz-db = authz
- anon-access
-
Determines the access level for unauthenticated users. "write" allows all repository operations. "read" allows all operations except committing and changing revision properties. "none" allows no unauthenticated access. The default level is "read".
- auth-access
-
Determines the access level for authenticated users, using the same access levels as above. The default level is "write".
- authz-db
-
Controls the location of the authorization rules for path-based access control. Filename may be relative to the repository conf directory. There is no default value. If you don’t specify an authz-db, no path-based access control will be set.
6.12.3. Server-side preparations
The following configuration is required on the server:
-
Create a ".ssh" directory in the home directory of the account that owns the repositories if it does not exist already, i.e.
mkdir ~/.ssh
chmod 0700 ~/.ssh
chown owneruid:ownergid ~/.ssh
Once this is done properly then the generated "authorized_keys" file can be successfully delivered.
6.12.4. Client-side
The following configuration is required for clients:
-
If required generate SSH keys:
ssh-keygen -t rsa
-
Copy the SSH key to the server entering the password for the wandisco user when prompted:
ssh-copy-id wandisco@<ip address>
Adding additional entries to authorized_keys file
The authorized_keys file that we build can now work with additional entries, added by the user. These entries need to be created in one of two blocks; authorized_keys.prepend or authorized_keys.append.
Not replicated
This feature works an a per-machine basis, it is not automatically replicated to all servers. To implement a global policy you will need to set up a uniform deployment of the files to all MultiSite nodes.
Example
In the account .ssh directory on your MultiSite machine create a file called authorized_keys.prepend. It should look something like this:
ssh-rsa AAAAB3NzaC1yc2EAAAADAQABAAABAQCf/5GZcLFVbDSOV51RoLKgbi8afL9N5zl3Im6MA4MgXt67u5D43+UjeU4vjH6wUW5zGdhK2BWX820qQvCwCYJCL6oEG+Lv/jMu0NgenO/jKYgeDVx4wsffkVYcABsz55cPO+qsM/BSxY00RGEMroVEQhAGVQF++340VRrcZCe6O0vGwLgFrl+Thb0z9RuDzj+a+Swl99dhkKMS1wlAPl0HIUpBYdhtoEc9dnn+mPNUV9CKaPBq79ANJxYEsmPKxUolhuIQH9GNxsAC3v3pmffKVNdy0kLeK6htQ4LPqRd1zmLgq7fNtiFszYJNZk6c0efTEf0yjYUKZvWEu26fnGht appendUserKey@appendUserKey.local
In ACP, navigate to Settings → Access Control Updates → Generate Authorization Files
The authorized_keys file on your MultiSite node should now included the appended entries after those added automatically by ACP.
7. Troubleshooting
7.1. Problem: Replication runs very slowly while server load and traffic are both light.
Solution
It is possible that pending tasks are currently stuck and are therefore holding up further replication. To test if this is what is happening:
-
Go to Settings/Node Induction.
-
Check for any pending tasks.
-
If you find that there are pending tasks then you should consider aborting them.
-
Recheck replication to see if things improve (it can take a few mins for backlogs to clear)
8. Admin UI Reference Guide
Welcome to the Reference Guide for Cirata ACP.
This section of the documentation provides a description of the admin UI, along with supporting information about how ACP work.
8.1. Installation directory structure
This shows the files installed as part of ACP:
/opt/wandisco/scm-access-control-plus
[wandisco wandisco]  ├── backups
[root     root    ]  ├── bin
[wandisco wandisco]  ├── config
[wandisco wandisco]  ├── content
[wandisco wandisco]  ├── database
[wandisco wandisco]  │   ├── application
[wandisco wandisco]  │   │   └── resettable.db
[wandisco wandisco]  │   ├── backup
[wandisco wandisco]  │   ├── DConE.application.db
[wandisco wandisco]  │   ├── h2
[wandisco wandisco]  │   │   ├── audit
[wandisco wandisco]  │   │   ├── enforced
[wandisco wandisco]  │   │   └── shadow
[wandisco wandisco]  │   └── recovery
[wandisco wandisco]  │       ├── application.integration.db
[wandisco wandisco]  │       ├── DConE.system.db
[wandisco wandisco]  │       └── DConE.topology.db
[root     root    ]  ├── docs
[root     root    ]  ├── flume
[root     root    ]  ├── gfr
[root     root    ]  │   ├── bin
[root     root    ]  │   │   └── acp
[wandisco wandisco]  │   ├── lib
[wandisco wandisco]  │   ├── log
[wandisco wandisco]  │   ├── tmp
[wandisco wandisco]  │   └── var
[root     root    ]  ├── lib
[wandisco wandisco]  ├── logs
[wandisco wandisco]  │   ├── recovery-details
[wandisco wandisco]  │   ├── tasks
[wandisco wandisco]  │   └── thread-dump
[wandisco wandisco]  ├── properties
[wandisco wandisco]  ├── tmp
[root     root    ]  ├── ui
[wandisco wandisco]  └── var
[wandisco wandisco]      └── watchdog
8.2. Properties files
The following files store application settings and constants that may need to be referenced during troubleshooting.
|
IMPORTANT
Do not make any changes to these files without consulting Support.
|
-
Settings for the replicator and affects how ACP performs.
-rw-r--r-- 1 root root 1036 May 6 10:17 samples/application.properties.txt
-
Properties that control how the log4j logging library works.
-rw-r--r-- 1 root root 1514 Feb 26 10:00 samples/log4j.properties.txt
-
Defines how the product’s logging is handled.
-rw-r--r-- 1 root root 1969 Feb 25 11:20 logger.properties
-
Stores the details of the primary administration account that is set up during the installation.
-rw-r--r-- 1 root root 185 May 6 10:17 user.properties
8.3. Logging
There are two logging systems running on ACP, firstly logger.properties which is used by DConE and contains the java.util.logging configuration.
This file should not be changed.
The other logger uses log4j. We use it for application logging because it has a better range of functionality. See log4j.properties
8.3.1. Log files
The following log files are generated during operation:
-
Records the use of the "scm-access-control-plus" application control script (normally executed via the "service" command).
-rw-r--r-- 1 wandisco wandisco 366 May 6 10:27 multisite.log
-
Contains information about how the nodes are set up and connected to each other.
drwxr-xr-x 2 wandisco wandisco 4096 May 7 10:27 recovery-details
-
The main log file containing most application logging.
-rw-r--r-- 1 wandisco wandisco 23226 May 6 10:27 acp.log
-
Log rotation - old logs are renamed to
acp.log.<date-time-stamp>, in ISO-8601 format.
-
From ACP 1.9.0 onwards the scm-access-control-plus.<time-date-stamp>.log files are obsolete and can be removed.
|
-
Contains any thread-dumps that might occur.
drwxr-xr-x 2 wandisco wandisco 4096 May 8 08:27 thread-dump
-
Logs changes to the watchdog process that ensures that ACP automatically restarts if it unexpectedly shuts down.
-rw-r--r-- 1 wandisco wandisco 3232 May 6 10:27 watchdog.log
8.3.2. java.util.logging
The logger file will look like this:
# Properties file which configures the operation of the JDK
# logging facility.

# The system will look for this config file, first using
# a System property specified at startup:
#
# >java -Djava.util.logging.config.file=myLoggingConfigFilePath
#
# If this property is not specified, then the config file is
# retrieved from its default location at:
#
# JDK_HOME/jre/lib/logging.properties

# Global logging properties.
# ------------------------------------------
# The set of handlers to be loaded upon startup.
# Comma-separated list of class names.
# (? LogManager docs say no comma here, but JDK example has comma.)
handlers=org.slf4j.bridge.SLF4JBridgeHandler

# Default global logging level.
# Loggers and Handlers may override this level
.level=INFO

# Loggers
# ------------------------------------------
# Loggers are usually attached to packages.
# Here, the level for each package is specified.
# The global level is used by default, so levels
# specified here simply act as an override.

# Handlers
# -----------------------------------------

# --- ACPFileHandler ---
# Override of global logging level
com.wandisco.acp.logging.ACPFileHandler.level=ALL

# Naming style for the output file
com.wandisco.acp.logging.ACPFileHandler.pattern=acp.%g.log

# Limiting size of output file in bytes -defaulted to 1MB:
com.wandisco.acp.logging.ACPFileHandler.limit=1048576

# Number of output files to cycle through, by appending an
# integer to the base file name:
8.3.3. log4j
ACP uses a logging system called log4j. We use it rather than java.util.logging because it has a better range of functionality
We still need to provide a log file that contains the log output of DConE and the ALM product.
We do this by bridging between java.util.logging and log4j.
All the log output of java.util.logging is directed to log4j which writes out the log messages for DConE and the ALM application to a single log file.
We use slf4j to do this: http://www.slf4j.org/.
We also have log rotation, were we rotate to a new log file after it has grown over a size defined in the logrj.properties file.
Our log4j.properties file looks like this :
# Direct log messages to a file
log4j.appender.file=com.wandisco.vcs.logging.VCSRollingFileAppender
log4j.appender.file.File=acp.log
log4j.appender.file.MaxFileSize=100MB
log4j.appender.file.MaxBackupIndex=10
log4j.appender.file.layout=org.apache.log4j.PatternLayout
log4j.appender.file.layout.ConversionPattern=%d{yyyy-MM-dd HH:mm:ss} %-5p [%c{1}:%M] - %m%n
log4j.appender.file.append=true

# Root logger option
log4j.rootLogger=INFO, file
Although you can edit this file, we do not recommend it. If you get it wrong then it will affect the format of the logs we get through our Talkback system.
If you do need to make changes, the following parameters can be changed :
log4j.appender.file.MaxFileSize= <max logfile size before rotation>
log4j.appender.file.MaxBackupIndex= <# log file rotations before we rotate back to the start>
8.4. Database fsync setting
It’s possible to configure ACP to prioritize either robustness or performance.
Add the following property to the application.properties file:
acp.database.enable.fsync=true
- true
-
(Default value) This makes the database operations more robust during a system outage with less chance of data lose.
- false
-
If database speed is preferable then this feature can be turned off by setting the property to false.
|
Take Note
If you configure for performance over robustness then you will likely see divergence between the different node’s database of Accounts, Teams, Rules, etc.
If you notice this then you would need to repair 1 or more nodes using the repair facility in the Node Repair tool under the Settings-Node Repair section.
Given that multiple node databases could fall into different states we really don’t recommended choosing performance over correctness, for long term stability.
|
8.5. Admin Console master screen
Below is a screenshot of Access Control’s admin console master screen. From here you can see all the component parts of your access control setup, accounts, teams, repositories (when not assigned to templates), resources, and rules.
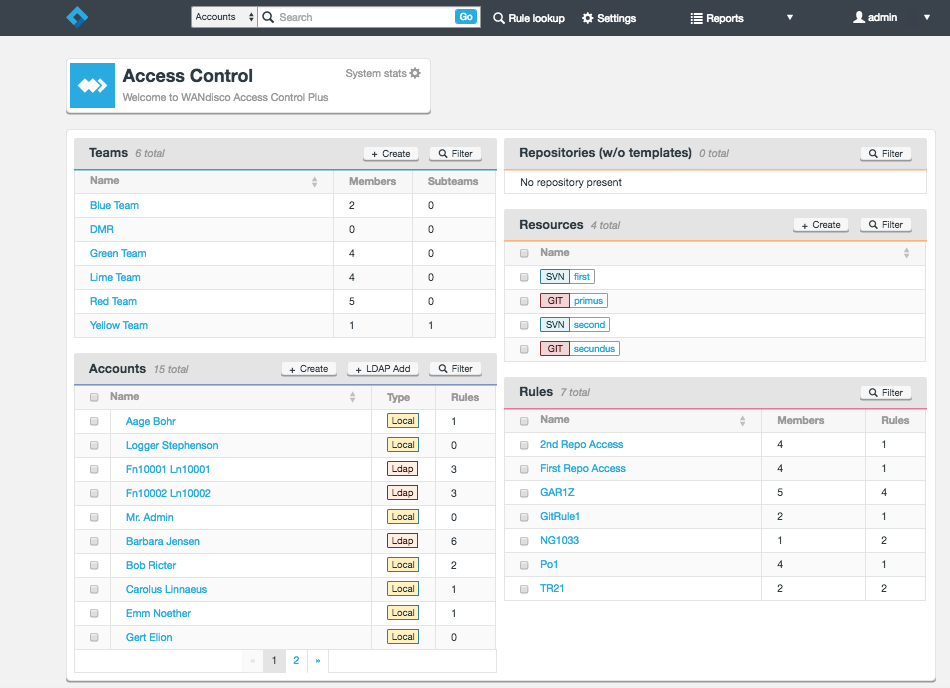
8.6. System stats
The System stats show the overall scale of the deployment. They appear if you click on System stats or the cog icon:
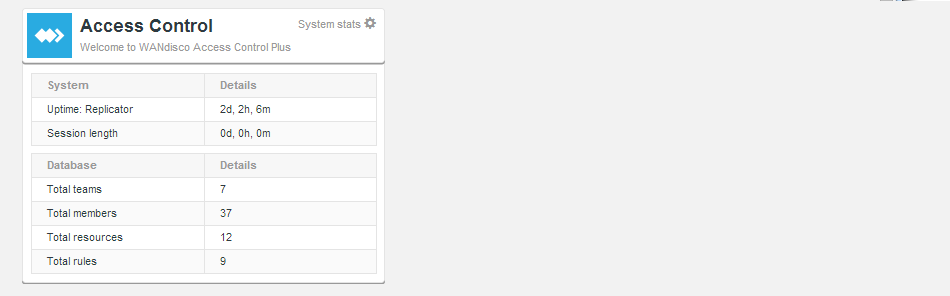
- Uptime: Replicator
-
The time that has passed since the ACP process was started.
- Session length
-
The time that has passed since the current browser session was started.
- Total teams
-
The current number of teams managed within ACP.
- Total members
-
The total number of members (active and inactive).
- Total resources
-
The total number of repository resources defined.
- Total Rules
-
The number of rules created.
8.7. Settings
The settings screen gives you access to ACP’s various application settings.
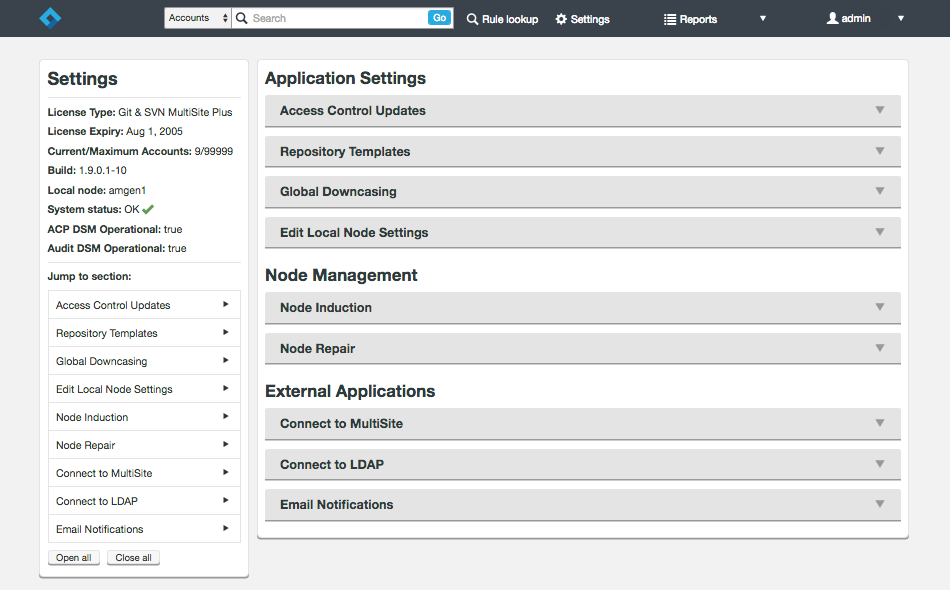
- License Type
-
The type of deployment. See Which mode is running?
- License Expiry
-
The date on which the current license expires.
8.7.1. Application Settings
Access Control updates
The Access Control Updates panel stores the settings for the Batch Updates Mode which helps mitigate the effects on system performance from very large numbers of password file and or AuthZ writes. See Enable/Disable Batch updates for more information about how and why you should use the Access Control Updates.
Batch Updates
Use these settings to enable the Batch Update mode, which will benefit replication performance in large deployments.
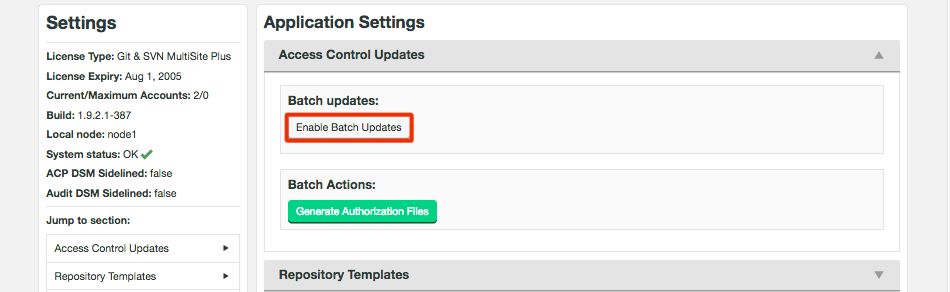
- Enable (Toggle)
-
Click the toggle button to enable/disable Batch updates.
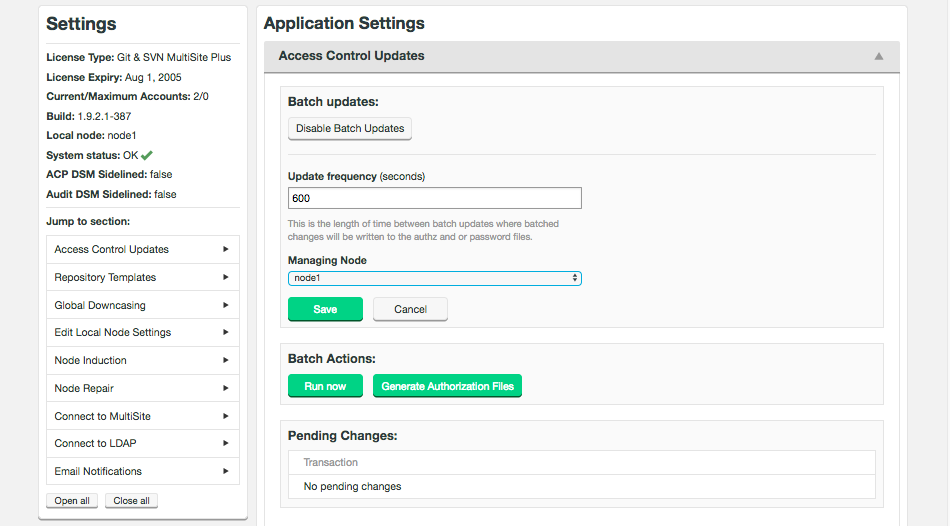
- Switch Period
-
This is the frequency at which batched changes are applied to the AuthZ and or password files. The default frequency is once per 600 seconds (10 minutes), so by default Access Control will never wait more than 10 minutes before applying an Access Control change.
ACP will not create and deliver a new set of AuthN/AuthZ files unless something is changed during the period. However, see below on how to force-generate and deliver a new set of files. - Managing Node
-
This is the node that you select to manage the Batch process. Batched changes are collated and stores on just one node (this Managing Node) and then applied to all nodes on the next batch update.
Batch Actions
Batch Actions gives you immediate control over Batching.
- Run Now
-
Run a batch update immediately.
- Generate Authorization Files
-
Click to force the creation and delivery of a new set of Authorization files.
The managing node for GitMS and/or SVN MSP must be set or else generated files will not be delivered.
Pending Changes
The Pending Changes table will list all those changes that are waiting for the next batch update in order to take effect.
| Due to browser caching, sometimes the entries in the Pending Changes table will be out of date. Please force-refresh this page (shift refresh) in order to verify what actual pending operations exist. |
8.7.2. Repository templates
The Repository Template options are used when connecting new SCM repositories to ACP. A repository template stores the paths for the repositories authentication and authorization files that are used by the Generic File Replication scripts to ensure that changes on each node are synced to all other nodes.
- Name
-
Name that you wish to associate with the template.
- Description
-
A brief description of what the template will be used for.
- Type
-
SCM system type, SVN or GIT.
- Generators
-
-
Git/SVN SSH Keys File Generator
-
Apache Password File Generator
-
Git/SVN Auth File Generator
-
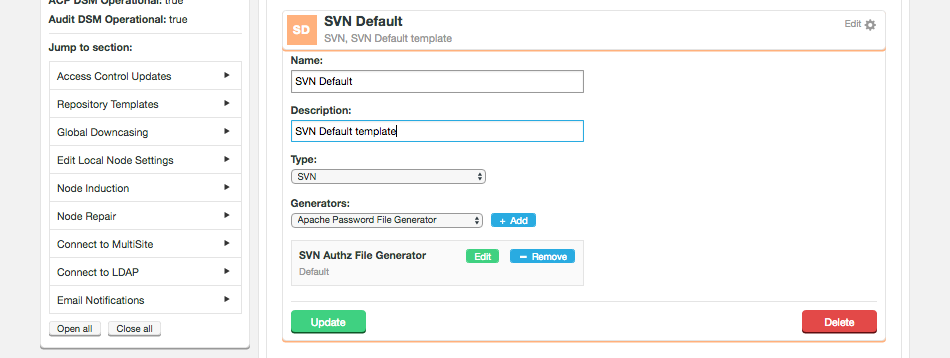
|
You create a template for either Git or SVN
We recommend that you do not edit the Type of the template in future because this could result in you overwriting the original.
We recommend that you create one repository template for Git and another one for SVN.
|
8.7.3. Global downcasing
ACP needs to handle situations where the customer’s Active Directory/Windows-based systems are maintaining user accounts that are case-insensitive, i.e. account "jsmith" and "JSmith" are considered the same account. ACP treats account names as case sensitive by default. In summary, the manner in which ACP handles "case insensitivity" is via "downcasing" all account names before comparison (and storage).
Enable Global Downcasing to ensure that Subversion users have their usernames forced into lowercase. This ensures consistency and protects against the possibility of AuthZ rules being applied incorrectly.

By default Global Downcasing is disabled and accounts are all considered case sensitive. Enabling Global Downcasing triggers a warning message:

If Global downcasing is enabled, it can be disabled from the same section in Settings.

| If you downcase usernames using the Apache directive AuthzForceUsernameCase, you must make sure no case-sensitive users will pass Authn for this location. If you mix sensitive/insensitive users, you will need to define a separate location for each of them. See more about AuthzForceUsernameCase in mod_authz_svn Configuration Directives. |
|
Beware of possible user duplication with downcasing:
Please be aware of the following situation concerning the use of downcasing: User bjensen and then the team(s) associated with that user get removed from ACP. The user will appear in the Accounts section as "bjensen". If downcasing is not enabled and we then create a new team and pull this user in again (and the username on LDAP is BJensen), there will now be 2 users in the account section; bjensen and BJensen. In order to be able to Global downcase the user BJensen, the administrator should manually remove the user bjensen. |
8.7.4. Edit Local Node Settings
The Edit Local Node Settings panel lets you modify the node properties at any time after the node has been setup and inducted.

- New Node Name
-
The new name of the node.
| When ACP is used in a replicated setting the following DConE Port entry field also appears. |
- DConE Port
-
The TCP port used for handling the DConE coordination traffic.
8.7.5. Managing nodes
This section describes how the ACP nodes work when connected together.
Node Induction
Induction refers to connecting nodes together to form a distributed system for replicating data. Nodes that are connected together form a membership that is governed by the requirements of the distributed system. One requirement is that there must be a minimum number of nodes (a quorum) available to agree on the ordering of replicated changes.
There may be insufficient nodes to create agreement, for example, if enough nodes are lost because they are disconnected or experiencing unrecoverable failure. Quorum is then lost and replication stops. On the Node Induction screen you see the warning: ACP operations currently impossible - Quorum is unavailable.

In this situation it may be possible to run through an Emergency Reconfiguration - please contact Support.
8.7.6. Node repairs
The Node Repairs tool allows you to get ACP data around Repositories, Resources, RepoTemplates, Teams, Rules, Accounts, etc. back into sync.
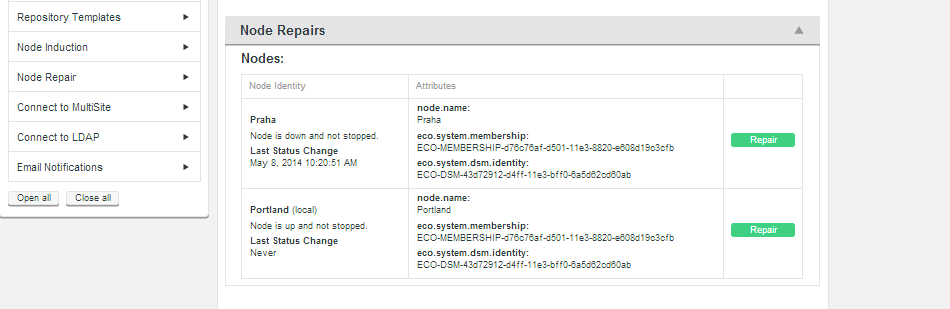
- Location Identity
-
The unique ID string that is used by the replication system to identify the node.
- node.name
-
The name given during installation that is used to identify the node to humans.
- eco.system.membership
-
A unique identifier for the replication network in which the node is operating.
- eco.system.dsm.identity
-
This identity is used to distinguish the specific distributed state machine. These attributes are only important if you need to troubleshoot replication problems.
Emergency Reconfiguration
The Emergency Reconfiguration tool allows the administrator to remove a downed node from membership. This allows the remaining nodes to continue to replicate using a new membership. Membership type depends on the number and type of remaining nodes.
|
Important
Don’t attempt an EMR without help from support.
|
In the event that you need to perform a permanent removal of a node (an emergency reconfiguration) then you should contact Support for assistance. The operation poses several risks to the overall operation of ACP. Therefore, we recommend that you do not attempt the procedure by yourself.
8.7.8. File Generation
When ACP is run in Standalone mode, this section includes a File Generation settings screen.

File Generation
Manages properties that apply to the Generic File Replication GFR system.
- Managing Node
-
Select the node for managing file generation.
- Enable Wildcards
-
Tick the checkbox to enable Wildcard support. Note - Wildcard support is only available if using Git from ACP 1.9.2 onwards, all ACP 1.9.x versions support SVN wildcards.
|
Once enabled you can’t disable
Be warned that enabling Wildcard support for the File Generation system can not be undone.
Should you need to disable Wildcard support you will be forced to reinstall ACP.
|

Conflict Strategy
We default to wildcards OFF and Conflict Strategy is set to Low Priority (Lowest Wins). Once wildcards is turned ON, we send round a proposal to get agreement from all other nodes and then auto turn on the High Priority Highest Wins strategy. It can take some time to occur though as we reach node agreement so its possible that the admin would need to refresh their page before the policy shows as set within the UI.
8.7.9. Connect to LDAP
Settings for connecting ACP to an LDAP service for managing users and access.
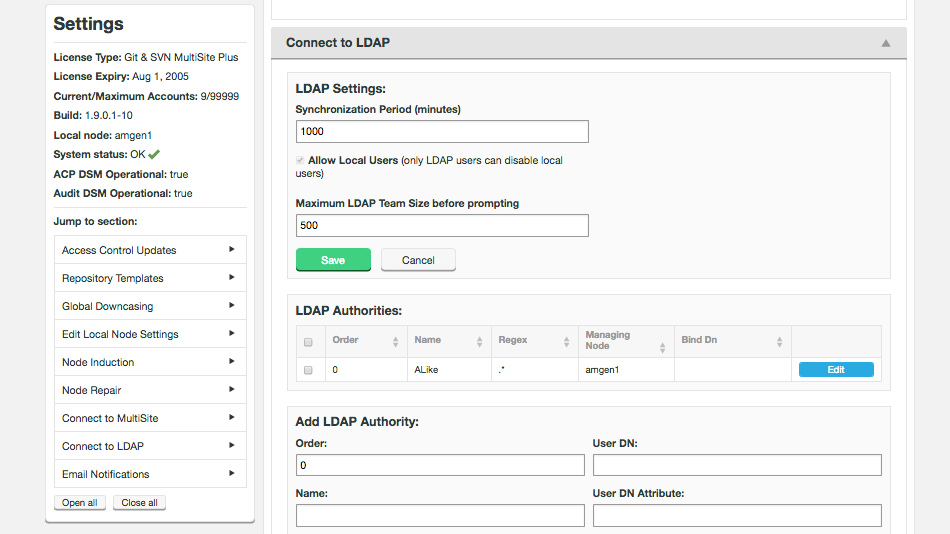
LDAP Settings
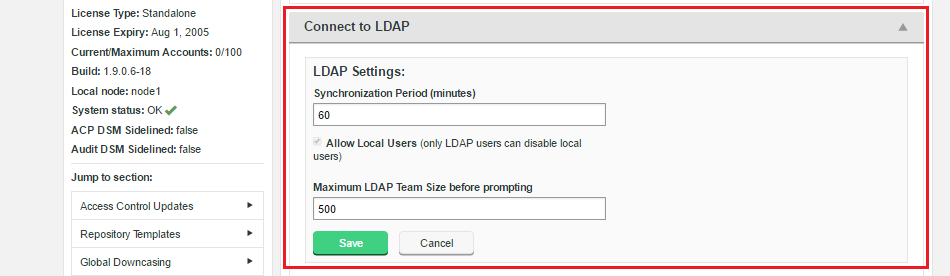
|
Do not set the period too low, or to zero.
You shouldn’t need to constantly hit your LDAP authority. If you have a large deployment, synchronization will be resource hungry.
|
| If you perform an import from an earlier version of Access Control you must ensure that ACP does not poll the LDAP authorities during the process. You can do this by setting the Synchronization Period to 99999 (minutes) just for the duration of the import. |
- Allow Local Users (Checkbox)
-
This checkbox is ticked by default. When ticked it is possible to field both LDAP-controlled and manually entered Accounts. Some organizations don’t permit manually entered accounts because they need to be sure that all accounts are managed through their LDAP. If this is the case, untick the checkbox when your LDAP accounts have been successfully imported and you have promoted multiple LDAP accounts to be administrative (since local administrative accounts will be disable too).
| If you are running with Local Users disabled and your LDAP service fails, you can re-enable local users as part of the forgotten password process. This process automatically re-enables local users, allowing you to gain access to the admin console via a newly created local administrative account. |

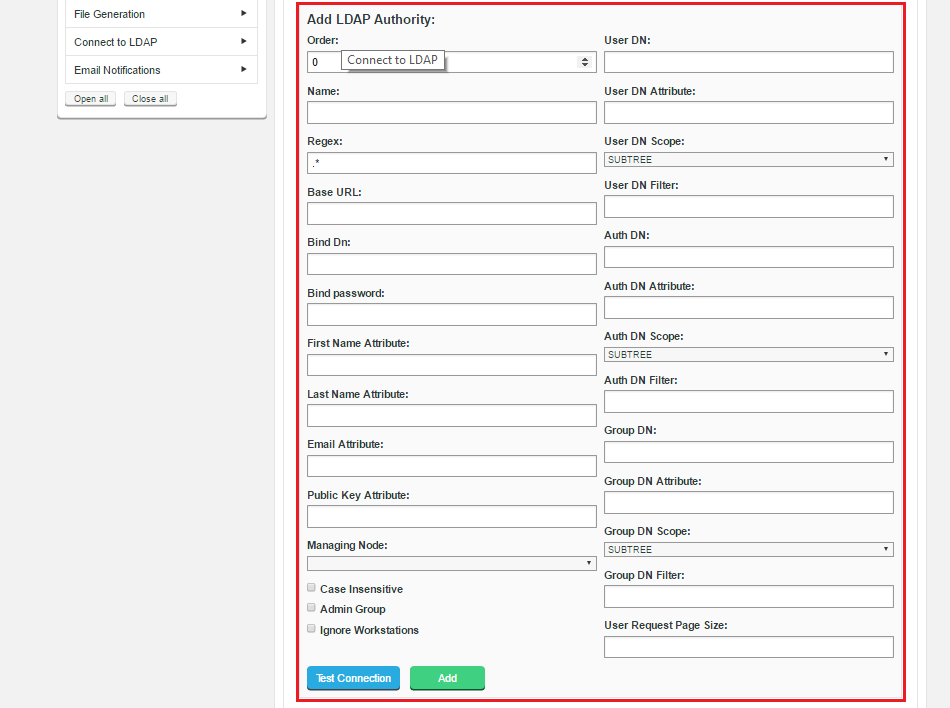
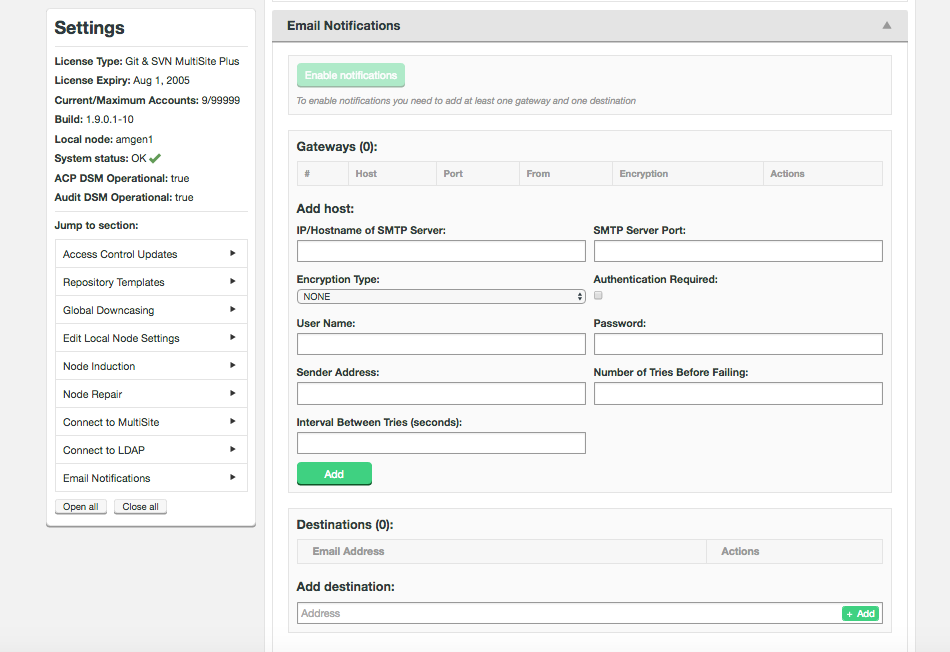
8.7.11. Connect to MultiSite
Settings for the connected SVN MSP node or GitMS node.
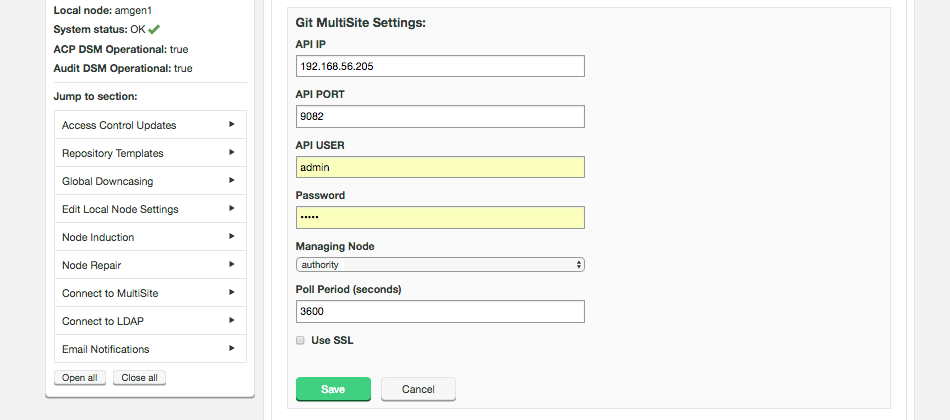
Use the external applications settings to connect with MultiSite products (GitMS and / or SVN MSP).
- API IP
-
The IP for the application’s server.
- API Port
-
The port used by the API (and the applications User Interface).
- API User
-
The application user account that is used by ACP to connect to the external application.
- Password
-
The password for the account that is used by ACP.
- Managing Node
-
The ACP node that will handle the communication with the external applications.
- Poll Period (seconds)
-
The frequency with which ACP connects with the external application.
- Use SSL (Check box)
-
Tick the checkbox to use SSL encryption for the traffic between ACP and the external application. If using SSL you must configure the SSL configuration parameters via the
application.propertiesfiles setting (see Enable SSL).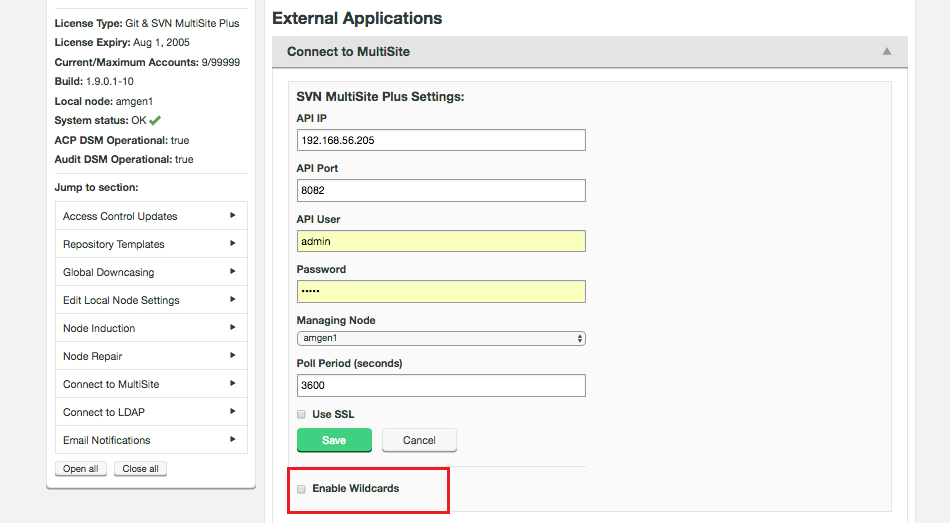 Enable Wildcards
|
SVN Only
Subversion MultiSite settings provide settings for enabling but not disabling Wildcards support.
|
- Enable Wildcards
|
Once enabled you can’t disable
Be warned that enabling Wildcard support for the File Generation system can not be undone. Should you need to disable Wildcard support you will be forced to reinstall ACP.
|
Conflict Strategy
We default to wildcards OFF and Conflict Strategy is set to Low Priority (Lowest Wins). Once wildcards is turned ON, we send round a proposal to get agreement from all other nodes and then auto turn on the High Priority Highest Wins strategy. It can take some time to occur though as we reach node agreement so its possible that the admin would need to refresh their page before the policy shows as set within the UI.
8.8. Teams
The Teams panel lists all the ACP teams that have been set up.

- Members
-
Number of accounts associated with the team
- Subteams
-
Number of Subteams
8.9. Accounts
The Accounts panel lists all connected accounts.
- Type
-
Type of account. Local accounts are imported from a file or entered into the ACP admin screen. LDAP-based accounts are added using LDAP queries.
- Rules
-
Number of rules that apply to the account.
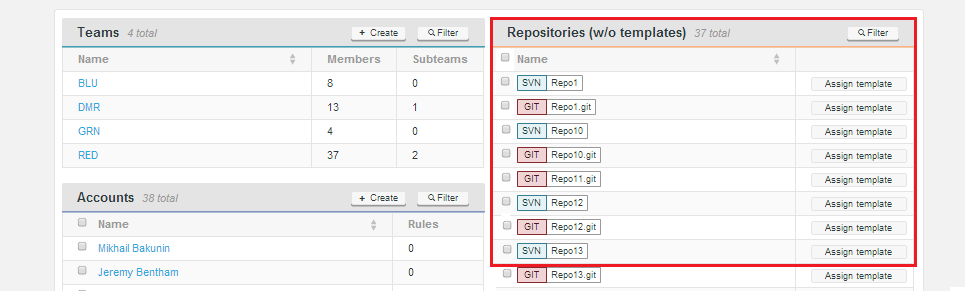
8.10. Resources
Lists available SCM repositories that have been applied to ACP using a template. See Create resources.
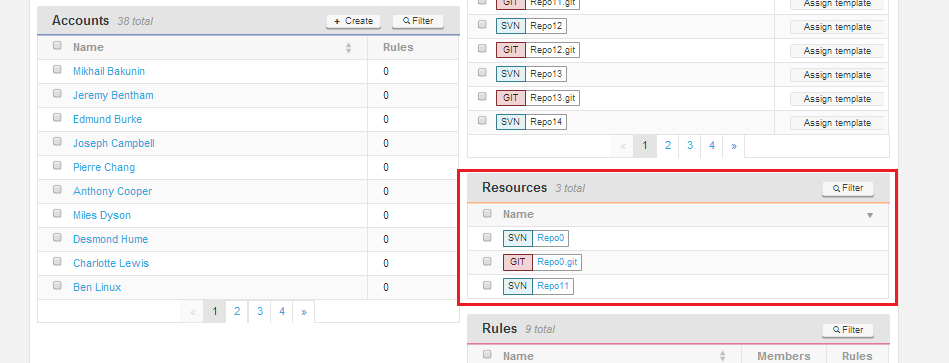
8.11. Rule Lookup
-
Click the Rule lookup link on the top menu bar.
- Account name
-
The name of the account that you want to investigate.
- Repository name
-
The name of the repository that you wish to test against. IMPORTANT: Do not include a trailing slash.
- Resource path
-
The file system path to a specific part of the repository.
-
To check the whole repository leave this field as None.
-
To specify a path, select SVN Path for SVN repositories or Git Branch/Git Tag for Git repositories.
-
- Permissions
-
Those access permissions that apply to the selected account, for the selected repository resources will be listed in the Permissions table. For more information on permissions, see Create a rule.
Click the Lookup button to start the search. All rules that apply to the account for the specified resources are displayed in the Permissions table. See Using Rule Lookup.
8.12. ACP UI User Access
ACP Users who are not assigned Admin permissions can login to the ACP UI to take a limited number of actions.
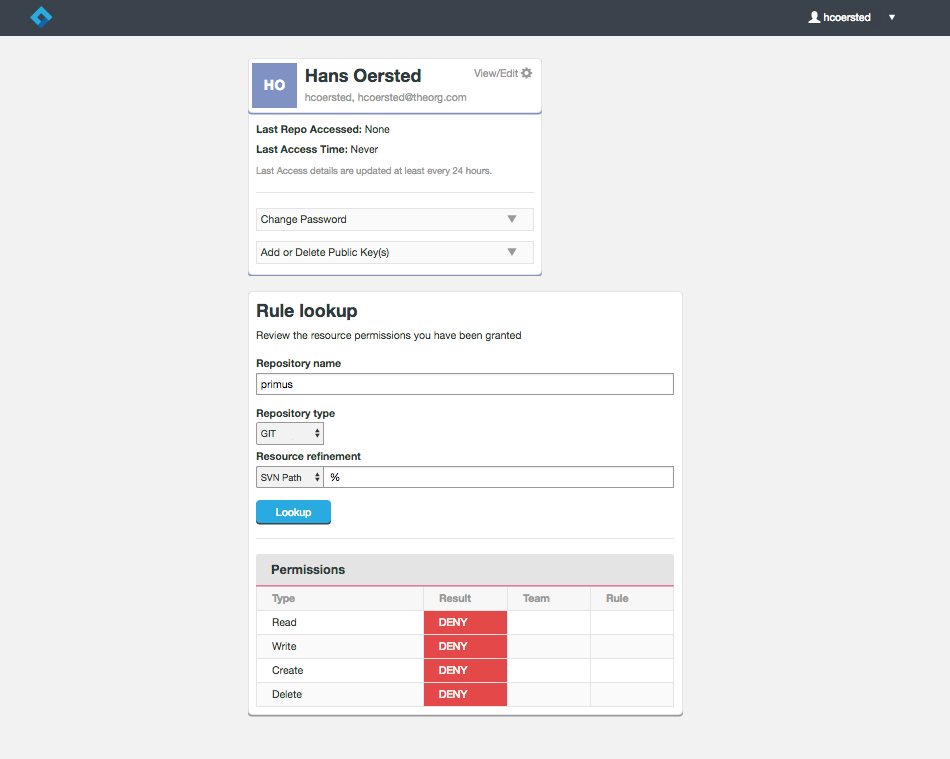
The user can edit their entry details by clicking on the View/Edit link, if their account is "local". They cannot do so if the account has been polled from LDAP.
- Last Repo Access
-
Reports the last repository that the Account user accessed.
- Last Access Time
-
Time of the Account user’s last repository access.
- Change Password
-
Allows the user to change their account password, (if the account is local - not available if the account is LDAP).
- Add or Delete Public Key(s)
-
Allows the user to add or remove public SSH keys associated with the account. See Adding public SSH keys.
- Rule lookup
-
The user gets access to the Rule lookup tool.
9. Deployment modes
ACP supports many different configurations that dictate its use. When installed, your license key tells ACP which features to expose.
9.1. Available modes
The following Modes are available:
-
Standalone: One or more nodes deployed at one or more sites. Standalone mode still supports the replication of Access Control data. However, without the MultiSite products you wouldn’t be able to reliably support far-flung development teams that collaborate on the same repository data. Each instance of Access Control would manage their local repository data. Generated password/AuthZ files are stored directly on the Access Control nodes.
|
SVN only
Currently the standalone mode is only available for SVN deployments.
|
-
GitMS (with GitMS): One or more nodes deployed at a one or more sites in conjunction with Cirata’s GitMS product.
-
MSP (with SVN MSP): One or more nodes deployed at a one or more sites in conjunction with Cirata’s SVN MSP product.
-
Both (with GitMS & SVN MSP): One or more nodes deployed at one or more sites in conjunction with both of Cirata’s SCM replication products.
9.2. Which mode is running?
|
pre-placement scripts
For pre-placement scripts see Pre-placement
|
To check which mode your installation is currently in:
-
Log in to ACP.
-
Click the Settings link on the top menu bar:
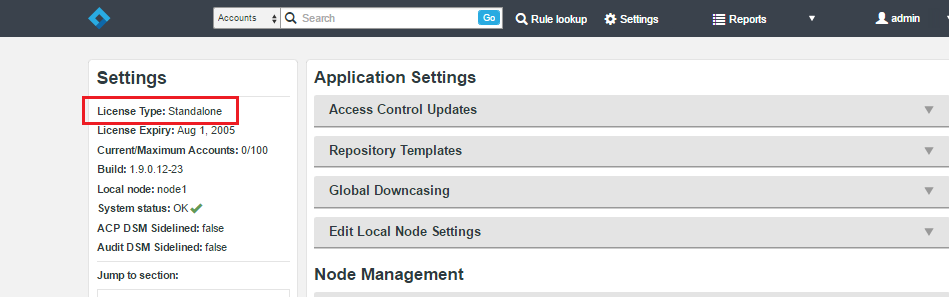 License type
On the side menu you can see a reference to the License Type. The example shows Standalone which means that it is set up to work with SVN and is only concerned with the local SVN server. It might show both where both Git and SVN are running, or it might instead show "GitMS & SVN MSP", which would mean that the installation is configured to support both Git and Subversion repositories within a replicated environment.
9.3. Batch updates mode
Many operations in ACP require that the AuthZ and SCM password files are regenerated. In a rapidly changing SCM environment, the number and frequency of account, team and rule changes can degrade performance of both ACP and whatever other Cirata ALM products it connects to. This can consume both Disk I/O as well as CPU an networking resources.
We strongly advise the use of the Batch updates feature.
|
Changes are not instant
When Access Control Batch updates is enabled, changes to accounts, teams, SCM resources or rules are not quickly available.
In order to see the actual current state (excluding changes that will only take effect after the next scheduled password/AuthZ rewrite) you need to use the Current View.
The Current view is intended for troubleshooting, where you need to see the state of accounts/teams/rules, etc. that match the latest delivered AuthN/AuthZ files.
|

When Batch updates is enabled, all ACP changes that would result in a regeneration of the password or AuthZ files (see the list below) are batched rather than updated for each individual change. Default is 600 seconds (10 minutes). This should be set to the largest tolerable period of time (e.g. 1 hour). For large implementations (in terms of nodes, accounts, repositories, etc.) the period should not be less than 5 minutes.
Access Control changes that can be batched are:
-
Create/delete users
-
Create/modify/delete teams
-
Create or modify rules (apply a change to access permissions for either a individual users or teams)
|
Changes to LDAP Authorities do not trigger password/AuthZ file rewrites.
However, when an authentication authority is polled for updates, any resulting user or team changes do trigger rewrites as of the next batch update.
|
9.4. Pending view vs current view
When batched updates are enabled you can view the admin console in two modes:
Pending view:
The admin console presents a view of Access Control that includes objects (users, teams and rules) that are not yet enforced, because they are waiting to be applied in the next batch update.
This is the mode you use to make any access control changes, which are immediately added to the current waiting batch.
Pending view actually shows you how access control will be applied when the current batch has been updated.
This makes it difficult for troubleshooting and testing, where you would only want to see objects as they are actually applied to users here and now, via the delivered AuthN and AuthZ files.
Current view:
Using Current view allows you to look at Access Control with all pending changes filtered out.
This is specifically for troubleshooting and testing. Most Access Control creation or edit tools are disabled.
It is not useful to create Access Control objects (users, teams or rules) in this mode because you will not see pending changes and therefore could create incorrect or conflicting changes.
-
Make changes.
-
Navigate to Settings → Access Control Updates.
-
Click Run now.
Note: Turning off batch mode could cause severe issues if batch mode is required for any of the reasons already described.
To change between Pending view and Current view, toggle between them from the admin tab. See next section.
9.5. Enable current view
Current View excludes any changes that are still waiting in the next batch update. To use the current view:
-
Log in to the admin console.
-
Click the Account drop-down menu in the right-hand corner of the screen.
 Account drop-down
 -
Click Current.
 Select current mode
 -
The admin console’s top bar changes color and a "Current" symbol appears next to the ACP logo. This reminds you that you’re currently in the Current view.
 Current view
 -
To leave the Current view click Pending.
10. Wildcards
The Deployment Guide describes how to install ACP and enable wildcard support.
- Using wildcards with SVN
-
-
All ACP 1.9.x versions support SVN wildcards.
-
You only have the option to deselect the Use wildcards checkbox before you save changes to the resource you have added. However, this is only required if you, extremely rarely, need to use the asterisk as a non-wildcard (normal) character.
-
Wildcards can be used in paths only.
-
Wildcards can be used to restrict read and write access to specified sub-repository paths. If the wildcard matching space is wide enough the entire repository could become inaccessible.
-
- Using wildcards with Git
-
-
Wildcard support is only available from ACP 1.9.2 onwards. You must also be using GitMS 1.9.x.
-
Do not uncheck the Use wildcards checkbox when creating refinements for Git. This is a known issue in ACP 1.9.2.
Asterisks are not allowed as a non-wildcard (normal) character in Git and so unchecking the box is never appropriate, unlike in SVN. -
Wildcards can be used in branches or tags.
-
Wildcards in Git are normally used to restrict the creation or modification of particular branches or tags. While it is possible to prevent repository reads (e.g. blocking access to every branch and tag), this is not the normal usage.
-
IMPORTANT The info in the table below is the same as above, just testing preferred format
| SVN | Git | |
|---|---|---|
Version |
All ACP 1.9.x |
ACP 1.9.2 onwards, using GitMS 1.9.x |
Used in |
Sub-repository paths |
Branches or tags |
Normal use |
Restrict both read or write access to the specified/matching sub-repository paths |
Restrict Create, Modify, and Remove access to the specified/matching branches and tags |
Use wildcards checkbox |
Can be unchecked as * can be used as a normal character |
Do not uncheck - * cannot be used as a normal character |
10.1. Creating Resources with Wildcards
To use wildcards you first need to create a resource refinement for the relevant team and then add this resource to the appropriate rule. This section outlines how to set up resources with wildcards in the UI.
Subsequent sections explain the use of wildcards. Please see section 10.2 and beyond if you are unfamiliar with wildcards and how they work.
10.1.1. Creating Git Wildcard Resources
To create a resource using wildcards follow the steps below.
-
Click the relevant Team, or create a team and add members.
-
Click Add in the Resources pane.
-
Select the Resource you want to add and click Refine.
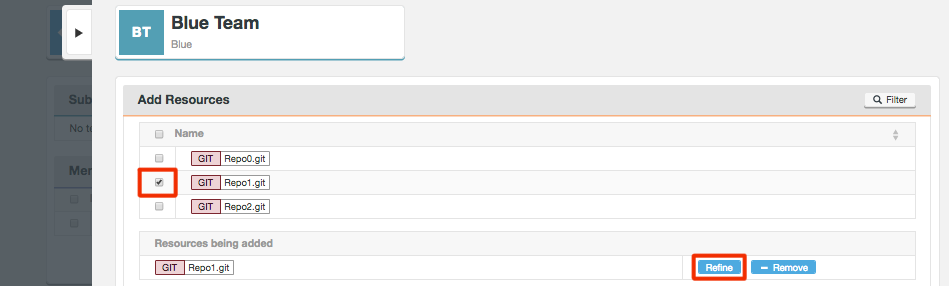 Add Resource
 -
Select Branch or Tag. Type the value you want to add and if this contains a wildcard the Use Wildcards checkbox will automatically be checked.
Click Add.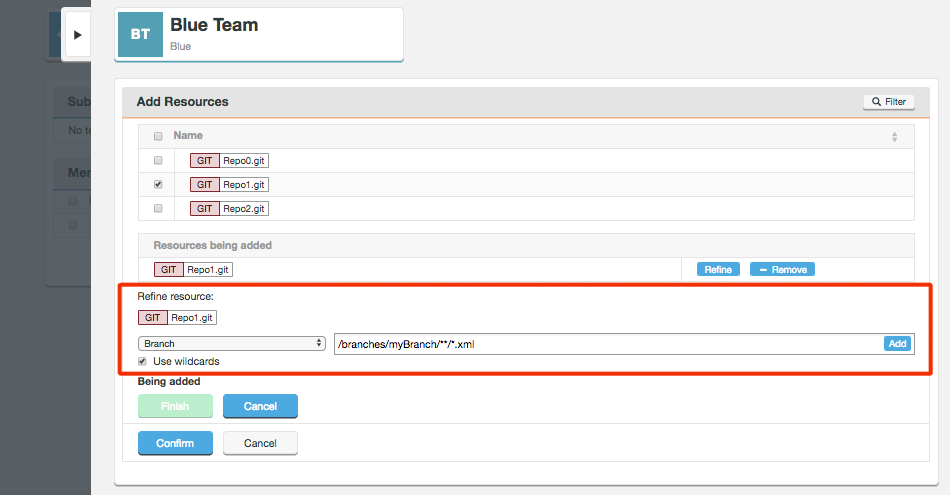 Refine Resource
For Git do not uncheck the Use wildcards box. See above for more information. -
You can add multiple refinements at once which will be listed under Being added. Once you have added all values click Finish and Confirm.
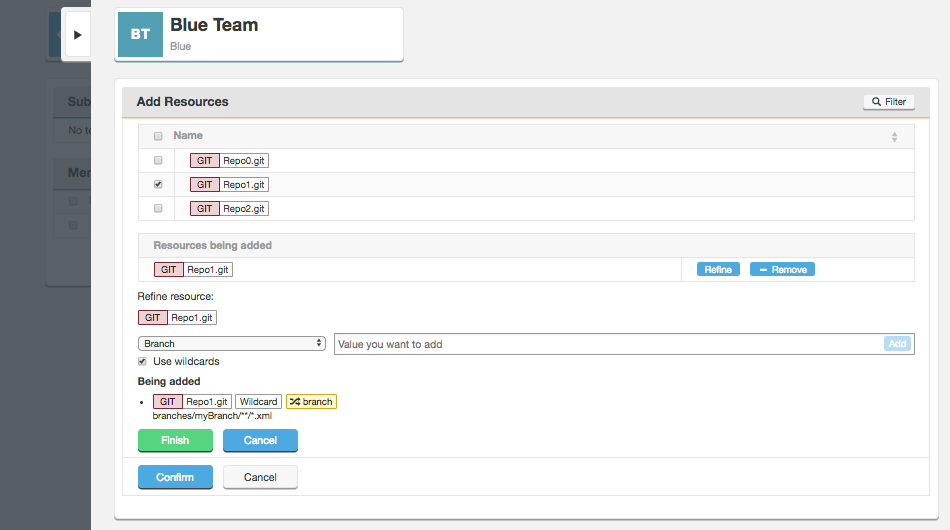 Adding Resource - Finish
 -
Resources will now be displayed on the Team page.
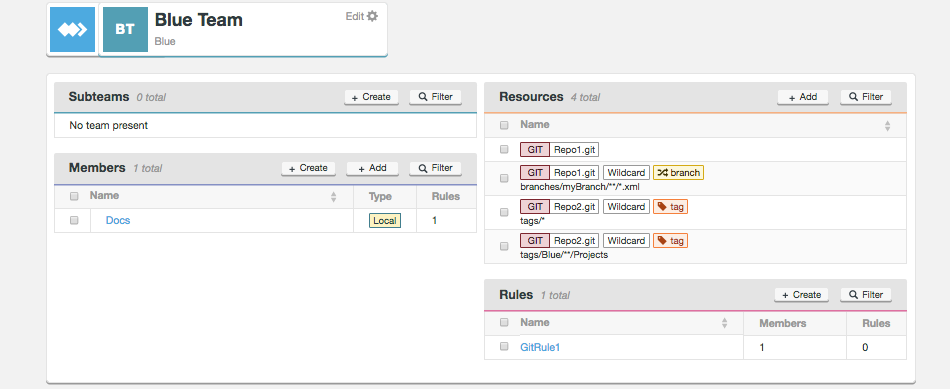 Team - Resources
 -
Now that the Resource refinement has been created, it needs to be added to a rule. For more information see Create a rule.
10.1.2. Creating Subversion Wildcard Resources
With Subversion, resources are sub-repository paths and permissions can be used to restrict read or write access, including preventing visibility completely.
To create a resource using wildcards follow the steps below.
-
Click the relevant Team, or create a team and add members.
-
Click Add in the Resources pane.
-
Select the Resource you want to add and click Refine.
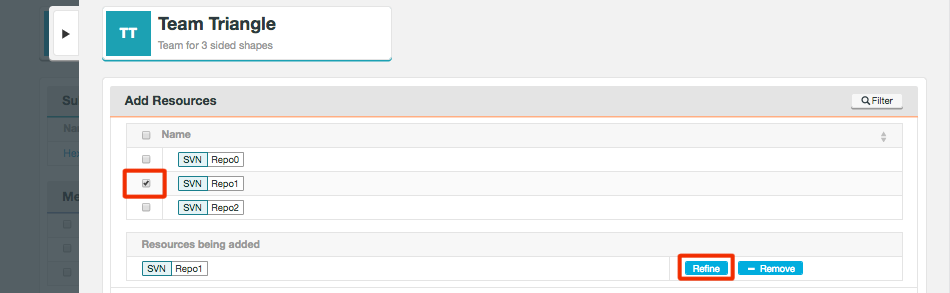 Add Resource
Type the value you want to add and if this contains a wildcard the Use Wildcards checkbox will automatically be checked.
Click Add.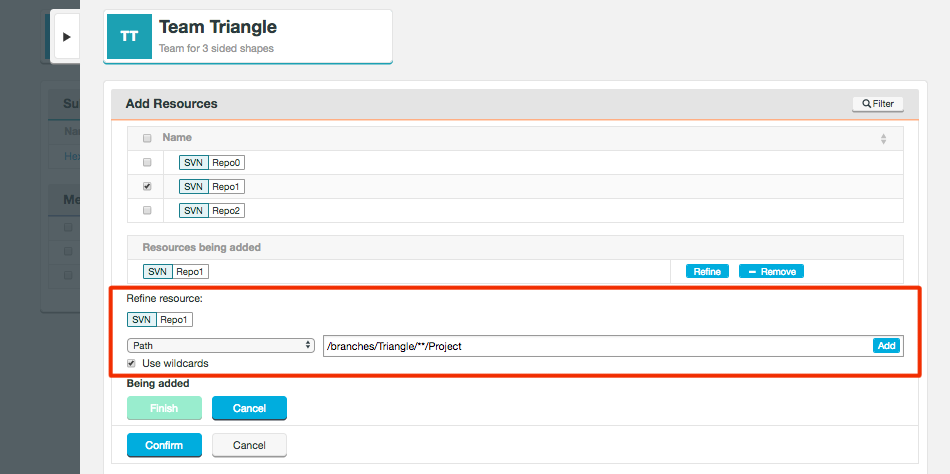 Refine Resource
 -
You can add multiple refinements at once which will be listed under Being added. Once you have added all values click Finish and Confirm.
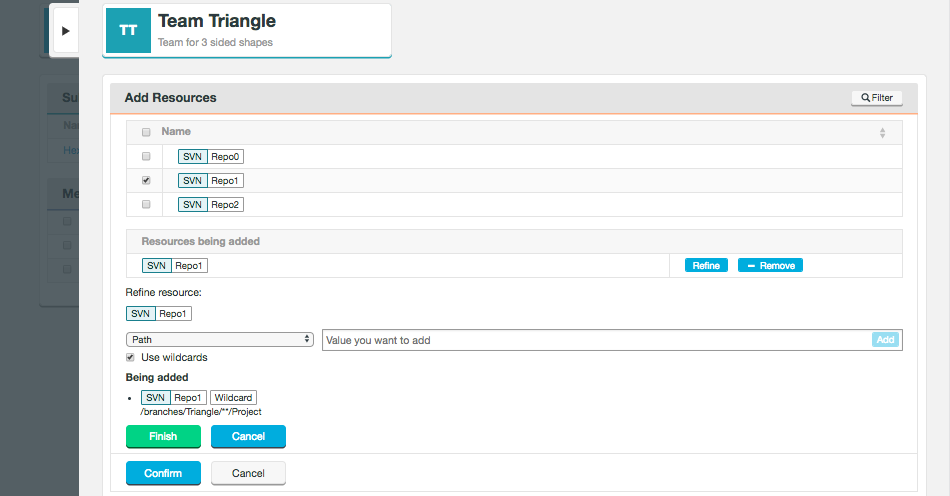 Adding Resource - Finish
 -
Resources will now be displayed on the Team page.
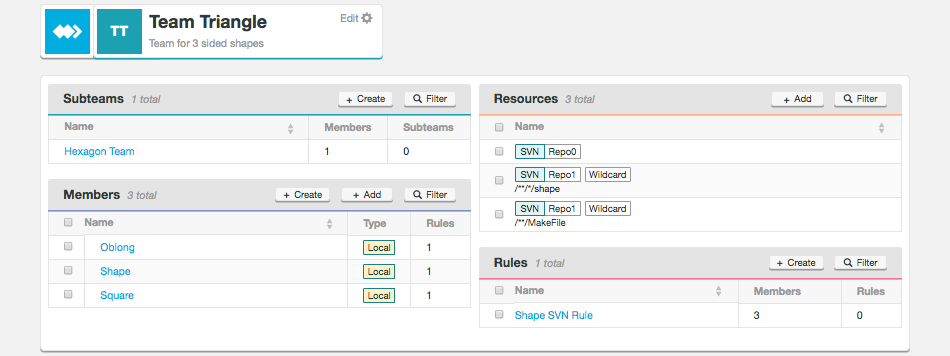 Team - Resources
 -
Now that the Resource refinement has been created, it needs to be added to a rule. For more information see Create a rule.
10.2. How the wildcards work
Wildcards are used to enable easy matching of one or more components of a text space.
There are 3 different text spaces to be considered for Git and Subversion:
-
Git wildcards match:
-
Git branch paths
-
These are meta-directories and meta-files - they can, but do not have to, map to actual directories and files
-
-
Git tag names
-
-
Subversion wildcards match:
-
Subversion repository paths
-
These are made up of directories, files or symbolic links
-
-
For paths, the components are called Directory Entries (DEs). It is simplest to consider "name" components as generic DEs, it does not matter if they are directories or files.
10.2.1. The wildcards
There are 2 different wildcards, used for both Git and Subversion:
-
* - matching all or a portion of a single DE.
-
** - matches zero or more DEs.
10.2.2. Creating refinements
See Creating Git Wildcard Resources and Creating Subversion Wildcard Resources above for how to create and refine resources.
Git refinements
For Git refinements you can select between Branch or Tag.
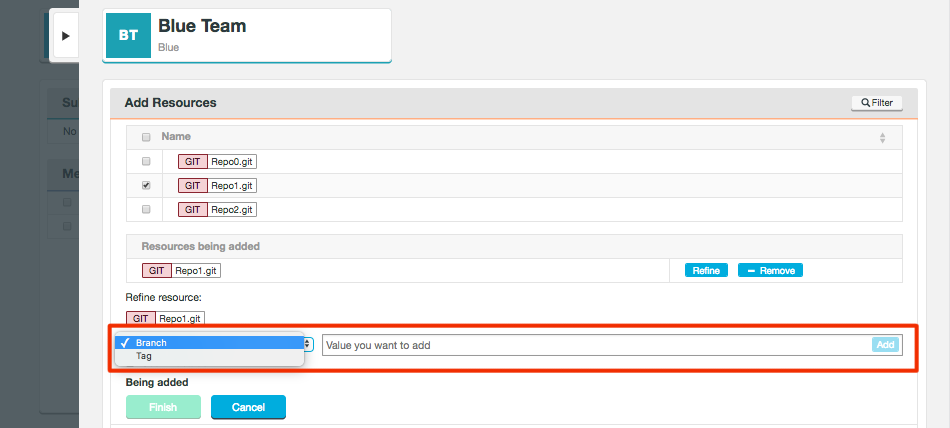
Git Tag examples:
-
Match all tags: *
-
Match all tags for releases: RELEASE*
-
Match all tags for version 13: *v13*
Git Branch examples:
-
Match all 1st level branch names: *
-
Match all 2nd level branch names: */*
-
Match all release branches: release/*
-
Match all branches named "turkey": **/turkey
| If you have branch called X then you cannot have a branch called X/anything. This is due to an implementation detail in Git. This is true anywhere in the branch-path so be careful when designing your policies. |
Account-Specific Branches
From GitMS 1.9.0 onwards there is an additional matching capability for branches - Account-Specific Branches.
To use this feature, create a Git Branch refinement.
The initial branch path can be anything but it needs to be followed with exactly <ACCOUNT>,
The <ACCOUNT> token must be last.
During an authorization, where an account context is clear, the token <ACCOUNT> is expanded to the "account name" requesting the access.
Example
Branch path: personal/<ACCOUNT>
In this example, if the account name was "bobhoward" then the following branch paths would match (and provide the permissions associated by the Rule):
-
personal/bobhoward/taskA
-
personal/bobhoward/special
-
personal/bobhoward/SecretSquirrel
This means that "bobhoward" should never directly use a branch by the name of "personal/bobhoward". As per the warning above, the use of these longer branch path names would be prevented.
Subversion refinements
For SVN refinements you can only select Path.
If you type an asterisk (*) the Use wildcards checkbox will automatically be checked. Unlike in Git, in the incredibly rare situation where you want a literal asterisk (not a wildcard) you can uncheck that check-box.
Subversion Path examples:
-
Match all DEs in the repository’s "branches" directory: /branches/*
-
Match all DEs in the repository’s "tags" directory: /tags/*
-
Match all DEs in the repository: /**
-
Match all "Makefile" DEs in the repository: /**/Makefile
-
Match all DEs ending in "Text": /**/*Text
-
Match all DEs starting with "Text": /**/Text*
-
Match all DEs called "Project" below the "Red" branch: /branches/Red/**/Project
|
The following match will be available once support for Subversion 1.10 is added to MSP:
|
10.2.3. Priorities - when a component matches
Once you include wildcards in the refinement space, it is possible for multiple refinements to match the same component. How do you decide which refinement will win? The answer is a combination of precedence, the sort order of the rule, and the priority of the rule. See Working with Rules and Setting priorities for more information.
10.3. Working with Rules
You can create a new rule or edit existing rules.
-
Rules for the same repository and identical path extension collapse into a single section.
-
Sections at the same priority sort by:
-
Sections for repositories are supported by repository name in strict <character-set> order.
-
Shorter sub-repository paths sort before longer paths where:
-
Wildcard "sort-specific path subset" is the shortest path that includes no wildcards (e.g. "/a/b/c/" in "/a/b/c/*.suffix").
-
Wildcard rules with matching "sort-specific path subset" sort via strict <character-set> sort on the remaining path segment (e.g. "/a/b/c/*.suffix") after "/a/b/c/README.*") with the caveats:
-
The wildcard character itself, *, always sorts before every other character in the <character-set> being used.
-
If the * is not a wildcard then it sorts in its normal location within the <character-set>.
-
-
Wildcard rules sort before non-wildcard rules.
-
-
-
-
Sections at higher priority sort after sections at lower priority and vice versa.
|
Note
If the wildcard flag is not set then the entire rule must be treated as a non-wildcard so the * is sorted based on <character-set> order only.
Priority is still observed.
|
Subversion examples:
-
The section header must start with :glob: for wildcards to be honored. All asterisks within that section are considered to be wildcards.
-
Sections without wildcards can have :glob: but with no effect.
-
Sections without :glob: with asterisks (‘*’) mean non-wildcard/literal.
For example:
[:glob:repo:/path/*]
@group1 = rw
is a wildcard reference while:
[repo:/path/*]
@group2 = r
is NOT a wildcard reference.
10.4. Setting priorities
To enable policy via wildcards you can specifically order specific sections before others. To enable this in ACP, each refinement has an associated priority. The priority value ranges between -9 and +9. Default is 0 (zero).
Most rules should not require priority adjustment.
Rules for the same repository and identical refinements collapse into a single section. Sections for repositories plus refinements are sorted in strict <character-set> order (see above).
Git example:
-
TeamBravo with a Priority 1 rule "repo1:BRANCH/a/**"
-
TeamRomeo with a Priority 4 rule "repo1:BRANCH/a/**"
both collapse to a single rule in the AuthZ file:
[repo1:BRANCH/a/**]
@TeamBravo = r
@TeamRomeo = rw
This section sorts with Priority 4 sections after sections with priority 3 but before sections with 5 (not priority 0).
SVN example:
-
TeamAlpha with a Priority 0 rule "repo1:/a/**"
-
TeamZed with a Priority 3 rule "repo1:/a/**"
both collapse to a single rule in the AuthZ file:
[:glob:repo1:/a/**]
@TeamAlpha = r
@TeamZed = rw
This section sorts with Priority 3 sections after sections with priority 2 but before sections with 4 (not priority 0).
10.4.1. Set priority for resources within rules
You can set a priority from -9 to +9 (0 is default) for every resource within every rule.
|
Note
At any time, you can change the priority for resources from the Rules page.
|
10.4.2. Wildcards conflict
When adding a resource to a rule you may get a priority conflict between this new rule and an existing one.

The priority chosen for the rules in conflict will depend on the global setting for conflict resolution, by default set to "Highest Wins". The conflict is then included in the count shown on the page header.
Critical conflict interactions occur where there is:
-
Direct matching: This applies to both SVN and Git. If a section matches a directory then the permissions associated pertain to the entire directory tree, unless other parts of the tree are directly matched by another rule. However: the "**" atom directly matches every single DE at or below directly. In general, a rule need not match every DE directly since inheritance from a directory above it will normally suffice. Therefore, minimize the use of the "**" atom.
SVN example (vertical order is critical):
Example
Solution
[repo1:/trunk/secret]

@group =
[:glob:repo1:/**/Makefile]
@group = RW[:glob:repo1:/**/Makefile]
@group = RW[:glob:repo1:/trunk/secret/**]
@group =Makefiles are accessible everywhere
Makefiles are accessible everywhere except within the
/trunk/secret tree

@group = -
Buried access: This is a SVN only concept. If a wildcard pattern enables "r" or "rw" rights to a DE, but that DE is below a directory with no rights, then SVN allows direct access if explicitly requested. For example:
[repo1:/a/b]
@group =

[repo1:/a/b/c]
@group = RW
Then direct access works if the path is known:
svn ls http://myserver/svn/repo1/a/b/c
10.4.3. Resolving conflicts in resource priorities
If a conflict is detected while creating or editing a rule then you see a message:
These changes will create priority conflicts. Are you sure you want to continue and create priority conflicts?
Click Continue or Cancel.
To resolve conflicts you need to compare priorities. Either:
-
Team leads can change the priority of their own Team’s rule.
-
Administrators can change priority of any rule.
Then:
-
Select the Rule.
-
Change the Priority.
-
Click Save.
Wildcard conflicts are counted in the page header by Priority Conflicts.
Click Priority Conflicts to display:
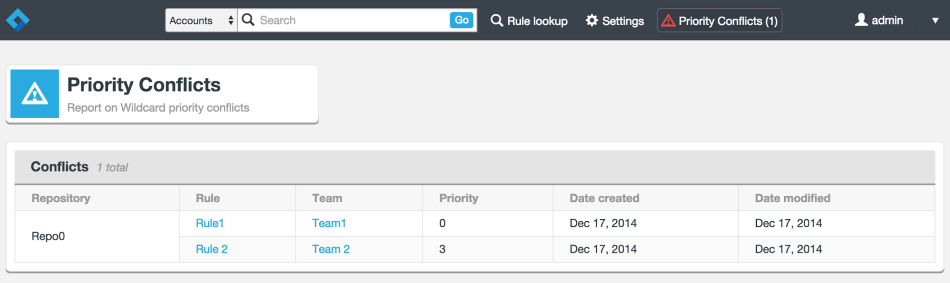
Alternatively you can run an API call conflict/conflictsreport which then lists:
-
Details of one rule
-
Details of the second rule
-
Repository details
-
Whether wildcards are enabled
The report of priority conflicts will depend on the privileges of the account running the report. Administrative accounts can see them all. Team leaders can only see rules that they have rights to see (not rules in other teams where they have no rights). Ultimately it might take an administrator to resolve a conflict dispute.
10.4.4. More Subversion Examples
Trailing ** above
Consider the following AuthZ snippet:
[:glob:ourRepo:/branch/**]
@group1 = rw

[ourRepo:/branch/secret]
@group1 =
group1 gets read/write for the path /branch/secret/source and for everything in /branch/secret but no rights for /branch/secret. So a checkout from “/” won’t get secret but a direct checkout of /branch/secret/private works, which a good reason to limit the /** wildcard.
Trailing ** below
Consider the following AuthZ snippet:
[ourRepo:/branch/secret]
@group1 = rw

[:glob:ourRepo:/branch/**]
@group1 =
In this case group1 members are completely out of luck since "/branch" itself and the entire subtree is directly matched and they are given no rights. Even if the rules were reversed this would not be good since they would then only have read/write rights to the "/branch/secret" directory but nothing in it or below and they would not see it on a checkout from "/".
Again, really need to be careful when using the ** wildcard rules.
11. Auditing
The ACP Auditing feature allows Account Access Auditing. Note that it is not a tool for Compliance Auditing.
ACP Application administrators can check when accounts were last active within the repositories by looking up the account in the UI and clicking Edit. The last access, either READ or WRITE, is shown. If the date displayed matches the Linux date epoch (e.g. 1970-01-01T00:00:00 UTZ) then the account has never accessed a repository. Note that the epoch changes based on the timezone of the ACP server process.
The auditing data stores the latest access time, and whether the access was a READ or WRITE, for each account known to ACP for each repository that the account has accessed. Access history is not stored. You can query the data from ACP by using the appropriate REST API calls, see the RESTful API Guide. Custom reports can then be constructed.
|
Note: Audit does not report SVN commits using file://
Commits over file:// do not generate anything in the logs that auditing monitors. This means that nothing is sent to the auditing mechanism to report to the user.
|
The Flume agents are located where you installed them, either when installing GitMS, SVN MSP or ACP. They default to being installed into /opt/wandisco.
The Flume sender does a tail -F on the appropriate log file(s) and sends log messages to the Flume receiver every time Git or Subversion is accessed. The Flume receiver has a configurable caching delay where it holds onto records from the Flume senders, then processes the data streams, determining via regular expressions the data necessary to forward to ACP. Cirata supplies regular expressions that will match normal log file entries. If you have changed your log file entries, for instance by changing how and where Apache logs information, then you may need to modify the regular expressions in the Flume receiver configuration files. After the specified time (recommended caching delay is 1hr - set as 3600 seconds in the configuration file), the consolidated data is forwarded to ACP.
The log messages contain user name, time of access, repository name and access type (read or write). The Flume receiver caches the records, discarding all but the most recent record and then periodically sends the data into ACP. This means that the longer the cache time the more likely that multiple Apache access_log entries will be filtered down to a single ACP update (WRITE) transaction. This is necessary as ACP’s database cannot sustain a high rate of WRITE transactions.
For information about the installation of the auditing function and Flume see Install auditing.
12. Authorization and Authentication file delivery
The Cirata replication technology has mostly been used to replicate repository data between nodes, using Generic File Replication. The GFR script uses the system to replicate other kinds of files. Currently these are the files that are used to coordinate changes in Access Control and repository management between nodes. ACP sends an archive of files (can contain multiple Authz, git Authz, passwd, git authorized keys, etc.) and a set of instructions about where to put all these files. The locations are defined by the administrator during the setup of the Repository Templates (all as defined by the repository templates). Then the scripts unpack the files and place them according to the instructions. There are some advance parameters for templates, which let you specify certain nodes to skip, or to place only on given nodes, and also to call a script before placement (which can trigger skip) and after.
The Generic File Replication script handles the final delivery for AuthZ and Password changes. Customers modifying this code assume all responsibility for the execution of it. Contact Support for more information.
|
To receive notification of GFR failures, you must configure email notifications correctly on all GitMS and SVN MSP nodes.
Currently the API only returns the success or failure of the node that ACP is directly connected to. Therefore, you need to configure email notifications correctly on your Cirata product.
|
12.1. ACP Placement scripts (for GFR)
ACP comes with some GFR scripts that are used exclusively in standalone mode. The GFR scripts that are used to manage MultiSite Access Control are supplied in separate packages:
- SVN MultiSite GFR
-
ACP-GFR-svn-<major>.<minor>.<patch>.<release_candidate>-<4-digits-of-build>-installer.sh
E.g.
-
ACP-GFR-svn-1.7.4.1-0100-installer.sh
-
- GitMS installer (acp-gfr-scripts-git-installer.sh)
-
ACP-GFR-git-<major>.<minor>.<patch>.<release_candidate>-<4-digits-of-build>-installer.sh
E.g.
-
ACP-GFR-git-1.7.4.1-0100-installer.sh
Install the corresponding package on each SVN MSP / GitMS node. Each package is available as an rpm, debian package, and .sh shell script.
12.2. Placement scripts
The pre-placement and post-placement scripts are executed by the ACP and will be passed the following arguments during the invocation:
-
ARGV[1] = path to the system generated temporary file that is about to be delivered
-
ARGV[2] = path to final destination of file to be delivered as configured elsewhere in the template
When configuring for pre-placement and post-placement scripts please only configure the name of the script to be run. Do not configure any additional arguments.
The following restrictions apply to the pre-placement or post-placement script names as they are configured in the repository template:
-
The template can only have a single entry which is the partial path, or leafname, of the script to be invoked.
-
There can be no arguments.
-
There can be no quoting, neither single nor double quotes.
Regarding the account/group identity that the pre and post-placement scripts are run as:
-
The scripts are run using the same account as the connected product (GitMS or MSP) is run as.
-
The scripts have the same primary group as the connected product (GitMS or MSP) is run as.
The current working directory of the pre and post-placement scripts is …/gfr/tmp. See the location of the gfr directory specified in the Pre-placement section, below.
12.2.1. Notes
-
The pre-placement script is normally used to modify the contents of the temporary file so as to customize the delivered contents. The contents of the temporary file are atomically moved into the operational location when the pre-placement script exits 0 (zero). If the pre-placement script exits anything other than 0 (zero) then this is taken as failure and the delivery is aborted.
Atomic delivery is accomplished via the
rename(2)system call after having copied the data into temporary file in the final location directory. In this way there are no race conditions between the prior file and the fully instantiated newly delivered file. -
The post-placement script is normally used to do notification of the delivery. The post-placement script should not modify the contents of either of the files pointed to by the arguments.
Modifications made by the post-placement script present race conditions to the agents that need to interpret those files. For the AuthZ files this might be Apache, svnserve, GitMS, etc. For AuthN files this could be SSHD or Apache. In any case these race conditions can and will cause unexpected failures in your environment and are easily avoided - use a pre-placement script to make any changes.
12.2.2. Pre-placement directories
The pre-placement scripts for the authorized_keys and password files must be located within the appropriate gfr directory for the type of SCM being delivered to. There are 3 options:
| Repository type | License type | Location | Default |
|---|---|---|---|
SVN |
Standalone |
ACPInstallDirectory/gfr/bin |
/opt/wandisco/scm-access-control-plus/gfr/bin |
SVN |
MultiSite Plus |
MSPInstallDirectory/replicator/gfr/bin |
/opt/wandisco/svn-multisite-plus/replicator/gfr/bin |
Git |
GitMS |
GitMSInstallDirectory/replicator/gfr/bin |
/opt/wandisco/git-multisite/replicator/gfr/bin |
12.2.3. Pre-placement script exit values
The delivery behavior depends on the pre-placement script’s exit value:
-
'0': Delivery of the file continues to use the current file contents
-
'101': Delivery of the file is skipped and no notification occurs
-
'>not 0' or '101': Delivery of the file is aborted and failure notification is attempted. In this situation, the exit value of the post-placement script is ignored since the delivery has already happened.
12.2.4. Example Pre-placement script
This pre-placement script lets you overcome the limitation of having a single authorized_keys generator. The key principle is that each generator is represented by a UUID that does not change from delivery to delivery:
#!/bin/bash --noprofile

# keep a record of each template's keys
# then sort -u them all together into the "$1":

set -e

myname=${0##*/}

myfile="$1"
myfile="${myfile%%/authorised_keys_folder*}"
myfile="${myfile##/*/}"

mydir="$1"
mydir="${mydir%%/../*}"
mydir="${mydir%/*}/tmp/authkeys"

mkdir -p "${mydir}"
sed -e 's:svnserve -t:svnserve --log-file /opt/repo/SvnServe.log -t:' "$1" > "${mydir}/${myfile}"

tf=${myname}.$$

APPEND=~/.ssh/authorized_keys.append.combo
PREPEND=~/.ssh/authorized_keys.prepend.combo
if [[ -f "${PREPEND}" ]]; then
    cp "${PREPEND}" $tf
else
    touch $tf
fi
sort -u "${mydir}/"* >> $tf
if [[ -f "${APPEND}" ]]; then
    cat "${APPEND}" >> $tf
fi
mv $tf "$1"

exit 0
12.3. acpLockAndRun Script
The "acpLockAndRun" script is part of the GFR packages that install with GitMS and MSP. It is used to prevent parallel updates to the delivered files. It also prevents hangs by having a built-in timeout.
12.3.1. Timeout
-
If the timeout is hit then it will kill off any delivery scripts in progress. The default timeout is 20 seconds.
-
In certain circumstances (e.g. very large number of SVN repositories using "svnserve" access) the actual delivery can take longer. ACP GFR 1.9.0 (and beyond) enables a configuration file to override the built in 20-second timeout with a user specified value.
The configuration file is not required. If it exists it will be read. The configuration file must be located here:
.../gfr/etc/acpLockAndRun.conf
Comments starting with a hash character ('#') are ignored within the file. Blank lines are ignored. Currently the only configurable value is "GFRTIMEOUT". An example entry would be:
GFRTIMEOUT=60
The default value for GFRTIMEOUT is 20 seconds.
12.3.2. acpLockAndRUn.conf in Large deployments
If your implementation has a very large number of AuthN or AuthZ files that need to be delivered then it may timeout. If this happens you will see errors to the effect of "message='acpLockAndRun: Error: Received signal ALRM, sending SIGINT to PGRP 32707 and exiting" in your GitMS and/or MSP log files. To work around this increase the timeout.
|
Recommended Timeout Limit
Do not set this timeout to more than 1 minute without contacting Support.
|
12.4. Generic File Replication log rotation
The version of GFR that ships with ACP 1.9.0 and later does not require GFR log rotation (it is now built in). If you previously had installed GFR file log rotation via the "logrotate" facility you should now remove those settings. More details in the ACP 1.7 User Guide - Set up GFR log file rotation.
13. Configure the repository template
When configuring the repository template, note that the relative path fragment configured into the repository template for the script (both pre- and post-placement) will be pre-ended with the path, defined in the section GFR Pre-placement directories, above.
You might locate all of your placement scripts inside of a directory called "myCompany". With this policy you would fill in the pre-placement relative path with "myCompany/preplacement" and the post-placement relative path with "myCompany/postplacement". The actual location of the script is determined as shown in the above table. If this was a GitMS installation, installed in the default locations, then the two scripts should be installed in the following location on all of your GitMS nodes that the repository template represents.
/opt/wandisco/git-multisite/replicator/gfr/bin/myCompany/preplacement
/opt/wandisco/git-multisite/replicator/gfr/bin/myCompany/postplacement
The scripts should be marked as executable, normally 0755 or rwxr-xr-x.
In general, there should be 1 template per GitMS or MSP ecosystem. This is because AuthN files such as "authorized_keys" get delivered to exactly 1 path in the file system (i.e. the ".ssh" subdirectory of the home directory of the application account that GitMS or MSP runs as). So the "normal" use is 1 template and 1 generator per type for each ecosystem.
14. Managing password and GitMS Authorization file format
The format of the GitMS Authorization file.
This is normally automatically generated by ACP and delivered via the GFR mechanisms detailed above.
Such information can be useful if you need some special customization of ACP’s generated file (e.g. by using a pre-placement script).
Rule conflicts within these hierarchies are resolved by picking the rule that is most precisely defined (granular).
15. License management
This section gives the guidelines used by ACP’s license model. They ensure that deployments run in accordance with their agreed capabilities, while also ensuring minimum disruption if you accidentally exceed your license limits.
15.1. License Components
The license you use to deploy ACP is set during installation by the placement of your license.key file.
Changing your license only requires that you replace the license.key file and restart ACP.
-
Contact Support and request that a new license.key file is generated. When you are sent this new file you can complete the update.
-
Copy the new license.key file to all of your ACP nodes. Because each node’s IP address is encoded into the key, changes to IP allocation or the addition of new nodes require that a fresh license.key file is placed on every node.
-
From a terminal, navigate to ACP’s config directory. e.g:
/opt/wandisco/scm-access-control-plus/properties
-
Back up or delete your old license.key file, then copy the new file into place.
-
When the license.key file is replaced on all nodes, restart each node. Do this one after another so that you can test that each one restarts successfully. If there’s a problem with the license.key file, a warning is written to the main log file, found here:
/opt/wandisco/scm-access-control-plus/logs/acp.log
|
Log rotation
Old logs are renamed to acp.log.<date-time-stamp>`
|
15.2. License monitoring
All components are checked on ACP’s startup. When started, each node checks all licensed components once every 24 hours. If a check fails, the thread writes out a warning to the log file and sends a notification email, so it is important to properly configure your notification settings.
This warning triggers a grace period of 10 days. In this time you need to remedy the license failure. Either:
-
Modify your deployment to bring it back into line with your license.
-
Contact Cirata and increase your license allowance.
-
If the issue is not resolved, after 10 days ACP enters a read-only mode.
|
Example
There’s an installation of ACP running with a license for 30 users. During the day we exceed this limit after adding users from LDAP. ACP is not shut down, but the check is done within 24 hours. A notification email will be sent that informs the administrator (the email account holder nominated in the notifications set up) of the breach. If the issue is not resolved then in 10 days ACP will no longer allow you to make any changes. Accounts, Resources, and Rules will be locked (read-only) until the license issue is remedied.
|
15.2.1. LDAP/AD filter for disabled and locked accounts
Use the following LDAP filter to remove disabled and locked accounts from user account polling.
-
Log into the ACP UI.
-
Click on Connect to LDAP, under Settings.
-
Enter the following string into the in the User DN Filter field of the LDAP Authority screen.
(&(!(userAccountControl:1.2.840.113556.1.4.803:=2))(!(userAccountControl:1.2.840.113556.1.4.803:=16)))
16. RESTful API Guide
ACP offers increased control and flexibility through the support of a RESTful (REpresentational State Transfer) API.
|
Knowledgebase
You can use your browsers developer tools to inspect and gain more information on how the API can be used.
Learn more in the following Knowledge base article. Using developer tools to understand the ACP API.
|
16.1. Functionality
Note the following:
All calls use the base URI:
http(s)://<server-host>:8082/api/<resource>
The internet media type of the data supported by the web service is application/xml. The API is hypertext driven, using the following HTTP methods:
Type |
Action |
POST |
Create a resource on the server |
GET |
Retrieve a resource from the server |
PUT |
Modify the state of a resource |
DELETE |
Remove a resource |
To avoid call-to-call data inconsistency, you must compute a pageSize big enough to obtain all of the data in one page. To do this make one call with an initial small pageSize and verify that all of the data was returned. Otherwise compute the required pageSize, add a buffer for growth, and make a second call to obtain all of the data.
16.2. Online documentation
You can review a copy of the bundled API documentation. This documentation is taken straight from a live installation. Because the documentation is automatically generated, it frequently links to local files and resources that will not be available here.
|
API documentation is still in development
Note that the API documentation is incomplete and requires clarification of available endpoints. Currently the documentation includes automatically generated endpoints that are not valid for their corresponding classes.
|
16.2.1. API Searches with UserType
When performing API calls that filter on UserType, you need to use the following enumeration to match the appropriate searchValueList integer value.
Account Type |
searchValueList |
STANDARD |
0 |
SYSTEM_ADMIN |
1 |
AUDIT_USER |
2 |
LOGGER_USER |
3 |
|
Changes to the REST API in ACP 1.9
The "publicKey" fieldList item is no longer available from the /api/users REST endpoint
e.g. Instead, the array of public keys is now available via:
Additionally, there is no other way to obtain the list of SSH Public Keys associated with an account in ACP 1.9. |