1. Introduction
Welcome to the User Guide for WANdisco’s Gerrit MultiSite 1.9.
To view User Guides for previous versions of Gerrit MultiSite visit the Archive.
Gerrit is an open source code review tool that works with Git. When equipped with Git and Gerrit, software development teams have a solid workflow for centralized Git usage where code changes can be submitted by authorized users, reviewed, approved and automatically merged in, greatly reducing the work load of the repository maintainers.
Gerrit MultiSite, referred to as GerritMS, can be integrated with WANdisco’s Git MultiSite (GitMS). For information on GitMS see the GitMS User Guide.
1.1. Get support
See our online knowledge base which contains updates and more information.
We use terms like node and replication group, and define them in the Glossary. This contains some industry terms, as well as WANdisco product terms.
If you need more help, raise a case on our support website.
If you find an error or if you think that some information needs improving, raise a case or email docs@wandisco.com.
1.2. Symbols in the documentation
In this document we highlight types of information using the following boxes:
|
Alert
The alert symbol highlights important information.
|
|
Tip
Tips are principles or practices that you’ll benefit from knowing or using.
|
|
Stop
The STOP symbol cautions you against doing something.
|
|
Knowledgebase
The i symbol shows where you can find more information in our online Knowledgebase.
|
1.3. Release Notes
View the Release Notes. These provide the latest information about the current release, including lists of new functionality, fixes, and known issues.
2. Installation Guide
| Make sure that you read the Integration Guide before starting your installation. |
2.1. Software requirements
|
Install Gerrit on first node before installing GerritMS
Install Vanilla Gerrit only on your first node.
Don’t install it on the other nodes because the WANdisco installer manages this.
At the end of the installation on the first node, you rsync the whole Gerrit root directory and its repos to the next node on which you want to install.
|
Software requirements, using the required Percona XtraDB database solution:
| Node 1 | Node n > 1 |
|---|---|
Vanilla Gerrit |
Git MultiSite |
Git MultiSite |
Percona XtraDB Cluster |
Database (master-master) |
See the Release Notes for which versions you will need.
You will need to upgrade to the required version of Gerrit before completing the installation of GitMS.
2.1.1. Database
Percona XtraDB We have developed and tested GerritMS using Percona XtraDB.
See the Release Notes for which version is suitable for your GerritMS release.
See the Percona chapter for more information on installing and using Percona.
Configuration change: During installation of Gerrit’s MultiSite components, you need to modify Gerrit’s database settings to increase its maximum number of database connections.
2.1.2. Replication requirements
The following limits that apply to this version of GerritMS:
-
Gerrit currently integrates with a single Replication Group:
Using multiple replication groups with Gerrit is an advanced operation. Before proceeding, contact WANdisco Support. -
All nodes in your Gerrit replication group must be Active or Active-Voters:
Any Gerrit node could also be a Tiebreaker. Passive and Voter-only nodes are not supported.
2.1.3. Authentication
OpenID not compatible: It’s not possible to use Google’s OpenID authentication. If you are planning to use HTTP then you need to ensure that you have an Apache web server running in front of Gerrit.
2.1.4. Caching
Compared with the initial versions of GerritMS, Gerrit caches can now be enabled.
Cache updates and invalidation happens appropriately based on replicated operations and events.
Please make sure that you enable the Gerrit caches if you had turned them off for the earlier versions.
To make sure that caches are properly enabled in GerritMS you need to add properties to the GitMS application.properties file.
See Enable Gerrit Caching.
2.1.5. System resources
Protect the server against resource exhaustion
The integration of Gerrit into a GitMS deployment will increase the demands on server resources. Take note of GitMS’s requirements for setting high File descriptor / User process limits. While these requirements are not changed by the addition of Gerrit, it does make resource management even more important.
Gerrit garbage collection
The system administrator should configure Gerrit to run a scheduled garbage collection. This can help ensure that that the server doesn’t experience errors or performance downgrade as as result of system resources running out.
| For tips see Running Garbage Collection (in GitMS docs). |
2.1.6. Integration with third-party applications
Many Gerrit deployments are integrated with one or more third-party applications. While there are no hard and fast rules for how these will be affected by moving to a replicated environment, the following information may be useful:
-
Git hooks - GitMS offers both standard and replicated hooks. Hooks are always installed manually at each replica by the Git Administrator. They are placed in each repository replica’s hooks directory depending on the policy for that replica. The easiest policy to design is one of complete uniformity; policies that do different things at different replicas are more difficult to create and administer. Therefore, generally we advise that hooks should be set up the same on all sites, although this is not a requirement for replication. If processes or policies differ from site to site then hooks will be need to be different.
-
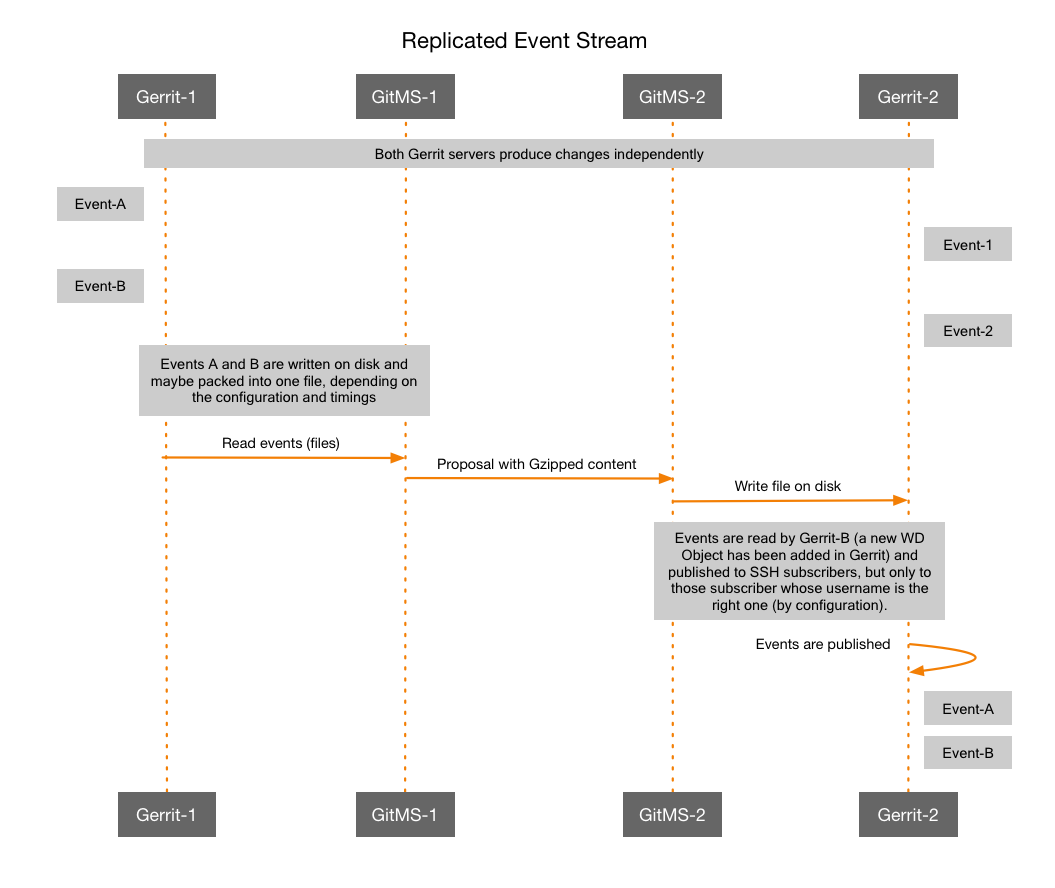
Gerrit event stream - The event stream only publishes events that occur directly on a node. If you have integrations that rely on seeing every event from every node, then you will need to make changes to the configuration. Please see the section on configuring the GerritMS Event Stream for your choices and configuration details.
2.1.7. Plugins
Gerrit plugins for solutions
Gerrit supports a number of plugins for integrating additional applications:
-
Plugins need to be installed in exactly the same way on every node to ensure deterministic behavior or nodes can lose their sync.
-
Plugins that use global configuration of key-value pairs, stored in the
gerrit.configwill replicate without problem providing they are configured the same on all nodes. -
Plugins with Project-level configuration (stored in
project.configwithinrefs/meta/config) should replicate without problem. -
We’re still investigating whether plugins that request data directories for storage can be supported with replication - please contact WANdisco support for more information.
Currently we have successfully tested the Gerrit plugins for:
-
commit-message-length-validator - validates that commit messages conform to length limits
-
delete project - deletes or cleans up a project, see Delete projects. Note that this is NOT the original Gerrit delete plugin.
-
download-commands - defines commands for downloading via different network protocols
Do not use white space in project namesIt is a known limitation of the
download-commandsplugin that it does not handle projects with white space in their names. It is generally advisable to not use white space in Gerrit project names but if you need to then you can use the following example workaround:If the
download-commandsgenerates the command:git clone ssh://admin@gerrit.wandisco.com:29418/Project Nightmare
then you need to change it to be:
git clone ssh://admin@gerrit.wandisco.com:29418/"Project Nightmare" ProjectNightmare
-
reviewnotes - retains review history for a Gerrit project under
refs/notes/review, which is replicated automatically by GerritMS -
singleusergroup - provides a group per user which is useful if you want to assign access rights directly to a single user
Gerrit plugins which are known not to work - do not use these plugins:
-
replication - provides master-slave replication, and therefore should not be used with GerritMS.
-
delete - the original delete plugin does not work, please use the delete project plugin above.
Solution plugins for Gerrit
-
its-jira - in addition to the Gerrit plugin for JIRA described above, there is a JIRA plugin for Gerrit. In order for this plugin to work it needs to be configured as detailed here - gerrit.googlesource.com. In addition to these configurations the following needs to be done:
-
Create a new directory called its in the location <install dir>/gerrit/etc/its/.
-
In this directory create an actions-@Plugin@.config: file e.g. actions-its-jira.config. View a sample config file here - actions-its-jira.config
Note if Gerrit is installed on multiple sites, then the configuration needs to be repeated on all sites.
-
2.2. Install procedure
These steps describe how to do an interactive installation. If you would like to use a non-interactive installation see the next section.
-
Run the single installer file on the command line.
-
Answer questions during the installation. For example, for a new installation you are asked:
-
If this install is being done on the first node
-
The root directory of GitMS
-
The root directory of Gerrit
-
The Gerrit admin account username and password for GitMS to use
-
The root directory for repositories deployed via Gerrit
-
The directory to use for publishing Gerrit Events
-
Whether the user wants the node to send replicated events
-
Whether the user wants the node to receive replicated events
-
The name of the default replication group to use for Gerrit in GitMS
-
The GitMS username and password
-
The location for deleted repositories to be archived to
You need to create this directory to use the Gerrit delete project plugin.
-
The location of the backup taken of the Gerrit root directory
-
-
Existing configuration options are detected and used as default options, for example, the location of GitMS on the node. However, from an install or upgrade you cannot modify existing GerritMS settings. Any settings which already exist (and have been read from an existing application.properties file) will be automatically filled in and will not be prompted for.
|
GerritMS 1.9.8 Removes support for distinct events.
The following Gerrit events properties are no longer supported. In GerritMS 1.9.8 and later versions, there’s no control over distinguishing replicated events. If these properties appear in a node’s application.properties file, we recommend that you remove them as they will not work if enabled. |
Follow the steps below to install:
-
Make the installer file executable if it is not already:
chmod +x gerritms-installer.sh
Workaround if /tmp directory is "noexec"Running the installer script will write files to the system’s
/tmpdirectory. If the system’s/tmpdirectory is mounted with the "noexec" option then you will need to use the following argument when running the installer:--target <someDirectoryWhichCanBeWrittenAndExecuted>
E.g../gerritms-installer.sh --target /opt/wandisco/installation/
-
Run the installer:
./gerritms-installer.sh
The installer starts up and you see:
$ ../installer-1702/gerritms-installer.sh
Verifying archive integrity... All good.
Uncompressing GerritMS Installer  100%

    ::   ::  ::     #     #   ##    ####  ######   #   #####   #####   #####
   :::: :::: :::    #     #  #  #  ##  ## #     #  #  #     # #     # #     #
  ::::::::::: :::   #  #  # #    # #    # #     #  #  #       #       #     #
 ::::::::::::: :::  # # # # #    # #    # #     #  #   #####  #       #     #
  ::::::::::: :::   # # # # #    # #    # #     #  #        # #       #     #
   :::: :::: :::    ##   ##  #  ## #    # #     #  #  #     # #     # #     #
    ::   ::  ::     #     #   ## # #    # ######   #   #####   #####   #####


 GerritMS Version: <GerritMS-Version-number> Installation

 Install Documentation:

 http://docs.wandisco.com/gerrit/1.9/#doc_gerritinstall

 Welcome to the GerritMS installation. Before the install can continue,
 you must:

 * Have Gerrit <requiredGerritVersion> installed before beginning
 * Have backed up your existing Gerrit database
 * Have a version of GitMS (1.9.1 or higher) installed and running
 * Have a replication group created in GitMS containing all Gerrit nodes
 * Have a valid GitMS admin username/password
 * Stop the Gerrit service on this node

 Do you want to continue with the installation? [Y/n]:
We recommend that, if you are upgrading, you stop all Gerrit nodes before the upgrade. This prevents changes to the shared database during the upgrade. For the <requiredGerritVersion> please see the release notes.
-
There are 5 environment variables that will affect the use of
curl. If any of these variables are set then the installer will output the variables and their values.The following environment variables are set and will affect the use of 'curl': * HTTP_PROXY=12345 Do you want to continue with the installation? [Y/n]:
Continuing with these variables setWe advise against continuing if you have the following variables set: HTTP_PROXY, HTTPS_PROXY, FTP_PROXY, ALL_PROXY or NO_PROXY. They may cause curl commands to redirect incorrectly and therefore prevent successful installation
If you have any questions, please contact WANdisco support. -
Answer whether this node is the first to to be installed to. This enables better targeted post-install advice.
Is this the first node GerritMS will be installed to? [Y/n]:
-
Answer whether you require the database to be upgraded. This question is only asked on the first node. Because Gerrit nodes share a database, it is not necessary to backup the database several times over.
-
The installer prints the currently running user and asks you to confirm that this user matches the owner of the GitMS/Gerrit services:
 Currently installing as user: gerrit

 The current user should be the same as the owner of the GitMS service.
 If this is not currently the case, please exit and re-run the installer
 as the appropriate user.

 Press [Enter] to Continue
-
The installer prints the currently running user and asks you to confirm that this user matches the owner of the GitMS/Gerrit services:
Configuration Information
Git Multisite root directory [/opt/wandisco/git-multisite]:
The installer collects details from the user for the install. The first question asked is the location of the GitMS service. A default option is provided, which is determined by the following checks:
-
Fetches the gitmsconfig property from ~/.gitconfig and confirms that the
application.propertiesfile it points to exists. -
If the gitmsconfig property does not exist, it looks in the default install location for GitMS (/opt/wandisco/git-multisite) If neither of these resolve to a GitMS install, no default option is provided.
-
-
After providing the installer with the location of GitMS, the installer reads the application.properties file and uses it to prepare any previously configured values, e.g. for an upgrade:
Configuration Information
Git Multisite root directory [/opt/wandisco/git-multisite]:
Reading GitMS Configuration...
Gerrit Root Directory:
Where there are properties that are not set in application.properties, the installer prompts you for input. If a property is set in application.properties, then it is re-used. You cannot change previously configured values during installation.
Using Regex file with GitMultiSiteYou need to configure the property
gerrit.rpgroup.regexin theapplication.propertiesso that it points towards the regex file, in order for Gerrit Project creation to work.For example, the entry in
application.propertiesmight look like:gerrit.rpgroup.regex=/opt/wandisco/gerrit/etc/gitms-regex.txt
The location must be readable and writable by both the Gerrit and GitMS system user.
See Configure the regex file into GitMS -
The installer fetches or asks for the following information:
- Gerrit Root Directory
-
The location of the Gerrit install.
- Gerrit Repository Directory
-
The location of the git repositories on disk that are managed by Gerrit.
- Gerrit Events Directory
-
GitMS and Gerrit will share information with each other via the filesystem. This directory is used to pass events from one process to another. If the directory does not exist at the time of installation, you are prompted to create it.
- Deleted Repositories Directory
-
When using the delete project plugin you can choose to archive and remove repositories. The Deleted Repositories Directory is the location for the deleted repositories to be archived to.
This directory needs to be able to store all the deleted repositories until they can be reviewed and removed. - Will this node send Replicated Events to other Gerrit nodes? [Y/n]
-
Gerrit nodes can send events that appear in its event stream to other nodes, to allow for a fully replicated event stream where you can monitor events from all Gerrit nodes by simply connecting to one. This option tells the current Gerrit node to publish its events to other nodes.
For more information see Configure Gerrit Event Stream. - Will this node receive Replicated Events from other Gerrit nodes? [Y/n]
-
This option will configure the current Gerrit node whether to show only its events, or all the replicated events it receives from other nodes too.
- Gerrit Replication Group Name
-
The name of the replication group that contains all Gerrit nodes.
Note: Even if you will run GerritMS with selective replication for the majority of the repositories, there must be one Replication Group which has every node as a member. This is because critical Gerrit configuration settings have been moved from the database to "system repositories" such as All-Projects and All-Users. These repositories will be required across every Gerrit site, and so they must belong to a replication group that covers every Gerrit node. - GitMS Username and Password
-
Naming the replication group initiates a REST call to the currently-running GitMS installation to fetch the Replication Group ID to match the name. This requires a GitMS admin username and password.
For example:
Reading GitMS Configuration...

 Gerrit Root Directory: /home/gerrit/gerrit2114-1702/
 Gerrit Admin Username: admin
 Gerrit Admin Password: ********
 Gerrit Repository Directory: /home/gerrit/gerrit2114-1702/git/
 Gerrit Events Path: /home/gerrit/gerrit_events/
 Gerrit Receive Replicated Events: true
 Gerrit Send Replicated Events: true
 Gerrit Replicated Cache enabled: true
 Gerrit Replicated Cache exclude reload for: changes,projects
 Gerrit Replication Group ID: 53edcbee-8183-11e5-b9e5-005056a97efe
Deleted Repositories Directory
  The Deleted Repositories Directory is only needed if you are using the Gerrit Delete Project Plugin. Remember that you should periodically review the repositories that are in the Deleted Repositories Directory and physically remove those that are no longer needed. You will need this directory to be capable of storing all deleted project's repositories until they can be reviewed and removed.

Location for deleted repositories to be moved to : /home/wandisco/gerrit/git/archiveOfDeletedGitRepositories
-
You are queried about the install path of various helper scripts that help manage GerritMS. By default these are placed in the GERRIT_ROOT/bin directory:
 Helper Scripts

 We provide some optional scripts to aid in installation/administration of GerritMS. Where should these scripts be installed?

 Helper Script Install Directory [/home/gerrit/gerrit2114-1702/bin]:
The helper scripts are:
- reindex.sh
-
A review can appear out of sync on one Gerrit UI compared to the review’s actual status. For example, very occasionally, on the review listing page, a review might be flagged as Submitted, Merge Pending, but may actually be Merged. This is caused by the Lucene index that Gerrit uses failing to update properly. Fix this by providing the ChangeID of the review to this script. This causes a reindex to occur on that individual change.
- sync_repo.sh
-
Note: This script does not rsync the repositories. Rsync happens at the same time as rsyncing the Gerrit install to the next node. If the repos directory is a subdirectory of Gerrit, it is brought in during the rsync. If it is not a Gerrit subdirectory, you are prompted to rsync it at the end of the install on the first node.
Any repositories created in Gerrit after GerritMS is installed, are automatically added to GitMS replication. If, however, you already have many repositories managed by Gerrit before installing GerritMS, the process to add them individually to replication can be tedious. This script iterates over the Gerrit repository root and automatically adds any repositories it finds to GitMS.
-
A backup of GERRIT_ROOT is taken before any upgrade happens. You are asked where to store this backup. If the location you give does not exist, the installer prompts to create it:
Backup Information
Taking a backup of the GitMS + Gerrit configuration. Where should this
be saved?
Backup Location: /tmp
-
During the backup of the first node only, you are prompted to back up the database. If the underlying version of Gerrit is being upgraded for example, when Gerrit is re-init’d, it may change the database schema so that it becomes incompatible with a previous version. Therefore, we recommend that you create a backup before installation. If you don’t create a backup, then you may not be able to roll back:
NOTE: This instance of Gerrit has been configured to use the database reviewdb.
It is recommended that you create a backup of this database now if one
does not exist already.
Creating backup...
Backup saved to: /tmp/gerrit-backup-20150319163550.tar.gz
Press [Enter] to Continue
-
The backup is taken and its location printed to you. We recommended that you now check the backup file to ensure that it was done successfully.
-
You now need to edit the
<gerrit.home>/etc/gerrit.configfile to contain the following:[container] startupTimeout = 200This value needs to be increased from the default of 90 to ensure a restart of Gerrit will be successful. Note that if you have a very large implementation this value may need to be higher. -
If the underlying versions of Gerrit being upgraded from/to are different, Gerrit may require schema changes to the database prior to running. For example, going from Gerrit 2.9.1 to 2.9.4 requires a schema change that alters some of the primary key settings. You should check the Release Notes for the underlying version of Gerrit and ensure that you have performed all the necessary steps that Gerrit requires for the upgrade.
Because the option for the first node was set to true earlier in the install, the output at the end describes how to continue the install across multiple sites:Finalizing Install Gerrit Configuration Updated GitMS Configuration Updated GitMS and Gerrit have now been configured. Please restart the GitMS service on this node now to finalize the configuration updates. Next Steps: * rsync /home/gerrit/gerrit2114-1702/ to all of your GerritMS nodes
Should your git repositories directory not be located within your Gerrit directory, this rsync command will indicate that you need to provide the corresponding path:
* rsync /a/path/to/repos to all of your GerritMS nodes* Run this installer on all of your other Gerrit nodes * On each of your Gerrit nodes, update gerrit.config: - change canonicalURL to the correct hostname - ensure that database details are correct * Run /home/gerrit/gerrit2114-1702/bin/sync_repo.sh on one node to add any existing Gerrit repositories to GitMS. Note that even if this is a new install of Gerrit with no user added repositories, running sync_repo.sh is still required to ensure that All-Projects is properly replicated. * When all nodes have been installed, you are ready to start the Gerrit services across all nodes.
rsyncIf your repos directory is a subdirectory of Gerrit, it is brought in during the rsync. If it is not a Gerrit subdirectory, you are prompted to rsync it at the end of the install on the first node.
|
Gerrit init required after installation
After the GerritMS installer is finished, perform a gerrit init.
This is only needed for first time installations, not upgrades.
|
2.2.1. Run sync_repo.sh script on Node 1
Gerrit is now integrated with GitMS but you still need to modify Gerrit’s Git configuration to introduce its repositories to GitMS.
./sync_repo.sh
When the script has completed, open a terminal session to each node and start Gerrit up, e.g:
./gerrit/bin/gerrit.sh
Gerrit is now replicating its review activities to all nodes. You should test that this is the case.
|
Important note if running Gerrit 2.13.11 on SLES 11.3
If you are running Gerrit 2.13.11 on SLES 11.3, then you may encounter an issue that prevents Gerrit from starting up after a shutdown. This is because Gerrit uses Workaround
|
2.2.2. Test the integration
Before going into production, run through your regular Gerrit workflow. For example:
-
Clone a repository.
-
Add a test file.
-
Commit and push to your Gerrit magic branch.
-
Check that you get a URL for the review.
-
Log in to Gerrit on each node and confirm the review has replicated, you should see it if you click List all.
-
Add a comment, e.g. "Looks good to me". Publish the comment and confirm that it replicates to the other nodes.
-
Next,the project owner should (from a different node) approve the review. This should trigger Gerrit to merge the change into the master branch and replicate the change across the GitMS nodes.
-
Check that replication has completed properly by logging into the GitMS admin UI and view the Repositories tab. Here you can run a consistency check for the applicable repository.
2.2.3. Gerrit Caching
The Gerrit Code Review for Git provides a number of caches which are use to speed up the response from Gerrit. Examples of the caches used in Gerrit are accounts, diff, groups, projects, permission_sort and so on.
Gerrit caches must be replicated between the nodes.
That means that when some cache becomes outdated on one node, it will also get outdated on the other nodes, so that it is possible to use the advantage of the caches without the problems that those caches could bring when something happens on a remote node.
To ensure that the caches are enabled in GerritMS you need to add these properties to the GitMS application.properties file:
| Property name | Default value | Description |
|---|---|---|
|
|
The current node will send its own cache events to the other nodes |
|
|
The name of the caches that will not trigger a reload event on the receiving node. |
|
Restart required
You need to restart GitMS for any changes to the Gerrit replicated events properties in the GitMS application properties file to take effect.
|
If you experience problems using Gerrit’s cache, you can disable it in the Gerrit config file using the following example configuration snippet
...
[cache "accounts"]
    memorylimit = 0
    disklimit = 0
[cache "accounts_byemail"]
    memorylimit = 0
    disklimit = 0
...
You will need to change the cache labels, e.g. [cache ""] to match the specific cache that you want to disable.
The integration is now complete! Additional information for managing GerritMS in the Admin section.
|
Use a local LDAP authority
As we run without LDAP account caching there will be a greater burden placed on your LDAP authority as it deals with all account lookups.
For this reason we strongly recommend that you ensure that the LDAP authority is hosted locally rather than via a WAN link which would could result in a significant drop in performance.
|
A reload event is always executed on the receiving node.
When a cache value is evicted (outdated) on a particular node, the other nodes receive a message to evict that very same value, and also to reload that value from the database or the repository, so that the part of the Gerrit application which relies on the values read directly from the caches, will always show up-to-date content.
Conversely, if a Gerrit cache is disabled in the gerrit.config file then that cache will not communicate the eviction.
Therefore, if you disable a Gerrit cache on one node you should disable that cache on all nodes.
2.3. Non-interactive installation
You can also install GerritMS with an unattended (scripted) install. Set the following environment variables (defaults are shown):
-
GITMS_ROOT=/opt/wandisco/git-multisite: The location of the GitMS install -
BACKUP_DIR=/home/wandisco: The location to store the backup of GERRIT_ROOT taken during installation. Should be writeable by current user. -
DB_BACKUP=false: Whether to create a database backup -
GERRIT_ROOT=/home/wandisco/gerrit: Path to Gerrit installation -
GERRIT_USERNAME=admin: Username for Gerrit admin account -
GERRIT_PASSWORD=pass: Password for Gerrit admin account -
GERRIT_RPGROUP_ID: <Replication group ID>: The UUID of the replication group to be used by Gerrit to the deploy repositories to. -
GERRIT_REPO_HOME: /home/wandisco/gerrit/git: Path to Gerrit’s Git directory -
GERRIT_EVENTS_PATH: /home/wandisco/gerrit/events: Path to where replicated events will be stored -
GERRIT_REPLICATED_EVENTS_SEND: TRUE: Whether this node should send replicated events to other nodes -
GERRIT_REPLICATED_EVENTS_RECEIVE_ORIGINAL: TRUE: Whether this node should receive replicated events from other nodes -
GERRIT_REPLICATED_EVENTS_RECEIVE_DISTINCT: FALSE: Whether this node should receive distinct events (e.g. Prefix+event_Type).Distinct EventsThe support for Distinct Events types has now been removed from GerritMS. If you’re not making use of them, you won’t need to make any changes. Although you might consider removing related properties from the GerritMS
application.propertiesfile. Learn more.If
true, this may result in the node receiving 2 copies of each event. -
GERRIT_REPLICATED_EVENTS_LOCAL_REPUBLISH_DISTINCT: FALSE: Whether this node should send its own events as distinct events, this is as well as publishing to ssh clients -
GERRIT_REPLICATED_EVENTS_DISTINCT_PREFIX: REPL-: Prefix to allow distinct events from this site to be identified. Note that this property can be different for every node. -
DELETED_REPO_DIRECTORY: /home/wandisco/gerrit/git/archiveOfDeletedGitRepositories: Directory where the deleted repos will be archived. This needs to set if you will use the Gerrit Delete Project Plugin.If this deletedRepositories directory does not exist and cannot be created, abort the install (if you want to use the Gerrit Delete Project Plugin).
The following variables do not need to be set but they will be displayed on the install:
-
UPDATE_REPO_CONFIG: TRUE -
RUN_GERRIT_INIT: TRUE -
REMOVE_PLUGIN: FALSE
2.4. Roll back
If, for any reason, your upgraded Gerrit is not working and you determine that you need to roll back, then you will need to manually complete the rollback procedure for GerritMS. This accounts for the variety of potential site scenarios. The database can be a complication of the rollback due to changes that may have happened to it, either caused by Gerrit’s upgrade procedure (altered schema) or by using Gerrit before an upgrade. Make sure that you back up the database backup before upgrading your version of Gerrit. During an install/upgrade of GerritMS, a backup of the Gerrit root directory is taken and you are prompted on where it should be stored.
2.4.1. Root backup
The backup taken during install has the following format:
gerrit-backup-<timestamp>.tar.gz
This should be extracted into its own folder:
mkdir /tmp/backup
mv gerrit-backup-<timestamp>.tar.gz /tmp/backup
cd /tmp/backup
tar -xvf gerrit-backup-<timestamp>.tar.gz
ls -shlt
    total 118M
    118M -rw-rw-r-- 1 gitms gitms 118M Mar 18 13:39 gerrit-backup-<timestamp>.tar.gz
    4.0K drwxrwxr-x 3 gitms gitms 4.0K Mar 18 13:39 backup
The backup extracts into a folder named backup. Inside the folder:
ls
    total 8.0K
    4.0K -rw-rw-r--  1 gitms gitms 1.4K Mar 18 13:39 application.properties
    4.0K drwxrwxr-x 13 gitms gitms 4.0K Mar 18 13:18 gerrit
There are 2 components to a backup taken during install:
-
The contents of the Gerrit root directory, excluding the Git repositories
-
The GitMS replicator settings in application.properties
2.4.2. Rollback procedure
You must stop all instances of Gerrit before rolling back any node. As they have a shared database (whether that is a single shared master, master/master or master slave), this avoids changes being written to the database during this process.
Compare the current state of application.properties with the backup of application.properties taken during install.
A GerritMS install adds several properties to this file prefixed with Gerrit. In most cases, it is safe to simply replace the current application.properties with the backed up copy. However, if other entries in application.properties have been changed since the upgrade, these will be lost. If this might happen, we recommend that you compare the files to ensure that any additional modifications are mirrored in the backed up copy.
When you are happy that the backup copy is correct, replace the existing application.properties file with it.
Note: For GitMS to pick up these changes, you need to restart it.
The Gerrit folder has the contents of the Gerrit root directory. Similar to application.properties, compare the existing etc/gerrit.config and etc/secure.config files to verify that no additional changes have been made to these since the upgrade. If, for example, the location of the git repository basePath has changed, the backup needs to be updated to show this.
When you are happy that the backup configuration is correct, replace the contents of the existing Gerrit installation root directory with those of the backup.
The Gerrit root is now restored, but the database may still be an issue. Work on the database depends on potential schema changes that the Gerrit project has made from one version to the next. Schema changes are not guaranteed on every update, but they occur fairly frequently. If you know that there are no schema changes between the backed up version of Gerrit and the one being rolled back from, then you do not have to modify the database. If, however, you have to roll it back, there maybe issues because user-initiated changes made to the database after the upgrade will be lost. Information about these changes are in the Gerrit release notes.
Whether the database has to be rolled back or not, you must now ensure that the Lucene index for the rolled back version of Gerrit is up to date.
Trigger full reindex on Gerrit by doing the following:
java -jar gerrit.war reindex
When the above steps are complete, restart GitMS and Gerrit on that node.
Note: Any steps taken to roll back a shared database only have to be performed once, but do them before any restored Gerrit instance is started.
2.5. Upgrade Gerrit MultiSite
This section deals with the installation of new versions of GerritMS onto existing deployments. For fresh installations see the main Installation Guide.
Before you begin upgrade you need to make the following updates as outlined in the Release notes.
These will enable a successful restart after they upgrade:
-
If you have any redundant slashes, you need to remove them before upgrade is attempted. Redundant slashes include any duplication of slashes or a slash at the end of the string.
The following steps need to be performed for any GerritMS repositories that have redundant slashes in their GitMS file path. The example uses the example repositoryAll-Users.git:-
Remove the
All-Users.gitrepository from GitMS -
Add the
All-Users.gitrepository back into GitMS, this time without redundant slashes -
Edit the
application.propertiesfile and remove the redundant slashes from any path specified therein (especially,gerrit.root,gerrit.repo.home)
-
-
You need to edit the
<gerrit.home>/etc/gerrit.configfile to contain the following:[container] startupTimeout = 200And set the following properties, also in the
gerrit.configfile:[cache "diff"] timeout = 15000 [cache "diff_intraline"] timeout = 15000The values given are those recommended for a moderate size Gerrit implementation, but they may need to be much larger if you have a large Gerrit deployment. You will need to evaluate the possible timeout values for your size of deployment. For more information on how to determine your cache size see the Gerrit documentation.
Please contact WANdisco support if you have any questions.
|
Altering the configuration file
If you do any work which involves altering the configuration file you need to ensure that the gerrit.serverId configuration value is the value it was first created with.
This was most likely auto-generated during installation or upgrade to 2.13 or above.
The value must be the same at all sites.
|
2.5.1. Upgrade
The upgrade of GerritMS requires that the following steps be taken.
|
Please read carefully, all the way to the end of this section. Contact WANdisco support if you have any questions about the process. Additionally, please ensure that you read the latest changes in the Gerrit Release Notes - for example, the following change - Manual Schema Update for Reviewed Flags. |
-
Stop Gerrit everywhere.
-
Prevent system restart from starting Gerrit everywhere.
-
-
Upgrade GitMS install everywhere (See GitMS Upgrade Procedure)
-
You may receive warnings from GitMS for Gerrit properties that are needed for the new version and are not yet in place. Ignore these warnings until GerritMS is upgraded.
-
-
Select a single node to be "the first" to upgrade (call it "First").
-
Iterate from the current Gerrit release to the Gerrit release supported by GerritMS:
-
Upgrade First to the next Gerrit vanilla release "latest" (e.g. go from 2.11.9 to 2.12.latest).
-
Run the vanilla Gerrit init: java -jar gerrit.war init -d /path/to/gerrit
-
-
Iterate.
-
-
On First run the Gerrit reindex, using the installed vanilla Gerrit war file :
java specialTunables -jar gerrit.war reindex -d /path/to/gerritTunables: need all java command line arguments (e.g. "-Xmx")
always set -Xms = -Xmx
-
When the reindex is finished, install GerritMS on the First node.
-
When the process asks "Where is GitMS?", it will read properties from the previous GerritMS install and only prompt for newly required properties.
-
It will ask "Is this the 1st node?" - Answer "y".
-
Finish the GerritMS installation.
-
-
When installation is finished:
-
Copy (rsync) Gerrit install directory - skipping/excluding "git" directory (repos) - to all other sites.
-
Edit remote site copies to make sure that the following are correct for the site:
-
canonicalWebURL
-
sshd.host
-
httpd.host
-
smtp settings - if configured
-
-
Copy (rsync) the "All-*" repos to all other sites.
-
Sanity check the "All-*" repos by doing a Consistency Check in GitMS.
-
-
-
Run GerritMS installer on all other nodes in parallel.
-
When asked if 1st node say "No" (this will fix up the local application.properties).
-
-
After GerritMS installs are finished, restart GitMS on all sites.
-
Start Gerrit on all sites.
|
Post upgrade: Using Gerrit specific features
If you want specific Gerrit features that had previously been used, then after the upgrade you need to run some additional commands, depending on the type of feature. Here are two examples:
|
2.5.2. Using Selective Replication?
If you are using the Selective Replication feature to target repositories at different replication groups using Repository name matching regexes, then you need to check those rules will match against "All-Users". This is a core Gerrit repository, similar to All-Projects, and must be made available to every Gerrit node.
|
Ensure all nodes relevant nodes are online
All the GitMS nodes that are part of your Gerrit replication group must be online during the upgrade.
You can identify these nodes from the property gerrit.rpgroupid in the nodes application.properties file.
This is a critical requirement because upgrading to 2.10 from 2.9 involves the creation of a new, All-Users repository.
This repository will be automatically deployed to GitMS and replicated to others nodes, but it has the same constraints as a normal repository deployment in GerritMS - all nodes in the targeted replication group must be available.
|
-
Stop all Gerrit services on all GerritMS nodes.
-
Following this run the GerritMS installer. Follow the prompts, confirm that proposed changes to the
application.propertiesare acceptable. -
Run
gerritms-installer.shon all other nodes. -
Restart both GitMS and Gerrit on all nodes
-
Following the restart all nodes are set to live.
-
Original reviews are present and new ones are replicated as well as submit rules.
-
Perform further testing to ensure that Gerrit is running properly and that changes are properly replicated.
3. Integration Guide
This section describes how to integrate an existing Gerrit installation, 2.9.1 onwards, with WANdisco’s GitMS.
Integration includes:
-
Prerequisites: Check that your deployment meets all the requirements for running GitMS with Gerrit.
-
Install GitMS on each of your nodes.
-
Induct your nodes so that they can talk to each other.
-
Create a replication group for your Gerrit projects.
-
Add Gerrit-controlled repositories to GitMS.
-
Run sync_repo.sh script on Node 1 to add Gerrit’s repositories to GitMS.
-
Test the integration: Run through your Gerrit workflow project and confirm that everything is replicated to all your nodes.
3.1. Prerequisites
Assumption: You’re already using Gerrit
We assume that you have an established Gerrit installation, along with the required database and authentication mechanism.
To avoid any problems it is advised that all servers should be in the same timezone.
Also, do not alter the Percona Database config files (my.cnf) to a different timezone from that of the system.
Installing Gerrit
If you need to install Gerrit see Gerrit’s own documentation.
system user: Gerrit installation instructions set the system user as gerrit2 by default.
We recommend that, instead, you create an account called gitms.
Ensure that, whatever user you set up for running Gerrit, this user works through the following procedures and is used for both Gerrit and GitMS.
Note: If you don’t use the same account, then you will probably have permission problems that will stop the integration from working properly.
|
Avoid port conflict
GitMS will try to use the same port, 8080, that Gerrit uses, by default, for web access.
You MUST configure GitMS to use a different port, e.g. 7070.
|
Database/clients
We’ve tested Gerrit integration using Percona XtraDB.
You must install and configure this database solution on all nodes.
Follow the instructions in Install and configure Percona XtraDB.
Auto-start
Gerrit automatically starts when installation is complete. Either:
-
Run the WAR file with the
--no-auto-startswitch. -
Shut down Gerrit before installing GitMS for Gerrit. E.g:
  gerrit2@host:~$ ~/gerrit/bin/gerrit.sh stop
    Stopping Gerrit Code Review: OK
    gerrit2@host:~$
Note: Check that your deployment meets the requirements.
3.2. Install GitMS
You need to install GitMS. This is a detailed procedure so this document refers to relevant sections of the GitMS documentation.
-
Remembering the Prerequisites, follow the installation procedure.
-
Complete the installation on each of your nodes.
-
Return to these instructions before you create the first replication group.
3.3. Induct your nodes
GitMS is now installed on all your nodes but they’re not yet connected or able to sync changes. You must follow the instructions in the GitMS User Guide. See Node Induction.
3.4. Create a replication group
Follow this procedure to create a replication group. These instructions are carried out on GitMS’s admin UI.
|
Current limitations
Note the following limitations that apply to this version of GerritMS:
|
-
When you have created and inducted all nodes, log in to the admin console and click the Replication Groups tab. Then click the Create Replication Group button.
 Create Replication Group
 -
Enter a name for the group, if you’re using multiple groups you may want to indicate that this one is for Gerrit repositories, e.g. name it Gerrit-Repositories. Then click the drop-down selector on the Add Nodes field and select each of the other Gerrit/GitMS nodes that you want to replicate between. The local node will automatically be added as you can’t create a replication group remotely. Note the warnings that may appear if the combination of nodes is incorrect.
 Enter a name and add some nodes
 -
Click each node label to set its node type. New nodes are added as Active Voters, denoted by "AV". You should leave this node type in most cases. When used with Gerrit, GitMS only supports Active or Active-Voter node types. For more information, see the GitMS User Guide, Guide to node types section.
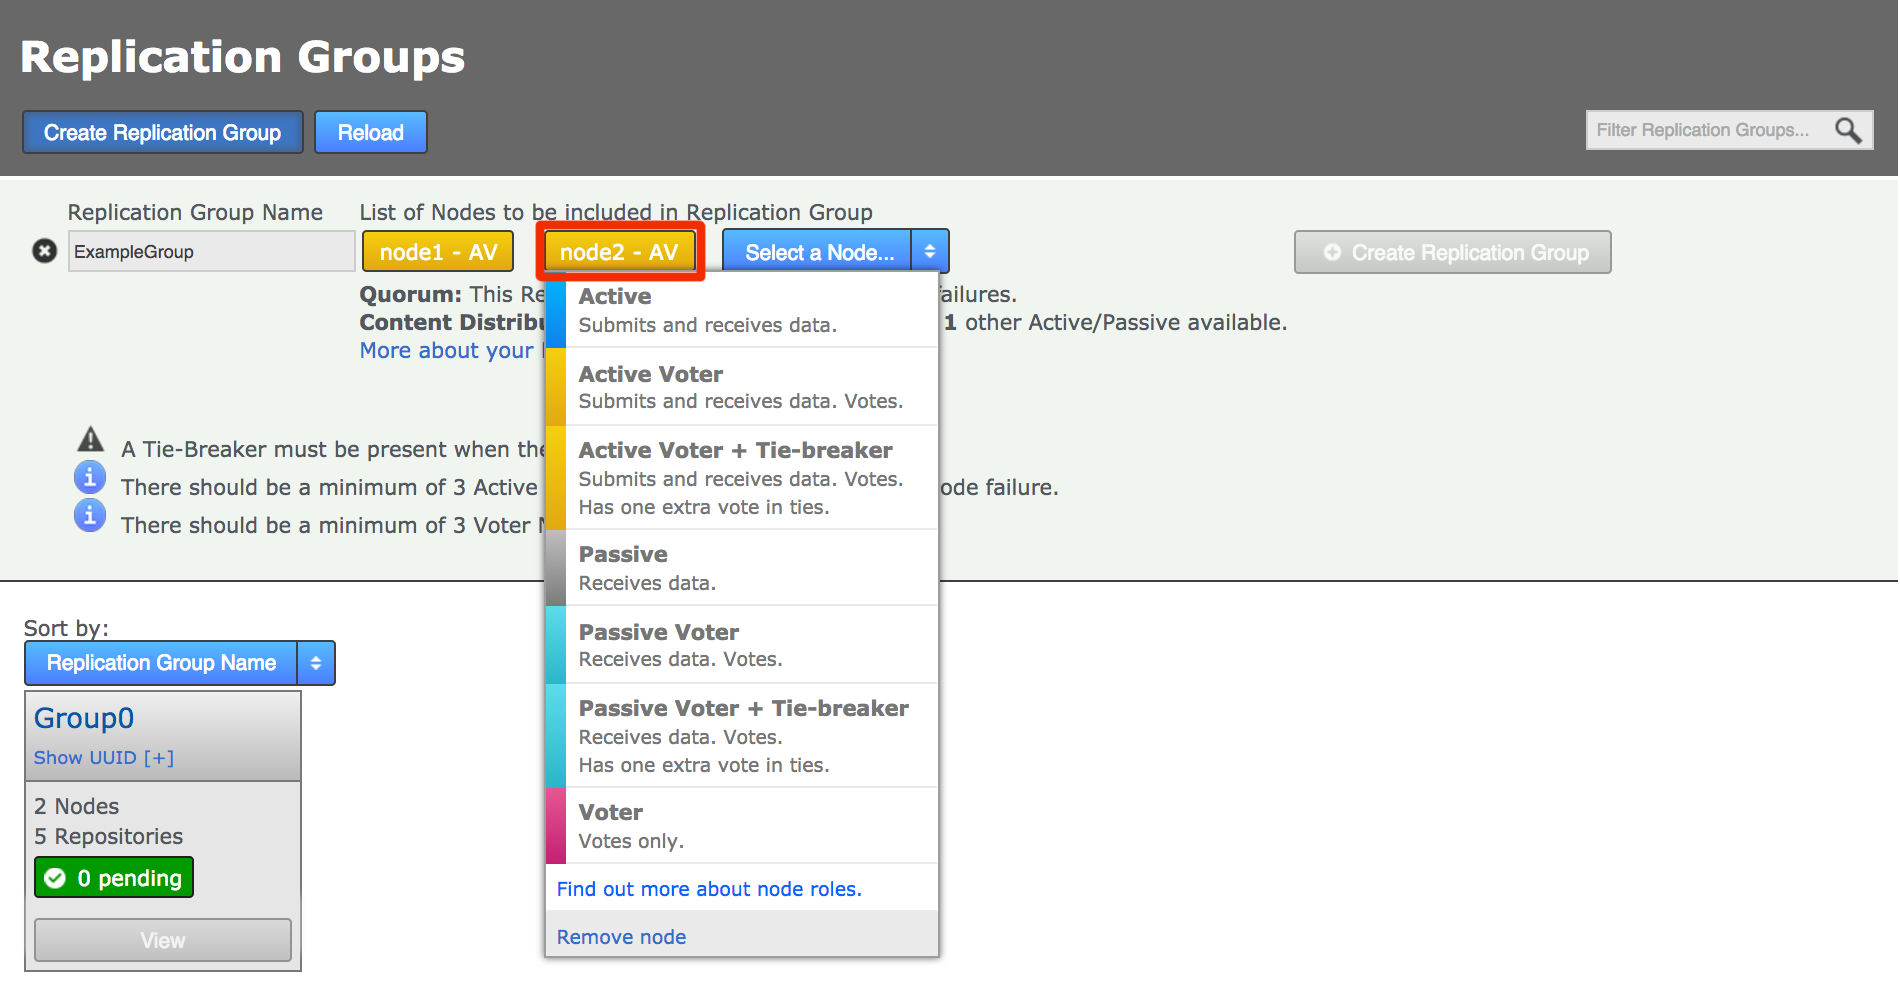 Don’t change node type
When you have added all nodes and confirmed their type, click Create Replication Group to see a confirmation of the replication group’s details.
-
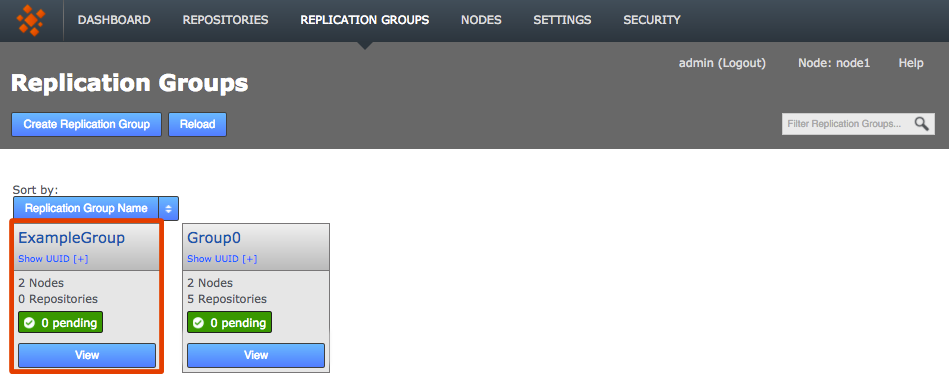
Newly created replication groups appear on the Replication Group tab, but only on the admin UI of nodes that are themselves members of the new group.
 Groups boxes, click View view your options
4. Percona XtraDB Guide
| Commands for use with both SysV and SystemD are given in this section. Please make sure you use the correct ones for your environment. For more information please refer to the Latest Percona Documentation. |
4.1. Requirements
-
It is recommended that you deploy at least 3 nodes. Although Percona Cluster will work with 2 nodes this configuration lacks the fault tolerance that is expected for production environments.
-
Linux distribution can be RedHat or Ubuntu, if you want a quick installation.
-
Percona only works with the MySQL InnoDB table engine.
-
Before proceeding you will need to uninstall the mysql-libs package from the system. This will uninstall
mysql-client,mysql-server,postfix…and all the mysql related packages.
4.2. Installation Procedure
-
Keep in mind that the Percona XtraDB is just a MySQL modified with the goal of using it as a multi-master database. It’s just MySQL remastered.
-
Everything that you need is also written in the
PerconaXtraDBCluster-5.6.37-82.2-56.pdffor the cluster. For specific information you can go to the section on Installing Percona XtraDB Cluster on CentOS. -
The main commands here to install everything are:
yum install socat   # note: you may need to add the EPEL repository before installing socat
yum remove mysql-libs
yum install http://www.percona.com/downloads/percona-release/redhat/0.1-4/percona-release-0.1-4.noarch.rpm
yum install Percona-XtraDB-Cluster-full-56
-
Create a
my.cnffor Node1, the first bootstrapping node of the cluster. You will need to know the IP addresses of the 3 nodes. You must put your IPs into this configuration.[mysqld] datadir=/var/lib/mysql user=mysql # To make sql_mode persistent sql-mode='ERROR_FOR_DIVISION_BY_ZERO,NO_AUTO_CREATE_USER,NO_ENGINE_SUBSTITUTION' ####################### ####### PERCONA ####### ####################### # Path to Galera library wsrep_provider=/usr/lib64/galera3/libgalera_smm.so # Cluster connection URL contains the IPs of node#1, node#2 and node#3 wsrep_cluster_address=gcomm://10.8.6.112,10.8.6.114,10.8.6.116 # Cluster name wsrep_cluster_name=pxc-cluster # Node #1 name wsrep_node_name=pxc1 # Node #1 address wsrep_node_address=10.8.6.112 # SST method wsrep_sst_method=xtrabackup-v2 # Authentication for SST method wsrep_sst_auth="sstuser:s3cret" # In order for Galera to work correctly binlog format should be ROW binlog_format=ROW # MyISAM storage engine has only experimental support default_storage_engine=InnoDB # This changes how InnoDB autoincrement locks are managed and is a requirement for Galera innodb_autoinc_lock_mode=2
-
Bootstrap node 1 by running:
SysV -
/etc/init.d/mysql bootstrap-pxc
SystemD -systemctl start mysql@bootstrap.service -
Check the status of the server in mysql
mysql> show status like 'wsrep%';
and check that the service is ON.
-
Create a specific user in MySQL to be used by the Percona replication:
mysql> CREATE USER 'sstuser'@'localhost' IDENTIFIED BY 's3cret';
mysql> GRANT RELOAD, LOCK TABLES, PROCESS, REPLICATION CLIENT ON *.* TO 'sstuser'@'localhost';
mysql> flush privileges;
-
Now create
/etc/my.cnfon Node 2.[mysqld] datadir=/var/lib/mysql user=mysql # To make sql_mode persistent sql-mode='ERROR_FOR_DIVISION_BY_ZERO,NO_AUTO_CREATE_USER,NO_ENGINE_SUBSTITUTION' ####################### ####### PERCONA ####### ####################### # Path to Galera library wsrep_provider=/usr/lib64/galera3/libgalera_smm.so # Cluster connection URL contains the IPs of node#1, node#2 and node#3 wsrep_cluster_address=gcomm://10.8.6.112,10.8.6.114,10.8.6.116 # Cluster name wsrep_cluster_name=pxc-cluster # Node #2 name wsrep_node_name=pxc2 # Node #2 address wsrep_node_address=10.8.6.114 # SST method wsrep_sst_method=xtrabackup-v2 # Authentication for SST method wsrep_sst_auth="sstuser:s3cret" # In order for Galera to work correctly binlog format should be ROW binlog_format=ROW # MyISAM storage engine has only experimental support default_storage_engine=InnoDB # This changes how InnoDB autoincrement locks are managed and is a requirement for Galera innodb_autoinc_lock_mode=2
-
Start the cluster on Node2:
SysV -service mysql start
SystemD -systemctl start mysql -
Create
/etc/my.cnfon node 3 as above but change the IP to that of node 3. -
Start node 3:
SysV -
service mysql start
SystemD -systemctl start mysql -
Test that the cluster is working and ANY database is replicating (Note: database mysql will not replicate directly cause it’s on the MyISAM table engine; but DDL will be replicated)
On node 3 or any:
mysql> create database perconatest;
Query OK, 1 row affected (0.38 sec)
mysql> use perconatest;
Database changed
mysql> create table a(c int primary key not null auto_increment,a varchar(200));
Query OK, 0 rows affected (<0.23 sec)
mysql> insert into a values(NULL,'ciccio');
Query OK, 1 row affected (0.22 sec)
mysql> select * from a;
+---+--------+
| c | a      |
+---+--------+
| 3 | ciccio |
+---+--------+
1 row in set (0.00 sec)
mysql> insert into a values(NULL,'ciccio2');
Query OK, 1 row affected (0.31 sec)
mysql> select * from a;
+---+---------+
| c | a       |
+---+---------+
| 3 | ciccio  |
| 6 | ciccio2 |
+---+---------+
2 rows in set (0.00 sec)
mysql>
THEN ON NODE 1 , for example, check that the table is there:
mysql> select * from a;
+---+---------+
| c | a       |
+---+---------+
| 3 | ciccio  |
| 6 | ciccio2 |
+---+---------+
2 rows in set (0.00 sec)
4.2.1. Important Tips
-
At least 2 nodes are required. We strongly recommended a minimum of 3 nodes to ensure that the loss a single node doesn’t stop production.
-
You cannot modify a password directly into the "mysql" database, because this won’t be replicated. You need to use SQL statements to create/modify users, passwords and permissions.
-
If you are developing a new application to be used with Percona XtraDB be prepared to catch an exception on the commit() call, and retry the whole transaction, because if something goes wrong, the commit() will know.
4.3. Percona Database Configuration
These steps configure the database section of the Gerrit config file and must be followed once you have completed the installation of the Percona XtraDB cluster with Gerrit.
4.3.1. Procedure
When installing Gerrit with Percona XtraDB using an 'n-nodes' configuration, you need to:
-
Create the
reviewdbdatabase only on one node (the other nodes will replicate this). -
Install Vanilla Gerrit on that node or on a node that connects to that database node.
-
Proceed with the standard installation of GerritMS.
-
Usually in a GerritMS-Percona configuration, each Gerrit node connects to an individual Percona XtraDB node, sitting maybe on the same host as Gerrit. So in the
gerrit.config propertyfile, in the database section, you will find localhost as the hostname to connect to. -
Then, if you want, you can maximize the database access speed from Gerrit to Percona XtraDB by using connection pooling. For this you need to:
-
edit the
etc/gerrit.configfile and -
add or replace this piece of configuration in the database section:
[database]
type = mysql
hostname = localhost
database = reviewdb
username = gerrit
connectionPool = true
poolLimit = 100
poolMinIdle = 50
Depending on the load of the machine you can raise or lower the
poolLimitor thepoolMinIdleproperties. Just keep in mind that, since, as usual, the default max number of connections for a MySQL server database is151, you need to raise that number if you need to set the poolLimit to a value close or higher than150. If you need to raise the max number of connection to MySQL (Percona) server, the you have to modify the my.cnf file and add something like:[mysqld] ... open_files_limit = 8192 # only if you need to raise the max number of connections to MySQL. Not needed otherwise max_connections = 1000 # only if you need to raise the max number of connections to MySQL. Not needed otherwise ...
-
-
The last step is to modify the GitMS configuration file (/opt/wandisco/git-multisite/replicator/properties/application.properties) for each node that will access a local master Percona database. Replace the following properties, or add them to the bottom of the file:
gerrit.db.slavemode.sleepTime=0
gerrit.db.mastermaster.retryOnDeadLocks=true
Note: Since Percona XtraDB cluster is based on MySQL server, the configuration is the same as the one for MySQL server.
4.4. How to restart Percona
If you need to restart Percona, please ensure that you follow the steps below completely to ensure that it is safe to bootstrap again.
-
First, choose one node to be the Selected Node. This node will see all of the other nodes stopping and then the Selected Node itself is stopped.
In the file/var/lib/mysql/grastate.daton the Selected Node, Percona sets the variable ofsafe_to_bootstrapto 1. All other nodes should have an undetermined value forsafe_to_bootstrap. -
On all nodes other than the Selected Node run:
SysV -service mysql stop
SystemD -systemctl stop mysql -
Once all the nodes are stopped, stop the Selected Node using the same command as above.
-
Now re-start Percona on the Selcted Node, making sure that MySQL is run in bootstrap mode on the Selected Node.
SysV -service mysql bootstrap-pxc
SystemD -systemctl start mysql@bootstrap.serviceIf this node fails to start, find which node the last to stop by checking
safe_to_bootstrapin the file/var/lib/mysql/grastate.daton all nodes.
If all nodes say thatsafe_to_bootstrapis set to 0 then your Percona Cluster is in an undetermined state, and requires extra steps to start. Please contact WANdisco Support to get assistance with this. -
Once the Selected Node has been started successfully, start MySQL on all other nodes.
SysV -service mysql start
SystemD -systemctl start mysql
4.5. Percona startup after outage
If you have a simultaneous outage on all nodes there are two possibilities for startup. The original method is to bring all nodes down and then manually bootstrap them all back up. From Percona XtraDB Cluster 5.6.21 onwards you can just bring up the same nodes that were in operation before the nodes went down. Read this article on How to recover PXC cluster for more information.
4.5.1. Bring up nodes
From Percona XtraDB Cluster 5.6.21 onwards, storing the Primary Component state to disk by setting the pc.recoveryvariable to true is supported.
This feature is enabled by default, but it can be turned off with the pc.recovery setting in the wsrep_provider_options.
The Primary Component can then recover automatically when all nodes that were part of the last saved state re-establish communications with each other. This feature can be used for automatic recovery from full cluster crashes, such as in the case of a data center power outage and graceful full cluster restarts without the need for explicitly bootstrapping a new Primary Component.
Note - if one or more nodes does not come back online you will need to work out which node(s) need to come back up to meet the required state and then bring them up, OR bring them all down and then bootstrap back up - see the next section for details.
4.5.2. Bring down nodes and then bootstrap back up
If you are using an older version of Percona, or all your nodes don’t come back up successfully in the method described above, you will need to manually bootstrap your nodes back up. This is the same process as during installation.
On one node only you will need to run the following command:
-
SysV -
/etc/init.d/mysql bootstrap-pxc -
SystemD -
systemctl start mysql@bootstrap.service
Which node to use for bootstrapping?
It is normally best to use the most advanced node for bootstrapping.
If mysqld was stopped without being shut down cleanly, the grastate.dat files will not be updated and will not contain a valid sequence number (seqno).
Before bootstrapping your nodes you need to determine which node is the most advanced.
To extract the last sequence number and find the transactional state use the following command :
mysqld_safe --wsrep-recover
Then you just need to bootstrap from the latest node first and then start the others.
4.6. Migrating from MySQL to Percona XtraDB Cluster
4.6.1. Requirements
-
You will need a dump of the originating MySQL database, obtained using the mysqldump tool.
-
If the originating MySQL database tables are not using the InnoDB engine, then you need to go through another step to transform it for the InnoDB engine, or you can edit the dump file to change all the "ENGINE=MyISAM"'s to "ENGINE=InnoDB".
4.6.2. Migration procedure
Follow these steps to complete the migration to Percona XtraDB Cluster.
-
If you have not yet produced a dump from the old MySQL database, create it now:
$ mysqldump -u gerrit -pXXXXXX reviewdb > reviewdb.dmp
-
If you need to modify the dump file, then make an additional backup copy of the dump you have just produced.
-
Uninstall MySQL and install Percona XtraDB if you need to do so (follow instructions in Percona XtraDB Installation Guide).
-
Take a look at the produced dump file: If the dump has all the tables with the ENGINE=InnoDB format, then it’s ok. Otherwise you need to change the dump file (or transform the tables and redo the dump) replacing the ENGINE=MyISAM with ENGINE=InnoDB.
-
Since the Percona XtraDB cluster is just a modified version of MySQL, you should:
-
Connect to a Percona Cluster node.
-
Create the new database and quit the client:
[gerrit@dger01 ~]$ mysql -u root -pXXXXXXX
Welcome to the MySQL monitor.  Commands end with ; or \g.
Your MySQL connection id is 1172696
Server version: 5.6.37-82.2-56 Percona XtraDB Cluster (GPL), Release rel72.0, Revision 978, WSREP version 25.8, wsrep_25.8.r4150
Copyright (c) 2009-2014 Percona LLC and/or its affiliates
Copyright (c) 2000, 2014, Oracle and/or its affiliates. All rights reserved.
Oracle is a registered trademark of Oracle Corporation and/or its
affiliates. Other names may be trademarks of their respective
owners.
Type 'help;' or '\h' for help. Type '\c' to clear the current input statement.
mysql> create database reviewdb;
Query OK, 1 row affected (0.32 sec)
mysql> quit
Bye
-
Import the old MySQL database into the new Percona XtraDB cluster:
[gerrit@dger01 ~]$ mysql -u gerrit -pXXXXXX reviewdb < reviewdb.dmp
Note that the "mysql" client here is the Percona modified version.
-
On the other Percona nodes you should already have the database fully imported at this stage, because Percona XtraDB is a replicated active-active cluster, i.e. you don’t need to import the database on the other nodes.
-
4.7. Percona Configuration Options
Various Percona specific settings can be set in the my.cnf file.
These can be used to best configure Percona to the level of load required on the database.
These are described below, divided into those which need to be set, and those which are optional.
Also worth noting is the tool Percona has provided that will provide a recommended configuration based on the responses to questions: https://tools.percona.com/wizard.
Configurations which need to be set:
- wsrep_retry_autocommit
-
This value needs to be set to 25.
It is the number of times to retry a transaction in the event of a replication conflict. - wsrep_provider_options
-
Many options exist for this, there is a full list on the Percona website.
The following properties need to be in a semi-colon separated list:-
wsrep_provider_options="evs.inactive_timeout=PT45S"- the inactivity limit, beyond which a node will be pronounced dead. -
wsrep_provider_options="evs.install_timeout=PT45S"- the timeout on waiting for install message acknowledgments. PT60S is out of range. -
wsrep_provider_options="evs.keepalive_period=PT3S"- how often to emit "keepalive beacons" in the absence of any other traffic. -
wsrep_provider_options="evs.max_install_timeouts=8"- how many membership install rounds to try before stopping. The total rounds will beevs.max_install_timeouts+ 2. -
wsrep_provider_options="evs.send_window=512"- the maximum number of data packets in replication at a time. -
wsrep_provider_options="evs.suspect_timeout=PT30S"- the inactivity period after which the node is “suspected” to be dead. If all remaining nodes agree, the node will be dropped out of cluster even beforeevs.inactive_timeoutis reached. -
wsrep_provider_options="evs.user_send_window=256"- the maximum number of packets in replication at a time. -
wsrep_provider_options="gcache.size=1G"- the size of the transaction cache for replication. The larger this cache is, the better chance a node that is down for a period of time can catchup by IST instead of SST. The default is 128Mb so more disk space for Percona on disk is required.
-
Configurations for which the default options are generally good:
- wsrep_auto_increment_control
-
This is enabled by default and is what is behind the occasional generation of changeIDs/patchset numbers which can skip entries. For example, 1, 2, 4, 5, 8, etc. Currently the only tested configuration in a multi-master environment is with this left on. But further investigation might be worthwhile into whether this might be worth disabling, to better match the "Vanilla Gerrit" experience.
- wsrep_debug
-
Sends debug messages to the
error_log. Useful when trying to diagnose a problem. Defaults to false. - wsrep_slave_threads
-
The number of threads that can apply replication transactions in parallel. By default this is set to one, which is the safest option. If however performance becomes an issue, particularly around database replication, this can be used to increase throughput.
- wsrep_sst_donor
-
The name of the preferred "donor" node in the event that the local node needs to recover by the SST mechanism. As the donor node database must enter read-only mode to allow the local node to catch up, it may be required that this isn’t determined at random (as is the default), and instead pick a specific node.
More information on the web:
5. MariaDB Guide
Replicated MariaDB is used instead of Percona for deployment on SUSE Linux Enterprise Server (SLES). If you are not running with SLES, see, instead the Percona XtraDB Guide.
5.1. MariaDB Pre-requisites
-
Requires root access to a SLES 11/12 server
-
EPEL (Extra Packages for Enterprise Linux) Repositories installed
-
See the release notes for which versions of MariaDB are compatible with supported operating systems - Software versions required or supported.
5.2. MariaDB Installation
5.2.1. Zypper Repositories
-
Install the repository file for Maria DB, create a file /etc/zypp/repos.d/maria-db.repo.
-
Insert the following content.
For SLES 11
[maria-dev]
        name=mariadb
        enabled=1
        autorefresh=0
        baseurl=http://ftp.hosteurope.de/mirror/archive.mariadb.org/mariadb-10.1.36/yum/sles/11/x86_64
        type=rpm-md
        gpgcheck=0
For SLES 12
[maria-dev] name=mariadb enabled=1 autorefresh=0 baseurl=https://yum.mariadb.org/10.2/sles/12/x86_64/ type=rpm-md gpgcheck=0 -
Update your zypper repolist by running the following command.
sudo zypper refresh -
Create /etc/my.cnf file for all nodes. In this file add the following content, changing wsrep_cluster_address, to a list of all nodes, and wsrep_node_address to the current node address.
[mysqld]

  query_cache_size=0

  datadir=/var/lib/mysql

  binlog_format=ROW

  default-storage-engine=innodb

  innodb_autoinc_lock_mode=2

  query_cache_type=0

  bind-address=0.0.0.0


# Galera Provider Configuration

  wsrep_on=ON

  wsrep_provider=/usr/lib64/galera/libgalera_smm.so


# Galera Cluster Configuration

  wsrep_cluster_name=test_cluster

  wsrep_cluster_address=gcomm://192.168.77.190,192.168.77.191,192.168.77.192


# Galera Synchronization Congifuration

  wsrep_sst_method=rsync

  wsrep_sst_auth=sstuser:s3cret

#Galera Node Configuration

  wsrep_node_address=192.168.77.190

[mysqld_safe]

  log-error=/var/log/mysqld.log

  pid-file=/var/run/mysqld/mysqld.pid
5.2.2. Installing MariaDB Packages
-
Once the RPM repositories are installed and zypper updated you can run the below commands to install MariaDB.
For Sles11:
sudo zypper install -y mariadb-server galera lsof socatFor Sles12:
sudo zypper install -y MariaDB-serverFollowing this the Server may start after install stop the service by running
sudo /etc/init.d/mysql stop
5.2.3. Bootstrap the first node
-
Now that the packages are installed we can boostrap the cluster, pick a site to act as the inital site.
-
On this site run the below command to bootstrap the site
sudo /etc/init.d/mysql bootstrap -
Once the service has started set the root users password by running the sqladmin command
sudo /usr/bin/mysqladmin -u root -h 127.0.0.1 password 'root' -
Now that the service is started create a Replication User on the site that will be used to replicate the content to other sites.
mysql -uroot -proot
CREATE USER 'sstuser'@'localhost' IDENTIFIED BY 's3cret';
GRANT ALL PRIVILEGES ON *.* TO 'sstuser'@'localhost' IDENTIFIED BY 's3cret';
GRANT ALL PRIVILEGES ON *.* TO 'sstuser'@'%' IDENTIFIED BY 's3cret';
FLUSH PRIVILEGES;
5.2.4. Start the other servers
-
Once the replication user has been created you can start the other servers. This should be done sequentially as each member will need to join the cluster completely before a new member can be added.
-
On each node, run the following command to start the mysql server:
sudo /etc/init.d/mysql startThe server should join and update automatically during start up.
5.2.5. Tips
-
If want to check a node is replicating run login to MySQL and run
show status like 'wsrep%'; -
If want to check logs for MySQL they are generated in file listed under log-error=/var/log/mysqld.log
Galara startup for MariaDB 10.2.18 on SLES 12
When running 10.2.18-MariaDB on sles12 the process for starting the Galera cluster is slightly different to that used in SLES 11.
As this is a systemctl only installation the bootstrap is instead started by a script automatically placed in path on installation.
Use one of the following, isntead of the bootstrap command, so in cases where the entire cluster is down or needs to be reinitialised, this method should be used.
galera_new_clusteror
/usr/bin/galera_new_clusterFor more information about starting up a Galera Cluster, see Getting Started with MariaDB Galera Cluster
5.2.6. Further reading
For more information about MariaDB, see the official product documentation - MariaDB Server Documentation
For more information about Galera - Galera Cluster website.
6. Admin Guide
6.1. Technical overview
6.1.1. Integration architecture
This diagram shows how Gerrit and GitMS interact in a replicated deployment.
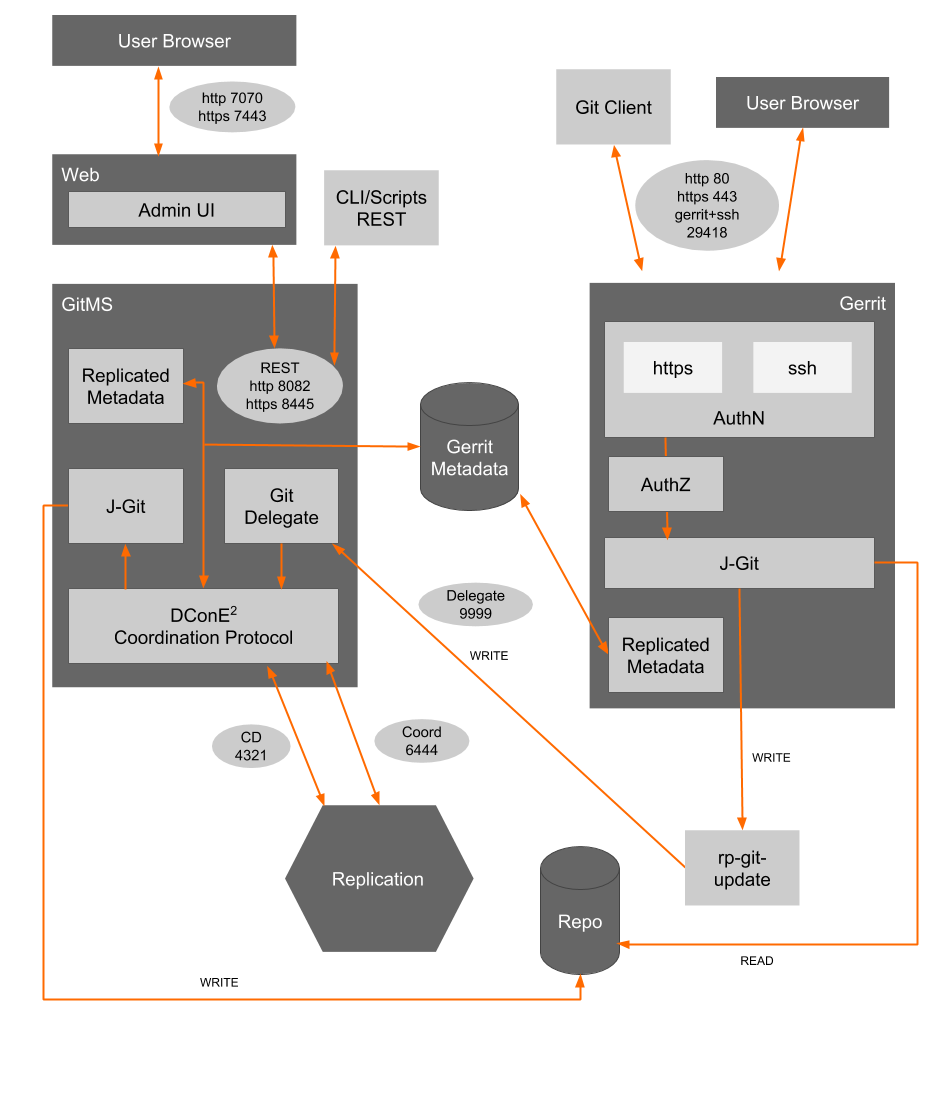
Architecture description
-
Gerrit runs much the same as it does in a stand-alone configuration, being a front-end for Git, intercepting push requests, holding them back until the review workflow is completed.
-
The Gerrit database is shared between all nodes via Percona XtraDB.
-
The Lucene index is local to each node. Re-indexing at each node will be triggered based on Gerrit Events arriving at each node.
-
Git changes are fed through Gerrit’s JGit implementation as modified by WANdisco. This implementation calls out to the
rp-git-updatescript in order to generate the pack file for distribution through GitMS via the Content Distribution sub-system. -
When the pack file is in place on a sufficient number of nodes (based on the Content Distribution policy - see here) then the proposal for the change is sent to all nodes over the Coordination stream (port 6444).
-
Both GitMS and Gerrit run their own browser-based admin UIs.
-
The ports shown in the diagram above are the default or recommended ports, all of which can be changed if this is necessary for your set up.
6.2. Gerrit administration
|
Altering the configuration file
If you do any work which involves altering the configuration file you need to ensure that the gerrit.serverId configuration value is the value it was first created with.
This was most likely auto-generated during installation or upgrade to 2.13 or above.
The value must be the same at all sites.
|
|
Gerrit User licensing
In GerritMS 1.9.4 onwards, active account information transfers from GerritMS to GitMS.
You therefore need to delete any unused accounts, or contact WANdisco support to get the correct number of licenses.
See this Knowledge base article on Gerrit User Licensing in GitMS for more information.
|
6.2.1. Gerrit client authentication
GitMS will default to calling Gerrit as an anonymous user. If the user is anonymous then, due to Gerrit issues, not all accounts may be visible and there will be a limit of 500 items returned per query. For accurate license reporting in GitMS you will need to configure a daemon account with sufficient access to be able to see all of the GerritMS account information.
To configure GitMS to use this account, see the Gerrit client authentication section in the GitMS User Manual. Note that the configuration will require a restart of GitMS.
6.2.2. Add projects
The functionality for adding new projects remains the same as when Gerrit is used outside of a MultiSite deployment. See Gerrit’s own documentation for this works.
6.2.3. Add existing repository
Normally you should create new Gerrit repositories by creating a new Gerrit project. By doing so a newly initialized Git repository will be created and replicated by GitMS. The Replication Group that it is inserted into will be determined by how you have configured Selective Replication.
However, you can also add an existing repository to GitMS directly and, if the path where it is located is within Gerrit’s repository tree then you will be able to manage that repository using Gerrit (by creating appropriate project permissions, etc.). You do so by following the procedure below. To add a repository to GitMS, see the GitMS User Guide Add Repository procedure.
|
Ensure the repository is in place on all nodes, it must be in exactly the same state.
Before adding a repository, consider running git fsck to ensure its integrity.
You may also wish to run a git gc (See Git Garbage Collection in the Git MultiSite User Guide) before your git fsck for performance reasons.
|
-
Log into GitMS’s admin UI.
-
Click the Repositories tab. Click on the Add button.
 Repositories > Add
 -
Enter the following details:
 Repositories > Enter details then click Add Repo
- Repo Name
-
Choose a descriptive name. While this doesn’t need to be the folder name (it can be anything you like), it is best to use a consistent naming convention that includes sufficient information to be able to determine the repository folder name. It really is therefore simplest just to use the folder name.
- FS Path
-
The local file system path to the repository. This needs to be the same across all nodes.
To control the repository through Gerrit, ensure that this path is for Gerrit’s repository directory, e.g. <install-path>/gerrit/git/repository1.git - Replication Group
-
The replication group in which the repository is replicated. It is the replication group that determines which nodes host repository replicas, and what role each replica plays.
- Deny NFF
-
If you would like to allow non-fast-forward changes on the repository, untick this box.
- Global Read-only
-
Check box that lets you add a repository that will be globally read-only. You can deselect this later. In this state GerritMS continues to communicate system changes, such as repository roles and scheduling, however, no repository changes will be accepted, either locally or through proposals that might come in from other nodes.
- Create New Repository
-
If the repository already exists it must be tested before you place it under the control of GitMS. If it doesn’t already exist then tick the Create New Repository box to create it at the same time as adding.
-
Click Add Repo to add the repository for replication.
|
These operations should not be performed on Gerrit repositories
See Selective Replication for more information on how to integrate Gerrit with only a subset of your replicated repositories. |
6.2.4. Add repository outside of Gerrit’s control
-
Copy the new repository into GitMS’s repository directory (on ALL NODES), making sure the GitMS repository directory is not Gerrit’s repository directory.
Repositories added in this way will not be seen from Gerrit. You will need to enable repository access using either Apache or "git+ssh". -
Add the repository to GitMS using the Add Repository procedure.
|
Adding or removing repositories outside of Gerrit is not recommended.
Repositories created or removed via the filesystem or through GitMS will not be seen in the Gerrit’s project listing, unless the Gerrit project cache is cleared.
We strongly recommend that you always manage Gerrit-based repositories through Gerrit.
|
6.2.5. Delete projects
Gerrit stores project information both on disk and in the database. A plugin called delete project has been created to help wipe this data. You will need to use this if you want to delete a project from Gerrit.
There are several reasons you may want to delete a project including:
-
The project has reached the end of its life and needs to be completely removed, but a backup is required for reference/future use
-
The project has become hard to manage, there are too many outdated/abandoned reviews and it needs to be cleaned up
Install the delete project plugin
Once you have installed GerritMS (version 1.9.1 or above) on all nodes, to install the delete project plugin you simply run the following command. The plugin has to be installed on nodes which already has GerritMS installed.
java -jar gerrit.war init -d <SITE_PATH> --install-plugin=gerrit-delete-project-plugin --batch
Run this command on all nodes on which you want to be able to run the delete project plugin. Then restart GerritMS to complete the plugin installation.
Using delete project plugin
The plugin acts differently depending on whether you are deleting a replicated or non replicated project.
-
A Replicated Project will be present on disk on all nodes of the replication group it is a member of, in both the GitMS UI and the Gerrit UI.
If you are deleting a Replicated Project there a 2 options, preserve and no preserve.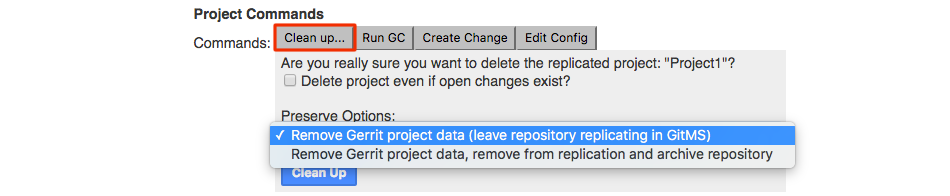 Gerrit UI appearance - Replicated projects - Clean Up button
- Remove Gerrit project data (leave repository replicating in GitMS)
-
If you select this option all associated changes, reviews etc will be removed, the project will remain in the project list on Gerrit, on disk and will continue to replicate within GitMS. It is a clean up of the project rather than complete removal. You will still be able to checkout the repo and commit changes.
- Remove Gerrit project data, remove from replication and archive repository
-
If you select this option you will completely remove the repository. The project and all associated changes, reviews etc will be removed from Gerrit, the repo will be removed from replication in GitMS and will no longer exist on disk.
However, before removal a zipped version of the repo will be archived to the directory specified during install.
-
A Non-Replicated Project is not replicated across a set of nodes and so will likely only appear on one node, both on disk and in the Gerrit UI, but NOT within GitMS.
If you are deleting a Non-Replicated Project, the functionality is the same as the original delete project plugin. Gerrit UI appearance - Non-Replicated projects - Delete button
|
Node goes down
If a node goes down during the removal process, then when it comes back up and reloads the project cache, the project may still be listed on the GerritMS UI.
If this happens then just flush the project cache.
|
Deleted repositories directory
To delete projects you will need to have created an appropriate directory during install.
The default location is /home/wandisco/gerrit/git/archiveOfDeletedGitRepositories.
You should periodically review the repositories that are in the directory and physically remove those that are no longer needed.
If deletion fails
If, for example a node is down when you use the delete project plugin, then deletion may fail. If this does happen you will need to perform a manual cleanup.
You will get a 500 server error in Gerrit, and on the GitMS dashboard a failed task will appear (this will only be on the node you used the plugin from), to alert you that deletion has failed.
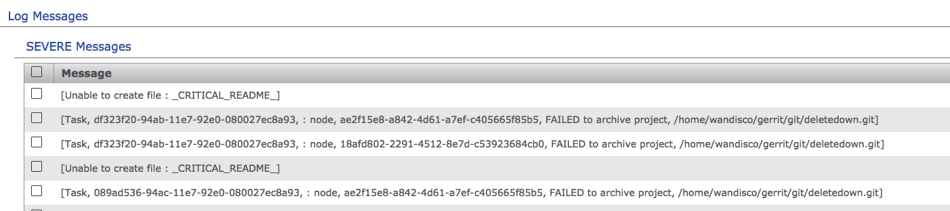
Deletion failure creates a file in the repository (WD_GitMS_CRITICAL_README) and an archived zip file. To cleanup follow these steps:
-
Remove the WD_GitMS_CRITICAL_README file from the repository you tried to delete and the archived zip file from the deleted repositories directory. This needs to be done on all nodes in the replication group.
-
Take the project out of GRO.
-
Ensure the issue preventing the initial failure is fixed, for example all nodes are up and running without problems.
-
Run the delete project plugin again.
6.2.6. Manually add new Gerrit projects
In a non-replicated Gerrit it is possible to add new projects just by dropping the <repository-name>.git file into Gerrit’s repository path (gerrit.basePath), that is, the local file system directory in which Gerrit stores the repositories that it knows about.
Note that:
-
You may need to restart Gerrit or force a cache refresh in order to see the repository.
-
You may find that the repository has an incorrect refs/meta/config entry which could confuse Gerrit.
When running GitMS there are some additional requirements for using this method for adding projects:
Copy the repository to all nodes
You need to ensure that the repository is copied to the same place on all nodes. The safest way to do this is to use rsync, ensuring that you use the following flags which preserve necessary properties (such as owner and group permissions). e.g.
rsync -rvlHtogpc /path/to/local/repo remoteHost:/path/to/remote/repo
Add the repository to GitMS
For changes to the repository to be replicated, including Gerrit tasks, you need to add the repository’s information into GitMS.
This only needs to be done on a single node as the details will be replicated to the other nodes in the replication group.
This can be done in one of two ways:
-
By using the
sync_repo.shscript (see Install procedure). -
By adding the repository via GitMS directly - see the GitMS User Guide.
In either case the same 2 issues mentioned above can still occur - this time on all replicated nodes.
It’s possible to script/automate the addition of repositories to GitMS using the REST API.
6.2.7. Manage projects in subfolders
Gerrit allows the grouping of repositories under folders just by adding a path into the project name. For example, you can create a project named 'sandboxes/abc'. This will create a repository called 'abc.git' under a folder called 'sandboxes'. You will see this naming convention carry through to GitMS.
6.2.8. Configure for Gerrit event stream
Gerrit Code Review for Git enables SSH clients to receive a stream of events that happen in the Gerrit node where the client is connected to. GerritMS (Gerrit + GitMS) enables those SSH clients to receive, not only the events from that node, but also the events coming from other nodes in the same replication groups.
See Gerrit event stream for more information on how to enable and disable the stream. To see how the stream of events works normally, refer to the Gerrit documentation. Also refer to information on adding repositories.
6.3. Add new node
Follow this procedure if you need to expand your Git/Gerrit deployment to a new location. We assume that you have already completed the initial installation and setup of your Gerrit and GitMS applications.
Overview
6.3.1. Prepare new server
When bringing a new node up, it’s vital that you make sure that it meets all the deployment requirements set in the deployment checklist. It’s often been considered good practice to create the new server from the image of an existing server so that software and settings are automatically matched.
6.3.2. Install GitMS
Follow our instructions to install GitMS on your new node. See Install GitMS. During setup, you are asked for the license key and the users.properties file. Take these from your first node and copy them to the corresponding locations on your new node.
6.3.3. Induct new node into replication system
When the installation of GitMS has been completed on your new node, you need to add it to your replication ecosystem. This is done by navigating to one of your existing nodes. Log in to its admin UI and click on the Nodes tab. Click on Connect to Node.
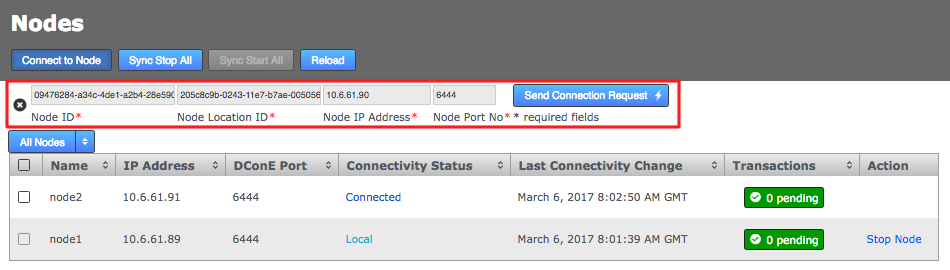
- Node Node ID
-
The name of your new node - you would have entered this during the installation of your new node.
- Node Location ID
-
The unique reference code that is used to define the new node’s location - you can verify this from the NODE ID entry on the new node’s Settings tab.
- Node IP Address
-
The IP address of the new node.
- Node Port No
-
The DConE Port number (6444 by default), again this is confirmed from on the new node’s Settings tab.
When these details are entered, click the Send Connection Request button. The new node will receive the connection request and will be added to the current membership. You will need to refresh your browser to see that this has happened. The new node should now appear on the map of on the Nodes screen.
If you run into problems there is more information about Node Induction in the GitMS User Guide.
6.3.4. Add new node to Gerrit replication group
Now that the new node is in place we need to a join it to our Gerrit replication group, this will tell GitMS to replicate Git and Gerrit data between the existing member nodes and the new node.
-
Log in to an existing node that is a member of the Gerrit replication group, click on the Replication Groups tab button.
-
Click on View at the bottom of your Gerrit replication group’s box.
-
Click the Add Nodes button. You will see the existing membership along with a Select a Node drop-down button.
-
Click the button and select the new node.
-
Click Add Nodes.
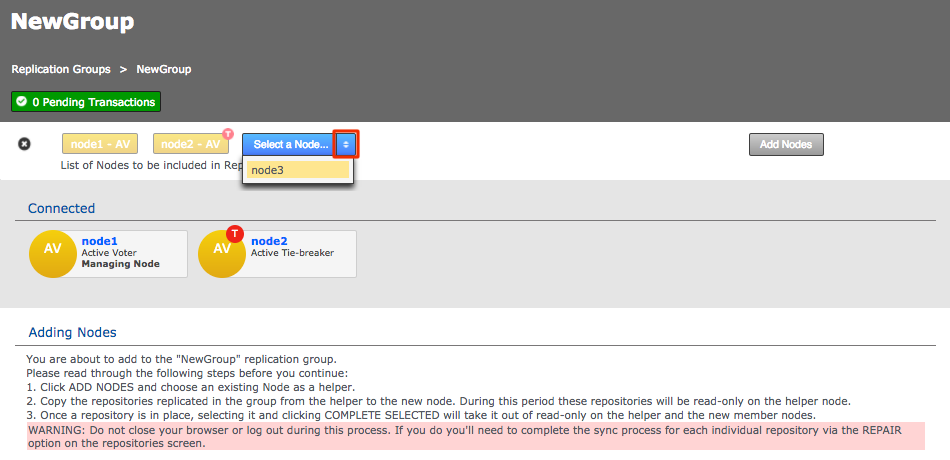
|
Node Role
You can leave the new node’s role as default unless by adding it you will end up with an even number of voter nodes.
If this is the case then either the new node or an existing node must be assigned as an Active TieBreaker to ensure that it’s not possible for a split vote to occur
which would result in a deadlock of the replication system.
See more about Node Types.
|
6.3.5. Place existing node in "Helper mode"
In the next step we need to use rysnc to copy the Gerrit directory from an existing node over to the new node. During the process we need to ensure that the existing node is not replicating or being written to as this could put it out of sync and corrupt the data we’ll be copying. For this reason we select one of the existing nodes to become a helper. While it takes on the role of helper replication to it will halt. Git users who use the node will not be able to make changes during this time.

Select a node and click Start Sync. Take note of the warning about not closing the browser or logging out during this process.
6.3.6. Use rsync to copy Gerrit directory to new node
Opening a terminal window on the Helper node and use rsync to copy the entire Gerrit repository over to the new node.
Instead of copying one or more Git repositories we need to copy the Gerrit folder (in which Gerrit’s repositories are normally stored). If you’re using a non-standard installation location then you’ll need to adapt this step to account for both Gerrit and the git repositories that it controls.
6.3.7. Put helper node back into operation
Once the Gerrit directory has been copied over and verified, click the Complete All button on the GitMS screen. Both helper and new node will now come out of read-only mode. They’ll now be updated with any Git/Gerrit activity that occurred during the procedure.
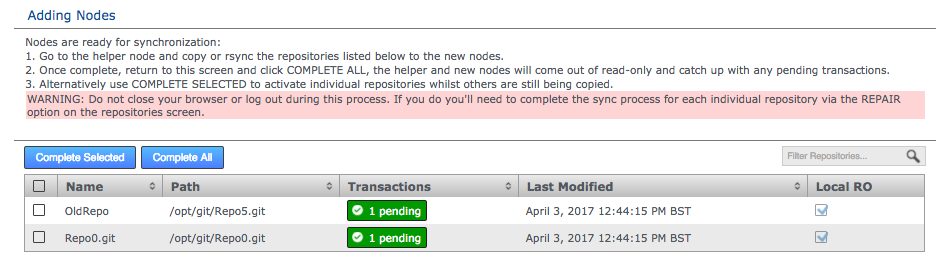
6.3.8. Start Gerrit on new node
We need to update Gerrit to account for GitMS. Run the Gerrit integration installer in the Gerrit
./installer.sh
The installation will proceed in the say manner as with the original Gerrit integration. However, we’ve already completed the sync of the repository data so the net steps differ slightly from what is described on screen. You do not have to run the sync_repo.sh script. The repositories are already known to Gerrit because you copied that config data in the previous step.
Open a terminal window to the new node and start the Gerrit service, e.g.
~/gerrit/bin/gerrit start
The new node should be up and running. Open the Gerrit UI and verify that all replicated repositories are present in the 'Projects' list.
6.4. Gerrit LFS
From GerritMS 1.9.4, Gerrit Large File Storage (LFS) is supported. Gerrit LFS is based upon Git LFS; see the Github docs for more information on Git LFS.
Git stores data as a directed acyclic graph (DAG), a collection of objects that contain references to other objects within your repository. Branches and tags refer to a commit object, with commits referring to their parent commits. There is also a tree object which represents a snapshot of your repository at a time of the commit which contains a blob representing the files in your repository, and nested trees representing the subdirectories. Git creates a new tree object for every commit and new blobs and trees for every file that is modified in your repository. All of this means that Git repositories can become large quickly if large files are frequently modified.
Git LFS is a Git extension which solves the problem of storing large files. It works by replacing large files in your repository with lightweight pointers which are only a few bytes each. The pointers contain a reference to your large files which are stored alongside your repository but outside the DAG. As a user you never see these pointer files on disk as Git LFS transparently swaps them out when you stage your changes or edit an existing commit.
The Gerrit LFS plugin is based on Git LFS, and WANdisco has created a replicated version which allows selected replication across nodes, based on the replication group of the selected repository. The installation process is outlined below and has few changes from the standard Gerrit LFS installation.
6.4.1. Pre-requisites
-
Git LFS v2.4.0 or higher must be installed on all nodes
-
git-LFSshould be installed on all GerritMS servers -
The LFS client package must be installed on both the client and server
-
-
We recommend Git v2.10 or above to have correct functionality
-
In
gerrit.config,gitBasicAuthneeds to be set to true on all nodes
6.4.2. Gerrit LFS installation
The installation process is outlined below and has few changes from the standard Gerrit LFS installation. See the LFS plugin docs for more information on the standard installation. The main difference is that installation has to be carried out on all nodes.
All custom server configurations must be the same on all nodes. e.g. in gerrit_root/etc/lfs.config
|
-
Install the LFS plugin using the following command. Run this on all nodes.
java -jar /opt/wandisco/gerrit/bin/gerrit.war init -d /opt/wandisco/gerrit --install-plugin=lfs --batch
After running this, you can check that
plugin=lfshas been added togerrit.configin/opt/wandisco/gerrit/etc. -
Restart Gerrit on all nodes. You can now check on the Gerrit UI that the plugin is installed.
-
Edit the All Projects repository on Gerrit and add to the file
lfs.config:[lfs "^lfs-test.*"] enabled = true maxObjectSize = 100mThe LFS namespace determines which repositories are LFS enabled, as well as other information about the repositories. By default, no projects are LFS enabled. The namespace can be an exact project name, a pattern or regular expression, e.g.
plugins/mylfs,sandbox/or^test-./.*. See the LFS plugin docs for more information on this.Now commit this to the
refs/meta/configbranch. You only have to edit this on one node as it will be committed to GitMS and replicated. -
Now configure the global plugin settings. this has to be done on all nodes. To do this, create a file called
lfs.configin<PathToGerritInstall>/etc. To this file add:[storage] backend = fsWe only support
fsbackend storage, notS3. -
Restart GitMS.
-
The LFS plugin can now be used in the standard way, the main difference is that LFS repositories must be in a replication group.
| Gerrit LFS will not work for a non-replicated repository. The work-around is to create a single-node replication group which contains the repository. This deficiency will be fixed in the next version of GerritMS. |
In order to push large files (>50MiB), the activitytimeout property in the gitconfig file needs to be increased from the default (30 seconds).
To change this run the following command:
git config --global lfs.activitytimeout <time in seconds>
The time in seconds value needs to be suitable for your network environment and file sizes. For instance if you upload 1GiB files and have a latency of 333ms then the value needs to be 3660 or higher.
As this is set globally you do not need to repeat this on each repository clone.
Optional configuration
The following properties can be added to the GitMS application.properties file.
These are not required properties but can be added if configuration is wanted.
Please consult with WANdisco support if you would like to change these tunables from their default values.
-
gerrit.lfs.cache.population.threadcount: The number of threads used to populate the LFS object cache. Default is 4. -
gerrit.lfs.content.validation: LFS content validation is to be performed using SHA256 for uploaded content files. Default is true.
6.5. Selective replication
Selective replication enables you to choose certain repositories to exist at some server nodes and not others:
-
Choose a GitMS replication group where all repositories that are not classified should go (unless you want an error).
-
Create and maintain a configuration file that specifies a series of wildcard, replication group UUID pairs.
Note: To get the replication group UUIDs, you can go to the GitMS UI and click the Replication Groups tab, then click Show UUI on a node. With a simple select copy, you can then create the regex configuration file.
|
Gerrit requires certain repositories, such as All-Projects, in order to function correctly.
If selective replication is enabled, you must ensure that the replication group the All-Projects repo belongs to spans all Gerrit nodes.
Any Gerrit node without a copy of All-Projects will fail to function.
|
6.5.1. Catch-all configuration
In large deployments you might want to integrate Gerrit with only a subset of your replicated repositories, or maybe for separate Gerrit instances to manage different groups of repositories.
Selective replication requires additional configuration.
Use this procedure, explicitly using gerrit.rpgroupid, if the regex file does not have a wildcard pattern that matches the repository you want to create.
Note: Do not configure this if you want a failure to occur if the regex file does not match the repository/project to be created.
-
Follow the installation procedure to create a replication group.
-
After adding all nodes to the "all projects" replication group, create additional replication groups that can be used for replicating certain repositories between different locations.
Example:
In a 5-node deployment:-
Create replication group GroupA, adding nodes 1, 2, and 3.
-
Create replication group GroupB, adding nodes 3, 4, and 5.
This creates two separate groups of nodes that replicate repositories and integrate with Gerrit independently. Note that Node 3 is a member of both groups and therefore hosts both sets of replicated repositories and will have visibility of all Gerrit reviews that are created.
-
-
Having created and populated your two additional Replication Groups, capture their UUIDs. Either:
-
Via the GitMS UI, click Replication Groups and click Show UUID on a node.
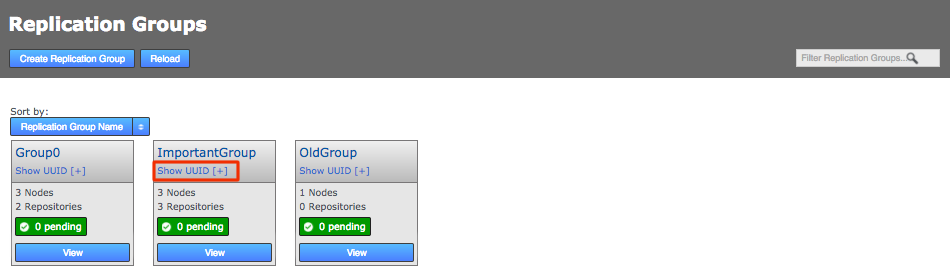 RG tab
 -
Use the API on one of the nodes in each of the new replication groups:
curl -u admin:pass http://<IP-ADDRESS>:8082/api/replication-groups
-
-
On each node, create a backup copy and then edit the
application.propertiesfile so that the propertygerrit.rpgroupidmatches with the appropriate replication group. In the example deployment nodes 1, 2 and 3 would have thegerrit.rpgroupidfor GroupA. -
When the
gerrit.rpgroupidis set on all nodes, restart GitMS on all nodes. -
Following the restart:
-
Each replication group will replicate separately.
-
New repositories will automatically added only to the nodes in the local replication group (e.g. a repository on node1 will be added to GroupA).
-
Node 3, being in both replication groups will replicate everything. New repositories created on node 3 will be added to the replication group that is declared in the node’s application.properties file.
-
When you create a new repository in Gerrit, the name of the repository is taken as a parameter to decide in what replication group it should live. A list of regular expressions is matched against the name and the resulting rule is used to put the new repository in the right replication group.
-
6.5.2. Regex file configuration
The regex file is used to specify a wildcard to be matched against a Gerrit project path as it is being created, in order to select the replication group where it is automatically placed. The matching starts from the top of the file and proceeds downwards until a match is made. If no match is made, either:
-
The catch-all is selected if configured as described.
-
An error message is generated and the project creation fails.
|
These regex rules are only applied to repository deployments through the Gerrit-specific deploy endpoint.
Therefore, they are not applied to repositories that are deployed through the standard GitMS mechanisms.
|
The regex format contains two wildcard matchers:
-
* is a wildcard for any valid sequence of characters that can be part of a file path. This wildcard does not pass directory boundaries however, so only matches within the current directory.
-
** is similar to * except that the directory boundary restriction does not apply.
Note: All matching is case sensitive.
Examples of wildcard matchers use:
-
*
-
Matches any single directory entry
-
Does not match past a / in either direction
-
-
*<suffix>
-
Matches any single directory entry ending in exactly *<suffix>
-
Does not match past a single / in either direction
-
-
<prefix>*
-
Matches any single directory entry starting in exactly <prefix>*
-
Does not match past a single / in either direction
-
-
<prefix>*<suffix>
-
Matches any single directory entry starting in exactly <prefix> and ending in exactly <suffix> with zero or more characters between them
-
Does not match past a single / in either direction
-
-
**
-
Matches zero or more directory entries
-
Matches past one or more / in either direction
-
You can use wildcard atoms freely in combination with each other, separated by a single / character. The entire sequence of atoms must match or there is no match.
Note these additional constraints:
-
Matching is done from top to bottom of the list configured by the administrator.
-
First match takes precedence.
-
Used alone, ** matches everything, so if used, it should be the last entry in the list. If the ** wildcard is used then the catch all configuration describe above is unnecessary.
The specification should be done via a config file. This is an example regex configuration file:
# Lines starting with '#' are treated as comments

  # RG1: 0000-0000-0000-0001
  # RG2: 0000-0000-0000-0002
  # RG3 0000-0000-0000-0003
  # RG4: 0000-0000-0000-0004

  team1/* => 0000-0000-0000-0001
  team2/* => 0000-0000-0000-0002
  * => 0000-0000-0000-0003
  ** => 0000-0000-0000-0004
In this example, repositories are treated as follows:
team1/repo1 - deployed to RG1
team2/repo2 - deployed to RG2

team2/subdir/repo3 - deployed to RG4. This is because 'team2/*' does not pass the directory boundary
repo4 - deployed to RG3.
subdir/another_subdir/test/repo5 - deployed to RG4
6.5.3. Configure the regex file into GitMS
You can put the regex configuration file anywhere on the system, as long as it is readable by the user running the GitMS service.
To enable the regex matching, you must update the application.properties file with the property gerrit.rpgroup.regex set to the full path of the regex file.
After you change this property to point to a new file location, you must restart the GitMS service on that node.
Changes to the regex file are detected automatically by the replicator so modifications to its contents should not require a restart of GitMS or Gerrit.
However, updates should be done atomically. To accomplish the atomicity the next version of the file should be renamed into place over the current version.
This means that the file is always complete whenever GitMS decides to re-read it.
Regex file monitoring messages
When the GitMS system is initialized with GerritMS enabled, and the gerrit.rpgroup.regex property is configured, then a File Monitor is started.
This detects changes to the file specified against the gerrit.rpgroup.regex property in the application.properties file.
You can see the File Monitor messages in two main places:
-
GitMS log files
-
GitMS dashboard (for errors)
File Monitor initialization messages are:
WARNING: The property gerrit.rpgroup.regex has been defined with the path: " + regexFilePath + ", but this file does not exist
-
File Not Found. The file monitor has not been started.
WARNING: The property gerrit.rpgroup.regex has been defined with the path: " + regexFilePath + ", but cannot be used as it is a directory.
-
File is a Directory. The file monitor has not been started.
WARNING: The property gerrit.rpgroup.regex has been defined with the path: " + regexFilePath + ", but this file cannot be read.
-
File not Readable for GitMS User. The file monitor is started. Therefore, to recover you can correct the file permissions and modify the file. The changes are then picked up by the file monitor.
WARNING: Failed to start selective replication configuration file monitor" + stackTrace
-
Exception Occurs While Starting File Monitor.
INFO: Starting selective replication configuration file monitor.
-
Message Just Prior to Starting File Monitor.
Where the replication group file is updated, changes to the file should be detected automatically by a dedicated Regex File Listener within 10 seconds of the change occurring. Change events come in for Created, Deleted, and Changed. All these cause the replication group expressions to be reloaded.
INFO: RegexFileListener-1:[CREATED - Selective replication configuration created: " + regexFilePath + "]
-
File monitor created.
WARNING: RegexFileListener-1:[DELETED - Selective replication configuration removed: " + regexFilePath + "]"
  "WARNING: RegexFileListener-1:[The property gerrit.rpgroup.regex has been defined with the path: " + regexFilePath + ", but this file cannot be read.]
-
File monitor deleted. By deleting the selective replication regex file, the system will be reset to use the default replication group ID. In the case where the file has been deleted incorrectly, the file can be recreated, using the same file name, and the file monitor will recognize that the expected file is present again.
INFO: RegexFileListener-1:[CHANGED - Selective replication configuration updated: " + regexFilePath + "]
-
File changed.
File loading messages are:
WARNING: Invalid regex defined: " + line
-
Invalid Regex detected (invalid line)
WARNING: Failed to compile pattern: " + pattern + ", skipped adding regex for Selective Replication.
-
Invalid Regex Detected (Pattern Compilation Error)
WARNING: Attempt to define the same regex multiple times, skipping second occurrence: " + regex
-
Duplicate Patterns Detected
ERROR: Error in reading regex file: " + regexFilePath + "." + stackTrace
-
IO Exception while Reading File (File system issues or unforeseeable errors)
7. Troubleshooting
7.1. Logs
When dealing with errors or similar issues, you should view both Gerrit’s and GitMS’s log files.
7.1.1. Gerrit logs
Error and warning messages from the server are automatically written to the log file under <install-dir>/gerrit/etc/.
This log file is automatically rotated daily (default: 12:00 midnight GMT).
An external log cleaning service (such as logrotate) is required to manage historical log files.
- audit.log
-
audit events
- system.log
-
INFO-level logging
- sshd.log
-
logs connections to Gerrit’s SSH port (not system shell SSH)
- *.gc.log
-
information on garbage collector usage
|
Gerrit Documentation
For more information about error messages that Gerrit can send, Gerrit Code Review - Error Messages.
|
7.1.2. Git MultiSite logs
GitMS stores logs in 2 locations:
-
Application logs -
/opt/wandisco/git-multisite/ -
Replicator logs -
/opt/wandisco/git-multisite/replicator/logs
For more detailed information on GitMS logs, see the GitMS User Guide.
7.2. Setting your timezone
If your timezone is set incorrectly you may experience Gerrit Event and Indexing replication issues.
If you are using CentOS6 then you can set the timezone by changing the file /etc/localtime.
However if using CentOS 7, RHEL 7 or SLES 12 you must use the timedatectl command.
See the Knowledgebase article Setting the timezone on Linux for more information.
7.3. Error messages in a replicated environment
Running Gerrit with GitMS introduces a number of potential errors that are very unlikely to be seen on a single-server deployment.
Below are outlined various instances in which you may get errors, what the cause may be, and the recommended action to take. Errors include 400 invalid project name error, 400 Invalid revision "HEAD", 500 internal server error and command line errors.
|
Check GitMS is running properly
If you experience any errors when using GerritMS a good first step is to check that GitMS is running without problems (all nodes are up, there are no LRO or GRO repositories, etc).
Errors in GitMS are a common cause of error messages when using Gerrit.
|
7.3.1. User gets a 400 invalid project name error when attempting to view Gerrit

The following issues can cause users to see the above 400 invalid project name error:
Create Project in Gerrit
-
Local GitMS Node Down
Recommended action: Contact the person or organization responsible for administering GitMS and ask them to ensure GitMS nodes are functioning properly. -
Remote GitMS Node Down
GitMS log: Error - Failed to deploy repository: com.wandisco.gitms.api.dto.GitRepositoryDTO@<NUMBER>
Recommended action: The error message "Failed to deploy repository" suggests you should contact the person or organization responsible for administering GitMS and ask them to ensure GitMS nodes are functioning properly. If any nodes are down they need to be brought back up. Network issues may also give this error message. -
Timeout
GitMS log: View sample log message
Recommended action: The error message "Failed to deploy repository" suggests you should contact the person or organization responsible for administering GitMS and ask them to ensure GitMS nodes are functioning properly. If any nodes are down they need to be brought back up. Network issues may also give this error message.
7.3.2. User gets a 400 Invalid revision "HEAD"

-
This error is displayed if you try to create a branch from a GitMS repository which has not had any commits made to it. When creating a branch through the Gerrit UI there will be no initial commit from which to branch off.
Recommended action: The error will disappear after the first commit has been made.
7.3.3. User gets a 500 internal server error when attempting to view Gerrit

The following issues can cause users to see the above 500 internal server error:
Merge Review Error
-
Local GitMS Node Down
Gerrit log: View sample log message
Recommended action: The error message "Failure to replicate update" suggests that either the node you are currently trying to push to, or another node in the replication group is down, causing a replication failure. You should contact the person or organization responsible for administering GitMS and ask them to ensure all nodes are running properly. -
No Quorum
Gerrit log: View sample log message
GitMS log:View sample log message
Recommended action: The error message "Minimum required learners are not available" suggests that nodes in the replication group are down, causing a lack of quorum and therefore replication failure. You should contact the person or organization responsible for administering GitMS and ask them to ensure all nodes are running properly.
Create Branch
-
Local GitMS Node Down
Gerrit log:View sample log message
Recommended action: The error message "Failure to replicate update" suggests that either the node you are currently trying to push to, or another node in the replication group is down, causing a replication failure. You should contact the person or organization responsible for administering GitMS and ask them to ensure all nodes are running properly. -
No Quorum
Gerrit log: View sample log message
GitMS log:View sample log message
Recommended action: The error message "Minimum required learners are not available" suggests that nodes in the replication group are down, causing a lack of quorum and therefore replication failure. You should contact the person or organization responsible for administering GitMS and ask them to ensure all nodes are running properly.
Delete Branch
-
Local GitMS Node Down
Gerrit log:View sample log message
Recommended action: The error message "Failure to replicate update" suggests that either the node you are currently trying to push to, or another node in the replication group is down, causing a replication failure. You should contact the person or organization responsible for administering GitMS and ask them to ensure all nodes are running properly. -
No Quorum
Gerrit log: View sample log message
GitMS log:View sample log message
Recommended action: The error message "Quorum is not available" suggests that nodes in the replication group are down. You should contact the person or organization responsible for administering GitMS and ask them to ensure all nodes are running properly.
7.3.4. User gets errors in the command line
The following issues can occur in the Git command line when attempting to push up to a Gerrit controlled project.
Git Push to Gerrit-controlled repository
-
Local GitMS Node Down
Git log output:$ git push origin master Password for 'http://admin@192.168.62.191:7070': Counting objects: 3, done. Writing objects: 100% (3/3), 288 bytes | 0 bytes/s, done. Total 3 (delta 0), reused 0 (delta 0) remote: Processing changes: refs: 1, done To http://admin@192.168.62.191:7070/a/TestRepo ! [remote rejected] master -> master (lock error: Failure to replicate update. ) error: failed to push some refs to 'http://admin@192.168.62.191:7070/a/TestRepo'
Recommended action: The error message "Failure to replicate update" suggests that either the node you are currently trying to push to, or another node in the replication group is down, causing a replication failure. You should contact the person or organization responsible for administering GitMS and ask them to ensure all nodes are running properly.
-
Content Distribution Fail
Git log output:$ git push origin master Counting objects: 3, done. Writing objects: 100% (3/3), 289 bytes | 0 bytes/s, done. Total 3 (delta 0), reused 0 (delta 0) remote: Processing changes: refs: 1, done To ssh://admin@192.168.62.190:29418/TestRepo ! [remote rejected] master -> master (lock error: Failure to replicate update. GitMS - minimum number of learners not available ) error: failed to push some refs to 'ssh://admin@192.168.62.190:29418/TestRepo'
GitMS log: View sample log message
Recommended action: The error message "Minimum required learners are not available" suggests that nodes in the replication group are down, causing a lack of quorum and therefore replication failure. You should contact the person or organization responsible for administering GitMS and ask them to ensure all nodes are running properly. -
No Quorum
Git log output:$ git push origin master Password for 'http://admin@192.168.62.191:7070': Counting objects: 3, done. Writing objects: 100% (3/3), 288 bytes | 0 bytes/s, done. Total 3 (delta 0), reused 0 (delta 0) remote: Processing changes: refs: 1, done To http://admin@192.168.62.191:7070/a/TestRepo ! [remote rejected] master -> master (lock error: Failure to replicate update. GitMS - minimum number of learners not available ) error: failed to push some refs to 'http://admin@192.168.62.191:7070/a/TestRepo'
GitMS log: View sample log message
Recommended action: The error message "Minimum required learners are not available" suggests that nodes in the replication group are down, causing a lack of quorum and therefore replication failure. You should contact the person or organization responsible for administering GitMS and ask them to ensure all nodes are running properly.
Create Review
-
Local GitMS Node Down
Git log output:$ git push origin HEAD:refs/for/master Password for 'http://admin@192.168.62.191:7070': Counting objects: 3, done. Writing objects: 100% (3/3), 288 bytes | 0 bytes/s, done. Total 3 (delta 0), reused 0 (delta 0) remote: Processing changes: refs: 2, done To http://admin@192.168.62.191:7070/a/TestRepo ! [remote rejected] HEAD -> refs/for/master (Unable to create changes: REJECTED_OTHER_REASON lock error: Failure to replicate update.) error: failed to push some refs to 'http://admin@192.168.62.191:7070/a/TestRepo'
Gerrit log: View sample log message
Recommended action: The error message "Failure to replicate update" suggests that either the node you are currently trying to push to, or another node in the replication group is down, causing a replication failure. You should contact the person or organization responsible for administering GitMS and ask them to ensure all nodes are running properly. -
No Quorum
Git log output:
$ git push origin HEAD:refs/for/master
Password for 'http://admin@192.168.62.191:7070':
Counting objects: 3, done.
Writing objects: 100% (3/3), 288 bytes | 0 bytes/s, done.
Total 3 (delta 0), reused 0 (delta 0)
remote: Processing changes: refs: 2, done
To http://admin@192.168.62.191:7070/a/TestRepo
 ! [remote rejected] HEAD -> refs/for/master (Unable to create changes: REJECTED_OTHER_REASON lock error: Failure to replicate update.
GitMS - minimum number of learners not available)
error: failed to push some refs to 'http://admin@192.168.62.191:7070/a/TestRepo'
Gerrit log: View sample log message
GitMS log: View sample log message
Recommended action: The error message "Minimum required learners are not available" suggests that nodes in the replication group are down, causing a lack of quorum and therefore replication failure. You should contact the person or organization responsible for administering GitMS and ask them to ensure all nodes are running properly.
7.4. Gerrit ACL rules and potential issues with ordering
Gerrit has the concept of storing the ACL rules in both parent repositories and in meta references within a repository itself. WANdisco’s replication system guarantees ordered writes on a repository by repository level, so when ACL rules for a particular repository is defined in a "parent" repository, the ordering of operations between repositories can’t be guaranteed, as each repository is its own distributed state machine.
Example: You could change a rule on a parent repository that impacts a child repository at the time when someone attempts to push something that would be rejected by that rule change. In a scenario where there is moderate network latency it is possible that the push would go through in spite of the just-added proscriptive rule.
So, rule updates on remotes are not applied immediately when applied to parent repositories. If a rule has to be changed on a repository and MUST apply immediately, the correct approach is to edit that individual repository ACL instead of the parent.
7.5. Garbage collection
| Gerrit uses JGit to do repository Garbage Collection. There is a bug in JGit’s implementation until JGit 4.6 (Gerrit 2.14) where an object could be lost during the GC operation (see discussion here and actual bugfix here). Therefore, we suggest you use the coordinated GC capabilities built into GitMS. See the Git Garbage Collection for more information. |
Gerrit has its own garbage collection command that can be used to free up system resources by removing objects that are no longer required by Gerrit. However, you should not use the Gerrit garbage collection for a number of reasons. It will:
-
greatly inflate the size of the Gerrit process (perhaps exceeding Java HEAP).
-
require a huge amount of Java GC when it is done. This could make the Gerrit server process freeze for a period of time.
-
not replicate to the other members of the family and could cause divergence.
7.5.1. Setting up garbage collection
It’s good practice to incorporate an automatically scheduled garbage collection. How frequently you need to run repository garbage collection on any specific repository depends on the frequency of updates to that repository. A large accumulation of pack files will slow Gerrit down. Consider a repository GC after 100 updates have been made; definitely after 200 updates. See more about Git Garbage Collection in the Git MultiSite User Guide.
7.6. Unauthorized proposal logging caused by password conflict
The following unauthorized proposal error doesn’t offer many clues to its cause.
2014-11-17 18:53:06 INFO [RestCaller:handle] - Thread-151:[com.wandisco.gitms.repository.handlers.GerritUpdateIndexProposalHandler:
output=Unauthorized]
2014-11-17 18:53:29 INFO [NodeEventHandler:handle] - 993753a9-6e7b-11e4-b352-080027776fdc:[Received node event,
Unknown macro: {Node}
Cause: GitMS stores a default username and password in its application.properties file.
e.g.
gerrit.enabled=true
gerrit.rpgroupid=0683d2fc-6e7c-11e4-9956-080027a5ec28
gerrit.repo.home=/home/wandisco/gerrit/git
gerrit.username=admin
gerrit.password=pass
gerrit.events.basepath=/home/wandisco/gerrit_events
gerrit.root=/home/wandisco/gerrit
Changing the user password via Gerrit’s settings screen (shown below) can result in the stated error. Ensure that passwords are matched to fix the problem. Note that

7.7. Reindex process
Below is a diagram that shows how Gerrit’s reindexing system runs. In most cases this system will run without intervention, however, in the event of a persistent reindexing failure, the administrator may need to get involved in order to fix an underlying problem or to trigger a retry.
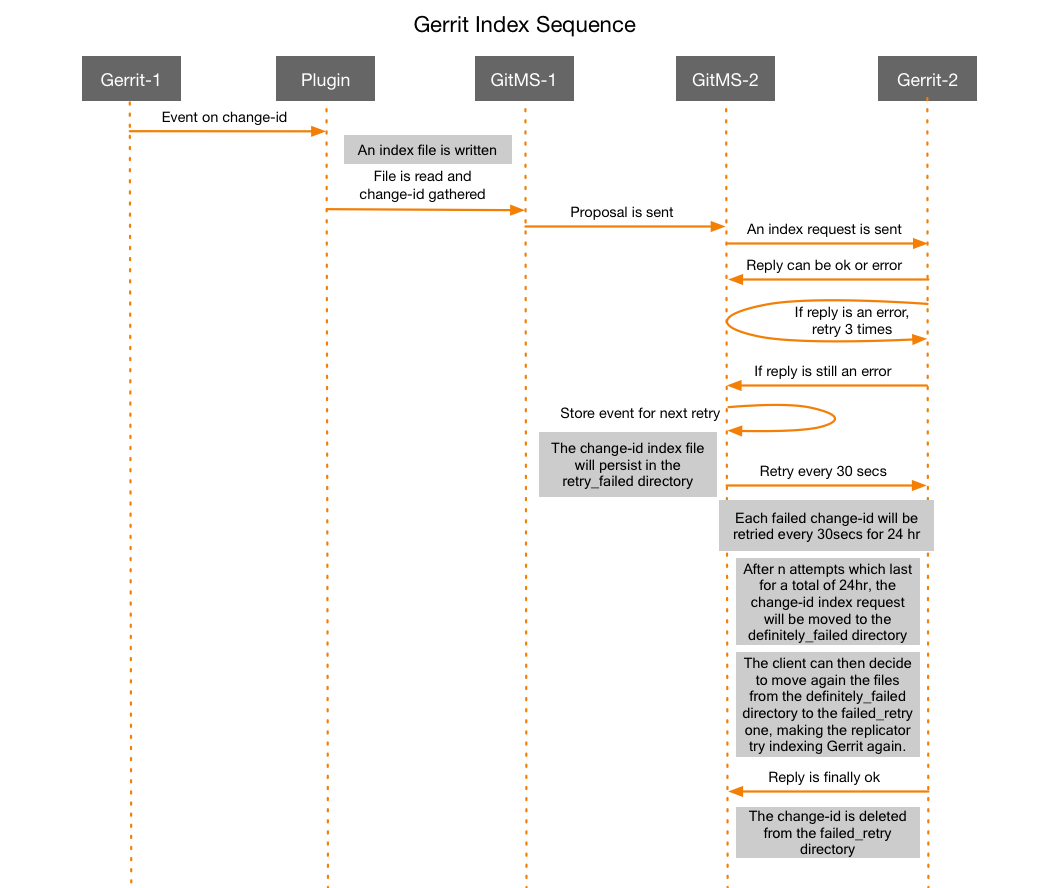
7.7.1. Description
-
Gerrit detects a change and an index file is created.
-
The file is read and change-id is gathered.
-
The local instance of GitMS sends a proposal for the index file to be replicated to the other nodes.
-
Now, an index request is sent, where the reply is OK, or an error can occur. If an error does occur then the process will retry the sending of the proposal 3 times.
-
After the 3rd failed retry the proposal is stored in a
retry_faileddirectory, by default you’ll find the directory in the gerrit-events directory, located (by default) in the same location as the Gerrit installation, e.g.[root@daily-gerrit-static-1 wandisco]# ls -l total 28 drwxr-xr-x 13 wandisco wandisco 4096 Dec 8 07:31 gerrit drwxr-xr-x 5 wandisco wandisco 4096 Dec 8 07:42 gerrit_events drwxr-xr-x 2 wandisco wandisco 4096 Dec 8 07:42 failed_definitely drwxr-xr-x 2 wandisco wandisco 4096 Dec 8 07:42 failed_retry drwxr-xr-x 2 wandisco wandisco 4096 Dec 8 07:42 gen_events drwxr-xr-x 2 wandisco wandisco 4096 Dec 8 07:40 gerrit-ms drwxrwxr-x 2 wandisco wandisco 4096 Dec 8 07:29 git drwxrwxr-x 4 wandisco wandisco 4096 Dec 8 07:29 keys drwxrwxr-x 2 wandisco wandisco 4096 Dec 8 07:29 misc drwxrwxr-x 2 wandisco wandisco 4096 Dec 8 07:29 toolsChange-ids stored in this directory are retried every 30 seconds for the next 24 hours.
-
Should a change-id not succeed during the 24 hours it will then be moved to the
definitely_faileddirectory. -
The client may elect to push these definitely failed change-ids back out for a retry.
-
A failed change-id that eventually succeeds is deleted from the failed_retry directory. As and when the proposal is accepted, the reindexing will proceed.
7.7.2. Restore Gerrit after temporary loss of replication
Should replication be lost on a deployment, Gerrit will not allow you to make changes on a repository. On GitMS’s dashboard a warning that replication to the lost nodes has failed. The usual GitMS procedure for repository recovery can be used, after which the replication group will catch up.
If a repository replica is lost or becomes unrecoverable then it becomes necessary to perform a manual recovery by using rsync to replace the corrupted/lost replica with a copy of the remaining good replicas.
7.7.3. Force a reindex
If a change index is out of date upon an active review, most often the next event that occurs on it will also pick up the new data that was missed in the previous reindex. This may not be always sufficient however, as generating false content to trigger reindexes is not desired. If a change needs to be updated on a node, the reindex.sh script can be used to update the index.
reindex.sh
The reindex.sh script is shipped with the gerrit-installer, and has the following requirements:
-
Should be run on the node that is to be reindexed.
-
Should have read access to the Gerrit config file.
-
Curl and Git must be installed.
Running the script
./reindex.sh <argument> <argument> <argument> <argument>
The script takes 4 arguments:
- -u: Gerrit account username
-
-
this should be the username of an Administrator account.
-
- -p: Gerrit account HTTP password
-
-
note, this is the password shown in the Gerrit UI, not necessarily the same password that user uses for logging into the Gerrit UI.
-
- -i: ChangeID that must be reindexed
-
-
This ID can be retrieved from the URL of the change.
For example:http://dger03.qava.wandisco.com:8080/#/c/309633/has a changeID of309633.
-
- -c: gerrit.config file
-
-
specify location of the Gerrit config file.
-
7.8. Gerrit event stream
Gerrit Code Review for Git provides ssh clients with the possibility to receive a stream of events that happen in the Gerrit node where the client is connected to. GerritMS enables those ssh clients to receive not only the events from that node, but also the events coming from other nodes in the same replication groups.
To see how the stream of events works normally refer to the standard Gerrit documentation. An example of how to attach to an ssh connection, and the related output is:
$ ssh -p 29418 review.example.com gerrit stream-events
{"type":"comment-added",change:{"project":"tools/gerrit", ...}, ...}
{"type":"comment-added",change:{"project":"tools/gerrit", ...}, ...}
7.8.1. Enable/disable event stream replication
All the events that happen on a Gerrit node can be shared with other nodes, and a node can receive events coming from the other nodes.
The replication of these events (send and receive) is on by default, i.e. every node will receive by default all the events happening on the other nodes which are on the same replication groups, and every node will send its events to the other nodes.
To modify or disable the replication of these events you need to modify the application.properties file and change the properties below.
|
Restart required
You need to restart both Gerrit and GitMS for any changes to the Gerrit replicated events properties in the GitMS application properties file to take effect.
|
| Property name | Default value | Description |
|---|---|---|
|
|
The current node receives events coming from other nodes |
|
|
The current node receives events coming from other nodes - this setting overrides |
Setting send and/or receive to false will make the node stop sending and/or stop receiving events from the other nodes.
Other configurable properties for the events are:
In v1.9.3, the property previously called gerrit.wait.on.event.receive.and.publish changed it’s name to gerrit.max.secs.to.wait.on.poll.and.read.
|
| Property name | Default value | Description |
|---|---|---|
|
N/A |
Can be used to point Gerrit and the replicator to use a specific directory to exchange the temporary events files. If this is not set, events will be stored temporarily in the |
|
2 |
Maximum number of seconds to wait on the sending event queue before processing the next incoming event. Do not set this value to 0, but it can be set to e.g. 0.5 if faster replication is needed in the sub-second range. |
|
5 |
Maximum number of seconds to queue events in a single file before releasing that file as ready to be sent. Do not set this value to 0, but it can be set to e.g. 0.5 if faster replication is needed in the sub-second range. |
|
30 events |
Maximum number of events to be packaged in one single proposal before (gzipping and) sending to the other nodes.
If the number of events exceeds this value then the events file is set as ready for replication. All the events need to be associated with a single project so this is unlikely. |
|
600L |
The sleep period between reading the files listed in the outgoing events directory. This configurable is a GitMS configurable, if there are no event files in the directory, this is the period that GitMS will wait again before checking. |
|
false |
When true, forces both Gerrit and the replicator to sync the temporary files with the filesystem before proceeding. This could be an additional precaution not to lose any events in the case of an operating system crash. |
|
true |
When true, the replicator will compress the file containing the events before sending it to the other nodes as a proposal |
|
1 second |
The maximum wait time between checks for events to be received or published. If an event is received or published then no wait will occur before the next check. |
|
20 seconds |
How long the queue of unique replicated index events builds for before sending. The delay avoids sending duplicates and prevents the maximum throughput of GitMS being reached. |
|
60 mins |
Used to calculate the time when a change was last indexed. This timeout feature enables indexing to take place without the expected required state changes. |
Incoming Event Handling
| Property name | Description |
|---|---|
|
Starting time for first event failure backoff in secs. Supports 0.5 type expressions. Default = 1 second. |
|
Ceiling time for largest event failure backoff in secs. Supports 0.5 type expressions. Default = 10 second. |
|
Max number of backoff retries before failing. Default = 10 second. |
|
Sets the number of seconds between outputs for certain diagnostics, so they don’t flood the logs. Default = 300. |
|
Replicated events worker pool size. Always +2 for the reserved Gerrit projects, "all-projects", "all-users", for which we reserver core threads. The event pool size can be no smaller than 1. Default = 10. |
|
Idle time of a worker thread, before it can die, and be reclaimed back - so a pool can grow to max workers above, and shrink back after this idle period to help save on memory use during lower use periods. Default = 60. |
Further tuning
The following log messages indicate the need for tuning some of the above properties:
Thread.pool.full
[2021-11-05 16:50:00,601] [Replicated-Incoming-Outgoing-worker-pool] INFO \
com.google.gerrit.common.replication.ReplicatedScheduling : Not scheduling event file: \
 /opt/wandisco/gerrit/events/replicated_events/incoming/events_1636130986150x1abeed8d63ce3300_3a334708-7232-449f-b8cb-d55526571ee3_f3af4375c5e5903ef3d6af0ba5e2c8f7ae32e635_3598e3110000.json. \
for project: p13, as all (project-only) worker threads are busy for now.
If the above message appears in the logs, increase the gerrit.replicated.events.worker.pool.size property to avoid exhausting available threads.
Any increase to gerrit.replicated.events.worker.pool.size must be matched to your server’s available processing capacity, or the change could make things worse.
|
Try count too low
[2021-11-23 20:42:10,625] [ReplicatedThreadPoolExecutor] WARN  \
com.google.gerrit.common.replication.workers.ReplicatedIncomingEventWorker : RE Task [ \
ReplicatedEventTask{projectName='lfs-test1', eventsFileToProcess=events_1637590080641x7caa7bc8cfb00000_5201c6b4-8902-4615-9cc0-88108f3dddd4_245e660f1726514541ea0728a750a31e359069ea_bae8f62e0000.json} ] \
has failures, it has been requested to move to failed directory, \
due to max number of retries allowed: 10, or failImmediately: true. Moving to failed.
[2021-11-23 20:42:10,625] [ReplicatedThreadPoolExecutor] WARN \
com.google.gerrit.common.FailedEventUtil : Moving event file \
/home/wandisco/gerrit/events/replicated_events/incoming/events_1637590080641x7caa7bc8cfb00000_5201c6b4-8902-4615-9cc0-88108f3dddd4_245e660f1726514541ea0728a750a31e359069ea_bae8f62e0000.json \
into the failed directory, it can be retried manually later by moving it back into the incoming events directory.
If the above message appears in the logs, increase the gerrit.replicated.events.max.backoff.retries property to provide more time for the event to process.
How subsequent delays increase
The first retry is delayed by gerrit.replicated.events.initial.backoff.period seconds. The second try is delayed by two times the first. The third delay is twice that of the second. and so on until the gerrit.replicated.events.ceiling.backoff.period is exceeded. After that all subsequent delays will be gerrit.replicated.events.ceiling.backoff.period seconds.
| Incoming Event Handling properties are measured seconds. Potentially expressed as a decimal, for example, "1.5" is one and a half seconds (1 second 500 milliseconds). |
Example retry
Tuning the timing for retries requires an understanding of how the three related properties interact. An effective setup requires a balance between the number of retries and the initial "wait before retry" value that increases geometrically with each subsequent retry. The ceiling property ensures that a high number of retries doesn’t result in an excessive total retry period.
The following example shows how the default values produce a total retry window of 75 seconds.
gerrit.replicated.events.initial.backoff.period 1
gerrit.replicated.events.ceiling.backoff.period 10
gerrit.replicated.events.max.backoff.retries 10
The above default values compute as follows:
-
1st retry at 1 second
-
2nd retry in 2 additional seconds
-
3rd retry in 4 additional seconds
-
4th retry in 8 additional seconds
-
5th retry hits the
gerrit.replicated.events.ceiling.backoff.periodof 10 seconds. -
6th - 10th retry attempts continue at the cap of 10 seconds.
Total retry period is 1+2+4+8+10+10+10+10+10+10 = 75 seconds.
How to enable/disable the Gerrit event stream replication
A dashboard message will be displayed if the number of files in the incoming/outgoing replicated events directory tree exceeds a specified value. The directories are checked periodically (the period is also specifiable). Here is how you configure these checks:
-
Files that Gerrit shares with WANdisco’s replicator are stored in two directories, one for incoming data, the other for outgoing data. i.e.
$ find /home/gerrit/gerrit_events
/home/gerrit/gerrit_events/replicated_events/outgoing
/home/gerrit/gerrit_events/replicated_events/incoming
/home/gerrit/gerrit_events/replicated_events/index_events
There’s a watchdog process that monitors how many files are accumulated in these directories and a warning is sent to the dashboard (and log) when that number reaches a level that you can specify in the configuration:
-
Open application.properties and edit the following lines:
gerrit.replicated.events.incoming.outgoing.threshold.email.notification 200
gerrit.replicated.events.incoming.outgoing.time.email.notification 120000L (2 minutes. You must include the "L")
- gerrit.replicated.events.incoming.outgoing.threshold.email.notification
-
The combined number of files contained in the Gerrit replicated events incoming and outgoing folders. Default: 200
- gerrit.replicated.events.incoming.outgoing.time.email.notification
-
Period of time to wait between each check on number of files in the incoming/outgoing directories. This is to avoid spam notifications every time a file is added to these directories after the threshold is met. Default 120000L
-
Save the file and restart the replicator for the changes to take effect.
How to distinguish lines related to the replication of events in the GitMS log
In the log files of Gerrit and the replicator, the information related to the replicated events is marked with the RE string to signify Replicated Event.
For example, currently only the standard Gerrit events are supported for the replication. If a custom Gerrit plugin tries to publish an event which is not supported, in the Gerrit log the following line will appear:
RE Event is not supported! Will not be replicated.
To apply a modification to the application.properties file you need to restart both Gerrit and the replicator.