Admin Guide
1. Technical overview
1.1 Integration architecture
This diagram shows how Gerrit and Git MultiSite interact in a replicated deployment.
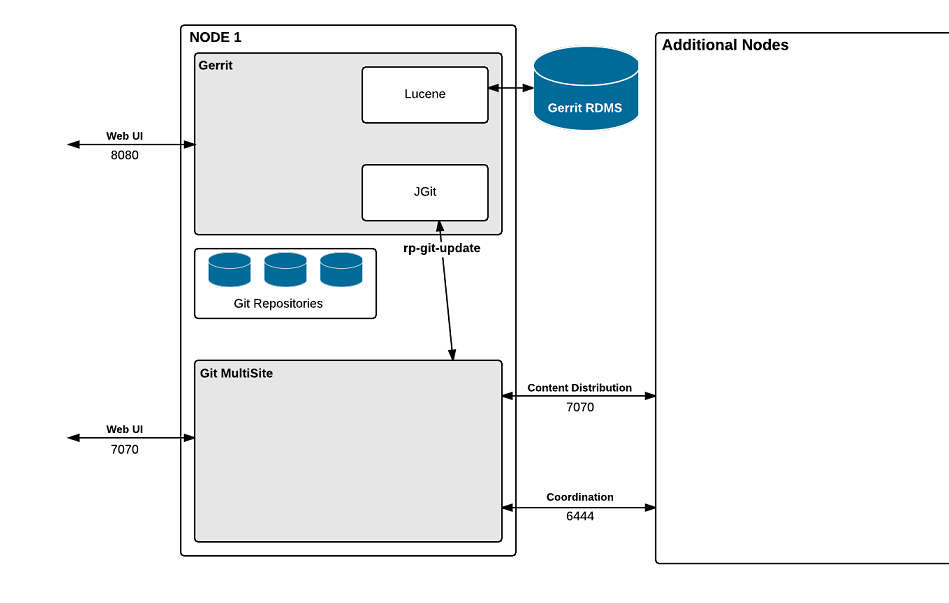
Gerrit - Git MultiSite integration
Architecture description
- Gerrit runs much the same as it does in a stand-alone configuration, being a front-end for Git, intercepting push requests, holding them back until the review workflow is completed.
- The Gerrit database is shared between all nodes. Lucene indexing is shared between nodes.
- Git changes are fed through Gerrit's JGit library where the rp-git-update hook script receives push requests. The replication system then creates a pack file that contains the actual repository changes and replicates the file to all the other nodes over the Content Distribution stream.
- When the pack file is in place on all nodes then the proposal for the change is sent to all nodes over the Coordination stream (port 6444). Both git MultiSite and Gerrit run their own browser-based admin UIs.
2. Gerrit administration
2.1 Add projects
The functionality for adding new projects remains the same as when Gerrit is used outside of a MultiSite deployment. See Gerrit's own documentation for this works.
2. Gerrit administration
2.1 Add projects
The functionality for adding new projects remains the same as when Gerrit is used outside of a MultiSite deployment. See Gerrit's own documentation for this works.
2.2 Add existing repository
You can create new repositories from Gerrit by creating a new project. It's also possible to take an existing Git repository and add it into Gerrit, so that it will come under Gerrit's control.
Ensure the repository is in place on all nodes, it must be in exactly the same state.
Before adding a repository, consider running git fsck to ensure its integrity. You may also wish to run a git gc before your git fsck for performance reasons.
- Log into Git MultiSite's admin UI.
- Click the Repositories tab. Click on the Add button.
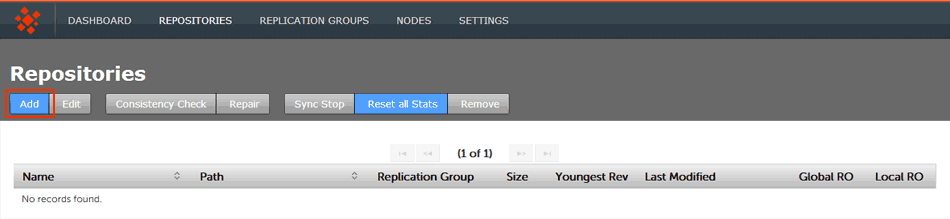
Repositories > Add
- Enter the following details:

Repositories > Enter details then click ADD REPO
- Repo Name - a name for the repository
- FS Path - the file system path (full path to the repository)
To control the repository through Gerrit, ensure that this path is for Gerrit's repository directory, e.g.
<install-path>/gerrit/git/repository1.git - Choose the Gerrit replication group from the drop-down. You can set the repository to be Read-only by ticking the Global Ready-only.
You can re-enable write permission later by unticking the checkbox. - Click ADD REPO to add the repository for replication.
IMPORTANT - these operations that should not be performed on Gerrit repositories
- Creating new replication groups - Git MultiSite for Gerrit currently only integrates with a single replication group.
- Moving repositories to other replication groups - Gerrit integration will break for the repository.
- Adding a new repository outside of Gerrit - It will not itegrate with Gerrit.
- Removing a repository in any way other than through Gerrit (project deletion) - Gerrit integration will break.
2.3 Add Git repository not for Gerrit control
You can add repositories that are not for control by Gerrit using the procedure described in Git MultiSites's Admin Guide. See Add a repository.
2.4 Add repositories through the file system
It's possible to to add additional repositories to the Gerrit Git MultiSite deployment without going through the Gerrit UI. This method relies on Gerrit behavior that isn't necessarily supported where Gerrit will automatically pick up repositories that are dropped into Gerrit's repository folder.
2.5 Add repository for Gerrit control
- Copy the new repository into Gerrit's repository directory (on ALL NODES), matching the Gerrit configuration.
- Add the repository to Git MultiSite using the Add Repository procedure.
See also information on Gerrit event stream.
2.6 Add repository outside of Gerrit's control
- Copy the new repository into Git MultiSite's repository directory (on ALL NODES).
- Add the repository to Git MultiSite using the Add Repository procedure.
Adding or removing repositories outside of Gerrit is not recommended.
Repositories created or removed via the filesystem or through Git MultiSite will not be seen in the Gerrit's project listing, unless the Gerrit project cache is cleared. We strongly recommend that you always manage Gerrit-based repositories through Gerrit.2.7 Delete projects
There are two approaches that you can use to delete a project from Gerrit:
2.7.1 Delete from under Gerrit
This approach pulls the repository out from under Gerrit by removing it from replication and from the Git Node.
- Remove the respository to you plan to delete from its Git MultiSite replication group. See the Git MultiSite administration guide for how to Remove a repository.
- Remove repository from disk on each node.
- This results in the project disappearing from the Gerrit UI, although the project will still be known to Gerrit.
The following approach is provided as an alternative:
- Gerrit stores project information both on disk and in the database. A plugin has been created to help wipe this data. It can be built from source, though I found it worked well to download it from.
-
Install the delete-project plugin with this command on each Gerrit node:
ssh -p 29418 localhost gerrit plugin install -n delete-project.jar /full/path/on/server/to/delete-project-2.9.jar
- Remove the project from replication through Git MultiSite's admin console. It will still appear in the Gerrit UI because it the repo remains on disk and in the database, which is expected.
- Visit the Gerrit project UI on each Gerrit node. A Delete button appears on the project details screen. Delete the project from each node. This cleans up files on disk as well as the database.
2.8 Manually add new Gerrit projects
It's possible to add new projects to Gerrit just by dropping the
<repository-name>.gitfile into Gerrit's repository path (gerrit.basePath), that is, the local file system directory in which Gerrit stores the repositories that it knows about. Note that you may need to restart Gerrit in order to see the new project listed.When running Git MultiSite there are some additional requirements for using this method for adding projects:
Copy the repository to all nodes
You need to ensure that the repository is copied to the same place on all nodes. The safest way to do this is to use rsync, ensuring that you use the following flags which preserve neccessary properties (such as owner and group permissions). e.g.
rsync -rvlHtogpc /path/to/local/repo
remoteHost:/path/to/remote/repo Read more about how to Synchronize repositories using rsync.
Add the repository to Git MultiSite
For changes to the repository, including gerrit tasks you need to add the repository's information into Git MultiSite. This only needs to be done on a single node as the details will be replicated to the other nodes in the replication group. For information about how you do this, see the Git MultiSite User Guide - 4.3 Add repositories
It's possible to script/automate the addition of repositories to Git MultiSite using the REST API.
2.9 Manage projects in subfolders
Gerrit allows the grouping of repositories under folders just by adding a path into the project name. For example, you can create a project named 'sandboxes/abc'. This will create a repository called 'abc.git' under a folder called 'sandboxes'. You will see this naming convention carry through to the Git MultiSite.
2.10 Configure for Gerrit event stream
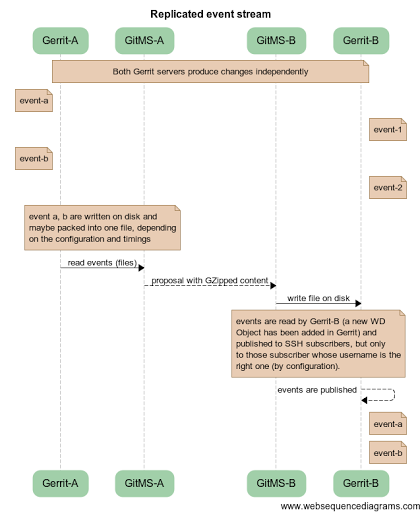
The Gerrit Code Review for Git enables SSH clients to receive a stream of events that happen in the Gerrit node where the client is connected to. GerritMS (Gerrit + GitMS) enables those SSH clients to receive, not only the events from that node, but also the events coming from other nodes in the same replication groups.
To see how the stream of events works normally, refer to the Gerrit documentation. Also refer to information on adding repositories.
An example of how to attach to an ssh connection, and the related output is:
  $ ssh -p 29418 review.example.com gerrit stream-events
  {"type":"comment-added",change:{"project":"tools/gerrit", ...}, ...}
  {"type":"comment-added",change:{"project":"tools/gerrit", ...}, ...}
2.10.1 Enable/disable event stream replication
All the events that happen on a Gerrit node can be shared with other nodes, and a node can receive events coming from the other nodes.
The replication of these events (send and receive) is on by default, i.e. every node will receive by default all the events happening on the other nodes which are on the same replication groups, and every node will send its events to the other nodes.
To modify or disable the replication of these events you need to modify the
application.propertiesfile and change these properties:Property name Default value Description gerrit.replicated.events.enabled.send true The current node sends its own events to the other nodes gerrit.replicated.events.enabled.receive true The current node receives events coming from other nodes without modification gerrit.replicated.events.enabled.receive.original true The current node receives events coming from other nodes - this overrides the property above gerrit.replicated.events.enabled.receive.distinct false If true the current node will receive the events coming from the other nodes with a distinctive text marking. This may result in the node receiving 2 copies of each event. gerrit.replicated.events.enabled.local.republish.distinct false If true the current node, while publishing events to their ssh clients, will also republish the same event with the distinctive text gerrit.replicated.events.distinct.prefix REPL- This is the prefix to add to the "type" field of the replicated event and will be used to make the event distinguishable in the distinct replication property. This property can be different for every node so that it is possible on the receiving node to understand the origin of the current received replicated event. If you set send and/or receive to false, the node stops sending and/or stops receiving events from the other nodes.
Known issue If you want to set gerrit.replicated.events.enabled.receive to false you will also need to add into the
application.propertiesfile: gerrit.replicated.events.enabled.receive.original=false This property is currently missing from the file but it needs to be altered to false to prevent the change made to gerrit.replicated.events.enabled.receive being overridden.Other configurable properties for the events are:
Property name Default value Description gerrit.replicated.events.basepath N/A Can be used to point Gerrit and the replicator to use a specific directory to exchange the temporary events files. If this is not set, events will be stored temporarily in the gerrit.events.basepath / replicated_events directory. gerrit.replicated.events.secs.on.queue 2 Used by Gerrit: max number of seconds to wait on the sending event queue before processing the next incoming event gerrit.replicated.events.secs.before.proposing 5 Used by Gerrit: max number of seconds to queue events in a single file before releasing that file as ready to be sent gerrit.replicated.events.ms.between.reads 10000 Sleep time in the main loop of the replicator which reads the file produced by Gerrit and send them as proposal to the other nodes gerrit.replicated.events.enabled.sync.files false When true forces both Gerrit and the replicator to sync the temporary files with the filesystem before proceeding. This could be an additional precaution not to lose any events in the case of an operating system crash. gerrit.replicated.events.outgoing.gzipped true When true the replicator will compress the file containing the events before sending it to the other nodes as a proposal In the log files of Gerrit and the replicator, information related to the replicated events is marked with the RE string to signify Replicated Event. For example, currently only the standard Gerrit events are supported for the replication. If a custom Gerrit plugin tries to publish an event which is not supported, in the Gerrit log the following line appears:
RE Event is not supported! Will not be replicated.
From version 1.2.0 of GerritMS, to apply a modification to the application.properties file you need to restart both Gerrit and the replicator. This will be changed in a future release.
2.10.2 Enable/disable event stream replication
A dashboard message will be displayed if the number of files in the incoming/outgoing replicated events directory tree exceeds a specified value. The directories are checked periodically (the period is also specifiable). Here is how you configure these checks:
- Files that Gerrit shares with WANdisco's replicator are stored in two directories, one for incoming data, the other for outgoing data. i.e.
[gerrit@dger01 ~]$ find /home/gerrit/gerrit_events
/home/gerrit/gerrit_events/replicated_events/outgoing
/home/gerrit/gerrit_events/replicated_events/incoming
/home/gerrit/gerrit_events/replicated_events/index_events
There's a watchdog process that monitors how many files are accumulated in these directories and a warning is sent to the dashboard (and log) when that number reaches a level that you can specify in the configuration: - Open application.properties and edit the following lines:
gerrit.replicated.events.incoming.outgoing.threshold.email.notification 200 gerrit.replicated.events.incoming.outgoing.time.email.notification 120000L (2 minutes. You must include the "L")- gerrit.replicated.events.incoming.outgoing.threshold.email.notification
- The combined number of files contained in the Gerrit replicated events incoming and outgoing folders. Default: 200
- gerrit.replicated.events.incoming.outgoing.time.email.notification
- Period of time to wait between each check on number of files in the incoming/outgoing directories. This is to avoid spam notifications every time a file is added to these directories after the threshold is met. Default 120000L
- Save the file and restart the replicator for the changes to take effect.
3. Add new node
Follow this procedure if you need to expand your Git/Gerrit deployment to a new location. We assume that you have already completed the inital installation and setup of your Gerrit and Git MultiSite applications.
Overview
- Prepare new server
- Install Git MultiSite
- Induct new node into replication system
- Add new node to Gerrit replication group
- Place existing node in "Helper mode"
- Use rsync to copy Gerrit directory to new node
- Put helper node back into operation
- Start Gerrit on new node
3.1 Prepare new server
When bringing a new node up, it's vital that you make sure that it meets all the deployment requirements set in the deployment checklist. It's often been considered good practice to create the new server from the image of an existing server so that software and settings are automatically matched.
3.2 Install Git MultiSite
Follow our instructions to install Git MultiSite on your new node. See Install Git MultiSite. During setup, you are asked for the license key and the users.properties file. Take these from your first node and copy them to the corresponding locations on your new node.
3.3 Induct new node into replication system
When the installation of Git MultiSite has been completed on your new node, you need to add it to your replication 'ecosystem'. This is done by navigating to one of your existing nodes. Log in to its admin UI and click on the Nodes tab. Click on Connect to Node.
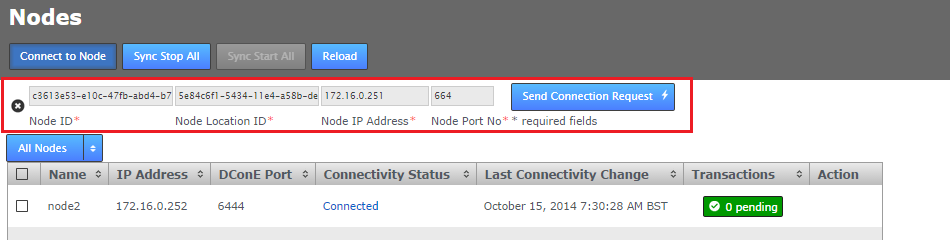
Node induction
- Node Node ID *
- The name of your new node - you would have entered this during the installation of your new node.
- Node Location ID *
- The unique reference code that is used to define the new node's location - you can verify this from the NODE ID entry on the new node's SETTINGS tab.
- Node IP Address *
- The IP address of the new node.
- Node Port No *
- The DConE Port number (6444 by default), again this is confirmed from on the new node's SETTINGS tab.
When these details are entered, click the SEND CONNECTION REQUEST button. The new node will receive the connection request and will be added to the current membership. You will need to refresh your browser to see that this has happened. The new node should now appear on the map of on the Nodes screen.
If you run into problems there is more information about Node Inductions in the installation section.
3.4 Add new node to Gerrit replication group
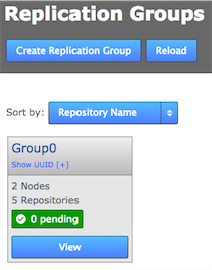
Now that the new node is in place we need to a join it to our Gerrit replication group, this will tell Git MultiSite to replicate Git and Gerrit data between the existing member nodes and the new node. Log in to an existing node that is a member of the Gerrit replication group, click on the Replication Groups tab button. Click on View at the bottom of your Gerrit replication group's box. Click the Add Nodes button. You will see the existing membership along with a Select a Node... drop-down button. Click the button and select the new node. Click Add Nodes.

Adding the new node to the Gerrit replication group
Node Role
You can leave the new node's role as default unless by adding it you will end up with an even number of voter nodes. If this is the case then either the new node or an existing node must be assigned as an Active TieBreaker to ensure that it's not possible for a split vote to occur which would result in a deadlock of the replication system. See more about Node Types.3.5 Place existing node in "Helper mode"
In the next step we need to use rysnc to copy the Gerrit directory from an existing node over to the new node. During the process we need to ensure that the existing node is not replicating or being written to as this could put it out of sync and corrupt the data we'll be copying. For this reason we select one of the existing nodes to become a helper. While it takes on the role of helper replication to it will halt. Git users who use the node will not be able to access repositories or interact with Gerrit.

Helper Node
Select a node and click Start Sync. Take note of the warning about not closing the browser or logging out during this process.
3.6 Use rsync to copy Gerrit directory to new node
Instead of using Git MultiSite's repair option we'll be opening a terminal window on the Helper node and using rsync to copy the entire Gerrit repository over to the new node. For information about the best approach for performing the rsync see 4. Synchronize repositories using rsync.
Instead of copying a git repository we need to copy the Gerrit folder (in which Gerrit's repositories are normally stored). If you're using a non-standard installation location then you'll need to adapt this step to account for both Gerrit and the git repositories that it controls.
3.7 Put helper node back into operation
Once the Gerrit directory has been copied over and verified, click the Complete All button on the Git MultiSite screen. Both helper and new node will now come out of read-only mode. They'll now being to resync with any git/gerrit activity that occured during the procedure.

Helper Node - Complete All
3.8 Start Gerrit on new node
We need to update Gerrit to account for Git MultiSite. Run the Gerrit integration installer in the Gerrit
./installer.sh
The installation will proceed in the say manner as with the original Gerrit integration. However, we've already completed the sync of the repository data so the net steps differ slighly from what is described on screen. You do not have to run the sync_repo.sh script. The repositories are already known to Gerrit because you copied that config data in the previous step.
Open a terminal window to the new node and start the gerrit service, e.g.
~/gerrit/bin/gerrit start
The new node should be up and running. Open the Gerrit UI and verify that all replicated repositories are present in the 'Projects' list.
4. Selective replication
Selective replication enables you to choose certain repositories to exist at some server nodes and not others:
- Choose a GitMS replication group where all repositories that are not classified should go (unless you want an error).
- Create and maintain a configuration file that specifies a series of wildcard, replication group UUID pairs.
Note: To get the replication group UUIDs, you can go to the GitMS UI and click the REPLICATION GROUPS tab, then click Show UUI on a node. With a simple select copy, you can then create the regex configuration file. See UUID capture options.
Gerrit requires certain repositories, such as All-Projects, in order to function correctly.
If selective replication is enabled, you must ensure that the replication group the All-Projects repo belongs to spans all Gerrit nodes. Any Gerrit node without a copy of All-Projects will fail to function.4.1 Catch-all configuration
In large deployments you might want to integrate Gerrit with only a subset of your replicated repositories, or maybe for separate Gerrit instances to manage different groups of repositories. Selective replication requires additional configuration. Use this procedure, explicitly using gerrit.rpgroupid, if the regex file does not have a wildcard pattern that matches the repository you want to create.
Note: Do not configure if you want a failure if the regex file does not match the repository/project to be created.
- Follow the installation procedure to create a replication group.
- After adding all nodes to the "all projects" replication group, create additional replication groups that can be used for replicating certain repositories between different locations.
Example:
In a 5-node deployment:- Create replication group GroupA, adding nodes 1, 2, and 3.
- Create replication group GroupB, adding nodes 3, 4, and 5.
This creates two separate groups of nodes that replicate repositories and integrate with Gerrit independently. Note that Node 3 is a member of both groups and therefore hosts both sets of replicated repositories and will have visibility of all Gerrit reviews that are created.
- Having created and populated your two additional replication groups, capture their UUIDs. Either:
- Via the GitMS UI, click REPLICATION GROUPS and click Show UUI on a node.
- Use the API on one of the nodes in each of the new replication groups:
curl -u admin:pass http://<IP-ADDRESS>:8082/api/replication-groups
- Via the GitMS UI, click REPLICATION GROUPS and click Show UUI on a node.
- On each node, create a backup copy and then edit the
application.propertiesfile so that the propertygerrit.rpgroupidmatches with the appropriate replication group. In the example deployment nodes 1, 2 and 3 would have thegerrit.rpgroupidfor GroupA. - When the gerrit.rpgroupid is set on all nodes, restart Git MultiSite on all nodes.
- Following the restart:
- Each replication group will replicate separately.
- New repositories will automatically added only to the nodes in the local replication group (e.g. a repository on node1 will be added to GroupA).
- Node 3, being in both replication groups will replicate everything. New repositories created on node 3 will be added to the replication group that is declared in the node's application.properties file.
- When you create a new repository in Gerrit, the name of the repository is taken as a parameter to decide in what replication group it should live. A list of regular expressions is matched against the name and the resulting rule is used to put the new repository in the right replication group.
4.2 Regex file configuration
The regex file is used to specify a wildcard to be matched against a Gerrit project path as it is being created, in order to select the replication group where it is automatically placed. The matching starts from the top of the file and proceeds downwards until a match is made. If no match is made, either:
- The catch-all is selected if configured as described.
- An error message is generated and the project creation fails.
These regex rules are only applied to repository deployments through the Gerrit-specific deploy endpoint.
Therefore, they are not applied to repositories that are deployed through the standard GitMS mechanisms.The regex format contains two matchers:
- * is a wildcard for any valid sequence of characters that can be part of a file path. This wildcard does not pass directory boundaries however, so only matches within the current directory.
- ** is similar to * except that the directory boundary restriction does not apply.
Note: All matching is case sensitive.
Wildcard atom definitions are:
- *
- Matches any single directory entry
- Does not match past a / in either direction
- *<suffix>
- Matches any single directory entry ending in exactly *<suffix>
- Does not match past a single / in either direction
- <prefix>*
- Matches any single directory entry starting in exactly <prefix>*
- Does not match past a single / in either direction
- <prefix>*<suffix>
- Matches any single directory entry starting in exactly <prefix> and ending in exactly <suffix> with zero or more characters between them
- Does not match past a single / in either direction
- **
- Matches zero or more directory entries
- Matches past one or more / in either direction
You can use wildcard atoms freely in combination with each other, separated by a single / character. The entire sequence of atoms must match or there is no match.
Note these additional constraints:
- Matching is done from top to bottom of the list configured by the administrator.
- First match takes precedence.
- Used alone, ** matches everything, so, it should be the last entry in the list.
The specification should be done via a config file. This is an example regex configuration file:
# Lines starting with '#' are treated as comments

  # RG1: 0000-0000-0000-0001
  # RG2: 0000-0000-0000-0002
  # RG3 0000-0000-0000-0003
  # RG4: 0000-0000-0000-0004

  team1/* => 0000-0000-0000-0001
  team2/* => 0000-0000-0000-0002
  * => 0000-0000-0000-0003
  ** => 0000-0000-0000-0004
In this example, repositories are treated as follows:
team1/repo1 - deployed to RG1
team2/repo2 - deployed to RG2


team2/subdir/repo3 - deployed to RG4. This is because 'team2/*' does not pass the directory boundary
repo4 - deployed to RG3.
subdir/another_subdir/test/repo5 - deployed to RG4
4.3 Configure the regex file into GitMS
You can put the regex configuration file anywhere on the system, as long as it is readable by the user running the GitMS service.
To enable the regex matching, you must update the application.properties file with the property gerrit.rpgroup.regex set to the full path of the regex file. After you change this property to point to a new file location, you must restart the GitMS service on that node. Changes to the regex file are detected automatically by the replicator so modifications to its contents should not require a restart of GitMS or Gerrit. However, updates should be done atomically. I.e. the next version of the file should be renamed into place over the current version. This means that the file is always complete whenever GitMS decides to re-read it.
4.3.1 Regex file monitoring messages
When GitMS system is initialised with GerritMS enabled, a File Monitor is started. This detects changes to the file specified against the gerrit.rpgroup.regex property in the application.properties file.
You can see the File Monitor messages in two main places:
- GitMS log files
- GitMS dashboard (for errors)
File Monitor initialisation messages are:
WARNING: The property gerrit.rpgroup.regex has been defined with the path: " + regexFilePath + ", but this file does not exist
- File Not Found. The file monitor has not been started.
WARNING: The property gerrit.rpgroup.regex has been defined with the path: " + regexFilePath + ", but cannot be used as it is a directory.
- File is a Directory. The file monitor has not been started.
WARNING: The property gerrit.rpgroup.regex has been defined with the path: " + regexFilePath + ", but this file cannot be read.
- File not Readable for GitMS User. The file monitor is started. Therefore, to recover you can correct the file permissions and modify the file. The changes are then picked up by the file monitor.
WARNING: Failed to start selective replication configuration file monitor" + stackTrace
- Exception Occurs While Starting File Monitor.
INFO: Starting selective replication configuration file monitor./pre>
- Message Just Prior to Starting File Monitor.
Where the replication group file is updated, changes to the file should be detected automatically by a dedicated Regex File Listener within 10 seconds of the change occurring. Change events come in for CREATED, DELETED, and CHANGED. All these cause the replication group expressions to be reloaded.
INFO: RegexFileListener-1:[CREATED - Selective replication configuration created: " + regexFilePath + "]
- File created.
WARNING: RegexFileListener-1:[DELETED - Selective replication configuration removed: " + regexFilePath + "]"
  "WARNING: RegexFileListener-1:[The property gerrit.rpgroup.regex has been defined with the path: " + regexFilePath + ", but this file cannot be read.]
- File deleted. By deleting the selective replication regex file, the system will be reset to use the default replication group ID. In the case where the file has been deleted incorrectly, the file can be recreated, using the same file name, and the file monitor will recognise that the expected file is present again.
INFO: RegexFileListener-1:[CHANGED - Selective replication configuration updated: " + regexFilePath + "]
- File changed.
File loading messages are:
WARNING: Invalid regex defined: " + line
- Invalid Regex detected (invalid line)
WARNING: Failed to compile pattern: " + pattern + ", skipped adding regex for Selective Replication.
- Invalid Regex Detected (Pattern Compilation Error)
WARNING: Attempt to define the same regex multiple times, skipping second occurence: " + regex
- Duplicate Patterns Detected
ERROR: Error in reading regex file: " + regexFilePath + "." + stackTrace
- IO Exception while Reading File (File system issues or unforeseeable errors)
5. Troubleshooting
5.1 Logs
When dealing with errors or similar issues, you should view both Gerrit's and Git MultiSite's log files.
5.1.1 Gerrit logs
Error and warning messages from the server are automatically written to the log file under
<install-dir>/gerrit/etc/. This log file is automatically rotated daily (default: 12:00 midnight GMT). An external log cleaning service is required to manage historical log files.- audit.log
- audit events
- system.log
- INFO-level logging
- sshd.log
- logs connections to Gerrit's SSH port (not system shell SSH)
- *.gc.log
- information on garbage collector usage
Gerrit Documentation
For more information about error messages that Gerrit can send, Gerrit Code Review - Error Messages.5.2 Error messages in a replicated environment
Running Gerrit with Git MultiSite introduces a number of potential errors that are very unlikely to be seen on a single-server deployment:
User gets a 500 internal server error when attempting to view Gerrit
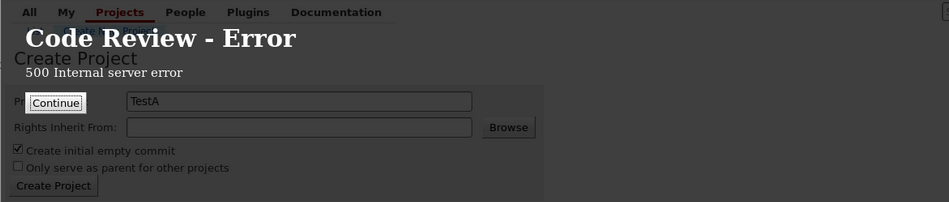
500 internal server error
The following issues can cause users to see the above 500 internal server error:
Create Project in Gerrit
- Local Node Down:
Gerrit Log file: View sample log message
Git MultiSite Log: No error is logged in the Git MultiSite Log file.
Recommended action: - Remote Node Down:
Gerrit Log file: View sample log message
Git MultiSite Log: No error is logged in the Git MultiSite Log file.
Recommended action: - Timeout
Gerrit log: View sample log message
Git MultiSite log: View sample log message
Recommended action:
Git Push to Gerrit-controlled repository
- Local Node Down
Git output:gitms ~/jgit-update-service/TestRepo $ git push origin master Counting objects: 3, done. Writing objects: 100% (3/3), 238 bytes | 0 bytes/s, done. Total 3 (delta 0), reused 0 (delta 0) remote: Processing changes: refs: 1, done To http://adminUser@localhost:4007/TestRepo ! [remote rejected] master -> master (lock error: Failure to replicate update. Output is: ) error: failed to push some refs to 'http://adminUser@localhost:4007/TestRepo'
Gerrit log: No error message in log
Git MultiSite Log: No error message in log Recommended action: - Content Distribution Fail
Git output:gitms ~/jgit-update-service/TestRepo $ git push origin master Counting objects: 3, done. Writing objects: 100% (3/3), 238 bytes | 0 bytes/s, done. Total 3 (delta 0), reused 0 (delta 0) remote: Processing changes: refs: 1, done To http://adminUser@localhost:4007/TestRepo ! [remote rejected] master -> master (lock error: Failure to replicate update. Output is: GitMS - minimum number of learners not available ) error: failed to push some refs to 'http://adminUser@localhost:4007/TestRepo'
Gerrit log: No error message in log
Git MultiSite log: View sample log message Recommended action: - No Quorum
Git log:gitms ~/jgit-update-service/TestRepo $ git push origin master Counting objects: 5, done. Delta compression using up to 2 threads. Compressing objects: 100% (3/3), done. Writing objects: 100% (5/5), 444 bytes | 0 bytes/s, done. Total 5 (delta 0), reused 0 (delta 0) remote: Processing changes: refs: 1, done To http://adminUser@localhost:4007/TestRepo ! [remote rejected] master -> master (lock error: Failure to replicate update. Output is: GitMS Error: Quorum not available. ) error: failed to push some refs to 'http://adminUser@localhost:4007/TestRepo'
Gerrit log: no error message in log
Git MultiSite log: View sample log message Recommended action:
Create Review
- Local Node Down
Git output:gitms ~/jgit-update-service/TestRepo $ git push origin HEAD:refs/for/master Counting objects: 2, done. Delta compression using up to 2 threads. Compressing objects: 100% (2/2), done. Writing objects: 100% (2/2), 277 bytes | 0 bytes/s, done. Total 2 (delta 0), reused 0 (delta 0) remote: Processing changes: refs: 2, done To http://adminUser@localhost:4007/TestRepo ! [remote rejected] HEAD -> refs/for/master (Unable to create changes: REJECTED_OTHER_REASON lock error: Failure to replicate update. Output is:) error: failed to push some refs to 'http://adminUser@localhost:4007/TestRepo'
Gerrit log: View sample log message
Git MiultiSite log: no log output
Recommended action: - No Quorum
Git output:gitms ~/jgit-update-service/TestRepo $ git push origin HEAD:refs/for/master Counting objects: 2, done. Delta compression using up to 2 threads. Compressing objects: 100% (2/2), done. Writing objects: 100% (2/2), 277 bytes | 0 bytes/s, done. Total 2 (delta 0), reused 0 (delta 0) remote: Processing changes: refs: 2, done To http://adminUser@localhost:4007/TestRepo ! [remote rejected] HEAD -> refs/for/master (Unable to create changes: REJECTED_OTHER_REASON lock error: Failure to replicate update. Output is: GitMS - minimum number of learners not available) error: failed to push some refs to 'http://adminUser@localhost:4007/TestRepo'
Gerrit log: View sample log message
Git MultiSite log: View sample log message
Recommended action:
User gets a Merge Review Error
Merge Review Error
- Local Node Down
Gerrit log: View sample log message
Git MultiSite log: no log output
Recommended action: - No Quorum
Merge Review Error - no quorum
Gerrit log: View sample log message
Git MultiSite log:View sample log message
Recommended action:
Create Branch
- Local Node Down
Gerrit log:View sample log message
Git MultiSite log: no log message
Recommended action: - No Quorum
Gerrit log: View sample log message
Git MiultiSite log:View sample log message
Recommended action:
Delete Branch
- Local Node Down
Gerrit log:View sample log message
Git MultiSite log: no log message
Recommended action: - No Quorum
Gerrit log: View sample log message
Git MiultiSite log:View sample log message
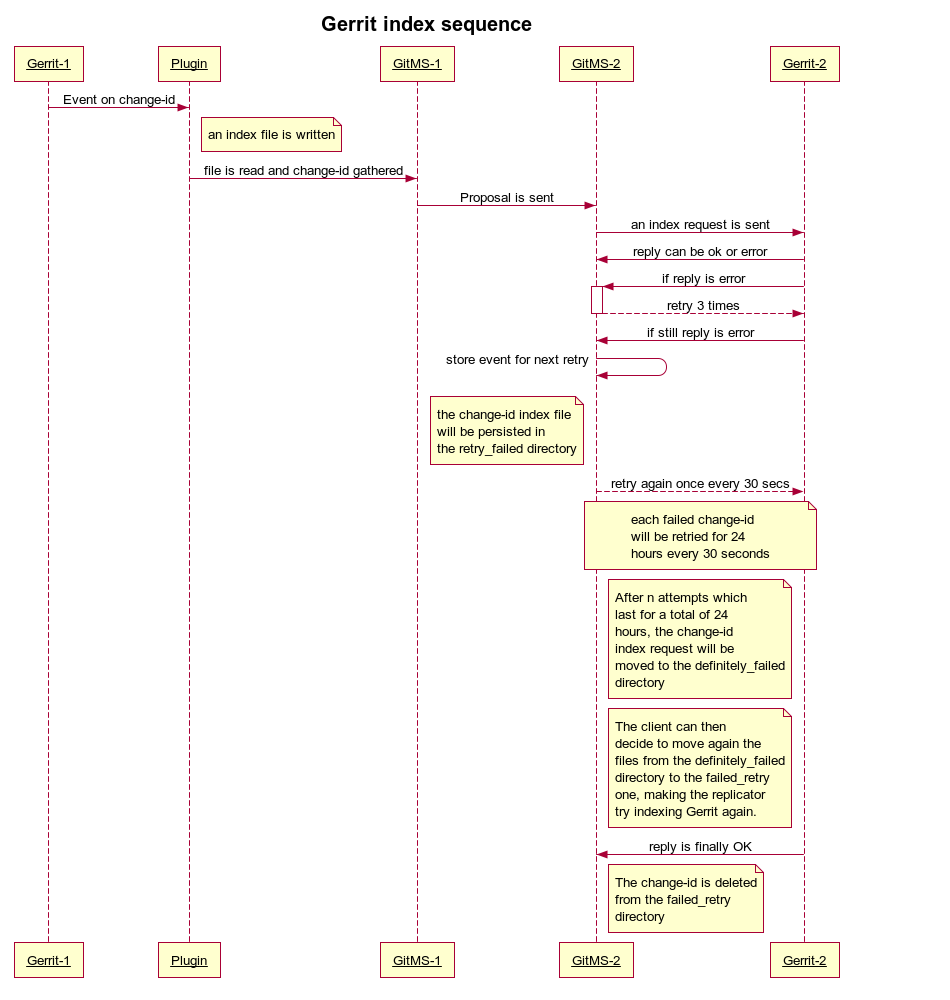
Recommended action: - Gerrit detects a change and an index file is created.
- The file is read and change-id is gathered.
- The local instance of Git MultiSite sends a proposal for the index file to be replicated to the other nodes.
- Now, an index request is sent, where the reply is OK, or an error can occur. If an error does occur then the process will retry the sending of the proposal 3 times.
- After the 3rd failed retry the proposal is stored in a
retry_faileddirectory, by default you'll find the directory in the gerrit-events directory, located (by default) in the same location as the Gerrit installation, e.g.[root@daily-gerrit-static-1 wandisco]# ls -l total 28 drwxr-xr-x 13 wandisco wandisco 4096 Dec 8 07:31 gerrit drwxr-xr-x 5 wandisco wandisco 4096 Dec 8 07:42 gerrit_events drwxr-xr-x 2 wandisco wandisco 4096 Dec 8 07:42 failed_definitely drwxr-xr-x 2 wandisco wandisco 4096 Dec 8 07:42 failed_retry drwxr-xr-x 2 wandisco wandisco 4096 Dec 8 07:42 gen_events drwxr-xr-x 2 wandisco wandisco 4096 Dec 8 07:40 gerrit-ms drwxrwxr-x 2 wandisco wandisco 4096 Dec 8 07:29 git drwxrwxr-x 4 wandisco wandisco 4096 Dec 8 07:29 keys drwxrwxr-x 2 wandisco wandisco 4096 Dec 8 07:29 misc drwxrwxr-x 2 wandisco wandisco 4096 Dec 8 07:29 toolsChange-ids stored in this directory are retried every 30 seconds for the next 24 hours. - Should a change-id not succeed during the 24 hours it will then be moved to the
definitely_faileddirectory. - The client may elect to push these definitely failed change-ids back out for a retry.
- A failed change-id that eventually succeeds is deleted from the failed_retry diretory. As and when the proposal is accepted, the reindexing will proceed.
5.3 Gerrit ACL rules and potential issues with ordering
Gerrit has the concept of storing the ACL rules in both parent repositories and a meta references within a repository itself. WANdisco's replication system guarantees ordered writes on a repository by repository level, so when ACL rules for a particular repository is defined in a "parent" repository, the ordering of operations between repositories can't be guarenteed, as each repository is its own distributed state machine.
Example: You could change a rule on a parent repository that impacts a child repository at the time when someone attempts to push something that would be rejected by that rule change. In a scenario where there is moderate network latency it is possible that the push would go through in spite of the just-added proscriptive rule.
So, rule updates on remotes are not applied immediately when applied to parent repositories. If a rule has to be changed on a repository and MUST apply immediately, the correct approach is to edit that individual repository ACL instead of the parent.
5.4 Garbage collection
Gerrit has its own garbage collection command to free up system resources by removing objects that are no longer required by Gerrit.
Setting up garbage collection
It's good practice to incorporate an automatically scheduled garbage collection using this command. How frequently you need to run garbage collection will depend on several factors including the size of the repositories and the load on the system. Gerrit lets you have default and project-level gc parameters, so you can tune garbage collection on a per-repository basis.
Running gc through SSH
This is a way to run gerrit garbage collection through the SSH interface. e.g.:
ssh -p 29418 adminUser@dger01.qava.wandisco.com 'gerrit gc' --all --show-progress
A password will be requested. This will be applied to all repositories. You can leaving off the --show-progress to perform the command without an output.
Read more about Gerrit's Garbage Collection command in the Gerrit's own documentation. See the gerrit gc page - https://gerrit-review.googlesource.com/Documentation/cmd-gc.html
5.5 Unauthorized proposal logging caused by password conflict
The following unauthorized proposal error doesn't offer many clues to its cause.
2014-11-17 18:53:06 INFO [RestCaller:handle] - Thread-151:[com.wandisco.gitms.repository.handlers.GerritUpdateIndexProposalHandler:
output=Unauthorized]
2014-11-17 18:53:29 INFO [NodeEventHandler:handle] - 993753a9-6e7b-11e4-b352-080027776fdc:[Received node event,
Unknown macro: {Node}
Cause: Git MultiSite stores a default username and password in its application.properties file.
e.g.
gerrit.enabled=true
gerrit.rpgroupid=0683d2fc-6e7c-11e4-9956-080027a5ec28
gerrit.repo.home=/home/wandisco/gerrit/git
gerrit.username=admin
gerrit.password=pass
gerrit.events.basepath=/home/wandisco/gerrit_events
gerrit.root=/home/wandisco/gerrit
Changing the user password via Gerrit's settings screen (shown below) can result in the stated error. Ensure that passwords are matched to fix the problem. Note that

Changing the gerrit password in settings can conflict with Git MultiSite's stored password.
5.6 Code Review Error - 400 Invalid revision "HEAD"
If you try to create a branch of a Git MultiSite repository which has not had any commits made to it, then you see the following error message:

No commits on a new branch results in this error.
Cause:
When creating a branch through Gerrit UI there will be no initial commit from which to branch off.
Recommended Action:
The error will disapear after the first commit has been made.
5.7 Reindex process
Below is a diagram that shows how Gerrit's reindexing system runs. In most cases this system will run without intervention, however, in the event of a persistent reindexing failure, the administrator may need to get involved in order to fix an underlying problem or to trigger a retry.
Gerrit's reindexing sequence