This section will run through the installation of WD Fusion from the initial steps where we make sure that your existing environment is compatible, through the procedure for installing the necessary components and then finally configuration.
We'll start with a quick overview of this installation guide so that you can seen what's coming or quickly find the part that you want:
From version 2.2, WD Fusion comes with an installer package
WD Fusion now has a unified installation package that installs all of WD Fusion's components (WD Fusion server, IHC servers and WD Fusion UI).The installer greatly simplifies installation as it handles all the components you need and does a lot of configuration in the background. However, if you need more control over the installation, you can use the orchestration script, instead. See the Orchestrated Installation Guide.
Sample Orchestration mydefines.sh file.
This section describes hardware requirements for deploying Hadoop using WD Fusion. These are guidelines that provide a starting point for setting up data replication between your Hadoop clusters.
Glossary
We'll be using terms that relate to the Hadoop ecosystem, WD Fusion and WANdisco's DconE replication technology. If you encounter any unfamiliar terms checkout out the Glossary.
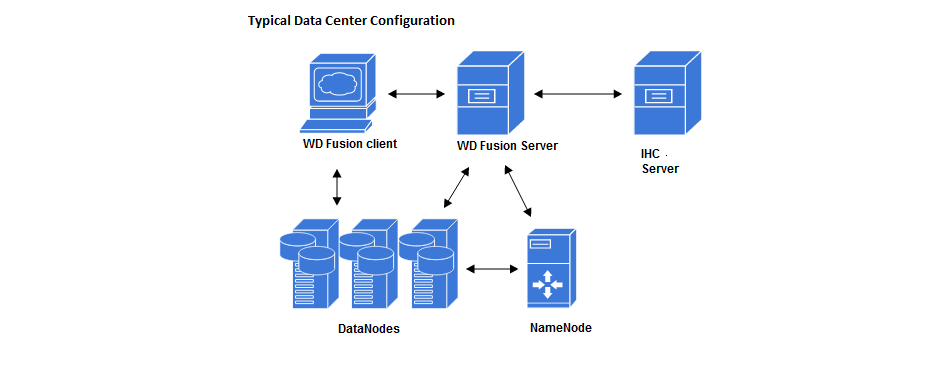
Example WD Fusion Data Center Deployment.
WD Fusion servers can co-located with IHC servers
Providing that a server has sufficient resources, it is possible to co-locate your WD Fusion server with the IHC servers.
WD Fusion servers must not be co-located with HDFS servers (DataNodes, etc)
HDFS's default block placement policy dictates that if a client is co-located on a DataNode, then that co-located DataNode will receive 1 block of whatever file is being put into HDFS from that client. This means that if the WD Fusion Server (where all transfers go through) is co-located on a DataNode, then all incoming transfers will place 1 block onto that DataNode. In which case the DataNode is likely to consumes lots of disk space in a transfer-heavy cluster, potentially forcing the WD Fusion Server to shut down in order to keep the Prevaylers from getting corrupted.
The following guidelines apply to both the WD Fusion server and for separate IHC servers. We recommend that you deploy on physical hardware rather than on a virtual platform, however, there are no reasons why you can't deploy on a virtual environment.
If you plan to locate both the WD Fusion and IHC servers on the same machine then check the Collocated Server requirements:
| CPUs: | Small WD Fusion server deployment : 8 cores Large WD Fusion server deployment: : 16 cores Architecture: 64-bit only. |
| System memory: | There are no special memory requirements, except for the need to support a high throughput of data:
Type: Use ECC RAM Size: Recommended 64 GB recommended (minimum of 16 GB) Small WD Fusion server Deployment: 32GB Large WD Fusion server deployment: 128GB System memory requirements are matched to the expected cluster size and should take into account the number of files and block size. The more RAM you have, the bigger the supported file system, or the smaller the block size. Collocation of WD Fusion/IHC servers |
| Storage space: | Type: Hadoop operations are storage-heavy and disk-intensive so we strongly recommend that you use enterprise-class Solid State Drives (SSDs). Size: Recommended: 1 TB Minimum: You need at least 500 GB of disk space for a production environment. |
| Network | Connectivity: Minimum 1Gb Ethernet between local nodes. Small WANdisco Fusion server: 2Gbps Large WANdisco Fusion server: 4x10 Gbps (cross-rack) TCP Port Allocation: Two ports are required for deployment of WD Fusion: DConE port: (default 8082) IHC ports: (7000 range for command ports) (8000 range for HTTP) HTTP interface: (default 50070) is re-used from the stand-alone Hadoop NameNode Web UI interface: (default 8083) |
| Operating systems: |
|
| Web browsers: |
|
| Java: | Hadoop requires Java JRE 1.7. It is built and tested on Oracle's version of Java Runtime Environment. We have now added support for Open JDK 7, although we recommend running with Oracle's Java as it has undergone more testing. Architecture: 64-bit only Heap size: Set Java Heap Size of to a minimum of 1Gigabytes, or the maximum available memory on your server. Use a fixed heap size. Give -Xminf and -Xmaxf the same value. Make this as large as your server can support. Avoid Java defaults. Ensure that garbage collection will run in an orderly manner. Configure NewSize and MaxNewSize Use 1/10 to 1/5 of Max Heap size for JVMs larger than 4GB. Stay deterministic! Where's Java? Ensure that you set the JAVA_HOME environment variable for the root user on all nodes. Remember that, on some systems, invoking sudo strips environmental variables, so you may need to add the JAVA_HOME to Sudo's list of preserved variables. |
| File descriptor/Maximum number of processes limit: | Maximum User Processes and Open Files limits are low by default on some systems. It is possible to check their value with the ulimit or limit command:
ulimit -u && ulimit -n
-u The maximum number of processes available to a single user. For optimal performance, we recommend both hard and soft limits values to be set to 64000 or more: RHEL6 and later: A file /etc/security/limits.d/90-nproc.conf explicitly overrides the settings in security.conf, i.e.:
      # Default limit for number of user's processes to prevent
      # accidental fork bombs.
      # See rhbz #432903 for reasoning.
      * soft nproc 1024 <- Increase this limit or ulimit -u will be reset to 1024
Ambari/Pivotal HD and Cloudera manager will set various ulimit entries, you must ensure hard and soft limits are set to 64000 or higher. Check with the ulimit or limit command. If the limit is exceeded the JVM will throw an error: java.lang.OutOfMemoryError: unable to create new native thread.
|
| Additional requirements: | passwordless ssh If you plan to set up the cluster using the supplied WD Fusion orchestration script you must be able to establish secure shell connections without using a passphrase. KB Security Enhanced (SE) Linux You need to disable Security-Enhanced Linux (SELinux) for the installation to ensure that it doesn't block activity that's necessary to complete the installation. Disable SELinux on all nodes, then reboot them: sudo vi /etc/sysconfig/selinuxSet SELINUX to the following value: SELINUX=disabled iptables Disable iptables. $ sudo chkconfig iptables offReboot. When the installation is complete you can re-enable iptables using the corresponding command: sudo chkconfig iptables on Comment out requiretty in /etc/sudoersThe installer's use of sudo won't work with some linux distributions (CentOS where /etc/sudoer sets enables requiretty, where sudo can only be invoked from a logged in terminal session, not through cron or a bash script. When enabled the installer will fail with an error:
execution refused with "sorry, you must have a tty to run sudo" messageEnsure that requiretty is commented out: # Defaults requiretty |
This table shows the versions of Hadoop and Java that we currently support:
| Distribution: | Console: | JRE: |
| Apache Hadoop 2.5.0 | Oracle JDK 1.7_45 64-bit | |
| HDP 2.1 / 2.2 / 2.3 | Ambari 1.6.1 / 1.7 / 2.1 Support for EMC Isilon 7.2.0.1 and 7.2.0.2 |
Oracle JDK 1.7_45 64-bit |
| CDH 5.2.0/5.3.0/5.4 | Cloudera Manager 5.3.2 Support for EMC Isilon 7.2.0.1 and 7.2.0.2 |
Oracle JDK 1.7_45 64-bit |
| Pivotal HD 3.0 | Ambari 1.6.1 / 1.7 |
Oracle JDK 1.7_45 64-bit |
We'll now look at what you should know and do as you begin the installation.
The time required to complete a deployment of WD Fusion will in part be based on its size, larger deployments with more nodes and more complex replication rules will take correspondingly more time to set up. Use the guide below to help you plan for for deployments.
Of course, this is a guideline to help you plan your deployment. You should think ahead and determine if there are additional steps or requirements introduced by your organization's specific needs.
See the deployment checklist for a list of the TCP ports that need to be open for WD Fusion.
The following guide runs through what you need to do to correctly configure a WD Fusion deployment if the nodes are running with multiple network interfaces.
/etc/wandisco/fusion/server/ihcList
/etc/wandisco/ihc/*.ihc files to zone1 Fusion-Server /etc/wandisco/server/ihcList
/etc/wandisco/ihc/*.ihc files to zone2 Fusion-Server /etc/wandisco/server/ihcListIf you are running Kerberos on your cluster you should consider the following requirements:
/etc/hadoop/conf/fusion.keytabBefore running the installer on a platform that is secured by Kerberos, you'll need run through the following steps: Setting up Kerberos.
The following instructions apply to manual or orchestration script-based installation. If you install WD Fusion using the installer script, Kerberos settings are, from Version 2.5.2, handled in the installer.
Make the following changes to WD Fusion's UI element to enable it to interact with a Kerberized environment:
ui.properties configuration file:
client.core.site=/etc/hadoop/conf/core-site.xml
client.hdfs.site=/etc/hadoop/conf/hdfs-site.xml/opt/wandisco/fusion-ui-server/properties/ui.properties):
kerberos.enabled=true
kerberos.generated.config.path=/opt/wandisco/fusion-ui-server/properties/kerberos.cfg
kerberos.keytab.path=/etc/hadoop/conf/fusion.keytab
kerberos.principal=/${hostname}@${krb_realm}primary/instance@realm.core-site.xml on the NameNode(s).<property>
<name>hadoop.proxyuser.$USERNAME.hosts</name>
<value>*</value>
</property>
<property>
<name>hadoop.proxyuser.$USERNAME.groups</name>
<value>*</value>
</property>
hdfs". From Version 2.6 these values are captured by the installer and can apply these values automatically.Before you start the installation you must ensure that there are no existing WD Fusion installations or WD Fusion components installed on your elected machines. If you are about to upgrade to a new version of WD Fusion you must first make sure that you run through the removal instructions provided in the Appendix - Cleanup WD Fusion.
You need to match WANdisco's WD Fusion installer file to each data center's version of Hadoop. Installing the wrong version of WD Fusion will result in the IHC servers being misconfigured.
After completing an evaulation deployment, you will need to contact WANdisco about getting a license file for your moving your deployment into production.
Below is the procedure for getting set up with the installer. Running the installer only takes a few minutes while you enter the neccessary settings, however, if you wish to handle installations without the need for a user having to manually enter the settings you can use the use the Silent Installer.
Listed below is the procedure that you should use for completing an installation using the installer file. This requires an administrator to enter details throughout the procedure. Alternatively, see Using the "Silent" Installer option to handle installation programatically.
chmod +x fusion-ui-server-<version>_rpm_installer.sh
sudo ./fusion-ui-server-<version>_rpm_installer.shVerifying archive integrity... All good.
Uncompressing WANdisco Fusion..............................
:: :: :: # # ## #### ###### # ##### ##### #####
:::: :::: ::: # # # # ## ## # # # # # # # # #
::::::::::: ::: # # # # # # # # # # # # # #
::::::::::::: ::: # # # # # # # # # # # ##### # # #
::::::::::: ::: # # # # # # # # # # # # # # #
:::: :::: ::: ## ## # ## # # # # # # # # # # #
:: :: :: # # ## # # # ###### # ##### ##### #####
Welcome to the WANdisco Fusion installation
You are about to install WANdisco Fusion version 2.4-206
Do you want to continue with the installation? (Y/n) y
Checking prerequisites:

Checking for perl: OK
Checking for java: OK

INFO: Using the following Memory settings:

INFO: -Xms128m -Xmx512m

Do you want to use these settings for the installation? (Y/n) y
Which port should the UI Server listen on? [8083]:
Please specify the appropriate backend from the list below:

[0] cdh-5.2.0
[1] cdh-5.3.0
[2] cdh-5.4.0
[3] hdp-2.1.0
[4] hdp-2.2.0
[5] hdp-2.3.0

Which fusion backend do you wish to use? 3
You chose hdp-2.2.0:2.6.0.2.2.0.0-2041
MapR/Pivotal availability
The MapR/PHD versions of Hadoop have been removed from the trial version of WD Fusion in order to reduce the size of the installer for most prospective customers. These versions are run by a small minority of customers, while their presence nearly doubled the size of the installer package. Contact WANdisco if you need to evaluate WD Fusion running with MapR or PHD.
Additional available packages
[1] mapr-4.0.1
[2] mapr-4.0.2
[3] mapr-4.1.0
[4] phd-3.0.0
MapR requirement
If you install into a MapR cluster then you need to assign the MapR superuser system account/group "mapr" if you need to run WD Fusion using the fusion:/// URI.
See the requirement for MapR Client Configuration.
We strongly advise against running Fusion as the root user.
For default HDFS setups, the user should be set to 'hdfs'. However, you should choose a user appropriate for running HDFS commands on your system.

Which user should Fusion run as? [hdfs]
Checking 'hdfs' ...
... 'hdfs' found.

Please choose an appropriate group for your system. By default HDP uses the 'hadoop' group.
Which group should Fusion run as? [hadoop]
Checking 'hadoop' ...
... 'hadoop' found.Installing with the following settings:
User and Group: hdfs:hadoop
Hostname: node04-example.host.com
Fusion Admin UI Listening on: 0.0.0.0:8083
Fusion Admin UI Minimum Memory: 128
Fusion Admin UI Maximum memory: 512
Platform: hdp-2.3.0 (2.7.1.2.3.0.0-2557)
Manager Type AMBARI
Manager Host and Port: :
Fusion Server Hostname and Port: node04-example.host.com:8082
SSL Enabled: false
Do you want to continue with the installation? (Y/n) yInstalling hdp-2.1.0 packages:
fusion-hdp-2.1.0-server-2.4_SNAPSHOT-1130.noarch.rpm ...
Done
fusion-hdp-2.1.0-ihc-server-2.4_SNAPSHOT-1130.noarch.rpm ...
Done
Installing fusion-ui-server package
Starting fusion-ui-server:[ OK ]
Checking if the GUI is listening on port 8083: .....Done
Please visit http://<YOUR-SERVER-ADDRESS>.com:8083/ to access the WANdisco Fusion

		If 'http://<YOUR-SERVER-ADDRESS>.com' is internal or not available from your browser, replace this with an externally available address to access it.

Installation Complete
[root@node05 opt]#
http://<YOUR-SERVER-ADDRESS>.com:8083/It's possible to enable High Availability in your WD Fusion cluster by adding additional WD Fusion/IHC servers to a zone. These additional nodes ensure that in the event of a system outage, there will remain sufficient WD Fusion/IHC servers running to maintain replication.
Add HA nodes to the cluster using the installer and choosing to Add to an existing Zone, using a new node name.
Configuration for High Availability
When setting up the configuration for a High Availability cluster, ensure that fs.defaultFS, located in the core-site.xml is not duplicated between zones. This property is used to determin if an operation is being executed locally or remotely, if two separate zones have the same default file system address, then problems will occur. WD Fusion should never see the same URI (Scheme + authority) for two different clusters.
Welcome.
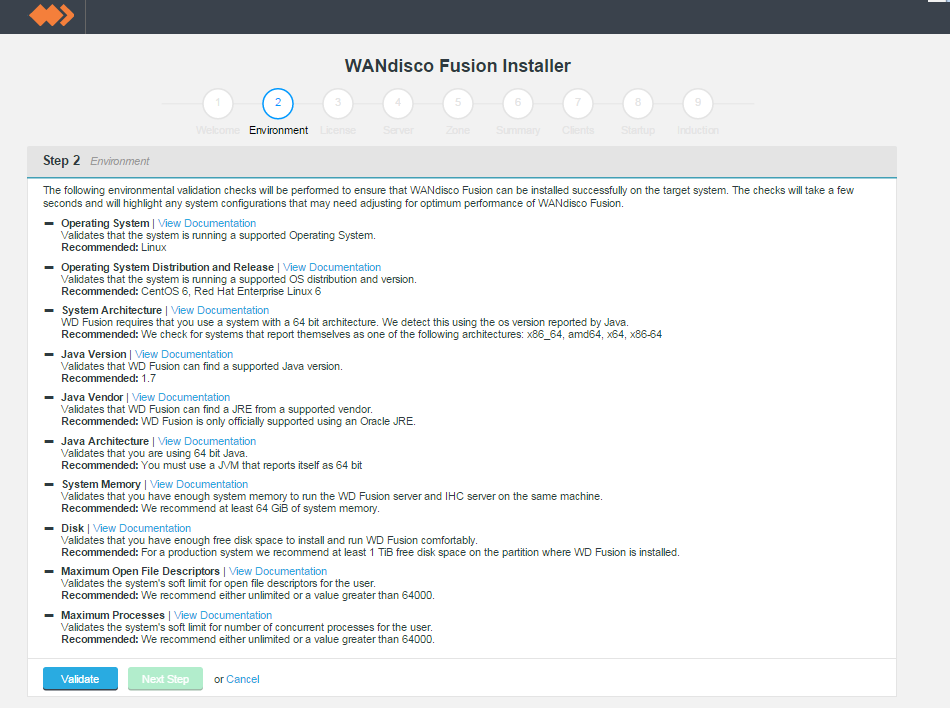
Environmental checks.
On clicking validate the installer will run through a series of checks of your system's hardware and software setup and warn you if any of WD Fusion's prerequisites are missing.

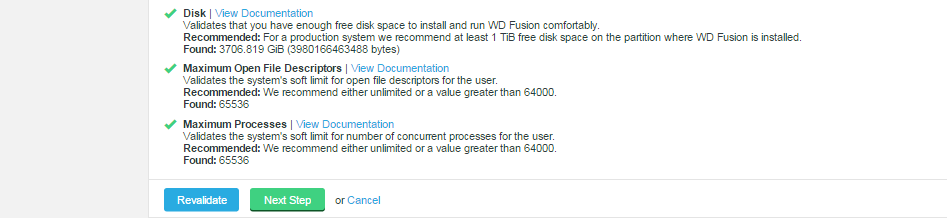
Example check results.
Any element that fails the check should be addressed before you continue the installation. Warnings may be ignored for the purposes of completing the installation, especially if the installation is only for evaluation purposes and not for production. However, when installing for production, you should also address all warnings, or at least take note of them and exercise due care if you continue the installation without resolving and revalidating.
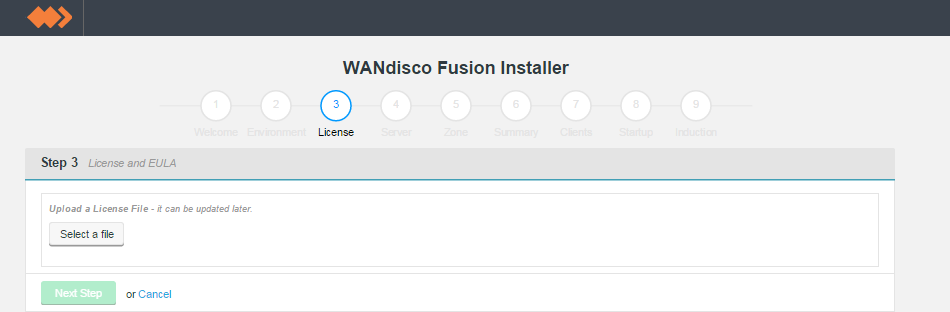
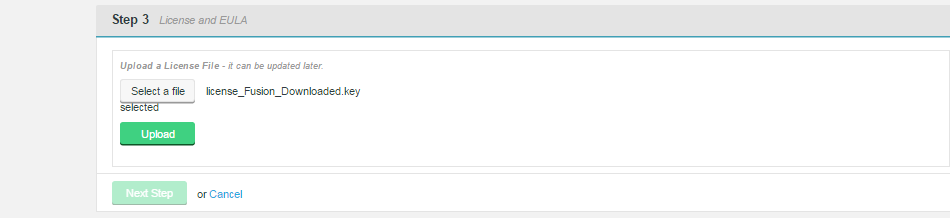
Upload your license file.
Verify license and agree to subscription agreement.
Next step.
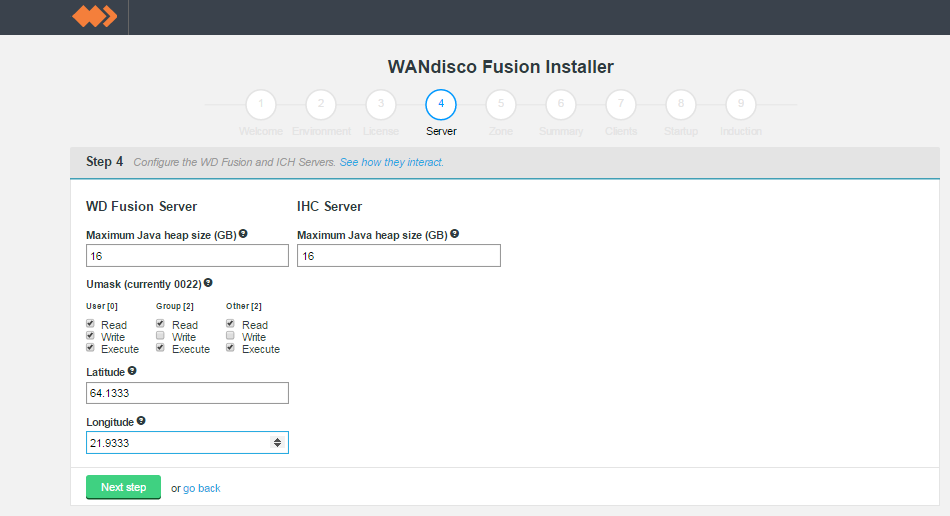
screen 4 - Server settings
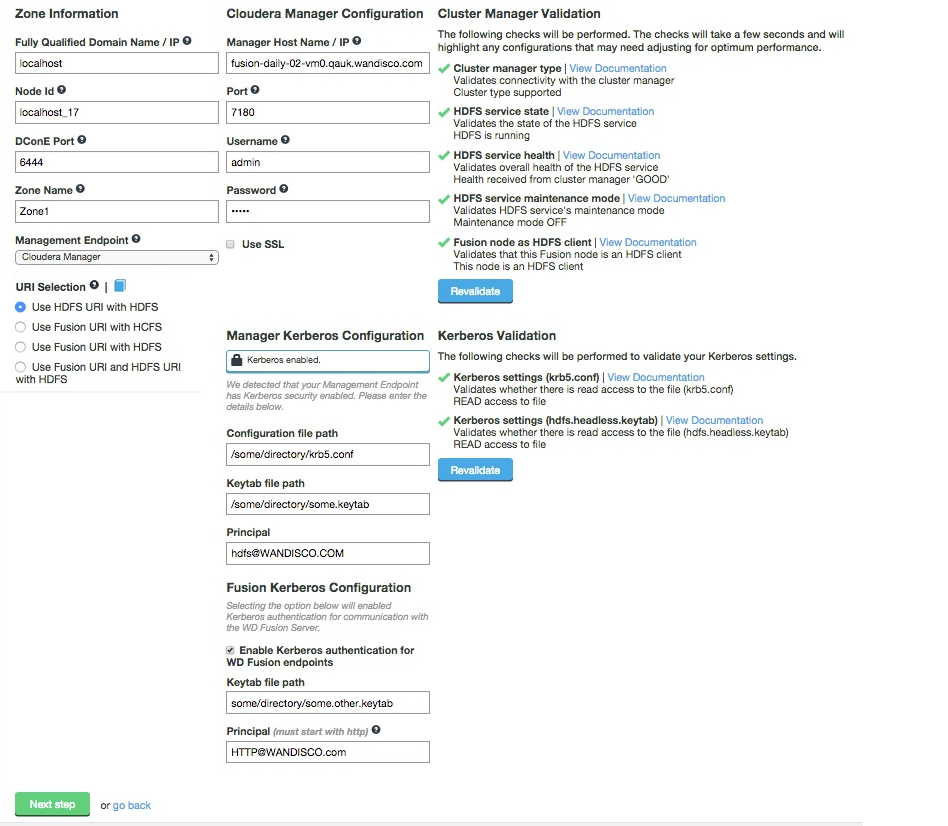
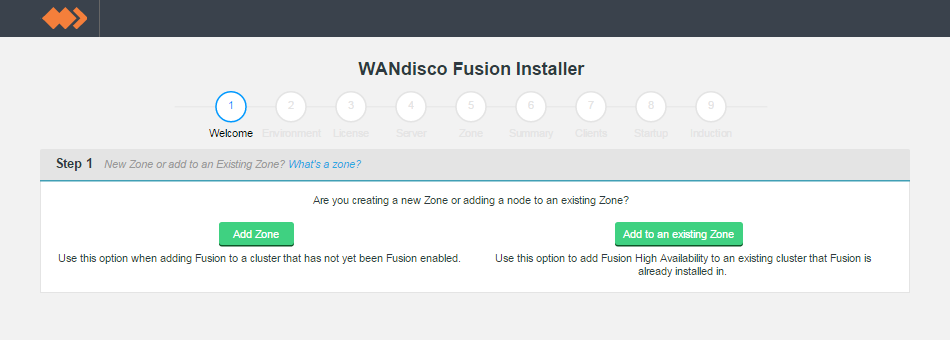
New Zone
Entry fields for zone properties
Known issue with Location names
You must use different Location names /Node IDs for each zone. If you use the same name for multiple zones then you will not be able to complete the induction between those nodes.
Only apply these options if you full understand what they do.
The following advanced options provide a number of low level configuration settings that may be required for installation into certain environments. The incorrect application of some of these settings could cause serious problems, so for this reason we strongly recommend that you discuss their use with WANdisco's support team before enabling them.
The default behavior for WD Fusion is to fix all replication to the Hadoop Distributed File System / hdfs:/// URI. Setting the hdfs-scheme provides the widest support for Hadoop client applications, so some applications can't support the available "fusion:///" URI or they can only run on HDFS. instead of the more lenient HCFS. Each option is explained below:

fusion:// uri to be used; only paths starting with hdfs:// or no scheme that correspond to a mapped path will be replicated. The underlying file system will be an instance of the HDFS DistributedFileSystem, which will support applications that aren't written to the HCFS specification.
fusion:// for all data that must be replicated over an instance of the Hadoop Compatible File System. If your deployment includes Hadoop applications that are either unable to support the Fusion URI or are not written to the HCFS specfication, this option will not work.

fusion://, hdfs:// and no scheme) and uses HDFS for the underlying file system, to support applications that aren't written to the HCFS specification.This section configures WD Fusion to interact with the management layer, which could be Ambari or Cloudera Manager, etc.
https in your Manager Host Name and Port. You may be prompted to update the port if you enable SSL but don't update from the default http port.In this step you also set the configuration for an existing Kerberos setup. If you are installing into a Kerberized cluster, include the following configuration.
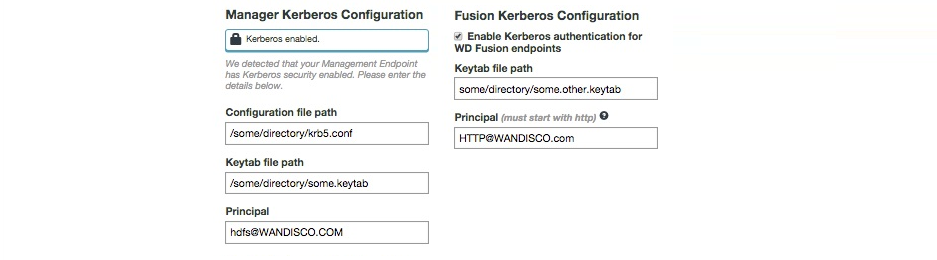
krb5.conf.your/etc/krb5.keytabHDFS@<REALM>Enabling Kerberos authentication on WD Fusion's REST API
When a user has enabled Kerberos-authentication on their REST API, they must kinit before making REST calls, and enable GSS-Negotiate authentication. To do this with curl, the user must include the "-negotiate" and "-u:" options, like so:
curl --negotiate -u: -X GET "http://${HOSTNAME}:8082/fusion/fs/transfers"
HTTP/<hostname>@<REALM>.See Setting up Kerberos for more information about Kerberos setup.
Zone information.
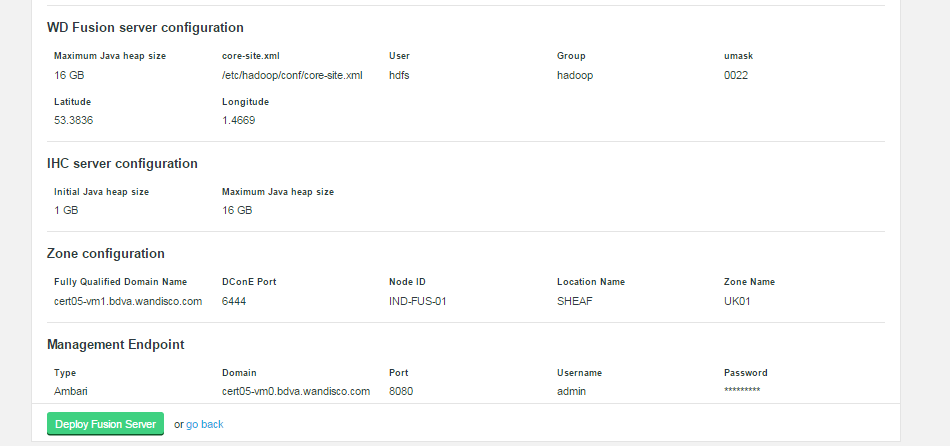
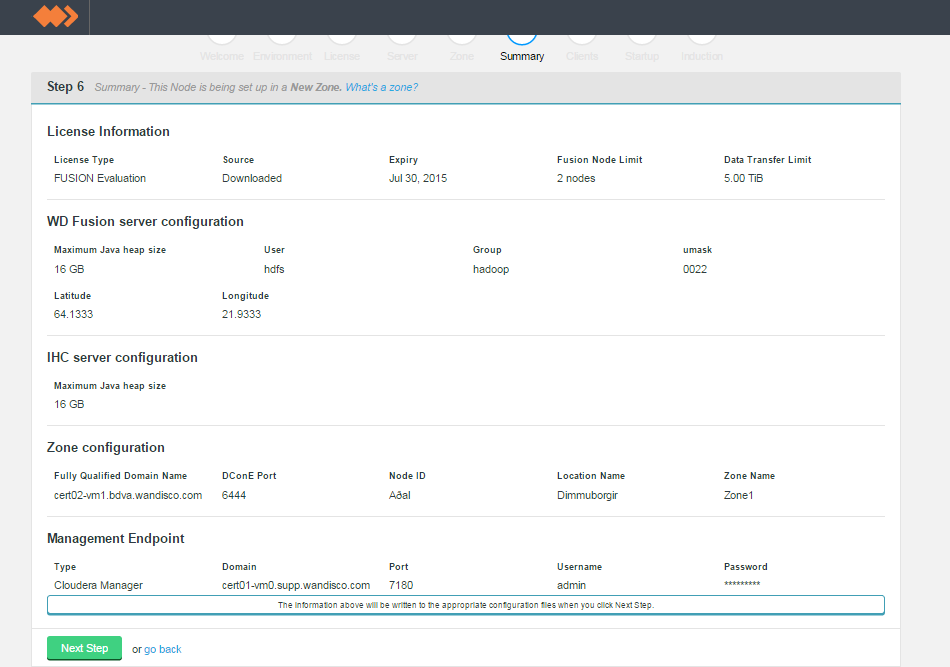
Summary
Once you are happy with the settings and all your WD Fusion clients are installed, click Deploy Fusion Server.
Client installations.
The installer supports three different packaging systems for installing Clients, regular RPMs, Parcels for Cloudera and HDP Stack for Hortonworks/Ambari.
Installing into MapR
If you are installing into a MapR cluster, use this default RPMs, detailed below. Fusion client installation with RPMs.
client nodes
By client nodes we mean any machine that is interacting with HDFS that you need to form part of WD Fusion's replicated system. If a node is not going to form part of the replicated system then it won't need the WD Fusion client installed. If you are hosting the WD Fusion UI package on a dedicated server, you don't need to install the WD Fusion client on it as the client is built into the WD Fusion UI package. Note that in this case the WD Fusion UI server would not be included in the list of participating client nodes.

Example clients list
For more information about doing a manual installation, see Fusion Client installation for regular RPMs.
To install with the Cloudera parcel file, see: Fusion Client installation with Parcels.
For Hortonwork's own proprietary packaging format: Fusion Client installation with HDP Stack.
Skip or start.
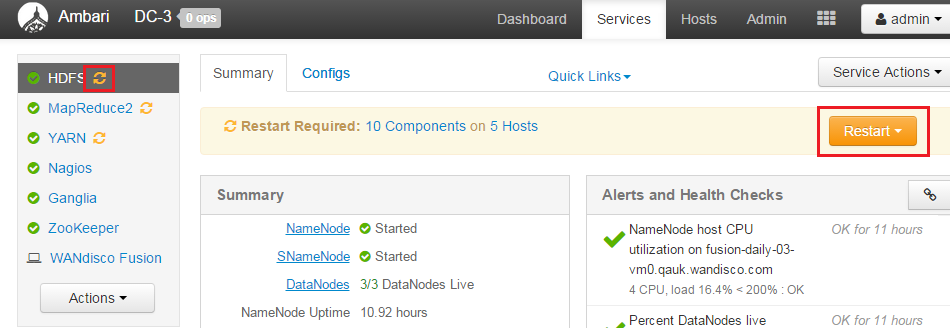
restart to refresh config
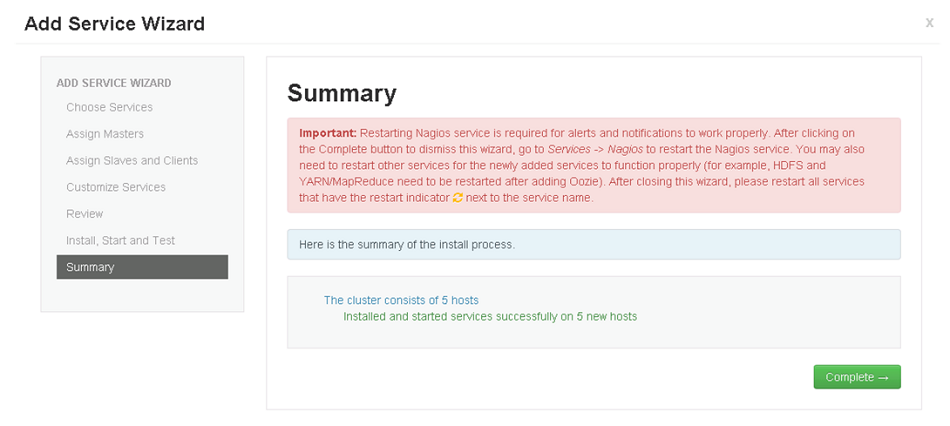
If you are running Ambari 1.7, you'll be prompted to confirm this is done.
Confirm that you have completed the restarts
Important! If you are installing on Ambari 1.7
Additionally, due to a bug in Ambari 1.7, before you can continue you must log into Ambari and complete a restart of HDFS, in order to re-apply WD Fusion's client configuration.
For the second and all subsequent WD Fusion nodes entered into a new or existing zone, you must complete the induction step. Enter the fully qualified domain name for the existing node, along with the WD Fusion server port (8082 by default). Click Start Induction.
Known issue with Location names
You must use different Location names /IDs for each zone. If you use the same name for multiple zones then you will not be able to complete the induction between those nodes.
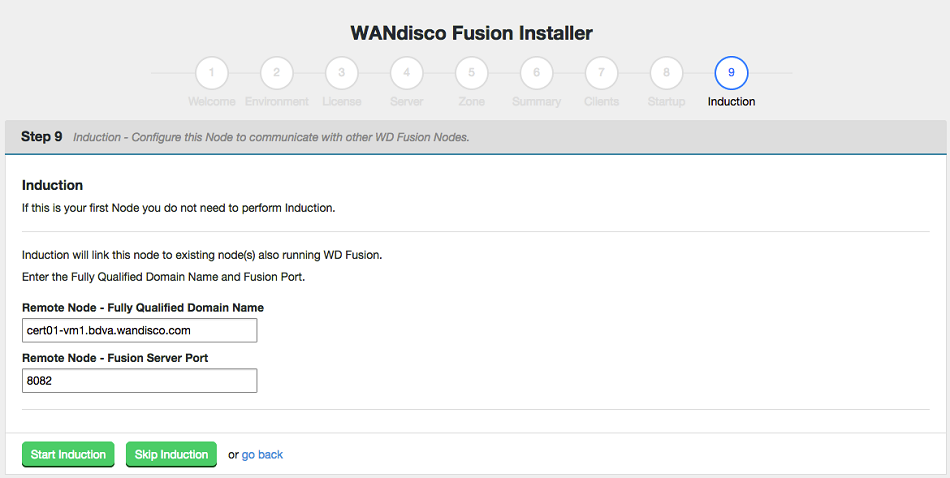
Induction.
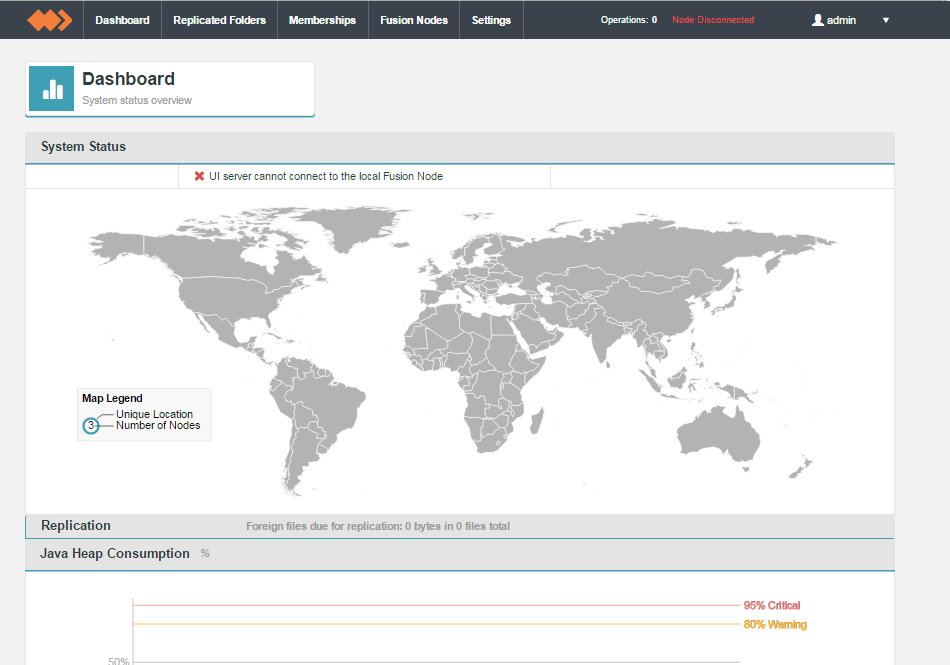
WD Fusion UI
Once WD Fusion has been installed on all data centers you can proceed with setting up replication on your HDFS file system. You should plan your requirements ahead of the installation, matching up your replication with your cluster to maximise performance and resilience. The next section will take a brief look at a example configuration and run through the necessary steps for setting up data replication between two data centers.

Example WD Fusion deployment in a 3 data center deployment.
In this example, each one of three data centers ingests data from it's own datasets, "Weblogs", "phone support" and "Twitter feed". An administrator can choose to replicate any or all of these data sets so that the data is replicated across any of the data centers where it will be available for compute activities by the whole cluster. The only change required to your Hadoop applications will be the addition of a replication specific URI. You can read more about adapting your Hadoop applications for replication.
The following steps are used to start replicating hdfs data. The detail of each step will depend on your cluster setup and your specific replication requirements, although the basic steps remain the same.
<property>
<name>dfs.client.block.write.replace-datanode-on-failure.best-effort</name>
<value>true</value>
</property>
dfs.client.block.write.replace-datanode-on-failure.best-effort to true, allowing the append to continue despite the inability to create the 3 block replicas. Note that his is not a recommended setting for clusters with more than 3 datanodes, as it may result in under replicated blocks. In this case the root cause of the errors should be identified and addressed - potentially a disk space issue could result in there not being sufficient datanodes having enough space to create the 3 replicas, resulting in the same symptoms.
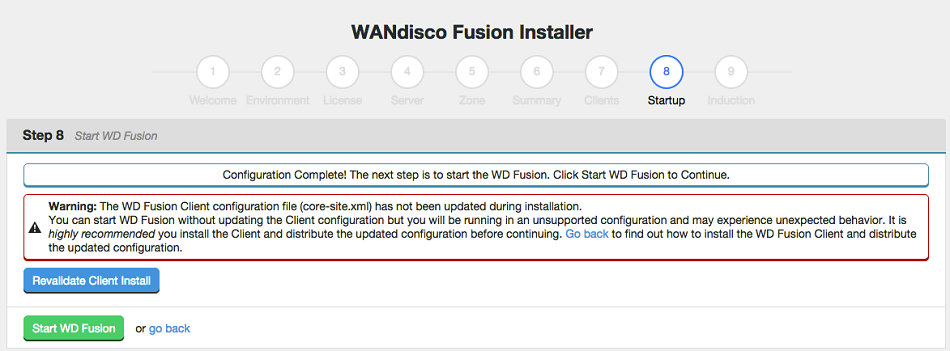
Currently the Installer doesn't work on a platform that is secured by Kerberos. If you run the installer on a platform that is running Kerberos then the WD Fusion and IHC servers will fail to start at the end of the installation. You can overcome this issue by completing the following procedure before you install WD Fusion: Setting up Kerberos.
The deployment section covers the final step in setting up a WD Fusion cluster, where supported Hadoop applications are plugged into WD Fusion's synchronized distributed namespace. It won't be possible to cover all the requirements for all the third-party software covered here, we strongly recommend that you get hold of the corresponding documenation for each Hadoop application before you work through these procedures.
This guide integrates WD Fusion with Apache Hive, it aims to accomplish the following goals:
The following requirements come into plqy if you are deploying WD Fusion using its native fusion:/// URI. In order to store a Hive table in WD Fusion you specify a WD Fusion URI when creating a table. E.g. consider creating a table called log that will be stored in a replicated directory.
CREATE TABLE log(requestline string) stored as textfile location 'fusion:///repl1/hive/log';
Hive from CDH 5.3/5.4 does not work with WD Fusion, as a result of HIVE-9991. The issue will be addressed once this fix for Hive is released.
This requires that modify the default Hive file system setting when using CDH 5.3 and 5.4. In Cloudera Manager, add the following property to hive-site.xml:
<property>
    <name>fs.defaultFS</name>
    <value>fusion:///</value>
</property>
This property should be added in 3 areas:
It's possible to configure Hive to use WD fusion URIs as output paths for storing data, to do this you must specify a fusion URI when writing data back to the underlying Hadoop-compatible file system (HCFS). For example, consider writing data out from a table called log to a file stored in a replicated directory:
INSERT OVERWRITE DIRECTORY 'fusion:///repl1/hive-out.csv' SELECT*FROMlog;
HDP 2.2
When running MapReduce jobs on HDP 2.2, you need to append the following entry to mapreduce.application.classpath in mapred-site.xml:
/usr/hdp/<hdp version>/hadoop-hdfs/lib/*
In this section we'll describe how to configure Hive to use fusion URIs as input paths for loading data.
It is not common to load data into a Hive table from a file using the fusion URI. When loading data into Hive from files the core-site.xml setting fs.default.name must also be set to fusion, which may not be desirable. It is much more common to load data from a local file using the LOCAL keyword:
LOAD DATA LOCAL INPATH '/tmp/log.csv' INTO TABLE log;If you do wish to use a fusion URI as a load path, you must change the
fs.defaultFS setting to use WD Fusion, as noted in a previous section. Then you may run:
LOAD DATA INPATH 'fusion:///repl1/log.csv' INTO TABLE log;
Advanced configuration - please contact WANdisco before attempting
In this section we'll describe how to share the Hive metastore between two clusters. Since WANdisco Fusion can replicate the file system that contains the Hive data storage, sharing the metadata presents a single logical view of Hive to users on both clusters.
When sharing the Hive metastore, note that Hive users on all clusters will know about all tables. If a table is not actually replicated, Hive users on other clusters will experience errors if they try to access that table.
There are two options available.
In this configuration, the Hive metastore is configured normally on one cluster. On other clusters, the metastore process points to a read-only copy of the metastore database. MySQL can be used in master-slave replication mode to provide the metastore.
In this configuration, the Hive metastore is writable on all clusters.
There are three strategies for replicating Hive metastore data with WD Fusion:
For Cloudera DCH: See Hive Metastore High Availability.
For Hortonworks/Ambari: High Availability for Hive Metastore.
In order to manually replicate metastore data ensure that the DDLs are placed on two clusters, and perform a partitions rescan.
Required configuration for running WD Fusion on a Hive-equipped cluster.
fs.defaultsFS property in hive-site.xml pointing to fusion:/// URI, while keeping scratchdirs pointing into the local HDFS, as described below. In this setup all tables will be created in Hive with the WD Fusion URI by default, however, replication of particular tables/databases could and should then be configured through the WD Fusion UI.
<property>
<name>fs.defaultFS</name>
<value>fusion:///</value>
</property>
<property>
<name>hive.exec.scratchdir</name>
<value>hdfs://dc1-cdh54-Cluster/tmp/hive-$
{user.name}</value>
</property>
<property>
<name>hive.exec.local.scratchdir</name>
<value>file:///tmp/${user.name}
</value>
</property>
Each node in an Oracle:BDA deployment has multiple network interfaces, with at least one used for intra-rack communications and one used for external communications. WD Fusion requires external communications so configuration using the public IP address is required instead of using host names.
Oracle:BDA is built on top of Cloudera's Hadoop and requires some extra steps to support multi-homed network environment.
communication.hostname=0.0.0.0Resave the file
tree /etc/wandisco
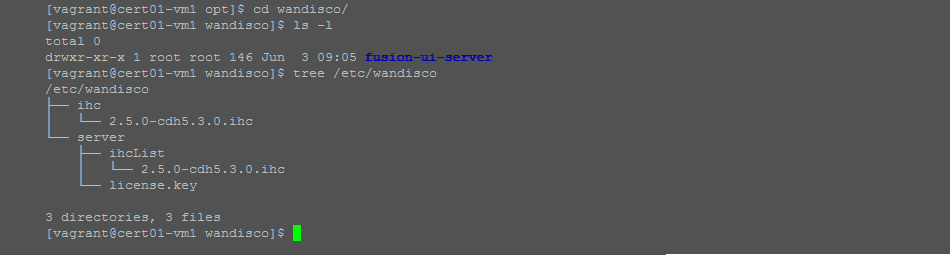
View of the WD Fusion configuration files.
2.5.0-cdh5.3.0.ihc that will need to be edited:
#Fusion Server Properties
#Wed Jun 03 10:14:41 BST 2015
ihc.server=node01.obda.domain.com\:7000
http.server=node01.obda.domain.com\:9001
In each case you should change the addresses so that they use the public IP addresses instead of the hostnames.
ui.hostname=0.0.0.0This should now ensure that the multi-homed deployment will work with WD Fusion.
If you suspect that the multi-homed environment is causing difficulty, verify that you can communicate to the IHC server(s) from other data centers. For example, from a machine in another data center, run:
ncIf you see errors from that command, you must fix the network configuration.<IHC server IP address>:<IHC server port>
Follow these steps to install WANdisco Fusion on a Hortonworks (HDP) cluster on Isilon storage.
/opt/fusion-server/core-site.xml from the WANdisco Fusion server to /opt/fusion/ihc-server/<package-version>/ on the IHC server(s).Apache Tez is a YARN application framework that supports high performance data processing through DAGs. When set up, Tez uses its own tez.tar.gz containing the dependencies and libraries that it needs to run DAGs. For a DAG to access WD Fusion's fusion:/// URI it needs our client jars:
Configure the tez.lib.uris property with the path to the WD Fusion client jar files.
...
<property>
  <name>tez.lib.uris</name>
# Location of the Tez jars and their dependencies.
# Tez applications download required jar files from this location, so it should be public accessible.
  <value>${fs.default.name}/apps/tez/,${fs.default.name}/apps/tez/lib/</value>
</property>
...
Running Hortonworks Data Platform, the tez.lib.uris parameter defaults to /hdp/apps/${hdp.version}/tez/tez.tar.gz.
So, to add fusion libs, there are two choices:
Option 1: Delete the above value, and instead have a list including the path where the above gz unpacks to, and the path where fusion libs are.
or
Option 2: Unpack the above gz, repack with WD Fusion libs and reupload to HDFS.
Note that both changes are vulnerable to a platform (HDP) upgrade.
Apache Ranger is another centralized security console for Hadoop clusters, a preferred solution for Hortonworks HDP (whereas Cloudera prefer Apache Sentry). While Apache Sentry stores it's policy file in HDFS, Ranger uses its own local MySQL database, which introdces concerns over non-replicated security policies. Ranger also applies its policies to the ecosystem via java plugins into the ecosystem components - the namenode, hiveserver etc. In testing, the WD Fusion client has not experienced any problems communicating with ranger-enabled platforms.
Ensure that the hadoop system user, typically hdfs, has permission to imperonate other users.
...
<property>
<name>hadoop.proxyuser.hdfs.users</name>
<value>*</value>
</property>
<property>
<name>hadoop.proxyuser.hdfs.groups</name>
<value>*</value>
</property>
...The appendix section contains extra help and procedures that may be required when running through a WD Fusion deployment.
During the installation, your system's environment is checked to ensure that it will support WANdisco Fusion, the Environment checks are intended to catch basic compatibility issues, especially those that may appear during an early evaluation phase. The checks are not intended to replace carefully running through the Deployment Checklist.
The WD Fusion installer doesn't currently handle the installation of the client to the rest of the nodes in the cluster. You need to go through the following procedure:
RPM package location
If you need to find the packages after leaving the installer page with the link, you can find there in your installation directory, here:
/opt/wandisco/fusion-ui-server/ui/client_packagesrpm -i <package-name>Debian not supported
Although Ubuntu uses Debian's packaging system, currently Debian itself is not supported. Note: Hortonworks HDP does not support Debian.
If you are running with an Ubuntu Linux distribution, You need to go through the following procedure for installing the clients using Debian's DEB package:
DEB package location
If you need to find the packages after leaving the installer page with the link, you can find there in your installation directory, here:
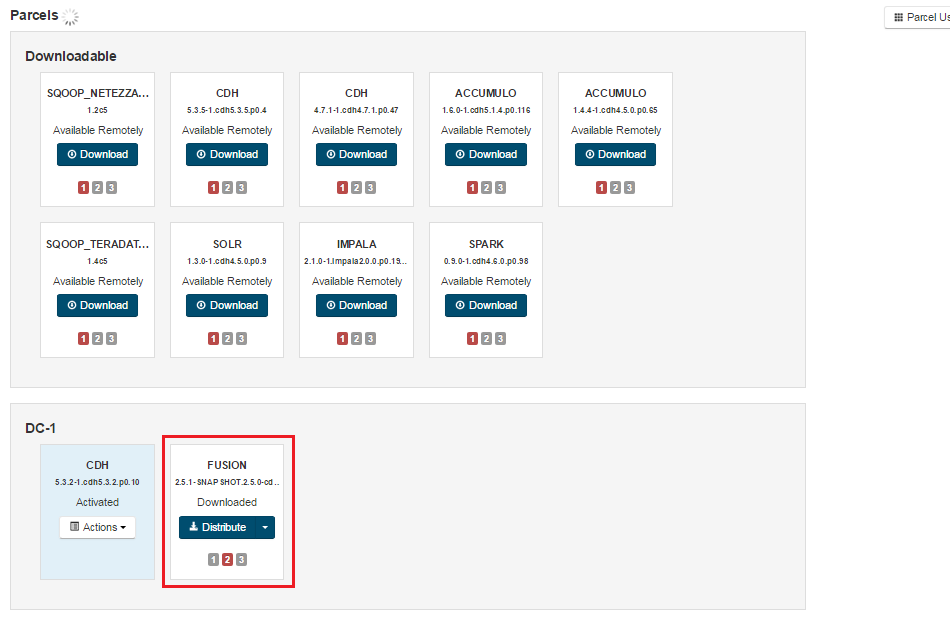
/opt/wandisco/fusion-ui-server/ui/client_packagessudo dpkg -i /path/to/deb/filesudo apt-get install -f/var/cache/apt/archives/ and then run apt-get install <fusion-client-filename.deb>For deployments into a Cloudera clusters, clients can be installed using Cloudera's own packaging format: Parcels.
wget "http://fusion.example.host.com:8083/ui/parcel_packages/FUSION-<version>-cdh5.<version>.parcel"
wget "http://node01-example.host.com:8083/ui/parcel_packages/FUSION-<version>-cdh5.<version>.parcel.sha"chown cloudera-scm:cloudera-scm FUSION-<version>-cdh5.<version>.parcel*mv FUSION-<version>-cdh5.<version>.parcel* /opt/cloudera/parcel-repo/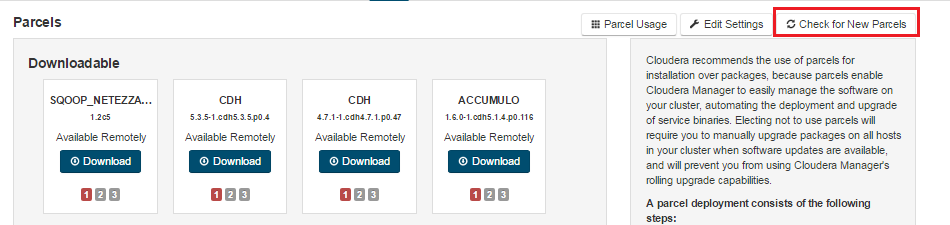
New Parcels check.
Ready to distribute.
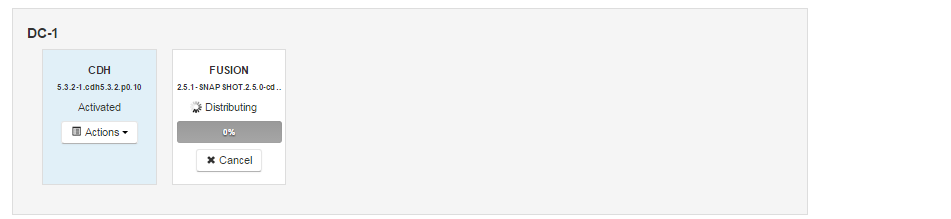
Distribute Parcels.

Distribute Parcels.
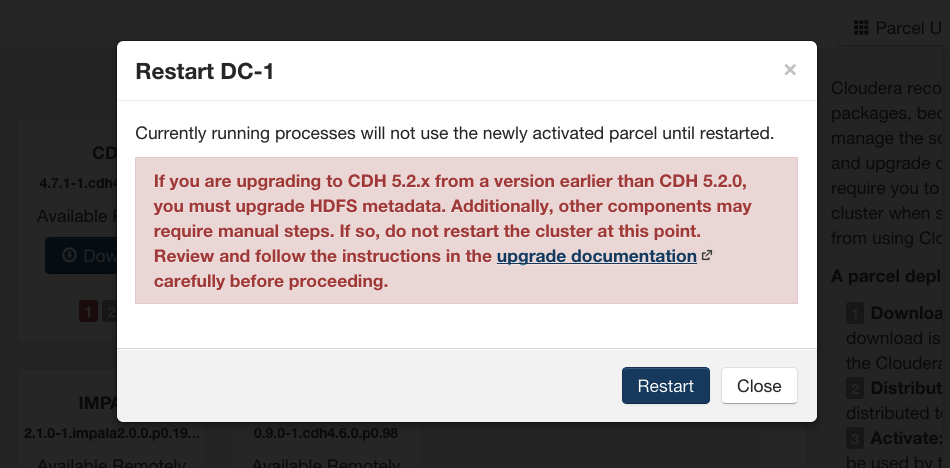
Restarts.
Also provided in a parcel format is the WANdisco compatible version of Cloudera's Impala tool:
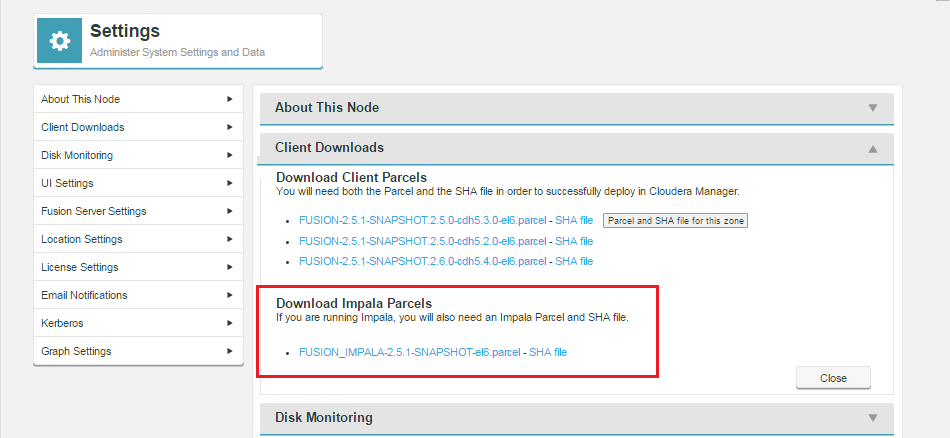
Ready to distribute.
Follow the same steps described for installing the WD Fusion client, downloading the parcel and SHA file, i.e.:
FUSION_IMPALA parcel and SHA into the local parcels repository, on the same node as Cloudera Mananger. This is by default located at: /opt/cloudera/parcels, but is configurable. In Cloudera Manager, you can go to the Parcels Management Page -> Edit Settings to find the Local Parcel Repository Path.
For deployments into Hortonworks HDP/Ambari cluster, version 1.7 or later. Clients can be installed using Hortonwork's own packaging format: HDP Stack.
Ambari 1.6 and earlier
If you are deploying with Ambari 1.6 or earlier, don't use the provided Stacks, instead use the generic RPMs.
Ambari 1.7
If you are deploying with Ambari 1.7, take note of the requirement to perform some necessary restarts on Ambari before completing an installation.
Ambari 2.0
When adding a stack to Ambari 2.0 (any stack, not just WD Fusion client) there is a bug which causes the YARN parameter yarn.nodemanager.resource.memory-mb to reset to a default value for the YARN stack. This may result in the Java heap dropping from a manually-defined value, back to a low default value (2Gb). Note that this issue is fixed from Ambari 2.1.
Upgrading Ambari
When running Ambari prior to 2.0.1, we recommend that you remove and then reinstall the WD Fusion stack if you perform an update of Ambari. Prior to version 2.0.1, an upgraded Ambari refuses to restart the WD Fusion stack because the upgrade may wipe out the added services folder on the stack.
If you perform an Ambari upgrade and the Ambari server fails to restart , the workaround is to copy the WD Fusion service directory from the old to the new directory, so that it is picked up by the new version of Ambari, e.g.:
cp -R /var/lib/ambari-server/resources/stacks_25_08_15_21_06.old/HDP/2.2/services/FUSION /var/lib/ambari-server/resources/stacks/HDP/2.2/servicesAgain, this issue doesn't occur once Ambari 2.0.1 is installed.
/var/lib/ambari-server/resources/stacks/HDP/<version-of-stack>/services. service ambari-server restart
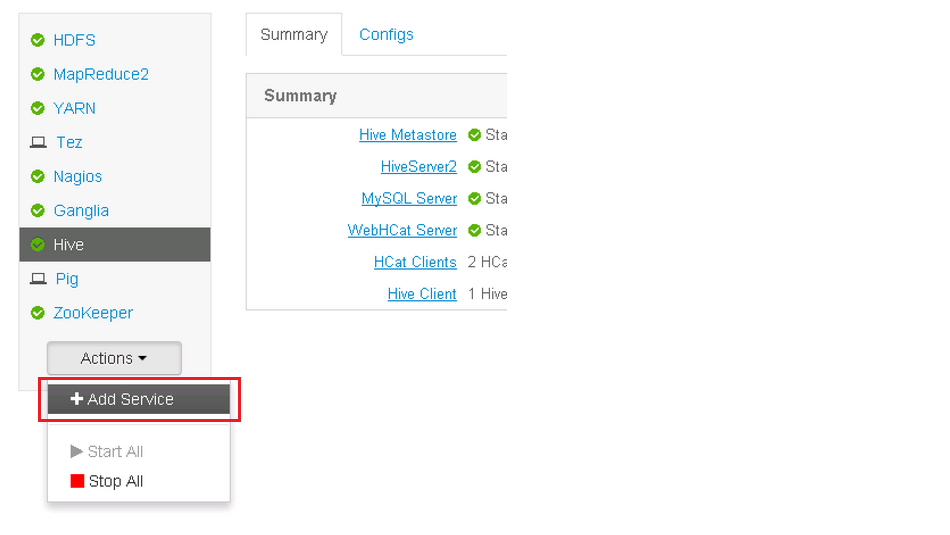
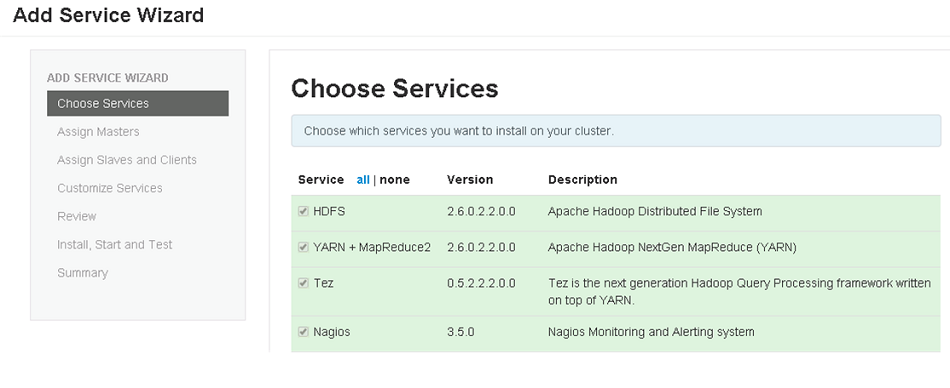
Add Service.
Scroll to the bottom of the list.
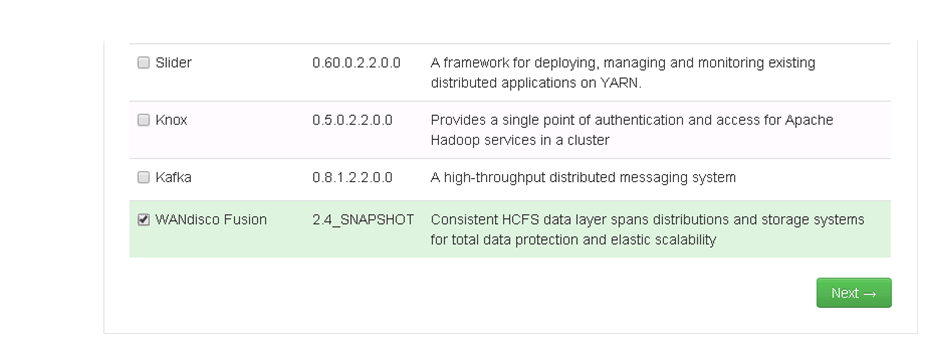
Tick the WANdisco Fusion service checkbox.
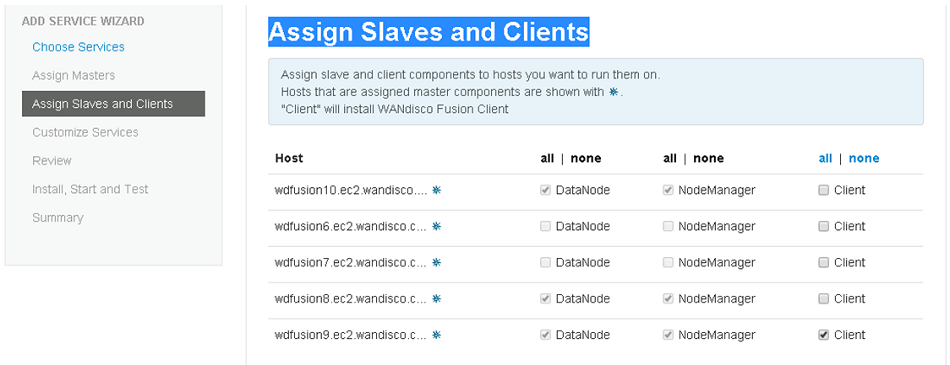
Assign Slaves and Clients.
Deploy.
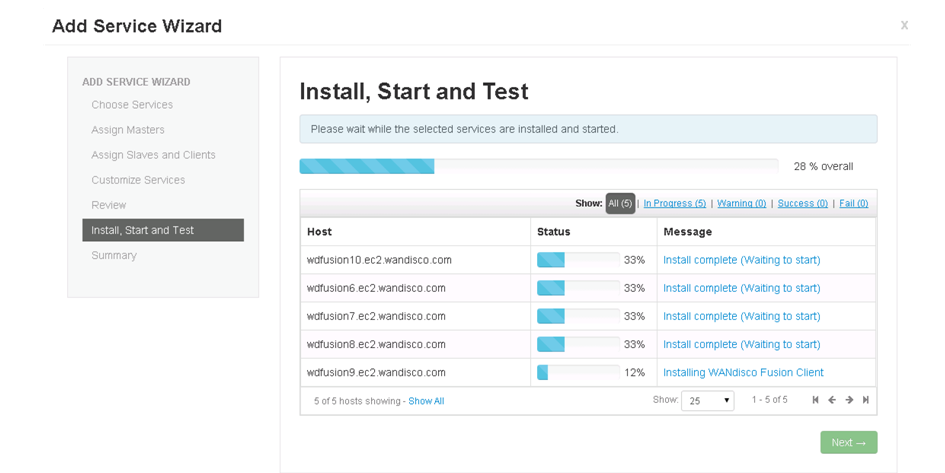
Install, start and test.
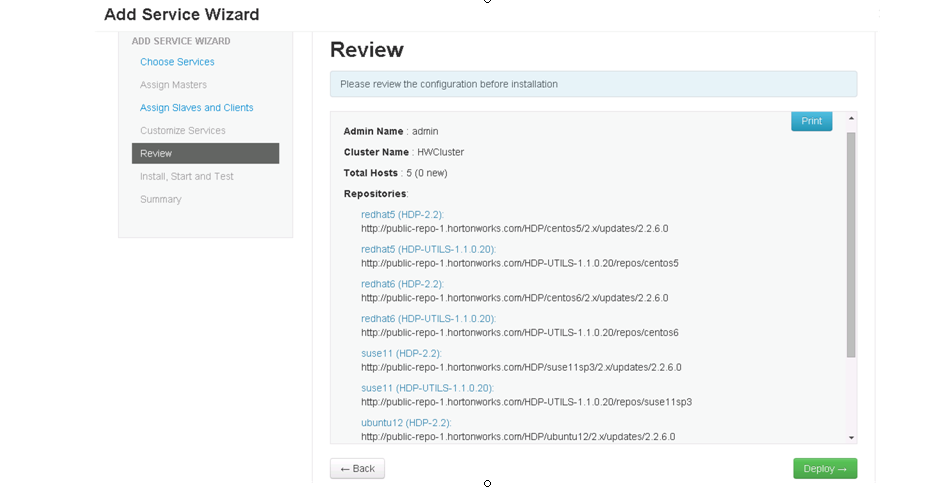
Review.
Installation of Services can remove Kerberos settings
During the installation of services through stacks it is possible that Kerberos configuration can be lost. This has been been seen to occur on Kerberized HDP2.2 clusters when installing Kafka or Oozie. Kerberos configuration in the core-site.xml file was removed during the installation which resulted in all HDFS / Yarn instances being unable to restart. For more details, see the Ambari JIRA AMBARI-9022
On MapR clusters, you need to copy WD Fusion configuration onto all other nodes in the cluster:
/opt/mapr/hadoop/<hadoop-version>/etc/hadoop.core-site.xml file to the same location on all other nodes in the cluster.If you are removing WD Fusion, maybe as part of a reinstallation, you should remove the client packages as well. Ambari never deletes any services from the stack it only disables them. If you remove the WD Fusion service from your stack, remember to also delete fusion-client.repo.
[WANdisco-fusion-client]
name=WANdisco Fusion Client repo
baseurl=file:///opt/wandisco/fusion/client/packages
gpgcheck=0
For instructions for the cleanup of Stack, see Host Cleanup for Ambari and Stack
There currently isn't a uninstall function for our installer, so the system will have to be cleaned up manually. The best way to remove Fusion (assuming it has been installed with our unified installer), is:
yum erase 'fusion*'
rm -r /opt/wandisco /opt/fusion/ /etc/wandisco