3. Administration Guide
This Admin Guide describes how to set up and use WANdisco's WD Fusion.
3.1 Housekeeping
This section covers basic operations for
Starting up
To start WD Fusion UI:
- Open a terminal window on the server and log in with suitable file permissions.
- Run the fusion-ui-server service from the /etc/init.d folder:
rwxrwxrwx 1 root root 47 Apr 10 16:05 fusion-ui-server -> /opt/wandisco/fusion-ui-server/bin/fusion-ui-server
- Run the script with the start command:
[root@localhost init.d]# ./fusion-ui-server start
WD Fusion starts. Read more about the fusion-ui-server init.d script.
Starting fusion-ui-server:. [ OK ] - Also you can invoke the service directly. e.g.
service fusion-ui-server stop/start
Shutting down
To shut down:
- Open a terminal window on the server and log in with suitable file permissions.
- Run the WD Fusion UI service, located in the init.d folder:
rwxrwxrwx 1 root root 47 Dec 10 16:05 fusion-ui-server -> /opt/wandisco/fusion-ui-server/bin/fusion-ui-server
- Run the stop script:
[root@redhat6 init.d]#  ./fusion-ui-server stop
stopping fusion-ui-server:                                   [  OK  ]
[root@redhat6 init.d]#
The process shuts down.
The shutdown script attempts to stop proceses in order before completing, as a result you may find that (from WD Fusion 2.1.3) shutdowns may take up to a minute to complete.
init.d management script
The start-up script for persistent running of WD Fusion is in the /etc/init.d folder. Run the script with the help command to list the available commands:
[root@redhat6 init.d]#./fusion-ui-server helpusage:./fusion-ui-server(start|stop|restart|force-reload|status|uistart|uistop|repstart|repstop|version) start Start Fusion UI Server services stop Stop Fusion UI Server services restart Restart Fusion UI Server services force-reload Restart Fusion UI Server services status Show the status of Fusion UI Server services uistart Start the Fusion UI Server User Interface uistop Stop the Fusion UI Server User Interface repstart Start the Fusion UI Server Replicator repstop Stop the Fusion UI Server Replicator version Show the version of Fusion UI Server
Check the running status (with current process ID):
[root@redhat6 init.d]# ./fusion-ui-server status
Checking delegate:not running                              [  OK  ]
Checking ui:running with PID 17579                         [  OK  ]
Check the version:
[root@redhat6 init.d]# ./fusion-ui-server  version
1.0.0-83
Managing Services through the WD Fusion UI
Providing that the UI service is running, you can stop and start WD Fusion through the Fusion Nodes tab.
WD Fusion UI Login
The UI for managing WD Fusion can be accessed through a browser, providing your have network access and the port that the UI is listening on is not blocked.
http://<url-for-the-server>:<UI port>
http://wdfusion-static-0.dev.organisation.com:8083/ui/
You should not need to add the /ui/ at the end, you should be redirected there automatically.

Login using your Hadoop platform's manager credentials.
Login credentials
Currently you need to use the same username and password that is required for your platform manager, e.g. Cloudera Manager or Ambari. In a future release we will separate WD Fusion UI from the manager and use a new set of credentials.
Checking cluster status on the dashboard
The WD Fusion UI dashboard provides a view of WD Fusion's status. From the world map you can identify which data centers are experiencing problems, track replication between data centers or monitor the usage of system resources.
For more details on what each section of the Dashboard, see the Reference section for the Dashboard.

UI Dashboard will indicate if there are problems with WD Fusion on your cluster.
Server Logs Settings
The WD Fusion logs that we display in the WD Fusion UI are configured by properties in the ui.properties file.

Logging
Default paths:
logs.directory.fusion/var/log/fusion/server/logs.directory.uiserver/opt/wandisco/fusion-ui-server/logs/
Configure log directory
By default the log location properties are not exposed in the ui.properites file. If you need to change the log paths, add the properties, along with your required file system paths, i.e.:
- logs.directory.fusion
- sets the path to the WD Fusion server logs.
- logs.directory.uiserver
- sets the path to the UI server logs.
The file is read by the UI server on start up so you will need to restart the server for changes to take affect. The ui.properties file is not replicated between nodes so you must currently set it manually on each node.
Logging at startup
At startup the default log location is /dev/null. If there's a problem before log4j has initialised this will result in important logs getting lost. You can set the log location to a filespace that preserve early logging.
Edit fusion_env.sh adding paths to the following properties:
- SERVER_LOG_OUT_FILE
- Path for WD Fusion server log output
- IHC_LOG_OUT_FILE
- Path for IHC server log output
3.2 Troubleshooting
We list any current known issues here, along with advise on fix or work around them:
Handling ThreadLocalRandom errors
When running hdfs commands it is possible that you may see the following error message:
WARN internal.ThreadLocalRandom: Failed to generate a seed from SecureRandom within 3 seconds. Not enough entrophy?
This error is caused by a deficiency in netty and will correspond in a drop in performance and is worth addressing using the following procedure. This example applies to Centos servers, you may need to adjust the procedure for other operating systems:
- Open a terminal session as root. Run
yum install rng-tools - Edit the rngd file, e.g.
vi /etc/sysconfig/rngd - add the line
EXTRAOPTIONS="-r /dev/urandom" - Run
service rngd start
to start up the random data daemon. - Run
to start the service on system boot.chkconfig rngd on
Note that when Netty 4.0.28 is released this procedure should no longer be necessary.
Moving objects between mismatched filesystems
If you move objects onto the distributed file system you must make sure that you use the same URI on both the originating and destination paths. Otherwise you'd see an error like this:
[admin@vmhost01-vm1 ~]$ hadoop fs -mv /repl2/rankoutput1 fusion:///repl2/rankoutput2/
15/05/13 21:22:40 INFO client.FusionFs: Initialized FusionFs with URI: fusion:///, and Fs: hdfs://vmhost01-vm1.cluster.domain.com:8020. FileSystem: DFS[DFSClient[clientName=DFSClient_NONMAPREDUCE_-721726966_1, ugi=admin@DOMAIN.EXAMPLE (auth:KERBEROS)]]
mv: `/repl2/rankoutput1': Does not match target filesystem
If you use the fusion:// on both paths it will work, E.g.
[admin@vmhost01-vm1 ~]$ hadoop fs -mv fusion:///repl2/rankoutput1 fusion:///repl2/rankoutput1
15/05/13 21:23:27 INFO client.FusionFs: Initialized FusionFs with URI: fusion:///, and Fs: hdfs://vmhost01-vm1.cluster.domain.com:8020. FileSystem: DFS[DFSClient[clientName=DFSClient_NONMAPREDUCE_-1848371313_1, ugi=admin@DOMAIN.EXAMPLE (auth:KERBEROS)]]
Note, however, that since the non-replicated directory doesn't yet exist in ZONE2 it will get created without the files it contains on the originating zone. When running WD Fusion using the
fusion:///, moving non-replicated directory to replicated directory will not work unless you use of the fusion:// URI.
Handling file inconsistencies
WD Fusion's replication technology ensures that changes to data are efficiently propagated to each zone. There are, however, a few cases where where the consistency of objects in the distributed file system lose consistency. WD Fusion can be set to schedule periodic consistency checks, or an administrator can trigger a check from the Admin UI or via the REST API.
If an inconsistency is found then the administrator needs to manually repair the issue using whatever system tools correspond with the Hadoop application. This may require that up-to-date files are manually copied over from one zone to overwrite the corrupted version of the files. In some cases files will need to be deleted/removed in order to restore consistency. You will need to follow the guidelines and documenation that corresponds with your underlying applications, e.g. MapR, Hive etc.
The current implementation of the Consistency Check tool compares the size of files between zones. We're looking carefully at how we can implement a qualitative check that can specifically identify file corruption while not greatly impacting performance.
Talkback
Talkback is a bash script that is provided in your WD Fusion installation for gathering all the logs and replication system configuration that may be needed for troubleshooting problems. Should you need assistance from WANdisco's support team, they will ask for an output from Talkback to begin their investigation.
Locating Talkback
The Talkback script is located in the Toolbox set of scripts that is bundled with WANdisco's WD Fusion packages. You need to ensure that this has been installed on your server.
WD Fusion Non-Stop Toolbox
[root@redhat6 wandisco]# rpm -qpl wdd-namenode-nonstop-toolbox-<versions>+WANdisco.326-1.el6.x86_64.rpm
/usr/hdp/current/hadoop-client/hadoop/toolbox
/usr/hdp/current/hadoop-client/hadoop/toolbox/README
/usr/hdp/current/hadoop-client/hadoop/toolbox/bin
/usr/hdp/current/hadoop-client/hadoop/toolbox/bin/add-new-learner.sh
/usr/hdp/current/hadoop-client/hadoop/toolbox/bin/change-membership.sh
/usr/hdp/current/hadoop-client/hadoop/toolbox/bin/deploy-membership.sh
/usr/hdp/current/hadoop-client/hadoop/toolbox/bin/do-emr.sh
/usr/hdp/current/hadoop-client/hadoop/toolbox/bin/do-induction.sh
/usr/hdp/current/hadoop-client/hadoop/toolbox/bin/encrypt-password.sh
/usr/hdp/current/hadoop-client/hadoop/toolbox/bin/function_lib
/usr/hdp/current/hadoop-client/hadoop/toolbox/bin/namenode-password-encrypter-1.9.10.1-hdp2.2.jar
/usr/hdp/current/hadoop-client/hadoop/toolbox/bin/quorum-check.sh
/usr/hdp/current/hadoop-client/hadoop/toolbox/bin/recover-agreements.sh
/usr/hdp/current/hadoop-client/hadoop/toolbox/bin/recover-from-dirty-shutdown.sh
/usr/hdp/current/hadoop-client/hadoop/toolbox/bin/remove-node.sh
/usr/hdp/current/hadoop-client/hadoop/toolbox/bin/set-disk-monitor.sh
/usr/hdp/current/hadoop-client/hadoop/toolbox/bin/show-current-membership.sh
/usr/hdp/current/hadoop-client/hadoop/toolbox/bin/show-memberships.sh
/usr/hdp/current/hadoop-client/hadoop/toolbox/bin/show-nodes.sh
/usr/hdp/current/hadoop-client/hadoop/toolbox/bin/show-progress.sh
/usr/hdp/current/hadoop-client/hadoop/toolbox/bin/start-output-proposal-sequence.sh
/usr/hdp/current/hadoop-client/hadoop/toolbox/bin/stop-output-proposal-sequence.sh
/usr/hdp/current/hadoop-client/hadoop/toolbox/bin/sysInfo.sh
/usr/hdp/current/hadoop-client/hadoop/toolbox/bin/talkback.sh
Running talkback
To run the talkback script, follow this procedure:
- Log into the NameNode server, If you're not logged in as root, use sudo to run the talkback script, e.g.
[root@redhat6 bin]# sudo ./talkback.sh ####################################################################### # WANdisco talkback - Script for picking up system & replicator # # information for support # ####################################################################### To run this script non-interactively please set following environment vars: ENV-VAR: WDFUSION_SUPPORT_TICKET Set ticket number to give to WANdisco support team ===================== INFO ======================== The talkback agent will capture relevant configuration and log files to help WANdisco diagnose the problem you may be encountering. Retrieving current system state information -
The output will run something like this:
Retrieving current system information Copying WANdisco config files Please provide absolute path to the hdfs headless keytab for the hdfs user. Gathering information from DConE endpoints Protocol is: http Hostname is host-example.hostname.com Port is: 50070 retriving details for node "node1.hostname.com" retriving details for node "node2.hostname.com" retriving details for node "node3.hostname.com" retriving details for node "node4.hostname.com" Managing type is: ambari Copying log files, this can take several monutes. /usr/hdp/2.2.x.x/hadoop-hdfs/lib Would you like to include hadoop fsck? This can take some time to complete and may drastically increase the size of the tarball. 1) Yes 2) No #? 1 Running sysInfo script to ensure maximum hardware and software information... Rootdir is /usr/hdp/2.2.x.x/hadoop/hadoop/toolbox/bin Gathering Summary info.... Gathering Kernal info.... Gathering Hardware info.... Gathering FIle-System info.... Gathering Network info.... Gathering Services info.... Gathering Software info.... Gathering Stats info..... Gathering Stats info..... THe FILE sysInfo/sysInfo_host-example.hostname.com-2015030242024-202620.tar.gz HAS BEEN CREATED By sysInfo TALKBACK COMPLETE --------------------------------------------------------------------------- Please upload the file: sysInfo/sysInfo_host-example.hostname.com-2015030242024-202620.tar.gz to WANdisco support with a description of the issue. Note: do not email the talkback fies, only upload them via ftp or attache them via the web ticket user interface. --------------------------------------------------------------------------- - Follow the instructions for uploading the output on WANdisco's support website.
Fine-tuning Replication
WANdisco's patented replication engine, DConE, can be configured for different use cases, balancing between performance and resource costs. The following section looks at a number of tunable properties that can be used to optimize WD Fusion for your individual deployment.
Increasing thread limit
WD Fusion processes agreements using a set number of threads, 20 by default, which offers a good balance between performance and system demands.
It is possible, in cases where there are many Copy agreements arriving at the same time, that all available threads become occupied by the Copy commands. This will block the processing of any further agreements.
You can set WD Fusion to reserve more threads, to protect against this type of bottleneck situation:
Increase executor.threads property
- Make a backup copy of WD Fusion's applications config file
/opt/wandisco/fusion-server/applications.properties,then open the original in your preferred text editor. - Modify the property
executor.threads.Property Description Permitted Values Default Checked at... executor.threads The number of threads executing agreements in parallel. 1-Integer.MAX_VALUE 20 Startup WD Fusion Server snippet
Don't go alone
Any upward adjustment will clearly increase the resourcing costs. Before you make any changes to DConE properties, you should open up discussions with WANdisco's support team. Applying incorrect or inappropriate settings to the replication system may result in hard to diagnose problems. - Save your edited
applications.propertiesfile, then restart WD Fusion.
4. Managing Replication
WD Fusion is built on WANdisco's patented DConE active-active replication technology. DConE sets a requirement that all replicating nodes that synchronize data with each other are joined in a "membership". Memberships are co-ordinated groups of nodes where each node takes on a particular role in the replication system.
For more information about DConE and its different roles see the reference section's chapter called A Paxos Primer.
Membership example
4.1 Create a membership
- Log in to the WD Fusion UI. Click on the Membership tab. Click on the + Create button. A "New Membership" window will open that will display the WD Fusion nodes organized by zone.

Create Membership1
- Configure the membership by selecting which nodes should be acceptors. Acceptors vote on the ordering of changes.

Settings
- Click Create to complete the operation. Click Cancel to discard the changes.
- APL
- Acceptor - the node will vote on the order in which replicated changes will play out
Proposer - the node will create proposals for changes that can be applied to the other nodes
Learner - the node will receive replication traffic that will synchronize its data with other nodes. - PL
- Proposer - the node will create proposals for changes that can be applied to the other nodes
Learner - the node will receive replication traffic that will synchronize its data with other nodes. - Distinguished Node
- Acceptor + - the distinguished node is used in sitations where there is an even number of nodes, a configuration that introduces the risk of a tied vote. The Distinguished Node's bigger vote ensures that it is not possible for a vote to become tied.
- On each data center, create a directory in the hdfs file space. To avoid permission problems, ensure that the owning user/group are identical across your data centers. Use Hadoop's filesystem command to complete the tasks:
hadoop fs -mkdir /user/hiver
hadoop fs -chown -R hiver:groupname /user/hiver
- As user
hdfs, run the following commands on each data center:hadoop fs -mkdir /usr/hive/warehouse-replicated hadoop fs -chown hiver:hiver /warehouse-replicated
This ensures that the a universal system user has read/write access to the hdfs directorywarehouse-replicatedthat will be replicated through WD Fusion. - Once the folder is in place on all nodes, log in to WD Fusion UI on one of the WD Fusion nodes and click on the Replciated Folders tab.

Create Rule
- Select the folder that you created in step 1. from the HDFS File Tree. Select check boxes of the Zones that you wish the folder to be replicated between. Select an available Membership from the Membership dropdown. The membership determines how replication is managed, there's more information about how membership works in the Reference section A Primer on Paxos.

Replicated folders
- If you didn't complete a consistency check on the selected folder, you may do so now.

Replicate to Zones
- After the completion of a consistency check, the Consistency column will report the consistency status.

Replicated folder status
- Enable High Availability on your Hadoop clusters. See the documentation provided by your Hadoop vendor, i.e. - Cloudera (via QJM) or Hortonworks.
The HA wizard does not set the HDFS dependency on ZooKeeper
Workaround:
- Create and start a ZooKeeper service if one doesn't exist.
- Go to the HDFS service.
- Click the Configuration tab.
- In the Service-Wide category, set the ZooKeeper Service property to the ZooKeeper service.
- Edit WD Fusion configuration element '
fusion.underlyingFs' to match the new nameservice ID in the cluster-widecore-site.xmlin your Hadoop manager.
E.g, change:<property> <name>fusion.underlyingFs</name> <value>hdfs://vmhost08-vm0.bdfrem.wandisco.com:8020</value> </property>To:<property> <name>fusion.underlyingFs</name> <value>hdfs://myCluster</value> </property> - Click Save Changes to commit the changes.
- Copy
/etc/hadoop/conf/core-site.xmlinto/opt/fusion-server/directory. This should include the new added HA nameservice configurations. - Copy
/etc/hadoop/conf/hdfs-site.xmlinto/opt/fusion-server/corresponding IHC server directory. This should include the new added HA nameservice configurations. - Copy
/etc/hadoop/conf/core-site.xmlinto/opt/fusion/ihc-server/'s corresponding IHC server directory. This should include the new added HA nameservice configurations. - Copy
/etc/hadoop/conf/hdfs-site.xmlinto/opt/fusion/ihc-server/'s corresponding IHC server directory. This should include the new added HA nameservice configurations. - If Kerberos security is installed make sure the configurations are there as well: Setting up Kerberos with WD Fusion.
- Restart the Zone1 WD Fusion server and the corresponding IHC server
- Now repeat the steps for the next HA-enabled Data Center, completing the steps from that data center.
- Consistency Status
- A status which links to the consistency check report. It can report Inconsistent, Consistent or Unknown.
- Last Check:
- Shows the time and date of the check that produced the current status. By default, Consistency checks are automatically started every 24 hours.
- Next Check:
- Shows the time and date of the next automatically scheduled Consistency Check. Remember, you don't need to wait for this automatic check, you can trigger a consistency check at any time through the Consistency Check tool.
- Start by completing a fresh Consistency Check. Select the inconsistent object using the corresponding check box, then click on the Consistency Check button. After a few moments you'll get an up-to-date report on inconsistency.

Consistency Check
- To fix an inconsistency, click on the Inconsistent link in the Consistency column.

Inconsistent
- The inconsistency is shown in terms of object properties.

Consistency Check
Path: the absolute path for the object.
- Length:
- the size of the object,
- Is a directory:
- identifies if the object is a directory (true) or a file (false).
- Owner:
- System account that owns the object.
- Group:
- System group associated with the object(s)
- Permission:
- File permissions for the object.
- Compare the various states of the inconsistent element across your cluster. You need to decide which zone(s) have a correct/up-to-date copy of the element, then select the zone under the Source of truth column. Click Resolve.
Confirm Consistency Check
- You'll get a confirmation prompt that will confirm which copies will be overwritten and which zone will source the file. Click Confirm to complete the fix or click Cancel to stop the process.

Consistency Check
- If you clicked Confirm then the fix operation will begin. The UI will indicate Fix requested.

Consistency Check
- Rechecking the Consistency will now confirm that the object is now consistent across all zones.

Consistency Check
- Username
- System user performing the transfer. (String)
- File name
- Name of the file being transferred. (String)
- Remote FS
- The file of the originating node. (URI)
- Origin
- The file's originating Zone. (String)
- Size
- The cumulative size of data transferred. (Long)
- Appends
- The number of appends that have been made to the file being transferred. (Long)
- AppendSize
- The size of the latest append.
- Remaining
- Remaining bytes still to be transferred for the latest append. (Long)
- Percent remaining
- Percentage of the file still to be transferred. (Double)
- Bytes/Sec
- The current rate of data transfer, i.e. Amount of file downloaded so far / elapsed download time. (Long)
- State
- One of "in progress", "incomplete", "completed", "appending", "append complete", "deleted" or "failed". (TransferState)
In progress: means we are performing an initial pull of the file.
Appending: means data is currently being pulled and appended to the local file.
Append completed: means all available data has been pulled and appended to the local file, although more data could be requested later.
Note: files can be renamed, moved or deleted while we pull the data, in which case the state will become "incomplete".
When the remote file is closed and all of its data has been pulled, the state will then change to "Complete".
If a file is deleted while we are trying to pull the end state will be "deleted".
If the transfer fails the state will be "failed". - Start Time
- The time when the transfer started. (Long)
- Elapsed Time
- Time that has so far elapsed during the transfer. Once the transfer completes it is then a measure of the time between starting the transfer and completing. (Long)
- Complete Time
- During the transfer this is an estimate for the complete time based on rate of through-put so far. Once the transfer completes this will be the actual time at completion. (Long)
- Delete Time
- If the file is deleted then this is the time the file was deleted from the underlying filesystem. (Long)
- Log in to the WD Fusion UI. Click on the Settings tab.
- Click on Disk Monitoring at the top of the side menu.

Settings - Disk monitor
- Click Create.

Settings - Disk monitor
- Enter the required details for setting up a disk monitor.

Settings - Disk monitor
- File system path
- Enter the full path of the system directory that will be monitored for disk usage.
- Severity level
- Select a system log severity level (Severe, Warning, Info or Debug) that will correspond with the Disk Capacity Threshold.
Caution Assigning a monitor with Severe level will impact operation should its trigger Disk Capacity Threshold be met. The affected WD Fusion will immediately shut down to protect its file system from corruption. Ensure that Severe level monitors are set up with a threshold that corresponds with serious risk. Set the threshold too low and you may find WD Fusion nodes are shutdown needlessly.
- Disk Capcity Threshold (bytes)
- The maximum amount of data that can be consumed by the selected system path before the monitor sends an alert message to the log file.
- Message
- A human-readible message that will be sent to the log at the point that the Disk Capacity Threshold is reached.
- You can set a monitor to have multiple trigger points. Click + Add another severity monitor and add an additional Severity level, Disk Capacity Threshold and Message. You can have a separate monitor for each Log level.

Settings - Additional Disk monitors
- Log in to the WD Fusion UI. Click on the Settings tab.
- Click on UI Settings link on the side menu.
- Enter a new HTTP Port or HTTP SSL.

Settings - Change it
- Click Update. You may need to update the URL in your browser to account for the change you just made.
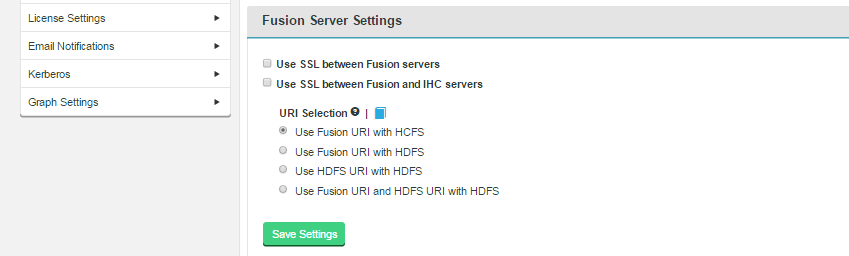
- Use SSL between Fusion servers
- (Checkbox) Tick to enable SSL encryption for traffic between WD Fusion servers.
- Use SSL between Fusion and IHC servers
- (Checkbox) Tick to enable SSL encryption for traffic between WD Fusion servers and the IHC servers.
- Use HDFS URI with HDFS file system

This option is available for deployments where the Hadoop applications support neither the WD Fusion URI or the HCFS standards. WD Fusion operates entirely within HDFS.
This configuration will not allow paths with thefusion://uri to be used; only paths starting withhdfs://or no scheme that correspond to a mapped path will be replicated. The underlying file system will be an instance of the HDFS DistributedFileSystem, which will support applications that aren't written to the HCFS specification.- Use WD Fusion URI with HCFS file system
-

This is the default option that applies if you don't enable Advanced Options, and was the only option in WD Fusion prior to version 2.6. When selected, you need to usefusion://for all data that must be replicated over an instance of the Hadoop Compatible File System. If your deployment includes Hadoop applications that are either unable to support the Fusion URI or are not written to the HCFS specfication, this option will not work. - Use Fusion URI with HDFS file system

This differs from the default in that while the WD Fusion URI is used to identify data to be replicated, the replication is performed using HDFS itself. This option should be used if you are deploying applications that can support the WD Fusion URI but not the Hadoop Compatible File System.- Use Fusion URI and HDFS URI with HDFS file system

This "mixed mode" supports all the replication schemes (fusion://,hdfs://and no scheme) and uses HDFS for the underlying file system, to support applications that aren't written to the HCFS specification.- Log in to the WD Fusion UI. Click on the Settings tab.
- Click on Email Notifications link on the side menu or the main header bar.
- Enter the details for your SMTP server.

Email Notification Settings
- SMTP Host
- The hostname or IP address for your email relay server.
- SMTP Port
- The port used by your email relay service. SMTP default port is 25.
- Connection Encryption:
- Drop-down for choosing the type of encryption that the mail server uses, None, SSL or TLS are supported. If SSL or TLS are selected you should make sure that you adjust the SMTP port value, if required.
- Authentication
- Checkbox for indicating that a username and password are required for connecting to the mail server. If you tick the checkbox additional entry fields will appear.
- SMTP Username
- A username for connecting to the email server.
- SMTP Password
- Apassword for connecting to the email server.
- Test email to
- Optional field for entering an email address that can be used for testing that the email setup will work.
- Send Test Email
- Button, click to send a sample notification email so that you can confirm that the email notification settings are working.
- Save Settings
- Button, click to store your email notification entries.
- Click Update. You may need to update the URL in your browser to account for the change you just made.
- Open a terminal to the WD Fusion. You will be making changed to configuration files so you need to be logged on as a system user with read-write permissions for system files.
- Navigate to the WD Fusion UI's properties directory, e.g.
/opt/wandisco/fusion-ui-server/properties/ - Open the
emailer.propertiesfile in an editor, after creating a backup copy. If you can't see anemail.propertiesfile there, you may be able to track it down by opening theui.propertiesfile and looking for the line:email.properties.path = path/to/email.properties - In the
email.propertiesfile, locate the message lines that correspond to those events that you want to edit:# below properties have default values: email.auth=false email.encryption=NONE email.from=namenode@example.com email.host=smtp.example.com email.password=4k9+9sWZ3/4= email.port=25 email.username= cpu_load_threshold_hit.enabled=false cpu_load_threshold_hit.message=The following issue occured: %s cpu_load_threshold_hit.subject=NonStop Name Node Alert cpu_load_threshold_hit.to= data_node_limit_count.enabled=false data_node_limit_count.message=The following issue occured: %s data_node_limit_count.subject=NonStop Name Node Alert data_node_limit_count.to= hdfs_usage_threshold_hit.enabled=false hdfs_usage_threshold_hit.message=The following issue occured: %s hdfs_usage_threshold_hit.subject=NonStop Name Node Alert hdfs_usage_threshold_hit.to= java_heap_usage_threshold_hit.enabled=false java_heap_usage_threshold_hit.message=The following issue occured: %s java_heap_usage_threshold_hit.subject=NonStop Name Node Alert java_heap_usage_threshold_hit.to= license_expiring.enabled=true license_expiring.message=The following issue occured: %s license_expiring.subject=NonStop Name Node Alert license_expiring.to=support@example.com - Enable the message block by changing the
enabledto true. Enter the messaging that you want for each notification event. You can for a new line by using a forward slash, i.e. "\".cpu_load_threshold_hit.enabled=true cpu_load_threshold_hit.message=Enter your own messaging here, allowing you to set more specific messaging for the alert. %s cpu_load_threshold_hit.subject=NonStop Name Node Alert cpu_load_threshold_hit.to=email address suitable for monitoring system failures - Check and save the changes. You do not need to restart anything for changes to take effect.
- Look to the security procedures of your particular form of Hadoop.
- For Hortonworks/Ambari see Ambari Kerberos Setup .
- For Cloudera/CDH5 see CDH5 Security Guide and Hadoop Security If you are running CDH -
- Generate Keytab for each of your WD Fusion nodes.
- On the KDC, generate keytab file:
> ktadd -k fusion.keytab -norandkey fusion/${hostname}@${krb_realm} - Copy the generated keytab to a suitable filesystem location, e.g.
/etc/wandisco/security/on the WD Fusion server. - Update the configuration on the Fusion servers, adding the following properties to
core-site.xml.<property> <name>fs.fusion.keytab</name> <value>/etc/wandisco/security/fusion.keytab</value> </property> <property> <name>fs.fusion.principal</name> <value>hdfs/{hostname}@{krb_realm}</value> </property>- fs.fusion.keytab
- Path to generated keytab.
- fs.fusion.principal
- Principal for the hdfs system user's keytab file.
- Set up a proxy user on the NameNode, adding the following properties to
core-site.xmlon the NameNode(s). - hadoop.proxyuser.$USERNAME.hosts
- Defines hosts from which client can be impersonated. $USERNAME, the superuser who wants to act as a proxy to the other users, is usually set as system user "
hdfs". From Version 2.6 these values are captured by the installer and can apply these values automatically. - hadoop.proxyuser.$USERNAME.groups
- A list of groups whose users the superuser is allowed to act as proxy. Including a wildcard (*), which will mean that proxies of any users are allowed. For example, for the superuser to act as proxy to another user, the proxy actions must be completed on one of the hosts that are listed, and the user must be included in the list of groups. Note that this can be a comma separated list or the noted wildcard (*).
- Open a terminal and navigate to
<INSTALL_DIR>/etc/wandisco/config. - Within
/configmake a new directory called ssl.
mkdir ssl
- Navigate into the new directory.
cd ssl
- Copy your private key into the directory. If you don't already have keys set up you can use JAVA's keygen utility, using the command:
keytool -genkey -keyalg RSA -keystore wandisco.ks -alias server -validity 3650 -storepass <YOUR PASSWORD>
Read more about the Java keystore generation tool in the KB article - Using Java Keytool to manage keystores
Ensure that the system account that runs the WD Fusion server process has sufficient privileges to read the keystore files.
Java keytool options
Variable Name Description -genkey Switch for generating a key pair (a public key and associated private key). Wraps the public key into an X.509 v1 self-signed certificate, which is stored as a single-element certificate chain. This certificate chain and the private key are stored in a new keystore entry identified by alias. -keyalg RSA The key algorithm, in this case RSA is specified. wandisco.ks This is file name for your private key file that will be stored in the current directory. - alias server Assigns an alias "server" to the key pair. Aliases are case-insensitive. -validity 3650 Validates the keypair for 3650 days (10 years). The default would be 3 months. - storepass <YOUR PASSWORD> This provides the keystore with a password. If no password is specified on the command, you'll be prompted for it. Your entry will not be masked so you (and anyone else looking at your screen) will be able to see what you type.
Most commands that interrogate or change the keystore will need to use the store password. Some commands may need to use the private key password. Passwords can be specified on the command line (using the
-storepassand-keypassoptions).
However, a password should not be specified on a command line or in a script unless it is for testing purposes, or you are on a secure system.
The utility will prompt you for the following information
What is your first and last name? [Unknown]: What is the name of your organizational unit? [Unknown]: What is the name of your organization? [Unknown]: What is the name of your City or Locality? [Unknown]: What is the name of your State or Province? [Unknown]: What is the two-letter country code for this unit? [Unknown]: Is CN=Unknown, OU=Unknown, O=Unknown, L=Unknown, ST=Unknown, C=Unknown correct? [no]: yes
Enter key password for <mykey> (RETURN if same as keystore password): - With the keystore now in place, you'll now need to add variables to the application.properties
SSL DConE Encryption Variables for application.properties
Variable Name Example Description ssl.enabled true Requires a "true" or "false" value. Clearly when the value is set to false, none of the other variables will be used. ssl.debug true Requires a "true" or "false" value. When set to true debugging mode is enabled. ssl.keystore ./properties/wandisco.ks The path to the SSL private Keystore file that is stored in the node. By default this is called "wandisco.ks". ssl.key.alias wandisco The assigned alias for the key pair. Aliases are case-insensitive. ssl.keystore.password <a password> The SSL Key password. ssl.truststore ./properties/wandisco.ks The path to the SSL private truststore file that is stored in the node. By default this is called "wandisco.ks" because, by default the keystore and truststore are one and the same file, although it doesn't have to be. ssl.truststore.password "bP0L7SY7f/4GWSdLLZ3e+ The truststore password. The password should be encrypted.
Changes in any of these values require a restart of the DConE service. Any invalid value will restart the replicator and no DConE traffic will flow. - On ALL nodes create key directories:
/etc/security/serverKeys and /etc/security/clientKeys
- On all nodes, create keystore files:
cd /etc/security/serverKeys keytool -genkeypair -alias $HOSTNAME -keyalg RSA -keysize 2048 -dname CN=$HOSTNAME,OU=Dev,O=BigData,L=SanRamon,ST=ca,C=us -keypass $PASSWORD -keystore $HOSTNAME.ks -storepass $PASSWORD
There's further explanation of what these options do, see the key Java keytool options - On all nodes export the certificate public key to a certificate file:
cd /etc/security/serverKeys keytool -exportcert -alias $HOSTNAME -keystore $HOSTNAME.ks -rfc -file $HOSTNAME.crt -storepass $PASSWORD
- On all nodes, import the certificate into truststore file:
cd /etc/security/serverKeys keytool -importcert -noprompt -alias $HOSTNAME -file $HOSTNAME.crt -keystore $HOSTNAME.trust -storepass $PASSWORD
-
Create a single truststore file containing the public key from all certificates (this will be for clients) start on node1:
cd /etc/security/serverKeys
Copy trust store file from current node to next one and redo all steps above. - From last node copy trust store, which has all certificates to all servers under
/etc/security/clientKeys/all.jks - On all nodes, copy keystore to "
service".ks (e.g. hdfs.ks) - The keystore contains private keys and certificates used by SSL servers to authenticate themselves to SSL clients. By convention, such files are referred to as keystores.
- When used as a truststore, the file contains certificates of trusted SSL servers, or of Certificate Authorities trusted to identify servers. There are no private keys in the truststore.
- Hadoop SSL requires that truststores and the truststore password be stored, in plaintext, in a configuration file that- is readable by all.
- Keystore and key passwords are stored, in plaintext, in a file that is readable only by members of the appropriate group.
- In Ambari, navigate to the HDFS service edit the configuration.
- Type SSL into the search filed to show the SSL properties.
- Make edits to the following properties:
Property Description SSL Server Keystore File Location Path to the keystore file containing the server certificate and private key. SSL Server Keystore File Password Password for the server keystore file. SSL Server Keystore Key Password Password that protects the private key contained in the server keystore. -
If you don't plan to use the default truststore, configure SSL client truststore properties:
Property Description Cluster-Wide Default SSL Client Truststore Location Path to the client truststore file. This truststore contains certificates of trusted servers, or of Certificate Authorities trusted to identify servers. Cluster-Wide Default SSL Client Truststore Password Password for the client truststore file. -
We recommend that you also enable web UI authentication for the HDFS service, providing that you have already secuired the HDFS service. Enter web consoles in the search field to bring up Enable Authentication for HTTP Web-Consoles property. Tick the check box to enable web UI authentication.
Property Description Enable Authentication for HTTP Web-Consoles Enables authentication for hadoop HTTP web-consoles for all roles of this service. - Now the necessary edits are complete, click Save Changes.
- Follow the next section for setting up SSL for YARN/MapReduce.
- Navigate to the YARN or MapReduce service and click Configuration.
- In the search field, type SSL to show the SSL properties.
- Edit the following properties according to your cluster configuration:
Property Description SSL Server Keystore File Location Path to the keystore file containing the server certificate and private key. Enable Authentication for HTTP Web-Consoles Password for the server keystore file. SSL Server Keystore Key Password Password for the client truststore file. -
We recommend that you also enable web UI authentication for the HDFS service, providing that you have already secuired the HDFS service. Enter web consoles in the search field to bring up Enable Authentication for HTTP Web-Consoles property. Tick the check box to enable web UI authentication.
Property Description Enable Authentication for HTTP Web-Consoles Enables authentication for hadoop HTTP web-consoles for all roles of this service. - Click Save Changes.
- Navigate to the HDFS service and in the search field, type Hadoop SSL Enabled. Click the value for the Hadoop SSL Enabled property and select the checkbox to enable SSL communication for HDFS, MapReduce, and YARN.
Property Description Hadoop SSL Enabled Enable SSL encryption for HDFS, MapReduce, and YARN web UIs, as well as encrypted shuffle for MapReduce and YARN. - Restart all affected services (HDFS, MapReduce and/or YARN), as well as their dependent services.
You will be prevented from creating more than 1 membership with a particular configuration.

Guide to node types
4.2 Replicated Folders
WD Fusion allows selected folders within your hdfs file system to replicated to other data centers in your cluster. This section covers the set up and management of replicated folders.
Create a replicated folder
Before you can configure WD Fusion UI to replicate a hdfs folder, you need to set the folder up on your cluster. This procedure is covered in the initial set up of WD Fusion server, it's covered here in more detail, specifically for creating additional replicated directories after a successful deployment.
Set up the folder in WD Fusion UI
Configure Hadoop
Once WD Fusion has been installed and set up, you will need to modify your Hadoop applications so that when appropriate, they write to your replicated folder.

Configure Hadoop applications to write to the replicated file space.
Configure for High Availability Hadoop
If you are running Hadoop in a High Availability (HA) configuration then you should run through the following steps for WD Fusion:
On Zone1
4.3 Reporting
4.3.1 Consistency Check
The consistency check mechanism lets you verify that replicated HDFS data is consistent between sites. Read about Handling file inconsistencies.
Consistency Checks through WD Fusion UI
Built into the Replicated Folders section of the WD Fusion UI is consistency checking system that routinely compares the file system across zones, looking for any objects that are no in sync.

Replicaton Rules table - indicates if inconsistencies are detected.
Consistency
Click on the report link to get more information about the current consistency check results.
Fix inconsistencies with the Consistency Check tool
WD Fusion's Consistency Check tool includes a feature for resolving any inconsistencies that are detected across the distributed file system. Use the following procedure to resolve any such inconsistencies:

Consistency Check

Consistency Check
Consistency Checks via REST API
4.3.2 File Transfer Report
As a file is being pulled into the local zone, the trasfer is recorded in the WD Fusion server and can be monitored for progress.
Use the REST API filter by the replicated path and sort by ascending or descending "complete time" or "start time":
GET /fusion/fs/transfers?path=[path]&sortField=[startTime|completeTime]&order=[ascending|descending]
File transfer Report Output
Example output showing an in-progress and completed transfer:
<?xml version="1.0" encoding="utf-8" standalone="yes"?>
<fileTransfers>
    <fileTransfer>
        <startTime>1426020372314</startTime>
        <elapsedTime>4235</elapsedTime>
        <completeTime>1426020372434</completeTime>
        <username>wandisco</username>
        <familyRepresentativeId>
            <nodeId>dconefs5-1</nodeId>
            <dsmId>93452fe3-c755-11e4-911e-5254001ba4b1</dsmId>
        </familyRepresentativeId>
        <file>/tmp/repl/isoDEF._COPYING_<;/file>
        <remoteFs>hdfs://vmhost5-vm4.frem.wandisco.com:8020</remoteFs>
        <origin>dc1<;/origin>
        <size>4148166656</size>
        <remaining>4014477312</remaining>
        <bytesSec>3.3422336E7</bytesSec>
        <percentRemaining>96.77714626516683</percentRemaining>
        <state>in progress</state>
    </fileTransfer>

    <fileTransfer>
        <startTime>1426019512082</startTime>
        <elapsedTime>291678</elapsedTime>
        <completeTime>1426019803760</completeTime>
        <username>wandisco</username>
        <familyRepresentativeId>
            <nodeId>dconefs5-1</nodeId>
            <dsmId>93452fe3-c755-11e4-911e-5254001ba4b1</dsmId>
        </familyRepresentativeId>
        <file>/tmp/repl/isoABC</file>
        <remoteFs>hdfs://vmhost5-vm4.frem.wandisco.com:8020</remoteFs>
        <origin>dc1</origin>
        <size>4148166656</size>
        <remaining>0</remaining>
        <bytesSec>1.4221733E7</bytesSec>
        <percentRemaining>0.0</percentRemaining>
        <state>complete</state>
    </fileTransfer>
</fileTransfers>
Output key with data type
Record retention
Records are not persisted and are cleared up on a restart. The log records are truncated to stop an unbounded use of memory, and the current implementation is as follows:
For each state machine, if there are more than 1,000 entries in its list of transfers we remove the oldest transfers ,sorted by complete time, which are in a terminal state ("completed", "failed" or "deleted") until the size of the list is equal to 1,000. The check on the number of records in the list is performed every hour.
4.4 Deleting memberships
It is possible to delete memberships that are no longer required.
5. Settings
Set up a Custom Disk Monitor
Use this procedure to set up a custom monitor in WD Fusion UI's Disk Monitor tool.
The Monitoring Data tool monitors the disk usage of the WD Fusion software, providing a basic level of protection against it consuming all disk space. The tool also lets you set up your own monitors for user-selected resources.
The disk monitor is no substitute for dedicated, system-wide monitoring tools. Instead, it is intended to be a 'last stand' against possible disk space exhaustion that could lead to data loss or corruption.
Read our Recommendations for system-wide monitoring tools.
Edit a Disk Monitor
You can make changes to an existing custom monitor by clicking on the Edit

Settings - Change it
Caution You can't delete or modify the default Monitor which protects the system from disk space exhaustion from the temporary files created in the WANdisco replication directory /DConE/consensusNode
Change the UI Settings
You can change how you interact with WD Fusion UI through the browser. Use the following procedure to change either the HTTP or HTTP SSL port that is used to view the UI through a browser.
Changing the WD Fusion server settings
The server settings give you control over traffic encryption between WD Fusion and IHC servers.
Configuration changes
These options set the following properties in /etc/hadoop/conf/core-site.xml
fs.fusion.ssl.enabled=true
ihc.ssl.enabled=true
This ensures that both WD Fusion server and the IHC server traffic is secured using SSL. The properties, as defined in the Reference Guide are repeated below:
| Property | Description | Permitted Values | Default | Checked at... |
| fs.fusion.ssl.enabled | If Client-WD Fusion server communications use SSL encryption. | true, false | false | Startup |
| ihc.ssl.enabled | Signifies that WD Fusion server - IHC communications should use SSL encryption. | true, false | false | Startup |
Setting a password for SSL encryption
Use our provided bash script for generating a password. Run the script at the command line, enter a plaintext password, the script then generates and outputs the encrypted version of the entry:
[root@vmhost01-vm3 fusion-server]# ./encrypt-password.sh
Please enter the password to be encrypted
> ********
btQoDMuub7F47LivT3k1TFAjWSoAgM7DM+uMnZUA0GUet01zwZl7M8zixVZDT+7l0sUuw6IqGse9kK0TiDuZi0eSWreeW8ZC59o4R15CCz0CtohER7O3uUzYdHaW6hmT+21RaFkUF5STXXHcwdflwq4Zgm+KdUXKF/8TrgEVqT854gci1KQyk+2TKSGtGbANg12LplEre3DEGoMFOpy2wXbwO5kGOQM07bZPjsDkJmAyNwERg0F3k2sebbuGmz4VSAY1NTq4djX1bVwMWoPwcuiQXLwWLgfrGZDHaT+Cm88vRUsYaK2CDlZI4C7r+Lkkm/U4F/M6TFLGT6ZFlB+xRQ==
Advanced Options
Only apply these options if you full understand what they do.
The following advanced options provide a number of low level configuration settings that may be required for installation into certain environments. The incorrect application of some of these settings could cause serious problems, so for this reason we strongly recommend that you discuss their use with WANdisco's support team before enabling them.
URI Selection
The default behavior for WD Fusion is to fix all replication to the Hadoop Distributed File System / hdfs:/// URI. Setting the hdfs-scheme provides the widest support for Hadoop client applications, so some applications can't support the available "fusion:///" URI or they can only run on HDFS. instead of the more lenient HCFS. Each option is explained below:
Setting up Node Location
WD Fusion is design to fit into deployments that have far-flug data centers. The Node Location setting is used to identify where in the world the data center is situated, using standard global positioning system coordinates. These coordinates will be used by any connected WD Fusion nodes to correctly place the node's location on the world map.

WD Fusion setting server location.
Set up email notifications
This section describes how to set up notification emails that will be triggered if one of the system resources that are graphed on the Dashboard breach a threshold.
SMTP Settings
Set up email messages
The notification emails content is not currently exposed to the UI. You can change it by making the following edit to the emailer.properties file.
Notification Email
Notification emails that are sent out by WD Fusion UI are made up of the following parts:
Event Details- System generated description that appears as "%s" in the emailer.properties file. It contains the specific details of the message, including NameNode name and threshold level breached.

Message- The user-defined message placed in the emailer.properties file.
Footer- System generated list of node properties.
Event Details
TBD
Footer
Each email has a footer block added by the system which includes a lot of extra information useful for quickly troubleshooting problems.
HostName
IP Address
IP port
Node Name
Node Role
Node's manager
Node status
Node's zone
Node location
Node latitude
Node longitude
Memory usage
Disk usage
Last update
Time Now
Setting up Kerberos
If the Hadoop deployment is secured using Kerberos you need to enable Kerberos in the WD Fusion UI. Use the following procedure:
Unified: Some Hadoop platforms are Kerberized under a single hdfs user, this is common in Cloudera deployments. For simplicity, this is what we recommend.
Per-service: If your deployment uses separate principals for each HDFS servicethen you will need to set up a principal for WD Fusion.
On the KDC, using kadmin.local, create new principals for WD Fusion user and generate keytab file, e.g.:
> addprinc -randkey fusion/${hostname}@${krb_realm}
> ktadd -k fusion.keytab -norandkey fusion/${hostname}@${krb_realm}Note: We don't recommend storing the keytab in Hadoop's own Kerberos /etc/hadoop/conf, given that this is regenerated by the cluster manager.
Secure Impersonation
Important: .
<property>
        <name>hadoop.proxyuser.$USERNAME.hosts</name>
        <value>*</value>
    </property>
    <property>
        <name>hadoop.proxyuser.$USERNAME.groups</name>
        <value>*</value>
</property>
Kerberos and HDP's Transparent Data Encryption
There are some extra steps required to overcome a class loading error that occurs when WD Fusion is used with at-rest encrypted folders. Specifically, cluster config changes described as follows:
<property>
<name>hadoop.kms.proxyuser.fusion.users</name>
<value>*</value>
</property>

<property>
<name>hadoop.kms.proxyuser.fusion.groups</name>
<value>*</value>
</property>

<property>
<name>hadoop.kms.proxyuser.fusion.hosts</name>
<value>*</value>
</property>
Setting up SSL encryption for DConE traffic
WD Fusion supports the use of Secure Socket Layer encryption (SSL) for securing its replication traffic. To enable this encryption you need to generate a keypair that must be put into place on each of your WD Fusion nodes. You then need to add some variables to the application.properties file.
Setting the server key
In the keystore, the server certificate is associate with a key. By default, we look for a key named server to validate the certificate. If you use a key for the server with a different name, enter this in the SSL settings.
SSL Troubleshooting
A complete debug of the SSL logging will be required to diagnose the problems. To capture the debugging, ensure that the variable debugSsl is set to "true".
To enable the logging of SSL implemented layer, turn the logging to FINEST for 'com.wandisco.platform.net' package.
Enable SSL for Hadoop Services
This section shows you how to enable SSL encryption for Hadoop's native services such as HDFS, Yarn or MapReduce.
Keystores are used in two ways:
While all SSL clients must have access to a truststore, it is not always necessary to create and deploy truststores across a cluster. The standard JDK distribution includes a default truststore which is pre-provisioned with the root certificates of a number of well-known Certificate Authorities. If you do not provide a custom truststore, the Hadoop daemons load this default truststore. Therefore, if you are using certificates issued by a CA in the default truststore, you do not need to provide custom truststores. However, you must consider the following before you decide to use the default truststore:
If you choose to use the default truststore, it is your responsibility to maintain it. You may need to remove the certificates of CAs you do not deem trustworthy, or add or update the certificates of CAs you trust. Use the keytool utility to perform these actions.
Security Considerations
keystores contain private keys. truststores do not. Therefore, security requirements for keystores are more stringent:
These considerations should guide your decisions about which keys and certificates you will store in the keystores and truststores that you will deploy across your cluster.
Keystores should contain a minimal set of keys and certificates. Ideally you should create a unique keystore for each host, which would contain only the keys and certificates needed by the Hadoop SSL services running on the host. Usually the keystore would contain a single key/certificate entry. However, because truststores do not contain sensitive information you can safely create a single truststore for an entire cluster. On a production cluster, such a truststore would often contain a single CA certificate (or certificate chain), since you would typically choose to have all certificates issued by a single CA.
SSL roles for Hadoop Services
| Service | SSL Role |
|---|---|
| HDFS | server and client |
| MapReduce | server and client |
| YARN | server and client |
| HBase | server |
| Oozie | server |
| Hue | client |
SSL servers load the keystores when starting up. Clients then take a copy of the truststore and uses it to validate the server's certificate.
Configure SSL for HDFS, YARN and MapReduce
Before you begin
Ensure keystores/certificates are accessible on all hosts running HDFS, MapReduce or YARN. As these services also run as clients they also need access to the truststore. (As mentioned, it's okay to put the truststores on all nodes as you can't always determine which hosts will be running the relevant services.)
keystores must be owned by the hadoop group and have permissions 0440 (readable by owner and group). truststores must have permission 0444 (readable by all).
You'll need to specify the absolute paths to keystore and truststore files - these paths need to be valid for all hosts - this translates into a requirement for all keystore file names for a given service to be the same on all hosts.
Multiple daemons running on a host can share a certificate. For example, in case there is a DataNode and an Oozie server running on the same host, they can use the same certificate.