The Hive Metastore plugin enables WD Fusion to replicate Hive's metastore, allowing WD Fusion to maintain a replicated instance of Hive's metadata and, in future, support Hive deployments that are distributed between data centers.
Check out the Hive Metastore Plugin Release Notes for the latest information. See 1.0 WD Hive Metastore Plugin Release Notes
Along with the default requirements that you can find on the WD Fusion Deployment Checklist, you also need to ensure that the Hive service is already running on your server. Installation will fail if the WD Fusion Plugin can't detect that Hive is already running.
Saving to: `fusion-ui-server-hdp-hive_deb_installer.sh'

100%[===============================================================================================================>] 1,635,783,053 8.76M/s   in 8m 18s

2016-06-15 10:53:47 (3.13 MB/s) - `fusion-ui-server-hdp-hive_deb_installer.sh' saved [1635783053/1635783053]

root@dc01-vm1:~# bash fusion-ui-server-hdp-hive_deb_installer.shInstalling WD Fusion
Verifying archive integrity... All good.
Uncompressing WANdisco Fusion........................
:: :: :: # # ## #### ###### # ##### ##### #####
:::: :::: ::: # # # # ## ## # # # # # # # # #
::::::::::: ::: # # # # # # # # # # # # # #
::::::::::::: ::: # # # # # # # # # # # ##### # # #
::::::::::: ::: # # # # # # # # # # # # # # #
:::: :::: ::: ## ## # ## # # # # # # # # # # #
:: :: :: # # ## # # # ###### # ##### ##### #####
Welcome to the WANdisco Fusion installation
You are about to install WANdisco Fusion version 2.8-19
Do you want to continue with the installation? (Y/n) Checking prerequisites:
Checking for perl: OK
Checking for java: OK
No packages found matching fusion-*.
INFO: Using the following Memory settings for the WANdisco Fusion Admin UI process:
INFO: -Xms128m -Xmx512m
Do you want to use these settings for the installation? (Y/n)
Which port should the UI Server listen on?  [8083]:
Please specify the appropriate platform from the list below:

[0] hdp-2.1.0
[1] hdp-2.2.0
[2] hdp-2.3.0
[3] hdp-2.4.0

Which fusion platform do you wish to use? 1
You chose hdp-2.2.0:2.6.0.2.2.0.0-2041We strongly advise against running Fusion as the root user.
For default CDH setups, the user should be set to 'hdfs'. However, you should choose a user appropriate for running HDFS commands on your system.
Which user should Fusion run as? [hdfs]
Checking 'hdfs' ...
... 'hdfs' found.
Please choose an appropriate group for your system. By default CDH uses the 'hdfs' group.
Which group should Fusion run as? [hdfs]
Checking 'hdfs' ...
... 'hdfs' found.Installing with the following settings:
User and Group: hdfs:hadoop
Hostname: dc01-vm1.bdva.wandisco.com
Fusion Admin UI Listening on: 0.0.0.0:8083
Fusion Admin UI Minimum Memory: 128
Fusion Admin UI Maximum memory: 512
Platform: hdp-2.2.0 (2.6.0.2.2.0.0-2041)
Fusion Server Hostname and Port: dc01-vm1.bdva.wandisco.com:8082
Do you want to continue with the installation? (Y/n)Adding the user hdfs to the hive group if the hive group is present.
Installing hdp-2.2.0 packages:
fusion-hcfs-hdp-2.2.0-server_2.8-SNAPSHOT-1854_all.deb ... Done
fusion-hcfs-hdp-2.2.0-ihc-server_2.8-SNAPSHOT-1854_all.deb ... Done
Installing plugin packages:
wd-hive-plugin-hdp-2.2.0_1.0-SNAPSHOT-480_all.deb ... Done
Installing fusion-ui-server package:
fusion-ui-server_2.8-19_all.deb ...Selecting previously unselected package fusion-ui-server.
(Reading database ... 56307 files and directories currently installed.)
Unpacking fusion-ui-server (from .../fusion-ui-server_2.8-19_all.deb) ...
Setting up fusion-ui-server (2.8-19) ...
DoneStarting fusion-ui-server: [ OK ]
Checking if the GUI is listening on port 8083: .....Done
Please visit http://node.hostname.com:8083/ to complete installation of WANdisco Fusion
If 'your.hostname.server.com' is internal or not available from your browser, replace
this with an externally available address to access it.
Stopping fusion-ui-server:. [ OK ]
Starting fusion-ui-server: [ OK ]Follow this section to complete the installation by configuring WD Fusion using a browser-based graphical user interface.
Silent Installation
For large deployments it may be worth using Silent Installation option.
http://<YOUR-SERVER-ADDRESS>.com:8083/It's possible to enable High Availability in your WD Fusion cluster by adding additional WD Fusion/IHC servers to a zone. These additional nodes ensure that in the event of a system outage, there will remain sufficient WD Fusion/IHC servers running to maintain replication.
Add HA nodes to the cluster using the installer and choosing to Add to an existing Zone, using a new node name.
Configuration for High Availability
When setting up the configuration for a High Availability cluster, ensure that fs.defaultFS, located in the core-site.xml is not duplicated between zones. This property is used to determine if an operation is being executed locally or remotely, if two separate zones have the same default file system address, then problems will occur. WD Fusion should never see the same URI (Scheme + authority) for two different clusters.

Welcome.
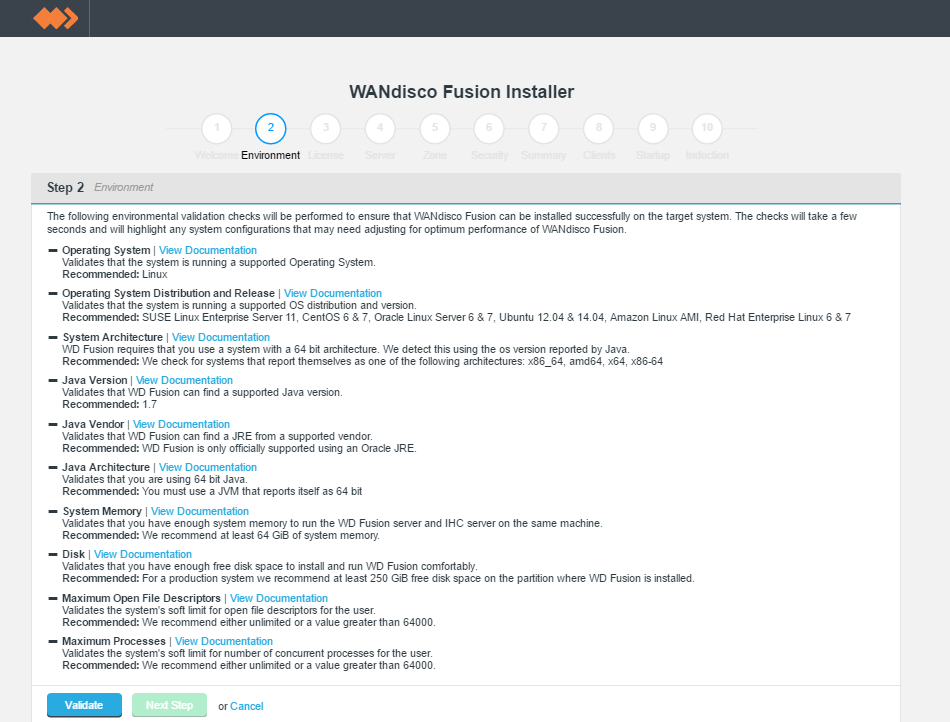
Environmental checks.
On clicking validate the installer will run through a series of checks of your system's hardware and software setup and warn you if any of WD Fusion's prerequisites are missing.

Example check results.
Any element that fails the check should be addressed before you continue the installation. Warnings may be ignored for the purposes of completing the installation, especially if the installation is only for evaluation purposes and not for production. However, when installing for production, you should also address all warnings, or at least take note of them and exercise due care if you continue the installation without resolving and revalidating.
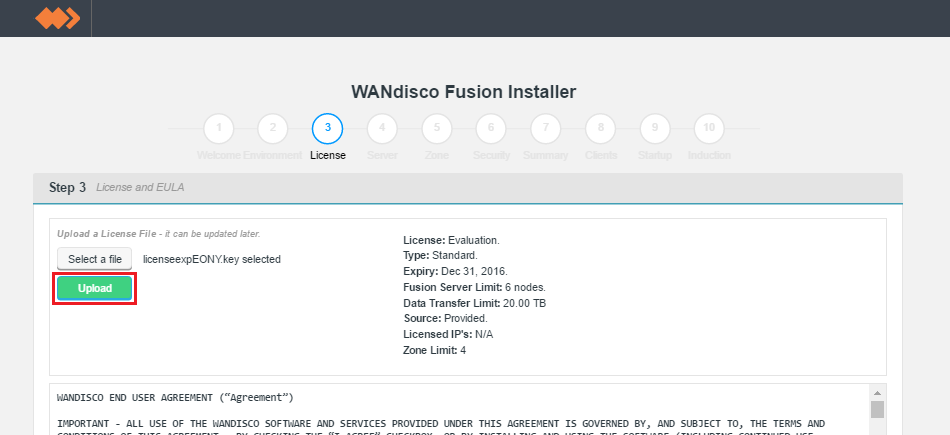
Upload your license file.

Verify license and agree to subscription agreement.
Click on the I agree to the EULA to continue, then click Next Step.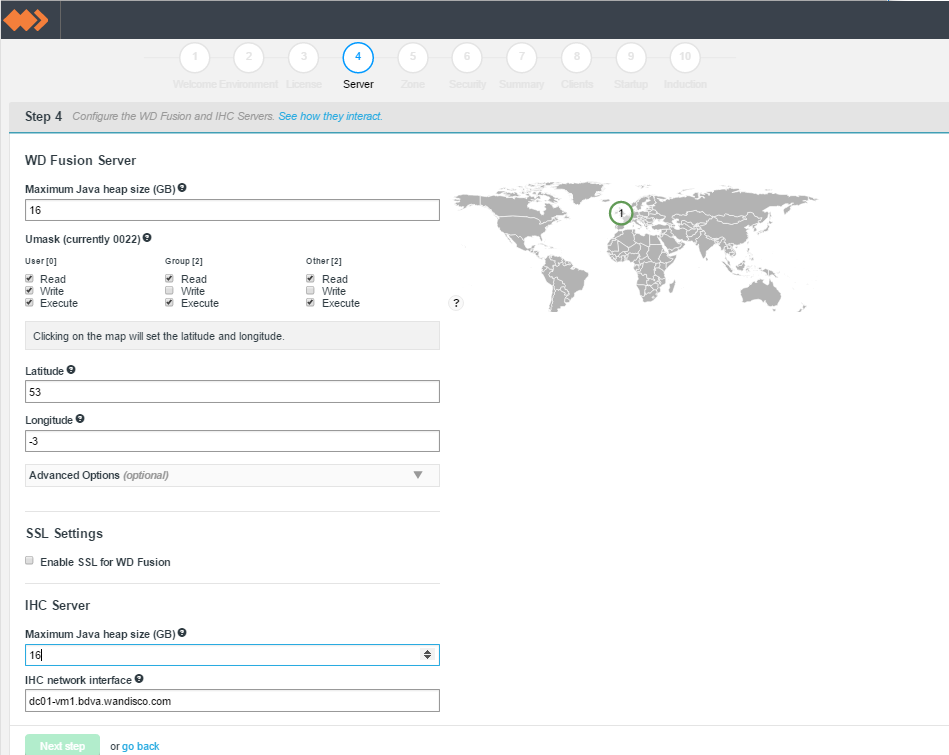
screen 4 - Server settings
Only apply these options if you fully understand what they do.
The following advanced options provide a number of low level configuration settings that may be required for installation into certain environments. The incorrect application of some of these settings could cause serious problems, so for this reason we strongly recommend that you discuss their use with WANdisco's support team before enabling them.
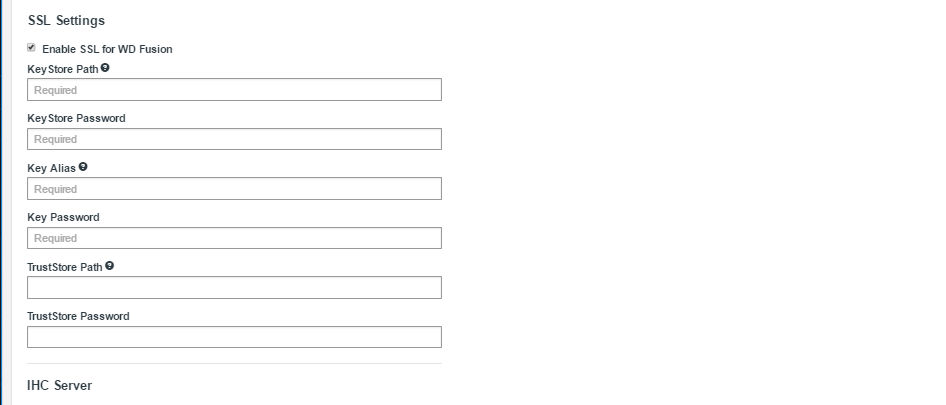
Tick the checkbox to enable SSL
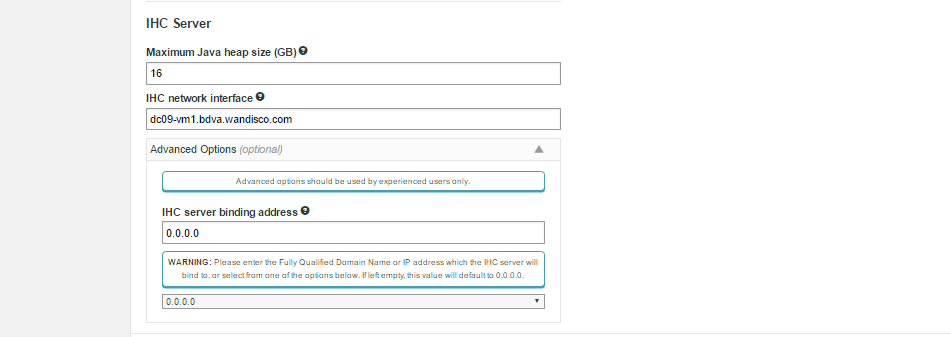
IHC Settings
ihc.server field. In all cases the port should be identical to the port used in the ihc.server address. i.e. /etc/wandisco/fusion/ihc/server/cdh-5.4.0/2.6.0-cdh5.4.0.ihc
or /etc/wandisco/fusion/ihc/server/localfs-2.7.0/2.7.0.ihc
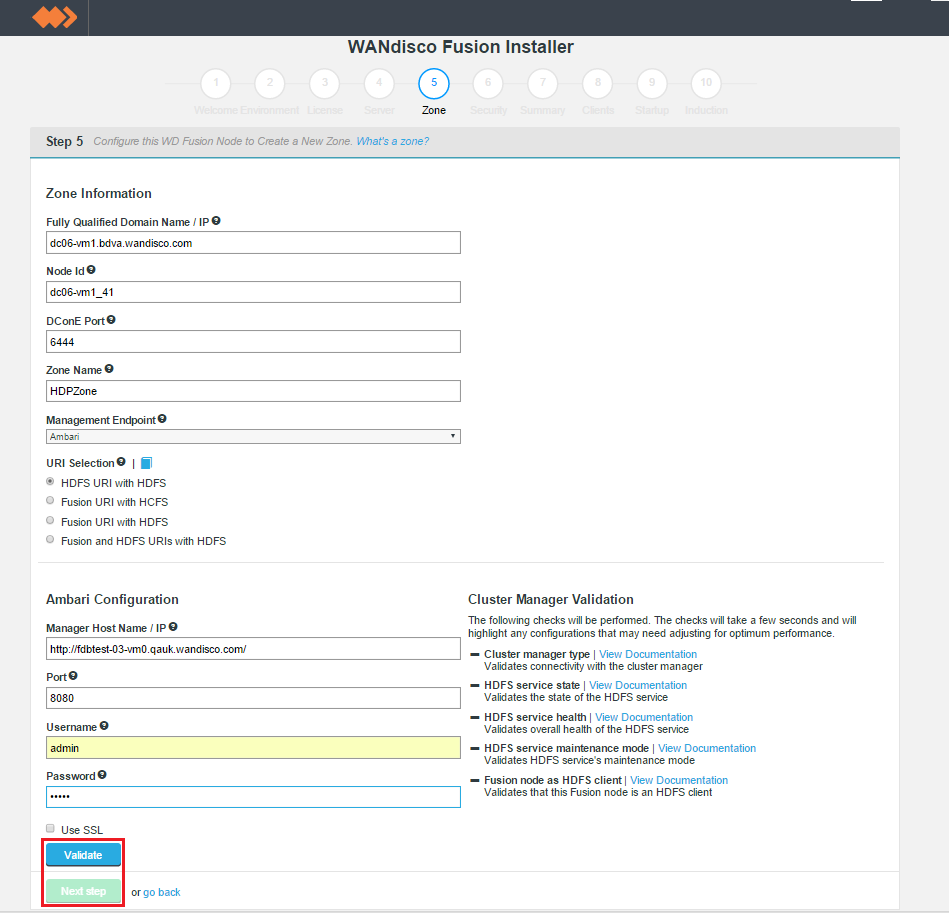
New Zone
Entry fields for zone properties
Induction failure
If induction fails, attempting a fresh installation may be the most straight forward cure, however, it is possible to push through an induction manually, using the REST API. See Handling Induction Failure.
Known issue with Location names
You must use different Location names /Node IDs for each zone. If you use the same name for multiple zones then you will not be able to complete the induction between those nodes.
Only apply these options if you fully understand what they do.
The following advanced options provide a number of low level configuration settings that may be required for installation into certain environments. The incorrect application of some of these settings could cause serious problems, so for this reason we strongly recommend that you discuss their use with WANdisco's support team before enabling them.
The default behavior for WD Fusion is to fix all replication to the Hadoop Distributed File System / hdfs:/// URI. Setting the hdfs-scheme provides the widest support for Hadoop client applications, since some applications can't support the available "fusion:///" URI they can only use the HDFS protocol. Each option is explained below:

fusion:// URI to be used; only paths starting with hdfs:// or no scheme that correspond to a mapped path will be replicated. The underlying file system will be an instance of the HDFS DistributedFileSystem, which will support applications that aren't written to the HCFS specification.
fusion:// for all data that must be replicated over an instance of the Hadoop Compatible File System. If your deployment includes Hadoop applications that are either unable to support the Fusion URI or are not written to the HCFS specfication, this option will not work.
MapR deployments
Use this URI selection if you are installing into a MapR cluster.


fusion://, hdfs:// and no scheme) and uses HDFS for the underlying file system, to support applications that aren't written to the HCFS specification.This option lets you select the TCP port that is used for WD Fusion's API.
Two advanced options are provided to change the way that WD Fusion responds to a system shutdown where WD Fusion was not shutdown cleanly. Currently the default setting is to not enforce a panic event in the logs, if during startup we detect that WD Fusion wasn't shutdown. This is suitable for using the product as part of an evaluation effort. However, when operating in a production environment, you may prefer to enforce the panic event which will stop any attempted restarts to prevent possible corruption to the database.
This section configures WD Fusion to interact with the management layer, which could be Ambari or Cloudera Manager, etc.
https in your Manager Host Name and Port. You may be prompted to update the port if you enable SSL but don't update from the default http port.Authentication without a management layer
WD Fusion normally uses the authentication built into your cluster's management layer, i.e. the Cloudera Manager username and password are required to login to WD Fusion. However, in Cloud-based deployments, such as Amazon's S3, there is no management layer. In this situation, WD Fusion adds a local user to WD Fusion's ui.properties file, either during the silent installation or through the command-line during an installation.
Should you forget these credentials, see Reset internally managed password
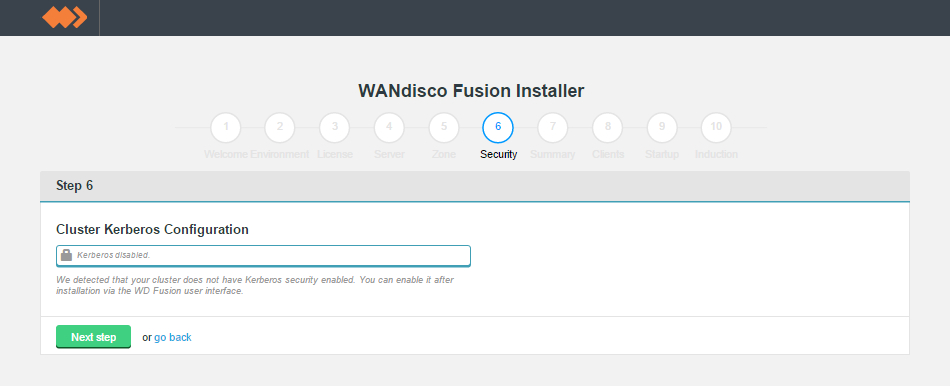
In this step you also set the configuration for an existing Kerberos setup. If you are installing into a Kerberized cluster, include the following configuration.
Enabling Kerberos authentication on WD Fusion's REST API
When a user has enabled Kerberos-authentication on their REST API, they must kinit before making REST calls, and enable GSS-Negotiate authentication. To do this with curl, the user must include the "-negotiate" and "-u:" options, like so:
curl --negotiate -u: -X GET "http://${HOSTNAME}:8082/fusion/fs/transfers"
See Setting up Kerberos for more information about Kerberos setup.

Zone information.
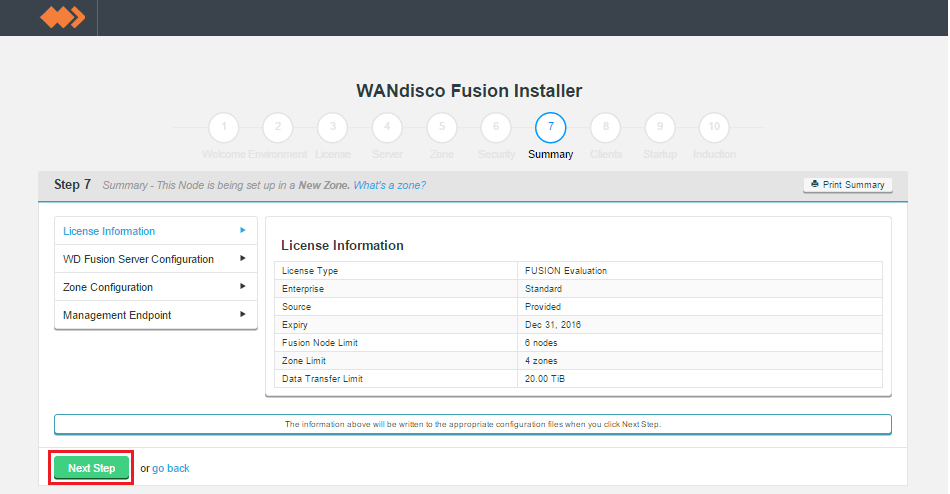
Summary
Once you are happy with the settings and all your WD Fusion clients are installed, click Deploy Fusion Server.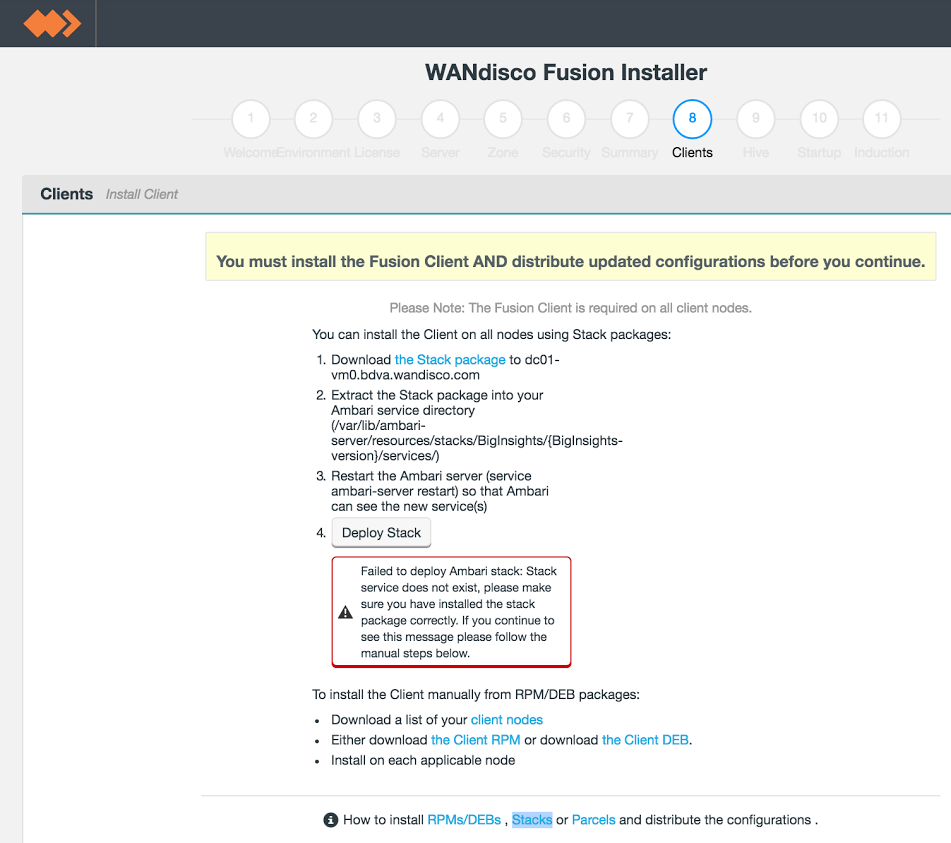
Client installations.
Currently you may need to manually install the WANdisco Fusion client files through Ambari. Complete the installation of the WD Fusion stack using Ambari's stack screen.

Ambari manual client installation.
The installer supports three different packaging systems for installing Clients, regular RPMs, Parcels for Cloudera and HDP Stack for Hortonworks/Ambari.
client package location
You can find them in your installation directory, here:
/opt/wandisco/fusion-ui-server/ui/client_packages
/opt/wandisco/fusion-ui-server/ui/stack_packages
/opt/wandisco/fusion-ui-server/ui/parcel_packages
Important! If you are installing on Ambari 1.7 or CHD 5.3.x
Additionally, due to a bug in Ambari 1.7, and an issue with the classpath in CDH 5.3.x, before you can continue you must log into Ambari/Cloudera Mananger and complete a restart of HDFS, in order to re-apply WD Fusion's client configuration.
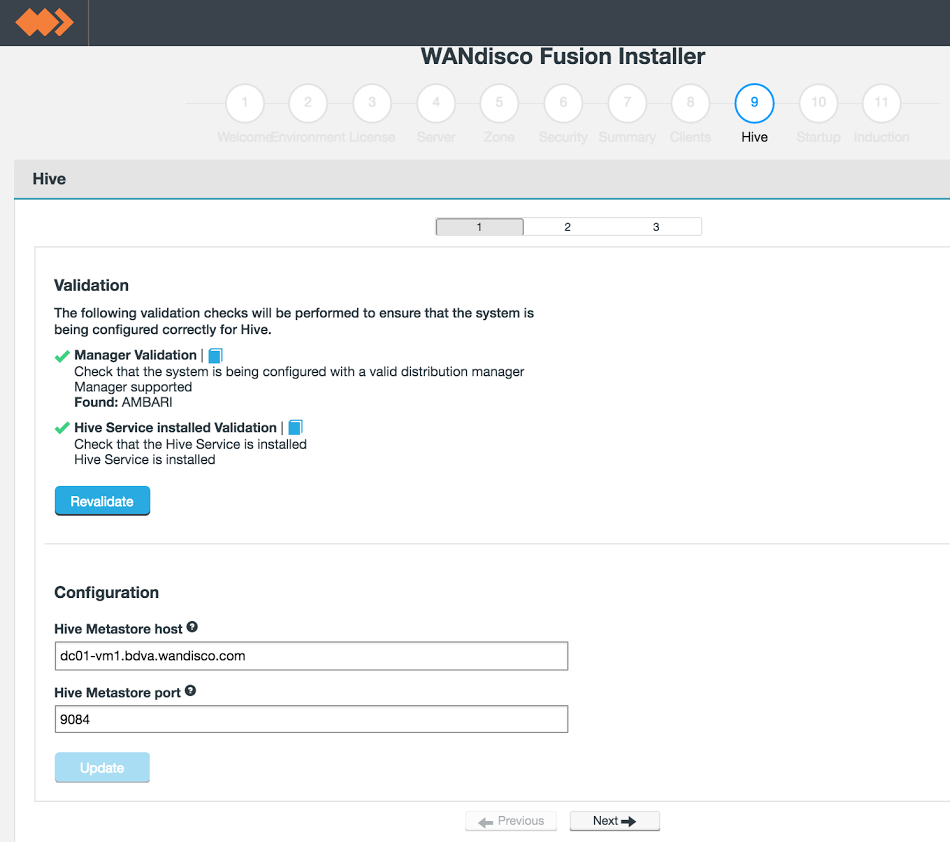
Hive Metastore plugin installation - substep 1.
The installer performs some basic validation, checking the following criteria:
During the installation you need to enter the following properties:
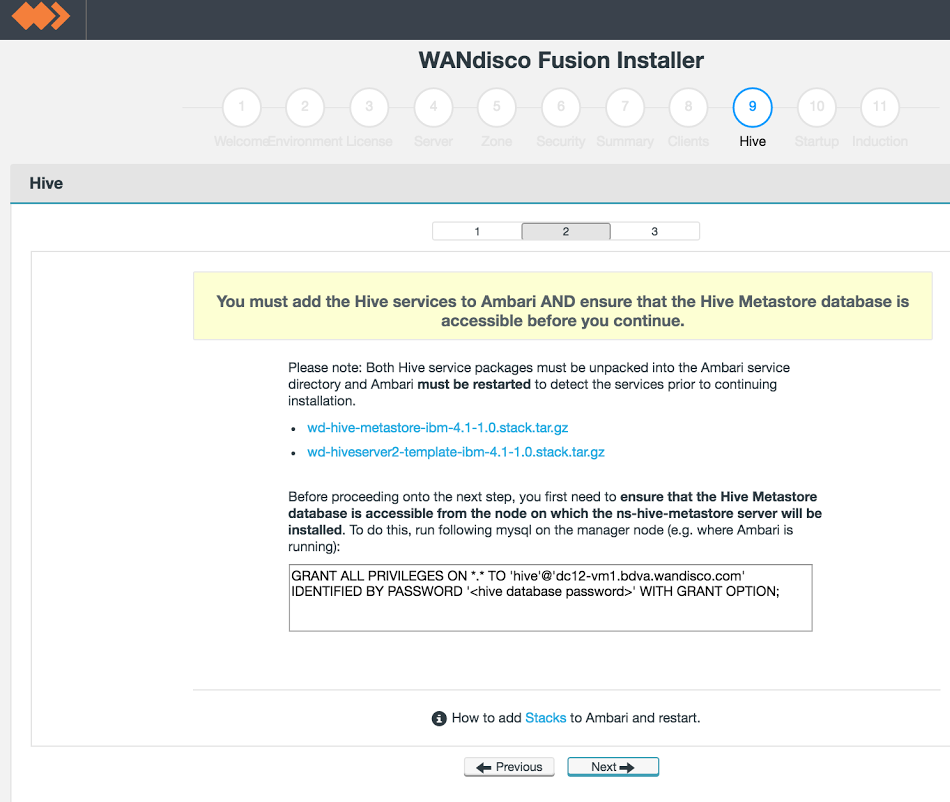
Hive Metastore plugin installation - sub-step 2.
If you check Ambari, providing the new packages are correctly put in place, you will see them listed. Do not enable them through Ambari, they will be installed later.
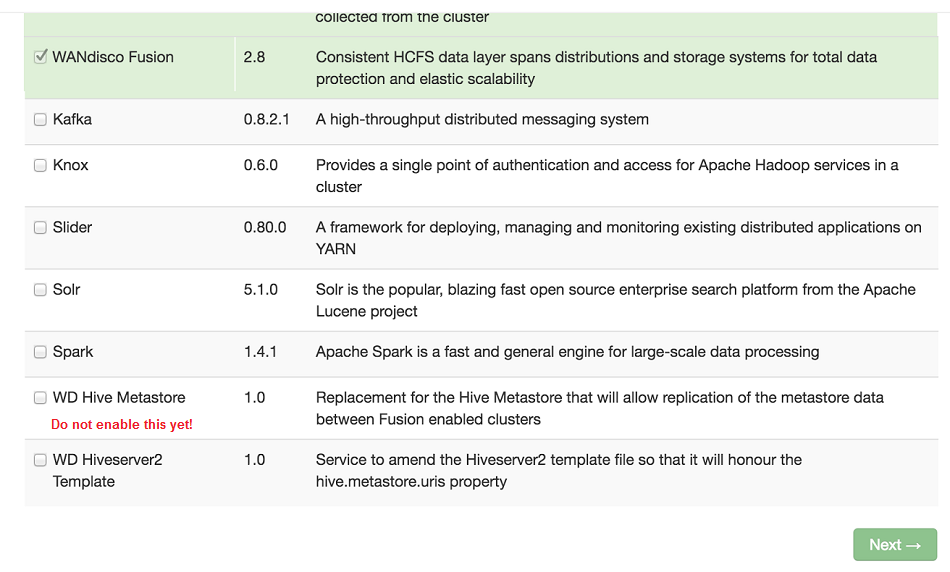
Hive Metastore plugin installation - check the service packages have been picked up.
GRANT ALL PRIVILEGES ON *.* TO 'hive'@'<HOSTNAME-FOR-HIVE-METASTORE-SERVICE-NODE>'
IDENTIFIED BY PASSWORD '<hive database password>' WITH GRANT OPTION;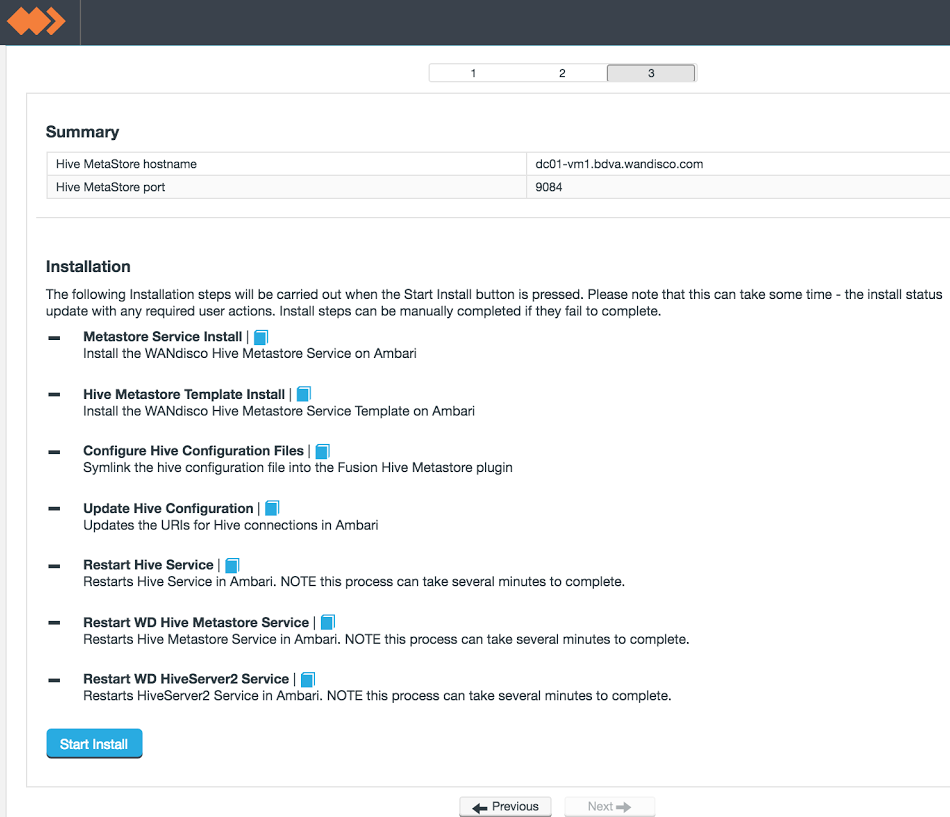
Hive Metastore plugin installation - sub-step 3.
When you have confirmed that the stack files are in place, on the installer screen, click Next.The summary confirms the values of the entries you provided in the first sub-step of the WANdisco Hive Metastore installation section.
To begin the installation of the Plugin, click Start Install.
The following notes explain what is happening during each phase of the installation into a Ambari-based cluster:
The following notes explain what is happening during each phase of the installation into a CDH-based cluster:
The Installer lets you configure WD Fusion to use your platform's Kerberos implementation. You can find supporting information about how WD Fusion handles Kerberos in the Admin Guide, see Setting up Kerberos.
The following diagram provides a simplified view of how WANdisco's Hive Metastore plugin interfaces between your Hive deployment and WD Fusion.

You may get an error in the WD Fusion log file or in the WDHive Metastore log:
Error getting metastore password: null
# curl -u YOUR_CM_USERNAME:YOUR_CM_PASSWORD http://YOUR_CM_HOSTNAME:7180/api/v11/clusters/DC-1/services/hive1/config
curl -u admin:admin http://cert01-vm0:7180/api/v11/clusters/DC-1/services/hive1/confighadoop credential create javax.jdo.option.ConnectionPassword -provider localjceks://file/etc/wandisco/hive/creds.localjceks# By default the file has rights-rwx------, so it has to be owned by the user who runs the Fusion or WDHive Metastore Server process chown hdfs /etc/wandisco/hive/creds.localjceks # If Fusion and WDHive Metastore Server run on the same server, but have each different user, then the file has to me made visible to bothchmod 644 creds.localjceks
vi /etc/wandisco/hive/hive-site.xmlset the property
hadoop.security.credential.provider.path to localjceks://file/etc/wandisco/hive/creds.localjceks (the property will already exist in the file).
<property>
    <name>hadoop.security.credential.provider.path</name>
    <value>localjceks://file/etc/wandisco/hive/creds.localjceks</value>
</property>