Installation Guide
This section runs through the various steps that you need to take in order to integrate an existing Gerrit (version 2.9.1) installation with WANdisco's Git MultiSite (Version 1.5).
Overview of the installation
Before we get started we'll run through the steps involved:
Installation Steps
- Prerequisites - Check that all the requirements for running Git MultiSite with Gerrit have been addressed.
- Install Git MultiSite - on each of your nodes.
- Induct your nodes - so that they can talk to each other.
- Create a replication group - for your gerrit projects.
- Add your Gerrit-controlled repositories - to Git MultiSite.
- Install WANdisco's Gerrit MultiSite - components.
- Run the sync_repo.sh script - this adds Gerrit's repositories to Git MultiSite.
- Test the integration - Run through your Gerrit workflow project, confirm that everything is replicated to all your nodes.
1. Prerequisites
Assumption: You're already up-and-running with Gerrit
We assume that you are starting with an established Gerrit installation, along with the required database and authentication mechanism. If you are starting from scratch then the first step would be to complete a Gerrit installation. For this you need to refer to Gerrit's own documentation.
If you are not currently running Gerrit and need to start with the Gerrit installation, take note of the following tips:
- system user The Gerrit installation instructions sets the system user as "gerrit2" by default. We recommend that you create an account "gitms" instead. It is important that whatever account you set up for running Gerrit, you need to carry this user through the following procedures and use it for both Gerrit and Git MultiSite.
- We've tested Gerrit integration using the MySQL. You should install and configure a MySQL database client on all nodes. Follow our guide to Install and configure MySQL for Gerrit
- Gerrit will automatically start at the end of the installation. Either run the WAR file with the
--no-auto-startswitch, or shut Gerrit down prior to moving onto the installation if Git MultiSite for Gerrit. e.g.gerrit2@host:~$ ~/gerrit/bin/gerrit.sh stop Stopping Gerrit Code Review: OK gerrit2@host:~$
Checklist:
You should check through the Gerrit section of Git MultiSite's installation checklist.
2. Install Git MultiSite
You need to complete the installation of Git MultiSite. This is a detailed procedure in its own right and rather than repeat it here we'll refer to the relevant sections of the Git MultiSite documentation.
Important requirements for Gerrit integration
- System user - Git Multisite MUST be installed using the same system user that is used for Gerrit (e.g.
gerrit2)
If you don't use the same user then you're likely to encounter permission problems that will stop the integration from working properly. - Avoid port conflict - Git MultiSite will try to use the same port that Gerrit uses (by default) for web access (8080). You MUST configure Git MultiSite to use a different port (e.g. 7070).
Now follow 3. Installation Procedure.
Remember the two requirements noted above and complete the installation on all of your nodes. You need to return to these instructions before you create the first replication group.
3. Induct your nodes
Git MultiSite is now installed on all your nodes but they're not yet connected or able to sync changes. Again, you need to follow the instruction in the Git MultiSite user guide. See Node Induction.
4. Create a replication group
Follow this procedure to create a replication group. These instructions are carried out on Git MultiSite's admin UI.
Current limitations:
You need to be aware of the following limits that apply to this version of Gerrit MultiSite:
- Gerrit can only integrate with a single Replication Group -
It is possible to have more than one replication group in your Git MultiSite deployment but each node can only integrate with a single replication group. See the Appendix for an example of a deployment that uses Selective Replication. - All nodes in your Gerrit replication group must be Active or Active-Voters -
Any Gerrit node could also be a Tiebreaker. Passive and Voter-only nodes are not supported.
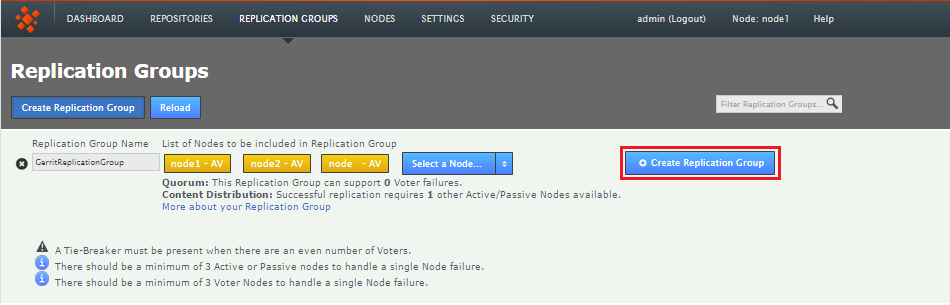
- When you have all nodes created and inducted, log in to the admin console and click on the Replication Groups tab. Then click on the Create Replication Group button.

Create Replication Group
- Enter a name for your Replication Group in the Replication Group Name field. If you're running with multiple groups you may want to indicate that this one is for Gerrit repositories, e.g. name it "Gerrit-Repositories". Then click on the drop-down button and select each of your other Gerrit/Git MultiSite nodes.
You can select any number of available nodes (providing they have been added as part of this Gerrit deployment). Those nodes that you select will appear as clickable buttons in the Add Node field.
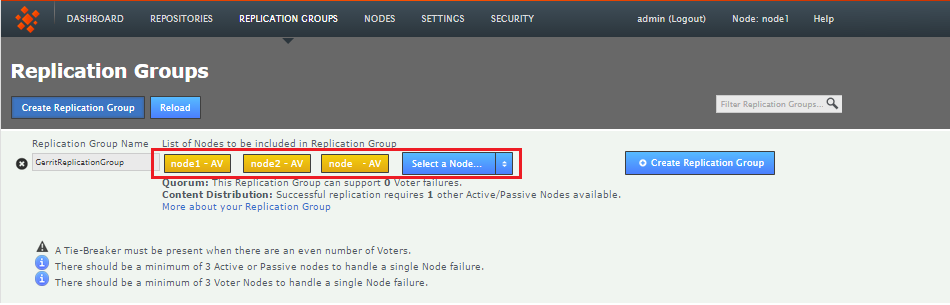
Enter a name and add some nodes.
- New nodes are added as Active Voters (denoted with "AV"). You should leave this node type in most cases. When used with Gerrit, Git MultiSite only supports Active or Active-Voter node types. For more information, see our Reference Section - Node Types
Don't change node type
Once you have added all nodes and confirmed their type, click Create Replication Group to see a confirmation of the replication group's details. - Replication Groups that you create will be listed on the Replication Groups tab.
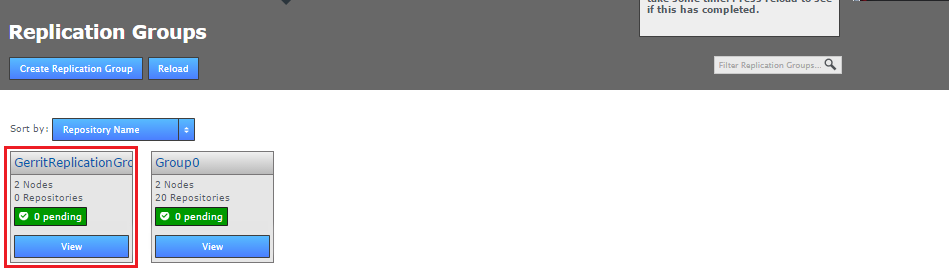
Groups boxes, click VIEW view your options.
5. Add your Gerrit-controlled repositories
Follow these instructions for adding repositories to your new replication group. We assume that you already have repositories set up under Gerrit. These existing repositories can be added using the following procedure, providing that you have used rsync to copy them to each of your nodes. You can't add existing repositories for replication unless they have been synced to all your nodes.
For new repositories, create a new project in Gerrit then proceed with the details of the Git repository which is then created. There's a slightly more detailed explanation of the procedure available in the Git MultiSite user guide, although it doesn't take Gerrit integration into account - 4.3 Add Repositories.
Before adding a repository:
- ensure that it has been copied (using rsync) to each of your nodes
- consider running
git fsckto ensure its integrity. - You may also wish to run a
git gcbefore yourgit fsckfor performance reasons.
- On one of your nodes, click the Repositories tab. Click on the Add button. The procedure only needs to be completed on one node, providing that the repositories and any related files or configuration are already in place on each node.
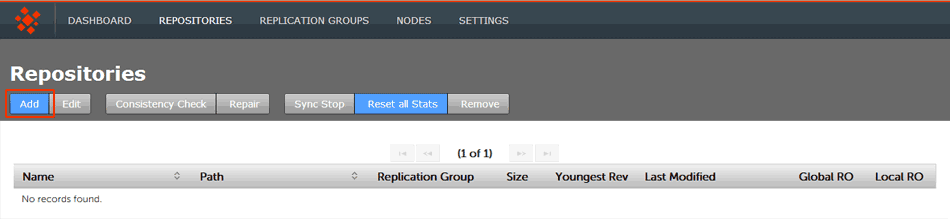
Repositories > Add
- Enter the Repository's name, the file system path (full path to the repository) and use the drop-down to select the replication group. You can set the repository to be Read-only by ticking the Global Ready-only You can deselect this later. Click ADD REPO.

Repositories > Enter details then click ADD REPO
- Click the REPOSITORIES tab to see a list of the repositories added.
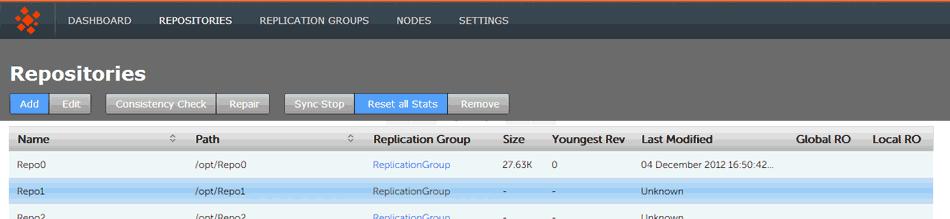
Repositories listed
The repositories list shows:
- Name
- The name of the repository - this will be the same as the folder name in the Git directory.
- Path
- This should be the the full path to the git repository used by Gerrit. The path will need to match with Gerrit's repository directory.
Default location
The location of Git repositories by default is the>gitdirectory in the installation folder of your Gerrit installation. e.g.<Install-path>/gerrit/git/ - Replication Group
- The Replication Group in which the repositories will be managed by Gerrit and replicated to your Gerrit -Git MultiSite nodes.
- Size
- The file size of the repository.
- Youngest Rev
- Not applicable to the Git version of MultiSite, this is relevant only when MultiSite is set for replicating Subversion repositories.
- Last Modified
- The timestamp for the last revision, which provides a quick indicator for the last time a Git user made a change.
- Global RO
- Checkbox that indicates whether the repository is globally Read-only, that is Read-only at all sites.
- Local RO
- Checkbox that indicates whether the repository is locally Read-only, that is Read-only to users at this node. The repository receives updates from the replicas on other sites, but never instigates changes itself.
Table columns describe master branch, not the whole repository
The following columns of information describe the master branch.
Be ware of the following considerations before making changes to Gerrit-controlled repositories:
- Creating new replication groups:
Using multiple replication groups with Gerrit is an advanced operation. Before proceeding, Contact WANdisco Support. - Moving repositories to other replication groups: If you move a Gerrit repository to a new replication group, make sure that the new replication group contains all Gerrit nodes. If you are trying to achieve selective replication, Contact WANdisco Support for advice before proceeding.
- Adding a new repository outside of Gerrit:
Adding a new repository that exists in Gerrit's data directory by creating it directly on disk: Keep in mind that new repositories created in this way must be registered with Git MultiSite. Although not officially supported, we're unaware of any problems when adding repositories in this way. - Adding a new repository that exists in Gerrit's data directory by creating it through Git MultiSite:
Although not officially supported, again, we're unaware of any problems when adding repositories in this way. - Removing a repository in any way other than through Gerrit (project deletion):
If you delete a repository on disk, make sure to remove it from Git MultiSite as well.
6. Install WANdisco's Git MultiSite for Gerrit
In this step we'll install Git MultiSite for Gerrit. This is will modify an existing installation of Gerrit, which must be version 2.9.1 or above, with the necessary components for replication with Git MultiSite. If you are running an earlier version of Gerrit then you should upgrade it before you continue.
When setting database hostname, use an IP address instead of
localhost(if applicable) or you will need to edit it for your other nodes, later.
Tar Archive contents
Place and extract archive file into your Git MultiSite directory. The archive contains the following components:
- common.sh - a set of common functions required by the included scripts
- install.conf - configuration file you will modify during the installation
- installer.sh - Gerrit MultiSite installer script
- README.md - a readme file that links to these instructions
- release.war - WANdisco specific version of the Gerrit archive file
- sync_repo.sh - script used at the end of the procedure to add git repositories to Git MultiSite
- Stop Gerrit if it auto-started and run re-index. e.g.
java -jar gerrit-2.9.1.war reindex
- On your first node, Start Gerrit. Open the Gerrit web interface and create a new admin user for Git MultiSite, set the HTTP Password.
Keep the password to hand, you'll need it again when you edit the install.conf file. - Before running the installer you need to provide some configuration. This is done by editing the
install.conffile that is located in the Gerrit MultiSite tar archive:vi install.conf
Important: the values provided below are workable examples, however, you shouldn't apply them blindly. Ensure that they will match the needs of your deployment.# GITMS_ADMIN_USER is the username of a Git Multisite Administrator GITMS_ADMIN_USER=admin- This should be an admin user that has been set up in Git MultiSite.# GITMS_ADMIN_PASS is the password of that user GITMS_ADMIN_PASS=admin- This is the password file that corresponds with the above Git MultiSite admin user.# GITMS_REPO_GROUP_NAME is the name of the replication group that Gerrit will use. GITMS_REPO_GROUP_NAME="Gerrit MultiSite"- This should correspond with the name you assigned to the replication group in step 4. Create a replication Group# GITMS_API_PORT is the port the GitMS API is running on GITMS_API_PORT=8082- You can leave this as the default unless you configured your Git MultiSite deployment to use a different port for the API.# GERRIT_ROOT is the directory Gerrit is installed in. It must contain etc/gerrit.conf and bin/gerrit.war GERRIT_ROOT=/home/gitms/gerrit- You need to change this to the directory in which Gerrit is installed.# GITMS_CONFIG_LOCATION is the full path to the application.properties file for the gitms node GITMS_CONFIG_LOCATION=/opt/wandisco/git-multisite/replicator/properties/application.properties- The path to Git MultiSite's main application configuration file. The installer will add the following Gerrit related properties to this file:gerrit.enabled=true- Gerrit integration enabledgerrit.rpgroupid=0683d2fc-6e7c-11e4-9956-080027a5ec28- the id of the Gerrit replication groupgerrit.repo.home=/home/wandisco/gerrit/git- path to Gerrit's repositoriesgerrit.username=admin- Gerrit admin account usernamegerrit.password=pass- Gerrit admin accoint passwordgerrit.events.basepath=/home/wandisco/gerrit_events- path to the Gerrit events directorygerrit.root=/home/wandisco/gerrit- Gerrit install directory# GERRIT_EVENTS_PATH is the location used to communicate Re-index events between the gitms-gerrit-event-plugin # and the GitMS replicator - this path must be writable by the GitMS/Gerrit user GERRIT_EVENTS_PATH=/home/gitms/gerrit_events- This directory is shared between Git MultiSite and Gerrit, check that it is writable by both applications.## GERRIT_REPO_HOME is the full path to the git repository basepath used in Gerrit GERRIT_REPO_HOME=/home/gitms/gerrit/git- The directory in which Gerrit stores its repositories. By default this is/gitdirectory in Gerrit's own installation directory.## GERRIT_USERNAME is the username of an account created in Gerrit - note that this user will need admin ## access to trigger reindex events on changeIDs. GERRIT_USERNAME=admin- The Gerrit account with admin privileges that will be used to coordinate reindexing.## GERRIT_PASSWORD is the password of the given GERRIT_USERNAME GERRIT_PASSWORD=password- Password that corresponds with the above Gerrit user account.## GERRIT_PORT is the Gerrit HTTP port GERRIT_PORT=8080- The port through which Gerrit's web interface is accessed. - Run the installer, e.g.
./installer.sh
You'll see the installation proceed in a manner illustrated below.Installing Gerrit MultiSite Checking install.conf Installer configuration loaded Fetching replication group ID Group ID found: 12473897-383f-11e4-bb16-080027279029 Configuring git Git configuration updated Stopping Gerrit Code Review: OK Configuring gerrit Gerrit configuration updated Injecting WEB-INF/lib/org.eclipse.jgit-3.2.0.201312181205-r.jar in to /home/gitms/gerrit/bin/gerrit.war freshening: WEB-INF/lib/org.eclipse.jgit-3.2.0.201312181205-r.jar (deflated 8%) Injection done First phase of installation complete. Next steps: - run this script on all of your other Gerrit nodes - run the sync_repo.sh script on this nodes - start Gerrit on all of your Gerrit nodes
- Before we follow the Next steps provided at the end of the installer, first you need to make a change to Gerrit's database settings to ensure that it can support enough connections. This is handled using the configuration variable
database.PoolLimitwhich needs to be placed in theconfig-gerritfile.This pool limit is not applied by default unless you run with a database type that is not MySQL. You will need to manually add the entry along with a value of 100. This should ensure that in a moderately sized Git MultiSite deployment periods of heavy Git traffic do not result in connection errors that would result in reviews getting stuck in "Submitted, Merge Pending" state.
Edit config-gerrit
[gerrit@node01 gerrit-ms]$ cat ~/gerrit/etc/gerrit.config
[gerrit]
        basePath = git
        canonicalWebUrl = http://x.x.x.x:8080/
[database]
        type = mysql
	poolLimit = 100 <- place here
        hostname = fully.qualified.domain.com
        database = reviewdb
        username = gerrit
[index]
        type = LUCENE
[auth]
        type = HTTP
[sendemail]
        smtpServer = localhost
[container]
        user = gerrit
        javaHome = /usr/java/jdk1.7.0_71/jre
[sshd]
        listenAddress = *:29418
[httpd]
        listenUrl = http://*:8080/
[cache "accounts"] Side note: You'll notice that we need to turn all caching off in a Git MultiSite deployment.
        memorylimit = 0
        disklimit = 0
[cache "accounts_byemail"]
        memorylimit = 0
        disklimit = 0
[cache "adv_bases"]
        memorylimit = 0
        disklimit = 0
[cache "changes"]
        memorylimit = 0
        disklimit = 0
[cache "diff"]
        memorylimit = 0
        disklimit = 0
[cache "diff_intraline"]
        memorylimit = 0
        disklimit = 0
[cache "git_tags"]
        memorylimit = 0
        disklimit = 0
[cache "groups"]
        memorylimit = 0
        disklimit = 0
[cache "groups_byinclude"]
        memorylimit = 0
        disklimit = 0
[cache "ldap_groups"]
        memorylimit = 0
        disklimit = 0
[cache "permission_sort"]
        memorylimit = 0
        disklimit = 0
[cache "plugin_resources"]
        memorylimit = 0
        disklimit = 0
[cache "projects"]
        memorylimit = 0
        disklimit = 0
        checkfrequency = 0
[cache "project_list"]
        memorylimit = 0
        disklimit = 0
[cache "sshkeys"]
        memorylimit = 0
        disklimit = 0
Now save the file.
- Open a terminal session on each node, using the same system user account. Navigate to the Git MultiSite directory and run the Gerrit MultiSite installer.
./installer.sh
Repeat the installation on each of your additional nodes
7. On Node 1, run the sync_repo.sh script
Gerrit is now integrated with Git MultiSite but we still need to modify Gerrit's Git configuration to introduce it's repositories to Git MultiSite.
./sync_repo.shOnce the script has completed, open a terminal session to each node and start Gerrit up, e.g.
./gerrit/bin/gerrit.shGerrit is now replicating its review activities to all nodes. You should test that this is the case.
8. Test the integration
Before leaping into production you should run through your regular Gerrit workflow. You might:
- Clone a repository.
- Add a test file.
- Commit and push to your Gerrit magic branch.
- Check that you get a URL for the review.
- Log in to Gerrit on each node and confirm the review has replicated, you should see it if you click List all.
- Add a comment, e.g. "Looks good to me". Publish the comment and confirm that it replicates to the other nodes.
- Next,the project owner should (from a different node) approve the review. This should trigger Gerrit to merge the change into the master branch and replicate the change across the Git MultiSite nodes.
- Check that replication has completed properly by logging into the Git MultiSite admin UI and view the Repositories tab. Here you can run a consistency check for the applicable repository.
Use a local LDAP authority
As we run without LDAP account caching there will be a greater burden placed on your LDAP authority as it deals with all account lookups. For this reason we strongly recommend that you ensure that the LDAP authority is hosted locally rather than via a WAN link which would could result in a significant drop in performance.
9. Appendix
Selective Replication
In large deployments it may be required that Gerrit is integrated with only a subset of your replicated repositories or even that separate Gerrit instances manage different groups of repositories. Selective Replication requires some additional configuration and can be enabled with the following alternate procedure.
- Follow the installation procedure to Step 4. Create a replication group.
- At Step 4, after adding all nodes to the "all projects" replication group, create additional replication groups that can be used for replicating certain repositories between different locations.
Example:
In a 5-node deployment:
Create Replication Group "GroupA", adding node 1,2 and 3
Create Replication Group "GroupB", adding node 3,4 and 5
This creates two seperate groups of nodes that replicate repositories and integrate with Gerrit independently. You'll notice that Node 3 is a member of both groups and therefore hosts both sets of replicated repositories and will have visibility of all Gerrit reviews that are created. - Having created and populated your two additional replication groups, use the API on one of the nodes in each of the new replication groups in order to capture each replication group's unique IDs.
curl -u admin:pass http://<IP-ADDRESS>:8082/api/replication-groups
- On each node, edit the
application.propertiesfile (you should create a backup copy first) so that the propertygerrit.rpgroupidmatches with the appropriate replication group. In the example deployment nodes 1,2 and 3 would have thegerrit.rpgroupidfor GroupA. - Once the gerrit.rpgroupid is set on all nodes, restart Git MultiSite on all nodes.
- Following the restart:
- Each replication group will replicate separately.
- New repositories will automatically added only to the nodes in the local replication group (e.g. a repository on node1 will be added to GroupA).
- Node 3, being in both replication groups will replicate everything. New repositories created on node 3 will be added to the replication group that is declared in the node's application.properties file.