Reference Guide
1. UI tabs
1.1 DASHBOARD
The dashboard provides administrators with a service status for Git MulitSite and pulls in any urgent Log Messages.
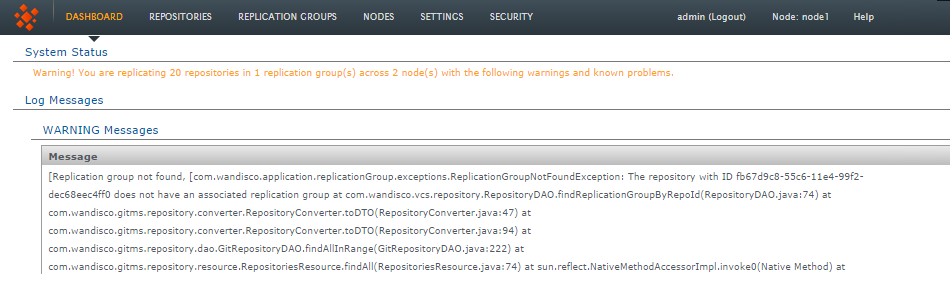
System status and log messages
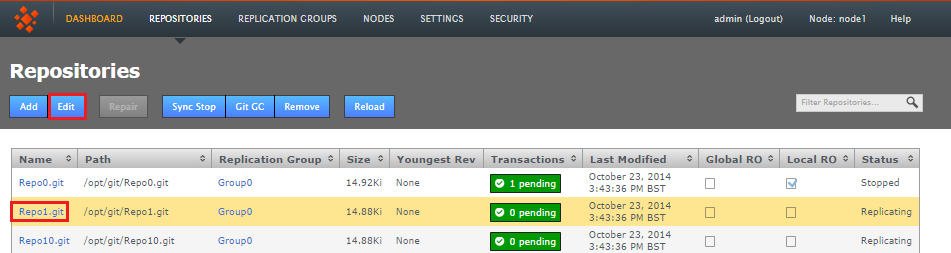
1.2 REPOSITORIES
Use this tab to manage your replicated Git repositories.
Add - Edit - Repair - Sync Stop - Git GC - Remove - Reload
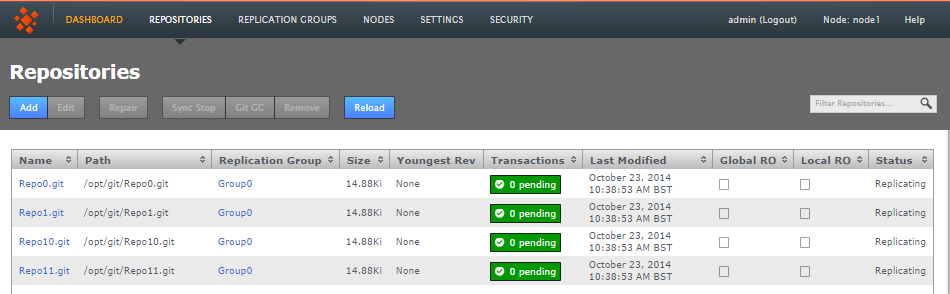
Repositories tab
1.2.1 Repository table
All repositories that you add to GitMS appear on the repository table.
- Name
- The repository name
Known issue: duplicate repository names allowed
You can currently add multiple repositories with the same name, although they need different paths. Ensure that you don't use the same name for multiple repositories because this is bad practice. - Path
- The local path to the repository. This needs to be the same across all sites
- Replicator Group
- The replication group in which the repository is replicated
- Size
- The file size of the repository
- Youngest Rev
- This is the latest revision number for the repository
- Transactions
- Lists any pending transactions. The transactions link to the last transactions played out for the repository:

Click on a transaction box
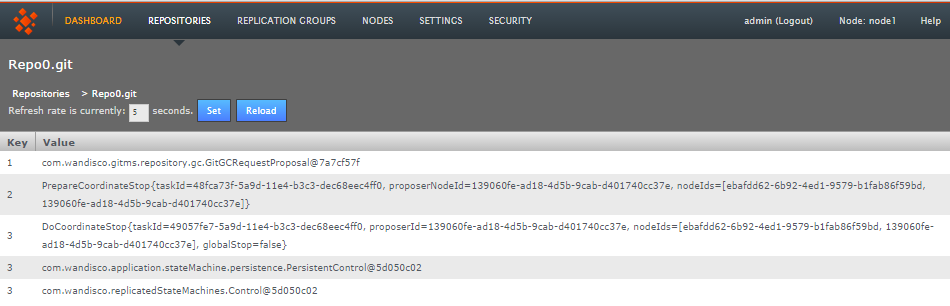
Transactions list revealed
- Last Modified
- The date and time of the last modification to the repository
- Global RO
- Indicates if the repository is globally read-only
Stops any further commits from Git users
The term Global Read-only doesn't accurately reflect what happens at the repository-level. When a repository enters a Global Read-only state it will no longer accept any commits from Git clients. However, proposals that are flying around within the state machine can still be written. It is this state that allows nodes to reach a synchronized stop. - Local RO
- Indicates if the repository is locally read-only. A locally read-only repository is completely locked down, it does not accept new commits from Git clients but does accept futher changes from within the replication system.
- Status
- Indicates whether the repository is replicating or has stopped. A stopped repository will be in a read-only state, either globally or locally
Remember that this table doesn't automatically show all the repositories on the server, only those repositories that have been added. See Add Repository.
1.2.2 Add repository
Click ADD in order to add a new repository to Git MulitiSite - the repository must already exist and be tested before you place it under the control of MultiSite.
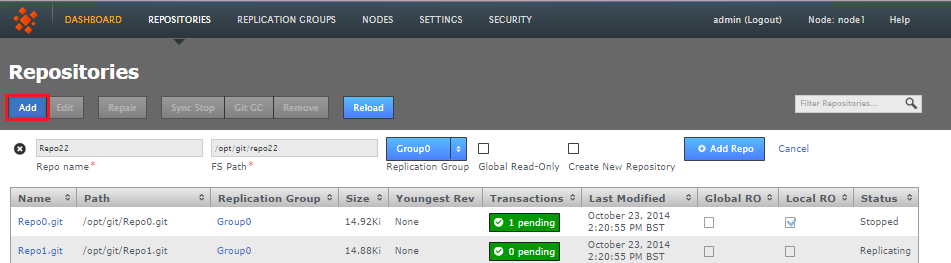
- Repo name
- Choose a descriptive name. This doesn't need to be the folder name, it can be anything you like.
- FS Path
- The local file system path to the repository. This needs to be the same across all sites.
- Replicator Group
- The replication group in which the repository is replicated. It is the replication group that determines which sites hold repository replica, and what role each replica plays.
- Global Read-only
- Check box that lets you add a repository that will be globally read-only. In this state GitMS continues to communicate system changes, such as repository roles and scheduling, however, no repository changes will be accepted, either locally or through proposals that might come in from other sites - which in most cases shouldn't happen as by definition the repository should also be read-only at all other sites.
Global Read-only
You can think of the Global Read-only flag as quick means of locking down a repository, so that no commits will be accepted at any site. - Add Repo
- Click the Add Repo button when you have entered all the required fields for the repository that you are adding. You can cancel the addition of the repository by clicking on the circular cross icon that appears on the left-hand side of the entry fields.
- Filter Repositories
- You can use this search box to filter the list of available repositories, useful if you're running with a large number of repositories.
1.2.3 Edit repositories
You can make changes to repository settings after it has been added:
- Click on the REPOSITORIES tab and then click on a Repository Name. Alternatively you can click anywhere on the Repository's bar, highlighting it in yellow. Click the Edit button on the repositories menu bar, which has now turned blue.
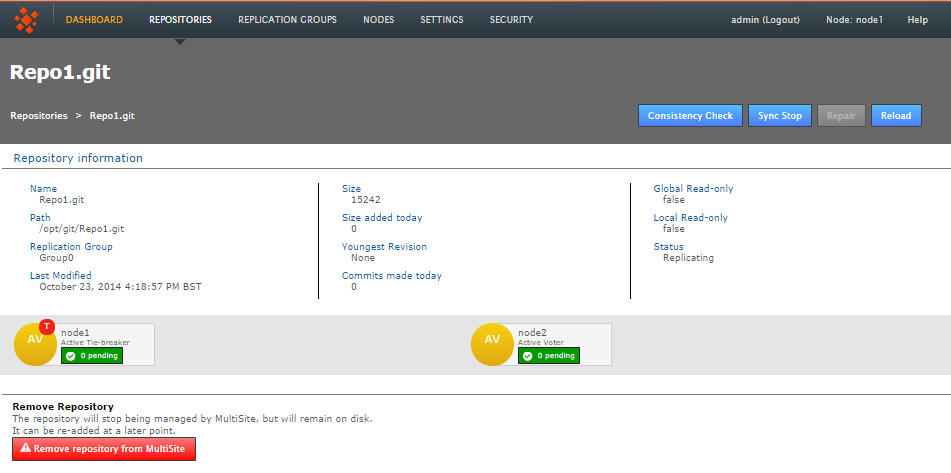
- The repository's screen opens. You can change any of the settings that were applied when the repository was set up.
- Consistency Check
- This button opens the consistency checker tool that you can use to verify that the repository matches its replicas on the other nodes.
- Sync Stop
- Bring replication of the repository to a stop accross all nodes.
- Repair
- Use the repair button to initiate a repository repair procedure.
- Reload
- Refresh the screen to pick up any changes.
- Repository Information
- Available information about the repository.
- Remove Repository
- Use this tool to remove a repository from GitMS's control. Note that the repository data is not moved or deleted, but it is not tracked by MultiSite.
1.2.4 Repair

The Repository Repair tool is used when a repository on one of your nodes has been corrupted or similarly requires repair or replacement. Selecting a repository to repair, the tool asks to you select a 'helper' node. This node briefly stops replicating because it will be used to copy or rsync an up-to-date replica of the broken repository onto the current node.
1.2.5 Sync stop
The Sync Stop tool lets you bring replication to a stop for a selected repository. The tool is required to ensure that when replication has stopped all repository replica remain in exactly the same state. This requirement is complicated within distributed systems where proposals may be accepted on some nodes while still in-flight to other nodes. See Performing a synchronized stop.
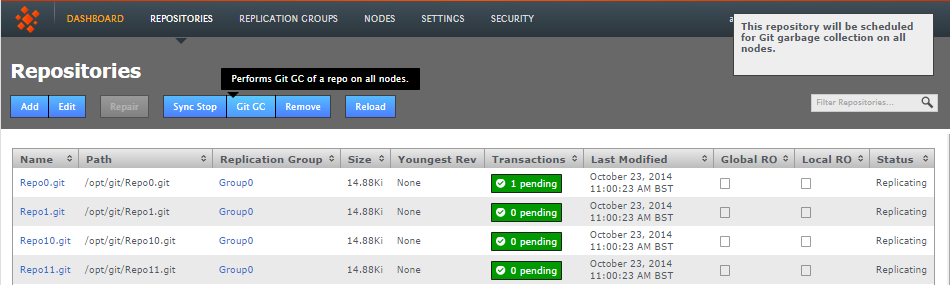
1.2.6 Git garbage collection
The Git Garbage Collection tool triggers a clearout of temporary files associated with proposals that have been successfully played out on each node in the repository's replication group. Read more about Garbage Collection in our Knowledge Base.
1.2.7 Remove
Use the remove button after selecting a repository to remove the selected repository from MultiSite's control. The repository data will not be deleted but once deleted, changes made to the repository locally will no longer be replicated to other nodes. See 8. Removing Repositories
1.2.8 Reload
Click the Reload button to force the Repository screen to refresh so that any recent changes are displayed.
1.3 REPLICATION GROUPS
Replication Groups are units of organization that we use to manage replication of certain repositories between certain sites. In order to replicate a Git repository between two or more nodes, you would need to associate by adding them to a replication group:
1.3.1 Example replication groups
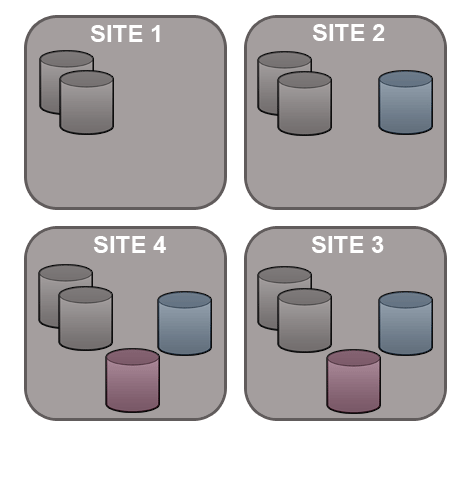
An organization with developers working in Chengdu and San Fransisco need to collaborate on projects stored in two Git repositories, Repo1 and Repo3. An administrator in the Chengdu office creates a replication group called "DragonGroup". The GitMS nodes corresponding with each of the two sites are added to the group.
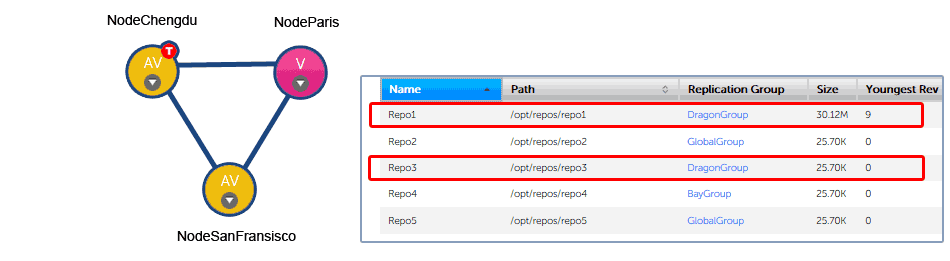
Replication group example
The Chengdu office is the location of largest development team, where most repository changes occur. For this reason the node is assigned the role of Tie-breaker. If there is disagreement between the nodes in the group over transaction ordering, NodeChengdu will carry the deciding vote.
The node in San Fransisco hosts a standard active node. Changes to the local repository are replicated to NodeChengdu, changes made on the Chengdu node are replicated back to San Fransisco.
In addition to the two active nodes, a third node, NodeParis is added, located at a management site that plays no active part in development. However, the node has been added to the group as a "pure voter". This means that NodeParis takes part in the vote for transaction ordering, even though the payload of those transactions are not written to repository replicas stored at the Paris office. The purpose of NodeParis is simply to add resilience to the replication system. If there is a short-term disruption to traffic from one of the other two nodes, agreement can still be reached and replication could continue.
The organization might choose to make the Paris node "Passive" instead. With ParisNode running a passive node, replicas of Repo1 and Repo3 would also be stored in Paris, although these copies could only be changed by updates from the other (active) repository copies, they wouldn't be accessible to Git clients.
Types of node
Another element controlled by replication groups is the role that each repository replica plays in the replication system. Each replica can cast a vote to determine the correct order in which proposals are considered. See more about Types of Sites.
1.3.2 Create replication group
You can create a replication group providing that you have at least two sites connected.
- Click Create Replication Group.

Replication groups
- Enter a Group Name, it can be anything but it's a good idea to keep it simple.

- Select from the available sites. You need a minimum of two. As you select sites they are listed.

Add some sites
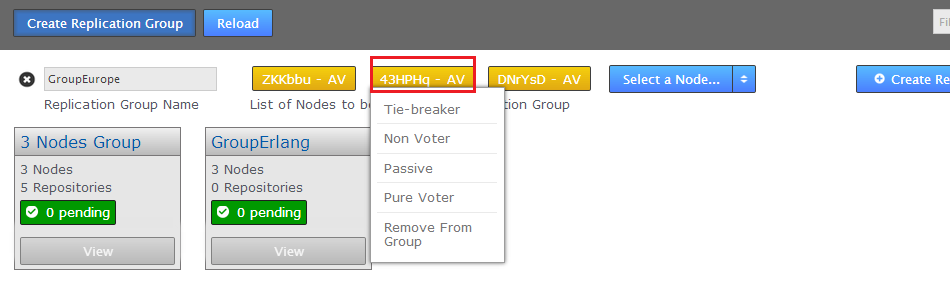
- Added sites are by default given the role Active Voter. Click on a node's label to bring up a list of available roles. See Types of Sites.
Replication groups
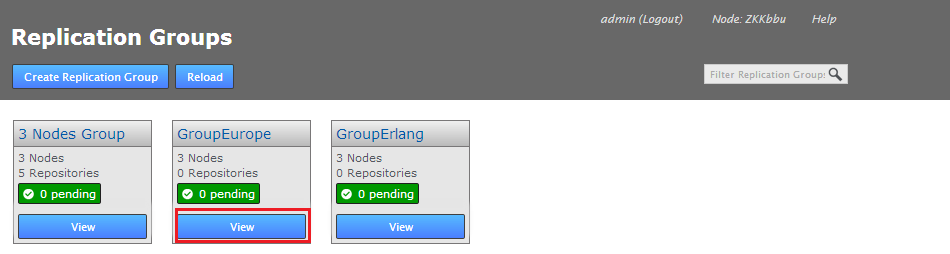
- When you have added all the nodes that you need, click on the Create Replication Group. Replication groups are listed in boxes on the Replication Group tab.
Group names
You cannot create a replication group remotely, the initiating node is alsways added automatically.
If you create a new replication group, then find that the task is stuck in pending because one of your nodes is down, do not use the Cancel Tasks option on the Dashboard's Pending Tasks table.

If, when all nodes are up and running, the replication group creation tasks are still not progressing, please contact the WANdisco support team for assistance.
View
You can view and partly edit a replication group by clicking on the  button.
- Click the Quick View button.
- The replication group's screen will open showing the member nodes of the group.
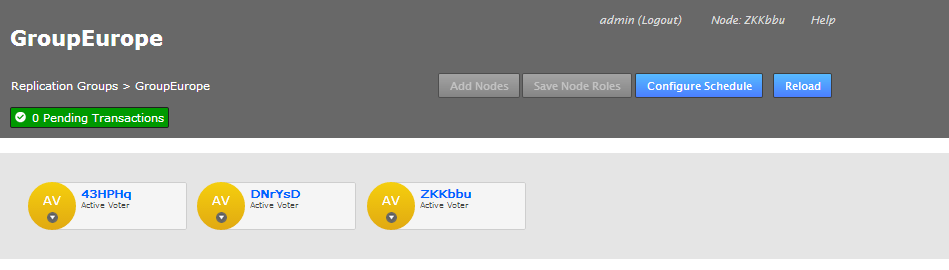
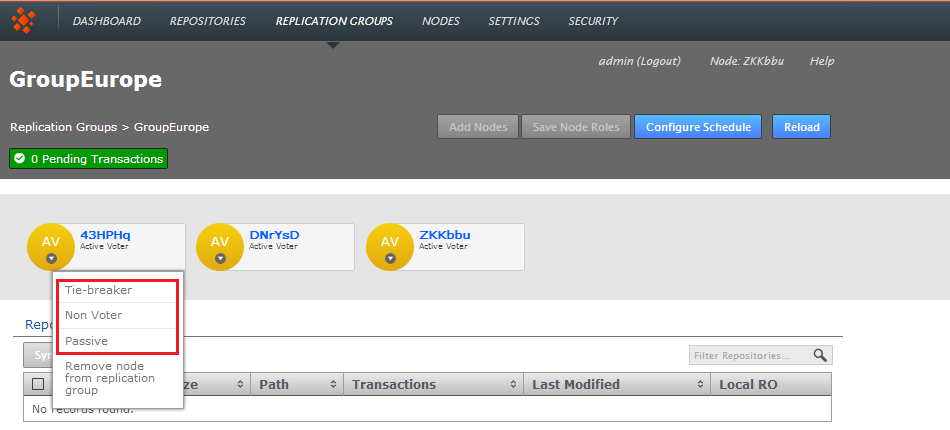
- Each node is desplayed as a color-coded circle. Click on the circle to see what other node types are available. Read more about node types.
- The Configuration screen provides access to the each node's type, along with a list of repositories and a link to the Configure Schedule screen.
Add Nodes
You can add additonal nodes to a replication group. Click on the Add Nodes button to start the procedure, you can read about it in the Admin Guide, Adding a node to a replication group
Save Node Roles
Use this button to save any changes that you make to the member nodes.
Configure Schedule
The Schedule screen lets you set the roles of sites to change over time, specifically changing according to a schedule.
Why change a node's role?
At the heart of WANdisco's DConE2 replication technology is an agreement engine that ensures that Git operations are performed in exactly the same order on each replica, on each node. Any node that has the role of voter becomes part of the agreement engine and together with other voters determine the correct ordering. If there's high latency between any voters this may adversely affect replication performance. Fortunately it isn't a requirement that every site takes part in forming agreement. An Active site can still create proposals (i.e. instigate repository changes) but the agreement engine doesn't need to wait for its vote. Read more about how replication works in the Reference Section.
Follow the Sun
To optimize replication performance it's common for administrators to remove voter status from node after their staff leave for the day - a practice commonly known as "Follow The Sun" where far-flung organisations transfer roles and privileges between locations so that they are always held by an active, manned site.
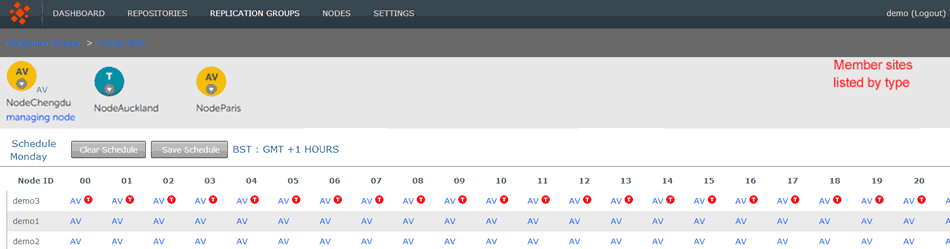
- Role Schedule
- The Role Schedule window shows all the sites in the replication group, along with each node's current roll (denoted by a circular buttons). You can click on a node and change its role as a Schedule Manager.

If you change any sites you need to click the SAVE SITE ROLES button. to ensure that your changes are saved.
An indicator shows if a Role Schedule has been enabled on the group. If there's a schedule in place the indicator shows ENABLED. Otherwise it shows DISABLED.

Click on the indicator to open up the Schedule screen, the same as if you clicked on the CONFIGURE SCHEDULE button. - Schedule
- A drop-down selector for viewing a particular day of the week. This filter is only for viewing an established schedule. It does not select the day that you intend to schedule.
- Clear Schedule
- Use this button to blank out settings that you have changed, returning to the default schedule.
- Save Schedule
- After making any changes to the schedule, you need to click the SAVE SCHEDULE to apply them. Next to the button, the server's timezone is derived from the server's system clock, not the location information provided during installation.
To see how to set up a schedule, read the Git MultiSite Admin Guide, How to configure a schedule.
1.4 SETTINGS
The server's internal settings are reported on the Settings tab, along with a number of important editable settings.
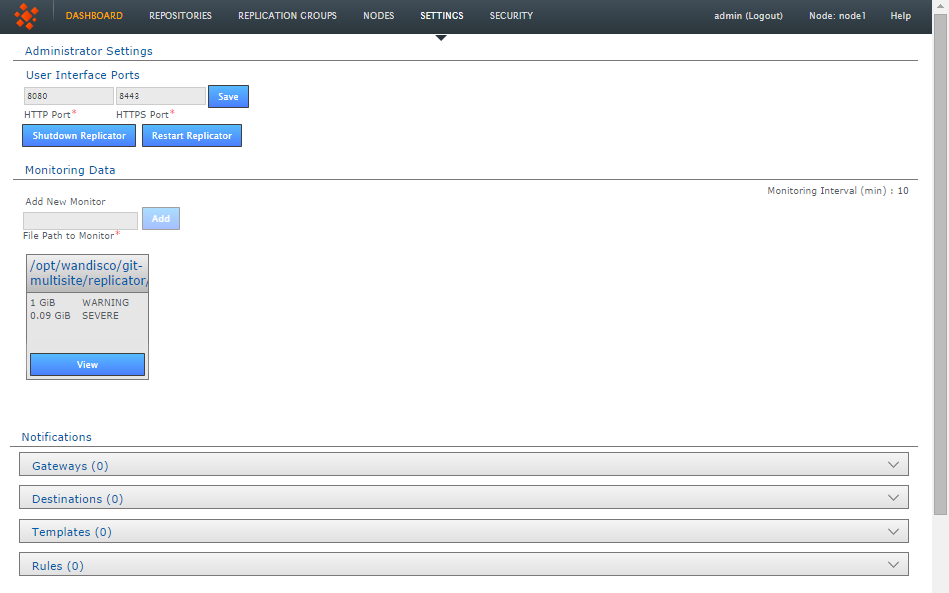
Administrator Settings
- Change Administrator Settings
- Use this form to change the current administrator password, this is the password that you provided during installation that is used to log in to the GitMS browser-based User Interface
See How to change your Administrator Password.
- User Interface HTTP Port
- Change the port that you want to use to access the User Interface. Just enter a valid port number and clock SAVE.
Resource Monitoring Data
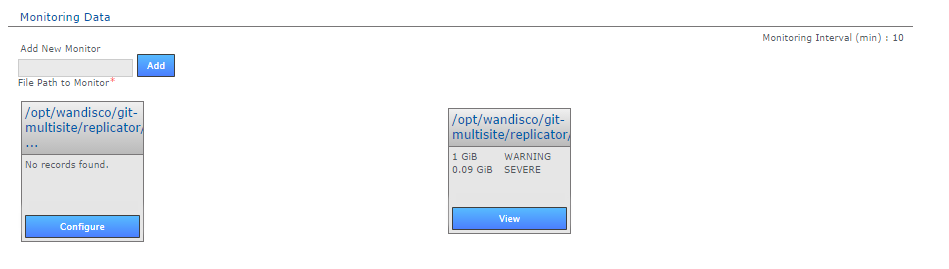
The Resource Monitoring Data settings provide a basic tool for monitoring available disk storage for MultiSite's resources.
- Monitor Interval (mins)
- If the disk space available to a monitored resource is less than the value you have for a "Severe" event then the event is logged and MultiSite's replicator will shut down after this interval, currently set at 10 minutes by default. You can configure the interval in application.properties file:
/opt/wandisco/git-multisite/replicator/properties/application.propertiesresourcemonitor.period.min=10
Value is in minutes, and only run through the UI. It is not handled directly by the replicator. - Add New Resource Monitor
- Enter the path to a resource that you wish to monitor, then click Add.
- Resource Monitors
- This section lists all resources currently being monitored. Click Configure to change monitor settings, Delete to remove a monitor.
For more information about setting up monitors, read Setting up resource monitoring.
Notifications
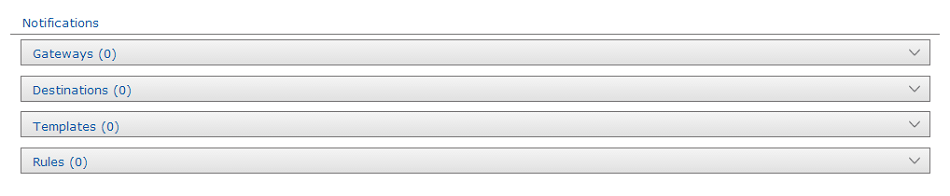
The notifications system enables you to create event-driven alert emails. Set up one more more gateway (mail servers), add destination emails to specify recipients, create email templates for the content of the alert emails, then set the rules for which event should trigger a specific email.
Gateways
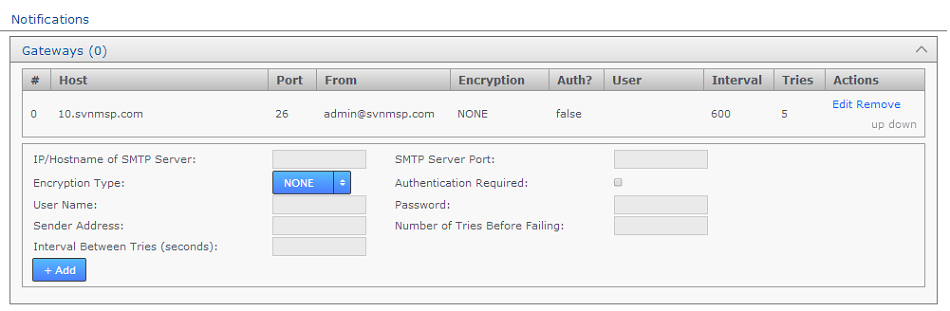
The Gateways section stores the details of those email relay servers that your organization uses for internal mail delivery. You can add any number of gateways. GitMS attempts to deliver notification emails using each gateway in the order on the list, #0, #1, #2, etc.
GitMS attempts delivery via the next gateway server when it has attempted delivery several times equal to the Tries number. It repeats a try after waiting a number of settings equal to the Internval setting.
Example: Gateway #0 is offline. With Tries set to 5 and Interval set to 600, MultiSite attempts delivery using the next gateway (#1) after 600s x 5 = 50 minutes.
- IP/Hostname of SMTP Server:
- your email server's address.
- SMTP Server Port
- The port assigned for SMTP traffic (Port 25 etc).
- Encryption Type
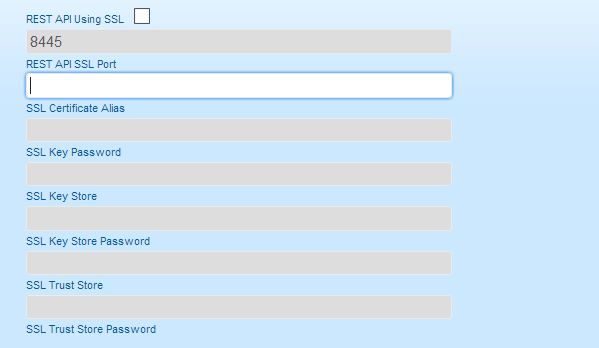
- Indicate your server's encryption type - None, SSL (Secure Socket Layer) or TLS (Transport Layer Security). SSL is a commonly used. For tips on setting up suitable keystore and truststore files see Setting up SSL Key pair.
If you're not familiar with the finer points of setting up SSL keystores and truststores it is recommended that you read the following article: Using Java Keytool to manage keystores. - Authentication Required
- Indicate whether you need a username and password to connect to the server. Requires either true or false.
- User Name
- If authentication is required, enter the authentication username here.
- Password
- If authentication is required, enter the authentication password here.
- Sender Address
- Provide an email address that your notifications will appear to come from. If you want to be able to receive replies from notifications you need to make sure this is a valid and monitored address.
- Number of Tries Before Failing
- Set the number of tries that GitMS makes to send out notifications.
- Interval Between Tries (Seconds)
- Set the time (in seconds) between your server's attempts to send notifications.
Destinations

The Destinations panel stores email addresses for notification recipients. Add, edit, or remove email addresses.
Templates
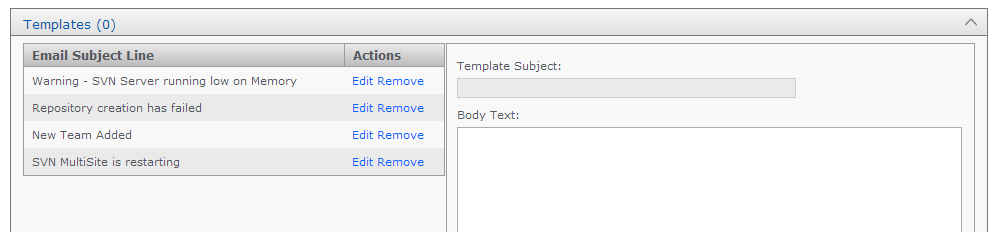
The templates panel stores email content. You create messaging to match the events that you want to send user notifications for.
- Template Subject
- Use this entry field to set the subject of the notification email. This subject should describe the event for which the email will be triggered.
- Body Text
- Enter the actual message that you want to send for a particular situation/event.
Rules
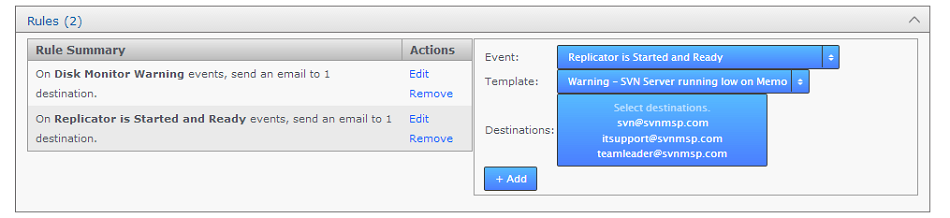
Use the Rules panel to set up up your notification emails. Here you associate email templates and destination emails with a particular system event. For example, you may create an email message to send to a particular group mailing list if a repository goes into Read-only mode. Selecting descriptive subjects for your templates will help you to select the right templates here.
- Event
- Choose from the available list of trigger events.
- Template
- Destination
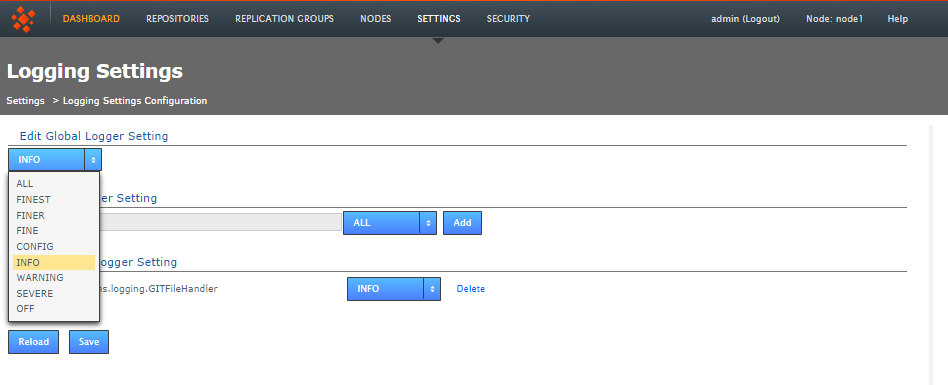
Logging Setting
Logging Setting lets you quickly add or modify Java loggers via the admin console, rather than making manual edits to the logger file:
<install-dir>/replicator/properties/logger.properties.

Loggers are usually attached to packages. Here, the level for each package is available to modify or delete. The global level is used by default, so changes made here override the default values. Changes are applied instantly but in-memory only and are forgotten after a restart of the replicator (unless they are saved). For information about adding or changing loggers, see Logging Setting Tool.
System Data
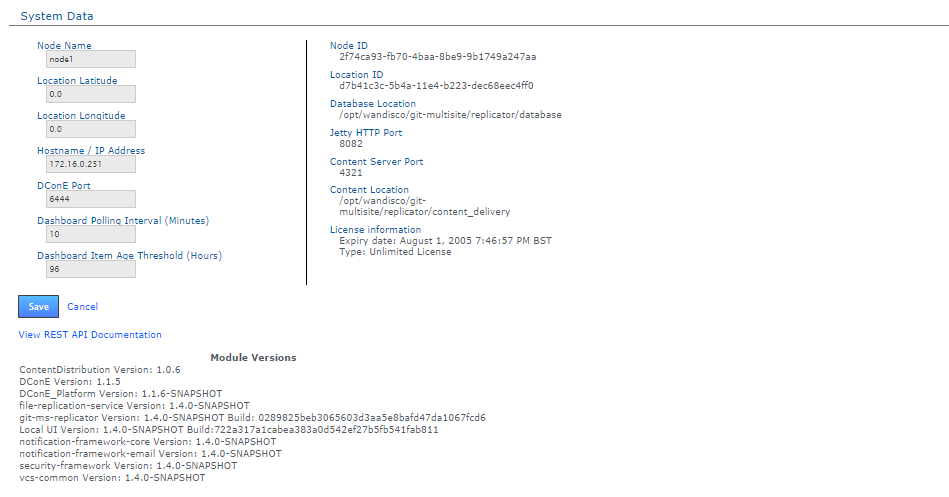
The System Data table provides a list of read-only settings that were either provided during setup or have since been applied:
- NodeID
- The name that you gave the node during installation.
- Location ID
- A unique string that is used to identify the server during an induction.
- Host Name/IP Address
- The Hostname / IP address of the server hosting the node.
- DConE port
- DConE port (actually it's DConE 2) handles agreement traffic between sites. The Default is 6444.
- Database Location
- The full path to MultiSite's database. By default this will be <install-dir>/replicator/database.
- Jetty HTTP Port
- The HTTP port is used for browser access to the User Interface.
- Content Server Port
- The port that will be used to transfer replicated content (repository changes). This is different from the port used by WANdisco's DConE agreement engine.
- Content Location
- The directory in which replication data is stored (prior to it having been confirmed as replicated).
- License information
- Details of GitMS product license, e.g. the date of expiry.
View REST API Documentation - This link takes you to your node's local copy of the API documentation. The link goes to the following location: http://<Node IP>:8080/apidocs/. This documentation is generated automatically and ties directly into your server's local resources. There is an only copy of the latest API documenation available in this admin guide, note though that it has been lifted from an installation and will link to resources that will not be available on the website (resulting in dead links).
Module Versions
The module versions provides a list of the component parts of the GitMS application. This is useful if you need to verify what version of a component you are using - such as if you need to contact WANdisco for support.
1.5 SECURITY
Use the SECURITY tab to manage admin accounts, either entered manually into GitMS or managed through an LDAP authority. On the tab is an entry form for multiple admin accounts, along with LDAP Settings for binding MultiSite to one or more LDAP services.
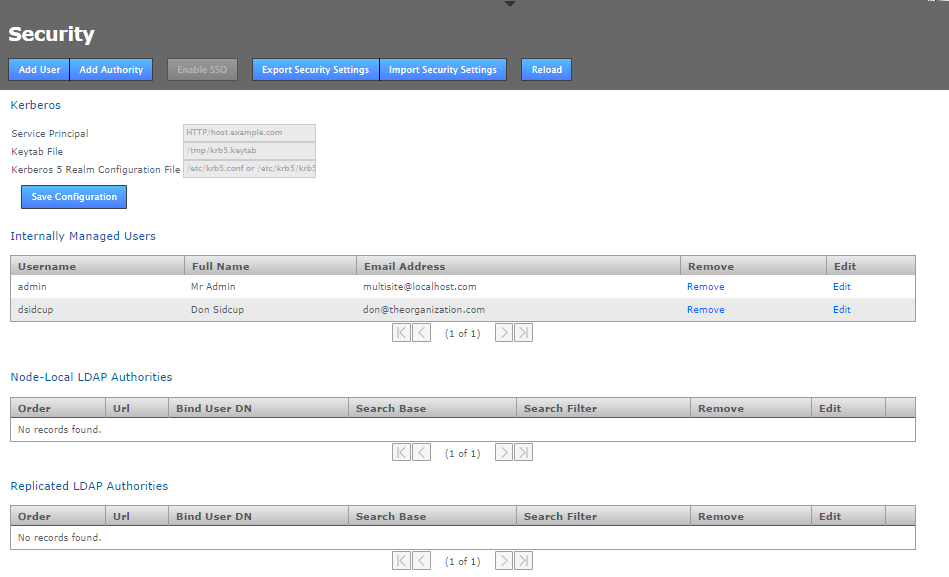
Security
- Add User
- Enter the details of an additional administrator who will be able to log in to the GitMS Admin UI. See Adding additional users for more information.
- Add Authority
- Enter the details of one or more LDAP authorities for managing administrator access. See Adding LDAP authorities for more information.
- Disable Managed Users
- This feature lets you block access to the GitMS Admin UI by non-LDAP users. See Disabling (Internally) Managed Users below.
- Enable SSO
- This button will only be available to click if you have entered valid Kerberos settings. When enabled it places GitMS's admin console into Single Sign-on mode. When enabled accessing the admin UI will use Kerberos instead of the username and password login form. In the enabled state the button will change to say Disable SSO.
- Export Security Settings
- The data entered into the Securities tab can be backed up for later re-importing by clicking the Export Security Settings button. The data is stored in /opt/wandisco/git-multisite/replicator/export/security-export.xml which should be included in any backup procedures you are running. You will need access to the file from your desktop during a re-import.
- Import Security Settings
- Click the Import Security Settings button if you need to restore your Security settings, such as after a re-installation of GitMS. The import will proceed providing that you can enter a file path to the security-export.xml file.
- Reload
- Click the reload button to refresh the Admin UI screen, you will need to do this in order to view any changes that you make.
1.5.1 Admin account precedence
GitMS uses the following order of precedence when checking for authentication of users:
- First: Internally managed users if they are enabled. See Disable Managed Users
- Second: Local LDAP authorities by order
- Third: Global LDAP authorities by order
This provider implementation tries to authenticate user credentials against either the list of internally managed users, or against any number of LDAP authorities, or both, depending on how the application is configured.
When authenticating against LDAP authorities, each one is tried in sequence until one either grants access or they all deny access. If they all deny access, only the error from the last authority tried is returned.
- Admin account changes are replicated to all nodes.
- Changes to admin accounts are handled as proposals that require agreement from a majority of every node in the replication network.
- Admin account changes are reported into the audit log.
1.5.2 Disable internally managed users
Click the Disabled Managed Users button if you want to control access to GitMS exclusively through LDAP. Once clicked, any Internally managed users will no longer be able to log into the Admin UI after they next log out. From that point only LDAP managed users will have access to the GitMS Admin UI.
If, after disabling Internally Managed Users you need to enable them again -- should there be a problem with your LDAP authorities -- then it is possible to enable access again by logging into the node via a terminal window (with suitable permissions), navigate to the following directory:
/opt/wandisco/git-multisite/replicatorand run the reset script:
java -jar resetsecurity.jarAny internally managed users who remain in GitMS's database will have their access restored.
Internally managed users
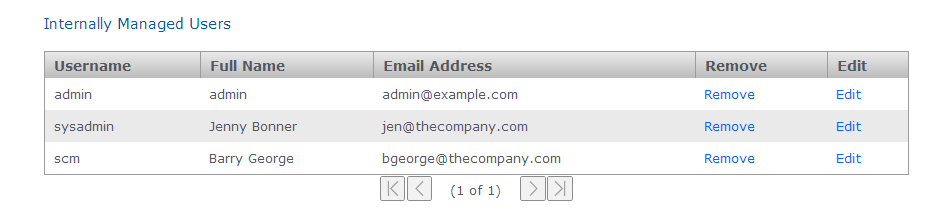
Internally managed users
This table lists admin users who have been entered through the Admin UI or imported using the Import Security Settings, along with the first admin account.
Admin Account #1
Note that the first admin account is the one set up during the installation of your first node. The credentials specified during this installation are stored to the users.properties file which is then used during the installation of all subsequent nodes.
The users.properties file ensures that exactly the same username/password is used on all nodes during installation. If that there's a mismatch then you wouldn't be able to connect the nodes together (through the Induction process). Rather than clean-up and reinstall you can fix this by manually syncing the password files.
Admin Account #1 can be removed but the last admin account remaining on the system will not be deletable to ensure that it isn't possible for an administrator to be completely locked out of the admin UI.
Kerberos
Support for the Kerberos protocol is now included. When enabled, Kerberos handles authentication for access to the admin UI, where the administrator is automatically logged in if their browser can retrieve a valid Kerberos ticket from the operating system.
When Kerberos SSO is enabled only users who are set up for Kerberos will be able to access the admin UI. The username and password login form will be disabled. If you ever need to disable Kerberos authentication this can be done using the authentication reset script which will return your deployment to the default login type.

kerberos settings entry form
- Service Principal
- A service principal name (SPN) is the name that a client uses to identify a specific instance of a service.
For example:HTTP/host.example.com
- Keytab File
- The keytab is the encrypted file on disk where pairs of Kerberos principals and their keys are stored.
For example:/tmp/krb5.keytab
- Kerberos 5 Realm Configuration File
- The krb5 configuration file location of the replicator host's Kerberos 5 realm configuration.
For example:/etc/krb5/krb5.conf
Kerberos configuration is not replicated around the replication network because each node in the network needs its own host-specific configuration. This configuration is node-local only. The configuration needed is the host-specific service principal name, noted in the settings above. e.g.
On most systems the location of the host's encrypted key table file will be something something like:
/etc/krb5.keytabThe location of the host's Kerberos 5 realm configuration may be something like: /etc/krb5.conf or /etc/krb5/krb5.conf
LDAP Authorities
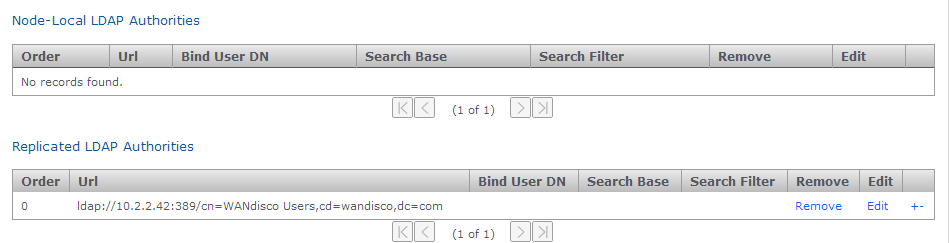
LDAP Authority entry forms
- Node-Local LDAP Authorities
- If chosen, then only the local node will use the LDAP authority for authentication.
- Replicated LDAP Authorities
- If replicated is chosen, all nodes in the replication network can use the LDAP authority for authentication.
Mixing local and WAN-based authorities
Both kinds of authority are supported simultaneously, with the node-specific LDAP authorities taking precedence over WAN-based authorities in order to support the use-case where, for example, a particular node may prefer to use a geographically closer LDAP directory. Also, if multiple LDAP authorities of either type are configured then the order in which they are consulted is also configurable, using the +/- buttons at the end of each entry.
- Order
- LDAP authorities are listed in the order of execution that you set when defining each authority's properties.
- Url
- The URL of the authority. The protocol "ldap://" or "ldaps://" are required.
- Bind User DN
- Identify the LDAP admin user account that GitMS will use to query the authority.
- Search Base
- This is the Base DN, that is the location of users that you wish to retrieve.
- Search Filter
- A query filter that will select users based on relevant LDAP attributes. For more information about query filter syntax, consult the documentation for your LDAP server.
- Remove
- Click to remove the authority from GitMS.
- Edit
- Click to make changes to the authority's settings.
The usual configuration options are supported for each configured LDAP authority: URL, search base and filter and bind user credentials. Note that the bind user's password cannot be one-way encrypted using a hash function because it must be sent to the LDAP server in plain text, so for this reason the bind user should be a low privilege user with just enough permissions to search the directory for the user being authenticated. Anonymous binding is permitted for those LDAP servers that support anonymous binding.
LDAP Home or away
When adding an LDAP authority, the configuration can be selected to be either replicated or node-specific.
Replicated LDAP Authorities
If node-specific is chosen, then only the local node will use the LDAP authority for authentication. Both kinds of authority are supported simultaneously, with the node-specific LDAP authorities taking precedence over WAN-based authorities in order to support the use-case where a particular node may prefer to use a geographically closer LDAP directory, for example. Also, if multiple LDAP authorities of either type are configured then the order in which they are consulted is also configurable.
The usual configuration options are supported for each configured LDAP authority: URL, search base and filter and bind user credentials.
The bind user's password cannot be one-way encrypted using a hash function because it must be sent to the LDAP server in plain text. For this reason the bind user should only have enough privileges to search the directory for the user being authenticated. Anonymous binding is permitted for those LDAP servers that support anonymous binding.
2. Architecture overview
This figure shows the GitMS architecture, how the application is split up, and how the component parts communicate with each other and the outside world.
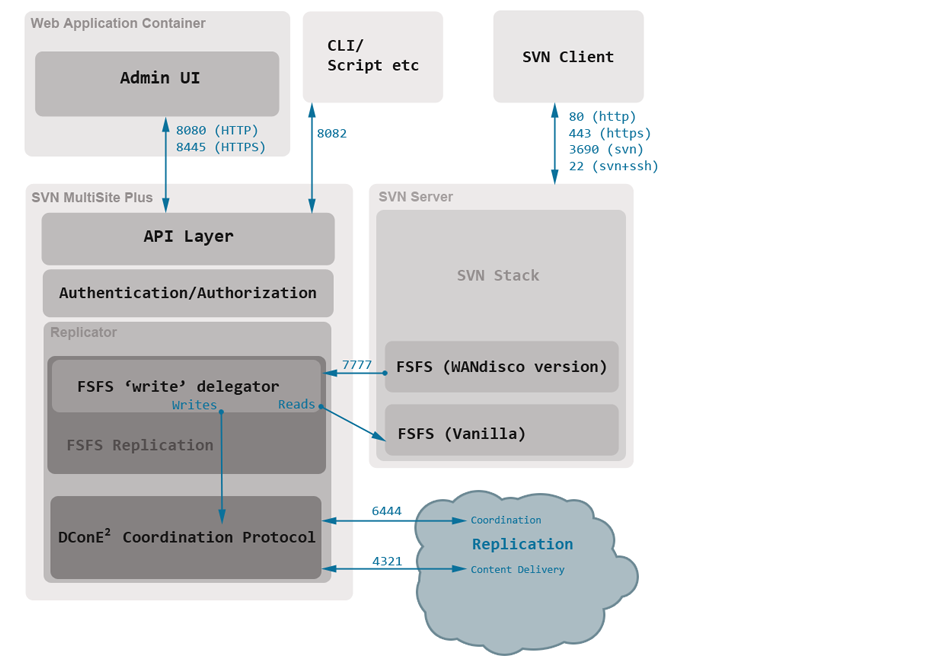
Key points
- Admin UI and Replicator are run in separate Java processes.
- The Admin UI interacts with the application thought the same API layer that is available for external interactions. This layer enforces seperation of concerns and handles authentication and authorization of all user interactions.
- Git server runs with a WANdisco version of the FSFS server libraries. Whilst Read operations are passed to Git's regular FSFS, writes are delegated to the GitMS replicator.
- The DConE 2 Coordination protocol handles the agreement of transaction ordering between nodes via port 6444. The delivery of the actual replicated content (Git commits etc) is handled by the Content Distribution layer on port 4321.
3. Install directory structure
GitMS is installed to the following path by default:
/opt/wandisco/git-multisite/You can install the files somewhere else on your server, although this guide assumes the above location when discussing the installation.
Inside the installation directory are the following files and directories:
drwxr-xr-x  2 root     root     4096 Oct 24 07:55 bin
	-r-xr-xr-x 1 root root  9551 Oct 22 10:26 backup
	-r-xr-xr-x 1 root root 23260 Oct 22 10:26 emr_driver
	-r-xr-xr-x 1 root root 20328 Oct 22 10:26 emr_nodes
	-r-xr-xr-x 1 root root  3516 Oct 22 10:26 gitms_shell
	-r-xr-xr-x 1 root root  1686 Oct 22 10:26 git-multisite
	-r-xr-xr-x 1 root root 20878 Oct 22 10:26 remove_nodes_eco_system
	-r-xr-xr-x 1 root root 19278 Oct 22 10:26 remove_nodes_replication_groups
	-r-xr-xr-x 1 root root  1620 Oct 22 10:26 rollback
	-r-xr-xr-x 1 root root 12349 Oct 22 10:26 sysInfo.sh
	-r-xr-xr-x 1 root root 24368 Oct 22 10:26 talkback
	-r-xr-xr-x 1 root root  4093 Oct 22 10:26 watchdog

drwxr-xr-x  2 wandisco wandisco 4096 Oct 24 07:55 config
	-rw-r--r-- 1 root root 317 Oct 24 07:55 main.conf

drwxr-xr-x  2 root     root     4096 Oct 24 07:55 lib
	-r--r--r-- 1 root root 20719 Oct 22 10:26 init-functions.sh
	-r--r--r-- 1 root root   127 Oct 22 10:26 lsb-functions.sh

drwxr-xr-x  3 wandisco wandisco 4096 Oct 24 07:56 local-ui
	drwxr-xr-x 2 wandisco wandisco 4096 Oct 24 07:55 ui-logs
	-rw-r--r-- 1 wandisco wandisco  384 Oct 24 07:58 ui.properties

drwxr-xr-x  2 wandisco wandisco 4096 Oct 24 07:56 logs
	-rw-r--r-- 1 wandisco wandisco   88 Oct 24 07:56 multisite.log
	-rw-r--r-- 1 wandisco wandisco    0 Oct 24 07:56 replicator.20141024-075611.log
	-rw-r--r-- 1 wandisco wandisco 3078 Oct 24 07:56 ui.20141024-075542.log
	-rw-r--r-- 1 wandisco wandisco 2041 Oct 24 07:56 watchdog.log

drwxr-xr-x 13 root     root     4096 Oct 24 07:55 replicator
	drwxr-xr-x 2 wandisco wandisco   4096 Oct 24 07:55 content
	drwxrwxr-x 2 wandisco wandisco   4096 Oct 24 07:55 content_delivery
	-rw-r--r-- 1 root     root        129 Sep 26 11:20 COPYING
	drwxr-xr-x 5 wandisco wandisco   4096 Oct 24 07:56 database
	drwxr-xr-x 3 root     root       4096 Oct 24 07:55 docs
		drwxr-xr-x 4 root root 12288 Oct 24 07:55 api
	drwxr-xr-x 2 wandisco wandisco   4096 Oct 24 07:55 export
	drwxr-xr-x 7 root     root       4096 Oct 24 07:55 gfr
	-rw-r--r-- 1 root     root     381022 Sep 26 11:31 git-ms-replicator-1.4.0-1693.jar
	-rw-r--r-- 1 root     root     381029 Sep 26 11:31 git-ms-replicator-1.4.0-SNAPSHOT-updateinetaddress.jar
	-rw-r--r-- 1 root     root     380728 Sep 26 11:31 git-ms-replicator-gitmsrestore.jar
	drwxr-xr-x 2 wandisco wandisco   4096 Oct 24 07:55 hooks
	drwxr-xr-x 2 root     root       4096 Oct 24 07:55 lib
	-rw-r--r-- 1 root     root      44869 Sep 26 11:20 LICENSE
	drwxr-xr-x 4 wandisco wandisco   4096 Oct 24 07:56 logs
	-rw-r--r-- 1 root     root     741999 Sep 26 11:28 NOTICE
	drwxr-xr-x 2 wandisco wandisco   4096 Oct 24 07:56 properties
		-rw-r--r-- 1 wandisco wandisco  954 Oct 24 07:56 application.properties
		-rw-r--r-- 1 wandisco wandisco  256 Oct 24 07:55 license.key
		-rw-r--r-- 1 wandisco wandisco  443 Jul 24 20:33 log4j.properties
		-rw-r--r-- 1 wandisco wandisco 1752 Sep  4 11:18 logger.properties
		-rw-r--r-- 1 wandisco wandisco  188 Oct 24 10:30 users.properties
	drwxr-xr-x 2 root     root       4096 Oct 24 07:55 properties.dist
	-rwxr-xr-x 1 root     root       7683 Oct 22 10:26 resetSecurity.jar
	-rwxr-xr-x 1 root     root      25056 Oct 22 10:26 transformer-tool.jar
	-rw-r--r-- 1 root     root        544 Sep 26 11:28 VERSION-TREE

drwxr-xr-x  3 wandisco wandisco 4096 Oct 24 07:55 tmp
drwxr-xr-x  2 root     root     4096 Oct 24 07:55 ui
drwxr-xr-x  3 wandisco wandisco 4096 Oct 24 07:55 var
4. Properties files
The following files store application settings and constants that may need to be referenced during troubleshooting. If you want to make changes to these files, contact WANdisco Support.
- /opt/wandisco/git-multisite/replicator/properties/application.properties
- file contains settings for the replicator and affects how MultiSite performs. View sample.
Temporary requirement:
If you (probably under instruction from WANdisco's support team) manually add either connectivity.check.interval or sideline.wait to the applications property file then you must add an "L" (Long value) to the end of their values so they are converted correctly. View our sample application.properties file to view all the properties that are suffixed as "Long". - /opt/wandisco/git-multisite/replicator/properties/logger.properties
- handles properties that apply to how logging is handled. View sample.
- /opt/wandisco/git-multisite/replicator/properties/users.properties
- Contains the admin account details which will be required when installing second and subsequent nodes. View sample.
- /opt/wandisco/git-multisite/local-ui/ui.properties
- Contains settings concerning the graphical user interface such as widget settings and timeout values. Stored in this file is the UI Port number and is considered the defacto recording of this value, superceding the version stored in the main config file /opt/wandisco/git-multisite/config/main.conf. You can view a sample.
5. Setting up SSL key pair
GitMS supports the use of Secure Socket Layer encrytion (SSL) for securing network traffic. Currently you need to run through the setup during the initial installation.
Follow these steps before starting the GitMS installation.
Using stronger and faster encryption
Java's default SSL implementation is intentionally weak to avoid the import regulations associated with stronger forms of encryption. However, stronger algorithms are available to install, placing the legal responsibility for compliance with local regulation on the user. See Oracle's information on the Import limits of Cryptographic Algorithms.
If you need stronger algorithms, e.g. AES which supports 256-bit keys, then you can download JCE Unlimited Strength Jurisdiction Policy Files that can be installed with your JDK/JRE. See Java Cryptography Extension (JCE) Unlimited Strength Jurisdiction Policy Files 7.
- Create a new directory in which to store your key files. This directory can be anywhere, although in this example we store them in the git-ms-replicator file structure: open a terminal and navigate to
<INSTALL_DIR>/git-ms-replicator/config. - From within the
/configfolder make a new directory called ssl:
-rw-rw-r-- 1 wandisco wandisco 5 Dec  5 13:53 setup.pid

[User@Fed11-2 config]$ mkdir ssl
- Go into the new directory:
cd ssl
- Copy your private key into the directory. If you don't have keys set up, you can use JAVA's keygen utility, using the command:
keytool -genkey -keyalg RSA -keystore wandisco.ks -alias server -validity 3650 -storepass <YOUR PASSWORD>
Knowledgebase
Read more about the Java keystore generation tool in the KB article Using Java Keytool to manage keystores.- -genkey
- Switch for generating a key pair (a public key and associated private key). Wraps the public key into an X.509 v1 self-signed certificate, which is stored as a single-element certificate chain. This certificate chain and the private key are stored in a new keystore entry identified by alias.
- -keyalg RSA
- The key algorithm, in this case RSA is specified.
- wandisco.ks
- This is file name for your private key file that will be stored in the current directory.
- -alias server
- Assigns an alias "server" to the key pair. Aliases are case-insensitive.
- -validity 3650
- Validates the keypair for 3650 days (10 years). The default would be 3 months
- -storepass <YOUR PASSWORD>
- This provides the keystore with a password.
Note: If no password is specified on the command, you are prompted for it. Your entry is not masked so you, and anyone else looking at your screen, can see what you type.
Most commands that interrogate or change the keystore will need to use the store password. Some commands may need to use the private key password. Passwords can be specified on the command line (using the
-storepassand-keypassoptions).
However, do not specify a password on a command line or in a script unless it is for testing purposes, or you are on a secure system.The utility prompts you for the following information:
What is your first and last name? [Unknown]: What is the name of your organizational unit? [Unknown]: What is the name of your organization? [Unknown]: What is the name of your City or Locality? [Unknown]: What is the name of your State or Province? [Unknown]: What is the two-letter country code for this unit? [Unknown]: Is CN=Unknown, OU=Unknown, O=Unknown, L=Unknown, ST=Unknown, C=Unknown correct? [no]: yes
Enter key password for <mykey> (RETURN if same as keystore password): - With the keystore now in place, the setup picks the file up if you provide the relevant details during the installation process:
Changes in these values require a restart. Any invalid value restarts the replicator and no DConE traffic flows.
SSLv3 is supported, though not enforced. If your browser setting has SSLv3 disabled, you get a handshake error message. If it has both SSLv3 and TLS enabled then, depending on the browser, it tries to switch from TLS to SSLv3 during the handshake. If you receive a handshake error message in your browser, make sure that TLS is disabled and only SSLv3 is enabled. All current browsers support SSLv3.
5.1 Setting the server key
In the keystore, the server certificate is associated with a key. By default, we look for a key named server to validate the certificate. If you use a key for the server with a different name, enter this in the SSL settings.
5.2 SSL troubleshooting
A complete debug of the SSL logging is required to diagnose the problems. To capture the debugging, run the java process with:
'-Djavax.net.debug=all' flag.
To enable the logging of SSL implemented layer, turn the logging to FINEST for the com.wandisco.platform.net package.
6. Replication strategy
Git MultiSite provides a toolset for replicating Git repository data in a way that maximizes performance and efficiency while minimizing network and hardware resources requirements. The following examples give a starting point for deciding on the best means to enable replication across your development sites.
6.1 Replication model
In contrast with earlier replication products, Git MultiSite is no longer based upon a network proxy that handles file replication between replica. Now, replication is handled at the filesystem level, via FSFS.
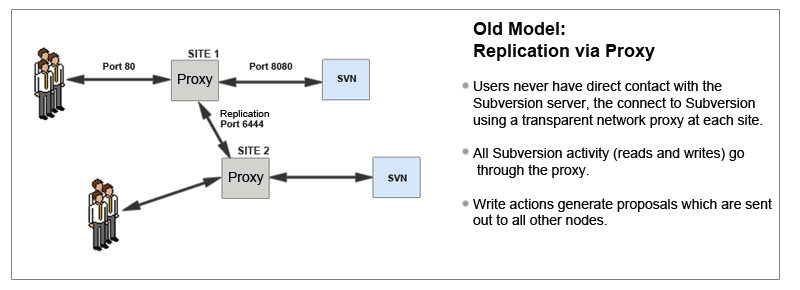
Git MultiSite differs from earlier WANdisco replication products on a number of levels.
6.1.1 Limitations of the old model
- The replicator sits in front of Apache
- All reads have to pass through the replicator
- Requires some functionality to be added so that certain operations can be performed prior to scheduling a transaction for replication
- Authentication against external data stores
- Hooks firing
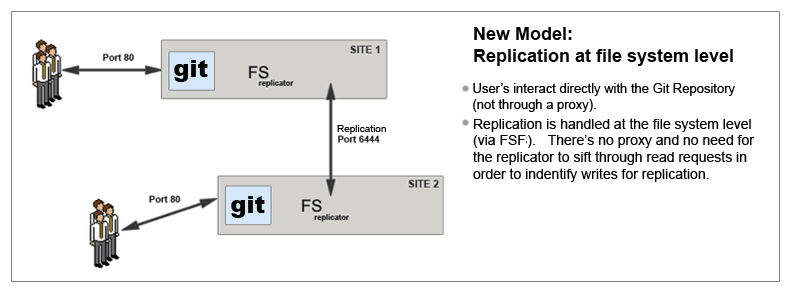
Git MultiSite differs from earlier versions in that it replicates at the file system level.
6.1.2 Per-Repository Replication
Git MultiSite is able to replicate on a per-repository basis. This way each site can host different sets of repositories and replicate repositories this means that you can have different repositories replicate as part of different replication groups.
6.1.3 Dynamic membership evolution
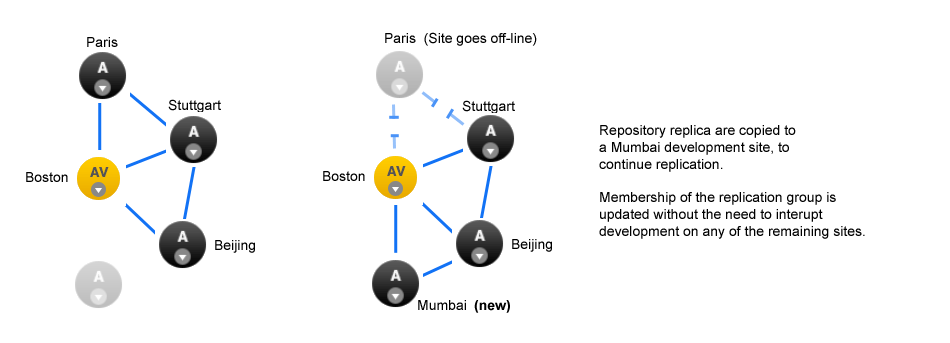
No need for a synchronized stop - Git MultiSite allows replication groups to change their membership on-the-fly.
A repository can only replicate to a single replication group at any one time, although it is possible to move between replication groups as required - this can now be done on-the-fly, nodes can be added or deleted without the need to pause all replication (with a synchronized stop)
Git MultiSite offers a great deal of flexibility in how repository data is replicated. Before you get started it's a good idea to map out which repositories at which locations you want to replicate.
6.1.4 WANdisco replication and compression
There are a number of WAN network management tools that offer performance benefits by using data compression. The following guide explains how data compression is already incorporated into WANdisco's replication system, and what effect this built-in compression may have on various forms of secondary compression.
Network management tools may offer performance benefits by on-the-fly compression of network traffic, however it's worth nothing that WANdisco's DConE replication protocol is already using compression for replicated data. Currently Zip compression is used before content is distributed using the Content Distribution component of DConE.
Traffic Management systems that provide WAN optimization or "WAN Acceleration" may not provide expected benefits as a result of WANdisco's compression. The following list highlights where duplication or redundancy occurs.
- Compression
- Encoding data using more efficient storage techniques so that a given amount of data can be stored in a smaller file size.
WANdisco effect: As replicated data is already compressed, having a WAN accelerator appliance compress the data again is a waste of time - however, as long as it can "fill the pipe", i.e. keep the throughput of traffic faster rate than the network can consume it then its not going to negatively impact data transfer. - Deduplication
- Eliminating the transfer of redundant data by sending references instead of the actual data. By working at the byte level, benefits are achieved across IP applications. In truth, Data-deduplication offers the most benefit when there's a lot of repetition in the data traffic.
WANdisco effect: Because the data is already compressed then data-deduplication (by whatever WAN optimization solution) will not be effective, when data is compressed any small change at the start of the data stream propagates through the data stream and defeats data-deduplication. You can read more about this effect in this external article - rsyncable-gzip - Latency optimization
- Various refinements to the TCP implementation (such as window-size scaling, selective Acknowledgement etc.
WANdisco effect: DConE does not use TCP / network layer techniques. This form of optimization won't have any impact on WANdisco Replication.
6.2 Creating resilient replication groups
Git MultiSite is able to maintainvrepository replication (and availability) even after the loss of nodes from a replication group. However, there are some configuration rules that are worth considering:
Rule 1: Understand Learners and Acceptors
The unique Active-Active replication technology used by GitMS is an evolution of the Paxos algorithm, as such we use some Paxos concepts which are useful to understand:
Learners:
Learners are the nodes that are involved in the actual replication of Git repository data. When changes are made on the local repository copy these nodes raise a proposal for the changes to be made on all the other copies.Learner Nodes are required for the actual storage and replication of repository data. You need a learner node at any location where Git users are working or where you wish to store hot-backups of repositories
Types of Nodes that are learners: Active, Passive-
Acceptors:
All changes being made on each repository in exactly the same order is a crucial requirement for maintaining synchronization. Acceptors are nodes that take part in the vote for the order in which proposals are played out.Acceptor Nodes are required for keeping replication going. You need enough Acceptors to ensure that agreement over proposal ordering can always be met, even accounting for possible node loss. For configurations where there are a an even number of Acceptors it is possible that voting could become tied. For this reason it is possible to make a voter node into a tiebreaker which has slightly more voting power so that it can outvote another single voter node.
Types of nodes that are Acceptors: Voter Only
Nodes that are both an Acceptor and Learner: Active Voter, Passive Voter
Rule 2: Replication groups should have a minimum membership of three learner nodes
Two-node replication groups are not fault tolerant, you should strive to replicate according to the following guideline:
The number of learner nodes required to survive population loss of N nodes = 2N+1
where N is your number of nodes.So in order to survive the loss of a single node you need to have a minimum of 2x1+1= 3 nodes
In order to keep on replicating after losing a second node you need 5 nodes.
Rule 3: Learner Population - resilience vs rightness
During the installation of each of your nodes you are asked to provide a Content Node Count number, this is the number of other learner nodes in the replication group that need to receive the content for a proposal before the proposal can be submitted for agreement.
Setting this number to 1 ensures that replication won't halt if some nodes are behind and have not received replicated content yet. This strategy reduces the chance that a temporary outage or heavily loaded node will stop replication, however, it also increases the risk that repositories will go out of sync (requiring admin-intervention) if there is an outage.
Rule 4: 2 nodes per site provides resilience and performance benefits
Running with two nodes per site provides two important advantages.
- Firstly it provides every site with a local hot-backup of the repository data.
- Enables a site to load-balance repository access between the nodes which can improve performance during times of heavy usage.
- Providing the nodes are Voters, it increases the voter population and improves resilience for replication.
6.3 Content distribution strategy
WANdisco's replication protocol separates replication traffic into two streams, the coordination stream which handles agreement between voter nodes and the content distribution stream through which Git repository changes are passed to all other nodes (that is "learner" nodes that store repository replicas).

Git MultiSite provides a number of tunable settings that let you apply different policies to content distribution. By default, content distribution is set up to prioritize reliability. You can, instead, set it to prioritize speed of replication. Alternatively you can apply a policy that prioritizes delivery of content to voter nodes. These policies can be applied on a per-site, per-repository and replication group basis providing a fine level of control providing that you take care to set things up properly.
6.3.1 Changing content distribution policy
To set the policy, you need to make a manual edit to Git MultiSite's Application properties file:
/opt/wandisco/git-multisite/replicator/properties/application.properties
Changing the current strategy requires the modification of properties files that the replicator only reads at start-up. As a result any changes to strategy require that the replicator be restarted before the change will be applied.
Editable content distribution properties
  content.push.policy=faster
  content.min.learners.required=true
  content.learners.count=1
  content.thread.count=10
  content.max.idle.time=2147483647
Above is an example Content Distribution Policy. This section describes the settings.
content.push.policy
This property sets the priority for Content Distribution. It can have one of three options which set the following behavior. Each option tells MultiSite to use a different calculation for relating replication agreement to the actual delivery of replicated data.
- "reliable" Policy:
- Replication can continue if content is available to a sufficient number of learners (the value of content.learner.count, not including the node itself).
"Reliable" is the default setting for the policy. Content must be delivered to a minimum number of nodes, the value of the property (content.min.learners.required, for a proposal to be accepted - which will allow replication to continue.
Reliable because it greatly reduces the risk that a proposal will be accepted when the corresponding content cannot be delivered (due to a LAN outage etc). This policy is less likely to provide good performance because replication is kept on hold until content has been successfully distributed to a greater number of nodes than would be the case under the "faster" policy.
Setting the corresponding "content.learner.count" value- This value is the number of learners (exluding the originating node) to which content is delivered before a proposal will be raised for agreement.
- If content.min.learners.required is false then the system will automatically lower content.learner.count to ensure that replication can continue om the event of a loss of node(s).
- If the value is higher than the number of available nodes then Git MultiSite is notified of the failure and the value is dropped further, ( based on 'content.min.learners.required').
- If content.min.learners.required is true the then Git MultiSite is notified of a failure to summon enough voters for agreement - content.leaner.count is automatically dropped again (to equal one less than the number of available learners), or if that's no longer possible, a failure is reported.
For "reliable" policy that offers the upmost reliability, set this to "true".
true enforces the requirement
When content.min.learners.required is set to "true" Git MultiSite will not lower the content.learner.count in light of insufficient learner nodes being available.
Example:
content.learner.count=5, content.min.learners.required=true
After an outage there are now only 4 learner nodes in the replication group - replication will be halted because there aren't enough available learners to validate a content distribution check.
content.learner.count=5, content.min.learners.required=false
After an outage there are now only 4 learner nodes in the replication group - replication will not be halted because GitMS will automatically drop the count to ensure that it doesn't exceed the total number of learners in the group.
- "acceptors" Policy:
- Voting can commence if content is delivered to 50% of voters (acceptors), include self if a voter
Content push policy only deals with delivering content to voters. This policy is ideal if you have a small number of voters. You don't want replication to continue until you have confirmed that at least half the voters have the corresponding payload. This policy supports a "follow-the-sun" approach to replication where the voter status of nodes changes each day to correspond with the locations where most development is being done. This ensures that the sites with the most development activity will get the best commit performance.
Setting the corresponding "content.learner.count" value
For "Acceptors" policy this is ignored.
Setting the corresponding "content.min.learners.required" valueFor "Acceptors" policy this is ignored - learners do not factor into the policy, only voters (acceptors).
- "faster" Policy:
- Replication can continue if content available to x learners (not including self)
OR [delivered to half the voters, including self if its a voter] where x = content.learner.count
Setting the policy to 'faster' lowers the requirement for successful content distribution so that replication can continue when fewer nodes (than under the reliable policy) have received the payload for the proposal. 50% of voters (acceptors) must receive the content. It's faster because if there's a slow or intermittent connection somewhere on the WAN, it wouldn't delay agreement/ slow down replication. It is less reliable because it increases the possibility that the ordering of a proposal can be agreed upon, only for the corresponding content to not get delivered. The result would be a break in replication.
Under the "Faster" policy "content.min.learners.required" can be set to "True" or "False" as the learners check takes a secondary role. If set to "True", even if the conditions are not satisfied then you can still achieve quorum.
Setting the corresponding "content.learner.count" value- For the 'faster' policy the node in question is always included in the count. If this is not satisfied, a further check is made against acceptors. The check passes if half or more (rounded up) of the available voters took delivery of the content.
For Faster, set this to "false".
If all the acceptors are not learners, we switch to 'reliable' policy with a log message. A node always includes itself in the count - in contrast with the "reliable" policy where a node never includes itself in the count.
6.3.2 Steps for a policy change
Use this procedure to change between the above Content Distribution policies.
- Make a back up and then edit the
/opt/wandisco/git-multisite/replicator/properties/application.propertiesfile (Read more about the properties files). - Change the value of
content.min.learners.required, make it "true" for reliability, "false" for speed (default is true). - Save the file and perform a restart of the node.
6.3.3 Set policy on a per-state machine basis
When editing the property, add the state machine identity followed by '.content.push.policy'. e.g.
<machine_identity_name>.content.push.policy=faster
The system assigns policy by looking up the state machine policy followed by 'content.push.policy'. If none are available, 'reliable' is chosen. Conditional switch between 'faster' and 'reliable' remains in effect regardless of the policy.
Example 1 - Faster policy on a 2-node replication group
Two-node Replication Group, NodeA (Active Voter) and NodeB (Active).
  content.push.policy=faster
  content.min.learners.required=false
  content.learners.count=1
- A Commit to NodeA (AV) will go through faster and before all content has been received on NodeB (A).
- A commit to the NodeB (A) will not go through until NodeA (AV) has received ALL content.
Example 2 - Acceptors policy on a 4-node replication group
Four nodes split between two sites. On Site 1 we have NodeA and NodeB, both are Active Voters. On site 2 we have NodeC (AV) and NodeD (A).
  content.push.policy=acceptors
  content.min.learners.required=true
  content.learners.count=1
- Acceptors policy requires delivery to half the voters (rounded-up). There are three nodes so commits at Site 1 need to reach both local AV nodes in order to go through.
- Commits to NodeC at site 2 will also need to be delivered to one of the nodes at Site 1 in order to go through. This configuration could support a "follow-the-sun" approach if one of the active voters at site 1 could be switched for NodeB at site 2, thus providing developers at site 2 with better performance.
content.thread.count
Content Distribution will attempt parallel file transfer if there are enough threads available. The number of threads is controlled by a configuration property "content.thread.count" which is written to the application.properties file.
content.thread.count=10
The default value is 10. This provides plenty of scope for parallel file transfer. However, as each thread consumes system overhead in the form of a file descriptor and some memory space, servers that are under regular heavy load should lower the count to 2.
6.3.4 Change the content maximum idle time
Set this in milliseconds. If content connection, either push or pull, is idle for this time, it is considered unreliable and closed. A new connection is then opened when needed. TCP/IP itself does not time-out the connections, however many network components (routers and firewalls) do. This timed-out connection then can behave as dead-hole, which blocks writes for tens of seconds timeouts. This can lead to spikes in transmission (push or pull) times after a period of inactivity (or even during activity if the number of connections is large and under-utilised).
Set the content.max.idle.time to, for example, 10 minutes, or whatever expiration the network infrastructure uses. We recommend that you set this to whatever your routers/firewalls are set to. This can avoid delays. If you set the value too low, connections may be closed unnecessarily and cause delays on new connection creation (roughly 1 RTT, but more for ssh connections).
You should set, or lower, this value if you get a large number of "Failed to send" info logs from PrioritizingSender, occurring especially after some time of commit inactivity.
6.4 Replication lag
There are some time-sensitive activities where you need to work around replication lag. For example:
- You have a 2-node replication group, NodeA and NodeB, and Repository Repo01 is replicated between them.
- A commit to NodeA puts Repo01 at Revision N. The proposal for this commit is agreed but NodeB is still waiting for the changes to arrive so lags slightly behind NodeA at revision N-1.
- A user on NodeB does an svn cp http://nodeB/repo01/trunk http://nodeB/repo01/tags/TAG_X.
- This tag does not include changes that occured in the latest revision. WANdisco's replication technology ensures that all nodes are in the same state in the short to medium term. However, at any moment changes may be in transit. A larger volume of traffic and less available network capacity increases this still in transit state.
This lag is unavoidable in a real-world application and all replica should soon be back in sync.
7. Guide to node types
Each replication group consists of a number of nodes and a selection of repositories that will be replicated.
There are now some different types of site:
 Active
- An Active node has users who are actively committing to Git repositories, which results in the generation of proposals that are replicated to the other nodes. However, it plays no part in getting agreement on the ordering of transactions. Active nodes support the use of the Consistency Checker tool.
 Active Voter
- An Active Voter is an Active node that also votes on the order in which transactions are played out. In a replication group with a single Active Voter, it alone decides on ordering. If there's an even number of Active Voters, a Tiebreaker will have to be specified. Active nodes support the use of the Consistency Checker tool.
-
 Passive
 - A node on which repositories receive updates from other nodes, but doesn't permit any changes to its replicas from Git clients - effectively making its repositories read-only. Passive nodes are ideal for use in providing hot-backup. Passive nodes do not support the reliable use of the Consistency Checker tool.
-
 Passive Voter
 -
A passive node that also takes part in the vote for transaction ordering agreement.
Use for:- Dedicated servers for Continuous Integration servers
- Sharing code with partners or sites that won't be allowed to commit changes back
- In addition, these nodes could help with HA as they add another voter to a site.
- Passive nodes do not support the reliable use of the Consistency Checker tool.
 Voter (only)
-
A Voter-only node doesn't store any repository data, it's only purpose is to accept transactions and cast a vote on transaction ordering. Voter-only nodes add resilience to a replication group as they increase the likelihood that enough nodes are available to make agreement on ordering.
The Voter-only node's lack of replication payload means that it can be disabled from a replication group, without being removed.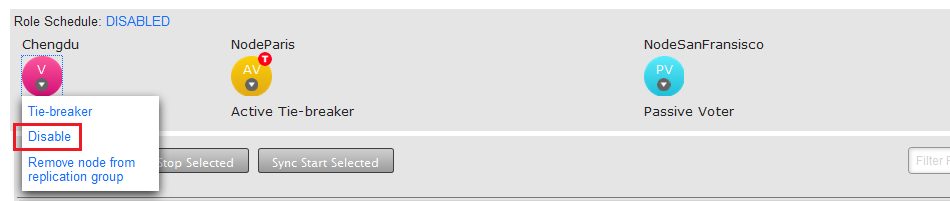
A disabled node can be re-enabled without the need to interrupt the replication group.
 Tiebreaker
- If there are an even number of voters in the Replication Group the Tiebreaker gets the casting vote. The Tiebreaker can be applied any type of voter: Active Voter, Passive Voter or Voter. The Tiebreaker is only available for a replication group that has an even number of voter nodes. Also, if a replication group that is equipped with a tiebreaker node subsquently changes so that it has an odd number of voter nodes, either by gaining or losing a node, then its tiebreaker node automatically loses the tiebreaker designation and gets the same voting power as any other voter node.
 Helper
- When adding a new site to an existing replication group you will select an existing site from which you will manually copy or rsync the applicable repository data. This existing site enters the 'helper' mode in which the same relevant repositories will be read-only until they have been synced with the new site. By relevant we mean that they are replicated in the replication group in which the new site is being added.
 New
New- When a site is added to an existing replication group it enters an 'on-hold' state until repository data has been copied across. Until the process of adding the repository data is complete, New nodes will be read-only. Should you leave the Add a Node process before it has completed you will need to manually remove the read-only state from the repository.
8. Hooks
Hooks are script that are triggered by specific repository events, such as the creation of a new revision or the modification of an unversioned property. As such they're very useful for Git administrators who want to have more control over their repository environment. Deploying GitMS should have minimal impact on how hook scripts run on a deployment. For information on Git hooks visit kernel.org
If you are using GerritMS in conjunction with GitMS do not install Git hooks as these will not fire. Gerrit fires specific Gerrit hooks.
Hooks are always installed manually at each replica by the Git Administrator. They must be placed on all of the remote node's repository's under the <repositoryPath>/hooks/ directory. Generally we advise that hooks should be set up the same on all sites, although this is not a requirement for replication. If processes or policies differ from site to site then hooks will be need to be different.
The following hooks which fire on a remote Git repository are currently supported:
- pre-receive
- This is the first script to run on a remote repository when handling a push from a local repository. If it exits with non-zero status, none of the refs will be updated. This hook can be used to, for example, ensure updated no references are non-fast-forwards.
- update
- This script is run once per ref the pusher is updating, unlike
pre-recievewhich is only run once even if pushing multiple refs. If the update script exits non-zero then only that reference is rejected; other references can still be updated. The hook takes three paramaters: the name of the ref, the old object name, and the new object name.- post-receive
- This hook fires on the remote repository once all refs have been updated following a push from a local repository. This hook can be used to notify users that the process is complete. This hook gets both the original and updated values of the refs. Do not run anything here that may take a long time as the client cannot disconnect until the script has completed.
- post-update
- This hook fires on the remote repository once all refs have been updated following a push from a local repository. Unlike a
post-receivehook, this hook only knows which heads were pushed and not the values of the refs.
Additionally there are 2 replicated hooks that execute on every node except the originating node:
- rp-post-update
- This hook can be used to update to every server.
- rp-post-receive
- This hook can be used to recieve notification when a push has reached every server.
If you are using post hooks to recieve notifications at every site for automation purposes then both the post-receive and rp-post-receive hooks need to be implemented. However, if you are using post hooks for generating e-mail notification then only the post-receive hook should be installed at all sites for all repositories. In this case, if you install the rp-post-receive hook as well then those receiving the e-mail notification will receive 1 e-mail per GitMS node - this is a potential e-mail storm so is not recommended.