4. Administrator's Guide
4.1 Running Git MultiSite
This guide runs through everything you need to know to get Git MultiSite deployed. First we'll cover all the things that you need to have in place before you install. We'll then cover a standard installation and setup. Finally we'll look at some possible problems you might experience with some troubleshooting tips.
Starting up
To start the Git MultiSite replicator, follow these steps:
- Log in to your server
- Run the git-multisite service, located in the init.d folder:
[root@localhost init.d]#
./git-multisite start
20130520-164811 (24088) [INFO]: Starting WANdisco MultiSite 20130520-164811 (24088) [INFO]: Started replicator (24100) 20130520-164811 (24088) [INFO]: Started ui (24110) 20130520-164811 (24088) [INFO]: Number of errors: 0 20130520-164811 (24088) [INFO]: Number of warnings: 0 - The two components of Git MultiSite; the replicator and the UI will start up. Read more about the git-multisite init.d script
Note: It is possible for Git MultiSite to start, but then be unable to continue. This is typically due to issues with the environment rather than the configuration - such as being unable to create log files or their directories.
After running
./git-multisite startyou should confirm the system is running using./git-multisite status(or runps ef | grep -i multisite). If the system isn't running, check the status logs for full details.
Shutting down
To shutdown:
- Open a terminal window on the server and login with suitable file permissions.
- Run the git-multisite service, located in the init.d folder:
lrwxrwxrwx 1 root root 37 May 9 10:37 git-multisite -> /opt/git-multisite/bin/git-multisite - Run the stop script, i.e.:
[wandisco@ip-10-0-100-7 bin]$ ./git-multisite stop 20130520-165704 (24767) [INFO]: Stopping WANdisco MultiSite 20130520-165704 (24767) [INFO]: Request received to shut down replicator 20130520-165704 (24767) [INFO]: replicator processes ended 20130520-165704 (24767) [INFO]: Request received to shut down ui 20130520-165704 (24767) [INFO]: Sending signal 15 to watched ui process (attempt 1)... 20130520-165707 (24767) [INFO]: Sending signal 15 to watched ui process (attempt 2)... 20130520-165710 (24767) [INFO]: ui processes ended 20130520-165710 (24767) [INFO]: Number of errors: 0 20130520-165710 (24767) [INFO]: Number of warnings: 0 - Both the replicator and the UI processes will shut down. Read more about the git-multisite init.d script
init.d script
The 'start-up' script for persistent running of Git MultiSite can be found in the /etc/init.d folder. Run the script with the help command to list the available commands:
[root@localhost init.d]# ./git-multisite help
Usage: git-multisite {start|stop|status|uistart|uistop|repstart|repstart}

start          Start the Multisite service
stop           Stop the Multisite service
restart        Stop and Start the Multisite service
force-reload   Force the reload of the  Multisite service
status         Confirms current status, with the master PID if the service is running
version        Show the current version of Multisite running
Changing the admin console password
You can change Git MultiSite's login password at any time by following this procedure:
- Login to the MultiSite admin console.

Login.
- Click on the Settings tab.
Settings.
- At the top of the settings screen is the password change form. Enter the current password, along with a new password.
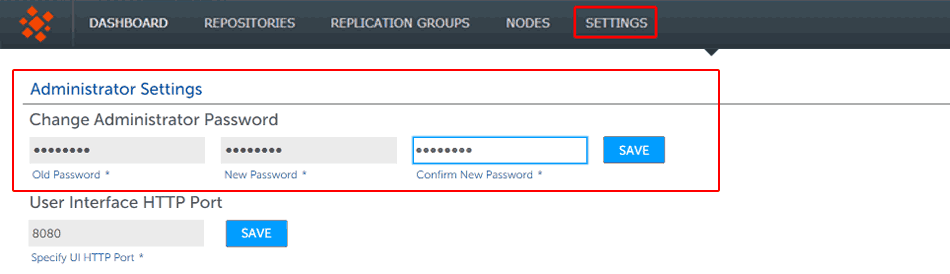
Changed password
- Click the SAVE button store the new password. You can be sure that the new password has been accepted if you see a growl message appear on screen.

Growl!
It's not currently possible to change the Administration username. In order to change the username you would need to re-install Git MultiSite
Updating your license.key file
Follow this procedure if you ever need to change your product license. You would need to do this if, for example, you needed to increase the number of users or the number of replication nodes.
- Login to your server's command line, navigate to the replicator directory (by default:
/opt/git-multisite/replicator) and rename thelicense.keytolicense.20130625.
i.e.total 1120 drwxr-xr-x 2 root root 4096 Jun 19 17:21 content drwxr-xr-x 5 root root 4096 Jun 19 17:21 database drwxrwxr-x 4 root root 4096 Jun 19 17:13 docs drwxrwxr-x 2 root root 4096 Jun 19 17:13 lib -rw-r--r-- 1 root root 256 Jun 19 17:18 license.key <- drwxrwxr-x 3 root root 4096 Jun 25 14:06 logs drwxrwxr-x 2 root root 4096 Jun 19 17:13 properties - Get your new
license.keyand drop it into the/opt/git-multisite/replicatordirectory. - Restart the replicator by running the Git MultiSite script with the following argument:
perl /etc/init.d/git-multisite repstartThis will trigger a replicator restart, which will force Git MultiSite to pickup the new license file and apply any changes to permitted usage.
If you run into problems, check the replicator logs (/opt/git-multisite/replicator/logs) for more information.
PANIC: License is invalid com.wandisco.fsfs.licensing.LicenseException: Failed to load filepath4.2 Managing Replication
This section covers the various functions that handle how repository data is replicated.
Adding a Node
To replicate Git repository data between nodes, you first first tie the nodes together, this process starts with adding (connecting) nodes in a process we call induction.
- Login to the Git MultiSite admin console of the new node that you are connecting to your existing servers.
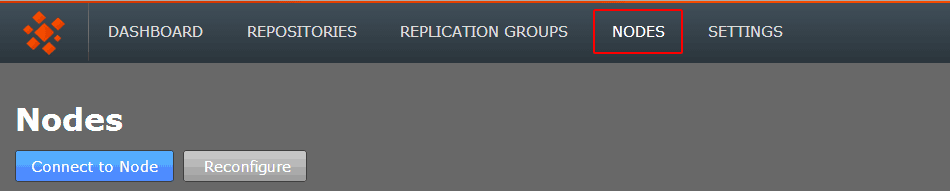
- Click on the Nodes tab.
- Click on the Connect to node button.
Connect to Node
- Enter the details of an existing node. You can get these details from the Settings tab of the existing node.
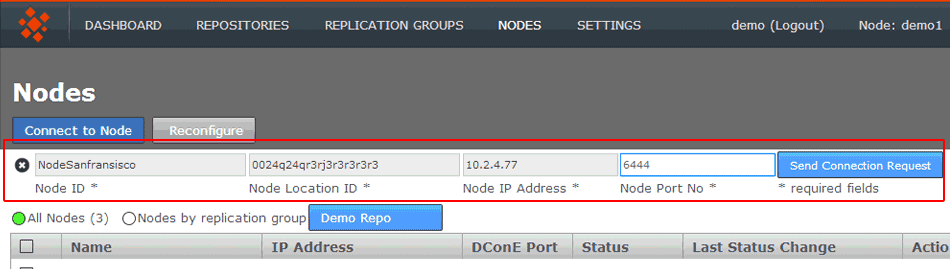
Enter the details from an existing, connected node.
- Node Node ID
- This is the name that you gave the Node during installation. If you log into the node in question you can see the Node ID on the title of any screen that you view, it also appears in the logged in message: "Welcome to MultiSite, admin. You are connected to <NODE ID>"
- Node Location ID
- A unique string that that a node creates for use as in identifier. You can get this from the node's Settings tab:
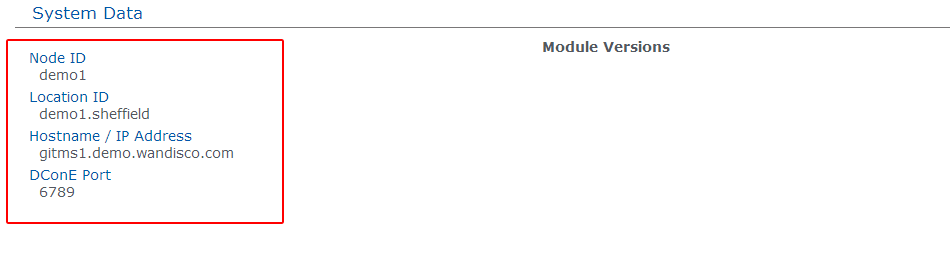
System Data table, found on the Settings tab.
- Node IP Address
- The IP Address of the node's server.
- Node Port No
- The TPC port that the node uses for DConE, which handles agreement traffic. The default is 6444 See Reserved Ports.
- Click on the SEND CONNECTION REQUEST button. The new node will appear on the active list of Nodes. Should a problem occur you may find that the new node gets stuck in a 'pending' state. If this happens click on the Cancel button.
Adding a Replication Group
Use the procedure to add a new Replication Group. You need to add a new replication group when you need to replicate between a new combination of snodes - i.e. nodes that are not currently replicating in an existing group. If you are, instead, looking to replicate a new repository between existing nodes, it's possible to add new a new reposity to those nodes. In this case see Add a new repository.
- Log in to the Git MultiSite browser-based user interface. Click on the REPLICATION GROUPS tab, then click on the CREATE REPLICATION GROUP button.
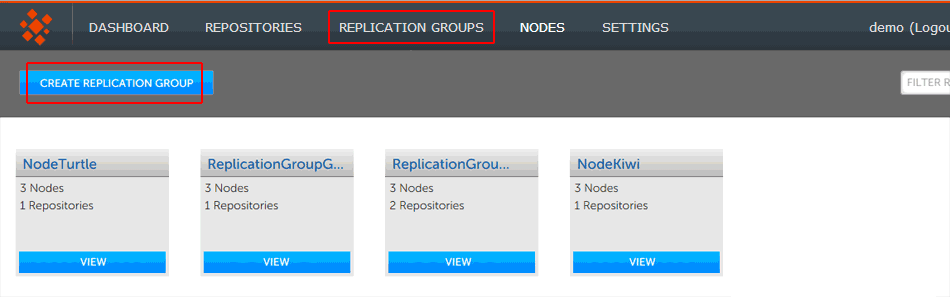
Creating a replication group.
- Enter a name for the group in the Group Name field, then click on the drop-down selector on the Add Nodes field. Select the nodes that you want to replicate between.
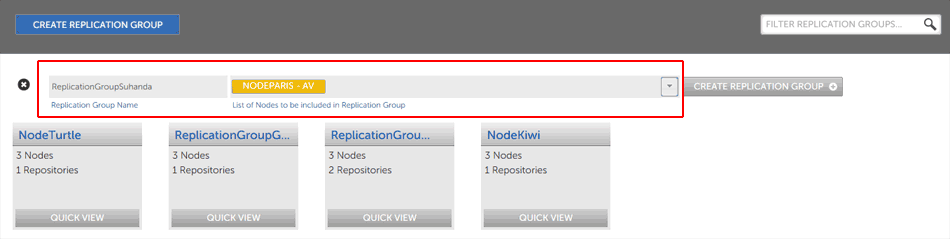
replication group details.
Replication Ground Rules
- A node can belong to any number of replication groups
- A repository can only be part of a single Active replication group at any particular time.
- It's possible to change membership on the fly, moving a repository between replication groups with minimal fuss. - Ensure that member nodes are each set as an appropriate type.

Click on node labels to change their type.
Quick guide to setting node types
All nodes are automatically added as the Active Voter type. To understand the differences between the different types of nodes, read Guide to Node Types - Once all nodes are in place and their settings adjusted to your needs, click CREATE REPLICATION GROUP.

Create Replication Group.
- Newly created replication groups will appear on the Replication Group tab, but only at the node that are themselves members of the new group.
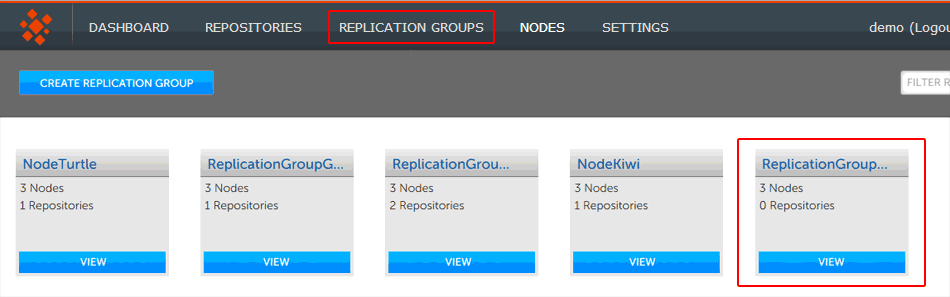
The new replication group now appears - if you are logged into one of its constituent nodes.
Scheduling node changes - follow the sun
You can schedule the member nodes of a replication group to change type according to when and where it is most beneficial to have active voters. To understand why you may want to change your nodes, read about Node Types
Instead of manually setting up schedules through a node's UI you can do it programmatically through calls to the public API.
See Public API ScheduledNodeAPIDTOList element and scheduledNodeAPIDTOList Datatype
Use the following API call
http://<ip>:8082/public-api/replicationgroup/{repgroupID}/schedulee.g.
http://10.0.100.135:8082/public-api/replicationgroup/97913c04-bbad-11e2-877a-028e03094f8d/schedulePUT with ReplicationGroupAPIDTO XML as body:
To make Node N3 a tie-breaker 'T' FROM 10:00 - 16:00 (GMT) every day of the week with Node N1 as tie-breaker 'T' afterwards: (N.B Times are in GMT -4 hours so 14 = 10:00 GMT)
Example curl command:
Make a text file containing ReplicationgroupAPIDTO XML (as above) called schedule.xml
curl -u username:password -X PUT -d @schedule.xml http://[IP]:[PORT]/public-api/replicationgroup/97913c04-bbad-11e2-877a-028e03094f8d/schedulesample 'schedule.xml' file
- Login to a node, click on the REPLICATION GROUPS tab. Click on the QUICK VIEW link for the replication group that you wish to make a schedule.
- The replication group's pop-up window will open, showing the member groups together, along with their current roles. Click the CONFIGURE button.
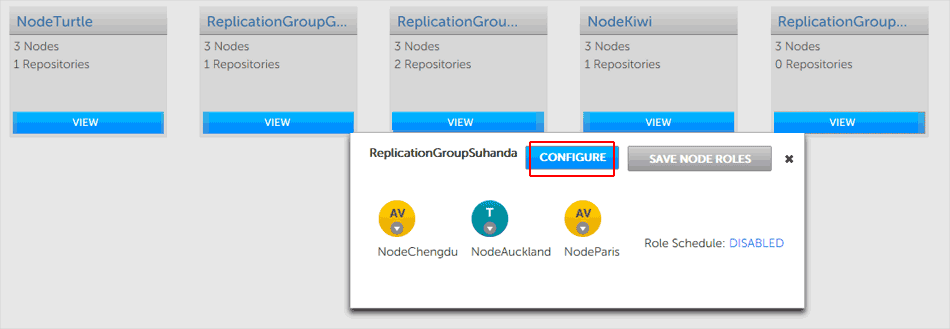
Configure.
- The replication groups configuration screen will appear. You may notice that to the left a Role Schedule is noted. By default this will show as DISABLED. Click on the CONFIGURE SCHEDULE button, in the right-hand corner.
- The Schedule screen will appear. The main feature of the screen is a table that lists all the nodes in the replication group, set against a generic day (midnight to midnight) that is divided into hourly blocks. Hourly block is color-coded to indicate each site's type.
In the image below NodeSanFransisco is coded as turquoise (blue-green) which indicates that it is set as a tie-breaker. The hourly blocks associated with NodeChengdu and NodeAuckland are colored yellow, indicating that these nodes are Active Voters. Finally, NodeParis is blank, indicating that it is Active.
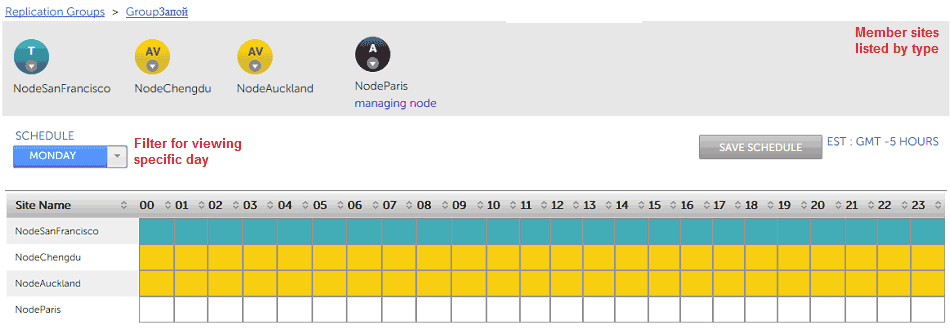
Vanilla Scheduling - no changes to type over time.
- To make a change to the shedule, click on a block. It doesn't matter which block you select as the New Scheduled Configuration form will let you modify any hours for any available node.
- Frequency
- Select from the available frequency patterns: Daily, Weekly, Monday-Friday or Saturday to Sunday.
- From
- The starting hour for the new schedule, e.g. 00 for the start of the day.
- To
- The hour at which the scheduled changes end, e.g. 24 would effectively end the scheduled change at midnight.
- Node list
- The member nodes are listed, in graphical form, colour coded to their type.
- Click on the node icon to change its type.
In this example NodeSanFransisco is changed to an Active Voter, then NodeAuckland is changed into a Tie-breaker.
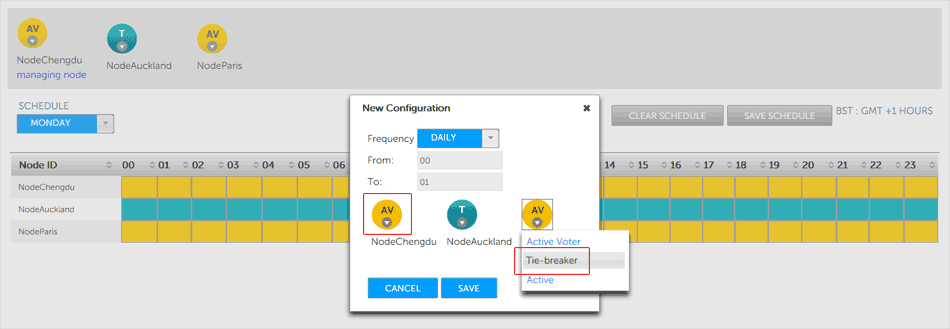
Swapping roles.
When all node changes have been made, click on the SAVE button to continue, or the CANCEL button if you change your mind.
- The schedule view will now change to show the changes that you make. You must click the SAVE SCHEDULE button for the changes to be applied.
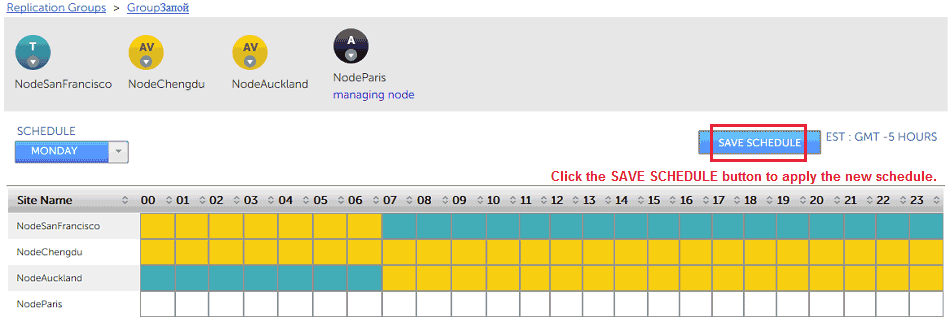
Swapping roles.
With all necessary changes made, you need to review the change to the schedule table and then click SAVE SCHEDULE button.
4.3 Managing Repositories
Add Repositories
Once you have added at least one Replication Group you will be able to add repositories to your node. Here's how:
- 1. Click on the REPOSITORIES tab. Click on the ADD button.
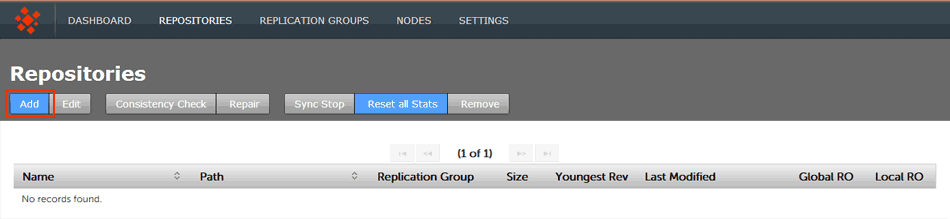
Repositories > ADD
- 2. Enter the Repository's name, the file system path (full path to the repository) and use the drop-down to select the replication group. You can set the repository to be Read-only by ticking the Global Ready-only You can deselect this later. Click ADD REPO.
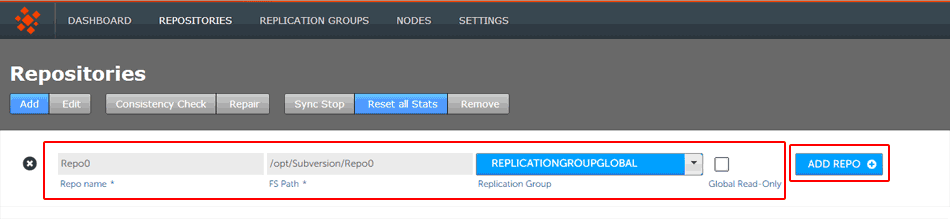
Repositories > Enter details then click ADD REPO
- 3. Once added, a repository will appear in a list on the REPOSITORIES tab. The list provides the following details.
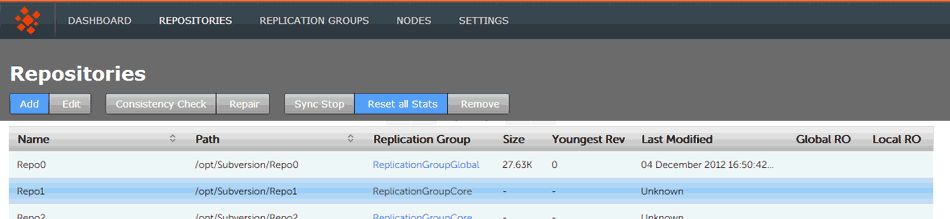
Repositories listed
- Name
- The name of the repository - this will be the same as the folder name in the Git directory.
- Path
- The full path to the Repository.
- Replication Group
- The Replication Group in which the repository may be replicated.
- Size
- The size of the repository is calculated as the disk space consumed by the repository directory on the node. It is computed when the UI loads the repository information. The value can differ between nodes.
- Youngest Rev
- The youngest (latest) revision in the repository. Comparing the youngest revisions between replicas is a quick test that a repository is in the same state on all nodes.
- Last Modified
- The timestamp for the last revision, which provides a quick indicator for the last time a Git user made a change.
- Global RO
- Checkbox that indicates whether the repository is globally Read-only, that is Read-only at all nodes.
- Local RO
- Checkbox that indicates whether the repository is locally Read-only, that is Read-only to users at this node. The repository receives updates from the replicas on other nodes, but never instigates changes itself.
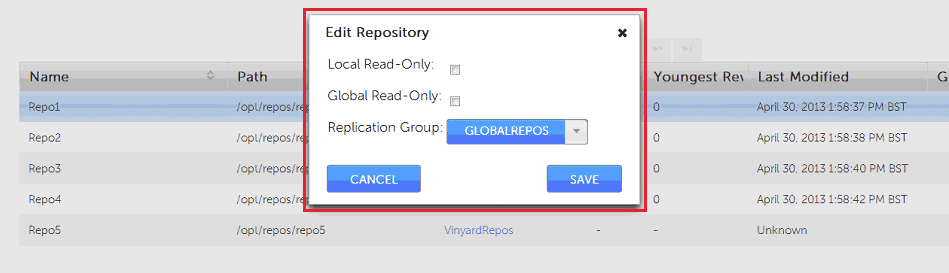
Edit a repository
It's possible to Edit a repository's properties after they have been set up in Git MultiSite. Follow this quick procedure.
- Login to the admin console of one of your nodes. The node will need to be the member of a replication group in which the repository is replicated, otherwise it won't appear on the tab. Click on the Repositories tab to see it.

Login.
- On the Repositories tab, click on the line that corresponds with the repository that you want to remove.
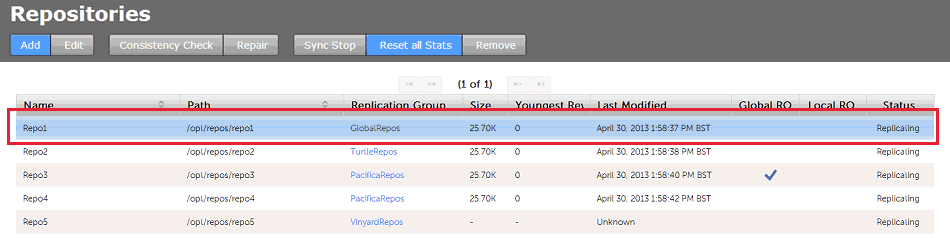
Repositories.
- Once a repository has been highlighted (Shown as a blue line), the EDIT button will become available. Click it.
Edit.
The repository edit window will open up.
- Local Read-only
- Change the Read-only setting, enable or disable the repository Local Read-only setting. When enabled, the repository will not be writable to local users. However, changes that are made on replica at other nodes will be applied through inter-site replication.
- Global Read-only
- Change the Read-only setting, enable or disable the repository Global Read-only setting. When enabled, the repository will not be writable either locally or globally. This is used to lock a repository from any changes.
- Replication Group
- Use the drop-down selector to change the replication group to which the repository belongs.
Important: Known problem concerning the moving of repositories between replication groups.
There's a problem that occurs if you move a repository to a replication group that contains one or more nodess from an earlier replication group, in which the repository was previously replicated.
Currently, logic persists from the earlier replication group that will cause commits to the newly added repository to fail, and for commits to the repository replicas on other member nodes to not be replicated.
We are addressing the problem as a matter of urgency, until a fix is in place do not move repositories into replication groups that contains nodes that have previously handled replication of the repository.
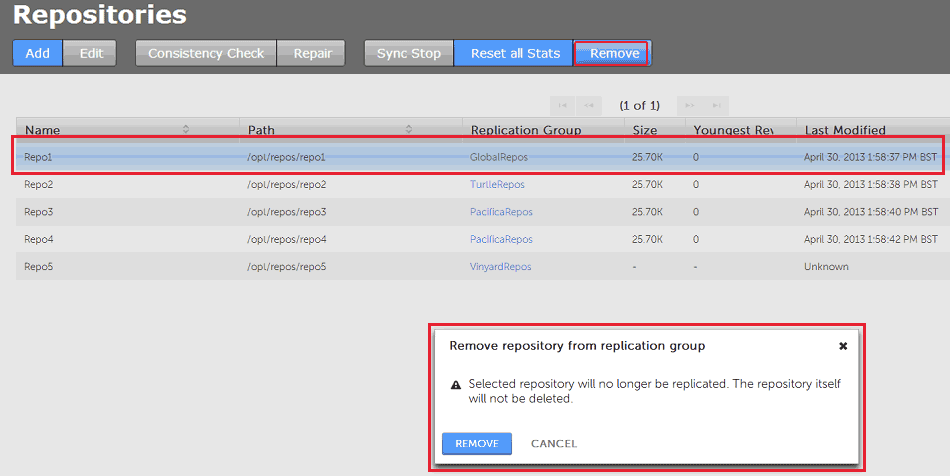
Remove a repository
It's possible to remove repositories from Git MultiSite. Follow this quick procedure.
- Login to the admin console of one of your nodes. The site will need to be the member of a replication group in which the repository is replicated, otherwise it won't appear on the tab. Click on the Repositories tab to see it.
Login.
- On the Repositories tab, click on the line that corresponds with the repository that you want to remove.
Repositories.
- Once a repository has been highlighted (Shown as a blue line), the REMOVE button will become available. Click it.
Remove.
A dialog box will appear entitled "Remove repository from replication group". It will confirm that removing a repository from a replication group will stop any changes that are made to it from being replicated. However, no repository data is removed.
4.4 Back up Git MultiSite Data
It's possible to back up Git MultiSite's own database in case you need to quickly restore a node.
This procedure backs up Git MultiSite's internal Prevayler database, it doesn't touch your Git repository data or any other system files that you should also be backing up.
Create a backup of the current installation by invoking the following API call:
curl --user <username>:<password> -X POST http://[node_ip_address]:8082/dcone/backupThis will create a backup folder in [INSTALL-DIR]/git-multisite/replicator/db/backup/X.X.X_DConE_Backup directory.
Back up while shut down
(run from within /replicator):
java -cp ./fsfsrestore.jar com.wandisco.fsfs.backup.FsfsBackup -c ./properties/application.propertiesUse this to back up the current state of all pervailers when Git MultiSite is shut down - you don't therefore need to start the replicator in order to create a backup of the database.
Back up selected prevailers
(run from within /replicator):
java -cp ./fsfsrestore.jar com.wandisco.fsfs.backup.FsfsClear -c ./properties/application.propertiesThis class clears selected prevaylers only, when the replicator is shut down. It does not clear all database instances, only those that are being restored during restore process.
4.5 Restore Git MultiSite Data
Use the following procedure to restore Git MultiSite settings after reinstalling and starting a node:
- Shutdown the node
- Run the following jar file:
java -jar fsfsrestore.jar path/to/application.properties path/to/back-up-folderthe first argument, path/to/application.properties is
<INSTALL-DIR>/git-multisite/replicator/properties/application.propertiespath/to/backup by default is
<INSTALL-DIR>/git-multisite/replicator/db/backup/FsfsBackup.class path/to/application.properties - Restart the node
Copyright © 2010-2013 WANdisco plc.
All Rights Reserved
This product is protected by copyright and distributed under licenses restricting copying, distribution and decompilation.