This section runs through the installation of WD Fusion into an IBM Openstack environment using Swift storage. Currently this deployment is limited to an active-passive configuration that would be used to ingest data from your on-premises cluster to your Swift storage.
Before you begin an installation to an Openstack Swift cluster make sure that you have the following directories created and suitably permissioned. Examples:
The installation process runs through the following steps:
The following issues should be considered before you start an installation.
Follow this section to complete the installation by configuring WD Fusion on a server that will place data that is replicated from your on-premises cluster to your OpenStack Swift storage. This second node can also be on-premises or co-located with your OpenStack platform.
Open a web browser and point it at the provided URL. e.g
http://<YOUR-SERVER-ADDRESS>.com:8083/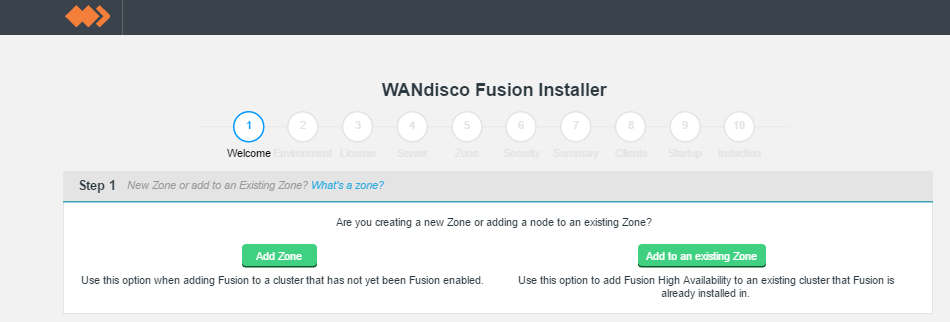
Welcome screen.
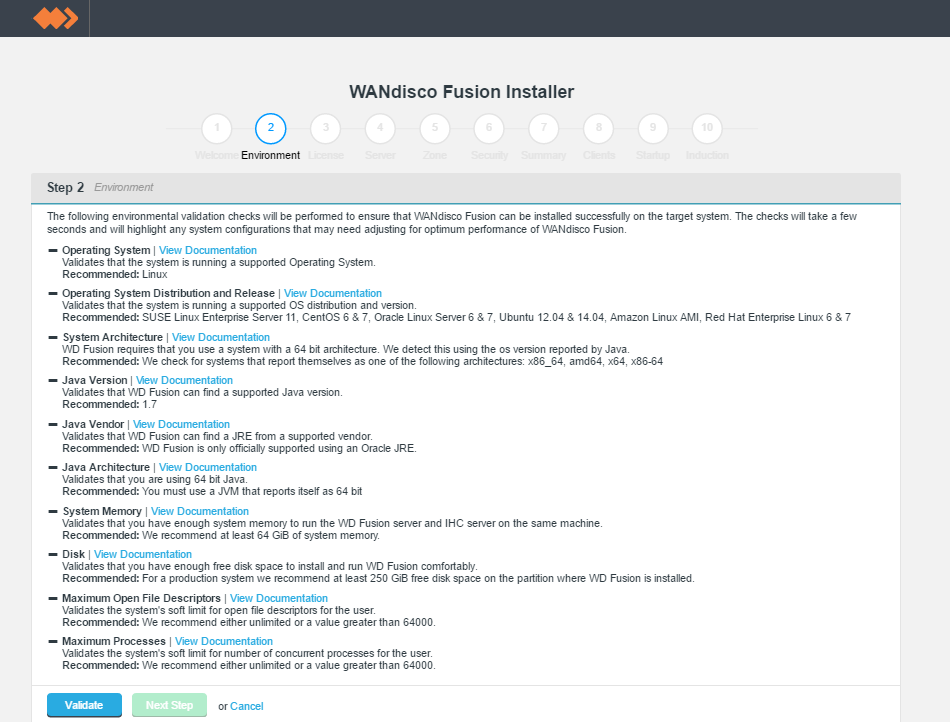
Environmental checks.
On clicking validate the installer will run through a series of checks of your system's hardware and software setup and warn you if any of WD Fusion's prerequisites are not going to be met.

Example check results.
Address any failures before you continue the installation. Warnings may be ignored for the purposes of completing the installation, especially if the installation is only for evaluation purposes and not for production. However, when installing for production, you should address all warnings, or at least take note of them and exercise due care if you continue the installation without resolving and revalidating.
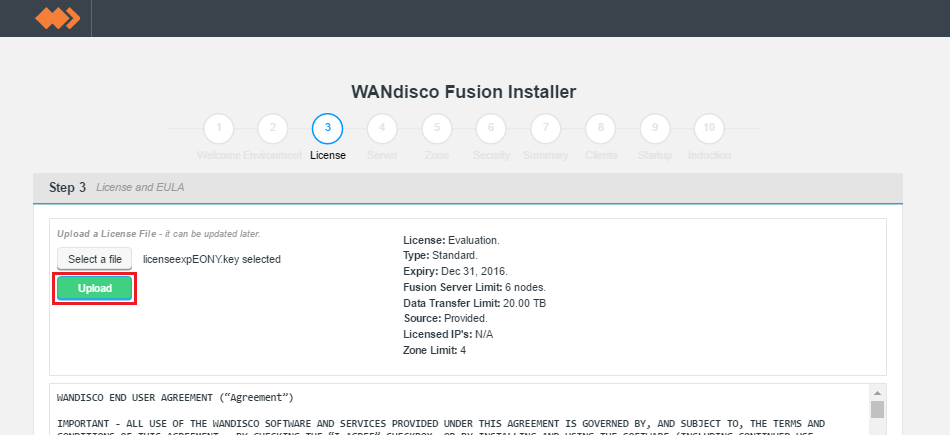
Upload your license file.
Verify license and agree to subscription agreement.
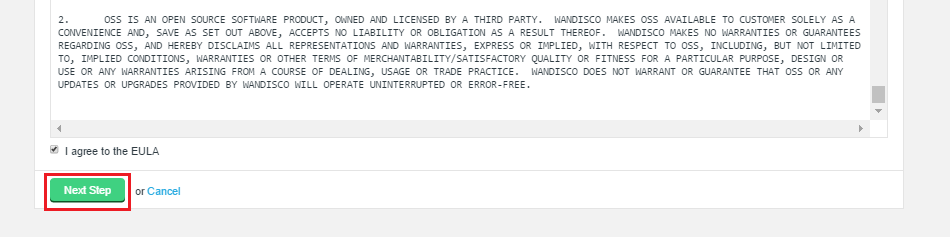
Click on the I agree to the EULA to continue, then click Next Step.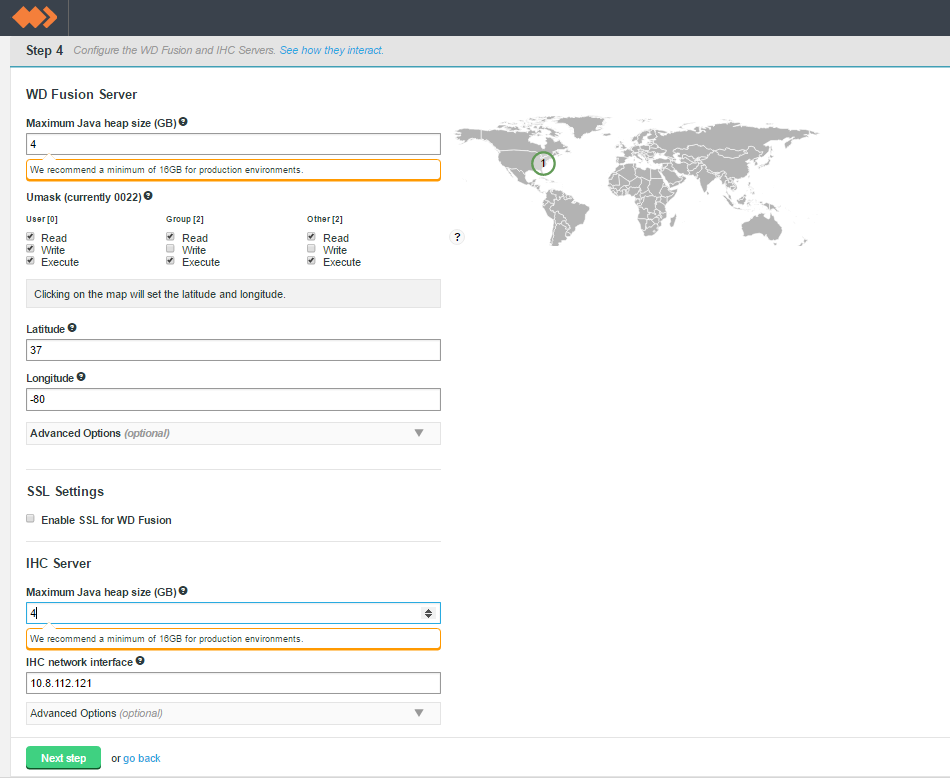
Screen 4 - Server settings
Swift Install 1
Swift Install 1
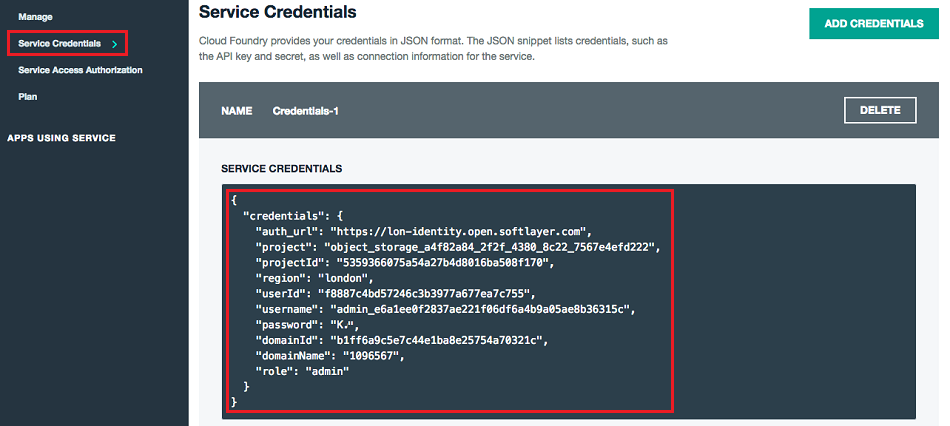
Some of the required information can be gathered from the Bluemix UI, in the Service Credentials section:
./encrypt-password.sh
  Please enter the password to be encrypted
Enter your Swift password and press return:
> password
eCefUDtgyYczh3wtX2DgKAvXOpWAQr5clfhXSm7lSMZOwLfhG9YdDflfkYIBb7psDg3SlHhY99QsHlmr+OBvNyzawROKTd/nbV5g+EdHtx/J3Ulyq3FPNs2xrulsbpvBb2gcRCeEt+A/4O9K3zb3LzBkiLeM17c4C7fcwcPAF0+6Aaoay3hug/P40tyIvfnVUkJryClkENRxgL6La8UooxaywaSTaac6g9TP9I8yH7vJLOeBv4UBpkm6/LdiwrCgKQ6mlwoXVU4WtxLgs4UKSgoNGnx5t8RbVwlrMLIHf/1MFbkOmsCdij0eLAN8qGRlLuo4B4Ehr0mIoFu3DWKuDw==
[ec2-user@ip-172-29-0-158 server]$

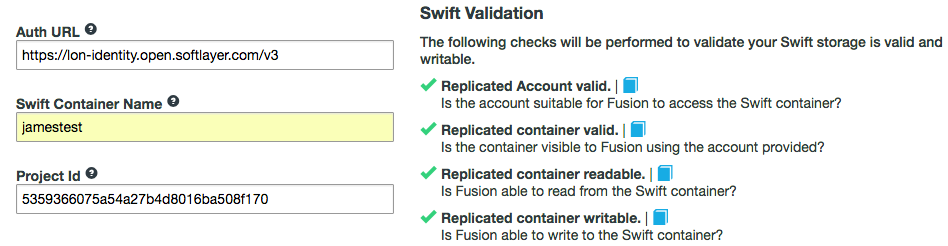
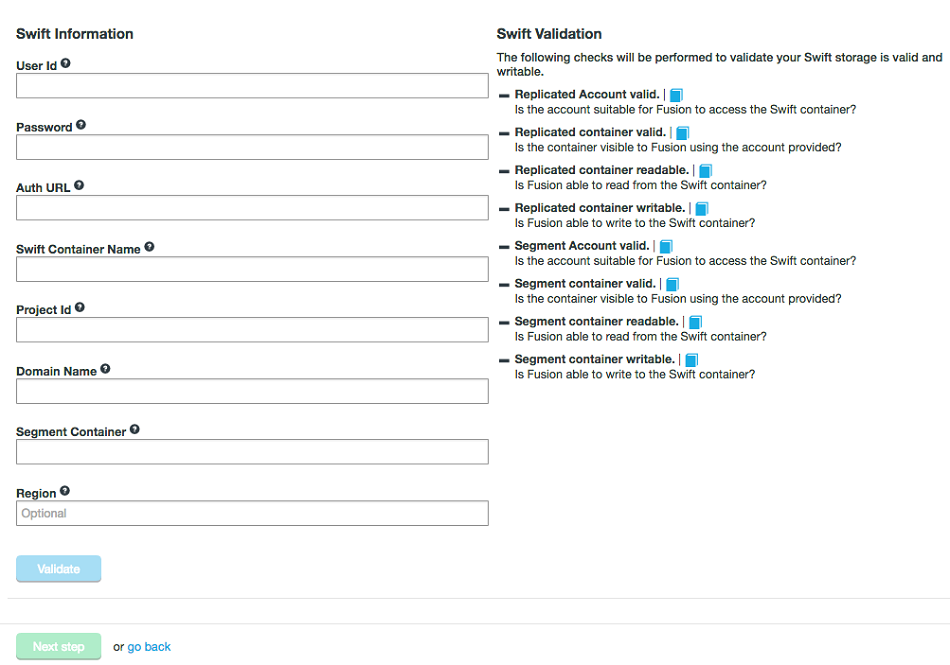
Swift Validation

Swift Segment Container Validation

Security

Summary
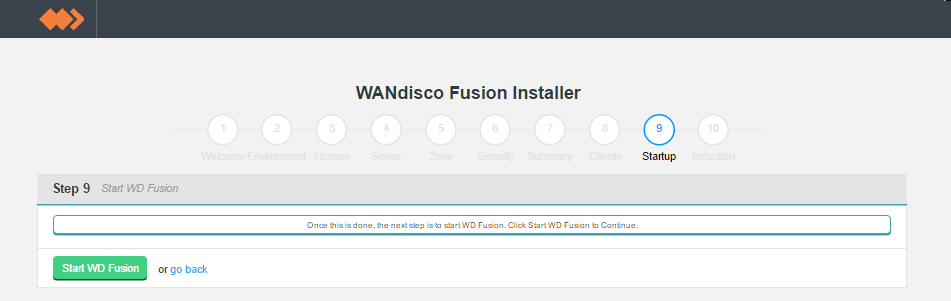
Startup
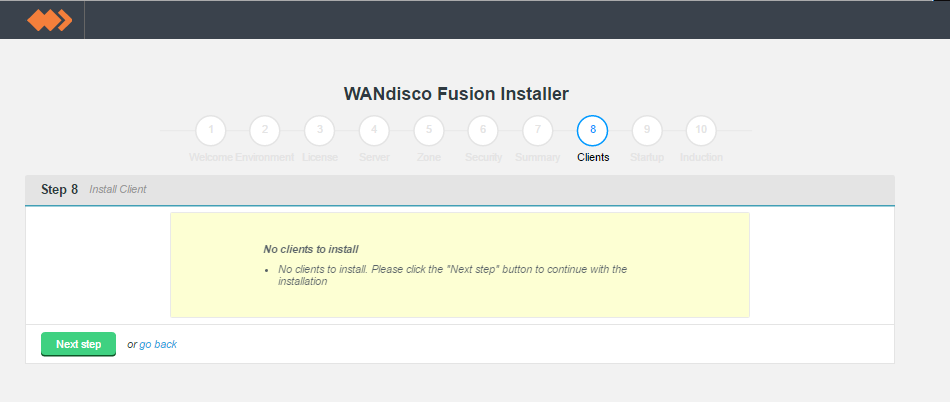
Clients
The WD Fusion server will now start up.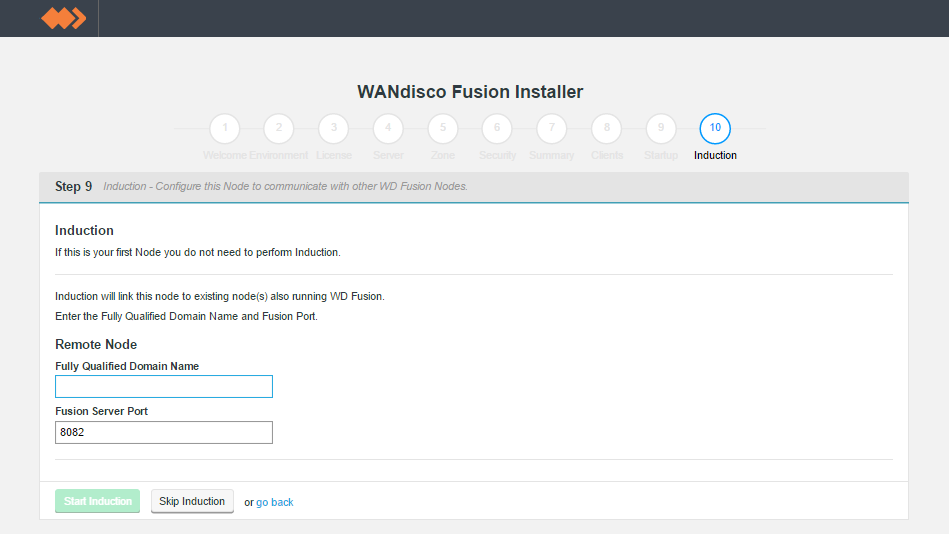
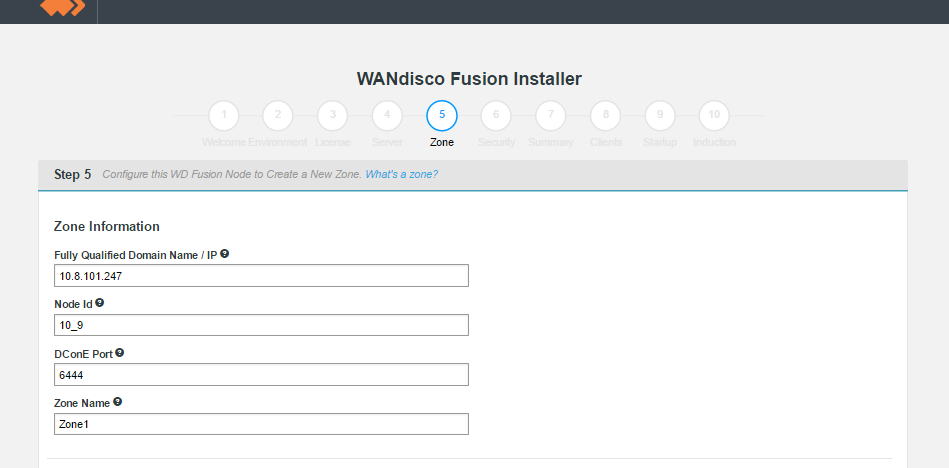
Induction
Enter the following details then Click Start Induction.
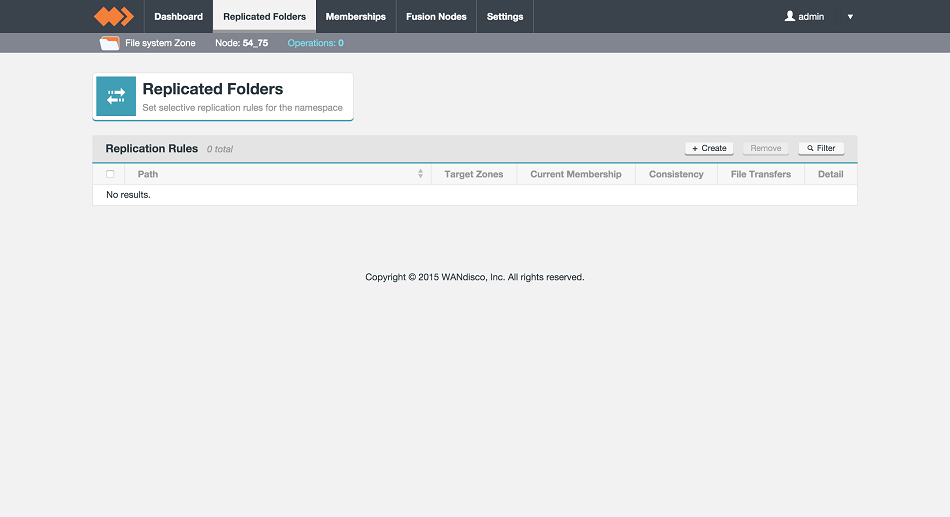
It's now time to demonstrate data replication between the on-premises cluster and the IBM OpenStack / Swift storage. First we need to perform a synchronization to ensure that the data stored in both zones is in exactly the same state.
You can synchronize data in both directions:
OpenStack/Swift storage - Fusion installation figure 09.
OpenStack/Swift storage - Fusion installation figure 10.
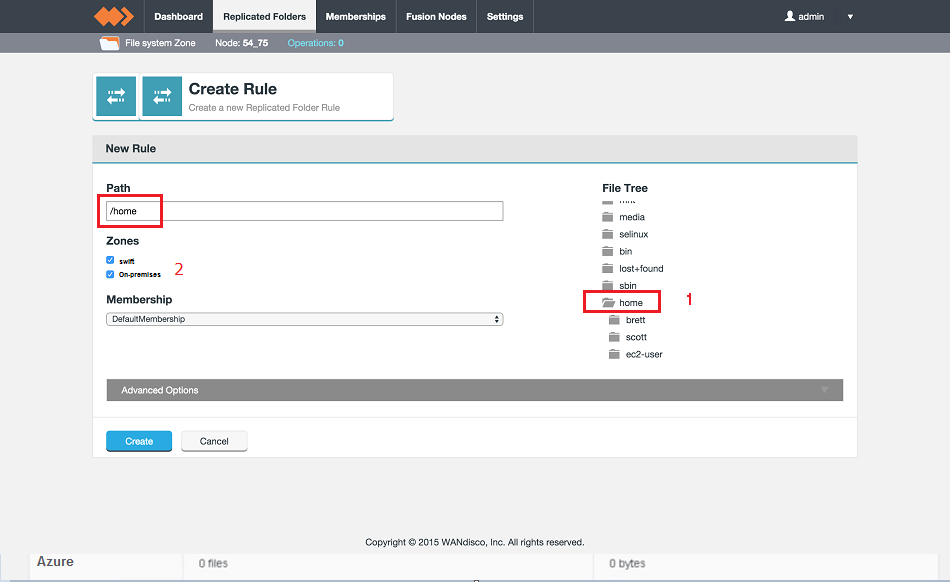
Navigate the HDFS File Tree (1), on the right-hand side of the New Rule panel to select your target folder, created in the previous step. The selected folder will appear in the Path entry field. You can, instead, type or copy in the full path to the folder in the Path directory.
Next, select both zones from the Zones list (2). You can leave the default membership in place. This will replicate data between the two zones.
More about Membership
Read about Membership in the WD Fusion User Guide - 4. Managing Replication.
IMPORTANT: files not appearing in the Swift store file tree
If you upload files to a Swift store using the Swift client, it is possible to exploit Swift's pseudo-file structure, placing a file in a subdirectory that isn't mapped to the file system. While this works internally, folders that exist in this state will not be visible to WD Fusion and so can't be viewed in the WD Fusion Rule file tree or set for replication.
workaround
When uploading files using the Swift client, ensure that you add a trailing slash, e.g.
swift upload [container name] [directory name]"/"Click Create to continue.
OpenStack/Swift storage - Fusion installation figure 11.
OpenStack/Swift storage - Fusion installation figure 12.
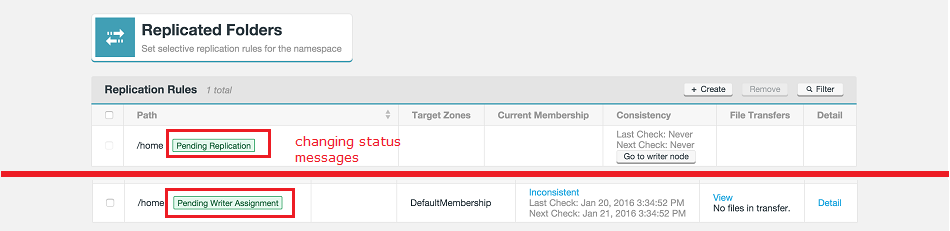
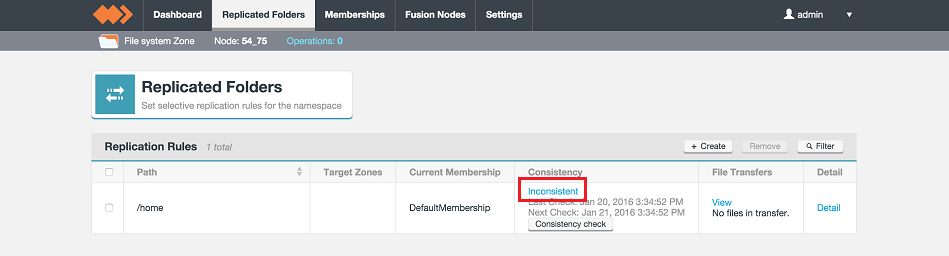
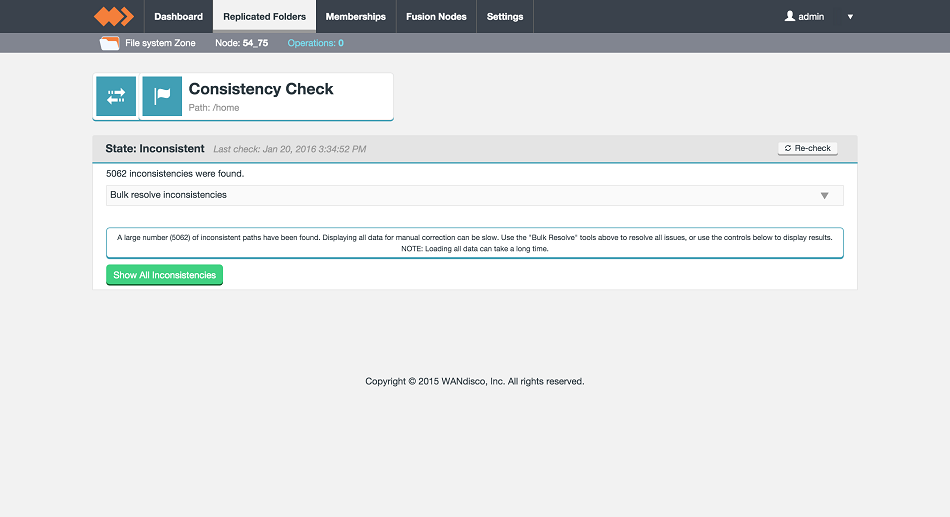
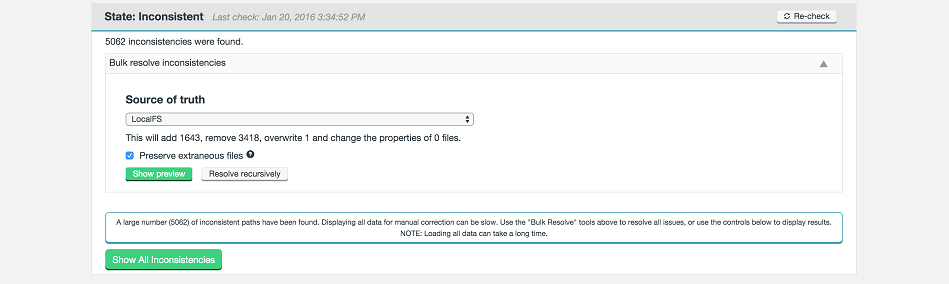
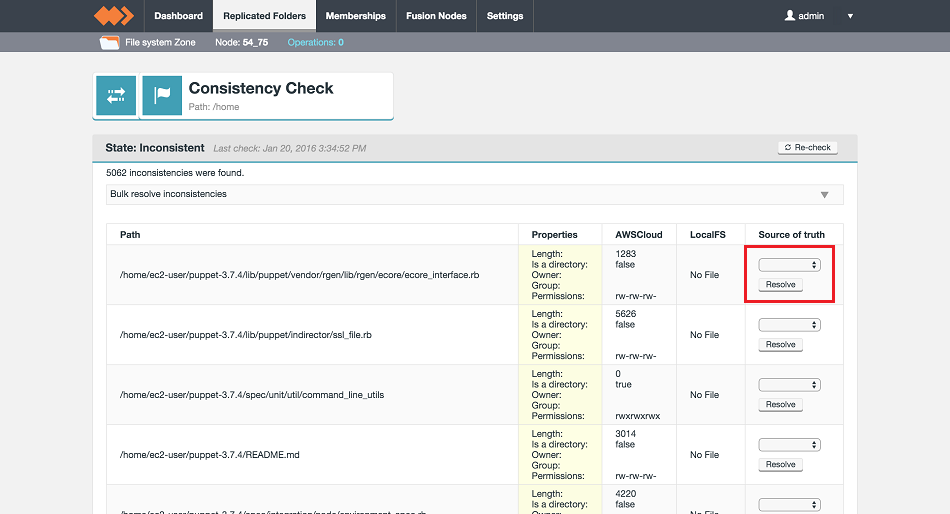
The consistency report will show you the number of inconsistencies that need correction. We will use bulk resolve to do the first replication.
See the Appendix for more information on improving performance of your first synch and resolving individual inconsistencies if you have a small number of files that might conflict between zones - Running initial repairs in parallel
OpenStack/Swift storage - Fusion installation figure 13.
OpenStack/Swift storage - Fusion installation figure 14.
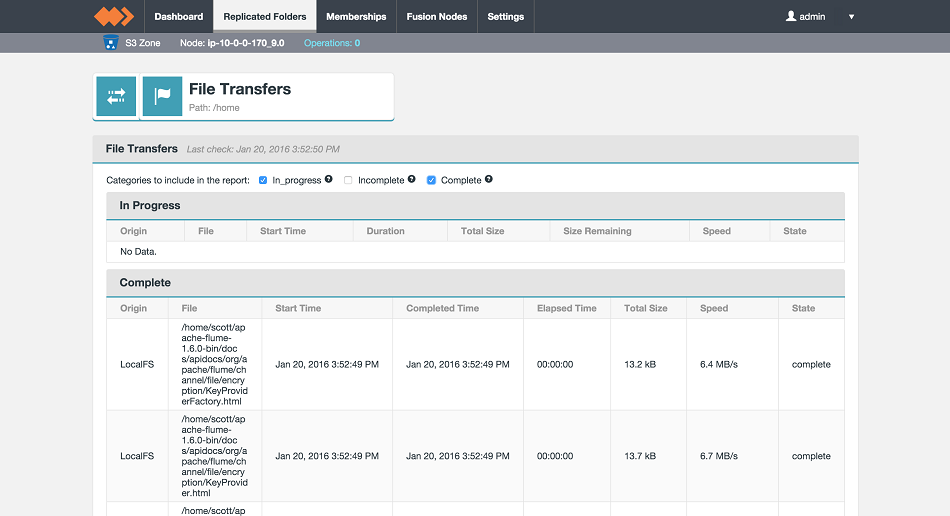
By checking off the boxes for each status type, you can report on files that are:
No transfers in progress?
You may not see files in progress if they are very small, as they tend to clear before the UI polls for in-flight transfers.
OpenStack/Swift storage - Fusion installation figure 15.
You can complete an IBM Swift installation using the Silent Installation procedure, putting the necessary configuration in the swift_silent_installer.properties as described in the section that covers Silent Installation.
Environment Variables Required for Swift deployments:
###############################
# Swift Configuration
###############################

#Swift installation mode
# REQUIRED for Swift Installations. Defaults to false
swift.installation.mode=true

#The Swift container name to use
# REQUIRED for Swift installations.
swift.containerName=

#The Swift username to use
# REQUIRED for Swift installations.
swift.username=

#The Swift password to use
# REQUIRED for Swift installations.
swift.password=

#The Swift auth URL to use for authenticating access to the storage
# REQUIRED for Swift installations.
swift.auth.url=

# The Swift tenant name to use
# Optional, for Swift installations.
swift.tenantName=

# The Swift tenant id to use
# Optional, for Swift installations.
swift.tenantId=silent_installer.properties File additional settings or specific required values listed here:
swift.installation.mode=true
swift.containerName=container1etc
kerberos.enabled=false (or unspecified)
As an example (as root), running on the installer moved to /tmp.
# If necessary download the latest installer and make the script executable
 chmod +x /tmp/installer.sh
# You can reference an original path to the license directly in the silent properties but note the requirement for being in a location that is (or can be made) readable for the $FUSIONUI_USER
# The following is partly for convenience in the rest of the script
cp /path/to/valid/license.key /tmp/license.key

# Create a file to encapsulate the required environmental variables (example is for emr-4.0.0):
cat <<EOF> /tmp/swift_silent_installer_env.sh
export FUSIONUI_MANAGER_TYPE=UNMANAGED_SWIFT
export FUSIONUI_INTERNALLY_MANAGED_USERNAME=admin
export FUSIONUI_FUSION_BACKEND_CHOICE=
export FUSIONUI_USER=hdfs
export FUSIONUI_GROUP=hdfs
export SILENT_PROPERTIES_PATH=/tmp/swift_silent.properties
export FUSIONUI_INTERNALLY_MANAGED_PASSWORD=admin
EOF

 # Create a silent installer properties file - this must be in a location that is (or can be made) readable for the $FUSIONUI_USER:
cat <<EOF > /tmp/swift_silent_installer_env.sh
existing.zone.domain=
existing.zone.port=
license.file.path=/tmp/license.key
server.java.heap.max=4
ihc.server.java.heap.max=4
server.latitude=54
server.longitude=-1
fusion.domain=my.s3bucket.fusion.host.name
fusion.server.dcone.port=6444
fusion.server.zone.name=twilight
swift.installation.modetrue
swift.container.name=container-name
induction.skip=false
induction.remote.node=my.other.fusion.host.name
induction.remote.port=8082
EOF

# If necessary, (when $FUSIONUI_GROUP is not the same as $FUSIONUI_USER and the group is not already created) create the $FUSIONUI_GROUP (the group that our various servers will be running as):
[[ "$FUSIONUI_GROUP" = "$FUSIONUI_USER" ]] || groupadd hadoop

#If necessary, create the $FUSIONUI_USER (the user that our various servers will be running as):
useradd hdfs

# if [[ "$FUSIONUI_GROUP" = "$FUSIONUI_USER" ]]; then
  useradd $FUSIONUI_USER
else
  useradd -g $FUSIONUI_GROUP $FUSIONUI_USER
fi

# silent properties and the license key *must* be accessible to the created user as the silent installer is run by that user
chown hdfs:hdfs $FUSIONUI_USER:$FUSIONUI_GROUP /tmp/s3_silent.properties /tmp/license.key

# Give s3_env.sh executable permissions and run the script to populate the environment
. /tmp/s3_env.sh

# If you want to make any final checks of the environment variables, the following command can help - sorted to make it easier to find variables!
env | sort

# Run installer:
/tmp/installer.sh
If you have a large folder you can parallelize the initial repair using the Fusion API. This can be accomplished on a single file or a whole directory. Choosing a directory will push all files from the source to the target regardless of existence at the target.
Consider the following directory structure for a fusion replicated folder /home
/home
/home/fileA
/home/fileB
/home/userDir1
/home/userDir2
/home/userDir3
We could run a bulk resolve in the UI against the /home directory, however, to provide parallelism of the repair operations we can use the Fusion API to issue repairs against each folder and the individual files in the /home folder.
"FUSION_NODE:PORT/fusion/fs/repair?path=SYSTEMPATH&recursive=true&src=ZONENAME"
curl -X PUT "FUSION_NODE:8082/fusion/fs/repair?path=/home/userDir1&recursive=true&src=LocalFS"
curl -X PUT "FUSION_NODE:8082/fusion/fs/repair?path=/home/userDir2&recursive=true&src=LocalFS"
curl -X PUT "FUSION_NODE:8082/fusion/fs/repair?path=/home/userDir3&recursive=true&src=LocalFS"
curl -X PUT "FUSION_NODE:8082/fusion/fs/repair?path=/home/fileA&recursive=false&src=LocalFS"
curl -X PUT "FUSION_NODE:8082/fusion/fs/repair?path=/home/fileB&recursive=false&src=LocalFS"
This will spawn simultaneous repairs increasing the performance of the initial synchronization. This is especially helpful when you have small file sizes to better saturate the network.
For files, the recursive parameter is ignored
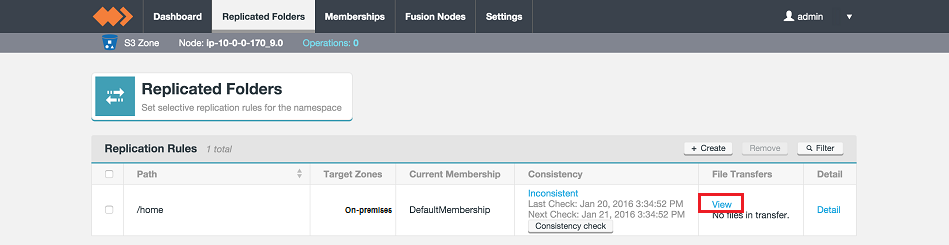
You can use the file transfers view in the Fusion UI on the OpenStack-replicating node to monitor the incoming files.
You can use the Fusion Web UI to selectively choose which files to repair in the UI when you have a small number of files that exists on both sides and a decision needs to be made as to which one is the source of truth.

LocalFS figure 49.
LocalFS figure 50.
LocalFS figure 51.

LocalFS figure 52.

LocalFS figure 53.