6. Upgrade Guide
Upgrades (point releases)
This section will run through the upgrade procedure for moving to the next point release. WD Fusion's point releases may include bug fixes along with new or changed functionality but generally don't include changes to the underlying core components.
Major updates, e.g. 2.6 to 2.7 may include architectural changes that can potentially impact WD Fusion's own database structure or the way that Fusion serializes data. Currently, we're unable to support upgrades to major new versions, this type of upgrade currentlyi requires that you complete a fresh installation.
This upgrade procedure uses a manual approach that may be fault intolerant. We strongly recommend that you consult with WANdisco's support team before you use it to complete a product upgrade.
Only follow this procedure for an upgrade to a point release. For major upgrades, e.g. 2.6 to 2.7. you must perform a fresh installation, including induction and the re-setup of replicated directories. We'll provide support for an upgrade path between major versions in a future release.
Procedure
- Download the new installer
- Stop all services
- Perform backups
- Extract the packages from the installer
- Upgrade the WD Fusion server
- Upgrade the IHC server
- Upgrade the WD Fusion UI
- Upgrade the clients
- Restart the WD Fusion UI
1. Download the new installer
The first step of the upgrade is to download the new installer files from WANdisco. The process will briefly halt replication on the local cluster.
2. Stop all services
Run the following commands. Shutdown the UI:
service fusion-ui-server stopservice fusion-server stopservice fusion-ihc-server-VERSION NUMBER stop3. Perform backups
Tarball your current installation files.
Backup properties
Make a backup of your installed WANdisco WD Fusion files, i.e./etc/wandisco /opt/wandisco/fusion-ui-server
4. Extract the packages from the installer
Get the client files that are embedded in the archive file, e.g.
./fusion-ui-server_rpm_installer.sh --noexec --keep
This will extract the contents of the installer, including the various rpms / packages.
5. Upgrade the WD Fusion server
Run the following command:
rpm -U fusion-hdp-2.3.0-server-2.6.-VERSION NUMBER.rpmWhen completed you'll get the message:
WANdisco Fusion Server upgraded successfully.The WD Fusion server will automatically restart once the upgrade has finished.
6. Upgrade the IHC server
Run the following command:
rpm -U fusion-hdp-2.3.0-ihc-server-2.6.-VERSION NUMBER.rpmWhen completed you'll get the message:
WANdisco Fusion Server upgraded successfully.
The IHC server automatically starts after the upgrade completes.
7. Upgrade the WD Fusion UI
Run the following command:
rpm -U fusion-ui-server-2.6.-VERSION NUMBER.rpm
8. Upgrade the clients
You can get the client files from /opt/wandisco/fusion-ui-server/ui/. You'll need to select the appropriate packaging format, i.e. stack/parcel/rpm etc.
8.1 Upgrade clients from Stacks
This section is specific to HDP 2.2, it should work with later versions, however, there's a known problem installing the WD Fusion client under Ambari 2.1. See HDP 2.3/Ambari 2.1.1 - Known Issue and workaround.
Follow these steps if you're installing via Ambari's stacks:
- Remove the WD Fusion Client from Ambari using curl see Removing a Service.
Summary of curl commands:
curl -u admin:admin -X GET http://hostname.domain.com:8080/api/v1/clusters/DC-00/services/FUSION curl -u admin:admin -X PUT -d '{"RequestInfo":{"context":"Stop Service"},"Body":{"ServiceInfo":{"state":"INSTALLED"}}}' http://hostname.domain.com::8080/api/v1/clusters/DC-00/services/FUSION fusion-ihc-hdp-2.3.0.log -H "X-Requested-By: admin" curl -u admin:admin -X DELETE http://hostname.domain.com::8080/api/v1/clusters/DC-00/services/FUSION -H "X-Requested-By: admin" - Remove the WD Fusion stack from the Ambari servers filesystem under
/var/lib/ambari-server/resources/stacks/HDP/2.2/services
- Put the new stack in place on the Ambari server, in:
/var/lib/ambari-server/resources/stacks/HDP/2.2/services
- Restart Ambari server so new metadata is picked up.
- On all client nodes that have the WD Fusion Client, use the package manager to remove
fusion-hdp-2.2.0-client package:ym remove fusion-hdp-2.2.0-client
- In Ambari, add new client service Fusion 2.5.5.
- Check the output of the deployment and ensure that all repoted nodes are installed on the client. To be clear, you need to make sure that node of them were skipped because the old client was already detected.
- Check the Yarn memory setting according to the following known issue:
Ambari 2.0
When adding a stack to Ambari 2.0 (any stack, not just WD Fusion client) there is a bug which causes the YARN parameteryarn.nodemanager.resource.memory-mbto reset to a default value for the YARN stack. This may result in the Java heap dropping from a manually-defined value, back to a low default value (2Gb). Note that this issue is fixed from Ambari 2.1. - Push the configuration and check Ambari for prompts to restart nodes.
8.2 Install client from Parcels
- Copy
FUSION-2.-VERSION NUMBER-cdh5.4.xx.parcelandFUSION-2.-VERSION NUMBER-cdh5.4.xx.parcel.shato the machine running the manager. - Run:
chown cloudera-scm:cloudera-scm FUSION-* - Move the foles into the parcel repository:
mv FUSION-* /opt/cloudera/parcel-repo/ - In Cloudera manager, check for new parcels.
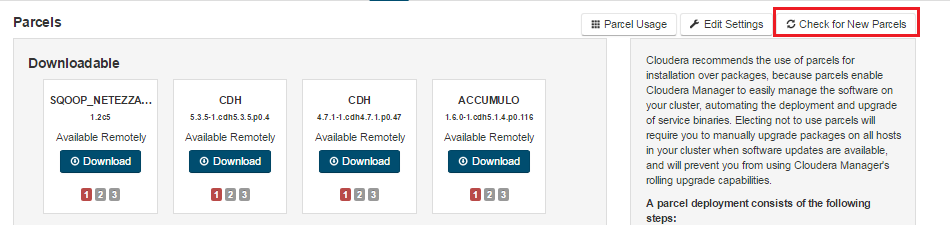
New Parcels check.
- Distribute and activate the new parcel.
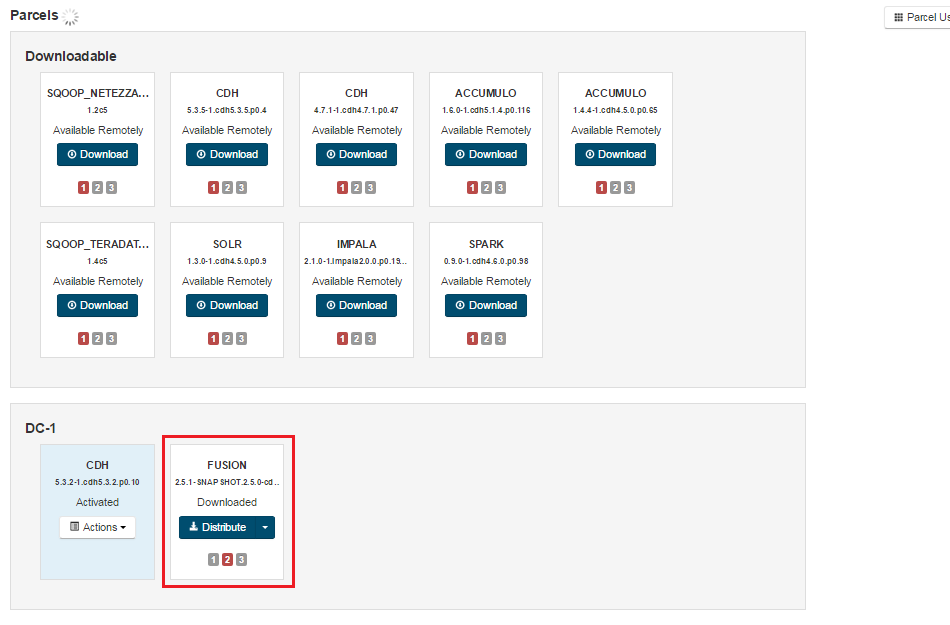
Ready to distribute.
- Activate new configs.

Activate the new Parcel.
- Restart again.
Replacing earlier parcels?
If you are replacing an existing package that was installed using a parcel, once the new package is activated you should remove the old package through Cloudera Manager. Use the Remove From Host button.

Remove from the host.
Restart the WD Fusion UI
If you are upgrading from WD Fusion 2.6.0/2.6.1 then you will need to force a refresh of the Kerberos settings. You will need to go into the Kerberos settings, located on the WD Fusion UI Settings screen and for the screen to pick up a change in the settings without actually changing the settings - such as adding then deleting a space. This will enable the greyed-out "Update" button so that you can click it, refreshing the Kerberos settings. Save the configuration enabled.
During the upgrade, the Hivemetastore canary test may report having "Bad health". FUS-1140, FUS-1193
Workaround
View Canary logs: click on "Diagostic", then "Logs" -> then search for "Canary".
The following workaround will fix the issue with HIVE canary:
- Click "Configuration" tab on the right of "Home" (You want the whole cluster configuration tab, not the scope of
hdfs, etc.) - Click "Advanced Configuration Snippets".
- Search for "Service Monitor Client Config Overrides".
- Under all config sections (
HDFS,HIVE, etc.) add the following property:<property> <name>fs.hdfs.impl</name> <value>org.apache.hadoop.hdfs.DistributedFileSystem</value> </property>This will reset the filesystem
implvalue todfs. To be clear, this means the PUT operation of the canary file will be non-replicated since its no longer using FusionHdfs replicated filespace, this is not a problem as the health check is for the underlying cluster and not concerned with WANdisco's inter-cluster replication. - Deploy Configs.
- Restart.
Open a terminal, with the appropiate system account/permissions to the WD Fusion UI server. Run:
service fusion-ui-server startNote: your cluster configuration will also be updated, though you don't need to restart/repopulate client configuration after this particular case.
Another method you can use to ensure the Kerberos settings are correctly preserved: Open
/opt/wandisco/fusion-ui-server/properties/ui.propertiesin an editor (with suitable user/permissions) and change the
_HOST pattern in kerberos.principal parameter to point into the actual fully qualified domain name of the WD Fusion hosts.
Major Upgrades (2.x to 2.y)
Currently, the procedure for upgrading to the next major release, e.g. 2.6 to 2.7, requires that you complete a fresh installation, along with the re-induction of your nodes and the re-adding of your replicated directory structure. In a future release we'll provide an upgrade path that will remove this need to start from scratch.