
Though you may have referred to the Deployment Checklist before or during an evaluation of Subversion Access Control we strongly recommend that you revisit the checklist and confirm that your system still meets all requirements.
 Tip
Tip
| System setup | |
Operating Systems |
We've tested the following operating systems:
In principle, any operating system that can support a Java environment, Apache and Subversion. |
Subversion server |
Version 1.4 and above (we've tested up to version 1.6.13). Run the Apache Portable Runtime that matches your Subversion version.  Certified Subversion Binaries Certified Subversion Binaries are now available from WANdisco. Providing the latest builds, without the risks associated with Open Source distribution.  Available as an uberAPP Available as an uberAPP Subversion Access Control is now available in a version that integrates with uberSVN, WANdisco's free, easy-to-use Subversion ALM platform. Access Control is compatible with uberSVN "Chimneyhouse" Update 1 or later. Installation Access Control runs as a plugin on uberSVN. For the installation procedure follow our dedicated Guide to Installing Access Control on uberSVN.
|
Subversion client |
Any that are compatible with local Subversion servers. |
Apache server |
See Configuring Apache for some advice on how to set up Apache to work with SVN Access Control Your Apache server will need to be configured to handle Subversion repositories using the following paramenters: <VirtualHost *:8181> <Location /svnrepos> Order allow,deny Allow from 127.0.0.1 DAV svn SVNParentPath /tmp/dav AuthType Basic AuthName wandisco AuthUserFile /etc/httpd/conf/htpasswd Require valid-user </Location> </VirtualHost>
 Locking down the backend Locking down the backendIt's important that access to Subversion is locked down to ensure that users don't bypass the Access Control proxy. To this end we configure Apache to deny requests by default, but allow from localhost. |
System memory |
Ensure RAM and swapping containers are at least four times larger than the largest Subversion file. Minimum: 2GB RAM; 4GB swapping container
Recommended: 4GB; 4GB swapping container
|
Disk space |
Subversion: Match to projects and branches. Checkouts: You need sufficient disk space to handle large, in-transit checkouts which may get buffered to a tmp directory beneath the replicator installation until that checkout has been completed. The required space can be calculated using the following guideline: Recommended storage = Number of clients checking out files(N) x average checkout sizes (Kilobytes) |
File descriptor limit |
Ensure hard and soft limits are set to 64000 or higher. Check with the ulimit or limit command. |
Journaling file system |
Replicator logs should be on a journaling file system, for example, ext3 on Linux or VXFS from Veritas.
|
Max. User Process Limit |
At least three times the number of Subversion users. |
Java |
Install JDK 6 (previously referred to as 1.6) or higher. We recommend using Oracle JDK 6.
|
Perl |
Install version 5.6.1 or later. For Access Control: Perl::DBI module for Audit Reports other than Users and Groups.
|
Audit reports |
For reports other than Users and Groups, you'll need to use a database such as MySQL, and php. |
mod_authz_svn |
Optional but recommended. See Access Control - Using the Authz Module. Module may be bundled with your version of Apache. |
Once you've checked through the deployment checklist and you're confident that your system meets all the requirements, run through the following section to get Subversion Access Control installed.
Tip
1. Download the Access Control installation file "svnsec.tar.gz" from the WANdisco File Distribution website.
2. Create a home directory for the installation, e.g. /wandisco.
3. Extract the "svnsec.tar.gz" file to the wandisco folder.
4. The installation files are now in place, they are arranged in the following directory structure:
drwxr-xr-x 2 root root 4096 2010-08-12 13:54  audit
drwxr-xr-x 3 root root 4096 2010-08-12 13:42  bin
drwxr-xr-x 8 root root 4096 2010-08-13 13:04  config
drwxr-xr-x 3 root root 4096 2010-08-12 13:10  lib
rw-r--r-   1 root root 16237 2010-05-21 15:03 license.txt
drwxr-xr-x 2 root root 4096 2010-08-12 14:29  logs
drwxr-xr-x 3 root root 4096 2010-08-12 13:54  systemdb
rw-r--r-   1 root root 24 2010-07-21 13:05    version.txt
5. Copy your Subversion Access Control license.key file into the config directory.
-rw-r--r-- 1 root root  26165 2010-08-13 13:04 backup.xml
-rw-rw-r-- 1 User User    512 2010-08-12 15:46 license.key
drwxrwxr-x 2 User User   4096 2010-08-12 13:37 licenses
-rw-r--r-- 1 root root   3327 2010-05-21 15:03 log.properties
-rw-r--r-- 1 root root    366 2010-08-12 14:28 mailconfig.properties
drwxr-xr-x 5 root root   4096 2010-08-12 13:42 membership
drwxr-xr-x 2 root root   4096 2010-08-12 18:27 passwd
drwxr-xr-x 3 root root   4096 2010-08-12 13:42 prefs
-rw-r--r-- 1 root root   3047 2010-05-21 15:03 prefs-template.xml
-rw-r--r-- 1 root root   2813 2010-08-12 14:26 prefs.xml
-rw-r--r-- 1 root root  92160 2010-07-21 13:05 reports.tar
drwxr-xr-x 3 root root   4096 2010-08-12 13:42 scm
drwxr-xr-x 7 root root   4096 2010-08-12 14:29 security
6. Enter the bin directory and run the setup, using the command:
perl setup
******* Start WANdisco Logging **************
 version : unknown build unknown
 Default member id : 00000000-0000-0000-0000-000000000000
 current time : Fri Aug 06 12:20:03 CEST 2010
******* End Log header **********************

1281090002964 org.nirala.communication.transport.DConeNet.ListenReactor setupListener
INFO:  [listen-1] Listening on port : 0.0.0.0/0.0.0.0:6444

Point a web browser to http://10.2.5.124:6444/ to configure the product.
7. From a browser, enter the setup URL (http://<Server IP>:<port>). From the welcome screen, click Continue.

8. Read the WANdisco End User License Agreement, then click I Agree.

9. The next two screens introduces you to the notion that Access Control works as a proxy between the clients of Subversion users and the Subversion server. Subversion users can continue to connect using the the default HTTP port (80).

Click Next

10. On the SVN Security Agent Proxy Settings screen, enter the following details
Node Name: A name you will use for the Access Control server.
Node IP: The server's IP address
Bind Host: By default, this uses the wildcard 0.0.0.0 IP that binds to all network interfaces on the node. Read our Knowledgebase article about the benefits of using the wildcard IP
Client Port By default this is 80, allowing Subversion users to continue without making change to their client setup.
(Linux/Unix) In order to use port 80, Access Control must be run as root.
Admin Console Port 6444 by default.
Reserved Ports A block of 10 ports are reserved for use by Subversion Access Control. By default these are sequential, starting with the Admin Console Port, however you can specify out of sequence ports if required.

Click
Next.
11. The next step automatically checks the Apache configuration. If the httpd.conf file isn't found, enter its path into the Configuration File entry box, then click Reload Configuration.
Look out for warning boxes for where setup finds a problem - like this one:

If a problem is highlighted, you'll need to manually edit the httpd.conf file, then click on Reload Configuration to have setup check your changes.
User: Owner of the file.
Group: The group in which the owner belongs.
KeepAlive: Whether or not to allow persistent connections (more than one request per connection). KeepAlive On.
KeepAliveRequests: The maximum number of requests to allow during a persistent connection. Set to 0 to allow an unlimited amount. MaxKeepAliveRequests 0.
KeepAliveTimeout: Number of seconds to wait for the next request from the same client on the same connection. KeepAliveTimeout 14400.
Listening IP: For a node with multiple IPs, this will indicate the IP used for listening.
Listening Port: The default listening port for Apache is 8080.
Override Listen Directive with a virtual host: Tick this box if the Apache parser doesn't pick up the correct Listen IP/port, maybe as a result of setting up Subversion to be only accessible through a virtual host. If you tick the box you'll need to manually enter hostname/IP.

Click Next. To continue without the Apache config check, click Skip.
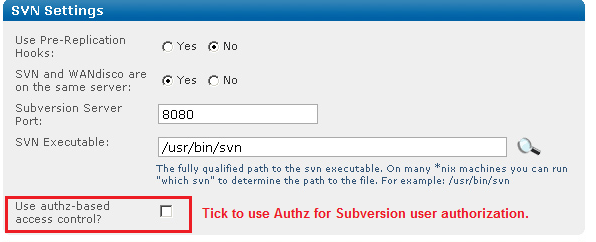
12. Setup now allows you to modify your Subversion settings. Watch for alerts that confirm the port and path that Access Control will associate with your Subversion repositories.

Subversion Server Port: the port on which Access Control talks to Subversion,(8080 by default).
SVN Executable: the fully qualified path to the Subversion executable. Setup will try to fill this in automatically, otherwise enter it manually.
Use authz-based access control? Tick the box to use Authz. If you tick the box you'll need to locate the fully qualified path to the Authz file.
Authorization File: Enter the path to the Authz file.
You can add additional repositories by clicking Add Repository. To continue setup, click Next.
If you click Edit to change Repository you'll be able to edit the following settings:
Editing repository settings:
Directory on File System: Repository location. This needs to be the fully qualified path to the repository directly, not the URL that clients use for remote connection.
Manage Password File: tick the box to allow your Subversion password file to be controlled by Access Control. If selected you'll need to provide the path to to the password file on the local file system, plus an Authentication Realm, if required. The ability to manually set a different authentication realm per repository gives you better control over how different systems connect to Subversion. For more information about why recommend that you enable "Manage Password File", see 3.1 Managing Users.
Settings in Apache
DAV Location: You can specify the location of the DAV file.
Multiple SVN Repositories: click Yes if you are using SVNParentPath for multiple repositories, or No if using SVNPath.
Click Update to apply your changes, or Cancel to return to the previous screen without making changes.

13. The next screen is for your email settings. Entering email settings will allow Access Control to send out alert emails that can help you identify problems.
SMTP Authentication: If you select No, you'll need to provide your account username and password.
Username and PasswordEnter these if you select that Yes to SMTP Authentication.
Use SSL/TLS: Choose yes if you wish to send emails over a secure connection.
Host: Enter the address of your mail server.
Port: Enter the SMTP port, 25 by default.
From Address Set the email address from which notification emails appear to come.
Send Admin Notification To: Enter the email address to which all notification emails will be sent.
Email settings are optional. If you don't need alert emails, click Skip to continue. Otherwise, click Next.

14. The setup has finished gathering information, You can go back and make changes or click Complete installation with these settings to save them and complete the installation.

15. When you click Complete installation with these settings Access Control's SVN Security Agent will automatically start up.

This optional section introduced the Apache Authz (Authorization) file which can be used to store Subversion user group and permission data. You only need to refer to this if you're planning on using Authz with your installation.
apachectl -MThis will produce a list of loaded modules, you should be looking for the authz_svn_module (shared).
<Location /repos>
   DAV svn
   SVNPath /home/wandisco/repository
   AuthType Basic
   AuthName WANdisco
   AuthUserFile /home/wandisco/htpasswd
   Require valid-user
   SVNAutoversioning on
   ###
   # Authz module for authorization configuration
   ###
   AuthzSVNAccessFile /home/wandisco/authz
   </Location>
Authz file.
sudo /sbin/service httpd restartCreate an empty authz file on each node:
touch /home/wandisco/authz
/home/wandisco/authz
Alert
Make sure MultiSite has permission to read and write to the svn.auth file. Also, this is a replicated change that will affect all nodes.
In the file, You should add an admin user for each repository: e.g. for repository mapped to /svn
add the following:
 [svn:/]
<admin username> = rw
or for a repo mapped to /myrepo:
[myrepo:/]
  <admin username> = rw
where <admin username> is the username that the user enters when adding a repository.
 Knowledgebase
Read more about how to use Authz - Authz basics
The following section covers some options for configurating Apache to work with WANdisco's SVN Access Control and or SVN MultiSite Plus. You can either give SVN Access Control exclusive use of Apache or share Apache with other applications/locations.
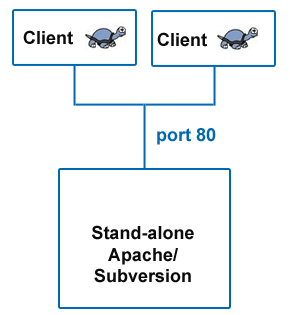
Example of a simple configuration without MultiSite
Without SVN Access Control, Subversion clients simply connect to Subversion on port 80.
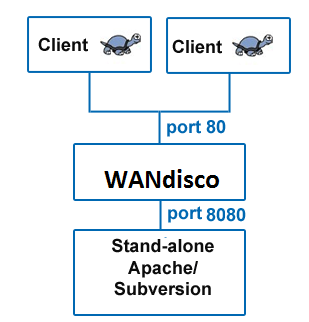
Example setup that includes SVN Access Control/SVN Access Control
SVN Access Control sits between the Subversion clients and Subversion server, acting as a web proxy. Subversion clients connect on the usual port 80, whilst Apache is set to listen on port 8080.
The listen port is set in Apache's config file, httpd.conf. See more information about the Listen directive in the Binding chapter of the Apache documentation.
#
# Listen: Allows you to bind Apache to specific IP addresses and/or
# ports, instead of the default. See also the <VirtualHost>
# directive.
#
# Change this to Listen on specific IP addresses as shown below to
# prevent Apache from glomming onto all bound IP addresses (0.0.0.0)
#
#Listen 12.34.56.78:80
Listen 8080
Snippet of the httpd.conf file
With this configuration, Apache server listens on port 8080 instead of default port 80.
You can choose to share Apache with other locations or applications, instead of dedicating it to Subversion. For example:
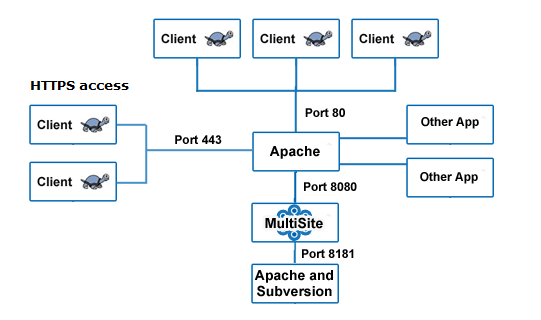
Using HTTPS or sharing Apache with other applications/locations
In the above example all processes are running on the same machine. Apache is running on port 80, Apache's webDAV module is running on port 8181. WANdisco's SVN Access Control is listening on port 8080, forwarding requests to Apache's WebDAV module on port 8181. Some clients are connecting via SSL (HTTPS) with their connection running on port 443.
Knowledgebase
You can use this configuration if you enable a proxy pass.
Default port settings required during the installation of SVN Access Control are:
In the Apache config httpd.conf file, specify the following parameters:
#
# Define Apache port and pass anything that matches location /svnrepos to
# WANdisco SVN Replicator
#
NameVirtualHost *:80
<VirtualHost *:80>
ProxyPass /svnrepos http://127.0.0.1:8080/svnrepos
ProxyPassReverse /svnrepos http://127.0.0.1:8080/svnrepos
</VirtualHost>

Listen 8181
NameVirtualHost *:8181

<VirtualHost *:8181>
<Location /svnrepos>
AllowOverride None
Order allow,deny
Allow from 127.0.0.1
DAV svn
SVNParentPath /tmp/dav
AuthType Basic
AuthName wandisco
AuthUserFile /etc/httpd/conf/htpasswd
Require valid-user
</Location>
</VirtualHost>
# For the SSL option
Listen 443
<VirtualHost *:443>
ProxyPass /svnrepos http://127.0.0.1:8080/svnrepos
ProxyPass /!svn http://127.0.0.1:8080/svnrepos/!svn
ProxyPassReverse /svnrepos http://127.0.0.1:8080/svnrepos
ProxyPassReverse /!svn http://127.0.0.1:8080/svnrepos/!svn
SSLEngine on
SSLCertificateFile /etc/httpd/conf/ssl.crt/server.crt
SSLCertificateKeyFile /etc/httpd/conf/ssl.key/server.key
SSLCACertificateFile /etc/httpd/conf/ssl.crt/ca-bundle.crt
</VirtualHost>
This section applies to all Apache configurations.
Alert
To make a Subversion repository function in a distributed environment, SVN Access Control requires exactly the same Apache/Subversion setup at all the nodes.
Even without SVN Access Control, Apache benefits from some tweaking in order to work effectively with Subversion.
# Timeout: The number of seconds before receives and sends time out.
#
Timeout 7200
# KeepAlive: Whether or not to allow persistent connections (more than
# one request per connection).
#
KeepAlive On
# MaxKeepAliveRequests: The maximum number of requests to allow
# during a persistent connection. Set to 0 to allow an unlimited amount.
#
MaxKeepAliveRequests 0
#
# KeepAliveTimeout: Number of seconds to wait for the next request from the
# same client on the same connection.
#
KeepAliveTimeout 14400
...
Example httpd.conf snippet showing recommended Apache timing configuration
Caution
If you are using ProxyPass, avoid using a single / (slash) DAV location because this is not compatible with MultiSite and can cause replication to crash.
We recommend copying the current httpd.conf file, and then changing the host:port settings. For example, here is a conf file snippet with Apache virtual hosts. You do not have to use Apache virtual hosts. This is an example:
# Site A
$ cat conf/extra/httpd-svn-dav.conf
...
NameVirtualHost site-a:8181
<VirtualHost site-a:8181>
<Location /dir0>
DAV svn
SVNPath /home/site-a/svnroot
AuthType Basic
AuthName wandisco
AuthUserFile /home/site-a/apache2/dist/conf/htpasswd
Require valid-user
</Location>
</VirtualHost>
...
# Site B
$ cat conf/extra/httpd-svn-dav.conf
...
NameVirtualHost site-b:9191
<VirtualHost site-b:9191>
<Location /dir0>
DAV svn
SVNPath /home/site-b/svnroot
AuthType Basic
AuthName wandisco
AuthUserFile /home/site-b/apache2/dist/conf/htpasswd
Require valid-user
</Location>
</VirtualHost>
...
Example httpd.conf file illustrating the use of Apache virtual hosts
Alert
SVN Access Control must have a valid username inside the HTTP authorization header to be passed for all DAV commands.
There are potential problems with connection pooling when using Apache and SVNKit. Adding SVN Access Control does not change these issues, but you may need to revisit them after installing MultiSite.
We recommend using JavaHL with Eclipse IDE, which does not use connection pooling and thereby eliminates the problem.
SVNKit uses connection pooling. For a given client, SVNKit opens two connections and keeps them open for later use. On a system with a heavy load this can affect performance. An open connection consumes an Apache worker thread and, with lots of clients and pooling going on, Apache may run out.
Apache provides some tuning parameters to optimize connection pooling, while still releasing unused connections. The tunable parameters are Timeout, KeepAliveTimeout, MaxKeepAliveRequests, and KeepAlive. For more details see the Apache configuration documentation.
Apache has two timeout configurations: Timeout and KeepAliveTimeout. In general, the Timeout value should be lower than the value for KeepAliveTimeout.
Caution
Setting KeepAlive to false is not recommended. If you set KeepAlive to false, a client's transactions create an enormous overhead setting up and destroying connections.
Apache's logs are dumped to a single file. This can cause problems when the log file grows so big that it needs to be truncated. When this happens, Apache service is interrupted while the file is restarted. On Linux/Unix servers you can pipe logs to another process. For more information see our Knowledgebase article, Piping Apache logs
Copyright © 2010-2015 WANdisco, Inc.
All Rights Reserved
This product is protected by copyright and distributed under licenses restricting copying, distribution, and decompilation.