1. Introduction
Welcome to the User Guide for WANdisco Fusion, version 2.12.
1.1. What is Fusion?
WANdisco Fusion is a software application that allows Hadoop deployments to replicate HDFS data between Hadoop clusters that are running different, even incompatible versions of Hadoop. It is even possible to replicate between different vendor distributions and versions of Hadoop.
1.1.1. Benefits
-
Virtual File System for Hadoop, compatible with all Hadoop applications.
-
Single, virtual Namespace that integrates storage from different types of Hadoop, including CDH, HDP, EMC Isilon, Amazon S3/EMRFS and MapR.
-
Storage can be globally distributed.
-
WAN replication using the WANdisco Fusion LiveData platform, delivering single-copy consistent HDFS data, replicated between far-flung data centers.
1.2. Using this guide
This guide describes how to install and administer WANdisco Fusion as part of a multi data center Hadoop deployment, using either on premises or cloud-based clusters. We break down the guide into the following three sections:
1.3. Symbols in the documentation
In the guide we highlight types of information using the following call outs:
| The alert symbol highlights important information. |
| The STOP symbol cautions you against doing something. |
| Tips are principles or practices that you’ll benefit from knowing or using. |
| The KB symbol shows where you can find more information, such as in our online Knowledge base. |
1.4. Get support
See our online Knowledge base which contains updates and more information.
If you need more help raise a case on our support website.
We use terms that relate to the Hadoop ecosystem, WANdisco Fusion and WANdisco’s DConE replication technology. If you encounter any unfamiliar terms checkout the Glossary.
1.5. Local Language Support
WANdisco Fusion supports internationalization (i18n) and currently renders in the following languages.
Language |
code |
U.S. English |
en-US |
Simplified Chinese |
zh-CN |
During the command-line installation phase, the display language is set by the system’s locale. In use, the display language is determined through the user’s browser settings. Where language support is not available for your locale, then U.S. English will be displayed.
To handle non-ASCII characters in file and folder names, the LC_ALL environment variable must be set to en_US.UTF-8.
This can be edited in /etc/wandisco/fusion/ui/main.conf.
You must make sure that the locale is correctly installed.
There are a few areas which are not automatically translated, for example Email templates, but these can be easily modified as described in the relevant sections.
1.6. Give feedback
If you find an error or if you think some information needs improving, raise a case on our support website or email docs@wandisco.com.
2. Release Notes
2.1. Release 2.12.5 Build 2604
23 May 2019
For the release notes and information on Known issues, please visit the Knowledge base - WANdisco Fusion 2.12.5 Build 2604 Release Notes.
2.2. Release 2.12.4 Build 2457
15 February 2019
WANdisco Fusion 2.12.4 is a minor release that includes new features, issue resolutions, platform support, performance, and usability improvements. These release notes include details on the specific improvements and enhancements to the product and should be read in conjunction with the product documentation.
2.2.1. Installation
The release can be installed with updates of the IHC server RPM, the Fusion server RPM and the client stack or package. e.g. The following packages should be updated for HDP 2.6.5:
fusion-hcfs-hdp-2.6.5-ihc-server-2.12.4.3.el6-xxxx.noarch.rpm
fusion-hcfs-hdp-2.6.5-server-2.12.4.3.el6-xxxx.noarch.rpm
fusion-hcfs-hdp-2.6.5-2.12.4.3.stack.tar.gz
Please contact Wandisco support for help with this process, and find detailed installation instructions in the installation section.
2.2.2. Highlighted New Features
This release includes the following major new features.
2.2.3. New Platform Support
WANdisco Fusion has added additional support for the following new platforms since version 2.12.2:
-
CDH 5.16
2.2.4. Available Packages
This release of WANdisco Fusion supports the following versions of Hadoop:
-
ASF Apache Hadoop 2.5.0 - 2.7.0
-
CDH 5.4.0 - CDH 5.16.1
-
HDP 2.1.0 - HDP 2.6.5
-
MapR 5.0.0 - MapR 5.2.0
-
IOP (IBM BigInsights) 4.0 - 4.2.5
The trial download includes the installation packages for CDH and HDP distributions only.
2.2.5. System Requirements
Before installing, ensure that your systems, software, and hardware meet the requirements found in the Pre-requisites Checklist.
Certified Third-Party Components
WANdisco certifies the interoperability of Fusion with a wide variety of systems, including Hadoop distributions, object storage platforms, cloud environments, and applications.
-
Amazon S3
-
Amazon EMR 4.0 - 5.4
-
Ambari 1.6, 1.7, 2.0, 2.1
-
CDH 5.4 - 5.16
-
EMC Isilon 7.2, 8.0
-
Google Cloud Storage
-
Google Cloud Dataproc
-
HDP 2.1.0 - 2.6.5
-
IBM BI 2.1.2 - 4.2.5
-
MapR M4.0.1 - M5.2.0
-
Microsoft Azure Blob Storage
-
Microsoft Azure Data Lake Store Gen1 and Gen2
-
Microsoft Azure HDInsights 3.2 - 3.6
-
MySQL, PostgreSQL (Hive Metastore)
-
Oracle BDA
Client Applications Supported
WANdisco Fusion is architected for maximum compatibility and interoperability with applications that use standard Hadoop File System APIs. All applications that use the standard Hadoop Distributed File System API or any Hadoop-Compatible File System API should be interoperable with WANdisco Fusion and will be treated as supported applications. Additionally, WANdisco Fusion supports the replication of content with Amazon S3 and S3-compatible objects stores, locally-mounted file systems, and NetApp NFS devices, but does not require or provide application compatibility libraries for these storage services.
2.2.6. Known Issues
WANdisco Fusion 2.12.4 includes a small set of known issues with workarounds. In each case, resolution for the known issues is underway.
-
WANdisco Fusion does not support truncate command -
WD-FUS-3022
The public boolean truncate(Path f, long newLength) operation in
org.apache.hadoop.fs.FileSystem (> 2.7.0) is not yet supported. Files will be
truncated only in the cluster where the operation is initiated. Consistency
check and make consistent can be used to both detect and resolve any resulting
inconsistencies.
-
Non-recursive OnTap make consistent operation works recursively -
WD-FUS-3932,WD-FUS-3640
All subdirectories for an OnTap snapdiff make consistent process are made consistent when recursive is set to false.
-
Checkpoint Make Consistent is not an available option if the Live Ranger or Live Sentry plugins are installed alongside WANdisco Fusion
WD-FUI-7618. -
Internal Error on REST API under high load -
WD-FUS-6236
Under high load, the Fusion server may respond to otherwise valid requests with
500 HTTP responses. While this will resolve automatically, it may temporarily
affect use of the Fusion APIs.
2.2.7. Other Improvements
In addition to the highlighted features listed above, WANdisco Fusion 2.12.4 includes a small set of other improvements:
-
Corrected implementation of authorization header "Bearer token" -
WD-FUI-7439,WD-FUS-6114,IBM-REPL-97 -
Fixed location of GSN key records -
WD-FUS-6021 -
IHC "Keepalive" optimization -
WD-FUS-6089,WD-FUS-6110 -
Do not restore configuration following client install step -
WD-FUI-6264 -
Improve kinit usage during security validation for install -
WD-FUI-7028 -
Validate truststore configuration for upgrade -
WD-FUI-7207 -
Do not set disable truststore on invalid configuration -
WD-FUI-7208 -
Improved SSL settings validation -
WD-FUI-7264 -
Correct AWS credential permissions -
WD-FUI-7285 -
UI trust store settings for silent installer -
WD-FUI-7401 -
V2/V4 authentication option for S3 bucket configuration -
WD-FUI-7494 -
Correct superuser password reset process -
WD-FUI-7513,WD-FUI-7532 -
Allow non-authenticated email notification delivery -
WD-FUI-7588 -
Improve InputStream reliability under load -
WD-FUS-5587 -
Improve S3 behavior for make consistent operations -
WD-FUS-6002 -
Handle client symbolic links during upgrade -
WD-FUS-6023 -
Include custom exclusions in upgrade tooling -
WD-FUS-6040 -
Improve resolution of large agreement backlogs -
WD-FUS-6049 -
RepairExecutor thread fix -
WD-FUS-6088 -
Improved performance under load -
WD-FUS-6119 -
Consistency check correction for username translation -
WD-FUS-6133 -
S3 V2 authentication for CEPH -
WD-FUS-6161 -
Correct list of zones in priority selection -
WD-FUS-7039 -
Improved input alignment for backup -
WD-FUI-7059 -
Labeling of private bucket -
WD-FUI-7106 -
Improved naming for administration role -
WD-FUI-7176 -
Improved automation for install in Kerberos-enabled clusters -
WD-FUI-7195 -
Improved feedback on truststore state during install -
WD-FUI-7209 -
Fix email notification content for license limit -
WD-FUI-7225 -
Include all 3rd-party license information in distribution -
WD-FUI-7234,WD-FUS-5995 -
Use "Make Consistent" term in interface -
WD-FUI-7279,WD-FUI-7280,WD-FUI-7304,WD-FUI-7306,WD-FUI-7307,WD-FUI-7314 -
CDH 5.16 support -
WD-FUI-7305,WD-FUS-6115 -
Improve redirect after login -
WD-FUI-7387 -
Installer support for ADLS Gen 2 -
WD-FUI-7413 -
Update LDAP documentation examples -
WD-FUI-7454 -
Correct link to ASF client installers -
WD-FUI-7599 -
Per-zone username translation -
WD-FUS-5929 -
Prevent race condition for concurrent rename from non-replicated to replicated locations -
WD-FUS-6006,WD-FUS-6010 -
Improve thread handling for ADLS storage -
WD-FUS-6056 -
Offload thread for GSN storage removal -
WD-FUS-6073 -
Improve performance for ADLS storage -
WD-FUS-6080,WD-FUS-6086 -
Correct Ranger service availability test -
WD-FUS-6094 -
Optimize GSN execution storage for non-HA deployment -
WD-FUS-6106 -
Improved threading for S3 storage -
WD-FUS-6143 -
Document non-support of deprecated Amabari Slider View -
WD-FUS-6194 -
Correct documentation link for GCS installation -
WD-FUS-6244 -
Default local zone only selection on rule creation -
WD-FUI-7143
2.3. Release 2.12.3 Build 2134
19 December 2018
WANdisco Fusion 2.12.3 is a minor release following Fusion 2.12.2, and includes issue resolutions, performance, and usability improvements. These release notes include details on the specific improvements and enhancements to the product and should be read in conjunction with the product documentation.
| Please be aware that there is a known issue which can stop live replication. A hotfix is available on customer.wandisco.com, please contact WANdisco support for information. |
2.3.1. Installation
The release can be installed with updates of the IHC server RPM, the Fusion server RPM and the client stack or package. e.g. The following packages should be updated for HDP 2.6.0:
fusion-hcfs-hdp-2.6.0-ihc-server-2.12.3.3.el6-3146.noarch.rpm
fusion-hcfs-hdp-2.6.0-server-2.12.3.3.el6-3146.noarch.rpm
fusion-hcfs-hdp-2.6.0-2.12.3.3.stack.tar.gz
Please contact Wandisco support for help with this process, and find detailed installation instructions in the installation section.
2.3.3. Available Packages
This release of WANdisco Fusion supports the following versions of Hadoop:
-
ASF Apache Hadoop 2.5.0 - 2.7.0
-
CDH 5.5.x - CDH 5.15.x
-
HDP 2.1.0 - HDP 2.6.5
-
MapR 5.0.0 - MapR 5.2.0
-
IOP (IBM BigInsights) 4.2.5
The trial download includes the installation packages for CDH and HDP distributions only.
2.3.4. System Requirements
Before installing, ensure that your systems, software, and hardware meet the requirements found in the Pre-requisites Checklist.
Certified Third-Party Components
WANdisco certifies the interoperability of Fusion with a wide variety of systems, including Hadoop distributions, object storage platforms, cloud environments, and applications.
-
Amazon S3
-
Amazon EMR 4.0 - 5.4
-
Ambari 1.6, 1.7, 2.0, 2.1
-
CDH 5.5 - 5.15
-
EMC Isilon 7.2, 8.0
-
Google Cloud Storage
-
Google Cloud Dataproc
-
HDP 2.1.0 - 2.6.5
-
IBM BI 2.1.2 - 4.2.5
-
MapR M4.0.1 - M5.2.0
-
Microsoft Azure Blob Storage
-
Microsoft Azure Data Lake Store
-
Microsoft Azure HDInsights 3.2 - 3.6
-
MySQL, PostgreSQL (Hive Metastore)
-
Oracle BDA
Client Applications Supported
WANdisco Fusion is architected for maximum compatibility and interoperability with applications that use standard Hadoop File System APIs. All applications that use the standard Hadoop Distributed File System API or any Hadoop-Compatible File System API should be interoperable with WANdisco Fusion, and will be treated as supported applications. Additionally, Fusion supports the replication of content with Amazon S3 and S3-compatible objects stores, locally-mounted file systems, and NetApp NFS devices, but does not require or provide application compatibility libraries for these storage services.
2.3.5. Known Issues
Fusion 2.12.3 includes a small set of known issues with workarounds. In each case, resolution for the known issues is underway.
-
Fusion does not support truncate command -
WD-FUS-3022
Thepublic boolean truncate(Path f, long newLength)operation inorg.apache.hadoop.fs.FileSystem(> 2.7.0) is not yet supported. Files will be truncated only in the cluster where the operation is initiated. Consistency check and repair can be used to both detect and resolve any resulting inconsistencies. -
Non-recursive OnTap repair repairs recursively -
WD-FUS-3932,WD-FUS-3640
All subdirectories for an OnTap snapdiff repair are repaired when recursive it set to false. -
NOW FIXED: Potential race condition if new client instance fires multiple requests from a large number of threads in parallel in HA environment, which could result in client-side out of memory error -
WD-FUS-5903 -
Fusion client deadlocks under high concurrent load with multiple writers in the zone -
WD-FUS-5944
We observed that the Fusion client can deadlock when running a high number of concurrent requests split between several replicated directories and split equally between multiple Fusion servers as writers in the zone. -
Fusion UI Server does not set the UI SSL Trust store correctly -
WD-FUI-7207
While SSL can be enabled for the Fusion UI Server, it will trust any certificate and is therefore exposed to man-in-the-middle attacks. This does not affect the Fusion Server responsible for replication. -
Fusion may experience some performance degradation under very high load with multiple replication rules
WD-FUS-5839. -
In rare cases where Fusion uses multiple threads to create and move a single file to different locations, you will need to use the Repair tool in order to make the file consistent on all zones. -
WD-FUS-6010.
2.3.6. Other Improvements
In addition to the highlighted features listed above, WANdisco Fusion 2.12.3 includes a small set of other improvements to WANdisco Fusion 2.12.2:
-
Using the silent installer to install Fusion is more resilient when adding to an existing zone -
WD-FUI-7178 -
Fusion installation now knows to ignore yum repos which become unavailable
WD-FUI-7142 -
More information is provided regarding what needs to be included in SSL trust stores for a successful installation
WD-FUI-7131 -
We have changed which licenses we include for dependencies, migrating away from LGPL where available
WD-FUI-7244WD-FUI-7221WD-FUI-7252
2.4. Release 2.12.2 Build 1993
1 November 2018
WANdisco Fusion 2.12.2 is a minor release following Fusion 2.12.1, and includes new features, issue resolutions, platform support, performance, and usability improvements. These release notes include details on the specific improvements and enhancements to the product and should be read in conjunction with the product documentation.
| Please be aware that there is a known issue which can stop live replication. A hotfix is available on customer.wandisco.com, please contact WANdisco support for information. |
2.4.1. Installation
The release can be installed with updates of the IHC server RPM, the Fusion server RPM and the client stack or package. e.g. The following packages should be updated for HDP 2.6.0:
fusion-hcfs-hdp-2.6.0-ihc-server-2.12.2.4.el6-xxxx.noarch.rpm
fusion-hcfs-hdp-2.6.0-server-2.12.2.4.el6-xxxx.noarch.rpm
fusion-hcfs-hdp-2.6.0-2.12.2.4.stack.tar.gz
Please contact Wandisco support for help with this process, and find detailed installation instructions in the installation section.
2.4.2. Highlighted New Features
This release includes the following major new features.
Fusion marker files
Fusion 2.12.2 adds a feature to allow applications to use a special marker directory to signal across clusters that a collection of files are available in full to a non-originating zone, including their content. For more information see Marker Files.
2.4.3. Highlighted Improvements
2.4.4. New Platform Support
WANdisco Fusion has added additional support for the following new platforms since Fusion 2.12.1:
-
Alibaba Cloud
2.4.5. Available Packages
This release of WANdisco Fusion supports the following versions of Hadoop:
-
ASF Apache Hadoop 2.5.0 - 2.7.0
-
CDH 5.5.x - CDH 5.15.x
-
HDP 2.1.0 - HDP 2.6.5
-
MapR 5.0.0 - MapR 5.2.0
-
IOP (IBM BigInsights) 4.2.5
The trial download includes the installation packages for CDH and HDP distributions only.
2.4.6. System Requirements
Before installing, ensure that your systems, software, and hardware meet the requirements found in the Pre-requisites Checklist.
Certified Third-Party Components
WANdisco certifies the interoperability of Fusion with a wide variety of systems, including Hadoop distributions, object storage platforms, cloud environments, and applications.
-
Amazon S3
-
Amazon EMR 4.0 - 5.4
-
Ambari 1.6, 1.7, 2.0, 2.1
-
CDH 5.5 - 5.15
-
EMC Isilon 7.2, 8.0
-
Google Cloud Storage
-
Google Cloud Dataproc
-
HDP 2.1.0 - 2.6.5
-
IBM BI 2.1.2 - 4.2.5
-
MapR M4.0.1 - M5.2.0
-
Microsoft Azure Blob Storage
-
Microsoft Azure Data Lake Store
-
Microsoft Azure HDInsights 3.2 - 3.6
-
MySQL, PostgreSQL (Hive Metastore)
-
Oracle BDA
Client Applications Supported
WANdisco Fusion is architected for maximum compatibility and interoperability with applications that use standard Hadoop File System APIs. All applications that use the standard Hadoop Distributed File System API or any Hadoop-Compatible File System API should be interoperable with WANdisco Fusion, and will be treated as supported applications. Additionally, Fusion supports the replication of content with Amazon S3 and S3-compatible objects stores, locally-mounted file systems, and NetApp NFS devices, but does not require or provide application compatibility libraries for these storage services.
2.4.7. Known Issues
Fusion 2.12.2 includes a small set of known issues with workarounds. In each case, resolution for the known issues is underway.
-
Fusion does not support truncate command -
WD-FUS-3022
The public boolean truncate(Path f, long newLength) operation in org.apache.hadoop.fs.FileSystem (> 2.7.0) is not yet supported.
Files will be truncated only in the cluster where the operation is initiated.
Consistency check and repair can be used to both detect and resolve any resulting inconsistencies.
-
Non-recursive OnTap repair repairs recursively -
WD-FUS-3932,WD-FUS-3640
All subdirectories for an OnTap snapdiff repair are repaired when recursive it set to false.
-
Potential race condition if new client instance fires multiple requests from a large number of threads in parallel in HA environment, which could result in client-side out of memory error -
WD-FUS-5903 -
Fusion stops live replication when a file us moved into a replicated directory -
WD-FUS-6004
When a file from a non-replicated directory is moved into a replicated directory, this can cause Fusion to stop from progressing with live replication. A hotfix is available on customer.wandisco.com, and this issue is resolved in Fusion 2.12.3.
2.4.8. Resolved Known Issues
Fusion 2.12.2 resolves one prior known issue:
-
Recursive parent directory creation with exclusions -
WD-FUS-4847
2.4.9. Other Improvements
In addition to the highlighted features listed above, WANdisco Fusion 2.12.2 includes a small set of other improvements to WANdisco Fusion 2.12.1:
-
Honor bandwidth policy for unidirectional transfers -
WD-FUS-5902,WD-FUS-5888 -
IHC configuration improvements -
WD-FUS-5891 -
Improve undirectional connection management -
WD-FUS-5889 -
Improve ADLS behavior for delete and rename operations -
WD-FUS-5885 -
Ambari stack deployment improvement -
WD-FUS-5881,WD-FUS-4083,WD-FUI-6595 -
Repair reporting improvement -
WD-FUS-5880 -
Documentation improvement for HDFS impersonation -
WD-FUS-5864 -
Documentation improvement for TCP port allocations -
WD-FUS-5853 -
Improve recovery from failed NameNode -
WD-FUS-5834 -
Improve safety of replication rule creation -
WD-FUS-5821,WD-FUS-5772,WD-FUS-5738 -
Allow explicit execution control by plugins -
WD-FUS-5788 -
Correct rename operations on WASB -
WD-FUS-5768 -
Correct bypass-utils script for CDH clusters -
WD-FUS-5762 -
Non-blocking repair correction for directory metadata -
WD-FUS-5760 -
Allow Fusion client deployment without HDFS client -
WD-FUS-5756, ???WD-FUS-5303 -
Do not override blocking repair selection -
WD-FUS-5747 -
Prevent task hang on replication rule removal -
WD-FUS-5738 -
Eliminate potential sideline condition -
WD-FUS-5723 -
Remove support for CDH 5.4.0 and CentOS 5 -
WD-FUS-5668,WD-FUI-6919 -
Correct repair option to replace files -
WD-FUS-5659 -
Remove duplicate symbolic links for client libraries -
WD-FUS-5612 -
Improved initial writer allocation for new replication rules -
WD-FUS-5597 -
Prevent server panic on rapid replication rule creation -
WD-FUS-5585,WD-DCO-784 -
Always include username translation in repair -
WD-FUS-5570 -
Validate compatibility with Alibaba EMR NativeOssFilesystem -
WD-FUS-5567 -
Improve IHC retry logic -
WD-FUS-5522 -
Fusion marker files -
WD-FUS-5450 -
Improve retry handling for truncated files -
WD-FUS-5408 -
Correct calculation of complete time for file transfer -
WD-FUS-5372 -
Core Alibaba EMR 3.10.1 support -
WD-FUS-5364,WD-FUI-6829 -
Smaller Fusion stack -
WD-FUS-4083 -
Document how to change login name of the super user -
WD-FUI-7101 -
Correct highlight of Step 2 during install -
WD-FUI-7085 -
Improve documentation on stack deployment -
WD-FUI-7058 -
Dcoument repair cancellation -
WD-FUI-7043 -
Improve Ambari stack deployment response to deploy errors -
WD-FUI-7029 -
Display plugin status on dashboard -
WD-FUI-6997,WD-FUI-6958 -
Reduce default log retention time and log size settings -
WD-FUI-6953 -
Improve email notification content for license notifications -
WD-FUI-6908 -
Remove install dependency on unzip -
WD-FUI-6869 -
Default
transfer.chunk.sizeto 32768 -WD-FUI-6863 -
Installer support of HDP 2.6.5 -
WD-FUI-6853,WD-FUI-6991,WD-FUI-7010 -
Resolve missing translation strings -
WD-FUI-6810,WD-FUI-6806,WD-FUI-6798,WD-FUI-6797,WD-FUI-6793,WD-FUI-6791,WD-FUI-6786,WD-FUI-6779,WD-FUI-6772,WD-FUI-6768,WD-FUI-6766,WD-FUI-6706 -
Fix typo in confirmation of networking settings change -
WD-FUI-6803 -
Improve setting page for Kerberos -
WD-FUI-6765 -
Provide message when new plugin detected -
WD-FUI-6763 -
Make repair history visible -
WD-FUI-6711,WD-FUI-6638 -
Correct replication rules filter handling -
WD-FUI-6705 -
Improve page number handling -
WD-FUI-6692 -
Improve silent installation for ADLS -
WD-FUI-6660,WD-FUI-6654 -
Correct i18n sanitization strategy -
WD-FUI-6640,WD-FUI-6848 -
Set UI server location in client stack configuration -
WD-FUI-6595 -
Installer support of CDH 5.15 -
WD-FUI-6557 -
Improve error handling for memory settings from property file -
WD-FUI-6489 -
Validate
swift.segment.sizetype in silent installation -WD-FUI-6218 -
Improve tooltip behavior for consistency check -
WD-FUI-6125 -
Display error message for invalid push threshold -
WD-FUI-5976 -
Guard against invalid port values -
WD-FUI-5958 -
Require Key Alias when HTTPS is selected -
WD-FUI-5935 -
Improve node identity display -
WD-FUI-5847 -
Improve error message for invalid replication exchange directory -
WD-FUI-5824 -
Correct pagination with filters -
WD-FUI-5808 -
Consolidate error message for incorrect login credentials -
WD-FUI-5778 -
Eliminate TransferData failure entries in log -
WD-FUI-5752 -
Improve UI Server HTTP client SSL trust handling -
WD-FUI-5727 -
Correct error message for client download with incorrect credentials -
WD-FUI-5657
2.5. Release 2.12.1 Build 1740
14 September 2018
WANdisco Fusion 2.12.1.8 is an update to version 2.12.1 that addresses a small number of minor issues. We advise all customers using WANdisco Fusion to apply this minor update to their environment.
| Please be aware that there is a known issue which can stop live replication. A hotfix is available on customer.wandisco.com, please contact WANdisco support for information. |
2.5.1. Getting Installed
The release can be installed with updates of the IHC server RPM, the Fusion server RPM and the client stack or package. e.g. The following packages should be updated for HDP 2.6.0:
fusion-hcfs-hdp-2.6.0-ihc-server-2.12.1.8.el6-xxxx.noarch.rpm
fusion-hcfs-hdp-2.6.0-server-2.12.1.8.el6-xxxx.noarch.rpm
fusion-hcfs-hdp-2.6.0-2.12.1.8.stack.tar.gz
Please contact WANdisco support for help with this process, and find detailed installation instructions in the user guide at http://docs.wandisco.com/bigdata/wdfusion/2.12/index.html#install
2.5.3. Available Packages
This release of WANdisco Fusion supports the following versions of Hadoop:
-
ASF Apache Hadoop 2.5.0 - 2.7.0
-
CDH 5.4.x - CDH 5.15.x
-
HDP 2.1.0 - HDP 2.6.5
-
MapR 5.0.0 - MapR 5.2.0
-
IOP (IBM BigInsights) 4.2.5
| Erratum: Support for HDP 2.6.5 and CDH 5.15 does not include the install-time specification of those versions, which was missed in the release packaging of WANdisco Fusion 2.12.1. While an install should be able to be completed successfully with those versions, complete packaging for them will be provided with a minor release. |
The trial download includes the installation packages for CDH and HDP distributions only.
2.5.4. System Requirements
Before installing, ensure that your systems, software and hardware meet the requirements found in our online user guide at http://docs.wandisco.com/bigdata/wdfusion/2.12/index.html#_prerequisites_checklist
Certified Third-Party Components
WANdisco certifies the interoperability of Fusion with a wide variety of systems, including Hadoop distributions, object storage platforms, cloud environments, and applications.
-
Amazon S3
-
Amazon EMR 4.0 - 5.4
-
Ambari 1.6, 1.7, 2.0, 2.1
-
CDH 5.4 - 5.14
-
EMC Isilon 7.2, 8.0
-
Google Cloud Storage
-
Google Cloud Dataproc
-
HDP 2.1.0 - 2.6.4
-
IBM BI 2.1.2 - 4.2.5
-
MapR M4.0.1 - M5.2.0
-
Microsoft Azure Blob Storage
-
Microsoft Azure HDInsight 3.6
-
MySQL, PostgreSQL (Hive Metastore)
-
Oracle BDA
Client Applications Supported
WANdisco Fusion is architected for maximum compatibility and interoperability with applications that use standard Hadoop File System APIs. All applications that use the standard Hadoop Distributed File System API or any Hadoop-Compatible File System API should be interoperable with WANdisco Fusion, and will be treated as supported applications. Additionally, Fusion supports the replication of content with Amazon S3 and S3-compatible objects stores, locally-mounted file systems, and NetApp NFS devices, but does not require or provide application compatibility libraries for these storage services.
2.5.5. Known Issues
Fusion 2.12.1 includes a small set of known issues with workarounds. In each case, resolution for the known issues is underway.
-
Fusion does not support truncate command -
WD-FUS-3022
The public boolean truncate(Path f, long newLength) operation in
org.apache.hadoop.fs.FileSystem (> 2.7.0) is not yet supported. Files will be
truncated only in the cluster where the operation is initiated. Consistency
check and repair can be used to both detect and resolve any resulting
inconsistencies.
When an exclusion rule prevents the replication of specific files, applications
that perform a mkdir() operation that includes the creation of parent
directories will not create those parent directories. This may be an unexpected
outcome from the definition of that exclusion rule.
-
Non-recursive OnTap repair repairs recursively -
WD-FUS-3932,WD-FUS-3640
All subdirectories for an OnTap snapdiff repair are repaired when recursive it set to false.
-
Fusion stops live replication when a file us moved into a replicated directory -
WD-FUS-6004
When a file from a non-replicated directory is moved into a replicated directory, this can cause Fusion to stop from progressing with live replication. A hotfix is available on customer.wandisco.com, and this issue is resolved in Fusion 2.12.3.
2.5.6. Other Improvements
-
Prevented PANIC when when replicated more then 200 folders.
WD-FUS-5585 -
Expanded IHC configuration options to increase the reliability of repairs.
WD-FUS-5728 -
Append command can now be used if using ADLS.
WD-FUS-5729 -
Addresses issue with repairing directory permissions during non-blocking repairs
WD-FUS-5760 -
Include additional information for debugging on Azure environments
WD-FUS-5764 -
File Trees now display replication rules with non US-ASCII names.
WD-FUI-6856, WD-FUI-6859
2.6. Release 2.12.1 Build 1640
09 August 2018
WANdisco Fusion 2.12.1.6 is an update to version 2.12.1 that addresses a small number of minor issues. We advise all customers using WANdisco Fusion to apply this minor update to their environment.
| Please be aware that there is a known issue which can stop live replication. A hotfix is available on customer.wandisco.com, please contact WANdisco support for information. |
2.6.1. Installation
The release can be installed with updates of the IHC server RPM, the Fusion server RPM and the client stack or package. e.g. The following packages should be updated for HDP 2.6.0:
fusion-hcfs-hdp-2.6.0-ihc-server-2.12.1.6.el6-xxxx.noarch.rpm
fusion-hcfs-hdp-2.6.0-server-2.12.1.6.el6-xxxx.noarch.rpm
fusion-hcfs-hdp-2.6.0-2.12.1.6.stack.tar.gz
Please contact WANdisco support for help with this process, and find detailed installation instructions in the user guide at http://docs.wandisco.com/bigdata/wdfusion/2.12/index.html#install
2.6.2. Highlighted New Features
This release includes the following major new features.
Allow zones to ignore requests
Fusion 2.12.1 has added a feature to allow a zone to ignore agreements that have originated in other zones. This provides added flexibility to limit unnecessary replication traffic for content. Please refer to http://docs.wandisco.com/bigdata/wdfusion/2.12/#_ignorezones for full information on how to use this feature.
2.6.3. New Platform Support
WANdisco Fusion has added support for the following new platforms since Fusion 2.12.0:
-
Alibaba Cloud
2.6.4. Available Packages
This release of WANdisco Fusion supports the following versions of Hadoop:
-
ASF Apache Hadoop 2.5.0 - 2.7.0
-
CDH 5.4.0 - CDH 5.15.0
-
HDP 2.1.0 - HDP 2.6.5
-
MapR 5.0.0 - MapR 5.2.0
-
IOP (IBM BigInsights) 4.2.5
| Erratum: Support for HDP 2.6.5 and CDH 5.15 does not include the install-time specification of those versions, which was missed in the release packaging of WANdisco Fusion 2.12.1. While an install should be able to be completed successfully with those versions, complete packaging for them will be provided with a minor release. |
The trial download includes the installation packages for CDH and HDP distributions only.
2.6.5. System Requirements
Before installing, ensure that your systems, software and hardware meet the requirements found in our online user guide at http://docs.wandisco.com/bigdata/wdfusion/2.12/index.html#_prerequisites_checklist
Certified Third-Party Components
WANdisco certifies the interoperability of Fusion with a wide variety of systems, including Hadoop distributions, object storage platforms, cloud environments, and applications.
-
Amazon S3
-
Amazon EMR 4.0 - 5.4
-
Ambari 1.6, 1.7, 2.0, 2.1
-
CDH 5.4 - 5.14
-
EMC Isilon 7.2, 8.0
-
Google Cloud Storage
-
Google Cloud Dataproc
-
HDP 2.1.0 - 2.6.4
-
IBM BI 2.1.2 - 4.2.5
-
MapR M4.0.1 - M5.2.0
-
Microsoft Azure Blob Storage
-
Microsoft Azure HDInsight 3.6
-
MySQL, PostgreSQL (Hive Metastore)
-
Oracle BDA
Client Applications Supported
WANdisco Fusion is architected for maximum compatibility and interoperability with applications that use standard Hadoop File System APIs. All applications that use the standard Hadoop Distributed File System API or any Hadoop-Compatible File System API should be interoperable with WANdisco Fusion, and will be treated as supported applications. Additionally, Fusion supports the replication of content with Amazon S3 and S3-compatible objects stores, locally-mounted file systems, and NetApp NFS devices, but does not require or provide application compatibility libraries for these storage services.
2.6.6. Known Issues
Fusion 2.12.1 includes a small set of known issues with workarounds. In each case, resolution for the known issues is underway.
-
Fusion does not support truncate command -
WD-FUS-3022
The public boolean truncate(Path f, long newLength) operation in
org.apache.hadoop.fs.FileSystem (> 2.7.0) is not yet supported. Files will be
truncated only in the cluster where the operation is initiated. Consistency
check and repair can be used to both detect and resolve any resulting
inconsistencies.
When an exclusion rule prevents the replication of specific files, applications
that perform a mkdir() operation that includes the creation of parent
directories will not create those parent directories. This may be an unexpected
outcome from the definition of that exclusion rule.
-
Non-recursive OnTap repair repairs recursively -
WD-FUS-3932,WD-FUS-3640
All subdirectories for an OnTap snapdiff repair are repaired when recursive it set to false.
-
Fusion stops live replication when a file us moved into a replicated directory -
WD-FUS-6004
When a file from a non-replicated directory is moved into a replicated directory, this can cause Fusion to stop from progressing with live replication. A hotfix is available on customer.wandisco.com, and this issue is resolved in Fusion 2.12.3.
2.7. Release 2.12.1 Build 1612
30 July 2018
WANdisco Fusion 2.12.1 is a minor release following Fusion 2.12, and includes new features, issue resolutions, platform support, performance and usability improvements. These release notes include details on the specific improvements and enhancements to the product and should be read in conjunction with the product documentation.
| Please be aware that there is a known issue which can stop live replication. A hotfix is available on customer.wandisco.com, please contact WANdisco support for information. |
2.7.1. Installation
The release can be installed with updates of the IHC server RPM, the Fusion server RPM and the client stack or package. e.g. The following packages should be updated for HDP 2.6.0:
fusion-hcfs-hdp-2.6.0-ihc-server-2.12.1.5.el6-xxxx.noarch.rpm
fusion-hcfs-hdp-2.6.0-server-2.12.1.5.el6-xxxx.noarch.rpm
fusion-hcfs-hdp-2.6.0-2.12.1.5.stack.tar.gz
Please contact WANdisco support for help with this process, and find detailed installation instructions in the user guide at http://docs.wandisco.com/bigdata/wdfusion/2.12/index.html#install.
2.7.2. Highlighted New Features
This release includes the following major new features.
Allow zones to ignore requests
Fusion 2.12.1 has added a feature to allow a zone to ignore agreements that have originated in other zones. This provides added flexibility to limit unnecessary replication traffic for content. Please refer to http://docs.wandisco.com/bigdata/wdfusion/2.12/#_ignorezones for full information on how to use this feature.
2.7.3. New Platform Support
WANdisco Fusion has added support for the following new platforms since Fusion 2.12:
-
Alibaba Cloud
2.7.4. Available Packages
This release of WANdisco Fusion supports the following versions of Hadoop:
-
ASF Apache Hadoop 2.5.0 - 2.7.0
-
CDH 5.4.0 - CDH 5.14.0
-
HDP 2.1.0 - HDP 2.6.4
-
MapR 5.0.0 - MapR 5.2.0
-
IOP (IBM BigInsights) 4.2.5
The trial download includes the installation packages for CDH and HDP distributions only.
2.7.5. System Requirements
Before installing, ensure that your systems, software and hardware meet the requirements found in our online user guide at http://docs.wandisco.com/bigdata/wdfusion/2.12/index.html#_prerequisites_checklist
Certified Third-Party Components
WANdisco certifies the interoperability of Fusion with a wide variety of systems, including Hadoop distributions, object storage platforms, cloud environments, and applications.
-
Amazon S3
-
Amazon EMR 4.0 - 5.4
-
Ambari 1.6, 1.7, 2.0, 2.1
-
CDH 5.4 - 5.14
-
EMC Isilon 7.2, 8.0
-
Google Cloud Storage
-
Google Cloud Dataproc
-
HDP 2.1.0 - 2.6.4
-
IBM BI 2.1.2 - 4.2.5
-
MapR M4.0.1 - M5.2.0
-
Microsoft Azure Blob Storage
-
Microsoft Azure HDInsight 3.6
-
MySQL, PostgreSQL (Hive Metastore)
-
Oracle BDA
Client Applications Supported
WANdisco Fusion is architected for maximum compatibility and interoperability with applications that use standard Hadoop File System APIs. All applications that use the standard Hadoop Distributed File System API or any Hadoop-Compatible File System API should be interoperable with WANdisco Fusion, and will be treated as supported applications. Additionally, Fusion supports the replication of content with Amazon S3 and S3-compatible objects stores, locally-mounted file systems, and NetApp NFS devices, but does not require or provide application compatibility libraries for these storage services.
2.7.6. Known Issues
Fusion 2.12.1 includes a small set of known issues with workarounds. In each case, resolution for the known issues is underway.
-
Fusion does not support truncate command -
WD-FUS-3022
The public boolean truncate(Path f, long newLength) operation in
org.apache.hadoop.fs.FileSystem (> 2.7.0) is not yet supported. Files will be
truncated only in the cluster where the operation is initiated. Consistency
check and repair can be used to both detect and resolve any resulting
inconsistencies.
When an exclusion rule prevents the replication of specific files, applications
that perform a mkdir() operation that includes the creation of parent
directories will not create those parent directories. This may be an unexpected
outcome from the definition of that exclusion rule.
-
Non-recursive OnTap repair repairs recursively -
WD-FUS-3932,WD-FUS-3640
All subdirectories for an OnTap snapdiff repair are repaired when recursive it set to false.
-
Fusion stops live replication when a file us moved into a replicated directory -
WD-FUS-6004
When a file from a non-replicated directory is moved into a replicated directory, this can cause Fusion to stop from progressing with live replication. A hotfix is available on customer.wandisco.com, and this issue is resolved in Fusion 2.12.3.
2.7.7. Other Improvements
In addition to the highlighted features listed above, Fusion 2.12.1 includes a small set of other improvements to Fusion 2.12:
-
Improved large file replication in Azure -
WD-FUS-5437 -
Correct license report generation -
WD-FUS-5512 -
Improved repair outcomes for recursive non-blocking repair -
WD-FUS-5537 -
Alibaba OSS compatibility improvements -
WD-FUS-3954 -
Support for Alibaba OSS authentication -
WD-FUS-3898 -
Improved packaging under cluster upgrade -
WD-FUS-4165 -
Automate Fusion configuration for Druid -
WD-FUS-5339 -
Improved sysinfo in talkbacks -
WD-FUS-5445 -
Improved behavior under outage conditions -
WD-FUS-5530 -
Ensure commutative behavior of consistency check strategy -
WD-FUS-5558 -
Provide type in consistency check task list -
WD-FUS-4559 -
Minor improvement to repair efficiency -
WD-FUS-5152 -
Improved classpath handling on package upgrade -
WD-FUS-5180 -
Ensure ability to run talkback as non-privileged user -
WD-FUS-5351 -
Correct race condition in Fusion server startup script -
WD-FUS-5413 -
Removal of unnecessary log entries -
WD-FUS-5464 -
Correct license report task on MapR 5.2.0 -
WD-FUS-5466 -
API on Fusion server to trigger GC -
WD-FUS-5472 -
Fixed - information loss when notification buffer fills -
WD-FUS-5476,WD-FUS-5532 -
Improved reporting for non-retriable exceptions -
WD-FUS-5478 -
Fixed consistency check with Scality -
WD-FUS-5487 -
Correction to repair with user translation -
WD-FUS-5505 -
Robust multipart upload handling for S3 compatible stores -
WD-FUS-5552 -
Avoid NPE on transfer update with replication rule removal -
WD-FUS-5556 -
Fix bandwidth calculations -
WD-FUS-5563 -
Remove symbolic links on RPM or DEB removal -
WD-FUS-5565 -
Correct naming of length indication in IHC logs -
WD-FUS-2679 -
Improve receive buffer size matching -
WD-FUS-5494 -
Transfer logging cleanup -
WD-FUS-5495 -
ReplicatedFC applyUmask allows null permission -
WD-FUS-5572 -
Fusion UI authentication with correct Kerberos superuser -
WD-FUI-5217 -
i18n locale support for command-line installer -
WD-FUI-6599 -
Fixed - Field user.password empty after installation -
WD-FUI-6101,WD-FUI-6577 -
Fixed - S3 Installation failure -
WD-FUI-6175 -
Improved error message for incorrect login -
WD-FUI-6550 -
Fixed - Incorrect localNode API -
WD-FUI-6555 -
Fixed - Empty warning message in repair submission -
WD-FUI-6561 -
Filter functionality on replication rules page -
WD-FUI-6562 -
Alibaba OSS support for UI and silent installer -
WD-FUI-6584 -
Alibaba OSS support in packaging and command-line installer -
WD-FUI-6585 -
Localization for Simplified Chinese language -
WD-FUI-6586 -
Fixed - override of plugin features -
WD-FUI-6623 -
Remove LDAP settings for cloud environments -
WD-FUI-6639 -
Fixed - Spark service start failure on CDH 5.10, CDH 5.11 -
WD-FUI-5466 -
Environment installer page step indication -
WD-FUI-5597 -
System status correction for no replication rules -
WD-FUI-5473 -
Fixed - display of tooltip on replication rule actions -
WD-FUI-5901 -
Fixed - Kerberos validation failure when klist unavailable -
WD-FUI-5953 -
Filter for inconsistent status -
WD-FUI-6038 -
Preview of LDAP queries -
WD-FUI-6188 -
Correct response for authorization restriction -
WD-FUI-6390 -
SSL settings validated for LDAP -
WD-FUI-6410 -
Correct access to LDAP settings for manager user -
WD-FUI-6467 -
Correct error message for port validation -
WD-FUI-6490 -
Clarify error message for log update settings -
WD-FUI-6492 -
Complete translation of installer node page -
WD-FUI-6507 -
Guard against UI server failure during discovery -
WD-FUI-6512 -
Fixed - incorrect CC type for trigger blocking check -
WD-FUI-6524 -
Silent installer role map load from serialized file -
WD-FUI-6546 -
Fixed - undefined error message on confirmation of node stop -
WD-FUI-6558 -
Fixed - empty warning during update of local zone network properties -
WD-FUI-6565 -
Fixed - typo in UI zone installation -
WD-FUI-6566 -
Fixed - empty error message for long values on settings page -
WD-FUI-6572 -
Fixed - plugin install permission enforcement -
WD-FUI-6579 -
Verification of super user password change -
WD-FUI-6590 -
Improved internal validation of local node availability at install -
WD-FUI-6592 -
Alignment of server port validation -
WD-FUI-6593 -
Fixed - spacing in license expiry message -
WD-FUI-6600 -
Translation corrections -
WD-FUI-6607,WD-FUI-6636,FUI-6663 -
Indicate local status when stopping local node -
WD-FUI-4819 -
Installer typo fix -
WD-FUI-6541 -
Status message for file transfer column correction -
WD-FUI-6568 -
Fixed - LDAP enabled UI asks for manager credentials -
WD-FUI-6574 -
Improve UI layout for Firefox 61 -
WD-FUI-6576 -
Bandwidth indicators on dashboard page -
WD-FUI-6583 -
Consistent capitalization on button text -
WD-FUI-6547 -
Remove AD-specific LDAP defaults -
WD-FUI-6549
2.8. Release 2.12.0 Build 1539
28 June 2018
WANdisco Fusion 2.12 is a new major release of the Fusion platform, available now from the WANdisco file distribution site. This release includes key new features, platform support, installation, scale, performance and usability improvements.
| Please be aware that there is a known issue which can stop live replication. A hotfix is available on customer.wandisco.com, please contact WANdisco support for information. |
2.8.1. Installation
Find detailed installation instructions in the user guide at Fusion Installation (On-premises).
Upgrades from Earlier Versions
As a major release, Fusion 2.12 introduces incompatibilities with the network protocols and storage formats used by prior versions. Please contact WANdisco support for information on the upgrade mechanism appropriate for your environment.
Specific new features have been added to this release to allow for minimally-disruptive approaches to upgrading from prior releases. The combination of non-blocking repair (sync) functionality with tooling to capture and reapply deployment configuration can be used to upgrade with minimal user input and minimal disruption to application behavior.
2.8.2. Highlighted New Features
This release includes the following major new features.
Tooling for Major Upgrades
This release introduces a tool that assists in bootstrapping a new Fusion deployment from the configuration and settings of a previous Fusion installation. Use it to capture and store the prior installation’s configuration so that a new deployment can be brought up quickly and automatically.
Non-Blocking Repair
Fusion supports a feature called "Repair", which provides a mechanism to correct inconsistencies between zones by restoring file system metadata and replicating content. Prior versions of Fusion provide this capability by blocking other operations that may be attempted against a location under repair while that task is in process. Fusion 2.12 introduces a non-blocking variant of Repair that can operate without affecting application operation during the task execution.
Non-blocking repair is a variant of regular repair with enhanced concurrency controls to prevent lost updates and file corruption. It performs a best-effort repair of a replicated location, reducing the scope of the locks applied to individual files. During execution of a non-blocking repair, only individual files are locked, rather than the root of the replicated location. This makes non-blocking repair suitable for use during regular application operation against replicated directories.
Other benefits of the non-blocking repair include reduced cluster load, Fusion memory consumption and preventing a surge in resources consumption following repair completion.
Heterogenous Plugins
Deploy more complex Fusion environments where not every Fusion server requires the same set of plugins to be installed. Fusion 2.12 will operate safely under conditions where Fusion servers have different plugins.
Internationalization of User Interface
User-facing information in the Fusion user interface is fully internationalized, allowing future releases to support other locales and present non-US English material, including that requiring double-byte character support.
Authorization Roles for User Interface
The Fusion user interface now allows individual users to be assigned to one of a collection of roles that restrict their capabilities. These roles span:
- Read-only users
-
who have the ability to view all information but make no modifications to system state or behavior,
- Content owners
-
who manage replication rules but do not have the responsibility for the continued health and operation of the Fusion infrastructure, and
- Infrastructure users
-
who are responsible for the health and operation of the Fusion system, but who do not manage the data that it replicates.
User roles can be assigned through an external directory, and will affect the privileges and capabilities available for a given user accessing the user interface. Read more in Roles and permissions.
2.8.3. Highlighted Improvements
WD-FUS-3861 - Per DSM manual fast bypass
Manual fast bypass allows the Fusion client to bypass coordination of
operations. Prior releases allowed this to be triggered by the existence of a
bypass directory in the location specified by the
fusion.replicated.dir.exchange configuration property. Fusion 2.12 extends
that feature to allow bypass to affect only individual directories.
Use the /opt/wandisco/fusion/tools/bin/bypass-utils script to manage
bypass options:
$ /opt/wandisco/fusion/tools/bin/bypass-utils --help
Initializing Bypass Utility
usage: bypass utility options are:
 -b,--bypass <path>               specify a path to bypass replication.
                                  (Can be used more than once)
 -c,--conf <configuration file>   specify an application configuration
                                  file. (Can be used more than once)
 -h,--help                        show this usage message.
 -r,--replicate <path>            specify a path that should be
                                  replicated. (Can be used more than once)
 -s,--status                      show current paths in bypass.
2.8.4. Known Issues Resolved
Previous known issues that are resolved in this release are:
Recursive parent directory creation with exclusions - WD-FUS-4847
When an exclusion rule prevents the replication of specific files, applications
that perform a mkdir() operation than includes the creation of parent
directories will not create those parent directories. This may be an unexpected
outcome from the definition of that exclusion rule.
This issue is resolved in Fusion 2.12.
2.8.5. Available Packages
This release of WANdisco Fusion supports the following versions of Hadoop:
-
ASF Apache Hadoop 2.5.0 - 2.7.0
-
CDH 5.2.0 - CDH 5.14.0
-
HDP 2.1.0 - HDP 2.6.4
-
MapR 5.0.0 - MapR 5.2.0
-
IOP (IBM BigInsights) 4.2.5
The trial download includes the installation packages for CDH and HDP distributions only.
2.8.6. System Requirements
Before installing, ensure that your systems, software and hardware meet the requirements found in our online user guide at http://docs.wandisco.com/bigdata/wdfusion/2.12.
Certified Third-Party Components
WANdisco certifies the interoperability of Fusion with a wide variety of systems, including Hadoop distributions, object storage platforms, cloud environments, and applications.
-
Amazon S3
-
Amazon EMR 5.3 - 5.4
-
CDH 5.4 - 5.14
-
EMC Isilon 7.2, 8.0
-
Google Cloud Storage
-
Google Cloud Dataproc
-
HDP 2.1.0 - 2.6.4
-
IBM BI 2.1.2 - 4.2.5
-
MapR M4.0.1 - M5.2.0
-
Microsoft Azure Blob Storage
-
Microsoft Azure HDInsight 3.6
-
MySQL, PostgreSQL (Hive Metastore)
-
Oracle BDA
Client Applications Supported
WANdisco Fusion is architected for maximum compatibility and interoperability with applications that use standard Hadoop File System APIs. All applications that use the standard Hadoop Distributed File System API or any Hadoop-Compatible File System API should be interoperable with WANdisco Fusion, and will be treated as supported applications. Additionally, Fusion supports the replication of content with Amazon S3 and S3-compatible objects stores, locally-mounted file systems, and NetApp NFS devices, but does not require or provide application compatibility libraries for these storage services.
2.8.7. Known Issues
Fusion 2.12 includes a small set of known issues with workarounds. In each case, resolution for the known issues is underway.
-
Fusion does not support truncate command - WD-FUS-3022
The public boolean truncate(Path f, long newLength) operation in
org.apache.hadoop.fs.FileSystem (> 2.7.0) is not yet supported. Files
will be truncated only in the cluster where the operation is initiated.
Consistency check and repair can be used to both detect and resolve any
resulting inconsistencies.
-
Unexpected things may happen if you restart in the middle of trying to deploy DSMs, leading to a failure to deploy the replicated directory completely on the node being restarted. If it happens, you can remove the replicated directory on the other nodes and then redeploy. - WD-FUS-5597
-
During the rapid creation of large numbers of DSMs, the Fusion server may fail to start, resulting in a "Received TerminalEvent" PANIC log message. - WD-FUS-5595
-
The creation of large numbers (100s) or replicated folders may cause a node to crash with a "uncommitted transaction" panic message in the logs. The cause is an issue in the underlying coordination engine, where negative acknowledgements can leave a thread-local transaction uncommitted. The issue is automatically fixed with a restart of the crashed node. - WD-FUS-5585
-
Fusion stops live replication when a file us moved into a replicated directory -
WD-FUS-6004
When a file from a non-replicated directory is moved into a replicated directory, this can cause Fusion to stop from progressing with live replication. A hotfix is available on customer.wandisco.com, and this issue is resolved in Fusion 2.12.3.
2.8.8. Other Improvements
In addition to the highlighted features listed above, Fusion 2.12 includes a wide set of improvements in performance, functionality, scale, interoperability and general operation.
-
Tooling for major upgades -
WD-FUS-1961 -
Non-blocking repair -
WD-FUS-3393 -
FIX - Fusion is unable to deserialize transaction -
WD-FUS-4217 -
Replication stops if target cluster restarts during copy -
WD-FUS-3078 -
Per DSM manual fast bypass -
WD-FUS-3861 -
Improved console logging -
WD-FUS-3996 -
Persistent execution history -
WD-FUS-4582 -
FIX - Ambari HDFS client install does not enforce required order -
WD-FUS-4655 -
FIX - Consistency Check results become unavailable after a while -
WD-FUS-1216 -
Fusion server is closing channel on namenode exception -
WD-FUS-1704 -
Make Repair use RequestWithMetadata -
WD-FUS-2452 -
S3 Streamed Uploads -
WD-FUS-2843 -
Audit filter should just dump the raw message body -
WD-FUS-3076 -
API call to consume XML to create/update replicated path properties -
WD-FUS-3323 -
Update FusionAbstractFs to be used in fs.AbstractFileSystem.hdfs.impl -
WD-FUS-3399 -
FIX - Shared KMS does not work for metadata driven operations -
WD-FUS-3528 -
FIX - DSM handler installation race -
WD-FUS-3762 -
FIX - Failed deployment of DSM will block removal -
WD-FUS-3781 -
FIX - KMS client failure in destination zone -
WD-FUS-3912 -
FIX - Race condition with update of IHC information in PWP and pull of file -
WD-FUS-3918 -
FIX - Distribution upgrade triggers yum repository logic -
WD-FUS-4186 -
Endpoint to report on CC progress -
WD-FUS-3939 -
FIX - Ambari HDFS client install does not enforce required order -
WD-FUS-4333 -
Modify consistency check to handle extended file statuses -
WD-FUS-4378 -
Modify repair to use consistency check report as input -
WD-FUS-4426 -
Provide ability to replicate timestamps -
WD-FUS-4531 -
Support EPOLL -
WD-FUS-4638 -
FIX - The CC and Repair handling of permissions is inconsistent (S3) -
WD-FUS-4640 -
Remove unused/incorrect IhcMetrics.setTransferLength -
WD-FUS-4641 -
FUS-3470 API for contents of AgreedProposalExecutor -
WD-FUS-4646 -
Consistent URI logging format -
WD-FUS-4697 -
FIX - Fusion client reinstall does not occur after hdp upgrade -
WD-FUS-4731 -
Enable option for netty logging -
WD-FUS-4761 -
FIX - Object store hard coded permissions -
WD-FUS-4762 -
Optimize gsn folder cleanup on S3 -
WD-FUS-4802 -
Delegate setStoragePolicy APIs to underlying fs -
WD-FUS-4825 -
FIX - Not mapped response redirect -
WD-FUS-4829 -
FUS-4838 Various tasks were not cleaned after replicated folders were removed. -
WD-FUS-4831 -
Last Rule deletion does not work -
WD-FUS-4838 -
FIX - Documented recommended memory values need adjustment -
WD-FUS-4839 -
Support recursive parent directory creation for exclusions -
WD-FUS-4847 -
FIX - OpenSSL memory leak -
WD-FUS-4857 -
FIX - Client hangs when first Fusion node is stopped (kill -STOP) -
WD-FUS-4898 -
FIX - listExtendedFileStatus in FsStoreProxy default sets includeTopDir true -
WD-FUS-4899 -
FIX - Path truncation in fusion-dcone logs -
WD-FUS-4917 -
FIX - application.properties type casting logic -
WD-FUS-4940 -
Repair of zero length file from EMR/S3 to HDFS overrides default permissions -
WD-FUS-4944 -
FIX - Fusion client blocks indefinitely with bypass enabled -
WD-FUS-4947 -
FIX - Fusion related files created with 777 permissions in HDFS -
WD-FUS-4963 -
Move executed GSN’s to an external location -
WD-FUS-4966 -
FIX - Remote zone holds file lease indefinitely if HDFS restarts during a pull -
WD-FUS-4996 -
FIX - memory leak inside hflushRecordMap if Exception happens before we mark HFlushRecord as Executed -
WD-FUS-4998 -
Delegate getStoragePolicy APIs to underlying fs -
WD-FUS-5017 -
Talkback script always prompts for ticket number -
WD-FUS-5038 -
Server Scripts should check process, not PID file -
WD-FUS-5044 -
FIX - Negative and non-zero values in transfers -
WD-FUS-5053 -
Document GSN/Metadata directory configs -
WD-FUS-5122 -
Bootstrap replicated directory on first RD rather than on DSM deployment -
WD-FUS-5179 -
Improved Fusion server restart time -
WD-FUS-5186 -
FIX - Unable to remove replicated paths -
WD-FUS-5200 -
Don’t log every inconsistency at INFO level -
WD-FUS-5220 -
Raw and metadata pulls should be done as system user of the source zone -
WD-FUS-5274 -
FIX - RenameFileToReplicatedRequest failed in pre_rename -
WD-FUS-5289 -
Don’t make requests dependent when they are not relevant to a zone -
WD-FUS-5291 -
talkback should switch from (deprecated) ifconfig to ip -
WD-FUS-3584 -
Add logging in FsMonitor -
WD-FUS-3832 -
[Talkback] Clean Up User Queries -
WD-FUS-4206 -
totalTransferred in IHC transfers API should be long not double -
WD-FUS-4625 -
Move LocalFileSystem client logging to appropriate directories -
WD-FUS-4698 -
FIX - Fusion server restart has confusing message if fusion server did not exist -
WD-FUS-4962 -
Fix the configure-fusion-server script such that it creates a correct statemachine.xml -
WD-FUS-5028 -
FileProxy methods for client handshake should be Unsupported Operation -
WD-FUS-5067 -
In server, log which IHC we connected to for a pull -
WD-FUS-5091 -
S3Lister should include name in toString and invalid config should log warning -
WD-FUS-5083 -
Add IHC connection logging -
WD-FUS-5091 -
Remove knox classpath symlinks on uninstall -
WD-FUS-5130 -
Map
adl://scheme toorg.apache.hadoop.fs.adl.AdlFileSystem-WD-FUS-5154 -
Do not retry malformed setfacl operation in local zone -
WD-FUS-5155 -
Bootstrap replicated directory correctly -
WD-FUS-5179 -
Azure Data Lake dependencies -
WD-FUS-5189 -
Improve data immutability on unsuccessful pull -
WD-FUS-5194 -
Correct replicated path removal -
WD-FUS-5200 -
Minimize INFO logging of inconsistency -
WD-FUS-5220 -
Perform client side ADL checks -
WD-FUS-5268 -
Apply system user identify to source zone pulls -
WD-FUS-5274 -
Fix execution of operations that rename to replicated location-
WD-FUS-5289 -
Remove dependencies for operations that do not affect zone -
WD-FUS-5291 -
Client initialization logs client version -
WD-FUS-5319 -
Handle client-server credential differences for ADL -
WD-FUS-5330 -
Fix IHC history lookup -
WD-FUS-5360 -
Improve task deletion -
WD-FUS-5374 -
Apply PermGen configuration during installation -
WD-FUS-5377 -
Fix stack deployment for HDP 2.6.4 on Ubuntu 16 -
WD-FUS-5380 -
Improve handshake error message on failed mkdir/chown -
WD-FUS-5390 -
Support arbitrary file system schemes -
WD-FUS-5418 -
Improve security checks for ADL -
WD-FUS-5419 -
Fix NPE in TransferManager initialization -
WD-FUS-5421 -
Internationalization of the user interface -
WD-FUI-3216 -
Bypass and replicated exchange settings for HDInsight -
WD-FUI-5556 -
FIX - User sometimes unnecessarily logged out with concurrent sessions -
WD-FUI-2244 -
Repair from checkpoit UI Server side implementation -
WD-FUI-3458 -
Remove disk monitoring from the UI -
WD-FUI-4675 -
Non-blocking Repair -
WD-FUI-4685 -
Reduce monolthic installer size -
WD-FUI-4689 -
FIX - Fusion UI shows 'Unable to locate the result' on replication page in case of network problems -
WD-FUI-4876 -
FIX - Cluster graph errors on warning/error states -
WD-FUI-5025 -
Remove Summary step from installer -
WD-FUI-5596 -
Remove Custom Consistency Check tab -
WD-FUI-5765 -
FIX - KMS setting is displayed under kerberos settings -
WD-FUI-5013 -
FIX - Console error when typing in RD dir name -
WD-FUI-5198 -
External UI links should persist through login page -
WD-FUI-5266 -
FIX -
GET /api/repair/history?path=returns null value on node repair is initiated from -WD-FUI-5308 -
URI tag on the rules table should not be red -
WD-FUI-5536 -
FIX - Oddly highlighted X when opening operations window-
WD-FUI-5066 -
Correct MapR client settings in installer -
WD-FUI-5097 -
FIX - console error when submitting replicated directory -
WD-FUI-5198 -
Persist external UI links through login page -
WD-FUI-5266 -
FIX - null value on repair history API -
WD-FUI-5308 -
Correct color for URI tag on rules table -
WD-FUI-5536 -
Display S3A file system on replicated folder creation -
WD-FUI-5551 -
Bypass and replicated directory exchange settings for HD Insight -
WD-FUI-5556 -
Remove summary step from installer -
WD-FUI-5596 -
Multi-byte character support -
WD-FUI-5614 -
Removal of custom consistency check tab -
WD-FUI-5765 -
FIX - Hive installer can’t pass KDC credential validation -
WD-FUI-5845 -
Remove CLI reference to Fusion server port -
WD-FUI-5915 -
Label consistency between installer and settings page -
WD-FUI-5990 -
IOP 4.0 support removal -
WD-FUI-6003 -
Correct total size of data in folder for S3 -
WD-FUI-6042 -
Ubuntu 16 installation -
WD-FUI-6250 -
Correct filtering of replication rules -
WD-FUI-6252
2.9. Earlier releases
Notes from WANdisco Fusion 2.11.x releases can be found here:
April 2018 |
|
February 2018 |
|
January 2018 |
|
December 2017 |
Notes from WANdisco Fusion 2.10.x releases can be found here:
October 2017 |
|
October 2017 |
|
September 2017 |
|
August 2017 |
|
May 2017 |
|
April 2017 |
3. Concepts
3.1. Product concepts
3.1.1. What is WANdisco Fusion
WANdisco Fusion shares data between two or more clusters. Shared data is replicated between clusters using DConE, WANdisco’s proprietary coordination engine. This isn’t a spin on mirroring data, every cluster can write into the shared data directories and the resulting changes are coordinated in real-time between clusters.
100% Reliability
LiveData uses a set of Paxos-based algorithms to continue to replicate even after brief networks outages, data changes will automatically catch up once connectivity between clusters is restored.
Below the coordination stream, actual data transfer is done as an asynchronous background process and doesn’t consume MapReduce resources.
Replication where and when you need
WANdisco Fusion supports Selective replication, where you control which data is replicated to particular clusters, based on your security or data management policies. Data can be replicated globally if data is available to every cluster or just one cluster.
The Benefits of WANdisco Fusion
-
Ingest data to any cluster, sharing it quickly and reliably with other clusters. Removing fragile data transfer bottlenecks, and letting you process data at multiple places improving performance and getting you more utilization from backup clusters.
-
Support a bimodal or multimodal architecture to enable innovation without jeopardizing SLAs. Perform different stages of the processing pipeline on the best cluster. Need a dedicated high-memory cluster for in-memory analytics? Or want to take advantage of an elastic scale-out on a cheaper cloud environment? Got a legacy application that’s locked to a specific version of Hadoop? WANdisco Fusion has the connections to make it happen. And unlike batch data transfer tools, WANdisco Fusion provides fully consistent data that can be read and written from any site.
-
Put away the emergency pager. If you lose data on one cluster, or even an entire cluster, WANdisco Fusion has made sure that you have consistent copies of the data at other locations.
-
Set up security tiers to isolate sensitive data on secure clusters, or keep data local to its country of origin.
-
Perform risk-free migrations. Stand up a new cluster and seamlessly share data using WANdisco Fusion. Then migrate applications and users at your leisure, and retire the old cluster whenever you’re ready.
3.2. WANdisco Fusion architecture
3.2.1. Example Workflow
The following diagram presents a simplified workflow for WANdisco Fusion, which illustrates a basic use case and points to how WANdisco’s distributed coordination engine (DConE) is implemented to overcome the challenges of coordination.

-
User makes a request to create or change a file on the cluster.
-
WANdisco Fusion coordinates File Open to the external cluster.
-
File is added to underlying storage.
-
WANdisco Fusion coordinates at configurable write increments and File Close with other clusters.
-
WANdisco Fusion server at remote cluster pulls data from IHC server on source cluster.
-
WANdisco Fusion server at remote site writes data to its local cluster.
3.2.2. Guide to node types
A Primer on Paxos
Replication networks are composed of a number of nodes, each node takes on one of a number of roles:
Acceptors (A)
The Acceptors act as the gatekeepers for state change and are collected into groups called Quorums. For any proposal to be accepted, it must be sent to a Quorum of Acceptors. Any proposal received from an Acceptor node will be ignored unless it is received from each Acceptor in the Quorum.
Proposers (P)
Proposer nodes are responsible for proposing changes, via client requests, and aims to receive agreement from a majority of Acceptors.
Learners (L)
Learners handle the actual work of replication. Once a Client request has been agreed on by a Quorum the Learner may take the action, such as executing a request and sending a response to the client. Adding more learner nodes will improve availability for the processing.
Distinguished Node
It’s common for a Quorum to be a majority of participating Acceptors. However, if there’s an even number of nodes within a Quorum this introduces a problem: the possibility that a vote may tie. To handle this scenario a special type of Acceptor is available, called a Distinguished Node. This machine gets a slightly larger vote so that it can break 50/50 ties.
Nodes in Fusion
- APL
-
Acceptor - the node will vote on the order in which replicated changes will play out.
Proposer - the node will create proposals for changes that can be applied to the other nodes.
Learner - the node will receive replication traffic that will synchronize its data with other nodes. - PL
-
Proposer - the node will create proposals for changes that can be applied to the other nodes.
Learner - the node will receive replication traffic that will synchronize its data with other nodes. - Distinguished Node
-
Acceptor - the distinguished node is used in situations where there is an even number of nodes, a configuration that introduces the risk of a tied vote. The Distinguished Node’s bigger vote ensures that it is not possible for a vote to become tied.
3.2.3. Zones
A Zone represents the file system used in a standalone Hadoop cluster. Multiple Zones could be from separate clusters in the same data center, or could be from distinct clusters operating in geographically-separate data centers that span the globe. WANdisco Fusion operates as a distributed collection of servers. While each WANdisco Fusion server always belongs to only one Zone, a Zone can have multiple WANdisco Fusion servers (for load balancing and high availability). When you install WANdisco Fusion, you should create a Zone for each cluster’s file system.
3.2.4. Memberships
WANdisco Fusion is built on WANdisco’s patented DConE active-active replication technology. DConE sets a requirement that all replicating nodes that synchronize data with each other are joined in a "membership". Memberships are coordinated groups of nodes where each node takes on a particular role in the replication system.
In versions of WANdisco Fusion prior to 2.11, memberships were manually created using the UI. Now all required combinations of zones are automatically created, making the creation of Replication Rules simpler. You can however still interact with memberships if needed through the API.
Creating resilient Memberships
WANdisco Fusion is able to maintain HDFS replication even after the loss of WANdisco Fusion nodes from a cluster. However, there are some configuration rules that are worth considering:
Rule 1: Understand Learners and Acceptors
The unique Active-Active replication technology used by WANdisco Fusion is an evolution of the Paxos algorithm, as such we use some Paxos concepts which are useful to understand:
-
Learners:
Learners are the WANdisco Fusion nodes that are involved in the actual replication of Namespace data. When changes are made to HDFS metadata these nodes raise a proposal for the changes to be made on all the other copies of the filesystem space on the other data centers running WANdisco Fusion within the membership.
Learner nodes are required for the actual storage and replication of hdfs data. You need a learner node where ever you need to store a copy of the shared hdfs data.
-
Acceptors:
All changes being made in the replicated space at each data center must be made in exactly the same order. This is a crucial requirement for maintaining synchronization. Acceptors are nodes that take part in the vote for the order in which proposals are played out.
Acceptor Nodes are required for keeping replication going. You need enough Acceptors to ensure that agreement over proposal ordering can always be met, even after accounting for possible node loss. For configurations where there are a an even number of Acceptors it is possible that voting could become tied. For this reason it is possible to make an Acceptor node into a tie-breaker which has slightly more voting power so that it can outvote another single Acceptor node.
Rule 2: Replication groups should have a minimum membership of three learner nodes
Two-node clusters (running two WANdisco Fusion servers) are not fault tolerant, you should strive to replicate according to the following guideline:
-
The number of learner nodes required to survive population loss of N nodes = 2N+1
where N is your number of nodes.So in order to survive the loss of a single WANdisco Fusion server equipped datacenter you need to have a minimum of 2x1+1= 3 nodes
In order to keep on replicating after losing a second node you need 5 nodes.
Rule 3: Learner Population - resilience vs rightness
-
During the installation of each of your nodes you may configure the Content Node Count number, this is the number of other learner nodes in the replication group that need to receive the content for a proposal before the proposal can be submitted for agreement.
Setting this number to 1 ensures that replication won’t halt if some nodes are behind and have not received replicated content yet. This strategy reduces the chance that a temporary outage or heavily loaded node will stop replication, however, it also increases the risk that namenode data will go out of sync (requiring admin-intervention) in the event of an outage.
Rule 4: 2 nodes per site provides resilience and performance benefits
Running with two nodes per site provides two important advantages.
-
Firstly it provides every site with a local hot-backup of the namenode data.
-
Enables a site to load-balance namenode access between the nodes which can improve performance during times of heavy usage.
-
Providing the nodes are Acceptors, it increases the population of nodes that can form agreement and improves resilience for replication.
3.2.5. Replication Frequently Asked Questions
What stops a file replication between zones from failing if an operation such as a file name change is done on a file that is still transferring to another zone?
Operations, such as a rename only affects metadata, so long as the file’s underlying data isn’t changed, the operation to transfer the file will complete. Only then will the rename operation play out. When you start reading a file for the first time you acquire all the block locations necessary to fulfill the read, at this point metadata changes won’t halt the transfer of the file to another zone.
3.2.6. Agreement recovery in WANdisco Fusion
This section explains why when monitoring replication recovery, it may be possible to see a brief delay and seemingly out-of-order delivery of proposals at the catching-up node.
In the event that the WAN link between clusters is temporarily dropped, it may be noticed that when the link returns, there’s a brief delay before the reconnected zones are back in sync and it may appear that recovery is happening with agreements being made out of order, in terms of the global sequence numbers (GSNs) associated with each agreement.
This behaviour can be explained as follows:
-
The "non-writer" nodes review the GSNs to determine which agreements the current writer has processed and which agreements they can remove from their own store, where they are kept in case the writer node fails and they have to take over.
-
When a new writer is elected, the presence/absence of a particular GSN tells the new writer which agreements can be skipped. There may be gaps in this sequence as not all proposals are filesystem operations. For example, writer and leader election proposals are not filesystem operations, therefore their GSNs are not written to the underlying filesystem.
Why are proposals seemingly being delivered out-of-order?
This is related and why you will see gsn’s written "out-of-order" in the filesystem. Internally within Fusion "non-interfering" agreements are processed in parallel so we can increase throughout and the global sequence is not blocked on operations that may take a long time, such as a large file copy.
Example
Consider the following global sequence, where /repl1 is the replicated directory:
1. Copy 10TB file to /repl1/dir1/file1
2. Copy 10TB file to /repl1/dir2/file1
3. Chown /repl/dir1
Agreements 1. and 2. may be executed in parallel since they do not interfere with one-another. However, agreement 3. must wait for agreement 1 to complete before it can be applied to the filesystem. If agreement 2 completes before 1 then its gsn will be recorded before the preceding agreement and look on the surface like out-of-order delivery of GSNs.
Under the hood
DConE’s Output Proposal Sequence (OPS) delivers agreed values in strict sequence, one-at-a-time, to an application. Applying these values to the application state in the sequence delivered by the OPS ensures the state is consistent with other replicas at that point in the sequence. However, an optimization can be made: if two or more values do not interfere with one another they may be applied in parallel without adverse effects. This parallelization has several benefits, for example:
-
It may increase the rate of agreed values applied to the application state if there are many non-interfering agreements;
-
It avoids an agreement that takes a long time to complete (such as a large file transfer) from blocking later agreements that aren’t dependent on that agreement having completed.
3.2.7. Authorization and Authentication
Overview
The Fusion user interface provides an LDAP/AD connection, allowing Fusion users to be managed through a suitable Authorization Authority, such as an LDAP, Active Directory or Cloudera Manager-based system. Read more about connecting to LDAP/Active Directory.
Users can have their access to Fusion fine-tuned using assigned roles. Each Fusion user can be assigned one or more roles through the organization’s authorization authority. When the user logs into Fusion, their account’s associated roles are checked and their role with the highest priority is applied to their access.
Roles can be mapped to Fusion’s complete set of functions and features, so that user access can be as complete or as limited as your organization’s guidelines dictate. A set of roles are provided by default, you read about these in the Roles and Permissions, you can, instead, create your own user roles and limit permissions to specific Fusion functions.
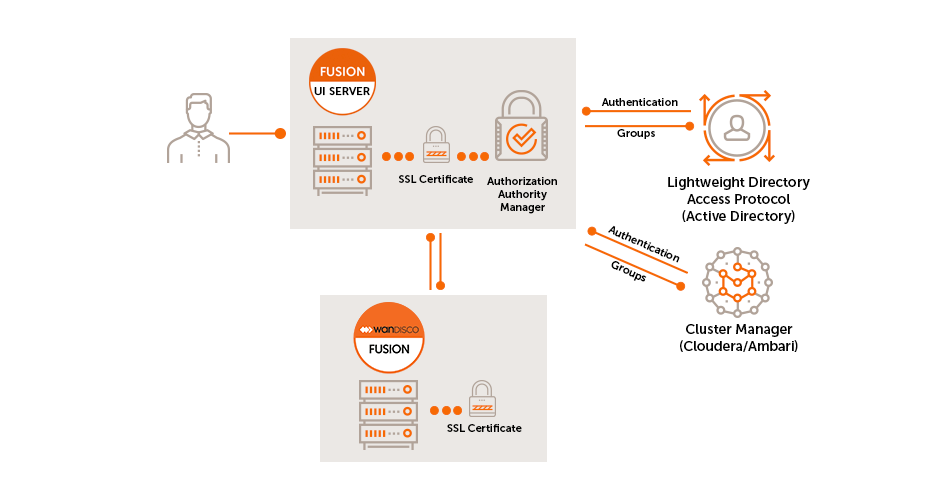
The Fusion UI server uses a _User Authorization abstraction which incorporates the following sub-systems:
Authorization Authority Manager
This component is responsible for mapping the authenticated user to one or more roles based on their presence in the "Authorization Authority".
Authorization Authority
This refers to the system that stores Authorization mapping information. This could be Active Directory, LDAP, Cloudera Manager, etc.
The Authorization Authority Manager is responsible for:
-
Managing connectivity to the authority
-
Mapping authority grouping to Fusion Roles
-
Syncing changes in user authorization
-
Invalidating sessions
| If an Authorization Authority is not connected then only the standard Fusion "admin" account will be able to access the Fusion user interface. |
Role Manager
The Role Manager defines the available user roles and maps them to sets of feature toggles.
-
Feature Toggle presents each of the UI features that a user can interact with (both read and write actions)
-
The set of Feature toggles is static and mapped into the system per release
-
The set of Features mapped to each role can be managed dynamically in the running system
-
Storage of this data will be in the underlying (replicated) file system. Thus enabling all Fusion nodes in a zone to take advantage of the same configuration
-
-
A default set of roles, each with a suitable set of mappings that match expected user types. See
API filter
Calls to Fusion’s REST APIs are guarded by a filter which checks the client calls against the roles specified and decides whether the call is authorized. The filter uses a 2 stage check:
-
Check that the supplied client token is valid and get the role(s) which it maps to
-
In the case that no token is supplied a 401 error should be returned - which should be interpreted as the need for the client to log in with their credentials and generate a token.
-
-
Check that the role for the given token is valid for the call being made (by checking against the permissions for the relevant feature).
-
If it is not valid then a 403 error should be returned.
-
3.3. Deployment models
The following deployment models illustrate some of the common use cases for running WANdisco Fusion.
3.3.1. Analytic off-loading
In a typical on-premises Hadoop cluster, data ingest, analytic jobs all run through the same infrastructure where some activities impose a load on the cluster that can impact other activities. WANdisco Fusion allows you to divide up the workflow across separate environments, which lets you isolate the overheads associated with some events. You can ingest in one environment while using a different environment where capacity is provided to run the analytic jobs. You get more control over each environment’s performance.
-
You can ingest data from anywhere and query that at scale within the environment.
-
You can ingest data on premises (or where ever the data is generated) and query it at scale in another optimized environment, such as a cloud environment with elastic scaling that can be spun up only when queries jobs are queued. In this model, you may ingest data continuously but you don’t need to run a large cluster 24-hours-per-day for queries jobs.
3.3.2. Multi-stage jobs across multiple environments
A typical Hadoop workflow might involve a series of activities, ingesting data, cleaning data and then analyzing the data in a short series of steps. You may be generating intermediate output to be run against end-stage reporting jobs that perform analytical work, running all these work streams on a single cluster could require a lot of careful coordination with different types of workloads, conducting multi-stage jobs. This is a common chain of query activities for Hadoop applications, where you might ingest raw data, refine and augment it with other information, then eventually run analytic jobs against your output on a periodic basis, for reporting purposes, or in real-time.
In a replicated environment, however, you can control where those job stages are run. You can split this activity across multiple clusters to ensure the queries jobs needed for reporting purposes will have access to the capacity necessary to ensure that they run under within SLAs. You also can run different types of clusters to make more efficient use of the overall chain of work that occurs in a multi-stage job environments. You could have a cluster running that is tweaked and tuned for most efficient ingest, while running a completely different kind of environment that is tuned for another task, such as the end-stage reporting jobs that run against processed and augmented data. Running with Live data across multiple environments allows you to run each different type of activity in the most efficient way.
3.3.3. Migration
WANdisco Fusion allows you to move both the Hive data, stored in HCFS and associated Hive metadata from an on-premises cluster over to cloud-based infrastructure. There’s no need to stop your cluster activity; the migration can happen without impact to your Hadoop operations.
3.3.4. Disaster Recovery
As data is replicated between nodes on a continuous basis, WANdisco Fusion is an ideal solution for protecting your data from loss. If a disaster occurs, there’s no complicated switchover as the data is always operational.
3.3.5. Hadoop to S3
WANdisco Fusion can be used to migrate or replicate data from a Hadoop platform to S3, or S3 compatible, storage. WANdisco’s S3 plugin provides:
-
LiveData transactional replication from the on-premise cluster to an S3 bucket
-
Consistency check of data between the Hadoop platform and the S3 bucket
-
Point-in-time batch operations to return to consistency from Hadoop to S3
-
Point-in-time batch operations to return to consistency from S3 back to Hadoop
However it does not provide any facility for LiveData transactional replication from S3 to Hadoop.
3.4. Working in the Hadoop ecosystem
This section covers the final step in setting up a WANdisco Fusion cluster, where supported Hadoop applications are plugged into WANdisco Fusion’s synchronized distributed namespace. It won’t be possible to cover all the requirements for all the third-party software covered here, we strongly recommend that you get hold of the corresponding documentation for each Hadoop application before you work through these procedures.
3.4.1. Hadoop File System Configuration
The following section explains how Fusion interacts with and replicates to your chosen file system.
| To be clear, this is actually Hadoop, not Fusion configuration. If you’re not familar with how the Hadoop File System configuration works, you may need to review your Hadoop documentation. |
There are several options available for configuring Hadoop clients to work with Fusion, with different configurations suiting different types of deployment. Configuration can be done during installation or as an in-production configuration change, through the Fusion UI, or even manually by amending a cluster’s core-site, via the Hadoop manager. This latter option can be used to make temporary configuration changes to assist in troubleshooting or as part of a maintenance or DR operation.
-
The Hadoop file system looks at either your input URI or defaultFs for a scheme, say "example".
-
It then looks for the Implementation property, i.e.,
fs.example.implto instantiate a filesystem. -
In order to instantiate Fusion, the implementation file needs to match with a compatible implementation, e.g.
fs.example.impl = hcfs. -
Fusion now uses the
fs.underlyingClassto identify the actual underlying filesystem, and therefore understand that "example" really maps to example-FileSystem.
URI (Universal Resource Identifier)
Client access to Fusion is chiefly driven by URI selection. The Hadoop URI consists of a scheme, authority, and path, with the scheme and authority, together, determining the FileSystem implementation. The default is hdfs and is referred to by fs.hdfs.impl, which points to the Java class that handles references to files under the hdfs:// prefix. This prefix is entirely arbitrary, and you could use any prefix that you want, providing that it points to an appropriate ".impl." that will handle the filesystem commands that you need.
| MapR must use WANdisco’s native "fusion:///" URI, instead of the default hdfs:///. |
Fusion (on-premises) provides 4 options for URI selection:
HDFS URI with HDFS
This option is available for deployments where the Hadoop applications support neither the WANdisco Fusion URI nor the HCFS standards. WANdisco Fusion operates entirely within HDFS.
This configuration will not allow paths with the fusion:/// uri to be used; only paths starting with hdfs:/// or no scheme that correspond to a mapped path will be replicated. The underlying file system will be an instance of the HDFS DistributedFileSystem, which will support applications that aren’t written to the HCFS specification.
Fusion URI with HCFS
This is the default option that applies if you don’t enable Advanced Options. When selected, you need to use fusion:// for all data that must be replicated over an instance of the Hadoop Compatible File System. If your deployment includes Hadoop applications that are either unable to support the Fusion URI or are not written to the HCFS specification, this option will not work.
Fusion URI with HDFS
This differs from the default in that while the WANdisco Fusion URI is used to identify data to be replicated, the replication is performed using HDFS itself. This option should be used if you are deploying applications that can support the WANdisco Fusion URI but not the Hadoop Compatible File System.
Fusion URI and HDFS URI with HDFS
This "mixed mode" supports all the replication schemes (fusion://, hdfs:// and no scheme) and uses HDFS for the underlying file system, to support applications that aren’t written to the HCFS specification.
Fusion (cloud) provides 2 options for URI selection:
fusion URI with HCFS
This differs from the default in that while the WANdisco Fusion URI is used to identify data to be replicated, the replication is performed using HDFS itself. This option should be used if you are deploying applications that can support the WANdisco Fusion URI but not the Hadoop Compatible File System.
Use this option if you are intending to limit replication to the fusion:// URI.
Platforms that must run with Fusion URI with HCFS |
Azure |
LocalFS |
OnTapLocalFs |
UmanagedBigInsights |
UnmanagedSwift |
UnmanagedGoogle |
UnmanagedS3 |
UnmanagedEMR |
MapR |
Default fs
Uses the default Filesystem. Use this option if you want everything to be replicated, using the settings of your implementation and defaultFS properties.
Examples:
-
ADL to use default fs would require fs.adl.impl instead of fs.fusion.impl
-
WASB to use default fs would require fs.wasb.impl instead of fs.fusion.impl
|
Implementation property
The impl (Implementation) property is the abstract FileSystem implementation that will be used. <property> <name>fs.<implementation-name>.impl</name> <value>valid.impl.class.for.an.hcfs.implementation</value> </property> |
DefaultFS property
Hadoop has a configuration property fs.defaultFs, that determines which scheme will be used when an application interacting with the FileSystem API doesn’t specify a file system type (e.g. just using a URI like /path/to/file.)
For example, fs.defaultFs is set to hdfs:<namenode>:<port> in an HDFS cluster, and adl://<account>.auredatalakestore.net in an HDInsight cluster using ADLS by default. The selection of defaultFs is going to be driven by your cluster’s storage file system.
fs.fusion.underlyingFs
The address of the underlying filesystem, which might be the same as the fs.defaultFS. However, in cases like EMRFS, the fs.defaultFS points to a local HDFS built on the instance storage which is temporary, with persistent data being stored in S3. In this case S3 storage is likely to be the fs.fusion.underlyingFs. There’s no default value, but it must be present.
The underlying filesystem needs a URI like hdfs://namenode:port, or adl://<Account Name>.azuredatalakestore.net/, and there needs to be a valid fs.<scheme>.impl setting in place for whatever that underlying file system is.
fs.fusion.underlyingFsClass
The name of the implementation class for the underlying file system specified with fs.fusion.underlyingFs. Fusion expects particular implementation classes to be associated with common URI schemes (e.g. S3://, hdfs://), used by Hadoop clients when accessing the file system.
org.apache.hadoop.fs.azure.NativeAzureFileSystem$Secure
would be used if
fs.fusion.underlyingFs is set to
adls://<Account Name>.azuredatalakestore.net
If you use alternative implementations classes for the scheme configured in fs.fusion.underlyingFs, you need to specify the name of the implementation for the underlying file system with this item. You also need to specify the implementation if using a URI scheme that is not one of those known to the defaults.
In turn, Fusion only gets involved if the implementation class for the file system used by an application is one of the implementations of the File System API - i.e.
com.wandisco.fs.client.FusionHcfs
or
com.wandisco.fs.client.FusionHdfs.
So if the fs.whatever.impl refers to either of those then you need to have the correct settings for fs.fusion.underlyingFs and fs.fusion.underlyingFsClass (but the latter has defaults that should work, and which are determined by the text used for the scheme.)
If you are using com.wandisco.fs.client.FusionHdfs, fs.fusion.underlyingFs must be an hdfs URI, like hdfs://<namenode>:<port>, and fs.hdfs.impl must refer to org.apache.hadoop.hdfs.DistributedFileSystem. You will need to use com.wandisco.fs.client.FusionHcfs if the underlying file system is anything other than HDFS.
3.4.2. Hive
This guide integrates WANdisco Fusion with Apache Hive, it aims to accomplish the following goals:
-
Replicate Hive table storage.
-
Use fusion URIs as store paths.
-
Use fusion URIs as load paths.
-
Share the Hive metastore between two clusters.
Prerequisites
-
Knowledge of Hive architecture.
-
Ability to modify Hadoop site configuration.
-
WANdisco Fusion installed and operating.
Replicating Hive Storage via fusion:///
The following requirements come into play if you have deployed WANdisco Fusion using with its native fusion:/// URI.
In order to store a Hive table in WANdisco Fusion you specify a WANdisco Fusion URI when creating a table. E.g. consider creating a table called log that will be stored in a replicated directory.
CREATE TABLE log(requestline string) stored as textfile location 'fusion:///repl1/hive/log';. Note: Replicating table storage without sharing the Hive metadata will create a logical discrepancy in the Hive catalog. For example, consider a case where a table is defined on one cluster and replicated on the HCFS to another cluster. A Hive user on the other cluster would need to define the table locally in order to make use of it.
|
Don’t use namespace
Make sure you don’t use the namespace name e.g. use fusion:///user/hive/log, not fusion://nameserviceA/user/hive/log.
|
Exceptions
Hive from CDH 5.3/5.4 does not work with WANdisco Fusion, (because of HIVE-9991). To get it working with CDH 5.3 and 5.4. you need to modify the default Hive file system setting. In Cloudera Manager, add the following property to hive-site.xml:
<property>
    <name>fs.defaultFS</name>
    <value>fusion:///</value>
</property>
This property should be added in 3 areas:
-
Service Wide
-
GateWay Group
-
Hiveserver2 group
Replicated directories as store paths
It’s possible to configure Hive to use WANdisco Fusion URIs as output paths for storing data, to do this you must specify a Fusion URI when writing data back to the underlying Hadoop-compatible file system (HCFS). For example, consider writing data out from a table called log to a file stored in a replicated directory:
INSERT OVERWRITE DIRECTORY 'fusion:///repl1/hive-out.csv' SELECT * FROM log;
Replicated directories as load paths
In this section we’ll describe how to configure Hive to use fusion URIs as input paths for loading data.
It is not common to load data into a Hive table from a file using the fusion URI. When loading data into Hive from files the core-site.xml setting fs.default.name must also be set to fusion, which may not be desirable. It is much more common to load data from a local file using the LOCAL keyword:
LOAD DATA LOCAL INPATH '/tmp/log.csv' INTO TABLE log;
If you do wish to use a fusion URI as a load path, you must change the fs.defaultFS setting to use WANdisco Fusion, as noted in a previous section. Then you may run:
LOAD DATA INPATH 'fusion:///repl1/log.csv' INTO TABLE log;
Sharing the Hive metastore
Advanced configuration - please contact WANdisco before attempting
In this section we’ll describe how to share the Hive metastore between two clusters.
Since WANdisco Fusion can replicate the file system that contains the Hive data storage, sharing the metadata presents a single logical view of Hive to users on both clusters.
When sharing the Hive metastore, note that Hive users on all clusters will know about all tables. If a table is not actually replicated, Hive users on other clusters will experience errors if they try to access that table.
There are two options available.
Hive metastore available read-only on other clusters
In this configuration, the Hive metastore is configured normally on one cluster. On other clusters, the metastore process points to a read-only copy of the metastore database. MySQL can be used in master-slave replication mode to provide the metastore.
Hive metastore writable on all clusters
In this configuration, the Hive metastore is writable on all clusters.
-
Configure the Hive metastore to support high availability.
-
Place the standby Hive metastore in the second data center.
-
Configure both Hive services to use the active Hive metastore.
|
Performance over WAN
Performance of Hive metastore updates may suffer if the writes are routed over the WAN.
Hive metastore replication
There are three strategies for replicating Hive metastore data with WANdisco Fusion:
|
Standard
For Cloudera CDH: See Hive Metastore High Availability.
For Hortonworks/Ambari: High Availability for Hive Metastore.
Manual Replication
In order to manually replicate metastore data ensure that the DDLs are placed on two clusters, and perform a partitions rescan.
3.4.3. Impala
Prerequisites
-
Knowledge of Impala architecture.
-
Ability to modify Hadoop site configuration.
-
WANdisco Fusion installed and operating.
Impala Parcel
If you plan to use WANdisco Fusion’s own fusion:/// URI, then you will need to use the provided parcel (see the screenshot, below for link in the Client Download section of the Settings screen):
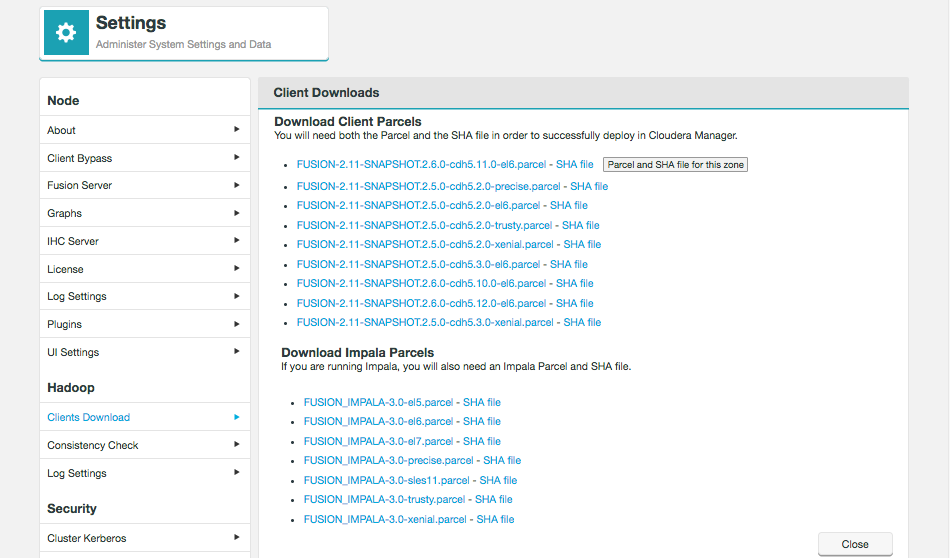
Follow the same steps described for installing the WANdisco Fusion client, downloading the parcel and SHA file, i.e.:
-
Have cluster with CDH installed with parcels and Impala.
-
Copy the
FUSION_IMPALAparcel and SHA into the local parcels repository, on the same node where Cloudera Manager Services is installed, this need not be the same location where the Cloudera Manager Server is installed. The default location is at: /opt/cloudera/parcel-repo, but is configurable. In Cloudera Manager, you can go to the Parcels Management Page → Edit Settings to find the Local Parcel Repository Path. See Parcel Locations.FUSION_IMPALA should be available to distribute and activate on the Parcels Management Page, remember to click Check for New Parcels button.
-
Once installed, restart the cluster.
-
Impala reads on Fusion files should now be available.
Setting the CLASSPATH
In order for Impala to load the Fusion Client jars, the user needs to make a small configuration change in their Impala service, through Cloudera Manager. In Cloudera Manager, the user needs to add an environment variable in the section Impala Service Environment Advanced Configuration Snippet (Safety Valve).
AUX_CLASSPATH='colon-delimited list of all the Fusion client jars'
The following command gives an example of how to do this.
echo "AUX_CLASSPATH=$((for i in /opt/cloudera/parcels/FUSION/lib/*.jar; do echo -n "${i}:"; done) | sed 's/\:$//g')"
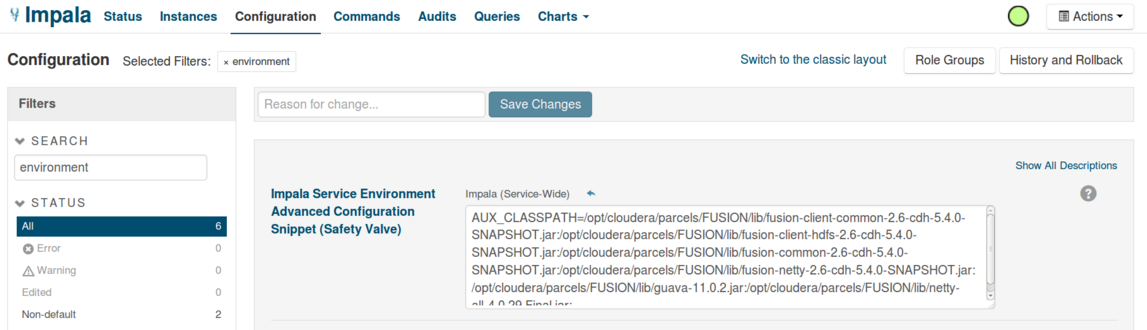
3.4.4. Presto
Presto Interoperability
Presto is an open source distributed SQL query engine for running interactive analytic queries. It can query and interact with multiple data sources, and can be extended with plugins.
Presto requires the use of Java 8 and has internal dependencies on Java library versions that may conflict with those of the Hadoop distribution with which it communicates when using the “hive-hadoop2” plugin. For example, Presto makes use of guava-21.0.jar, while HDP 2.4 uses guava-11.0.2.jar.
Presto and Fusion
WANdisco Fusion leverages a replacement client library when overriding the hdfs:// scheme for access to the cluster file system in order to coordinate that access among multiple clusters.
This replacement library is provided in a collection of jar files in the /opt/wandisco/fusion/client/lib directory for a standard installation.
These jar files need to be available to any process that accesses the file system using the com.wandisco.fs.client.FusionHdfs implementation of the Apache Hadoop FileSystem API.
Because Presto requires these classes to be available to the hive-hadoop2 plugin, they must reside in the plugin/hive-hadoop2 directory of the Presto installation.
Using the Fusion Client Library with Presto
-
Copy the JAR files in the plugin/hive-hadoop2 directory of each Presto server.
-
Restart the Presto coordinators.
It is also important to confirm that the Presto configuration includes the necessary properties to function correctly with the hive-hadoop2 plugin.
The specific values below will need to be adjusted for the actual environment, including references to the WANdisco replicated metastore, the HDP cluster configuration that includes Fusion configuration, and Kerberos-specific information to allow Presto to interoperate with a secured cluster.
connector.name=hive-hadoop2
hive.metastore.uri=thrift://presto02-vm1.test.server.com:9084
hive.config.resources=/etc/hadoop/conf/core-site.xml,/etc/hadoop/conf/hdfs-site.xml
hive.metastore.authentication.type=KERBEROS
hive.metastore.service.principal=hive/presto02-vm1.test.server.com@WANDISCO.HADOOP
hive.metastore.client.principal=presto/presto02-vm0.test.server.com@WANDISCO.HADOOP
hive.metastore.client.keytab=/etc/security/keytabs/presto.keytab
hive.hdfs.authentication.type=KERBEROS
hive.hdfs.impersonation.enabled=true
hive.hdfs.presto.principal=hdfs-presto2@WANDISCO.HADOOP
hive.hdfs.presto.keytab=/etc/security/keytabs/hdfs.headless.keytab
Keytabs and principals will need to be configured correctly, and as the hive-hadoop2 Presto plugin uses YARN for operation, the /user/yarn directory must exist and be writable by the yarn user in all clusters in which Fusion operates.
Known Issue
Presto embeds Hadoop configuration defaults into the hive-hadoop2 plugin, including a core-default.xml file that specifies the following property entry:
<property>
  <name>hadoop.security.authentication</name>
  <value>simple</value>
  <description>Possible values are simple (no authentication), and kerberos
  </description>
</property>
Although Presto allows the hive-hadoop2 plugin to use additional configuration properties by adding entries like the following in a .properties file in the etc/catalog directory:
hive.config.resources=/etc/hadoop/conf/core-site.xml,/etc/hadoop/conf/hdfs-site.xml
This entry allows extra configuration properties to be loaded from a standard Hadoop configuration file, but those entries cannot override settings that are embedded in the core-default.xml that ships with the Presto hive-hadoop2 plugin.
In a kerberized implementation the Fusion client library relies on the ability to read the hadoop.security.authentication configuration property to determine if it should perform a secure handshake with the Fusion server. Without that property defined, the client and server will fail to perform their security handshake, and Presto queries will not succeed.
Workaround
The solution to this issue is to update the core-default.xml file contained in the hive-hadoop2 plugin:
$ mkdir ~/tmp
$ cd ~/tmp
$ jar -xvf <path to…>/presto-server-0.164/plugin/hive-hadoop2/hadoop-apache2-0.10.jar
Edit the core-default.xml file to update the hadoop.security.authentication property so that its value is “kerberos”
$ Jar -uf <path to...>/presto-server-0.164/plugin/hive-hadoop2/hadoop-apache2-0.10.jar core-default.xml
Distribute the hadoop-apache2-0.10.jar to all Presto nodes, and restart the Presto coordinator.
3.4.5. Oozie
The Oozie service can function with Fusion, running without problem with Cloudera CDH. Under Hortonworks HDP you need to apply the following procedure, after completing the WANdisco Fusion installation:
-
Open a terminal to the node with root privileges.
-
If Fusion was previously installed and has now been removed, check that any dead symlinks have been removed.
cd /usr/hdp/current/oozie-server/libext
ls -l
rm [broken symlinks]
-
Create the symlinks for fusion client jars.
ln -s /opt/wandisco/fusion.client/lib/* /usr/hdp/current/oozie-server/libext
-
In Ambari, stop the Oozie Server service.
-
Open a terminal session as user oozie and run:
/usr/hdp/current/oozie-server/bin/oozie-setup.sh prepare-war
-
In Ambari, start the Oozie Server service.
It is worth noting that the new symlinks get created, but if previous symlinks have not been manually removed first, the war packaging which happens when oozie server is started will fail, causing the oozie server startup to fail.
You need to ensure old symlinks in
/usr/hdp/current/oozie-server/libextare removed before we install the new client stack.
Oozie installation changes
Something to be aware of in Hyper Scale-Out Platform (HSP) installations - when you install the client stack, the fusion-client RPM creates symlinks in /usr/hdp/current/oozie-server/libext for the client jars. However, these get left behind if the client stack/RPM are removed.
If a new version of fusion-client is installed, Oozie server will refuse to start because of the broken symlinks.
A change in behavior
Installing clients via RPM/Deb packages no longer automatically stop and repackage Oozie. If Oozie was running prior to the client installation, you will need to manually stop Oozie, then Oozie setup command -
oozie-setup.sh prepare-war
If possible, complete these actions through Ambari.
If Oozie is installed after WANdisco Fusion
In this case, the symlinks necessary for the jar archive files will not have been created. Under Ambari, using the "Refresh configs" service action on the WANdisco Fusion service should trigger re-linking and the prepare-war process.
If not installed directly via RPM/Deb packages, you should use the manual process for reinstalling the package, followed by the same steps noted above to stop and restart Oozie, using the setup script.
3.4.6. Oracle: Big Data Appliance
Each node in an Oracle:BDA deployment has multiple network interfaces, with at least one used for intra-rack communications and one used for external communications. WANdisco Fusion requires external communications so configuration using the public IP address is required instead of using host names.
Prerequisites
-
Knowledge of Oracle:BDA architecture and configuration.
-
Ability to modify Hadoop site configuration.
Required steps
-
Configure WANdisco Fusion to support Kerberos. See Setting up Kerberos
-
Configure WANdisco Fusion to work with NameNode High Availability described in Oracle’s documentation
-
Restart the cluster, WANdisco Fusion and IHC processes. See init.d management script
-
Test that replication between zones is working.
Operating in a multi-homed environment
Oracle:BDA is built on top of Cloudera’s Hadoop and requires some extra steps to support multi-homed network environment.
Running Fusion with Oracle BDA 4.2 / CDH 5.5.1
There’s a known issue concerning configuration and the Cloudera Navigator Metadata Server classpath.
Error message:
2016-04-19 08:50:31,434 ERROR com.cloudera.nav.hdfs.extractor.HdfsExtractorShim [CDHExecutor-0-CDHUrlClassLoader@3bd4729d]: Internal Error while extracting
java.lang.RuntimeException: java.lang.ClassNotFoundException: Class com.wandisco.fs.client.FusionHdfs not found
        at org.apache.hadoop.conf.Configuration.getClass(Configuration.java:2199)
There’s no clear way to override the fs.hdfs.impl setting just for the Navigator Metadata server, as is required for running with WANdisco Fusion.
Fix Script
Use the following fix script to overcome the problem:
CLIENT_JARS=$(for i in $(ls -1 /opt/cloudera/parcels/CDH/lib/hadoop/client/*.jar  | grep -v jsr305 | awk '{print $NF}' ) ; do echo -n $i: ; done)
NAVIGATOR_EXTRA_CLASSPATH=/opt/wandisco/fusion/client/lib/*:/opt/cloudera/parcels/CDH/lib/hadoop/lib/jetty-*.jar:$CLIENT_JARS
echo "NAVIGATOR_EXTRA_CLASSPATH=$NAVIGATOR_EXTRA_CLASSPATH" > ~/navigator_env.txt
The environment variables are provided here - navigator_env.txt
You need to put this in the configuration for the Cloudera Management Service under "Navigator Metadata Server Environment Advanced Configuration Snippet (Safety Valve)". This modification needs to be done any time the Cloudera version is changed (upgrade or downgrade).
3.4.7. Apache Livy
There’s an issue with running Apache Livy. As a Spark1 application, it does not use the standard Hadoop classpath, but also does not use the Spark Assembly. Livy may fail to start with FusionHdfs class not found.
Based on the current active version of HDP/Livy, you can resolve this with the following symlink.
ln -s /opt/wandisco/fusion/client/lib/* /usr/hdp/current/livy-server/jars/
3.4.8. Apache Tez
Apache Tez is a YARN application framework that supports high performance data processing through DAGs. When set up, Tez uses its own tez.tar.gz containing the dependencies and libraries that it needs to run DAGs.
Tez with Hive
In order to make Hive with Tez work, you need to append the Fusion jar files in tez.cluster.additional.classpath.prefix under the Advanced tez-site section:
tez.cluster.additional.classpath.prefix = /opt/wandisco/fusion/client/lib/*
e.g. WANdisco Fusion tree
Running Hortonworks Data Platform, the tez.lib.uris parameter defaults to /hdp/apps/${hdp.version}/tez/tez.tar.gz. So, to add Fusion libs, there are three options.
| Fusion installer users Option 1 |
Option 1: Delete the tez.lib.uris path, e.g. "/hdp/apps/${hdp.version}/tez/tez.tar.gz". Instead, use a list including the path where the tez.tar.gz file will unpack, and the path where Fusion libs are located.

Option 2: Or unpack tez.tar.gz, repack with WANdisco Fusion libs and re-upload to HDFS.
Option 3:
Alternatively, you may set the tez.lib.uris property with the path to the WANdisco Fusion client jar files, e.g.
<property>
  <name>tez.lib.uris</name>
# Location of the Tez jars and their dependencies.
# Tez applications download required jar files from this location, so it should be public accessible.
  <value>${fs.default.name}/apps/tez/,${fs.default.name}/apps/tez/lib/</value>
</property>
| All these methods are vulnerable to a platform (HDP) upgrade. |
3.4.9. Tez / Hive2 with LLAP
The following configuration changes are needed when running Tez with Low Latency Analytical Processing functionality.
Tez Overview
You can read about the results of testing Hive2 with LLAP - Low Latency Analytical Processing, using Apache Slider to run Tez Application Masters on YARN. Inevitably, running a Tez query through this interface results in a FusionHDFS class not found.
The following steps show an example remedy, through the bundling of the client jars into the tez.lib.uris tar.gz.
|
Verified on HDP 2.6.2
The following example is tested on HDP 2.6.2. The procedure may alter on different platforms.
|
-
First, extract existing Tez library to a local directory.
# mkdir /tmp/tezdir
# cd /tmp/tezdir
# cp /usr/hdp/2.6*/tez_hive2/lib/tez.tar.gz .
# tar xvzf tez.tar.gz
-
Add the Fusion client jars to the same extracted location.
# cp /opt/wandisco/fusion/client/lib/* .
-
Re-package the Tez library including the Fusion jars.
# tar cvzf tez.tar.gz *
-
Upload the enlarged Tez library to HDFS (taking a backup of original).
# hdfs dfs -cp /hdp/apps/<your-hdp-version>/tez_hive2/tez.tar.gz /user/<username>/tez.tar.gz.pre-WANdisco
# hdfs dfs -put -f tez.tar.gz /hdp/apps/<your-hdp-version>/tez_hive2/
Note The <your-hdp-version> component of the path name needs to match the point release of HDP you are using. This should be in the form 2.major.minor.release-build id e.g.
/hdp/apps/2.6.3.0-235/tez_hive2 -
Restart LLAP service through Ambari.
3.4.10. Apache Ranger
Apache Ranger is another centralized security console for Hadoop clusters, a preferred solution for Hortonworks HDP (whereas Cloudera prefers Apache Sentry). While Apache Sentry stores its policy file in HDFS, Ranger uses its own local MySQL database, which introduces concerns over non-replicated security policies.
Ranger also applies its policies to the ecosystem via java plugins into the ecosystem components - the namenode, hiveserver etc. In testing, the WANdisco Fusion client has not experienced any problems communicating with Apache Ranger-enabled platforms (Ranger+HDFS).
3.4.11. Apache Kafka
Apache Kafka is a distributed publish-subscribe messaging system. Now part of the Apache project, Kafka is fast, scalable and by its nature, distributed, either across multiple servers, clusters or even data centers. See Apache Kafka.
|
Known problem
When Ranger auditing is enabled for Kafka, the audit logging data spools on local disk because the write to HDFS fails. The failure is caused by a "no class found" issue with the Fusion client. A typical error message if you added the Fusion client jars location to the CLASSPATH:
|
java.lang.ClassCastException: com.wandisco.fs.client.FusionHdfs cannot be cast to org.apache.hadoop.fs.FileSystem error.
workaround
In order to override the fs.hdfs.impl configuration in core-site.xml, all that we need to do is to add a custom property in Custom ranger-kafka-audit under Kafka Config in Ambari.
-
Ambari → Kafka → Configs
-
Expand Custom ranger-kafka-audit
-
Add the following property:
xasecure.audit.destination.hdfs.config.fs.hdfs.impl=org.apache.hadoop.hdfs.DistributedFileSystem
-
Save the changes.
3.4.12. Solr
Apache Solr is a scalable search engine that can be used with HDFS.
In this section we cover what you need to do for Solr to work with a WANdisco Fusion deployment.
Note: Solr only comes with CDH and IOP 4.2 and greater.
For information on how to use Solr with HDP, read the Knowledge base article Solr support for HDP distributions.
Minimal deployment using the default hdfs:// URI
Getting set up with the default URI is simple, Solr just needs to be able to find the fusion client jar files that contain the FusionHdfs class.
-
Copy the Fusion/Netty jars into the classpath. Please follow these steps on all deployed Solr servers. For CDH5.4 with parcels, use these two commands:
cp /opt/cloudera/parcels/FUSION/lib/fusion* /opt/cloudera/parcels/CDH/lib/solr/webapps/solr/WEB-INF/lib
cp /opt/cloudera/parcels/FUSION/lib/netty-all-*.Final.jar /opt/cloudera/parcels/CDH/lib/solr/webapps/solr/WEB-INF/lib
cp /opt/cloudera/parcels/FUSION/lib/wd-guava-15.0.jar /opt/cloudera/parcels/CDH/lib/solr/webapps/solr/WEB-INF/lib
cp /opt/cloudera/parcels/FUSION/lib/bcprov-jdk15on-1.54.jar /opt/cloudera/parcels/CDH/lib/solr/webapps/solr/WEB-INF/lib
-
Restart all Solr Servers.
-
Solr is now successfully configured to work with WANdisco Fusion.
Minimal deployment using the WANdisco "fusion://" URI
This is a minimal working solution with Solr on top of fusion.
Requirements
Solr will use a shared replicated directory.
-
Symlink the WANdisco Fusion jars into Solr webapp.
cd /opt/cloudera/parcels/CDH/lib/solr/webapps/solr/WEB-INF/lib
ln -s /opt/cloudera/parcels/FUSION/lib/fusion* .
ln -s /opt/cloudera/parcels/FUSION/lib/netty-all-4* .
ln -s /opt/cloudera/parcels/FUSION/lib/bcprov-jdk15on-1.52 .
-
Restart Solr.
-
Create instance configuration.
$ solrctl instancedir --generate conf1
-
Edit conf1/conf/solrconfig.xml and replace
solr.hdfs.homein directoryFactory definition with actual fusion:/// uri, like fusion:///repl1/solr -
Create solr directory and set solr:solr permissions on it.
$ sudo -u hdfs hdfs dfs -mkdir fusion:///repl1/solr
$ sudo -u hdfs hdfs dfs -chown solr:solr fusion:///repl1/solr
-
Upload configuration to zk.
$ solrctl instancedir --create conf1 conf1
-
Create collection on first cluster.
$ solrctl collection --create col1 -c conf1 -s 3
|
Tip
For cloudera, fs.hdfs.impl.disable.cache = true should be set for Solr servers. (don’t set this options cluster-wide, that will stall the WANdisco Fusion server with an unbounded number of client connections).
|
3.4.13. Flume
This set of instructions will set up Flume to ingest data via the fusion:///` URI.
Edit the configuration, set "agent.sources.flumeSource.command" to the path of the source data.
Set “agent.sinks.flumeHDFS.hdfs.path” to the replicated directory of one of the DCs. Make sure it begins with fusion:/// to push the files to Fusion and not hdfs.
Prerequisites
-
Create a user in both the clusters
'useradd -G hadoop <username>' -
Create user directory in hadoop fs
'hadoop fs -mkdir /user/<username>' -
Create replication directory in both DC’s
'hadoop fs -mkdir /fus-repl' -
Set permission to replication directory
'hadoop fs -chown username:hadoop /fus-repl' -
Install and configure WANdisco Fusion.
Setting up Flume through Cloudera Manager
If you want to set up Flume through Cloudera Manager follow these steps:
-
Download the client in the form of a parcel and the parcel.sha through the UI.
-
Put the parcel and .sha into /opt/cloudera/parcel-repo on the Cloudera Managed node.
-
Go to the UI on the Cloudera Manager node. On the main page, click the small button that looks like a gift wrapped. box and the FUSION parcel should appear (if it doesn’t, try clicking Check for new parcels and wait a moment).
-
Install, distribute, and activate the parcel.
-
Repeat steps 1-4 for the second zone.
-
Make sure replicated rules are created for sharing between Zones.
-
Go onto Cloudera Manager’s UI on one of the zones and click Add Service.
-
Select the Flume Service. Install the service on any of the nodes.
-
Once installed, go to Flume→Configurations.
-
Set 'System User' to 'hdfs'
-
Set 'Agent Name' to 'agent'
-
Set 'Configuration File' to the contents of the flume.conf configuration.
-
Restart Flume Service.
-
Selected data should now be in Zone1 and replicated in Zone2
-
To check data was replicated, open a terminal onto one of the DCs and become
hdfsuser, e.g.su hdfs, and run.hadoop fs -ls /repl1/flume_out"
-
On both Zones, there should be the same FlumeData file with a long number. This file will contain the contents of the source(s) you chose in your configuration file.
3.4.14. Spark1
It’s possible to deploy WANdisco Fusion with Apache’s high-speed data processing engine. Note that prior to version 2.9.1 you needed to manually add the SPARK_CLASSPATH.
Spark with CDH
There is a known issue where Spark is not picking up hive-site.xml, So that Hadoop configuration is not localised when submitting job in yarn-cluster mode (Fixed in version Spark 1.4).
You need to manually add it in by either:
-
Copy /etc/hive/conf/hive-site.xml into /etc/spark/conf.
or -
Do one of the following, depending on which deployment mode you are running in:
- Client
-
set HADOOP_CONF_DIR to /etc/hive/conf/ (or the directory where hive-site.xml is located).
- Cluster
-
add --files=/etc/hive/conf/hive-site.xml (or the path for hive-site.xml) to the spark-submit script.
-
Deploy configs and restart services.
|
Using the FusionUri
The fusion:/// URI has a known issue where it complains about "Wrong fs". For now Spark is only verified with FusionHdfs going through the hdfs:/// URI.
|
Fusion Spark Interoperability
Spark applications are run on a cluster as independent sets of processes, coordinated by the SparkContext object in the driver program. To run on a cluster, the SparkContext can connect to several types of cluster managers (either Spark’s own standalone cluster manager, Mesos or YARN), which allocate resources across applications. Once connected, Spark acquires executors on nodes in the cluster, which are processes that run computations and store data for your application. Next, it sends your application code (defined by JAR or Python files passed to SparkContext) to the executors. Finally, SparkContext sends tasks to the executors to run.

Spark and Fusion
WANdisco Fusion uses a replacement client library when overriding the hdfs:// scheme for access to the cluster file system in order to coordinate that access among multiple clusters. This replacement library is provided in a collection of jar files in the /opt/wandisco/fusion/client/lib directory for a standard installation. These jar files need to be available to any process that accesses the file system using the com.wandisco.fs.client.FusionHdfs implementation of the Apache Hadoop File System API.
Because Spark does not provide a configurable mechanism for making the Fusion classes available to the Spark history server, the Spark Executor or Spark Driver programs, WANdisco Fusion client library classes need to be made available in the existing Spark assembly jar that holds the classes used by these Spark components. This requires updating that assembly jar to incorporate the Fusion client library classes.
Updating the Spark Assembly JAR
This is one of a number of methods that may be employed to provide Fusion-Spark integration. We hope to cover some alternate methods at a later date.
Hortonworks HDP
-
First, make a backup of the original Spark assembly jar:
$ cp /usr/hdp/<version>/spark/lib/spark-assembly-<version>-hadoop<version>.jar /usr/hdp/<version>/spark/lib/spark-assembly-<version>-hadoop<version>.jar.original
Then follow this process to update the Spark assembly jar.
$ mkdir /tmp/spark_assembly
$ cd /tmp/spark_assembly
$ jar -xf /opt/wandisco/fusion/client/lib/bcprov-jdk15on-<version>.jar
$ jar -xf /opt/wandisco/fusion/client/lib/fusion-adk-client-<fusion-version>-hdp-<version>.jar
$ jar -xf /opt/wandisco/fusion/client/lib/fusion-adk-common-<fusion-version>.jar
$ jar -xf /opt/wandisco/fusion/client/lib/fusion-adk-netty-<fusion-version>.jar
$ jar -xf /opt/wandisco/fusion/client/lib/fusion-adk-security-<fusion-version>.jar
$ jar -xf /opt/wandisco/fusion/client/lib/fusion-client-common-<fusion-version>-hdp-<version>.jar
$ jar -xf /opt/wandisco/fusion/client/lib/fusion-client-hdfs-<fusion-version>-hdp-<version>.jar
$ jar -xf /opt/wandisco/fusion/client/lib/fusion-common-<fusion-version>-hdp-<version>.jar
$ jar -xf /opt/wandisco/fusion/client/lib/wd-guava-<version>.jar
$ jar -xf /opt/wandisco/fusion/client/lib/wd-netty-all-<version>.Final.jar

jar -uf /usr/hdp/<version>/spark/lib/spark-assembly-<version>-hadoop<version>.jar com/** org/** META-INF/**
-
You now have both the original Spark assembly jar (with the extension “.original”) and a version with the Fusion client libraries available in it. The updated version needs to be made available on each node in the cluster in the /usr/hdp/<version>/spark/lib directory.
-
If you need to revert to the original Spark assembly jar, simply copy it back in place on each node in the cluster.
Cloudera CDH
The procedure for Cloudera CDH is much the same as the one for HDP, provided above. Note that path differences:
-
First, make a backup of the original Spark assembly jar:
$ cp /opt/cloudera/parcels/CDH-<version>.cdh<version>/jars/spark-assembly-<version>-cdh<version>-hadoop<version>-cdh<version>.jar /opt/cloudera/parcels/CDH-<version>.cdh<version>/jars/spark-assembly-<version>-cdh<version>-hadoop<version>-cdh<version>.jar.original
Then follow this process to update the Spark assembly jar.
$ mkdir /tmp/spark_assembly
$ cd /tmp/spark_assembly
jar -xf /opt/cloudera/parcels/FUSION-<fusion-version>-cdh<version>/lib/bcprov-jdk15on-1.54.jar
jar -xf /opt/cloudera/parcels/FUSION-<fusion-version>-cdh<version>/lib
jar -xf /opt/cloudera/parcels/FUSION-<fusion-version>-cdh<version>/lib/fusion-adk-client-<fusion-version>-cdh-<version>.jar /
jar -xf /opt/cloudera/parcels/FUSION-<fusion-version>-cdh<version>/lib/fusion-adk-common-<fusion-version>.jar
jar -xf /opt/cloudera/parcels/FUSION-<fusion-version>-cdh<version>/lib/fusion-adk-security-<fusion-version>.jar
jar -xf /opt/cloudera/parcels/FUSION-<fusion-version>-cdh<version>/lib/fusion-adk-netty-<fusion-version>.jar
jar -xf /opt/cloudera/parcels/FUSION-<fusion-version>-cdh<version>/lib
jar -xf /opt/cloudera/parcels/FUSION-<fusion-version>-cdh<version>/lib/
jar -xf /opt/cloudera/parcels/FUSION-<fusion-version>-cdh<version>/lib/fusion-common-<fusion-version>-cdh-<version>.jar
jar -xf /opt/cloudera/parcels/FUSION-<fusion-version>-cdh<version>/lib/fusion-client-hdfs-<fusion-version>-cdh-<version>.jar
jar -xf /opt/cloudera/parcels/FUSION-<fusion-version>-cdh<version>/lib/fusion-client-common-<fusion-version>-cdh-<version>.jar
jar -xf /opt/cloudera/parcels/FUSION-<fusion-version>-cdh<version>/lib/wd-guava-<version>.jar
jar -xf /opt/cloudera/parcels/FUSION-<fusion-version>-cdh<version>/lib/wd-netty-all-<version>.Final.jar

jar -uf /opt/cloudera/parcels/CDH-<version>.cdh<version>/jars/spark-assembly-<version>-cdh<version>-hadoop<version>-cdh<version>.jar com/** org/** META-INF/**
-
You now have both the original Spark assembly jar (with the extension “.original”) and a version with the Fusion client libraries available in it. The updated version needs to be made available on each node in the cluster in the /opt/cloudera/parcels/CDH-5.9.1-1.cdh5.9.1.p0.4/jars/ directory.
-
If you need to revert to the original Spark assembly jar, simply copy it back in place on each node in the cluster.
Spark Assembly Upgrade
The following example covers how you may upgrade the Spark Assembly as part of a Fusion upgrade. This example uses CDH 5.11, although it can be applied generically:
# Create staging path for client and spark assembly
mkdir -p /tmp/spark_assembly/assembly
# Copy existing Spark assembly to work on
cp /opt/cloudera/parcels/CDH/jars/spark-assembly-*.jar /tmp/spark_assembly/assembly/
# Collect file list for purging, sanitise the list as follows
# * List jar files. Do not list symlinks
# * Exclude directory entries which end with a '/'
# * Sort the list
# * Ensure output is unique
# * Store in file
find /opt/cloudera/parcels/FUSION/lib -name '*.jar' -type f -exec jar tf {} \; | grep -Ev '/$' | sort | uniq > /tmp/spark_assembly/old_client_classes.txt
# Purge assembly copy
xargs zip -d /tmp/spark_assembly/assembly/spark-assembly-*.jar < /tmp/spark_assembly/old_client_classes.txt
The resulting spark-assembly is now purged and requires one of two actions:
-
If WANdisco Fusion is being removed, distribute the new assembly to all hosts.
-
If Fusion is being upgraded, retain this jar for the moment and use it within the assembly packaging process for the new client.
3.4.15. Spark 2
Spark 2 comes with significant performance improvements at the cost of incompatibility with Spark (1). The installation of Spark 2 is more straight forward but there is one known issue concerning the need to restart the Spark 2 service during a silent installation. Without a restart, configuration changes will not be picked up.
Manual symlink
If Spark 2 is installed after WANdisco Fusion you will need to manually symlink the WANdisco Fusion client libraries.
For HDP, create the 3 symlinks as follows:
ln -s /opt/wandisco/fusion/client/lib/* /usr/hdp/current/spark2-client/jars
ln -s /opt/wandisco/fusion/client/lib/* /usr/hdp/current/spark2-historyserver/jars
ln -s /opt/wandisco/fusion/client/lib/* /usr/hdp/current/spark2-thriftserver/jars
Cloudera will automatically handle the creation of symlinks for managed clusters. However if you are using unmanaged clusters you will need to create the symlinks using the following command:
ln -s /opt/wandisco/fusion/client/lib/* /opt/cloudera/parcels/SPARK2/lib/spark2/jars/
3.4.16. HBase (Cold Back-up mode)
It’s possible to run HBase in a cold-back-up mode across multiple data centers using WANdisco Fusion, so that in the event of the active HBase node going down, you can bring up the HBase cluster in another data centre, etc. However, there will be unavoidable and considerable inconsistency between the lost node and the awakened replica. The following procedure should make it possible to overcome corruption problems enough to start running HBase again, however, since the damage dealt to underlying filesystem might be arbitrary, it’s impossible to account for all possible corruptions.
Requirements
For HBase to run with WANdisco Fusion, the following directories need to be created and permissioned, as shown below:
platform |
path |
|---|---|
permission |
CDH5.x |
/user/hbase |
hbase:hbase |
HDP2.x |
/hbase
/user/hbase |
|
Known problem: permissions error blocks HBase repair.
Error example: 2016-09-22 17:14:43,617 WARN [main] util.HBaseFsck: Got AccessControlException when preCheckPermission
org.apache.hadoop.security.AccessControlException: Permission denied: action=WRITE path=hdfs://supp16-vm0.supp:8020/apps/hbase/data/.fusion user=hbase
at org.apache.hadoop.hbase.util.FSUtils.checkAccess(FSUtils.java:1685)
at org.apache.hadoop.hbase.util.HBaseFsck.preCheckPermission(HBaseFsck.java:1606)
at org.apache.hadoop.hbase.util.HBaseFsck.exec(HBaseFsck.java:4223)
at org.apache.hadoop.hbase.util.HBaseFsck$HBaseFsckTool.run(HBaseFsck.java:4063)
at org.apache.hadoop.util.ToolRunner.run(ToolRunner.java:70)
at org.apache.hadoop.util.ToolRunner.run(ToolRunner.java:84)
You can configure the root path for all .fusion directories associated with Deterministic State Machines (DSMs). Customizable DSM token directories
These can be set in the respective configurations to change the location of the .fusion directory. It is important to note that the configuration and same path must be added to all fusion servers in all zones if used. |
Procedure
The steps below provide a method of handling a recovery using a cold back-up. Note that multiple HMaster/region servers restarts might be needed for certain steps, since hbck command generally requires master to be up, which may require fixing filesystem-level inconsistencies first.
-
Delete all recovered.edits directory artifacts from possible log splitting for each table/region. This might not be strictly necessary, but could reduce the numbers of errors observed during startup.
hdfs dfs -rm /apps/hbase/data/data/default/TestTable/8fdee4924ac36e3f3fa430a68b403889/recovered.edits
-
Detect and clean up (quarantine) all corrupted HFiles in all tables (including system tables - hbase:meta and hbase:namespace). Sideline option forces hbck to move corrupted HFiles to a special .corrupted directory, which could be examined/cleanup up by admins:
hbase hbck -checkCorruptHFiles -sidelineCorruptHFiles
-
Attempt to rebuild corrupted table descriptors based on filesystem information:
hbase hbck -fixTableOrphans
-
General recovery step - try to fix assignments, possible region overlaps and region holes in HDFS - just in case:
hbase hbck -repair
-
Clean up ZK. This is particularly necessary if hbase:meta or hbase:namespace were messed up (note that exact name of ZK znode is set by cluster admin).
hbase zkcli rmr /hbase-unsecure
Final step to correct metadata-related errors.
hbase hbck -metaonly
hbase hbck -fixMeta
3.4.17. Apache Phoenix
The Phoenix Query Server provides an alternative means for interaction with Phoenix and HBase. When WANdisco Fusion is installed, the Phoenix query server may fail to start. The following workaround will get it running with Fusion.
-
Open up phoenix_utils.py, comment out.
#phoenix_class_path = os.getenv('PHOENIX_LIB_DIR','')and set WANdisco Fusion’s classpath instead (using the client jar file as a colon separated string). e.g.
def setPath(): PHOENIX_CLIENT_JAR_PATTERN = "phoenix-*-client.jar" PHOENIX_THIN_CLIENT_JAR_PATTERN = "phoenix-*-thin-client.jar" PHOENIX_QUERYSERVER_JAR_PATTERN = "phoenix-server-*-runnable.jar" PHOENIX_TESTS_JAR_PATTERN = "phoenix-core-*-tests*.jar" # Backward support old env variable PHOENIX_LIB_DIR replaced by PHOENIX_CLASS_PATH global phoenix_class_path #phoenix_class_path = os.getenv('PHOENIX_LIB_DIR','') phoenix_class_path = "/opt/wandisco/fusion/client/lib/fusion-client-hdfs-2.6.7-hdp-2.3.0.jar:/opt/wandisco/fusion/client/lib/fusion-client-common-2.6.7-hdp-2.3.0.jar:/opt/wandisco/fusion/client/lib/fusion-netty-2.6.7-hdp-2.3.0.jar:/opt/wandisco/fusion/client/lib/netty-all-4.0.23.Final.jar:/opt/wandisco/fusion/client/lib/guava-11.0.2.jar:/opt/wandisco/fusion/client/lib/fusion-common-2.6.7-hdp-2.3.0.jar" if phoenix_class_path == "": phoenix_class_path = os.getenv('PHOENIX_CLASS_PATH','') -
Edit: queryserver.py, change the Java construction command to look like the one below by appending the phoenix_class_path to it within the "else" portion of java_home :
if java_home:
    java = os.path.join(java_home, 'bin', 'java')
else:
    java = 'java'

#    " -Xdebug -Xrunjdwp:transport=dt_socket,address=5005,server=y,suspend=n " + \
#    " -XX:+UnlockCommercialFeatures -XX:+FlightRecorder -XX:FlightRecorderOptions=defaultrecording=true,dumponexit=true" + \
java_cmd = '%(java)s -cp ' + hbase_config_path + os.pathsep + phoenix_utils.phoenix_queryserver_jar + os.pathsep + phoenix_utils.phoenix_class_path + \
    " -Dproc_phoenixserver" + \
    " -Dlog4j.configuration=file:" + os.path.join(phoenix_utils.current_dir, "log4j.properties") + \
    " -Dpsql.root.logger=%(root_logger)s" + \
    " -Dpsql.log.dir=%(log_dir)s" + \
    " -Dpsql.log.file=%(log_file)s" + \
    " " + opts + \
3.4.18. Running with Apache HAWQ
In order to get Hawq to work with fusion HDFS client libs there needs to be an update made to the pxf classpath. This can be done in Ambari through the "Advanced pxf-public-classpath" setting adding an entry to the client lib path:
/opt/wandisco/fusion/client/lib/*
3.4.19. Apache Slider
Apache Slider is an application that lets you deploy existing distributed applications on an Apache Hadoop YARN cluster, monitor them and make them larger or smaller as desired - even while the application is running. As these applications run within YARN containers, they are isolated from the rest of the cluster, making Slider an ideal mechanism for running applications that are otherwise incompatible with your Hadoop cluster.
WANdisco Fusion supports the use of Slider via the Slider CLI only, not the Ambari Slider View.
3.4.20. KMS / TDE Encryption and Fusion
TDE (Transparent Data Encryption) is available to enhance their data security. TDE uses Hadoop KMS (Key Management Server) and is typically done using Ranger KMS (in Hortonworks / Ambari installs) or Navigator Key Trustee (Cloudera installs).
In simple terms, a security / encryption key or EEK (encrypted encryption key) is used to encrypt the HDFS data that is physical stored to disk. This encryption occurs within the HDFS client, before the data is transported to the datanode.
The key management server (KMS) centrally holds these EEKs in an encrypted format. ACL (access control lists) defines what users/groups are permitted to do with these keys. This includes creating keys, deleting keys, rolling over (re-encrypting the EEK, not changing the EEK itself), obtaining the EEK, listing the key or keys and so on.
Data encrypted in HDFS is split into encrypted zones. This is the act of defining a path (e.g. /data/warehouse/encrypted1) and specifying which EEK is used to to protect this zone (i.e. the key used to encrypt / decrypt the data). A zone is configured with a single key, but different zones can have different keys. Not all of HDFS needs to be encrypted, only the specific zones (and all sub-directories of that zone) an admin defines are.
A user then needs to be granted appropriate ACL access to a get (specifically the "Get Metadata" and "Decrypt EEK" permissions) the EEK needed, to read / write from the zone.
WANdisco Fusion runs as a HDFS user just like any other user. As such, Fusion will need permissions in order to read / write to an encrypted zone.
Fusion may want to write metadata (consistency check, make consistent and other meta operations), tokens or other items for administrative reasons which may fall under an encrypted zone. Depending on configuration and requirements, the make consistent operation itself will be writing data thus needs access.
Additionally, KMS provides its own Proxyuser implementation which is separate to the HDFS proxyusers. Although this works in the same, defining who is permitted to impersonate another user whilst working with EEKs.
To add complication. The "hdfs" user is typically blacklisted from performing the "Decrypt EEK" function by default. The fact "hdfs" is a superuser means they wield great power in the cluster. That does not mean they are superuser in KMS. As "hdfs" is commonly the default user of choice to use to fix things in HDFS (given the simple fact it overrides permissions), it seems wise to prevent such authority to access EEKs by default. Note: Cloudera also seems to blacklist the group "supergroup" which is the group defined as the superusergroup. That is, any users added to "supergroup" become superusers, however they then also automatically get blacklisted from being able to perform EEK operations.
Configuring Fusion
To configure Fusion for access to encrypted zones, two aspects need to be considered:
-
The local user that Fusion runs as in HDFS (after kerberos auth_to_local mapping) must be able to access and decrypt EEKs.
-
Although other users will be performing the requests themselves, the Fusion server will proxy that request. As such, a proxyuser within the KMS configs for the Fusion user must also be provided.
Step-by-step guide
The following items need to be considered within KMS configuration to ensure Fusion has access:
The kms-site configuration (such as Advanced kms-site in Ambari) contains its own auth_to_local type parameter called “hadoop.kms.authentication.kerberos.name.rules”
Ensure that any auth_to_local mapping used for the Fusion principal is also contained here. This can be most easily achieved via simple copy/paste from core-site.xml.
The kms-site configuration (such as Custom kms-site in Ambari) contains proxyuser parameters such as:
hadoop.kms.proxyuser.USERNAME.hosts
hadoop.kms.proxyuser.USERNAME.groups
hadoop.kms.proxyuser.USERNAME.users
Entries should be created for the local Fusion user (after auth_to_local translation) to allow Fusion to proxy/impersonate other users requests. This could be as simple as.
hadoop.kms.proxyuser.USERNAME.hosts=fusion.node1.hostname,fusion.node2.hostname
hadoop.kms.proxyuser.USERNAME.groups=*
hadoop.kms.proxyuser.USERNAME.users =*
In the dbks-site configuration, the parameter hadoop.kms.blacklist.DECRYPT_EEK exists. Ensure this does not contain the username that Fusion uses (after auth_to_local translation).
In the KMS ACLs, such as using Ranger KMS, ensure that the Fusion user (after auth_to_local translation) has "Get Metadata" and "Decrypt EEK" permissions to keys.
This could be granted access to all keys. This will avoid a need to review rules when new keys are added. However, Fusion will only need these permissions to keys that apply to zones that fall within a replicated path. Consideration is needed here based on the user that Fusion has been configured as - either "HDFS" will need access to EEKs, OR the fusion user will need access, OR the supergroup could be given access to EEKs (it is enabled by default on Ambari but disabled on CDH), and then make the Fusion user a member of the supergroup.
Defining replicated paths
Replicated paths must be defined at or below the root of the encrypted zone.
For example, if the encrypted path is /repl1/encrypted, the replicated path/DSM can be defined as e.g.:
-
/repl1/encrypted
-
/repl1/encrypted/subdir
-
/repl1/encrypted/subdir/subdir
-
But not /repl1
This is because Hadoop carries a fixed rule that restricts file and directory renames across encryption zone boundaries. See the Hadoop website for more information. Partial Fusion service will be possible if the path is incorrectly defined, however issues will occur for example during renames or adding user directories. Problems can occur if KMS is on one zone but not another, or if both have KMS, but the encrypted boundary exists in different places.
Troubleshooting
If you do not perform the correct configuration, both local operations (as performed by a client) and/or the replicated actions may fail when the Fusion client is invoked. This should only apply to replicated paths.
So to troubleshoot:
-
Perform the same command without Fusion (use the -D "fs.hdfs.impl=org.apache.hadoop.hdfs.DistributedFileSystem" parameter if running basic HDFS CLI tests). If clients can read/write encrypted content without Fusion, this points to misconfiguration in the above.
-
Test with an encrypted but non-replicated directory through Fusion client. If this works, but the replicated directory does not, this suggests issues on the remote cluster.
-
Look in client side application/service logs for permissions issues. (This may be mapreduce, Hive, HBase Region Server logs etc). This may require debug logging being enabled temporarily.
-
Search for the path/file under investigation; you are looking for KMS ACL exceptions.
3.4.21. WebWasb
WebHDFS is the implementation of HTTP Rest API for HDFS compatible file systems. WebWasb is simply WebHDFS for the WASB file system.
WebWasb can be installed on the edge node where the ISV applications live. From the edge node, WebWasb can be accessed by referring to localhost and the port 50073.
WebWasb works off of the default file system for the cluster (a specified default container in the default storage account) specified in /etc/hadoop/conf/core-site.xml under the property fs.defaultFS. As an example, if your default storage account is named storage1 and your default container is named container1, you could create a new directory called dir1 within that container by the following WebHDFS command:
curl -i -X PUT http://localhost:50073/WebWasb/webhdfs/v1/dir1?op=MKDIRS
WebWasb commands are case sensitive, so pay specific attention to the casing of "WebWasb" and the operations should all be uppercase.
- Azure virtual network
-
With virtual network integration, Hadoop clusters can be deployed to the same virtual network as your applications so that applications can communicate with Hadoop directly. The benefits include:
-
Direct connectivity of web applications or ISV applications to the nodes of the Hadoop cluster, which enables communication to all ports via various protocols, such as HTTP or Java RPC.
-
Improved performance by not having your traffic go over multiple gateways and load-balancers.
-
Virtual network gives you the ability to process info more securely, and only provide specific endpoints to be accessed publicly.
-
3.4.22. HttpFS
HttpFS is a server that provides a REST HTTP gateway supporting all HDFS File System operations (read and write), and it is interoperable with the webhdfs REST HTTP API.
If httpFS is installed after WANdisco Fusion, then you will need to manually create the file /etc/hadoop-httpfs/tomcat-deployment/bin/setenv.sh in the HttpFS node. Then add the following script to the file avoid getting a "ClassNotFound" error.
# START_FUSION - do not remove this line, or the STOP_FUSION line
(shopt -s nullglob
if [ -d /opt/wandisco/fusion/client/lib ]; then
for jar in /opt/wandisco/fusion/client/lib/*; do
cp $jar /usr/hdp/current/hadoop-httpfs/webapps/webhdfs/WEB-INF/lib
done
fi)
# STOP_FUSION
3.4.23. ACL Replication
The ACL replication feature enables replication of ACL changes between zones. By default, ACL changes are only executed on the in the local zone. In situations where you need ACL rules to be applied across zones, enable the feature by ticking the checkbox.
-
This is a zone setting, so is enabled for the whole zone on which you enable the option.
-
Regardless of the state of this setting, a HDFS client loading FusionHdfs will submit agreements for File ACL changes in HDFS (if it is on a replicated path and not-excluded).
-
While a local zone will always execute a locally generated ACL change, it will only be executed in other zones, if the ACL Replication checkbox is ticked.
To use ACL replication the following need to be set:
-
The checkbox Enable ACL replication on the ACL Replication - Settings panel needs to be checked (it is checked by default).
-
If using the fusion:// scheme, add the property
fusion.acls.supportedto the core-site.xml and set it totrue.
4. Installation (On-premises)
This section will run through the installation of WANdisco Fusion from the initial steps where we make sure that your existing environment is compatible, through the procedure for installing the necessary components and then finally configuration.
4.1. Pre-requisites Checklist
The following prerequisites checklist applies to both the WANdisco Fusion server and for separate IHC servers. We recommend that you deploy on physical hardware rather than on a virtual platform, however, there are no reasons why you can’t deploy on a virtual environment.
During the installation, your system’s environment is checked to ensure that it will support WANdisco Fusion the environment checks are intended to catch basic compatibility issues, especially those that may appear during an early evaluation phase.
4.1.1. WANdisco server requirements
This section describes hardware requirements for deploying Hadoop using WANdisco Fusion. These are guidelines that provide a starting point for setting up data replication between your Hadoop clusters.
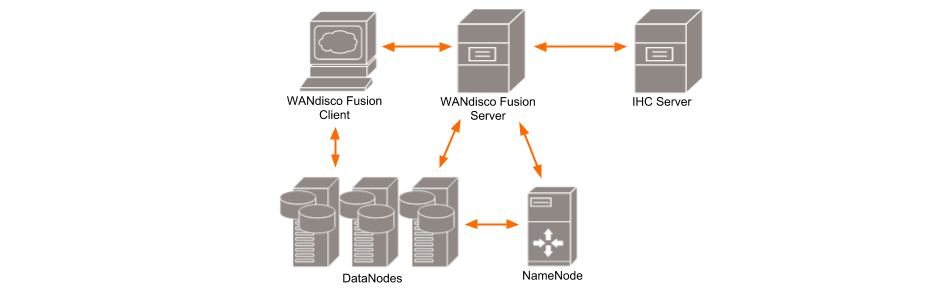
- WANdisco Fusion UI
-
A separate server that provides administrators with a browser-based management console for each WANdisco Fusion server. This can be installed on the same machine as WANdisco Fusion’s server or on a different machine within your data center.
- IHC Server
-
Inter Hadoop Communication servers handle the traffic that runs between zones or data centers that use different versions of Hadoop. IHC Servers are matched to the version of Hadoop running locally. It’s possible to deploy different numbers of IHC servers at each data center, additional IHC Servers can form part of a High Availability mechanism.
|
WANdisco Fusion servers don’t need to be collocated with IHC servers
If you deploy using the installer, both the WANdisco Fusion and IHC servers are installed into the same system by default. This configuration is made for convenience, but they can be installed on separate systems. This would be recommended if your servers don’t have the recommended amount of system memory.
|
- WANdisco Fusion Client
-
Client jar files to be installed on each Hadoop client, such as mappers and reducers that are connected to the cluster. The client is designed to have a minimal memory footprint and impact on CPU utilization.
|
WANdisco Fusion must not be collocated with HDFS servers (DataNodes, etc)
HDFS’s default block placement policy dictates that if a client is collocated on a DataNode, then that collocated DataNode will receive 1 block of whatever file is being put into HDFS from that client. This means that if the WANdisco Fusion Server (where all transfers go through) is collocated on a DataNode, then all incoming transfers will place 1 block onto that DataNode. In which case the DataNode is likely to consume lots of disk space in a transfer-heavy cluster, potentially forcing the WANdisco Fusion Server to shut down in order to keep the Prevaylers from getting corrupted.
|
4.1.2. Memory and storage
You deploy WANdisco Fusion/IHC server nodes in proportion to the data traffic between clusters; the more data traffic you need to handle, the more resources you need to put into the WANdisco Fusion server software.
If you plan to locate both the WANdisco Fusion and IHC servers on the same machine then check the collocated Server requirements:
- CPUs
-
Minimum for server deployment: 8 cores
Architecture: 64-bit only.
- System memory
-
There are no special memory requirements, except for the need to support a high throughput of data:
Type: Use ECC RAM
Size: Minimum for WANdisco Fusion server deployment: 48 GB-
WANdisco Fusion is tested using 16 GB of HEAP, which is a good starting point for a deployment.
-
System memory requirements are matched to the expected cluster size and should take into account the number of files.
-
The more RAM you have, the bigger the supported file system.
-
|
Collocation of WANdisco Fusion/IHC servers
16GB of this memory requirement is allocated to the IHC server which is nearly always installed on the WANdisco Fusion server.
|
Recommended WANdisco Fusion server deployment: 16 GB or more
- Storage space
-
Type: Hadoop operations are storage-heavy and disk-intensive so we strongly recommend that you use enterprise-class Solid State Drives (SSDs).
Size: Recommended: 1 TiB
Minimum: You need at least 250 GiB of disk space for a production environment.
- Network Connectivity
-
Minimum 1Gb Ethernet between local nodes.
WANdisco Fusion has no minimum requirement on network throughput, other than it is sized sufficiently for the expected data volumes.
4.1.3. TCP Port Allocation
Before beginning installation you must have sufficient ports reserved. Below are the default, and recommended, ports.
- WANdisco Fusion Server
-
DConE replication port: 6444
DConE port handles all coordination traffic that manages replication. It needs to be open between all WANdisco Fusion nodes. Nodes that are situated in zones that are external to the data center’s network will require unidirectional access through the firewall.
Fusion HTTP Server Port: 8082
The HTTP Server Port or Application/REST API is used by the WANdisco Fusion application for configuration and reporting, both internally and via REST API.
The port needs to be open between all WANdisco Fusion nodes and any systems or scripts that interface with WANdisco Fusion through the REST API.
Fusion HTTPS Server Port: 8084
If SSL is enabled, this port is used for application for configuration and reporting, both internally and via REST API.
The port needs to be open between all WANdisco Fusion nodes and any systems or scripts that interface with WANdisco Fusion through the REST API.
Fusion Request port: 8023
Port used by WANdisco Fusion server to communicate with HCFS/HDFS clients.
The port is generally only open to the local WANdisco Fusion server, however you must make sure that it is open to edge nodes.
Fusion Server listening port: 8024
Port used by WANdisco Fusion server to listen for connections from remote IHC servers. It is only used in unidirectional mode, but it’s always opened for listening.
Remote IHCs connect to this port if the connection can’t be made in the other direction because of a firewall.
The SSL configuration for this port is controlled by the same ihc.ssl.enabled property that is used for IHC connections performed from the other side.
See Enable SSL for WANdisco Fusion.
IHC ports: 7000-range or 9000-range
7000 range, (the exact port is determined at installation time based on what ports are available), it is used for data transfer between Fusion Server and IHC servers.
It must be accessible from all WANdisco Fusion nodes in the replicated system.
9000 range, (the exact port is determined at installation time based on available ports), it is used for an HTTP Server that exposes JMX metrics from the IHC server.
HTTP UI port: 8083
Used to access the WANdisco Fusion UI by end users (requires authentication), it’s also used for inter-UI communication.
This port should be accessible from all Fusion servers in the replicated system as well as visible to any part of the network where administrators require UI access.
HTTPS UI port: 8443
If SSL is enabled, this port is used to access the WANdisco Fusion UI by end users (requires authentication), it’s also used for inter-UI communication.
This port should be accessible from all Fusion servers in the replicated system as well as visible to any part of the network where administrators require UI access.
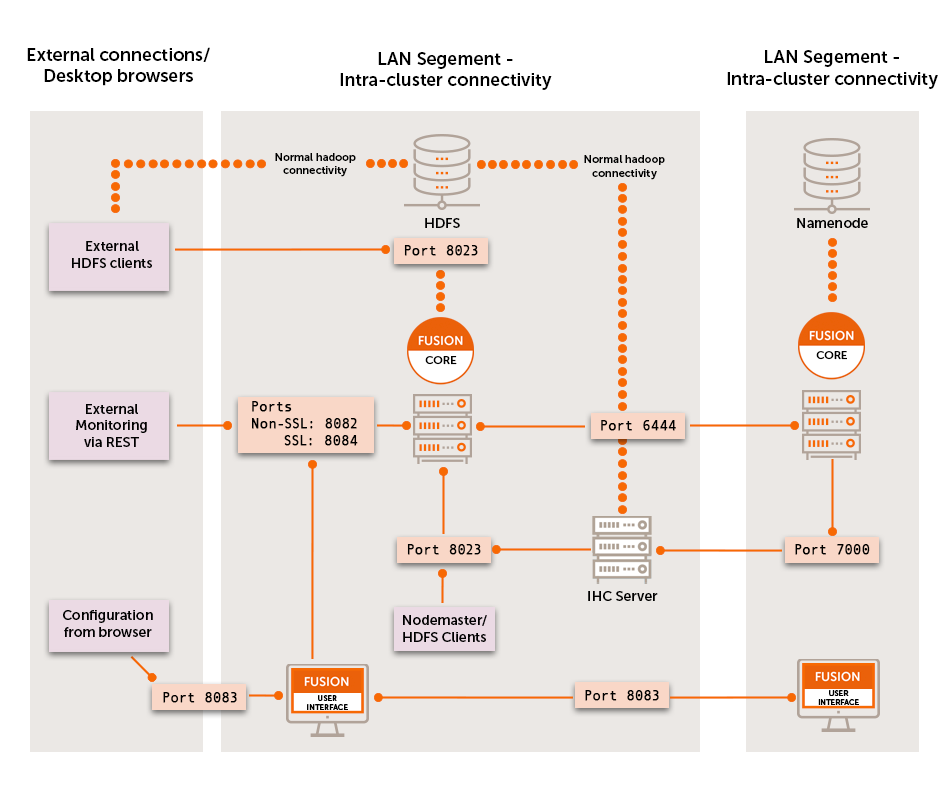
4.1.4. Software requirements
Operating systems:
Amazon Linux 2
CentOS 6 x86_64
CentOS 7 x86_64
Oracle Linux 6 x86_64
Oracle Linux 7 x86_64
RHEL 6 x86_64
RHEL 7 x86_64
SLES 11 x86_64
SLES 12 x86_64
Ubuntu 14.04LTS
Ubuntu 16.04LTS
We only support AMD64/Intel64 64-Bit (x86_64) architecture.
Web browsers
We develop and test using the following browsers:
-
Chrome 45 and later
-
Edge 12 and later
-
Firefox 40 and later
-
Safari 9 and later
Other browsers and older versions may be used but bugs may be encountered.
Java
Java JRE 1.7 / 1.8.
Testing and development are done using a minimum of Java JRE 1.7, or the minimum version for the target platform, whichever is the higher.
We have now added support for Open JDK 7, which is used in cloud deployments.
For other types of deployment we recommend running with Oracle’s Java as it has undergone more testing.
- Architecture
-
64-bit only
- Heap size
-
Set Java Heap Size of to a minimum of 1Gigabytes, or the maximum available memory on your server.
Use a fixed heap size. Give -Xminf and -Xmaxf the same value. Make this as large as your server can support.
Avoid Java defaults. Ensure that garbage collection will run in an orderly manner. Configure NewSize and MaxNewSize Use 1/10 to 1/5 of Max Heap size for JVMs larger than 4GB. Stay deterministic!
When deploying to a cluster, make sure you have exactly the same version of the Java environment on all nodes. - Where’s Java?
-
Although WANdisco Fusion only requires the Java Runtime Environment (JRE), Cloudera and Hortonworks may install the full Oracle JDK with the high strength encryption package included. This JCE package is a requirement for running Kerberized clusters.
For good measure, remove any JDK 6 that might be present in /usr/java. Make sure that /usr/java/default and /usr/java/latest point to an instance of java 7 version, your Hadoop manager should install this.Ensure that you set the
JAVA_HOMEenvironment variable for the root user on all nodes. Remember that, on some systems, invoking sudo strips environmental variables, so you may need to add the JAVA_HOME to Sudo’s list of preserved variables.
|
Due to a bug in JRE 7, you should not run javax.security.sasl.level=INFO The problem has been fixed for JDK 8 (FUS-1946). Due to a bug in JDK 8 prior to 8u60, replication throughput with SSL enabled can be extremely slow (less than 4MB/sec). This is down to an inefficient GCM implementation. Workaround |
File descriptor/Maximum number of processes limit
Maximum User Processes and Open Files limits are low by default on some systems. It is possible to check their value with the ulimit or limit command:
ulimit -u && ulimit -n
-u The maximum number of processes available to a single user.
-n The maximum number of open file descriptors.
For optimal performance, we recommend both hard and soft limits values to be set to 64000 or more:
RHEL6 and later: A file /etc/security/limits.d/90-nproc.conf explicitly overrides the settings in security.conf, i.e.:
      # Default limit for number of user's processes to prevent
      # accidental fork bombs.
      # See rhbz #432903 for reasoning.
      * soft nproc 1024 <- Increase this limit or ulimit -u will be reset to 1024
Ambari and Cloudera manager will set various ulimit entries, you must ensure hard and soft limits are set to 64000 or higher.
Check with the ulimit or limit command. If the limit is exceeded the JVM will throw an error: java.lang.OutOfMemoryError: unable to create new native thread.
Additional requirements
iptables
Use the following procedure to temporarily disable iptables, during installation:
RedHat 6
-
Turn off with
$ sudo chkconfig iptables off
-
Reboot the system.
-
On completing installation, re-enable with
$ sudo chkconfig iptables on
RedHat 7
-
Turn off with
$ sudo systemctl disable firewalld
-
Reboot the system.
-
On completing installation, re-enable with
$ sudo systemctl enable firewalld
Comment out requiretty in /etc/sudoers
The installer’s use of sudo won’t work with some linux distributions (CentOS where /etc/sudoer sets enables requiretty, where sudo can only be invoked from a logged in terminal session, not through cron or a bash script. When enabled the installer will fail with an error:
execution refused with "sorry, you must have a tty to run sudo" message
Ensure that requiretty is commented out:
# Defaults	requiretty
SSL encryption
- Basics
-
WANdisco Fusion supports SSL for any or all of the three channels of communication: Fusion Server - Fusion Server, Fusion Server - Fusion Client, and Fusion Server - IHC Server.
- keystore
-
A keystore (containing a private key / certificate chain) is used by an SSL server to encrypt the communication and create digital signatures.
- truststore
-
A truststore is used by an SSL client for validating certificates sent by other servers. It simply contains certificates that are considered "trusted". For convenience you can use the same file as both the keystore and the truststore, you can also use the same file for multiple processes.
- Enabling SSL
-
You can enable SSL during installation (Step 4 Server) or through the SSL Settings screen, selecting a suitable Fusion HTTP Policy Type. It is also possible to enable SSL through a manual edit of the application.properties file. We don’t recommend using the manual method, although it is available if needed: Enable HTTPS.
| Due to a bug in JDK 8 prior to 8u60, replication throughput with SSL enabled can be extremely slow (less than 4MB/sec). This is down to an inefficient GCM implementation. |
Workaround
Upgrade to Java 8u60 or greater, or ensure WANdisco Fusion is able to make use of OpenSSL libraries instead of JDK. Requirements for this can be found at http://netty.io/wiki/requirements-for-4.x.html
FUS-3041
Updating SSL
Updating fusion-ui-server truststore for fusion-server SSL cert
If you add/update the fusion-server SSL certificate then you must update the fusion-ui-server trust store with that certificate too, otherwise fusion-ui-server will be unable to communicate with fusion-server.
| This is important to consider during installation, when you can’t change the fusion-ui-server truststore from the default JVM truststore in the UI — this will block installation if you use a certificate that isn’t signed by a CA in the default truststore. |
Workaround
Use one of the following workarounds:
-
Wait until after completing basic installation before configuring SSL for the fusion-server.
-
Add the fusion-server cert to the default JVM truststore, usually
jssecertsorcacerts(in that order of preference)-
This change may be reverted post install if a custom truststore is configured via the UI.
-
-
Change the default JVM truststore in the startup script, and then restart the Fusion UI server. This can be achieved by adding the following extra Java arguments to the
'JAVA_ARGS'string in the file/opt/wandisco/fusion-ui-server/lib/init-functions.sh:-Djavax.net.ssl.trustStore=/path/to/truststore.jks -Djavax.net.ssl.trustStoreType=jks -Djavax.net.ssl.trustStorePassword=<password>
-
This should be considered a temporary configuration for install only, and should be rolled back post install.
-
The truststore pointed to needs to include the managers CA, for example AWS CA if you are using S3.
-
-
Add the value ui.truststore.option=DISABLED into the ui.properties file and then restart Fusion UI server.
-
This configuration will turn off trust completely, and should be rectified post install.
-
Disabling low strength encryption ciphers
Transport Layer Security (TLS) and its predecessor, Secure Socket Layer (SSL) are widely adopted protocols that are used transfer of data between the client and the server through authentication and encryption and integrity.
Recent research has indicated that some of the cipher systems that are commonly used in these protocols do not offer the level of security that was previously thought.
In order to stop WANdisco Fusion from using the disavowed ciphers (DES, 3DES, and RC4), use the following procedure on each node where the Fusion service runs:
-
Confirm JRE_HOME/lib/security/java.security allows override of security properties, which requires
security.overridePropertiesFile=true -
As root user:
mkdir /etc/wandisco/fusion/security
chown hdfs:hadoop /etc/wandisco/fusion/security
-
As hdfs user:
cd /etc/wandisco/fusion/security
echo "jdk.tls.disabledAlgorithms=SSLv3, DES, DESede, RC4" >> /etc/wandisco/fusion/security/fusion.security
-
As root user:
cd /etc/init.d
-
Edit the fusion-server file to add
-Djava.security.properties=/etc/wandisco/fusion/security/fusion.security
to the JVM_ARG property.
-
Edit the
fusion-ihc-server-xxxfile to add-Djava.security.properties=/etc/wandisco/fusion/security/fusion.security
to the JVM_ARG property.
cd /opt/wandisco/fusion-ui-server/lib
-
Edit the init-functions.sh file to add
-Djava.security.properties=/etc/wandisco/fusion/security/fusion.security
to the JAVA_ARGS property.
-
-
Restart the fusion server, ui server and IHC server.
4.1.5. Supported versions
Please see the release notes for your specific WANdisco Fusion version for the supported Hadoop distributions and versions.
4.1.6. Supported plugins
WANdisco Fusion works with WANdisco’s family of plugins which can be found in the Fusion Plugin Compatibility Table.
4.1.7. Supported applications
Supported Big Data applications may be noted here, as we complete testing:
Application: |
Version Supported: |
Tested with: |
Syncsort DMX-h: |
8.2.4. |
See Knowledge base |
4.2. Deployment planning
4.2.1. Licensing
WANdisco Fusion includes a licensing model that can limit operation based on time, the number of nodes and the volume of data under replication. WANdisco generates a license file matched to your agreed usage model. You need to renew your license if you exceeds these limits or if your license period ends. See License renewals.
License Limits
When your license limits are exceeded, WANdisco Fusion will operate in a limited manner, but allows you to apply a new license to bring the system back to full operation. Once a license is no longer valid:
-
Write operations to replicated locations are blocked
-
Warnings and notifications related to the license expiry are delivered to the administrator
-
Replication of data will no longer occur
-
Consistency checks and make consistent operations are not allowed
-
Operations for adding replication rules will be denied
Each different type of license has different limits.
Evaluation license
To simplify the process of pre-deployment testing, WANdisco Fusion is supplied with an evaluation license (also known as a "trial license"). This type of license imposes limits:
Source |
Time limit |
No. fusion servers |
No. of Zones |
Replicated Data |
Plugins |
Specified IPs |
Website |
14 days |
1-2 |
1-2 |
5TB |
No |
No |
Production license
Customers entering production need a production license file for each node.
These license files are tied to the node’s IP address.
In the event that a node needs to be moved to a new server with a different IP address customers should contact WANdisco’s support team and request that a new license be generated.
Production licenses can be set to expire or they can be perpetual.
Source |
Time limit |
No. fusion servers |
No. of Zones |
Replicated Data |
Plugins |
Specified IPs |
WANdisco |
variable (default: 1 year) |
variable (default: 20) |
variable (default: 10) |
variable (default: 20TB) |
Yes |
Yes |
License renewals
-
The WANdisco Fusion UI provides a warning message whenever you log in.
 Figure 10. License expiry warning
 -
A warning also appears under the Settings tab on the license Settings panel. Contact WANdisco support or follow the link to the website.
 Figure 11. License expiry warning
 -
Complete the form to set out your requirements for license renewal.
 Figure 12. License webform
License updates
Unless there’s a problem that stops you from reaching the WANdisco Fusion UI, the correct way to upgrade a node license is through the License panel, under the Settings tab.
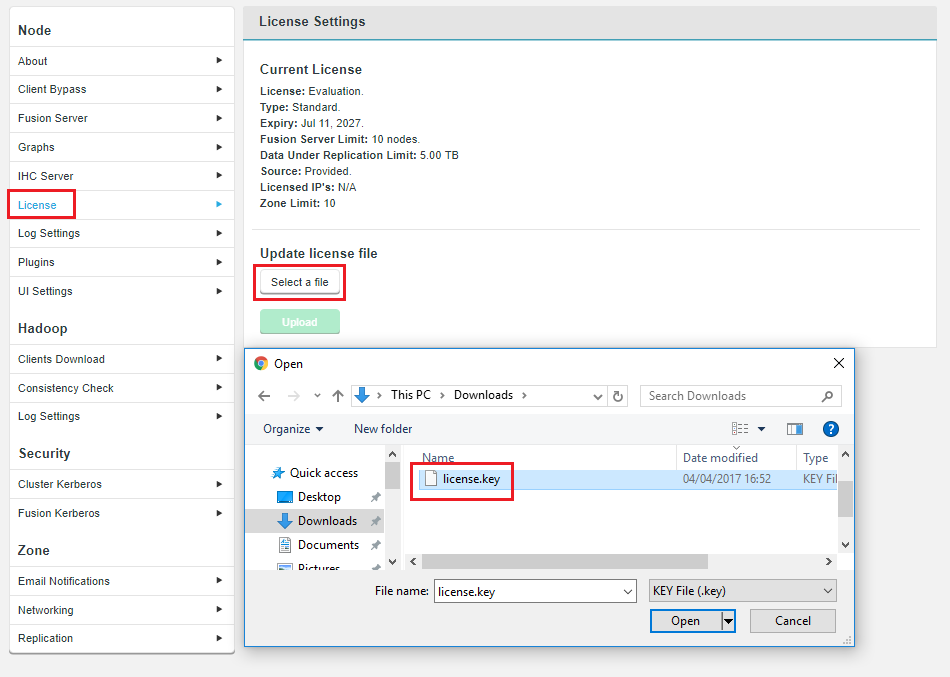
-
Click on License to bring up the License Settings panel.
-
Click Select a file. Navigate to and select your replacement License file.
-
Click Upload and review the details of your replacement license file.
License updates when a node is not accessible.
If one or more of your nodes are down or expired, you can still perform a license update by updating the license file on all nodes, via the UI. In this situation, the license upgrade cannot be done in a coordinated fashion, from a single node, but it can be completed locally if done on all nodes.
Manual license update
The following manual procedure should only be used if the above method is not available, such as when a node cannot be started - maybe caused by ownership or permissions errors on an existing license file. If you can, use the procedure outlined above.
-
Log in to your server’s command line, navigate to the properties directory:
/etc/wandisco/fusion/server
-
We recommend that you rename the
license.keyto something versioned, e.g.license.20170711. -
Get your new license.key and drop it into the
/etc/wandisco/fusion/serverdirectory. You need to account for the following factors:-
Ensure the filename is license.key
-
Ownership should be the same as the original file.
-
Permissions should be the same as the original file.
-
-
Restart the replicator by running the Fusion init.d script with the following argument:
[root@redhat6 init.d]# service fusion-ui-server restart
This will trigger the WANdisco Fusion replicator restart, which will force WANdisco Fusion to pick up the new license file and apply any changes to permitted usage.
If you don’t restartIf you follow the above instructions but don’t do the restart WANdisco Fusion will continue to run with the old license until it performs a daily license validation (which runs at midnight). Providing that your new license key file is valid and has been put in the right place then WANdisco Fusion will then update its license properties without the need to restart. -
If you run into problems, check the replicator logs (
/var/log/fusion/server/) for more information.PANIC: License is invalid com.wandisco.fsfs.licensing.LicenseException: Failed to load filepath>
4.2.2. Final Preparations
We’ll now look at what you should know and do as you begin the installation.
Time requirements
The time required to complete a deployment of WANdisco Fusion will in part be based on its size, larger deployments with more nodes and more complex replication rules will take correspondingly more time to set up. Use the guide below to help you plan for deployments.
-
Run through this document and create a checklist of your requirements. (1-2 hours).
-
Complete the WANdisco Fusion installation (about 20 minutes per node, or 1 hour for a test deployment).
-
Complete client installations and complete basic tests (1-2 hours).
Of course, this is a guideline to help you plan your deployment. You should think ahead and determine if there are additional steps or requirements introduced by your organization’s specific needs.
Network requirements
-
See the Pre-requisites Checklist - TCP Port Allocation for a list of the TCP ports that need to be open for WANdisco Fusion.
-
WANdisco Fusion does not require that reverse DNS is set up but it is vital that all nodes can be resolved from all zones.
4.2.3. Security
Requirements for Kerberos
If you are running Kerberos on your cluster you should consider the following requirements:
-
Kerberos is already installed and running on your cluster
-
Fusion-Server is configured for Kerberos as described in the Kerberos section.
-
Kerberos Configuration before starting the installation.
For information about running Fusion with Kerberos, read this guide’s chapter on Kerberos.
|
Warning about mixed Kerberized / Non-Kerberized zones
In deployments that mix kerberized and non-kerberized zones it’s possible that permission errors will occur because the different zones don’t share the same underlying system superusers. In this scenario you would need to ensure that the superuser for each zone is created on the other zones.
|
For example, if you connect a Zone that runs CDH, which has superuser 'hdfs" with a zone running MapR, which has superuser 'mapr', you would need to create the user 'hdfs' on the MapR zone and 'mapr' on the CDH zone.
|
Kerberos Relogin Failure with Hadoop 2.6.0 and JDK7u80 or later
Hadoop Kerberos relogin fails silently due to HADOOP-10786. This impacts Hadoop 2.6.0 when JDK7u80 or later is used (including JDK8).
Users should downgrade to JDK7u79 or earlier, or upgrade to Hadoop 2.6.1 or later.
|
Manual Kerberos configuration
See the Knowledge base for instructions on setting up manual Kerberos settings. You only need these in special cases as the steps have been handled by the installer. See Manual Updates for WANdisco Fusion UI Configuration.
Instructions on setting up auth-to-local permissions, mapping a Kerberos principal onto a local system user. See the Knowledge base article - Setting up Auth-to-local.
|
TIP For the system users that run Fusion Server and UI Server, any cached Kerberos tickets must be cleared. You can ensure this is done by logging in as each applicable system user and running kdestroy. This issue is fixed in 2.12.4. |
4.2.4. Clean Environment
Before you start the installation you must ensure that there are no existing WANdisco Fusion installations or WANdisco Fusion components installed on your elected machines. If you are about to upgrade to a new version of WANdisco Fusion you must first see the Uninstall chapter.
|
Ensure HADOOP_HOME is set in the environment
Where the hadoop command isn’t in the standard system path, administrators must ensure that the HADOOP_HOME environment variable is set for the root user and the user WANdisco Fusion will run as, typically hdfs.
When set, HADOOP_HOME must be the parent of the bin directory into which the Hadoop scripts are installed.
Example: if the hadoop command is:
|
/opt/hadoop-2.6.0-cdh5.4.0/bin/hadoop
then HADOOP_HOME must be set to
/opt/hadoop-2.6.0-cdh5.4.0/.
4.2.5. Installer File
You need to match the WANdisco Fusion installer file to each data center’s version of Hadoop. Installing the wrong version of WANdisco Fusion will result in the IHC servers being misconfigured.
|
Why installation requires root user
Fusion core and Fusion UI packages are installed using root permissions, using the RPM tool (or equivalent for .deb packages). RPM requires root to run - hence the need for the permissions. The main requirement for running with root is the need for the installer to create the directory structure for WANdisco Fusion components, e.g.
Once all files are put into place, they are permissioned and owned by a specific fusion user. After the installation of the artifacts root is not used and the Fusion processes themselves are run as a specific Fusion user (usually "hdfs"). |
List the included files in the installer package by running the above list command, e.g.
./fusion-ui-server-cdh_rpm_installer.sh --list
This will generate a list of included package files. Note that this is an example 2.12.0.2. installer for CMD.
Target directory: installer
drwxr-xr-x jenkins/jenkins   0 2018-06-19 23:52 ./
drwxr-xr-x jenkins/jenkins   0 2018-06-19 23:48 ./resources/
-rwxr-xr-x jenkins/jenkins 1759 2018-06-19 23:47 ./resources/RPM-GPG-KEY-WANdisco
-rwxr-xr-x jenkins/jenkins  554 2018-06-19 23:47 ./resources/logo.txt
drwxr-xr-x jenkins/jenkins    0 2018-06-19 23:51 ./resources/fusion-server/
-rw-r--r-- jenkins/jenkins 44070973 2018-06-19 23:51
./resources/fusion-server/fusion-hcfs-cdh-5.4.0-server-2.12.0.2.el6-3036.noarch.rpm
-rw-r--r-- jenkins/jenkins 50396791 2018-06-19 23:51
./resources/fusion-server/fusion-hcfs-cdh-5.5.0-server-2.12.0.2.el6-3036.noarch.rpm
-rw-r--r-- jenkins/jenkins 50415598 2018-06-19 23:51
./resources/fusion-server/fusion-hcfs-cdh-5.6.0-server-2.12.0.2.el6-3036.noarch.rpm
-rw-r--r-- jenkins/jenkins 50434146 2018-06-19 23:51
./resources/fusion-server/fusion-hcfs-cdh-5.7.0-server-2.12.0.2.el6-3036.noarch.rpm
-rw-r--r-- jenkins/jenkins 51593367 2018-06-19 23:51
./resources/fusion-server/fusion-hcfs-cdh-5.8.0-server-2.12.0.2.el6-3036.noarch.rpm
-rw-r--r-- jenkins/jenkins 51761295 2018-06-19 23:51
./resources/fusion-server/fusion-hcfs-cdh-5.9.0-server-2.12.0.2.el6-3036.noarch.rpm
-rw-r--r-- jenkins/jenkins 51953478 2018-06-19 23:51
./resources/fusion-server/fusion-hcfs-cdh-5.10.0-server-2.12.0.2.el6-3036.noarch.rpm
-rw-r--r-- jenkins/jenkins 52029177 2018-06-19 23:51
./resources/fusion-server/fusion-hcfs-cdh-5.11.0-server-2.12.0.2.el6-3036.noarch.rpm
-rw-r--r-- jenkins/jenkins 52052071 2018-06-19 23:51
./resources/fusion-server/fusion-hcfs-cdh-5.12.0-server-2.12.0.2.el6-3036.noarch.rpm
-rw-r--r-- jenkins/jenkins 52236280 2018-06-19 23:51
./resources/fusion-server/fusion-hcfs-cdh-5.13.0-server-2.12.0.2.el6-3036.noarch.rpm
-rw-r--r-- jenkins/jenkins 52220479 2018-06-19 23:51
./resources/fusion-server/fusion-hcfs-cdh-5.14.0-server-2.12.0.2.el6-3036.noarch.rpm
drwxr-xr-x jenkins/jenkins        0 2018-06-19 23:51
./resources/fusion-ihc-server/
-rw-r--r-- jenkins/jenkins 38027602 2018-06-19 23:51
./resources/fusion-ihc-server/fusion-hcfs-cdh-5.4.0-ihc-server-2.12.0.2.el6-3036.noarch.rpm
-rw-r--r-- jenkins/jenkins 44349512 2018-06-19 23:51
./resources/fusion-ihc-server/fusion-hcfs-cdh-5.5.0-ihc-server-2.12.0.2.el6-3036.noarch.rpm
-rw-r--r-- jenkins/jenkins 44368103 2018-06-19 23:51
./resources/fusion-ihc-server/fusion-hcfs-cdh-5.6.0-ihc-server-2.12.0.2.el6-3036.noarch.rpm
-rw-r--r-- jenkins/jenkins 44388066 2018-06-19 23:51
./resources/fusion-ihc-server/fusion-hcfs-cdh-5.7.0-ihc-server-2.12.0.2.el6-3036.noarch.rpm
-rw-r--r-- jenkins/jenkins 45550081 2018-06-19 23:51
./resources/fusion-ihc-server/fusion-hcfs-cdh-5.8.0-ihc-server-2.12.0.2.el6-3036.noarch.rpm
-rw-r--r-- jenkins/jenkins 45714848 2018-06-19 23:51
./resources/fusion-ihc-server/fusion-hcfs-cdh-5.9.0-ihc-server-2.12.0.2.el6-3036.noarch.rpm
-rw-r--r-- jenkins/jenkins 45906239 2018-06-19 23:51
./resources/fusion-ihc-server/fusion-hcfs-cdh-5.10.0-ihc-server-2.12.0.2.el6-3036.noarch.rpm
-rw-r--r-- jenkins/jenkins 45984332 2018-06-19 23:51
./resources/fusion-ihc-server/fusion-hcfs-cdh-5.11.0-ihc-server-2.12.0.2.el6-3036.noarch.rpm
-rw-r--r-- jenkins/jenkins 46006526 2018-06-19 23:51
./resources/fusion-ihc-server/fusion-hcfs-cdh-5.12.0-ihc-server-2.12.0.2.el6-3036.noarch.rpm
-rw-r--r-- jenkins/jenkins 46190743 2018-06-19 23:51
./resources/fusion-ihc-server/fusion-hcfs-cdh-5.13.0-ihc-server-2.12.0.2.el6-3036.noarch.rpm
-rw-r--r-- jenkins/jenkins 46174357 2018-06-19 23:51
./resources/fusion-ihc-server/fusion-hcfs-cdh-5.14.0-ihc-server-2.12.0.2.el6-3036.noarch.rpm
drwxr-xr-x jenkins/jenkins        0 2018-06-19 23:51
./defaults/
-rw-r--r-- jenkins/jenkins      392 2018-06-19 23:51
./defaults/installer
-r-xr-xr-x jenkins/jenkins     5525 2018-06-19 23:52
./installer.sh
drwxr-xr-x jenkins/jenkins        0 2018-06-19 23:51
./ui-server-plugins/
-rw-r--r-- jenkins/jenkins    64149 2018-06-19 23:51
./functions.sh
-rw-r--r-- jenkins/jenkins     8234 2018-06-19 23:51
./BOM.txt
drwxr-xr-x jenkins/jenkins        0 2018-06-19 23:52
./rpm/
-rw-r--r-- jenkins/jenkins 268489590 2018-06-19 23:52
./rpm/fusion-ui-server-2.12.0.2-1519.noarch.rpm
#4.3. Installation steps
The installation section covers all the steps in getting Fusion deployed into your clusters and or cloud infrastructure. Here is a run-down of what is covered:
- Installer Options
-
Information about supporting files, utilities and procedures that you can use as part of an installation.
4.3.1. Installer Options
Installing to a custom location
The WANdisco Fusion installer places files into a fixed location, /opt/wandisco. We strongly recommend that you use the default location as it’s better supported and more roundly tested, however, for deployments where this location is not permitted, the following RPM relocation feature is available, allowing installations of WANdisco Fusion to a user-selected location:
Pre-requisites
-
Red Hat Enterprise Linux and derivatives only (SuSE not currently supported)
-
Special attention will be required for client installations.
-
Limitation concerning Ambari stack installation
|
Non-root Ambari agents
Unfortunately the Ambari Stack installer cannot be configured for non-root if you intend to use this RPM relocation feature.
Ambari can be configured for non-root Ambari Agents.
|
FUSION_PREFIX Environmental variable
When running the installer, first set the following environmental variable:
sudo FUSION_PREFIX=<custom-directory> ./fusion-ui-server-hdp_rpm_installer.sh
This will change the installation directory from the default to the one that you provide, e.g.
sudo FUSION_PREFIX=/CustomInstallLocation ./fusion-ui-server-hdp_rpm_installer.sh
The above example would install fusion-ui-server into /CustomInstallLocation/fusion-ui-server. Also, the WANdisco Fusion server and IHC server will be installed under /CustomInstallLocation/fusion/server and /CustomInstallLocation/fusion/ihc/server/ respectively.
If you run with the FUSION_PREFIX, an additional line will appear on the summary screen of the installer:
   ::   ::  ::     #     #   ##    ####  ######   #   #####   #####   #####
  :::: :::: :::    #     #  #  #  ##  ## #     #  #  #     # #     # #     #
 ::::::::::: :::   #  #  # #    # #    # #     #  #  #       #       #     #
::::::::::::: :::  # # # # #    # #    # #     #  #   #####  #       #     #
 ::::::::::: :::   # # # # #    # #    # #     #  #        # #       #     #
  :::: :::: :::    ##   ##  #  ## #    # #     #  #  #     # #     # #     #
   ::   ::  ::     #     #   ## # #    # ######   #   #####   #####   #####

Installing with the following settings:

Installation Prefix:                /CustomInstallLocation
User and Group:                     hdfs:hdfs
Hostname:                           localhost.localdomain
Fusion Admin UI Listening on:       0.0.0.0:8083
Fusion Admin UI Minimum Memory:     128
Fusion Admin UI Maximum memory:     512
Platform:                           hdp-2.4.0 (2.7.1.2.4.0.0-169)

Do you want to continue with the installation? (Y/n)
Alternate method
You can also perform an installation to a custom directory using the following alternative:
Inject the environmental variable:
`export FUSION_PREFIX=<custom-directory>`
Run the installer as per the usual method, i.e.:
./fusion-ui-server-hdp_rpm_installer.sh
The installer will use the provided path for the installation, as described in the main procedure.
Custom location installations - Client Installation
When installing to a customer location, you will need to ensure that your clients are configured with the matching location. You should be able to correctly install clients using the normal procedure, outlined above. See Client Installation, immediately below.
Client Installations
|
Known issue with ASF installation
Currently the link for client downloads is broken, this will be fixed in 2.13.
Please download the client from the directory listing page <hostname>:8083/ui/downloads/client_packages/.
|
Client Installation with RPMs
The WANdisco Fusion installer doesn’t currently handle the installation of the client to the rest of the nodes in the cluster. You need to go through the following procedure:
In the Client Installation section of the installer there is a link to client RPM packages.

RPM package location
If you need to find the packages after leaving the installer page with the link, you can find them in your installation directory, here:
/opt/wandisco/fusion-ui-server/ui-client-platform/downloads/
If you are installing the RPMs, download and install the package on each of your nodes.
Installing the client RPM is done in the usual way:
rpm -i <package-name>
Install checks
-
First, we check if we can run
hadoop classpath, in order to complete the installation. -
If we’re unable to run
hadoop classpaththen we check forHADOOP_HOMEand run the Hadoop classpath from that location. -
If the checks cause the installation to fail, you need to export HADOOP_HOME and set it so that the hadoop binary is available at $HADOOP_HOME/bin/hadoop, e.g.
export HADOOP_HOME=/opt/hadoop/hadoop
export HIVE_HOME=/opt/hadoop/hive
export PATH=$HADOOP_HOME/bin:$HIVE_HOME/bin
Installation with DEB
Debian not supported
Although Ubuntu uses Debian’s packaging system, currently Debian itself is not supported. Note: Hortonworks HDP does not support Debian.
If you are running with an Ubuntu Linux distribution, you need to go through the following procedure for installing the clients using Debian’s DEB package:
-
In the Client Installation section of the installer there is a link to client DEB packages.
DEB package location
If you need to find the packages after leaving the installer page with the link, you can find them in your installation directory, here:
/opt/wandisco/fusion-ui-server/ui-client-platform/downloads/client_package
-
To install WANdisco Fusion client, download and install the package on each of your nodes.
-
You can install it using
sudo dpkg -i /path/to/deb/file
followed by
sudo apt-get install -f
Alternatively, move the DEB file to
/var/cache/apt/archives/and then runapt-get install <fusion-client-filename.deb>
Client Installation with Parcels
For deployments into Cloudera clusters, clients can be installed using Cloudera’s own packaging format: Parcels.
Parcel Locations
By default local parcels are stored on the Cloudera Manager Server:/opt/cloudera/parcel-repo. To change this location, follow the instructions in Configuring Server Parcel Settings.
The location can be changed by setting the parcel_dir property in /etc/cloudera-scm-agent/config.ini file of the Cloudera Manager Agent and restart the Cloudera Manager Agent or by following the instructions in Configuring the Host Parcel Directory.
|
Don’t link to /usr/lib/
The path to the CDH libraries is /opt/cloudera/parcels/CDH/lib instead of the usual /usr/lib.
We strongly recommend that you don’t link /usr/lib/ elements to parcel deployed paths, as some scripts distinguish between the two paths.
|
Installing the parcel
-
Open a terminal session to the location of your parcels repository, it may be your Cloudera Manager server, although the location may have been customized. Ensure that you have suitable permissions for handling files.
-
Download the appropriate parcel and sha for your deployment.
wget "http://fusion.example.host.com:8083/ui/parcel_packages/FUSION-<version>-cdh5.<version>.parcel"
wget "http://node01-example.host.com:8083/ui/parcel_packages/FUSION-<version>-cdh5.<version>.parcel.sha"
-
Change the ownership of the parcel and .sha files so that they match the system account that runs Cloudera Manager:
chown cloudera-scm:cloudera-scm FUSION-<version>-cdh5.<version>.parcel*
-
Move the files into the server’s local repository, i.e.
mv FUSION-<version>-cdh5.<version>.parcel* /opt/cloudera/parcel-repo/
-
Open Cloudera Manager and navigate to the Parcels screen by clicking on the Parcel icon.
 Figure 15. Open Cloudera Manager
 -
Click Check for New Parcels.
 Figure 16. Check for new parcels
 -
The WANdisco Fusion client package is now ready to distribute. Click on the Distribute button to install WANdisco Fusion from the parcel.
 Figure 17. Ready to distribute
 -
Click on the Activate button to activate WANdisco Fusion from the parcel.
 Figure 18. Activate Parcels
Then confirm you want to activate Fusion.
-
The configuration files need redeploying to ensure the WANdisco Fusion elements are put in place correctly. You will need to check Cloudera Manager to see which processes will need to be restarted in order for the parcel to be deployed. Cloudera Manager provides a visual cue about which processes will need a restart.
Important
To be clear, you must restart the services, it is not sufficient to run the "Deploy client configuration" action.
WANdisco Fusion uses Hadoop configuration files associated with the Yarn Gateway service and not HDFS Gateway. WANdisco Fusion uses config files under /etc/hadoop/conf and CDH deploys the Yarn Gateway files into this directory.
Replacing earlier parcels?
If you are replacing an existing package that was installed using a parcel, once the new package is activated you should remove the old package through Cloudera Manager. Use the Remove From Host button.

Installing HttpFS with parcels
HttpFS is a server that provides a REST HTTP gateway supporting all HDFS File System operations (read and write). And it is interoperable with the webhdfs REST HTTP API.
While HttpFS runs fine with WANdisco Fusion, there is an issue where it may be installed without the correct class paths being put in place, which can result in errors when running Mammoth test scripts.
Example errors
Running An HttpFS Server Test -- accessing hdfs directory info via curl requests
Start running httpfs test
HTTP/1.1 401 Unauthorized
Server: Apache-Coyote/1.1
WWW-Authenticate: Negotiate
Set-Cookie: hadoop.auth=; Path=/; Expires=Thu, 01-Jan-1970 00:00:00 GMT; HttpOnly
Content-Type: text/html;charset=utf-8
Content-Length: 997
Date: Thu, 04 Feb 2016 16:06:52 GMT

HTTP/1.1 500 Internal Server Error
Server: Apache-Coyote/1.1
Set-Cookie: hadoop.auth="u=oracle&p=oracle/bdatestuser@UATBDAKRB.COM&t=kerberos&e=1454638012050&s=7qupbmrZ5D0hhtBIuop2+pVrtmk="; Path=/; Expires=Fri, 05-Feb-2016 02:06:52 GMT; HttpOnly
Content-Type: application/json
Transfer-Encoding: chunked
Date: Thu, 04 Feb 2016 16:06:52 GMT
Connection: close

{"RemoteException":{"message":"java.lang.ClassNotFoundException: Class com.wandisco.fs.client.FusionHdfs not found","exception":"RuntimeException","javaClassName":"java.lang.RuntimeException"}}
Fusion Client installation with HDP Stack / IBM BigInsights
For deployments into Hortonworks HDP/Ambari/IBM BigInsights cluster, version 1.7 or later. Clients can be installed using Hortonwork’s own packaging format: HDP Stack.
Ambari 2.0
When adding a stack to Ambari 2.0 (any stack, not just WANdisco Fusion client) there is a bug which causes the YARN parameter yarn.nodemanager.resource.memory-mb to reset to a default value for the YARN stack.
This may result in the Java heap dropping from a manually-defined value, back to a low default value (2Gb).
Note that this issue is fixed from Ambari 2.1.
Upgrading Ambari
When running Ambari prior to 2.0.1, we recommend that you remove and then reinstall the WANdisco Fusion stack if you perform an update of Ambari.
Prior to version 2.0.1, an upgraded Ambari refuses to restart the WANdisco Fusion stack because the upgrade may wipe out the added services directory on the stack.
If you perform an Ambari upgrade and the Ambari server fails to restart, the workaround is to copy the WANdisco Fusion service directory from the old to the new directory, so that it is picked up by the new version of Ambari, e.g.:
cp -R /var/lib/ambari-server/resources/stacks_25_08_15_21_06.old/HDP/2.2/services/FUSION /var/lib/ambari-server/resources/stacks/HDP/2.2/services
Again, this issue doesn’t occur once Ambari 2.0.1 is installed.
HDP 2.3/Ambari 2.1.1 install
There’s currently a problem that can block the installation of the WANdisco Fusion client stack.
If the installation of the client service gets stuck at the "Customize Service" step, you may need to use a workaround:
-
If possible, restart the sequence again, if the option is not available, because the Next button is disabled, or it doesn’t work try the next workaround.
-
Try installing the client RPMs.
-
Install the WANdisco Fusion client service manually, using the Ambari API.
Install & Start the service via Ambari’s API
Make sure the service components are created and the configurations attached by making a GET call, e.g.
http://<ambari-server-host>:8080/api/v1/clusters/<cluster-name>/services/<service-name>
1. Add the service
curl -u <username>:<password> -H "X-Requested-By: ambari" http://<ambari-server-host>:8080/api/v1/clusters/<cluster-name>/services -d '{"ServiceInfo":{"service_name":"FUSION"}}'
2. Add the component
curl -u <username>:<password> -H "X-Requested-By: ambari" http://<ambari-server-host>:8080/api/v1/clusters/<cluster-name>/services/FUSION/components/FUSION_CLIENT -X POST
3. Get a list of the hosts
curl -u <username>:<password> -H "X-Requested-By: ambari" http://<ambari-server-host>:8080/api/v1/clusters/<cluster-name>/hosts/
4. For each of the hosts in the list, add the FUSION_CLIENT component
curl -u <username>:<password> -H "X-Requested-By: ambari" http://<ambari-server-host>:8080/api/v1/clusters/<cluster-name>/hosts/<host-name>/host_components/FUSION_CLIENT -X POST
5. Install the FUSION_CLIENT component
curl -u <username>:<password> -H "X-Requested-By: ambari" http://<ambari-server-host>:8080/api/v1/clusters/<cluster-name>/services/FUSION/components/FUSION_CLIENT -X PUT -d '{"ServiceComponentInfo":{"state": "INSTALLED"}}'
Installing the WANdisco service into your HDP Stack
-
Download the service from the installer client download panel, or after the installation is complete, from the client packages section on the Client Download screen, found under the Hadoop section of the Settings tab.
-
The service is a gz file (e.g. fusion-hdp-<your_version>.stack.tar.gz) that will expand to a directory called /FUSION.
-
For HDP, first check for and remove existing /FUSION directories in
/var/lib/ambari-server/resources/stacks/HDP/<version-of-stack>/services, before placing in the new /FUSION directory. If you don’t clear out a pre-existing directory you might end up installing an outdated version of the client. -
Restart the ambari-server
service ambari-server restart
Note If using centos6/rhel6 we recommend using the following command to restart:
initctl restart ambari-server
-
After the server restarts, go to + Add Service.
 Figure 19. Ambari - Add service
 -
Scroll down the Choose Services window to check that WANdisco Fusion is present on the list
 Figure 20. Choose service
 -
Do not add the service here, instead go back to the Fusion Installer UI and follow the on screen instructions.
Recovering from a stacks deploy error
If the Deploy action fails, this can leave your cluster in an inconsistent state and result in some tasks left permanently hanging. If this happens it is vital that you perform a cleanup, using the following steps.
-
Restart the Ambari server then check the Ambari UI to see if the operation is still marked as in progress.
service ambari-server restart
-
If the operation still shows as "in progress", click the blue box with “X op” where X is the number of operations that are in progress. This brings up the UI listing the results of the current and recent operations. Select (drill down into) the operation that is still running.
 Figure 21. Abort Ambari task
 -
Select, through a drill-down, a node listed as “In Progress”, these show a icon of 3 cogs. Check the logs in case there are clues to the reason for the task to hang.
-
Get the task ID from the logs. You can see this as a suffix at the of the output file.
 Figure 22. Abort Ambari task
 -
Use the task ID to query the Ambari database, log into the Ambari database, you will need the username, database name and database password, e.g.
psql -h localhost -U username databasename
Provide password when prompted.
-
Run the following query, placing your hung task’s ID in the <task_id>.
select task_id, role, role_command, status from host_role_command where task_id = <task_id>;
-
If the details of this query match the operation that is hanging, then you have found the right database entry. In this case, the status in the table will show "IN_PROGRESS".
-
Providing that you confirm the match, now query the database to update the task status.
update host_role_command set status = ‘ABORTED’ where task_id = and status = ‘IN_PROGRESS’;
-
Log out of the Ambari database, e.g. enter "/q".
-
Check the Ambari UI, in most cases, the UI will already show the results of your update.
Removing a Fusion client stack
When we use the "Deploy Stack" button it can on rare occasions fail. If it does you can recover the situation with the following procedure, which involves removing the stack, then adding it again using Ambari’s "Add New Service" wizard.
-
Send these two curl calls to Ambari:
curl -u admin:admin -X PUT -d '{"RequestInfo":{"context":"Stop Service"},"Body":{"ServiceInfo":{"state":"INSTALLED"}}}' http://<manager_hostname>:<manager_port>/api/v1/clusters/<cluster_name>/services/FUSION -H "X-Requested-By: admin" curl -u admin:admin -X DELETE http://<manager_hostname>:<manager_port>/api/v1/clusters/<cluster_name>//services/FUSION -H "X-Requested-By: admin" -
Now remove the client from each node:
yum erase <the client>
rm -rf /opt/wandisco/fusion/client/
-
Restart ambari-server using the following command on the manager node:
ambari-server restart
Note If using centos6/rhel6 we recommend using the following command to restart:
initctl restart ambari-server
-
Finally, add the service using Ambari’s Add Service Wizard.
MapR Client Configuration
On MapR clusters, you need to copy WANdisco Fusion configuration onto all other nodes in the cluster:
-
Open a terminal to your WANdisco Fusion node.
-
Navigate to
/opt/mapr/hadoop/<hadoop-version>/etc/hadoop. -
Copy the
core-site.xmlandyarn-site.xmlfiles to the same location on all other nodes in the cluster. -
Now restart HDFS, and any other service that indicates that a restart is required.
MapR Impersonation
Enable impersonation when cluster security is disabled
Follow these steps on the client to configure impersonation without enabling cluster security.
-
Enable impersonation for all relevant components in your ecosystem. See the MapR documentation - Component Requirements for Impersonation.
-
Enable impersonation for the MapR core components:
The following steps will ensure that MapR will have the necessary permissions on your Hadoop cluster:-
Open the
core-site.xmlfile in a suitable editor. -
Add the following *hadoop.proxyuser* properties:
<property>
    <name>hadoop.proxyuser.mapr.hosts</name>
    <value>*</value>
</property>
<property>
    <name>hadoop.proxyuser.mapr.groups</name>
    <value>*</value>
</property>
Note: The wildcard asterisk * lets the "mapr" user connect from any host and impersonate any user in any group.
-
Check that your settings are correct, save and close the
core-site.xmlfile.
-
-
On each client system on which you need to run impersonation:
-
Set a MAPR_IMPERSONATION_ENABLED environment variable with the value, true. This value must be set in the environment of any process you start that does impersonation. E.g.
export MAPR_IMPERSONATION_ENABLED=true
-
Create a file in
/opt/mapr/conf/proxy/that has the name of the mapr superuser. The default file name would be mapr. To verify the superuser name, check themapr.daemon.user=line in the/opt/mapr/conf/daemon.conffile on a MapR cluster server.
-
4.3.2. Installer Help
Running the following commands on the installer will generate a number of helpful outputs:
# ./fusion-ui-server-cdh_rpm_installer.sh -h
Makeself version 2.1.5

 1) Getting help or info about ./fusion-ui-server-cdh_rpm_installer.sh :
  ./fusion-ui-server-cdh_rpm_installer.sh --help   Print this message
  ./fusion-ui-server-cdh_rpm_installer.sh --info   Print embedded info : title, default target directory, embedded script ...
  ./fusion-ui-server-cdh_rpm_installer.sh --lsm    Print embedded lsm entry (or no LSM)
  ./fusion-ui-server-cdh_rpm_installer.sh --list   Print the list of files in the archive
  ./fusion-ui-server-cdh_rpm_installer.sh --check  Checks integrity of the archive

 2) Running ./fusion-ui-server-cdh_rpm_installer.sh :
  ./fusion-ui-server-cdh_rpm_installer.sh [options] [--] [additional arguments to embedded script] with following options (in that order)
  --confirm             Ask before running embedded script
  --noexec              Do not run embedded script
  --keep                Do not erase target directory after running
			the embedded script
  --nox11               Do not spawn an xterm
  --nochown             Do not give the extracted files to the current user
  --target NewDirectory Extract in NewDirectory
  --tar arg1 [arg2 ...] Access the contents of the archive through the tar command
  --                    Following arguments will be passed to the embedded script

 3) Environment:
  LOG_FILE              Installer messages will be logged to the specified file
#
4.3.3. Starting the Installation
These steps apply to both Cloudera and Ambari platforms, differences between platforms are highlighted during the procedure.
|
Installation via sudo-restricted non-root user
In some deployments it may not be permitted to complete the installation using root user. It should be possible to complete an installation with a limited set of sudo commands.
|
|
Workaround if /tmp directory is "noexec"
Running the installer script will write files to the system’s /tmp directory. If the system’s /tmp directory is mounted with the "noexec" option then you will need to use the following argument when running the installer: --target <someDirectoryWhichCanBeWrittenAndExecuted> E.g. sudo ./fusion-ui-server-<version>_rpm_installer.sh --target /opt/wandisco/installation/ The location must be somewhere
|
Run the installer
Use the following steps to complete an installation using the installer file. This requires an administrator to enter details throughout the procedure. Once the initial settings are entered through the terminal session, the installation is then completed through a browser or alternatively, using a Silent Installation option to handle configuration programmatically.
| The screenshots shown in this section are from a Cloudera installation so there may be slight differences to your set up. |
-
Open a terminal session on your first installation server. Download the installer matching your platform from customer.wandisco.com.
-
Make the downloaded installer file executable, e.g.
chmod +x fusion-ui-server-<version>_rpm_installer.sh
-
Execute the file with root permissions, e.g.
sudo ./fusion-ui-server-<version>_rpm_installer.sh
-
The installer will now start.
Verifying archive integrity... All good.
Uncompressing WANdisco Fusion..............................

    ::   ::  ::     #     #   ##    ####  ######   #   #####   #####   #####
   :::: :::: :::    #     #  #  #  ##  ## #     #  #  #     # #     # #     #
  ::::::::::: :::   #  #  # #    # #    # #     #  #  #       #       #     #
 ::::::::::::: :::  # # # # #    # #    # #     #  #   #####  #       #     #
  ::::::::::: :::   # # # # #    # #    # #     #  #        # #       #     #
   :::: :::: :::    ##   ##  #  ## #    # #     #  #  #     # #     # #     #
    ::   ::  ::     #     #   ## # #    # ######   #   #####   #####   #####

Welcome to the WANdisco Fusion installation

You are about to install WANdisco Fusion version 2.12

Do you want to continue with the installation? (Y/n) y
The installer will perform an integrity check, confirm the product version that will be installed, then invite you to continue. Enter "Y" to continue the installation.
-
The installer checks that both Perl and Java are installed on the system.
Checking prerequisites:

Checking for perl: OK
Checking for java: OK
See the Pre-requisites Checklist Java Requirements for more information about these requirements.
-
Next, confirm the port that will be used to access WANdisco Fusion through a browser.
Which port should the UI Server listen on? [8083]:
-
Select the platform version and type from the list of supported platforms. The examples given below are from a Cloudera installation, the Ambari step will include an equivalent list of Hortonworks packages.
Please specify the appropriate backend from the list below:
[0] cdh-5.4.x
[1] cdh-5.5.x
[2] cdh-5.6.x
[3] cdh-5.7.x
[4] cdh-5.8.x
[5] cdh-5.9.x
[6] cdh-5.10.x
[7] cdh-5.11.x
[8] cdh-5.12.x
[9] cdh-5.13.x
[10] cdh-5.14.x
Which WANdisco Fusion platform do you wish to use? 5
Installing on AmbariIf you are using HDP-2.6.x ensure you specify the correct platform version - version 2.6.0 and 2.6.1 need a separate installer to 2.6.2 and above.MapR availabilityThe MapR versions of Hadoop have been removed from the trial version of WANdisco Fusion in order to reduce the size of the installer for most prospective customers. These versions are run by a small minority of customers, while their presence nearly doubled the size of the installer package. Contact Wandisco if you need to evaluate WANdisco Fusion running with MapR.
MapR requirementsURI MapR needs to use WANdisco Fusion’s native "fusion:///" URI, instead of the default hdfs:///.
Ensure that during installation you select the Use WANdisco Fusion URI with HCFS file system URI option.
Superuser
If you install into a MapR cluster then you need to assign the MapR superuser system account/groupmaprif you need to run WANdisco Fusion using the fusion:/// URI. See the requirement for MapR Client Configuration. See the requirement for MapR impersonation. When using MapR and doing a TeraSort run, if one runs without the simple partitioner configuration, then the YARN containers will fail with a Fusion Client ClassNotFoundException. The remedy is to setyarn.application.classpathon each node’s yarn-site.xml.
FUI-1853 -
Next, you set the system user group for running the application.
We strongly advise against running Fusion as the root user.

For default CDH setups, the user should be set to 'hdfs'. However, you should choose a user appropriate for running HDFS commands on your system.

Which user should WANdisco Fusion run as? [hdfs]
Checking 'hdfs' ...
 ... 'hdfs' found.

Please choose an appropriate group for your system. By default CDH uses the 'hdfs' group.

Which group should WANdisco Fusion run as? [hdfs]
Checking 'hdfs' ...
 ... 'hdfs' found.
-
The installer does a search for the commonly used account and group, assigning these by default. Check the summary to confirm that your chosen settings are appropriate: Installing with the following settings:
Installing with the following settings:

Installation Prefix:                /opt/wandisco
User and Group:                     hdfs:hdfs
Hostname:                           <your.fusion.hostname>
WANdisco Fusion Admin UI Listening on:    0.0.0.0:8083
WANdisco Fusion Admin UI Minimum Memory:  128
WANdisco Fusion Admin UI Maximum memory:  512
Platform:                           <your selected platform and version>

Do you want to continue with the installation? (Y/n)
If these settings are correct then enter "Y" to complete the installation of the WANdisco Fusion server.
-
The package will now install.
Installing <your selected packages> server packages:
  <your selected server package> ... Done
  <your selected ihc-server package> ... Done
Installing plugin packages:
  <any selected plugin packages> ... Done
Installing fusion-ui-server package:
  fusion-ui-server-<your version>.noarch.rpm ... Done

Starting fusion-ui-server:                                 [  OK  ]
Checking if the GUI is listening on port 8083: .......Done
-
The WANdisco Fusion server will now start up:
Please visit <your.fusion.hostname> to complete installation of WANdisco Fusion

If <your.fusion.hostname> is internal or not available from your browser, replace
this with an externally available address to access it.
At this point the WANdisco Fusion server and corresponding IHC server will be installed. The next step is to configure the WANdisco Fusion UI through a browser or using the silent installation script.
Browser-based configuration
Follow this section to complete the installation by configuring WANdisco Fusion using a browser-based graphical user interface.
|
Silent Installation
For large deployments it may be worth using Silent Installation option.
|
-
Open a web browser and point it at the provided URL. e.g.
http://<your.fusion.hostname>.com:8083/
-
In the first "Welcome" screen you’re asked to choose between Create a new Zone and Add to an existing Zone.
 Figure 23. Welcome
Make your selection as follows: Adding a new WANdisco Fusion cluster Select Add Zone. Adding additional WANdisco Fusion servers to an existing WANdisco Fusion cluster Select Add to an existing Zone.
High Availability for WANdisco Fusion / IHC Servers
It’s possible to enable High Availability in your WANdisco Fusion cluster by adding additional WANdisco Fusion/IHC servers to a zone. These additional nodes ensure that in the event of a system outage, there will remain sufficient WANdisco Fusion/IHC servers running to maintain replication.Add HA nodes to the cluster using the installer and choosing to Add to an existing Zone. A new node name will be assigned although you can choose your own label if you prefer.
-
Run through the installer’s detailed Environment checks. For more details about exactly what is required and checked for, see the pre-requisites checklist.
 Figure 24. Installer screen
 -
On clicking validate the installer will run through a series of checks of your system’s hardware and software setup and warn you if any of WANdisco Fusion’s prerequisites are missing.
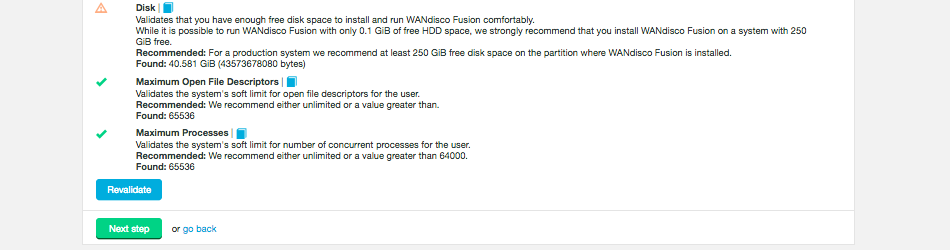 Figure 25. Validation results
Any element that fails the check should be addressed before you continue the installation. Warnings may be ignored for the purposes of completing the installation, especially if only for evaluation purposes and not for production. However, when installing for production, you should address all warnings, or at least take note of them and exercise due care if you continue the installation without resolving and revalidating.
-
Upload the license file.
 Figure 26. Installer screen
The conditions of your license agreement will be shown in the top panel.
Click Next step to continue. -
Enter settings for the WANdisco Fusion server.
 Figure 27. Fusion server settings
WANdisco Fusion Server
- Fully Qualified Domain Name / IP
-
The full hostname for the server.
- We have detected the following hostname/IP addresses for this machine.
-
The installer will try to detect the server’s hostname from its network settings. Additional hostnames will be listed on a dropdown selector.
- DConE Port
-
TCP port used by WANdisco Fusion for replicated traffic. Validation will check that the port is free and that it can be bound to.
- Fusion HTTP Policy Type
-
Sets the policy for communication with the WANdisco Fusion Core Server API.
Select from one of the following policies:
Only HTTP - WANdisco Fusion will not use SSL encryption on its API traffic.
Only HTTPS - WANdisco Fusion will only use SSL encryption for API traffic.
Use HTTP and HTTPS - WANdisco Fusion will use both encrypted and un-encrypted traffic.Known IssueCurrently, the HTTP policy and SSL settings both independently alter how WANdisco Fusion uses SSL, when they should be linked. You need to make sure that your HTTP policy selection and the use of SSL (enabled in the next section of the Installer) are in sync. If you choose either to the policies that use HTTPS, then you must enable SSL. If you stick with "Only HTTP" then you must ensure that you do not enable SSL. In a future release these two settings will be linked so it wont be possible to have contradictory settings. - Fusion HTTP Server Port
-
The TCP port used for standard HTTP traffic. Validation checks whether the port is free and that it can be bound.
- Maximum Java heap size (GB)
-
Enter the maximum Java Heap value for the WANdisco Fusion server. The minimum for production is 16GB but 64GB is recommended.
- Umask (currently 0022)
-
Set the default permissions applied to newly created files. The value 022 results in default directory permissions 755 and default file permissions 644. This ensures that the installation will be able to start up/restart.
Advanced options
|
Only apply these options if you fully understand what they do.
The following advanced options provide a number of low level configuration settings that may be required for installation into certain environments.
The incorrect application of some of these settings could cause serious problems, so for this reason we strongly recommend that you discuss their use with WANdisco’s support team before enabling them.
|
Custom Fusion Request Port
You can provide a custom TCP port for the Fusion Request Port (also known as WANdisco Fusion client port).
The default value is 8023.
Strict Recovery
Two advanced options are provided to change the way that WANdisco Fusion responds to a system shutdown where WANdisco Fusion was not shutdown cleanly.
Currently the default setting is to not enforce a panic event in the logs, if during startup we detect that WANdisco Fusion wasn’t shutdown.
This is suitable for using the product as part of an evaluation effort.
However, when operating in a production environment, you may prefer to enforce the panic event which will stop any attempted restarts to prevent possible corruption to the database.
-
DConE panic if db is dirty
This option lets you enable the strict recovery option for WANdisco’s replication engine, to ensure that any corruption to its prevayler database doesn’t lead to further problems. When the checkbox is ticked, WANdisco Fusion will log a panic message whenever WANdisco Fusion is not properly shutdown, either due to a system or application problem.
-
App panic if db is dirty
This option lets you enable the strict recovery option for WANdisco Fusion’s database, to ensure that any corruption to its internal database doesn’t lead to further problems. When the checkbox is ticked, WANdisco Fusion will log a panic message whenever WANdisco Fusion is not properly shutdown, either due to a system or application problem.
Push Threshold
-
Set threshold manually
Set to blocksize, by default. See the Set push threshold manually panel under the Fusion Server section of the Settings tab. Chunk Size
The size of the 'chunks' used in file transfer.
-
Enter the settings for the IHC Server.
 Figure 28. IHC Server details
- Maximum Java heap size (GB)
-
Enter the maximum Java Heap value for the WD Inter-Hadoop Communication (IHC) server. The minimum for production is 16GB but 64GB is recommended.
- IHC network interface
-
The hostname for the IHC server. It can be typed or selected from the dropdown on the right.
|
Don’t use Default route (0.0.0.0) for this address
Use an actual IP address for an interface that is accessible from the other cluster. Default route is already used by the WANdisco Fusion server on the other side to pick up a proper address for the IHC server at the remote end.
|
Advanced Options (optional)
- IHC server binding address
-
In the advanced settings you can decide which address the IHC server will bind to. The address is optional, by default the IHC server binds to all interfaces (0.0.0.0), using the port specified in the
ihc.serverfield.
Once all settings have been entered, click Next step.
-
Next, you will enter the settings for your new Zone.
 Figure 29. Zone information
Entry fields for zone properties:
- Zone Name
-
The name used to identify the zone in which the server operates.
- Node Name
-
The Node’s assigned name that is used in with the UI and referenced in the node server’s hostname.
Induction failureIf induction fails, attempting a fresh installation may be the most straight forward cure, however, it is possible to push through an induction manually, using the REST API. See Handling Induction Failure.Known issue with Node IDsYou must use different Node IDs for each zone. If you use the same name for multiple zones, then you will not be able to complete the induction between those nodes. - Management Endpoint
-
If relevant to your set up, select the manager that you are using, for example Cloudera or Ambari. The selection will display the entry fields for your selected manager.
URI Selection
The default behavior for WANdisco Fusion is to fix all replication to the Hadoop Distributed File System / hdfs:/// URI. Setting the hdfs-scheme provides the widest support for Hadoop client applications, since some applications can’t support the available "fusion:///" URI they can only use the HDFS protocol. Each option is explained below:
- Use HDFS URI with HDFS file system
-
The element appears in a radio button selector:

This option is available for deployments where the Hadoop applications support neither the WANdisco Fusion URI nor the HCFS standards. WANdisco Fusion operates entirely within HDFS.
This configuration will not allow paths with the fusion:/// uri to be used; only paths starting with hdfs:/// or no scheme that correspond to a mapped path will be replicated. The underlying file system will be an instance of the HDFS DistributedFileSystem, which will support applications that aren’t written to the HCFS specification.
- Use WANdisco Fusion URI with HCFS file system
-
 Figure 31. URI option B
This is the default option that applies if you don’t enable Advanced Options, and was the only option in WANdisco Fusion prior to version 2.6. When selected, you need to use
fusion://for all data that must be replicated over an instance of the Hadoop Compatible File System. If your deployment includes Hadoop applications that are either unable to support the Fusion URI or are not written to the HCFS specification, this option will not work.
| Platforms that must be run with Fusion URI with HCFS: |
|---|
Azure |
LocalFS |
OnTapLocalFs |
UnmanagedBigInsights |
UnmanagedSwift |
UnmanagedGoogle |
UnmanagedS3 |
UnmanagedEMR |
MapR |
- Use Fusion URI with HDFS file system
-
 Figure 32. URI option C
This differs from the default in that while the WANdisco Fusion URI is used to identify data to be replicated, the replication is performed using HDFS itself. This option should be used if you are deploying applications that can support the WANdisco Fusion URI but not the Hadoop Compatible File System.
Benefits of HDFS.
The following advanced options provide a number of low level configuration settings that may be required for installation into certain environments.
The incorrect application of some of these settings could cause serious problems, so for this reason we strongly recommend that you discuss their use with WANdisco’s support team before enabling them.
- Use Fusion URI and HDFS URI with HDFS file system
-
This "mixed mode" supports all the replication schemes (
fusion://, hdfs:// and no scheme) and uses HDFS for the underlying file system, to support applications that aren’t written to the HCFS specification. Figure 33. URI option D
Advanced Options
|
Only apply these options if you fully understand what they do.
The following Advanced Options provide a number of low level configuration settings that may be required for installation into certain environments.
The incorrect application of some of these settings could cause serious problems, so for this reason we strongly recommend that you discuss their use with WANdisco’s support team before enabling them.
|

- HTTP UI Host
-
To change the host the UI binds to, enter your UI host or select it from the drop down below.
- HTTP UI Port
-
To change the port the UI binds to, enter the port number for the Fusion UI. Make sure this port is available.
- HTTP UI External Host
-
The address external processes should use to connect to the UI on. This is the address used by, for example, the Jump to node button on the UI Nodes tab. Depending on your system configuration this may be different to the internal address used when accessing the node via a browser.
UI trustStore Options
The next section deals with your installation’s trustStore settings. Select the appropriate radio button option, then click Update and Validate or Update (if you select Disable TrustStore).
|
Important Known Issue This issue is fixed in 2.12.4 There is currently a known issue with this truststore, whereby it is automatically classed as invalid and checks are disabled. However, trust errors may occur and the functionality is marked as disabled in the UI properties config file. The resultant trust errors can be fixed by restarting the Fusion UI Server. |
Use JVM TrustStore
Select Use JVM TrustStore to install with the default JVM TrustStore, e.g. $JAVA_HOME/jre/lib/security/cacerts.

Use Custom Trust Store
Select Use Custom Trust Store to install with your own TrustStore.


Manager Settings
-
In the lower panel you now need to configure the Cloudera or Ambari manager if relevant to your set up.
 Figure 38. Cloudera Manager Configuration
 Figure 39. Ambari Configuration
- Manager Host Name /IP
-
The FQDN for the server the manager is running on.
- Port
-
The TCP port the manager is served from. The default is 7180 (Cloudera Manager) and 8080 (Ambari).
- Username
-
The username of the account that runs the manager. This account must have admin privileges on the Management endpoint.
- Password
-
The password that corresponds with the above username.
- SSL
-
Tick the SSL checkbox to use https in your Manager Host Name and Port. You may be prompted to update the port if you enable SSL but don’t update from the default http port. If using SSL the Ambari server certificate needs to be added to the default java cacerts, e.g.
Java keystore = /usr/java/jdk1.8.0_131/jre/lib/security/
Once you have entered the information click Validate.
- Cluster manager type
-
Validates connectivity with the cluster manager.
- HDFS service state
-
WANdisco Fusion validates that the HDFS service is running. If it is unable to confirm the HDFS state a warning is given that will tell you to check the UI logs for possible errors. See the Logs section for more information.
- HDFS service health
-
WANdisco Fusion validates the overall health of the HDFS service. If the installer is unable to communicate with the HDFS service then you’re told to check the WANdisco Fusion UI logs for any clues.
See the Logs section for more information.
- HDFS service maintenance mode
-
WANdisco Fusion looks to see if HDFS is currently in maintenance mode. Both Hortonworks and Ambari support this mode for when you need to make changes to your Hadoop configuration or hardware, it suppresses alerts for a host, service, role or, if required, the entire cluster.
WANdisco Fusion does not require maintenance mode to be off, this validation is simply to bring the state to your attention.
- Fusion node as HDFS client
-
Validates that this Fusion node is a HDFS client.
-
Enter the security details applicable to your deployment.
 Figure 40. Security - No Kerberos
- Cluster Kerberos Configuration
-
When Kerberos is not enabled, this element will appear with the following message:
We detected that your cluster does not have Kerberos security enabled. If your cluster becomes Kerberized in the future, you can configure it after installation via the WANdisco Fusion user interface.
 Figure 41. Security - Kerberos enabled
 - Cluster Kerberos Configuration
-
When Kerberos is enabled, this element will appear with the following message:
Your manager reports that your cluster is Kerberos enabled. Please enter the following
- Configuration file path
-
the local file system path to the Kerberos krb5 configuration file. Normally installed in the /etc directory.
- Keytab file path
-
the path to the Kerberos keytabl file
- Principal
-
the unique identity to which Kerberos will assign authentication tickets
- Handshake Token Directory
-
is an optional entry. It defines what the root token directory should be for the Kerberos Token field. This is set if you want to target the token creations within the NFS directory and not on just the actual LocalFileSystem. If left unset it will default to the original behaviour; which is to create tokens in the /user/<username>/ directory.
 Figure 42. Security - Kerberos enabled - more detailsKnown Issue - Validation may hangThe validation of the Kerberos Handshake Directory may hang. If this occurs, go back to the previous installer screen and then retry.
Fusion Kerberos Configuration
Optional settings for using your Kerberos authentication with the Fusion server. Tick the checkbox to enable.
| Enable API Authorization after installation. See Setting up API Authorization. |

- Enable HTTP Authentication
-
Tick the checkbox to enable Kerberos authentication between Fusion servers.
- Keytab file path
-
The path to the applicable keytab
- Enable API Authorization
-
Tick the checkbox to enable authorization to apply to Fusion’s REST API. Users must be configured manually in the core-site file, will need to be distributed manually
Click Validate.
Fusion Administrator Configuration
During installation you must provide credentials for a Fusion Administrator account. This account replaced the "admin", although you can still use "admin" as its username. This account will function as a user with all available Fusion privileges, in contrast to other user roles that are now available if you deploy using an authentication/authorization mechanism, such as LDAP/Active Directory. See Authorization and authentication.
| In earlier versions of Fusion, authentication was delegated to your Hadoop manager (Ambari or Cloudera Manager), from Fusion 2.12 these details are managed though Fusion itself. |
- Username
-
The username for the controlling Fusion Administrator account that will be used to access all areas of the WANdisco Fusion UI.
- User Password
-
The installer automatically generates a well formed (random) password that you use, or you may use the Generate new password feature.
Should you ever need to reset the Fusion Administrator password, see Generate a new password Before you click Next step note the message:
When you progress past this step we will - if applicable - submit configuration changes to your cluster manager. You will need to distribute this in a later step.
|
Once you have completed installation you can access the Fusion Administrator Details under the Security section of the Settings Screen. 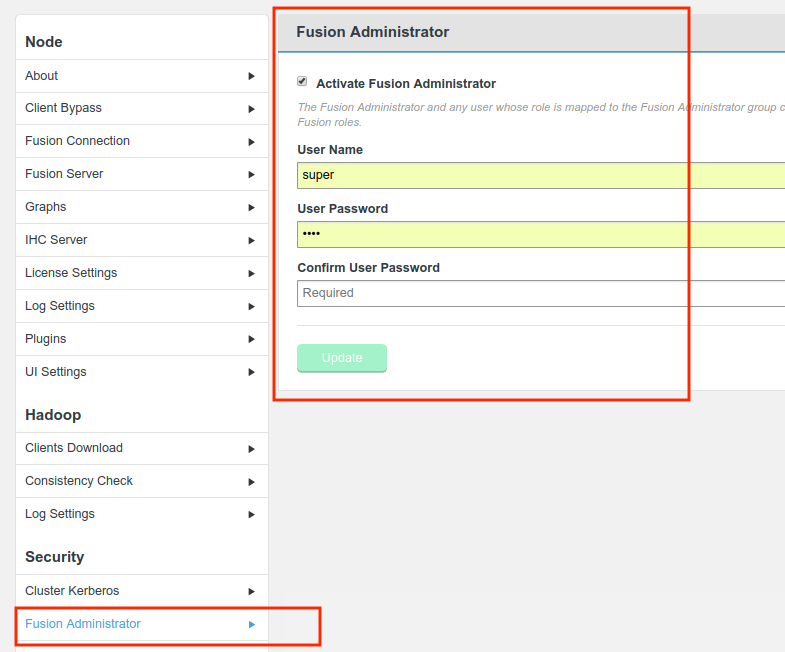
Figure 44. Fusion Administrator login
Use this screen to update the User Name or associated Password. |
-
In the next step you need to place the WANdisco Fusion client parcel on the manager node and distribute to all nodes in the cluster. The WANdisco Fusion client is required to support data WANdisco Fusion’s replication across the Hadoop ecosystem. Follow the on-screen instructions relevant to your installation, this may involve going to the UI of your manager.
 Figure 45. Clients
Ambari Installation
If you are installing onto a platform that is running Ambari, once the clients are installed you should log in to Ambari and restart services that are flagged as waiting for a restart. This will apply to MapReduce and YARN, in particular.

|
Potential failures on restart
In some deployments, particularly running HBase, you may find that you experience failures after restarting. In these situations if possible, leave the failed service down until you have completed the next step where you will restart WANdisco Fusion.
|
If you are running Ambari 1.7, you’ll be prompted to confirm this is done.

Confirm that you have completed the restarts.
|
Restarting Ambari
If using centos6/rhel6 we recommend using the following command to restart: initctl restart ambari-server Instead of service ambari-server restart |
|
Important! If you are installing on Ambari 1.7 or CDH 5.3.x
Additionally, due to a bug in Ambari 1.7, and an issue with the classpath in CDH 5.3.x, before you can continue you must log into Ambari/Cloudera Manager and complete a restart of HDFS, in order to re-apply WANdisco Fusion’s client configuration.
|
-
Configuration is now complete. You may receive notices or warning messages if, for example, your clients have not yet been installed. You can now address any client installations, then click Revalidate Client Install to make the warning go away. Once you have followed the on screen instructions click Start WANdisco Fusion to continue.
 Figure 48. Startup
 -
If you have existing nodes you can induct them now. If you would rather induct them later, click Skip Induction.
 Figure 49. Induction
- Fully Qualified Domain Name
-
The fully qualified domain name of the node that you wish to connect to.
- Fusion Server Port
-
The TCP port used by the remote node that you are connecting to 8082 is the default port.
|
No induction for the first installed node
When you install the first node, you can’t complete an induction. Instead you will click "Skip Induction".
|
|
Installation on second node
If you have just installed on a second node, you now need to check in core-site.xml that hadoop.proxyuser.<fusionusername>.hosts has the expected value.
|
Configure Fusion
Once WANdisco Fusion has been installed on all data centers you can proceed with setting up replication on your HDFS file system. You should plan your requirements ahead of the installation, matching up your replication with your cluster to maximize performance and resilience. The next section will take a brief look at a example configuration and run through the necessary steps for setting up data replication between two data centers.
Setting up Replication
The following steps are used to start replicating HDFS data. The detail of each step will depend on your cluster setup and your specific replication requirements, although the basic steps remain the same.
-
Create and configure a Replication Rule. See Replication Rules.
-
Perform a consistency check on your replication rule. See Consistency Check.
-
Configure your Hadoop applications to use WANdisco’s protocol.
-
Run Tests to validate that your replication rule remains consistent while data is being written to each data center.
4.3.4. Silent installation
The "Silent" installation tools are still under development, although, with a bit of scripting, it should now be possible to automate WANdisco Fusion node installation. The following section looks at the provided tools, in the form of a number of scripts, which automate different parts of the installation process.
|
Client Installations
The silent installer does not handle the deployment of client stacks/parcels. You must be aware of the following:
Stacks/Parcels must be in place before the silent installer is run, this includes restarting/checking for parcels on their respective managers.
Failure to do so will leave the HDFS cluster in a state without fusion clients and running with a config that expects them to be there, this can be fixed by reverting service configs if necessary.
See Installing Parcels and Stacks.
|
|
How to skip client installation
When installing Fusion, using the full silent installation procedure, on any node other than the name node, you will need to set the following flag to skip the installation of the Ambari client, as this has already been installed. e.g. ./silent-installer_full_install.sh --skip-client-install <location of silent-installer.properties file> |
|
Using Amazon Linux 2
If you are installing on Amazon Linux 2 you will need to add validation.environment.checks.enabled=false to the silent installer properties files.
This will mean environmental checks such as memory size and java version will be skipped so please ensure you have the correct set up before starting - see the Pre-requisites Checklist for more information.
|
Overview
The silent installation process supports two levels: Unattended installation handles just the command line steps of the installation, leaving the web UI-based configuration steps in the hands of an administrator. See unattended installation.
Fully Automated also includes the steps to handle the configuration without the need for user interaction.
Unattended Installation
Use the following command for an unattended installation where an administrator will complete the configuration steps using the browser UI.
sudo FUSIONUI_USER=x FUSIONUI_GROUP=y FUSIONUI_FUSION_BACKEND_CHOICE=z ./fusion-ui-server_rpm_installer.sh
Set the environment
There are a number of properties that need to be set up before the installer can be run:
- FUSIONUI_USER
-
User which will run WANdisco Fusion services. This should match the user who runs the hdfs service.
- FUSIONUI_GROUP
-
Group of the user which will run Fusion services. The specified group must be one that FUSIONUI_USER is in.
|
Check FUSIONUI_USER is in FUSIONUI_GROUP
Verify that your chosen user is in your selected group. > groups hdfs hdfs : hdfs hadoop |
- FUSIONUI_FUSION_BACKEND_CHOICE
-
Should be one of the supported package names, as per the following list, which includes all options, not all will be available on a single installer:
|
Check your release notes
Check the release notes for your version of WANdisco Fusion to be sure the packages are supported on your version.
|
-
cdh-5.5.0:2.6.0-cdh5.5.0
-
cdh-5.6.0:2.6.0-cdh5.6.0
-
cdh-5.7.0:2.6.0-cdh5.7.0
-
cdh-5.8.0:2.6.0-cdh5.8.0
-
cdh-5.9.0:2.6.0-cdh5.9.0
-
cdh-5.10.0:2.6.0-cdh5.10.0
-
cdh-5.11.0:2.6.0-cdh5.11.0
-
cdh-5.12.0:2.6.0-cdh5.12.0
-
cdh-5.13.0:2.6.0-cdh5.13.0
-
cdh-5.14.0:2.6.0-cdh5.14.0
-
cdh-5.15.0:2.6.0-cdh5.15.0
-
cdh-5.16.0:2.6.0-cdh5.16.0
-
emr-5.3.0:2.7.3-amzn-1
-
emr-5.4.0:2.7.3-amzn-1
-
gcs-1.0:2.7.3
-
gcs-1.1:2.7.3
-
hdi-3.5:2.7.3.2.5.0.0-1245
-
hdi-3.6:2.7.3.2.6.2.0-147
-
hdp-2.1.0:2.4.0.2.1.5.0-695
-
hdp-2.2.0:2.6.0.2.2.0.0-2041
-
hdp-2.3.0:2.7.1.2.3.0.0-2557
-
hdp-2.4.0:2.7.1.2.4.0.0-169
-
hdp-2.5.0:2.7.3.2.5.0.0-1245
-
hdp-2.6.0:2.7.3.2.6.0.3-8
-
hdp-2.6.2:2.7.3.2.6.2.0-205
-
hdp-2.6.3:2.7.3.2.6.3.0-235
-
hdp-2.6.4:2.7.3.2.6.4.0-91
-
hdp-2.6.5:2.7.3.2.6.5.0-292
-
ibm-4.2:2.7.2-IBM-12
-
ibm-4.2.5:2.7.3-IBM-29
-
localfs-2.7.0:2.7.0
-
mapr-5.0.0:2.7.0-mapr-1506
-
asf-2.5.0:2.5.0
-
asf-2.7.0:2.7.0
|
(ontap)/(s3)/(swt)
Each of these version use the same package "asf-2.5.0:2.5.0".
|
This mode only automates the initial command line installation step, the configuration steps still need to be handled manually in the browser steps.
Example
sudo FUSIONUI_USER=hdfs FUSIONUI_GROUP=hadoop FUSIONUI_FUSION_BACKEND_CHOICE=hdp-2.3.0 ./fusion-ui-server_rpm_installer.sh
Fully Automated Installation
This mode is closer to a full "Silent" installation as it handles the configuration steps as well as the installation.
This must be run as the user chosen to run Fusion. This is normally hdfs.
Properties that need to be set:
- SILENT_CONFIG_PATH
-
Path for the environmental variables used in the command-line driven part of the installation. The paths are added to a file called silent_installer_env.sh.
- SILENT_PROPERTIES_PATH
-
Path to 'silent_installer.properties' file. This is a file that will be parsed during the installation, providing all the remaining parameters that are required for getting set up. The template is annotated with information to guide you through making the changes that you’ll need.
Take note that parameters stored in this file will automatically override any default settings in the installer. - FUSIONUI_USER
-
User which will run Fusion services. This should match the user who runs the hdfs service.
- FUSIONUI_GROUP
-
Group of the user which will run Fusion services. The specified group must be one that FUSIONUI_USER is in.
- FUSIONUI_FUSION_BACKEND_CHOICE
-
Should be one of the supported package names.
- FUSIONUI_UI_HOSTNAME
-
The hostname for the WANdisco Fusion server.
- FUSIONUI_UI_PORT
-
Specify a fusion-ui-server port (default is 8083)
- FUSIONUI_TARGET_HOSTNAME
-
The hostname or IP of the machine hosting the WANdisco Fusion server.
- FUSIONUI_TARGET_PORT
-
The fusion-server port (default is 8082)
- FUSIONUI_MEM_LOW
-
Starting Java Heap value for the WANdisco Fusion server.
- FUSIONUI_MEM_HIGH
-
Maximum Java Heap.
- FUSIONUI_UMASK
-
Sets the default permissions applied to newly created files. The value 022 results in default directory permissions 755 and default file permissions 644. This ensures that the installation will be able to start up/restart.
- FUSIONUI_INIT
-
Sets whether the server will start automatically when the system boots. Set as "1" for yes or "0" for no
Cluster Manager Variables are deprecated
The cluster manager variables are mostly redundant as they generally get set in different processes though they currently remain in the installer code.
FUSIONUI_MANAGER_TYPE
FUSIONUI_MANAGER_HOSTNAME
FUSIONUI_MANAGER_PORT
- FUSIONUI_MANAGER_TYPE
-
"AMBARI", "CLOUDERA", "MAPR" or "UNMANAGED_EMR" and "UNMANAGED_BIGINSIGHTS" for IBM deployments. This setting can still be used but it is generally set at a different point in the installation now.
- validation.environment.checks.enabled
-
Permits the validation checks for environmental
- validation.manager.checks.enabled
-
Note manager validation is currently not available for S3 installs
- validation.kerberos.checks.enabled
-
Note kerberos validation is currently not available for S3 installs
If this part of the installation fails it is possible to re-run the silent_installer part of the installation by running:
/opt/wandisco/fusion-ui-server/scripts/silent_installer_full_install.sh /path/to/silent_installer.properties
Note that available silent installer scripts are located in:
/opt/wandisco/fusion-ui-server/silent_installer_properties/
i.e.
ls -l /opt/wandisco/fusion-ui-server/silent_installer_properties/
-rw-r--r-- 1 root root  2466 Jul 25 14:16 silent_installer_env.sh
-rw-r--r-- 1 root root 14876 Jul 25 14:16 silent_installer.properties
...
Uninstall WANdisco Fusion UI only
This procedure is useful for UI-only installations:
sudo yum erase -y fusion-ui-server
sudo rm -rf /opt/wandisco/fusion-ui-server /etc/wandisco/fusion/ui
To Uninstall Fusion UI, Fusion Server and Fusion IHC Server (leaving any fusion clients installed):
See the Uninstall Script Usage Section for information on removing Fusion.
Silent Installation files
For every package of WANdisco Fusion there’s both an env.sh and a .properties file. The env.sh sets environment variables that complete the initial command step of an installation. The env.sh also points to a properties file that is used to automate the browser-based portion of the installer. The properties files for the different installation types are provided below:
- silent_installer.properties
-
standard HDFS installation.
- s3_silent_installer.properties
-
properties file for Amazon S3-based installation.
- swift_silent_installer.properties
-
file for Swift-based installation.
4.4. LocalFileSystem Installation
For most cloud deployments, a WANdisco Fusion node must be installed within the customer’s local cluster for data replication into cloud-based storage.
4.4.1. Installer-based LocalFileSystem Deployment
The following procedure covers the installation and setup of WANdisco Fusion deployed over the LocalFileSystem. This requires an administrator to enter details throughout the procedure. Once the initial settings are entered through the terminal session, the deployment to the LocalFileSystem is then completed through a browser.
The procedure to install for LFS are very similar to the standard installation outlined in the On-premises installation guide. Follow these steps having read the differences highlighted below.
-
Make sure that you use an LFS specific installer, for example
fusion-ui-server-localfs_rpm_installer.sh. -
In step 7 of the UI installer there are no clients to install so you can skip this step. The step is reserved for deployments where HDFS clients need to be installed.
4.4.2. Notes on user settings
When using LocalFileSystem, you can only support a single user. This means when you configure the WANdisco Fusion Server’s process owner, that process owner should also be the process owner of the IHC server, the Fusion UI server, and the client user that will be used to perform any puts.
|
Fusion under LocalFileSystem only supports 1 user
Again, Fusion under LocalFileSystem only supports 1 user (on THAT side; you don’t have to worry about the other DCs). To assist administrators the LocalFS RPM comes with Fusion and Hadoop shell, so that it is possible to run suitable commands from either. E.g.
|
hadoop fs -ls /
fusion fs -ls /
Using the shell is required for replication.
4.5. Activate Fusion
4.5.1. Induction
Induction is the process used to incorporate new nodes into the WANdisco Fusion LiveData platform. The process can be run at the end of a node installation or at a later point.
Use this procedure if you have installed a new node but did not complete its induction into your replication system at the end of the installation process.
-
Log in to one of the active nodes, clicking on the Nodes tab. Click the + Induct button.
 Figure 50. Induct node
 -
Enter the FQDN of the new node that you wish to induct and the Fusion Server Port. Click Start Induction.
 Figure 51. Remote node details
- Fully Qualified Domain Name
-
The full domain name for the new node that you will induct into your replication system.
- Fusion Server Port
-
The TCP port used by the WANdisco Fusion application for configuration and reporting, both internally and via REST API. The port needs to be open between all WANdisco Fusion nodes and any systems or scripts that interface with WANdisco Fusion through the REST API. Default is 8082.
-
When the induction process completes you have the option to induct another node. The Nodes tab will refresh with the new node added to the list.
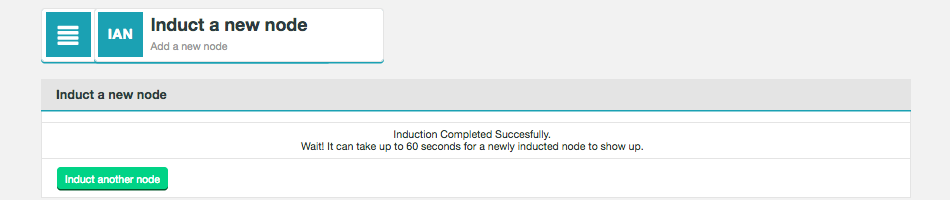 Figure 52. Induction complete
|
Re-make Replication Rules
To add your newly inducted nodes to existing Replication Rules you will need to manually remove existing rules and create new ones including the new node.
This process will be improved in future releases.For information on how to create rules see Create a Rule. |
Induction Failure
The induction process performs some validation before running. If this validation failures you will quickly see a warning messages appear.

- Automatic Induction Failure
-
If the induction process can’t connect to the new node using the details provided, a failure will happen instantly. This could happen because of an error in the new node’s installation, however it could also be caused by the node being kerberized.
- We also could not reach any of our standard ports
-
If connections can’t be made on specific Fusion ports, they will be listed here. If none of the standard ports are reachable then you will be warned that this is the case.
- Fully Qualified Domain Name
-
The full hostname for the server.
- Node ID
-
A unique identifier that will be used by WANdisco Fusion UI to identify the server.
- Location ID
-
This is the unique string (e.g. "db92a062-10ba-11e6-9df2-4ad1c6ce8e05") that appears on the Node screen (see below).
- DConE Port
-
The TCP port used by the replication system. It needs to be open between all WANdisco Fusion nodes. Nodes that are situated in zones that are external to the data center’s network will require unidirectional access through the firewall.
4.6. Validation
Before moving into production you should always perform completion testing to ensure that Fusion is functioning as expected, with the minimum required levels of performance.
4.6.1. Environment
Ensure…
-
operation across two data centers
-
there are three servers that can act as Name Nodes
-
there are a minimum of three data nodes
4.7. Upgrade
|
Contact support
Please contact WANdisco support before upgrading.
|
This section covers the basic steps to upgrade WANdisco Fusion 2.11.x to 2.12 in a vanilla environment. The steps shown are based on using CentOS. If you want to upgrade, please contact WANdisco support to discuss the specific details for your environment. WANdisco support will then make the necessary scripts available to you on customer.wandisco.com.
|
WD Hive is not supported from 2.12 onwards.
If WD Hive is installed the service must now be removed/replaced with Live Hive.
|
4.7.1. Before Upgrade
| The Fusion upgrade should not be done in conjunction with a cluster upgrade. |
Follow the steps in this section before upgrading.
-
Enable the Fusion Client Bypass. See Enable/disable client bypass via the UI.
-
Existing replication rules first need to be gathered using a script provided by WANdisco support. To do this:
-
Create a file called
config-src.jsoncontaining the following:{ "ui": { "host": "http://<your.fusion.node>", "port": 8083, "username": "$USERNAME", "password": "$PASSWORD" }, "server": { "host": "http://<your.fusion.node>", "port": 8082 } }Substitute
$USERNAMEand$PASSWORDfor the actual login credentials of your Fusion UI server, and<your.fusion.node>for the address of your node. -
Then run the command:
> python2 2_11-to-2_12_upgrade.py --config=config-src.json --read=true
An example of the output:
=> INFO:__main__:UI Server API: http://<your.fusion.node>:8083/api
=> INFO:__main__:Fusion Server API: http://<your.fusion.node>:8082/fusion
=> INFO:__main__:3 path(s): ['/repl', '/repl1', '/repl2']
=> INFO:__main__:Authentication token: 59e34afd-b9a3-4273-9087-653cd02ec5d4
=> INFO:__main__:Wrote 2_11.json
Note that
2_11.jsoncontains a view of the configuration information of the 2.11 install.
-
-
Now you need to transform the configuration by running:
> python2 2_11-to-2_12_upgrade.py --config=config-src.json --transform=true
An example of the output:
=> INFO:__main__:UI Server API: http://<your.fusion.node>:8083/api
=> INFO:__main__:Fusion Server API: http://<your.fusion.node>/fusion
=> INFO:__main__:Read 2_11.json
=> INFO:__main__:[ 1 / 3 ]: /repl
=> INFO:__main__:/repl: Marking GDCPROD as the priority zone as it was the local zone
=> INFO:__main__:[ 2 / 3 ]: /repl1
=> INFO:__main__:/repl: Marking GDCPROD as the priority zone as it was the local zone
=> INFO:__main__:[ 3 / 3 ]: /repl2
=> INFO:__main__:/repl2: Marking GDCPROD as the priority zone as it was the local zone
=> INFO:__main__:Wrote 2_12.json
2_12.jsonnow contains a transformed configuration that will be used to input the information into the new 2.12 install. -
Stop all Fusion services.
Stop the Fusion server:
service fusion-server stop
Stop the Fusion IHC server:
service fusion-ihc-server-<DISTRO_VERSION> stop
Stop the Fusion UI server:
service fusion-ui-server stop
-
Back up your WANdisco Fusion installation and configuration directories.
mkdir /tmp/fusion-upgrade
cp -pdr /etc/wandisco /tmp/fusion-upgrade/etc-wandisco-backup
cp -pdr /opt/wandisco /tmp/fusion-upgrade/opt-wandisco-backup
Config FilesThe configuration files may change between versions. This means that to return to your current configuration you will need to manually update any non-default values in all files in/etc/wandiscoat the end of the upgrade process.Note that /opt/wandisco contains the following property files and the prevayler, which will be necessary in case you decide to roll back to your previous Fusion version after upgrading. Make sure you have backed up these files and directory prior to moving on with the upgrade process.
Property files:
/opt/wandisco/fusion-ui-server/lib/fusion_ui_log4j.xml
/opt/wandisco/fusion-ui-server/properties/ui.properties
/etc/wandisco/fusion/server/application.properties
/etc/wandisco/fusion/server/log4j.properties
/etc/wandisco/fusion/server/logger.properties
/etc/wandisco/fusion/ihc/server/cdh-<your version>/log4j.properties
Prevayler:
/opt/wandisco/fusion/server/dcone
-
It may also be a good idea to preserve log files:
cp -pdr /var/log/fusion /tmp/fusion-upgrade/logs
-
If WD Hive is installed, remove it now by following the steps in the Live Hive plugin guide.
-
While the Fusion server is down, flush the DConE database on all Fusion nodes:
rm -rf /opt/wandisco/fusion/server/dcone/db
-
Download the installer script for the Fusion version you intend to upgrade to and extract its contents:
chmod +x fusion-ui-server-<PLATFORM>_rpm_installer.sh
./fusion-ui-server-<PLATFORM>_rpm_installer.sh --noexec --keep
The contents of the installer will be extracted to the directory installer/ by default.
4.7.2. Upgrade Fusion
-
Upgrade the Fusion server:
yum -y upgrade installer/resources/fusion-server/fusion-hcfs-<DISTRO-VERSION>-server-<FUSION_VERSION>.noarch.rpm
You should see the following output:
WANdisco Fusion Server upgraded successfully.
Fusion server startsThe Fusion server will start after the upgrade completes. -
Upgrade the Fusion IHC server:
yum -y upgrade installer/resources/fusion-ihc-server/fusion-hcfs-<DISTRO-VERSION>-ihc-server-<FUSION_VERSION>.noarch.rpm
You should see the following output:
WANdisco Fusion IHC Server upgraded successfully.
IHC server startThe Fusion IHC server will start after the upgrade completes. -
Upgrade the Fusion UI server:
yum -y upgrade installer/rpm/fusion-ui-server-<FUSION_VERSION>.noarch.rpm
The upgrade will now complete.
No automatic restartThe Fusion UI server has not been started and will need to be started manually at the end of the upgrade.
Now go to the appropriate section for your set up and follow the specific steps:
4.7.3. Cloudera Upgrade
The following section takes you through a WANdisco Fusion upgrade on a Cloudera managed cluster. Ensure you have followed the steps in the above section before continuing.
-
Install the new Fusion parcel.
-
Copy the new Fusion .parcel and .parcel.sha files from /opt/wandisco/fusion-ui-server/ui-client-platform/downloads/parcel_packages to the Cloudera Manager node’s /opt/cloudera/parcel-repo directory.
-
Change the ownership of the parcel and .sha files so that they match the system account that runs Cloudera Manager -
chown cloudera-scm:cloudera-scm FUSION-<version>-<version>.parcel*. -
Navigate to the parcels page of the Cloudera Manager and press ‘Check for new parcels’. You should have 2 parcels, one for 2.11 and one for 2.12.
-
Now distribute and activate the new Fusion parcel. This will automatically deactivate the old parcel so the old 2.11 parcel should now be inactive, and the 2.12 parcel active.
-
Now remove the old 2.11 Fusion parcel from hosts.
-
-
To complete the upgrade follow the steps below.
4.7.4. Ambari Upgrade
The steps below will take you through a WANdisco Fusion upgrade on an Ambari managed cluster. Ensure you have followed the steps in the Before Upgrade section before continuing.
-
Remove the old Fusion stack from the Ambari UI via WANdisco Fusion → Service Actions → Delete Service.
 Figure 53. Ambari Upgrade - Delete Service
 -
Upgrade the Fusion stack.
-
Remove the old Fusion stack from the services directory on your Ambari manager node:
rm -rf /var/lib/ambari-server/resources/stacks/HDP/<VERSION>/services/FUSION
-
Copy the new Fusion stack from the Fusion node in /opt/wandisco/fusion-ui-server/ui-client-platform/downloads/stack_packages to /var/lib/ambari-server/resources/stacks/HDP/<VERSION>/services/ in the Ambari node.
-
Unpack the new Fusion stack inside the services directory.
-
Copy the RPM file from the Fusion package directory ( /opt/wandisco/fusion-ui-server/ui-client-platform/downloads/client_packages/) to the antecedent downloads directory, i.e., (/opt/wandisco/fusion-ui-server/ui-client-platform/downloads) on the Fusion Server node.
-
Restart the Ambari server so it is aware of the new stack:
service ambari-server restart
Note If using Centos6/RHEL6 we recommend using the following command to restart:
initctl restart ambari-server
-
Re-deploy the WANdisco Fusion stack via Actions → Add Service. You should now see the new stack package. Make sure to install the Fusion client on all nodes.
-
Now populate a new configuration in
fusion-client-configcalledfusion.ui.server.url. This should point to the Fusion UI server where the new client package will be obtained from (for example http://$HOSTNAME:8083). Figure 54. Ambari Upgrade - Delete Service
 -
Review the changes and complete the Service Wizard.
-
-
To complete the upgrade follow the steps below.
4.7.5. Final steps
-
Verify your Fusion configuration has not changed. Use the back-up files you’ve created copies of to verify that your Fusion configuration has not changed. If it has, the changed properties need to be changed back manually in the Fusion UI.
-
Restart all services marked as requiring a restart on the cluster manager.
-
IMPORTANT! It’s imperative that all old windows are closed and the browser cache is cleared prior to starting the Fusion UI server. Once this is complete, proceed with the start-up:
service fusion-ui-server start
The UI server should start successfully.
-
Induct your Fusion nodes - see Induction.
-
Now re-create the replication rules you recorded before starting the upgrade process. This step checks that zone names are the same as that of the 2.11 install and if not uses the rewrite rules defined in the configuration.
-
Create a file called
config-dst.jsoncontaining the following:{ "ui": { "host": "http://<your.fusion.node>.com", "port": 8083, "username": "$USERNAME", "password": "$PASSWORD" }, "server": { "host": "http://<your.fusion.node>.com", "port": 8082 }, "_Comment": "zones entails the zone rewrite rules", "zones": [{"old": "GDCPROD", "new": "zone01"}, {"old": "DC3PROD", "new": "zone02"}] } -
Now run the command:
> python2 2_11-to-2_12_upgrade.py --config=config-dst.json --pre-publish=true
An example of the output:
=> INFO:__main__:UI Server API: http://<your.fusion.node>:8083/api
=> INFO:__main__:Fusion Server API: http://<your.fusion.node>:8082/fusion
=> INFO:__main__:Read 2_12.json
=> INFO:__main__:Authentication token: 4472f0ff-9135-4440-ba9b-8e94f86369cc
=> INFO:__main__:Zone GDCPROD will be updated to be zone01
=> INFO:__main__:Zone DC3PROD will be updated to be zone02
=> INFO:__main__:Wrote publish-2_12.json
-
-
Now publish the transformed 2.12 configuration to the new install by running the command:
> python2 2_11-to-2_12_upgrade.py --config=config-dst.json --publish=true
An example of the output:
=> INFO:__main__:UI Server API: http://<your.fusion.node>:8083/api
=> INFO:__main__:Fusion Server API: http://<your.fusion.node>:8082/fusion
=> INFO:__main__:Authentication token: f8d880e1-6835-4a6e-b5bc-ec3f1122c797
=> INFO:__main__:Read publish-2_12.json
=> INFO:__main__:Checking 3 path(s) exist on the underlying storage
=> INFO:__main__:[ 1 / 3 ]: /repl
=> INFO:__main__:[ 2 / 3 ]: /repl1
=> INFO:__main__:[ 3 / 3 ]: /repl2
-
Disable client bypass - see Enable/disable client bypass.
-
Now carry out some basic tests to validate that replication is occurring correctly, for example perform a consistency check and make consistent, as well as testing replication. If these tests fail, re-enable client bypass and investigate the problem. Contact WANdisco support if you need assistance.
4.8. Uninstall WANdisco Fusion
| To avoid issues during the uninstall process, first remove the Ambari Fusion stacks or Cloudera parcels depending on your environment. Then proceed to uninstall the Fusion client and Fusion servers. |
4.8.1. Uninstalling Fusion - Ambari
Through Terminal
-
Remove the packages on the WANdisco Fusion Node.
yum remove -y “fusion-*”
-
Remove the jars, logs, configs.
rm -rf /opt/wandisco/ /etc/wandisco/ /var/run/fusion/ /var/log/fusion/
Through the Ambari UI
-
Click on Services, then HDFS. Next go to the Configs tab and then Advanced.
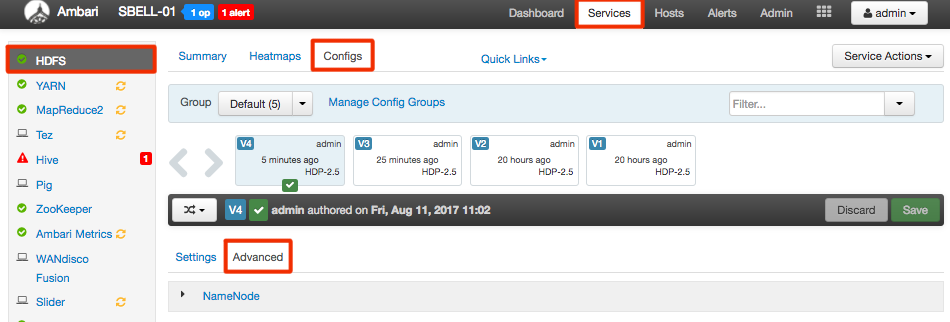
-
Scroll down until you come to the Custom core-site section.
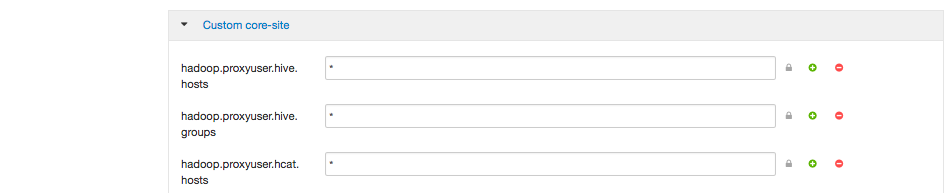
Remove all WANdisco Fusion related elements, for example
fs.fusion.underlyingFsandfs.hdfs.impl. -
Save changes.

Clean WANdisco Fusion HD
Go through the following steps before installing a new version of WANdisco Fusion:
-
On the production cluster, run the following curl command to remove the service:
curl -su <user>:<password> -H "X-Requested-By: ambari"
http://<ambari-server>:<ambari-port>/api/v1/clusters/<cluster-name>/services/FUSION -X DELETE
Replacing the following with your specific information:
-
<user>:<password> - login and password used for Ambari
-
<ambari-server>:<ambari-port> - the URL used to access Ambari UI
-
<cluster> refers to the cluster name - it can be seen at the very top next to the Ambari logo
-
-
On ALL nodes, run the corresponding package manager to remove the client package command. Firstly find your version using the command:
rpm -qa 'fusion*'
Then run the following command, using your version number:
yum erase fusion-hcfs-hdp-2.6.0-client-hdfs
-
Now go to the Ambari UI homepage and restart Hive.
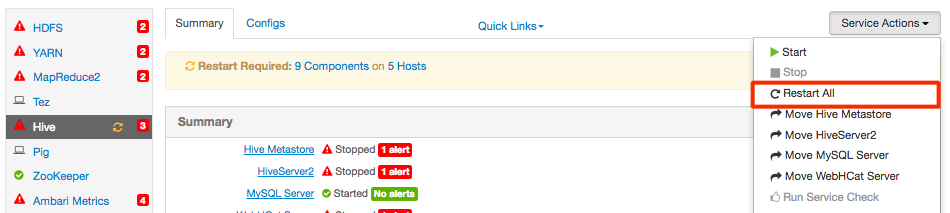
-
In terminal, remove all packages from clients if they exist.
yum remove -y fusion*client*.rpm
-
Restart services in Ambari.
-
Finally, in Ambari, make sure the following properties are removed from
core-site.xmlin the HDFS service:-
Fs.fusion.server -
Fs.hdfs.impl -
Fs.fusion.impl
-
4.8.2. Uninstalling Fusion - Cloudera
Through the Cloudera UI
-
From the Cloudera homepage click on hfds1 and then Configuration.
In the search box, search for Fusion.
-
Remove all WANdisco Fusion related elements and then save the changes.

-
Stop the Cluster or Hosts that are still running Fusion.

-
Now click on the Parcels icon.

-
Scroll down to FUSION and click Deactivate.

-
On the pop out, change to Deactivate only.

-
Now click Remove From Hosts.

Confirm the removal.
-
Start Clusters and Hosts that were stopped.

-
Restart services as necessary for configuration changes to go through. These will be highlighted by warnings in the UI.
4.8.3. Default Uninstall
In cases where you need to remove WANdisco Fusion from a system, use the following script:
/opt/wandisco/fusion-ui-server/scripts/uninstall.sh
-
The script is placed on the node during the installation process.
-
You must run the script as root or invoke sudo.
-
Running the script without using an additional option performs the following actions.
A default uninstall using the script:
-
Stops all WANdisco Fusion related services
-
Uninstalls the WANdisco Fusion, IHC and UI servers
-
Uninstalls itself.
After running the script you will need to:
Usage
The script can be used as follows:
sudo CONFIG_BACKUP_DIR=/data/my_config_backup LOG_BACKUP_DIR=/data/my_log_backup /opt/wandisco/fusion-ui-server/scripts/uninstall.sh -c -l -p
Running the script with -h outputs a list of options for the script.
Usage: ./uninstall.sh [-c] [-l] [-p] [-d]
 -c: Backup config to '$CONFIG_BACKUP_DIR' (default: /tmp/fusion_config_backup).
 -d: Dry run mode. Demonstrates the effect of the uninstall without performing the requested actions.
 -h: This help message.
 -l: Backup logs to '$LOG_BACKUP_DIR' (default: /tmp/fusion_log_backup).
 -p: Purge config, log, data files, etc to leave a cleaned up system.
4.8.4. Backup config/log files
Run the script with the -c option to back up your config and -l to back up WANdisco Fusion logs.
The files will be backed up to the following location:
/tmp/fusion_config_backup/fusion_configs-YYYYMMDD-HHmmss.tar.gz
Change the default save directory
You can change the locations that the script uses for these backups by adding the following environmental variables:
CONFIG_BACKUP_DIR=/path/to/config/backup/dir
LOG_BACKUP_DIR=/path/to/log/backup/dir
4.8.5. Uninstall with config purge
Running the script with -p will also include the removal of any configuration changes that were made during the WANdisco Fusion installation.
Reinstallation
Use the purge (-p) option in the event that you need to complete a fresh installation.
As the purge option will completely wipe your installation, there’s a backup option that can be run to back up your config files. Please note that the backup option is for recording final state/capturing logs for analysis. It isn’t practical for this option to be used to restore an installation.
4.8.6. Service removal
There’s an uninstaller script, so that you don’t need to clean up your deployment manually. If you used the unified installer then use the uninstall script, following the steps described in Uninstall.
Cloudera Manager:
-
Go to "Cluster-wide Advanced Configuration Snippet (Safety Valve) for core-site.xml"
-
Delete all Fusion-related content
-
Remove WANdisco Fusion parcel
-
Restart services
For more detailed steps see Uninstalling Fusion - Cloudera.
Ambari
-
Got to HDFS → Configs → Advanced → Custom core-site
-
Delete all WANdisco Fusion-related elements
-
Remove stack
-
Remove the package from all clients, e.g.
yum remove -y fusion*client*.rpm
-
Restart services
For more detailed steps see Uninstalling Fusion - Ambari.
Core-site properties to delete:
For a complete uninstallation, remove the following properties from the
core-site.xml:
-
fs.fusion.server (If removing a single node from a zone, remove just that node from the property’s value, instead).
-
fs.hdfs.impl (its removal ensures that this native hadoop class is used, e.g.
org.apache.hadoop.hdfs.DistributedFileSystem). -
fs.fusion.impl
Reinstalling fusion server only
If you reinstall the fusion-server without also reinstalling the
fusion-ui-server, then you should restart the fusion-ui-server service
to ensure the correct function of some parts of the UI. If the service
is not restarted then you may find that the dashboard graphs stop
working properly, along with the UI’s Stop/start controls. e.g. run:
[root@redhat6 init.d]# service fusion-ui-server restart
4.9. Installing without the installer
The following procedures covers the hands-on approach to installation and basic setup of a deployment that deploys over the LocalFileSystem. For the vast majority of cases you should use the previous Installer-based LocalFileSystem Deployment procedure.
|
Don’t do it this way unless you have to.
We provide this example to illustrate how a completely hands-on installation can be performed. We don’t recommend that you use it for a deployment unless you absolutely can’t use the installers.
Instead, use it as a reference so that you can see what changes are made by our installer.
|
4.9.1. Non-HA Local filesystem setup
-
Start with the regular WANdisco Fusion setup. You can go through either the installation manually or using the installer.
-
When you select the $user:$group you should pick a master user account that will have complete access to the local directory that you plan to replicate. You can set this manually by modifying etc/wandisco/fusion-env.sh setting FUSION_SERVER_GROUP to
$groupand FUSION_SERVER_USER to$user. -
Next, you’ll need to configure the core-site.xml, typically in /etc/hadoop/conf/, and override “fs.file.impl” to “com.wandisco.fs.client.FusionLocalFs”, “fs.defaultFS” to "file:///", and "fs.fusion.underlyingFs" to "file:///". (Make sure to add the usual Fusion properties as well, such as "fusion.server").
-
If you are running with fusion URI, (via “fs.fusion.impl”), then you should still set the value to “com.wandisco.fs.client.FusionLocalFs”.
-
If you are running with Kerberos then you should also override “fusion.handshakeToken.dir” to point to some directory that will exist within the local directory you plan to replicate to/from. You should also make sure to have “fusion.keytab” and “fusion.principal” defined as usual.
-
Ensure that the local directory you plan to replicate to/from already exists. If not, create it and give it 777 permissions or create a symlink (locally) that will point to the local path you plan to replicate to/from.
-
For example, if you want to replicate /repl1/ but don’t want to create a directory on your root level, you can create a symlink to repl1 on your root level and point it to wherever you want to actually be your replicated directory. In the case of using NFS, it should be used to point to /mnt/nfs/.
-
Set-up an NFS.
Be sure to point your replicated directory to your NFS mount, either directly or using a a symlink.
4.9.2. HA local file system setup
-
Install Fusion UI, Server, IHC, and Client (for LocalFileSystem) on every node you plan to use for HA.
-
When you select the
$user:$groupyou should pick a master user account that will have complete access to the local directory that you plan to replicate. You can set this manually by modifying /etc/wandisco/fusion-env.sh setting FUSION_SERVER_GROUP to$groupand FUSION_SERVER_USER to$user. -
Next, you’ll need to configure the core-site.xml, typically in /etc/hadoop/conf/, and override “fs.file.impl” to “com.wandisco.fs.client.FusionLocalFs”, “fs.defaultFS” to "file:///", and “fs.fusion.underlyingFs” to "file:///". (Make sure to add the usual Fusion properties as well, such as "fs.fusion.server").
-
If you are running with fusion URI, (via “fs.fusion.impl”), then you should still set the value to “com.wandisco.fs.client.FusionLocalFs”.
-
If you are running with Kerberos then you should also override “fusion.handshakeToken.dir” to point to some directory that will exist within the local directory you plan to replicate to/from. You should also make sure to have “fusion.keytab” and “fusion.principal” defined as usual.
-
Ensure that the local directory you plan to replicate to/from already exists. If not, create it and give it 777 permissions or create a symlink (locally) that will point to the local path you plan to replicate to/from.
-
For ex, if you want to replicate /repl1/ but don’t want to create a directory on your root level, you can create a symlink to repl1 on your root level and point it to wherever you want to actually be your replicated directory. In the case of using NFS, it should be used to point to /mnt/nfs/.
-
Now follow a regular HA set up, making sure that you copy over the core-site.xml and fusion-env.sh everywhere so all HA nodes have the same configuration.
-
Create the replicated directory (or symlink to it) on every HA node and chmod it to 777.
5. Installation (Cloud)
The following section covers the installation of WANdisco Fusion into a cloud / hybrid-cloud environment.
5.1. Alibaba Installation
WANdisco Fusion can be installed on Alibaba Cloud, enabling you to replicate on-premises data over to Alibaba Cloud.
5.1.1. Installation of WANdisco Fusion for use with Alibaba
Installing WANdisco Fusion for use with Alibaba Cloud follows a very similar process to the standard installation.
The first part of the installation is CLI based.
Follow the steps in the Starting the Installation section to do this.
Note - you will need to use an Alibaba specific installer, for example, fusion-ui-server-alibaba_rpm_installer.sh.
The next section of the installer is browser based. For this, follow the steps in the Browser-based configuration section. All steps are the same for Alibaba installation except for some additional fields which need to be completed on page 5 of the installer.
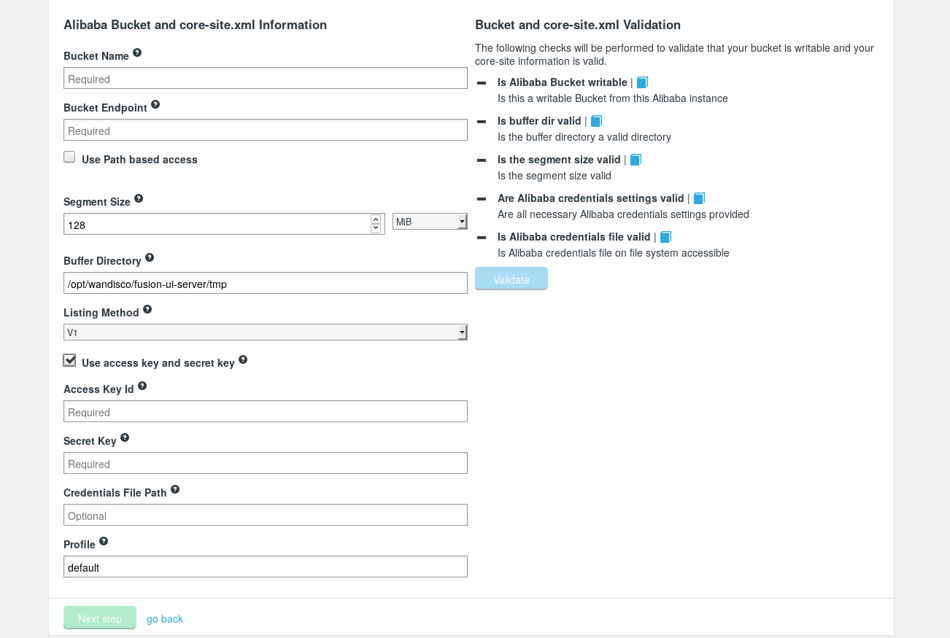
- Bucket Name
The name of the storage bucket that will be replicated. Validation checks that this bucket is writable.
- Bucket Region Endpoint
-
This is where your bucket is based. As the bucket name contains no identifying information on where it is located, this information is necessary.
- Use Path based access
-
Select this if you want to use path based access, this is important if your bucket is protect by SSL.
- Segment Size
-
This the smallest block to write.
- Buffer Directory
-
This is where complete objects are stored before being pushed to storage. Appends are not supported and so complete files must always be pushed.
- Listing Method
-
This defines which listing request Fusion makes.
If you are using access key and secret key then additional fields are required. Please see the Use access key and secret key section for more information on this.
As there are no clients to install for this Cloud Platform you can skip step 7 of the installer.
For more information on post-installation configuration see the Configuration for S3 section, and for information about completing cloud or hybrid deployments, see the Cloud Deployment Guide.
5.2. Amazon Installation
Seamlessly move transactional data at petabyte scale to Amazon S3 with no downtime and no disruption.
There are 2 flavors of WANdisco Fusion underpinned by Amazon’s S3 service. The Live S3 plugin is covered in the Plugin guide. This section gives information on installing and using Fusion with EMR, this Fusion flavor allows multi-directional replication and is used through AWS. This set up can use Bring Your Own License (BYOL) or the AWS metering model. The BYOL model requires that you have already contacted WANdisco and purchased a license whereas metering is purchased through the AWS Marketplace.
IMPORTANT: Amazon cost considerations.
Please take note of the following costs, when running Fusion from Amazon’s cloud platform:
-
AWS EC2 instances are charged per hour or annually.
-
WANdisco Fusion nodes provide continuous replication to S3 that will translate into 24/7 usage of EC2 and will accumulate charges that are in line with Amazon’s EC2 charges (noted above).
-
When you stop the Fusion EC2 instances, Fusion data on the EBS storage will remain on the root device and its continued storage will be charged for. However, temporary data in the instance stores will be flushed as they don’t need to persist.
-
If the WANdisco Fusion servers are turned off then replication to the S3 bucket will stop.
5.2.1. Prerequisites for AWS
See the Prerequisites Checklist for information about what is required for a WANdisco Fusion set up.
There is also more information on, for example, networking in the Cloud Deployment Guide.
Known issues when using WANdisco Fusion with AWS
-
With EMR consistency view enabled, if data is edited other than through the consistency view setting it will become out of sync. If you do edit data outside of the consistency view then the following needs to be added to
/etc/wandisco/fusion/server/core-site.xml:<property> <name>fs.s3.consistent.retryCount</name> <value>0</value> </property> <property> <name>fs.s3.consistent.throwExceptionOnInconsistency</name> <value>false</value> </property>
-
Known Issue when replicating data to S3 while not using the EMR version of Fusion.
Take note that the Amazon DynamoDB NoSQL database holds important metadata about the state of the content that would be managed by EMR and Fusion in S3. Deleting or modifying this content on any level except the EMR filesystem libraries (e.g. by manually deleting bucket content) will result in that metadata becoming out of sync with the S3 content.
This can be resolved by either using the EMRFS CLI tool "sync" command, or by deleting the DynamoDB table used by EMRFS. See AWS’s documentation about EMRFS CLI Reference.
This is a manual workaround that should only be used when strictly necessary. Ideally, when using the EMRFS variant of Fusion to replicate with S3, you should not modify S3 content unless doing so via an EMR cluster.
-
The following log message is a benign warning and can be ignored:
com.amazonaws.services.s3.internal.S3AbortableInputStream - AgreedExecutor-1-4:[Not all bytes were read from
the S3ObjectInputStream, aborting HTTP connection. This is likely an error and may result in sub-optimal behavior. Request only the bytes
you need via a ranged GET or drain the input stream after use.
It is a message which can occur in the version of AWS SDK used by WANdisco Fusion, see Github for more information.
-
Currently, the AWS Metering plugin status appears as "unknown", both on the Dashboard and Plugin Status panel, under the Settings tab, although it will work correctly.
5.2.2. AWS Metering
Amazon metering is a new pricing model available to AWS EC2 instances that charges for usage based on Data under replication during a clock hour. This value is the total size of data contained in replicated directories rounded up to the nearest terabyte.
|
WANdisco Fusion plugin status unknown
The AWS metering plugin status will show as unknown on the WANdisco Fusion dashboard. This will be fixed in the next release.
|
Data under replication
This is defined as the total amount of data held in AWS in directories that are replicated, excluding those files that are excluded from replication through regex-based filtering. WANdisco Fusion therefore measures the amount of data under replication each hour.
| Pricing bands for data replication | |
|---|---|
0-25TB |
$0.1/hour per TB under replication per instance |
26-50TB |
$0.075/hour per TB under replication per instance |
51-100TB |
$0.05/hour per TB under replication per instance |
101-200TB |
$0.04/hour per TB under replication per instance |
>200TB |
$0.03/hour per TB under replication per instance |
Installation via the AWS Marketplace
Follow these instructions to set up the metered option of WANdisco Fusion through the AWS Marketplace.
-
Login to your AWS account and navigate to the AWS Marketplace. Locate the WANdisco Fusion products and select WANdisco Fusion - Metered.
 Figure 56. AWS Marketplace - search for WANdisco
 -
You can review the product details on the product page. Click Continue to Subscribe to begin.
 Figure 57. AWS Marketplace - continue to subscribe
 -
On the Product Detail tab read the additional information available.
You must accept the terms for your specific version of FusionIf you try to start a CFT without first clicking the Accept Terms button you will get an error and the CFT will fail. If this happens, go to the Amazon Marketplace, search for the Fusion download screen that correspond with the version that you are deploying, run through the screen until you have clicked the Accept Terms button. -
Then click Continue to Configuration, this will take you to fulfillment options.
 Figure 58. AWS Marketplace - configuration
 -
Select Complete Installation of Fusion from the drop down menu then click Continue to Launch to proceed to the CFT launch.
 Figure 59. AWS Marketplace - installation option
 -
Select Launch CloudFormation from the drop down menu then click Launch to proceed to the CFT stack creation.
 Figure 60. AWS Marketplace - launch CFT creation
 -
Now follow the instructions on how to complete the CFT in the section Launching the Cloud Formation Template.
Metering troubleshooting
Logging and persistence files
For the Fusion plugin to be able to recover its state upon restart we need to have persistence of meter data. This is split into 3 files: live meter readings, failed meter readings and audit data.
Unless specified in /etc/wandisco/fusion/plugins/aws-metering/metering.properties all of these files will be in /etc/wandisco/fusion/aws-metering
- meterAudit.json
-
Contains a record of all reports made to Amazon Web Services and is read by the UI side of the plugin to display the graphs as well as being readable by the user and support.
- meterFile.json
-
This encrypted file holds the requests for the hour time period. Once the hour is up the stored request logs are used to calculate the maximum amount of data transfer that took place within the hour, and this number used for working out the charging.
- meterFail.json
-
An encrypted file that holds any failed requests to AWS.
How WANdisco Fusion handles failed usage recording
-
Failed requests are retried periodically.
-
Metering runs on clock hours, i.e. billing will apply on the hour, at 2pm for the hour between 1pm-2pm, rather than for an arbitrary 60-minute period.
-
Amazon does not allow the submission of billing reports that are over 3 hours old. Any reports that have failed to reach AWS and are over 3 hours old will be aggregated and submitted with the latest valid report.
-
If a WANdisco Fusion instance fails to bill AWS for a 48 hour period, the service will become degraded.
|
License exception
If WANdisco Fusion enters a license exception state due to failed metering records, you will need to restart Fusion on the metering node to recover operation.
|

5.2.3. AWS Bring Your Own License
| The BYOL (Bring Your Own License) version requires that you purchase a license, separately, from WANdisco. |
Installation via the AWS Marketplace
-
Login to your AWS account and navigate to the AWS Marketplace. Locate the WANdisco Fusion products and select WANdisco Fusion - BYOL.
 AWS Marketplace - search for WANdiscoAWS Marketplace - search for WANdisco
 -
You can review the product details on the product page. Click Continue to Subscribe to begin.

-
Now go to the CFT, which is accessed through the AWS marketplace. For instructions on how to complete the CFT see the next section, Launching the Cloud Formation Template.
5.2.4. Launching the Cloud Formation Template (CFT)
It’s now time to enter configuration for the Cloud Formation Template. Once completed, an EC2 instance will launch.
-
The template URL should be pre-filled, however you can upload your CFT for WANdisco Fusion if you have one. Click Next.

-
On the Specify Details screen, you need to provide key configuration for AWS and WANdisco Fusion.

Listed below are the configuration entries that are critical for setup:
- Stack name
-
The name of your stack - only use alphanumeric characters.
- AWS configuration
-
- EC2 Instance Type (dropdown)
-
The size of the EC2 storage is based on data volume. This will default to
m3.2xlarge. - VPC ID (dropdown)
-
The ID of the Amazon Virtual Private Cloud to use. You need to select an existing VPC into which your WANdisco Fusion instances will be launched. Click and select from the list of available VPCs.
- Security Group ID (dropdown)
-
The ID of the Security Group to use. You need to select an existing Security Group. It will need to allow incoming and outgoing connections on the ports specified in the Networking Guide section of this document below.
- VPC subnet ID (dropdown)
-
The ID of the Subnet to use. You need to select an existing Subnet. The CIDR range for that subnet will need to be addressable from all other Fusion servers that you establish in your network. If you use the default
subnet-00000000it will create a new VPC and relate resources which you can use to evaluate WANdisco Fusion against another ec2 instance that acts as the Filesystem to Synch S3 for the purpose of evaluation. - S3Bucket
-
This is the s3 bucket, to which you will replicate files. If this is not filled in correctly it will trigger a rollback event.
- PersistentStorage
-
Use this field to add additional storage for your cluster. In general use, you shouldn’t need to add any more storage, you can rely on the memory in the node plus the ephemeral storage.
- Key Name (dropdown)
-
Enter the name of the existing EC2 KeyPair within your AWS account, all instances will launch with this KeyPair.
- Cluster Name
-
The WANdisco Fusion CF identifier, in the example, awsfs.
- WANdisco Fusion configuration
-
- Cluster Instance Count (dropdown)
-
Enter the number of WANdisco Fusion instances (1-3) that you’ll launch. e.g. "2" This value is driven by the needs of the cluster, either for horizontal scaling, continuous availability of the WANdisco Fusion service, etc.
- Zone Name
-
The logical name that you provide for your zone. e.g. awsfs
- User Name
-
Default username for the WANdisco Fusion UI is "admin".
- Password
-
Default password for the WANdisco Fusion UI is "admin".
- EMR Version (dropdown)
-
The version of Elastic Map Reduce you are running.
- ARN Topic code to publish messages to
-
ARN Code to topic to email. If you set up an SNS service you can add an ARN code here to receive a notification when CFT completes succesfully. This oculd be an email, SMS message or various other message types supported by AWS SNS service.
- FusionLicense
-
This is a path to your WANdisco Fusion license file. If you don’t specify the path to a license key you will automatically get a trial license.
- S3 Security configuration for WANdisco Fusion
- KMSKey
-
ARN for KMS Encryption Key ID. You can leave the field blank to disable KMS encryption.
- Enable S3 server-side Encryption (dropdown)
-
"Yes", otherwise leave as "No".
- S3 Server-side Encryption Algorithm (dropdown)
-
The algorithm used for server-side encryption on S3 (default AES256).
-
On the next screen you can add options, such as Tags for resources in your stack, or Advanced elements.
We recommend that you disable the setting Rollback on failure. This ensures that if there’s a problem when you deploy, the log files that you would need to diagnose the cause of the failure don’t get wiped as part of the rollback.
Click Next.
-
Review the summary and acknowledge the creation of the IAM resources. Tick the checkbox and Click Create to continue.
-
After you launch the CFT it will take a few minutes to spin up the environment.

-
When finished, your stack status will change to CREATE_COMPLETE

-
Go to your browser and enter the IP address for the WANdisco Fusion web UI. The URL will take the form
http://ec2-instance-IP:8083
On the login screen enter the admin username and password that you specified in the CFT. -
Now log into the WANdisco Fusion web UI. You will now need to induct to an existing Fusion node if you have one. See Induct a node for more information. If you didn’t specify a license during the CFT launch, you will see details for a trial license that will expire 14 days after you first launched the instance.
-
5.2.5. Installing into Amazon EMRFS
S3 Bucket and core-site.xml Information
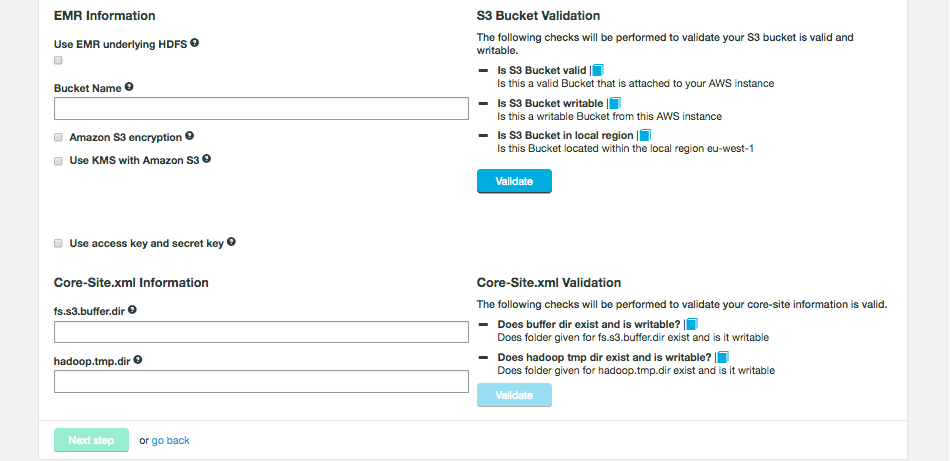
- Bucket Name
-
The name of the S3 Bucket that will connect to WANdisco Fusion.
- Use access key and secret key
-
Additional details required if the S3 bucket is located in a different region. See Use access key and secret key.
- Use KMS with Amazon S3
-
Use an established AWS Key Management Server See Use KMS with Amazon S3.
The following checks are made during installation to confirm that the zone has a working S3 bucket.
- S3 Bucket Valid
-
The S3 Bucket is checked to ensure that it is available and that it is in the same Amazon region as the EC2 instance on which WANdisco Fusion will run. If the test fails, ensure that you have the right bucket details and that the bucket is reachable from the installation server (in the same region for a start).
- S3 Bucket Writable
-
The S3 Bucket is confirmed to be writable. If this is not the case then you should check for a permissions mismatch.
- S3 Bucket in local region
-
Checks the bucket is located in the local region.
If you are using access key and secret key then additional fields are required. Please see the Use access key and secret key section for more information on this. These settings can also be updated on the Settings tab in the UI after installation.
Core-site.xml information:
- fs.s3.buffer.dir
-
The full path to a directory or multiple directories, separated by comma without space, that S3 will use for temporary storage. The install will check that the directory exists and that it will accept writes.
- hadoop.tmp.dir
-
The full path to a one or more directories that Hadoop will use for "housekeeping" data storage. The installer will check that the directories that you provide exists and is writable. You can enter multiple directories separate by comma without space.
Setting up AWS profiles
IAM roles are the default method we use for S3 authentication, they are specific to the AWS platform.
If you don’t have the correct IAM roles to access your S3 bucket you can use the Access Key and Secret Key credentials. These are configured by running "aws configure" on the command line. This creates a .aws directory with a "credentials" file with the relevant keys, under a [default] section.
However, there is also the concept of "profiles", and you can store multiple different credentials for different profiles using the CLI command:
CLI
"aws configure --profile <profilename>". e.g.
aws --endpoint-url=https://s3-api.us-example.domain.url.net --profile fusion s3 ls s3://vwbucket/repl1/
This creates a new section in the credentials file like so:
[newprofilename]
[nolan]
aws_access_key_id = A******XYZ123ABCRFOA
aws_secret_access_key = 77***********************XZ
Use KMS with Amazon S3
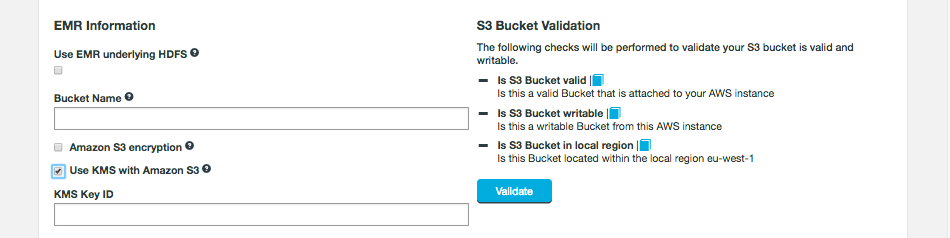
- KMS Key ID
-
This option must be selected if you are deploying your S3 bucket with AWS Key Management Service. Enter your KMS Key ID. This is a unique identifier of the key. This can be an ARN, an alias, or a globally unique identifier. The ID will be added to the JSON string used in the EMR cluster configuration.
SSL with AWS
When using SSL between Fusion nodes, you can create dedicated truststores. However, when connecting WANdisco Fusion to external resources, such as AWS/Cloud nodes, the SSL connection will fail because these external nodes use CA certificates.
| When using SSL between Fusion and other nodes, such as cloud object stores, you need to update your truststores to include both the homemade certs and the Root authorities certs. |
Installing on a new Amazon Elastic MapReduce (EMR) cluster
These instructions apply during the set up of WANdisco Fusion on a new AWS EMR cluster. This is the recommended approach, even if you already have an EMR cluster set up.
-
On the Settings tab go to EMR Client and follow the instructions to configure EMR for Fusion.
 Figure 64. Create script
 -
This will automatically generate a configuration script for your AWS cluster and place the script onto your Amazon storage.
-
Run through the Amazon cluster setup screens. In most cases you will run with the same settings that would apply without WANdisco Fusion in place.
 Figure 65. Cluster setup
 -
In the Step 3: General Cluster Settings screen there is a section for setting up Bootstrap Actions.
 Figure 66. Bootstrap Actions
 -
In the next step, create a Bootstrap Action that will add the WANdisco Fusion client to cluster creation. Click on the Select a bootstrap action dropdown.
-
Choose Custom Action, then click Configure and add.
 Figure 67. Select a bootstrap action
 -
Navigate to the EMR script, generated by WANdisco Fusion in step 14. Enter the script’s location and leave the Optional arguments field empty.
 Figure 68. Add Bootstrap Action
 -
Click Next to complete the setup.
 Figure 69. Custom action
 -
Finally, click the Create cluster button to complete the AWS setup.
 Figure 70. Create cluster
5.2.6. Installing on an existing Amazon Elastic MapReduce (EMR) cluster
We strongly recommend that you terminate your existing cluster and use the previous step for installing into a new cluster.
No autoscaling
This is because installing WANdisco Fusion into an existing cluster will not benefit from AWS’s auto-scaling feature.
The configuration changes that you make to the core-site.xml file will not be included in automatically generated cluster nodes, as the cluster automatically grows you’d have to follow up by manually distributing the client configuration changes.
Two manual steps
Install the fusion client (the one for EMR) on each node and after scaling, modify the core-site.xml file with the following:
<property>
  <name>fs.fusion.underlyingFs</name>
  <value>s3://YOUR-S3-URL/</value>
</property>
<property>
  <name>fs.fusion.server</name>
  <value>IP-HOSTNAME:8023</value>
</property>
<property>
  <name>fs.fusion.impl</name>
  <value>com.wandisco.fs.client.FusionHcfs</value>
</property>
<property>
  <name>fs.AbstractFileSystem.fusion.impl</name>
  <value>com.wandisco.fs.client.FusionAbstractFs</value>
</property>
- fs.fusion.underlyingFs
-
The address of the underlying filesystem. In the case of Elastic MapReduce FS, the
fs.defaultFSpoints to a local HDFS built on the instance storage which is temporary, with persistent data being stored in S3. Example:s3://wandisco. - fs.fusion.server
-
The hostname and request port of the Fusion server. Comma-separated list of hostname:port for multiple Fusion servers.
- fs.fusion.impl
-
The Abstract FileSystem implementation to be used.
- fs.AbstractFileSystem.fusion.impl
-
The abstract filesystem implementation to be used.
5.3. Microsoft Azure Installation
This section covers how WANdisco Fusion can be used with Microsoft’s Cloud platform. WANdisco Fusion supports both Azure Data Lake Store (ADLS) and Azure Storage (WASB).
Currently the following installation options are available:
-
Installing Fusion via the Azure portal - Azure - Install WANdisco Fusion Server
-
Installing the Fusion HDI App - Azure - HDInsight client installation
-
Installing Fusion onto Azure cloud via the Fusion UI installer (old method) - Installation via the UI
|
Secure transfers
If secure transfers are enabled in Azure then you must change the WASB scheme to WASBS in the following properties in fs.fusion.underlyingFs wasb://container@storage.blob.core.windows.net fs.defaultFS wasb://container@storage.blob.core.windows.net See the core-site.xml properties section for more information on these properties. |
|
Owner access required - ADLS
WANdisco Fusion requires that the Active Directory app is configured to run with owner-level service principals. To confirm you are the owner, open the Data Lake store account in the Azure portal and click on Access Control (IAM). Your service principal should show up on the list with the role set as "Owner". As the Fusion Server now has owner-level service principals, any operation delegated to it by the client will be permitted. The Fusion Client performs some basic client-side access checks to ensure the client is permitted to do the operation before sending requests to the server. No checks can be done on the server side, however, as the Server uses its own service principals. |
|
Core-site properties for ADL-ADL replication
If using ADL to ADL replication, and you want Consistency Checks to include the user/group and permission of files, then 2 core-site properties need to be added and/or set to "true".
In /etc/wandisco/fusion/server/core-site.xml change the properties fusion.check.ownerAndGroup and fusion.check.permission to true.
See the Consistency Check settings section for more information on these properties.
|
|
Service principal user and group
For ADL, information about the service principal is needed.
The directory this information is obtained from is set by fusion.adl.ugi.check.path.
See the Azure Configuration section for more information on this property.
|
|
Azure logs
In 2.12.0 - 2.12.3 the logs for the Fusion configuration script are located at /var/lib/waagent/custom-script/download/0/stdout.
In 2.12.4 onwards, the logs are located at /var/log/cloud-init-output.log.
|
5.3.1. Install WANdisco Fusion Server
These instructions cover the set up of a WANdisco Fusion server on Microsoft Azure.
Use this if you want to replicate data from on-premises to cloud only.
Following the steps in this section creates a VM in Azure with WANdisco Fusion installed, this cannot be linked directly to the Fusion Client.
If you intend to replicate in both directions, both to and from your cloud storage, you will need to also use the Fusion HDI App.
The installation steps are very similar for both ADLS and Azure storage (WASB). This section takes you through both, highlighting the differences.
In order to complete this procedure you will need an Azure subscription and familiarity with the Azure platform.
-
Find and select the version appropriate for your set up - WANdisco Fusion for ADLS Gen1 or WANdisco Fusion for ADLS Gen2 & WASB.
 Figure 71. Azure - Store
 -
Under the Resource Manager deployment model, click Create.
 Figure 72. Azure - Store
 -
The first step is to enter the "Basic" settings that relate to your Azure platform.
 Figure 73. Azure - configure basic settings
- Virtual Machine Name
-
A name of the virtual machine that will be used to host WANdisco Fusion server.
- SSH Username
-
SSH username for the virtual machine.
- Authentication type
-
Select the type of authentication that you wish to use: Password or SSH public key.
- Password
-
If you selected Password, enter a password for use on the new VM.
- SSH public key
-
In production you may prefer to use an SSH key. If you selected SSH public key as your authentication type, enter your public key into this box.
- Number of VMs to deploy
-
On 2.12.3 onwards you can select more than 1 VM for high availability mode.
- Subscription
-
Select Master Azure Subscription.
- Resource group
-
Create new / Use existing.
- Location
-
The location of your Resource Group.
Click OK
-
On the next panel you enter the details that relate to your WANdisco Fusion server settings. Different details are required depending on whether you are using ADLS Gen1 or ADLS Gen2 & WASB.
If ADLS Gen 2 is selected the storage account chosen below must have hierarchical namespace enabled. If creating a StorageV2 account, this must be created prior to selection in this deployment.  Figure 74. Azure - Configure Fusion (WASB)
- Username
-
Local Fusion UI administrator account name. "admin" by default.
- Password
-
Local Fusion administrator password.
- Fusion Zone Name
-
Zone name for this Fusion server. It must be unique in the Fusion ecosystem
- Fusion VM Size
-
Virtual machine size for Fusion Server.
- Fusion IP Visibility
-
The IP to bind to, you can use private or public IPs.
- Unidirectional Networking
-
If Unidirectional Networking is enabled, Fusion waits for and re-uses inbound connections for data-transfer.
If using Azure Storage (ADLS Gen2 & WASB):
- Storage Account for Fusion
-
Configure required settings for VM’s storage. Select an existing account or create a new one.
- Storage Account Container for Fusion replication
-
Enter the name of the container to synchronize with, within the storage account selected above. A new one will be created if one doesn’t exist.
- Secure Transfer
-
Enable this option if your WASB storage has security enabled.
If using ADLS Gen1:

- Full storage path for Fusion replication
-
Path of the ADLS account to synchronize with. This must be in the format
adl://<path to storage>. - File System mount point
-
The file path in the ADLS file system for Fusion to use as root. This needs to match your HDI cluster if you wish to use HDI to replicate your data out of ADLS.
For example/or/cluster/example.
|
The mount point must be correct at installation
You must enter the correct mount point here, changing it after installation may not be possible.
The mount point needs to match between your Fusion Server and cluster.
|
The following information will need to be obtained from your Active Directory administrator:
- Principal Name
-
The Active Directory service principal name for the Active Directory credential you wish to use with Fusion.
- Client ID
-
The full client ID of the Active Directory credential you wish to use with Fusion.
- Authentication credential
-
The authentication key of the Active Directory credential you wish to use with Fusion.
- Refresh token
-
Enter the refresh token of the Active Directory credential you wish to use with Fusion. This must be in the format
https://login.microsoftonline.com/<id>/oauth2/token/.
Click OK to continue.
-
Next, enter the General Settings.
 Figure 76. Azure - General settings
Click on Configure subnets if you need to modify the default values.
- Subnet name
-
The name assigned to the subnet. the subnet name must be unique within the virtual network.
- Subnet address prefix
-
Single address prefix that makes up the subnet in CIDR notation. Must be a single CIDR block that is part of one of the VNet’s address spaces.
Also check the Public IP Configuration and enter a valid subdomain name for the Fusion server’s DNS service. If you selected multiple VMs in step 1 you will have multiple sections here. Once set up is complete, these nodes will be fully inducted within one zone.
-
The Summary will now show all the entries that you have provided so far. Check the details and then click on OK to continue.
-
On the next step you must read the terms of use and confirm acceptance but clicking on the Create button.
 Figure 77. Azure - Buy
The client installation is now complete.
5.3.2. HDInsight client installation
The WANdisco Fusion HDI app is required for deployments which require replication to go in both directions, both in and out of the cloud. This can be used for both Azure storage (ADLS Gen2 & WASB) and ADLS Gen1. The WANdisco Fusion HDI app allows you to install a Fusion Client on to a HDI cluster. Follow this section after completing the steps in Install WANdisco Fusion Server.
This section explains the important details specific for the WANdisco Fusion HDI App.
For more general information on setting up HDI and Azure see Microsoft’s own documentation.
Useful pages include:
|
Important!
If using ADLS Gen2 & WASB you must use the same storage account and container that was selected when you installed the WANdisco Fusion server.If using ADLS Gen1 you must use the same Data Lake and your cluster root path of your HDI cluster must match the mount point of your Fusion server. |
If using ADL then once the WANdisco Fusion Fusion Server has been installed a few configurations need to be changed in order to use the HdiAdlFileSystem. The following steps can be done before or after HDI App installation:
-
Shut down all Fusion Servers and IHC Servers (if up).
-
From an HDI client, go into the hadoop classpath and locate adls2-oauth2-token-provider.jar. e.g.
/usr/lib/hdinsight-datalake/adls2-oauth2-token-provider.jar. -
For each Fusion Server, copy this jar into
/opt/wandisco/fusion/server/. -
For each Fusion Server, in
/etc/wandisco/fusion/server/core-site.xmlset fs.fusion.underlyingFsClass to org.apache.hadoop.fs.adl.HdiAdlFileSystem (overwrite or add as appropriate for your set up). -
For each Fusion IHC server, copy the above jar into
/opt/wandisco/fusion/ihc/server/<DISTRO>/. -
For each Fusion IHC Server, in
/etc/wandisco/fusion/ihc/server/<DISTRO>/core-site.xmlset fs.fusion.underlyingFsClass to org.apache.hadoop.fs.adl.HdiAdlFileSystem (overwrite or add as appropriate for your set up). -
Restart all Fusion Servers.
-
Restart all IHC Servers.
-
From the Azure Marketplace, select WANdisco Fusion HDI app.
 Figure 78. Azure - HDI App
 -
The deployment model is located at Resource Manager. Click the Create button.
 Figure 79. Azure - Resource Manager
 -
The Basics panel will appear. Depending on your set up, select Quick create or Custom. Complete all the relevant information for your set up. Contact your Azure administrator for this information.
-
In step 2 select your storage type.
-
If using Azure storage (WASB) you must use the same storage account and container that was selected when you installed the WANdisco Fusion server.
 Figure 80. Azure storage - set up
 -
If using ADLS you must use the same Data Lake account and the root path of your HDI cluster must match the mount point of your Fusion server.
 Figure 81. ADLS - set up
-
-
Once you have completed all the steps for your set up you need to provide your License key.
 Figure 82. Azure - IP and Legal terms
- License key
-
This is the existing Fusion Server IP address or hostname. The Fusion server must be in the same VNet as this HDInsight cluster and pointing to the same storage account and container.
License key title misleadingDue to outside limitations the License key field needs to contain your Fusion Server IP address or hostname, not your WANdisco license.
-
Click on Legal terms, read the Terms of use and then click on Create.
 Figure 83. Azure - Purchase
The cluster will now build. Take note that the process may take up to 20 minutes to complete.
If you are using Azure storage (WASB), installation is now complete. If you are using ADLS, complete one final step. -
If you are using ADLS you now need to add configurations to allow the Fusion URI to work with ADLS.
The following configurations need to be added via your HDI Ambari console and distributed to all clients.ADLS credentialsfs.adl.oauth2.credential-
The authentication key of the Active Directory credential. You will also set this during the Fusion installation.
example: otgT5QTIbLU0qgB13Ckh+example-only+bB1Ikqik=
fs.adl.oauth2.refresh.url-
Enter the refresh token of the Active Directory credential you wish to use with Fusion. This must be in the format https://login.microsoftonline.com/<id>/oauth2/token/. You will also set this during the Fusion installation.
example: https://login.microsoftonline.com/015b+example-only+b542-6474c07e30fd/oauth2/token
fs.adl.oauth2.client.id-
The full client ID of the Active Directory credential. You will also set this during the Fusion installation.
example: d2-dexample-only-475c-9a9a-43859a667652
fs.adl.oauth2.access.token.provider.type-
To ensure that authentication uses the previous three values, set this to ClientCredential
5.3.3. WANdisco Fusion Installation via the UI
|
Old installation method
The following installation method has been superseded.
We recommend using the simpler, more up-to-date method described above.
See WANdisco Fusion Server.
|
Azure can be manually installed on to your WANdisco Fusion nodes. For instruction on installing, follow the Local file system installation section.
During step 5 of the installer, additional information is required. See below for your relevant set up.
Azure storage (WASB)
- Primary (KEY1) Access Key
-
When you create a storage account, Azure generates two 512-bit storage access keys, which are used for authentication when the storage account is accessed. By providing two storage access keys, Azure enables you to regenerate the keys with no interruption to your storage service or access to that service. The Primary Access Key is now referred to as Key1 in Microsoft’s documentation. You can get the KEY from the Microsoft Azure storage account.
This can be changed on the UI Settings page alter installation.
- WASB storage URI
-
This needs to be in the format
wasb[s]://<containername>@<accountname>.blob.core.windows.net
Validation then checks that:
-
the URI is in the correct format
-
it is possible for WANdisco Fusion to read from the Blob store
-
it is possible for WANdisco Fusion to write data to the Blob store
ADLS
- ADL store URI
-
Path of the ADLS account to synchronize with. This must be in the format
adl://<path to storage>. - Mount Point
-
The file path in the ADLS file system for Fusion to use as root. This will need to match your HDI cluster if you wish to use HDI to replicate your data out of ADLS.
For example/or/cluster/example.The mount point must be correct at installationYou must enter the correct mount point here, changing it after installation may not be possible. The mount point needs to match between your Fusion Server and cluster. - Client ID
-
The full client ID of the Active Directory credential you wish to use with Fusion.
- Credential
-
The authentication key of the Active Directory credential you wish to use with Fusion.
- Refresh Token URL
-
This needs to be in the format
https://login.microsoftonline.com/<id>/oauth2/token/.
Note: If you are intending to enable SSL on the Fusion core/IHC, then the Root CA of the above URL (login.microsoftonline.com) must be included inside of the Keystore that the Fusion Server will be using.
Validation then checks that:
5.4. Google Cloud Installation
WANdisco’s Fusion can be installed on Google Cloud, enabling you to replicate on-premises data over to the Google Cloud Platform.
As well as using WANdisco Fusion with the Cloud Platform, you can also integrate it with Cloud Dataproc, Google’s cloud service for running Hadoop clusters.
This section takes you through how to install WANdisco Fusion on the Google Cloud Platform and then how to integrate it to Dataproc.
5.4.1. Connect WANdisco Fusion with your Google Cloud Storage
To use WANdisco Fusion with the Google Cloud Platform you first need to set up a VM. This guide assumes that you are already using Google Cloud and so have Bucket storage already set up. For more information see Google’s documentation.
-
Log into the Google Cloud Platform. Under VM instances in the Compute Engine section, click Create instance.
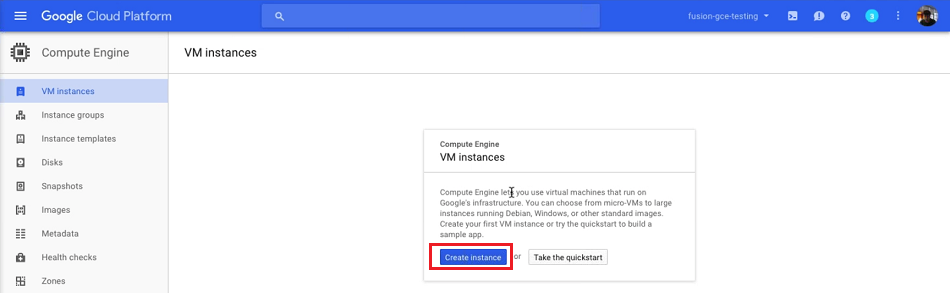 Figure 84. VM Instances
 -
Set up suitable specifications for the VM.
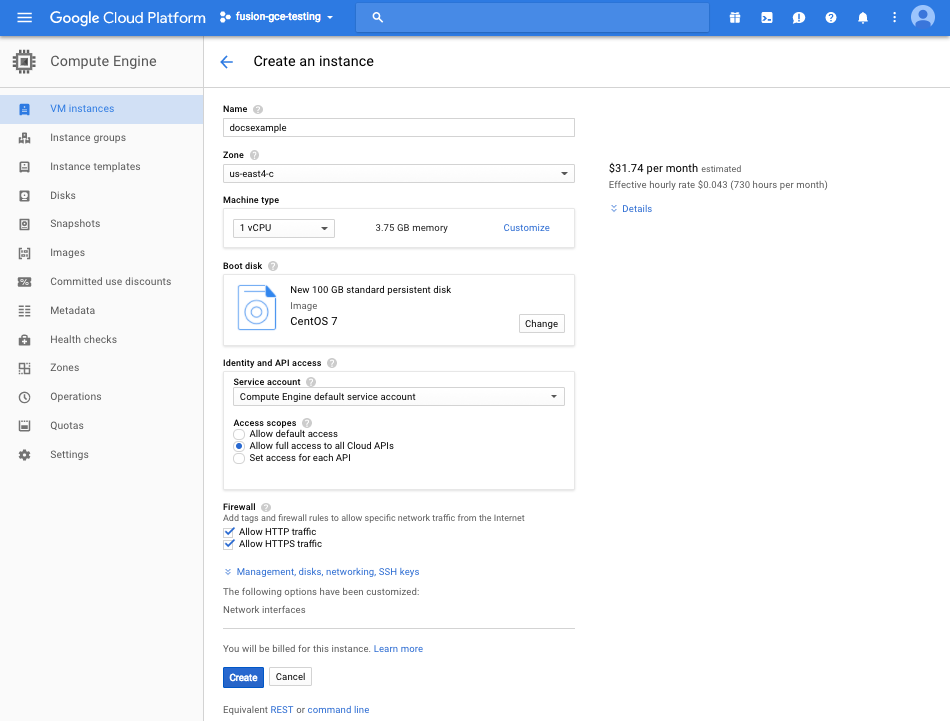 Figure 85. Create an instance
- Machine type
-
2vCPUs recommended for evaluation.
- Boot disk
-
Click on the Change button and select Centos 7.
Increase Boot disk sizeEnsure that the boot disk size is sufficient.
 Figure 86. Boot disk info
 - Identity and API access
-
Select 'Allow full access to all Cloud APIs'
- Firewall
-
Enable publicly available HTTP and HTTPS.
-
Expand the Management, disks, networking, SSH keys section and complete the following sections:
- Management
-
On the Management tab, scroll to the Metadata section:
-
Specify the key, in this case
startup-script-url -
Add the value. This is the URL to the install script, the version number will need updating accordingly.
For 2.12.2 and earlier - https://storage.googleapis.com/wandisco-public-bucket/installScript-2.12.2.sh
From 2.12.4 onwards - https://storage.googleapis.com/wandisco-public-files/2.12.4/installScript.sh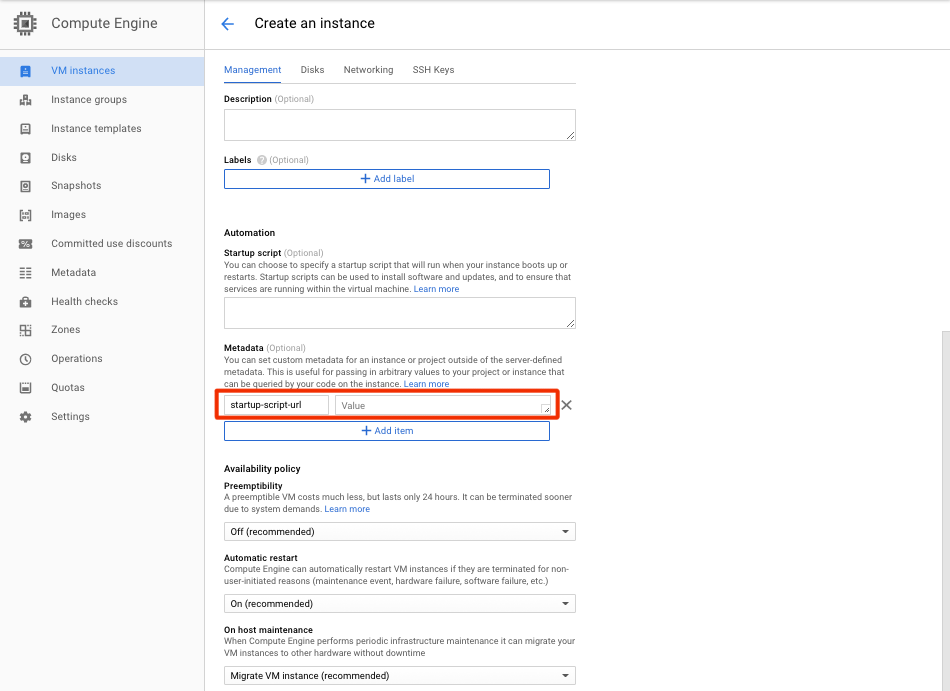 Figure 87. Metadata - install script
- Networking
-
Select your Google Network VPC from the dropdown list and press Done.
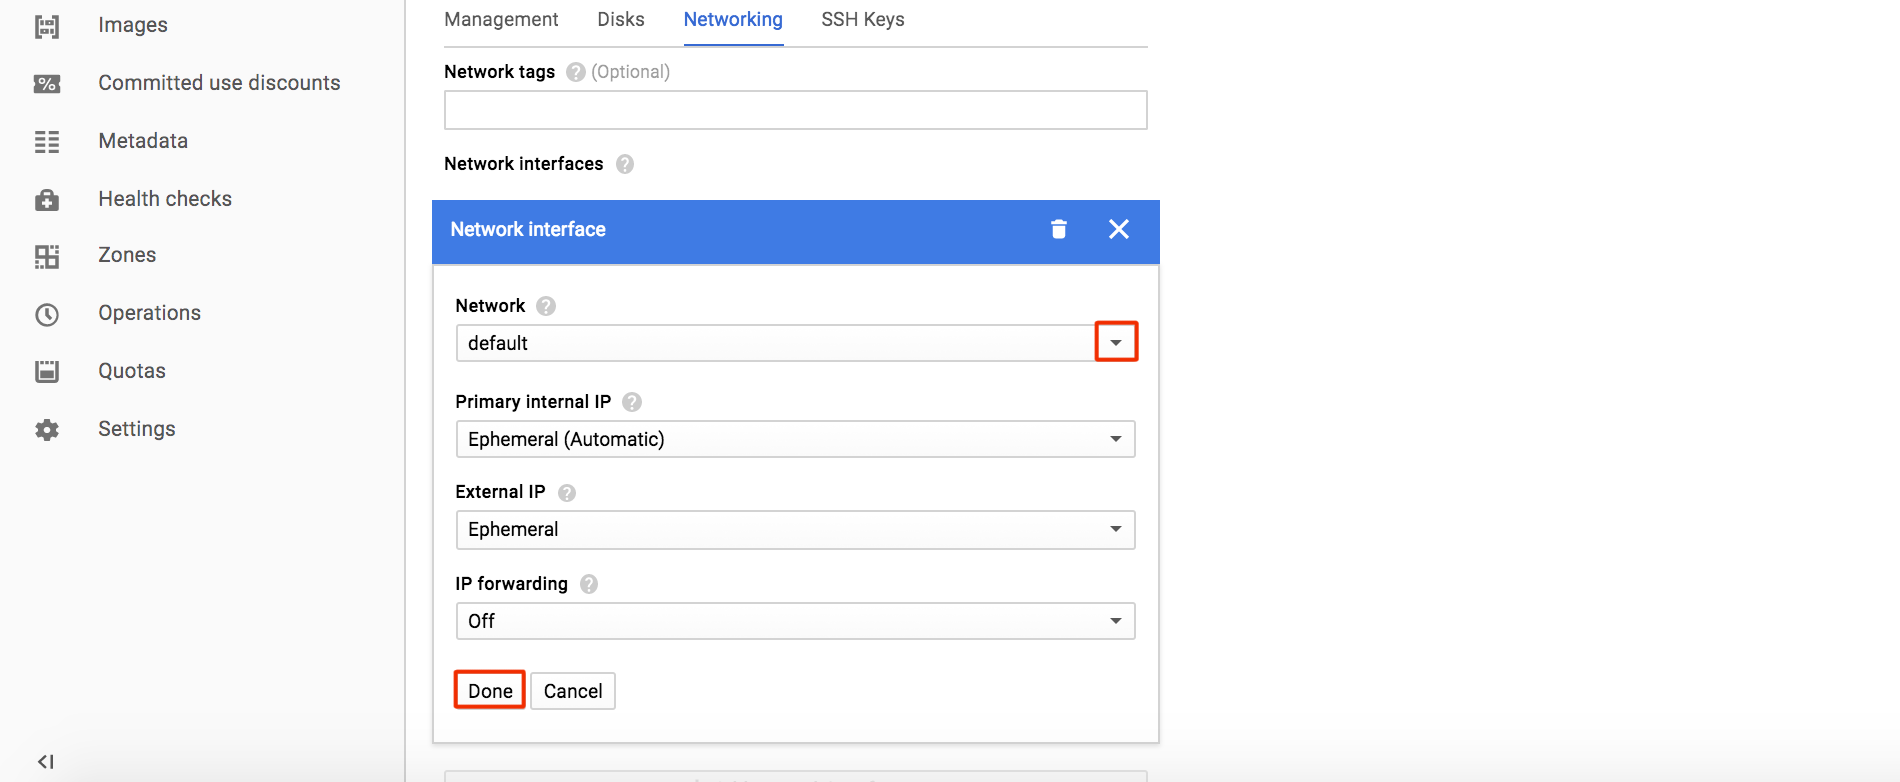 Figure 88. Network
-
-
Click Create to create your VM instance.
-
When the instance is complete a green tick will appear on the VM Instances list.
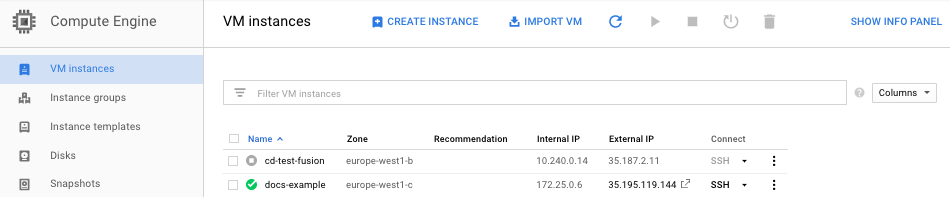 Figure 89. Network
 -
Take note of the IP address of the instance. You will need this in the next step to access the UI for the WANdisco Fusion installer. Your network configuration will determine if you need to use the internal or external IP.
5.4.2. Installation of WANdisco Fusion for use with Google Cloud
Now you have created a VM on Google Cloud Platform you need to install WANdisco Fusion at your on-premises location.
To do this, open a browser and go to http://your-server-IP:8083/ to access the UI for your installer - this the IP noted in the previous step.
Now follow the steps in the On premises installation section.
When installing for use with Google Cloud, different information is required at step 5 in the installer compared to the standard installation.
These additional fields are highlighted below:
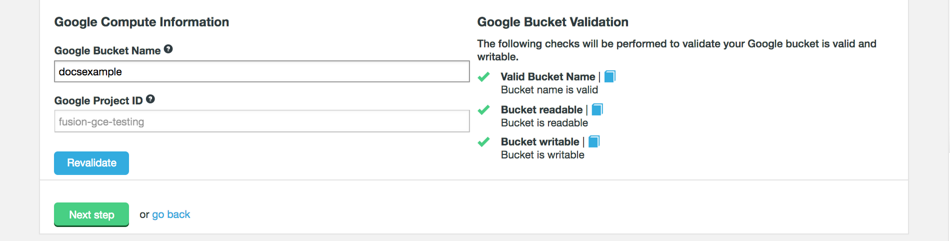
- Google Bucket Name
-
The name of the Google storage bucket that will be replicated. This field will auto-fill with the name given in the Google Cloud Platform set up.
- Google Project ID
-
The Google Project associated with the deployment. This field should auto-fill.
The following validation is completed against the settings:
- Valid Bucket Name
-
Checks the provided bucket matches with an actual bucket on the platform.
- Bucket Readable
-
Checks the bucket can be read by WANdisco Fusion.
- Bucket writable
-
Checks the provided bucket can be written to by WANdisco Fusion.
Also, as there are no clients to install for this Cloud Platform you can skip step 7 of the installer.
For more information about completing cloud or hybrid deployments, see the Cloud Deployment Guide.
5.4.3. Cloud Dataproc
This section goes through how to integrate your on Cloud WANdisco Fusion node with Dataproc. Familiarity with how to use Google Cloud and Dataproc is assumed - visit the Google documentation on Dataproc if you need more information.
Prerequisites
Before you can use WANdisco Fusion with Dataproc you must first have:
-
A Fusion VM on the Google Cloud Platform - see the Connect WANdisco Fusion with your Google Cloud Storage for how to set this up.
-
You need to know the bucket name this node is synced with.
-
-
Access to create a storage account in Google.
Setting up Dataproc
-
Download installClient.sh and complete the following properties at the top of the script. The rest of the script should not be altered.
Note: this script is for 2.12.4.-
GS_BUCKET_NAME=the name of the bucket your Fusion VM is synced with. -
FUSION_NODE_IP=the IP address of your Fusion node.This completed script needs to be accessible to your Dataproc cluster.
-
-
Now upload the script to your bucket. You can do this on the Google Cloud Platform UI in the Storage section.
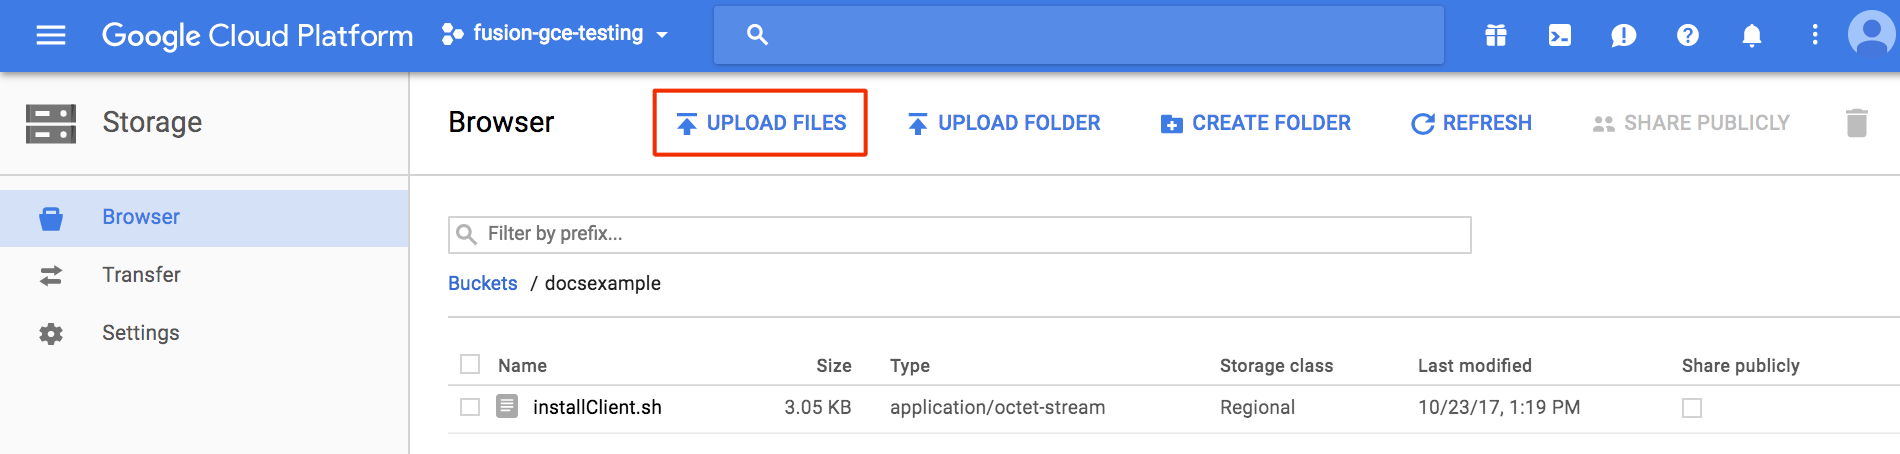 Figure 91. Upload script to bucket - Dataproc
Take note of the internal link of this script e.g.
gs://yourbucket/installClient.sh, you will need this later. -
You now need to create a Dataproc cluster. To do this click on Dataproc in the Google Cloud Platform UI menu and then Create cluster.
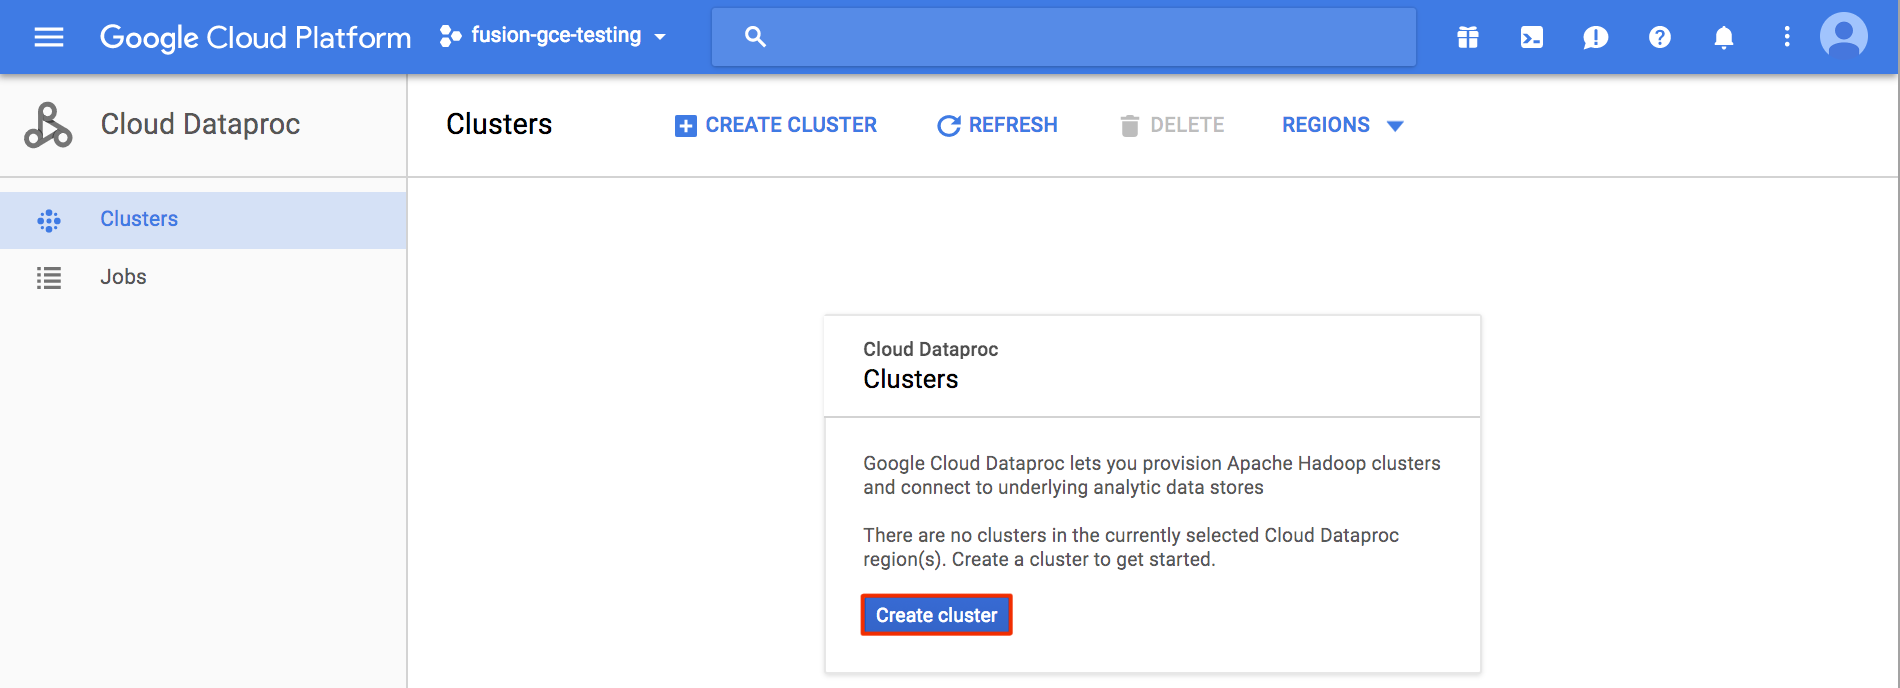 Figure 92. Create cluster - Dataproc
 -
Choose a name for your cluster and fill out all the fields required for your set up.
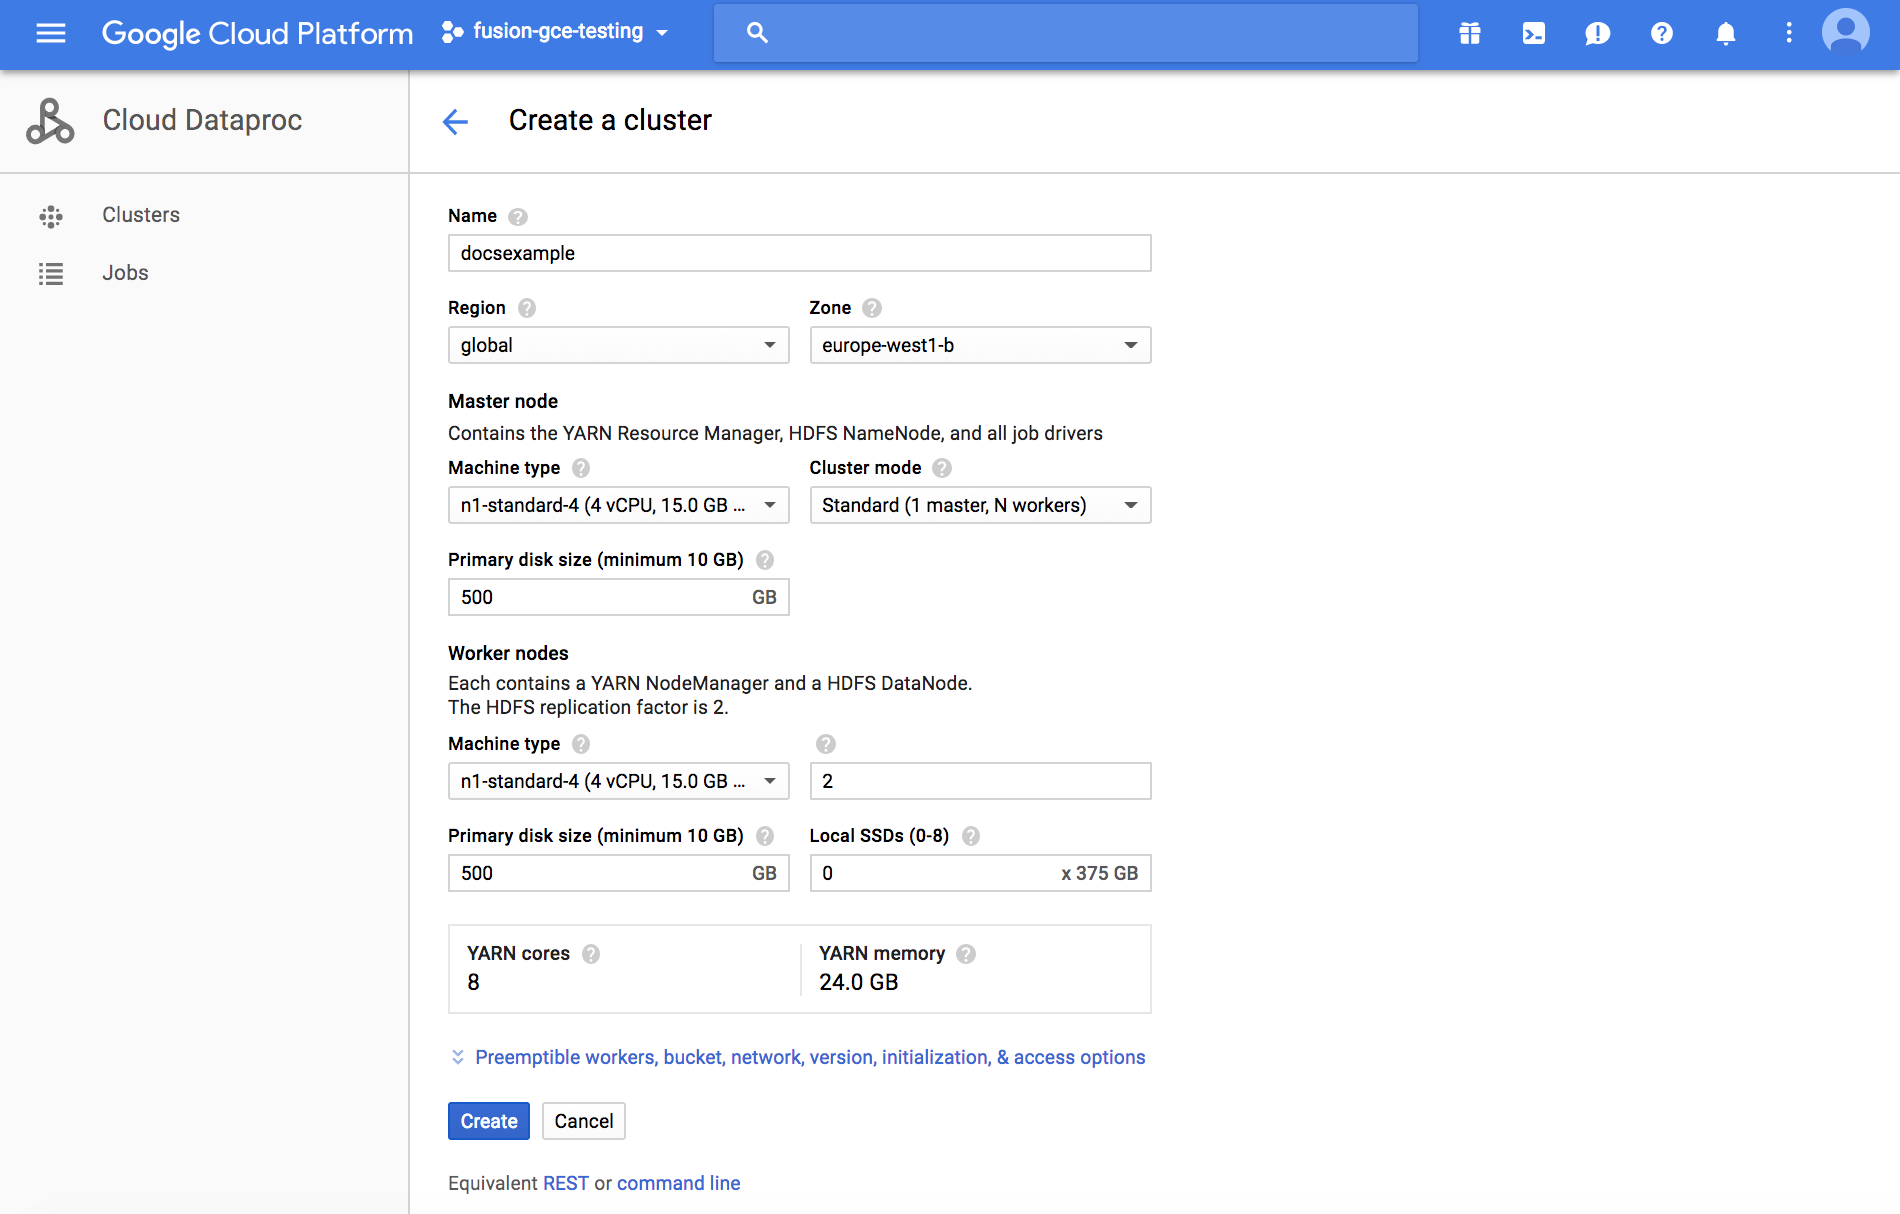 Figure 93. Create cluster info - Dataproc
 -
Click Preemptible workers, bucket, network, version, initialization & access options to reveal more options.
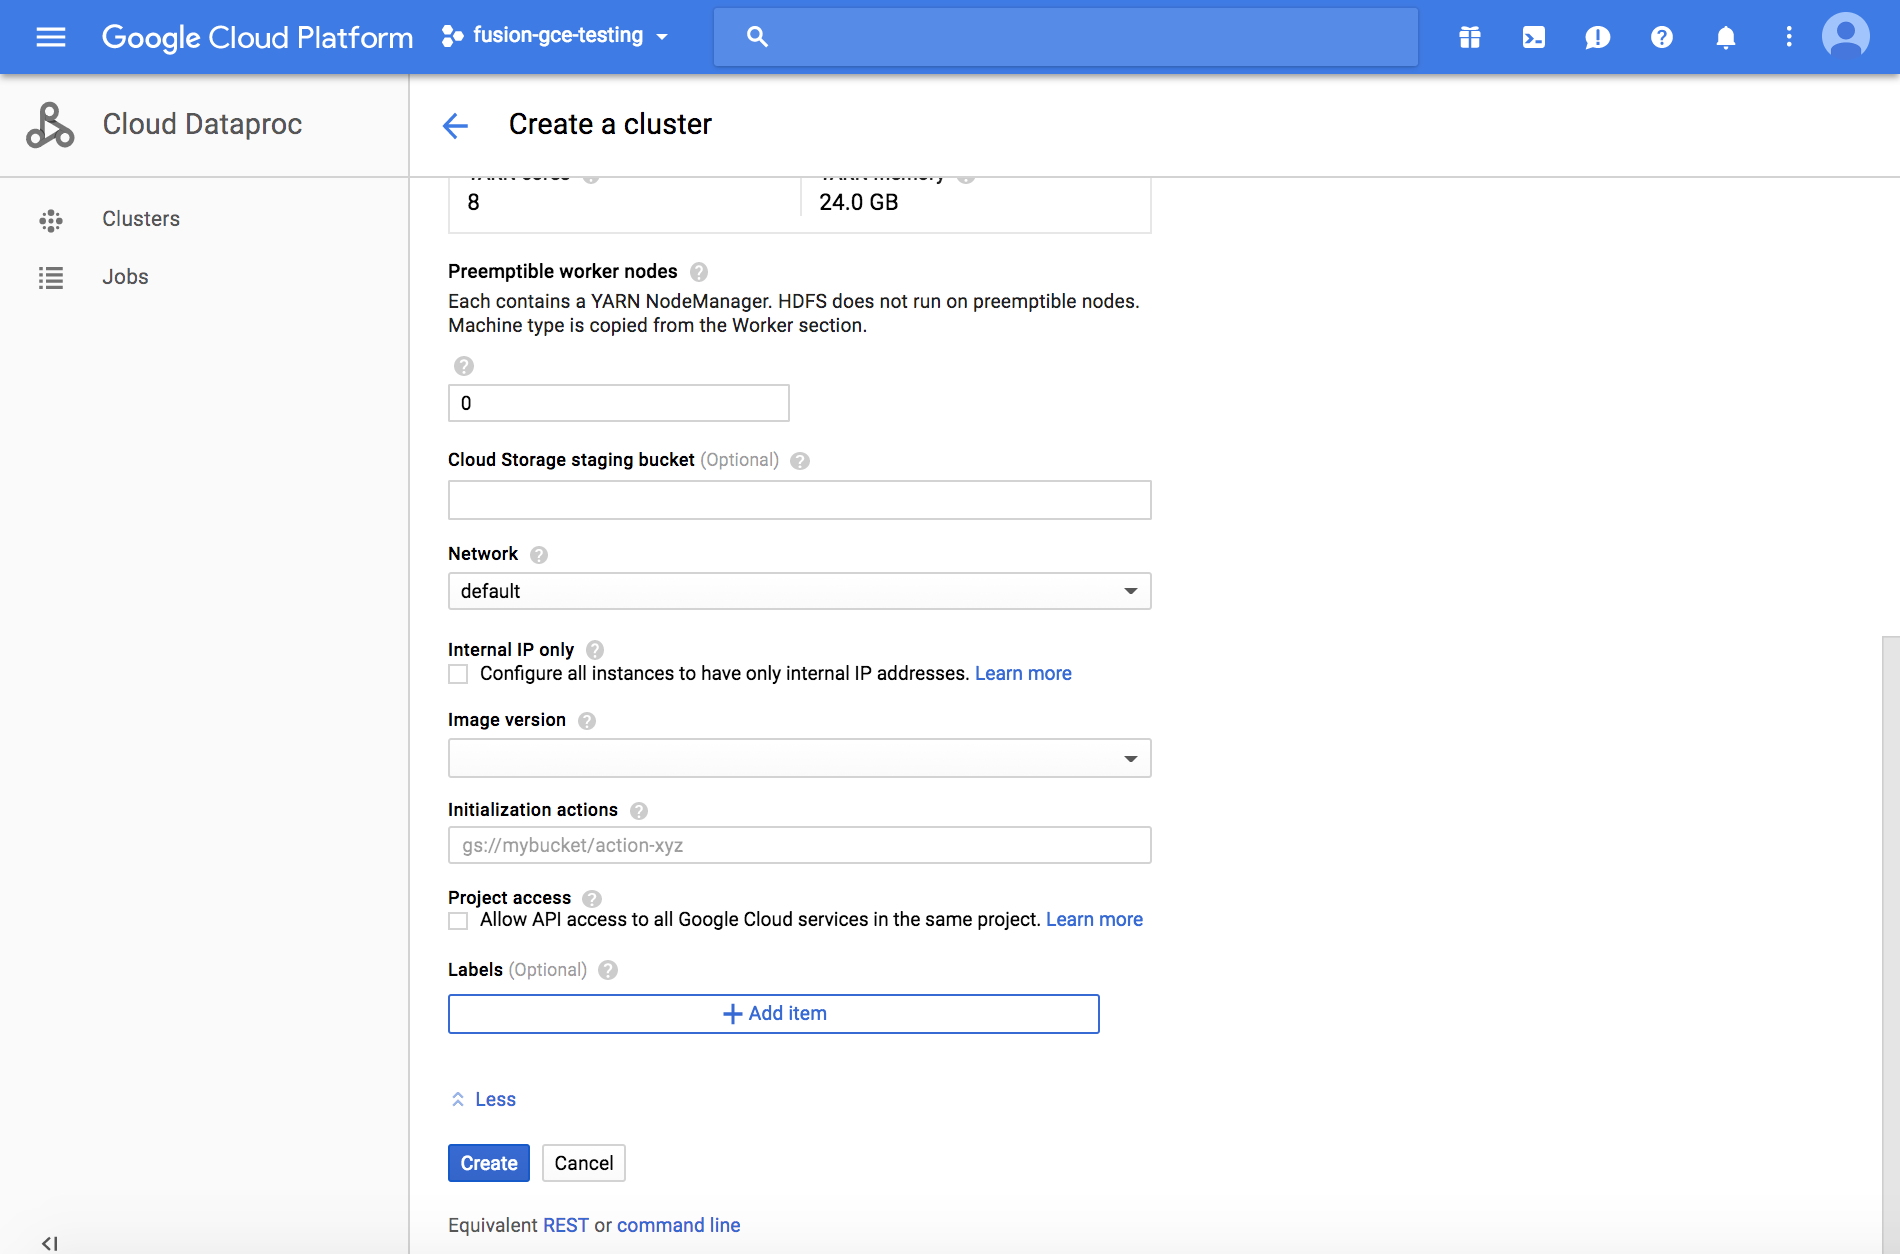 Figure 94. Create cluster info - Dataproc
Fill in the following information:
- Network
-
Select your network from the drop down
- Image Version
-
Select the version you are using - this will either be 1.0 or 1.1.
- Initialization actions
-
The internal link to the completed
installClient.shin your bucket.Then click Create.
-
Congratulations! You have integrated your WANdisco Fusion node with Dataproc.
5.4.4. Networking Guide for WANdisco Fusion Google Cloud
Setting up suitable network connectivity between your WANdisco Fusion zones using your Google Cloud private network system can be difficult to understand and implement if you’re not very familiar with the networking part of the Google Cloud platform. This section of the appendix will give you all the information you need to make the best choices and right configuration for setting up network connectivity between your on-premises and Google Cloud environments.
WANdisco Fusion makes the replication of your on-premises data to Google cloud simple and efficient. It relies on network connectivity between the two environments, and because a typical on-premises data store will reside behind your firewall, you will need to plan the right approach for that connection.
The following sections give information on the requirements that your solution will need to meet, along with options for establishing communication between the environments. You can choose among those options, and perform simple testing to ensure that the configured solution meets all your needs for data replication with WANdisco Fusion.
See the Cloud Deployment Guide for more information about setting up connections between cloud and on-premises WANdisco Fusion servers.
5.5. S3 Installation
WANdisco Fusion can be installed for use with S3, and S3 compatible platforms, enabling you to replicate on-premises data to to cloud object storage.
5.5.1. Installation of WANdisco Fusion for use with S3 compatible storage
Installing WANdisco Fusion for use with S3 compatible storage follows a very similar process to the standard installation.
The first part of the installation is CLI based.
Follow the steps in the Starting the Installation section to do this.
Note - you will need to use an S3 specific installer, for example, fusion-ui-server-s3_rpm_installer.sh.
The next section of the installer is browser based. For this, follow the steps in the Browser-based configuration section. All steps are the same for S3 installation except for some additional fields which need to be completed on page 5 of the installer.

- Bucket Name
-
The name of the storage bucket that will be replicated.
- Bucket Region Endpoint
-
This is where your bucket is based, for example, the AWS or Scality Server. As the bucket name contains no identifying information on where it is located, this information is necessary. The default is s3.amazonaws.com and, for example, the endpoint for Alibaba’s schenzhen region is oss-cn-shenzhen.aliyuncs.com.
- Use Path based access
-
Select this if you want to use path based access, this is important if your bucket is protect by SSL.
- Segment Size
-
This the smallest block to write.
- Buffer Directory
-
This is where complete objects are stored before being pushed to storage. Appends are not supported and so complete files must always be pushed.
If you are using access key and secret key then additional fields are required. Please see the Use access key and secret key section below for more information on this. These settings can also be updated on the Settings tab in the UI after installation. This section is targeted at customers using Amazon S3 and so modifications may be needed depending on your specific type of S3.
As there are no clients to install for this Cloud Platform you can skip step 7 of the installer.
For more information about completing cloud or hybrid deployments, see the Cloud Deployment Guide.
Use access key and secret key
Access and secret keys are used by many S3 compatible storages. Tick this checkbox if you do not have permissions to access the S3 storage system, for example, incorrect IAM role permissions. This option will reveal additional entry fields:

- Access Key Id
-
This is your Access ID token for the service to use to communicate with the account. Validation tests that there is a provided value, along with a valid secret key.
- Secret Key
-
The secret key token for the service to use to communicate with the account. It is used in conjunction with your Access Key ID to sign programmatic requests that are sent to your S3 storage.
Click Validate to verify the access key and secret key.
- Credentials File Path
-
File containing the access and secret key. Validation checks that the credentials file is accessible.
- Profile
-
Optional - Credential profiles allow you to share multiple sets of security credentials between different tools like the AWS SDK for Java and the AWS CLI.
Export Secret Key Variables
The information in this section is for customers using AWS, however similar steps are relevant to other S3 compatible storages. Use the following command to export the variable:
[hdfs@example01-vm1 .aws]$ export AWS_PROFILE=fusion
[hdfs@example01-vm1 .aws]$ aws --endpoint-url=https://s3-api.us-example.domain.url.net s3 ls s3://vwbucket/repl1/
More about WDS Access Key ID and Secret Access Key
If the node you are installing is set up with the correct IAM role, then you won’t need to use the Access Key ID and Secret Key, as the EC2 instance will have access to S3.
However if IAM is not correctly set for the instance or the machine isn’t even in AWS then you need to provide both the Access Key ID and Secret Key.
Entered details are placed in core.site.xml.
Alternatively the AMI instance could be turned off. You could then create a new AMI based on it, then launch a new instance with the IAM based off of that AMI so that the key does not need to be entered.
"fs.s3.awsAccessKeyId"
"fs.s3.awsSecretAccessKey"
Read Amazon’s documentation about Getting your Access Key ID and Secret Access Key.
Configuration for S3
Once installation is complete, please see the S3 section in the Reference Guide for more information on properties which may need configured.
You can also configure some properties on the Settings tab in the UI. These include:
-
the access key and secret key information - see Use access key and secret key.
-
S3 throttle settings

- Retry before throttling
-
Select if you which to throttle the Amazon HTTP retries.
- Maximum number of retries
-
The maximum number of consecutive retries before throttling kicks in. The default is zero.
5.6. Swift Installation
5.6.1. Installing into Openstack Swift storage
This section runs through the installation of WANdisco Fusion into an Openstack environment using Swift storage.
We use Bluemix, the IBM cloud managed Swift solution, as an example but other implementations are available.
Currently this deployment is limited to an active-passive configuration that would be used to ingest data from your on-premises cluster to your Swift storage.
5.6.2. Pre-requisites
Before you begin an installation you need to have a Bluemix (or equivalent) account with container(s) set up. This guide runs through installing WANdisco Fusion and using it with Bluemix, but not how to set up Bluemix.
Make sure that you have the following directories created and suitably permissioned. Examples:
|
Important! For installations to Swift storage, we currently only support Keystone 3.0. |
5.6.3. Overview
The installation process runs through the following steps:
-
On-premises installation - installing a WANdisco Fusion node on your cluster
-
Setting up replication - Configure the nodes to ingest data from the on-premises cluster to the OpenStack Swift storage.
-
Silent Installation - Notes on automating the installation process.
-
Parallel Repairs - Running initial repairs in parallel.
5.6.4. Installation of WANdisco Fusion for use with Swift
To install WANdisco Fusion for Swift follow the steps in the On-premises installation guide. There a few differences when using Swift compared to the standard installation and these are highlighted below.
-
Make sure that you use a Swift specific installer, for example
fusion-ui-server-swt_rpm_installer.sh.
Step 5 in the installer requires additional information compared to the standard installation. These additional fields are highlighted below:
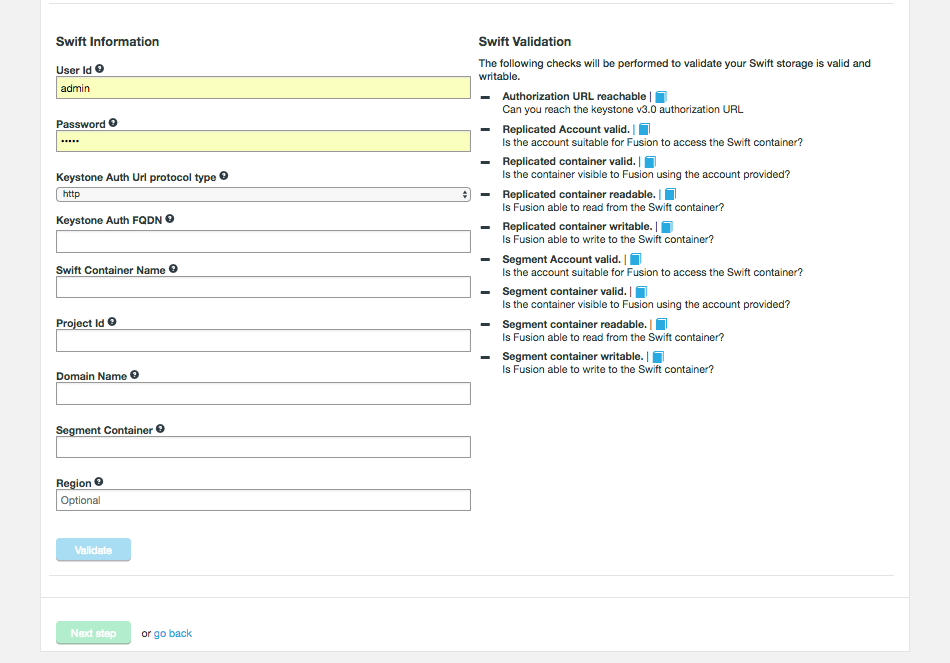
Some of the required information can be gathered from the Bluemix UI (or other Swift Implementation), in the Service Credentials section:
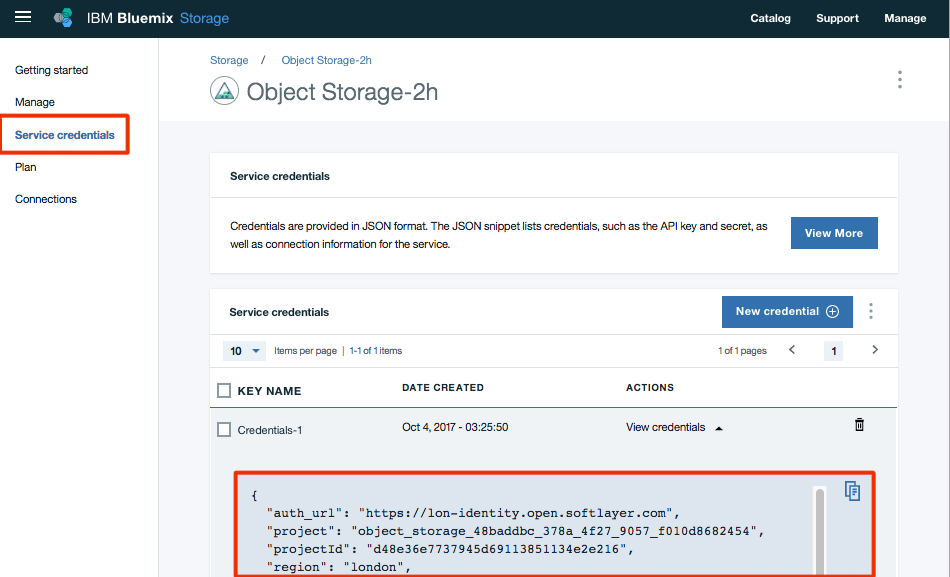
- User ID
-
The unique ID for the Bluemix/Swift user.
- Password
-
The password for the Bluemix/Swift user.
Swift password changes
During installation, the Bluemix/Swift password is encrypted for use with WANdisco Fusion.
This process doesn’t require any further interaction except for the case where the Swift password is changed. If you change your Swift password you need to do the following:
-
Open a terminal to the WANdisco Fusion node and navigate to /opt/wandisco/fusion/server.
-
Run the following script:
./encrypt-password.sh
  Please enter the password to be encrypted
Enter your Bluemix/Swift password and press return:
> password
eCefUDtgyYczh3wtX2DgKAvXOpWAQr5clfhXSm7lSMZOwLfhG9YdDflfkYIBb7psDg3SlHhY99QsHlmr+OBvNyzawROKTd/nbV5g+EdHtx/J3Ulyq3FPNs2xrulsbpvBb2gcRCeEt+A/4O9K3zb3LzBkiLeM17c4C7fcwcPAF0+6Aaoay3hug/P40tyIvfnVUkJryClkENRxgL6La8UooxaywaSTaac6g9TP9I8yH7vJLOeBv4UBpkm6/LdiwrCgKQ6mlwoXVU4WtxLgs4UKSgoNGnx5t8RbVwlrMLIHf/1MFbkOmsCdij0eLAN8qGRlLuo4B4Ehr0mIoFu3DWKuDw==
[ec2-user@ip-172-29-0-158 server]$
-
Place the re-encrypted password in *core-site.xml* and *application.properties*.
- Auth URL
-
The URL required for authenticating against Swift.
- Swift Container Name
-
The name of the Swift storage container that Fusion will be connecting to.
- Project Id
-
The Bluemix project ID.
- Domain Name
-
The Swift Domain Name.
- Segment Container
-
The name of the Segment container. The Segment container is used where large files break Swift’s 5GB limit for object size. Objects that exceed 5GB are broken into segments and get stored in here.
- Region
-
The Swift Object Storage Region. Not to be confused with the Bluemix region.
Once you have entered this information click Validate.
The following Swift properties are validated:
- Authorization URL reachable
-
Can you reach the keystone v3.0 authorization URL
- Account valid
-
The installer checks that the Swift account details are valid. If the validation fails, you should recheck your Swift account credentials.
- Container valid
-
The installer confirms that a container with the provided details exists. If the validation fails, check that you have provided the right container name.
- Container readable
-
The container is checked to confirm that it can be read. If the validation fails, check the permissions on the container.
- Container writable
-
The container is checked to confirm that the container can be written to. If the validation fails, check the permissions on the container.
The installer checks that the Swift account details are valid for accessing the segment container. If the validation fails, you should recheck your Swift account credentials.
- Segment Container valid
-
The installer confirms that a segment container with the provided details exists. If the validation fails, check that you have provided the right segment container name.
- Segment Container readable
-
The container is checked to confirm that it can be read. If the validation fails, check the permissions on the segment container.
- Segment Container writable
-
The container is checked to confirm that the container can be written to. If the validation fails, check the permissions on the segment container.
- Segment Account writable
-
The Account is checked to confirm that it can be written to. If the validation fails, check the permissions on the segment account.
In step 7 of the UI installer there are no clients to install so you can skip this step. The step is reserved for deployments where HDFS clients need to be installed.
For more information about the network configuration required for cloud or hybrid deployments, see the Cloud Deployment Guide.
5.6.5. Swift Silent Installation
You can complete a Swift installation using the Silent Installation procedure, putting the necessary configuration in the swift_silent_installer.properties and swift_silent_installer_env.sh as described in the section that covers Silent Installation.
Swift-specific settings
The following environment variables required for Swift deployments.
###############################
# Swift Configuration
###############################

#Swift installation mode
# REQUIRED for Swift Installations. Defaults to false
swift.installation.mode=true

#The Swift container name to use
# REQUIRED for Swift installations.
swift.containerName=

#The Swift userID to use to use
# REQUIRED for Swift installations.
swift.userID=

#The Swift password to use
# REQUIRED for Swift installations.
swift.password=

#Use HTTPS with the swift auth url
# REQUIRED for Swift installations.
swift.useHttps=false

#The Swift fully qualified domain name to use for authenticating access to the storage
# REQUIRED for Swift installations.
swift.auth.url=

# The Swift domain name to use
# REQUIRED, for Swift installations.
swift.domainName=

# The Swift project id to use
# REQUIRED, for Swift installations.
swift.projectId=

# The Swift file segment container to use
# REQUIRED, for Swift installations.
swift.segment.container=

# The Swift region to use
# OPTIONAL for Swift installations.
# swift.region

# The Swift buffer directory to use
# OPTIONAL for Swift installations, defaults to /tmp.
# swift.buffer.dir=

# The Swift  to use
# OPTIONAL for Swift installations, defaults to 5368709120 bytes, max 5368709120.
# swift.segment.size=

###############################
# Management Endpoint section
###############################

#The type of Management Endpoint.
management.endpoint.type=UNMANAGED_SWIFT
In the swift_silent_installer_env.sh:
-
FUSIONUI_INTERNALLY_MANAGED_USERNAME -
FUSIONUI_INTERNALLY_MANAGED_PASSWORD -
FUSIONUI_FUSION_BACKEND_CHOICE -
FUSIONUI_USER -
FUSIONUI_GROUP -
SILENT_PROPERTIES_PATH
Example Installation
As an example (as root), running on the installer moved to /tmp.
# If necessary download the latest installer and make the script executable
 chmod +x /tmp/installer.sh
# You can reference an original path to the license directly in the silent properties but note the requirement for being in a location that is (or can be made) readable for the $FUSIONUI_USER
# The following is partly for convenience in the rest of the script
cp /path/to/valid/license.key /tmp/license.key

# Create a file to encapsulate the required environmental variables:
cat <<EOF> /tmp/swift_silent_installer_env.sh
export FUSIONUI_MANAGER_TYPE=UNMANAGED_SWIFT
export FUSIONUI_INTERNALLY_MANAGED_USERNAME=admin
export FUSIONUI_FUSION_BACKEND_CHOICE=
export FUSIONUI_USER=hdfs
export FUSIONUI_GROUP=hdfs
export SILENT_PROPERTIES_PATH=/tmp/swift_silent.properties
export FUSIONUI_INTERNALLY_MANAGED_PASSWORD=admin
EOF

 # Create a silent installer properties file - this must be in a location that is (or can be made) readable for the $FUSIONUI_USER:
cat <<EOF > /tmp/swift_silent_installer_env.sh
existing.zone.domain=
existing.zone.port=
license.file.path=/tmp/license.key
server.java.heap.max=4
ihc.server.java.heap.max=4
fusion.domain=my.s3bucket.fusion.host.name
fusion.server.dcone.port=6444
fusion.server.zone.name=twilight
swift.installation.mode=true
swift.container.name=container-name
induction.skip=false
induction.remote.node=my.other.fusion.host.name
induction.remote.port=8082
EOF

# If necessary, (when $FUSIONUI_GROUP is not the same as $FUSIONUI_USER and the group is not already created) create the $FUSIONUI_GROUP (the group that our various servers will be running as):
[[ "$FUSIONUI_GROUP" = "$FUSIONUI_USER" ]] || groupadd hadoop

#If necessary, create the $FUSIONUI_USER (the user that our various servers will be running as):
useradd hdfs

if [[ "$FUSIONUI_GROUP" = "$FUSIONUI_USER" ]]; then
  useradd $FUSIONUI_USER
else
  useradd -g $FUSIONUI_GROUP $FUSIONUI_USER
fi

# silent properties and the license key *must* be accessible to the created user as the silent installer is run by that user
chown hdfs:hdfs $FUSIONUI_USER:$FUSIONUI_GROUP /tmp/s3_silent.properties /tmp/license.key

# Give s3_env.sh executable permissions and run the script to populate the environment
. /tmp/s3_env.sh

# If you want to make any final checks of the environment variables, the following command can help - sorted to make it easier to find variables!
env | sort

# Run installer:
/tmp/installer.sh
5.6.6. How Swift handles large files
Swift containers can appear to have a file-size discrepancy, looking smaller than the sum of their stored files. The reason for this apparent discrepancy is given below.
Files that are smaller than the segment size of a container are, predictably, stored directly to the container - as would be expected. However, large files that are bigger than the container’s segment size are actually stored in a companion container that is used for segments and has the same name as the parent container with the suffix "_segments". Segmented files appear in the main container, although these are empty manifest objects that symlink to the segments that correspond to the file in question.
So, for measuring the actual volume of data stored in a Swift container, you must also take into account the size of the corresponding segment’s container.
Impact on Fusion replication
WANdisco Fusion uses the same rules when replicating to Swift, and so provides configuration parameters for the ContainerName, SegmentContainerName and Segment Size for files uploaded via replication. Clearly, decreasing segmentSize for a container could increase the apparent storage size discrepancy, as more file content is actually stored in the segment container.
5.7. Cloud Deployment Guide
The following section expands upon the various Cloud installation guides, providing information that will help with general issues.
5.7.1. Networking between on-premises and Cloud
Setting up suitable network connectivity between your WANdisco Fusion zones using your Cloud private network system can be difficult to understand and implement if you’re not very familiar with the networking part of the Cloud platform. This section will give you all the information you need to make the best choices and right configuration for setting up network connectivity between your on-premises and Cloud environments.
WANdisco Fusion makes the replication of your on-premises data to cloud simple and efficient. It relies on network connectivity between the two environments, and because a typical on-premises data store will reside behind your firewall, you will need to plan the right approach for connecting it to a cloud resource.
The following sections give information on the requirements that your solution will need to meet, along with options for establishing communication between the environments. You can choose among those options, and perform simple testing to ensure that the configured solution meets all your needs for data replication with WANdisco Fusion.
Networking in WANdisco Fusion
WANdisco Fusion is a distributed system, allowing multiple, separate storage systems to exchange data to replicate content. It includes a collection of services that communicate over the network, requiring the ability to establish and use TCP connections between one another.
WANdisco Fusion for Cloud environments includes components that are created and launched in a Virtual Private Cloud (VPC). Your on-premises WANdisco Fusion components will need to establish connections with these VPC-resident services, and will also need to accept incoming connections from them.
You have many choices for how to establish connectivity between your on-premises environment and the Cloud-based Fusion node.
Regardless of your choice, you will need to ensure that your network connectivity meets the requirements defined in this document. For information from VPC connectivity options, please refer to documentation for you specific cloud platform, for example Using VPC Networks - Google or Amazon Virtual Private Cloud Connectivity Options.
Unidirectional Networking
WANdisco Fusion supports a feature that permits a switch in the direction of networking between the WANdisco Fusion server and remote IHC servers. By default, network connections are created outbound to any remote IHC servers during data transfer. To overcome difficulties in getting data back through your organization’s firewalls, it is possible to have Fusion wait for and re-use inbound connections.
Only turn on Inbound connection if you are sure that you need the open your network to traffic from the IHC servers on remove nodes.
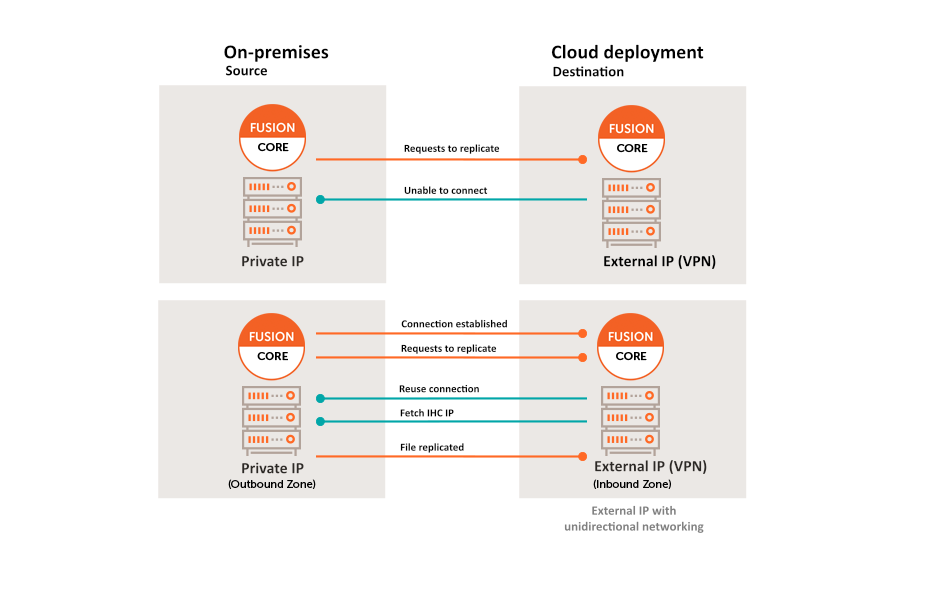
Inbound connection
When Inbound connection is selected, then you must ensure that WANdisco Fusion server must be publicly visible. To ensure this, you must enter a Fusion Server/Local IHC Public IP Adress.
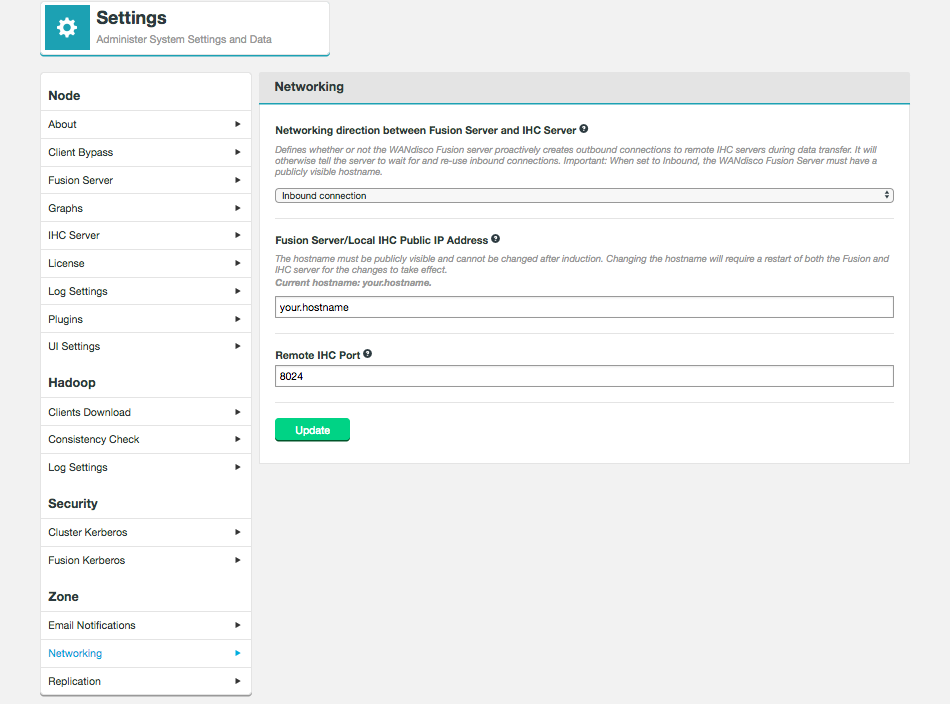
- Fusion Server/Local IHC Public IP Address
-
The hostname must be publically visible and cannot be changed after induction. Changing the hostname will require a restart of both the Fusion and IHC server, in order for the change to take effect.
- Remote IHC Port
-
The port that remove IHC servers will use to contract this Fusion server in the case of Inbound connections.
|
Hostname cannot be changed after induction
Note that once a WANdisco Fusion node has been inducted, it is no longer possible to change its hostname.
|
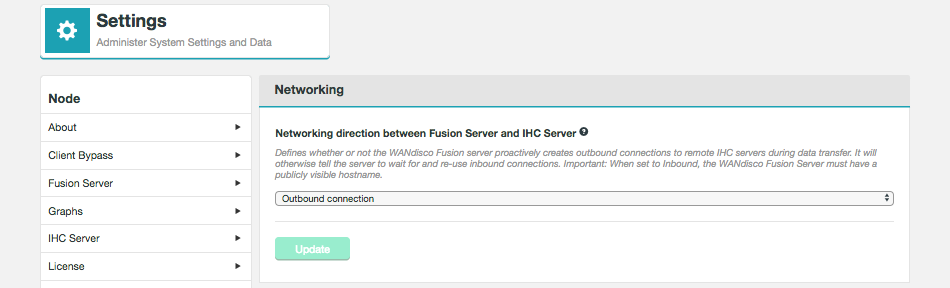
5.7.2. Ports
The diagram below shows the Fusion services and the ports they expose, that are used to replicate content between an on-premises local file system and Google Cloud.
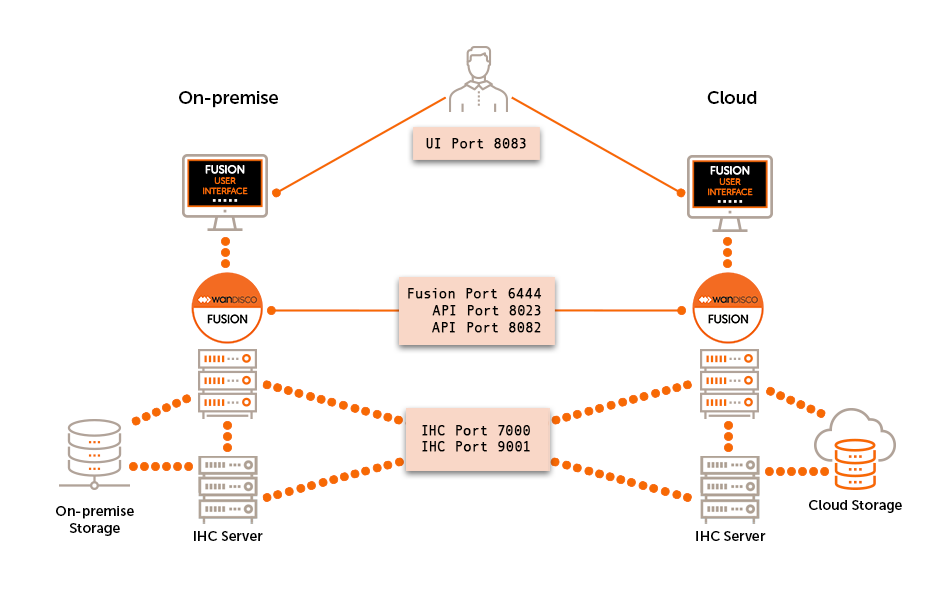
Take careful note of the need for TCP connections to be established in both directions between the hosts on which the Fusion and IHC servers execute. You need to allow incoming and outgoing TCP connections on ports:
- 6444
-
DConE port handles all co-ordination traffic that manages replication. It needs to be open between all WANdisco Fusion nodes. Nodes that are situated in zones that are external to the data center’s network will require unidirectional access through the firewall.
- 8023
-
Port used by WANdisco Fusion server to communicate with HCFS/HDFS clients. The port is generally only open to the local WANdisco Fusion server, however you must make sure that it is open to edge nodes.
- 8082
-
REST port is used by the WANdisco Fusion application for configuration and reporting, both internally and via REST API. The port needs to be open between all WANdisco Fusion nodes and any systems or scripts that interface with WANdisco Fusion through the REST API.
- 7000
-
7000 range, (exact port is determined at installation time based on what ports are available), used for data transfer between Fusion Server and IHC servers. Must be accessible from all WANdisco Fusion nodes in the replicated system.
- 8083
-
Used to access the WANdisco Fusion Administration UI by end users (requires authentication), also used for inter-UI communication. This port should be accessible from all Fusion servers in the replicated system as well as visible to any part of the network where administrators require UI access.
6. Operation
|
Known issue in 2.12.4
If using Kerberos for you cluster (HDFS, Hive) then upon Kerberos HDFS ticket expiring (usually after 1 day of running WANdisco Fusion), the file tree in the Fusion UI may disappear. If you also have core REST authentication enabled, then upon Kerberos HDFS ticket expiring, functionality such as email notifications will stop. WANdisco Fusion will report as unavailable on the dashboard. If either of these happens then restart the UI server: service fusion-ui-server restart This issue affects 2.12.4 only. This issue does not affect replication. |
6.1. Configuration
6.1.1. Managing Replication
WANdisco Fusion is built on WANdisco’s patented DConE active-active replication technology. DConE sets a requirement that all replicating nodes that synchronize data with each other are joined in a "membership". Memberships are coordinated groups of nodes where each node takes on a particular role in the replication system.
For more information about DConE and its different roles see the reference section - Guide to node types.
|
Known issue
Where possible, do not use the same Fusion Client to perform writes to different replicated directories.
This issue will be fixed in the 2.14 release.
|
Replication tab
The Replication tab contains the Replicated Rules table.

This table lists all available rules and gives basic information:
- Type
-
Currently HCFS is the only rule type available.
- Resource
-
The file path.
- Zone
-
The zones the rule is in.
- Status
-
The summary of the latest Consistency Check, if one has occurred.
- Activity
-
Information on the files being transferred.
From the top bar of the table you can create and remove rules. You can also run make consistent and consistency checks.
Clicking on the rule in the table takes you to the Replication Rule profile screen, giving more details about the rule. See the section on Managing Replication for more information.
Replication Rules
WANdisco Fusion allows selected directories within your hdfs file system to replicated to other data centers in your cluster. This section covers the set up and management of replication rules.
Create a Replication Rule
The first step in setting up a Replication Rule is the creation of a target directory:
-
In each zone, create a directory in the hdfs file space. To avoid permission problems, ensure that the owning user/group are identical across the zones. Use Hadoop’s filesystem command to complete the tasks:
hadoop fs -mkdir /user/hiver
hadoop fs -chown -R hiver:groupname /user/hiver
-
As user hdfs, run the following commands on each data center:
hadoop fs -mkdir /user/hiver/warehouse-replicated
hadoop fs -chown hiver:hiver /user/hiver/warehouse-replicated
This ensures that the a universal system user has read/write access to the hdfs directory
warehouse-replicatedthat will be replicated through WANdisco Fusion.
Create a Rule
-
Once the directory is in place on all nodes, log in to WANdisco Fusion’s UI on one of the WANdisco Fusion nodes and click on the Replication tab.
-
Click on the + Create button.
 Figure 105. Create rule 1
 -
The Replication Rule rule form screen will appear.
 Figure 106. Create rule 2
Navigate to the HDFS File Tree, on the right-hand side of the New Rule panel to select your target file, created in the previous section. The selected rule (file) will appear in the Path entry field, click Add
You can create multiple replication rules at once. If you need to remove a rule, just click the X next to it in the Paths list.Next, select two or more zones from the Zones list.
The Priority Zone now needs to be selected. This is the zone which is most important, that which is most reliable or up to date. For example if your set up has a production zone and a disaster recovery zone then production would be more important and therefore your priority zone.
-
You can now complete the creation of the Rule by clicking on the Create button. However, there are some additional options available on the Advanced Options panel which you may want to configure.
-
Click on Advanced Options to show more options.
 Figure 107. Create rule - advanced options
For non-cloud based deployments the advanced options are:
- Shared Encrypted KMS
-
In deployments where multiple zones share a command KMS server, then enable this parameter to specify a virtual prefix path.
- Preserve Origin Block Size
-
The option to preserve the block size from the originating file system is required when Hadoop has been set up to use a columnar storage solution such as Apache Parquet. If you are using a columnar storage format in any of your applications then you should enable this option to ensure that each file sits within the same HDFS block.
- Preserve Replication Factor
-
By default, data that is shared between clusters will follow the local cluster’s replication rules rather than preserve the replication rules of the originating cluster. When this option is enabled, the replication factor of the originating cluster is preserved.
For all deployments the advanced options are:
- Schedule Consistency Checks
-
If you select this option you can to set a consistency check interval that is specific to the rule and overrides the default value set in the Consistency Check section of the Settings tab. The consistency check can be set hourly, weekly or daily.
 Figure 108. Override consistency check interval
 - Exclude from replication
-
This lets you set an "exclude pattern" to indicate files and directories in your Replication Rules that you don’t want to be replicated. See Exclude from replication? for more information.
Path interpretation
If the path contains a leading slash "/", we assume it is an absolute path, if it contains no leading slash then we assume it is a relative path and the root directory will be added to the beginning of the exclusion.
-
If you didn’t complete a consistency check on the selected directory, you may do so now.
 Figure 109. Replicate to Zones
 -
After the completion of a consistency check, the Consistency column will report the consistency status.
 Figure 110. Replication Rule status
View/Edit Replication Rule
The Replication screen lists those rules in the cluster’s hdfs space that are set for replication between WANdisco Fusion nodes.

The table contains all rules: active, pending and failed. Labels in the Resource column indicate the status of rules (if required), for example Make Consistent Process in Progress.
If you click on the View link for a Replication Rule, then you enter a tabbed UI:

The View/Edit tab lets you view details or make changes to selected properties of the Rule:
- Writer for this zone
-
Indicates which node is set to handle writes for this zone.
- Path
-
The file path for the replication rule in question and its size.
- Zones
-
The zones that are replicated between, for the corresponding rule.
- Priority Zone
-
You can change the Priority Zone if the rule exists an even number of zones. If there is an odd number of of zones you will get the message "Priority Zone selection is only available with an even number of Zones".
- Advanced Options
-
Various advanced options that can be set for a replication rule. See Advanced Options.
Filtering

In deployments that use large numbers of rules, you can use the filter tool to focus on specific sets of rules, filtering by type, resource, status, consistency or zone. Filtering by Resource uses a text box, the other options provide a drop down list of options to filter by.
Remove a Rule
To remove a rule, simply tick the checkbox next to the no longer needed rule(s) and click Remove.
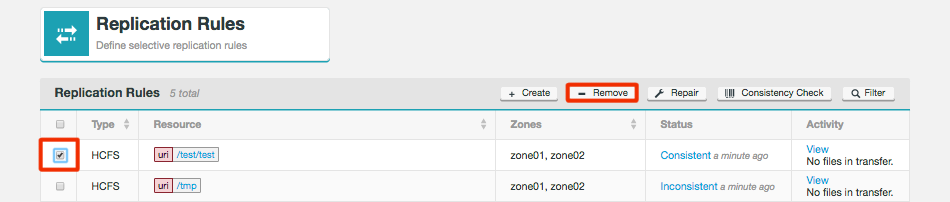
Replication Settings
The following configuration options are available in the Settings tab.

- ACL Replication
-
If ACL replication is enabled, then changes from both local and remote zones are executed, Otherwise, only locally originated ACL modification commands are executed.
-
This is a zone setting, so is enabled for the whole zone on which you enable the option.
-
Regardless of the state of this setting, a HDFS client loading FusionHdfs will submit agreements for File ACL changes in HDFS (if it is on a replicated path and not-excluded).
-
While a local zone will always execute a locally generated ACL change, it will only be executed on in other zones, if the ACL Replication checkbox is ticked.
-
- Enable ACL replication
-
Checkbox (ticked by default)

If you enable ACL replication you will get the following prompt:
| Changes to thse settings require the manual restarting of the Fusion Core Server and the Fusion IHC Server. |
- Replication Exchange Directory
-
Location of a directory in the replicated filesystem to which the Fusion Server will write information about replicated directories for clients to read. It should be a non-replicated location, readable by all users and writable by the Fusion user. If the directory doesn’t exist, it will be automatically created during the next Fusion server restart.
- Use replication exchange directory
-
Checkbox (unticked by default)
- Path to exchange directory
-
Entry field for the local path to the exchange directory. The entry field only appears if you tick the checkbox.

Setting a replication exchange directory will trigger the following warning:
| Changing these settings require the manual restarting of the Fusion Core Server. You will also need to redistribute the client configurations. |
Exclude from replication
You can select files or file system locations that will be excluded from replication across your clusters and will not show up as inconsistent when a consistency check is run on the file system.
This feature is used to remove housekeeping and temporary system files that you don’t want clogging up the replication traffic. The entry field will accept specific paths and files or a glob pattern (sets of filenames with wildcard characters) for paths or files.
Default Exclusions
The following glob patterns are automatically excluded from replication:
/**/.fusion, /**/.fusion/**
-
Fusion directories store WANdisco Fusion’s housekeeping files, it should always be excluded in the global zone properties (even after update)
/**/.Trash, /**/.Trash/**
-
Trash directories are excluded by default but it can be removed if required.
Example
Requirement: exclude all files in the replicated directory with the
"norep_" prefix from replication.
Directory structure:
/repl1/rep_a
/repl1/norep_b
/repl1/subdirectory/rep_c
/repl1/subdirectory1/norep_d
/repl1/subdirectory2/rep_e
/repl1/subdirectory2/norep_e
Required rule:
**/norep_*
-
Pattern does not need to be an absolute path, e.g. /repl1/subdirectory2/no_rep_3, patterns are automatically treated as relative to the replication rule, e.g. /subdirectory/no_rep_3
-
Take care when adding exclusion rules as there is currently no validation on the field.
|
Important considerations for Exclude rules
Exclusion patterns determine what files should not be replicated when they otherwise would by being in the scope of a replication rule. *IMPORTANT: Exclusions do not determine how to apply individual operations at the file system level in general. In particular, exclusion patterns shouldn’t determine what gets deleted at all.
|
IgnoreZones
In some cases you may wish to block some zones from accepting requests from certain other zones. This provides useful flexibility, at the zone level, allowing you to limit unnecessary or unwanted replication traffic.
|
Consistency check remains pending
If you attempt to perform a consistency check against a path which is replicated between one or more ignored zones, then the consistency check will never complete as the zone is being ignored by Fusion.
|
Setting up an IgnoreZone
To use this property, you use the following PUT call which uses an XML file to define the ignore policy for the specified Replicated Directory Path.
curl --negotiate -u : -v -s -X PUT -d@ignoringZones.xml -H "Content-Type: application/xml" "http://hostname.cluster.domain.com:8082/fusion/fs/properties/global/ignorePolicies?path=/repl1"with the above "ignoringZones.xml" input XML file conforming to the following pattern:
<ignorePolicies>
    <ignorePolicy>
        <zone>dc1</zone>
        <ignore>
            <zone>dc2</zone>
            <zone>dc3</zone>
        </ignore>
    </ignorePolicy>
    <ignorePolicy>
        <zone>dc2</zone>
        <ignore>
            <zone>dc1</zone>
            <zone>dc4</zone>
        </ignore>
    </ignorePolicy>
</ignorePolicies>
Each ignorePolicy is a mapping of zones to ignore from one zone, "zone" to other zones, "ignore". In the above example,
-
"dc1" would ignore any requests/repair from "dc2" and "dc3"
-
"dc2" would ignore any requests/repair from "dc1" and "dc4"
IgnoreZone validation
-
An ignorePolicy can NOT be defined more than once for the same zone, so there can’t be two ignorePolicy instances with the same <zone> attribute.
-
A zone can NOT ignore itself.
-
A zone can NOT be defined more than once in the ignore list per ignorePolicy.
-
When issuing a make consistent process, zones that are ignoring the source zone will not participate. If there was only one participating zone, a make consistent process is not possible - so it would be cancelled automatically.
6.1.2. Fusion Server settings
The Fusion server settings give you control over traffic encryption between WANdisco Fusion and IHC servers.

- Fusion HTTP Policy Type
-
Sets the policy for communication with the WANdisco Fusion Core Server API.
Select from one of the following policies:
Only HTTP - WANdisco Fusion will not use SSL encryption on its API traffic.
Only HTTPS - WANdisco Fusion will only use SSL encryption for API traffic.
Use HTTP and HTTPS - WANdisco Fusion will use both encrypted and un-encrypted traffic.Known IssueCurrently, the HTTP policy and SSL settings both independently alter how WANdisco Fusion uses SSL, when they should be linked. You need to make sure that your HTTP policy selection and the use of SSL (enabled in the next section of the Installer) are in sync. If you choose either to the policies that use HTTPS, then you must enable SSL. If you stick with "Only HTTP" then you must ensure that you do not enable SSL. In a future release these two settings will be linked so it wont be possible to have contradictory settings. - Fusion HTTP Server Port
-
The TCP port used for standard HTTP traffic. Validation checks whether the port is free and that it can be bound.
- Maximum Java heap size (GB)
-
Enter the maximum Java Heap value for the WANdisco Fusion server. The minimum for production is 16GB but 64GB is recommended.
- DConE panic if dirty (checkbox)
-
This option lets you enable the strict recovery option for WANdisco’s replication engine, to ensure that any corruption to its prevayler database doesn’t lead to further problems. When the checkbox is ticked, WANdisco Fusion will log a panic message whenever WANdisco Fusion is not properly shutdown, either due to a system or application problem.
- App Integration panic of dirty (checkbox)
-
This option lets you enable the strict recovery option for WANdisco Fusion’s database, to ensure that any corruption to its internal database doesn’t lead to further problems. When the checkbox is ticked, WANdisco Fusion will log a panic message whenever WANdisco Fusion is not properly shutdown, either due to a system or application problem.
URI Selection
The default behaviour for WANdisco Fusion is to handle all replication using the Hadoop Distributed File System via the hdfs:/// URI.
Selecting the HDFS-scheme provides the widest support for Hadoop client applications, since some applications can’t support the available fusion:/// URI or they can only run on HDFS instead of the less strict HCFS. Each option is explained below:
- Use HDFS URI with HDFS file system
-
This option is available for deployments where the Hadoop applications support neither the WANdisco Fusion URI or the HCFS standards.
WANdisco Fusion operates entirely within HDFS. This configuration will not allow paths with the fusion:// URI to be used; only paths starting with hdfs:// or no scheme that correspond to a mapped path will be replicated. The underlying file system will be an instance of the HDFS DistributedFileSystem, which will support applications that aren’t written to the HCFS specification.
- Use WANdisco Fusion URI with HCFS file system
-
This is the default option that applies if you don’t enable Advanced Options, and was the only option in WANdisco Fusion prior to version 2.6.
When selected, you need to use fusion:// for all data that must be replicated over an instance of the Hadoop Compatible File System. If your deployment includes Hadoop applications that are neither able to support the Fusion URI, nor are written to the HCFS specification, then this option will not work.
- Use Fusion URI with HDFS file system
-
This differs from the default in that while the WANdisco Fusion URI is used to identify data to be replicated, the replication is performed using HDFS itself.
This option should be used if you are deploying applications that can support the WANdisco Fusion URI but not the Hadoop Compatible File System.
- Use Fusion URI and HDFS URI with HDFS file system
-
This "mixed mode" supports all the replication schemes (
fusion://, hdfs:// and no scheme) and uses HDFS for the underlying file system, to support applications that aren’t written to the HCFS specification.
Set Push Threshold Manually

The feature exposes the configuration property fs.fusion.push.threshold, stored in the core-site.xml file.
It provides administrators with a means of making a small performance improvement, useful in a small number of cases.
When enabled in the UI the entry displays as "Required".
You can enter your own value (in bytes) and click the Update button.
|
Amazon cloud deployments
For cloud deployments, ensure the property is disabled (unticked) or set to zero "0". This will disable HFLUSH which is suitable because appends are not supported for S3 storage.
|
6.1.3. Consistency Check
The Consistency Check tool is used to confirm that the files and metadata that are managed under a replication rule are consistent between zones. Perform consistency checks when you add new data into replication, periodically to monitor the state of replication or as part of a make consistent operation.
|
Username Translation
If any nodes that take part in a consistency check have the Username Translation feature enabled, then inconsistencies in the "user" field will be ignored.
|

A status message appears at the top of the panel that indicates if and when a consistency check has recently been performed on this path.
You can click on Reload results to view the cached results from a previous check, or you can click Trigger check to run a new check.
- Path
-
The path to the replication rule currently being viewed for consistency.
- Properties
-
The system properties for the rule, including the following properties:
-
Length: - byte length of the file (in kilobytes)
-
Is a directory: - distinguishes files from directories (true or false)
-
Owner: - Owning system account
-
Group: - Associated system account group
-
Permissions: - File permissions applied to the element
-
ACLs: - Associated Access Control Lists for the element
-
- Zone columns
-
Columns will appear for each replicated zone that should contain a copy of the available metadata, as labeled in the Properties field.
- Source of truth
-
From the available zones, you must choose the one that represents the most up-to-date state.
- Resolve
-
Once you have selected from the available zones, click the Resolve button.
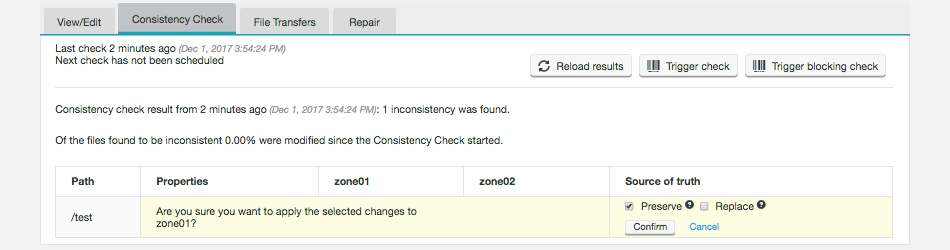
- Reload results
-
Click to view the stored results from the previous consistency check. Viewing the results does not require that another check be run but the results may not be up-to-date.
- Trigger check
-
Click to run a new consistency check. This consistency check is non-blocking and is the default type of check that is made through the tool.
|
Non-blocking Consistency Check
The non-blocking consistency check mechanism (introduced in Fusion 2.11) allows information on consistency state to be determined without blocking other activity while the check is underway. It takes advantage of tracking the state of changes to content under check during execution and produces information for each item checked that covers the states: consistent, not-consistent, potentially inconsistent.
|
- Trigger blocking check
-
Click to perform a consistency check using the pre-2.11 consistency check mechanism. The new mechanism flags any path that has been changed as "dirty," i.e., cannot be evaluated for consistency. So, there may be environments, with high rates of change, where you need to block further activity during a consistency check to get any useful information about consistency.
Performing a Consistency Check
There are two different ways of doing a Consistency Check:
Consistency Check by Checkbox
-
Select a Path from the Replication Rules table using the check box column.
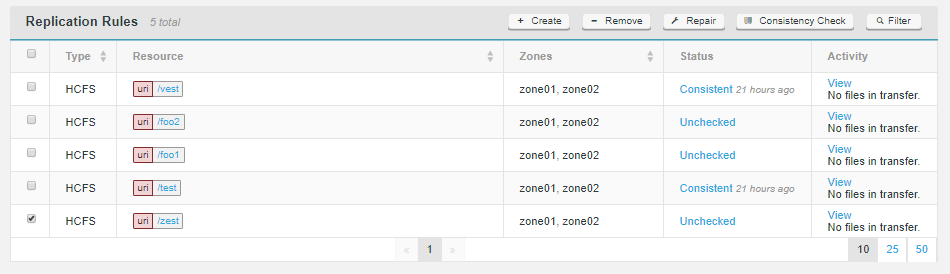 Figure 122. Consistency Check - Checkbox
 -
The rule-specific options on the top of the panel will no longer be greyed-out. Click on the Consistency Check button.
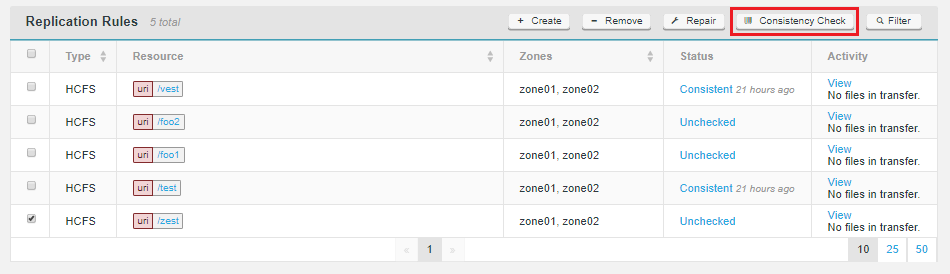 Figure 123. Consistency Check - Check
 -
The selected rule will now be checked in the background.
 Figure 124. Consistency Check - Check Pending
The results will appear in the Consistency column as either "Unchecked", "Consistent" or "Inconsistent". This result is also a link to the Consistency Check tab.
Consistency Check by link
You can go to to the Consistency Check tab by clicking on the status link in the Status column, or the Path link.
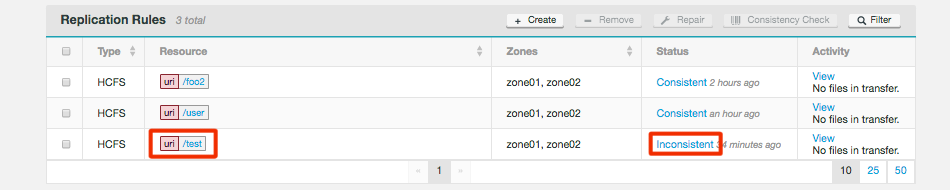
-
On the Consistency Check tab, trigger the type of Consistency check you want - see above for the differences between blocking and non-blocking consistency checks.
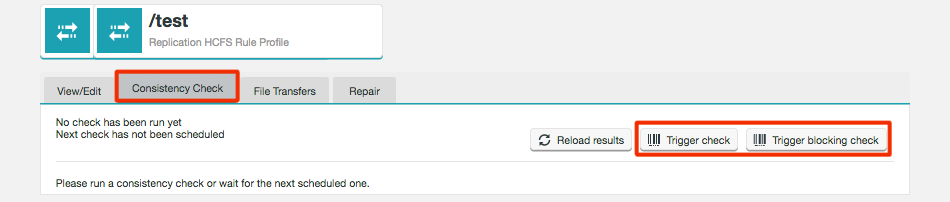 Figure 126. Consistency Check tab - Trigger Check
 -
Based on the results, you may want to run a make consistent operation.
Scheduled Consistency Check
The Consistency Check section under the Settings tab allows you to enable or disable scheduled consistency checks, alter the default check interval and change the consistency check report limit.

- Schedule Checks
-
This determines if scheduled consistency checks are enabled. Altering this can be applied to existing rules and/or newly created rules.
- Default Check Interval
-
This can be set to repeat hourly, daily or weekly. Hourly lets you set the default number of hours (1-12) that are allowed to pass before a replication rule is checked for consistency between replicas. Weekly lets you set the day of the week and time of day that the consistency check will occur.
- Update
-
Click Update to store the entered value and use it for all new replication rules that don’t have their own set interval.
- Apply to existing rules
-
This applies the new default value to all replication rules, except those with their own schedule.
- Consistency Check Report Limit
-
The maximum number of inconsistencies displayed in reports.
It’s possible to set a different schedule for each specific replication rule using the Advanced Options available when setting up or editing a Replication Rule. See Create a Rule or View/Edit Replication Rule.
6.1.4. File Transfers
The File Transfer panel shows the movement of data coming into the zone. The current transfer speed is also displayed.
6.1.5. Make Consistent
The Make Consistent tab provides a tool for resolving file inconsistencies between available zones. The tool provides two different types of operations (a third SnapDiff option is available if running the netapp-specific "Ontap" build version), based on the option you select from the Make Consistent Type dropdown.

- HCFS Make Consistent
-
this is an operation on live Hadoop Compatible File System. This method is the most direct for making file systems consistent, although running it will stop writes to the replication rule in the local zone. The block is removed once the operation completes.
- Checkpoint Make Consistent
-
this option uses the fsimage checkpoints created by Hadoop’s admin tool. The use of a snapshot from the namenode ensures that the local filesystem does not get locked during the operation.
Known issueThis option is not available if the Live Ranger or Live Sentry plugins are installed. - SnapDiff (NetApp)
-
The Snapdiff implementation of make consistent allows the operation to be driven by the use of the Netapp snapdiff API. The process for use of the snapdiff implementation of snapshot make consistent is detailed below. See Make consistent type SnapDiff (NetApp).
Blocking vs Non-blocking Make Consistent
In Fusion 2.12, make consistent operation defaults to a new non-blocking mechanism that does not block other operations that may be attempted against a location currently being made consistent while that task is in process. This can make the operations less obtrusive, although there are still some situations where the old blocking form of make consistent operation may be required.
Blocking vs Non-blocking Make Consistent
By not blocking other activities, during its operation, a Non-blocking Make Consistent can only offer a best-effort attempt to resolve metadata inconsistencies, and may suffer from failures if data that is subject to the make consistent is modified after the sync was initiated.
-
Non-blocking make consistent operations are not compatible with SnapDiff or checkpoint repairs.
-
Consistency checks cannot be executed in parallel to non-blocking make consistent operations.
-
Non-blocking make consistent operations should not be allowed to run when bypass is enabled.
Make Consistent type HCFS
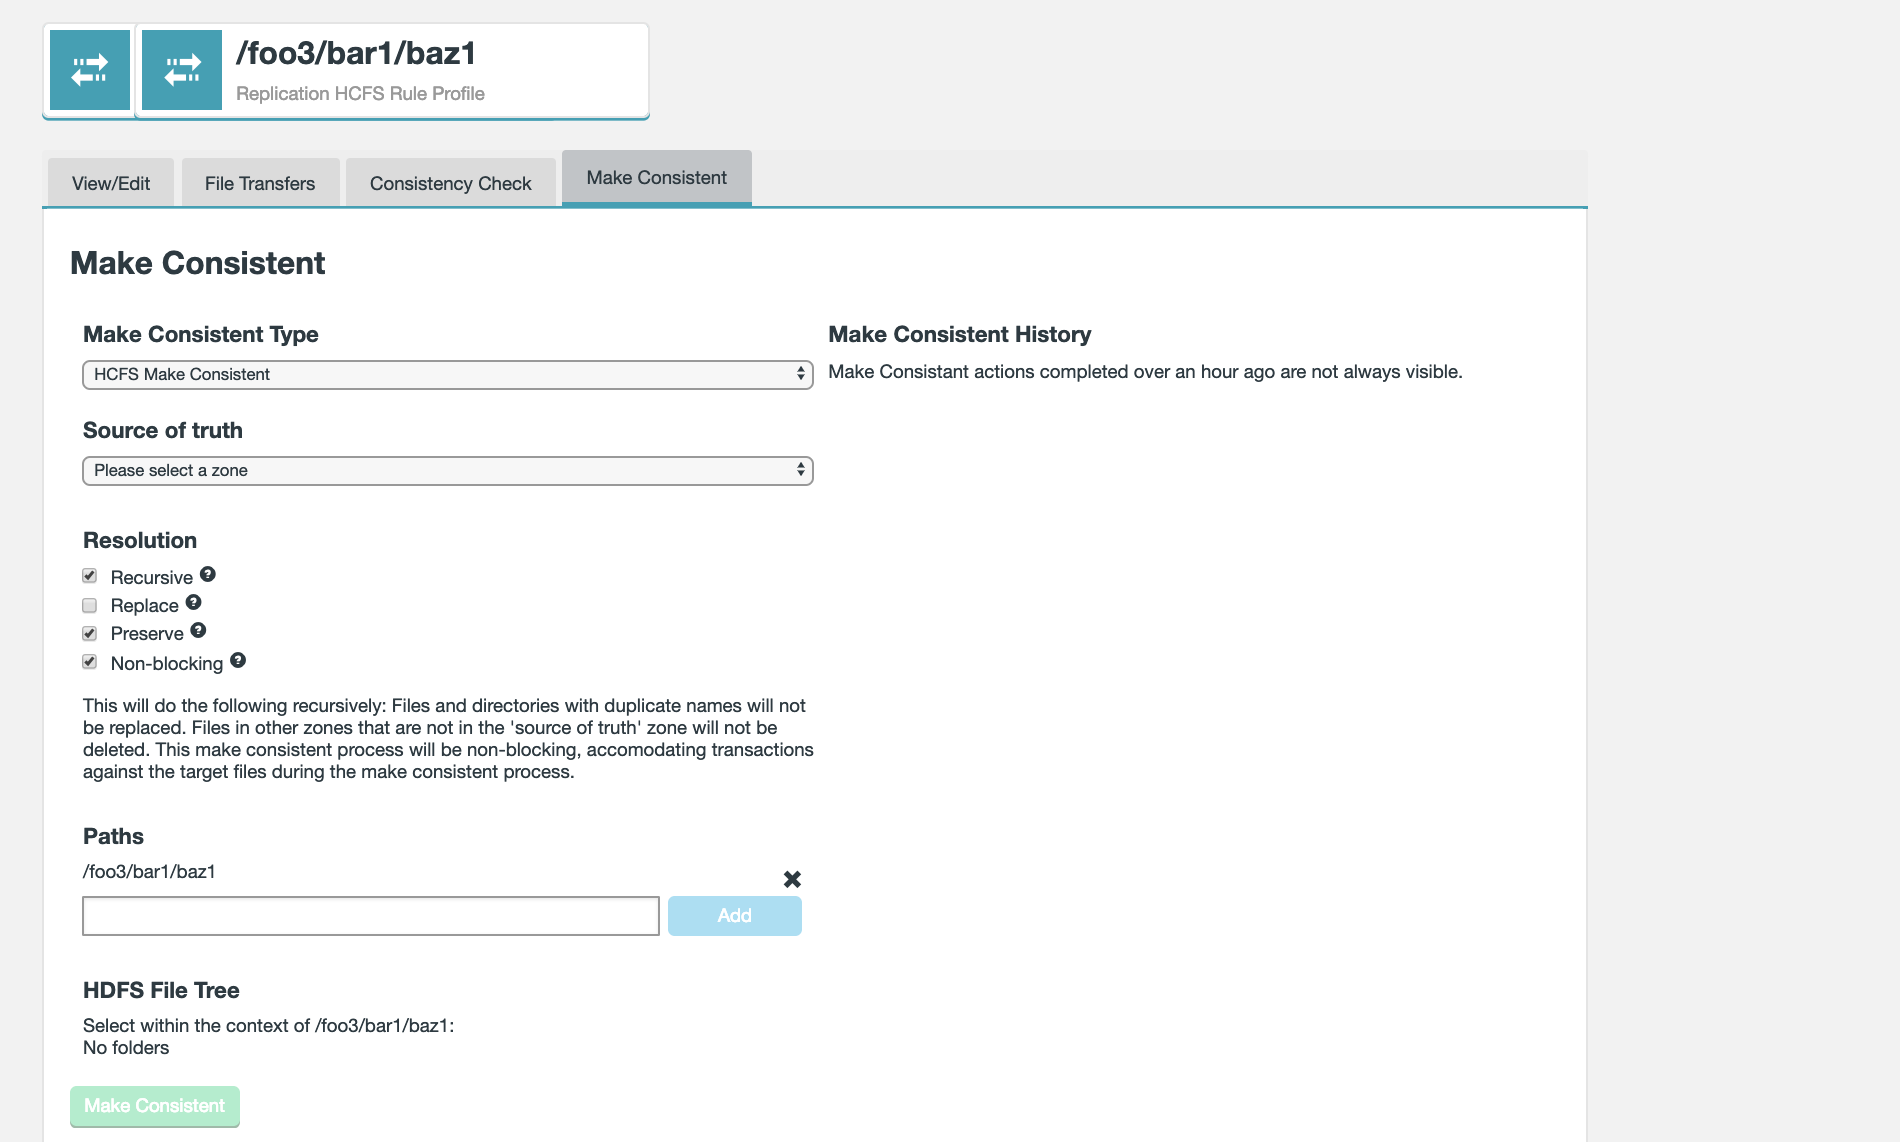
Run through the following procedure to perform a make consistent operation:
-
Select the Source of truth from the dropdown. This will flag one of the available zones as most up-to-date / most correct in terms of stored data.
-
Select from three Resolution types, Recursive, Replace or Preserve (select all that apply). The Resolution description will alter based on your selection.
- Recursive
-
If checkbox is ticked, this option will cause the path and all files under it to be made consistent. The default is true, but is ignored if the path represents a file.
|
Clarification on running without Recursive operation
A make consistent operation that is run without the Recursive option will not work successfully on the contents of any subfolders in the target directory of your replication rule, however it will apply to all contained files and folders, but not the contents of those subfolders. Example make consistent operation run on /mnt/nfs/dir1 with "no recursive" option.
/mnt/nfs/dir1 - made consistent (no recursive) /mnt/nfs/dir1/file1 - made consistent /mnt/nfs/dir1/file2 - made consistent /mnt/nfs/dir1/subdirectory/file3 - not made consistent /mnt/nfs/dir1/subdirectory/file4 - not made consistent |
- Replace
-
If checkbox is ticked, when the make consistent operation is executed in a zone that is not the source zone, any duplicate files and directories will be overwritten.
| Opting not to replace produces inconsistent results when there are pre-exising directories or files. |
The following table shows what to expect when running (and finishing) a Blocking Make Consistent with the Replace checkbox unticked (no attempt to overwrite pre-existing data). To be clear, the outcomes for files or directories are inconsistent.
| Local Directory Exist | Local Files Exist | Make Consistent Outcome | Remaining |
|---|---|---|---|
No |
No |
Make Consistent "complete" (Operation completes as expected) |
= 0 |
No |
Yes |
Make Consistent remains "incomplete" |
= 0 |
Yes |
No |
Make Consistent "complete" |
> 0 |
Yes |
Yes |
Make Consistent "incomplete" |
> 0 |
- Preserve
-
If checkbox is ticked, when the make consistent operation is executed in a zone that is not the source zone, any data that exists in that zone but not the source zone will be retained and not removed.
- Non-blocking
-
When checkbox is ticked, the file system changes that take place after the make consistent operation has been started. This option is ticked by default. You might untick the option if your replicated data environment has high rates of change, where you need to block HDFS client operations during a consistency check to get any useful information about consistency.
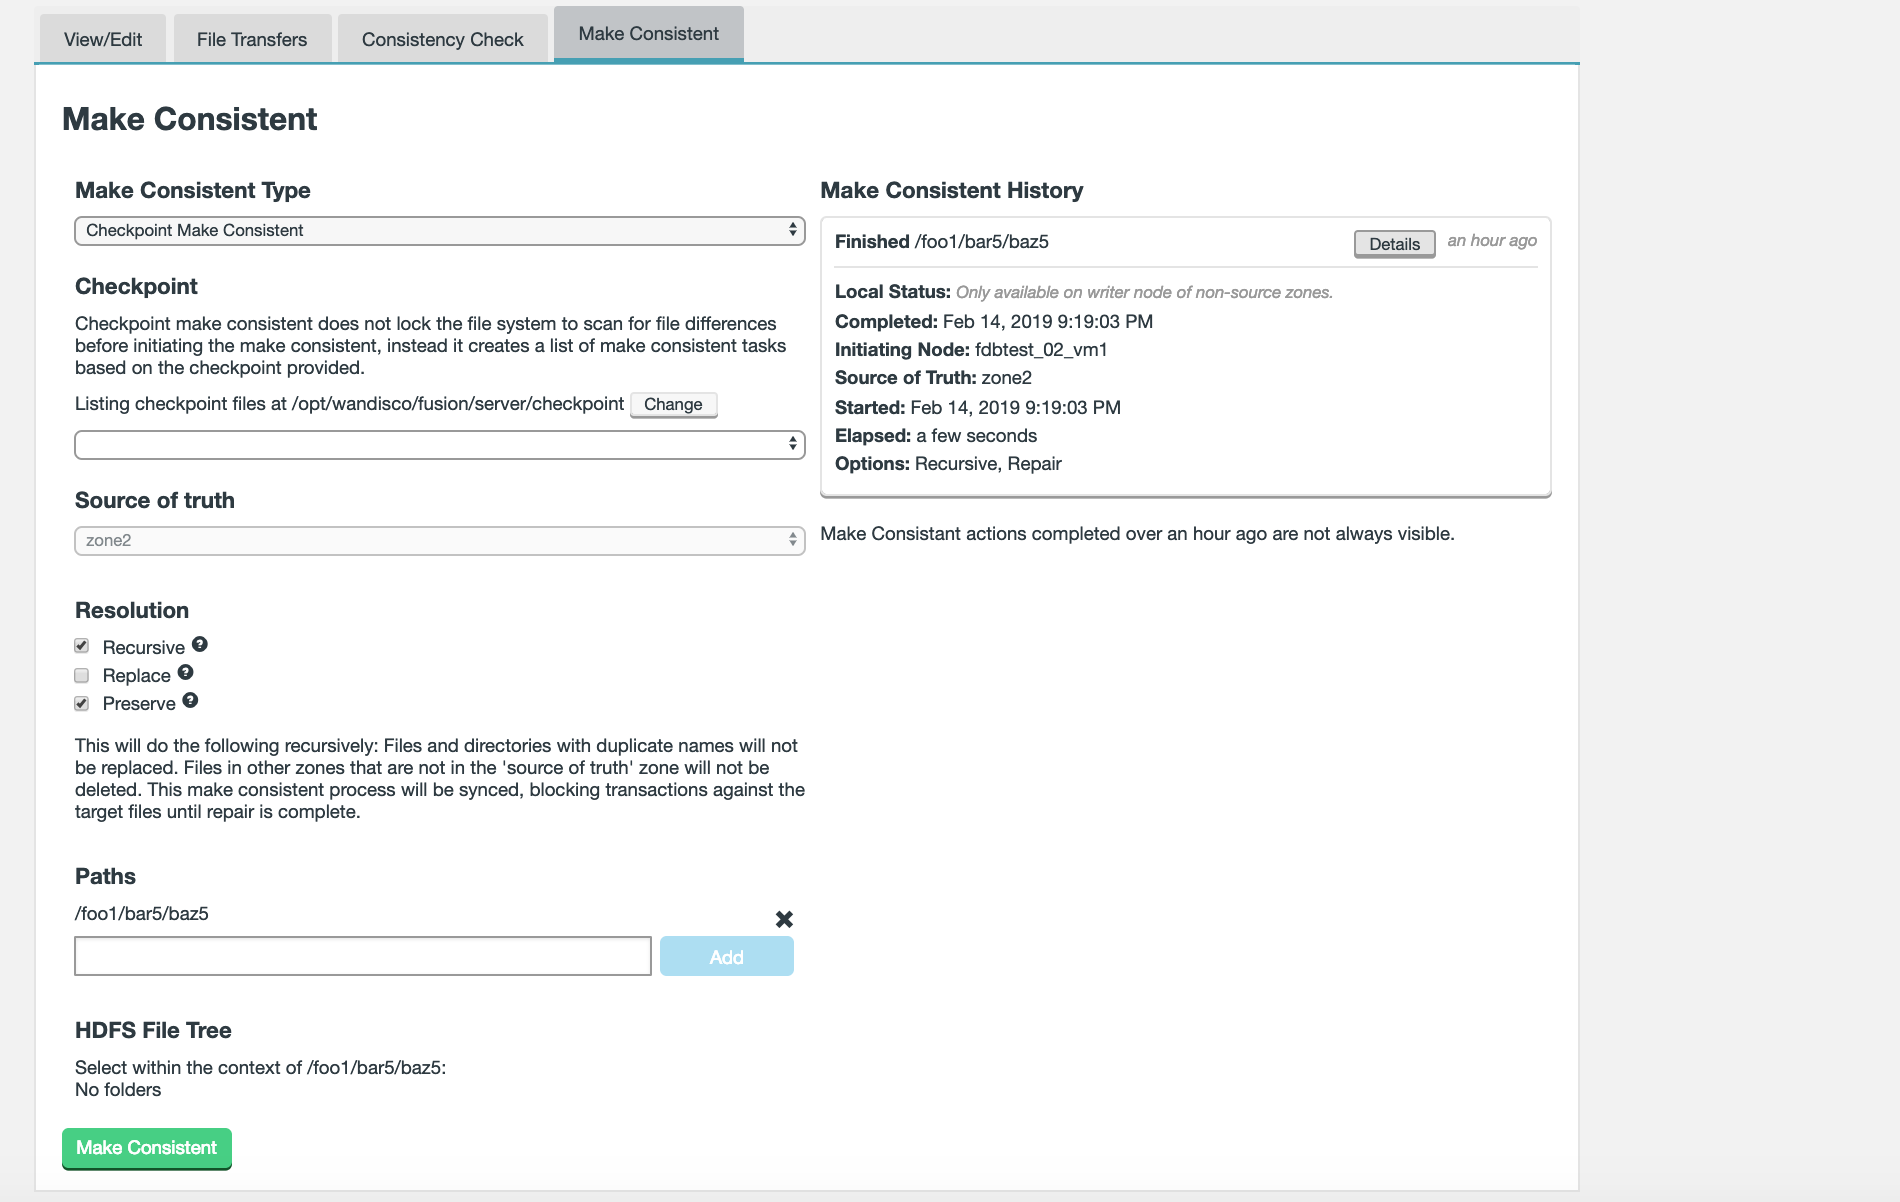
Make Consistent type SnapDiff (NetApp)
SnapDiff is an internal Data ONTAP engine that quickly identifies the file and directory differences between two Snapshot copies. See What SnapDiff is.

- Type
-
The type of make consistent operation that you wish to start. hdfs or ontap
- Path
-
The replicated system path.
- Netapp filter URI
-
The URI used for Natapp API traffic.
- Virtual Filter Name
-
A name provided for the virtual filter.
- Volume Name
-
Storage volume name.
- Mountpoint
-
Path where the volume is mounted on the underlying filesystem.
- Base Snapshot
-
Name of the base snapshot. Diffs are calculated as deltas between a base and diff snapshot.
- Diff Snapshot
-
Name of the diff snapshot.
- Maximum number of diffs per request
-
Max diffs returned per request. See MaxDiffs.
- Source of truth
-
The node on which the most correct/update data is stored.
- Resolution of truth
-
Mechanism that determines how the latest/most correct data is copied into place.
- Paths
-
Paths to replicated directories.
- HDFS File Tree
-
Rendered view of the current file tree.
-
A user initiates a snapshot of the NFS content (externally to WANdisco Fusion). This will be called the “base snapshot”.
-
Time passes, changes occur in that NFS file system.
-
The user initiates another snapshot of that content (externally to Fusion) - this will be called the “diff snapshot”.
-
The user invokes the snapshot repair API, including this information:
-
Required parameters:
HTTP authentication (user/password) in the header of the request. Ontap requires this to invoke their API.
- snapshotType
-
The type of make consistent operation that you wish to start. hdfs or ontap.
- path
-
Replicated path.
- endpoint
-
URI of the Netapp Filer serving Ontap requests.
- vfiler
-
Name of the virtual filer.
- volume
-
The exported volume.
- mountpoint
-
Path where the volume is mounted on the underlying filesystem.
- baseSnapshot
-
Name of the base snapshot. Diffs are calculated as deltas between a base and diff snapshot.
- diffSnapshot
-
Name of diff snapshot.
Optional parameters:
- recursive
-
Indicates whether subdirectories should be considered.
|
Non-Recursive requests
If the recursive parameter is set to "false", the parameter is ignored. NetApp snapshots are ALWAYS recursive over a directory hierarchy.
From 2.10.2 onwards, an error code will be returned instead — it’s not a valid request for this API call.
|
- replace
-
Replace files/dirs of the same name on the receiving zone.
- preserve
-
If preserve == true, do not remove any files on the receiving zone that don’t exist on the source zone.
- maxDiffs
-
Max diffs returned per request. There is a hard limit of 256, unless an admin goes to the admin server and changes the registry keys:
|
To change maxDiff limit on the Netapp Filer:
Use the following steps.
|
system node run -node "nameofvserver"
priv set advanced
registry walk
registry set options.replication.zapi.snapdiff.max_diffs SOMENUMBER
Example to invoke via curl:
curl --user admin:Ontap4Testing -v -X PUT 'http://172.30.1.179:8082/fusion/fs/repair/snapshot?snapshotPath=/tmp/snapshot1&snapshotType=ontap&path=/tmp/repl1/vol1&endpoint=https://172.30.1.200:443/servlets/netapp.servlets.admin.XMLrequest_filer&vfiler=svm_taoenv&volume=vol1&maxDiffs=256&mountpoint=/tmp/repl1/vol1&preserve=true&baseSnapshot=snap1&diffSnapshot=snap2'
-
The snapshot make consistent operation then executes as per the standard make consistent mechanism to update zones, but will only consider the information that has changed between the base and diff snapshots. The intention is for the base snapshot to reflect the known state of all zones at a prior point in time, and to use the difference between it and the diff snapshot for reconciliation. Non-source zones for snapshot make consistent operation with this mechanism trust that the difference between the base and diff snapshots is a true representation of the changes required.
Example Make Consistent operation
-
Compare the inconsistent states of the consistency check result. You need to identify which version of the file/metadata is correct/most up-to-date, then set the zone on which it is located as the Source of truth.
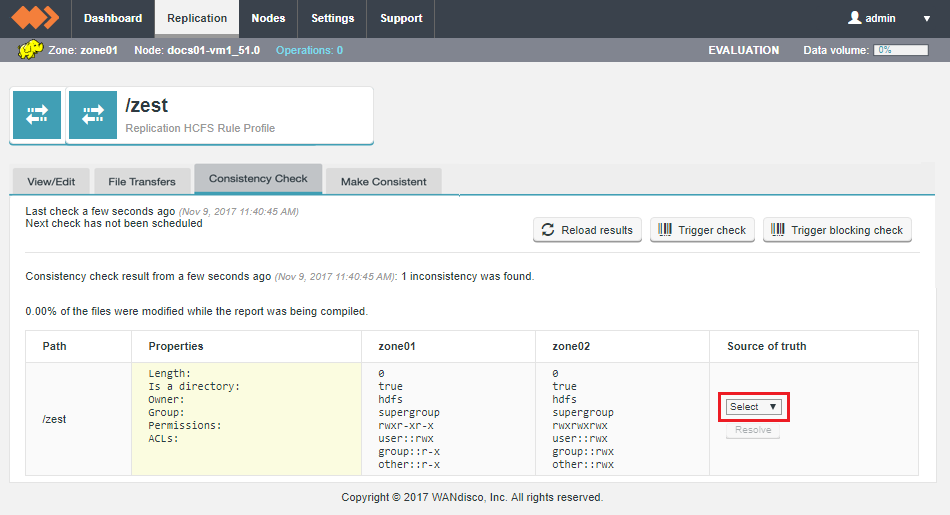 Figure 133. Bulk Make Consistent
 -
Once selected, click Resolve.
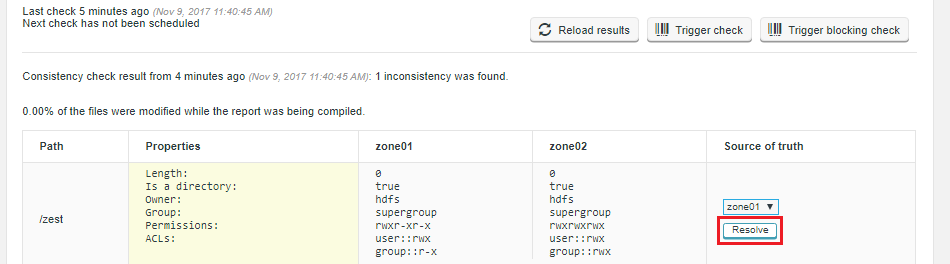 Figure 134. Resolve
 -
Please select any rules that you wish to apply to the make consistent operation. You can see an explanation for each action in the section Make Consistent type HCFS.
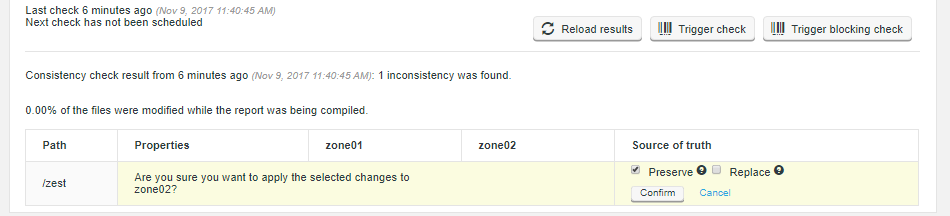 Figure 135. Make Consistent handling rules
 -
A confirmation message will display the status of the make consistent operation. You should see "Fix requested" appear in a green background in the Source of truth box. This indicates that the fix has been submitted. You will need to rerun the consistency check to confirm that the issue is fixed.
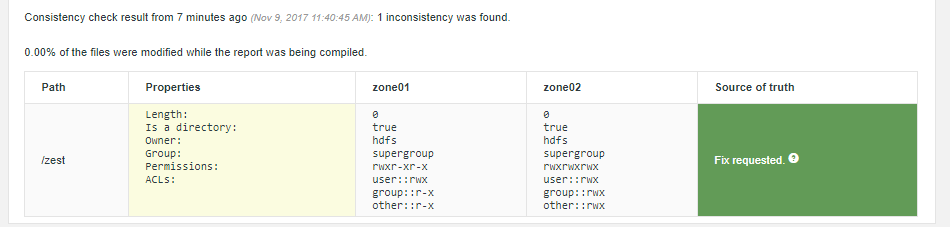 Figure 136. Fix requested
Bulk make consistent
When a large number of inconsistencies are found, you don’t need to manually set each make consistent operation, instead you can use the Bulk make consistent tool to set the rules for a collective operation that applies to multiple paths.
-
Select Bulk resolve inconsistencies from the dropdown, this will reveal the make consistent tool screen. The make consistent tool works in the same way as the regular make consistent operation. Read the start of this section for more information on the Make Consistent tool options.
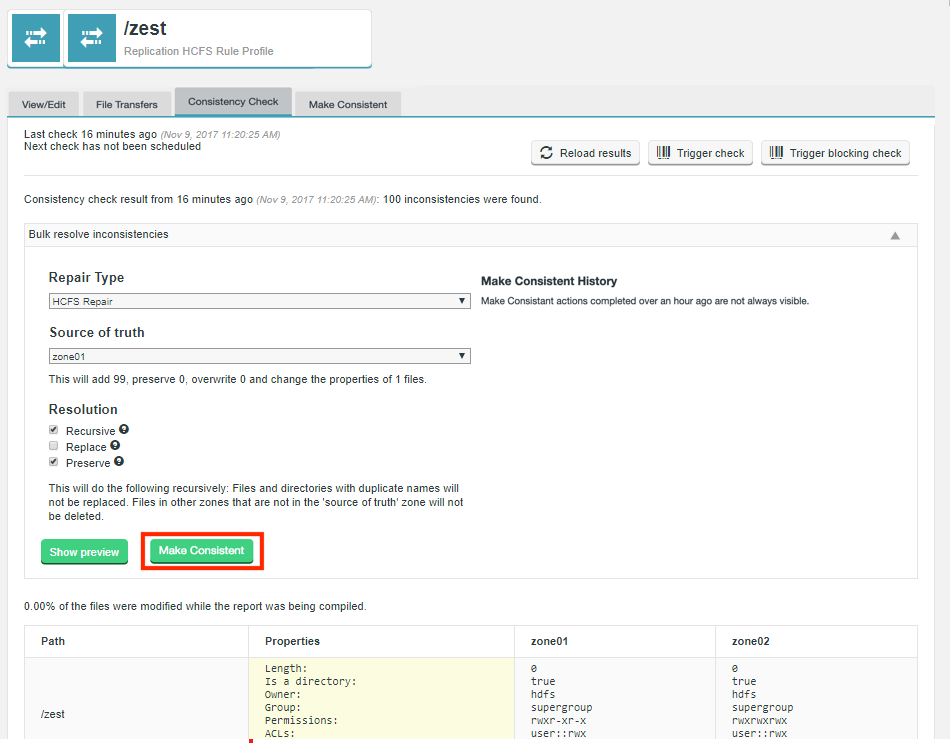 Figure 137. Bulk Make Consistent
 -
Once you start an operation, you will get a confirmation request. Click Confirm to continue.
 Figure 138. Bulk Make Consistent confirmation
 -
Next, you will receive a confirmation message that the request has been submitted successfully.
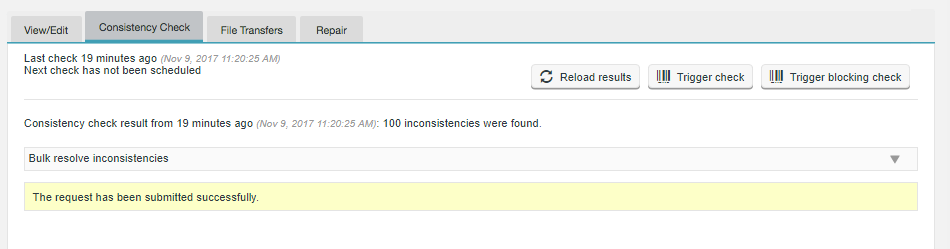 Figure 139. Request submitted
Rerun the Consistency Check to confirm that all issues have now been resolved.
Running initial make consistent operations
If you have a large directory you can parallelize the initial make consistent operation using the Fusion API. This can be accomplished on a single file or a whole directory. Choosing a directory will push all files from the source to the target regardless of existence at the target.
Consider the following directory structure for a fusion replication rule /home
/home
/home/fileA
/home/fileB
/home/userDir1
/home/userDir2
/home/userDir3
We could run a bulk resolve in the UI against the /home directory, however, to provide parallelism of the make consistent operations we can use the Fusion API to issue make consistent operations against each directory and the individual files in the /home directory.
Example - Multiple API Calls using curl
curl -X PUT "FUSION_NODE:8082/fusion/fs/repair?path=/home/userDir1&recursive=true&src=LocalFS"
curl -X PUT "FUSION_NODE:8082/fusion/fs/repair?path=/home/userDir2&recursive=true&src=LocalFS"
curl -X PUT "FUSION_NODE:8082/fusion/fs/repair?path=/home/userDir3&recursive=true&src=LocalFS"
curl -X PUT "FUSION_NODE:8082/fusion/fs/repair?path=/home/fileA&recursive=false&src=LocalFS"
curl -X PUT "FUSION_NODE:8082/fusion/fs/repair?path=/home/fileB&recursive=false&src=LocalFS"
This will spawn simultaneous make consistent operations, increasing the performance of the initial synchronization. This is especially helpful when you have small file sizes to better saturate the network.
For files, the recursive parameter is ignored
You can use the file transfers view in the Fusion UI on the OpenStack-replicating node to monitor the incoming files.
Cancelling a make consistent operation
In the event that a make consistent operation gets stuck, or for some reason needs to be cancelled, this can be actioned from the Make Consistent tab. Ongoing make consistent operations are noted with a label on the Replication Rule screen.
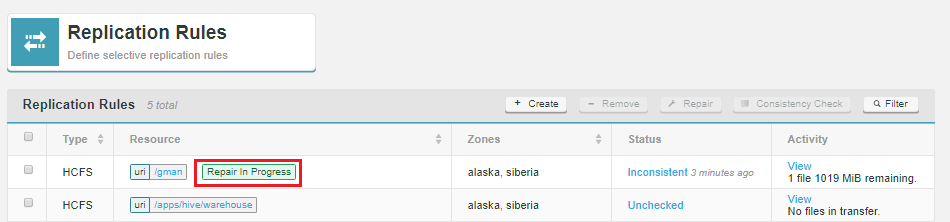
Cancel an ongoing make consistent operation by going to the Make Consistent History panel on the Make Consistent tab and clicking the Cancel Make Consistent button.
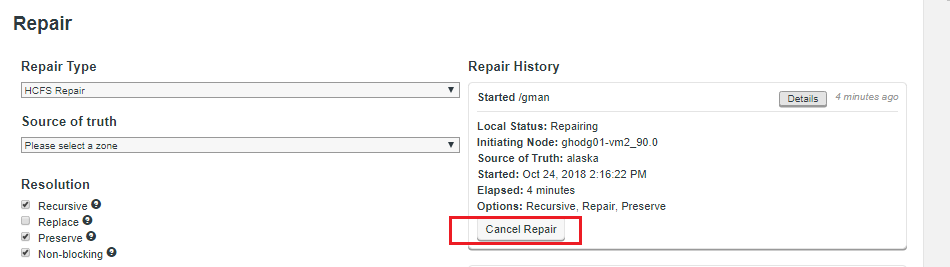
- Started
-
Identifies the rule path under make consistent operation. Click the Details button for more information about the state of the process.
- Local Status
-
Will show as Completed or Making Consistent.
- Initiating Node
-
Shows the node from which the make consistent proposal was created.
- Started
-
Time-stamp for the start of the make consistent.
- Elapsed
-
Amount of time that the make consistent operation has been underway.
- Options
-
Lists the make consistent options selected for the operation. For an explanation of their meaning, see Make Consistent Type HCFS.
- Cancel Make Consistent Operation
-
If an operation is still underway, there is a Cancel button available that lets you halt it.
6.1.6. Replicating using the Filesystem’s scheme
Any WANdisco Fusion supported FileSystem can replicate using its own scheme, the fusion scheme does not have to be used.
This allows you to have some schemes replicated using WANdisco Fusion and others independent of WANdisco Fusion.
Creating your own schemes lets you, for example, change over time which sets of files are replicated.
This may be useful if when setting up WANdisco Fusion you do not wish to replicate all files initially.
You can configure this with the following steps:
-
Set
fs.<scheme>.impltocom.wandisco.fs.client.FusionHcfsin thecore-site.xmlfile. The<scheme>can have any name but it is advisable for it to be logical. -
If the
<scheme>is not one of the ones provided by Fusion, updatefs.fusion.underlyingFsClass. The value needs to be the full filesystem class, for exampleorg.apache.hadoop.fs.RawLocalFileSystem.
The schemes provided are listed in the Fusion Client Configuration section. -
Now deploy the client configs.
The result of this is that the fs.<scheme>.impl now points to Fusion, and Fusion interacts with the original FileSystem.
Any client side application using the <scheme> will first go through Fusion.
| Certain products make assumptions about the scheme used, for example Sentry ignores everything which is non-hdfs. |
More information can be found in the Fusion Client Configuration section.
6.1.7. Username Translations
Username translation is available in all 2.12.x versions. In 2.12.4 the per-zone username translation feature was added. Per-zone username translation allows mappings to be defined based on the name of the originating zone and the username, rather than just the username. This section focuses on per-zone username translation.
Important information:
-
All nodes of the same zone must have the same fusion.username.translations.
-
Mappings only exist as a one-way relationship between two zones, regardless of how many zones are inducted.
-
Translated users should have write permissions in the destination directory.
-
Usernames are not checked in consistency checks if username translation is enabled. If any nodes that take part in a consistency check have the Username Translation feature enabled, then inconsistencies in the "user" field will be ignored. Therefore, when making zones consistent, usernames will remain different for files/directories which are otherwise consistent.
The username translation property is in the application.properties file, e.g.
fusion.username.translations=foreignZone0[foreignUser0/destinationUser1]
In the data center where the fusion.username.translations property is set, when a request comes in from a zone, it will check the username of the request against each listed pattern of that zone.
If the username matches that pattern, an attempt is made to translate using the listed value.
If, during a check, none of the rules are found to match, the default is to not translate.
Also, if there is no username translation rule for the requesting zone, the default is to not translate.
The rules can be defined explicitly as the exact string values or as a regex:
-
Rules are comma separated.
-
Patterns and translations are separated by "/".
-
Patterns and translations don’t contain "/".
-
White spaces should be accounted for in code, but are discouraged.
-
Zone rules are separated by ";" (see example below).
For example
foreignZone0[hdp-(.*)/cdh-$1,([A-Z]*)-([0-9]*)-user/usa-$2-$1]
or
foreignZone0[hdp-1/cdh-2,A-user/usa-1]
Examples
-
Add the following to
application.propertiesin Zone1:fusion.username.translations=zone2[hdfs/testuser,fusionuser/testuser]
Files transferred to Zone1 from Zone2, which are owned by
hdfsorfusionuseron zone2, will have the ownertestuseron Zone1.
-
The configuration can also contain multiple zones. For example, if all Fusion servers of Zone1 contain the configuration:
fusion.username.translations=zone2[hdfs/testuser,fusionuser/testuser];zone3[hdfs/otheruser,fusionuser/otherfususer]
Then:
Files transferred to Zone1 from Zone2, that are owned byhdfson zone2, will have the ownertestuseron Zone1. Files transferred to Zone1 from Zone3, that are owned byfusionuseron zone3, will have the ownerotherfususeron Zone1. -
Pre 2.12.4 the non-zone specific format is required. This translates the user from any zone.
fusion.username.translations=user1/user2,user3/user4
6.1.8. Configure for High Availability Hadoop
| When using HA mode, there is a possibility that when multiple replication requests arrive at the same time from a client which has not sent any requests before, some requests will fail and will not replicate. An exception/error will return to the caller if there is a failure. |
If you are running Hadoop in a High Availability (HA) configuration then you should run through the following steps for WANdisco Fusion:
-
Enable High Availability on your Hadoop clusters. See the documentation provided by your Hadoop vendor, i.e. - Cloudera or Hortonworks.
The HA wizard does not set the HDFS dependency on ZooKeeper
Workaround:-
Create and start a ZooKeeper service if one doesn’t exist.
-
Go to the HDFS service.
-
Click the Configuration tab.
-
In the Service-Wide category, set the ZooKeeper Service property to the ZooKeeper service.
-
-
Edit WANdisco Fusion configuration element
fs.fusion.underlyingFsto match the new nameservice ID in the cluster-widecore-site.xmlin your Hadoop manager.
E.g, change:<property> <name>fs.fusion.underlyingFs</name> <value>hdfs://vmhost08-vm0.cfe.domain.com:8020</value> </property>To:
<property> <name>fs.fusion.underlyingFs</name> <value>hdfs://myCluster</value> </property> -
Click Save Changes to commit the changes.
-
If Kerberos security is installed make sure the configurations are there as well: Setting up Kerberos with WANdisco Fusion.
-
You’ll need to restart all Fusion and IHC servers once the client configurations have been deployed.
6.1.9. Known issue on failover
Where High Availability is enabled for the NameNode and WANdisco Fusion, when the client attempts to failover to the Standby NameNode it generates a stack trace that outputs to the console. As the WANdisco Fusion client can only delegate the method calls to the underlying FileSystem object, it isn’t possible to properly report that the connection has been reestablished. Take care not to assume that a client has hung, it may, in fact, be in the middle of a transfer.
6.1.10. Reporting
The following section details with the reporting tools that WANdisco Fusion currently provides.
Consistency Check
The consistency check mechanism lets you verify that replicated HDFS data is consistent between sites. Read about Handling file inconsistencies.
Consistency Checks through WANdisco Fusion UI
|
Username Translation
If any nodes that take part in a consistency check have the
Username Translation feature
enabled, then inconsistencies in the "user" field will be ignored.
|
Consistency
- Consistency Status
-
A status which links to the consistency check report. It can report Check Pending, Inconsistent, Consistent or Unknown.
- Last Check
-
Shows the time and date of the check that produced the current status. By default, Consistency checks are not automatically run.
- Next Check
-
Shows the time and date of the next automatically scheduled Consistency Check. Remember, you don’t need to wait for this automatic check, you can trigger a consistency check at any time through the Consistency Check tool.
Click on the Consistency/Inconsistency link to get more information about the consistency check results for a selected path.
Read more about Consistency Check tool.
File Transfer Report
As a file is being pulled into the local zone, the transfer is recorded in the WANdisco Fusion server and can be monitored for progress.
Use the REST API filter by the replicated path and sort by ascending or descending "complete time" or "start time":
GET /fusion/fs/transfers?path=[path]&sortField=[startTime|completeTime]&order=[ascending|descending]
File transfer Report Output
Example output showing an in-progress and completed transfer:
<?xml version="1.0" encoding="utf-8" standalone="yes"?>
<fileTransfers>
    <fileTransfer>
        <startTime>1426020372314</startTime>
        <elapsedTime>4235</elapsedTime>
        <completeTime>1426020372434</completeTime>
        <username>wandisco</username>
        <familyRepresentativeId>
            <nodeId>f5255a0b-bcfc-40c0-b2a7-64546f571f2a</nodeId>
            <dsmId>93452fe3-c755-11e4-911e-5254001ba4b1</dsmId>
        </familyRepresentativeId>
        <file>/tmp/repl/isoDEF._COPYING_<;/file>
        <remoteFs>hdfs://vmhost5-vm4.frem.wandisco.com:8020</remoteFs>
        <origin>dc1<;/origin>
        <size>4148166656</size>
        <remaining>4014477312</remaining>
        <bytesSec>3.3422336E7</bytesSec>
        <percentRemaining>96.77714626516683</percentRemaining>
        <state>in progress</state>
    </fileTransfer>

    <fileTransfer>
        <startTime>1426019512082</startTime>
        <elapsedTime>291678</elapsedTime>
        <completeTime>1426019803760</completeTime>
        <username>wandisco</username>
        <familyRepresentativeId>
            <nodeId>f5255a0b-bcfc-40c0-b2a7-64546f571f2a</nodeId>
            <dsmId>93452fe3-c755-11e4-911e-5254001ba4b1</dsmId>
        </familyRepresentativeId>
        <file>/tmp/repl/isoABC</file>
        <remoteFs>hdfs://vmhost5-vm4.frem.wandisco.com:8020</remoteFs>
        <origin>dc1</origin>
        <size>4148166656</size>
        <remaining>0</remaining>
        <bytesSec>1.4221733E7</bytesSec>
        <percentRemaining>0.0</percentRemaining>
        <state>complete</state>
    </fileTransfer>
</fileTransfers>
Output key with data type
- Username
-
System user performing the transfer. (String)
- File name
-
Name of the file being transferred. (String)
- Remote FS
-
The file of the originating node. (URI)
- Origin
-
The file’s originating Zone. (String)
- Size
-
The cumulative size of data transferred. (Long)
- Appends
-
The number of appends that have been made to the file being transferred. (Long)
- AppendSize
-
The size of the latest append.
- Remaining
-
Remaining bytes still to be transferred for the latest append. (Long)
- Percent remaining
-
Percentage of the file still to be transferred. (Double)
- Bytes/Sec
-
The current rate of data transfer, i.e. Amount of file downloaded so far / elapsed download time. (Long)
- State
-
One of "in progress", "incomplete", "completed", "appending", "append complete", "deleted" or "failed". (TransferState)
In progress: means we are performing an initial pull of the file.
Appending: means data is currently being pulled and appended to the local file.
Append completed: means all available data has been pulled and appended to the local file, although more data could be requested later.
Note: files can be renamed, moved or deleted while we pull the data, in which case the state will become "incomplete".
When the remote file is closed and all of its data has been pulled, the state will then change to "Complete".
If a file is deleted while we are trying to pull the end state will be "deleted".
If the transfer fails the state will be "failed". - Start Time
-
The time when the transfer started. (Long)
- Elapsed Time
-
Time that has so far elapsed during the transfer. Once the transfer completes it is then a measure of the time between starting the transfer and completing. (Long)
- Complete Time
-
During the transfer this is an estimate for the complete time based on rate of through-put so far. Once the transfer completes this will be the actual time at completion. (Long)
- Delete Time
-
If the file is deleted then this is the time the file was deleted from the underlying filesystem. (Long)
6.1.11. Record retention
Records are not persisted and are cleared up on a restart. The log
records are truncated to stop an unbounded use of memory, and the
current implementation is as follows:
For each state machine, if there are more than 1,000 entries in its
list of transfers we remove the oldest transfers ,sorted by complete
time, which are in a terminal state ("completed", "failed" or "deleted")
until the size of the list is equal to 1,000. The check on the number of
records in the list is performed every hour.
6.1.12. Bandwidth management
Enterprise License only The Bandwidth Management tools are only enabled on clusters that are running on an Enterprise license. See the Deployment Checklist for details about License Types.
The bandwidth management tools provide two additional areas of functionality to support Enterprise deployments.
-
Limit the rate of outgoing traffic to each other zone.
-
Limit the rate of incoming traffic from each other zone.
Any applicable bandwidth limits are replicated across your nodes and applied on a per-zone basis.

The Fusion Nodes screen will display current incoming traffic for the local zone. You will need to log in to the WANdisco Fusion UI on a node within each Zone to see all incoming traffic levels.
Setting up bandwidth limits
Use this procedure to set up bandwidth limits between your zones.
Click on the Set bandwidth limit button for each corresponding zone.
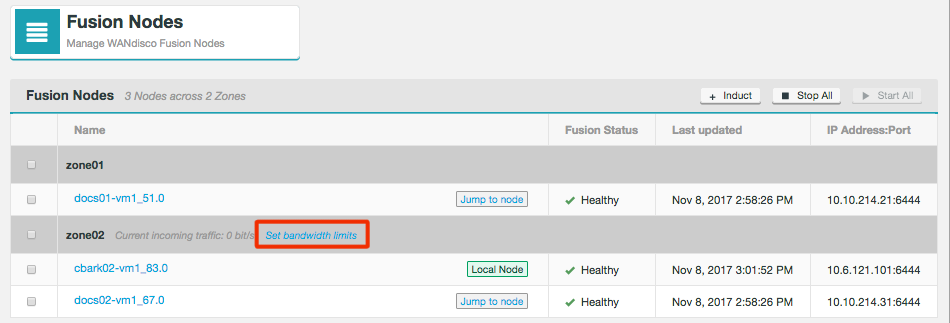
The Maximum bandwidth dialog will open.
For each remote zone you can set a maximum Outgoing to and Incoming from values, either by typing in your value or using the arrows in the box.
Entered values are in Mibit.
The default value is 0 which indicates unlimited bandwith.
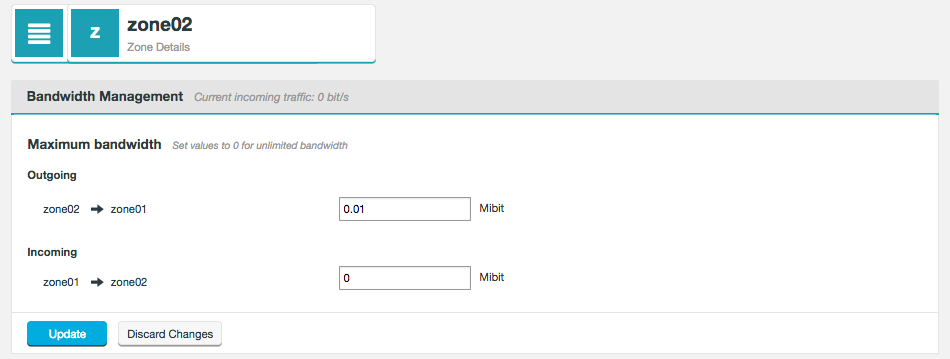
- Outgoing to
-
The provided value will be used as the bandwidth limit for data coming from the target zone.
- Incoming from
-
As it is only possible to actually limit traffic at source, the Incoming from value is applied at the target zone as the Outgoing to limit for data being sent to the present zone.
When you have set your bandwidth values, click Update to apply these settings to your deployment.
Set Push Threshold Manually
The feature exposes the configuration property fs.fusion.push.threshold, stored in the core-site.xml file.
It provides administrators with a means of making a small performance improvement, useful in a small number of cases.
When enabled in the UI the entry displays as "Required".
You can enter your own value (in bytes) and click the Update button.
Amazon cloud deployments
For cloud deployments, ensure the property is disabled (unticked) or set to zero "0". This will disable HFLUSH which is suitable because appends are not supported for S3 storage.
6.1.13. Renaming files and directories
Files and directories under replication can be renamed. However if one or more zones is encrypted, and the others are not, then the rename may fail. See the Hadoop documentation for more information.
This rename failure will happen in the following circumstances:
-
The file/directory in the originating cluster is not in an encrypted zone, or the rename means the file/directory remains within the same encrypted zone, but, the rename will result in the file/directory moving into or out of an encrypted zone in the target cluster.
-
Result: The rename will complete on the source cluster but will fail in target clusters.
-
-
When the rename of a file/directory in the originating cluster will result in a move out of, into or between encrypted zones, but, in the target cluster there will be no movement in relation to encrypted zones.
-
Result: The rename will fail on the source cluster but will complete in target clusters.
-
Example
-
The path
/repl1/ais defined in a replication rule and it contains the file or directory/repl1/a/b/c. -
In ZoneA there is no encrypted zone but in ZoneB there is an encrypted zone of
/repl1/a/b.
In this set up, if the command hdfs dfs -mv /repl1/a/b/c /repl1/a/X/c is run on ZoneA, then the rename will work on ZoneA but it will fail on ZoneB.
This is because c is being moved from within the encrypted zone /repl1/a/b to outside of it in /repl1/a/X.
6.1.14. Marker Files
From 2.12.1.8 onwards, applications can now use Fusion marker files to signal across clusters that files are available in full.
Hadoop does not provide a built-in mechanism for file or directory locking, so applications that require some means of signaling when a set of data has been written in full need to provide some application-specific mechanism for this. In a single Hadoop cluster, applications can use a marker file or directory to indicate to other applications when a particular, application-defined set of files have been completely written. i.e. Application X writes file1, file2, and file3, and only having done so in full creates a file marker. Other applications wait on the arrival of the marker file to determine that file1, file2, and file3 are available in full.
This works for a single cluster because an application performing those creates and writes will not create the marker file until it knows that the other files exist in full, including their content. It is a way of signaling through the file system that content is available.
In an environment where Fusion provides replication, the pattern does not hold across clusters because the marker file may be created before the content for each of the other files has been replicated. An application awaiting the marker file in a non-originating zone may still be able to open the other files for read, and not see their full content, whereas if it waited for the marker file in the originating cluster it would likely see the full content for those files.
The Fusion Markers feature extends the capabilities of Fusion to provide a special designation to a directory whose name ends in the text .fusion_marker. This is called a marker. When completed, that directory will not be visible in a non-originating cluster until all content associated with files created previously in the originating cluster (in or beneath the same directory in which the marker was created) have been replicated and made available in full to the non-originating cluster.
Applications can use this feature to achieve the same functionality that is present in a non-replicated Hadoop file system.
To implement the marker file functionality, files are added to the intended source directory as intended, after these files are all added, the marker file directory must be created to the source path,it must either be created directly to the source path or added to the source path, moving or copying a marker file directory will not work due to Fusion’s internal ordering logic. After the creation of the marker file directory, all other actions on the same path, after the creation of the marker file directory are held until the actions before the marker file directory creation are all finished, once they are finished, the marker file is created and all other actions are now performed.
6.1.15. Setting up API Authorization
The Fusion server provides an authorization filter which is chained after the existing Kerberos authentication filter. This implementation makes use of the username supplied during authentication to check a list of users, stored in the core-site.xml file to decide if the action is authorized.
Authz prerequisites
-
Enable and configure Kerberos
-
Enable authentication
These instructions cover the setting up of Fusion’s Authz function, that works through Kerberos.
In WANdisco Fusion UI
-
Go to Fusion UI and navigate to the setting page.
-
Navigate to the Kerberos panel.
-
Tick the checkbox Enable API Authorization.

Manually configure users
You now need to configure users in the core-site file, through your Hadoop manager:
Ambari
-
Go to the manager UI

-
Navigate to the Custom core-site and add the following custom properties.

  fusion.http.authorization.authorized.proxies -- admin,fusionUISystem,HTTP
  fusion.http.authorization.authorized.read.writers -- admin,fusionUISystem,HTTP
  fusion.http.authorization.authorized.readers -- admin,fusionUISystem,HTTP
If there are any
auth_to_localconfigurations that will downcase usernames, the Fusion UI will not be able to connect to the Fusion server, in which case the HTTP should be changed to http in theauthorized.proxies. In versions of WANdisco Fusion before 2.12.4 the default is hdfs, not HTTP. -
Save the changes.

-
Restart the sale configuration in the manager node.
Cloudera Manager
-
Go to the manager UI, go to hdfs1 and click on Configuration.

-
Navigate to the Cluster-wide Advanced Configuration Snippet (Safety Valve) for core-site.xml.

-
Add the following custom properties.
  fusion.http.authorization.authorized.proxies -- admin,fusionUISystem,HTTP
  fusion.http.authorization.authorized.read.writers -- admin,fusionUISystem,HTTP
  fusion.http.authorization.authorized.readers -- admin,fusionUISystem,HTTP
-
Save and then click Restart the stale configuration in the manager node.
6.1.16. UI Settings
You can change how you interact with WANdisco Fusion UI through the browser:

Change UI ports
-
Log into the WANdisco Fusion UI. Click on the Settings tab.
-
Click on UI Settings link on the side menu.
-
Enter a new HTTP Port.
 Figure 148. Settings - Fusion UI host and port
 -
Click Update. You may need to update the URL in your browser to account for the change you just made.
Restart required - Any change that you make will require a restart of the WANdisco Fusion server in order for it to be applied.
To change the HTTPS Port see the next section, Enable SSL for WANdisco Fusion, for more information.
6.2. Administration
6.2.1. Starting up
To start WANdisco Fusion UI:
-
Open a terminal window on the server and log in with suitable file permissions.
-
Run the fusion-ui-server service from the /etc/init.d directory:
rwxrwxrwx 1 root root 47 Apr 10 16:05 fusion-ui-server -> /opt/wandisco/fusion-ui-server/bin/fusion-ui-server
-
Run the script with the start command:
[root@localhost init.d]#  ./fusion-ui-server start

Starting fusion-ui-server:.                         [  OK  ]
WANdisco Fusion starts. Read more about the fusion-ui-server init.d script.
-
Also you can invoke the service directly. e.g.
service fusion-ui-server stop/start
6.2.2. Shutting down
To shut down:
-
Open a terminal window on the server and log in with suitable file permissions.
-
Run the WANdisco Fusion UI service, located in the init.d directory:
rwxrwxrwx 1 root root 47 Dec 10 16:05 fusion-ui-server -> /opt/wandisco/fusion-ui-server/bin/fusion-ui-server
-
Run the stop script:
[root@redhat6 init.d]#  ./fusion-ui-server stop
stopping fusion-ui-server:                                   [  OK  ]
[root@redhat6 init.d]#
The process shuts down.
Shutdowns take some time
The shutdown script attempts to stop processes in order before completing, as a result you may find that (from WANdisco Fusion 2.1.3) shutdowns may take up to a minute to complete.
6.2.3. init.d management script
The start-up script for persistent running of WANdisco Fusion is in the /etc/init.d directory. Run the script with the help command to list the available commands:
[root@redhat6 init.d]# service fusion-ui-server help
  usage: ./fusion-ui-server (start|stop|restart|force-reload|status|version)

start Start Fusion services
stop Stop Fusion services
restart Restart Fusion services
force-reload Restart Fusion services
status Show the status of Fusion services
version Show the version of Fusion
Check the running status (with current process ID):
[root@redhat6 init.d]# service fusion-ui-server status
Checking delegate:not running                              [  OK  ]
Checking ui:running with PID 17579                         [  OK  ]
Check the version:
[root@redhat6 init.d]# service fusion-ui-server  version
1.0.0-83
6.2.4. Managing cluster restarts
WANdisco Fusion’s replication system is deeply tied to the cluster’s file system (HDFS). If HDFS is shut down, the WANdisco Fusion server will no longer be able to write to HDFS, stopping replication even if the cluster is brought back up.
To avoid replication problems:
-
Where possible, avoid doing a full shutdown. Instead, restart services to trigger a rolling restart of datanodes.
-
If a full shutdown is done, you should do a rolling restart off all WANdisco Fusion nodes in the corresponding zone. A rolling restart ensures that you will keep the existing quorum.
6.2.5. Managing services through the WANdisco Fusion UI
Providing that the UI service is running, you can stop and start WANdisco Fusion through the Nodes tab.
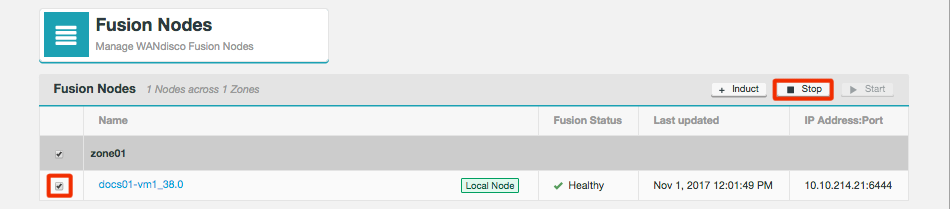
The Fusion Nodes table shows the:
- Name
-
The node name. Labels in this column indicate which node is the local node or give links to the remote nodes.
- Jump to node/Local Node
-
Button indicates the Local Node or provides a link to other nodes. The address to jump between nodes can be changed on the Settings page of the relevant node.
- Fusion Status
-
The status of the node.
- Last updated
-
The time and date of the last change on the node.
- IP Address:Port
-
The IP address and DConE port (default is 6444).
From the top bar of the table you can induct a new node as well as stop and start nodes.
6.2.6. WANdisco Fusion UI login
The UI for managing WANdisco Fusion can be accessed through a browser, providing you have network access and the port that the UI is listening on is not blocked.
http://<url-for-the-server>:<UI port>
e.g.
http://wdfusion-static-0.dev.organisation.com:8083/ui/
You should not need to add the /ui/ at the end, you should be redirected there automatically.
Log in using your Hadoop platform’s manager credentials or applicable LDAP/AD credentials
Login credentials
Currently you need to use the same username and password that are required for your platform manager, e.g. Cloudera Manager or Ambari. In a future release we will separate WANdisco Fusion UI from the manager and use a new set of credentials.
LDAP/Active Directory and WANdisco Fusion login
If your Cloudera-based cluster uses LDAP/Active Directory to handle authentication then please note that a user that is added to an LDAP group will not automatically be assigned the corresponding Administrator role in the internal Cloudera Manager database. A new user in LDAP that is assigned an Admin role will, by default, not be able to log in to WANdisco Fusion. To be allowed to log in, they must first be changed to an administrator role type from within Cloudera Manager.
Running without LDAP-based Authn/Authz (CDH)
CDH holds its own database of Cloudera Manager users, and has authz roles for them (RO, Full Admin etc.) We only allow Fusion UI logins for manager users who have full admin privileges.
Note that the internal database is NOT synchronized with the external auth providers, e.g., there may be an LDAP group that CDH regards as full admin, but the role is NOT entered into the internal database, so without manual intervention, these users will be denied access to the Fusion UI.
| The above functionality appears to be session-based, in that, if one of these users logs in to the manager and views their profile, it could indicate that they have full admin privileges. The simple workaround is the use Fusion’s LDAP integration. |
For more information about setting up the LDAP/AD sync, see LDAP/ Active Directory.
Change login credentials
The procedure to change the user/password credentials differs depending on whether you are using a Fusion with a manager or without a manager (e.g. cloud deployments), in the zone.
With a manager
When using a manager, you need to use your manager’s username and password. To make changes to authentication you need to handle this through your manager. For information about how to do this, you will need to review your manager’s documentation.
UI authentication of the manager
If you are using a zone with a manager use the following steps to change the UI’s authentication for your manager, which allows it to inspect settings and cluster status and update configuration.
-
Generate a new hash for your password using:
/opt/wandisco/fusion/server/encrypt-password.sh
-
On each Fusion server, edit /opt/wandisco/fusion-ui-server/properties/ui.properties and update the following properties with the new credentials:
manager.username
manager.encrypted.password
-
Restart Fusion UI server, see init.d management script.
# service fusion-ui-server restart
-
Repeat procedure for all WANdisco Fusion server nodes in the zone. Note that you can reuse the hash generated in step 1, you do not need to create a new one for each password.
Without a manager
This section covers the use of login credentials that are not controlled by a cluster manager.
Generate a new password
If you need to reset a lost password, or if you don’t have a Hadoop manager in the zone, for example if you are using a Cloud zone, use the following steps to set, change or reset lost login credentials:
-
Generate a default admin user.password using the following command.
manager user (access to the UI but not LDAP or super user settings)cd /opt/wandisco/fusion-ui-server java -cp fusion-ui-server.jar com.wandisco.fusionui.authn.ResetPasswordRunner -f /opt/wandisco/fusion-ui-server/properties/ui.properties
Confirm your new password. This will automatically update the user.password property in the ui.properties file. This file also may contain the properties super.user.username, for Fusion Administrator and manager.username, for the default manager user, which are used for storing the account usernames, and may be updated with a manual edit, if required.
-
Restart Fusion UI server, see init.d management script.
# service fusion-ui-server restart
-
Repeat procedure for all WANdisco Fusion server nodes in the zone.
Generate a new password for the Fusion Administrator
This function is applicable for deployments where a Fusion Administrator has been set up, for which the deployment must be running with a cluster manager.
Follow the instructions provided, above with the following command, used instead:
cd /opt/wandisco/fusion-ui-server
java -cp fusion-ui-server.jar  com.wandisco.fusionui.authn.ResetPasswordRunner -s -f /opt/wandisco/fusion-ui-server/properties/ui.properties
6.2.7. Authentication misalignment
There are four possible scenarios concerning how LDAP authentication can align and potentially misalign with the internal CM database:
- User has full access in CM, denied access in WANdisco Fusion UI
-
-
User is in the Full Administrator group in LDAP
-
User is left as the default read-only in the internal Cloudera Manager database
-
- User has full access in CM, full access in WANdisco Fusion UI
-
-
User is in the Full Administrator group in LDAP
-
User is changed Full Administrator in the internal Cloudera Manager database
-
- User has read-only access in CM, denied access to WANdisco Fusion UI
-
-
User is removed from the Full Administrator group in LDAP and added to the read-only group
-
User is left as the default read-only in the internal Cloudera Manager database
-
- User has read-only access to CM, Full access to WANdisco Fusion UI
-
-
User is removed from the Full Administrator group in LDAP and added to the read-only group
-
User is set as Full Administrator in the internal Cloudera Manager database + Clearly this scenario represents a serious access control violation, administrators must audit WANdisco Fusion users in Cloudera Manager.
-
6.2.8. Set up email notifications
This section describes how to set up notification emails that will be triggered if one of the tracked system resources reaches a defined threshold.
|
Email notification is disabled by default.
You must complete the following steps before any messages will be sent.
|
Email Notification Settings are located in the Zone section of the settings menu.
Complete the following steps to enable email notification:
-
Enter your SMTP properties in the Server configuration tab.
-
Enter recipient addresses in the Recipients tab.
-
Tick the Enable check-box for each trigger-event for which you want an email notification sent out.
-
[Optionally] You can customize the messaging that will be included in the notification email message by adding your own text in the Templates tab.
Notification email triggers
The following triggers support email notification. See the Templates section for more information.
- Consistency Check Failing
-
Email sent if a consistency check fails.
- CPU Load Threshold Hit
-
Dashboard graph for CPU Load has reached. See Dashboard Graphs Settings.
- HDFS Usage Threshold Hit
-
Dashboard graph for Database partition disk usage has been reached. See Dashboard Graphs Settings.
- License Expiring
-
The deployment’s WANdisco license is going to expire.
- Node Down
-
One of the Nodes in your deploy is down.
- Quorum Lost
-
One of the active replication groups is unable to continue replication due to the loss of one or more nodes.
Server config
The server config tab contains the settings for the SMTP email server that you will use for relaying your notification emails. You need to complete and check the provided details are correct first, before your notification emails can be enabled.
Currently, there is a known issue where email servers that are used for notification emails must have authentication enabled. Following the instructions, below, you must enable authentication for messages to be sent. WD-FUI-5766
|
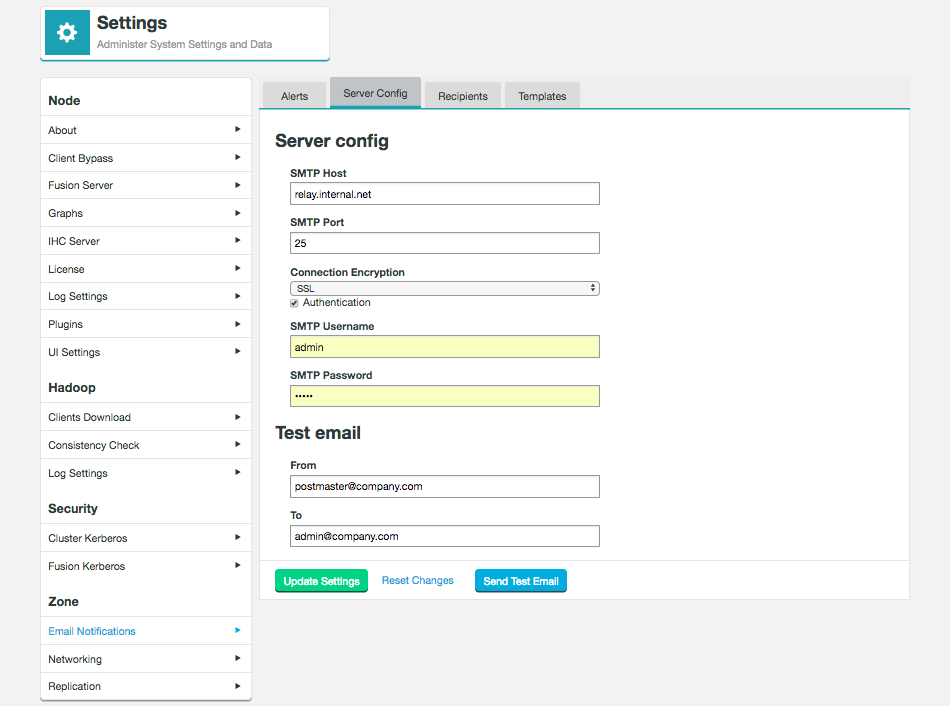
Email Notification Settings are located in the Zone section of the Settings tab
- SMTP Host
-
The hostname or IP address for your email relay server.
- SMTP Port
-
The port used by your email relay service. SMTP default port is 25.
- Connection Encryption
-
Drop-down for choosing the type of encryption that the mail server uses, None, SSL or TLS are supported. If SSL or TLS are selected you should make sure that you adjust the SMTP port value, if required.
- Authentication
-
Checkbox for indicating that a username and password are required for connecting to the mail server. If you tick the checkbox additional entry fields will appear. Currently, authentication must be enabled.
- SMTP Username
-
A username for connecting to the email server.
- SMTP Password
-
A password for connecting to the email server.
- From
-
Optional field for adding the sender email address that will be seen by to the recipient.
- To
-
Optional field for entering an email address that can be used for testing that the email setup will work.
- Update Settings
-
Button, click to store your email notification entries.
- Reset Changes
-
Reloads the saved settings, undoing any changes that you have made in the template that have not been saved.
- Send Test Email
-
Trigger the sending of a test email to confirm that it works as expected.
Recipients
The recipients tab is used to store one or more email addresses that can be used when sending out notification emails. You can enter any number of addresses, although you will still need to associate an entered address with a specific notification before it will be used. See Adding recipients.
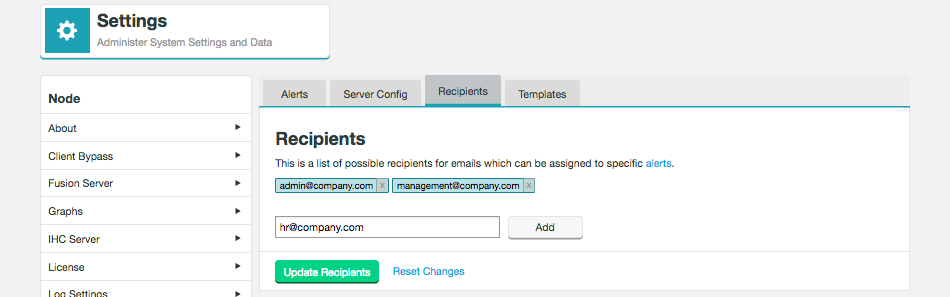
Adding recipients
-
Enter a valid email address for a recipient who should receive a notification email from WANdisco Fusion.
-
Click the Add button.
You can repeat the procedure as many times as you like, you can send each different notification to a different recipient (by associating that recipient’s address with the particular trigger), or you can send a single notification email to multiple recipients (by associating multiple addresses with the notification email. -
Click Update Recipients to save the new email addresses.
Enable Notification Emails
Once you have working server settings valid recipient email addresses you can start to enable notification emails from the Alerts tab.
-
Go to the Alerts tab and select a notification trigger for which you would like to send emails. For example Consistency Check Failing. Tick the Enabled checkbox.
If a trigger is not enabled, no email notification will ever be sent. Likewise, an enabled trigger will not send out notification emails unless recipients are added. 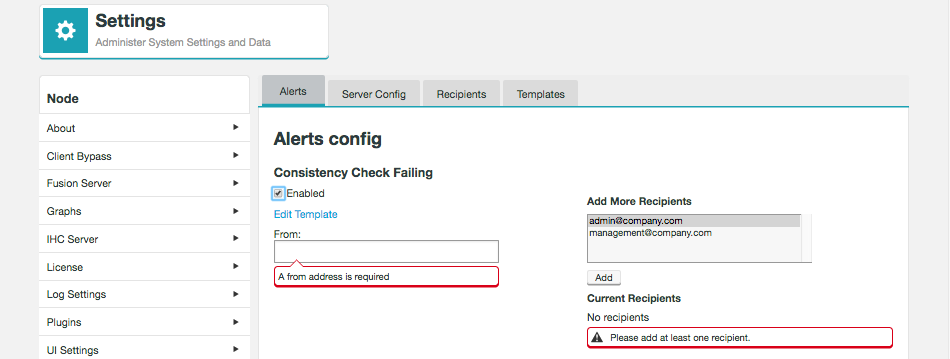 Figure 153. Email Notification Enabled
 -
Enter a From email address and select recipients from the Add More Recipients window. Once you have finished selecting recipients, click Add.
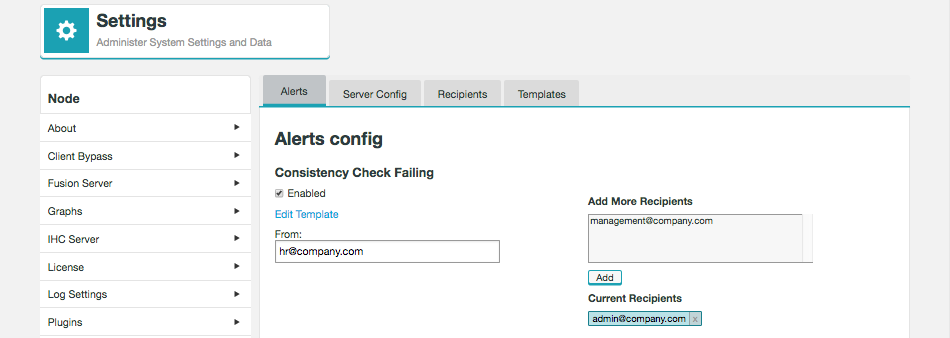 Figure 154. Email Notification - Add
 -
Scroll to the bottom of the screen and click Update Alerts to save changes.
-
You can choose to change/add additional recipients, review or customize the messaging by clicking on the Edit Template link.
Templates
The Templates tab gives you access to the email default text, allowing you to review and customize with additional messaging.
The types of template available are:
-
Consistency Check Failing
-
CPU Load Threshold Hit
-
Fusion Database Partition Disk Threshold Hit
-
License Data Threshold Hit
-
License Expiring
-
Node Down
-
Quorum Lost
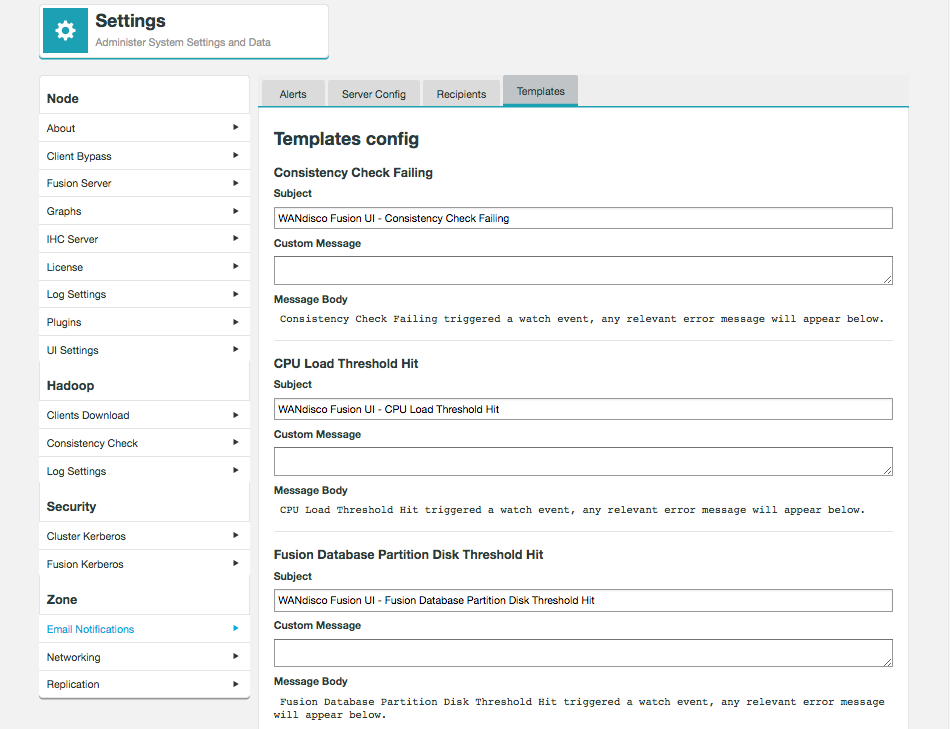
- Consistency Check Failing
-
This is the trigger system event for which the notification email will be sent.
- Subject
-
The email’s subject line. A default value is set for each of the triggers, however, you can reword these by changing the text in the template.
- Custom Message
-
This entry box lets you add your own messaging to the notification. This could be anything that might be useful to an on-duty administrator such as links to related documentation or contact details for the next level of support, etc.
- Message Body
-
The message body contains the fixed payload of the notification email; you can’t edit this element and it may contain specific error messaging taken from logs.
The subject and custom messages can also be altered in the file /opt/wandisco/fusion-ui-server/properties/email.properties.
This allows, for example, the email subject to be in the language of the recipients.
Example Notification Email
This is what an email notification looks like:
    From: cluster-admin@organization.com>
    Date: Mon, Nov 6, 2017 at 3:49 PM
    Subject: WANdisco Fusion UI - Consistency Check Failing
    To: admin@company.com

    Here is a custom message.
     - Custom messaging entered in the Template

    Consistency Check Failing triggered a watch event, any relevant error message will appear below.
     - Default Message

    The following directory failed consistency check:

      /repl1
    - Specific error message

    ==================== NODE DETAILS =====================
    Host Name     : xwstest-01.your.company.com
    IP address    : 10.0.0.146
    IP port       : 6444
    -------------------------------------------------------
    Node Id       : f5255a0b-bcfc-40c0-b2a7-64546f571f2a
    Node Name     : wdfs1
    Node status   : LOCAL
    Node's zone   : zone1
    Node location : location1
    Node latitude : 11.0
    Node longitude: 119.0
    -------------------------------------------------------
    Memory usage  : 0.0%
    Disk usage    : 0.0%
    Last update   : 2017.Nov.06 at 15:49:28 GMT
    Time Now      : 2017.Nov.06 at 15:49:48 GMT
    =======================================================
     - Standard footer
6.3. Maintenance
6.3.1. Tunables
Agreements in flight
Due to architectural changes implemented in 2.11, we recommend that the maximum allowed number of in-flight agreements be increased from default.
In 2.12.0, we advise adding the following to the application.properties file.
maximum.size=1000000
This increased size is the default from 2.12.1 onwards.
Fine-tuning Replication
WANdisco’s patented replication engine, DConE, can be configured for different use cases, balancing between performance and resource costs. The following section looks at a number of tunable properties that can be used to optimize WANdisco Fusion for your individual deployment.
Increasing thread limit
WANdisco Fusion processes agreements using a set number of threads, 20 by default, which offers a good balance between performance and system demands.
It is possible, in cases where there are many Copy agreements arriving at the same time, that all available threads become occupied by the Copy commands. This will block the processing of any further agreements.
You can set WANdisco Fusion to reserve more threads, to protect against this type of bottleneck situation:
Increase executor.threads property
-
Make a backup copy of WANdisco Fusion’s applications config file
/etc/wandisco/fusion/server/application.properties, then open the original in your preferred text editor. -
Modify the property
executor.threads.Property Description Permitted Values Default Checked at… executor.threads
The number of threads executing agreements in parallel.
1-Integer.MAX_VALUE
250
Startup
WANdisco Fusion Server snippet
Don’t go alone
Any upward adjustment will clearly increase the resourcing costs. Before you make any changes to replication system properties, you should open up discussions with WANdisco’s support team. Applying incorrect or inappropriate settings to the replication system may result in hard to diagnose problems. -
Save your edited
application.propertiesfile, then restart WANdisco Fusion.
Tuning Writer Re-election
Only one WANdisco Fusion node per zone is allowed to write into a particular replicated directory. The node that is assigned to do the writing is called the writer. See more about the role of the writer in the glossary.
Should the current writer suddenly become unavailable, then a re-election process begins for assigning the role to one of the remaining nodes. Although the re-election process is designed to balance speed against and system resource usage, there may be deployments where the processing speed is critical. For this reason, the reelection timing can be tuned with the following system:
Tunable properties
- writerCheckPeriod
-
The period of time (in seconds) between writer check events. Default: 60.
- writerCheckMultiple
-
The number of check events that will fail before initiating an election. Default: 3.
Setting the writer re-election period
Period of time between a writer going off-line and another writer is elected and starts picking up = writerCheckPeriod * writerCheckMultiple. i.e.
the default is 3 minutes ( writerCheckPeriod 60s x writerCheckMultiple 3)
If you feel these default settings create cause the system to wait too long before kicking off a re-election then you can update them using an API call:
curl -X POST http://.../fusion/fs/properties/global?path=<mapped path>&writerCheckPeriod=<new period>&writerCheckMultiple=<new multiple>
You can adjust these properties to be optimal for your deployment. However, consider the following pointers:
-
Setting the properties so that the period is very short will ensure that if a writer is lost, a new writer will be brought into action so quickly that there should be no impact on replication. However, very short periods are likely to result in a larger number of false alarms, where writer re-elections are triggered unnecessarily.
-
Setting the properties so that the period is very long will ensure that a re-election only takes place if the current writer is really "out for the count", however, a long delay between the loss of the writer and a new writer picking up could be very detrimental in some situations, such as where very large numbers of small files are being replicated between zones.
6.3.2. System Status on the dashboard
The WANdisco Fusion UI dashboard provides a view of WANdisco Fusion’s status. From the Cluster Graph you can identify which data centers are experiencing problems, track replication between data centers or monitor the usage of system resources.
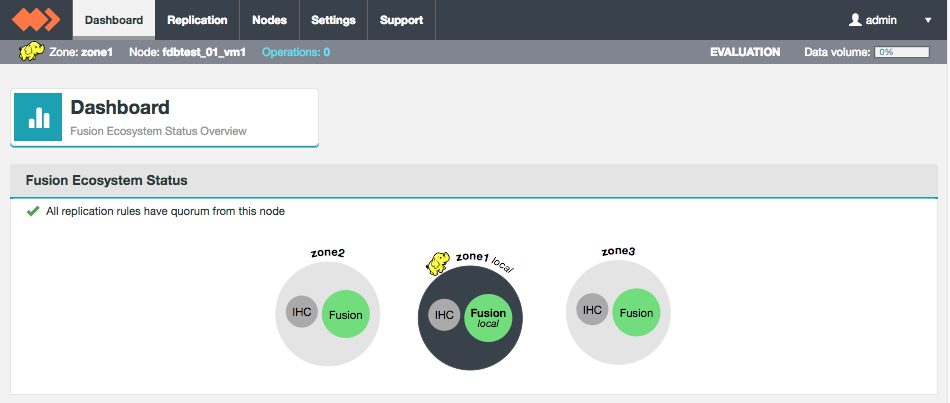
UI Dashboard will indicate if there are problems with WANdisco Fusion on your cluster.
- Environment
-
The environment icon identifies the type of file system being replicated. E.g.
-
Hadoop
-
Cloud
-
Local File System
-
- Zone
-
The name of the zone that you are viewing.
- Node
-
The name of the node that you are viewing.
- Operations
-
Number of pending operations.
- License Status
-
Shows the type of license in use. Evaluation, Production or Unlimited.
- Data volume
-
Only shown if you are using an Evaluation license. This bar graph displays the volume of used data transfer, as a percentage value. The actual volume of replicated data can be viewed further down on the Dashboard.
Activity Graphs
- Activity in the last hour
-
This graph shows the activity which occurred in the last hour.
 Figure 157. License Limit
 - License Limit: Volume of Replicated Data
-
On nodes that have data limits on their product license (an Evaluation license), there’s a graph that displays the volume of replicated data, as a percentage of the license limit.
 Figure 158. License Limit
 - Fusion Database Partition Disk Usage
-
This graph measures the percentage of available storage in the partition that hosts the WANdisco Fusion installation.
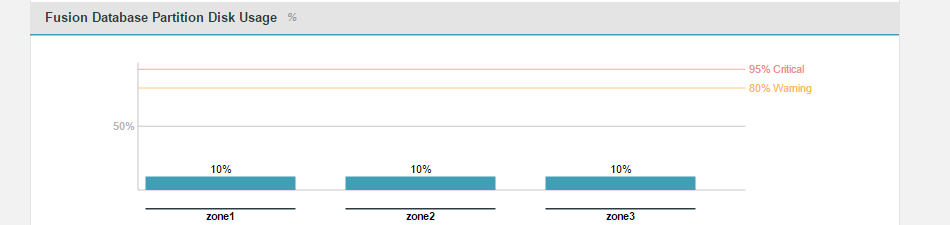 Figure 159. Fusion Database Partition Disk Usage
 - System CPU Load
-
This graph tracks the current percentage load on the cluster’s processors.
 Figure 160. System CPU Load
Graph Settings
The graphs that are displayed on the WANdisco Fusion dashboard can be modified so that they use different thresholds for their "Warning" and "Critical" levels. By default, warn triggers at 80% usage and critical triggers at 90% or 95%.
- Warning
-
At the warn level, the need for administrator intervention is likely, although the state should have no current impact on operation. On a breach, there is the option for WANdisco Fusion to send out an alerting email, providing that you have configured the email notification system. See Set up email notifications.
- Crtical
-
At the critical level, the need for administrator intervention may be urgent, especially if the breach concerns partition usage where reaching 100% will cause the system to fail and potentially result in data corruption. On a breach, there is the option for WANdisco Fusion to send out an alerting email, providing that you have configured the email notification system. See Set up email notifications.
CPU Graph clarification
We display CPU load averages. Low values indicate that the system’s processor(s) have unused capacity. Above the warning threshold (80% by default) available capacity starts to run out. Note that the number that drives the graph is between 0 and 1, and so already takes multi-core systems into consideration.
6.4. Server Logs Settings
The WANdisco Fusion logs that we display in the WANdisco Fusion UI are configured by properties in the ui.properties file.
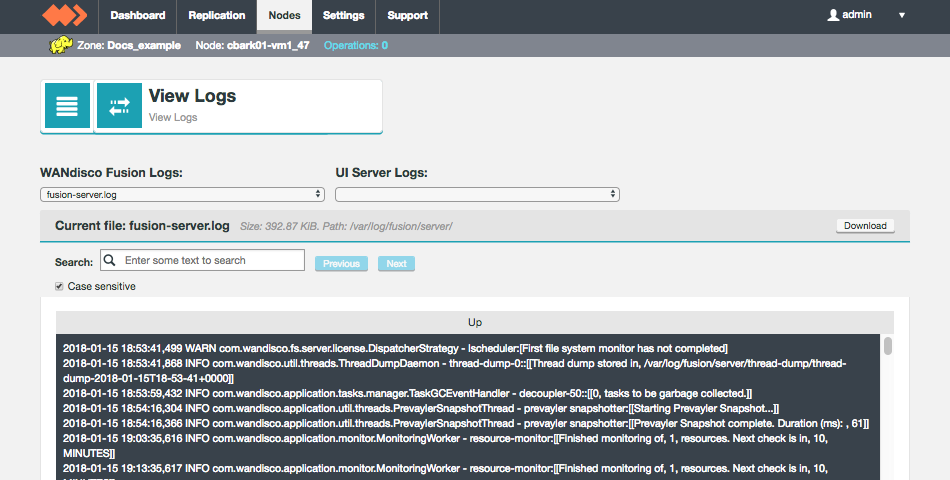
6.4.1. WANdisco Fusion UI Logs viewer
Using WANdisco Fusion UI’s log viewer (View Logs):
-
Log in to the WANdisco Fusion UI and click on the Nodes tab button. Then click on the Node on which you wish to view logs.
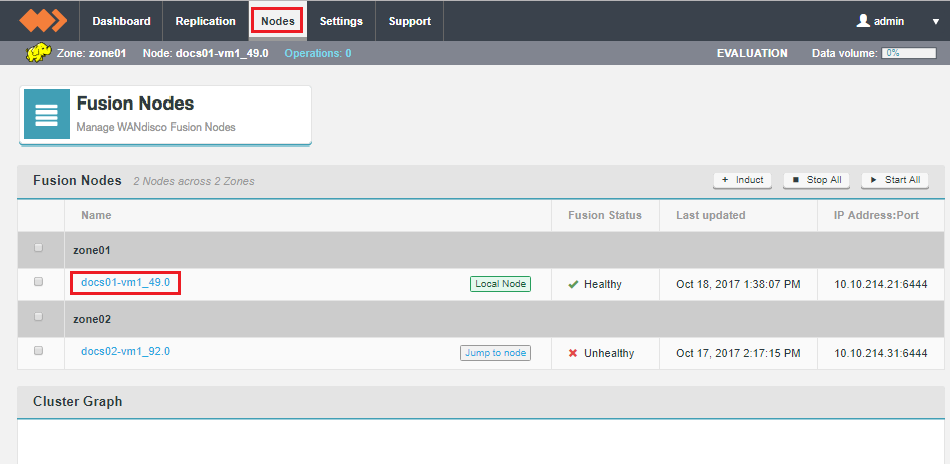 Figure 162. Log viewer 1
 -
Click on the View Logs link, in the Local WANdisco Fusion Server table:
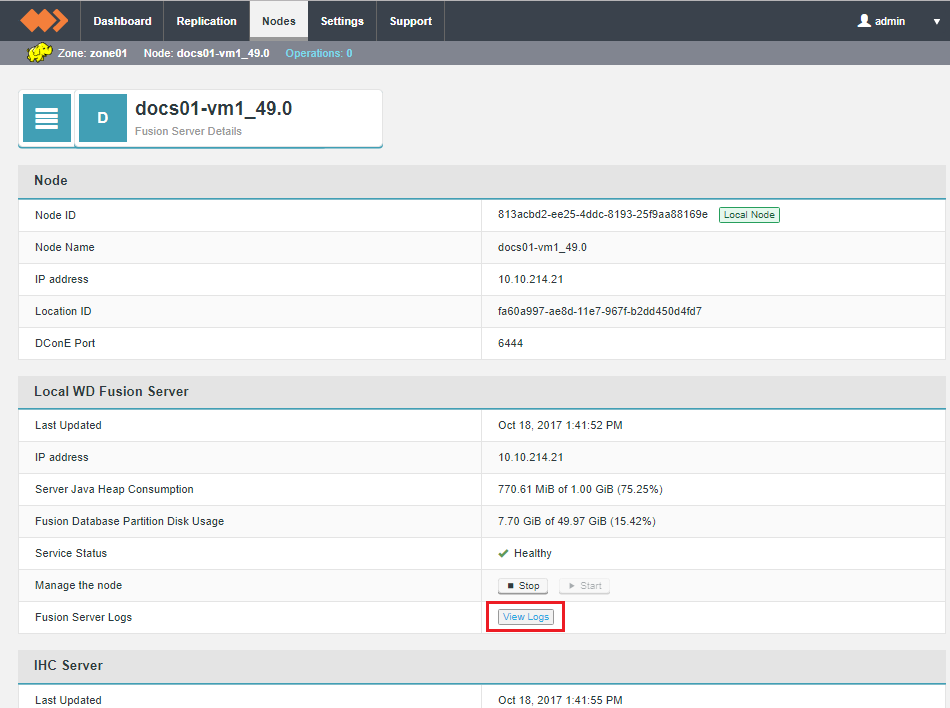 Figure 163. Log viewer 2
 -
The View Logs screen lets you select from either WANdisco Fusion or UI Server logs.
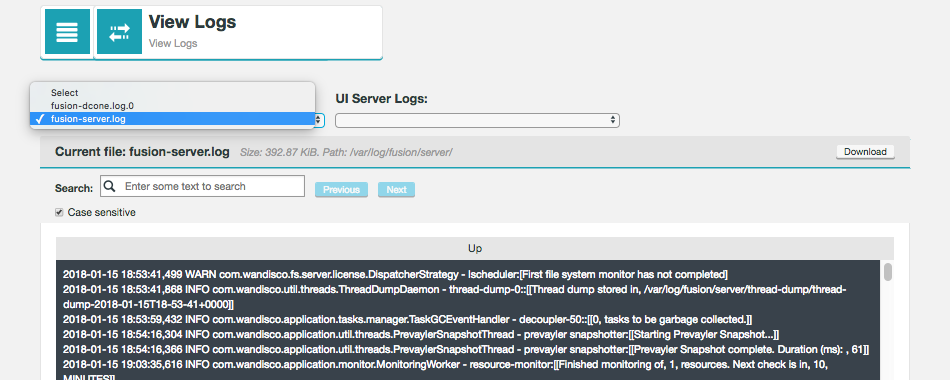 Figure 164. Log viewer 3
6.4.2. Configure log directory
Unless configured differently, WANdisco Fusion logs default to the following locations:
-
WANdisco Fusion server logs -
/var/log/fusion/server -
IHC server logs -
/var/log/fusion/ihc -
WANdisco Fusion UI server logs -
/var/log/fusion/ui
Via the UI
The log directory can be configured via the UI on the Settings tab.
This is the recommended method.
Before changing the directory you must ensure that the new directory exists and that the Fusion user has full permissions on it.
Changes to the Fusion UI log directory will only take effect after restarting the Fusion UI Server.

6.4.3. Changing the timezone
Logs use UTC timezone by default but this can be manually altered through log4j configuration if required.
To alter the timezone the xxx.layout.ConversionPattern property needs to be overwritten.
log4j.appender.stdout.layout.ConversionPattern=%d{ISO8601}{UTC} %p %c - %t:[%m]%n
{UTC} can be replaced with, for example {GMT} or {ITC+1:30}.
If offsetting from a timezone, + or - can be used, hours must be between 0 and 23, and minutes must be between 00 and 59.
This property is located in several properties files. For an example set up these are listed below, but the exact paths may differ for your set up:
-
/etc/wandisco/fusion/server/log4j.properties -
/etc/wandisco/fusion/ihc/server/hdp-2.6.0/log4j.properties -
/opt/wandisco/fusion-ui-server/lib/fusion_ui_log4j.xml
After updating all the relevant files, WANdisco Fusion needs to be restarted for the changes to take effect.
6.4.4. Logging at startup
At startup the default log location is /dev/null. If there’s a problem before log4j has initialised this will result in important logs getting
lost. You can set the log location to a filespace that preserve early logging.
Edit fusion_env.sh adding paths to the following properties:
- SERVER_LOG_OUT_FILE
-
Path for WANdisco Fusion server log output
- IHC_LOG_OUT_FILE
-
Path for IHC server log output
|
More about logging
For more information about WANdisco Fusion’s logging, see Troubleshooting - Read logs.
|
6.5. Security
6.5.1. SSL
Secure Socket Layer encryption can be used to secure Fusion traffic along a number of different network paths:
Network path |
Configured in |
Config parameter |
Fusion server ←→ Fusion server |
application.properties |
ssl.enabled=true/false |
IHC server content transfer (to Fusion server) |
application.properties/ihc server |
ihc.ssl.enabled=true/false |
Fusion server HTTP servlet (for API / JMX) |
application.properties |
fusion.http.policy=HTTP_ONLY/ HTTPS_ONLY/BOTH_HTTP_HTTPS |
IHC server HTTP servlet (for API / JMX) |
ihc server |
ihc.http.policy=HTTP_ONLY/ HTTPS_ONLY/BOTH_HTTP_HTTPS |
Fusion client ←→ Fusion server |
core-site.xml |
fusion.client.ssl.enabled=true/false |
Browser to Fusion UI |
Not yet possible |
See below |
-
fusion server HTTP API moves from 8082 to 8084
-
IHC server HTTP API moves from 9001 to 8001 (6444, 8023 and 7000 stay the same as non-HTTP ports)
Client to server encryption
When deploying to a custom environment, consider whether client to server encryption is required. This may not be desirable if the traffic is only over the LAN, and therefore considered reasonably secure, and not worth the performance overhead that comes with SSL encryption.
|
Check your Java
Pay attention to the version of Java running on your platform. Some versions have bugs with memory leaks or crippled performance. For example, see this example.
|
Enable SSL for WANdisco Fusion
The following procedure is used for setting up SSL encryption for WANdisco Fusion.
The encryption will be applied between all components: Fusion servers, IHC servers and clients.
Before you enable use of HTTPS, ensure that all WANdisco Fusion nodes/zones have been installed and configured (without using HTTPS for browser access).
However, it is not necessary to have inducted the nodes.
The procedure must be followed for each WANdisco Fusion server in your replication system, in turn.
|
Enable HTTPS on all nodes
If you don’t enable HTTPS on some nodes, some information, such as graph data will not be displayed.
|
-
Create a Key Store file using keytool, then save the file to a location on each node where the WANdisco Fusion server can read it.
-
Log in to WANdisco Fusion UI, click on the Settings tab.
-
Change the Fusion Policy Type to include HTTPS.
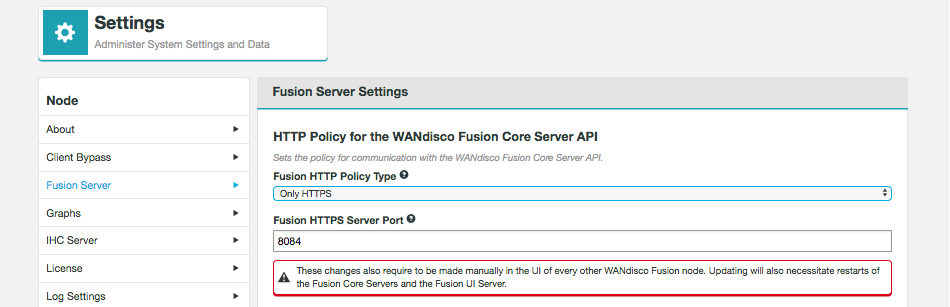
-
The UI Settings section appears.
Enter the details for the following properties: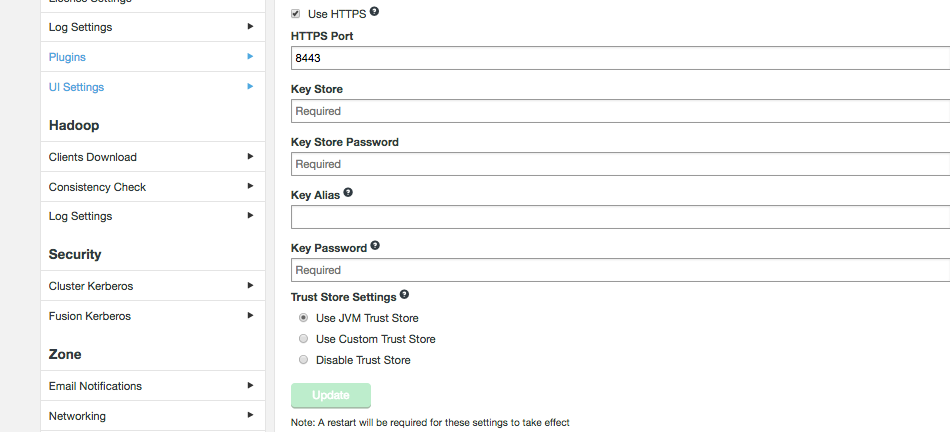
- HTTPS Port
-
The TCP port that will be used for the SSL traffic.
- KeyStore
-
Path to the keystore.
e.g. /opt/wandisco/ssl/keystore.ks - Key Store Password
-
Password for the KeyStore.
- Key Password
-
The Alias of the private key.
e.g. WANdisco - Trust Store Settings
-
- Use JVM Trust store
-
Default JVM truststore, usually jssecerts or cacerts.
- Use Custom Trust Store
-
A custom trust store. If selected, additional entry fields will appear for Trust Store and Trust Store Password.
- Disable Trust Store
-
Disable the Trust Store.
|
Important Known Issue
There is currently a known issue with this truststore, whereby it is automatically classed as invalid and checks are disabled. However, trust errors may occur and the functionality is marked as disabled in the UI properties config file. The resultant trust errors can be fixed by restarting the Fusion UI Server.
This issue has been resolved in the 2.12.4 release.
|
|
Important:
Check that you are using the correct Key Alias.
Currently, if you use an alias that doesn’t exist in the keystore then the Fusion UI server will fail to start without warning.
Improved error handling will be added in a later release.
|
Changes must be applied to all servers
Changes to SSL settings require the same changes to be made manually in the UI of every other WANdisco Fusion node.
Updating will also make changes in file via the management endpoint.
You will need to push out configs and restart some services.
Additional change required in Ambari only
When enabling SSL on the Fusion UI, the additional task must be performed:
-
Go to the Ambari UI.
-
Select WANdisco Fusion in the list of services.
-
In Configs, select the Advanced fusion-client-config.
-
Adjust the
fusion.ui.server.urlvalue to include HTTPS and update to the relevant SSL port.
Example
Before
http://test01.wandisco.com:8083
After
https://test01.wandisco.com:8443
When disabling SSL on the Fusion UI, proceed with the same operation as above except reverse the adjustment:
Example
Before
https://test01.wandisco.com:8443
After
http://test01.wandisco.com:8083
Enable SSL (HTTPS) for the WANdisco Fusion Server
The manual steps (if you prefer not to use the UI settings server settings) for getting WANdisco Fusion Server to support HTTPS connections:
You need to add the following property to application.properties.
| Type | Key | Value | Default | File |
|---|---|---|---|---|
Enable HTTPS support for Fusion core |
fusion.http.policy |
HTTP_ONLY, HTTPS_ONLY, BOTH_HTTP_HTTPS. If you enable HTTPS_ONLY, you need to make some matching changes to the WANdisco Fusion UI server so that it is able to communicate with the core Fusion server. |
HTTP_ONLY |
application.properties |
Enable HTTPS for Fusion UI
Note that if you enable the Fusion Server to communicate over HTTPS-only, then you must also make the following changes so that the Fusion UI matches up:
target.ssl true
target.port 8084
- target.ssl
-
SSL enabled on the fusion-server. Used for API calls to fusion-server. Value: true/false Default: false
- target.port
-
Port of the fusion-server, used for API calls to fusion-server. Default: 8082
These properties are configured in the ui.properties file located in
/opt/wandisco/fusion-ui-server/properties/ui.properties
2-Way SSL (Mutual Authentication)
For enhanced security, use mutual authentication on your Fusion nodes. When running 1-way SSL a newly inducted node will verify the authenticity of the existing nodes through the public key/digital certificates. However, the authenticity of the new node is never checked.
Mutual SSL authentication or certificate-based mutual authentication will ensure that both the existing nodes and the newly inducted node have their authenticity verified.
Because authentication relies on digital certificates, certification authorities are an important part of the mutual authentication process. Authenticating and establishing an encrypted channel using certificate-based mutual authentication adds the following requirements:
-
The Server/Client certificate that you use must have Extended Key Usage for both serverAuth and clientAuth.
-
A certifcate with serverAuth can only be used for existing non-mutual authentication. For setups that will require mutual, the certificate must have serverAuth and clientAuth.
-
There may be additional SSL configuration, either through CA management, through a provider or using a tool such as easy-rsa). Note that easy-rsa will not issue these by default. A new x509 type needs to be defined that includes both client and server types, as the defaults provided are for one or the other, not both.
Changing SSL Settings
If you disable SSL, you must also update the HTTP Policy for the WANdisco Fusion Core Server API so that it is set to HTTP only.
Any changes that you make to the SSL settings must be applied, manually in the UI of every other WANdisco Fusion node. Adding an update to the SSL settings will apply changes in the core-site file via the management endpoint (Cloudera Manager, Ambari, etc). You may be required to make manual changes to configuration files and restart some services.
|
Known Issue
Currently, the HTTP policy and SSL settings both independently alter how WANdisco Fusion uses SSL, when they should be linked.
You need to make sure that your HTTP policy selection and the use of SSL (enabled in the next section of the Installer) are in sync.
If you choose either to the policies that use HTTPS, then you must enable SSL.
If you stick with "Only HTTP" then you must ensure that you do not enable SSL.
In a future release these two settings will be linked so it will not be possible to have contradictory settings.
|
Setting up SSL
What follows is a manual procedure for setting up SSL. In most cases it has been superseded by the above Fusion UI-driven method. If you make changes using the following method, you will need to restart the WANdisco Fusion server in order for the changes to appear in on the Settings tab.
Create the keystores / truststores. Every Fusion Server and IHC server should have a KeyStore with a private key entry / certificate chain for encrypting and signing. Every Fusion Server and Fusion Client must also have a truststore for validating certificates in the path specific in “fusion.client.ssl.truststore”. The keystores and truststores can be the same file and may be shared amongst the processes.
Setting a password for SSL encryption
Use our provided bash script for generating a password. Run the script at the command line, enter a plaintext password, the script then generates and outputs the encrypted version of the entry:
[root@vmhost01-vm3 fusion-server]# ./encrypt-password.sh
Please enter the password to be encrypted
> ********
btQoDMuub7F47LivT3k1TFAjWSoAgM7DM+uMnZUA0GUet01zwZl7M8zixVZDT+7l0sUuw6IqGse9kK0TiDuZi0eSWreeW8ZC59o4R15CCz0CtohER7O3uUzYdHaW6hmT+21RaFkUF5STXXHcwdflwq4Zgm+KdUXKF/8TrgEVqT854gci1KQyk+2TKSGtGbANg12LplEre3DEGoMFOpy2wXbwO5kGOQM07bZPjsDkJmAyNwERg0F3k2sebbuGmz4VSAY1NTq4djX1bVwMWoPwcuiQXLwWLgfrGZDHaT+Cm88vRUsYaK2CDlZI4C7r+Lkkm/U4F/M6TFLGT6ZFlB+xRQ==
Fusion Server configuration for SSL
To configure Server-Server or Server-Client SSL, enter the following configurations to the application.properties file. e.g.
ssl.enabled=true
ssl.key.alias=socketbox
ssl.key.password=***********
ssl.keystore=/etc/ssl/key.store
ssl.keystore.password=**************
This ensures that both WANdisco Fusion server and the IHC server traffic is secured using SSL. The properties, are defined in the WANdisco Fusion Configuration.
Server-Server or Server-Client
Configure the keystore for each server:
| Key | Value | Default | File |
|---|---|---|---|
ssl.key.alias |
alias of private key/certificate chain in KeyStore. |
NA |
application.properties |
ssl.key.password |
encrypted password to key |
NA |
application.properties |
ssl.keystore |
path to Keystore |
NA |
application.properties |
ssl.keystore.password |
encrypted password to KeyStore. |
NA |
application.properties |
Server-to-Server or Server-to-IHC
Configure the truststore for each server:
| Key | Value | Default | File |
|---|---|---|---|
ssl.truststore |
Path to truststore |
Default |
application.properties |
ssl.truststore.password |
encrypted password to trust store |
Default |
application.properties |
Fusion client configuration Server-Client only
Configure the truststore for each client:
| Key | Value | Default | File |
|---|---|---|---|
fusion.client.ssl.truststore |
Path to trust store |
NA |
core-site.xml |
fusion.client.ssl.truststore.password |
Encrypted password for trust store |
NA |
core-site.xml |
fusion.client.ssl.truststore.type |
Format of trust store - JKS, PCKS12 |
JKS |
core-site.xml |
IHC Server configuration (Server-IHC SSL only)
Configure the keystore for each IHC server:
| Key | Value | Default | File |
|---|---|---|---|
ihc.ssl.key.alias |
alias of private key/certificate chain in keystore |
NA |
.ihc |
ihc.ssl.key.password |
encrypted password to key |
NA |
.ihc |
ihc.ssl.keystore |
path to keystore |
NA |
.ihc |
ihc.ssl.keystore.password |
encrypted password to keystore |
NA |
.ihc |
ihc.ssl.keystore.type |
JKS, PCKS12 |
JKS |
.ihc |
Enable SSL:
The following configuration is used to turn on each type of SSL encryption:
| Key | Value | Default | File | Fusion Server - Fusion Server |
|---|---|---|---|---|
ssl.enabled |
true |
false |
application.properties |
Fusion Server - Fusion Client |
fusion.client.ssl.enabled |
true |
false |
core-site.xml |
Fusion Server - Fusion IHC Server |
Setting up SSL encryption for replication traffic
WANdisco Fusion supports the use of Secure Socket Layer encryption (SSL) for securing its replication traffic. To enable this encryption you need to generate a keypair that must be put into place on each of your WANdisco Fusion nodes. You then need to add some variables to the application.properties file.
-
Open a terminal and navigate to
<INSTALL_DIR>/etc/wandisco/config. -
Within
/configmake a new directory called ssl.mkdir ssl
-
Navigate into the new directory.
cd ssl
-
Copy your private key into the directory. If you don’t already have keys set up you can use JAVA’s keygen utility, using the command:
keytool -genkey -keyalg RSA -keystore wandisco.ks -alias server -validity 3650 -storepass <YOUR PASSWORD>
Read more about the Java keystore generation tool in the KB article - Using Java Keytool to manage keystores
Ensure that the system account that runs the WANdisco Fusion server process has sufficient privileges to read the keystore files.
Java keytool options
Variable Name Description -genkey
Switch for generating a key pair (a public key and associated private key). Wraps the public key into an X.509 v1 self-signed certificate, which is stored as a single-element certificate chain. This certificate chain and the private key are stored in a new keystore entry identified by alias.
-keyalg RSA
The key algorithm, in this case RSA is specified.
wandisco.ks
This is file name for your private key file that will be stored in the current directory.
- alias server
Assigns an alias "server" to the key pair. Aliases are case-insensitive.
-validity 3650
Validates the keypair for 3650 days (10 years). The default would be 3 months.
- storepass <YOUR PASSWORD>
This provides the keystore with a password.
If no password is specified on the command, you’ll be prompted for it. Your entry will not be masked so you (and anyone else looking at your screen) will be able to see what you type.
Most commands that interrogate or change the keystore will need to use the store password. Some commands may need to use the private key password. Passwords can be specified on the command line (using the
-storepassand-keypassoptions).
However, a password should not be specified on a command line or in a script unless it is for testing purposes, or you are on a secure system.The utility will prompt you for the following information
What is your first and last name?  [Unknown]:
What is the name of your organizational unit?  [Unknown]:
What is the name of your organization?  [Unknown]:
What is the name of your City or Locality?  [Unknown]:
What is the name of your State or Province?  [Unknown]:
What is the two-letter country code for this unit?  [Unknown]:
Is CN=Unknown, OU=Unknown, O=Unknown, L=Unknown, ST=Unknown, C=Unknown correct?  [no]:  yes

Enter key password for <mykey>
(RETURN if same as keystore password):
-
With the keystore now in place, you’ll now need to add variables to the application.properties
SSL DConE Encryption Variables for application.properties
| Variable Name | Example | Description |
|---|---|---|
ssl.enabled |
true |
Requires a "true" or "false" value. Clearly when the value is set to false, none of the other variables will be used. |
ssl.debug |
true |
Requires a "true" or "false" value. When set to true debugging mode is enabled. |
ssl.keystore |
./properties/wandisco.ks |
The path to the SSL private Keystore file that is stored in the node. By default this is called "wandisco.ks". |
ssl.key.alias |
wandisco |
The assigned alias for the key pair. Aliases are case-insensitive. |
ssl.keystore.password |
<a password> |
The SSL Key password. This is described in more detail in Setting a password for SSL encryption. |
ssl.truststore |
./properties/wandisco.ks |
The path to the SSL private truststore file that is stored in the node. By default this is called "wandisco.ks" because, by default the keystore and truststore are one and the same file, although it doesn’t have to be. |
ssl.truststore.password |
"bP0L7SY7f/4GWSdLLZ3e+ |
The truststore password. The password should be encrypted. |
Changes in any of these values require a restart of the DConE service. Any invalid value will restart the replicator and no DConE traffic will flow.
Setting the server key
In the keystore, the server certificate is associate with a key.
By default, we look for a key named server to validate the certificate.
If you use a key for the server with a different name, enter this in the SSL settings.
SSL Troubleshooting
A complete debug of the SSL logging will be required to diagnose the problems. To capture the debugging, ensure that the variable debugSsl is set to "true".
To enable the logging of SSL implemented layer, turn the logging to FINEST for 'com.wandisco.platform.net' package.
Enable SSL for Hadoop Services
This section shows you how to enable SSL encryption for Hadoop’s native services such as HDFS, Yarn or MapReduce.
-
On ALL nodes create key directories:
/etc/security/serverKeys and /etc/security/clientKeys
-
On all nodes, create keystore files:
cd /etc/security/serverKeys
keytool -genkeypair -alias $HOSTNAME -keyalg RSA -keysize 2048 -dname CN=$HOSTNAME,OU=Dev,O=BigData,L=SanRamon,ST=ca,C=us -keypass $PASSWORD -keystore $HOSTNAME.ks -storepass $PASSWORD
There’s further explanation of what these options do, see the key Java keytool options.
-
On all nodes export the certificate public key to a certificate file:
cd /etc/security/serverKeys
keytool -exportcert -alias $HOSTNAME -keystore $HOSTNAME.ks -rfc -file $HOSTNAME.crt -storepass $PASSWORD
-
On all nodes, import the certificate into truststore file:
cd /etc/security/serverKeys
keytool -importcert -noprompt -alias $HOSTNAME -file $HOSTNAME.crt -keystore $HOSTNAME.trust -storepass $PASSWORD
-
Create a single truststore file containing the public key from all certificates (this will be for clients) start on node1:
cd /etc/security/serverKeys
Copy trust store file from current node to next one and redo all steps above.
-
From last node copy trust store, which has all certificates to all servers under
/etc/security/clientKeys/all.jks -
On all nodes, copy keystore to “service”.ks (e.g. hdfs.ks)
Keystores
-
The keystore contains private keys and certificates used by SSL servers to authenticate themselves to SSL clients. By convention, such files are referred to as keystores.
-
When used as a truststore, the file contains certificates of trusted SSL servers, or of Certificate Authorities trusted to identify servers. There are no private keys in the truststore.
Most commonly, cert-based authentication is only done in one direction server→client. When a client also authenticates with a certificate this is called mutual authentication.
While all SSL clients must have access to a truststore, it is not always necessary to create and deploy truststores across a cluster. The standard JDK distribution includes a default truststore which is pre-provisioned with the root certificates of a number of well-known Certificate Authorities. If you do not provide a custom truststore, the Hadoop daemons load this default truststore. Therefore, if you are using certificates issued by a CA in the default truststore, you do not need to provide custom truststores. However, you must consider the following before you decide to use the default truststore:
If you choose to use the default truststore, it is your responsibility to maintain it. You may need to remove the certificates of CAs you do not deem trustworthy, or add or update the certificates of CAs you trust. Use the keytool utility to perform these actions.
Security Considerations
Keystores contain private keys. truststores do not. Therefore, security requirements for keystores are more stringent:
-
Hadoop SSL requires that truststores and the truststore password be stored, in plaintext, in a configuration file that- is readable by all.
-
Keystore and key passwords are stored, in plaintext, in a file that is readable only by members of the appropriate group.
These considerations should guide your decisions about which keys and certificates you will store in the keystores and truststores that you will deploy across your cluster.
Keystores should contain a minimal set of keys and certificates. Ideally you should create a unique keystore for each host, which would contain only the keys and certificates needed by the Hadoop SSL services running on the host. Usually the keystore would contain a single key/certificate entry. However, because truststores do not contain sensitive information you can safely create a single truststore for an entire cluster. On a production cluster, such a truststore would often contain a single CA certificate (or certificate chain), since you would typically choose to have all certificates issued by a single CA.
Important: Do not use the same password for truststores and keystores/keys. Since truststore passwords are stored in the clear in files readable by all, doing so would compromise the security of the private keys in the keystore.
SSL roles for Hadoop Services
| Service | SSL Role |
|---|---|
HDFS |
server and client |
MapReduce |
server and client |
YARN |
server and client |
HBase |
server |
Oozie |
server |
Hue |
client |
SSL servers load the keystores when starting up. Clients then take a copy of the truststore and uses it to validate the server’s certificate.
Configure SSL for HDFS, YARN and MapReduce
Before you begin
Ensure keystores/certificates are accessible on all hosts running HDFS, MapReduce or YARN. As these services also run as clients they also need access to the truststore. (As mentioned, it’s okay to put the truststores on all nodes as you can’t always determine which hosts will be running the relevant services.)
Keystores must be owned by the hadoop group and have permissions 0440 (readable by owner and group). Truststores must have permission 0444 (readable by all).
You’ll need to specify the absolute paths to keystore and truststore files - these paths need to be valid for all hosts - this translates into a requirement for all keystore file names for a given service to be the same on all hosts.
Multiple daemons running on a host can share a certificate. For example, in case there is a DataNode and an Oozie server running on the same host, they can use the same certificate.
Configuring SSL for HDFS
-
In Ambari, navigate to the HDFS service edit the configuration.
-
Type SSL into the search field to show the SSL properties.
-
Make edits to the following properties:
Property Description SSL Server Keystore File Location
Path to the keystore file containing the server certificate and private key.
SSL Server Keystore File Password
Password for the server keystore file.
SSL Server Keystore Key Password
Password that protects the private key contained in the server keystore.
-
If you don’t plan to use the default truststore, configure SSL client truststore properties:
Property Description Cluster-Wide Default SSL Client Truststore Location
Path to the client truststore file. This truststore contains certificates of trusted servers, or of Certificate Authorities trusted to identify servers.
Cluster-Wide Default SSL Client Truststore Password
Password for the client truststore file.
-
Now the necessary edits are complete, click Save Changes.
-
Follow the next section for setting up SSL for YARN/MapReduce.
Configuring SSL for YARN / MapReduce
-
Follow these steps to configure SSL for YARN or MapReduce services.
-
Navigate to the YARN or MapReduce service and click Configuration.
-
In the search field, type SSL to show the SSL properties.
-
Edit the following properties according to your cluster configuration:
Property Description SSL Server Keystore File Location
Path to the keystore file containing the server certificate and private key.
Enable Authentication for HTTP Web-Consoles
Password for the server keystore file.
SSL Server Keystore Key Password
Password for the client truststore file.
-
Click Save Changes.
-
Navigate to the HDFS service and in the search field, type Hadoop SSL Enabled. Click the value for the Hadoop SSL Enabled property and select the checkbox to enable SSL communication for HDFS, MapReduce, and YARN.
Property Description Hadoop SSL Enabled
Enable SSL encryption for HDFS, MapReduce, and YARN web UIs, as well as encrypted shuffle for MapReduce and YARN.
-
Restart all affected services (HDFS, MapReduce and/or YARN), as well as their dependent services.
6.5.2. Kerberos
WANdisco Fusion can run on Kerberized Hadoop clusters, with minimal configuration requirements. The following guide runs through the most deployment scenarios.
|
Existing cluster
If you are installing Fusion into a cluster that is secured with Kerberos, you will need to enable Kerberos during the Fusion installation process. See Kerberos step.
|
|
Setting up a new cluster
If you are setting up your platform from scratch, you may elect to enable Kerberos once Fusion is up and running, in which case you can enable Kerberos through Fusion’s web UI.
|
Use the following procedure to set up Kerberos through the UI:
Look to the security procedures of your particular form of Hadoop:
|
Before installing on Cloudera
Ensure that the Cloudera Manager database of Kerberos principals is up-to-date.
|
Running with unified or per-service principle:
Unified
Some Hadoop platforms are Kerberized under a single hdfs user, this is common in Cloudera deployments.
For simplicity, this is what we recommend.
-
Generate a keytab for each of your WANdisco Fusion nodes using the hdfs service, for clarification the steps below present a manual setup:
ktadd -k fusion.keytab -norandkey hdfs/${hostname}@${krb_realm}
Per-service
-
If your deployment uses separate principals for each HDFS service then you will need to set up a principal for WANdisco Fusion.
-
On the KDC, using kadmin.local, create new principals for WANdisco Fusion user and generate keytab file, e.g.:
> addprinc -randkey hdfs/${hostname}@${krb_realm}
> ktadd -k fusion.keytab -norandkey hdfs/${hostname}@${krb_realm}
Copy the generated keytab to a suitable filesystem location, e.g.
/etc/wandisco/security/on the WANdisco Fusion server that will be accessible to your controlling system user, "hdfs" by default.
We don’t recommend storing the keytab in Hadoop’s own Kerberos /etc/hadoop/conf, given that this is overwritten by the cluster manager._
|
Setting up handshake tokens
By default, handshake tokens are created in the user’s working directories, e.g. /user/jdoe.
It is recommended that you create them elsewhere, using the following procedure:
Open the core-site.xml file and add the following property:
<property>
      <name>fusion.handshakeToken.dir</name>
      <value>/wandisco/handshake_tokens</value>
</property>
Handshake tokens for the cluster will be created at the location set by fusion.handshakeToken.dir e.g., if for DC1 you configure the fusion.handshakeToken.dir to be /wandisco/handshake_tokens, then handshake tokens will be written in /wandisco/handshake_tokens/.fusion/.token_$USERNAME where $USERNAME is the username of the user connecting.
Important requirement: All users of the cluster should have the relevant read and write permissions for this location. Applying the correct permissions to this path is important for the security and performance of the cluster.
If setting the handshake tokens directory to /wandisco/handshake_tokens, you can create and setup the path for secure access as follows:
# Create the handshake token path and required sub-directory
$ hdfs dfs -mkdir /wandisco/handshake_tokens
$ hdfs dfs -mkdir /wandisco/handshake_tokens/.fusion

# Set ownership to the fusion user for both paths
$ hdfs dfs chown fusionuser:hdfs /wandisco/handshake_tokens
$ hdfs dfs chown fusionuser:hdfs /wandisco/handshake_tokens/.fusion

# Set the handshake token path to allow list and access permissions to group and other
$ hdfs dfs -chmod 755 /wandisco/handshake_tokens

# Set the inner directory to provide access for group and other, but not list or write
# The directory stick bit is also set, ensuring only the path owner or superuser may delete an object
# This permissions set ensures no individual user may delete an object that may result in denial of service to another user
$ hdfs dfs -chmod 1711 /wandisco/handshake_tokens/.fusion
Important: Known issue if using MapR
There are known problems if using MapR with FusionHdfs or FusionHcfs configurations.
Some required directories are currently missing.
You can work around the problem by creating the following directories, then making sure that Yarn and MapR users are added and that they have access to the directories. E.g.,
sudo -u hdfs hadoop fs -mkdir /user/yarn
sudo -u hdfs hadoop fs -chown yarn /user/yarn
sudo -u hdfs hadoop fs -mkdir /user/mapred
sudo -u hdfs hadoop fs -chown mapred /user/mapred
Kerberos Configuration
This chapter provides an overview of the most common approaches you may taken when preparing Kerberos principals to secure Fusion operations:
Basic requirements
The following requirements need to be considered as part of the work required to enable Kerberos.
-
Hadoop system user dealing with requests from Fusion must be capable of impersonation so that Fusion can proxy requests on that user’s behalf - otherwise, the request will be denied. For more information read about secure impersonation/DoAs.
-
The same underlying system user must be capable of running HDFS file-system operations on paths for which it is not itself have appropriate permissions. E.g.
-
Creating the .fusion directories inside the root of replicated paths, specifically in cases where the fusion user does not own the directory.
-
During replication, the ability of Fusion to delete handshake tokens, as created by a client to provide HDFS access (user, fusion user doesn’t usually have permission to the actioning user’s home directory where the tokens are created by default).
-
During replication & make consistent operation, the ability to read the contents of data on the source cluster that is under replication or make consistent operation. Also, the ability to write to files that it does not own and to be able to chown the files after they are written to the destination.
-
The following four options are provided in order of security in that the later approaches use fewer shared components which reduces exposure or are more readily able to revoke access.
Approach 1: Default Principal (HDFS)
Use of the default available HDFS Kerberos principal as already used by the cluster. In HDP this typically involves the use of the pre-available hdfs.headless.keytab principal.
| Headless principals are not bound to a specific host or node. Syntax: - @ EXAMPLE.COM Service principals are bound to a specific service and host or node. syntax: / @ |
This principal already maps to the hdfs user on the underlying file-system, it’s a superuser by default. Depending on the nature of any reason to revoke access, this may involve the complete regeneration of a new hdfs keytab for all services that use it.
Configuration requirements:
The easiest option for configuration, when asked to configure Kerberos in the Fusion installation, you supply the Kerberos keytab as /etc/security/keytabs/hdfs.headless.keytab (location may vary, especially in CDH installs).
This principal already maps internally on the cluster to the superuser (hdfs).
Approach 2: Custom Principal
Custom Kerberos principal with exported keytab, configured to map to the hdfs user on the underlying system.
Due to the use of mapping to the hdfs user, this means it will be a superuser by default.
Depending on the nature of any reason to revoke access, this could be removing the mapping to the hdfs user or regeneration of only the associated principal keytabs.
Configuration requirements:
-
Requires manual preparation of the Kerberos principal & keytab, along with configuration to map this user to the existing superuser account. Assumptions: Kerberos realm: EXAMPLE.HADOOP, superuser: hdfs principal will be: fusionuser@EXAMPLE.HADOOP
-
Create the Kerberos principal in the KDC via the kadmin command on the host of the Fusion server, e.g.
kadmin -p admin/admin@EXAMPLE.HADOOP -q "addprinc -randkey fusionuser@EXAMPLE.HADOOP"
Export the keytab to appropriate directory.
mkdir -p /opt/keytabs
kadmin -p admin/admin@EXAMPLE.HADOOP -q "ktadd -kt /opt/keytabs/fusionuser.keytab fusionuser@EXAMPLE.HADOOP"
chown -R hdfs:hdfs /opt/keytabs
-
Add an auth_to_local rule in Hadoop configuration (located in the hdfs service) to make the fusionuser@EXAMPLE.HADOOP to be the local user "hdfs". Search for auth_to_local under the HDFS config in the cluster. Add the following at the top of this box (these rules are read in order and the first match applies. The exact order may vary on configuration choice, please review this yourself)
RULE:[1:$1@$0](fusionuser@EXAMPLE.HADOOP)s/.*/hdfs/
This rule says if the principal matches fusionuser@EXAMPLE.HADOOP then apply this rule. Do a sed (regexp replacement) by matching the entire principal (.*) and replacing it with the user hdfs. Ensure this config is saved and deployed to the cluster.
The Fusion installation will configure a proxy user setting. This setting defines that the user through which fusion is run as can impersonate another user. If the user is hdfs, the rules are as follows.
hadoop.proxyuser.oozie.hosts=*
Allow the user oozie to perform impersonation from any host in the cluster. This can be a comma-separated list of hostnames, thus should at least contain the hostname of the Fusion server.
hadoop.proxyuser.oozie.groups=*
Allow the user oozie to perform an impersonation of users that are members of any Linux group. This is a comma-separated list that you may need to refine. Typically this should be set as an asterisk.
In our case, the property names for our hdfs user we are mapped to will be hadoop.proxyuser.hdfs.hosts & hadoop.proxyuser.hdfs.groups.
-
Fusion will now use the custom principal and keytab while granting superuser as the hdfs user and impersonation.
Approach 3: Custom Principal
Custom Kerberos principal with exported keytab. Configure the user that this principal maps to into the supplementary group associated with the hdfs superuser group setting (making it a superuser). This is the supplementary Linux user group. The configured group is in the hdfs-site.xml file and is named dfs.permissions.superusergroup Depending on the nature of any reason to revoke access, this could be removing the mapping to the hdfs user or regeneration of only the associated principal keytabs. Removing the supplementary Linux group will also revoke superuser.
Configuration requirements:
This process will require manual preparation of the Kerberos principal & keytab, along with group membership to make this user a superuser.
-
You need to know the supergroup, which can be found under the HDFS service setting dfs.permissions.superusergroup. The value is typically "hdfs".
-
Create the Kerberos principal in the KDC via the kadmin command on the host of the Fusion server.
kadmin -p admin/admin@EXAMPLE.HADOOP -q "addprinc -randkey fusionuser@EXAMPLE.HADOOP"
-
Export the keytab to the appropriate directory.
\mkdir -p /opt/keytabs
kadmin -p admin/admin@EXAMPLE.HADOOP -q "ktadd -kt /opt/keytabs/fusionuser.keytab fusionuser@EXAMPLE.HADOOP"
chown -R hdfs:hdfs /opt/keytabs
Add an auth_to_local rule in Hadoop configuration (located in the hdfs service) to make the fusionuser@EXAMPLE.HADOOP to be the local user "hdfs" Search for auth_to_local under the HDFS config in the cluster. Add the following at the top of this box, and this will map it to currently non-superuser fusionservice.
RULE:[1:$1@$0](fusionuser@EXAMPLE.HADOOP)s/.*/fusionservice/
These rules are read in order and the first match applies. The exact order may vary on configuration choice, please review. This rule says if the principal matches fusionuser@EXAMPLE.HADOOP then apply this rule. Do a sed (regexp replacement) by matching the entire principal (.*) and replacing it with the user fusionservice. Ensure this config is saved and deployed to the cluster.
-
You must create Linux user fusionservice on all hosts in the cluster, i.e.
adduser fusionservice
-
To make this user a superuser in hdfs, ensure this user is a member of the superusergroup. This can be a supplementary group and does not need to be the primary group.
usermod -a -G hdfs fusionservice
-
The Fusion installation will configure a proxyuser setting. This setting defines that the user "fusion" is running as it can impersonate another user, in this case, "fusionservice", e.g.,
hadoop.proxyuser.fusionservice.hosts=*
Allow the user proxyuser to perform impersonation from any host in the cluster, usually through a comma-separated list of hostnames, which should contain the hostname of the Fusion server.
hadoop.proxyuser.fusionservice.groups=*
Allow the user proxyuser to perform an impersonation of users that are members of any Linux group. This is a comma-separated list and is for the customer to refine. Typically this should be an asterisk.
-
Fusion will now use the custom principal and keytab, while granting superuser as the fusionservice user through the supergroup, along with impersonation.
| This configuration can be made even more secure by creating a user that is in the supergroup, and then pointing fusion.system.user at that user instead of hdfs, itself. This additional level of security / auditing capability brings this approach in line with Approach 4. |
Approach 4: Custom Principal
Custom Kerberos principal with exported keytab. Then use the core-site.xml parameter "fusion.system.user" to point an actual HDFS superuser. Fusion will then proxy to that user when required. This method provides auditing benefits as all superuser actions by fusion are visible in the hdfs-audit.log which will report each proxy request and who proxied who.
Configuration requirements:
This process will require manual preparation of the Kerberos principal & keytab, along with group membership to make this user a superuser.
-
You need to know the supergroup, which can be found in the HDFS service setting dfs.permissions.superusergroup. The value is typically "hdfs" but may vary.
-
Create the Kerberos principal in the KDC via the kadmin command on the host of the Fusion server.
kadmin -p admin/admin@EXAMPLE.HADOOP -q "addprinc -randkey fusionuser@EXAMPLE.HADOOP"
-
Export the keytab to the appropriate directory.
\mkdir -p /opt/keytabs
kadmin -p admin/admin@EXAMPLE.HADOOP -q "ktadd -kt /opt/keytabs/fusionuser.keytab fusionuser@EXAMPLE.HADOOP"
chown -R hdfs:hdfs /opt/keytabs
Add an auth_to_local rule in Hadoop configuration (located in the hdfs service) to make the fusionuser@EXAMPLE.HADOOP to be the local user "hdfs" Search for auth_to_local under the HDFS config in the cluster. Add the following at the top of this box, this will map it to currently non-superuser fusionservice.
RULE:[1:$1@$0](fusionuser@EXAMPLE.HADOOP)s/.*/fusionservice/
| These rules are read in order with the first match applied first. The exact order may vary based on your particular configuration, so please review carefully. |
This rule says if the principal matches fusionuser@EXAMPLE.HADOOP then apply this rule. Do a sed (regexp replacement) by matching the entire principal (.*) and replacing it with the user fusionservice. Ensure this config is saved and deployed to the cluster
-
You must create Linux user fusionservice on all hosts in the cluster, i.e.
adduser fusionservice
-
The Fusion installation will configure a proxyuser setting. This setting defines who the user "fusion" is running as given they can impersonate other users, in this case, user "fusionservice."
hadoop.proxyuser.fusionservice.hosts=*
Allow the user proxyuser to perform impersonation from any host in the cluster. This can be a comma-separated list of hostnames, thus should at least contain the hostname of the Fusion server.
hadoop.proxyuser.fusionservice.groups=*
Allow the user proxyuser to perform an impersonation of users that are members of any Linux group. This is a comma-separated list and is for the customer to refine. Typically this should be an asterisk.
-
Edit core-site.xml (via the appropriate manager UI) and add the following property:
fusion.system.user=hdfs
where "hdfs" is a superuser.
-
Deploy the configs and restart the Fusion processes. Fusion will now use the custom principal and keytab, while granting superuser privileges by way of proxying to the "fusion.system.user".
Kerberos and HDP’s Transparent Data Encryption
There are some extra steps required to overcome a class loading error that occurs when WANdisco Fusion is used with at-rest encrypted directories. Specifically, cluster config changes described as follows:
<property>
<name>hadoop.kms.proxyuser.fusion.users</name>
<value>*</value>
</property>

<property>
<name>hadoop.kms.proxyuser.fusion.groups</name>
<value>*</value>
</property>

<property>
<name>hadoop.kms.proxyuser.fusion.hosts</name>
<value>*</value>
</property>
Set up Kerberos single KDC with Ambari
The following procedures illustrate how to installing Kerberos, running with a single Key Distribution Center, under Ambari.
When to use kadmin.local and kadmin?
When performing the Kerberos commands in this procedure you can use kadmin.local or kadmin depending on your access and account:
-
IF you can log onto the KDC host directly, and have root access or a Kerberos admin account: use the
kadmin.localcommand. -
When accessing the KDC from a remove host, use the
kadminfrom any host, run one of the following:$ sudo kadmin.local
or
$ kadmin
Before you start, download and install the Java Cryptographic Extension (JCE) Unlimited Strength Jurisdiction Policy Files 7. See Setup procedure.
Set up Kerberos single KDC on CDH cluster
The following procedures illustrate how to installing Kerberos, running with a single Key Distribution Center, under CDH.
Set up a KDC and Default Domain
When to use kadmin.local and kadmin?
When performing the Kerberos commands in this procedure you can use
kadmin.local or kadmin depending on your access and account:
-
IF you can log onto the KDC host directly, and have root access or a Kerberos admin account: use the
kadmin.localcommand. -
When accessing the KDC from a remove host, use the
kadminfrom any host, run one of the following:$ sudo kadmin.local
or
$ kadmin
|
JCE policy files
Before you start, you must download and install the Java Cryptographic Extension (JCE) Unlimited Strength Jurisdiction Policy Files.
This is a pre-requisite for Hadoop to be successfully secured by Kerberos.
|
Create a Kerberos Principal and Keytab File for the Cloudera Manager Server
The following sequence is an example procedure for creating the Cloudera Manager Server principal and keytab file for MIT Kerberos.
-
In the kadmin.local or kadmin shell, type in the following command to create the Cloudera Manager Service principal:
kadmin: addprinc -randkey cloudera-scm/admin@WANDISCO.COM
-
Create the Cloudera Manager Server
cmf.keytabfile:kadmin: xst -k cmf.keytab cloudera-scm/admin@DOMAIN.COM
Important:
The Cloudera Manager Server keytab file must be namedcmf.keytabbecause that name is hard-coded in Cloudera Manager.
Deploying the Cloudera Manager Server Keytab
After obtaining or creating the Cloudera Manager Server principal and keytab, follow these instructions to deploy them:
Move the cmf.keytab file to the /etc/cloudera-scm-server/.
This is the directory on the host where you are running the Cloudera Manager Server.
$ mv cmf.keytab /etc/cloudera-scm-server/
Ensure that the cmf.keytab file is only readable by the Cloudera
Manager Server user account cloudera-scm.
sudo chown cloudera-scm:cloudera-scm /etc/cloudera-scm-server/cmf.keytab

sudo chmod 600 /etc/cloudera-scm-server/cmf.keytab
Add the Cloudera Manager Server principal
(cloudera-scm/admin@DOMAIN.COM) to a text file named cmf.principal and
store the cmf.principal file in the /etc/cloudera-scm-server/
directory on the host where you are running the Cloudera Manager Server.
Make sure that the cmf.principal file is only readable by the Cloudera Manager Server user account cloudera-scm.
sudo chown cloudera-scm:cloudera-scm /etc/cloudera-scm-server/cmf.principal

sudo chmod 600 /etc/cloudera-scm-server/cmf.principal
Note: For Single KDC copy cmf.keytab and cmf.principal to another CM
node:
scp /etc/cloudera-scm-server/cmf* vmhost17-vm0.bdfrem.wandisco.com:/etc/cloudera-scm-server/
API with Kerberos enabled
If you have Kerberos-authentication enabled on REST API, you must kinit before making REST calls, and enable GSS-Negotiate authentication. To do this with curl, you must include the "--negotiate" and "-u:" options e.g.:
curl --negotiate -u: -X GET "http://${HOSTNAME}:8082/fusion/fs/transfers"
Configure the Kerberos Default Realm in the Cloudera Manager Admin Console
-
In the Cloudera Manager Admin Console, select Administration > Settings.
-
Click the Security category, and enter the Kerberos realm for the cluster in the Kerberos Security Realm field that you configured in the
krb5.conffile. -
Click Save Changes.
Adding Gateway roles to all YARN hosts.
-
From the Services tab, select your YARN service.
-
Click the
Instancestab. -
Click
Add Rolesand chooseGateway role. -
Select
all hostsand clickInstall.
Enable Hadoop Security
You can do this by hand, see CM Enable Security.
Cloudera Manager Kerberos Wizard
After configuring kerberos, you now have a working Kerberos server and can secure the Hadoop cluster. The wizard will do most of the heavy lifting; you just have to fill in a few values.
-
To start, log into Cloudera Manager by going to
http://your_hostname:7180in your browser. The user ID and Password are the same as those used for accessing your Management Endpoint (Ambari or Cloudera Manager, etc.) or if you’re running without an manager, such as with a Cloud deployment, then they will be set in a properties file. -
There are lots of productivity tools here for managing the cluster but ignore them for now and head straight for the
Administration > Kerberoswizard. -
Click on the "Enable Kerberos" button.
-
Check each KRB5 Configuration item and select Continue.
 Figure 166. Kerberos config
 -
The Kerberos Wizard needs to know the details of what the script configured. Fill in the entries as follows:
-
KDC Server Host KDC_hostname
-
Kerberos Security Realm: DOMAIN.COM
-
Kerberos Encryption Types: aes256-cts-hmac-sha1-96
Click Continue.
-
-
You want Cloudera Manager to manage the
krb5.conffiles in your cluster so, please check "Yes" and then select "Continue." -
Enter the credentials for the account that has permissions to create other listeners.
User: testuser@WANDISCO.COM
Password: password for testuser@WANDISCO.COM
-
The next screen provides good news. It lets you know that the wizard was able to successfully authenticate.
-
On this step setup wizard will create Kerberos principals for each service in the cluster.
-
You’re ready to let the Kerberos Wizard do its work. You should select I’m ready to restart the cluster now and then click Continue.
-
Successfully enabled Kerberos. You now running a Hadoop cluster secured with Kerberos.
Securing the REST endpoint
In Ambari, to enable web UI authentication for the HDFS service:
-
Search for web consoles in the sAMbari Manager UI.
-
Select the Enable Authentication for HTTP Web-Consoles property.
-
Tick the check box to enable web UI authentication.
Property Description Enable Authentication for HTTP Web-Consoles
Enables authentication for hadoop HTTP web-consoles for all roles of this service.
Kerberos Troubleshooting
This section covers some recommended fixes for potential Kerberos problems.
Kerberos Error with MIT Kerberos 1.8.1 and JDK6 prior to update 27
Prior to JDK6 Update 27, Java fails to load the Kerberos ticket cache correctly when using MIT Kerberos 1.8.1 or later, even after a kinit.
The following exception will occur when attempting to access the Hadoop cluster.
WARN ipc.Client: Exception encountered while connecting to the server : javax.security.sasl.SaslException:
GSS initiate failed [Caused by GSSException: No valid credentials provided (Mechanism level: Failed to find any Kerberos tgt)]
The workaround is:
-
Renew the local Kerberos ticket with "kinit -R". (This requires that the Kerberos ticket is renewable) This is fixed in JDK 6 Update 27 or later: http://www.oracle.com/technetwork/java/javase/2col/6u27bugfixes-444150.html
-
See: CCacheInputStream fails to read ticket cache files from Kerberos 1.8.1
Kerberos 1.8.1 introduced a new feature by which configuration settings can be stored in the ticket cache file using a special principal name.
Error "Can’t get Kerberos realm" when installing WANdisco Fusion.
WANdisco Fusion uses the settings that are written in the krb5.conf file to configure Kerberos. The default realm (default_realm) is one of the values that must be specified. If not, then the JVM will fallback by trying to get the default realm through DNS. If this fails, then you see the "Can’t get Kerberos realm" error message.
Workaround
The workaround is to properly configure the default_realm in krb5.con.
6.5.3. LDAP/ Active Directory
Set up LDAP
Use the following procedure for setting up and applying an LDAP/AD service for handling Fusion user authentication.
| OpenLDAP and Active Directory implementations are both supported. |
-
Login using the Super User credentials that you provided during installation. Navigate to the Settings tab and click on LDAP under the Security Section.
 Figure 167. LDAP Enabled
Enter the following properties.
- Host
-
the URL or hostname for your LDAP/AD authority
- Port
-
the port used by your LDAP/AD authority. Default: 389
- Use SSL
-
tick this checkbox if you wish to secure LDAP/AD traffic using SSL. Your required port will need to change
 Figure 168. LDAP Enabled
 - TrustStore Path
-
the file path to your SSL TrustStore file
- TrustStore Password
-
the password required for your TrustStore
- BindDN
-
The distinguishing Name is used by Fusion to authenticate to LDAP/AD in order to read groups, etc. In the case that your authority does not allow unauthenticated queries.
- Bind Password
-
password required to query your LDAP/AD authority
- User Search Base
-
the point in point in the LDAP/AD tree where the search for valid users will begin
- User Search Filter
-
LDAP/AD search string used to filter the directory for applicable accounts
- Login Name Attribute
-
the name of the uid attribute for users in the directory
CLick Check connection
 Figure 169. Test LDAP Configuration
-
If your LDAP/AD settings are confirmed as valid then you must click Update to save them. If you don’t click Update then they won’t be saved.
 Figure 170. Test LDAP Configuration
 -
After clicking Update a message will appear to confirm that the LDAP settings will now be applied.
 Figure 171. Update LDAP Settings
LDAP settings succesfully updated. Please reload the browser.
Click Close and refresh your browser.
| If you are not accessing the Fusion UI using the Super User account then you may find that your access to the UI is now restricted. |
6.5.4. Roles and Permissions
When LDAP is enabled the Fusion UI will list a new section Roles and Permissions under the Security section of the Settings tab.
To assign roles and control the permissions available to each role, click on the Roles and Permissions button.
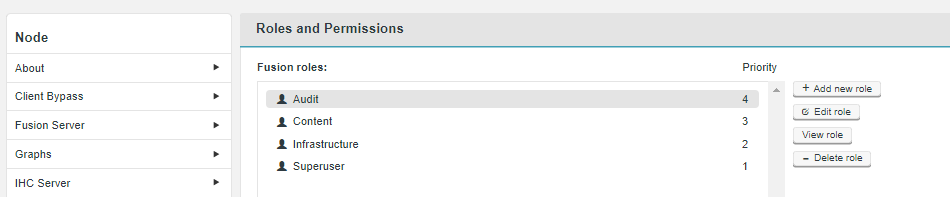
By default, Fusion comes with the following defined roles.
| Role | Priority See Role Priority |
|---|---|
4 |
|
3 |
|
2 |
|
1 |
Audit
The Audit role is intended for access that requires no actual interaction. This role lets an account get access to the Fusion UI without actually being able to make any changes. By default, the Audit user has the lowest priority (4).
-
Has READ access to everything.
-
No write access of any sort.
Content
The Content role provides access to the basic Fusion UI functionality, allowing a user with this role to modify replication rules, without having access to deeper configuration-related functions.
-
Has WRITE access to Replication Rules (eg CRUD)
-
Has WRITE access to Consistency Checks and Make Consistent operations (eg can trigger these)
-
Has READ access to the Dashboard
-
Has NONE access to the Nodes page
-
Has READ access to the Settings page
-
Has NONE access to any feature within this other than Email Notifications
Infrastructure
The Infrastructure role provides access to a system administrator level user.
-
Has WRITE access to all system or performance related features (eg Dashboard, Nodes page, Settings page)
-
Has READ access to everything else (for diagnostic purposes).
-
Writer node information, which is required for the infrastructure role, will be added onto the node profile page
Superuser
The Super User has all complete access. For this reason, it is not intended to be used for regular operation. The Superuser has the highest priority (1).
-
Has WRITE access to everything, permissions can not be modified.
| You can reset the Superuser password using the following - Generate a new password |
Role Priority
Each role is assigned a priority parameter (int value). The priority for a role must be unique, means there should be no roles with the same priority.
In the event that a user account has been assigned multiple roles, the priority is used to set the order in which Fusion checks for applicable permissions. This check is done each time the applicable user logs in, in which case, changes to a user’s role and permissions will not be picked up until they next log in. For example, a user assigned with the Super User role will always be checked first, and it’s permissions will apply over any other roles with more limited permissions.
Role Permissions limit access to UI Features
| This user guide is written to provide the most complete view of the Fusion UI, as if you are logging in with the Superuser or equivalent role. If you access the Fusion UI using an account with an assigned role that has a limited set of permissions, then you many not see some features or may not permit you to edit those features. |
The Fusion UI will limit access to those functions and features that match the role and permissions of the logged-in account. For example, logging in with a Super User role will provide unlimited access, while a user logging in with an account assigned with the Audit role will only have access to a very limited feature-set.
| The permissions available to each role can be customised in this section. Consider creating new roles if you need a bespoke set of permissions, so that you don’t lose track of unexpected access or restrictions that have been applied to the default roles. |
Add new role
The Add new role function lets you create a brand new role with a custom set of permissions. Use this feature if you need to assign users to roles that do not match with those roles that are provided by default.

Fusion role:
Role properties for the new role.
Name:: a unique name for the role
Priority:: a unique priority number. see Role Priority for more guidance on how priority is used.
LDAP users for
LDAP search properties for the new role.
Search Base:: the starting point in your LDAP for user searches
Search Filter:: the filter used for user searches
Permissions for
Permissions that will be assigned to the new role. Tick a checkbox to provide READ and or WRITE access. If neither READ or WRITE are ticked then this role will get no access to that resource.
- Replication
-
Permissions for access to Consistency check, Create rules, Edit rules, Remove rules, Make Consistent
- Plugins
-
Permissions for enabled plugins
- Global settings
-
Adls settings, Aws credentials, Azure settings, Bandwidth limits, Chunk size, Client bypass, Consistency check settings Core http settings, Dcone database, Emr client, Emr settings, Fusion roles, Google settings, Graph settings, Heap size, Ihc server, Kerberos, Ldap settings, License, Log settings, Networking, Notifications, Plugin installation, Push threshold, Replication settings, S3 settings, S3 throttle, Swift settings, Ui server http settings, Uri selection Infrastructure::Induction, Node operations, User management, View logs
- Resources
-
Client download, Fusion assets download
- System information
-
About versions, Aggregate throughput, Fusion db disk usage, System cpu load, System status
- Support
-
Contact information, License information
Edit role
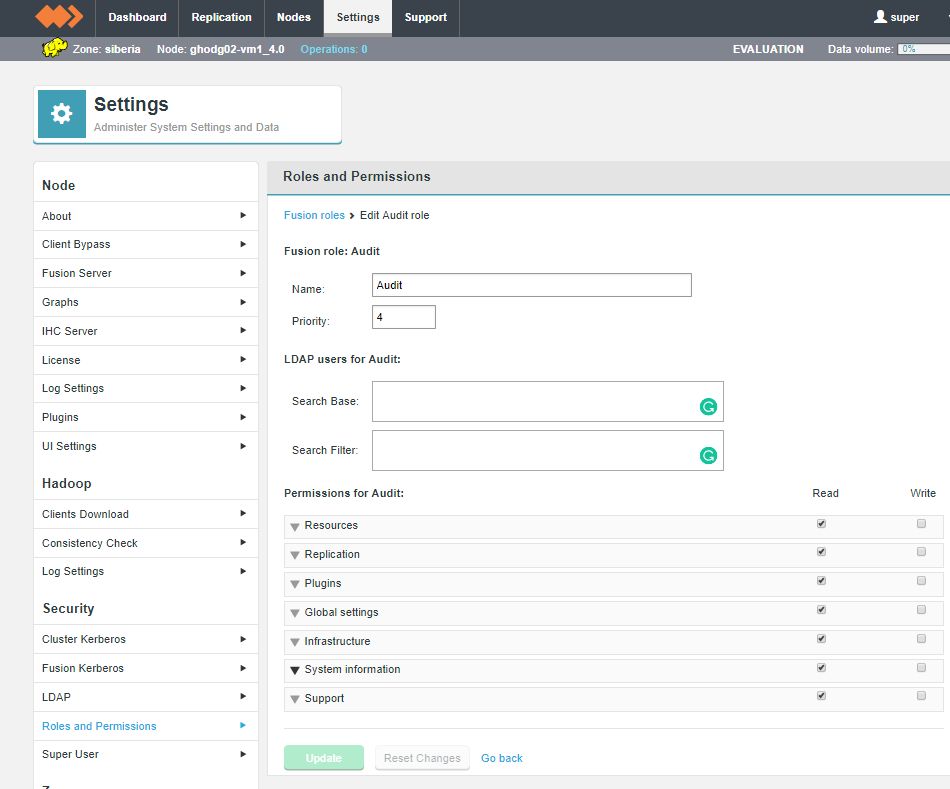
Select from the existing roles, then click the Edit role. You can make modifications to any of the role’s properties. Click Update to save any changes you have made or click Reset to reload the exiting permissions.
View role
Select from the existing roles, then click the View role button. This is a read-only version of the Edit role screen. You can’t make changes here, instead used the Edit role screen.
Delete role
Select from the existing roles, then click the Delete role button. This will
-
Click on the Delete role button.
 Figure 175. Delete a role
 -
The following message will appear:
Are you sure you want to delete the selected role?
Click Confirm to continue with the deletion.
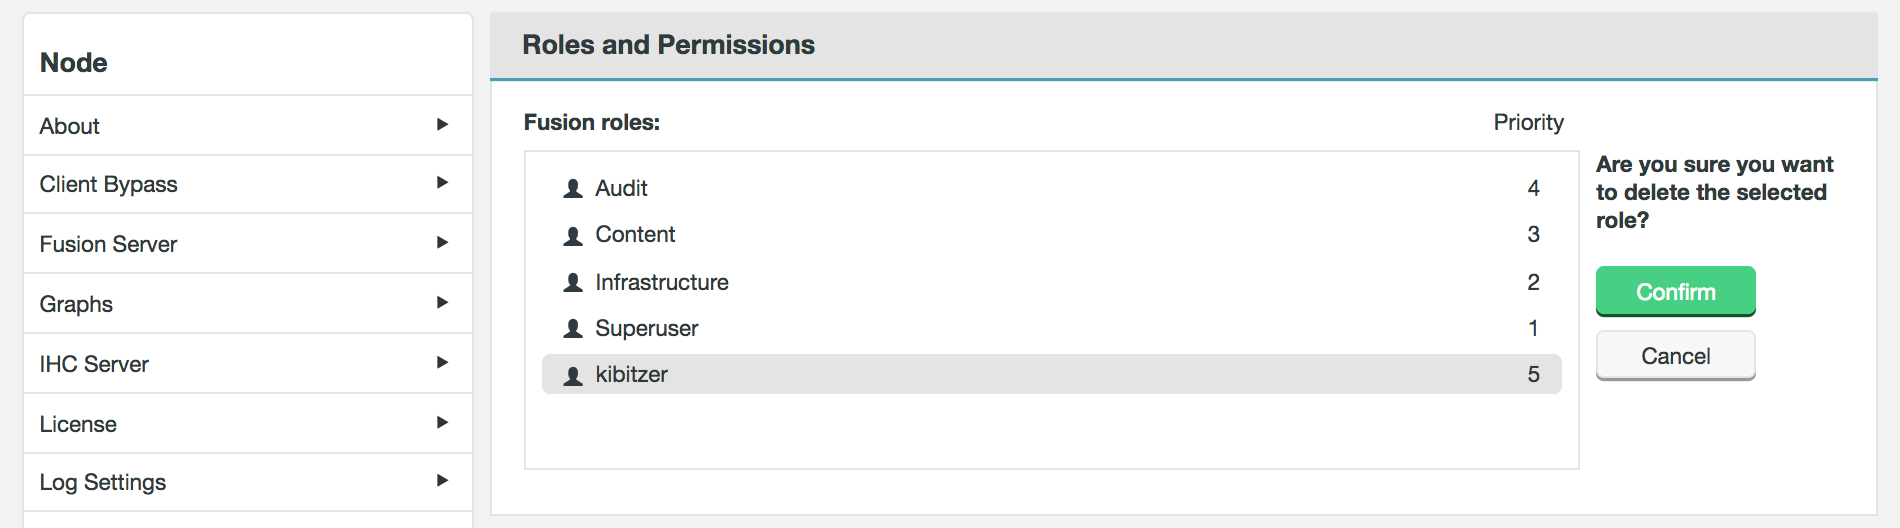 Figure 176. Delete a role
 -
The deletion will be confirmed with the message:
Role deleted successfully
Click Close.
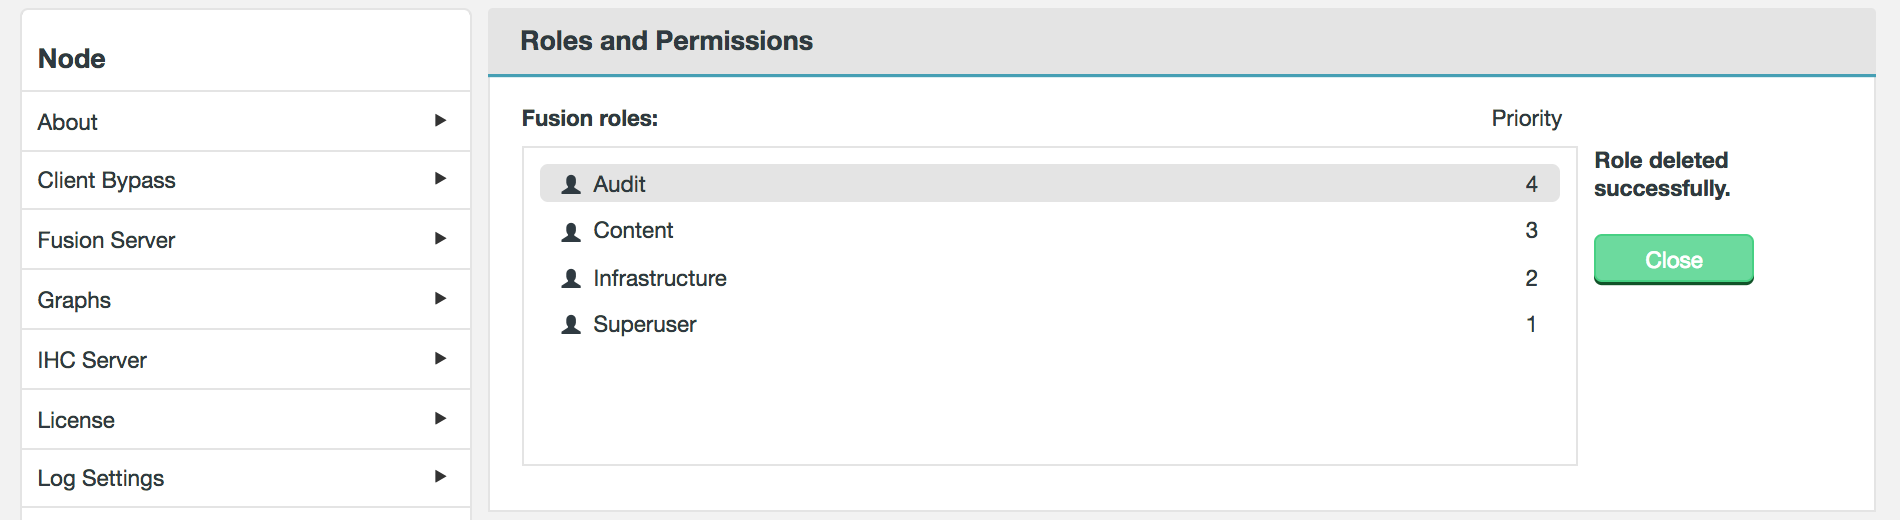 Figure 177. Confirm delete of a role
6.6. Troubleshooting
This section details with how to diagnose and fix problems that many occur in deployment. It’s important that you check the Release Notes for any Known issues in the release that you are using.
6.6.1. Read the logs
There are a number of log files that provide information that will be necessary in finding the cause of many problems.
The log files for WANdisco Fusion are spread over three locations. Some processes contain more than one log file for the service. All pertinent log files are captured by running the WANdisco talkback shell script that is covered in the next section.
Log Directory Settings
Log Settings
On the Settings tab of the Fusion UI, you will find a Log Directory Settings screen. The screen defines the log directories of the Fusion Core Server, Fusion IHC Server and Fusion UI. The Fusion user must have full permissions on these directories. See Configure log directory via UI.
WANdisco Fusion Server Logs
The logs on the WANdisco Fusion server record events that relate to the data replication system.
- Log locations
-
/var/log/fusion/server - Primary log(s)
-
fusion-dcone.log.0-
this is the live log file for the running WANdisco Fusion server process.
-
- Historical logs
-
The following logs are listed for completeness but are not generally useful for monitoring purposes.
fusion dcone.log.x-
the log file is rotated once its file size reaches 200MB. By default, the last 100 log files are stored. The "x" represents an incrementing number, starting at 1.
Filenames are appended with an incrementing number starting at 1.
Rotation is presently defaulted at 200MB with a retention of 100 files, although this can be customised.
fusion-server.log -
a log of the application-level events, such as kerberos authentication, license validation.
fusion-server.log.yyyy-mm-dd
log_out.log -
this is the output redirected from STDOUT and STDERR that invoked java. This is used to capture exceptions that occur before logging could start.
-
WANdisco Fusion UI Server Logs
The WANdisco Fusion user interface layer, responsible for handling interactions between the administrator, WANdisco Fusion and the Hadoop Management layer.
- Log locations
-
/var/log/fusion/ui/ - Primary log(s)
-
fusion-ui.log - Historical logs
-
fusion-ui.log.x
The UI logs will contain errors such as failed access to the user interface, connectivity errors between the user interface and WANdisco Fusion Server REST API and other syntax errors between the user interface and the WANdisco Fusion server’s REST API and other syntax errors whilst performing administrative actions across the UI.
Inter-Hadoop Connect (IHC) Server Logs
Responsible for streaming files from the location of the client write to the WANdisco Fusion server process in any remote cluster to which hadoop data is replicated.
- Log location
-
/var/log/fusion/ihc
/var/log/fusion/ihc/server- Primary log(s)
-
server/fusion-ihc-ZZZ-X.X.X.log-
The live IHC process log files. The components of the filename are as follows:
ZZZ - Hadoop distribution marker (hdp, cdh, etc). This will be "hdp" for a Hortonworks integrated cluster.
X.X.X - A matching cluster version number. This will be "2.2.0" for a Hortonworks 2.2 cluster.
-
- Historical logs
-
server/fusion-ihc-ZZZ-X.X.X.log.yyy-mm-dd
log_out.log
This log file contains details of any errors by the process when reading from HDFS in the local cluster, such as access control violations, or network write errors when streaming to the WANdisco Fusion server in any remote cluster.
WANdisco Fusion Client Logging
By default, the WANdisco Fusion client remains silent and will not provide an indication that it has been loaded or is in use by an application. For troubleshooting purposes, it can help to enable client logging to allow you to determine when the client is in effect. Client logging can be enabled by adding an entry to the cluster’s log4j.properties file similar to that below:
log4j.logger.com.wandisco.fs.client=INFO
Once enabled, client log information will be produced by default on the standard output. Either removing this entry, or setting the logging level for the WANdisco Fusion client library to "OFF" will restore default behavior with no client-side logging.
Log analysis
This is the standard format of the WANdisco log messages within Fusion. It includes an ISO8601 formatted timestamp of the entry, the log level / priority, followed by the log entry itself. Log levels we provide in order of severity (highest to lowest) that you may observe:
-
PANIC
-
SEVERE
-
ERROR
-
WARNING
-
INFO
For log analysis and reporting, logs with at the PANIC, SEVERE and ERROR levels should be investigated. The warning level messages indicate an unexpected result has been observed but one that hasn’t impacted the system’s continued operation. Additional levels may exist, but are used in cases when the logging level has been increased for specific debug purposes. At other times, other levels should be treated as informational (INFO).
6.6.2. About this Node
Under the Settings tab there is an About screen that provides the following information, useful for quickly comparing the versions of different nodes in a deployment.
The About This Node panel shows the version information for the underlying Hadoop deployment as well as the WANdisco Fusion server and UI components:
- Fusion UI Version
-
The current version of the WANdisco Fusion UI.
- Fusion Build Number
-
The specific build for this version of the WANdisco Fusion UI.
- Hadoop Version
-
The version of the underlying Hadoop deployment.
- Fusion Version
-
The version of the WANdisco Fusion replicator component.
- Fusion Uptime
-
The time elapsed system the WANdisco Fusion system last booted up.
- Cluster Manager
-
The management application used with the underlying Hadoop.
6.6.3. Support
The support tab contains links and details that may help you if you run into problems using WANdisco Fusion.
6.6.4. Talkback
Talkback is a bash script that is provided in your WANdisco Fusion installation for gathering all the logs and replication system configuration that may be needed for troubleshooting problems. Should you need assistance from WANdisco’s support team, they will ask for an output from Talkback to begin their investigation.
|
Known issue - special characters
If replicated paths have a special character in the name, this can cause the talkback script to hang.
|
Talkback location
You can find the talkback script located on the WANdisco Fusion server’s installation directory:
$ cd /opt/wandisco/fusion/server/
You can run talkback as follows:
$ sudo talkback.sh
If a cluster has Kerberos security enabled (Talkback will detect this from WANdisco Fusion’s configuration), you may be asked for Kerberos details needed to authenticate with the cluster.
For more information on talkback usage you can run:
$ sudo talkback.sh -h
Talkback can be run interactively or non-interactively.
To run non-interactively the following variables must be set. If you do not set these variables you will be prompted.
-
FUSION_KERBEROS_CONFIGS- Set to "true" or "false" to grab the Kerberos configs (not necessary if Kerberos is not enabled). -
FUSION_PERFORM_FSCK- Set to "true" or "false" to perform a file system consistency check.-
If running interactively you will be asked if you wish to perform a HDFS fsck, or not. Option 1 for yes, option 2 for no.
-
-
FUSION_TALKBACK_DIRECTORY- Set the absolute path directory where the tarball will be saved.
Note, WANdisco Fusion talkbacks can exceed 300MB compressed, but well over 10GB uncompressed (due to logs).
The following variables can also be set:
-
FUSION_JSTACK- Set to "true" or "false" to run JStack. Defaults to "false". -
FUSION_KERBEROS_ENABLED- Set to "true" or "false" on whether Kerberos enabled. Talkback will check if left null. -
FUSION_LOG_PERIOD- Set to positive integer on how long to set timeout for log copies. Defaults to 15. -
FUSION_MARKER- Set to include custom marker inside of talkback filename. Defaults to "FUSION" if left null. -
FUSION_PMAP- Set to "true" or "false" to grab the pmap of the file. Defaults to "false". -
FUSION_PROC- Set to "true" or "false" to grab the proc of the file. Defaults to "true". -
FUSION_PROXY_USER- Set the proxy user for curls. Defaults to null. -
FUSION_SUPPORT_TICKET- Set ticket number to give to WANdisco support team. Defaults to null. -
FUSION_TIMEOUT- Set the timeout of the CURL commands. Defaults to two minutes. -
DFS_COUNT- Set to "true" or "false" to run 'hdfs dfs -count /repl' on HDFS distros. Defaults to false. -
IS_HADOOP_ZONE- Set to "true" or "false" depending on whether Hadoop distro (only necessary if cannot detect distro). -
HADOOP_RETRY- Set to "true" or "false" to bypass Hadoop host prompts. -
SSH_USER_KERBEROS- SSH to KDC as a different user. Defaults to null. -
TALKBACKNAME- Set the talkback filename to something other than the default format.
PID Variables: Used for JStack, PMap and proc file capture:
-
FUSION_SERVER- Set to "true" or "false" to capture pid info for fusion server. Defaults to "true". -
FUSION_IHC_SERVER- Set to "true" or "false" to capture pid info for ihc server. Defaults to "true". -
FUSION_UI_SERVER- Set to "true" or "false" to capture pid info for UI server. Defaults to "false".
Running talkback
To run the talkback script, follow this procedure:
-
Log into the Fusion server. If you’re not logged in as root, use sudo to run the talkback script. Below is an example output:
====================== INFO ========================= The talkback agent will capture relevant configuration and log files to help WANdisco diagnose the problem you may be encountering. Use '-h' flag for more info. Retrieving current system state information Capturing uptime. Capturing pwd. Capturing uname -a. Capturing df -k. Capturing df -k /opt/wandisco/fusion/server/dcone. Capturing mount. Capturing /usr/java/jdk1.7.0_79/bin/java -version. Capturing /bin/bash -version. /usr/bin/lsb_release Capturing rpm -qa | grep coreutil. Capturing ps -leaf | grep java. Capturing ps -C java -L -o tid,pcpu,time. Capturing ps -leaf. Capturing top -b -n 1. Capturing netstat -anp. Found 'fusion-server' with user: 'hdfs' and pid: '26950'. Capturing proc file for 'fusion-server'. Found 'fusion-ihc-server' with user: 'hdfs' and pid: '24536'. Capturing proc file for 'fusion-ihc-server'. Copying Fusion UI log files, this can take several minutes. Gathering information from Fusion endpoints Protocol is: http Hostname is: <your.hostname> Port is: 8082 retrieving details for node <your.nodeID> Capturing ping -c 5 <your.hostname>. Copying Fusion server log files, this can take several minutes. Copying Fusion IHC log files, this can take several minutes. WARNING: fs.xml could not be parsed. This is expected behavior when no replicated directories exist. Gathering Java Management Extension data. 2 archives were successfully processed. 2 archives were successfully processed. Would you like to include hadoop fsck? This can take some time to complete and may drastically increase the size of the tarball. 1) Yes 2) No ? 1 Capturing sudo -u hdfs hadoop --config /etc/hadoop/conf fsck / -blocks -locations -racks -files -openforwrite. Running sysinfo script to capture maximum hardware and software information... Gathering Summary info.... Gathering Kernel info.... Gathering Hardware info.... Gathering File-Systems info.... Gathering Network info.... Gathering Services info.... Gathering Software info.... Gathering Stats info.... Gathering Misc-Files info.... THE FILE sysinfo/sysinfo_<your.hostname>-20171108-100136.tar.gz HAS BEEN CREATED BY sysinfo TALKBACK COMPLETE --------------------------------------------------------------- Please upload the file: /<your specified directory>/talkback-FUSION-201711081510-<your.hostname>.tar.gz to WANdisco support with a description of the issue. Note: do not email the talkback files, only upload them via ftp or attach them via the web ticket user interface. -------------------------------------------------------------- -
Follow the instructions for uploading the output on WANdisco’s support website.
Uploading talkback files
If you need help from WANdisco support you may need to send them your talkback output files.
DO NOT send these files by email.
The best way to share your talkback files is via SFTP, but small files (<50MB) can also be uploaded directly at customer.wandisco.com.
For information on how to upload talkback files, see the Knowledge base article How to upload talkback files for support.
Information can also be found at customer.wandisco.com but you will need a valid WANdisco License Key to access this information.
6.6.5. Common problems
Moving objects between mismatched filesystems
If you move objects onto the distributed file system you must make sure that you use the same URI on both the originating and destination paths. Otherwise you’d see an error like this:
[admin@vmhost01-vm1 ~]$ hadoop fs -mv /repl2/rankoutput1 fusion:///repl2/rankoutput2/
15/05/13 21:22:40 INFO client.FusionFs: Initialized FusionFs with URI: fusion:///, and Fs: hdfs://vmhost01-vm1.cluster.domain.com:8020. FileSystem: DFS[DFSClient[clientName=DFSClient_NONMAPREDUCE_-721726966_1, ugi=admin@DOMAIN.EXAMPLE (auth:KERBEROS)]]
mv: `/repl2/rankoutput1': Does not match target filesystem
If you use the fusion:/// URI on both paths it will work, e.g.
[admin@vmhost01-vm1 ~]$ hadoop fs -mv fusion:///repl2/rankoutput1 fusion:///repl2/rankoutput1
15/05/13 21:23:27 INFO client.FusionFs: Initialized FusionFs with URI: fusion:///, and Fs: hdfs://vmhost01-vm1.cluster.domain.com:8020. FileSystem: DFS[DFSClient[clientName=DFSClient_NONMAPREDUCE_-1848371313_1, ugi=admin@DOMAIN.EXAMPLE (auth:KERBEROS)]]
Note that since the non-replicated directory doesn’t yet exist in ZONE2 it will get created without the files it contains on the originating zone.
When running WANdisco Fusion using the fusion:///, moving non-replicated directory to replicated directory will not work unless you use of the fusion:/// URI.
You can’t move files between replicated directories
Currently you can’t perform a straight move operation between two
separate replicated directories.
Handling file inconsistencies
WANdisco Fusion’s replication technology ensures that changes to data are efficiently propagated to each zone. However, the replication system is optimized for maintaining consistency through transactional replication and is not designed to handle the initial synchronization of large blocks of data. For this requirement, we have the Consistency Check tool.
Transfer reporting
When looking at the transfer reporting, note that there are situations in which HFlush/early file transfer where transfer logs will appear incorrect. For example, the push threshold may appear to be ignored. This could happen if an originating file is closed and renamed before pulls are triggered by the HFlush lookup. Note that although this results in confusing logs, those logs are in fact correct; you would see only two appends, rather than the number determined by your push threshold - one in the very beginning, and one from the rename, which pulls the remainder of the file. What is happening is optimal; all the data is available to be pulled at that instant, so we might as well pull all of it at once instead of in chunks.
6.6.6. Handling Induction Failure
In the event that the induction of a new node fails, here is a possible approach for manually fixing the problem using the API.
Requirements: A minimum of two nodes with a fusion server installed and running, without having any prior knowledge about the other.
This can be verified by querying <hostname>:8082/fusion/nodes
Steps:
Generate an xml file (we’ll call it induction.xml) containing an induction ticket with the inductors details (Generally the inductor port should not change but this is the port that all DConE traffic uses.
You can find this in your application.properties file as application_port)
<inductionTicket>
  <inductorNodeId>${NODE1_NODEID}</inductorNodeId>
  <inductorLocationId>${NODE1_LOCATIONID}</inductorLocationId>
  <inductorHostName>${NODE1_HOSTNAME}</inductorHostName>
  <inductorPort>6444</inductorPort>
</inductionTicket>
Send the xml file to your inductee:
curl -v -s -X PUT -d@${INDUCTION.XML} -H "Content-Type: application/xml" http://${NODE2_HOSTNAME}:8082/fusion/node/${NODE2_IDENTITY}
Membership
For more information on memberships see the reference guide.
Requirements: A minimum of two nodes that have been inducted.
Steps:
Generate an xml file (we’ll call it membership.xml) containing a membership object.
DConE supports various configuration of node roles but for the time being the Fusion UI only supports <Acceptor, Proposer, Learner> and <Proposer, Learner>.
If you choose to have an even number of <Acceptor, Proposer, Learner> nodes you must specify a tiebreaker.
<membership>
  <membershipIdentity>${MEANINGFUL_MEMBERSHIP_NAME}</membershipIdentity>
  <distinguishedNodeIdentity>${NODE1_NODEID}</distinguishedNodeIdentity>
  <acceptors>
    <node>
      <nodeIdentity>${NODE1_NODEID}</nodeIdentity>
      <nodeLocation>${NODE1_LOCATIONID}</nodeLocation>
    </node>
    <node>
      <nodeIdentity>${NODE2_NODEID}</nodeIdentity>
      <nodeLocation>${NODE2_LOCATIONID}</nodeLocation>
    </node>
  </acceptors>
  <proposers>
    <node>
      <nodeIdentity>${NODE1_NODEID}</nodeIdentity>
      <nodeLocation>${NODE1_LOCATIONID}</nodeLocation>
    </node>
    <node>
      <nodeIdentity>${NODE2_NODEID}</nodeIdentity>
      <nodeLocation>${NODE2_LOCATIONID}</nodeLocation>
    </node>
  </proposers>
  <learners>
    <node>
      <nodeIdentity>${NODE1_NODEID}</nodeIdentity>
      <nodeLocation>${NODE1_LOCATIONID}</nodeLocation>
    </node>
    <node>
      <nodeIdentity>${NODE2_NODEID}</nodeIdentity>
      <nodeLocation>${NODE2_LOCATIONID}</nodeLocation>
    </node>
  </learners>
</membership>
Send the xml file to one of your nodes:
curl -v -s -X POST -d@${MEMBERSHIP.XML} -H "Content-Type: application/xml" http://${NODE_HOSTNAME}:8082/fusion/node/${NODE_IDENTITY}/membership
Statemachine
Requirements: A minimum of two nodes inducted together and a membership created that contains them (you’ll want to make a note of the membership id of your chosen membership).
Steps:
Generate an xml file (we’ll call it statemachine.xml) containing a fsMapping object.
<replicatedDirectory>
  <path>${URI_TO_BE_REPLICATED}</path>
  <membershipId>${MEMBERSHIP_ID}</membershipId>
  <familyRepresentativeId>
    <nodeId>$NODE1_ID</nodeId>
  </familyRepresentativeId>
</replicatedDirectory>
Send the xml file to one of your nodes:
curl -v -s -X POST -d@${STATEMACHINE.XML} -H "Content-Type: application/xml" http://${NODE1_HOSTNAME}:8082/fusion/fs
6.6.7. Client Bypass
Client bypass to allow writes to proceed
If WANdisco Fusion is down and clients use the HDFS URI, then further writes will be blocked. The client bypass feature gives the administrator an option to bypass WANdisco Fusion and write to the underlying file system, which will introduce inconsistencies between zones. This is suitable for when short-term inconsistency is seen as a lesser evil compared to blocked progress.
The inconsistencies can then be fixed later using the Consistency and Make Consistent process(es). A client that is allowed to bypass to the underlying filesystem will continue to bypass for the duration of the retry interval. Long-running clients will automatically reload configurations at a hardcoded 60 second interval. Thus it is possible to disable and enable the bypass on-the-fly.
Enable/disable client bypass via the UI
-
Log in to the Fusion UI and go to the Settings tab. Click Client Bypass Settings.
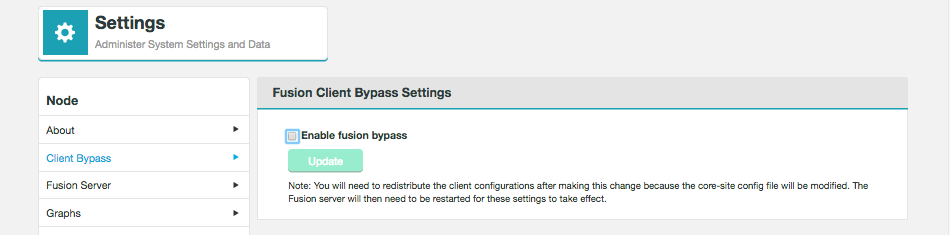 Figure 180. Client Bypass - step1
 -
Tick the Enable fusion bypass checkbox. This will enable two entry fields for configuration:
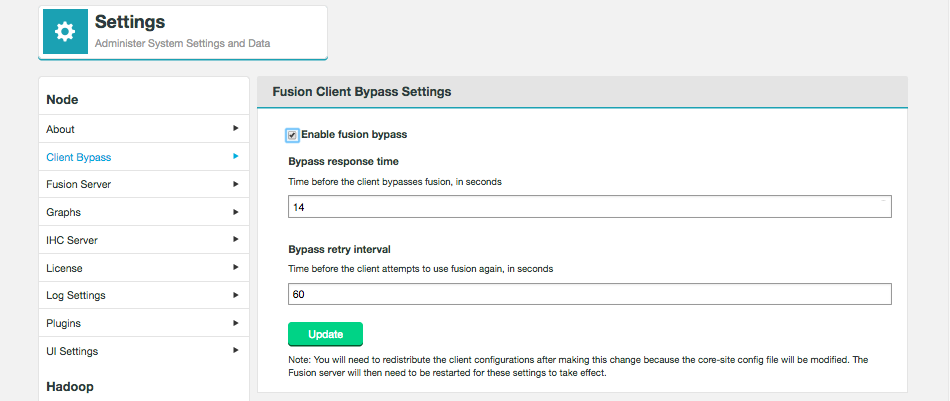 Figure 181. Client Bypass - step2
- Bypass response time
-
The time (in seconds) that will pass before the client will bypass WANdisco Fusion. Default: 14.
- Bypass retry interval
-
The time (in seconds) before the client attempts to use WANdisco Fusion, again. Default: 60.
-
Click Update to save your changes.
-
A HDFS restart is now needed for the changes to take effect.
Enable/disable client bypass via manual configuration change
In core-site.xml add the following properties:
-
fusion.client.can.bypass = true-
default is false
-
-
fusion.client.bypass.retry.interval.secs = 120-
default is 60 (in seconds)
-
The properties are also listed in the Fusion Client configuration table.
6.6.8. Manual Bypass
Manual bypass allows clients to bypass WANdisco Fusion. It can be used for, for example, WANdisco Fusion maintenance and troubleshooting.
When manual bypass is enabled, consistency check and make consistent can still continue in both directions. Replication can also continue from the remote zone to the zone with the bypass in place.
The warning 'This zone is not actively replicating' is displayed on the Fusion dashboard when manual bypass is enabled.
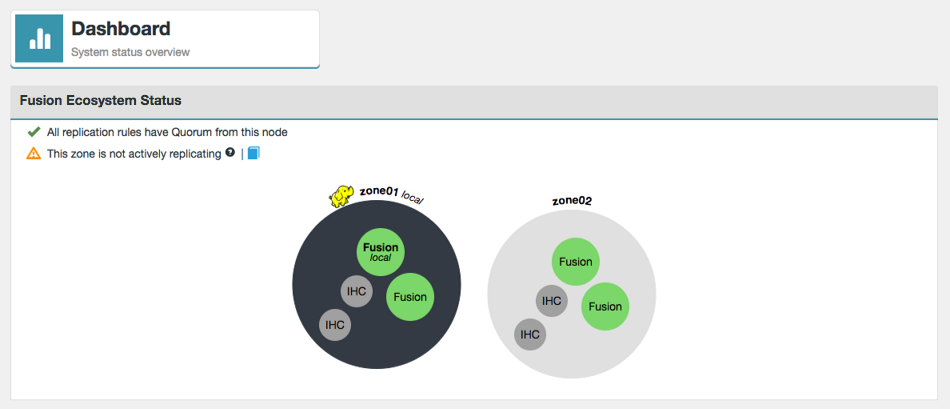
Connecting to Fusion
Client access to Fusion is mostly defined by URI selection. This is specified during installation, or via the Settings tab on the Fusion UI of an established deployment. It can also be controlled manually by amending the cluster core-site directly, though your cluster manager (CM, Ambari, etc)
URI Selection.
There are two parameters that are modified according to your needs. You can modify the default HDFS "implementation" (fs.hdfs.imp) to point at Fusion instead of the default Hadoop HDFS client, or we add a whole new "fusion". Note the fourth option, in the table below; you can run both URIs in parallel.
| URI | core-site parameter | points to Fusion class: |
|---|---|---|
hdfs:// with HDFS |
|
|
fusion:// with HCFS |
|
|
fusion:// with HDFS |
|
|
fusion:// & hdfs:// with HDFS |
|
both point to |
| You can create your own implementation by defining a new .impl parameter and pointing it at a class that handles the filesystem commands of your choice. E.g., fs.fusion.impl could be renamed (or exist in conjunction with) fs.secret.impl, which would mean any filesystem commands to path prefixed with secret:// get handled by the Fusion class as well. |
Bypass Option
With the HDFS URI, Fusion sits in the write path for all cluster filesystem edits, so a complete Fusion outage would prevent any cluster write operations. The bypass option allows clients to write directly to the local cluster, preventing a block on cluster activity. The bypass cn be enabled from the UI or through the following manual process.
<property>
	<name>fusion.client.can.bypass</name>
	<value>true</value>
</property>
by default, ie when the parameter is missing, it’s set to false. With it set to true, if all the Fusion servers are down in a zone then the client writes directly to the underlyingFS. If you perform any client operations via command line you should see the following additional output:
Bypassing enabled with ResponseWaitTime(secs): X, RetryInterval(secs): Y.
You may also see the following additional output after it bypasses to the underlying:
Bypassing triggered for Y seconds.
The other parameter to adjust the response time and retry interval for long-running clients:
<property>
	<name>fusion.client.bypass.retry.interval.secs</name>
	<value>integer number representing seconds; default is 60</value>
</property>
//<name>fs.fusion.client.bypass.response.secs</name> //<value>integer number representing seconds; default is 14</value> //</property> //....
- fusion.client.bypass.retry.interval.secs
-
is the number of seconds for which the client will stay "bypassed" before trying Fusion again.
"Hiding" the Fusion servers and Manual Fast Bypass
The bypass procedure is not just for handling node failure, there may be occasions that you wish to hide Fusion from the clients so that bypass happens while Fusion servers are up and running, during maintenance, application troubleshooting, or performing tests commands with and without Fusion, etc.
The reason for doing this are:
-
it enables consistency check and make consistent to continue operating, in both directions.
-
it allows replication to continue from the remote zone to the zone with the bypass in place
-
it prevents stopped nodes from accidentally sidelining if down too long
-
it allows individual clients to continue contacting Fusion server for testing / troubleshooting (if they’re then configured without repl_exchange_dir)
A Manual Fast Bypass flag available as part of the replicated exchange directory feature. If your clusters is configured with the replicated_exchange_dir then adding a subdirectory called "bypass" to the repl_exchange_dir tells your Fusion Clients to treat all folders as non-repl, and to therefore not contact the Fusion server at all. This is, in effect, a quick way to hide the Fusion servers. Clients will continue to bypass Fusion until the "bypass" flag is deleted.
<property>
<name>fs.fusion.client.can.bypass</name>
<value>true</value>
</property>-
By default the parameter is missing, so is therefore "false".
-
When set to true, if all the Fusion servers are down in a zone then the client writes directly to the underlyingFS. If you perform any client operations via command line you should see the following additional output:
Bypassing enabled with ResponseWaitTime(secs): X, RetryInterval(secs): Y.
You may also see the following additional output after it bypasses to the underlying:
Bypassing triggered for Y seconds.
Bypass utility script
A library has been introduced to Fusion-Core (bypass-utils), that allows for bypass paths to be created under the configured repl_exchange_dir. The bypass paths created are not required to be associated with a DSM directly, so bypasses can be specified that are parents of a replicated directory, subdirectories, or the replicated directory itself, thus providing greater flexibility to bypass operations than was available using the external utility script provided for Fusion 2.11.
The bypass-utils library is accessible to the user via the means of a script located within fusion-server binary bundle at:
/opt/wandisco/fusion/tools/bin/bypass-utils
bypass-utils Usage
- --help (-h)
-
Output the usage message
$ /opt/wandisco/fusion/tools/bin/bypass-utils --help
Initializing Bypass Utility
usage: bypass utility options are:
 -b,--bypass <path>               specify a path to bypass replication.
                                  (Can be used more than once)
 -c,--conf <configuration file>   specify an application configuration
                                  file. (Can be used more than once)
 -h,--help                        show this usage message.
 -r,--replicate <path>            specify a path that should be
                                  replicated. (Can be used more than once)
-s,--status show current paths in bypass.- --conf (-c)
-
In order for bypass-utils to connect with the underlying Hadoop file system, the current core-site.xml for the deployment should be provided.
| In order for bypass-utils -b/-r/-s options to work, it is expected that core-site.xml should have a valid 'fusion.replicated.dir' property. See: WANdisco Fusion Configuration |
Kerberos
In the event that kerberos is enabled on the cluster (which is usually more likely than not), it is recommended that the current hdfs-site.xml for the deployment also be provided. This will overlay on top of the provided core-site.xml and provide the extended security settings needed to initialise the hadoop fs client in the kerberised environment.
To provide more than one configuration, simple specify multiple '--conf <path_to_conf>' options. e.g.
/opt/wandisco/fusion/tools/bin/bypass-utils -c /usr/hdp/2.6.2.0-205/hadoop/conf/core-site.xml -c /usr/hdp/2.6.2.0-205/hadoop/conf/hdfs-site.xml
- --status (-s)
-
The bypass-utils
--statusoption should be used as a convenient way to list paths for which a bypass marker is in place inside the configured repl_exchange_dir. In the below example we have 2 bypasses in place, /some-parent/repl1 (DSM level bypass), /some-parent/repl2/subdir (sub directory bypass), and /other-parent (non-replicated parent of group of DSMs).
$ /opt/wandisco/fusion/tools/bin/bypass-utils -c /usr/hdp/2.6.2.0-205/hadoop/conf/core-site.xml -c /usr/hdp/2.6.2.0-205/hadoop/conf/hdfs-site.xml --status
Initializing Bypass Utility
[INIT]        Unable to load native-hadoop library for your platform... using builtin-java classes where applicable
[INIT]        The short-circuit local reads feature cannot be used because libhadoop cannot be loaded.
[INIT]        Filesystem type: com.wandisco.fs.client.FusionHdfs
[STATUS]      Retrieving list of bypassed paths
[STATUS]      Checking for 'fusion.replicated.dir.exchange' setting
[STATUS]      fusion.replicated.dir.exchange: /fusion/exchange
Paths bypassing replication:
	* /other-parent
	* /some-parent/repl1
	* /some-parent/repl2/subdir
Complete.-
The status option requires core-site.xml to be provided. Where kerberos is in use, hdfs-site.xml should also be provided.
-
Paths listed by the status option are lexicographically ordered to aid the user when trying to parse a large list of bypassed paths.
|
TIP
You may notice the following warning line in the above output:
|
[INIT] Unable to load native-hadoop library for your platform... using builtin-java classes where applicable
This is nothing to be worried about, and is merely an indication that 32-bit binaries are being used on a 64-bit system. The bypass utility still should still function as normal in this case.
- --bypass (-b)
-
The bypass-utils
--bypassoption allows the user to create bypass markers for one or more paths at a time. Each requested bypass path, should be specified with --bypass or -b option. e.g.
$ /opt/wandisco/fusion/tools/bin/bypass-utils -c <conf_file> --bypass /repl1 --bypass /repl2/subdir -b /some/yet/to/exist/path
| Bypasses can be created for any path, whether it exists or not, and whether it is replicated or not. |
Replicated Directories:

/parent/repl1
/parent/repl2

Example Bypasses:

/parent - bypassing parent directory of both replicated directories
/parent/repl1 - BYPASSED
/parent/repl1/* - BYPASSED
/parent/repl2 - BYPASSED
/parent/repl2/* - BYPASSED
/parent/repl1 - Bypass specific replicated directory
/parent/repl1 - BYPASSED
/parent/repl1/* - BYPASSED
/parent/repl2 - REPLICATED
/parent/repl2/* - REPLICATED
/parent/repl1/someChildDir - Bypass a specific sub directory
/parent/repl1 - REPLICATED
/parent/repl1/someChildDir - BYPASSED
/parent/repl1/* - REPLICATED
/parent/repl2 - REPLICATED
/parent/repl2/* - REPLICATED
- --remove (-r)
-
The --remove option of the bypass utility can be used to remove the bypassed paths that can be listed using --status. Like the --bypass option, multiple paths can be selected at once, and each path should be specified with the --remove (-r) flag. e.g.
$ /opt/wandisco/fusion/tools/bin/bypass-utils -c <conf_file> --remove /repl1 --remove /repl2/subdir -r /some/yet/to/exist/path
| All of the option flags for bypass utils can be chained together, so it’s therefore possible to create, remove, and list bypass paths all from one command. |
7. Reference Guide
7.1. Fusion Configuration Properties
This section lists the available configuration for WANdisco Fusion’s component applications. You should take care when making any configuration changes on your clusters. This section describes the configuration files and the properties editable in them.
-
/etc/wandisco/fusion/server/application.properties- contains WANdisco Fusion Server properties -
/etc/hadoop/conf/core-site.xml- contains WANdisco Fusion Client and WANdisco Fusion Server properties -
/etc/wandisco/fusion/ihc/server/{distro}/{version string}.ihc- contains all the IHC server properties
7.1.1. application.properties file
The following properties are found in /etc/wandisco/fusion/server/application.properties.
All these properties are used by the WANdisco Fusion Server.
| Property | Description | ||||||
|---|---|---|---|---|---|---|---|
This is the hostname used in reporting the Fusion server’s address.
|
|||||||
The port DConE uses for communication.
|
|||||||
If set to true and the application integration database was not shut down 'cleanly' (i.e., the prevaylers weren’t closed) then on restart the server will not start.
|
|||||||
Specifies the minimum GSN interval that triggers the generation of a status message.
|
|||||||
This is the hostname used for binding opened ports (for DConE, requests port, REST).
|
|||||||
The directory DConE will use for persistence.
|
|||||||
If set to true/false and the DConE system database was not shut down 'cleanly' (i.e., the prevaylers weren’t closed) then on restart the server will not start.
|
|||||||
Specifies the maximum number of agreements sent in a teach message.
|
|||||||
Specifies the size of the default decoupler’s thread pool.
|
|||||||
The number of threads which will be dedicated for execution of fast requests, which in short means requests which don’t do pull. Their count defaults to (executor.threads - repair.threads) (which is the number of threads which would be executing requests before the fast threads were added). So without configuration change they are able to scale to meaningful value (note that when pulling, the Hadoop creates additional 2 threads for each written file - "ResponseProcessor for block xxx" and "DataStreamer for file"), so if old config allowed X threads, there were actually created up to 3*X and fast threads just change this to 4*X. The names of the threads start with FastExecutor. This can be used to determine where a request was executed - the Completed log message of request contains the thread name, which would either start with AgreedExecutor or with FastExecutor.
|
|||||||
The number of threads executing agreements in parallel (this is total number of repair and agreement execution threads). See also executor.fast.threads.
|
|||||||
Determines the transfer protocol(s) to be supported by Fusion Server.
|
|||||||
Location of a directory in the replicated filesystem to which Fusion server will write information about replicated directories for clients to read. It’s necessary to configure the same in the core-site.xml, so that it generates the necessary data.
|
|||||||
See Username Translations for more information. Property was moved to this file in 2.11. |
|||||||
How long Fusion should wait for IHC connection to established (networking timeout).
|
|||||||
If Fusion Server - IHC communications should use SSL.
|
|||||||
The port the Fusion HTTP server will use.
|
|||||||
The path to the license file
|
|||||||
The maximum number of times to retry an agreed request.
|
|||||||
How long without response before the IHC connection times out.
|
|||||||
The port remote ihc servers should connect to when the zone is Inbound.
|
|||||||
Number of executor threads dedicated for repair only. These are the ones which will do the work for repairing and nothing else.
|
|||||||
Maximum number of outstanding files that a single repair will have scheduled for execution at any given time. If this limit is reached, it will wait for some to complete, before scheduling mode. This is a mechanism to allow multiple parallel repairs to zip together.
|
|||||||
The port Fusion clients will use
|
|||||||
The sleep time (milliseconds) in between retries of an agreed request.
|
|||||||
Whether Fusion Server - Fusion Server, Fusion Server - IHC Server, and Fusion Server - Fusion Client communications should all use SSL.
|
|||||||
Alias of private key / certificate chain used to encrypt communications by server.
|
|||||||
Encrypted password of key entry
|
|||||||
Location of key store containing key entry
|
|||||||
Encrypted password of key store.
|
|||||||
Location of trust store used to validate certificates sent by other Fusion Servers or IHC servers.
|
|||||||
Encrypted password of trust store.
|
|||||||
The size of the ChunkedStream.
|
|||||||
To reduce the loading on NotificationEventsBuffer, this configuration sets updates to occur on time intervals, instead of on each write. With the default 500ms, a limit of 2 updates per second will occur.
|
|||||||
The transport the Fusion server should use
|
|||||||
The zone where the Fusion server is located
|
7.1.2. core-site.xml properties
The core-site.xml file contains many configurable properties which are used by the Fusion Client, Fusions Server, or both.
These are described in this section, grouped by function.
These properties are found in /etc/hadoop/conf/core-site.xml or /etc/wandisco/fusion/server/core-site.xml if there is no Hadoop.
The default for each property, where appropriate, is indicated in bold.
General settings
| Property | Description | ||||||||
|---|---|---|---|---|---|---|---|---|---|
|
The Abstract FileSystem implementation to be used.
|
||||||||
|
Max number of times to attempt to connect to a Fusion server before failing over (in the case of multiple Fusion servers).
|
||||||||
|
The FileSystem implementation to be used. See the Fusion Client Usage Guide.
|
||||||||
|
The number of bytes the client will write before sending a push request to the Fusion server indicating bytes are available for transfer.
|
||||||||
|
The hostname and request port of the Fusion server. Comma-separated list of hostname:port for multiple Fusion servers.
|
||||||||
|
The transport the FsClient should use.
|
||||||||
|
The address of the underlying filesystem.
|
||||||||
|
The name of the implementation class for the underlying file system specified with
|
||||||||
|
The DistributedFileSystem implementation to be used. See the Fusion Client Usage Guide.
|
||||||||
|
If true, the Fusion server will pull data when it receives an HFlush request from another zone.
|
||||||||
|
Location from which clients should try to read information about replicated directories, before contacting Fusion server. It’s necessary to configure the same in server’s application.properties, so that it generates the necessary data.
|
||||||||
|
Customize .fusion dsm token directory. See below for more details.
|
Fusion Client Usage Guide
There is a fixed relationship between the type of deployment and some of the Fusion Client parameters. The following table describes this relationship:
| Configuration | fs.fusion.impl | fs.AbstractFileSystem.fusion.impl | fs.hdfs.impl |
|---|---|---|---|
Use of fusion:/// with HCFS |
com.wandisco.fs.client.FusionHcfs |
com.wandisco.fs.client.FusionAbstractFs |
Blank |
Use of fusion:/// with HDFS |
com.wandisco.fs.client.FusionHdfs |
com.wandisco.fs.client.FusionAbstractFs |
Blank |
Use of hdfs:/// with HDFS |
Blank |
Blank |
com.wandisco.fs.client.FusionHdfs |
Use of fusion:/// and hdfs:/// with HDFS |
com.wandisco.fs.client.FusionHdfs |
com.wandisco.fs.client.FusionAbstractFs |
com.wandisco.fs.client.FusionHdfs |
fusion.dsmToken.dir Details
This property is used to set a custom location for the .fusion DSM token directory. The property is not in the Fusion UI, yet. The following limitations apply:
-
The token directory can only be changed when no replicated directories exist. Otherwise the behavior is undefined.
-
Some files, such as the Consistency Check metadata are transferred via the standard IHC mechanism, which will require that the paths are identical across all zones. As a result, this configuration must be applied across all zones.
Security Settings
The following properties are used if Kerberos and/or SSL are enabled on the underlying cluster.
These properties must be defined in the /etc/hadoop/conf/core-site.xml file and if you are using unmanaged clusters will also need to be replicated to the IHC core-site.xml file.
The default for each property, where appropriate, is indicated in bold.
| Property | Description | ||||||
|---|---|---|---|---|---|---|---|
|
The absolute location of the readable keytab file.
|
||||||
|
The name of the fusion principal found in the keytab file.
|
||||||
|
If defined, Fusion impersonates to this user for performing various HDFS tasks which require system privileges (e.g. chowns or repairs).
It must be defined when
|
||||||
|
Path to the handshake directory. Fusion will attempt to write to this directory to verify that the user has the proper Kerberos credentials to write to the underlying file system.
|
||||||
Enables authentication on the REST API
|
|||||||
|
Type of authentication to use
|
||||||
|
If type is "simple", whether anonymous API calls are allowed.
|
||||||
|
If type is "kerberos", the principal the fusion server will use to login with. The name of the principal must be "HTTP"
|
||||||
|
If type is "kerberos", the path to a keytab that contains the principal specified.
|
||||||
|
Path to a readable secret file. File is used to authenticate cookies.
|
||||||
|
Enables authorization on the REST API. Authentication must also be enabled.
|
||||||
|
Users that are allowed to make read OR write calls (basically any type of HTTP request)
|
||||||
|
Users that are allowed to make read calls ONLY (write calls are PATCH, POST, PUT, DELETE)
|
||||||
|
Users that are allowed to proxy on behalf of other users. HTTP calls would include a value for the header "proxy.user.name". The proxied user’s permissions will then be checked against authorized readers and read-writers.
|
||||||
|
Sets if Fusion Server - Fusion Client communications should use SSL
|
||||||
|
Location of trust store used to validate certificates sent by Fusion Servers.
|
||||||
|
Encrypted password of trust store
|
||||||
|
Format of trust store.
|
Consistency Check and Bypass Settings
The following properties determine how consistency checks and bypass run.
| Property | Description | ||||||
|---|---|---|---|---|---|---|---|
|
If true, then Fusion will include the permissions in the produced file statuses and they will then be compared in consistency check.
|
||||||
|
If true, then Fusion will include the group and username in the produced file statuses and it will be then compared in consistency check.
For owner equivalence, this property needs to be true, as well as
|
||||||
|
Whether Fusion will try to read or set ACLs. If false, they will not be compared in consistency check.
|
||||||
|
If true, bypasses the request to the underlying filesystem after retrying.
|
||||||
|
Rather than just have the client try over and over this could cause some extreme slowness during a down fusion server, so instead, after client switched to a fusionless operation, all operations that follow would be fusionless until this time passed and which time the client would use fusion again.
|
||||||
|
Determines whether the filesystem supports appends or not. Fusion already contains a list of filesystems that contain defaults based on whether appends are supported. For new filesystems, this configuration can be used.
|
LocalFileSystems
We’ve introduced FusionLocalFs for LocalFileSystems using WANdisco Fusion.
This is necessary because there are a couple of places where the system expects to use a Local File System.
Configuration |
|
|
|
LocalFileSystems |
com.wandisco.fs.client.FusionLocalFs |
com.wandisco.fs.client.FusionLocalFs |
com.wandisco.fs.client.FusionLocalFs |
Therefore, for LocalFileSystems, users should set their fs.<parameter>.impl configuration to *com.wandisco.fs.client.FusionLocalFs*.
Usage
-
Set
fs.file.impltoFusionLocalFs, (then any file:/// command will go through FusionLocalFs) -
Set
fs.fusion.impltoFusionLocalFs, (then any fusion:/// command will go through FusionLocalFs).Further more, a user can now set any scheme to any
Fusion*Fsand when running a command with that scheme, it will go through thatFusion*Fs. e.g., -
Set
fs.orange.implto FusionLocalFs, (then any oranges:/// command will go through FusionLocalFs). -
Set
fs.lemon.implto FusionHdfs, (then any lemon:/// command will go through FusionHdfs).
Azure Configuration
When using Fusion with Azure the following configurations can be added to /etc/hadoop/conf/core-site.xml or /etc/wandisco/fusion/server/core-site.xml if there is no Hadoop.
S3 Plugin Configuration
When using the Fusion S3 plugin the following configurations can be added to /etc/hadoop/conf/core-site.xml or /etc/wandisco/fusion/server/core-site.xml if there is no Hadoop.
| Property | Description | ||||||
|---|---|---|---|---|---|---|---|
|
Configures the client to use S3 accelerate endpoint for all requests.
|
||||||
|
Path to the directory where files are downloaded locally from IHC servers before uploading to s3. Multiple buffer directories are supported.
|
||||||
|
The name of the container that will store the file system.
|
||||||
Sets whether or not to cache response metadata. Response metadata is typically used for troubleshooting issues with AWS support staff. While this feature is useful for debugging it adds overhead and so disabling it may be desired in high throughput applications. Property added in 2.12.3.
|
|||||||
|
Configures the client to enable chunked encoding automatically for PutObjectRequest and UploadPartRequest.
|
||||||
|
Time in milliseconds to wait when initially establishing a connection before timing out.
|
||||||
|
The s3 endpoint.
|
||||||
|
Configures the client to use Amazon S3 dualstack mode for all requests.
|
||||||
|
Configure whether global bucket access is enabled for clients.
|
||||||
|
Defines which listing request Fusion makes against S3 - listObjects version 1 or listObjects version 2.
Some S3 implementations do not support version 2.
|
||||||
|
The maximum number of open HTTP connections.
|
||||||
|
The maximum number of times that a retriable failed request (ex: a 5xx response from a service) will be retried.
|
||||||
|
The default number of keys that can be retrieved per list objects request.
|
||||||
|
The minimum part size for upload parts.
|
||||||
|
The size threshold for when to use multipart uploads.
|
||||||
|
The size threshold for Amazon S3 object after which multipart copy is initiated.
|
||||||
|
The minimum size of each part for multipart copy.
|
||||||
|
Configures the client to use virtual-hosted-style (false) or path-style (true) access for all requests.
|
||||||
|
Configures the client to sign payloads in all situations.
|
||||||
|
The s3 region
|
||||||
|
Time in milliseconds to wait for data to be transferred over an established, open connection before the connection is timed out.
|
||||||
|
Configures the client to use S3 server side encryption.
|
||||||
|
The default on whether to use TCP KeepAlive.
|
||||||
|
The number of threads used by TransferManager to do the transfer.
|
||||||
|
The upload method to the s3 bucket. "disk" will use the current scheme, use tmp dir to save the file and support multi-part upload. "stream" will build pipeline and directly upload stream into the bucket.
|
Swift Plugin Configuration
When using the Fusion Swift plugin the following configurations need to be added to /etc/hadoop/conf/core-site.xml or /etc/wandisco/fusion/server/core-site.xml if there is no Hadoop.
| Property | Description | ||||||
|---|---|---|---|---|---|---|---|
The name of the container that will store the file system.
|
|||||||
The name of the container that will store the data for large objects.
|
|||||||
The Swift endpoint
|
|||||||
Encrypted password used to access the swift container.
|
|||||||
ID of project or account
|
|||||||
ID of user (not username)
|
|||||||
The domainName of the container - can be used instead of fs.fusion.swift.domainId.
|
|||||||
The domainId of the container - can be used instead of fs.fusion.swift.domainName
|
|||||||
The region of the container
|
|||||||
Path to the directory where files are downloaded locally from IHC servers before uploading to Swift.
|
|||||||
The object size at which to separate large objects into segments.
|
7.1.3. IHC Server
The Inter-Hadoop Communication Server is configured from a single file located at:
/etc/wandisco/fusion/ihc/server/{distro}/{version string}.ihc.
| Property | Description | ||||||
|---|---|---|---|---|---|---|---|
The hostname and port the IHC server will listen on, e.g 0.0.0.0:port
|
|||||||
The address the ihc server will bind to.
If not specified, the default is "0.0.0.0:port". In all cases the port should be identical to the port used in the
|
|||||||
The transport the IHC server should use.
|
|||||||
Signifies that WANdisco Fusion server - IHC communications should use SSL encryption.
|
|||||||
Location of the trust store used to validate certificates sent by other Fusion Servers
|
|||||||
Encrypted password of trust store
|
|||||||
Format of trust store.
|
|||||||
Alias of private key / certificate chain used to encrypt communications by IHC Server.
|
|||||||
Encrypted password of key entry
|
|||||||
Location of key store containing key entry
|
|||||||
Encrypted password of key store
|
|||||||
Format of key store
|
|||||||
The host and port for the web server, used when the
|
|||||||
The host and port for the web server, used when the
|
|||||||
Determines the HTTP policy supported by IHC Server.
|
|||||||
SSL Handshake timeout on transfer channel. Property added in 2.12.1.8.
|
|||||||
Write bandwidth limit on transfer channel. Property added in 2.12.1.8.
|
|||||||
Check interval for bandwidth limit enforcement. Property added in 2.12.1.8.
|
|||||||
Number of threads servicing transfer connections in IHC Outbound mode. Property added in 2.12.1.8.
|
|||||||
Number of threads servicing transfer connections in IHC Inbound mode. Property added in 2.12.1.8.
|
IHC Network configuration
The following is a description of how IHC servers are added to the replication system:
-
The IHC servers are configured with the addresses of the WANdisco Fusion servers that inhabit the same zone.
-
Periodically, the IHC servers ping the WANdisco Fusion servers using these stored addresses.
-
The WANdisco Fusion servers will announce the IHC servers that have pinged them.
IHC servers in standard configuration should have the address of all WANdisco Fusion servers, since the core-sites.xml property fusion.server lists them all.
This is important because only the Writer node in each zone will confirm the existence of IHCs that have pinged it.
Other Fusion Servers don’t.
Therefore the IHC has to talk to all Fusion servers in the zone in order to be flagged as available.
The same method used in Hadoop to handle namenode and datanode connections. The datanode is configured with the namenode’s address and uses the address to contact the namenode and indicate its availability. If the namenode doesn’t hear from the datanode within a set period, the namenode assumes that the datanode is offline.
|
Note: If the property was missing from the file during initialization then it is possible that the IHC server will fail to make a connection to the WANdisco Fusion server, causing replication to stall. If a restart of the cluster fixes the problem this may indicate that a necessary restart isn’t happening which may result in IHC servers running with outdated configuration. |
7.2. API
WANdisco Fusion offers increased control and flexibility through a RESTful (REpresentational State Transfer) API.
Below are listed some example calls that you can use to guide the construction of your own scripts and API driven interactions.
7.2.1. Authentication warning
It’s important that you restrict access to your API. If your Fusion instance is not kerberized or is kerberized but API authentication isn’t enabled then the Fusion core API will be open to use without providing security credentials. A warning will appear on the dashboard if server is running in this state.

For more information about restricting API access, see the section on Kerbreos.
7.2.2. REST API Endpoints
|
API documentation is still in development:
Note that the API documentation is incomplete and requires clarification of available endpoints.
|
Note the following:
-
All calls use the base URI:
http(s)://<server-host>:8082/fusion/<resource>
-
The internet media type of the data supported by the web service is application/xml.
-
The API is hypertext driven, using the following HTTP methods:
| Type | Action |
|---|---|
POST |
Create a resource on the server |
GET |
Retrieve a resource from the server |
PUT |
Modify the state of a resource |
DELETE |
Remove a resource |
-
If you have Kerberos-authentication enabled on REST API, you must kinit before making REST calls, and enable GSS-Negotiate authentication. To do this with curl, you must include the "--negotiate" and "-u:" options e.g.:
curl --negotiate -u: -X GET "http://${HOSTNAME}:8082/fusion/fs/transfers"
-
REST calls do not have any associated style information. To make the output human readable you can, for example, use:
curl <your URL> | xmllint --format -
7.2.3. Unsupported operations
As part of Fusion’s replication system, we capture and replicate some "write" operations to an underlying DistributedFileSystem/FileSystem API.
However, the truncate command is not currently supported.
Do not run this command as the filesystem will become inconsistent between clusters.
7.2.4. Examples
The following examples illustrate some simple use cases, most are direct calls through a web browser, although for deeper or interactive examples, a curl client may be used.
Mount point information
http://<WANDISCOFUSION.URL.COM>:8082/fusion/
Calling the mount point output:
Output
<application>
        <applicationLocation>.</applicationLocation>
        <beaconPeriod>1000</beaconPeriod>
        <DConePort>6444</DConePort>
        <databaseLocation>/opt/fusion-server/dcone/db</databaseLocation>
        <httpPort>8082</httpPort>
        <httpsPort>0</httpsPort>
        <sslEnabled>false</sslEnabled>
</application>
List all replicated paths
http://<WANDISCOFUSION.URL.COM>:8082/fusion/fs
Output
<replicatedDirectories>
  <total>1</total>
  <offset>0</offset>
  <size>1</size>
  <replicatedDirectory>
    <path>/repl1</path>
    <membershipId>simpleMembership</membershipId>
    <familyRepresentativeId>
      <nodeId>f5255a0b-bcfc-40c0-b2a7-64546f571f2a</nodeId>
      <dsmId>9bc8170e-e70d-11e4-95f9-ae4369cdbb06</dsmId>
    </familyRepresentativeId>
    <consistencyReport>
      <state>CONSISTENT</state>
      <lastCheckResult>CONSISTENT</lastCheckResult>
      <taskId>580464f1-3734-11e8-9072-1e45bca6d95e</taskId>
      <lastCheckTaskId>580464f1-3734-11e8-9072-1e45bca6d95e</lastCheckTaskId>
      <lastCheck>1522755859894</lastCheck>
      <nextCheck>-1</nextCheck>
    </consistencyReport>
    <leader>
      <nodeId>4e7ef576-3902-4792-a42b-e37937458088</nodeId>
      <dsmId>886a382f-328d-11e8-a69b-4acb40819bdf</dsmId>
    </leader>
    <isLeaderElected>true</isLeaderElected>
    <isLeader>false</isLeader>
    <writer>
      <nodeId>faa3ef92-b052-4cd3-a9f8-6cd8f9c97659</nodeId>
      <dsmId>886a382f-328d-11e8-a69b-4acb40819bdf</dsmId>
    </writer>
    <isWriterElected>true</isWriterElected>
    <isWriter>true</isWriter>
    <gsn>18672</gsn>
    <transfersInProgress>0</transfersInProgress>
  </replicatedDirectory>
</replicatedDirectories>
Return a specific replicated path
http://<WANDISCOFUSION.URL.COM>:8082/fusion/fs?path=<[PATH NAME]
Output
<replicatedDirectory>
  <path>/foo1/bar1/baz4</path>
  <membershipId>bf0bf386-a878-4205-a16e-8b7f258ab1b0</membershipId>
  <familyRepresentativeId>
    <nodeId>f5255a0b-bcfc-40c0-b2a7-64546f571f2a</nodeId>
    <dsmId>b911c0a9-24ad-11e7-9ba2-fea140f240c9</dsmId>
  </familyRepresentativeId>
  <consistencyReport>
    <state>INCONSISTENT</state>
    <lastCheckResult>INCONSISTENT</lastCheckResult>
    <taskId>0c77a086-24e0-11e7-b2f3-fea140f240c9</taskId>
    <lastCheckTaskId>0c77a086-24e0-11e7-b2f3-fea140f240c9</lastCheckTaskId>
    <lastCheck>1492593040812</lastCheck>
    <nextCheck>-1</nextCheck>
  </consistencyReport>
  <leader>
    <nodeId>f5255a0b-bcfc-40c0-b2a7-64546f571f2a</nodeId>
    <dsmId>b911c0a9-24ad-11e7-9ba2-fea140f240c9</dsmId>
  </leader>
  <isLeaderElected>true</isLeaderElected>
  <isLeader>true</isLeader>
  <writer>
    <nodeId>f5255a0b-bcfc-40c0-b2a7-64546f571f2a</nodeId>
    <dsmId>b911c0a9-24ad-11e7-9ba2-fea140f240c9</dsmId>
  </writer>
  <isWriterElected>true</isWriterElected>
  <isWriter>true</isWriter>
  <gsn>1174</gsn>
  <transfersInProgress>0</transfersInProgress>
</replicatedDirectory>
Show tasks
http://<WANDISCOFUSION.URL.COM>:8082/fusion/tasks
Output
<tasks>
<task xmlns:xsi="http://www.w3.org/2001/XMLSchema-instance" xsi:type="membershipProposalTaskDTO">
        <taskId>8391e4c7-e803-11e4-b2f1-c62bbea4984d</taskId>
        <timeCreated>1429606251844</timeCreated>
        <creatorNodeId>f5255a0b-bcfc-40c0-b2a7-64546f571f2a</creatorNodeId>
        <timeUpdated>1429606252381</timeUpdated>
        <isDone>true</isDone>
        <aborted>false</aborted>
        <properties>
                <entry>
                <key>TASK_TYPE</key>
                <value>MEMBERSHIP_PROPOSAL_TASK_TYPE</value>
                </entry>
        </properties>
        <previousTask xsi:nil="true"/>
        <message>
6ea76f8d-e803-11e4-b2f1-c62bbea4984d, membershipId: simpleMembership, dsmId: 8391e4c8-e803-11e4-b2f1-c62bbea4984d, uri: /repl1
        </message>
</task>
</tasks>
Show Nodes
http://<WANDISCOFUSION.URL.COM>:8082/fusion/nodes
Output
<nodes>
    <node>
        <nodeIdentity>eac94420-8bd1-40db-8e0d-3f6ccede00d4</nodeIdentity>
        <locationIdentity>location1</locationIdentity>
        <isLocal>true</isLocal>
        <isUp>true</isUp>
        <isStopped>false</isStopped>
        <lastStatusChange>1429606531682</lastStatusChange>
        <attributes>
        <attribute>
        <key>eco.system.dsm.identity</key>
        <value>ECO-DSM-24f8d34b-e803-11e4-b2f1-c62bbea4984d</value>
        </attribute>
        <attribute>
        <key>node.name</key>
        <value>wdfs1</value>
        </attribute>
        <attribute>
        <key>eco.system.membership</key>
        <value>
        ECO-MEMBERSHIP-59addd8f-e803-11e4-88e6-c228c4f805ee
        </value>
        </attribute>
        </attributes>
    </node>
</nodes>
Show replicated directories
http://<WANDISCOFUSION.URL.COM>:8082/fusion/fs
Add another replicated directory
Create a file called stateMachine.xml for use as payload in the REST API call. Note: membershipId should point to an existing membership:
stateMachine.xml
<replicatedDirectory>
     <path>/repl1</path>
     <membershipId>simpleMembership</membershipId>
     <familyRepresentativeId>
          <nodeId>f5255a0b-bcfc-40c0-b2a7-64546f571f2a</nodeId>
     </familyRepresentativeId>
</replicatedDirectory>
curl call to add it:
curl -v -X POST -d@./stateMachine.xml -H "Content-Type: application/xml" http://<WANDISCOFUSION.URL.COM>:8082/fusion/fs
Remove a directory from replication
To remove a replicated path:
DELETE <host>:<port>/fusion/fs?path=<directory path>
e.g.
curl -X DELETE http://<WANDISCOFUSION.URL.COM>:8082/fusion/fs?path=/repl1
You can have multiple replicated paths to the same DSM. If you later want to delete one of these paths, all replicated paths to that DSM will be deleted.
To remove all paths:
curl -X DELETE "<host>:<port>/fusion/fs?path=<directory path>&removeAll=true"
If you have multiple paths to your DSM and do not use &removeAll=true, removal will fail with a Bad Request (400) error.
Remove a node from WANdisco Fusion
The following procedure uses the REST API to remove a node from your WANdisco Fusion enabled cluster.
Create an XML file called removal.xml for use as a payload to be delivered to the replicated system using a curl command. The file should contain the following snippet:
<nodes>
  <node>
  <nodeIdentity>${NODE_ID}</nodeIdentity>
  <locationIdentity>${LOCATION_ID}</locationIdentity>
  </node>
</nodes>
- NODE_ID
-
The node ID, autogenerated string created for each node during installation, E.g. "eac94420-8bd1-40db-8e0d-3f6ccede00d4".
- LOCATION_ID
-
The location ID of the node that you want to remove from the ecosystem.
You can view these properties by pointing your browser at the node that you want to remove, using the following port and path:
http://<WANDISCOFUSION.URL.COM>:8082/fusion/nodes
The curl should be constructed as follows:
curl -u <username>: <password> -X PUT -d @"$removal.xml" --header 'Content-Type: application/xml' http://<WANDISCOFUSION.URL.COM>:8082/fusion/node/${LOCAL_NODE_ID}/removenodes
Consistency Check
You can trigger consistency checks using the following commands. The default is a non-blocking consistency check e.g.:
curl -v -X POST http://<WANDISCOFUSION.URL.COM>:8082/fusion/fs/check?path=/folder_name
Blocking consistency checks can be run by setting the nonBlocking parameter e.g.:
curl -v -X POST http://<WANDISCOFUSION.URL.COM>:8082/fusion/fs/check?path=/folder_name&nonBlocking=false
Other parameters which can be set are:
-
checksumMethod=MD5|SHA1|NONE- The checksum method that consistency check should use. It can be either MD5, SHA1 or NONE. The default value is set globally for all replicas of the path inGlobalProperties. -
nonBlockingThreshold=0- The number of modified paths on one side which can be reached before the consistency check is cancelled. The default is 0 but this falls back to 100000.
To return the consistency check report, take the taskId returned in the content-location header and view the report with e.g.:
http://<WANDISCOFUSION.URL.COM>:8082/fusion/fs/check/b911241f-c430-11e4-9486-0ebe9eaaf785
The above will return just a summary of the number of inconsistencies but additional parameters can be added.
The task can also be viewed as usual:
http://<WANDISCOFUSION.URL.COM>:8082/fusion/task/b911241f-c430-11e4-9486-0ebe9eaaf785
Additional parameters for consistency checks
The following parameters can be added to the command above to return extra details of the consistency check results:
-
withConsistencyReport=true- returns the details of the CC result. By default only 5000 entries will be returned. -
firstEntry=1- start of the range for the list of inconsistencies (used to override default 5000 entry limit). -
lastEntry=80100- end of the range for the list of inconsistencies (used to override default 5000 entry limit). This example will return up to 80100 inconsistencies - the figure is configurable based on the number of inconsistencies you wish to view.
Writers and Leaders
-
The writer is the "elected leader" for the state machine replicas in a zone, and the leader is the "elected leader" for the entire set of state machine replicas.
-
There are as many writers as there are zones, but only one leader — like a local leader vs global leader.
Repair
| In the Fusion UI, repairs are now called Make Consistent operations, reflecting on the fact your data isn’t damaged or corrupted, just not in sync between replicas. |
Example repair curl:
PUT /fusion/fs/repair?path=<path>&recursive=true&src=<source-of-truth-zone-name>&preserve=true&replace=true&repair=true&type=cc&nonBlocking=true
Parameter |
Description |
Default |
source-of-truth-zone-name |
The zone name of the "source of truth" |
NA |
preserve |
when the repair is executed in a zone that is not the source zone, any data that exists in that zone but not the source zone will be retained and not removed. |
true |
replace |
Replace files/dirs of the same name on the receiving zone. |
false |
repair |
complete the repair operation true/false |
true |
type |
blocking or nonBlocking |
nonBlocking |
Repair Status
Gets a list of repairs done or being on done on this zone. Its important to note that this information exists in the node that is or was doing the repair, not the "source-of-truth" or proposing zone.
http://<fusion-server-host/IP>:8082/fusion/fs/repairs
| Parameter | Description | Default |
|---|---|---|
path |
The path for which the list of repairs should be returned. If null, we will get all repairs. |
null |
showAll |
Whether or not to include past repairs for the same file. The options are true to show all repairs on the given path, and false to show only the last repair. |
false |
sortField |
The field by which the repairs should be sorted. The options are to sort by the startTime, completeTime or path. |
completeTime |
sortOrder |
The order in which the entries should be sorted according to the sort field. The options are to sort in ascending (ASC) or descending (DESC) order. |
DESC |
recursive |
If true, repairs are also done on descendants of the path. |
false |
Start a Repair
To start a repair using the REST API, use the following call:
PUT <fusion-server-host/IP>:8082/fusion/fs/repair?path=/path/requiring/repair&src=zoneOfTruth
Further optional parameters are listed below:
| Option name | Description | Default |
|---|---|---|
path |
The path that should be made consistent across all zones |
NONE |
recursive |
If true, this option will cause the path and all files under it to be made consistent. The default is true, but is ignored if the path represents a file. |
true |
repair |
If false, when the repair is executed in a zone that is not the source zone any data that is inconsistent in that zone will not be changed. If true, data that exists on the source zone and not on the executing zone will be repaired and data that exists with the same name on both zones will depend on the value of the "replace" argument. The default is true, i.e., to make all replicas of the path consistent. |
true |
replace |
If false, when the repair is executed in a zone that is not the source zone, any files or directories of the same name will not be replaced. The default is true, i.e., files/directories of the same name will be recreated to match the source zone. This argument is irrelevant if "repair" is false. |
false |
preserve |
If true, when the repair is executed in a zone that is not the source zone any data that exists in that zone but not the source zone will be retained and not removed. The default is false, i.e., to make all replicas of the path consistent by removing all data in the non-source zone(s) that does not exist in the source. |
true |
src |
The "source" zone that contains the correct copy of the path and which will be used as the source of correct data and meta-data. |
NONE |
checksumMethod |
The checksum method to use to verify whether files are equivalent across zones. It can be either of MD5/SHA1/NONE. |
NONE |
type |
The type of repair to run. |
fs |
nonBlocking |
Selects whether to run the repair type in non-blocking mode. This applies exclusively to the RepairVariant#CC and is ignored for other types of repair. |
false |
force |
Whether to skip lookup of existing consistency check tasks to base a repair on and trigger a new check prior to repair. This applies exclusively to the RepairVariant#CC and is ignored for other types of repair. |
true |
7.2.5. Summary statistics of directed acyclic graph (DAG)
The following API endpoints may be used for troubleshooting / analysis.
Requests
Currently, the DAG contains 2 types of node:
-
DependentAgreedProposal (DAP or agreed proposal), which is generally for most proposals such as create, close and rename.
-
DependentCallable, (DC or callable), which is only used for HFlush.
When added into the DAG, these nodes behave differently, DC will just calculate the dependencies by Tree (Dependency tree, the real DAG), and is then added in Tree, if there are dependencies, then also into the preMap and succMap.
The store will check the DAP size in the DAG first. There’s a fixed size for this, which currently set to 20000. So, if there is still some space, then it will be recalculated and dependencies will be added to DAG and database. If not, then it goes into database (in the unprocessed state) and awaits the availability of space in DAG.
State |
Description |
Submitted |
Requests submitted to executor. |
Waiting |
Requests waiting in DAG for their dependencies' completion. |
Unprocessed (DAP only) |
DAPs in database but not in DAG. |
DAG statistics
The following REST API endpoints can be used to measure that status of the DAG.
| Statistics currently only work on the writer node. For non-writer nodes, results would be inaccurate. |
| Endpoint | Name | Description |
|---|---|---|
/fusion/fs/requests/dag/size |
DAGSize |
Number of all requests in DAG |
/fusion/fs/requests/waiting/size |
waitingSize |
Number of requests in DAG waiting their dependencies’ completion |
/fusion/fs/requests/unprocessed/size |
UnprocessedSize |
Counter monitoring the number of unprocessed DAPs |
/fusion/fs/requests/submitted/size |
submittedSize |
Number of all requests submitted to executor |
/fusion/fs/requests/proposal/size |
proposalSize |
Number of all uncompleted DAPs |
/fusion/fs/requests/callable/size |
callableSize |
Number of all uncompleted DCs |
/fusion/fs/requests/summary |
NA |
All above |