Reference Guide
Welcome to the Reference Guide for WANdisco's Access Control Plus.
Access Control Plus delivers a single, easy-to-use point-and-click solution that fully protects valuable source code across all of your Subversion and Git repositories. It's designed to work in conjunction with WANdisco's SCM replication products or as a standalone solution. Integration with LDAP and Active Directory ensures that users are automatically assigned to the Subversion and Git teams that correspond to their authentication server groups. Security administrators can delegate authority to team leads to further reduce administrative overhead.
1. Installation directory structure
This shows the files installed as part of Access Control Plus:
rwxr-xr-x  2 wandisco wandisco   4096 May  6 10:17  backups

drwxr-xr-x  2 root     root       4096 May  6 10:17  bin
-r-xr-xr-x 1 root root 14088 Jul 24 11:50 backup
-r-xr-xr-x 1 root root 13030 Jul 24 11:50 import42backup
-r-xr-xr-x 1 root root 11909 Jul 24 11:50 replace-link
-r-xr-xr-x 1 root root 13178 Jul 24 11:50 rollback
-r-xr-xr-x 1 root root  1334 Jul 24 11:50 scm-access-control-plus
-r-xr-xr-x 1 root root 12349 Jul 24 11:50 sysInfo.sh
-r-xr-xr-x 1 root root 22794 Jul 24 11:50 talkback
-r-xr-xr-x 1 root root  4073 Jul 24 11:50 watchdog

drwxr-xr-x  2 wandisco wandisco   4096 May  6 10:17 config
-rw-r--r-- 1 root root 123 May 6 10:17 main.conf
drwxr-xr-x 2 wandisco wandisco 4096 May 6 10:36 content
-rw-r--r-- 1 wandisco wandisco 6010 May 6 10:36 8e09a1a2-0539-4ff1-b83a-f868ccc1a6c0
drwxr-xr-x 7 wandisco wandisco 4096 May 6 11:59 database
-rw-r--r-- 1 wandisco wandisco 8424 May  6 10:36 20140514.103607.290_Shadow_ACP_Model_Backup.zip
drwxr-xr-x 3 wandisco wandisco 4096 May  6 10:17 application
drwxr-xr-x 2 wandisco wandisco 4096 May  7 14:39 backup
drwxr-xr-x 2 wandisco wandisco 4096 May  8 08:27 DConE.application.db
drwxr-xr-x 3 wandisco wandisco 4096 May  6 10:36 h2
drwxr-xr-x 4 root root 4096 May 6 10:17 docs
drwxr-xr-x 4 root root 12288 May  6 10:17 api
drwxr-xr-x 2 root root  4096 May  6 10:17 licenses
drwxr-xr-x 6 root root 4096 May 6 10:17 gfr
drwxr-xr-x 3 root     root     4096 May  6 10:17 bin
drwxr-xr-x 2 wandisco wandisco 4096 May  6 10:17 log
drwxr-xr-x 2 wandisco wandisco 4096 May  6 10:17 tmp
drwxr-xr-x 2 wandisco wandisco 4096 May  6 10:17 var
drwxr-xr-x  2 root     root       4096 May  6 10:17 lib
-rw-r--r--  1 root     root     198000 Apr 25 17:31 LICENSE.htm
-rw-r--r--  1 root     root      45311 Apr 25 17:31 LICENSE.txt
drwxr-xr-x  4 wandisco wandisco   4096 May  6 10:27 logs
-rw-r--r-- 1 wandisco wandisco     366 May  6 10:27 multisite.log
drwxr-xr-x 2 wandisco wandisco    4096 May  7 10:27 recovery-details
-rw-r--r-- 1 wandisco wandisco   23226 May  6 10:27 scm-access-control-plus.20140506-101717.log
-rw-r--r-- 1 wandisco wandisco   42441 May  6 10:27 scm-access-control-plus.20140506-102521.log
-rw-r--r-- 1 wandisco wandisco 3550637 May  8 09:17 scm-access-control-plus.20140506-102749.log
drwxr-xr-x 2 wandisco wandisco    4096 May  8 08:27 thread-dump
-rw-r--r-- 1 wandisco wandisco    3232 May  6 10:27 watchdog.log
drwxr-xr-x 2 wandisco wandisco 4096 May 6 10:17 properties
-rw-r--r-- 1 root     root     1036 May  6 10:17 application.properties
-rw-r--r-- 1 wandisco wandisco  512 May  6 10:17 license.key
-rw-r--r-- 1 root     root     1514 Feb 26 10:00 log4j.properties
-rw-r--r-- 1 root     root     1969 Feb 25 11:20 logger.properties
-rw-r--r-- 1 root     root      185 May  6 10:17 user.properties
-rw-r--r--  1 root     root      34113 May  6 09:55 scm-access-control-plus-client.jar
-rw-r--r--  1 root     root       8024 May  6 09:55 scm-access-control-plus-cryptPassword.jar
-rw-r--r--  1 root     root     651749 May  6 09:55 scm-access-control-plus.jar
-rw-r--r--  1 root     root       9882 May  6 09:55 scm-access-control-plus-resetSecurity.jar
-rw-r--r--  1 root     root       1024 Apr 28 17:56 template-application.properties
-rw-r--r--  1 root     root       3064 Apr 29 11:16 THIRD-PARTY.txt
drwxr-xr-x  2 wandisco wandisco   4096 May  6 10:17 tmp
drwxr-xr-x 11 root     root       4096 May  6 10:17 ui
drwxr-xr-x  3 wandisco wandisco   4096 May  6 10:17 var
-rw-r--r--   1 root     root        689 May  6 09:46 VERSION-TREE
2. Properties files
The following files store application settings and constants that may need to be referenced during troubleshooting.
Do not make any changes to these files without consulting WANdisco's support team.
-rw-r--r-- 1 root root 1036 May 6 10:17 application.properties- Settings for the replicator and affects how Access Control Plus performs.
-rw-r--r-- 1 root root 1514 Feb 26 10:00 log4j.properties- Properties that control how the log4j Logging library works.
-rw-r--r-- 1 root root 1969 Feb 25 11:20 logger.properties- Defines how the product's logging is handled.
-rw-r--r-- 1 root root 185 May 6 10:17 user.properties- Stores the details of the primary administration account that is set up during the installation.
3. Log files
The following log files are generated during operation:
-rw-r--r-- 1 wandisco wandisco 366 May 6 10:27 multisite.log- Logs the application starts and stops.
drwxr-xr-x 2 wandisco wandisco 4096 May 7 10:27 recovery-details- Contains information about how the nodes are set up and connected to each other.
-rw-r--r-- 1 wandisco wandisco 23226 May 6 10:27 scm-access-control-plus.<time-date-stamp>.log- The main log file containing most application logging.
drwxr-xr-x 2 wandisco wandisco 4096 May 8 08:27 thread-dump- Contains any thread-dumps that might occur.
-rw-r--r-- 1 wandisco wandisco 3232 May 6 10:27 watchdog.log- Logs changes to the watchdog process that ensures that Access Control Plus automatically restarts if it unexpectedly shuts down.
3.1 Configure maximum size and maximum number of log files
You can set the maximum size and maximum number of log files. Either:
- Create a new logger.properties file to replace the existing one.
- Edit the existing logger.properties file.
- Stop ACP with the command:
service scm-access-control-plus stop
- Navigate to your ACP properties directory, i.e /opt/wandisco/scm-access-control-plus/properties
The existing file resembles:############################################################ # Logging Configuration File # # Specify the use of this logging configuration locally # with the java.util.logging.config.file system property. # For example java -Djava.util.logging.config.file=./properties/logger.properties ############################################################ ############################################################ # Global properties ############################################################ # "handlers" specifies a comma separated list of log Handler # classes. These handlers will be installed during VM startup. # Note that these classes must be on the system classpath. # By default we only configure a ConsoleHandler, which will only # show messages at the INFO and above levels. handlers= java.util.logging.ConsoleHandler # To also add the FileHandler, use the following line instead. #handlers= java.util.logging.FileHandler, java.util.logging.ConsoleHandler # Default global logging level. # This specifies which kinds of events are logged across # all loggers. For any given facility this global level # can be overriden by a facility specific level # Note that the ConsoleHandler also has a separate level # setting to limit messages printed to the console. .level= INFO ############################################################ # Handler specific properties. # Describes specific configuration info for Handlers. ############################################################ # default file output is in user's home directory. java.util.logging.FileHandler.pattern = %h/java%u.log java.util.logging.FileHandler.limit = 50000 java.util.logging.FileHandler.count = 1 java.util.logging.FileHandler.formatter = java.util.logging.XMLFormatter # Limit the message that are printed on the console to INFO and above. java.util.logging.ConsoleHandler.level = INFO java.util.logging.ConsoleHandler.formatter = java.util.logging.SimpleFormatter
- Change the ConsoleHandler:
handlers= java.util.logging.ConsoleHandler
to a FileHandler:handlers= java.util.logging.FileHandler
- In the Handler specific properties, change the absolute path where the logs are created. Change the line:
java.util.logging.FileHandler.pattern = %h/java%u.log
to something more suitable, e.g:java.util.logging.FileHandler.pattern = /opt/wandisco/scm-access-control-plus/logs/scm-access-control-plus%u.log
- To set the maximum log file size, update the following line:
java.util.logging.FileHandler.limit = 50000
Change the size (in bytes):java.util.logging.FileHandler.limit = 100000
- To set the maximum size of the log files, update the following line:
java.util.logging.FileHandler.count = 1
Change the number:java.util.logging.FileHandler.count = 10
Your file now resembles:############################################################ # Logging Configuration File # # Specify the use of this logging configuration locally # with the java.util.logging.config.file system property. # For example java -Djava.util.logging.config.file=./properties/logger.properties ############################################################ ############################################################ # Global properties ############################################################ # "handlers" specifies a comma separated list of log Handler # classes. These handlers will be installed during VM startup. # Note that these classes must be on the system classpath. # By default we only configure a ConsoleHandler, which will only # show messages at the INFO and above levels. # To also add the FileHandler, use the following line instead. handlers= java.util.logging.FileHandler # Default global logging level. # This specifies which kinds of events are logged across # all loggers. For any given facility this global level # can be overriden by a facility specific level # Note that the ConsoleHandler also has a separate level # setting to limit messages printed to the console. .level= INFO ############################################################ # Handler specific properties. # Describes specific configuration info for Handlers. ############################################################ # default file output is in user's home directory. java.util.logging.FileHandler.pattern = /opt/wandisco/scm-access-control-plus/logs/scm-access-control-plus%u.log java.util.logging.FileHandler.limit = 100000 java.util.logging.FileHandler.count = 10 java.util.logging.FileHandler.formatter = java.util.logging.SimpleFormatter
This example keeps the same formatter that was used for console.
- Restart ACP with the command:
service scm-access-control-plus start
You now see your new log files.
Note that the old logs are still created on service restart. However, they do not contain any logs other than those that tell the user that the service was restarted.
4. Admin Console master screen
Below is a screenshot of Access Control's admin console master screen. From here you can see all the component parts of your access control setup, accounts, teams, repositories (when not assigned to templates), resources, and rules.

5. System stats
The System stats show the overall scale of the deployment:

- Uptime: Replicator
- The time that has passed since the Access Control Plus process was started.
- Session length
- The time that has passed since the current browser session was started.
- Total teams
- The current number of teams managed within Access Control Plus.
- Total members
- The total number of members (active and inactive).
- Total resources
- The total number of repository resources defined.
- Total Rules
- The number of rules created.
6. Deployment modes
Access Control Plus supports many different configurations that dictate its use. When installed, your license key tells Access Control Plus which features to expose.
6.1 Available modes
The following Modes are available:
- Standalone: One or more nodes deployed at one or more sites. Standalone mode still supports the replication of Access Control data. However, without the MultiSite products you wouldn't be able to reliably support far-flung development teams that collaborate on the same repository data. Each instance of Access Control would manage their local repository data. Generated password/Authz files are stored directly on the Access Control nodes.
SVN only
Currently the standalone mode is only available for SVN deployments. - GitMS (with Git MultiSite): One or more nodes deployed at a one or more sites in conjunction with WANdisco's Git MultiSite product.
- MSP (with SVN MultiSite): One or more nodes deployed at a one or more sites in conjunction with WANdisco's SVN MultiSite product.
- Both (with Git & SVN MultiSite): One or more nodes deployed at one or more sites in conjunction with both of WANdisco's SCM replication products.
6.2 Which mode is running?
To check which mode your installation is currently in:
- 1. Log in to Access Control Plus.
- 2. Click the Settings link on the top menu bar:

On the side menu you can see a reference to the mode. The example shows "Both", which means that the installation is configured to support both Git and Subversion repositories within a replicated environment.
7. Batch updates mode
Many operations in Access Control Plus require that the Authz and SCM password files are regenerated. In a rapidly changing SCM environment, the number and frequency of account, team and rule changes can degrade performance, chiefly from a basic disk I/O perspective.
If you need to ensure that performance is not affected by Access Control traffic, use the Batch updates feature.
WARNING: Changes are not instant
When Access Control Batch updates is enabled, changes to accounts, teams, SCM resources or rules are not instant. In order to see the actual current state (excluding changes that will only take effect after the next scheduled password/Authz rewrite) you need to use the Current View. The Current view is intended for troubleshooting, where you need to see what is actually going on.
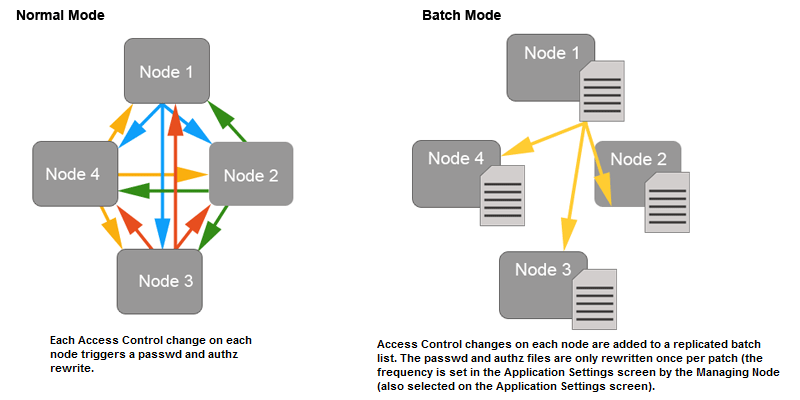
When Batch updates is enabled, all Access Control Plus changes that would result in a regeneration of the password or Authz files (see the list below) are batched up to be replicated to the other MultiSite nodes at a user-defined frequency. Default is 600 seconds (10 minutes).
Access Control changes that can be batched are:
- Create/delete users
- Create/modify/delete teams
- Create or modify rules (apply a change to access permissions for either a individual users or teams)
Changes that are not affected include:
- Changes to repository templates
- Creation/modification of LDAP authorities
WARNING: Changes to LDAP Authorities do not trigger password/Authz file rewrites.
However, when an authority is run, any resulting user or team changes do trigger rewrites.
7.1 Pending mode vs current view
When batched updates are enabled you can view the admin console in two modes:
- Pending mode:
- The admin console presents a view of Access Control that includes objects (users, teams and rules) that are not yet enforced, because they are waiting to be applied in the next batch update. This is the mode you use to make any access control changes, which are immediately added to the current waiting batch.
Pending mode actually shows you how access control will be applied when the current batch has been updated. This makes it difficult for troubleshooting and testing, where you would only want to see objects as they are actually applied to users here and now. - Current view:
-
Using Current view allows you to look at Access Control with all pending changes filtered out. This is specifically for troubleshooting and testing. Most Access Control creation or edit tools are disabled. It is not useful to create Access Control objects (users, teams or rules) in this mode because they do not appear until the current batch is run.
If you need to make immediate Access Control changes, disable the Batched Updates feature before applying the change.
7.2 Enable current view
Current View excludes any changes that are still waiting in the next batch update. To use the current view:
- Log in to the admin console.
- Click on the Account drop-down menu in the right-hand corner of the screen.

- Toggle the Enforce On.

- The admin console's top bar changes color and a "Current" symbol apears next to the Access Control Plus logo. This reminds you that you're currently in the enforced view.

- To leave the Current view, repeat the procedure and toggle to the Off setting.
8. Generic File Replication (GFR)
WANdisco's replication technology has mostly been used to replicate repository data between nodes. The GFR script uses the system to replicate other kinds of files. Currently these are the files that are used to coordinate changes in Access Control and repository management between nodes. Access Control Plus sends an archive of files (can contain multiple Authz, git Authz, passwd, git authorized keys, etc.) and a set of instructions about where to put all these files. The locations are defined by the administrator during the setup of the Repository Templates (all as defined by the repository templates). Then the scripts unpack the files and place them according to the instructions. There are some advance parameters for templates, which let you specify certain nodes to skip, or to place only on given nodes and also to call a script before placement (which can trigger skip) and after.
The Generic File Replication script handles the final delivery for AuthZ and Password changes. Customers modifying this code assume all responsibility for the execution of it. Contact WANdisco support for more information.
WARNING: To receive notification of GFR failures, you must configure email notifications correctly on all Git MultiSite and Subversion MultiSite Plus nodes.
Currently the API only returns the success or failure of the node that ACP is directly connected to. Therefore, you need to configure email notifications correctly on your WANdisco product.
8.1 Generic File Replication for MultiSite
Access Control Plus comes with a number of GFR scripts (see Internal Scripts) that are used exclusively in standalone mode. The GFR scripts that are used to manage MultiSite Access Control are supplied in seperate packages.
8.1.1 Installation
SVN MultiSite GFR (acp-gfr-scripts-svn-installer.sh)- acp-gfr-scripts-svn-1.0.0-XX.noarch.rpm
- acp-gfr-scripts-svn-installer.sh
- acp-gfr-scripts-svn_1.0.0-XX_all.deb
- acp-gfr-scripts-git-1.0.0-XX.noarch.rpm
- acp-gfr-scripts-git-installer.sh
- acp-gfr-scripts-git_1.0.0-XX_all.deb
The corresponding package should be installed on each MultiSite Plus / Git MultiSite node. Each package is available as an rpm, debian package and .sh shell script.
8.1.2 Internal scripts
/opt/wandisco/svn-multisite-plus/replicator/gfr
            bin
               drwxr-xr-x 2 root root  4096 Apr 24 11:43 acp [Folder]
      -rwxr-xr-x 1 root root 2187 Apr  9 10:39 acp_build_copy_authorized_keys_file.sh
      -rwxr-xr-x 1 root root  135 Apr  8 11:50 acp_copy_file.sh
      -rwxr-xr-x 1 root root  223 Apr  8 11:50 acp_pre_placement_script_1.sh
         -rwxr-xr-x 1 root root 15547 Apr 22 16:36 acp_gfr_main.sh


            lib
            log
            var
9. Managing passwd and Authz
This section gives a basic description of how authorization is controlled from within the Authz file when deploying with an Authz file/ Git MultiSite.
9.1 Permissions
Authz rules are applied to users and teams through the following tokens:
- R(+/-)
- Allow/Deny the user read access.
- W(+/-)
- Allow/Deny the user write access.
- C(+/-)
- Allow/Deny the user ref create access.
- D(+/-)
- Allow/Deny the user ref delete access.
- RE(+/-)
- Allow/Deny the user rewind access (not supported in 1.2.1 release).
9.1.1 Implied permissions
Naturally, if you are assigned a Deny Read Permission, this implies that you will not have Write access:
R- is by implication a W-
W+ is by implication a R+
9.1.2 Reference permissions
When controlling access to branches and tags you don't deal with Reads or Writes, only Create or Delete. Therefore C and D are used. Other permissions can be specified for branches or tags, but they are ignored.
9.1.3 Authz rules hierarchies
Authz rules have 2 hierarchies which are considered in the evaluation of whether a user has a requested level of access:
- Resource level hierarchy (Repo->Branch|Tag)
- Account level hierarchy (Account->Team)
Rule conflicts within these hierarchies are resolved by picking the rule that is most precisely defined (granular).
Example
If you have a user, Tom, requesting Write access to branch "master" on repo Repo1.git, the Authz rule resolution is:
- Determine that the repo Repo1.git exists on the local node. If not, error out.
- Lookup Tom's rules for branch "master" on Repo1.git.
- If rules exist for Tom that grant/deny the access he needs, apply them.
- If rules do not exist for Tom, check each of the teams that Tom is a part of.
Tom may be a part of multiple teams which have conflicting rule permissions. One could grant access and one could deny access. If the permissions conflict at the same point on the hierarchy, we always pick the most permissive rule. - If Tom's teams have no rules for the "master" branch either, we move up the Resource hierarchy and check the permissions assigned against Repo1.git.
- If Tom has permissions assigned against Repo1.git, apply them.
- If no relevant rules exist for Tom, check again for each of the teams he is a part of.
- If no permissions exist at this point, apply the default policy permissions (gitms.authz.policy).
9.2 Create an Authz file
To create an Authz file to use with Git:
- Create a new file here:
/opt/wandisco/git-multisite/replicator/properties/authz.git - Open the new file, adding the lines:
#Git AuthZ Version:1.0 [groups] team1 = user1 team2 = user2 [/opt/git/Repo20] user1 = R+W+C+D+ user2 = R+W+C+D+ [/opt/git/Repo20:BRANCH/branch1] user2 = W+D+C+ - Set the ownership of the file to match your requirements, e.g:
chown wandisco:wandisco /opt/wandisco/git-multisite/replicator/properties/authz.git
9.3 Configure the Authz file
Include the following lines in Git MultiSite's application.properties file /opt/wandisco/git-multisite/replicator/properties/application.properties
gitms.authz.file=/opt/wandisco/git-multisite/replicator/properties/authz.git
gitms.authz.enabled=true
gitms.authz.policy=deny
gitms.authz.poll.timer=30L
- gitms.authz.file
- Path to the Authz file.
- gitms.authz.enabled
- Property that tells Git MultiSite to use Authz.
- gitms.authz.policy
- The policy determines whether access is allowed to users who do not have defined Authz rules defined. Default: Deny
gitms.authz.policy must be set to Deny
... unless you want to run your repository access on the basis of assumed access, where accounts that do not have Authz rules defined get full Write access by default. - gitms.authz.poll.timer
- A number, followed by "L", representing the number of milliseconds between each polling of the Authz file to determine if there are any changes. Default: 30L.
Long Value suffix
Placing the "L" (stands for Long value) ensures that it is converted correctly.
10. License management
This section gives the guidelines used by Access Control Plus's license model. They ensure that deployments run in accordance with their agreed capabilities, while also ensuring minimum disruption if you accidently exceed your license limits.
10.1 License components
An Access Control Plus deployment runs with four seperately licensed elements that combine to make up the product license:
- Deployment mode: The license controls which deployment mode Access Control will operate in: Standalone, MultiSite with Git, MultiSite with SVN or MultiSite Both (Git and SVN). This license component changes the features that are exposed in the Access Control Plus admin console. For example, if your license is for Git MultiSite mode, then you do not see any features or tools that are distinct to handling SVN repository data.
- Account Licenses: The number of active account holders running on the deployment.
- Installation timelimit: Expiration based on license renewal period.
- Per-node license: The number of deployed nodes, tracked by the node's IP address.
Each component is tracked. If any component fails to match with the license then the installation fails its next license check. When running in conjunction with a WANdisco MultiSite product, these run with their own product licenses which apply their own limits completely independent of Access Control Plus.
10.2 License monitoring
- All components are checked on Access Control Plus's startup.
- When started, each node checks all licensed components once every 24 hours.
If a check fails, the thread writes out a warning to the log file and sends a notification email.
This warning triggers a grace period of 10 days. In this time you need to remedy the license failure. Either:
- Modifiy your deployment to bring it back into line with your license.
- Contact WANdisco and increase your license allowance.
If the issue is not resolved, after 10 days Access Control Plus enters a read-only mode.
Example
There's an installation of Access Control Plus running with a license for 30 users. During the day we exceed this limit after adding users from LDAP. Access Control Plus is not shut down, but the check is done within 24 hours. A notification email will be sent that informs the administrator (the email account holder nominated in the notifications set up) of the breach. If the issue is not resolved then in 10 days Access Control Plus will no longer allow you to make any changes. Accounts, Resources, and Rules will be locked (read-only) until the license issue is remedied.
10.3 License updates
The license you use to deploy Access Control Plus is set during installation, by the placement of your license.key file. Changing your license only requires that you replace the license.key file and restart Access Control Plus.
- Contact WANdisco's support team and request that a new
license.keyfile is generated. When you are sent this new file you can complete the update. - Copy the new
license.keyfile to each of your Access Control Plus nodes, i.e. all of them. Because each node's IP address is encoded into the key, changes to IP allocation or the addition of new nodes require that a freshlicense.keyfile is placed on every node. - From a terminal, navigate to Access Control Plus's config directory. e.g:
/opt/wandisco/scm-access-control-plus/properties
- Back up or delete your old
license.keyfile, then copy the new file into place. - When the
license.keyfile is replaced on all nodes, restart each node. Do this one after another so that you can test that each one restarts successfully. If there's a problem with thelicense.keyfile, a warning is written to the main log file, found here:/opt/wandisco/scm-access-control-plus/logs/scm-access-control-plus.<date-time-stamp>.log
11. Settings
11.1 Access Control updates
The Access Control Updates panel stores the settings for the Batch Updates Mode which helps mitigate the effects on system performance from very large numbers of password file and or Authz writes. See Enable/Disable Batch updates for more information about how and why you should use the Access Control Updates.

11.1.1 Batch Updates
Use these settings to enable the Batch Update mode, which will benefit replication performance in large deployments.
- Enable (Checkbox)
- Tick the checkbox to enable Batch updates.
- Switch Period
- This is the frequency at which batched changes are applied to the Authz and or password files. The default frequency is once per 600 seconds (10 minutes), so by default Access Control will never wait more than 10 minutes before applying an Access Control change.
- Managing Node
- This is the node that you select to manage the Batch process. Batched changes are collated and stores on just one node (this Managing Node) and then applied to all nodes on the next batch update.
11.1.2 Batch Actions
Batch Actions gives you immediate control over Batching.
- Run Now
- Generate New Files
11.2 Repository templates
The Repository Template options are used when connecting new SCM repositories to Access Control Plus. A repository template stores the paths for the repositories authentication and authorization files that are used by the Generic File Replication scripts to ensure that changes on each node are synced to all other nodes.

Note: You create a template for either Git or SVN
We recommend that you do not edit the Type of the template in future because this could result in you overwriting the original. We recommend that you create one repository template for Git and another one for SVN.
11.3 Global downcasing
Access Control Plus needs to handle situations where the customer's Active Directory/Windows-based systems are maintaining user accounts that are case-insensitive, i.e. user "jsmith" and "JSmith" are considered the same user. While Access Control Plus can handle case insensitivity internally, using Authz can be problematic because this is case sensitive.
Enable Global Downcasing to ensure that Subversion users have their usernames forced into lowercase. This ensures consistency and protects against the possibility of Authz rules being applied incorrectly.

By default Global Downcasing is disabled.

Enabling Global Downcasing triggers a warning message:
Enabling the global account name downcasing setting requires adjustment of VCS access paths to properly handle authorization. Inappropriate settings may incorrectly grant or deny user access to repositories.
WARNING: If you downcase usernames using the Apache directive AuthzForceUsernameCase, you must make sure no case-sensitive users will pass Authn for this location. If you mix sensitive/insensitive users, you will need to define a separate location for each of them. See more about AuthzForceUsernameCase in mod_authz_svn Configuration Directives.

11.4 Managing nodes
This section describes how the Access Control Plus nodes work when connected together.
11.4.1 Node Induction
Induction refers to connecting nodes together to form a distributed system for replicating data. Nodes that are connected together form a membership that is governed by the requirements of the distributed system. One requirement is that there must be a minimum number of nodes (a quorum) available to agree on the ordering of replicated changes.
There may be insufficient nodes to create agreement, for example, if enough nodes are lost because they are disconnected or experiencing unrecoverable failure. Quorum is then lost and replication stops. On the Node Induction screen you see the warning: "ACP operations currently impossible - Quorum is unavailable."

In this situation it may be possible to run through an Emergency Reconfiguration.
11.4.2 Emergency Reconfiguration
The Emergency Reconfiguration tool allows the administrator to remove a downed node from membership. This allows the remaining nodes to continue to replicate using a new membership. Membership type depends on the number and type of remaining nodes.
In the event that you need to perform a permanent removal of a node (an emergency reconfiguration) then you should contact WANdisco's support team for assistance. The operation poses several risks to the overall operation of Access Control Plus. Therefore, we recommend that you do not attempt the procedure by yourself.
11.4.3 Node repairs
The Node Repairs tool allows you to get repositories back into sync.

- Location Identity
- The unique ID string that is used by the replication system to identify the node.
- node.name
- The name given during installation that is used to identify the node to humans.
- eco.system.membership
- A unique identifier for the replication network in which the node is operating.
- eco.system.dsm.identity
- This identity is used to distinguish the specific distributed state machine.
These attributes are only important if you need to troubleshoot replication problems.
11.5 External applications
Use the external applications settings to connect with MultiSite products (Git MultiSite and / or SVN MultiSite).
- API IP
- The IP adress for the application's server.
- API Port
- The port used by the API (and the applications User Interface).
- API User
- The application user account that is used by Access Control Plus to connect to the external application.
- Password
- The password for the account that is used by Access Control Plus.
- Managing Node
- The Access Control Plus node that will handle the communication with the external applications.
- Poll Period (seconds)
- The frequency with which Access Control Plus connects with the external application.
- Use SSL (Check box)
- Tick the checkbox to use SSL encryption for the traffic between Access Control Plus and the external application.
11.6 Teams

11.7 Accounts

11.8 Repositories

11.9 Resources

11.10 Rules

11.10.1 Rules lookup

The Rules Lookup tool helps administrators plan, audit and troubleshoot user access. In a deployment with large numbers of accounts, repositories and rules, the Rules lookup tool gives you a quick way to test which rules apply to a given account.
- Account name
- Enter an account name to view rules that currently apply to that account.
- Repository name
- Enter a repository name to view rules that currently apply to that repository.
- Resource refinement
- Use the Resource refinement field to add a repository subdirectory as a search criteria.
- Permissions
- Any returned rules will be displayed in the Permissions table.
11.10.2 Lookup results

- Type
- The type of permission granted, Read or Read/Write.
- Result
- This field rapidly displays where a match occurs.
11.11 Log out

To log out of Access Control Plus:
- Click the admin link in the top-right corner.
- Click Logout.