Navigation:
wandisco.com |
Index |
Deployment |
User Guide |
Technical |
Glossary |
Mobile |
WANdisco
LATEST VERSION: The documentation for the latest version of Subversion Multisite: Subversion MultiSite 4.2
Welcome to the Admin Guide for WANdisco's Subversion MultiSite. This is where you'll find all the information you'll need for planning a deployment, installing and managing the software.
If you can't find what you're looking for check out our online Knowledgebase which contains updates and extra documentation. Should you need further help and want to alert us to an error, please contact us by raising a case on our support website.
We'll be using terms like "node" and "replication group" without explaining what we mean. Check out the Glossary for an explanation of these and other WANdisco terms.
For a better understanding about how MultiSite and WANdisco's replication technology works read the Subversion MultiSite Technical Guide.
If you find an error, or if you think that something needs improving we'd like to hear about it. Tell us about it by raising a case on our support website or emailing docs@wandisco.com.
Throughout this document we'll highlight things using the following types of information box.
 Alert
Alert
We use alerts to highlight something we think is important for you to know.
 Caution
The stop symbol is used when we want to caution you against doing something.
 Tip
Tip
Tips are principles or practices that you'll benefit from knowing or using.
 Knowledgebase
The KB symbol indicates that you can find out more about the subject in our online Knowledgebase.
Check out the latest release information on the Release Notes page.
The deployment guide will help you prepare your development environment for the implementation of WANdisco's Subversion MultiSite.
This section details the knowledge and technical requirements for deployment and operation of the WANdisco software, you should ensure that each of these sections is addressed before you begin the deployment.
| Technical Skill Requirements | |
System administration |
|
Apache administration |
|
Networking |
|
Subversion |
|
If you're not confident about handling any of these tasks, you can request a supported Installation from WANdisco.
A single administrator can manage all the systems running MultiSite, although it's a good idea to have someone at each site who is familar with the MultiSite Basics.
As with any software implementation you should deploy WANdisco Subversion MultiSite following a well defined plan. Doing so will help keep things under control, understood, and any potential problems will be spotted and fixed before you go into production.
We recommend that any deployment plan includes the following steps:
1. Deployment Planning: Identifying the requirements, people and skills needed for deployment and operation. Also covers agreeing schedule and milestones, highlighting any assumptions, constraints, dependencies and risks to a successful deployment.
2. Deployment Preparation: Preparation and identification of server specifications, locations, node configuration, repository set-up, replication architecture, server and software configurations.
3. Testing Phase: Activities related to installation in an initial installation and testing in a non production environment, executing test cases, and verifying deployment readiness.
4. Production Deployment: Activities related to the installation, configuration, testing, and deployment in the production environment.
5. Post-deployment Operations and Maintenance: Post-deployment activities including environment monitoring, system maintenance, training and in-life technical support.
This section covers everything you need to know when preparing your Subversion servers for replication. You should view this information as a set of guidelines, not as a fixed set of requirements that are followed slavishly.
| Hardware Sizing Guidelines | |||||||
|---|---|---|---|---|---|---|---|
| Size | #Users | Repository Size (GB) | CPU speed (GHz) | #CPU | #Cores | RAM (GB) | HDD (GB) |
| Small | 100 | 25 | 2 | 1 | 2-4 | 8-16 | 100 |
| Medium | 500 | 100 | 2 | 2 | 4 | 16-32 | 250 |
| Large | 1000 | 500 | 2.66 | 4 | 4 | 32-64 | 750 |
| Enterprise | 5000 | 1000 | 2.66 | 4 | 4-6 | 128 | 1500 |
KnowledgebaseThis is a summary of the requirements, you'll need to run through the more detailed Deployment Checklist.
Tip
Each MultiSite server must begin with an exact replica of the Subversion repository. The method you use to copy repositories depends on how big they are.
If a repository is relatively small, it can be bundled up with the MultiSite install files when you come to activate additional MultiSite nodes. However, this option is only practical for relatively small repositories.
For repositories that are over 1GB in size, it's no longer practical to bundle them during the installation of MultiSite software, instead you should use the following process:
Alert
Ensure file ownerships and permissions are the same on all nodes.
This process ensures that the Subversion repositories are exact copies, and does so with minimal downtime for Subversion users.
Subversion MultSite is capable of replicating any number of Subversion repositories, using the Apache SVNPath or SVNParentPath directives. For more information, see the chapter Setting up Apache.
Read more about adding repositories.
The SVNPath directive is used to tell Apache where your Subversion repository is located. You can have multiple Location Directives, each pointing to a different Subversion repository.
  <Location /repo>
    DAV svn
    SVNPath /home/svn/repo1
    AuthType Basic
    AuthName wandisco
    AuthUserFile /home/scm/htpasswd
    Require valid-user  </Location>


  <Location /xyz>
    DAV svn
    SVNPath /home/projects/repositories/xyz
    AuthType Basic
    AuthName wandisco
    AuthUserFile /home/scm/htpasswd
    Require valid-user  </Location>
Example httpd.conf syntax for using SVNPath.
The ParentPath directive is used if you have multiple repositories that reside in the same directory. Instead of directing to a specific repository directly, it tells Apache to match to the parent directory, under which there may be several repositories.
e.g. subversion-domain.com/svn/repo1 and subversion-domain/svn/repo2 would map to repositories at /home/svn/repo1 and /home/svn/repo2.
    <Location /svn>
    DAV svn
    SVNParentPath /home/svn/
    AuthType Basic
    AuthName wandisco
    AuthUserFile /home/scm/htpasswd
    Require valid-user  </Location>
Example httpd.conf syntax for using SVNParentPath.
Alert
A repository can belong to only one replication group at a time.
Each replication group that a node belongs to will require its own SVNParentPath.
Knowledgebase
There's an example use of SVNParentPath featured in our Knowledgebase - Using SVNParentPath with multiple replication groups
Authz is the Apache module that gives you control over user authorization. It takes user information from the password file and associates access permissions.
Tip
We recommend using the Authz along with Access Control to fully control access to your Subversion repositories.
Alert
If you move from Subversion MultiSite bundled with Access Control to the baseline MultiSite (that doesn't feature Access Control), you will need to manually remove the Authz directive from the Apache config file as well as the Authz file.
apachectl -MThis will produce a list of loaded modules, you should be looking for the authz_svn_module (shared).
<Location /repos>
   DAV svn
   SVNPath /home/wandisco/repository
   AuthType Basic
   AuthName WANdisco
   AuthUserFile /home/wandisco/htpasswd
   Require valid-user
   SVNAutoversioning on
   ###
   # Authz module for authorization configuration
   ###
   AuthzSVNAccessFile /home/wandisco/authz
   </Location>
Authz file.
sudo /sbin/service httpd restartCreate an empty authz file on each node:
touch /home/wandisco/authz
/home/wandisco/authz
Alert
Make sure MultiSite has permission to read and write to the svn.auth file. Also, this is a replicated change that will affect all nodes.
In the file, You should add an admin user for each repository: e.g. for repository mapped to /svn
add the following:
 [svn:/]
<admin username> = rw
or for a repo mapped to /myrepo:
[myrepo:/]
  <admin username> = rw
where <admin username> is the username that the user enters when adding a repository.
Knowledgebase
Read more about how to use Authz - Authz basics
The Subversion server on each and every node must have the details of all users across the replication group. The easiest way to keep user details consistant is the allow MultiSite to take control of the Subversion password files, so that any user created in MultiSite's admin console is automatically added to Subversion servers across the replication group. Using this Access Control feature greatly simplifies the management of Subversion users.
You can choose to have Subversion MultiSite control the Subversion password during installation, where you identify the Subversion password file's location. The installer then incorporates it into the replication group.
Tip
If you have a lot of Subversion users, you can bulk import them into Subversion MultiSite.
The Quorum refers to the strategy used for handling agreement between the nodes in a replication group. You can read more about the different types of Quourum in the glossary. This section gives you a quick summary of the benefits of each quourum type, and in what setup it should be used.
| Setup Type | Quorum Recommendation |
| MultiSite | Singleton Response or Majority Response quorum, balancing performance versus availability. |
| MultiSite with Sub Groups | Majority Response quorum. If you select Singleton Response quorum, the distinguished node represents a single point of failure. |
| Stand-Alone Group at One Location | Have a group of at least three nodes, which automatically handles the failure of any single replicator node and its subsequent recovery. With a two node group, select Singleton or Majority Response quorum, and the second node must be the distinguished node. |
The unexpected blocking of ports can be a problem when setting up Subversion MultiSite. Before you start the installation you should determine if any of the nodes in your replication group will be accessing a firewall. You must ensure that any firewalls are configured so that the port numbers (6444 etc) you specify during installation are not blocked or filtered.
If you have a AV software/virus scanner running on your network, you must configure it to not filter traffic on the ports you specify during installation.
You can give Subversion MultiSite exclusive use of Apache or share Apache with other applications/locations.
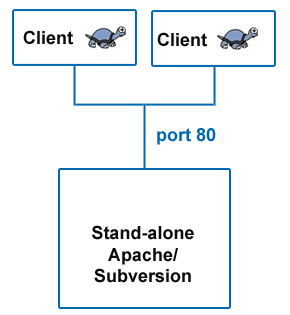
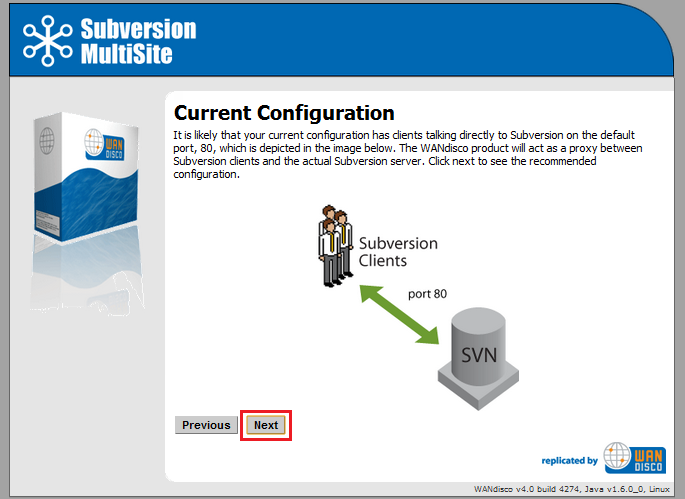
Example of a simple configuration without MultiSite.
Without Subversion MultiSite, Subversion clients simply connect to Subversion on port 80.
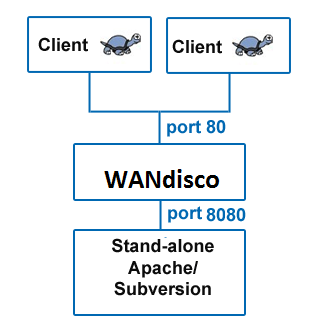
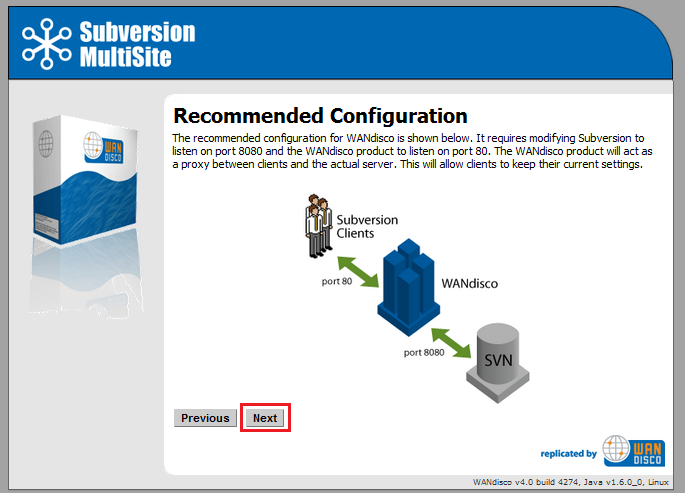
Example setup that includes Subversion MultiSite.
Subversion MultiSite sits between the Subversion clients and Subversion server, acting as a web proxy. Subversion clients connect on the usual port 80, whilst Apache is set to listen on port 8080.
The listen port is set in Apache's config file - httpd.conf. There's more information about the Listen directive in the Binding chapter of the Apache documentation.
#
# Listen: Allows you to bind Apache to specific IP addresses and/or
# ports, instead of the default. See also the <VirtualHost>
# directive.
#
# Change this to Listen on specific IP addresses as shown below to
# prevent Apache from glomming onto all bound IP addresses (0.0.0.0)
#
#Listen 12.34.56.78:80
Listen 8080
Snippet of the httpd.conf file.
With this configuration, Apache server listens on port 8080 instead of default port 80.
You can choose to share Apache with other locations or applications, instead of dedicating it to Subversion. This illustration shows how:
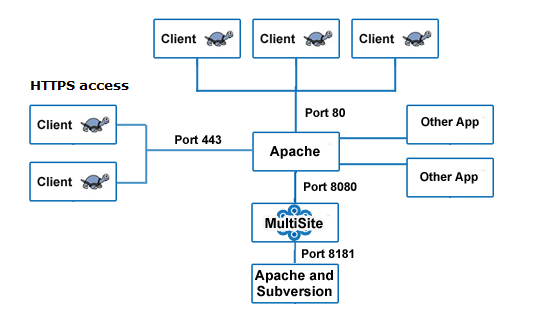
Using HTTPS or sharing Apache with other applications/locations.
In the above example all processes are running on the same machine. Apache is running on port 80, Apache's webDAV module is running on port 8181. WANdisco's Subversion MultiSite is listening on port 8080, forwarding requests to Apache's WebDAV module on port 8181. Some clients are connecting via SSL (HTTPS) with their connection running on port 443.
Knowledgebase
You can use this configuration if you enable a proxy pass.
Default port settings required during the installation of Subversion MultiSite:
In the Apache config httpd.conf file, specify the following parameters:
#
# Define Apache port and pass anything that matches location /svnrepos to
# WANdisco SVN Replicator
#
NameVirtualHost *:80
<VirtualHost *:80>
ProxyPass /svnrepos http://127.0.0.1:8080/svnrepos
ProxyPassReverse /svnrepos http://127.0.0.1:8080/svnrepos
</VirtualHost>

Listen 8181
NameVirtualHost *:8181

<VirtualHost *:8181>
<Location /svnrepos>
AllowOverride None
Order allow,deny
Allow from 127.0.0.1
DAV svn
SVNParentPath /tmp/dav
AuthType Basic
AuthName wandisco
AuthUserFile /etc/httpd/conf/htpasswd
Require valid-user
</Location>
</VirtualHost>
# For the SSL option
Listen 443
<VirtualHost *:443>
ProxyPass /svnrepos http://127.0.0.1:8080/svnrepos
ProxyPass /!svn http://127.0.0.1:8080/svnrepos/!svn
ProxyPassReverse /svnrepos http://127.0.0.1:8080/svnrepos
ProxyPassReverse /!svn http://127.0.0.1:8080/svnrepos/!svn
SSLEngine on
SSLCertificateFile /etc/httpd/conf/ssl.crt/server.crt
SSLCertificateKeyFile /etc/httpd/conf/ssl.key/server.key
SSLCACertificateFile /etc/httpd/conf/ssl.crt/ca-bundle.crt
</VirtualHost>
This section applies to any Apache configuration.
Alert
In order to make a Subversion repository function in a distributed environment, Subversion MultiSite requires exactly the same Apache/Subversion setup at all the nodes.
Even without Subversion MultiSite, Apache benefits from some tweaking in order to work effectively with Subversion.
conf/httpd.conf or included conf/extra/httpd-defaults.conf. For instance,
# Timeout: The number of seconds before receives and sends time out.
#
Timeout 7200
# KeepAlive: Whether or not to allow persistent connections (more than
# one request per connection).
#
KeepAlive On
# MaxKeepAliveRequests: The maximum number of requests to allow
# during a persistent connection. Set to 0 to allow an unlimited amount.
#
MaxKeepAliveRequests 0
#
# KeepAliveTimeout: Number of seconds to wait for the next request from the
# same client on the same connection.
#
KeepAliveTimeout 14400
...
Example httpd.conf snippet showing recommended Apache timing configuration
Caution
If you are using ProxyPass, avoid using a single '/' (slash) DAV location as this is not compatible with MultiSite and can cause replication to crash.
We recommend copying the current httpd.conf file, and then changing the host:port settings. For instance, here is a conf file snippet with Apache virtual hosts (you do not have to use Apache virtual hosts, this is only an illustration):
# Site A
$ cat conf/extra/httpd-svn-dav.conf
...
NameVirtualHost site-a:8181
<VirtualHost site-a:8181>
<Location /dir0>
DAV svn
SVNPath /home/site-a/svnroot
AuthType Basic
AuthName wandisco
AuthUserFile /home/site-a/apache2/dist/conf/htpasswd
Require valid-user
</Location>
</VirtualHost>
...
# Site B
$ cat conf/extra/httpd-svn-dav.conf
...
NameVirtualHost site-b:9191
<VirtualHost site-b:9191>
<Location /dir0>
DAV svn
SVNPath /home/site-b/svnroot
AuthType Basic
AuthName wandisco
AuthUserFile /home/site-b/apache2/dist/conf/htpasswd
Require valid-user
</Location>
</VirtualHost>
...
Example httpd.conf file illustrating the use of Apache virtual hosts
Alert
Subversion MultiSite must have a valid username inside the HTTP authorization header to be passed for all DAV commands.
There are potential problems with connection pooling when using Apache and SVNKit. Adding Subversion MultiSite to the mix doesn't change these issues, though you may need to revisit them after installing MultiSite.
We recommend using JavaHL with Eclipse IDE, which does not use connection pooling, and thereby eliminates the problem.
SVNKit uses connection pooling. For a given client, SVNKit opens two connections and keeps them open for later use. On a system with a heavy load this can hit performance. An open connection consumes an Apache worker thread, with lots of clients and pooling going on, Apache may run out.
Apache provides some tuning parameters to optimize connection pooling, while still releasing unused connections. The tunable parameters are Timeout, KeepAliveTimeout, MaxKeepAliveRequests, and KeepAlive. For more details refer to the Apache configuration documentation.
Apache has two timeout configurations: Timeout and KeepAliveTimeout. In general, the Timeout value should be lower than the value for KeepAliveTimeout.
Caution
Setting KeepAlive to false is not recommended. If you set KeepAlive to false, a client's transactions create an enormous overhead establishing and destroying connections.
Apache's logs are dumped to a single file, which can cause problem when the log file grows so big that it needs to be truncated. When this happens, Apache service is interrupted while the file is restarted. On Linux/Unix servers there's the option of piping logs to another process. For more information see our Knowledge Base article - Piping Apache logs
Though you may have referred to the Deployment Checklist during your evaluation we strongly recommend that you revisit the checklist and confirm that your system still meets all requirements.
Though you may have referred to the Deployment Checklist prior to an evaluation of Subversion MultiSite we strongly recommend that you revisit the checklist and confirm that you're system still meets all requirements.
| System setup | |
Operating Systems |
We've tested the following operating systems:
In principle, any operating system that can support a Java environment, Apache and Subversion. |
Subversion server |
Version 1.4 and above (we've tested up to version 1.7.1). Run the Apache Portable Runtime that matches your Subversion version. Subversion MultiSite Version 4.1 is required in order to use Subversion 1.7's HTTPv2 implementation. Read our Knowledge base article on a workaround that lets you Run MultiSite 4.0 with Subversion 1.7.  Certified Subversion Binaries Certified Subversion Binaries are now available from WANdisco. Providing the latest builds, without the risks associated with Open Source distribution. |
Subversion client |
Any that are compatible with local Subversion servers. |
Triggers |
|
System memory |
Ensure RAM and swapping containers are at least four times larger than the largest Subversion file. Minimum recommended: 2 GB RAM; 4 GB swapping container |
Disk space |
Subversion: Match to projects and issues. MultiSite Transaction Journal: Equivalent of seven days of changes. To estimate your disk requirements, you need to quantify some elements of your deployment:
Recommended storage = Number of clients checking out files(N) x average checkout sizes (Kilobytes) |
File descriptor limit |
Ensure hard and soft limits are set to 64000 or higher. Check with the ulimit or limit command. |
Journaling file system |
Replicator logs should be on a journaling file system, for example, ext3 on Linux or VXFS from Veritas.
|
Max. User Process Limit |
At least three times the number of Subversion users. |
Java |
Install JDK 1.6. We recommend using Oracle JDK 1.6.
|
Perl |
Install version 5.6.1 or later. For Access Control: Perl::DBI module for Audit Reports other than Users and Groups.
|
| Apache setup | |
Apache version |
All nodes must have the same version, 2.2.3 or above. |
Apache modules version |
All nodes have the same version of mod_dav and mod_dav_svn. |
mod_deflate.c for SVN_DAV |
DO NOT USE mod_deflate. |
Location URI |
Ensure the Apache config file on all nodes have the same location URI for Subversion repository access. |
Valid user for write methods |
Ensure that all WebDAV methods require authentication for SVN-DAV protocol. |
Use port 80 for WANdisco |
Standard Port 80 avoids confusion, change default Apache port if using 80. |
Apache server port |
Use non-standard Apache server port to avoid conflict with replicator port. See Dedicated Apache - Changing Subversion Port On |
File permissions in svnroot |
See this article (http://www.reallylongword.org/articles/svn/) |
| MultiSite setup | |
Quorum |
Default is singleton, providing performance over availability. Read more about Quorum options. |
Rotating quorum schedule |
Ensure the distinguished node is in the active time zone. |
Disk space for recovery journal |
Provision large disk for svn-replicator/systemdb, at least number of commits within a two to four hour window |
Batch processing |
If there are any batch processes that interact with WANdisco, turn the deferred-writes to false. |
The installation guide runs through setting up Subversion MultiSite for the first time. If you're already using an earlier version of MultiSite, refer to the Upgrade section.
Before we begin, here is a recap of the installation process:
Alert
Authentication Must be enabled (within the location directive of the Apache config file). Otherwise changes to the repository will not be replicated.
Alert
Important:
Java 7 is supported in the latest 4.2 releases (4.2 build 6801 and later). If you want to use Java 7, you need to upgrade.
Some things you should bear in mind before starting the installation:
svnrep.tar.gz archive to your Installation node.
Ensure that you install the MultiSite files to a directory called svn-replicator and that you preserve the following subdirectory structure:
| Directory | Contents |
/audit |
Contains the audit trail logs for Access Control. |
/bin |
Contains scripts like svnreplicator and shutdown |
/config |
Contains prefs.xml which contains MultiSite configuration information. The license file needs to be place here before you can run MultiSite. |
/lib |
Contains the Java archives (jar) files required to run the MultiSite. |
/logs |
Stores logs and other temporary files. MultiSite's main log file is named SVNProxyServer-prefs.log.0 |
/systemdb |
Contains the system database with its transaction journal. Warning: Deleting or modifying files from systemdb will likely corrupt your installation. |
If using selective replication you need seperate instances of MultiSite installed, but each situated in a directory called svn-replicator, for example:
<replicator01>/svn-replicator
<replicator02>/svn-replicator
<replicator03>/svn-replicator
Selective replication is used when you need to replicate only specific repositories. You can find further information in 1.23 Selective Replication.
license.key file in the svn-replicator/config directory.
Silent Installer
Import all setup information in an XML file, allowing setup to be completed with minimal user intervention.
Use the Silent Installer Option Recommended for advanced users.
Setup wizard
Setup is completed by running through steps in a browser-based wizard.
To use the setup wizard, continue to 3.1
/bin directory, start setup with the following command:
perl setupWANdisco products use port 6444 by default. If you're not able to use this port on your network, you can set a different port by starting setup using the command:
perl setup <chosen port number>
=======================================================================
WANdisco java processes will start with the following memory settings:

     -Xms128m -Xmx2048m -ea -server -Djava.net.preferIPv4Stack=true

Change the environment variable WD_JVMARGS if you wish to start java differently
WARNING: if the host does not meet these specified memory requirements, you will
encounter problems starting the WANdisco processes.
Continue,  Y or N ? [Y] :  y
Mar 29, 2010 11:29:47 AM org.nirala.trace.Logger info
INFO: Invoked from WANdisco installation at: /wandisco/svn-replicator
[I] using specified port: 6444
[I] Starting Subversion web installer
You can change how memory is allocated by editing references to SERVER_JVM_ARGS in the bin/reputils.pm file.
Read our knowledgebase article about Changing the default Java heap size.
If you're happy with the allocation, type 'y' and then press return.
Point a web browser to http://10.2.5.46:6444/ to configure the product.
http://<server IP>:<WANdisco port you selected when starting setup>
(Linux/Unix) In order to use port 80, MultiSite must be run as root.
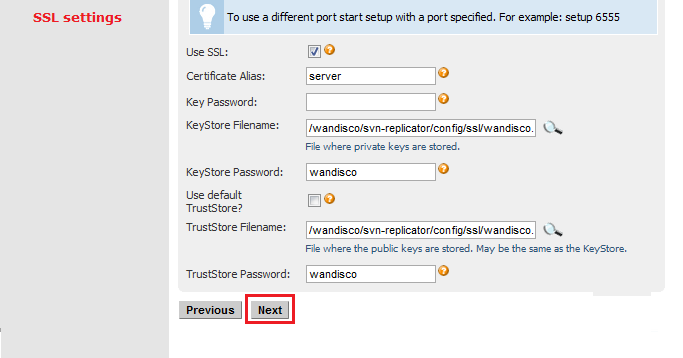
Key Password: Password for the KeyStore file.
KeyStore Filename: Path to file where private keys are stored.
KeyStore Password: Password for the KeyStore file.
Use default TrustStore: Tick the checkbox to use the default TrustStore , otherwise you'll need to supply TrustStore details.
TrustStore Filename: Path to the file where public keys are stored. This may also be the KeyStore file.
TrustStore Password: Password for the TrustStore file.
The settings are populated with default values to aid setup, make sure these match your environment and security requirements before clicking Next.
4.7 Setup will now check the Apache config file for settings that might cause problems for MultiSite.
More about Apache configuration changes for MultiSite.
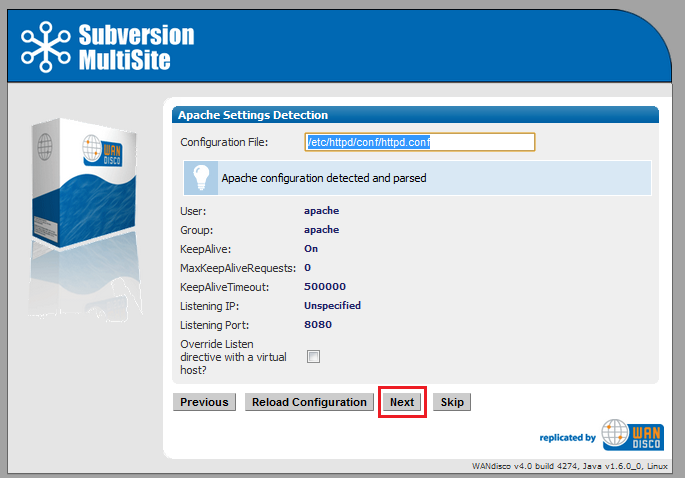
If the httpd.conf file isn't found, enter its path into the Configuration File entry box,
then click Reload Configuration.
Look out for warning boxes for where setup finds a problem - like this one:

If a problem is highlighted, you'll need to manually edit the httpd.conf file, then click on Reload Configuration to have setup check your changes.
User: Owner of the file.
Group: The group in which the owner belongs.
KeepAlive: Setup will look to see that the Keep-Alive directive is set to On.
KeepAliveRequests: Setup will look for 0, which indicates that no maximum limit will be set for connection requests.
KeepAliveTimeout: Set very high to ensure connections don't timeout.
Listening IP: For a node with multiple IPs, this will indicate the IP used for listening.
Listening Port: The default listening port for Apache is 8080.
When you want to continue, click Next. To continue without the Apache config check, click Skip.
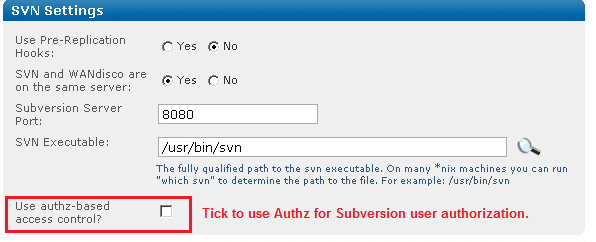
4.8 Setup now allows you to modify your Subversion settings. Watch for alerts that confirm the port and path that MultiSite will associate with the Subversion server.
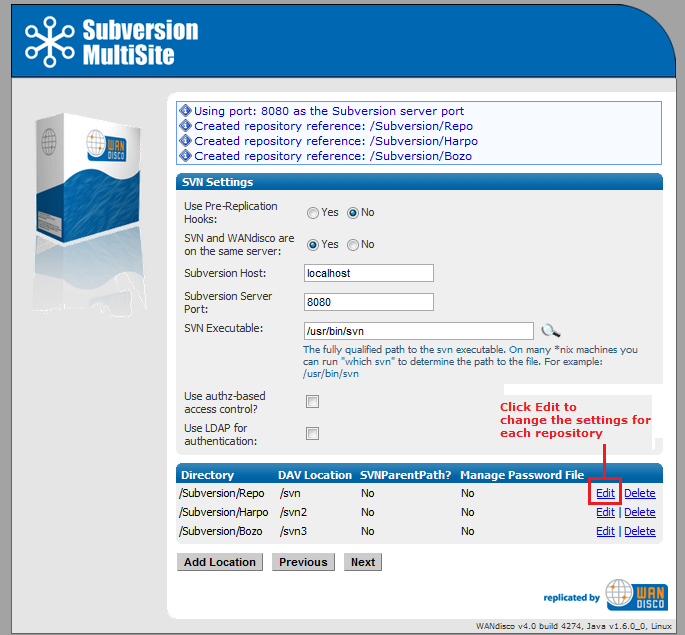
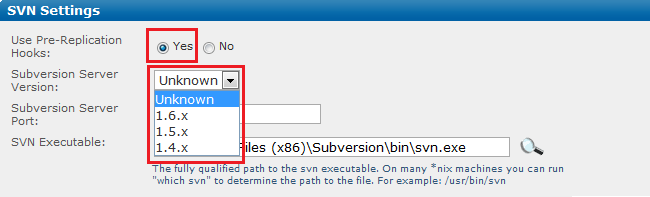
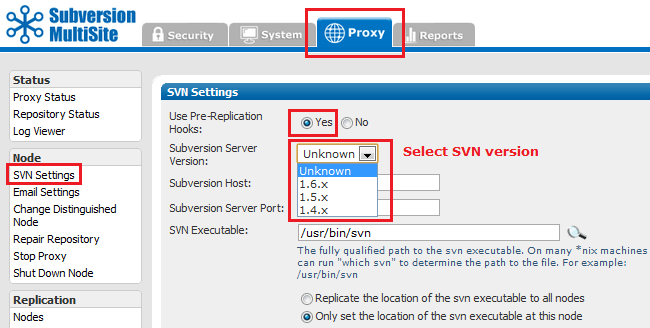
Use Pre-Replication Hooks: Select Yes or No.
If you select Yes you must select the version of Subversion installed on your server. If you don't know the version as you run through the setup you can select "Unknown". However, once the installation is completed, you must confirm the version of Subversion you are using, then edit the option from the SVN Settings page.
SVN and WANdisco are on the same server: Yes or No. Benefit from running MultiSite and Subversion on the same server.
Subversion Server Port: 8080 by default.
SVN Executable: This is the fully qualified path to the Subversion executable. Setup will try to fill this in automatically, otherwise type it into the entry box.
Selecting authz access or LDAP authentication will open up the following additional settings:
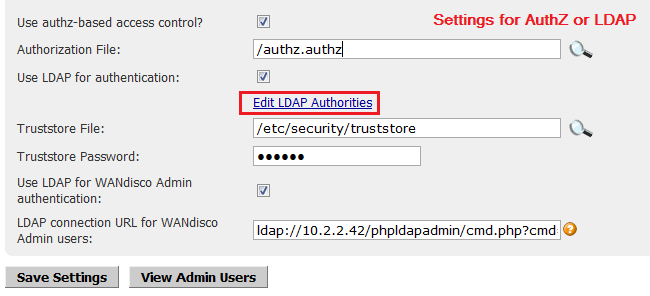
Use authz-based access control? Tick the box to have MultiSite use Authz authorization.
Authorization File: The path to the file you used to store authz settings.
Use LDAP for authentication Tick the box to use an LDAP service. Provide the URL to your LDAP server. See LDAP Admin Authentication URL syntax for information about how to form the URL to your needs.
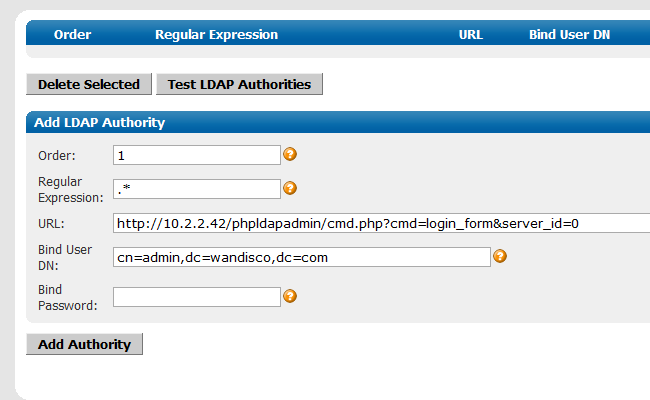
Edit LDAP Authorities - a link to the screen on which LDAP server access is managed.
LDAP connection URL: the URL for the LDAP server, using the format ldap(s)://hostport/basedn?attribute
Truststore File: Select the location of a Truststore file that points to your trusted SSL certificates.
Truststore password is the password used to authenticate the Truststore file.
The Truststore file must be manually copied to the same location on all nodes.
If you're specifying secure email (using a truststore) and LDAP authentication over SSL (using a truststore), the same truststore mustbe used for both sets of certificates. If different truststores are used then the LDAP truststore will overwrite the email truststore and secure emails will stop working.
Use LDAP for WANdisco admin authentication: Tick this option to use LDAP to manage the admin login credentials for MultiSite's admin console. If you select this option you will need to provide a URL for the LDAP server in the format ldap(s)://host:port/basedn?attribute
The option to use LDAP for WANdisco admin authentication is only available when you first select Use LDAP for authentication (which applies to all users).
Test LDAP Connection Click this button to confirm that you're able to connect to your LDAP server before continuing with the setup.
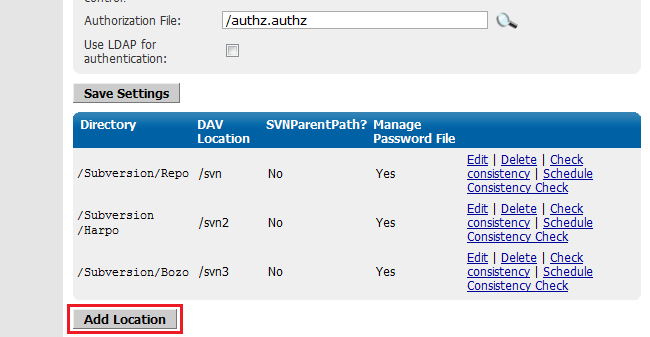
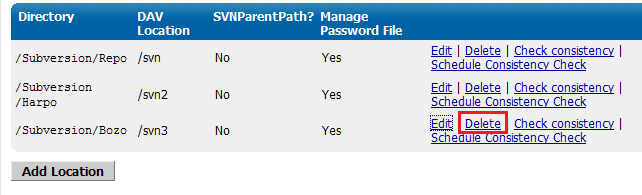
At the bottom of the screen is a table that confirms the DAV Location and password control for your repositories. You can click Edit to make changes. You can add additional repositories by clicking Add Repository. To continue setup, click Next.
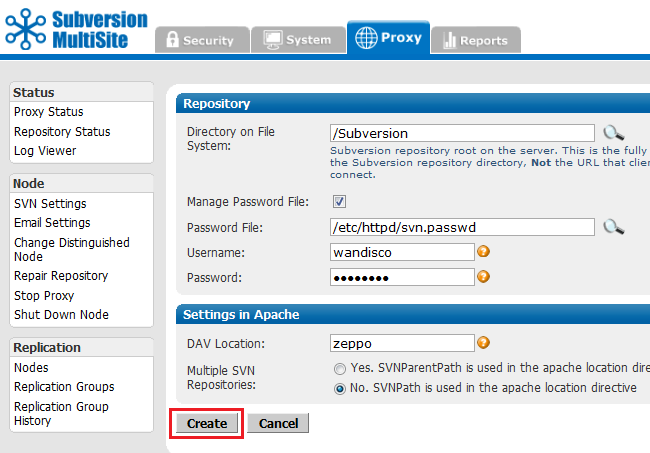
If you click Edit to change Repository you'll be able to edit the following settings:
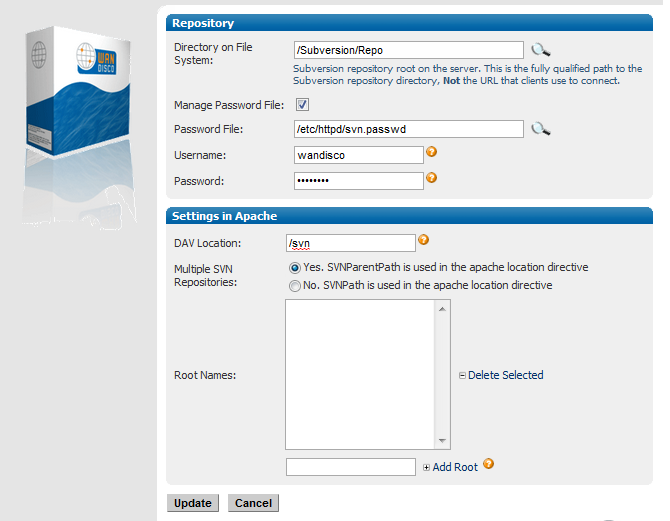
Directory on File System: Fully qualified path to the Subversion repository, not the URL used by clients to connect.
Manage Password File: Tick the box to allow your Subversion password file to be controlled by Access Control.
Username: The Subersion user account used to browse the repository by WANdisco's Access Control.
Password: The password of the Subversion user account.
Settings in Apache
DAV Location: You can specify the location of the DAV file.
Multiple SVN Repositories: click Yes if you are using SVNParentPath for multiple repositories, or No if using SVNPath.
If you select Yes, SVNParentPath is used in Apache location directorive, you'll be shown a list of Root Names, and can add additional subdirectories by entering their names in the Add Root box.
For example, given the root /svnroot with the repositories /svnroot/one, /svnroot/two and /svnroot/three the value would be: one,two,three.
Click Update to apply your changes, or Cancel to return to the previous screen without making changes.
When you've finished making changes to the repository settings, click Update to return to the previous screen, then click Continue.
4.9 You can enter email settings so that MultiSite can send alterts when problems are detected.
Example email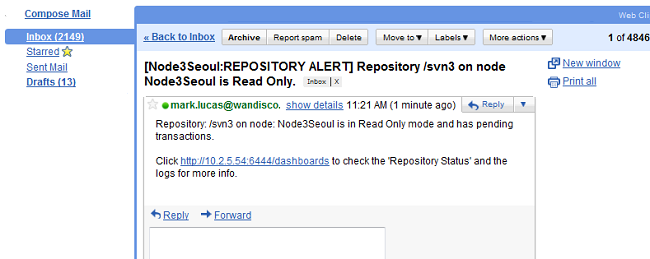
The distinguished node sends alerts on behalf of the whole replication group. The node and repository that the alert to which the email applies are noted in the email subject.
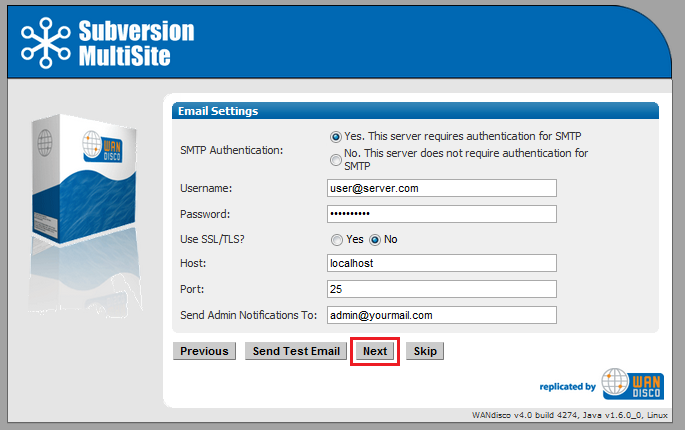
SMTP Authentication: If you select No, you'll need to provide your account.
Username and Password in the following entry boxes.
Use SSL/TLS: Choose yes if you wish to send emails over a secure connection.
Host: Enter the address of your mail server.
Port: Enter the SMTP port, 25 by default.
Send Admin Notification To: The email address (You can only specify a single address, not a comma delimited list) to where notifications will be sent.
Email settings are optional. If you don't need alert emails, click Skip to continue. Otherwise, click Next.
4.10. The setup has finished gathering information, You can go back and make changes or click Complete installation with these settings to save them and complete the installation.
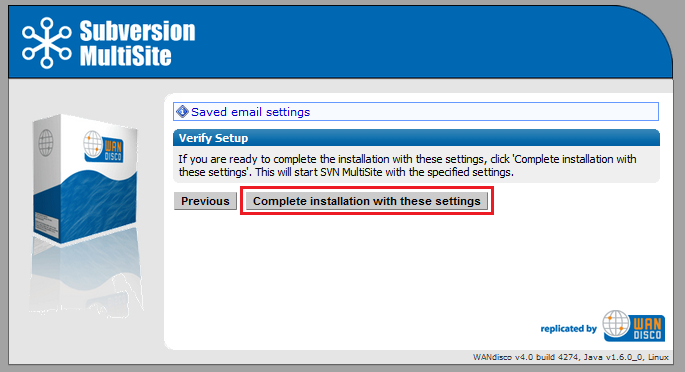
When you click Complete installation MultiSite will start running. You'll be prompted to reload the admin console using an SSL connection.

The Silent installer scripts the WANdisco setup process, avoiding the need for a systems administrator. All the relevant data required for setup, which is currently captured via the GUI installer can be provided in an XML file. This XML file will then be used by setup instead of starting the normal GUI application. If all of the data provided is valid, setup will exit as normal and the replicator will start.
The process for the silent installer is as follows:
setup_Settings.xml.
Ensure that entered values follow the ordering described in the Silent Installer dtd.
If prefered you can edit the example_setup_Settings.xml, located in svn-replicator\config. Then save your changes and rename the file to setup_Settings.xml
setup_Settings.xml into svn-replicator\configsvn-replicator\binperl setup
======================================================================
WANdisco java processes will start with the following memory settings:

     -Xms128m -Xmx2048m -ea -server -Djava.net.preferIPv4Stack=true

Change the environment variable WD_JVMARGS if you wish to start java differently
WARNING: if the host does not meet these specified memory requirements, you will
encounter problems starting the WANdisco processes.
Continue,  Y or N ? [Y] : y
Mar 23, 2010 2:27:09 PM org.nirala.trace.Logger info
INFO: Invoked from WANdisco installation at: /wandisco/svn-replicator
[I] using specified port: 6444
[I] Starting Subversion web installer
Starting Silent Installer
setup return code: 50
Setup complete.  Starting proxy: ../bin/svnreplicator
[root@Fed11-2 bin]# Mar 23, 2010 2:27:14 PM org.nirala.trace.Logger info
INFO: Invoked from WANdisco installation at: /wandisco/svn-replicator
Mar 23, 2010 2:27:15 PM org.nirala.trace.Logger info
INFO:Invoked from WANdisco installation at: /wandisco/svn-replicator
Before the installation begins, the setup script will prompt you to confirm the JAVA memory settings.
Avoid the need to enter a "Y" response, start the setup script with following argument:
perl setup -noconfirm
http://hostname:6444 and the process will continue as before./logs/WebProxy log file will contain any setup errors.prefs.xmlThe replicator will be started automatically and the setup_Settings.xml file will be archived as installed_Settings_Date-Time.xml.
It's possible to reuse the saved xml file by renaming it back to setup_Settings.xml, although you will need to edit the file to re-enter passwords, as these are stripped out at the end of a successful setup.
The setup process will exit and the /logs/WebProxy log file will contain any setup errors.
There's a detailed explanation of the Silent Installer's XML file in the Technical Guide -
Silent Installer Document Type Definition.

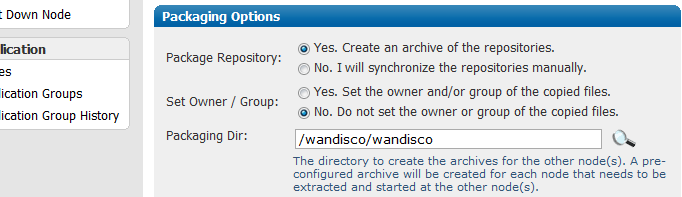
Follow these instructions if you were unable or chose not to use the automated packaging option Covered in section 7.
MultiSite creates a [node name].zip file for each of the nodes in a replication group. The first node is installed, so perform the following for all new nodes in the group:
cd wandisco
perl unpackage
There are some changes you may need to make before starting to use Subversion through MultiSite. These changes are made through the admin console. For more information see the admin Console guide
If you are going to be using pre-commit hooks, these become WANdisco pre-replication hooks. Read Setting up hooks
in the User Guide.
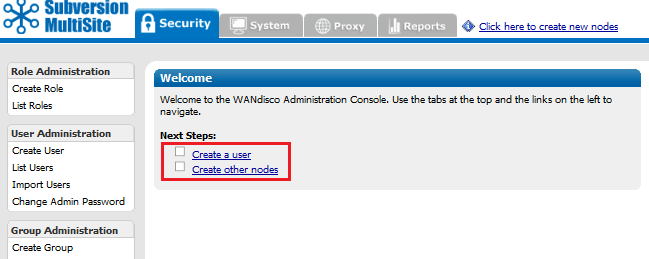
To add a node to an existing replication group, you have to create a new replication group that contains the new node and then activate the new replication group. See Creating a New Replication Group.
Determine a plan for copying the repository to the new node. See 2.3.3 Creating copies of your repository.
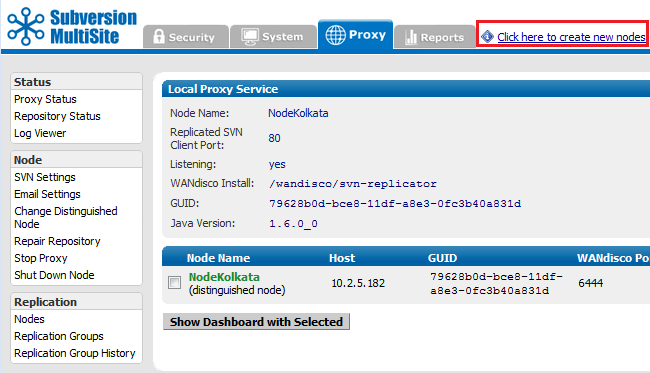
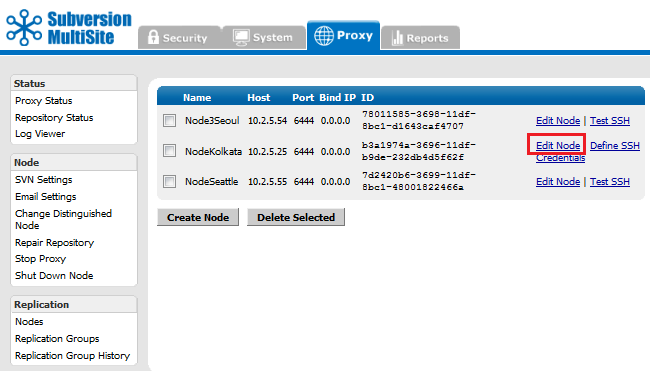
Creating a new node.
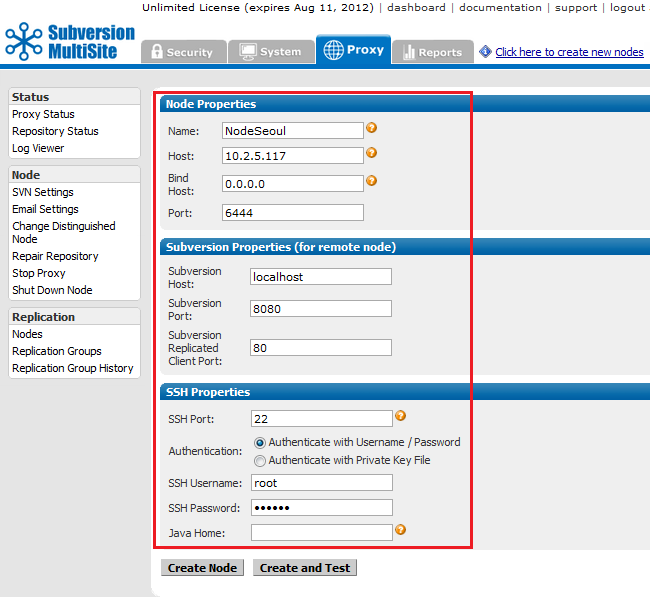
Entering the properties for the new node.
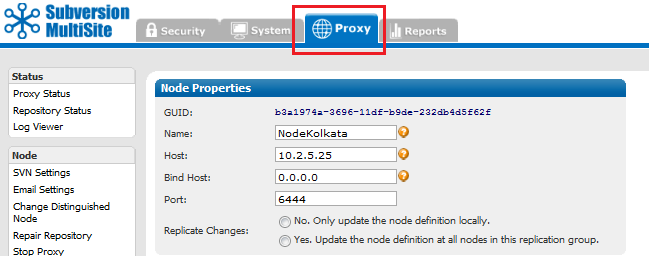
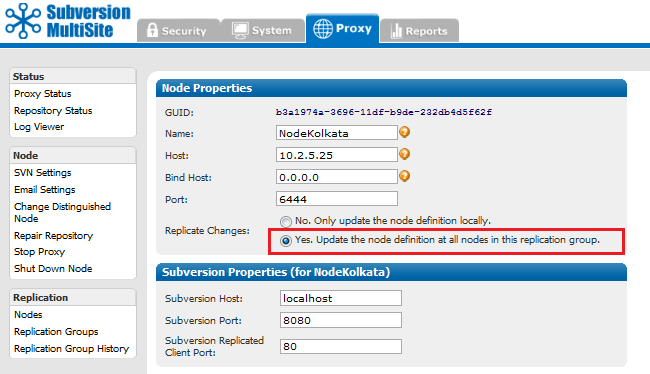
Enter the details of your new node:
Node properties
Name: A name to be used to refer to this node.
Host Name: DNS name or IP address of the node.
Bind Host: The IP bound to MultiSite. We suggest using 0.0.0.0. why we bind to 0.0.0.0.
Port:Port number allocated to the node. The default port is 6444.
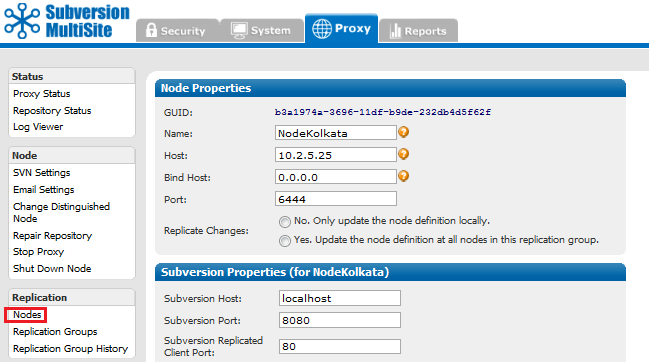
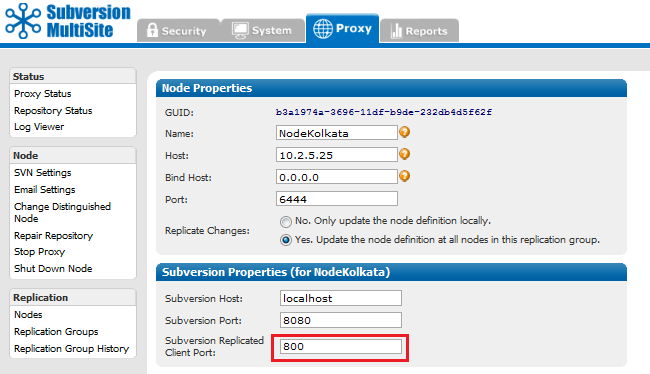
Subversion Properties (for remote node)
The Subversion Properties are populated with settings of the first node, which assumes that your new node will use the same proxy setup. Change them if required.
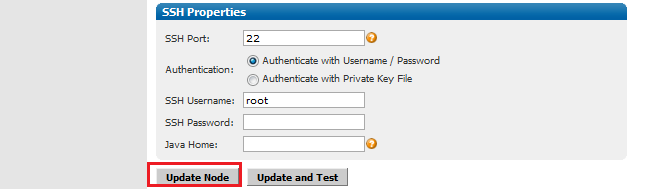
SSH Properties
SSH is used by MultiSite to automatically install on your additional nodes. You enter the details here for giving SSH access to the new node.
Why don't I see SSH settings?
You won't see SSH settings if you have created the current replication group using the manual approach, instead of selecting to "Activate the nodes automatically via SSH?" demonstrated here.
SSH Port: Default port for SSH is 22. Assign if a different port if required.
Authentication: By username/password or by Private Key File.
Selecting Authentication with Username/ Password:
SSH Username: The SSH authentication Username.
SSH Pasword: The SSH autentication password.
JAVA Home:The path to JAVA on the new node. This field is optional. If not specified here the value for the environmental variable JAVA_HOME will be used.
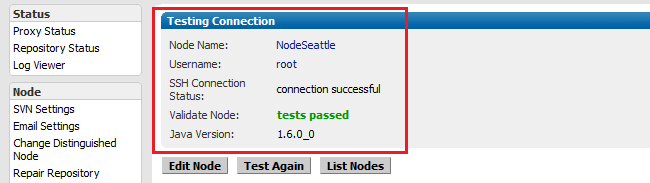
Successful test of the node's SSH properties.
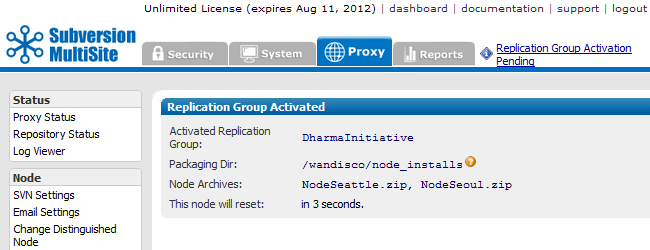
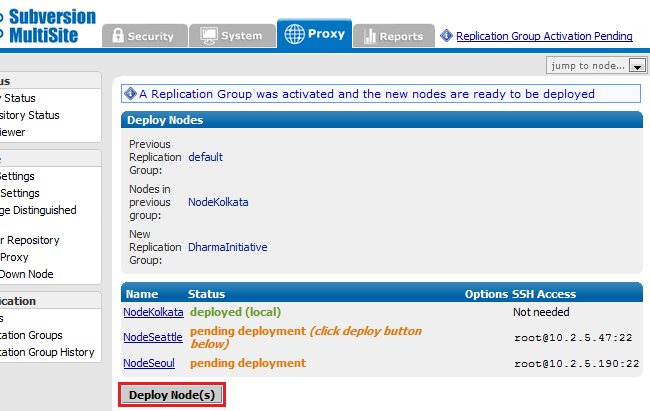
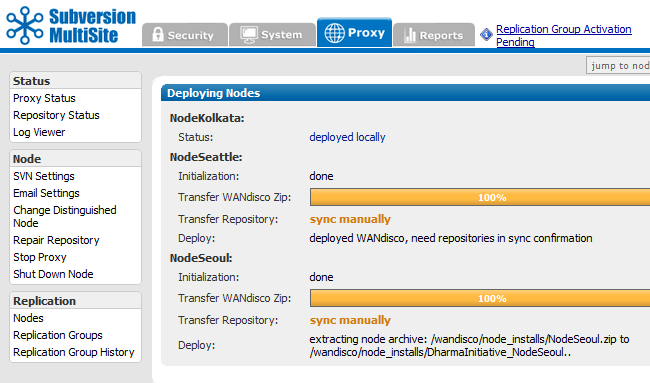
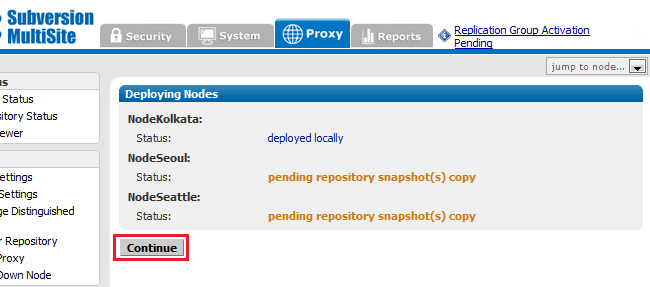
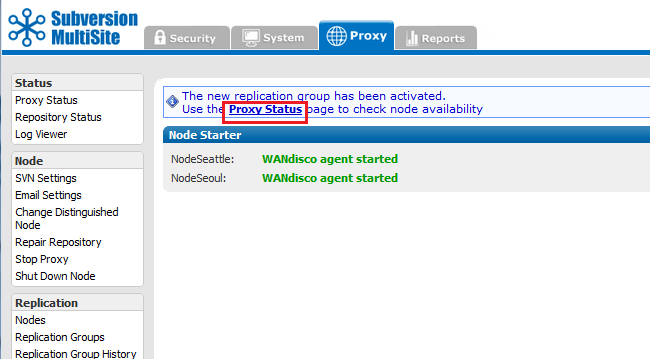
The new replication group is activated with all nodes.
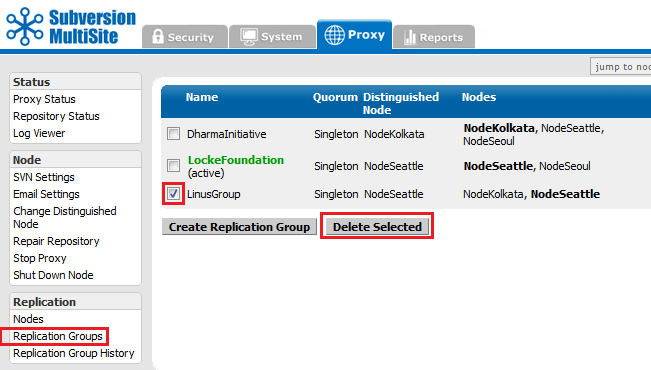
It's not possible to remove a node from an active replication group, instead a new replication group is created excluding the node that you want to remove:
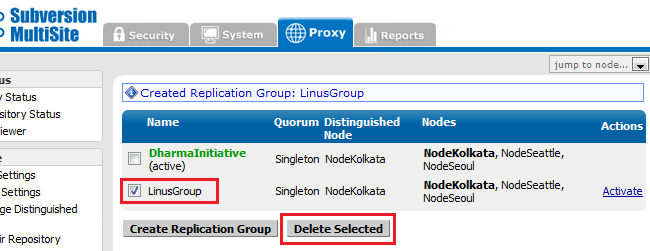
Select any inactive replication group and click the "Delete Selection" button.
Alert
Only one replication group can be active at a time.
You can create as many replication groups as you like, although only one replication group can be active at a time.
You can't delete the active replication group, first you need to create a new replication group and make it the active group.
See Deleting replication groups
Tip
Create replication groups from the node that will be the distinguished node in the new replication group.
Alert
Only one replication group can be active at a time.
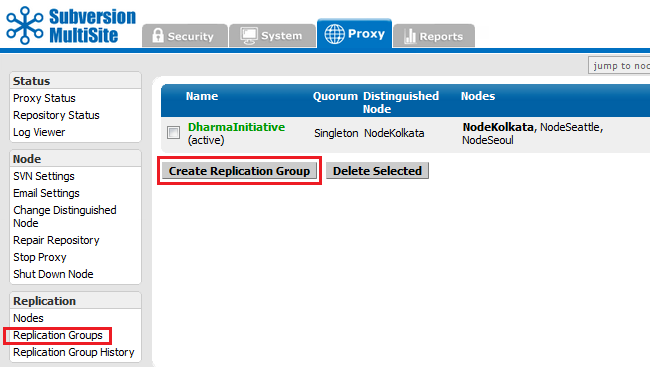
Replication Groups screen, with one previously created replication group listed.
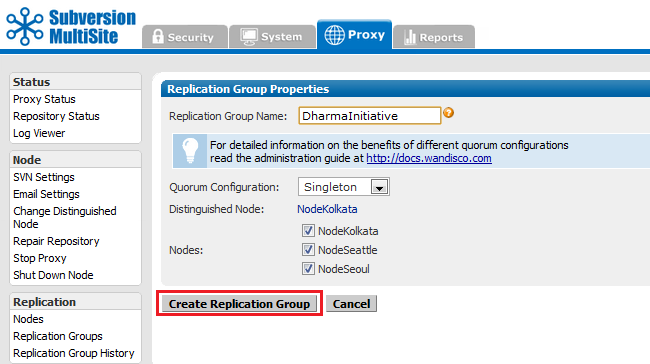
Replication Groups screen basic settings.
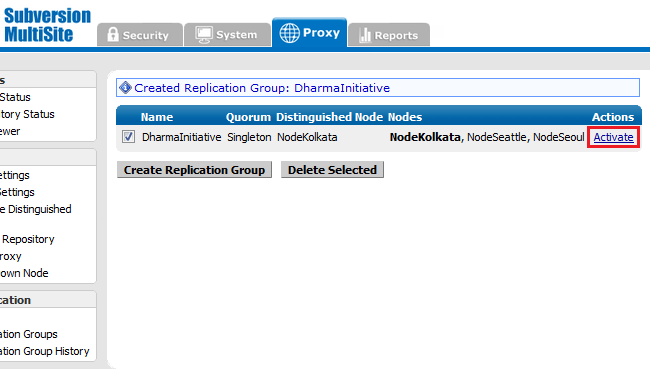
Replication group created - awaiting activation.
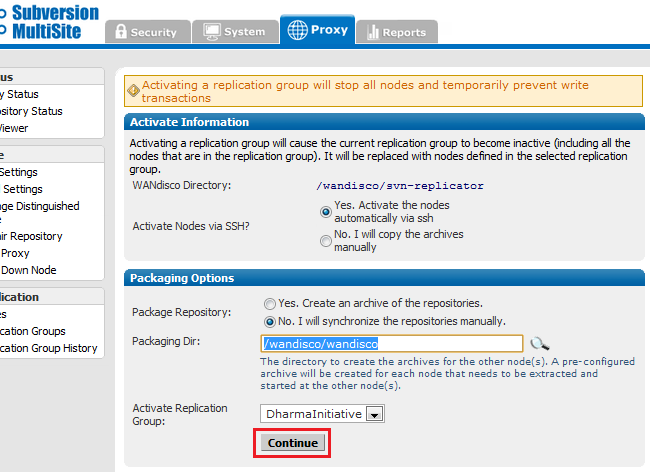
Caution
Activating a replication group will stop all nodes and temporarily prevent write transactions.
Nodes that are retired from replication should be shut down.

Caution
If you manually transfer your repositories, ensure that their owner and group are set appropriately, otherwise permission errors may occur during replication.
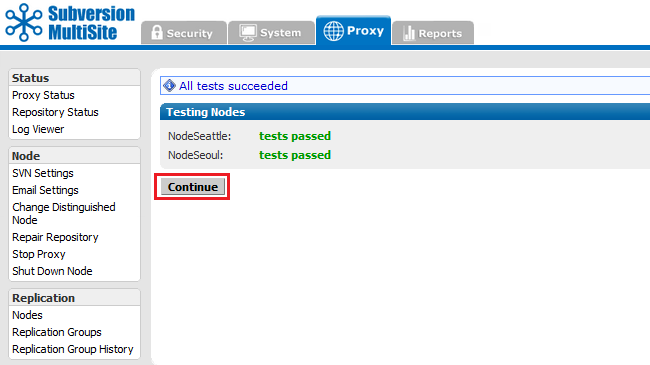
If the test fails, check your SSH settings, and that the node is able to accept connections on the SSH port (port 22 by default).

Follow this procedure to delete a replication group. Remember, you can only delete a replication group that is inactive.

 Tip
Tip<Location /zeppo>
AllowOverride None Order allow,deny Allow from 127.0.0.1 DAV svn SVNParentPath /tmp/dav AuthType Basic AuthName wandisco AuthUserFile /etc/httpd/conf/htpasswd Require valid-user </Location>

To move a repository from one replication group to another:
Subversion MultiSite comes with sample scripts debiansvnreplicator-init.d-sample and svnreplicator-init.d-sample which can be found in the svn-replicator/bin directory. A copy of the script debiansvnreplicator-init.d-sample (written for Debian, though also compatible with Ubuntu) is listed here:
Tip
#!/bin/bash
#
# description: Ubuntu Linux dist compatible init.d script
#              for starting/stopping WANdisco svnreplicator daemon
#
# Copyright (c) 2006-2016 WANdisco,Inc. Pleasanton,CA,USA
# All rights reserved.
#
# Author: WANdisco Support Staff <support@wandisco.com>
#
############################################################
# MODIFY THE FOLLOWING VARIBLES TO MATCH YOUR ENVIRONMENT

export JAVA_HOME=/usr/lib/jvm/java-6-sun
WD_USER="root"
WD_INSTALL_DIR="/home/user/svnrep/svn-replicator"
# (WD_INSTALL_DIR _MUST_ end with "/svn-replicator" or errors in installation can occur.

############################################################
# DO NOT MODIFY THESE VARIABLES

# Source function library.
. /lib/lsb/init-functions

CURRENT_OS=`uname -sv`
OS_DEFINER="/etc/debian_version"
PERL_LOC="/usr/bin"
WD_AGENT_NAME="svnreplicator"
WD_SHUTDOWN="${WD_INSTALL_DIR}/bin/shutdown"
WD_AGENT_BIN="${WD_INSTALL_DIR}/bin/${WD_AGENT_NAME}"
WD_AGENT_CONF="${WD_INSTALL_DIR}/config/prefs.xml"

# Maximum number of file descriptors.
MAXFDS="65000"

############################################################

# Startup procedure.
start() {

# Checks to see if the replicator is running.
REPRUN=`ps ax | grep "${WD_AGENT_NAME}" | grep -v grep | wc -l`
RETVAL=$?

if [ ${REPRUN} -gt 0 ]
then
  echo "The replicator is already running."
  echo "------------------------------"
else
  echo "Starting ${WD_AGENT_BIN}:"
  # Don't produce core files.
  ulimit -S -c 0 >/dev/null 2>&1
  # Set maximum number of file descriptors.
  ulimit  -n ${MAXFDS} >/dev/null 2>&1
  start-stop-daemon --start --quiet --chuid ${WD_USER} --exec ${WD_AGENT_BIN} > /dev/null 2>&1

  # Checks the last transaction and returns a value depending on success or failure.
  RETVAL=$?

  # Sleep to prevent errors in restarts.
  sleep 4

  if [ ${RETVAL} -eq 0 ]
  then
    echo "Status Code: $RETVAL: The ${WD_AGENT_NAME} started successfully."
    echo "------------------------------"
  fi

  if [ ${RETVAL} -eq 2 ]
  then
    echo "Status Code: $RETVAL: The ${WD_AGENT_NAME} failed to start successfully."
    status
  fi
fi
}

############################################################

# Shutdown procedure.
stop() {


REPRUN=`ps ax | grep "${WD_AGENT_NAME}" | grep -v grep | wc -l`
RETVAL=$?

# Checks to see if the replicator is running. If it is, script will shut it down, otherwise
a message will be printed.
if [ ${REPRUN} -gt 0 ]
then
  echo "Shutting down ${WD_AGENT_NAME}"
  start-stop-daemon --start --chuid ${WD_USER} --exec ${WD_SHUTDOWN} > /dev/null 2>&1

  # Checks the last transaction and returns a value depending on success or failure.
  RETVAL=$?

  # Sleep to prevent errors in restarts.
  sleep 4

  if [ ${RETVAL} -eq 0 ]
  then
    echo "Status Code: $RETVAL: The ${WD_AGENT_NAME} shutdown successfully."
    echo "------------------------------"
  fi

  if [ ${RETVAL} -eq 2 ]
  then
    echo "Status Code: $RETVAL: The ${WD_AGENT_NAME} failed to shut down successfully."
    status
  fi
else
  echo "The replicator is currently not running."
  echo "------------------------------"
fi

}

############################################################

# Replicator status checker.
status() {

echo "------------------------------"

# Checks for to make sure that the person running the script is root.

if [ `id -u` = 0 ]
then
  echo "[OK] This script is being run by root."
else
  echo "[FAIL] This script is not being run by root. Please switch the user to root
  to avoid any potential errors."
fi

echo "------------------------------"

echo "The current operating system is ${CURRENT_OS}."
# Checks the system info see if Ubuntu is installed.
if test -f "${OS_DEFINER}"
then
  echo "[OK] The current operating system is valid to run this script."
else
  echo "[FAIL] You are not running on this script on a valid operating system."
fi

echo "------------------------------"

echo "Checking ${PERL_LOC} for Perl binary."
# Checks to see if Perl is installed.
if test -f "${PERL_LOC}/perl"
then
  echo "[OK] Perl is installed on this machine."
else
  echo "[FAIL] Could not find Perl on this machine."
fi

echo "------------------------------"

echo "The Java environment variable is currently set to: ${JAVA_HOME}"
# Tests for the JAVA_HOME variable.
if test -f "${JAVA_HOME}/bin/java"
then
  echo "[OK] The JAVA_HOME variable is set correctly."
else
  echo "[FAIL] The JAVA_HOME variable is not set correctly."
fi

echo "------------------------------"

echo "The user is currently set to: ${WD_USER}"
# Tests to see if a valid user exists.
id "${WD_USER}" >/dev/null 2>&1
RETVAL=$?
if [ ${RETVAL} -eq 0 ]
then
  echo "[OK] This is a valid user."
else
  echo "[FAIL] This is not a valid user."
fi

echo "------------------------------"

# Returns the base directory of the {WD_INSTALL_DIR}.
BASE_INS_DIR=`basename ${WD_INSTALL_DIR}`

echo "The install directory is currently set to: ${WD_INSTALL_DIR}"
# Checks to see if the WD_INSTALL_DIR ends with "/svn-replicator"
if `[ "${BASE_INS_DIR}" == "svn-replicator" ]`
then
  echo "[OK] The replicator is installed to a suitable directory."
else
  echo "[FAIL] Please rename the replicator install directory to /svn-replicator to
  avoid installation errors."
fi

echo "------------------------------"

echo "The replicator binary is currently set to: ${WD_AGENT_BIN}"
# Checks to see if the replicator binary exists in the specified directory.
if test -f "${WD_AGENT_BIN}"
then
  echo "[OK] The replicator script was found successfully."
else
  echo "[FAIL] The replicator script was not found."
fi

echo "------------------------------"

echo "The shutdown script is currently set to: ${WD_SHUTDOWN}"
# Checks to see if the config file exists.
if test -f "${WD_SHUTDOWN}"
then
  echo "[OK] The shutdown script was found successfully."
else
  echo "[FAIL] The shutdown script was not found."
fi

echo "------------------------------"

echo "The config file is currently set to: ${WD_AGENT_CONF}"
# Checks to see if the config file is readable.
if test -r "${WD_AGENT_CONF}"
then
  echo "[OK] The config file could be read."
else
  echo "[FAIL] The config file could not be read."
fi

echo "------------------------------"

# Checks to see if the replicator is running.
if ps ax | grep -v grep | grep ${WD_AGENT_BIN} > /dev/null
then
  # Returns the process ID of the replicator and checks the relevent file for the file descriptors.
  PROC_ID=`pidof -sx "${WD_AGENT_BIN}"`
  FDS_LOC=`grep -i "Max open files *${MAXFDS}" /proc/${PROC_ID}/limits`
  RETVAL=$?

  echo "The attempted max number of set file descriptors is ${MAXFDS}."
  # Checks the /proc/${PROC_ID}/limits file for the file descriptors.
  if [ ${RETVAL} -eq 0 ]
  then
    echo "[OK] The file descriptors were set successfully."
    echo "------------------------------"
  else
    echo "[FAIL] The file descriptors were not set successfully."
    echo "------------------------------"
  fi
  echo "[OK] The replicator is currently running."

else
  echo "[FAIL] The replicator is currently not running."
fi

echo "------------------------------"

}

############################################################

# Restart procedure.
restart() {

  stop
  sleep 4
  start

}

############################################################

case "$1" in
start)
  start
  ;;
stop)
  stop
  ;;
status)
  status
  ;;
restart|reload)
  restart
  ;;
*)

echo $"Usage: $0 {start|stop|status|restart}"
exit 1

esac
To change the Subversion replication port that clients use to connect to repositories:
You can shut down a replicator at any time, either from the node's admin console (see the Admin Console Guide 5.9 Shut down node), or through running the shutdown script ./shutdown in the svn-replicator/bin/ directory.
We offer a Perl plug-in that lets you run MultiSite as a Windows service through the Windows Service Control Manager.
To set up MultiSite as a Windows service you need:Alert
The 32-bit version must be used (version 5.8), even if you're running 64-bit Windows. Contact WANdisco support if you need help locating and installing ActivePerl 5.8.
Follow these steps on all the nodes where you want to run your WANdisco product as a Windows service:
svn-replicator\bin\winservice.plppm install win32-daemon.ppd
winservice.pl -install
(Type winservice.pl to see all parameters for the command.)
5. To add email service for the WANdisco watchdog:
winservice.pl script.#$NOTIFY_EMAIL = 'admin@company.com';Replace
admin@company.com with the email address you would like alert emails to be sent to.Your installation provides the following scripts:
Apply these steps on all nodes.
export JAVA_HOME=/usr/java/default
WD_USER="root"
WD_INSTALL_DIR="/opt/wandisco/svn-replicator"
where:
The service creates a winservice.log, located in the svn-replicator\logs directory.
To change the quorum type create a new replication group and then specify the new quorum type.
See Creating a New Replication Group>.
Subversion MultiSite verifies if a network quorum is reachable when a write command is submitted. If the quorum is unreachable, by default, the write command is aborted and the following message appears on the Subversion client console:
Check the Network connectivity, failed to reach a
minimum quorum of nodes. Aborting the svn write operation.
To turn off the quorum check, edit the prefs file (svn-replicator/config/prefs.xml). Set the parameter, AlwaysVerifyQuorum to false in the file. For instance,
<SVNProxy>
<AlwaysVerifyQuorum>false</AlwaysVerifyQuorum>
....
</SVNProxy>
If the check is turned off and quorum is un-reachable, the write transaction will be applied to the WANdisco Subversion MultiSite's transaction journal and stay in a pending state till network connectivity and quorum is restored.
Alert
With singleton quorum, if the current node is also the distinguished node, the quorum check will always succeed irrespective of network connectivity to other nodes.
By default, Subversion MultiSite starts in watchdog mode. Whenever the replicator goes down, the watchdog mode restarts it. In watchdog mode, the replication process automatically disassociates from the terminal and becomes a daemon process, so you should not try running it in the background (with &).
Watchdog mode is not supported in Windows, use Windows Cygwin.
You can turn off watchdog by typing:
-nowdog
If MultiSite is unable to start up, for example if it terminates several times in quick secession, watchdog starts the the node in read-only mode.
$ ./bin/svnreplicator -h
Usage:
svnreplicator [-v] [-verbose] [-nowdog] [-pause time] [-email email-address]
-email option to generate email alerts whenever MultiSite restarts. For instance:$ svn-replicator/bin/svnreplicator -pause 5 -email "admin@blueandgold.com, scmuser@blueandgold.com"
Alert
In order to have the replicator automatically started on system reboots, see Setting Replicator to Start Up on System Boot.
Subversion MultiSite can be set up to use SSL encryption. First you should run through the following steps after extracting the Subversion MultiSite files (but before running setup).
<INSTALL_DIR>/svn-replicator/config./config make a new directory called ssl.-rw-rw-r-- 1 User User 512 2010-03-12 19:03 license.key -rw-r--r-- 1 User User 3327 2010-05-21 14:12 log.properties -rw-r--r-- 1 User User 579 2010-05-21 14:12 mailconfig.properties drwxr-xr-x 5 root root 4096 2010-06-18 12:39 membership drwxr-xr-x 2 root root 4096 2010-06-18 12:39 passwd drwxr-xr-x 3 root root 4096 2010-06-18 12:33 prefs -rw-r--r-- 1 User User 2005 2010-05-21 14:12 prefs-template-failover.xml -rw-r--r-- 1 User User 3047 2010-05-21 14:12 prefs-template.xml -rw-r--r-- 1 User User 92160 2010-06-11 14:26 reports.tar drwxr-xr-x 3 root root 4096 2010-06-18 12:39 scm drwxr-xr-x 6 root root 4096 2010-06-18 12:39 security -rw-r--r-- 1 User User 72 2010-05-21 14:12 svnerr.catalog -rw-r--r-- 1 User User 625 2010-05-21 14:12 svnokerr.catalog [User@Fed11-2 config]$ mkdir ssl
cd ssl
$JAVA_HOME/bin/keytool -genkey -keyalg RSA -keystore <PRIVATE KEY> -storepass <YOUR PASSWORD>
If no password is specified on the command, you'll be prompted for it. Your entry will not be masked so you (and anyone else looking at your screen) will be able to see what you type.
Most commands that interrogate or change the keystore will need to use the store password. Some commands may need to use the private key password. Passwords can be specified on the command line (using the -storepass and -keypass options).
However, a password should not be specified on a command line or in a script unless it is for testing purposes, or you are on a secure system.
The utility will prompt you for the following information
What is your first and last name?  [Unknown]:
What is the name of your organizational unit?  [Unknown]:
What is the name of your organization?  [Unknown]:
What is the name of your City or Locality?  [Unknown]:
What is the name of your State or Province?  [Unknown]:
What is the two-letter country code for this unit?  [Unknown]:
Is CN=Unknown, OU=Unknown, O=Unknown, L=Unknown, ST=Unknown, C=Unknown correct?  [no]:  yes


Enter key password for <mykey>
(RETURN if same as keystore password):

SSLv3 is support (though not enforced). If your browser setting has SSLv3 disabled, you will get a handshake error message. If it has both SSLv3 and TLS enabled, then, depending on the browser, it will try to switch from TLS to SSLv3 during the handshake. If you receive a handshake error message in your browser, make sure that TLS is disabled and only SSLv3 is enabled. All current browsers support SSLv3.
In the keystore, the server certificate is associated with a key. By default, we look for a key named server to validate the certificate. If you use a key for the server with a different name, enter this in the SSL settings.
A complete debug of the SSL logging will be required to diagnose the problems. To capture the debugging, run the java process with:
'-Djavax.net.debug=all' flag.
To enable the logging of SSL implemented layer, turn the logging to FINEST for 'com.wandisco.platform.net' package.
If you're specifying secure email (using a truststore) and LDAP authentication over SSL (using a truststore), the same truststore must be used for both sets of certificates. If different truststores are used then the LDAP truststore will overwrite the email truststore and secure emails will stop working.
Subversion MultiSite's settings are stored within a prevayler database. However, some settings (for all nodes in the replication group) are stored within a preference file (prefs.xml) which is located in the <WANDISCO/svn-replicator/config directory.
Alert
If you make changes that affect more than one node, you must change each node's specific file. If your change only effects just one node, you can change just that node's prefs.xml file.
prefs.xml file and save the changes../svnreplicator
Alert
Previously, all nodes in a replication group needed to be available in order to perform a synchronized stop. Now it's possible to synchronize stop a subgroup of nodes which is useful if you need to bring your replication group to a stop even if you don't have all nodes up and working. However, this action should only be used as a final resort and will require additional work to ensure that sync is maintained.
All Sync stops make Subversion read-only. You'll need to warn your Subversion users of some down-time.
If you wish to perform a synchronized stop on a subgroup of nodes, untick the node(s) that you do not wish to bring to a stop and click Continue.
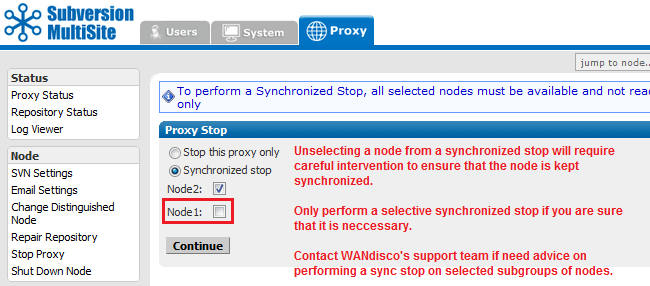
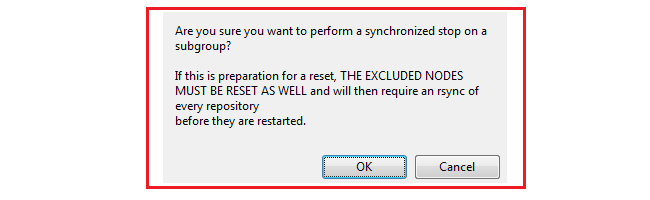
You'll be shown a warning box:
"Are you sure you want to perform a synchronized stop on a subgroup?
If this is preparation for a reset, THE EXCLUDED NODES MUST BE RESET AS WELL and will then require
an rsync of every repository before they are restarted."
Alert
The purpose of a synchronized stop is to ensure that all repositories are maintained in exactly the same state, that one node doesn't process transactions that are not completed on another. Any node that is not stopped in sync with the rest of the replication group is more than likely going to fall out of sync, causing replication to stop.
All nodes that are not included in the synchronized stop must be reset to purge all queued traffic and all their repositories must be manually synchronized (using rsync) with the rest of the replication group.
The quickest way to check replication is to add a new user through the Admin Console of one of your nodes. Then, jump to another node and confirm that new user has appears there too.
Another way to check replication is to verify there are commit transactions posted to the log file
svn-replicator/logs/SVNProxyServer-prefs0.log. More about log files
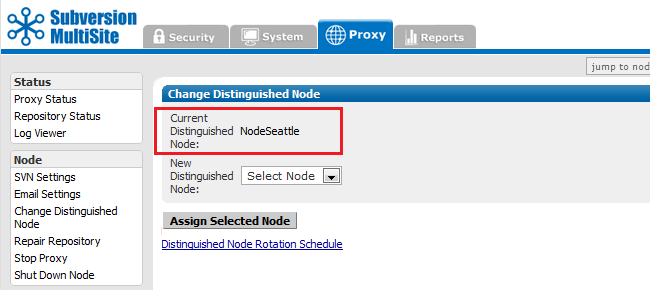
The distinguished node has greater voting power within the quorum. In a singleton quorum the distinguished node decides transaction ordering and keeps the other nodes in sync.
In a singleton qourum, Subversion users who operate from the distinguished node will see the best performance because their local replicator never needs to wait for agreement to be reached on a distant node.
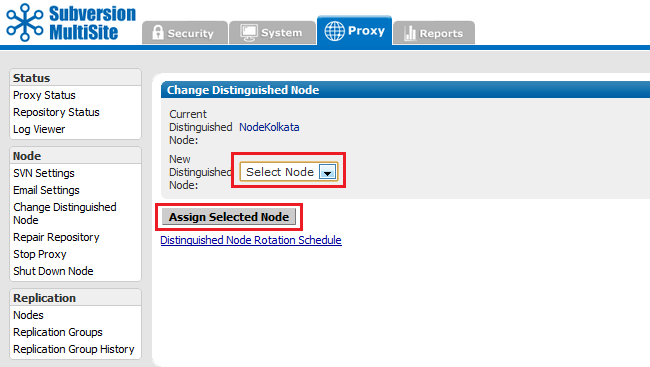
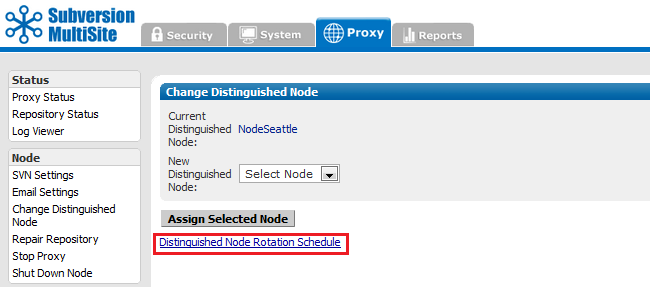
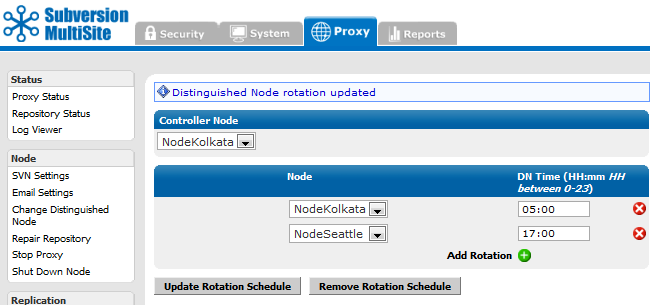
In a singleton qourum it's advantageous to change the distinguished node to correspond with the site where the most repository changes are taking place, i.e. operating within business hours. You can manually change the distinguished node at any time. You can also automate the process by setting up a Rotation Schedule.
The distinguished node is selected from the replication group, it can be any node.
Alert
Changing the Distinguished Node requires a Unanimous Quorum where agreement must be reached between all nodes.
See the Troubleshooting guide if one or more of your nodes become unreachable.
In the majority quorum the distinguished node acts as a tie breaker when there are an even number of nodes. For example, with a 4 node setup, in order to achieve a majority you would technically need 3 nodes. With the distinguished node's slightly heavier weighted vote, you can achieve a majority with only 2 nodes as long as one of the two is the distinguished node.
Many administrators like to set up Subversion backend hooks that fire whenever a Subversion user commits a set of file changes. With a master/slave Subversion server setup, e-mails can be initiated once when the post-commit trigger fires.
You can set up Subversion hooks to send emails when Subversion users commit file changes. However, with MultiSite, these emails will get duplicated, with a potential for spamming with notification emails.
To avoid this, set up one node as an "e-mail hub" by enabling the post-commit trigger to fire from a single node within the replication group.
Alternatively, you could use the time of day to fire the e-mail alerts from a specific node. For example, you could modify the post-commit trigger to send e-mails from India during 9:00 a.m. to 5:00 p.m. IST, and from the US during 9:00 a.m. to 5:00 p.m. PST.
Caution
If using asymmetrical e-mail hooks ensure that you don't disable the pre-commit trigger. That may cause a Subversion commit transaction to abort at some nodes but commit at other nodes causing a loss of sync.
Tip
Configure email setup to avoid long blockages or delays. The default SMTP service on node should be adequate. We recommend that you set up a local e-mail hub or a local SMTP agent/server. The local SMTP server should preferably be on the same host as the Subversion server. It should be set up to forward/relay e-mails to the organization-wide SMTP server. This ensures the e-mail hooks are a lot faster and just need to enqueue the e-mails to the local SMTP server. Test that your emails are delivered before going into production.
The default login username for the Admin Console is admin, and the password is user-defined during installation. That way, all nodes initially have the same login and password.
You can set up different login credentials for each node, however, you should ensure that all administrators who manage nodes are able to login to all nodes.
Tip
We recommend that you keep admin authorization simple, and have the same login and password for all nodes. This will greatly simplify managing replication.
To change the login at a particular node, enter the following in prefs.xml.
<Security>
 <Admin>
   <user>newlogin</user>
  </Admin>
</Security>
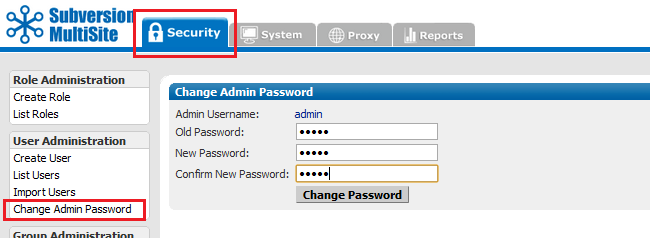
This changes the password for this node only. The password does not get replicated.
Ensure that all node administrators throughout the replication group are informed about password changes.
A hook is a script that gets triggered by a specified repository event, such as creation of a new revision or the modification of an unversioned property. Read more about Hook Scripts.
| Hook | How to Integrate with WANdisco |
| start-commit | Standard Subversion implementation. Must be present at all nodes, and must either execute identically at all nodes or fail identically at all nodes. |
| pre-commit | This becomes the pre-replication hook. See the following Replication Hook section. |
| post-commit | Standard Subversion implementation. Must be present at only one node. |
| pre-revprop-change | Standard Subversion implementation. Must be present at all nodes, and must either execute identically at all nodes or fail identically at all nodes. |
| post-revprop-change | Standard Subversion implementation. Must be present at only one node. |
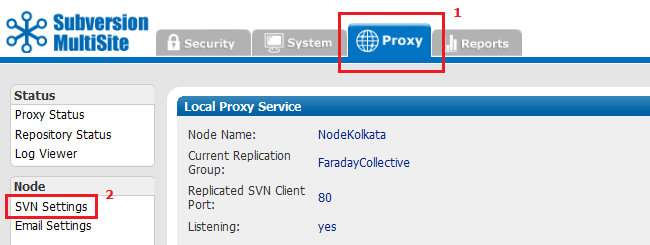
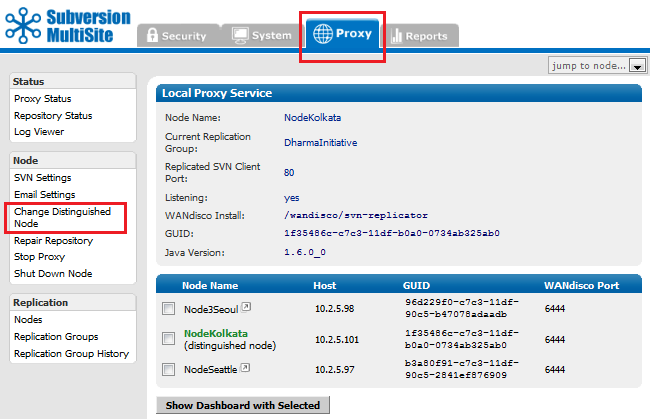
To use pre-replication hooks, Subversion MultiSite needs to be set with the version of Subversion you are using. Go to the Proxy tab, select SVN Settings, and select the Yes radio button for Use Pre-Replication Hooks. specify the Subversion Server Version. See Subversion Server Version in Using the Admin Console.
The SVN DAV pre-commit hook becomes the pre-replication hook. Subversion does not execute it, instead MultiSite invokes it before forming a proposal. As per the SVN DAV specification, if the hook succeeds, nothing is communicated back to the client. The handling of the command proceeds normally. If the hook fails, stderr is packaged as an XML response to the client. In response, the client typically deletes the activity; i.e., cleans up the temporary files, etc., on the server side.
Modify your prefs.xml file at all nodes to contain the following tags. See Changing a prefs.xml File. Below is a sample configuration of a pre-commit pre-replication hook.
Tip
Make sure the hook is not installed in the repository's hooks directory, since you don't want the SVN server to find it.
<Hooks>
 <enabled>true</enabled>
  <list>
    <hook name="pre-commit">
     <command>C:/cygwin/home/user/bin/pre-commit.bat</command>
     <captureExitCode>true</captureExitCode>
    </hook>
  </list>
</Hooks>
If you want different hooks to act on different repositories, you can do so. Create a script (for example, pre-replication.sh or .bat) that contains a case statement that calls each repository-specific hook by passing the repository name as a parameter. Change the prefs.xml to point to that script.
<Hooks>
 <enabled>true</enabled>
  <list>
    <hook name="pre-commit">
     <command>C:/cygwin/home/user/bin/pre-replication.bat</command>
     <captureExitCode>true</captureExitCode>
    </hook>
  </list>
</Hooks>
By default, MultiSite replicates all SVNROOTS associated with a Subversion repository. However, you can specify a set of SVNROOTS that you do not want to replicate. Use Excludes for SVNROOTS in the prefs.xml file to identify the repositories you do not wish to have replicated. For example:
<SVNProxy>
....
<ExcludeRepositories>/exclude,/dir0</ExcludeRepositories>
....
</SVNProxy>
If MultiSite can't find the entry, it's included in the replication. There are no wildcard (regular) expressions. For Apache and SVNPath, the syntax must match what is listed in the Location directive. For Apache and SVNParentPath, the syntax must match what is listed in the Location directive and Path to the repository.
All the included roots go through the same agreement manager. For example, say you have three repositories.
/repos/rep1

/repos/rep2

/repos/rep3
For SVNPath, the Location directive is
<Location/rep1>
  SVNPath /repos/rep1
</Location/rep1>

<Location/rep2>
  SVNPath /repos/rep2
</Location/rep2>

<Location/rep3>
  SVNPath /repos/rep3
</Location/rep3>
For SVNParentPath, the Location directive is
<Location/repository>
  SVNParentPath /repos
</Location/repository>
To exclude the first repository, rep1, for SVNPath, you would exclude rep1: for SVNParentPath, you would exclude /repository/rep1.
You must name a repository after the / character. Subversion does not support a location named with just the / character.
This procedure requires that your MultiSite deployment, including Subversion servers, are offline during the time it takes to upgrade at each node. Please plan this procedure accordingly.
Use these instructions to upgrade your Subversion MultiSite to a later build or version, rather than those found in The Deployment Guide: 3. Installation section, which are intended for a first time installation.
The correct method for upgrading Subversion MultiSite depends on which versions you are moving between. Use the guide below to ensure that you upgrade with the right method.
Upgrading from Subversion MultiSite 3.6 or earlier - See our Knowledge base articles on Installation and Upgrade
Upgrade rule of thumb
When looking to upgrade Subversion MultiSite, apply the following rule:
Upgrading within a version, e.g. 4.0 build x --> 4.0 build y , use the Upgrade with Script
Upgrading between versions. e.g. 3.7 --> 4.0 will require you to Upgrade from backup
Use this procedure if you are upgrading between product versions (3.7 to 4.0 etc.) rather than builds (4.0 build x to 4.0 build y etc.). To upgrade between builds, see Upgrade with script.
Summary of the Upgrade procedure:
Installing in order to perform an upgrade using the backup.xml file?
Don't enable Authz during the installation - wait until the import is completed, then enable Authz from the Subversion Settings screen.
Enabling Authz during the installation can greatly impact the performance of the backup.xml import.
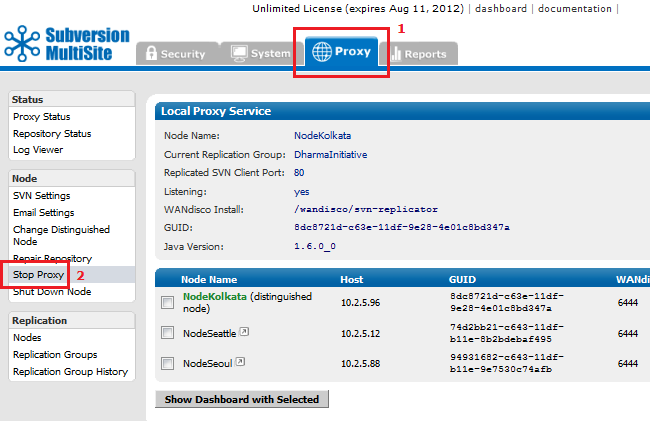
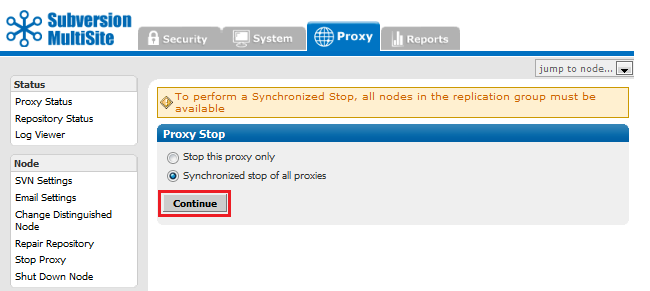
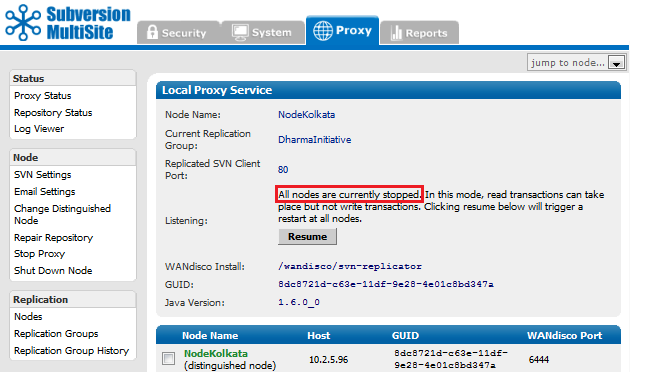
5.1.1. Open the Admin Console, on the left-hand menu click Stop Proxy.
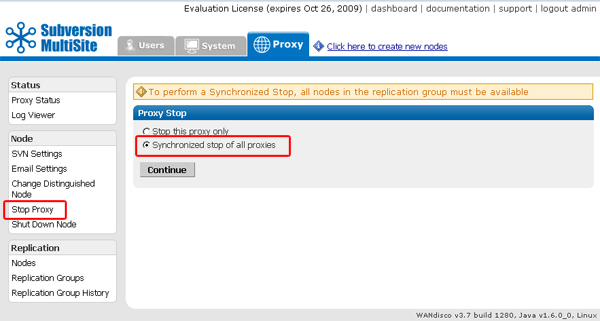
5.1.2. Check that radio button for "Synchronized Stop of all proxies". MultiSite will now wait for any remaining transactions to complete, after which all nodes will stop listening, stopping replication.
5.1.3. Open the admin console and click on the System tab.
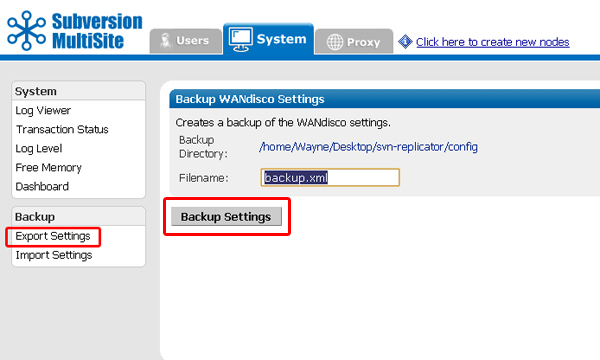
5.1.4. Click on Export Settings. Confirm the filename and location, then click on Backup Settings. All settings and user data will be exported in a backup xml file.
Next you need to Shutdown all nodes, then rename the svn-replicator directory to backup-svn-replicator.
5.1.5. Extract the installation files to the same location as your previous install, before it was renamed.
5.1.6. Copy the license evaluation key file from your old installation to the svn-replicator/config directory in your new installation.
5.1.7. Go to /svn-replicator/bin/, then start the installation with the following command:
perl setup
Respond to the Yes / No prompt relating to java memory settings.

5.1.8. The setup will now start up the browser based installer. Open your browser and go to address shown at the end of the setup. This will be the IP of your installation machine, on the WANdisco port (6444 by default).

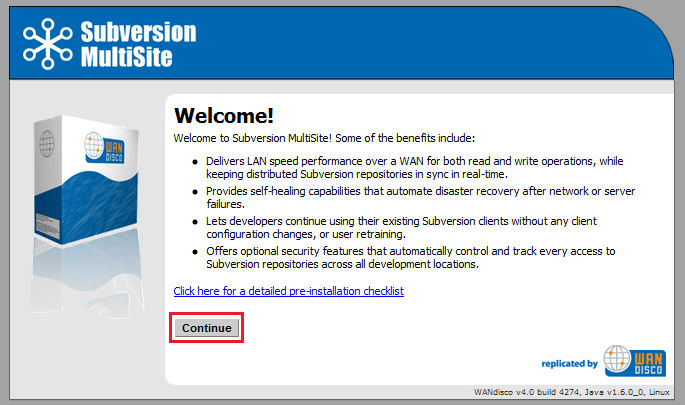
5.1.9. From the Welcome screen, click Continue.
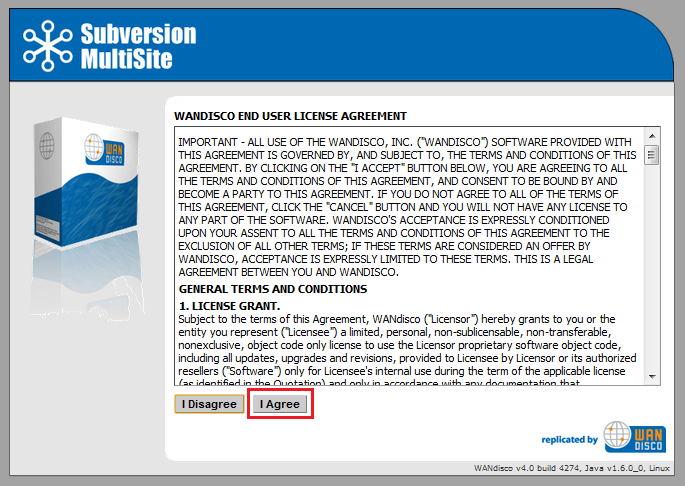
5.1.10. Once you've read the WANdisco End User License Agreement, click I Agree to continue with the upgrade.
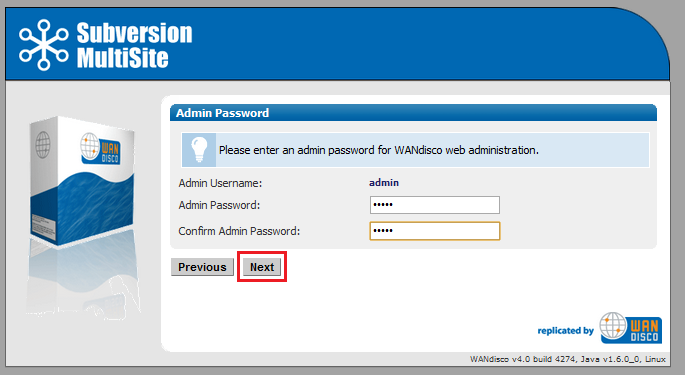
5.1.11. Enter a password for the default Admin Console account, the username for this account is now admin (for earlier versions it was "root"). Click Next to continue.
5.1.12. The next two screens explain how MultiSite will act as a proxy between Subversion clients and the Subversion server. Click Next to continue.
5.1.13. By default, MultiSite will listen on port 80, while Subversion will listen on port 8080. The benefit of this setup is that Subversion end-user don't need to make any changes.
5.1.14.
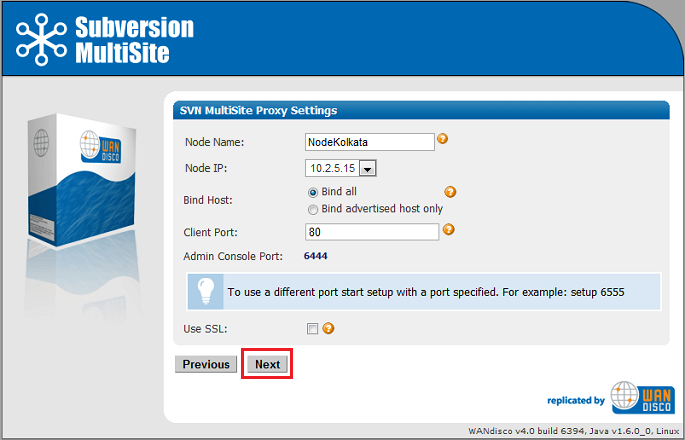
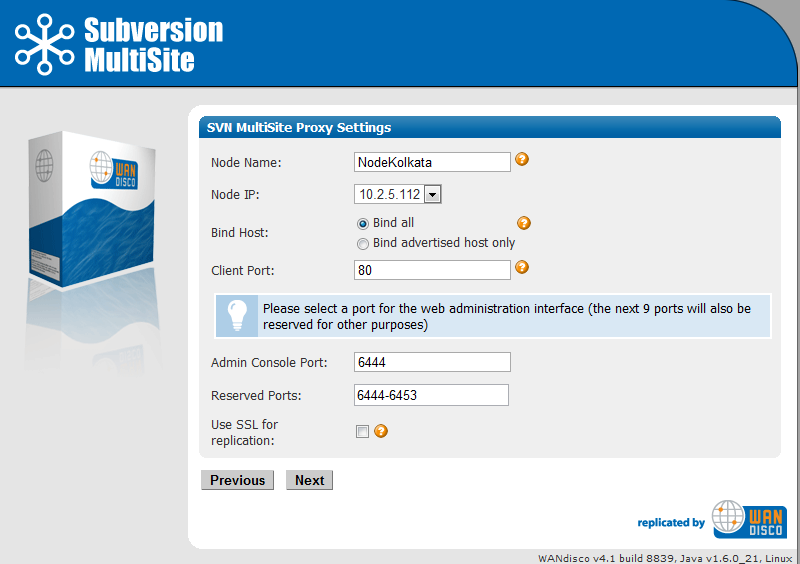
You'll confirm the proxy settings. These will be populated with the default settings noted in the previous screens.
Node Name: The name that MultiSite will use for this, the first node. The name cannot contain spaces, but can be changed later from the Admin Console.
Node IP: The node's IP.
Bind Host: By default, all network interfaces bind to the node. Select "Bind advertised host only" to limit to the node's IP address (stated in the field, above).
Client Port: By default this is 80, allowing Subversion users to continue without making change to their client setup.
Admin Console Port: 6444 by default. Should you need to use a different port for accessing the Admin Console, restart the setup (step 3.1.3) using the following command:
perl setup <preferred port for Admin Console access>
Reserved Ports: MultiSite will reserve a block of 10 ports, you can either leave the default ports or enter ports that you prefer.
Once you've finished making any changes to the proxy settings, click Next to continue.
5.1.15.
Setup will check the Apache config file for settings that might cause problems for MultiSite.
If the httpd.conf file isn't found, enter its path into the Configuration File entry box, then click Reload Configuration.
Look out for warning boxes for where setup finds a problem. You'll need to manually edit the httpd.conf file, then click on Reload Configuration to have setup check your changes.
User: Owner of the file.
Group: The group in which the owner belongs.
KeepAlive: Setup will look to see that the Keep-Alive directive is set to On.
KeepAliveRequests: Setup will look for 0, which indicates that no maximum limit will be set for connection requests.
KeepAliveTimeout: Set very high (500,000 seconds) to ensure connections don't timeout.
Listening IP: For a node with multiple IPs, this will indicate the IP used for listening.
Listening Port: The default listening port is 8080.
Override Listen directive with a virtual host? Tick if you are using a virtual host.
5.1.16. Setup now allows you to modify your Subversion settings. Watch for alerts that confirm the port and path that MultiSite will associate with Subversion.
SVN Settings
Use Pre-Replication Hooks: Select whether you are using Pre-Replication Hooks.
SVN and WANdisco are on the same server: Confirm if MultiSite and Subversion are running on the same machine, this is a requirement for MultiSite to manage your Subversion password file.
Subversion Server Port: 8080 by default.
SVN Executable:This is the fully qualified path to the Subversion executable. Setup will try to fill this in automatically, otherwise type it into the entry box.
Use authz-based access control Click on the box if you are using Authz access control. See the following note about why you may wish to hold off selecting this option until later.
Installing in order to perform an upgrade using the backup.xml file?
Don't enable Authz during the installation - wait until the import is completed, then enable Authz from the Subversion Settings screen.
Enabling Authz during the installation can greatly impact the performance of the backup.xml import.
At the bottom of the screen is a table that confirms the DAV Location and password control for your repositories. You can click edit to make changes. You can add additional repositories by clicking Add Repository. To continue setup, click Next.
5.1.17.
You can enter email settings so that MultiSite can send alerts.
SMTP Authentication: If you select No, you'll need to provide your account.
Username and Password in the following entry boxes.
Use SSL/TLS: Choose yes if you wish to send emails over a secure connection.
Host: Enter the address of your mail server.
Port: Enter the SMTP port, 25 by default.
Send Admin Notification To: The email address to where notifications will be sent.
You don't need to provide email settings, in which case, click Skip to continue. Otherwise, click Next.
5.1.20. You have now completed setup. You can go back and make changes or click Complete installation with these settings to save them and restart MultiSite.
5.1.18. You will next see a Completing Installation screen, which MultiSite restarts. When completed, you'll see the authentication screen for the Admin Console. Enter the username 'admin' and the password you entered during setup to enter.
From the Admin Console, click on the System tab. Click on Import Settings. Enter the path to your backup file or folder (exported in step 5.1.5) or click on the magnifying glass to browser for the file. Click Import Settings.
Important All files for use with WANdisco MultiSite should use UTF-8 encoding (and/or single-byte encoding if there are no none-ASCII characters). Any other encoding eg. Unicode will not be parsed correctly.

You've now completed the upgrade.
5.1.19 Next, you'll need to recreate your replication group and apply other settings that don't get preserved (such as Consistency Check or Distinguished Node Rotation Schedules).
5.1.20 Start by redefining your other nodes, using the Add a node procedure.
5.1.22 With your nodes defined you should recreate your replication groups. Use the Create a new replication group procedure.
5.1.23 Finally, activate the replication group, if you select to use the packaging option "Activate Nodes via SSH?" then installation of your other nodes will be handled automatically.
5.1.24 Before resuming replication of your live repository data, perform some tests to make sure that replication is working properly.
Use this procedure if you are upgrading between builds (4.0 build x to 4.0 build y etc.) of the same product version.
Things you must know before you make a start:
AlertAlert
Don't make changes to your setup (replication groups or nodes) during this procedure. If you plan to make changes, complete the upgrade first, then make changes once you have confirmed the upgrade has worked.
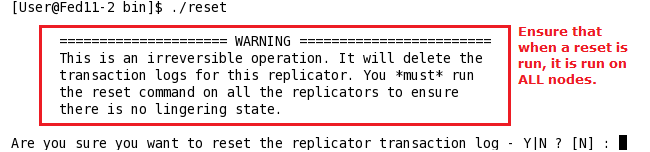
svn-replicator/bin, run:
./reset
cd /opt/wandisco
tar czf svn-replicator-4-previous.tgz svn-replicator
The upgrader script is only for moving to a later build of the same product version.
Do not use the upgrader script for moving from 3.7 to 4.0, or 4.0 to 4.1.
When upgrading between full versions, backup your user data, complete a fresh installation, then import your backed-up data.
See Upgrade from backup.
Complete these steps on all nodes:
/user/temp/wandisco/svn-replicator/
/user/temp/wandisco/svn-replicator/liband run the upgrader script, using the command:
java -jar svn-replicator.jar -upgrade <path><path> is the path to the svn-replicator directory of your current installation, e.g.
/opt/wandisco/svn-replicatorRead more about using the upgrader script.
2) Have you run synchronized stop on replicators at all nodes Y or N ?
3) Have you run reset command from the /bin directory at all nodes? Y or N ?
4) Confirm that you wish to upgrade the installation at: /wandisco/svn-replicator
   If you proceed, files will be overwritten. Y or N ?
Answer "Y" to all prompts. If there's anything you need to complete, open up a new terminal window and complete the requirement before continuing.
Alert
Don't forget to repeat these steps for each node.
The upgrader script is only for moving to a later build of the same product version.
Do not use the upgrader script for moving from 3.7 to 4.0, or 4.0 to 4.1.
When upgrading between full versions, backup your user data, complete a fresh installation, then import your backed-up data.
See Upgrade from backup.
You can read more about how to use the upgrader script by running it with the -help flag.
$ java -jar svn-replicator.jar -help
Alert
Valid parameters are:
-dprefs show dynamic preferences.
-nodes show node information.
-upgrade <path> upgrade an existing installation at the specified path.
-upgradeNoConfirm <path> upgrade an existing installation at the specified path WITHOUT PROMPTING FOR CONFIRMATION.
-help | -h show help
The Authz Notification (authznotifier.jar) utility passes the location of the diff file containing the changes between the existing and newly updated Authz file to the replicators, along with the output of the md5sum tool on the existing Authz file.
authznotifier.jar file is located in the svn-replicator/lib directory.
Authz notifiier (When not using SSL encryption) runs using the following command:
java -Dauthznotifier.nossl=true -jar authznotifier.jar </path/to/admin/password-file> </path/to/diff>
<md5-value> [-patchtool </path/to/patch>] [-md5sumtool </path/to/md5sum>]
example:
java -Dauthznotifier.nossl=true -jar authznotifier.jar /sec/pass.file /home/scm/diff.out "2889b653854f68872fbb6c771348f3d9 /home/scm/svn.auth"
Authz notifiier (When using SSL encryption) runs using the following command:
java -jar authznotifier.jar </path/to/admin/password-file> </path/to/diff>
<md5-value> [-patchtool </path/to/patch>] [-md5sumtool </path/to/md5sum>]
example:
java -jar authznotifier.jar /sec/pass.file /home/scm/diff.out "2889b653854f68872fbb6c771348f3d9 /home/scm/svn.auth"
Key
diff <original-authz-file> <new-authz-file> > diff.out
/usr/bin/patch
/usr/bin/md5sum
Defaults to /usr/bin/md5sumThe password file should be in plain text and contain MultiSite's admin authentication details in the following format:
Username
Password
Or, if you use the default 'admin' username, then the password file can just contain the password.
To use a different port, invoke java with -Dauthznotifier.port=xxxx
For example:
java -Dauthznotifier.port=xxxx -jar authznotifier.jar /path/to/password-file
</path/to/diff> <md5-value> [-patchtool </path/to/patch>] [-md5sumtool </path/to/md5sum>]
java -jar ldapadminreset.jar /path/to/passwordwhere /path/to/password points to a file containing the original WANdisco admin password (ie. not an LDAP login).
java -Dldapadminreset.port=6445 -jar ldapadminreset.jar /wandisco/pass.wd
The LDAP Admin login functionality lets you specify an LDAP group or subtree that contains users who can login as administrators. The format of the URL is:
ldap(s)://host:port/basedn?attribute?scope?filter
objectClass=*), which will search for all objects in the tree.Once a user is deemed to be an admin based on the criteria above, authentication is carried out against the LDAP Authority system, so it is important to ensure a relevant LDAP authority has been defined.
MultiSite's pre-replication authentication operates with some timeout values which may need to be modified to match your environment.
To override these defaults, ensure that the following statements are present as SERVER_JVM_ARGS: statements in the
<WANdisco Installlation>/bin/reputils.pm file:
$SERVER_JVM_ARGS .= " -Dldapauth.timeout=<LDAP timeout> -Dldapauth.cachettl=<Cache expiry time>";
Both timeouts are in milliseconds
Example LDAP Timeout error as it appears in the log:
Mon Feb 28 15:27:24 GMT 2011 1298906844401 org.nirala.util.services.ldap.LDAPAuthenticator getLdapContext
WARNING: [request-handler-1] LDAP response read timed out, timeout used:1ms.
Mon Feb 28 15:27:24 GMT 2011 1298906844402 org.nirala.util.services.ldap.LDAPAuthenticator isUserAuthed
WARNING: [request-handler-1] LDAP Authorization failed: null
Mon Feb 28 15:27:24 GMT 2011 1298906844402 org.nirala.util.services.ldap.LDAPAuthenticator isUserAuthed
INFO: [request-handler-1] LDAP Auth - User: test@wandisco.com Authenticated: false
Even though committed transactions are always in the same order for each node, the timing of the commits usually varies from node to node. So unless there are no Subversion users logged in, you probably are going to have variations per node for committed transactions.
Go to any node's Dashboard. Type:
http://<IP address>:<WANdisco port number>/dashboard2
You see all the nodes on the Dashboard to compare the listed transactions. Click on a Tx Id (Transaction ID) to view more details about the WebDAV command, along with it's transaction number.
Repair Repository is a tool for making a repair of corrupted repositories. Previously, repairing a repository would require that all nodes in the replication group be brought to a stop, making all repositories read-only until the repair was completed.
This overview will help you understand the sequence of events that are involved in a typical repository repair, for a step-by-step explanation of how to repair a repository see the Repository Repair Procedure.
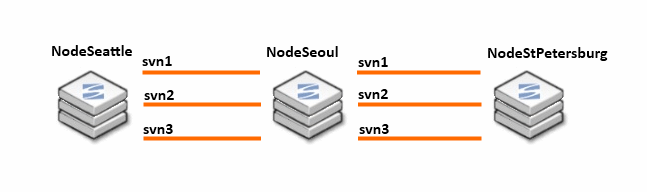
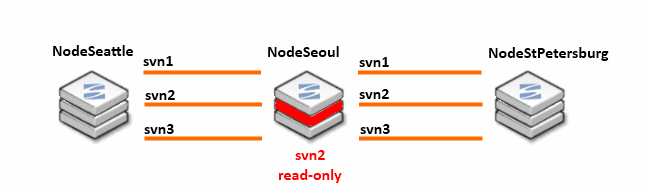
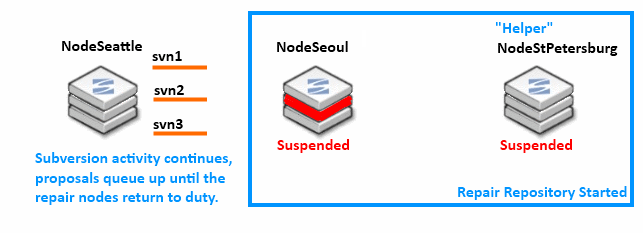
rsync between the two nodes.rsync program to transfer missing or corrupted revisions from the helper node, NodeStPetersburg to NodeSeoul.
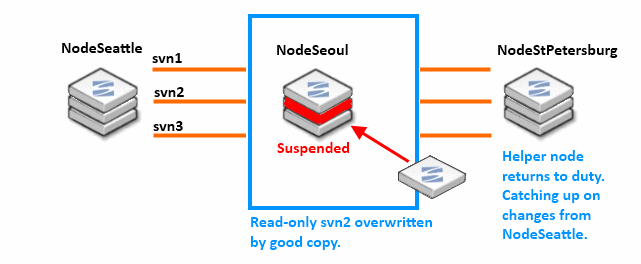
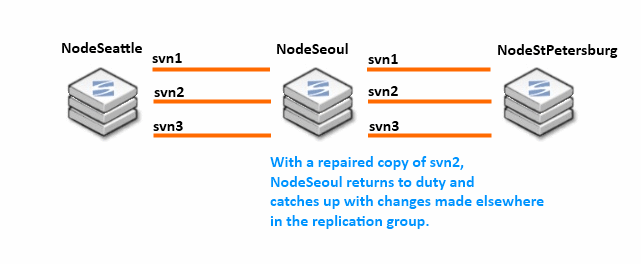
This is a step-by-step guide to doing a repository repair. Before running through this procedure, it may be helpful to read through the overview which explains how the nodes and repositories change their state through the Repository Repair Overview.
WARNING: After starting a repository repair you Must Not navigate away from the repair browser session or open up a new session on the node. To ensure that the repair doesn't fail or stall, don't perform any other action on the node until the repair has been completed.
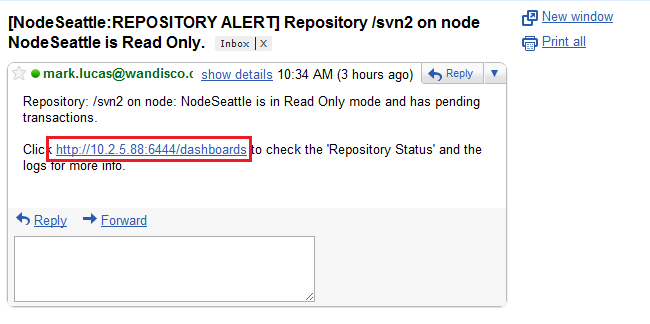
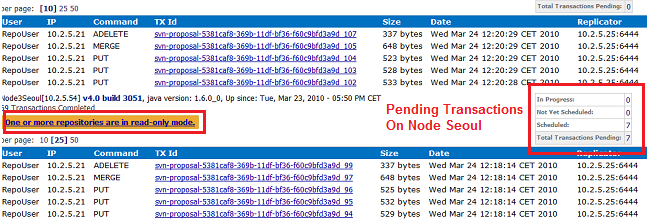
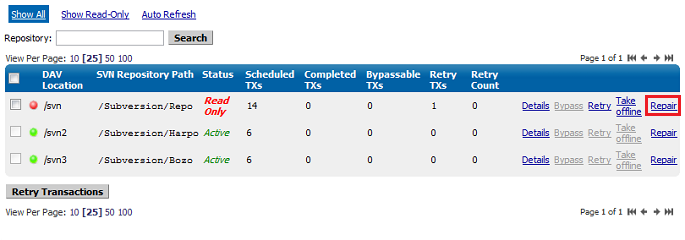
Alert
The Helper Node must have an up-to-date copy of the repository under repair, and must also not be currently involved in another repair.
Tip
If you start a repair using the "repair" link on the status screen (shown above) you'll only need to select the helper node.
If you start the repair by following the Repair Repository link (side menu) then you will also need to select the node on which the repair will be done.
To move to the next step of the repair procedure, click Continue. Before doing so, make sure that you read through the key information:
Alert
VERY IMPORTANT - PLEASE READ
Unless the repair tool is used properly you may worsen your situation and require additional repairs:
* Inform Subversion users working on either the helper or affected node that they won't be able to commit to any repositories hosted on their node during the repair.
* Repair only one repository at any given time and ensure that it is completed before starting another.
* Whilst using the repair tool, don't navigate away, start another repair or use other admin console features until the repair is complete. We recommend that you arrange exclusive access to the admin console on all nodes during the repair.
 Nodes put in a suspended mode will:
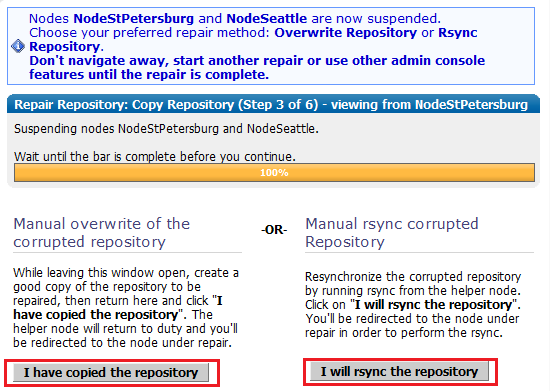
With this option, you will take an up-to-date copy of the repository from the helper node, once you have the copy, click "I have copied the repository". The helper node will be returned to duty, and will catch up with the remaining active nodes.
During a repair, don't close the admin console session, or navigate away from the screen. You shouldn't start a repair if another repair is underway on other nodes in your replication group.
We strongly recommend that you organise to have exclusive access to the admin consoles of your nodes during a repair, to ensure that no actions are triggered that might cause the repair to fail.
This section illustrates a possible method for creating a copy of the repository.
root@Fed11-2 Subversion]# ls -l
total 12
drwxr-xr-x 7 apache apache 4096 2010-03-24 11:13 Bozo
drwxr-xr-x 7 apache apache 4096 2010-03-24 11:11 Harpo
drwxr-xr-x 7 apache apache 4096 2009-11-05 17:26 Repo
[root@Fed11-2 Subversion]# mkdir backup
[root@Fed11-2 Subversion]# tar cvf RepoBozoBackup.tar Bozo
Then move the tar file into the backup directory:
backup  Bozo  Harpo  Repo  RepoBozoBackup.tar
[root@Fed11-2 Subversion]# mv RepoBozoBackup.tar backup

<repository_name>/db/rep-cache.dbThis step is not essential and could result in the repository becoming slightly larger, however it removes the risk that the repaired repository will not match with the cache file.
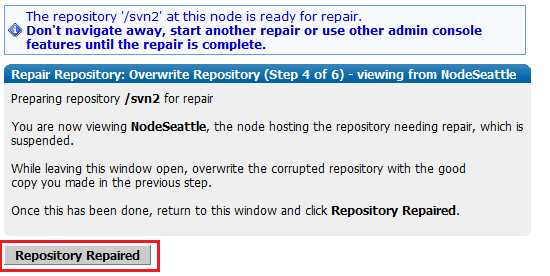
Using SVN 1.7 or later?
At this point we recommend that you force a restart of Apache using your startup scripts. In Subversion 1.7 or later there is a chance that there remain open file handlers that point to files that no longer exist or have been replaced during the rsync.
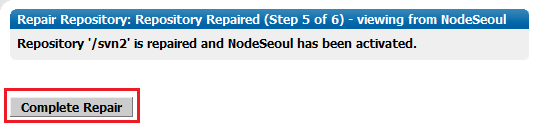
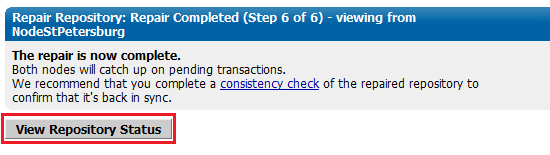
With this repair method you'll use the rsync command to synchronize the out-of-date repository with the good copy on the helper node.
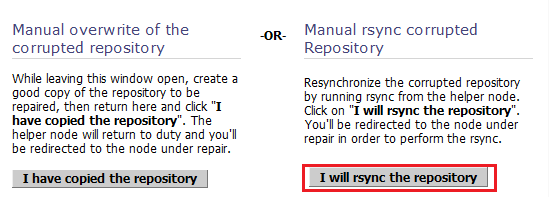
rsync command in the Troubleshooting section 2.7 Using rsync to repair a repository.svnadmin verify <REPOSITORY NAME> -r <REVISION NUMBER>

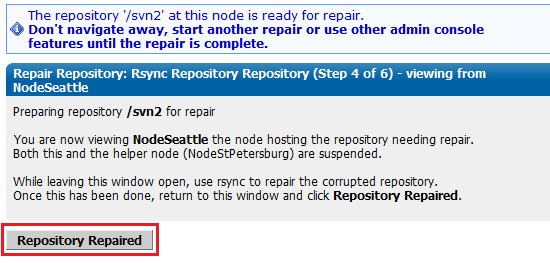
Using SVN 1.7 or later?
At this point we recommend that you force a restart of Apache using your startup scripts. In Subversion 1.7 or later there is a chance that there remain open file handlers that point to files that no longer exist or have been replaced during the rsync.
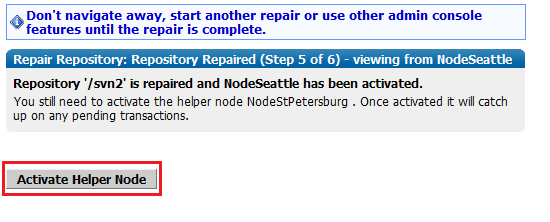
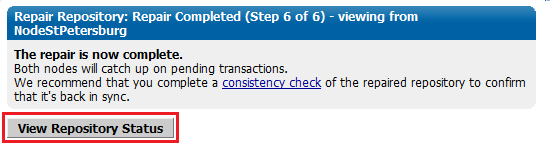
Alert
This makes Subversion read-only. You may need to warn you Subversion users.
You can stop transactions at one or more nodes. For a discussion of stopping one, but not all, nodes, see WANdisco is Listening
Alert
To stop replication you need to run a synchronized stop.
6. Re-start each node that you stopped.
To stop all nodes at once, run a synchronized stop.
Use this procedure as a last resort, if the distinguished node (in a singleton quorum) has become permanently unavailable. The procedure basically creates a new replication group that excludes the unreachable node.
If a quorum can't be formed, an alert will appear at the top of the admin console.
Follow the "Click here for more details" link.
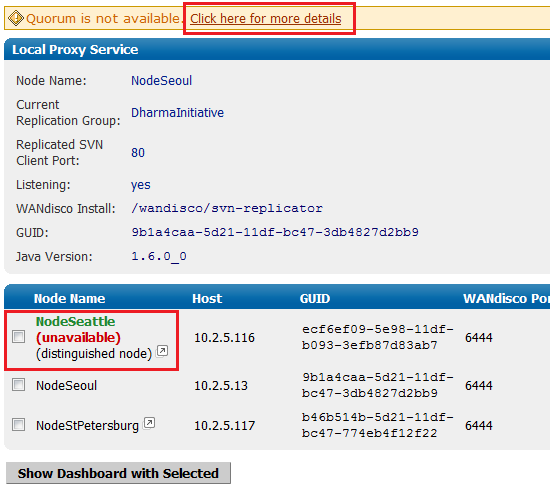
Use the emergency reconfiguration procedure only when the recovery of the distinguished node will take an unacceptable amount of time.
Using a Singleton Quorum - If the distinguished node is periodically reachable, instead, try using the Change Distinguished Node while its available.
Using a Majority Quorum - If the quorum is periodically reachable, instead, wait for the quorum to become available and recreate the replication group, using a singleton quorum, instead of using the emergency procedure. You can change back to the majority quorum after stabilising your nodes.
Caution
We don't recommend using this procedure because of the potential for data loss. If the distinguished node is unreachable by other nodes it could still be processing transactions on its own (with singleton quorum, the distinguished node can operate alone). Therefore, if the other nodes form a new quorum that excludes the distinguished node, any transactions made at the distinguished node since it became unreachable to the other nodes would be lost.
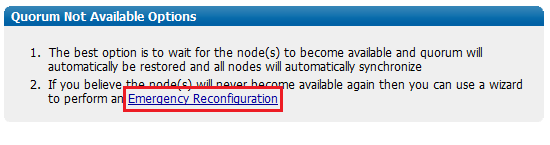

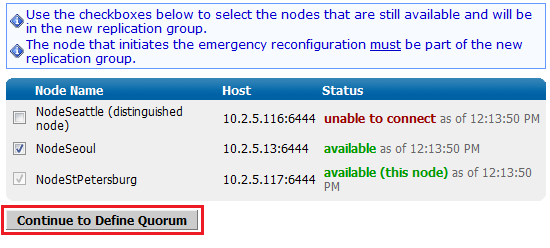
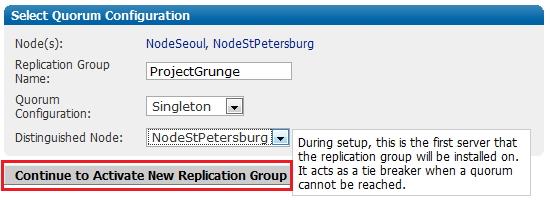
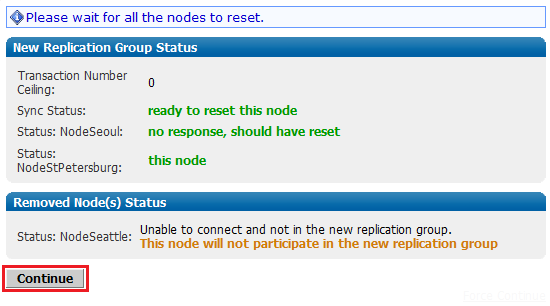
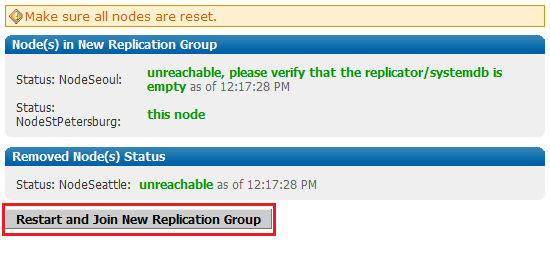
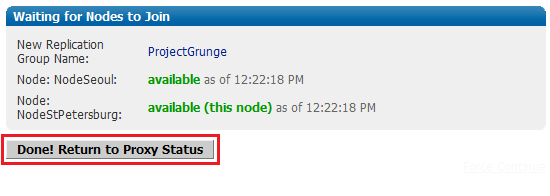
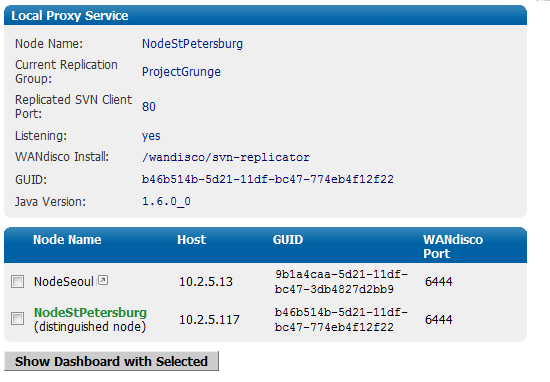
This process can fix a corrupted or out-of-sync repository by restoring it to a replica of the repository that is known to be in a good state.
From the machine with the master repository, type the following commands:
rsync -rvlHtogpc /path/to/local/repositories/<Repository Name> remoteHost:/path/to/remote/repositories/
For example:
rsync -rvlHtogpc /Subversion/Repo/db/ root@172.7.2.33:/Subversion/Repo/
Then follow up with an additional rsync that will ensure that contents of the locks directory are indentical (by deleting locks that are not present on the originating server)
rsync -rvlHtogpc --delete /path/to/local/repo/db/locks/<Repository Name> remoteHost:/path/to/remote/repo/
For example:
rsync -rvlHtogpc --delete /Subversion/Repo/db/locks root@172.7.2.33:/Subversion/Repo/db/
Knowledgebase
You can read a more detailed step-by-step guide to using rsync in the Knowledge Base article Reset and rsync Subversion repositories.
How read-only repositories can lead to performance problems
If a transaction fails on one node, and is not bypassed, the repository is placed in a read-only mode to stop the failure from halting replication between the replicas on the other nodes. The subsequent transactions between the other replicas will stack up until the read-only replica is again writable. Garbage collection is held up and on the node with the read-only repository, all buckets subsequent to the failed transaction remain active and continue to eat into the Java heap. In a heavy traffic environment this can lead to Java heap overflows unless the repository is quickly recovered or taken offline.
Knowledgebase
For a detailed explanation of how Subversion MultiSite's Garbage Collection works, see the article Garbage Collection.
A read-only repository will switch offline should the number of transactions exceed a threshold. This threshold is controlled from the Garbage Collection screen, found on the admin console's System tab.
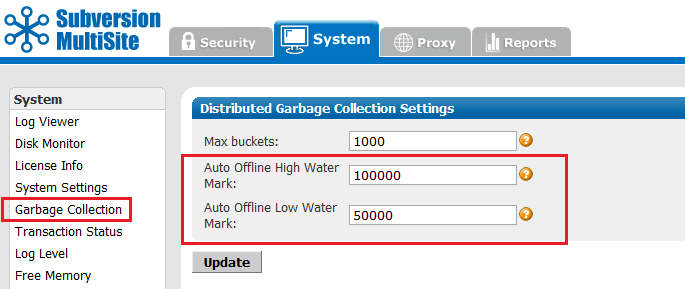
For an explanation of the Garbage Collection page, see the Admin Console Guide - 4.5 Garbage Collection.
The threshold is called the Auto Offline High Water Mark and by default it is set to 100,000 transactions. You can increase the number if there's sufficient Java heap space to handle large amounts of queued transactions. If JAVA resources are tight, you can reduce the threshold so that a read-only repository is taken offline sooner.
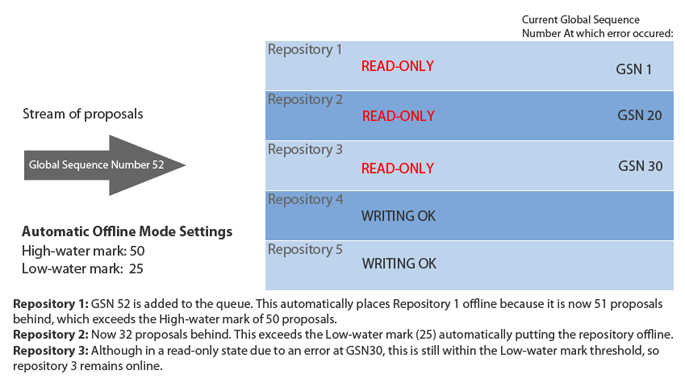
Here is an example of the Automatic offline mode in action.
A repository that is read-only can be placed offline through the admin console. The option to take a repository offline will coincide with the option to attempt a bypass of a failed transaction.
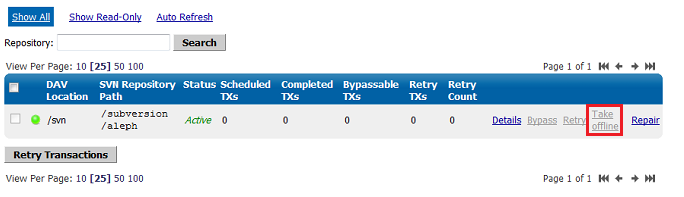
From the Proxy tab, click on Repository Status which is the second link on the status menu.
When you do contact WANdisco with a problem, the first thing WANdisco support asks for is the talkback file. Run the file by typing at svn-replicator/bin
perl talkback
Type in the pathname to SVNROOT when prompted. The output looks like this:
Please open a ticket by visiting http://support.wandisco.com and upload the /talkback-<machine name>.zip, with a description of the issue.
Do not email the talkback files, only attach them via the web case interface.
The zip file is located at the root directory. Do not email the .zip file, just attach them to your case. Read our Knowledgebase article about How to raise a support case.
Sometimes in the WANdisco logs, you see connection request timeout information messages logged. These are informational messages and should be ignored unless it is guaranteed that the connection can be established in xxx milli-seconds and happens often.
In normal operation of MultiSite, two connections are established between each of the replicated machines, MultiSite connection and a DFTP connection. These two connections were established when MultiSite started and are used when required. A keep-alive signal is periodically sent on the WANdisco port. There is no traffic on DFTP until a file transfer begins.
Some lesser routers in the path of the two end points will close an established connection if there is no traffic on the connection without notifying the end points. When end points sent data on this stale connection, they hang forever. To deal with these lesser routers, MultiSite does not keep the DFTP open in its connection pool forever. MultiSite establishes a DFTP connection from receiver to sender when a file transfer was required. This solved the problem dealing with lesser routers.
Some companies have a corporate policy that network connections can only be established in one direction. To deal with this scenario, the replicated machines establish a DFTP connection to other nodes periodically and tear them down if there is no traffic within a known interval. Once a connection is established, any side is free to use the connection regardless of which side initiated the connection. A connection in use is never torn down until it is available as a free connection. This is the current implementation.
It takes between 300 to 400 milli-seconds to establish a network connection even on a slow WAN. By default, MultiSite waits for 500 milli-seconds before giving up that a connection cannot be established to a peer machine and prints this informational message. What if the establishments of connection always take 501 milli-seconds. In this case, a connection is never established. To solve this problem, the timeout value is adjusted in 10% increments of the last timeout, starting at 500 milli-seconds, to a maximum of 10 seconds for each timed out connection.
Upon establishment of a successful connection, this timeout value is used for subsequent connection establishment unless an adjustment is required for failed attempts.
This section is useful if you are experiencing issues with slow commits on the non-distinguished node or if you have port-forwarding in your environment.
In a multi-site configuration, most nodes are connected through a WAN. Often, VPN and NAT devices are used to do IP translation and port forwarding. These devices need to maintain state in order to do the port forwarding on-the-fly. This state can grow if not cleaned out. Many devices simply reset the internal state after an inactivity timeout. For example, some Cisco NAT routers reset state after 7200 seconds or 2 hours.
The MultiSite replicator uses persistent TCP connections between the replicators. If these TCP connection are going through a NAT or port forwarding device, it's important to tune the VPN and/or the TCP stack at the replicator host machine. Many NAT devices have buggy implementation that resets the internal state without resetting the TCP connections.
In such a situation, the replicators may see a connection as established but no communication actually happens. The symptoms include a slow commit that is blocking WAN communication. You can run netstat -a | grep <DConEPort> to see if the TCP send queues are backing up. That, in conjunction with slow commits that appear to be hanging, or frozen, typically indicates the NAT is not gracefully resetting TCP connections.
You can further confirm this by using tcpdump or ethereal to check for excessive retransmissions on the DConENet connections. You could also look at your VPN/NAT device log to see if it reset any DConENet connections that appear to be in an ESTABLISHED state via the netstat -a command.
These are a few ways of addressing the issue :
<DConENet>
 <ConnectionKeepAliveTime>1800000</ConnectionKeepAliveTime>
</DConENet>
/proc/sys/net/ipv4/tcp_keepalive_time to reduce the interval from default 2 hours to 30 minutes.If any nodes are in read-only mode,
This procedure requires that your MultiSite deployment, including Subversion servers, are offline during the time it takes to upgrade at each node. Please plan this procedure accordingly.
Subversion MultiSite depends on a license key file being present in the svn-replicator/config directory for each node. Please get a valid license from WANdisco and copy the file to the config directory. MultiSite won't start without the license file.
I'm getting a SEVERE exception, and replicator is aborting the Subversion transaction and shutting down.
If you get a message in the logs/SVNProxy*.log file similar to
svn: Commit failed (details follow):

svn: File not found: transaction '10-d', path '/development/Hello.txt'
it means the replicator has detected an out of sync condition. Remember, the replicator continuously monitors your repository for any out of sync issues. If it detects this has occurred, it triggers an automatic shutdown to prevent further corruption.
This could happen if someone accidently committed directly to Subversion, bypassing the replicator, and ramped up the version in one node without giving the replicator any chance of replicating. This can be easily resolved by following the reset procedure outlined in I Directly Committed to Subversion, How Do I Rsync?.
Follow all precaution to avoid bypassing the replicator:
Subversion MultiSite has a browser-based admin console for the management of replication groups, setting changes or viewing system logs.
Connect to the admin console through a web browser, using your server's hostname or IP address, along with the administration port (defaults to 6444).
e.g.
http://10.2.5.101:6444 (http://(Server IP):(Admin port)
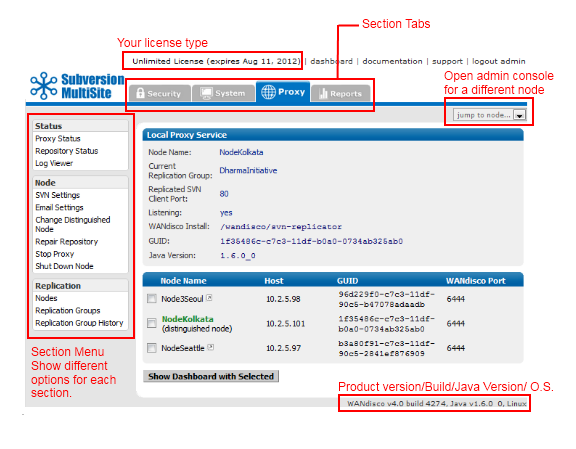
The admin console screen consists of the following elements:
Top menu bar: includes the product license and any expiry date, along with links to documentation and support.
Section tabs: The admin consoles different sections are seperated on tabs. They consist of the following sections:
Alert
The layout and features available in admin console alter depending on your license agreement. So you may not see all the elements described in this guide.
Jump to node...: This drop-down link will open the admin console for one of the other nodes. You can identify which node you're viewing by checking the webpage's title.
Section menu: Appears on the left-hand side and contains links to features that are specific to the tab.
Product version line appears at the bottom of the screen and shows the product version and build, the version of Java installed and the operating system.
On the authentication screen there are a number of links available, even if you don't login.
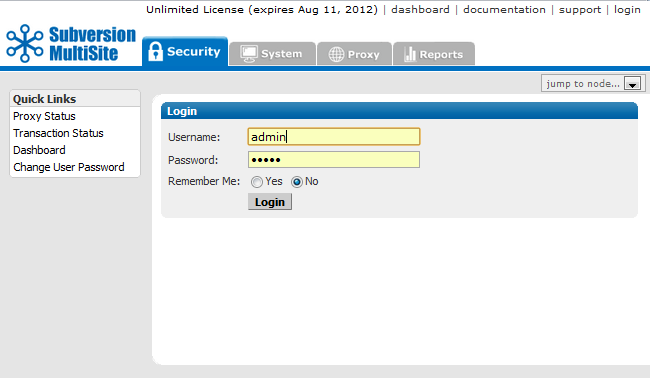
Proxy Status - Proxy Status Displays the node's status in the tab's main panel.
Transaction Status - Lets you check on the status of individual transactions.
Dashboard - Lists DAV traffic
Change User Password - Follow this link to change the password of a User, it's not used for changing the Admin password.
The security tab handles all user related functionality.
Tip
The Security tab features product capabilities that are available when the Access Control product has been bundled with Subversion MultiSite. The documentation for using Access Control can be found in the Access Control Admin Guide.
Caution
If you are using LDAP based authentication, do not make changes to users using the admin console user administration.
LDAP passwords
Use only alphanumeric characters in LDAP passwords. Due to a bug in sn Apache/mod_dav_svn, the use of non-alphanumeric characters in passwords could result in replication failure.
Create new roles and assign them privileges.
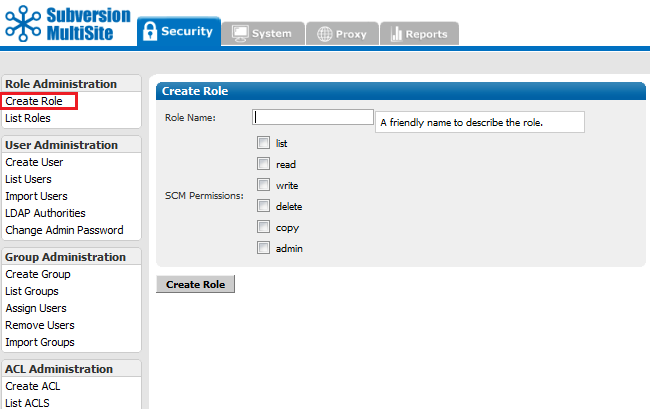
Role Name: Enter a name for the new role.
Tick the checkboxes that correspond with the Subversion file permissions that you want to assign to the role.
The available permissions are:
Click Create Role to save the new role.
View the roles that have already been set up, along with their corresponding permissions.
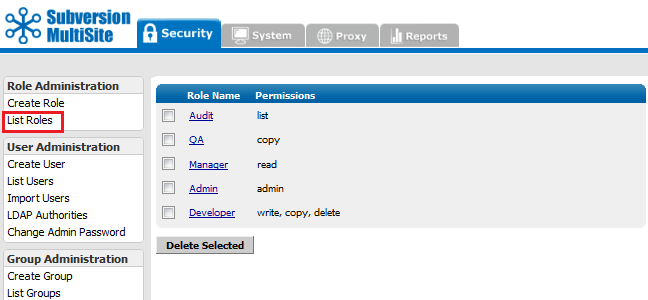
Display all roles, including pre-defined and any new roles created using the Create Roles screen.
To delete a role, click on the corresponding checkbox and click Delete Selected.
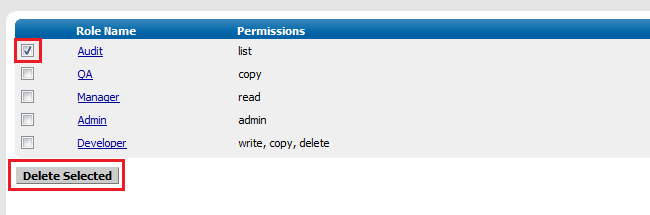
To Update a role, click on the Role Name and change the permissions by ticking and unticking the checkboxes. Then click Update Role.

Manage Subversion user accounts. If you have set Subversion MultiSite to manage the Subversion password file, then any user that you create in the admin console, will automatically be added to the Subversion password file.
Enter the details of the Subversion user, select a default role.
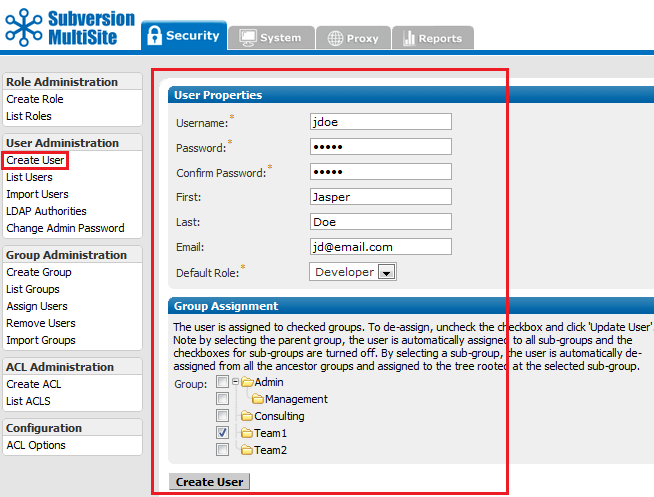
Create User
Enter the details of a new Subversion User.
Tip
Usernames can contain any characters except for ~ (tilde), " (double quote) or : (colon).
When importing users, it's possible to include a comma in a username by using an escape character, e.g.
,"Reninngton\, Jr.","Oscar"
Select the Default Role, which will decide which file permissions the user will have. e.g. With the Default Role set to "Developer" the user will have write,copy,delete permissions. When the User details are entered click Create User to save them.
All users entered in the system are listed here. Though users who were already present in the Subversion password file will not appear unless they are imported or entered into the admin console. The Last Recorded Access column shows the date and time that each user last accessed (or attempted to access) a Subversion repository.

AlertUserid You can view and edit each user's details by clicking on that user's Userid entry.
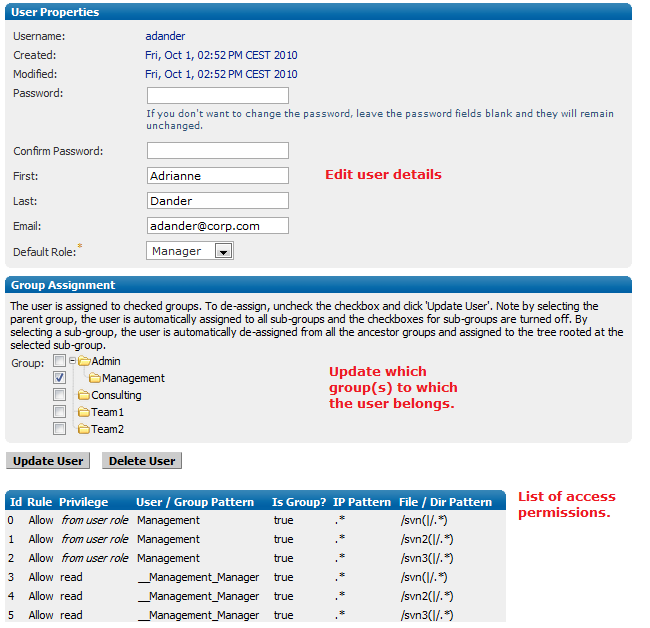
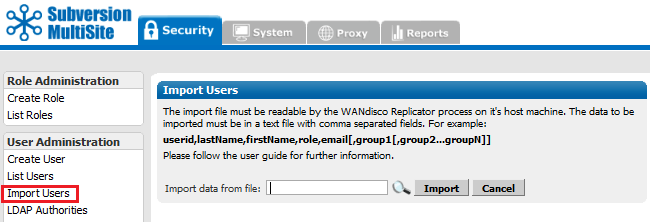
Import Users You can import an existing list of users. The import file must be a comma delimited text file, of the format; userid,lastName,firstName,role,email[,group1[,group2...groupN]]
Important All files for use with WANdisco MultiSite should use UTF-8 encoding (and/or single-byte encoding if there are no none-ASCII characters). Any other encoding eg. Unicode will not be parsed correctly.
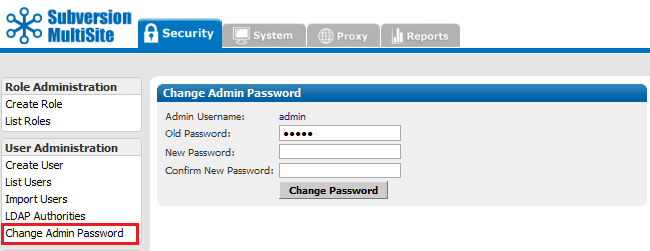
Change Admin Password You can change the Access Control Admin password with this screen.
Control the groups used for organising Subversion users.
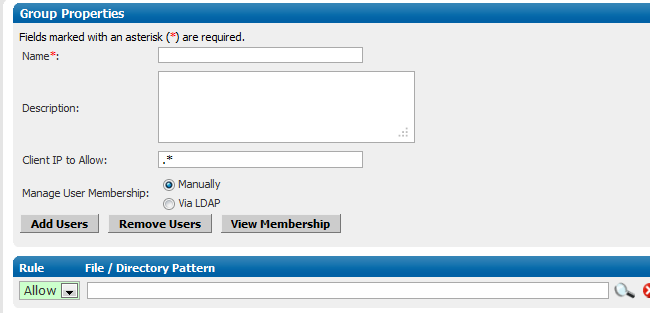
Create Group
Create a new group.
Group Properties
Name: A name for the group
Description: A field for writing an explanation of what the group does.
Client IP Pattern to Allow: Provide an IP range pattern to determine membership of the group.
Manage User Membership: Select either Manually or via LDAP.
Manually handles the assignment of users to groups through the admin console.
Via LDAP allows an organisation's LDAP service to control which users are assigned to groups.
Add Users Add users to the group.
Remove Users Remove users from the group.
View Membership View the group's current members.
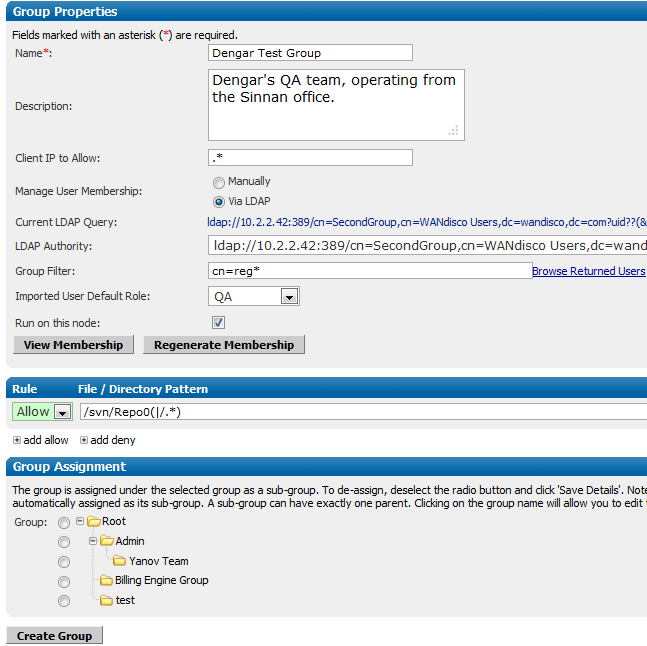
Current LDAP Query: The LDAP query that identifies the group membership requirements
LDAP Authority: The LDAP service that is currenly being use for LDAP.
Group Filter: The filter used to identify the criteria for group membership.
Imported User Default Role When a user is added to the group, this is the role they are given by default.
Run on this node: Select whether the groups membership is managed via the LDAP settings on this node. Unselected, changes to Access Control will replicate from the node on which the LDAP control is running.
View Membership View the group's current members.
Regenerate Membership Use this to poll LDAP for group membership, this will recreate the group membership.
Access Control Rule:
You can add access rules that group members will inherit. Click the Add allow or add deny to add a new rule line. You can then specify whether a rule is an allow or deny by using the dropdown.
Group Assignment
You can organise groups using the assignment feature. Selecting Root will place the new group at the top of the groups tree. You can also select another group, which will place the new group as a subgroup.
Click Create Group to save the settings.
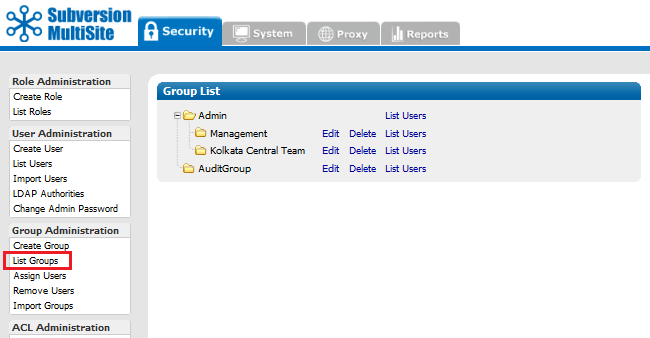
List Group Shows all the available groups.
You can Edit, Delete groups or List Users.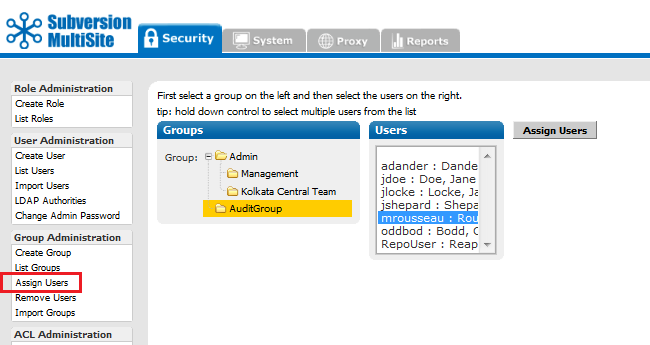
Assign Users Allows you to assign users to groups. If a user is already in a group, his or her name does not appear in the list of available users.
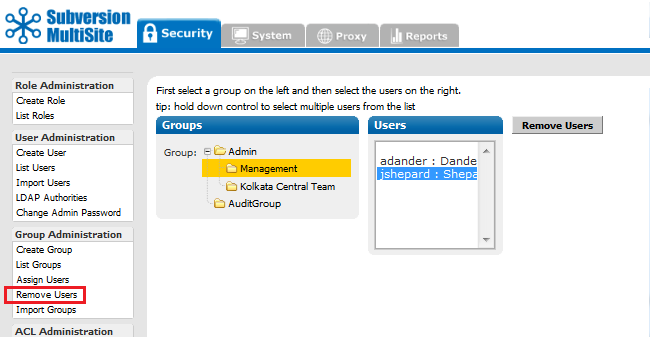
Remove Users Use this to remove users from a group.
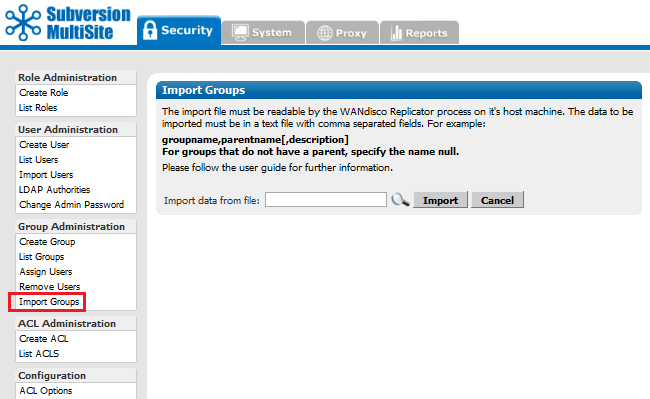
Import Groups You can import a list of existing groups. The import file must be a comma delimited text file, of the format groupname,parentname[,description]. If there is no parent name, specify null.
Important All files for use with WANdisco MultiSite should use UTF-8 encoding (and/or single-byte encoding if there are no none-ASCII characters). Any other encoding eg. Unicode will not be parsed correctly.
This menu can be toggled off. See Toggling the ACL Options. For a complete discussion on ACLs, See About Access Control Lists.

Create ACL Create more than one at a time, use List ACLs.
User / Group: Enter either a User or Group name.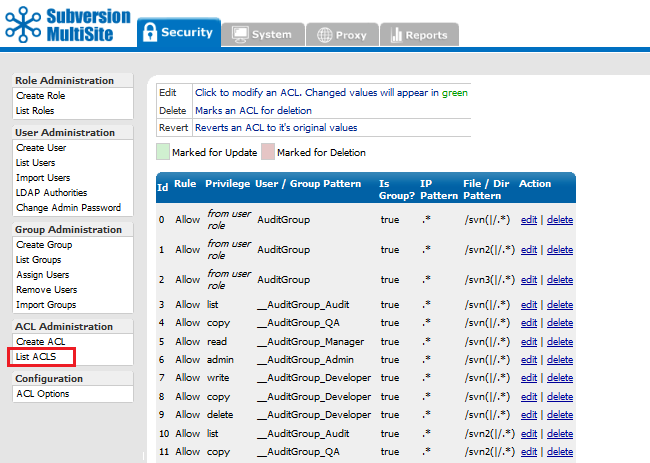
List ACLs Lists all existing ACLs. You can create, edit or delete ACLs from this screen. Use the List ACLs screen if you need to create multiple ACLs. Click edit to make changes to an existing rule, delete to delete a rule.
Tip
Access Control uses the concept of a valid Principal with adequate privileges to access a secured resource. Powerful Perl style regular expressions can be used wherever patterns are allowed. Principal can be any valid user, group or IP pattern for instance - engineering.* (note the dot) or 217\.[0-9]+ are all valid. By default the HEAD branch is specified but you can enter a regular expression just as well - release9\.0_.* for instance.
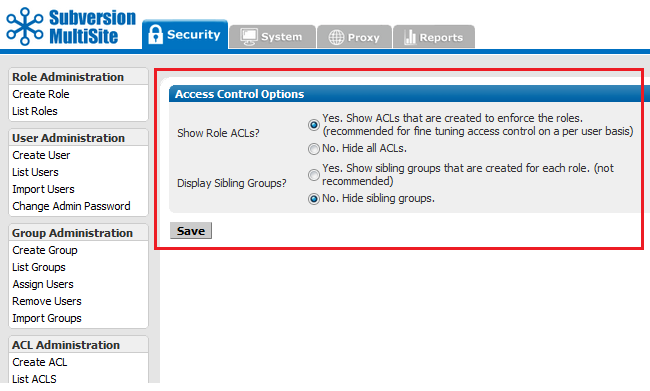
The Access Control Options screen is used to filter display of Role ACLs and Sibling Groups.
Show Role ACLs? Yes or No. "Yes" will enable the Access Control Lists screens, allowing fine-tuning of user and group controls. With "No" selected, the ACL Administration section of the menu will no longer appear. The only ACLs that apply will be those inherited from assigned groups.
Display Sibling Groups? Yes or No. With a "Yes", when creating or editing groups you will be shown a group entry for each role. This gives you finer control over how access control rules are applied.
The system tab provides access to logging and backup features.
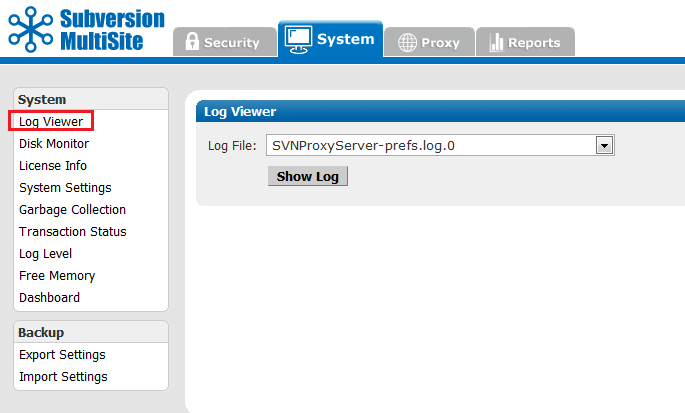
MultiSite log files can be viewed from here.
Knowledgebase
There's a knowledgebase article about WANdisco Log Files.
Logs can be generated over multiple lines, which can make reading/performing greps difficult. It's possible to limit each log to a single line by using the following procedure:
org.nirala.trace.WandiscoLoggingFileHandler.formatter = org.nirala.trace.SingleLineFormatter
The disk monitor can be used to lessen the chance of a node running out of disk space, which would result in the loss of replication or data corruption.
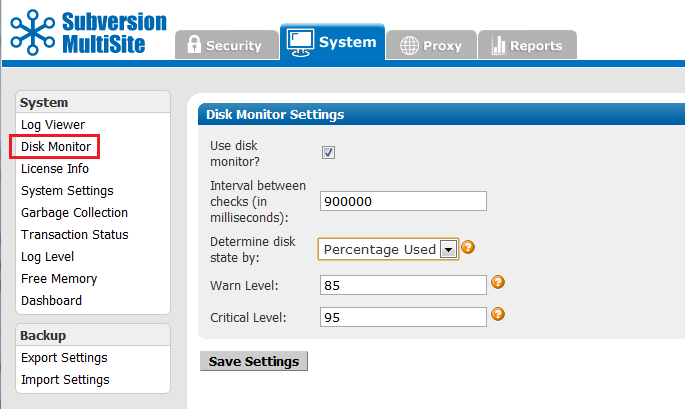
Alert
You MUST restart the node for any changes you make to take effect.
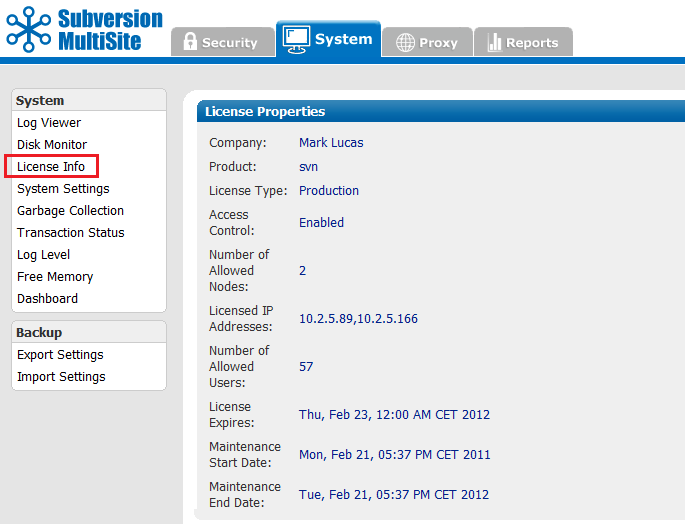
The License Info page contains the details of your WANdisco product license, useful for confirming the details of a number of license-specific features.
Company: Your company name.
Product: The product type. This is currently either svn (Subversion) or (CVS).
License Type: This indicated whether the license is either for evaluation or production.
Access Control:
Shows if Access Control has been enabled on the product. With Access Control enabled, the User's tab is renamed "Security" and is expanded to include many additional features for Access Control.
Number of Allowed Nodes: Number of replicator instances that have been licensed.
Licensed IP Addresses: The IP addresses of each node.
Number of Allowed Users: Total number of possible users that are covered under the license.
License Expires: The date on which the current license will expire.
Maintenance Start Date: The first date covered by the current maintenance contract.
Maintenance End Date: The final date covered by the current maintenance contract.
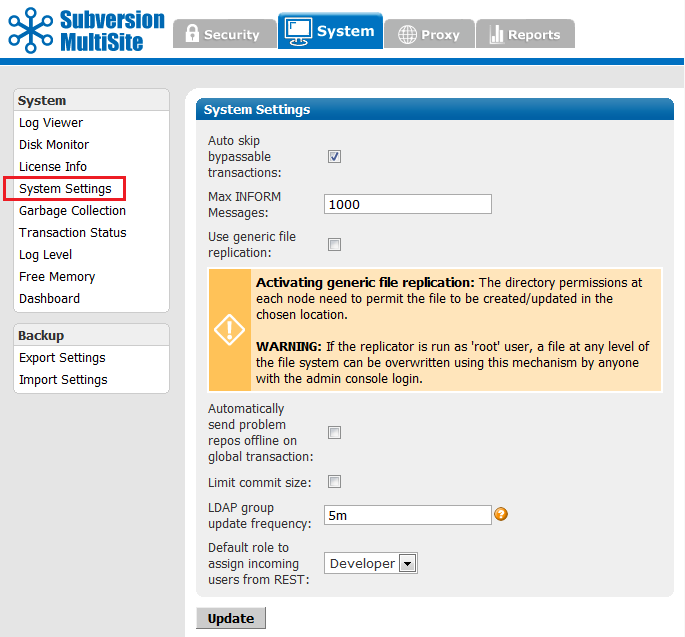
The system settings screen provides a number of extra controls that allow you to fine-tune MultiSite for potential performance improvements.
Auto skip bypassable transactions: Tick the box to force the replicator to automatically skip bypassable transactions.
A transaction is bypassable so long as it fails on all nodes within the replication group. In spite of the failure, all repository replicas remain in sync, allowing replication to continue.
Max INFORM Messages: This is a an advanced tunable parameter that can limit network notification traffic in situations where a node is pulling in a large number of changes, such as while recovering from a brief network outage.
Default value: 1000,
For Unlimited INFORM Messages use the setting "-1".
The default value of 1000 is optimal for the majority of network configurations and file sizes, but can be tuned to make best use of higher or lower bandwidth networks handling varying file sizes.
Once the value is altered at one node, it is replicated to other nodes that are part of the replication group. We recommend that you consult with our support team before changing this setting.
HTML format failed pre-replication hook output: The labelling of the output of failed pre-prelication hook scripts can cause problems. Untick the checkbox to removed the extra formatting, which will make outputs less human-readible but will support scripts that were written around the previous output.
Use generic file replication: Use this checkbox to activate the RESTful API function that allows for generic file replication.
Alert
Turning on this feature allows you to replicate files within your file system, i.e. files outside of your repositories such as Authz or Apache configuration files. The feature should be activated with caution as it allows the admin console user to overwrite any file.
Automatically send problem repos offline on global transaction:
Tick this option to ensure that any repositories that are "read-only" are sidelined (taken offline) if a global transaction arrives, so that they don't risk halting the whole replication group. This setting is required because a global transaction needs to pass on every repository before it can execute. Unable to pass against a read-only repository, the transaction will get stuck until the read-only repository can catch up, blocking further repository traffic. Sending the read-only repository offline clears all pending proposals and allow replication of the other repositories to continue.
Limit commit size:
The commitance of a very large file can easily clog DFTP transfer between nodes, which will hold up all other traffic behind a single PUT operation. It's possible to mitigate against attempts to commit giant files using pre-replication hook scripts, however, hooks don't fire commits until the MERGE command is sent, which can be too late to stop the disruption.

Instead, use this check box to set a maximum file size for a commit. When switched on, the default is 1,024MB (1GB). You can use the units: "KB", "MB" or "GB" to denote your filesize. Known issue: although a comma is shown in the default value, currently the entry doesn't support commas.
LDAP group update frequency: Time between the refreshing of LDAP group membership, specified using h, m or s (not case sensitive) to denote hours/minutes/seconds eg. "1h 30m 10s". An unmodified number will be interpreted as milliseconds. The default is 5m.
Default role to assign incoming users from REST: Users who are added via the RESTful API are automatically assigned a default role, selected from the dropdown list.
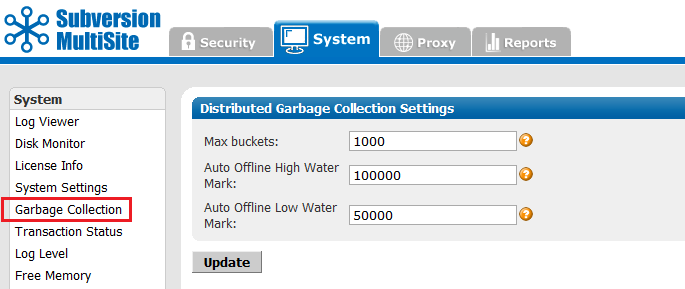
The Garbage collection page lets you tune MultiSite's memory recycling system - the process by which objects that are no longer require get deleted in order to free up resources.
Knowledgebase
For a detailed explanation of how Subversion MultiSite's Garbage Collection works, see the article Garbage Collection.
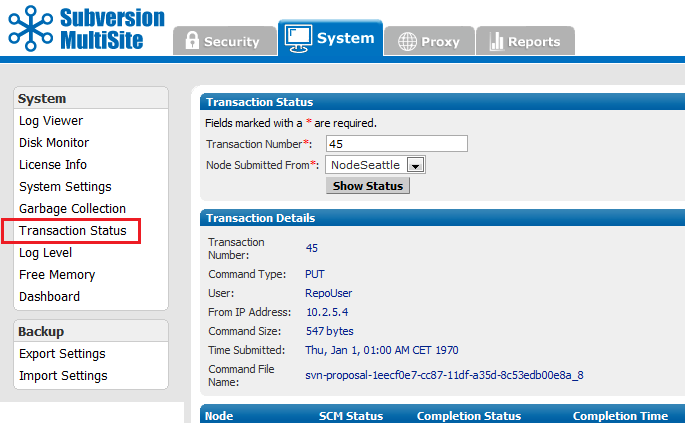
The Transaction Status page lets you query individual transactions to check on their status.
Transaction Number: The transaction's reference number.
Node Submitted From: The originating node of the transaction.
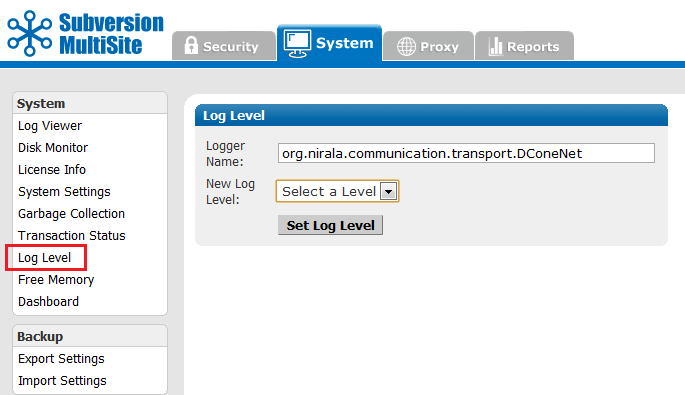
MultiSite uses one log, and the default level is info. The levels vary from severe, where you get only the most severe warnings, to finest, which logs every action.
Logger Name: References the logger object's name.
New Log Level: The following options are available:
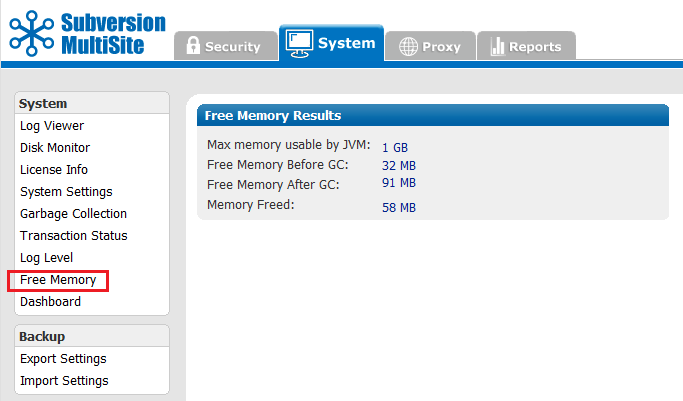
This command frees the memory (GC stands for garbage collection) for the current node. The command occurs when you click on this menu selection. The display shows information on the command that was just performed.
Max mem used by JVM the maximum memory that JVM can use on the current node.
Free memory before GC the amount of free memory before you ran this command
Free memory after GC the amount of free memory after you ran this command
Memory freed the total amount of memory freed at the command's completion
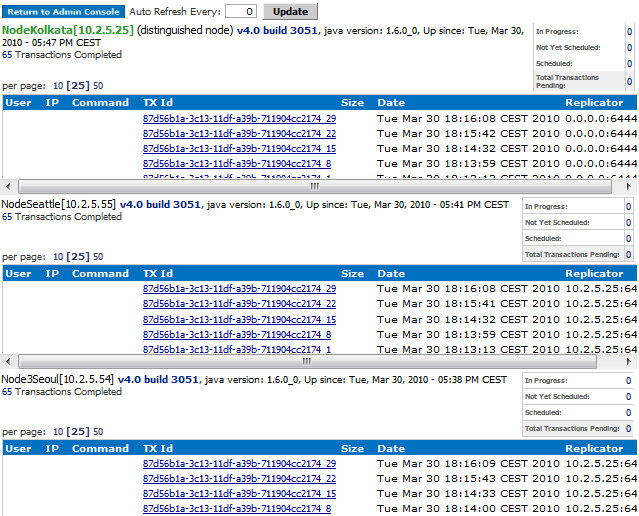
Dashboard provides a list of replicated transactions.
By default, the Dashboard doesn't refresh automatically. Click Update to force a refresh, or set an automatic refresh by enterying a refresh rate, in seconds in the Auto Refresh Every box.
As soon as MultiSite receives a Subversion transaction request, that transaction joins the replication group's queue. There is one queue for the replication group. Pending transactions are not displayed, but are counted in the Total Transactions Pending box in the upper right.
When MultiSite finishes processing a transaction, its displayed in the TX Id field. The Replicator field shows the node from where the transaction originated.
e.g. 0.0.0.0:6444 means the local node originated the transaction.

Export Settings Allows you to export settings, including all users, for later importation into a WANdisco product.
Allows you to import settings, including all users.
Important All files for use with WANdisco MultiSite should use UTF-8 encoding (and/or single-byte encoding if there are no none-ASCII characters). Any other encoding eg. Unicode will not be parsed correctly.
The Proxy tab handles proxy settings which alter the way that MultiSite works between Subversion and users.
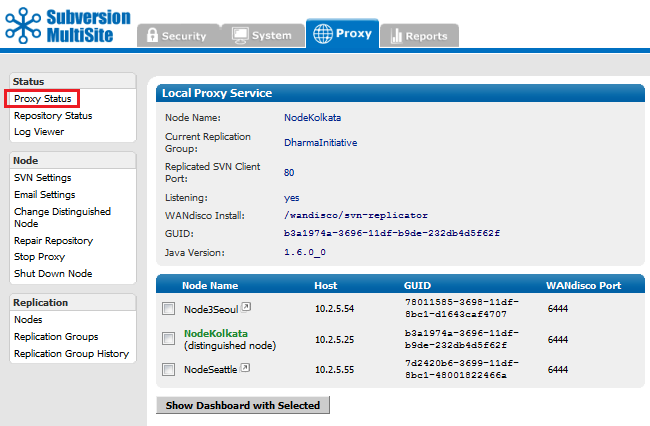
Proxy Status Displays the node's status in the tab's main panel.
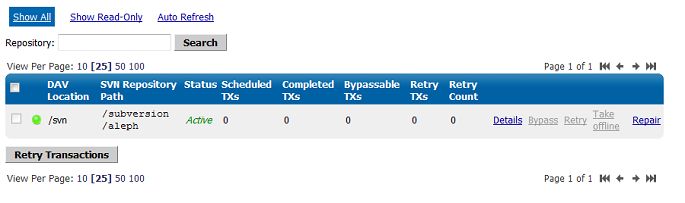
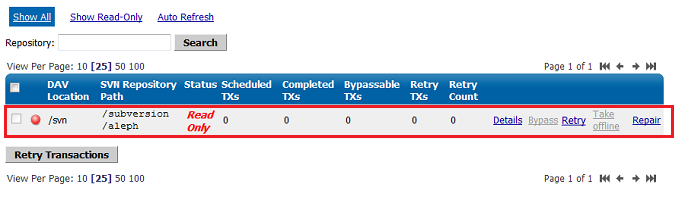
Log Viewer You can view the logs, including the main log SVNProxyServer-prefs.log.0
These settings control how Subversion is set up and include host and authorization details.
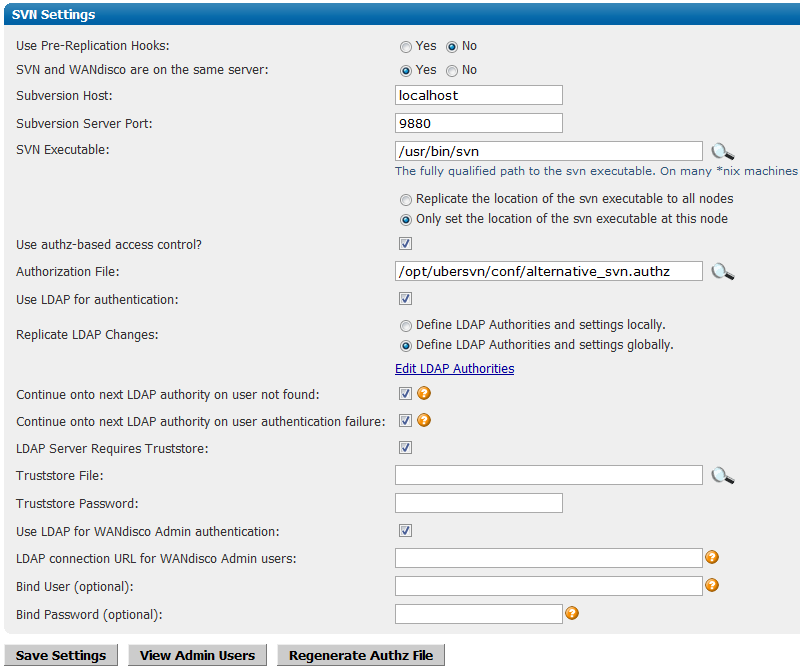
Knowledgebase
You must select the version of Subversion you are using, otherwise pre-replication hooks will not work. See Setting up hooks.
Save Settings Click to save your settings.
Regenerate Authz File If an Authz file is deleted or corrupted, it's now possible to regenerate the file by clicking this button.
Edit LDAP Authorities
Clicking on the Edit LDAP Authorities link takes you to a separate window in which multiple LDAP authorities can be added.
Order: Assign a number for this LDAP authorities relative priority. Authentication will run through available LDAP authorities, going from lowest order number to highest, using the first server that matches the user's username against their regular expression.
Regular Expression The regular expression determining whether a user should be authenticated against this authority. The wildcard ".*" will ensure that all uses the authority.
URL: The LDAP URL to authenticate against in the format ldap(s)://host:port/basedn?attribute. Equivalent to AuthLDAPURL in Apache's MOD_AUTH_LDAP.
Bind User DN (Distinguished Name) (optional) A DN to bind with when accessing the given LDAP URL. Equivalent to AuthLDAPBindDN in Apache's MOD_AUTH_LDAP.
Bind Password (optional) The bind DN (Distinguished Name) password. Equivalent to AuthLDAPBindPassword in Apache's MOD_AUTH_LDAP.
Add Authority: The "Add Authority" button will add the LDAP details.
You can Edit, Delete or Check the consistency of the Subversion Repository.
Add Location: Click to add an additional location to the directory in which you are managing repositories.
Edit Repository

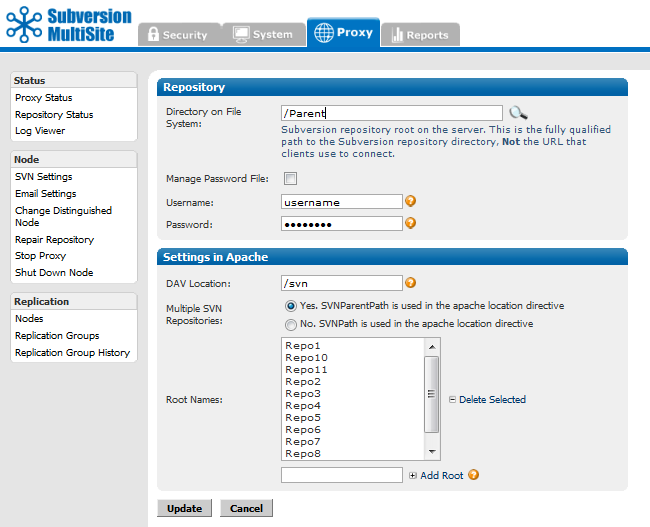
Directory on File System: This is the fully qualified path to the Subversion repository. Not the URL used by clients. You can seach for the location by clicking on the magnifying glass button.
Manage Password File: Tick the checkbox to have MultiSite control your Subversion password file. You can only use this feature if both MuliSite and Subversion are located on the same server.
Username and Password: Username and password of the Subversion user account that will be used to browse the repository. The account will need read and write access to the whole repository.
DAV Location: the directory in which WebDAV is located.
Multiple SVN Repositories: Choose whether you are using SVNParentPath or SVNPath in the Apache location directive.
If you select Yes, SVNParentPath is used in the apache location directive, you'll be presented with a entry box that allows you to select and edit available Root Names.
Consistency CheckProvides a basic check that replication is working properly by comparing Subversion revision information between nodes. Although this is a fairly superficial test of consistency, it will more often than not pick up on problems.
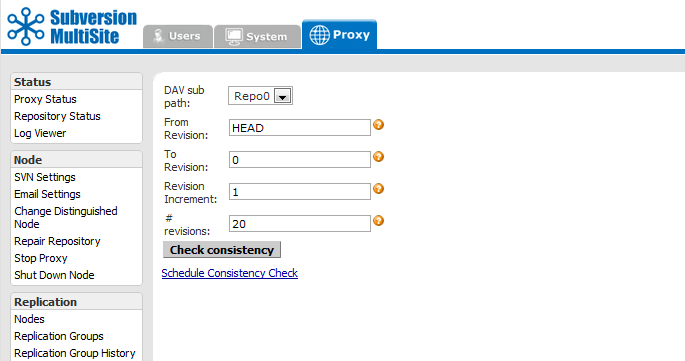
The following parameters are available, allowing for more selective checks to be performed:
DAV sub path: Select the Repository by its DAV sub path.
From Revision: The most recent revision to take the consistency check from. Can be specified by revision number or "HEAD" to indicate the latest in the repository.
To Revision: The oldest revision to include in the consistency check.
Revision Increment: The increment to display the revisions in eg. display every 5th, 10th, 100th revision (1 to display all revisions in range, can be used to speed up result retrieval for large revision ranges).
# revisions: The maximum number of revisions to include in the consistency check.
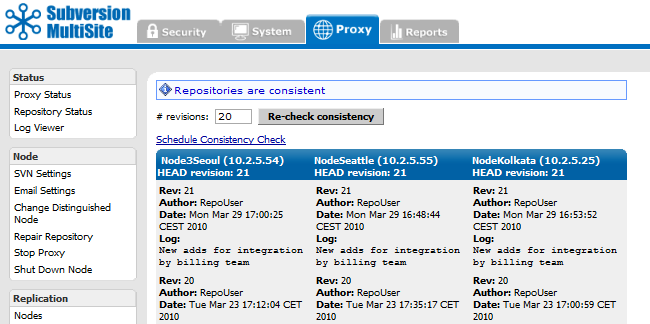
When a consistency check confirms that replicas are consistent the screen will appear as above
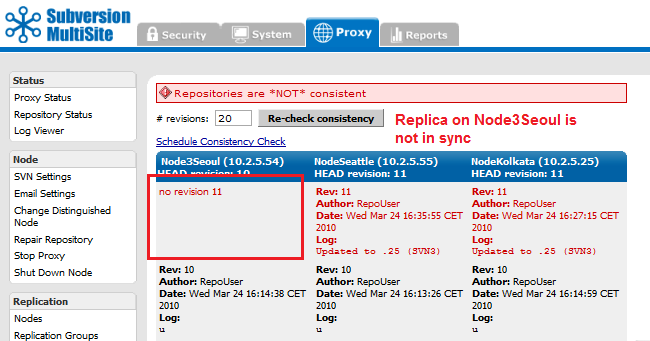
When a consistency check finds that there's an inconsistency between replicas the screen will appear as above.
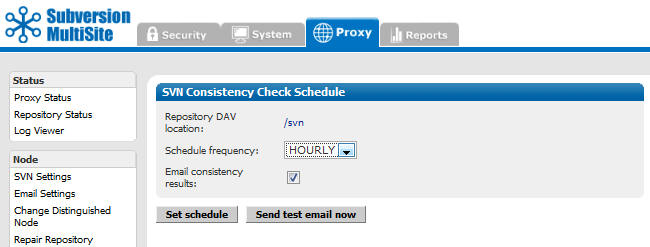
Allows you to set an automatic consistency check once per day or once per hour.

Email Settings Email settings that Access Control uses to send status alerts.
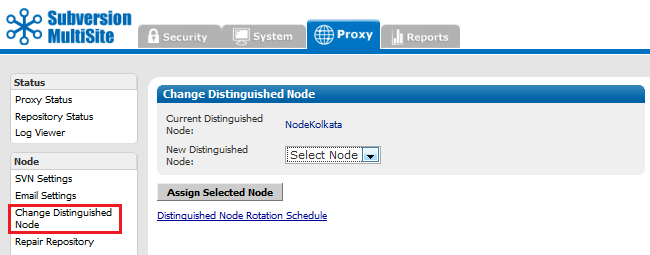
Allows you to change the node in your replication group that holds distinguished status.
Change the distinguished node immediately. Verify with Proxy Status.
Distinguished Node Rotation Schedule
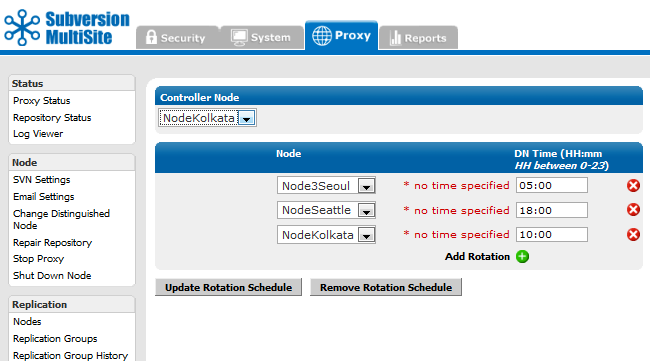
If you have a distinguished node rotation schedule in place, the distinguished node is changed immediately, but then the schedule rotates to the next node at the scheduled time of rotation.
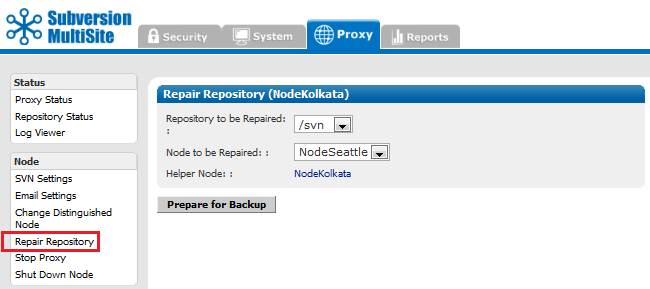
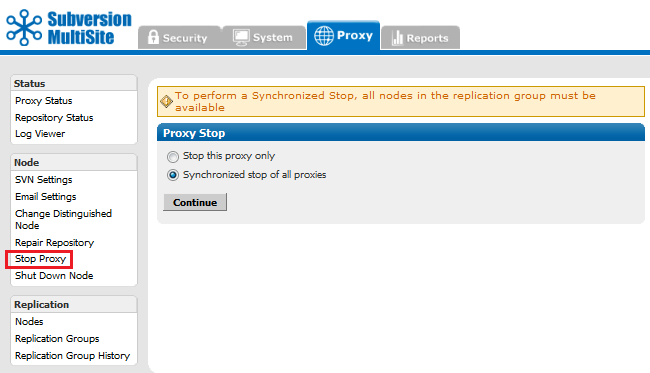
Stop Proxy Stops MultiSite from and prevents clients from writing to the repository.
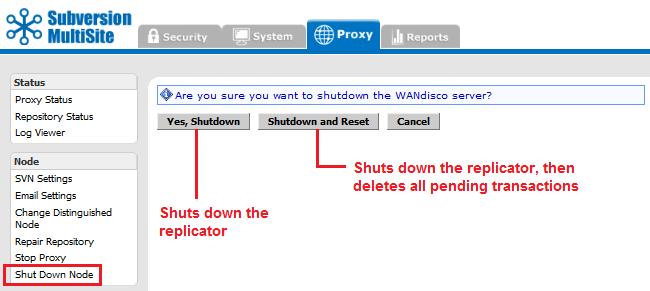
Shut Down Node Shuts down MultiSite completely on the node.
To restart the node:
Go to svn-replicator/bin and type:
perl svnreplicator
Provides control over node and replication group settings
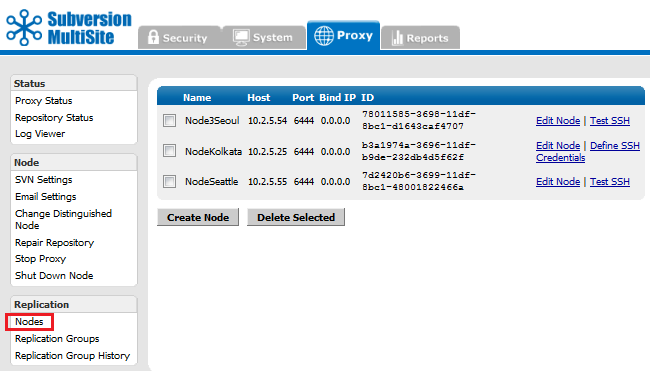
Lists the available nodes. You can edit or create a new node.
Create / Edit Node
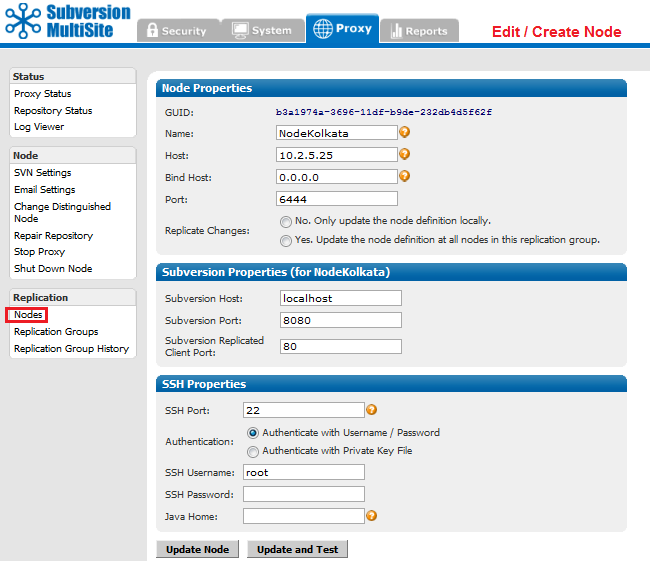
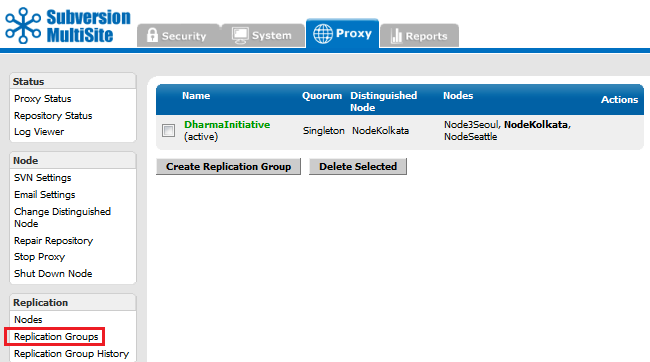
View or create new replication groups.
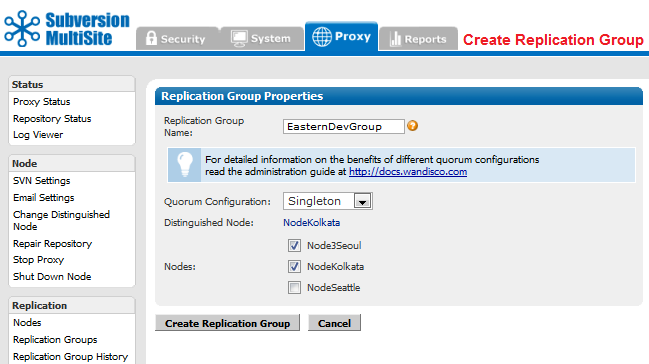
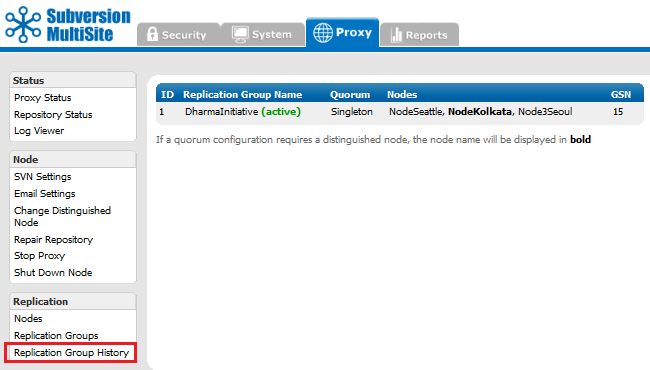
A table presents the current and any past active replication group activity.
The reports tab gives you acess to various reporting tools for use with the optional Access Control component of MultiSite.
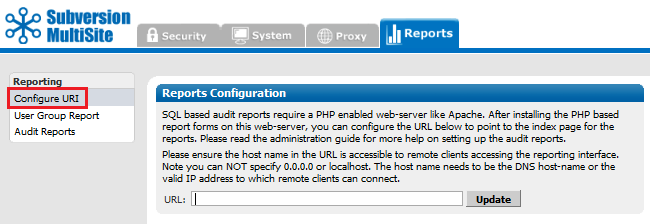
Configure URI If you set up a web-based PHP report form, you enter its address here.
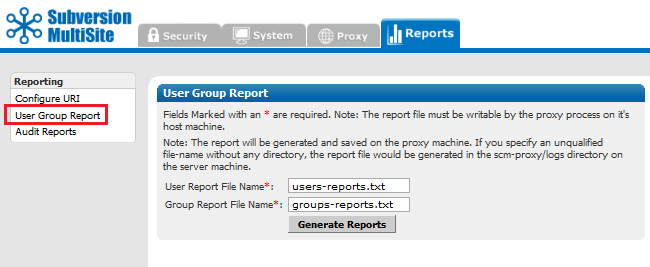
User Group Reports Generate User Group reports and view them with Log Viewer in the System and Proxy tabs.
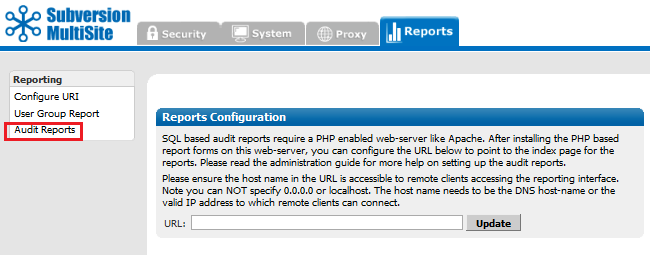
Access Control logs any Subversion user access, these logs are controlled through the Audit Reports tab.
This technical guide will help you understand the underlying technology and technical concepts that relate to WANdisco's Subversion MultiSite software.
We'll be using terms like "node" and "replication group" without explaining what we mean. Check out the Glossary for an explanation of these and other WANdisco terms.
Subversion is designed to run as a central server to which multiple Subversion clients connect. WANdisco's replication technology makes it possible to have multiple active replicas of a Subversion repository that are in synch. The Subversion replicas can be anywhere on a WAN - distributed throughout a company's campus or throughout the world. WANdisco users experience the performance of a local Subversion repository, with the semantics of a single shared Subversion repository. We call this "active replication with one-copy-equivalence."
Replication ensures that each replica acts as a hot backup to every other replica. If a local server experiences a problem that takes it offline, only local users are disrupted, the rest of the replication group continues as normal.
Example Replication Group

This illustration shows a replication group with five Subversion severs.
WANdisco offers a High Availability solution based on Zeus Software that ensures no disruption in service. Even if a Subversion server failed, a Zeus cluster ensures that Subversion and repository data continue to be available.

Subversion MultiSite acts as a proxy between the Subversion Server and clients. An instance of the proxy runs at each replica. All the communication paths involved in the operation of WANdisco are illustrated in diagram above.
All MultiSite nodes are synchronized at all times: each Subversion repository is a functional replica of the others. WANdisco replication technology is the concept of one repository, multiplied. Because there are multiple synchronized repositories, each replicated node is effectively a current hot backup, which makes disaster recovery easy to plan and implement.
The Subversion usernames and passwords on all repository hosts must match. This is required because MultiSite creates a peer-to-peer replication system. Any replica of the Subversion repository is accessible by every valid Subversion user. WANdisco offers the user the option of having MultiSite manage the Subversion password file.
The sites in the replication group are continuously coordinating the Subversion write transactions users are making. The group establishes transaction ordering through the agreement of a quorum of replicas. When you install the first node, that node by default is the distinguished node with Singleton quorum. When you create the replication group that includes other nodes, you select the quorum type best suited to your configuration. For which quorum is best for particular situations, see Quorum Recommendations.
Singleton Quorum Singleton Response quorum - only one of the nodes in the membership decides on the transaction order. With Singleton Response quorum, the node that decides transaction ordering is called the distinguished node. The Singleton quorum offers the fastest response time for those users working at the distinguished node, because as soon as the distinguished node determines that a transaction can be processed in the correct order, the transaction is sent to Subversion. Any replicator except the distinguished node can go down, but the replication group continues. The replication group replays the missing transactions when that node rejoins the group. However, the Singleton quorum also represents a single point of failure, since replication halts if the distinguished node fails.
Majority Quorum Majority Response is another quorum option, whereby you specify that a majority of the sites must agree on transaction order before any transaction is committed. Having a majority quorum ensures that if one site goes down in a replication group, even the distinguished node, the other sites can continue uninterrupted, as long as a majority of the sites remain available. The replication group replays the missing transactions when that site rejoins the group.
In a majority quorum, the distinguished node?s role is that of a tie-breaker. For example, in a four node replication group, three sites make the quorum (three sites must agree about transaction ordering). If two nodes want one transaction first, and the other two want another transaction first, then the distinguished node gets a weighted vote. The group with the distinguished node determines the transaction ordering. With an even number of nodes with majority quorum, you can schedule the distinguished node to rotate to different nodes around the world, to "follow the sun".
Unanimous Quorum The last quorum option is unanimous response, which requires that all replicators must be reachable to accomplish transaction ordering.
Here is an overview of what occurs when a write transaction is received by any replicator in the replication group.
There is a field in the Admin Console that tells you whether WANdisco is accepting any incoming Subversion client requests. Replication still continues among the WANdisco sites, whether WANdisco is listening or not at one or more sites.

You can turn the listening on and off through the Admin Console (through the Start Proxy and Stop Proxy commands). Issuing the Stop Proxy command on a site puts that Subversion server in read-only mode.
The following illustration shows Sites 2 and 5 are not listening. (An administrator executed the Stop Proxy command for those sites.) Replication continues, and Sites 2 and 5 are still receiving and processing replicated transactions originating from the other sites. However, Subversion users at Sites 2 and 5 cannot make any write transactions. Once an administrator issues the Start Proxy command for Sites 2 and 5, the local Subversion users can again issue Subversion commands.

Please follow your company guidelines in regards to notifying Subversion users of maintenance.
When an administrator issues a synchronized stop command, the Subversion servers stop accepting write commands from clients. Pending transactions are processed, but no new write transactions are accepted. Subversion users continue to have read access to the repository, but cannot perform write operations, such as commit or lock.
When an administrator issues a resume command, the WANdisco proxies restart and begin accepting write transactions.

For Singleton Response quorum: If a nodes goes down, replication continues at the remaining nodes, as long as the quorum* is reached, although users connecting to the downed node will be unable to write to repositories until the node is repaired (and the quorum reached).
In a Singleton Response quorum, the distinguished node must be available.
As soon as a node comes back up, the replication group catches up the node on its missing transactions, so that all nodes are again synchronized.
For Majority Response quorum: say you have a five node replication group. One or two nodes could go down, and replication would continue at the other nodes, as long as a majority of nodes remain up. The one or two downed nodes go into read-only mode. As soon as a node comes back up, the replication group catches up the node on its missing transactions, so that all nodes are again synchronized.
Subversion MultiSite 4.0/GA includes some changes to transaction scheduling and failure handling. In previous versions, a single scheduler handled all transactions on a node, so that in the event of a single repository becoming corrupted, and entering read-only mode, all the repositories hosted on the node would also become read-only.
Previous model
Transaction failures would result in the replicator restarting and retrying an arbitrary number of times. If the transaction still failed, a check would be made to see if the transaction was bypassable (this is so if it failed on all nodes). If the transaction is bypassable, replication would continue after a restart, if the transaction was not bypassable, the node would restart in read-only mode.
New model
Instead of a single scheduler per node, Subversion transactions now use a scheduler per svnroot, with AuthzProposal and UserPasswordProposal shared between all schedulers.
There are two key changes in behaviour, as a result of this change:
If a network link goes down for one node, and outside connectivity is completely lost, there are two possible scenarios, depending on your quorum:
When connectivity is restored or the errored node is back online, the local node syncs up with the replication group automatically. First, the local node consults its local recovery journal (similar to a database redo log), and then, if necessary, attempts recovery from any of the quorum sites.
The recovery infrastructure and details of WANdisco fault-tolerance can be found at http://www.wandisco.com/get/?f=documentation/whitepapers/WANdisco_DConE_White_Paper.pdf.
Authentication is handled by the MultiSite replicator performing an LDAP login attempt from the originating node, using the credentials supplied by the user. As users successfully authenticate, they are added to the replicator's user database and added to the (replicated) Apache password file with a known common password.
Apache is configured to use the password file containing common passwords and the WebDAV requests are populated with an authentication string from that password file. The remainder of the replication work flow remains unchanged. The key difference is that the authentication credentials used by Apache will not change over time and thus authenticated transactions can be executed on each replicated node.
Caution
If you are using LDAP based authentication, do not make changes to users using the admin console User Administration screen.
LDAP passwords
Use only alphanumeric characters in LDAP passwords. Due to a bug in sn Apache/mod_dav_svn, the use of non-alphanumeric characters in passwords could result in replication failure.
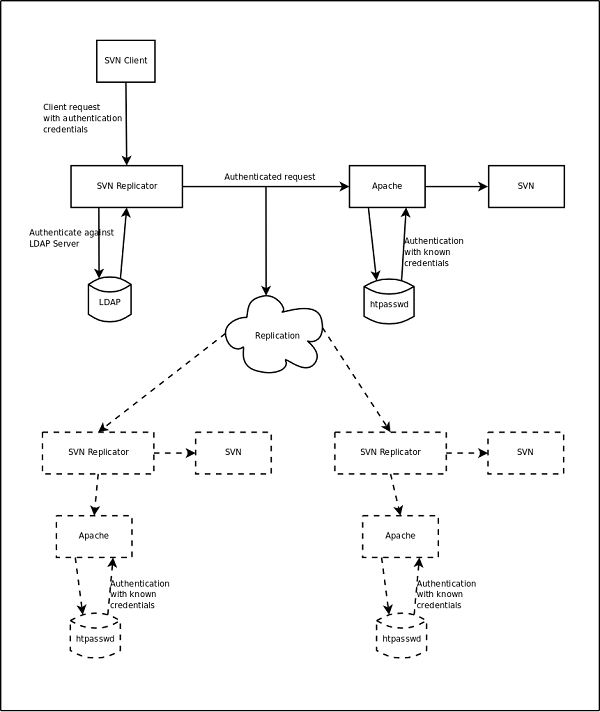
Some of the REST API commands have an associated commandline client to simplify execution, the clients can be found in the <svn-replicator>/lib directory.
The command line clients use a properties file to specify common properties; an example properties file, named restclient.properties is provided in the /svn-replicator/ config directory.
This file specifies the following attributes:
rest.client.host - the replicator hostname (required)
rest.client.port  - the replicator port (required)
rest.client.username  - the replicator login username (required)
rest.client.password  - the replicator login password (required)
rest.client.truststore  - the truststore file to use if SSL is enabled (optional)
rest.client.truststore_password  - the truststore password to use if SSL is enabled (optional)
rest.client.usessl  - specifies if SSL is enabled (optional, defaults to false)
Alert
The default port for the RESTful API is 8182.
Overview: View existing repositories and add new repositories
Command-line client: svnrepo-client.jar
Usage: java -jar svnrepo-client.jar </path/to/properties/file> <command> [parameters]
e.g.
java -jar svnrepo-client.jar ../config/restclient.properties list
GET http://<host>:<port>/wandisco-rest/repos
GET http://<host>:<port>/wandisco-rest/repos/<DAVLocation>
PUT http://<host>:<port>/wandisco-rest/repos/<DAVLocation>form values must be specified as:
newroot=<child repository name> (parent path)or
newpath=<repository name>
Overview: View existing LDAP Authorities and add new LDAP Authorities
Commandline client: svnldap-client.jar
Usage: java -jar svnldap-client.jar </path/to/properties/file> <command> [parameters]
e.g.
java -jar svnldap-client.jar ../config/restclient.properties listCommands:
http://<host>:<port>/wandisco-rest/ldapauths
http://<host>:<port>/wandisco-rest/ldapauths/<order>
The end points use standard web security and will challenge for the admin username and password on invocations.
GET http://<host>:<port>/wandisco-rest/ldapauthsDelete an LDAP authority:
DELETE http://<host>:<port>/wandisco-rest/ldapauths/<order>Add an LDAP authority:
PUT http://<host>:<port>/wandisco-rest/ldapauths/<order>form values must be specified as:
Overview: Add or overwrite non-replicated dynamic preferences.
Commandline client: dynpref-client.jar
Usage: java -jar dynpref-client.jar </path/to/properties/file> <command> [parameters]
e.g.
java -jar dynpref-client.jar ../config/restclient.properties <command>Commands:
http://<host>:<port>/wandisco-rest/dynpref/<dynpref-key>
The end points use standard web security and will challenge for the admin username and password on invocations.
Add/Overwrite pref:
PUT http://<host>:<port>/wandisco-rest/dynpref/<dynpref-key>
Overview: Display information about the current distinguished node.
No command line client available.
URLs:
http://<host>:<port>/wandisco-rest/dn
Get DN info:
GET http://<host>:<port>/wandisco-rest/dnOptional Params: Will return only the specified value.
Overview: Display information about the current transaction count.
No command line client available.
URLs:
http://<host>:<port>/wandisco-rest/txns
shut
Get DN info:
GET http://<host>:<port>/wandisco-rest/txns
Overview: Display information about the replicator and can shutdown the replicator.
No command line client available.
The end points use standard web security and will challenge for the admin username and password on invocations.
URLs:
http://<host>:<port>/wandisco-rest/replicatorGet Replicator status:
GET http://<host>:<port>/wandisco-rest/replicatorShutdown replicator:
GET http://<host>:<port>/wandisco-rest/replicator?shutdown
Overview: Replicate a file to all nodes.
Knowledgebase
A command line method for invoking generic file replication is currently being tested. If you would like to know more, Contact Support.
http://<host>:<port>/wandisco-rest/filenotifierReplicate File:
GET http://<host>:<port>/wandisco-rest/filenotifier?filelocation=
<source-file-location>&destlocation=<dest-file-location>
<dest-file-location> is optional
To specify the port that the REST server will listen on the following value must be passed into the JVM.
-Drest.server.port=xxxx
Where xxxx is the port number you wish to specify.
Alert
The default port for the RESTful API is 8182.
This can be configured at installation time by setting the environment variable WD_JVMARGS=-Drest.server.port=xxxx prior to running setup.
To configure this value after installation, open the svn-replicator/bin/reputils.pm file and edit each instance of the line:
$SERVER_JVM_ARGS = "-Xms128m -Xmx2048m -ea -server -Djava.net.preferIPv4Stack=true";
by adding the -Drest.server.port=xxxx to the end of the line. e.g.
$SERVER_JVM_ARGS = "-Xms128m -Xmx2048m -ea -server -Djava.net.preferIPv4Stack=true -Drest.server.port=xxxx";
To run the silent installer you require an XML file that is valid against the following setup.dtd:
<?xml version="1.0" encoding="UTF-8"?>
<!ELEMENT SetupSettings
     (
     adminPassword, adminUsername, nodeName, selectedNodeIP, apacheConfigFile?, bindHost,
     clientPort, adminConsolePort, apacheUser?, apacheGroup?, apacheKeepAlive?, apacheMaxKeepAliveRequest?,
     apacheKeepAliveTimeout?, apacheListeningIP?,apacheListeningPort?, usePreReplicationHooks,
     subversionServerVersion?, svnServerCoHosted, svnHost?, svnHostPort, svnExecutableLocation,
     ldapAuthenticationUsed, ldapConnectionUrl?, ldapTruststoreFile?, ldapTruststorePassword?,
     authzUsed, authzFile?, emailSMTPAuthRequired?,
     emailSettingsSkipped, emailUsername?, emailPassword?, useEmailSSL?, emailSSLTrustStoreFile?,
     emailSSLTrustStorePassword?,emailHost?, emailPort?, emailAdminAddress?, sslUsed, sslCertificateAlias?,
     sslKeyPassword?, sslKeyStoreFile?, sslKeyStorePassword?,
     sslDefaultTrustStoreUsed?, sslTrustStoreFile?, sslTrustStorePassword?, directories
     ) >

<!ELEMENT adminPassword ( #PCDATA ) >
<!ELEMENT adminUsername ( #PCDATA ) >
<!ELEMENT nodeName ( #PCDATA ) >
<!ELEMENT selectedNodeIP ( #PCDATA ) >
<!ELEMENT apacheConfigFile ( #PCDATA ) >
<!ELEMENT bindHost ( #PCDATA ) >
<!ELEMENT clientPort ( #PCDATA ) >
<!ELEMENT adminConsolePort ( #PCDATA ) >
<!ELEMENT apacheUser ( #PCDATA ) >
<!ELEMENT apacheGroup ( #PCDATA ) >
<!ELEMENT apacheKeepAlive ( #PCDATA ) >
<!ELEMENT apacheMaxKeepAliveRequest ( #PCDATA ) >
<!ELEMENT apacheKeepAliveTimeout ( #PCDATA ) >
<!ELEMENT apacheListeningIP ( #PCDATA ) >
<!ELEMENT apacheListeningPort ( #PCDATA ) >
<!ELEMENT usePreReplicationHooks ( #PCDATA ) >
<!ELEMENT subversionServerVersion ( #PCDATA ) >
<!ELEMENT svnServerCoHosted ( #PCDATA ) >
<!ELEMENT svnHost ( #PCDATA ) >
<!ELEMENT svnHostPort ( #PCDATA ) >
<!ELEMENT svnExecutableLocation ( #PCDATA ) >
<!ELEMENT ldapAuthenticationUsed ( #PCDATA ) >
<!ELEMENT ldapConnectionUrl ( #PCDATA ) >
<!ELEMENT ldapTruststoreFile ( #PCDATA ) >
<!ELEMENT ldapTruststorePassword ( #PCDATA ) >
<!ELEMENT authzUsed ( #PCDATA ) >
<!ELEMENT authzFile ( #PCDATA ) >
<!ELEMENT emailSMTPAuthRequired ( #PCDATA ) >
<!ELEMENT emailSettingsSkipped ( #PCDATA ) >
<!ELEMENT emailUsername ( #PCDATA ) >
<!ELEMENT emailPassword ( #PCDATA ) >
<!ELEMENT useEmailSSL ( #PCDATA ) >
<!ELEMENT emailSSLTrustStoreFile ( #PCDATA ) >
<!ELEMENT emailSSLTrustStorePassword ( #PCDATA ) >
<!ELEMENT emailHost ( #PCDATA ) >
<!ELEMENT emailPort ( #PCDATA ) >
<!ELEMENT emailAdminAddress ( #PCDATA ) >
<!ELEMENT sslUsed ( #PCDATA ) >
<!ELEMENT sslCertificateAlias ( #PCDATA ) >
<!ELEMENT sslKeyPassword ( #PCDATA ) >
<!ELEMENT sslKeyStoreFile ( #PCDATA ) >
<!ELEMENT sslKeyStorePassword ( #PCDATA ) >
<!ELEMENT sslDefaultTrustStoreUsed ( #PCDATA ) >
<!ELEMENT sslTrustStoreFile ( #PCDATA ) >
<!ELEMENT sslTrustStorePassword ( #PCDATA ) >
<!ELEMENT directories ( directory+) >
<!ELEMENT directory
     (
     path, DAVLocation, managePasswordFile, passwordFile?, username?,
     password?, svnParentPathUsed, rootnames?
     ) >

<!ELEMENT path ( #PCDATA ) >
<!ELEMENT DAVLocation ( #PCDATA ) >
<!ELEMENT managePasswordFile ( #PCDATA ) >
<!ELEMENT passwordFile ( #PCDATA ) >
<!ELEMENT username ( #PCDATA ) >
<!ELEMENT password ( #PCDATA ) >
<!ELEMENT svnParentPathUsed ( #PCDATA ) >
<!ELEMENT rootnames ( #PCDATA ) >
The elements of this DTD are described in more detail below:
| Element Name | Requirement | Description | Where Persisted |
| adminPassword | Required Once | Administrator Password | PasswordDB prevayler database |
| adminUsername | Required Once | Administrator Username | PasswordDB prevayler database |
| nodeName | Required Once | Descriptive Name for Node | NodeRegistry prevayler database |
| selectedNodeIP | Required Once | IP to use for this Node | NodeRegistry prevayler database |
| apacheConfigFile | Optional | Location of your Apache configuration file | Not persisted |
| bindHost | Required Once | IP Address to bind to | NodeRegistry prevayler database and prefs.xml |
| clientPort | Required Once | Port clients will use to connect to SVN | NodeRegistry prevayler database and pref.xml |
| adminConsolePort | Required Once | Port the WANdisco admin console will be available on | NodeRegistry prevayler database |
| apacheUser | Optional | Apache User parsed from your apache configuration file | Not persisted |
| apacheGroup | Optional | Apache Group parsed from your apache configuration file | Not persisted |
| apacheKeepAlive | Optional | Not persisted | |
| apacheMaxKeepAliveRequest | Optional | Not persisted | |
| apacheKeepAliveTimeout | Optional | Not persisted | |
| apacheListeningIP | Optional | IP your Apache is hosted on | Not persisted |
| apacheListeningPort | Required Once | IP your apache is listening on | Not persisted |
| usePreReplicationHooks | Required Once | Specify if you are using PreReplicationHooks | Not persisted |
| subversionServerVersion | Required Once | The version of your Subversion server | DynamicPreferences |
| svnServerCoHosted | Required Once | Once Specify if your subversion server is co hosted with WANdisco | Not persisted |
| svnHost | Required Once | IP of you subversion server machine | NodeRegistry prevayler database and prefs.xml |
| svnHostPort | Required Once | Port that SVN is listening on | NodeRegistry prevayler database and prefs.xml |
| svnExecutableLocation | Required Once | Location of your svn.exe file | DynamicPreferences |
| ldapAuthenticationUsed | Required Once | Are you using LDAP authentication | Not Persisted |
| ldapConnectionUrl | Optional | URL used to connect to your LDAP server | DynamicPreferences |
| ldapTruststoreFile | Optional | LDAP Truststore file location | DynamicPreferences |
| ldapTruststorePassword | Optional | LDAP Truststore Password | DynamicPreferences |
| authzUsed | Required Once | Are you using authz authorization | Not Persisted |
| authzFile | Optional | Location of your authz file | DynamicPreferences |
| emailSMTPAuthRequired | Optional | Does your email server require SMTP authentication? | mailconfig.properties |
| emailSettingsSkipped | Required Once | Do you want to skip setting up your mail configuration | Not Persisted |
| emailUsername | Optional | An email username to connect to your email server | mailconfig.properties |
| emailPassword | Optional | The password for the email username specified | mailconfig.properties |
| useEmailSSL | Optional | Does your email server use SSL/TLS | mailconfig.properties |
| emailSSLTrustStoreFile | Optional | The location of your email SSL Truststore file | mailconfig.properties |
| emailSSLTrustStorePassword | Optional | The password for your email SSL Truststore file | mailconfig.properties |
| emailHost | Optional | The port used by your email service | mailconfig.properties |
| emailAdminAddress | Optional | The Email address used by your admin user | mailconfig.properties |
| sslUsed | Required Once | Do you require SSL connections | DynamicPreferences |
| sslCertificateAlias | Optional | Your SSL certificate alias | DynamicPreferences |
| sslKeyPassword | Optional | Your SSL Key password | DynamicPreferences |
| sslKeyStoreFile | Optional | Your SSL Key Store file location | DynamicPreferences |
| sslKeyStorePassword | Optional | Your SSL Key Store password | DynamicPreferences |
| sslDefaultTrustStoreUsed | Optional | Do you want to use the default SSL Truststore | DynamicPreferences |
| sslTrustStoreFile | Optional | Your SSL Trust store file location | DynamicPreferences |
| sslTrustStorePassword | Optional | Your SSL Trust Store password | DynamicPreferences |
| directories | Required Once | Your SSL Trust Store password | DynamicPreferences |
| directory | At Least Once | An individual SVN repository directory | |
| path | Required Once | The path to this SVN repository | RepositoryDB prevayler database |
| DAVLocation | Required Once | The DAV location value for this repository | RepositoryDB prevayler database |
| managePasswordFile | Required Once | Do you want WANdisco to manage the password file for this repository | RepositoryDB prevayler database |
| passwordFile | Optional | The location of the svn password file for this repository | RepositoryDB prevayler database |
| username | Optional | An SVN username that can be used to connect to this repository | RepositoryDB prevayler database |
| password | Optional | An SVN username that can be used to connect to this repository | RepositoryDB prevayler database |
| svnParentPathUsed | Required Once | Has SVN Parent Path been used for this repository | RepositoryDB prevayler database |
| rootnames | Optional | The rootnames used for this repository (for multiple rootnames separate with a comma) | RepositoryDB prevayler database |
Copyright © 2010-2014 WANdisco
All Rights Reserved
This product is protected by copyright and distributed under
licenses restricting copying, distribution and decompilation.