Administrator's Guide
1. Running Git MultiSite
This guide describes how to deploy Git MultiSite.
1.1 Starting up
To start the Git MultiSite replicator, follow these steps:
- Open a terminal window on the server and login with suitable file permissions.
- Run the git-multisite service, located in the init.d folder:
lrwxrwxrwx 1 root root 37 May 9 10:37 git-multisite -> /opt/git-multisite/bin/git-multisite
- Run the start script:
[root@localhost init.d]# ./git-multisite start
20130520-164811 (24088) [INFO]: Starting WANdisco MultiSite 20130520-164811 (24088) [INFO]: Started replicator (24100) 20130520-164811 (24088) [INFO]: Started ui (24110) 20130520-164811 (24088) [INFO]: Number of errors: 0 20130520-164811 (24088) [INFO]: Number of warnings: 0 - The two components of Git MultiSite, the replicator and the UI, start up. Read more about the git-multisite init.d script
1.2 Shutting down
To shutdown:
- Open a terminal window on the server and login with suitable file permissions.
- Run the git-multisite service, located in the init.d folder:
lrwxrwxrwx 1 root root 37 May 9 10:37 git-multisite -> /opt/multisite-plus/bin/git-multisite
- Run the stop script, i.e.:
[wandisco@ip-10-0-100-7 bin]$ ./git-multisite stop 20130520-165704 (24767) [INFO]: Stopping WANdisco MultiSite 20130520-165704 (24767) [INFO]: Request received to shut down replicator 20130520-165704 (24767) [INFO]: replicator processes ended 20130520-165704 (24767) [INFO]: Request received to shut down ui 20130520-165704 (24767) [INFO]: Sending signal 15 to watched ui process (attempt 1)... 20130520-165707 (24767) [INFO]: Sending signal 15 to watched ui process (attempt 2)... 20130520-165710 (24767) [INFO]: ui processes ended 20130520-165710 (24767) [INFO]: Number of errors: 0 20130520-165710 (24767) [INFO]: Number of warnings: 0 - Both the replicator and the UI processes will shut down. Read more about the git-multisite init.d script
1.3 Startup script
The startup script for persistent running of Git MultiSite is in the /etc/init.d folder.
Run the script with the help command to list the available commands:
    [root@localhost init.d]# ./git-multisite help
    Usage: git-multisite {start|stop|status|uistart|uistop|repstart|repstart}

      start      Start WANdisco Multisite service
      stop       Stop WANdisco Multisite service
      status     Display running WANdisco Multisite services
      uistart    Start WANdisco Multisite UI service
      uistop     Stop WANdisco Multisite UI service
      repstart   Start WANdisco Multisite Replicator service
      repstop    Stop WANdisco Multisite Replicator service
1.4 Changing the admin console password
You can change Git MultiSite's login password at any time by following this procedure:
- Login to the MultiSite admin console.
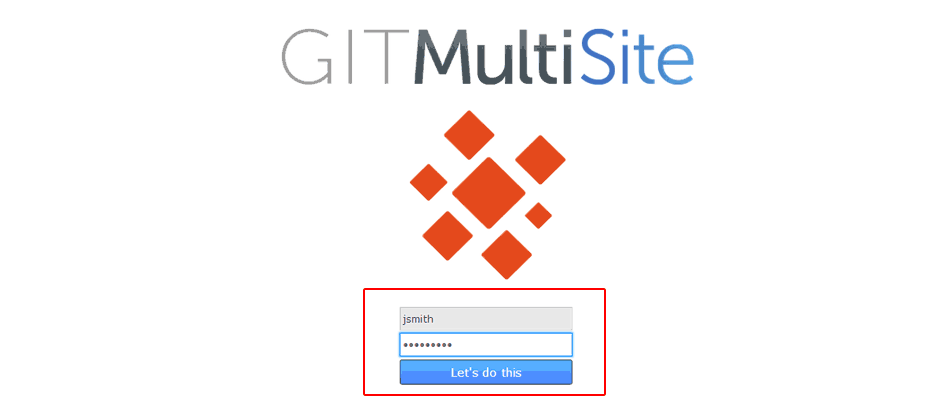
Login.
- Click on the Security tab.

Security.
- On the security tab screen you will see the Internally Managed Users table. Click on the Edit link that corresponds with the Admin account. In the Edit User window that opens, enter a new password. Repeat the entry in the box immediately below.
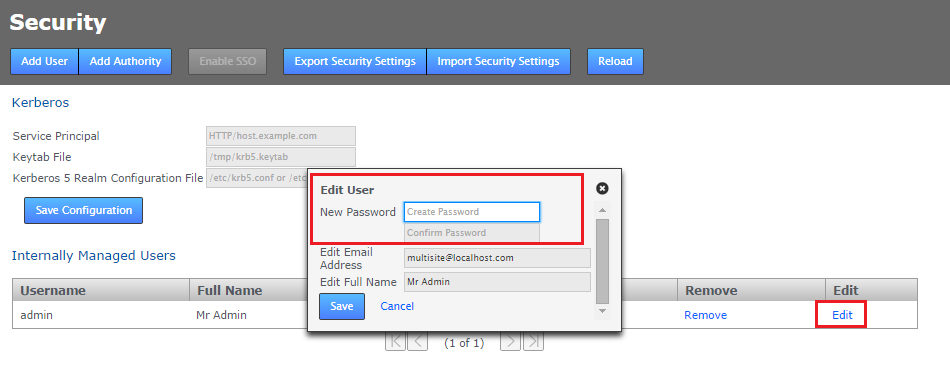
Changed password
- Click the SAVE button store the new password. You can be sure that the new password has been accepted if you see a growl message appear on screen.

Growl!
It's not currently possible to change the Administration username. In order to change the username you would need to re-install Git MultiSite
1.5 Update your license.key file
Follow this procedure if you ever need to change your product license. You would need to do this if, for example, you needed to increase the number of Git users or the number of replication nodes.
- Login to your server's command line, navigate to the properties directory:
/opt/wandisco/git-multisite/replicator/propertiesand rename thelicense.keytolicense.20130625.
i.e.total 16 -rw-r--r-- 1 wandisco wandisco 1183 Dec 5 15:58 application.properties -rw-r--r-- 1 wandisco wandisco 512 Dec 5 15:05 license.key -rw-r--r-- 1 wandisco wandisco 630 Dec 17 15:43 logger.properties -rw-r--r-- 1 wandisco wandisco 630 Dec 17 15:45 log4j.properties - Get your new
license.keyand drop it into the/opt/git-multisite/replicator/propertiesdirectory. - Restart the replicator by running the Git MultiSite script with the following argument:
/etc/init.d/git-multisite restart
This will trigger an Git MultiSite replicator restart, which will force Git MultiSite to pick up the new license file and apply any changes to permitted usage.
If you follow the above instructions but don't do the restart Git MultiSite will continue to run with the old license until it performs a daily license validation (which runs at midnight). Providing that your new license key file is valid and has been put in the right place then Git MultiSite will then update its license properties without the need to restart.
If you run into problems, check the replicator logs (/opt/git-multisite/replicator/logs
) for more information.
PANIC: License is invalid com.wandisco.fsfs.licensing.LicenseException: Failed to load filepath>
1.6 Update a node's properties
In the System Data section of the Settings tab there's a bank of editable properties that can be quickly updated by re-entering, saving and allowing the Git MultiSite replicator to restart - although this may cause brief disruption to users whose in-flight commits will fail.
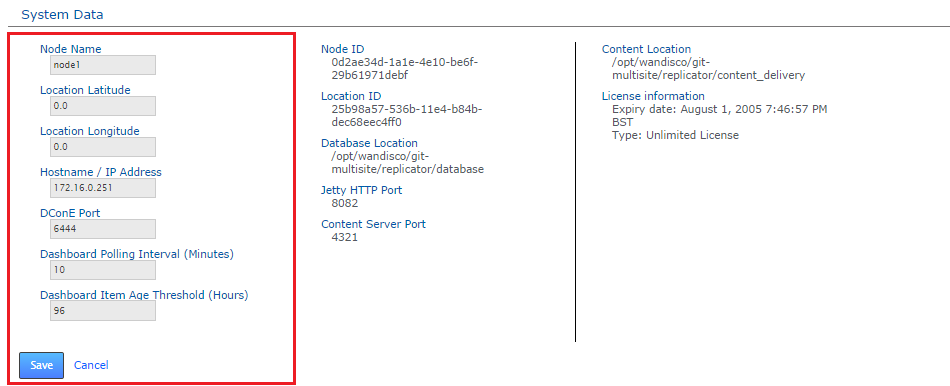
Node properties that you can change -- subject to a restart of the replicator.
- Node Name
- - This is the human-readable form of the node's ID. Unlike the Node ID it is possible to change the value of Node Name and reuse it (after it has been removed from the replication network). That is, you can't have two nodes with the same name, but you can now reuse a previously removed node name.
- Location Longitude
- The Node's geographical location is no longer recorded during installation. Instead you enter the details here.
- Location Latitude
- Along with Longitude, this value places the node on the internal map and helps the application determined the local time for the node based on the timezone in which it falls.
- Hostname / IP Address
- The hostname or underlying IP address can be updated.
- DConE Port
- The TCP port used for DConE agreement traffic - not to be confused with the Content Distribution port which carries the payload repository data.
- Dashboard Polling Interval (Minutes)
- Sets how often the dashboard messaging is updated. The messaging is populated by Warnings and Errors that appear in the replicator logs file. The default frequency is every 10 minutes.
- Dashboard Item Age Threshold (Hours)
- Sets how long dashboard messages are maintained. After this amount of time messages are flushed from the dashboard. The default is 96 hours (4 days).
After entering a new value, click the Save button. A growl message will appear to confirm that the change is being replicated - this will result in a restart of the replicator which may cause brief disruption to SVN users.
1.6.1 Other property changes
In addition to those properties that appear on the settings screen, there are some more properties that can be modified in the configuration files. You should take great care when making changes to these 'hidden' properties, and error in the edit can have far reaching effects on product behavior and be difficult to track down. In most situations you should only make changes with the assistance of WANdisco's support team.
Content Delivery Port
To change the Content Delivery port
content.port.<Node id>=<new port>
java -jar svn-ms-replicator-updateinetaddress.jar -c <path to application.properties>
Task Garbage Collection
There are two configurable properties that control how often the task garbage collection process should run. These properties are set during the installation. If you need to modify their values you need to add them to the application.properties file.
- task.removal.interval
- This setting controls how often the task garbage collection process should run. The default is 96 hours, noted in milliseconds (i.e. 345600000 milliseconds for 96 hours).
- task.expired.interval
- This setting controls how old a successfully run task must be before it is made available for garbage collection. The default is 96 hours, noted in milliseconds (i.e. 345600000 milliseconds for 96 hours).
Recommended Settings
Summary: For large deployments reduce the time from 96 to 24 hours
The recommended settings are suitable for most deployments. However, for deployments with very large numbers (thousands) of repositories and where repository consistency checks are automated then we recommend that you reduce the setting times, initially to 24 hours (86400000 ms).
Shorter periods will result in a corresponding reduction in your ability to troubleshoot problems that involve replicator task history. If you notice large numbers of failed tasks accumulating over time or have any concerns about what settings are right for your specific deployment, contact WANdisco's support team.
Example
For a deployment that replicates several thousand repositories and schedules daily consistency checks it's decided to reduce the task expiry to 48 hours and the garbage collection frequency to 24 hours. The settings would therefore be:
    task.removal.interval   86400000L
    task.expired.interval   172800000L
Note that you must add an "L" to the end of your value.
Node content distribution timeouts
There are two configurable properties that you can modify as part of fine-tuning an Git MultiSite deployment. They are provided to allow you to balance best possible performance against the tolerance of a poor WAN connectivity. Both properties are contained within the application properties file, by default located here: /opt/wandisco/git-multisite/replicator/properties/application.properties.
socket.timeout
socket.timeout=90000
The socket.timeout is an amount of time in milliseconds that the local node will wait for the connection to be established before throwing an exception - therefore signalling that it failed to connect within that timeout. Default value is 15 minutes (90,000 milliseconds).
DO NOT set socket.timeout to less than 10 minutes (60,000 milliseconds) or you may encounter problems.
content.pull.timeout
content.pull.timeout=300000
The content pull timeout sets how long the Content Distribution system will wait for new content to be pulled fully over from a remote node. The default value is 5 minutes (300,000 milliseconds). This default is set on the assumption that there are no problems with the deployment's WAN connectivity.
Increasing the timeout
Increasing the value may help if poor connectivity is resulting in the replicator repeatedly giving up on content distribution that would have eventually transferred had it been given enough time, i.e. not as a result of a slow network rather than something that has caused a permanent error.
Decreasing the timeout
Decreasing the value is not generally recommended. Doing so is not intended as a method for boosting performance - although this may occur in some situations. We recommend that you don't drop the timeout value below 5000 (5 seconds) without consulting with our support team.
1.7 Set up data monitoring
The Monitoring Data tool monitors the disk usage of Git MultiSite's database directory, providing a basic level of protection against Git MultiSite consuming all disk space. The tool also lets you set up your own monitors for user-selected resources.
Monitoring Data - not intended as a final word in system protection
Monitoring Data is no substitute for dedicated, system-wide monitoring tools. Instead, it is intended to be a 'last stand' against possible disk space exhaustion that could lead to data loss or corruption.
Read our Recommendations for system-wide monitoring tools.
1.7.1 Default settings
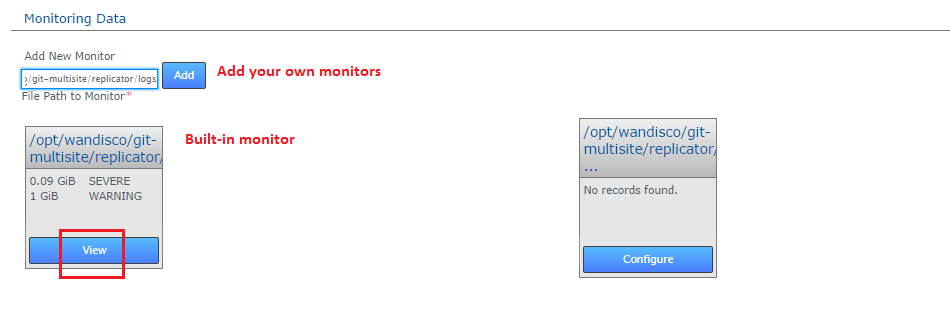
Click the "View" link to go to a monitor's settings.
By default MultiSite's database directory (/opt/wandisco/git-multisite/replicator/database) is monitored - this is the location of MultiSite's prevayler database where all data and transactions files for replication are stored.
This built-in monitor runs on all nodes. Any additional monitors that you set up will monitor on a per-node basis. Monitors are not replicated so a monitor set up on one node is not applied to any other node.
1.7.2 Additional monitors
As well as Git MultiSite's own database folder, there are several directories that might grow very large and potentially consume all available file space.
Consider monitoring the following MultiSite directories:
/opt/wandisco/git-multisite/replicator/content/opt/wandisco/git-multisite/logs/opt/wandisco/git-multisite/replicator/logsAlso monitor /path/to/authz. If you are using Authz to manage authorization and your Authz file is situated on different file system from Git MultiSite, then you are recommended to set up monitoring of the authz file.
For most deployments all these directories will reside on the same file system, so that our default monitor would catch if any of them were consuming the available space. However, there are two scenarios where we'd recommend that you set up your own monitor for the content directory:
1) You wish to set a higher trigger amount than the default monitor (1GiB for warning, 0.09GiB for emergency shutdown).
2) You have placed the content directory on a different filesystem with its own capacity that wouldn't be tracked by the default monitor.
In either case you should follow up the setting up of a monitor with a corresponding email notification that will be sent if some or all of your monitor's trigger conditions are met.
Create additional resource monitors using the following procedure:
- Log in to the Administrator user interface.
- Click the "SETTINGS" link on the top menu bar.
- Monitoring Data is situated below the Administrator Settings. Enter the full path to the resource that you wish to monitor. For example, you might wish to monitor the replicator logs: "
/opt/svn-multisite-plus/replicator/logs". Enter the path and click "Add".

Add resource path
- The new resource monitor appears as a new box - it will display "No records found", indicating that it doesn't yet have any monitoring rules set. Click its corresponding "Configure" link.
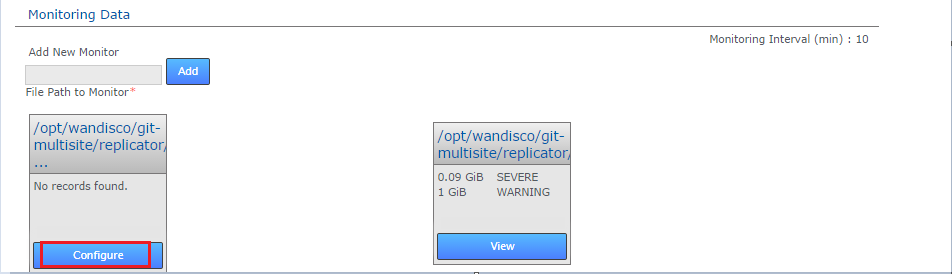
Configure
- The screen will update to show the Resource Monitoring screen for your selected resource.
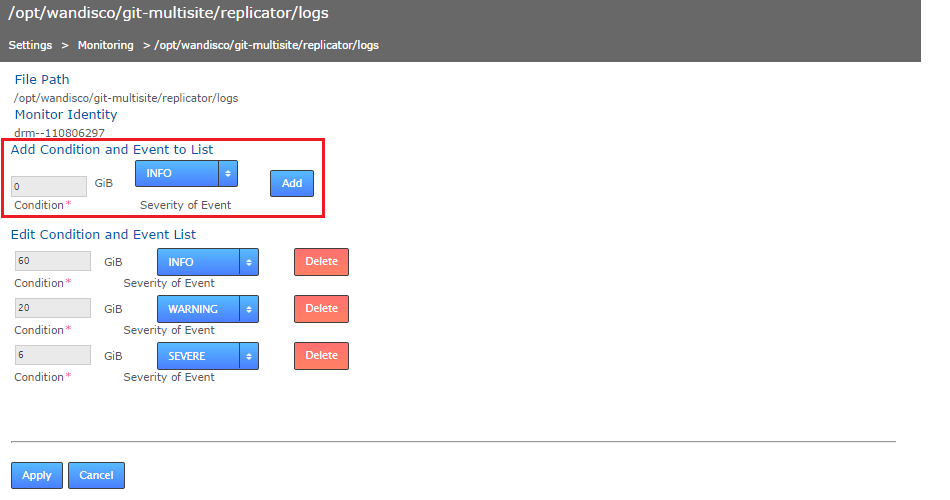
Settings
- File Path:
- The full path for your selected resource
- Monitor Identity:
- The unique string that will identify the monitor
- Edit Condition and Event List
- Lists current resource monitors, initially this will state "No records found"
- Add Conditional and Event to list.
- Storage amount entry field
- Enter an amount of disk space in Gigabytes. e.g. 0.2 would be equal to 200 Megabytes of storage.
- Select an Event from the dropdown:
-
- SEVERE
- - will initiate a shutdown of Git MultiSite and will also write a message to the log and the "SEVERE" logging level. See "When a Shut down is triggered" for more information.
- WARNING
- - will write a message to the log and the "WARNING" level of severity.
- DEBUG
- - will write a message to the log and the "DEBUG" level of severity.
- INFO
- - will write a message to the log and the "INFO" level of severity.
- When you have added all the trigger points and events that you require for the resource, click "Update". You can then navigate away: Click "Resource Monitoring" on the breadcrumb trail to return to the settings screen.
1.7.3 When a shutdown is triggered
If the disk space available to a monitored resource is less than the value you have for a "Severe" event then the event is logged and MultiSite's replicator will shut down after a set interval of 10 minutes. You can configure the interval in application.properties file:
/opt/wandisco/git-multisite/replicator/properties/application.properties
- resourcemonitor.period.min=10L
- Value is minutes.
Any change that you make to the application.properties file will require that you restart Git MultiSite's replicator.
Once shut down all SVN repositories will become unavailable to users, you should immediately take action to make more disk space available, the replicator can be restarted using Git MultiSite's service as soon as the resource that triggered the shutdown has enough available disk space not to shut down again.
You may need to override the forced shutdown if you can't start a node to resolve the cause of the forced shutdown. For example, you might have created a data monitor that triggers a severe log message if there's less disk space than the disk's actual capacity. You then cannot free up space, apart from swapping for a bigger disk.
There's a method you can use to unlock the forced shutdown.
- Login to the locked node using a terminal.
- Navigate to the properties folder, by default you'll find this here:
/opt/wandisco/git-multisite/replicator/properties/application.properties
- Create a backup, then edit the file, changing the line
monitor.ignore.severe=false
to saymonitor.ignore.severe=true
Save the change to the file. - Restart the replicator (see Starting up). During the restart the replicator will now ignore the severe warning (which are still written to the log file) allowing you to delete the offending monitor.
You can't use this procedure to override the default monitor, its emergency shutdown limit of <100MiB will ALWAYS shut down the replicator.
1.8 Setting up email notifications
Email notification is a rules-based system for delivering alerts (based on user-defined templates) over one or more channels to destinations that are based on triggers that are activated by arbitrary system events. Put simply, email notification sends out emails when something happens within the Git MultiSite environment. The message content, trigger rules and destinations are all user-definable.

Automated alert emails
- Read about
- Gateways in Set up a Gateway
- Destinations in Set up a Destination
- Templates in Set up a Template
- Rules in Set up a rule
1.8.1 Set up a gateway
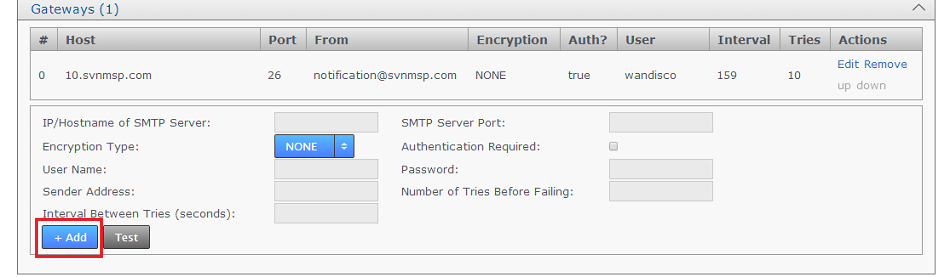
The Gateway settings panel stores your email (SMTP) server details. You can set up multiple gateways to ensure that the loss of the server doesn't prevent alert notifications from being delivered.
- Log into the admin UI, then click the Settings tab.
- Click on the Gateway section of the Notifications area.

Add Gateway
- Enter your email gateway's settings:
Enter settings
- IP/Hostname of SMTP Server:
- your email server's address.
- SMTP Server Port:
- The port assigned for SMTP traffic (Port 25 etc).
- Encryption Type:
- Indicate your server's encryption type - None, SSL (Secure Socket Layer) or TLS (Transport Layer Security). SSL is a commonly used. For tips on setting up suitable keystore and truststore files see Setting up SSL Key pair.
Keystores?
If you're not familiar with the finer points of setting up SSL keystores and truststores it is recommended that you read the following article: Using Java Keytool to manage keystores..
- Authentication Required:
- Indicate whether you need a username and password to connect to the server - requires either "true" or "false".
- User Name:
- If authentication is required, enter the authentication username here.
- Password:
- If authentication is required, enter the authentication password here.
- Sender Address:
- Provide an email address that your notifications will appear to come from. If you want to be able to receive replies from notifications you'll need to make sure this is a valid and monitored address.
- Number of Tries Before Failing:
- Set the number of attempts Git MultiSite will make in order to send out notifications.
- Interval Between Tries (Seconds):
- Set the time (in seconds) between your server's attempts to send notifications.
- Click on the "+Add" button. Your gateway will appear in the table.
You can add any number of gateways. Git Multisite will exhaust the "Number of Tries Before Failing" for each registered gateway before moving on down the list to the next. You can use the Test button to verify that your entered details will connect to a mail gateway server. - Click on the Destinations line.

Click Destinations
- Enter an email address for a notification recipient. Click the + Add link.

Email addresses you target for alerting.
- The destination will appear in a table. Click the Edit or Remove links to change the address or remove it from the system.
- Click on the Templates line.

Click Templates
- Enter a Template Subject line, this will be the subject of the notification email.
- Enter some Body Text, this will be the message that is sent out when the notification is triggered. The message has a 1024 character limit, you can track the available number of characters at the bottom of the text box.
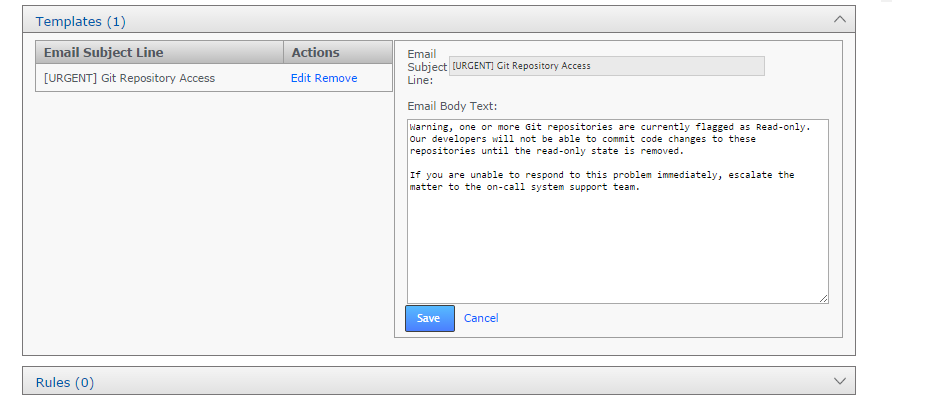
The message you want to send out.
- When the message has been entered, click the + Add link to save the message template.
- {timestamp}
- This will be substituted with the time at which the event is received (not the time at which the notification is delivered).
- {event}
- This will be substituted with the raw dump of the event.
- {event.message}
- This will be substituted with information about the disk monitoring threshold that was exceeded.
- {event.proposerNodeId}
- This will be substituted with the ID of the node that sent the event.
- {event.originalProposal.repository.name}
- This will be substituted with user-specified name of the repository to which the event pertains.
- {event.originalProposal.repository.fSPath}
- This will be substituted with location on-disk of the repository that the event pertains to. More events types and event variables will be added in the future.
- Click on the + on the Rule line.
- Choose an Event from the Event drop-down list:
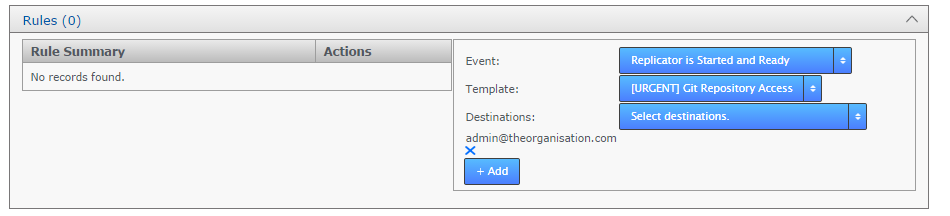
Rules are formed from a trigger event, a message to send on being triggered, and a destination where the message will be sent.
- Any Repository Global Read-Only Event
- In case of any repository entering a global read-only mode.
- Global Read-Only Due to Admin Action
- In case of any repository entering a global read-only mode as a result of administrator interaction through the admin UI.
- Disk Monitor Info
- Disk Storage has dropped below the Info level. This will trigger if any data monitor message is written to the logs at the "INFO" level.
- Disk Monitor Warning
- Disk Storage has dropped below the Warning level.This will trigger if any data monitor message is written to the logs.
- Disk Monitor Severe
- Disk Storage has hit the Severe level. This will trigger if any "Severe" level data monitor message is written to the logs. At this level, Git MultiSite will have shutdown to ensure that disk space exhaustion doesn't corrupt your system and potentially your Git repositories.
- Deploy Repository Failed
- A repository added to Git MultiSite has failed to deploy, in which case the repository will not be replicated.
- Deploy Repository Succeeded
- A repository added to Git MultiSite has successfully deployed. Such an event might be sent to a mail group received by Git users, telling them that their repository is now accessible.
- Global Read-Only Due to Consistency Check Failure
- In case of any repository entering a global read-only mode as a result of failing a consistency check with its replicas.
- Generic file replication error occurred
- An error occured with the Generic Replication script (When running git MultiSite in conjunction with Access Control Plus).
- Choose a Template from the drop-down list. These are the templates that you have already set up under the Templates section.
- Choose destinations for your notification from the available destination email addresses. You can make multiple selections so that a message is sent to more than one recipient address.
- Click on the + Add link to save your rule.

Rules that have been set can be edited or removed.
- Shutdown the node
- Run the following jar file:
java -jar fsfsrestore.jar path/to/application.properties path/to/back-up-folder
the first argument, path/to/application.properties is
<INSTALL-DIR>/git-multisite/replicator/properties/application.propertiespath/to/backup by default is
<INSTALL-DIR>/git-multisite/replicator/db/backup/FsfsBackup.class path/to/application.properties
- Restart the node
- Internally Managed users - are admin accounts that are set up from within Git MultiSite's Admin UI.
- LDAP Authorities - you can have Git MultiSite query LDAP services and filter for a suitable group from which to populate admin users.
- Kerberos Security - Finally, if your organization uses a Kerberos authentication system you can set up MultiSite to use it.
- Log in to the Admin UI using an existing admin account.

Login
- Click the SECURITY tab, then click Add User.

Git MultiSite - Add User
- Enter details for the new administrator, then click the Add User button at the end of the entry bar.
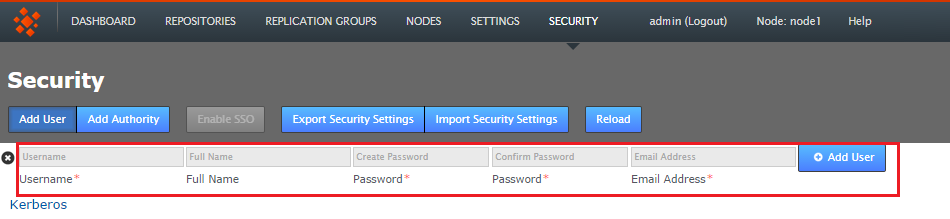
Git MultiSite - Click Add User to save their details.
- You'll see a growl message confirming that the user has been added. You'll see them listed on the Internally Managed Users after clicking the Reload button (or refershing your browser session).

Git MultiSite - New user appears
- Login to the admin UI, click on the Security tab.
- Click on Add Authority.

Add Authority
- The Authority entry form will appear. Enter the following details:

Add Authority
- URL
- Enter your authorities URL. You need to include the protocol ldap:// or ldaps://
Example (Active Directory:)ldap://<server IP>:389
- Bind User DN
- Enter a LDAP admin user account that will be used to query the authority
Example (Active Directory:)cn=Administrator,cn=Users,dc=windows,dc=AD
- Search Base
- Enter the Base DN, that is the location of users that you wish to retrieve.
Example (Active Directory:)CN=Users,DC=sr,DC=wandisco,DC=com?sAMAccountName
- Search Filter
- Optionally add A query filter that will a select user based on relevant LDAP attributes. Currently the search filter must be created so that it filters LDAP query result into unique result. A work around might look something like:
Example: (Active Directory)(&(memberOf=[DN of user group])(sAMAccountName={0}))This dynamically swaps the {0} for the ID of the active user. For more information about query filter syntax, consult the documentation for your LDAP server. - Is Local?
- Tick this checkbox if you want the authority to only apply to the current node and not be replicated to other nodes (which is otherwise done by default).
- Click the Add Authority. This will save the authority settings that you have just entered. You can click the Test button to verify that the details will successfully connect to the authority without yet adding the authority.
- When running with multiple authorities, you should determine the order by which MultiSite polls the authorities. Use the +- symbols at the end of each authority entry to push it up (+) or down (-) the list.

Order authorities
- Log in to the admin UI, click on the Security tab.
- Click the edit link on the line that corresponds with the authority that you wish to edit.

Edit authorities link
- Update the settings in the popup box, then click Save.

Edit authorities box
- A Key Distribution Center
- A Workstation setup on each node
- A machine with a suitably configured browser. See Enabling Kerberos access on your browser
- On each node, add the service principal:
	# kadmin -p root/admin -q "addprinc -randkey HTTP/node1.example.com"
	# kadmin -p root/admin -q "ktadd -k /opt/krb5.keytab HTTP/node1.example.com"
	# chmod 777 /opt/krb5.keytab
- Each node should have installed the add-on JCE Java 6 or Java 7 Unlimited Strength Jurisdiction Policy Files". These can be downloaded from Oracle, subject to your local import rules concerning encryption technology. Once downloaded, extract to the the Java security library, i.e.
$JAVA_HOME/lib/security/
- At this point you can install Git MultiSite on each node. If that's already done, then configure the Kerberos settings under the Security tab.

Edit Kerberos box
- Serivce Principal:
- This unique name for an instance of a service, such as HTTP/node1.example.com
- Keytab Location:
- This is the location of the keytab, a file containing pairs of Kerberos principals and encrypted keys (often derived from the Kerberos password). It's used for logging into Kerberos without being prompted for a password.
- Kerberos Config Location:
- The krb5.conf file contains Kerberos configuration information, including the locations of KDCs and admin servers for the Kerberos realms of interest, defaults for the current realm and for Kerberos applications, and mappings of hostnames onto Kerberos realms. Normally, you should install your krb5.conf file in the directory /etc. i.e. /etc/krb5.conf
- Login to the Git MultiSite admin console of the new node that you are connecting to your existing servers.
- Click on the Sites tab.
- Click on the Connect to node button.

Connect to Node
- Enter the details of an existing node. You can get these details from the Settings tab of the existing node.
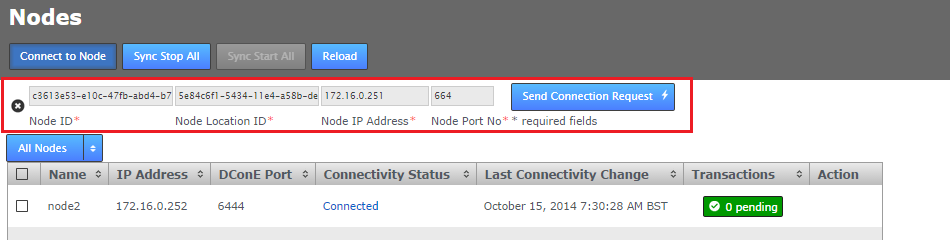
Enter the details from an existing, connected node.
- Node Node ID
- This is the name that you gave the Node during installation. If you log into the node in question you can see the Node ID on the title of any screen that you view, it also appears in the logged in message: "Welcome to MultiSite, admin. You are connected to <NODE ID>"
- Node Location ID
- A unique string that that a node creates for use as in identifier. You can get this from the node's Settings tab:
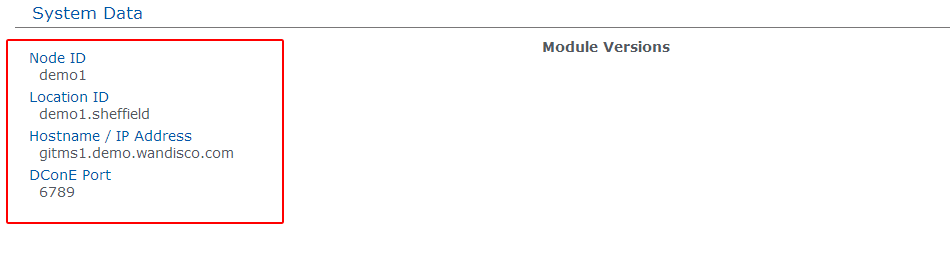
System Data table, found on the Settings tab.
- Node IP Address
- The IP Address of the node's server.
- Node Port No
- The TPC port that the node uses for DConE, which handles agreement traffic. The default is 6444 See Reserved Ports.
- Click on the SEND CONNECTION REQUEST button. The new node will appear on the active list of Sites. Should a problem occur you may find that the new node gets stuck in a 'pending' state. If this happens click on the Cancel button.
- Log in to the SVN MultiSite admin console of any connected node.
- Click on the Nodes tab.
- Nodes that are eligable for removal will have the "Remove Node" option available under the Action column. In this example, NodeSanFrancisco is eligable for removal because we have removed it from any replication groups.

Nodes table under the Nodes tab
-
Click on the "Remove Node" link. Don't forget that this action is irreversible, you must be absolutely sure that you want to permanently remove the node.

Ready to remove NodeSanFrancisco.
- After a refresh of the admin user interface you will see that the removed node will continue to display if you click the Display Removed Nodes button. Removed nodes can be otherwise identified by their "Removed" status.

Node removed.
- Log into the admin UI and click on the Nodes tab.
- Click the Sync Stop All button.
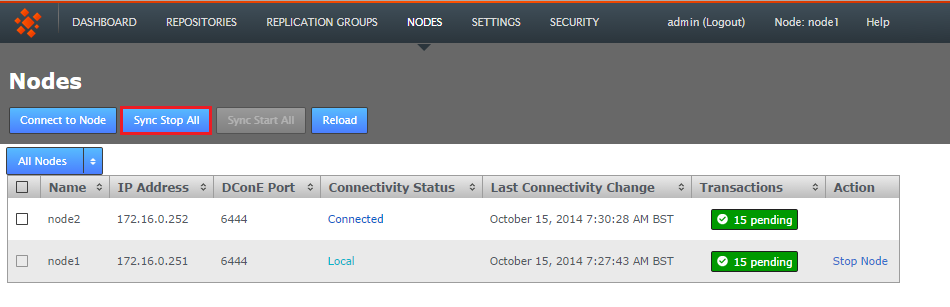
Stop all nodes.
You'll get a growl message confirming the stop has been triggered. You'll see the results on refreshing your browser session.

Stopped!
- On the Node table all nodes will show as Stopped. In this state you can do maintenance or repairs without risking your replication getting out-of-sync.

Node removed.
- The Sync Stop All button has changed to Start all. However, you can start selected nodes by logging in to the admin console of each node that you want to start. Use the Start Node link that appears in the Action column of the nodes table.
- If all nodes have been brought to a stop, click the Start All button to start them replicating again.
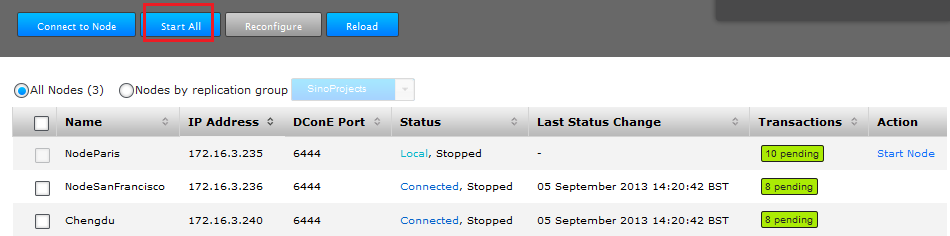
Stopped!
- After a browser refresh, all nodes will now show as running.
- Log in to the SVN MultiSite browser-based user interface. Click on the REPLICATION GROUPS tab, then click on the CREATE REPLICATION GROUP button.

Creating a replication group.
- Enter a name for the group in the Replication Group Name field, then click on the drop-down selector on the Add Sites field. Select the sites that you want to replicate between.
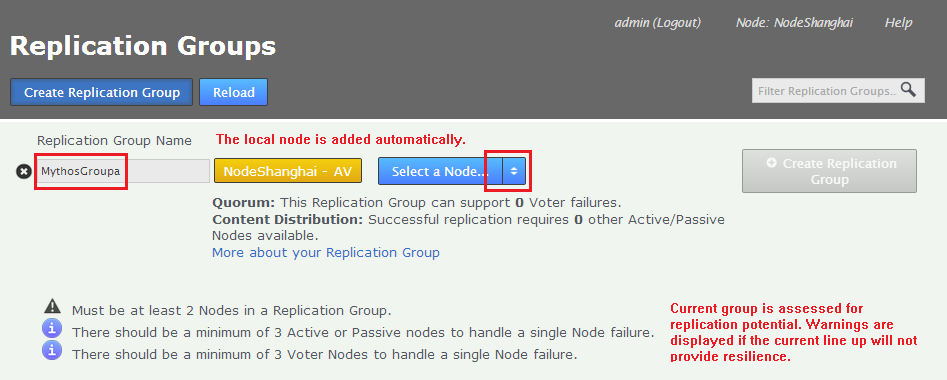
replication group details.
Replication Ground Rules
- A node can belong to any number of replication groups.
- A repository can only be part of a single active replication group at any particular time.
- It's possible to change membership on the fly, moving a repository between replication groups with minimal fuss.
- Click on each node label to set its node type.
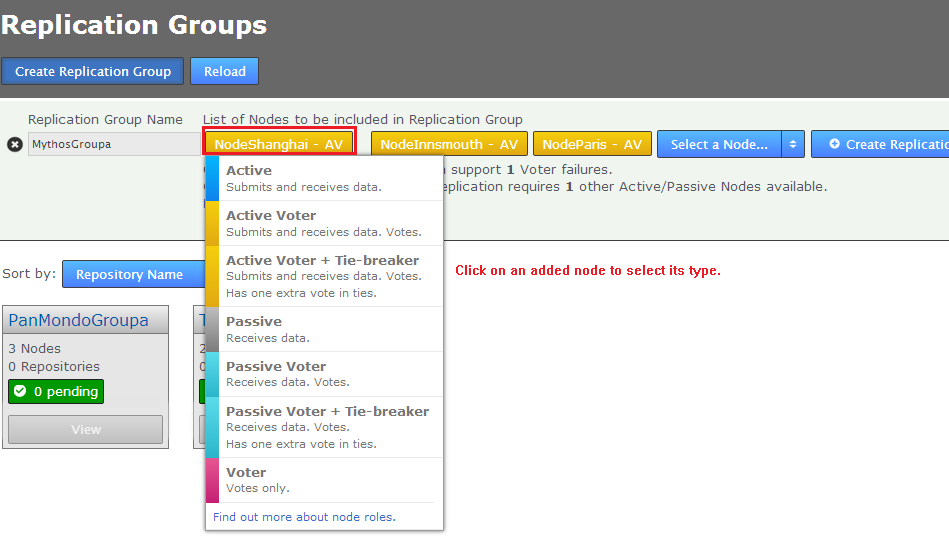
Click on node labels to change their type.
Advice on creating effective replication groups
For an understanding of some of the ground rules for replication you should read the section Creating resilient Replication Groups.
Nodes are automatically added to a group as "Active Voters". To understand the differences between the different types of nodes, read Guide to node types - Once all sites are in place and their settings adjusted to your needs, click CREATE REPLICATION GROUP.

Create Replication Group.
- Newly created replication groups will appear on the Replication Group tab, but only on the admin UI of nodes that are themselves members of the new group.
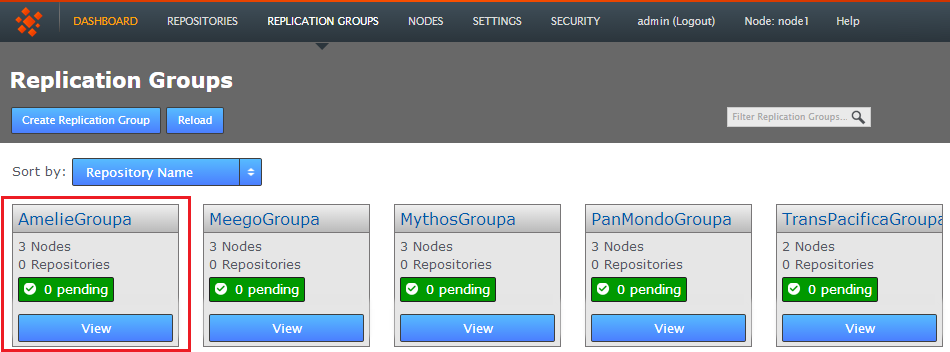
The new replication group now appears - if you are logged into one of its constituent nodes.
- We have identified that replication group "VineyanRepos" is to be removed from Git MultiSite. We can see that it has a single repository associated with it. Click on the View to see which one.
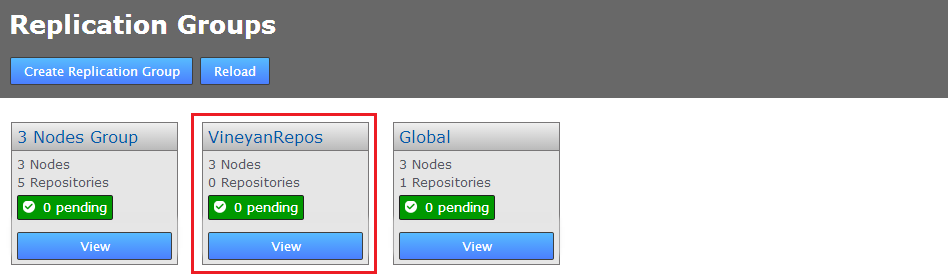
View
- On the Replication Group configuration screen we can see that Repo5 is associated with the group. We can see that currently the Delete Replication Group (VinyardRepos) is disabled. You can follow the link to the repositories page to remove the association.
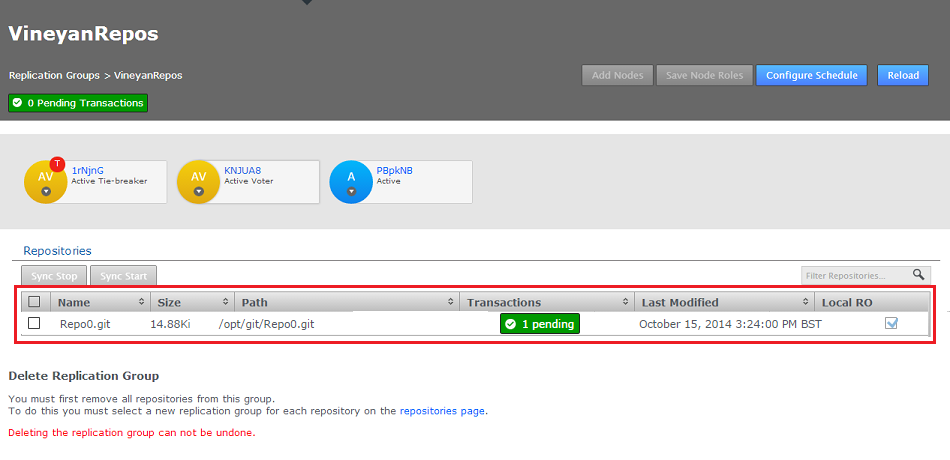
Repositories
- On the repositories screen, click on the associated repository, in this example it's Repo5, then click on the EDIT button.
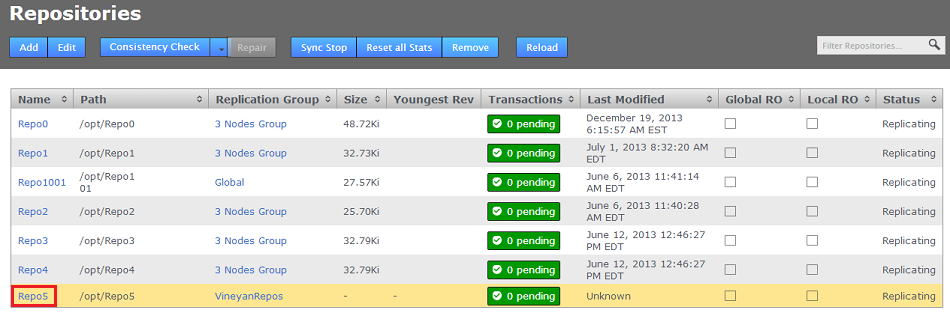
Select and Edit
- On the Edit Repository box, use the Replication Group drop-down to move the repository to a different Replication Group. Then click SAVE.

Edit
- Repeat this process until there are no more repositories assoicated with the Replication Group that you wish to delete. In this example VinyardRepos only had a single repository, so it is now empty, and can be deleted. Click on View, then on Configure.

Move it
- Now that Replication Group VinardRepos is effectively empty of replication payload the Delete link is enabled. Click on the link Delete Replication Group (VinyardRepos) to remove the replication group, taking note that there's no undo - although no data is removed when a replication group is deleted, it should be easy enough to recreate a group if necessary.
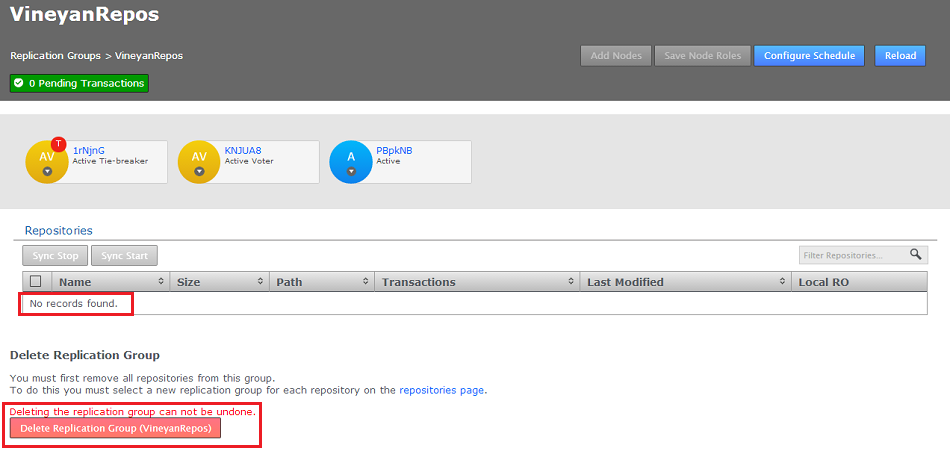
Click the Delete link button
- A growl will appear confirming that the replication group has been deleted.
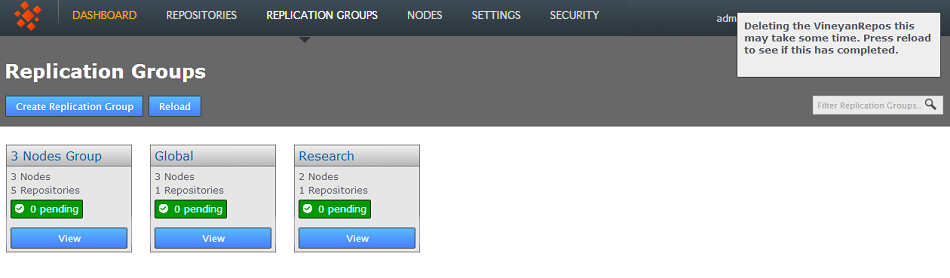
Deleting the replication group
- Login to a node, click on the REPLICATION GROUPS tab. Go to the replication group to which you will add a new node, click on its VIEW.
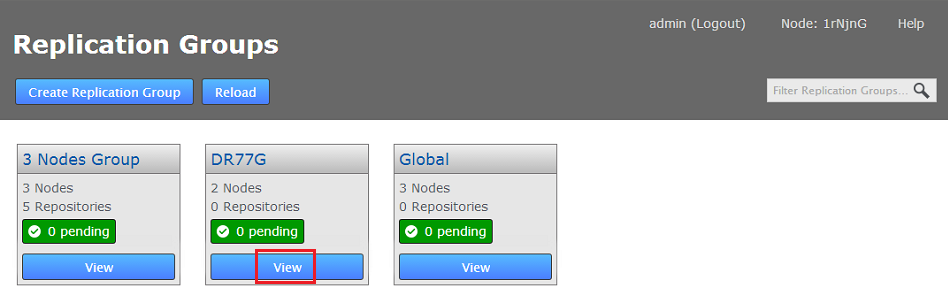
Replication Groups
- The replication group screen will appear. Click Add Nodes.
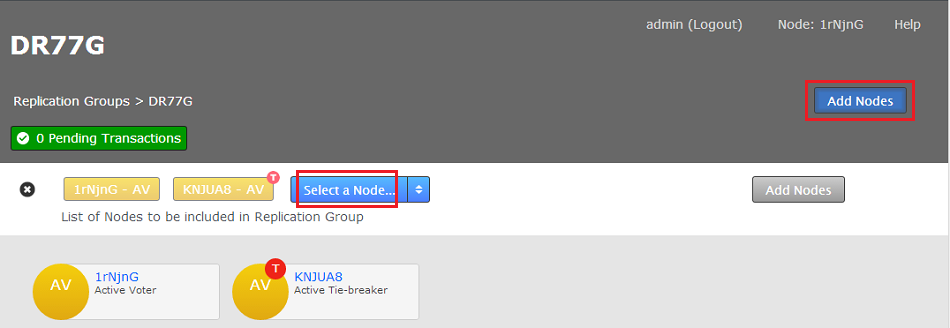
View the group settings
- Select the node that you wish to add to the replication group.

Select
- When there are no further nodes to add to the group, click on the Add Nodes button.

- At this stage in the process we're ready to select a Helper node from which we'll synch repository data to the new node - select a Helper Node.
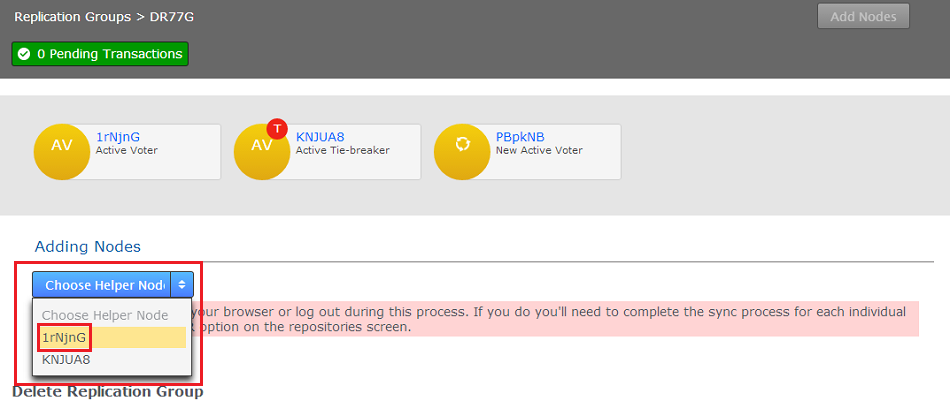
Helper node
- Heed the warning about not closing the browser or logging out during this process otherwise you'll need to perform a more lengthy repair procedure. Click the Start Sync button.

start sync
- You've reached the stage in the process where you need to manually synchronize the repositories from the helper node (which is places temporarily offline for users until this process is finished. See our guide: 30 Synchronizing repositories using rsync.
The process lets you do a complete sync or select specific repositories that you wish to sync. Assuming that you have synced all repositories you would click Complete All. The helper node is then released from the process, allowing it to catch up with any transactions it missed while taking part in the procedure.
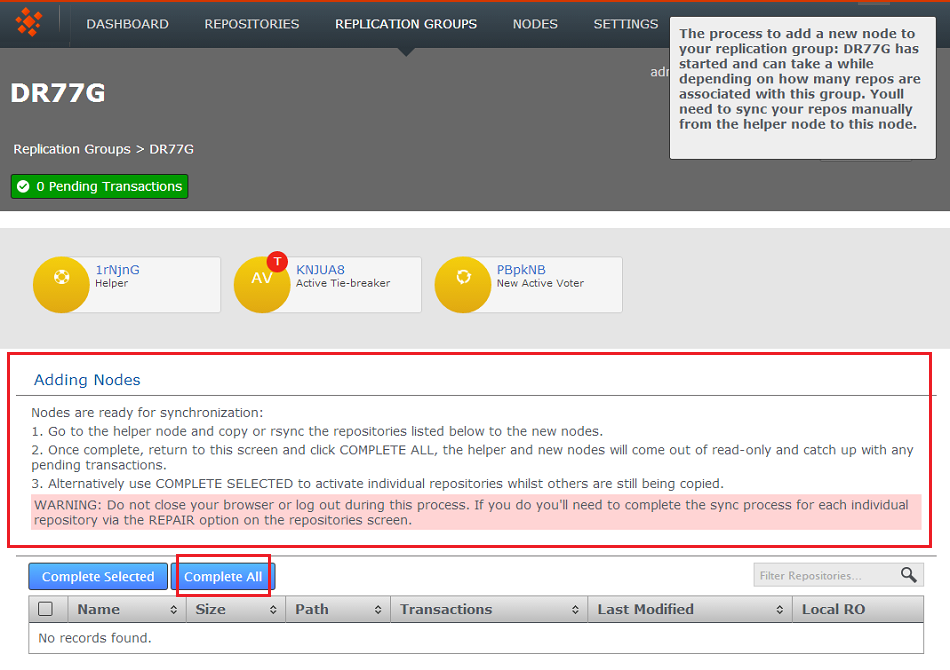
complete all
- A growl message will appear copnfirming that the new node has been added to the replication group.
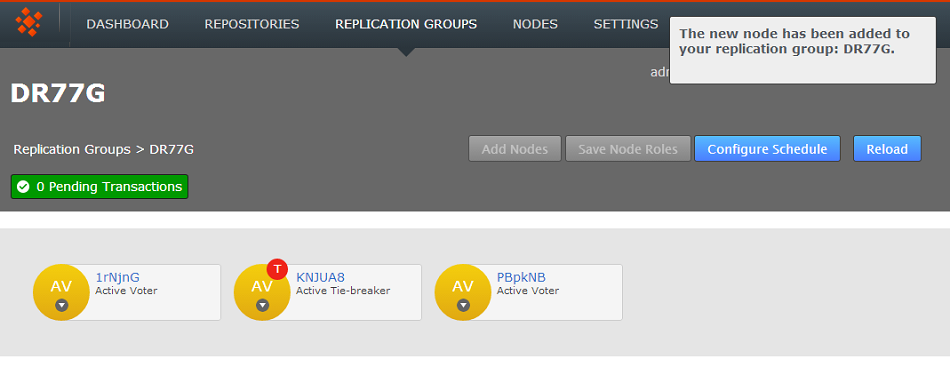
new node!
- Returning to the Replication Group screen, you can see the new node count.

Adding new node complete!
- Login to the admin console of one of your nodes. The node will need to be the member of the relevant Replication Group, otherwise it won't appear on the tab. Click on the Replication Groups tab.
On the Replication Groups tab, click on the View button that corresponds with the Replication Group from which you plan to remove a node.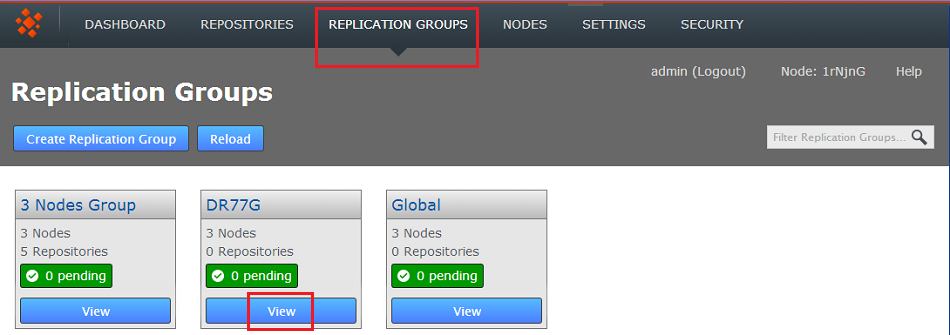
Login and go to REPLICATION GROUPS
- Click on the node that you plan to remove from the group. Providing that the removal of the node doesn't invalidate the remaining configuration you will see a Remove node from replication group link. Click the link.
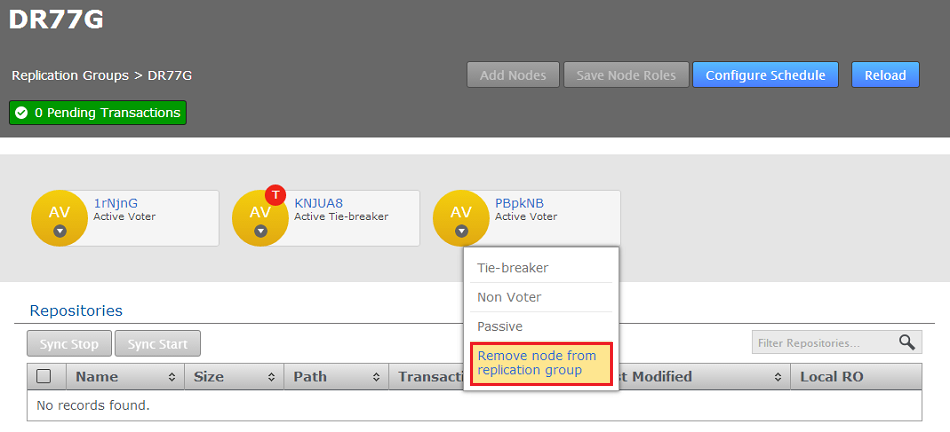
Remove!
- A dialog will open which asks you to confirm the removal of the selected node from the Replication Group. Click Remove.
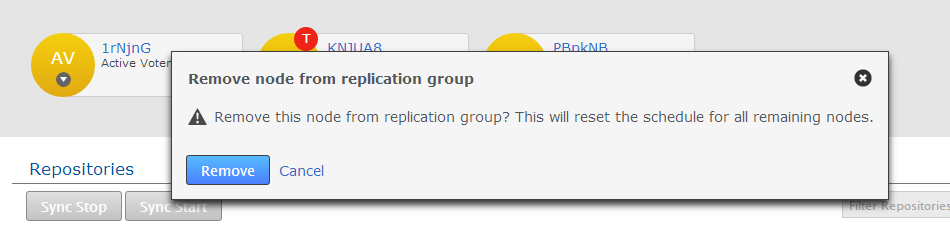
Remove. Really!
- A growl message will confirm that the removal is in progress. You many need to click the Reload button to ensure that the action has been completed on all nodes.
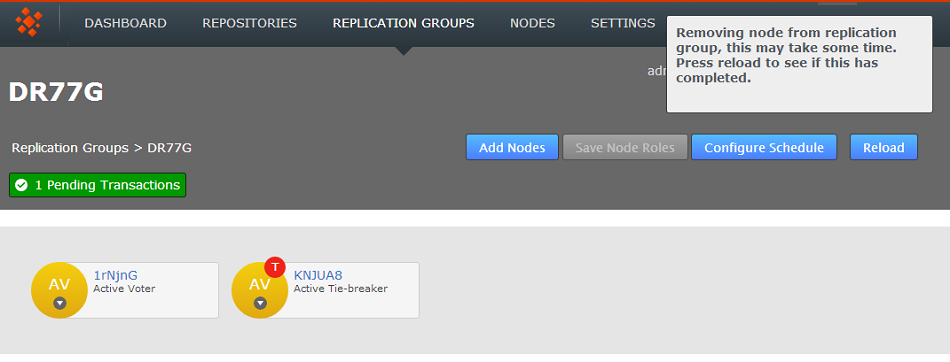
Reload to confirm the updated state.
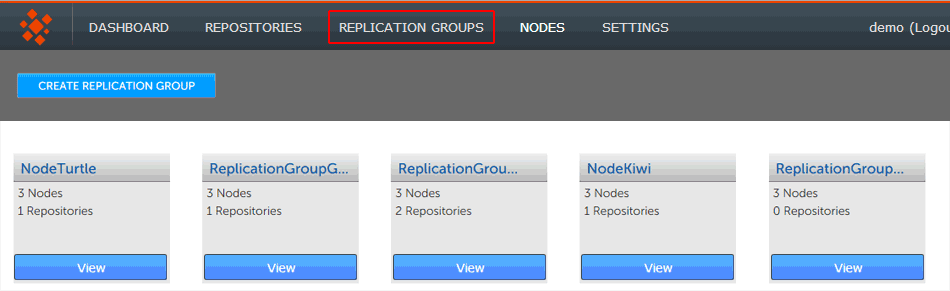
- The node will now be removed from the Replication Group. On the Replication Groups panel you should now see that the constituent number of nodes has reduced by one.

Less one member node
- Login to a node, click on the REPLICATION GROUPS tab. Click on the VIEW link for the replication group that you wish to make a schedule.
Scheduling is done through replication group settings.
- The replication group's pop-up window will open, showing the member nodes together, along with their current (scheduled) roles. Click the CONFIGURE button.
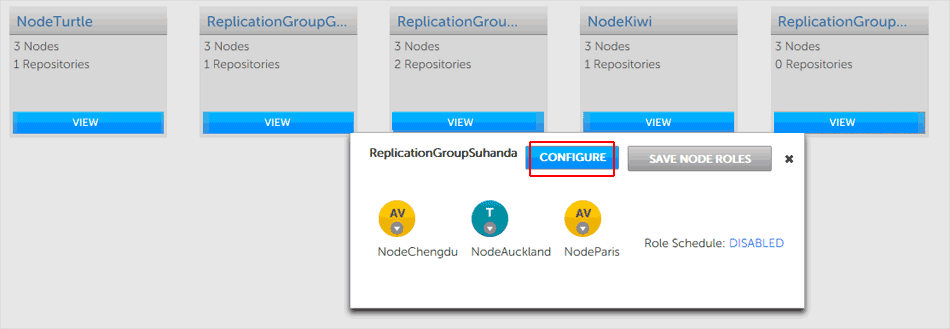
Configure.
Membership views are what is scheduled not necessarily what is currently active
The roles and membership displayed in the popup is based upon the agreed schedule, it's the setup that should be in place if everything is running smoothly. It is always possible that it doesn't accurately represent the state of the replication group, due to a delay in processing on a node, or if something has caused a process to hang. This should not be a cause for concern but it's important to be aware that the displayed membership is an approximation based on the information currently available to the local node.
- The replication groups configuration screen will appear. You may notice that to the left a Role Schedule is noted. By default this will show as DISABLED. Click on the Configure Schedule button, in the right-hand corner.
Role Schedule: Disabled (for now).
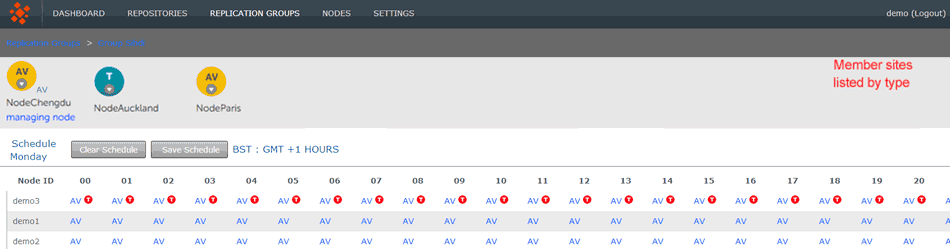
- The Schedule screen will appear. The main feature of the screen is a table that lists all the nodes in the replication group, set against a generic day (midnight to midnight) that is divided into hourly blocks. Each hourly block is color-coded to indicate the specific node's type.
In the image below NodeSanFrancisco is coded as blue which indicates that it is set as a Passive Voter. The hourly blocks associated with NodeChengdu are Magenta, indicating that it is set as a pure voter. The blocks for NodeParis are colored yellow, indicating that this node is set as an Active Voter.
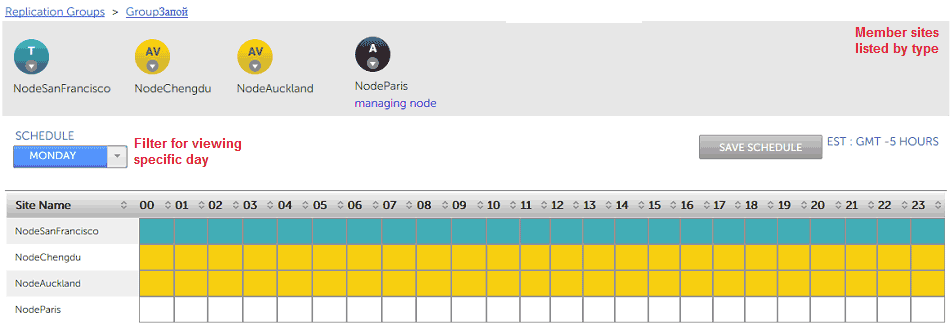
Vanilla Scheduling - no changes to type over time.
- To make a change to the schedule, click on a block. It doesn't matter which block you select as the New Scheduled Configuration form will let you modify any hours for any available node.

New Schedule Form.
- Frequency
- Select from the available frequency patterns: Daily, Weekly, Monday-Friday or Saturday to Sunday.
- From
- The starting hour for the new schedule, e.g. 00 for the start of the day.
- To
- The hour at which the scheduled changes end, e.g. 24 would effectively end the scheduled change at midnight.
- Node list
- The member nodes are listed, in graphical form, colour coded to their type.
- Click on the node icon to change its type.
In this example NodeSanFransisco is changed to a Tie-breaking Passive Voter, then NodeAuckland is changed into a Tie-breaker.
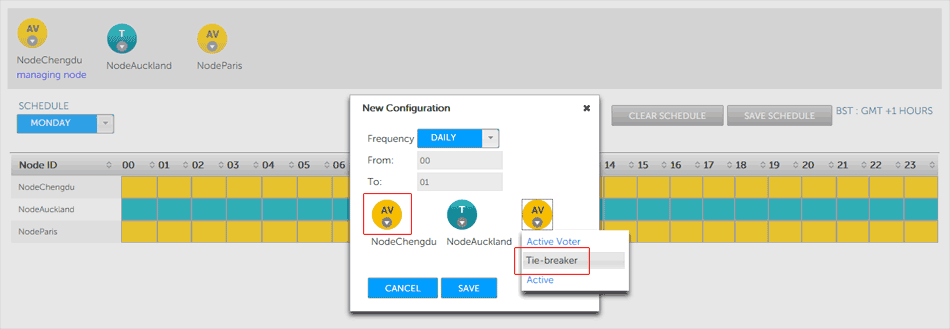
Swapping roles.
When all node changes have been made, click on the SAVE button to continue, or the CANCEL button if you change your mind. - The schedule view will now change to show the changes that you make. You must click the Save Schedule button for the changes to be applied.
With all necessary changes made, you need to review the change to the schedule table and then click SAVE SCHEDULE button. - 1. Click on the REPOSITORIES tab. Click on the ADD button.
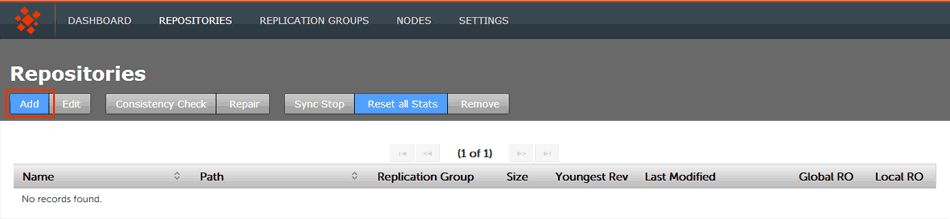
Repositories > ADD
- 2. Enter the Repository's name, the file system path (full path to the repository) and use the drop-down to select the replication group. You can set the repository to be Read-only by ticking the Global Ready-only You can deselect this later. Click ADD REPO.
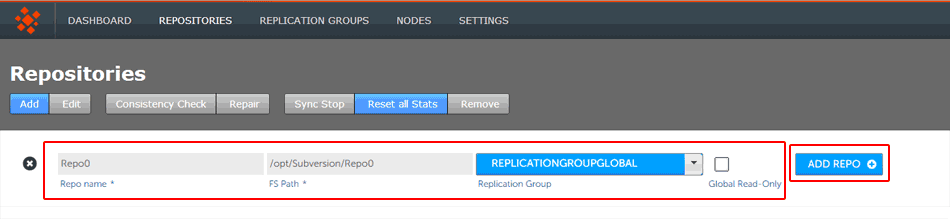
Repositories > Enter details then click ADD REPO
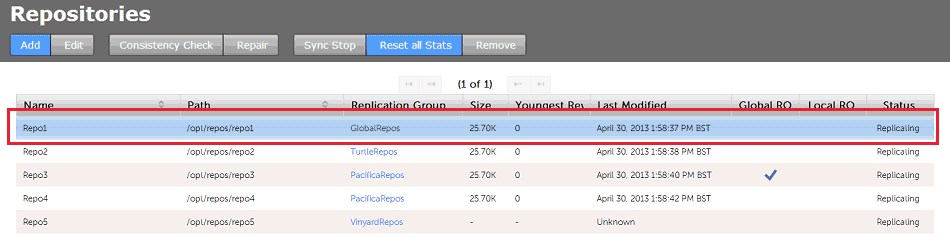
- 3. Once added, a repository will appear in a list on the REPOSITORIES tab. The list provides the following details.
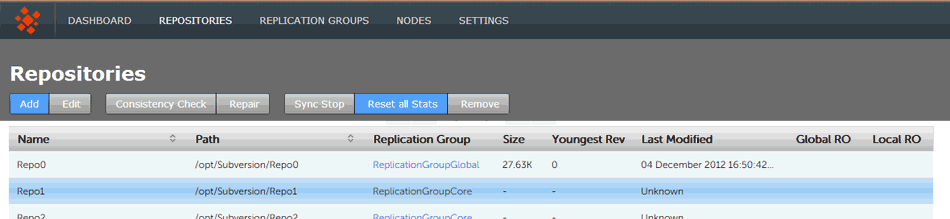
Repositories listed
- Name
- The name of the repository - this will be the same as the folder name in the Git directory.
- Path
- The full path to the Repository.
- Replication Group
- The Replication Group in which the repository may be replicated.
- Size
- The file size of the repository.
- Youngest Rev
- The youngest (latest) revision in the repository. Comparing the youngest revisions between replicas is a quick test that a repository is in the same state on all sites.
- Last Modified
- The timestamp for the last revision, which provides a quick indicator for the last time a Git user made a change.
- Global RO
- Checkbox that indicates whether the repository is globally Read-only, that is Read-only at all sites.
- Local RO
- Checkbox that indicates whether the repository is locally Read-only, that is Read-only to users at this node. The repository receives updates from the replicas on other sites, but never instigates changes itself.
- Login to the admin console of one of your nodes. The node will need to be the member of a replication group in which the repository is replicated, otherwise it won't appear on the tab. Click on the Repositories tab to see it.

Login.
- On the Repositories tab, click on the line that corresponds with the repository that you want to remove.
Repositories.
- Once a repository has been highlighted (in yellow), the REMOVE button will become available. Click it.
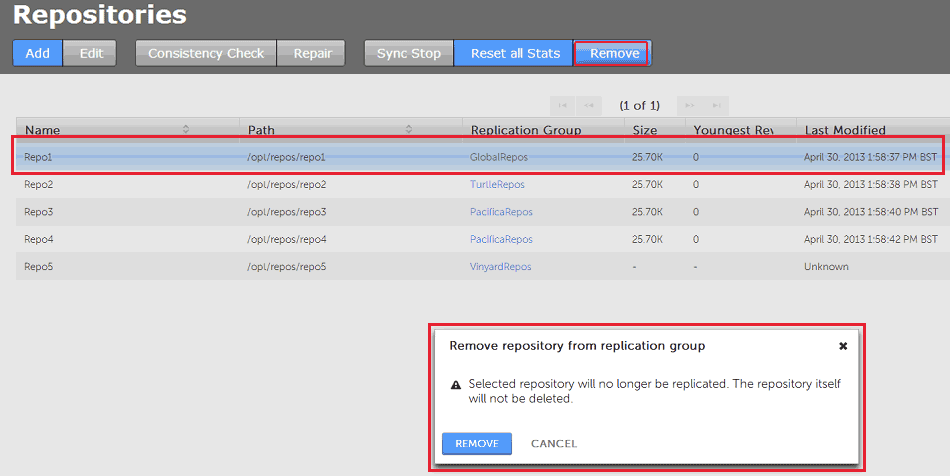
Remove.
A dialog box will appear entitled "Remove repository from replication group". It will confirm that removing a repository from a replication group will stop any changes that are made to it from being replicated. However, no repository data is removed. - Login to the admin console of one of your nodes. The node will need to be the member of a replication group in which the repository is replicated, otherwise it won't appear on the tab. Click on the Repositories tab to see it.
Login.
- On the Repositories tab, click on the line that corresponds with the repository that you want to edit. Then click the Edit button. You can also click on the repository's name to go directly to the Edit screen.

Repositories.
- You will now see the Repository screen appear. For here you can trigger a consistency check, bring the repository to a coordinated stop or start a repair if a problem has been detected.
Edit Repository.
- Name
- The name of the repository assigned when it was placed under MultiSite control.
- Path
- The absolute path to the repository on each node.
- Replication Group
- I
- Last Modified
- The filesize of the repository, noted here in bytes.
- Size
- The timestamp of the last modification to the repository.
- Sized added today
- Indicates the change in repository size over the last 24 hours, which provides a quick cue for recent traffic levels.
- Youngest Revision
- This entry is not used by Git MultiSite, it's used when MultiSite is configured to run with Subversion.
- Commits made today
- Provides a count of the repository changes that have been made over the last 24 hours. This is used to measure recent activity levels on the repository.
- Global Read-only
- Changes the Read-only setting, enable or disable the repository Global Read-only setting. When enabled, the repository will not be writable either locally or globally. This is used to lock a repository from any changes.
- Local Read-only
- Changes the Read-only setting, enable or disable the repository Local Read-only setting. When enabled, the repository will not be writable, either for local users or for the replication system (that would push changes made to the repository on other nodes). However, changes that come from the other nodes are stored away to be played out as soon as the read-only state is removed.
- Reload
- For a refresh of the repository information to pick up any changes that may have occured since loading the screen.
- Login to a node's browser-based UI and click on the Repositories tab. Click on the repository that you wish to stop replicating.
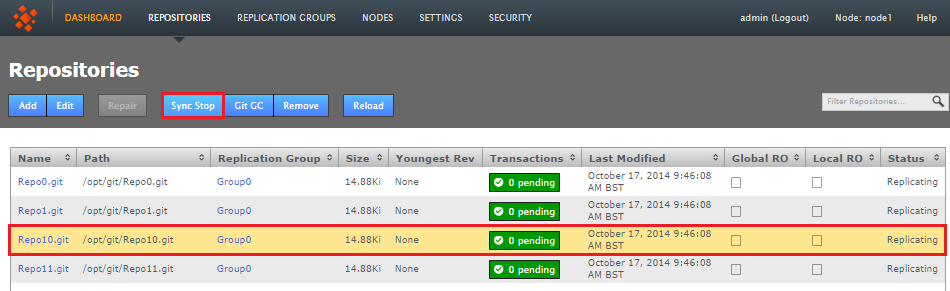
- With the repository selected, click the Sync Stop button. A growl message will appear to confirm that a synchronized stop has been requested. Note that the process may not be completed immediately, especially if there are large proposals transferring over a WAN link.
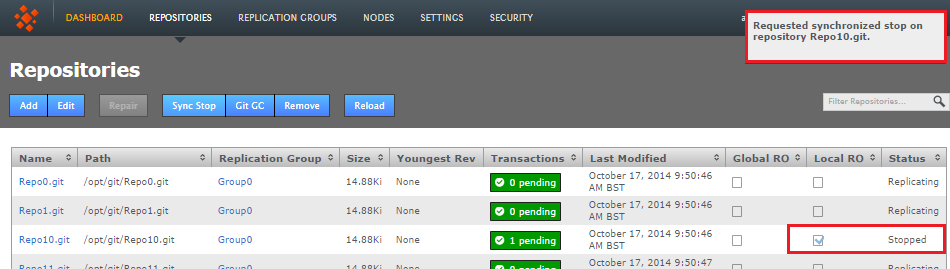
- On refreshing the screen you will see that a successfully sync stopped repository will have a status of Stopped and will be Local RO (Locally Read-only) at all nodes.
- Click on a stopped repository and click on the Sync Start button.
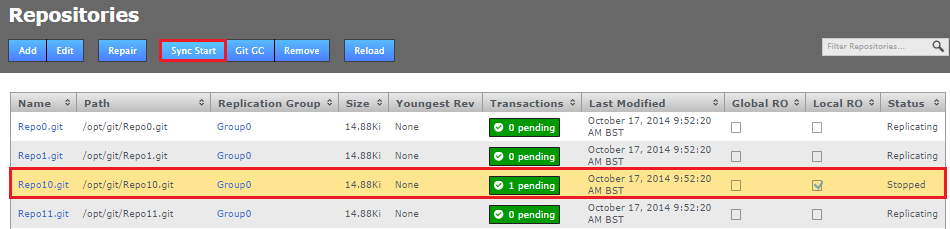
- The repository will stop being Local Read-only on all nodes and will restart replicating again.
- Sync-Stop the Node - this takes the node offline as it will stop accepting proposals from other other.
- Stop Node via API call - use the API to stop all repositories on a nodes. This method is less obtrusive as the first as it doesn't stop the node from otherwise operating
- Shutdown the node
- Run the following jar file:
java -jar fsfsrestore.jar path/to/application.properties path/to/back-up-folder
the first argument, path/to/application.properties is
<INSTALL-DIR>/git-multisite/replicator/properties/application.propertiespath/to/backup by default is
<INSTALL-DIR>/git-multisite/replicator/db/backup/FsfsBackup.class path/to/application.properties
- Restart the node
- Java JDK 1.7 or later
- Apache HTTP Web Server
- Git 2.0+ (See Yum Configuration).
- Git MultiSite (installed and configured for replication, using gitms as the user).
Ensure that at least one repository has been replicated successfully and is in the directory /home/gitms/repos/ on each machine. - Access Control Plus
- Generic File Replication package (used to link Access Control Plus to a Git MultiSite installation).
userhas a valid shell.- Apache doesn't invoke the SuexecUserGroup directive, which ensures that
apacheuser is set to run CGI programs. - Repositories should be set to be owned by
apache. - SSH
- HTTP with an authentication mechanism such as htpasswd or LDAP
- Git MultiSite is already set up and configured for replication
- Git MultiSite runs with the 'gitms' user and 'gitms' group
- The base directory for managed repositories is
/home/gitms/repos/ - The
apache2+suexecpackage is installed - If an htpasswd file is required, it is stored in
/var/www/passwd - Apache runs as user 'apache'
- Apache configuration is in its default directory,
/etc/httpd/conf.d/ - Install gitweb from yum
yum install gitweb
- Locate gitweb installation files, I like to put them into their own folder
mkdir /var/www/gitweb
copy gitweb.cgi gitweb.perl and the static directory into here. - Set permissions (since we are using suexec it has to be wandisco)
chown -R wandisco:wandisco /var/www/gitweb
- Modify /etc/gitweb.conf to reflect site changes
our $projectroot = "/opt/repos"; our @git_base_url_list = qw(http://<server-ip-or-name>/gitweb)
Save changes. - Configure Apache to use gitweb (see Appendix A example) and restart Apache after making any changes.
- Browse to http://<server-ip-or-name>/gitweb to verify installation and configuration
- Git operations are run through a single shared user account
- The user account is the same as the account that runs the GitMS service - for example, "gitms"
- All authentication is done by public/private keypairs. No password or certificate based authentication
- The ssh daemon uses the authorized_keys file in "~/.ssh/" to do the public key lookup
- The shared user account must have a regular shell login in /etc/passwd - using for example, git-shell, will cause the command GitMS relies on to fail.
- R(+/-) - Allow/Deny user read access
- W(+/-) - Allow/Deny user write access
- C(+/-) - Allow/Deny user create access
- D(+/-) - Allow/Deny user delete access
- Determine that the repo Repo1.git exists on the local node. If not, error out.
- Lookup Tom's rules for branch master on Repo1.git
- If rules exist for Tom which grant/deny the access he needs, apply them
- If rules do not exist for Tom, check each of the teams Tom is a part of.
- Tom may be a part of multiple teams which have conflicting rule permissions. One could grant, and one could deny access. In the case where the permissions conflict at the same point on the hierarchy, we always pick the most permissive rule.
- If Tom's teams have no rules for the master branch either, we move up the Resource hierarchy and check the permissions assigned against Repo1.git.
- If Tom has permissions assigned against Repo1.git, apply them.
- If no relevant rules exist for Tom, check again for each of the teams he is a part of.
- If no permissions exist at this point, apply the default policy permissions. (gitms.authz.policy)
1.8.2 Set up a destination
The destinations panel stores the email addresses for your notification recipients.
1.8.3 Set up a template
The template section is used to store email messages. You can create any number of templates, each with its own notification message, triggered by one of a number of trigger scenarios that are set up in the Rule section.
Available variables
When writing email notification templates, you can insert variables into the template that will be interpolated when the notification is delivered. The following two variables are available for ALL event types:
For the event types "Disk Monitor Info", "Disk Monitor Severe" and "Disk Monitor Warning", the following additional variable is available:
For the event types "Deploy Repository Succeeded" and "Deploy Repository Failed", the following additional variables are available:
1.8.4 Set up a rule
The Rule section is used to define which system event should trigger a notification, what message template should be used and which recipients should be sent the notification.
Event:
1.9 Back up Git MultiSite data
It's possible to back up Git MultiSite's own database in case you need to quickly restore a node.
This procedure backs up Git MultiSite's internal Prevayler database, it doesn't touch your Git repository data or any other system files that you should also be backing up.
-
Create a backup of the current installation by invoking the following API call:
curl --user <username>:<password> -X POST http://[node_ip_address]:8082/dcone/backupThis will create a backup folder in
[INSTALL-DIR]/git-multisite/replicator/db/backup/X.X.X_DConE_Backup directory.
1.9.1 Back up while shut down
(run from within /replicator):java -cp ./fsfsrestore.jar com.wandisco.fsfs.backup.FsfsBackup -c ./properties/application.properties
Use this to back up the current state of all pervailers when Git MultiSite is shut down - you don't therefore need to start the replicator in order to create a backup of the database.
1.9.2 Back up selected prevailers
(run from within /replicator):java -cp ./fsfsrestore.jar com.wandisco.fsfs.backup.FsfsClear -c ./properties/application.properties
This class clears selected prevaylers only, when the replicator is shut down. It does not clear all database instances, only those that are being restored during restore process.
1.9.3 Restore Git MultiSite data
Use the following procedure to restore Git MultiSite settings after reinstalling and starting a node:
2. Manage access to Git MultiSite
Git MultiSite supports three different mechanisms for managing access to its admin UI:
You can set up multiple administrator accounts for accessing the Git MultiSite admin console. Accounts can be set up from within the admin UI (via the Security tab). These users can then log in to any node's admin UI by providing their username and password.
The following sections explain how to set up multiple accounts, set up managing LDAP authorities and export/import the resulting data.
2.1 Adding additional users
2.2 Removing or editing user details
You can modify any user details by clicking their corresponding Edit button on the Internally Managed Users table

Git MultiSite - Remove or Edit users
2.2 LDAP authorities
Git MultiSite supports the use of LDAP authorities for managing admin logging accounts. See our Guide to LDAP.
When connecting Git MultiSite to available LDAP authorities it is possible to classify the authority as "Local" i.e. specific to the node in question or not - in which case the authority details will be replicated to the other nodes within the replication network.
It's possible to run multiple LDAP authorities that are of mixed type, i.e. using some local authorities along with other authorities that are shared by all nodes. When multiple authorities are used, it's possible to set what order they are checked for users.
The standard settings are supported for each configured LDAP authority: URL, search base and filter and bind user credentials. Note that the bind user's password cannot be one-way encrypted using a hash function because it must be sent to the LDAP server in plain text, so for this reason the bind user should be a low privilege user with just enough permissions to search the directory for the user being authenticated. Anonymous binding is permitted for those LDAP servers that support anonymous binding.
Add authority
Use the Add Authority feature to add one or more LDAP authorities, either local to the node or connected via WAN. Locally LDAP services are treated as having presedence. When Internally managed users are enabled they are first checked when authenticating users - see Admin Account Precedence
Procedure for adding an authority:
Edit authority
Modify an existing authorities settings:
Kerberos security
This section describes the basic requirements for integrating Git MultiSite with your existing Kerberos systems. The procedure requires the following:
Ensure that time synchronization and DNS are functioning correctly on all nodes before configuring Kerberos. A time difference between a client and the master Kerberos server that exceeds the Kerberos setting (5 mins default) will automatically cause auth failure.
Configuration
This procedure assumes that you have already set up your DNS service and master Key Distribution Center.
See Security Reference: Kerberos settings.
See Configure browsers for Kerberos authentication.
3. Nodes
This section covers the various functions that handle how repository data is replicated.
3.1 Adding a node
To replicate Git repository data between sites, you first first tie the sites together, this process starts with adding (connecting) sites in a process we call induction.
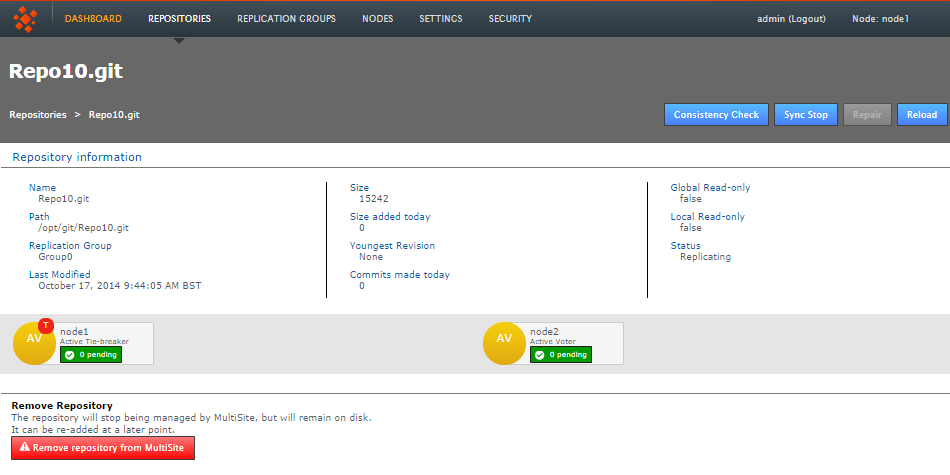
3.2 Remove a Node
The removal of a node from the Git MultiSite replication group is useful if you will no longer be replicating repository data to its location and wish to tidy up your replication group settings.
The option to remove a node should only appear if it is not currently a member of a replication group. You may need to remove and recreate replication groups in order make it eligible for removal.
Known issue:
NOTE: If a node is inducted but not in a replication group then it is possible (from that node) to remove other inducted nodes that are in a replication group. There's currently an issue in that a node isn't aware of the membership of replication groups of which it is not itself a member. This means that it is possible to remove a node that is a member of a replication group, if done from another node that doesn't have knowledge of the replication group.
Until we block this capability you should do a manual check of any nodes that you plan to remove to make absolutely sure that it is not a member of a replication group.
Take care when removing nodes. In order to ensure that replication network is kept in sync, removed nodes are barred from being re-inducted. The only way that you can bring back a node is to perform a reinstallation of Git MultiSite using a new Node ID.
3.3 Stopping nodes
You can bring all nodes to a stop with a single button click (if all associated repositories are replicating/writable).
Before starting a Sync Stop All, make sure that none of your nodes have repositories in a local read-only state.
We strongly recommend that you watch the log messages and confirm that all nodes report as stopped. If you suspect that one or more nodes are not going to stop you should investigate immediately. The DASHBOARD messages should report the stop, for example:
    Aborted tasksType PREPARE_COORDINATE_STOP_TASK_TYPE
    Delete Task
    Originating Node: Ld5UYU
    tasksPropertyTASK_ABORTING_NODE: Ld5UYU
    tasksPropertyTASK_ABORT_REASON: One or more replicas is already stopped.
    The replica was: [[[Ld5UYU][bf0c6395-77b6-11e3-9990-0a1eeced110e]]]
Look for the message:
Aborted tasksType PREPARE_COORDINATE_STOP_TASK_TYPEIn the replicator.log file you might see the error type:
"DiscardTaskProposal <task id etc> message: One or more replicas is already stopped."
3.4 Starting nodes
4. Replication groups
4.1 Add a replication group
Use the procedure to add a new Replication Group. You need to add a new replication group when you need to replicate between a new combination of sites - i.e. sites that are not currently replicating in an existing group. If you are, instead, looking to replicate a new repository between existing sites, it's possible to add a new repository to those sites. In this case see Add a new repository.
4.2 Delete a replication group
It's possible to remove replication groups from Git MultiSite, although only if they they have been emptied of repositories. Run through the following procedure as an example.
4.3 Add a node to a replication group
When adding nodes to a replication group that already contains three or more nodes, ensure that there isn't currently a large number of commits being replicated.
Adding a node during a period of high traffic (heavy level of commits) going to the repositories may cause the process to stall.
It's possible to add additional nodes to an existing replication group, so that there's minimal disruption to users. Here's the procedure:
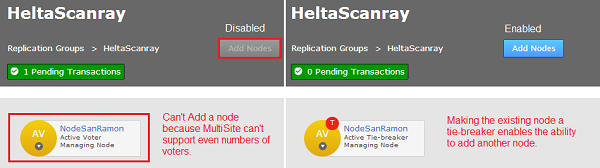
The Add Nodes button may be greyed out if the current replication group configuration won't support the addition of a new voter node.
It is also possible that a configuration that is scheduled in the future may block the addition of a new node. Check the schedule if you think that you should otherwise be able to add a new node to the replication group.
4.4 Remove a node from a replication group
It's possible to remove a node from a replication group. This functionality is required if the developers at one of your nodes are no longer going to contribute to the repositories handled by a replication group. Removing a node from a replication group will halt further updates to its repository replicas.
In the event that you remove a node from a replication group, you should delete its copy of the repositories managed by the replication group. Having an out-of-date stray copy could result in confusion/users working from old data.
You will not be allowed to remove a node that is currently assigned as the "Managing Node". In order to remove the managing node, go to the Configure Schedule page and assign a different node as a Managing Node.
4.5 Schedule node changes: follow the sun
You can schedule the member nodes of a replication group to change type according to when and where it is most beneficial to have active voters. To understand why you may want to change your nodes read about Node Types
Schedule node type changes via the public API
Instead of manually setting up schedules through a node's UI you can do it programmatically through calls to the public API.
See Public API ScheduledNodeAPIDTOList element
and scheduledNodeAPIDTOList Datatype
Use the following API call
http://<ip>:8082/public-api/replicationgroup/{repgroupID}/schedule
e.g.
http://10.0.100.135:8082/public-api/replicationgroup/97913c04-bbad-11e2-877a-028e03094f8d/schedulePUT with
ReplicationGroupAPIDTO XML as body:
To make Node N3 a tie-breaker 'T' FROM 10:00 - 16:00 (GMT) every day of the week with Node N1 as tie-breaker 'T' afterwards:
When viewed on a node times are shifted to the local timezone although internally they are always recorded in UTC.
Example curl command:
Make a text file containing ReplicationgroupAPIDTO XML (as above) called schedule.xml
curl -u username:password -X PUT -d @schedule.xml http://[IP]:[PORT]/public-api/replicationgroup/97913c04-bbad-11e2-877a-028e03094f8d/schedule
Sample 'schedule.xml' file
<ReplicationGroupAPIDTO>
       <replicationGroupName>global</replicationGroupName>
     <replicationGroupIdentity>97913c04-bbad-11e2-877a-028e03094f8d</replicationGroupIdentity>
       <scheduledNodes>
           <dayOfWeek>1</dayOfWeek>
           <hourOfDay>14</hourOfDay>
           <schedulednode>
               <nodeIdentity>N1</nodeIdentity>
               <locationIdentity>c0e486a0-bbab-11e2-863b-028e03094f8e</locationIdentity>
               <isLocal>true</isLocal>
               <isUp>true</isUp>
               <lastStatusChange>0</lastStatusChange>
               <role>AV</role>
           </schedulednode>
           <schedulednode>
               <nodeIdentity>N3</nodeIdentity>
               <locationIdentity>5480f515-bbad-11e2-8301-028e03094f8c</locationIdentity>
               <isLocal>false</isLocal>
               <isUp>true</isUp>
               <lastStatusChange>0</lastStatusChange>
               <role>T</role>
           </schedulednode>
           <schedulednode>
               <nodeIdentity>N2</nodeIdentity>
               <locationIdentity>478c766f-bbad-11e2-877a-028e03094f8d</locationIdentity>
               <isLocal>false</isLocal>
               <isUp>true</isUp>
               <lastStatusChange>0</lastStatusChange>
               <role>AV</role>
           </schedulednode>
Download the full sample schedule.xml file.
It's currently not possible to change the role of the node that is assigned as the managing node.
If you need to change a node's role, first make a different node the manager. This restriction was intended stop the managing node from being given a non-active role. Not only would this stop the node from managing schedule changes, it would make it impossible to move the managing node status to another node.
In a future release we may be able to make it possible to change the managing node's role to another compatible role, e.g. from Active Voter to Active.
5. Repositories
5.1 Add a repository
Once you have added at least one Replication Group you will be able to add repositories to your node. Here's how:
If a repository that you added gets stuck in the deploying state - you'll see this on the Dashboard, in the Replicator Tasks window - you can cancel the deployment and try adding the repository again. To cancel a deployment, go to the Replicator Tasks window and click on the Cancel Task link.
5.1.1 Automated Deployment of Repositories
While it is possible to deploy new repositories through automation, using the REST API, currently the changing state of repositories is not chained to the deployment task. It's therefore possible that a repository that is successfully created will not actually be fully deployed and this could result in errors if your automation moves ahead too soon.
Ensure that a short delay is added to the deployment of new repositories. You can query the newly added repository through the REST API (using the repository endpoint) in order to verify that it is in fact deployed.
5.2 Remove a repository
It's possible to remove repositories from Git MultiSite. Follow this quick procedure.
If a repository is removed and in some way historically edited (e.g. an SVN dumpfilter to remove content/revisions due to sensitive content), before re-introducing the repository to MultiSite Plus (all whilst maintaining the same UUID), commits may fail due to the existing fulltext cache references no longer being applicable.
Workaround: Restart Apache and MultiSite Plus before you use the repository.
5.3 Edit a repository
It's possible to edit a repository's properties after they have been set up in Git MultiSite. Follow this quick procedure.
5.4 Repository synchronized stop
The Repository Synchronized Stop is used to stop replication between repository replicas, it can be performed on a per-repository basis or on a replication group basis (where replication will be stopped for all associated repositories).
To bring some or all nodes to a stop, use the Sync Stop All command found on the Nodes tab.
Repository Stops are synchronized between nodes using a 'stop' proposal to which all nodes need to agree. So that while not all nodes will come to a stop at the same time they do all stop at the same point.
5.5 Repository synchronized start
Restarting replication after performing a Synchronized Stop requires that the stopped replication be started in a synchronized manner.
5.6 Stopping repositories on a node
In some situations, such as performing a repository backup, you may need to stop writes to the local repository replica. There are a couple of methods for doing so:
5.6.1 Stop node via API call
Using this method proposals will still be delivered to the node and the node can still participate in voting, but the proposals will not be executed until the output is restarted.
This is supported in the API with the RepositoryResource methods:PUT <server>:<port>/api/repository/{repositoryId}/stopoutput
This command takes one argument: NodeListDTO nodeListDTO which is the list of nodes on which the repo output will be stopped. In this case that list will only include NodeX.
Note that whilst the output is stopped it will show in the UI as LocalReadOnly.
PUT <server>:<port>/api/repository/{repositoryId}
/startoutput
This command takes one argument: NodeListDTO nodeListDTO which is the list of nodes on which the repo output will be started. In this case that list will only include NodeX.
PUT: <server>:<port>/api/replicator/stopall
If you don't need the stop to be coordinated the the following method is simpler and immediately stops the output of proposals on all repositories on the node it is executed against:
PUT: <server>:<port>/api/replicator/stopall
This will stop all repositories on the node on which it is invoked (with no coordination).
To start them all again call:
PUT: <server>:<port>/api/replicator/startall
5.7 Reuse a repository
You need to edit the Git configuration file.
You might reuse a repository after improperly removing it from replication, by copying it from backup/restore, for example. If so, you need to hand edit the Git configuration file (in repo/config) to change replicated = true to replicated = false or remove the line. Do this before putting it in place on any replicated server as a local, i.e. non-replicated, repository.
6. Back up Git MultiSite data
It's possible to back up Git MultiSite's own database in case you need to quickly restore a node.
This procedure backs up Git MultiSite's internal Prevayler database, it doesn't touch your Git repository data or any other system files that you should also be backing up.
-
Create a backup of the current installation by invoking the following API call:
curl --user <username>:<password> -X POST http://[node_ip_address]:8082/dcone/backupThis will create a backup folder in
[INSTALL-DIR]/git-multisite/replicator/db/backup/X.X.X_DConE_Backup directory.
6.1 Back up while shut down
(run from within /replicator):java -cp ./fsfsrestore.jar com.wandisco.fsfs.backup.FsfsBackup -c ./properties/application.properties
Use this to back up the current state of all pervailers when Git MultiSite is shut down - you don't therefore need to start the replicator in order to create a backup of the database.
6.2 Back up selected prevailers
(run from within /replicator):java -cp ./fsfsrestore.jar com.wandisco.fsfs.backup.FsfsClear -c ./properties/application.properties
This class clears selected prevaylers only, when the replicator is shut down. It does not clear all database instances, only those that are being restored during restore process.
6.3 Restore Git MultiSite data
Use the following procedure to restore Git MultiSite settings after reinstalling and starting a node:
6. Running Git MultiSite with Apache
This section describes how to set up Apache with Git MultiSite.Using mod_dav or WebDav to administer Git MultiSite is not supported.
6.1 Before you start
Take note of the following requirements:
If you are using ONLY Apache to access both Git MultiSite and Subversion MultiSite Plus then you can use just one account.
If you are ONLY accessing either Git MultiSite or Subversion MultiSite Plus via SSH then you can use just one account.
However, if you are using Apache and SSH to access both Git and Subversion repositories you will need to use two accounts (because each account has only a single authorized_keys file).
When using SSH for both SVN and Git access, the account used to run Apache must be the same account that is used to install SVN MultiSite Plus.
Running Git MultiSite with the same system account as Apache (for example, via a dedicated apache user account) can cause problems. For production we recommend that you set up a dedicated user account: in Red Hat that's an account with a UID of 500 or higher.
In some cases you may need to run Git MultiSite using the apache user, for example if you are deploying with both Git and SVN repository replication. To make the apache user account suitable for running Git MultiSite you need to ensure that:
6.2 Install Apache
yum install httpd mod_sslNext, ensure Apache will start on system restart
chkconfig --add httpd service httpd start6.3 Configure SeLinux
If SeLinux is running:
Enable access to home directories - ie /usr/home/gitms
setsebool -P httpd_enable_homedirs on Install semanage
usermod -a -G apache gitmsyum -y install policycoreutils-python Next, allow httpd read/write access to /home/gitms
chcon -R -t httpd_sys_rw_content_t /home/gitmschcon -R -t httpd_sys_rw_content_t /opt/wandisco/git-multisite/replicator/content_deliveryThen we need to allow the update script to make a network connection to the Java service
setsebool -P httpd_can_network_connect onsetsebool -P git_system_enable_homedirs on6.4 Configure IPTables
/etc/sysconfig/iptables should look like:
*filter
:INPUT ACCEPT [0:0]
:FORWARD ACCEPT [0:0]
:OUTPUT ACCEPT [11:12222]
-A INPUT -m state --state RELATED,ESTABLISHED -j ACCEPT
-A INPUT -p icmp -j ACCEPT
-A INPUT -i lo -j ACCEPT
-A INPUT -p tcp -m state --state NEW -m tcp --dport 6789 -j ACCEPT
-A INPUT -p tcp -m state --state NEW -m tcp --dport 8082 -j ACCEPT
-A INPUT -p tcp -m state --state NEW -m tcp --dport 8085 -j ACCEPT
-A INPUT -p tcp -m state --state NEW -m tcp --dport 9001 -j ACCEPT
-A INPUT -p tcp -m state --state NEW -m tcp --dport 443 -j ACCEPT
-A INPUT -p tcp -m state --state NEW -m tcp --dport 22 -j ACCEPT
-A INPUT -j REJECT --reject-with icmp-host-prohibited
-A FORWARD -j REJECT --reject-with icmp-host-prohibited
COMMIT
# Completed on Mon Jul 29 13:52:30 2013
Increased the OUTPUT ACCEPT from 2222 to 12222 (allows outgoing connections up to port 12222)
Allow incoming connections on 6789, 8082, 8085, 9001 and 443.
7.5 Create your HTTP password file
htpasswd -c /var/www/passwd usernameChange the ownership of the passwd file:
chown apache:apache /var/www/passwd7.6 Create git-http-backend wrapper script
The script executed by suexec must be under /var/www
mkdir -p /var/www/binAdd the following to /var/www/bin/git-http-backend
#!/bin/bash
GIT_PROJECT_ROOT=/home/gitms/repos
# This value should be configured to match the base location of repos on disk
export GIT_BASEDIR=$GIT_PROJECT_ROOT
# This should be set to the gitms users home directory - reset here because SUexec strips it out
export HOME=/home/gitms
export GIT_HTTP_EXPORT_ALL=true
# Execute gitms_shell script
exec /opt/wandisco/git-multisite/bin/gitms_shell $REMOTE_USER
The script and the directory it is in must be owned by the user who will be executing the script:
chown -R gitms:gitms /var/www/binYou'll need to tell selinux that /var/www/bin has httpd exectuable scripts)
semanage fcontext -a -t httpd_sys_script_exec_t /var/www/bin restorecon /var/www/bin6.7 Add Apache config
Copy the following into /etc/httpd/conf.d/repo.conf
<VirtualHost *:80>
DocumentRoot /home/gitms/repos
ServerName git.example.com
<Directory "/home/gitms/repos">
Allow from All
Options +ExecCGI
AllowOverride All
</Directory><Location /repos>
AuthType Basic
AuthName "Private Git Access"
AuthUserFile "/var/www/passwd"
Require valid-user
</Location>uexecUserGroup gitms gitms
ScriptAlias /repos /var/www/bin/git-http-backend
</VirtualHost>6.8 Allow Git pushes
Change to the directory your repo is located in
su - gitms -s /bin/bash
cd /home/gitms/repos/bar.git
git config http.receivepack true
git config core.sharedRepository groupThis needs to be done in each repo and on all replicas.
6.9 Restart Apache and test
service httpd restart
git clone http://192.168.122.1/repos/bar.git6.10 HTTPS support: Generate certificates
You can use tools such as easy-rsa to generate certificates.
You need to have the Epel rep installed to use this:
wget http://dl.fedoraproject.org/pub/epel/6/i386/epel-release-6-8.noarch.rpm
rpm -Uvh epel-release-6-8.noarch.rpm
yum install easy-rsa
cp -r /usr/share/easy-rsa/2.0 .
cd 2.0/
source vars
./clean-all
./build-ca
./build-key-server git-http1 (when prompted for the CommonName use the system IP address if the system does not have a register DNS name)
./build-key-server git-http2
./build-key-server git-http3This will generate three server certs/keys as well as the ca cert/key in the ./keys directory.
Copy a cert and key into /etc/apache on each node.
cp ./keys/git-http1.crt /etc/httpdcp ./keys/git-http1.key /etc/httpdchown apache:apache /etc/httpd/git-http1.crt /etc/httpd/git-http1.key6.11 Modify Apache config to support SSL
Edit /etc/httpd/conf.d/repo.conf
<VirtualHost *:443>
DocumentRoot /home/gitms/repos
ServerName git.example.com
SSLEngine on
SSLCertificateFile /etc/httpd/git-http1.crt
SSLCertificateKeyFile /etc/httpd/git-http1.key
<Directory "/home/gitms/repos">
Allow from All
Options +ExecCGI
AllowOverride All
</Directory>
<Location /repos>
AuthType Basic
AuthName "Private Git Access"
AuthUserFile "/var/www/passwd"
Require valid-user
</Location>
SuexecUserGroup gitms gitms
ScriptAlias /repos /var/www/bin/git-http-backend
</VirtualHost>Restart service:
service httpd restart6.12 Add the CA certificate to client system
The server certificate generated will not be recognized by your client. You can either turn of strict SSL checking:
git config --global http.sslVerify falseOr the CA certificate can be added to the client machine, this means adding the ./keys/ca.crt file to the set of CA certificates the client system accepts. Instructions for doing this can be found here: http://askubuntu.com/questions/73287/how-do-i-install-a-root-certificate
6.13 Test
$ git push

WARNING: gnome-keyring:: couldn't connect to: /tmp/keyring-P25n4M/pkcs11: No such file or directory
Password for 'https://test@192.168.122.207':
remote: GitMS - update replicated.
To https://test@192.168.122.207/repos/bar.git
 d434f14..8b7bab0 master -> master$
7. Git MultiSite Authentication and Authorization
Git MultiSite authentication is performed by a third party service. Once the authentication is complete, details of the requested git operation and a username are passed back to Git MultiSite.
The operation and username are then checked internally by Git MultiSite to ensure sufficient permissions are available to perform the operation.
Authentication can use either:
7.1 Authentication
As mentioned already, authentication can be by either SSH directly or via an HTTP authentication mechanism. It is normal to only use one or the other, but it is possible to use both in parallel.
Here are examples of using either SSH or Apache for authentication:
8.1.1 Authentication through Apache
Apache authentication allows users to communicate via the HTTP(S) protocol. This is beneficial in environments with heavily restricted firewalls, as the usual ports 80 and 443 are used for communication.
Git has two HTTP-based protocols, namely 'git over HTTP' and 'Smart HTTP'. Git MultiSite only supports the 'Smart HTTP' protocol, due to improved functionality compared with the older 'git over HTTP' protocol, especially with regards to speed of operation.
Assumptions
The following assumptions are made:
Authentication providers
We'll show you how Apache can be configured to authenticate against either an internal file (htpasswd) or an LDAP directory service.
Authentication by htpasswd
This requires an htpasswd file to be created to store usernames.
Creating the htpasswd file
htpasswd -c /var/www/passwd <username>Adding users to an existing file:
htpasswd /var/www/passwd <username>The -c option should only be used when first creating an htpasswd file. If you use this to reference a pre-existing file, any details in the file will be overwritten with the username you specify.
Configuration for htpasswd
Add a file called repo.conf in the /etc/httpd/conf.d/ directory with the following contents:
<VirtualHost *:80>
# 80 is the port the webserver will bind to
DocumentRoot /home/gitms/repos
# The base directory for repositories managed by Git MultiSite
ServerName git.example.com
RewriteEngine On
RewriteCond %{REMOTE_USER} ^(.*)$
RewriteRule ^(.*)$ - [E=R_U:%1]
RequestHeader set X-Remote-User %{R_U}e
<Directory "/home/gitms/repos">
Allow from All
Options +ExecCGI
AllowOverride All
</Directory>
<Location /repos>
# This matches the location in the requesting url,
# for example, matches against request http://<ip>/repos/Authentication by LDAP
Apache can use an LDAP directory to authenticate against. Unlike htpasswd, this does not require the maintenance of a separate passwd file.
Add a file called repo.conf in the /etc/httpd/conf.d/ directory with the following contents:
<VirtualHost *:80>
DocumentRoot /home/gitms/repos
ServerName git.example.com
RewriteEngine On
RewriteCond %{REMOTE_USER} ^(.*)$
RewriteRule ^(.*)$ - [E=R_U:%1]
RequestHeader set X-Remote-User %{R_U}e

<Directory "/home/gitms/repos">
Allow from All
Options +ExecCGI
AllowOverride All
</Directory>


<Location /repos>
AuthType Basic
AuthName "Git Repos"
AuthBasicProvider ldap
AuthzLDAPAuthoritative off
AuthLDAPURL "ldap://LDAP-IP:389/CN=CN-details,DC=DC-details,DC=DC-details?uid"

#If the LDAP directory requires a bind user and password:
AuthLDAPBindDN "CN=Administrator,CN=Users.DC=sr,DC=wandisco,DC=com"
AuthLDAPBindPassword password

Require valid-user
</Location>

SuexecUserGroup gitms gitms
ScriptAlias /repos /var/www/bin/git-http-backend
</VirtualHost>
Configuration using HTTPS
You can set up Apache to use HTTPS rather than HTTP. This is preferred in Enterprise settings due to the security benefits.
Using HTTPS with htpasswd:
Add a file called repo.conf in the /etc/httpd/conf.d/ directory with the following contents:
<VirtualHost *:443>
DocumentRoot /home/gitms/repos
ServerName git.example.com
RewriteEngine On
RewriteCond %{REMOTE_USER} ^(.*)$
RewriteRule ^(.*)$ - [E=R_U:%1]
# The following two lines will redirect port 80 (HTTP) to 443 (HTTPS)
# if SSL/TLS is always required:
RewriteCond %{HTTPS} off
RewriteRule (.*) https://%{HTTP_HOST}%{REQUEST_URI}
RequestHeader set X-Remote-User %{R_U}e
SSLEngine on
SSLCertificateFile /etc/httpd/git-http1.crt
SSLCertificateKeyFile /etc/httpd/git-http1.key

<Directory "/home/gitms/repos">
Allow from All
Options +ExecCGI
AllowOverride All
</Directory>

<Location /repos>
AuthType Basic
AuthName "Private Git Access"
AuthUserFile "/var/www/passwd"
Require valid-user
</Location>

SuexecUserGroup gitms gitms
ScriptAlias /repos /var/www/bin/git-http-backend
</VirtualHost>
Using HTTPS with LDAP
Add a file called repo.conf in the /etc/httpd/conf.d/ directory with the following contents:
<VirtualHost *:443>
DocumentRoot /home/gitms/repos
ServerName git.example.com
RewriteEngine On
RewriteCond %{REMOTE_USER} ^(.*)$
RewriteRule ^(.*)$ - [E=R_U:%1]
#  The following two lines will redirect port 80 (HTTP) to 443 (HTTPS)
# if SSL/TLS is always required:
RewriteCond %{HTTPS} off
RewriteRule (.*) https://%{HTTP_HOST}%{REQUEST_URI}
RequestHeader set X-Remote-User %{R_U}e
SSLEngine on
SSLCertificateFile /etc/httpd/git-http1.crt
SSLCertificateKeyFile /etc/httpd/git-http1.key

<Directory "/home/gitms/repos">
Allow from All
Options +ExecCGI
AllowOverride All
</Directory>

<Location /repos>
AuthType Basic
AuthName "Git Repos"
AuthBasicProvider ldap
AuthzLDAPAuthoritative off
AuthLDAPURL "ldap://LDAP-IP:389/CN=CN-details,DC=DC-details,DC=DC-details?uid"

#If the LDAP directory requires a bind user and password:
AuthLDAPBindDN "CN=Administrator,CN=Users.DC=sr,DC=wandisco,DC=com"
AuthLDAPBindPassword password

Require valid-user
</Location>

SuexecUserGroup gitms gitms
ScriptAlias /repos /var/www/bin/git-http-backend
</VirtualHost>
Create git-http-backend script
Create a script called git-http-backend as follows:
#!/bin/bash
GIT_PROJECT_ROOT=/home/gitms/repos
# This value should be configured to match the base location of repos on disk
export GIT_BASEDIR=$GIT_PROJECT_ROOT
export GIT_HTTP_EXPORT_ALL=true
# Execute gitms_shell script
exec /opt/wandisco/git-multisite/bin/gitms_shell $REMOTE_USER
This script location should match where you set it to be called from in the repo.conf file on the ScriptAlias line - we have used /var/www/bin/git-http-backend. It is important to ensure that this script is executable, and the script and directory it is in are both owned by the "gitms" user - not "apache".
This script is run by suexec, and will therefore run as the user that owns it, which we require to be "gitms":
chmod +x /var/www/bin/git-http-backend
chown -R gitms:gitms /var/www/bin
Configuration of SELinux
If SELinux is being run, additional configuration is required, as follows:
#enable access to home directories, i.e. /home/gitms
setsebool -P httpd_enable_homedirs on

usermod -a -G apache gitms

#install semanage
yum -y install policycoreutils-python

#allow httpd read/write access to /home/gitms
chcon -R -t httpd_sys_rw_content_t /home/gitms

#allow httpd read/write access to /home/gitms
chcon -R -t httpd_sys_rw_content_t /opt/wandisco/git-multisite/replicator/content_delivery

#allow the update script make network connection to the Java service
setsebool -P httpd_can_network_connect on

setsebool -P git_system_enable_homedirs on

#configure selinux for suexec on git-http-backend
semanage fcontext -a -t httpd_sys_script_exec_t /var/www/bin
restorecon /var/www/bin
8. Installing GitWeb
GitWeb is an optional open source component that provides read only access to your Git repositories via a Web interface. It allows users to review recent commits, logs, history and other metadata about the git repositories.
Example GitWeb Configuration
#GitWeb Configuration
Alias /gitweb /var/www/gitweb

<Directory /var/www/gitweb>
  Options +ExecCGI
  AddHandler cgi-script.cgi
  DirectoryIndex gitweb.cgi
</Directory>
Final step
After you've finished updating your configuration, the last step is to restart apache:
service httpd restart9. SSH Authentication
SSH authentication is available for Git and supported by Git MultiSite. It is simple to set up and is attached to a service which is often already enabled. Occasionally, firewall rules may block clients and is not as popular with Windows users.
Requirements
SSH authentication is done using the SSH daemon and public/private keypairs. Requirements are as follows:
Authorized keys
Git MultiSite requires use of the 'command' keyword to be attached to each key in the authorized_keys file. This associates a username with the key used to login by using it as an argument to the gitms_shell script. By default, the script is found in /opt/wandisco/git-multisite/bin/gitms_shell, but this can vary between installations.
An example entry is as follows:
command="/opt/wandisco/git-multisite/bin/gitms_shell user1" ssh-rsa <SSH_KEY>If your script is in a different location, just update this line accordingly.
If you're running both Gitolite and Git MultiSite over SSH, both applications may attempt to use the same system account for SSH, this would introduce the risk of conflicts. We therefore recommend that you set up separate system accounts for Git MultiSite and Gitolite.
10.1 Authorization
10.1.1 Git MultiSite configuration
Authorization isn't enabled by default. To change this, and any other authorization settings, edit the application.properties file. The location is /opt/wandisco/git-multisite/replicator/properties/ for default installations.
# enable/disable authz module
# Default:
#gitms.authz.enabled=false
gitms.authz.enabled=true

# Set the file location of the authz file
# Default: /opt/wandisco/git-multisite/replicator/properties/auth.authz
#gitms.authz.file=/opt/wandisco/git-multisite/replicator/properties/auth.authz
gitms.authz.file=<filepath>

# Set the default permissions policy to DENY or ACCEPT
# for requests without a specific rule
# Default:
#gitms.authz.policy=DENY;
gitms.authz.policy=<policy>

# Set the polling period to detect changes in the AuthZ file
# NOTE: The trailing L is important, as it indicates this
# number is a Long value
# Default:
#gitms.authz.poll.timer=50L
gitms.authz.poll.timer=<numberInMilliseconds>L
10.1.2 AuthZ File format
Begin with the following header:
# Git AuthZ Version:1.0To define teams, add entries such as:
[groups]
team1 = user1, user2
team2 = user3, user4
To define rules against individual repositories, the repository path is used as a unique identifier, which is added in square brackets. For instance:
[/home/gitms/repos/Repo1.git]
user1 = R+W+
@team1 = R+W+C+D+
AuthZ rules are applied to users and teams using the following tokens:
Note: In order to create a branch, a user must have both Create and Write access, i.e. C+W+
Rules can also be applied at branch level, as follows:
For a branch-level rule to be effective, at least read access is required at the repository level.
[/opt/gitRepos/Repo1.git:BRANCH/secure]
rick = W-
A complete example:
# Git AuthZ Version:1.0
[groups]
team1 = wayne, rick
team2 = wayne, allan
[/home/gitms/repos/Repo1.git]
rick = R+W+
@team2 = R+W+C+D+
[/home/gitms/repos/Repo1.git:BRANCH/secure]
rick = W-
AuthZ rule application
The AuthZ rules have 2 hierarchies which are considered in the evaluation of whether a user has a requested level of access. They are the Resource level hierarchy (Repo->Branch|Tag), and the user level hierarchy (User->Team). Rule conflicts within these hierarchies are resolved by picking the rule which is most granular. In our above example, "rick" would have Read and Write access to the whole repo, except for the "secure" branch, on which he wouldn't have write access. The process by which these rules are applied is as follows:
For a branch-level rule to be effective, at least read access is required at the repository level.
If a user called Tom is requesting Write access to branch master on repo Repo1.git, the AuthZ rule resolution goes like this:
If read access is provided for a repository, all branches are readable, even if a rule is added at branch level to deny access.
Logging
The Git MultiSite replicator makes several log entries relating to AuthZ acitivities.
| Activity | Log entry |
|---|---|
| Detected an AuthZ file change | |
| When an AuthZ file change is detected | INFO: AuthZ: File change detected for <filename> |
| When there has been an error parsing the new AuthZ file | WARNING: AuthZ: Auth file invalid <errorMessage> |
| When the new AuthZ file has been successfully parsed | INFO: AuthZ: Time taken for parsing: <timeTaken> |
| Authorization Request Received | |
| Request received - authorization disabled | DEBUG: AuthZ: Authorization disabled, accepting request |
| Request received - authorization enabled | INFO: "AuthZ: Request [user: <username, repoPath: <repoPath>, ref:<refName>, accessRequested:<accessRequested>] received" |
| Request received - authorization configuration error | WARNING: AuthZ: There was an error with the Authorization setup, request declined |
| Authorization Response | |
| Permissions Specified in AuthZ and applied | INFO: AuthZ: <ACCEPT/DENY> Permissions applied for [user: <username, repoPath: <repoPath>, ref:<refName>, accessRequested:<accessRequested>] |
| No specific permissions found - using default policy | INFO: AuthZ: No permissions specified for [user: <username, repoPath: <repoPath>, ref:<refName>, accessRequested:<accessRequested>] using default policy: <ACCEPT/DENY> |
| No matching user found - using default policy | AuthZ: Request received for non-existent user: <username> applying default policy: <ACCEPT/DENY> |
Note: Logging descriptions are subject to change between versions and patches