6. Troubleshooting Guide
6.1 Logs
Git MultiSite has two sets of logs, one set is used for application, the other logs replication activity:
Application Logs
<install-dir>/git-multisite/logs
These logs are used for troubleshooting problems with MultiSite's running:
drwxrwxr-x 2 wandisco wandisco 4096 Dec  5 14:20 logs

	-rw-rw-r-- 1 wandisco wandisco 32647705 Dec  6 09:50 replicator.log.20121205-142035
	-rw-rw-r-- 1 wandisco wandisco   775889 Dec  6 15:00 replicator.log.20121206-101206
	-rw-rw-r-- 1 wandisco wandisco     1666 Dec  5 13:21 setup.20121205-132141
	-rw-rw-r-- 1 wandisco wandisco     1674 Dec  5 13:53 setup.20121205-135328
	-rw-rw-r-- 1 wandisco wandisco      157 Dec  5 14:20 setup.20121205-142034
	-rw-rw-r-- 1 wandisco wandisco     1979 Dec  5 14:20 startup.20121205-142035
	-rw-rw-r-- 1 wandisco wandisco     1980 Dec  6 10:12 startup.20121206-101206
	-rw-rw-r-- 1 wandisco wandisco       94 Dec  6 09:57 stop.20121206-095714
	-rw-rw-r-- 1 wandisco wandisco     5136 Dec  6 10:26 ui.launch.log
Replication Logs
<install-dir>/git-multisite/replicator/logs
	-rw-rw-r--. 1 wandisco wandisco  371282 Jan 23 10:00 fileysys.0
	-rw-rw-r--. 1 wandisco wandisco       0 Jan 18 10:40 fileysys.0.lck
	-rw-rw-r--. 1 wandisco wandisco 1054726 Jan 23 06:29 fileysys.1
	-rw-rw-r--. 1 wandisco wandisco 1055024 Jan 17 11:38 fileysys.10
	-rw-rw-r--. 1 wandisco wandisco 1049842 Jan 17 11:38 fileysys.11
	-rw-rw-r--. 1 wandisco wandisco 1050660 Jan 17 11:38 fileysys.12
	-rw-rw-r--. 1 wandisco wandisco 1049618 Jan 17 11:37 fileysys.13
	-rw-rw-r--. 1 wandisco wandisco 1049228 Jan 17 11:37 fileysys.14
The fileysys.xx logs record all actions taken by the replicator and a good starting point in the investigation of replication problems.
drwxrwxr-x. 2 wandisco wandisco    4096 Jan 17 11:43 stats

	-rw-rw-r--. 1 wandisco wandisco  22 Jan 17 11:43 111f4016-a23a-49d6-9769-ced78a250539
	-rw-rw-r--. 1 wandisco wandisco  22 Jan 17 11:43 420aa491-1bbb-4a6c-9cff-e8b60e911dd9
The Stats files are where the repository statistics used by Dashboard widgets are stored. These files are not intended to be readible by users.
drwxrwxr-x. 2 wandisco wandisco   12288 Jan 23 09:40 thread-dump

        -rw-rw-r--. 1 wandisco wandisco 55395 Jan 17 06:34 thread-dump-2013-01-17.06-34-00
        -rw-rw-r--. 1 wandisco wandisco 79150 Jan 17 07:34 thread-dump-2013-01-17.07-34-01
        -rw-rw-r--. 1 wandisco wandisco 79162 Jan 17 08:34 thread-dump-2013-01-17.08-34-01
The thread-dump directory contains thread dumps that the replicator periodically writes to help with troubleshooting.
Logging Levels
- SEVERE:
- Message level indicating a serious failure.
- WARNING:
- A message level indicating a potential problem.
- INFO:
- Interesting runtime events (startup/shutdown). Expect these to be immediately visible on a console, so be conservative and keep to a minimum.
- CONFIG:
- Details of configuration messages.
- FINE:
- Provides a standard level of trace information.
- FINER:
- Provides a more detailed level of trace information.
- FINEST:
- Provides a boggling level of trace information for troubleshooting hard to identify problems.
Changing the Loggoing Level
You can change the current logging level by editing the logger properties file
install-dir>/git-multisite/replicator/properties/logger.properties.
You can see a sample logger.properties file.
6.2 Consistency Check
The consistency Checker will tell you quickly and easily whether a selected repository remains consistent across the sites of its replication group. Follow these steps to check on consistency:
The Consistency Check will tell you whether all replicas of a Git repo have the same hash. Given the dynamic nature of a replication group it's possible that there will be in-flight proposals in the system that have not yet been agreed upon at all nodes. For this reason it isn't possible for a consistency check to be completely authoritative.
Specifically, consistency checks should be made on replication groups that contain only Active (inc Active Voter) nodes. The presence of passive nodes will cause consistency checks to fail.
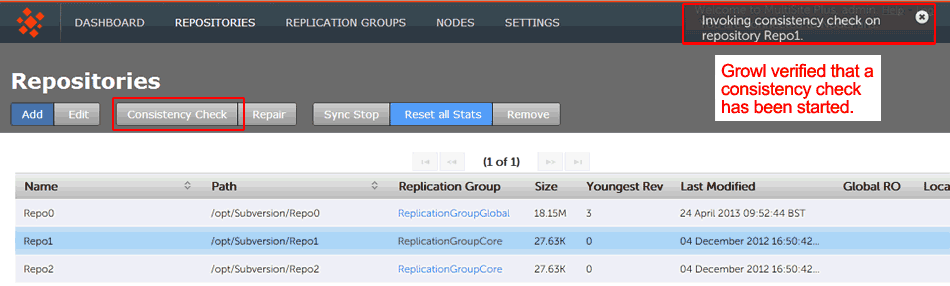
- Login to a site, click on the REPOSITORIES tab.

Go to the repository
- Click on one of the listed repositories. This will activate the above line of buttons.

Consistency Check is done on a per node basis
- Click on the Consistency check button. A growl message "Invoking consistency check on repository <Repository Name>" will appear.
Consistency check in action
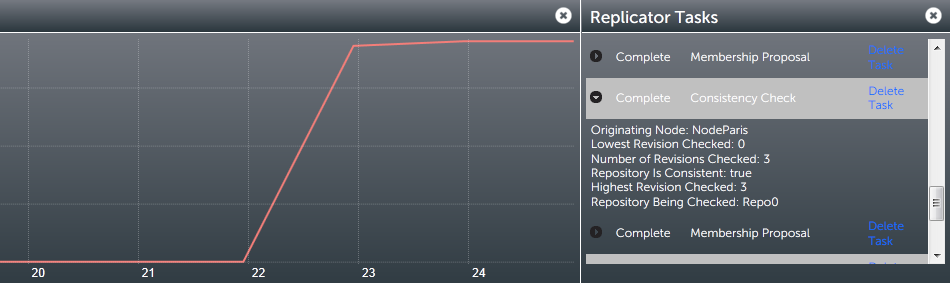
- Click on the DASHBOARD tab. The results of the consistency check will appear on the Replicator Tasks widget - you'll need to select All Tasks, instead of the default Pending Tasks.
Repository replicas need to be identical - are they?
- Originating Node:
- The site from which the check was requested
- Lowest Revision Checked:
- The oldest revision compared across all sites
- Number of Revisions Checked:
- Total number of revisions checked
- Repository is Consistent:
- The result of the check as a 'true' or 'false' statement
- Highest revision Checked:
- The youngest revision compared across all sites
- Repository Being Checked:
- The name of the repository that has had its consistency checked
Log results
It's also possible to check the results of a consistency check by viewing the replicator's log file (fileysys.##). See Logs
6.3 Copying repositories
This section provides advice on getting your repository data distributed prior to starting or replication. You will need to use this procedure should you ever need to add additional nodes, or perform a recovery on a node.
Git installations must have:
These are things are a recap of the installation checklist, you must have them in place in order for replication to run effectively:
- the same version of Git server
- matching file and directory level permissions on repositories
- exactly matched contents of the git system files directories between servers
Copying Existing Repositories
It's simple enough to make a copy of a small repository and transfer it to each of your sites. However, remember that any changes made to the original repository will invalidate your copies unless you perform a syncronzation prior to starting replication.
If a repository needs to remain available to users during the proccess, you should briefly halt access, in order to make a copy. The copy can then be transferred to each site. Then, when you are ready to begin replication, you need use rsync to update each of your replicas. Fore more information about rsync, see Synchronizing repositories using rysnc.
New Repositories
If you are creating brand new repositories, don't create them at each site, instead create the repository once, then rsync it to the other sites. You need to do this to ensure that each replica has the same UUID.
6.4 Synchronizing repositories using rysnc
If for any reason repositories are corrupted or unable to automatically catch up it's usually possible to use rsync to get them back into sync.
To rsync you'll need to copy data from a repository replica that is up-to-date, before you do so it's good practice to perform an Git verify on the repository to be absolutely sure of it's integrity.
Use git's command on the 'helper' site:
git-fsck
From the site with the up-to-date repository, type the following commands:
rsync -rvlHtogpc /path/to/local/repo <Repository Name> remoteHost:/path/to/remote/repo
For example:
rsync -rvlHtogpc /path/to/git/repo/ root@172.7.2.33:/Subversion
Then follow up with an additional rsync that will ensure that contents of the locks directory are identical (by deleting locks that are not present on the originating server)
rsync -rvlHtogpc --delete /path/to/git/repo/db/locks <Repository Name> remoteHost:/path/to/remote/repo
For example:
rsync -rvlHtogpc --delete /path/to/git/repo/db/locks root@172.7.2.33:/git
You can read a more detailed step-by-step guide to using rsync in the Knowledge Base article Reset and rsync repositories.
6.5 Adding a node to a replication group
When adding sites to a replication group that already contains three or more sites, ensure that there isn't currently a large number of commits being replicated.
Adding a site during a period of high traffic (heavy level of commits) going to the repositories may cause the adding process to stall.
It's possible to add additional sites to an existing replication group, so that there's minimal disruption to users. Here's the procedure:
- Login to a site, click on the REPLICATION GROUPS tab. Go to the replication group to which you will add a new site, click on its View.
- The replication group pop-up will appear. Click CONFIGURE.
- On the replication group configuration screen you can see the existing sites. Click the ADD SITES button. Click on one or more of the available sites to add them. It is possible to bring in a brand new site that isn't currently connected by clicking on CONNECT NEW SITE, this will take you to the SITES tab.
- Any new node(s) that you add will now appear on the screen as a blue icon tab. You'll be presented with the following information:
Adding Nodes

You are about to add "NodeAuckland" to the "ReplicationGroupGladius" replication group.
Please read through the following steps before you continue:

1. Click ADD NODES and choose an existing Node as a helper.
2. Copy the repositories replicated in the group from the helper to the new node. During this period these repositories will be read-only on the helper node.
3. Once a repository is in place, selecting it and clicking COMPLETE SELECTED will take it out of read-only on the helper and the new member nodes.

WARNING: Do not close your browser or log out during this process. If you do you'll need to complete the sync process for each individual repository via the REPAIR option on the repositories screen.
Click ADD NODES to confirm your selection and proceed with adding them.
- Select one of the existing sites to be the 'helper' from the CHOOSE HELPER NODE drop-down selector. This helper site will be used to supply copies of the relevant repositories to the new site. During the helper phase the relevant repositories will be temporarily read-only for their local users.
- Click START SYNC to begin your copying process. Once you click the button the helper node will's relevant repositories will bcome read-only to local users.
- The helper site is now ready for you to start copying data across. You can manually copy the repository files or you can use rsync - see our guide: 11. Synchronizing repositories using rsync.
Always copy, never create
Manually copy or rsync repositories, even if they're empty. If you instead use svnadmin create the resulting repository will have a universally unique identifier (UUID) that will not match with the other replicas, potentially causing problems. - Once the relevant repositories have been copied to the new site, and the copies have been checked to ensure they're up-to-date, it's time finish the process by clicking COMPLETE ALL.
- The new site will now appear as a member of the replication group. It is added as a non-voter by default, to change its type, click on its icon and change it to a Voter or Tie-breaker .
Starting the Sync may cause a brief disruption to users on the helper node. You may wish to alert them or complete the work at a time where the disruption will be minimal.
6.6 Recover from the loss of a node
It's possible for Git MultiSite to recover from the brief outage of a member site, which should be able to resync once it is reconnected. The crucial requirement for MultiSite's continued operation is that agreement over transaction ordering must be able to continue. Votes must be cast and those votes must always result in an agreement - no situation must arise where the votes are evenly split between voters.
By default a node will be classed as offline (and picked up as such by other nodes) if it fails unexpectedly and is not responding after a ten minute interval (this can be changed in the Application Properties file). Any attempted commits during this window will only be accepted if there are still enough nodes left to achieve quorum.
If after the loss of a node, a replication group can no longer form agreements then replication is halted. If the lost node was a voter, and there aren't enough remaining voters to form an agreement, then either the lost site must be repaired/reconnected, or the replication group must undergo emergency reconfiguration.
Emergency Reconfiguration is a final option for recovery
The emergency reconfiguration process can't be undone, and it represents a big shakeup of your replication system. Only complete an emergency reconfiguration if the lost site can not be repaired or reconnected in an acceptable amount of time.
After a lost site has been removed and a replication group reconfigured, the lost site MUST NOT be allowed to come back online. Ensure that you perform a cleanup after you have completed the emergency reconfiguration.
6.7 Emergency Reconfiguration
So, having confirmed that an emergency reconfiguration is required, follow this procedure:
- Verify the details of the site that is now declared 'lost'. Login to the user interface of one of the remaining sites and view the Sites tab. The missing site will show a status of Down.
- Select the lost node by ticking its corresponding checkbox and then click the RECONFIGURE button.
- The Emergency Reconfiguration screen will appear. Check and confirm that you have selected the correct site, then click on the Start Reconfiguration button.
- A warning will appear, asking you to confirm that you are ready to start the process, and that once started the process can not be cancelled. Click CONFIRM if you are ready to proceed.
- The Reconfiguration process will now run, creating new, replacement replication groups, activating them, then removing the old groups. The process is finished when all items are listed as Complete.
How Reconfiguration Works
The emergency reconfiguration process seeks to recreate functional replication groups using the remaining member sites. In siutations where a replication group only contained two sites, including the lost site, then a reconfiguration is not possible, in this scenario a new replication group will need to be created once a replacement site has been inducted.
- Finally, you should check the state of the reformed replication groups to ensure that they'll still perform according to your organization's requirements.
6.8 Restore replication on a problem node.
It's possible that a problem with a single transaction can result in a repository being put into a read-only mode. Causing the replication of this repository at just one node. If possible, use the following procedure to get replication started again:
- The first sign that a transaction has not been able to complete on a node is when the repository is placed in a protective read-only state. This is done to ensure that it will remain in a condition in which it can be recover and catch up. On the Repositories tab you'll see the repository is now flagged as locally read-only.
Providing there are still enough nodes to reach agreement, repository changes at the other nodes can continue to be made. - At the problem site, you would now need to indentify the cause of the problem. Check Git MultiSite's logs as well as the logs generated for Git users who are trying to commit changes to the problem repository. It may be possible to quickly fix the causeo f the problem, such as a permission problem that has prevented a file to be written to on the node.
- When the problem has been fixed you can go to the Repositories tab and edit the read-only repository. Remove the Local RO (Read-only) tick. The node will then attempt to catch up and get the repository back into sync with its other replicas.
6.9 Deleting Replication Groups
It's possible to remove replication groups from Git MultiSite , although only if they they have been emptied of repositories. Run through the following procedure as an example.
- We have identified that replication group "VinyardRepos" is to be removed from Git MultiSite. We can see that it has a single repository associated with it. Click on the Quick View to see which one.
- Click on Configure.
- On the Replication Group configuration screen we can see that Repo5 is associated with the group. We can see that currently the Delete Replication Group (VinyardRepos) is disable. You can follow the link to the repositories page to remove the association.
- On the repositories screen, click on the assoicated repository, in this example it's Repo5, then click on the EDIT button.
- On the Edit Repository box, use the Replication Group drop-down to move the repository to a different Replication Group. Then click SAVE.
- Repeat this process until there are no more repositories assoicated with the Replication Group that you wish to delete. In this example VinyardRepos only had a single repository, so it is now empty, and can be deleted. Click on the Quick View, then on the Configure.
- Now that Replication Group VinardRepos is effectly empty of replication payload the Delete link is enabled. Click on the link Delete Replication Group (VinyardRepos) to remove the replication group, taking note that there's no undo - although no data is removed when a replication group is deleted, it should be easy enough to recreate a group if necessary.
- A growl will appear confirming that the replication group has been deleted.
6.10 Performing a Synchronized Stop
The Synchronized Stop is used to stop replication between repository replicas, it can be performed on a per-repository basis or on a replication group basis (where replication will be stopped for all associated repositories). Stops are synchronized between nodes using a 'stop' proposal to which all nodes need to agree. So that while not all nodes will come to a stop at the same time they do all stop at the same point.
- Login to a node's browser-based UI and click on the Repositories tab. Click on the repository that you wish to stop replicating.
- With the repository selected, click the Sync Stop button. A growl message will appear to confirm that a synchronized stop has been requested. Note that the process may not be completed immediately, especially if there are large proposals transfering over a WAN link.
- On refreshing the screen you will see that a successfully sync stopped repository will have a status of Stopped and will be Local RO (Locally Read-only) at all nodes.
6.11 Performing a Synchronized Start
Restarting replication after performing a Synchronized Stop requires that the stopped replication be started in a synchronized manner.
- Click on a stopped repository and click on the Sync Start button.
- The repository will stop being Local Read-only on all nodes and will restart replicating again.
6.12 Running Talkback
Talkback is a bash script that is provided in your Git MultiSite installation for use in the event that you need to talk to the WANdisco support team.
Manually run Talkback using the following procedure:
Login to the server with admin privileges. Navigate to the Git MultiSite's binary directory: /opt/wandisco/git-multisite/bin/talkback
Run talkback.
[root@localhost bin]# ./talkback
You'll need to provide some information during the run - also note the environmental variables noted below which can be used to further modify how the talkback script runs:
#######################################################################
# WANdisco talkback - Script for picking up system & replicator       #
# information for support                                             #
#######################################################################

    To run this script non-interactively please set following environment vars:

    ENV-VAR:
    MS_REP_UN                  Set username to login to MultiSite
    MS_REP_PS                  Set password to login to MultiSite
    MS_SUPPORT_TICKET          Set ticket number to give to WANdisco support team

    By default, your talkback is not uploaded. If you wish to upload it, you may also specify
    the following variables:

    MS_FTP_UN                  Set ftp username to upload to WANdisco support FTP server. Note that
                                specifying this may cause SSH to prompt for a password, so don't set
                                this variable if you wish to run this script non-interactively.


      ===================== INFO ========================
      The talkback agent will capture relevant configuration
      and log files to help WANdisco diagnose the problem
      you may be encountering.

Please enter replicator admin username: adminUIusername
Please enter replicator admin password: thepasswordhere

retrieving details for repository "Repo1"
retrieving details for repository "Repo3"
retrieving details for repository "Repo4"
retrieving details for repository "repo2"
retrieving details for node "NodeSanFransisco"
retrieving details for node "NodeAuckland"
retrieving details for node "NodeParis"

Please enter your WANdisco support FTP username (leave empty to skip auto-upload process):
Skipping auto-FTP upload

TALKBACK COMPLETE

---------------------------------------------------------------
 Please upload the file:

     /opt/wandisco/git-multisite/talkback-201312191119-redhat6.3-64bit.tar.gz

 to WANdisco support with a description of the issue.

 Note: do not email the talkback files, only upload them
 via ftp or attach them via the web ticket user interface.
--------------------------------------------------------------
Talkback Output Example
replicator
	application.xml
	config
	application.properties
	license.key
	logger.properties
	ui.properties
		users.properties
		license.xml
		locations.xml
		md5s
		memberships.xml
	nodes
		Node1
			connection-test
			location.xml
			node.xml
		Node2
			connection-test
			location.xml
			node.xml
		Node3
			connection-test
			location.xml
			node.xml
	nodes.xml
	recent-logs
		gitms.0.log
		gitms.0.log.lck
		multisite.log
		node-details
		replicator.20140203-170618.log
		thread-dump-2014-02-03.11-06-22
		ui.20140203-165434.log
		watchdog.log
	replicationGroups.xml
	replicator-file-list
	repositories.xml
	tasks.xml
	system
	file-max
	file-nr
	limits.conf
	logs
		messages
		messages-20140126
		messages-20140202
	netstat
	processes
	services
	sysctl.conf
	sys-status
	top
Copyright © 2010-2013 WANdisco plc.
All Rights Reserved
This product is protected by copyright and distributed under licenses restricting copying, distribution and decompilation.
Git MultiSite
Last doc build: 16:45 - Thursday 3rd July 2014 - Finally, you should check the state of the reformed replication groups to ensure that they'll still perform according to your organization's requirements.