Navigation:
Documentation |
WANdisco Security Agent provides security services for a Software Configuration Management (SCM)
repository such as CVS or
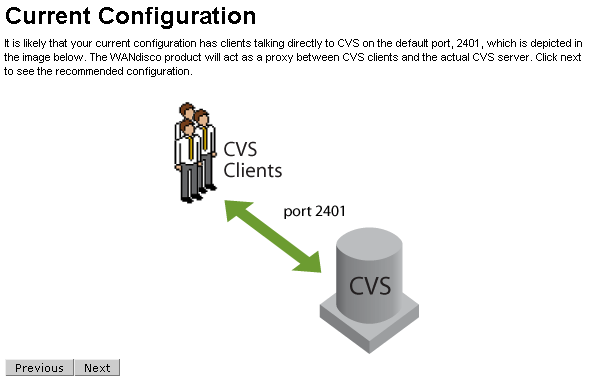
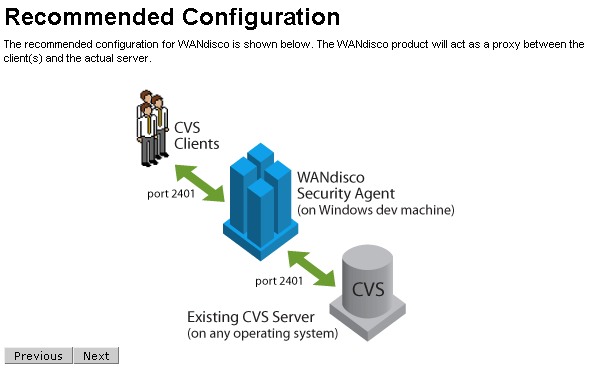
Subversion. It allows an SCM user to transparently connect to the SCM repository via a network proxy that acts as a security agent. The SCM user connects to the Security Agent on the standard SCM port (configurable) such as 2401 for CVS, 3690 for Subversion, 80 for Subversion-HTTP. The Security Agent in turn connects to the underlying SCM repository server.
In this administration guide, you will learn how to easily setup WANdisco Security Agent.
This guide is intended for an SCM administrator or a user who is reasonably comfortable with:
inetd/xinetd service on Unix, Cygwin or Windows platform
If you don't meet the above pre-requisites you may want to contact your SCM administrator.
The diagram below illustrates a typical deployment architecture for a CVS backend. Similar deployment architecture applies to Subversion. As you can see in the diagram below, Security Agent acts as the front-end for the SCM clients.
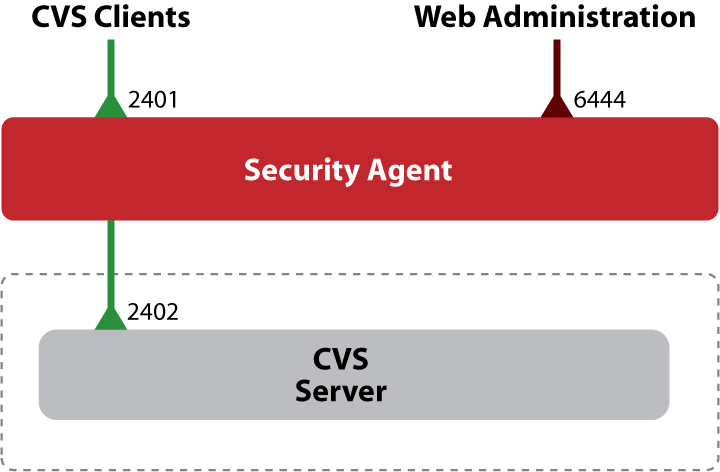
As show in the above diagram, the WANdisco Security Agent uses a configurable control port (defaults to 6444) for web based management. It can listen on a configurable SCM port to allow SCM clients to connect transparently.
Here is an explanation of various TCP ports used in the above deployment:
Before running the WANdisco Security Agent, please ensure:
C:/Program Files/java/jdk1.5.0_03. Choose an alternate installation directory, for example C:/java with no spaces in the path.
JAVA_HOME environment variable is defined.
JDK is installed, not just the JRE. This can be confirmed by running java -server -version. If it generates a not found error, uninstall the JRE Java package and reinstall the JDK Java package.
perl executable is on the system PATH.
logtimefix script requires Perl package Date::Manip.
- To install a Perl package on UNIX or Cygwin, using CPAN (ensure you are logged into the root account first), for example:
  $ perl -MCPAN -eshell
  cpan> install Term::ReadKey
perl executable is on the system PATH. Please download the MSI installer for ActivePerl from here: [http://activestate.com/Products/Download/Download.plex?id=ActivePerl]
logtimefix script requires Perl package Date::Manip.
- To install a Perl package on Windows, using ActivePerl package manager, for example:
  c:\>ppm
  ...
  ppm>install DateManip
importauditdb script requires Perl package Perl::DBI.
Untar or unzip (using WinZip for example on Windows) the WANdisco Security Agent package
(a tar.gz file) into the intended subdirectory.
You should see the following directory structure:
  Security_Agent_root
    bin
    config
    docs
    lib
    logs
cvssecurityagent and shutdown
jar files and DLLs that are required to run the product.
-prefs.log.n,
with the extension -prefs.log.0 representing the most recent log file.
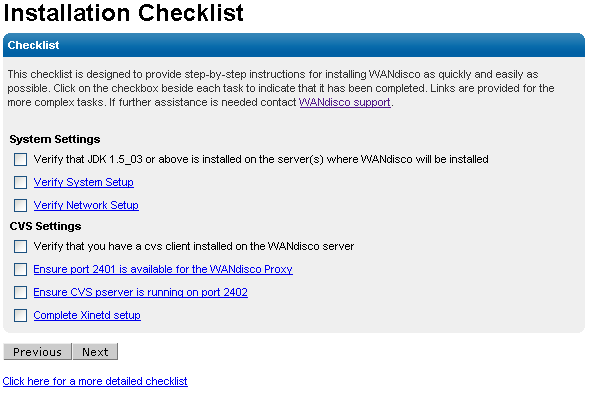
If the installation requirements in the previous section have been met, setup should take 20 minutes or less to get a basic WANdisco Security Agent configured.
Security_Agent_root/bin/setup [port]If no port parameter is specified the default port 6444 will be used. This port is used for web administration. Once the server has started it will log a message to point a web browser to
http://server:port/. Please note that server should be replaced with the IP address or machine name that the WANdisco Security Agent is being installed to.

ifconfig. If it is not found in the path it may be in the /sbin or /usr/sbin directory.
root and the password is specified during install:
If the server does not restart on it's own, you can use the startup script provided to run WANdisco Security Agent from the command line:
  $ Security_Agent_root/bin/cvssecurityagent
  $ tail -f Security_Agent_root/logs/ProxyServer-prefs.log.0
  ....
  INFO:  [main] CVS Proxy listener is now turned ON at port :2401
When you see the last line, you know WANdisco Security Agent has started successfully. Alternatively, you can go to the web console and check the status.
To shutdown WANdisco Security Agent run:
$ Security_Agent_root/bin/shutdown
Caution: We recommend taking all possible precautions to avoid direct access to the SCM server, bypassing the WANdisco Security Agent. For example, you could:
The WANdisco Security Agent has a built-in web-server that can be used for monitoring and dynamic configuration of the Security Agent. You can connect to the web-server on Security Agent's administration port (defaults to 6444). On connecting you will be prompted for a login. The default admin username is root and the password is specified during setup.
It is customary to use the CVS_RSH environment variable to specify the remote shell to use in lieu of pserver authentication. The CVS_RSH environment variable can specify for example SSH as the remote shell and can directly use the encryption feature of SSH.
WANdisco Security Agent doesn't restrict you in any way when you choose to use a CVS_RSH based remote shell. Just follow the setup directions below to get SSH, Kerberos etc support going for your CVS clients.
There are two ways do this. You can directly have the CVS client connect with the SSH daemon (Direct SSH Method) or you can tunnel the CVS pserver protocol over SSH (SSH Tunneling Method).
We will walk through an example with SSH as the remote shell.
Set CVS_RSH to point to ssh or ssh.exe depending upon the platform. For Windows, if you use a Putty based ssh client, set CVS_RSH to the path to plink.exe
Ensure that your ssh credentials are accessible from the machine you will be running CVS client on. For example if you have a private key, you may want to use the ssh-agent (pageant for Putty) and ssh-add to have ssh pre-register your private key.
Use the bundled cvsrelay executable as the CVS_SERVER. This can be done in two
ways:
CVS_SERVER to point to the bundled cvsrelay executable. For example using tcsh :
setenv CVS_SERVER <path-to-WANdisco-install>/bin/cvsrelay
cvsrelay to cvs and modify the PATH so that the ssh daemon
(sshd) will invoke cvsrelay instead of cvs when a CVS client connects to it.
If sshd is launched via the init.d startup script, you could modify the script that starts sshd to set the PATH to point to cvsrelay bin directory before any other path element. This lets you essentially invoke cvsrelay when a CVS
client request comes in. The cvsrelay executable will then be able to relay CVS request/response packets from sshd to WANdisco Security Agent.
  > cd Security_Agent_root/bin
  > pwd
  Security_Agent_root/bin
  > ln -s cvsrelay cvs
Due to security concerns, on most UNIXs sshd is typically compiled with a hardwired PATH. Then setting the PATH in init.d sshd startup script will not work. This
can typically be confirmed via:
  > strings `which sshd` | grep -i bin
  ...
  /usr/bin:/bin:/usr/sbin:/sbin
  ...
If you see a colon separated string like above, that might be the compiled in PATH.
Alternatively you may look at the first couple of lines in /etc/ssh/sshd_config:
  #$OpenBSD: sshd_config,v 1.65 2003/08/28 12:54:34 markus Exp $

  # This is the sshd server system-wide configuration file.  See
  # sshd_config(5) for more information.

  # This sshd was compiled with PATH=/usr/bin:/bin:/usr/sbin:/sbin
If you determine that your sshd has a path hardwired at compilation time
you could do one of the following:
sshd with PATH to cvsrelay ahead of standard
cvs executable.
cvs to something like
cvs.org and change references to cvs in xinet.d/cvspserver to point
to cvs.org. Finally link cvsrelay into /usr/bin or any system directory
that is on sshd compiled in PATH.
If you use cvsrelay, you must setup the CVS server's password database in $CVSROOT/CVSROOT/passwd file. The passwords in this file are encrypted using standard UNIX crypt() function so it is possible to cut and paste from /etc/passwd (on some system /etc/shadow)file. Since the authentication is already done via sshd, all we need to do is select a single system password and have all users in the CVSROOT/passwd file share the same password.
In essence the CVSROOT/passwd file would look like:
  Bach:1sOp854gDF3DY
  Mozart:1sOp854gDF3DY
  Handel:1sOp854gDF3DY
All users, as you can see, share the same password. A default passwd file can be copied from Security_Agent_root/config/passwd-template. The template file already contains the default password used by cvsrelay. If you decide to over-ride the default password, you have to modify the configuration (/etc/prefs.conf) for cvsrelay to tell it the new system password to use.
You can also use the bundled utility Security_Agent_root/bin/cvspasswd to generate crypt() password for CVSROOT/passwd file:
  $ cvspasswd
  Enter CVS password :
  CVSROOT/passwd : sa0Pk81ulv7qc
  CVSRelay Password   : 117:99:121:32:73:121:60:121
Also the CVSROOT/config file needs to turn off System authentication:
  #Set this to "no" if pserver shouldn't check system users/passwords
  SystemAuth=no

  # Put CVS lock files in this directory rather than directly in the repository.
  #LockDir=/var/lock/cvs
The above scheme is essentially delegating the credentials that were obtained after authenticating with sshd to the cvs server as shown below.
The CVS user authenticates with the SSH daemon, which then invokes cvsrelay with the user ID of the secure shell. This is the user ID that the CVS client transparently passes to sshd. The cvsrelay process in turns looks up the system password at startup time from prefs.conf and passes the user-name and encrypted password to CVS. The CVS server in turn verifies the delegated credentials with entries in CVSROOT/passwd file.
The cvsrelay process acts as the bridge between sshd and the WANdisco Security Agent. The prefs.conf file contains the configuration parameters for cvsrelay.
The prefs.conf file is first located in the current working directory (cwd). If it is not found, cvsrelay attempts to locate it in the /etc directory. If it is still not found an error message is logged to UNIX syslog.
The prefs.conf can be automatically generated by the setup tool during the express setup or post-setup using the bundled install-cvsrelay tool.
The following are sample screens depicting how setup or install-cvsrelay can auto-generate the prefs.conf needed by cvsrelay.
  Specify Security Agent Host name [localhost] :
  You specified localhost, is this correct?[Y|N] [Y] :

  Specify Security Agent port [2409] :
  You specified 2409, is this correct?[Y|N] [Y] :

  Specify CVS pserver host name [localhost] : tao
  You specified tao, is this correct?[Y|N] [Y] :

  Specify CVS pserver port [2401] : 2409
  You specified 2409, is this correct?[Y|N] [Y] :

  Specify path to the cvs client binary [/usr/bin/cvs] :
  You specified /usr/bin/cvs, is this correct?[Y|N] [Y] :

  Are CVS Clients using WinCVS or TortoiseCVS? Y/N [N] : Y
  You specified Y, is this correct?[Y|N] [Y] :

  Enter a valid CVS user on tao [admin0] : user1
  You specified user1, is this correct?[Y|N] [Y] :

  Enter any valid CVS Root directory on tao [/home/cvs] : /cvsd/admin0/cvsroot
  You specified /cvsd/admin0/cvsroot, is this correct?[Y|N] [Y] :

  Enter CVS password :

          Creating ../config/prefs-localhost.conf ... [DONE]
          **I: Please copy ../config/prefs-localhost.conf to
               localhost:/etc/prefs.conf

  In order to complete the SSH configuration, ensure:

          1. All cvspserver host:<cvsroot>/CVSROOT/config have the
             entry "SystemAuth=no".
          2. Copy ../config/passwd-template file to
             cvspserver host:<cvsroot>/CVSROOT/passwd file
             and ensure all users added to passwd file have the same password.
          3. Ensure SSH daemon (sshd) is using cvsrelay instead of cvs.
             See Security Agent admin guide for more details.
The prefs.conf syntax is name=value pairs. The following parameters can be specified in prefs.conf to customize its defaults:
2401
Specifies the port of the CVS Security Agent to which the CVS requests will be relayed.
127.0.0.1
Specifies the IP address (in IPv4 dot notation, not DNS name) of the Security Agent to forward to. Using the cvsrelay one can run sshd and the CVS server on separate hosts. It is not necessary to collocate them.
117:99:121:32:73:121:60:121
Specifies the octet sequence denoting the system password to pass to the CVS server when delegating the credentials to cvs from sshd. Use the included Security_Agent_root/bin/cvspasswd program to generate password encoded in WANdisco format for cvsrelay. This is done to encode the pass phrase generated by the CVS scrambling algorithm when transmitting cleartext passwords on the wire.
4 KBytes
Specifies the buffer size used by the relay. Used to tune the performance of the cvsrelay.
Here is a sample /etc/prefs.conf file:
  $ cat /etc/prefs.conf
  cvs.port=2401
  cvs.host=192.168.1.20
  cvs.password=117:99:121:32:73:121:60:121
When using many of the popular GUI clients with cvsrelay, you may need to patch your cvsrelay installation to make it work. For example when using Tortoise and WinCVS, you may see the following error message:
warning: unrecognized response `Please run install-cvsrelay for this client' from cvs server
If you see the above message, then the administrator needs to run the bundled install-cvsrelay utility. Note this is needed iff you are using cvsrelay.
The install-cvsrelay utility will prompt you for the fully qualified path to the cvs server executable. It will then attempt create a patch specific to the version of cvs server being used. If you install a different version of cvs server at a latter date, be sure to re-run install-cvsrelay.
  > cd Security_Agent_root/bin
  > pwd
  Security_Agent_root/bin
  > ./install-cvsrelay
Once install-cvsrelay has patched the prefs.conf, you can then start using Tortoise, WinCVS clients.
Configuring SSH access from CVS clients requires getting the SSH credentials setup correctly as well as configuring the cvsrelay as outlined above.
Here are common gotchas and their solutions:
pageant or ssh-agent is running with private keys already loaded, a less secure way is to have no pass-phrase on the private keys at creation time.
cvsrelay is being invoked?
First check the system log (on Linux /var/log/messages) for any error messages from cvsrelay, for example:
  tao /var/log# pwd
  /var/log
  tao /var/log# grep cvsrelay messages
  Dec  1 21:02:04 tao cvs-security/bin/cvsrelay[15105]: failed to open /etc/pref
  s.conf
  Feb 24 22:03:07 tao ./cvsrelay[5348]: cvs: delegated login failure. Check syslog
   for further info. Server response - "error 0 /tmp/cvstest: no such repository"
You can also setup cvsrelay to run in verbose mode by passing an optional -v parameter:
setenv CVS_SERVER "...../bin/cvsrelay -v"
This will cause the system log (on Linux /var/log/messages) to contain detailed messages from cvsrelay.
This method requires first setting up a secure SSH tunnel between the CVS client and the SSH daemon. Once the tunnel is set up, ssh will allocate a listen socket on the client-side. All traffic to this port will be automatically forwarded to the remote host (cvs server) over a secure connection.
Using the usual ssh -L option setup a local listen port on the client side.
  >ssh -L 2401:cvs-server-host:2401 cvs-server-host
  >setenv CVSROOT :pserver:user@cvs-server-host:/a/b/c.../cvsroot
  >cvs co ..
The local port could be 2401, the standard CVS port, but it does not have to. Make sure the remote host:port is the normal pserver host:port for CVS server. Setup CVSROOT on the client to point to localhost. In the example above, all traffic to localhost:2401 will be forwarded via SSH to the CVS server.
Note that even a temporary disruption in connectivity will tear down an SSH tunnel. When this happens, the tunnel will have to be recreated using the above ssh command.
The WANdisco Security Agent enables an administrator to implement a comprehensive security model that provides features beyond file-system permissions or cvs_acl scripts that are bundled with CVS sources:
The fundamental permissions for a user are defined by their default role. The product comes with a few default roles (e.g. Developer, Project Lead, QA, Admin). The resources (or files and directories) a user has access to are defined at the group level. With this structure, you can have multiple projects with complex resource definitions and users will be able to perform their default role's permissions on those resources.
For example, let's assume we create two users. Bob with the role of Developer and Mary with the role of QA. Next we create a group named project1 and define what CVS directories that group has access to. Now Bob can perform write operations on those directories and Mary can perform read and tag operations.
On the List Roles page you will see the default Roles that are shipped with the product.

In the Security tab click Create Role. Enter a name for the Role and select the SCM Permissions you would like this Role to have. Any user that is assigned this Role will have the permissions selected to the resources defined by their Group(s).

Click List Roles and click on the name of the Role to edit. This will take you to the Edit Role page shown below. Select the new SCM Permissions for this Role and click Update Role.

Select List Roles from the left hand navigation, select the Role(s) to delete with the checkboxes to the left of their names and click Delete Selected.
The Group Administration functions allow an you to:
The first step towards setting up security is to map organization or project structure to WANdisco Groups.

To add a new group, click on the Create Group option in the security menu and specify its name. The name can contain any character, including white-space, except the underscore character. The group name is the primary key into the group database, it can not be changed. The description field can contain any relevant text describing the group. The WANdisco Security Agent tracks the creation and modification time-stamp on the groups automatically.
With WANdisco Security Agent the Client IP Pattern allows you to restrict access based on the client's IP address. This field can be a regular expression, for example, to allow any user with an IP address that begins with 192.168 enter the value: 192\.168.*
Note that the period character must be prefixed by a backslash. With regular expressions, the period character is used to represent a character that can have any value.
Multiple File / Dir Patterns can be entered for a Group. To add or remove patterns use the add allow, add deny and remove dir buttons below the text input. The magnifying glass icon to the right of the input allows for browsing the file system to select a file or directory.

The Branch Pattern field also allows for regular experssions. For example, to specify access to the HEAD and a branch named release001 enter the value: HEAD|release001
Note the pipe character in between the two values.
Once a group is created, you can start assigning users to it.
Please note that a system group Admin always exists in the WANdisco Security Agent. A user belonging to the Admin Group has all privileges on all resources.
The group is assigned under the checked group as a sub-group. To de-assign, select the Root group. Note by selecting a group, this group is automatically assigned as its sub-group. A sub-group can have exactly one parent. A child Group inherits all of the resources and privileges from the parent Group.
From the List Groups page click the Delete link next to the Group name and confirm that you would like to delete this Group. When a group is deleted it is also removed from the all users who previously belonged to that group.
In the Security tab under Group Administration you can use the Assign Users and Remove Users pages to mass assign users. First select a Group on the left. The list of users on the right will be updated to reflect valid additions. Hold down control to select multiple users on the right. As an example, if John is already in the Group Admin he will not be shown as a possible addition to that group.

If a user has been added to a parent group, they automatically belong to any sub-groups underneath it. So there is no need to add them to the sub-groups. The context-aware web UI will show users who are not in parent groups for example when adding them to a sub-group.
A bulk user import is available and described later in this document.
To view a list of users who belong directly to a specific Group, go to Security, List Users and click the List Users link next to the Group name.
The User Management functions allow an administrator to:
The Users must exist in the authentication database (NIS, LDAP, /etc/passwd etc) used by the CVS server. The User management function allows administrator to specify licensed users who can access CVS repository via the WANdisco Security Agent.
If a CVS user has not been registered and they try to access WANdisco Security Agent they will see an Access Denied error message in their client.

To add a new user, click on the Create User option in the security tab and specify a login id (cvs user name). The last and first name can contain any character including white-space, there are no restrictions. You can specify an optional email address for the user. A Default Role is required to define the user's privileges within a Group. The WANdisco Security Agent tracks the creation and modification time-stamp on the users automatically.

To remove users, click the List Users link in the Security tab. Select the users you want to delete with the checkbox on the left and click the Delete Selected button.

The user can be assigned to any number of Groups. To de-assign, uncheck the checkbox and click 'Save Details'. Note by selecting a group, the user is automatically assigned to the group and all its sub-groups.

To get a list of all the registered users, click on the List Users option. The user list page shows all the users by default. The page size by default is set to show 25 users per page. You can change that by selecting the page size on the left of the user list. The page control on the right corners allow you to go to next or previous page.
If you want to locate a user by first or last name quickly, start typing the name in the Search textbox and an incremental search starts automatically. To get the full list back clear Search textbox.
All the columns in the user list are enabled for sorting. By clicking on the column header you can sort the list in ascending or descending order. The sortable columns include: Userid, last name, first name, email, last modified date.
To restrict the list by a group select a group name from the drop down menu. To see users in the selected group as well as all the ancestor groups click the Show Inherited checkbox.
You can click on the user id hyperlink to edit the user. Mass delete action is supported via selecting the checkbox in the table header (next to User Login id column) and then clicking the Delete Selected button.

In order to import users from other databases like NIS, etc/passwd you can have a script create a comma separated import file with all relevant users. The data to be imported must be in a text file with comma separated fields. The syntax of a user row in the csv file is:
userid,lastName,firstName[[,email],group1[,group2..groupN]]
Here is an example of a csv file:
  ravi,Shastri,Ravi,ravi@email.com,Admin,sc-engr
  rchen,Chen,Roger,rchen@email.com,engr
  sony,Richards,Sony,Admin,engr
  vanu,Xandau,Vanu
Line 1: Will import a CVS user ravi with last name Shastri, first name Ravi, email address ravi@email.com and assign him to Groups: Admin and sc-engr.
Line 2: Will import a CVS user rchen with last name Chen, first name Roger, email address rchen@email.com and assign him engr Group.
Line 3: Will import a CVS user sony with last name Richards, first name Sony, no email address and assign him to Groups: Admin and engr.
Line 4: Will import a CVS user vanu with last name Xandau, first name Vany, and no email address and no groups.
The user id, last and first name are required and can not be empty. The email and group names are optional. If a group name is specified, the group must already exists in the WANdisco Security Agent group database, if not the user will not be added. If the 4th field contains the character "@" it is presumed to be an email address.
The path to the csv file must be accessible by the WANdisco Security Agent server process. Before doing the import make sure the csv file is either copied on the WANdisco Security Agent machine or NFS/Samba accessible to the WANdisco Security Agent process.
The Access Control or authorization mechanism in WANdisco Security Agent is based on the concept of a set of valid principals with adequate privileges to access a secured resource. By default ACLs are not visible, to enable go to System tab, select Show Role ACLs and click Save. The ACL management features allow an administrator to:
Here are the definitions of the commonly used terms when describing the WANdisco Security Agent's ACL mechanism:
/a/b/c/, not /a/b/c.
The privileges are ordered. In other words if a principal has Admin privilege, they also have the other three: List, Read, Write. If a principal has Write privilege, they do not get Admin privilege but have the other two: List, Read. If a principal has Read privilege, they do not get Admin and Write privileges but have the List privilege. If a principal has only List privilege, they do not get Admin, Write, Read privileges.
The following is the mapping of actual CVS commands to minimum privilege needed to execute them:
| CVS Command | Privilege Needed |
|---|---|
| status | List |
| log | List |
| ls | List |
| list | List |
| diff | Read |
| checkout | Read |
| export | Read |
| update | Read |
| annotate | Read |
| tag | Tag |
| remove | Delete |
| commit | Write |
| import | Write |
| add | Write |
| admin | Admin |
| watch | Admin |
| init | Admin |
| history | Admin |
| release | Admin |
| edit | Admin |
| rdiff | Admin |
| rtag | Admin |
| rlog | Admin |
| rlist | Admin |
| rls | Admin |
| rannotate | Admin |
The majority of access control needs can be addressed with Role and Group management but in the case that you need finer grained control you can also create individual ACLs to address your organizations needs. This view is disabled by default. To enable it go to the System tab, select System Config, .
The WANdisco Security Agent ships with no default rules. By default everyone is denied. This is essential for security - it closes the window of vulnerability that would have allowed everyone full access between the time the product is first installed and the admin creates access rules. In order to grant access, the administrator has to explicitly create allow rules.

Using the ACL editor from the web console, the admin can create allow or deny rules.
Perl style regular expressions can be used wherever patterns are allowed. Principal (user/group) or IP patterns for instance - engineering.* (note the dot) or 217.[0-9]+ are all valid patterns. By default the HEAD branch is specified but you can enter a regular expression just as well - release9.0_.* for instance. Note: With the Perl regular expression syntax, if you need to use the '.' (dot) character literally, you need to escape it with a backslash, otherwise '.' (dot) will match any character. To learn more about regular expressions look at a tutorial here.

Multiple rules can be edited atomically using the WANdisco Security Agent. When you submit changes to ACLs, the WANdisco Security Agent guarantees either all the rules are updated or none at all. This ensures consistent rules database across multiple sites, with any pattern of failures.
The following steps are followed by the WANdisco Security Agent's ACL engine when making an allow or deny decision on a CVS command the user is trying to execute:
To illustrate how the ACL enforcement works, lets walk through several examples below:
User doe belongs to group engr. The administrator has setup the following rules:
| Rule | Privilege | Group Pattern | IP Pattern | File/Dir Pattern | Branch Pattern |
|---|---|---|---|---|---|
| Allow | List | engr.* | 192.* | /data/cvsroot/ecommerce.* | HEAD |
The user is allowed to execute the following commands that require only list privilege:
  $ echo $CVSROOT
  :pserver:doe@mypc:/data/cvsroot
  $ cd /home/ecommerce/
  $ cvs status
  $ cvs ls
The user is denied access when executing the following commands that require read or write privilege:
  $ cvs update foo
  cvs acl: Access Denied: The CVS administrator has not granted
  cvs acl: you sufficient permissions to execute this command.
  cvs acl: Please contact your local CVS administrator for help.
  cvs acl: Aborting the cvs operation.

  $ cvs commit -m "my changes"
  cvs acl: Access Denied: The CVS administrator has not granted
  cvs acl: you sufficient permissions to execute this command.
  cvs acl: Please contact your local CVS administrator for help.
  cvs acl: Aborting the cvs operation.
The user is denied access when executing the following list commands from subnet 10.23.1:
  $ ifconfig -a
  eth0      Link encap:Ethernet  HWaddr 00:09:5B:19:3E:F8
            inet addr:10.23.1.7  Bcast:10.23.1.255  Mask:255.255.255.0
  ...
  $ cvs status
  cvs acl: Access Denied: The CVS administrator has not granted
  ...
User jane belongs to group build-engr. The administrator has setup the following rules:
| Rule | Privilege | Group Pattern | IP Pattern | File/Dir Pattern | Branch Pattern |
|---|---|---|---|---|---|
| Allow | Write | build-engr | 192.* | /data/cvsroot/build.* | rel.* |
| Deny | Write | build-engr | 192.* | /data/cvsroot/build/secret.make | rel.* |
The user is allowed to execute the following command:
  $ echo $CVSROOT
  :ext:jane@mypc:/data/cvsroot
  $ cd /home/build
  $ ls
  foo.c bar.v secret.make
  $ cvs update secret.make
  $ cvs ci -m "new" foo.c bar.v
The deny rule above doesn't restrict read access to secret.make, only write access is limited.
The user is denied access when executing the following command:
  $ cvs ci -m "new changes"  secret.make
  cvs acl: Access Denied: The CVS administrator has not granted
  ...
In this example, the deny rule is used to restrict access to the file secret.make. Deny rules can be applied to a file or directory pattern as well.
User jane belongs to group qa. The administrator has setup the following rules:
| Rule | Privilege | Group Pattern | IP Pattern | File/Dir Pattern | Branch Pattern |
|---|---|---|---|---|---|
| Allow | Read | qa | 192.* | /data/cvsroot/ecommerce.* | HEAD |
| Allow | Read | qa | 192.* | /data/cvsroot/ecommerce.* | rel_1_0 |
The user is allowed to execute the following commands that require only list privilege:
  $ echo $CVSROOT
  :ext:jane@mypc:/data/cvsroot
  $ cd /home/ecommerce/
  $ ls
  foo.c bar.v
  $ cvs status foo.c
  $ cvs ls
  $ cvs up -r rel_1_0 bar.v
  $ cvs diff -r rel_1_0 foo.c
The user is denied access when executing the following commands:
  $ cvs ci -m "new changes"
  cvs acl: Access Denied: The CVS administrator has not granted
  ...
  $ cvs up -j rel_2_0
  cvs acl: Access Denied: The CVS administrator has not granted
  ...
  $ cd /home
  $ cvs co ecommerce
  cvs acl: Access Denied: The CVS administrator has not granted
  ...
The last checkout command is denied because to checkout from the CVSROOT requires read privilege not only on the module ecommerce but also the top level cvsroot /data/cvsroot.
To checkout the module the administrator would setup access rules as:
| Rule | Privilege | Group Pattern | IP Pattern | File/Dir Pattern | Branch Pattern |
|---|---|---|---|---|---|
| Allow | Read | qa | 192.* | /data/cvsroot[/] | HEAD |
| Allow | Read | qa | 192.* | /data/cvsroot/ecommerce.* | HEAD |
User bigoram belongs to parent group div-engr, while user smalloram belongs to sub-group nyc-engr of div-engr.
The administrator has setup the following rules:
| Rule | Privilege | Group Pattern | IP Pattern | File/Dir Pattern | Branch Pattern |
|---|---|---|---|---|---|
| Allow | Read | div-engr | .* | /data/cvsroot/dvd/sfo.* | .* |
| Allow | Read | nyc-engr | .* | /data/cvsroot/dvd/nyc.* | rel.* |
The user bigoram belongs to both the groups (div-engr, nyc-engr), therefore is allowed to execute the following commands:
  $ echo $CVSROOT
  :pserver:bigoram@mypc:/data/cvsroot
  $ cd /home/dvd
  $ cvs update -P -d sfo
  $ cvs update -P -d nyc
The user smalloram is belongs to only the group (nyc-engr), therefore is allowed to execute the command:
  $ echo $CVSROOT
  :pserver:smalloram@mypc:/data/cvsroot
  $ cd /home/dvd
  $ cvs update -P -d nyc
The user smalloram is denied access when executing the following command:
  $ cvs -z6 update -P -d sfo
  cvs acl: Access Denied: The CVS administrator has not granted
  ...
The following properties in the prefs.xml file can be used to control the ACL engine:
  <Security>
   <AccessControl>
    <Enable>true</Enable>
   </AccessControl>
  </Security>
By default, the WANdisco Security Agent has access control enabled. To turn it off set /Security/AccessControl/Enable to false.
In order to setup security policies the administrator needs to typically setup the users in the WANdisco Security Agent's internal database. For large organization this can be cumbersome if the user information is already maintained in an external database like LDAP or NIS. For such a deployment, the WANdisco Security Agent for CVS provides integration with LDAP/NIS based authentication databases.
The integration allows the administrator to automatically synchronize the user properties (user id, password) from an LDAP/NIS database. The WANdisco Security Agent for CVS will periodically (default is every 5 minutes) connect with the LDAP/NIS database server and pull the user information. Using the WANdisco web console, the administrator can go and select the new users that were discovered during the synchronization with LDAP/NIS. The selected user's are then added to the WANdisco Security Agent's internal database. If CVS repository properties are configured correctly, the user and password information is also updated in the CVSROOT/passwd file. Using the CVSROOT/passwd file is a good idea as it increases the availability of CVS if the external authentication database is unavailable.
The following properties can be configured from the WANdisco Security Agent's web console to setup the LDAP/NIS integration:
The CVS properties section is common to both NIS and LDAP (* indicates mandatory):
CVSROOT/passwd file when updating the file with new users. The CVS server will switch to this user when executing the command.
If setting up integration with LDAP, the following properties need to be setup (* indicates mandatory):
Note: The password should be stored in the same format (crypt etc) on LDAP server as the format on the CVS server machine.
If setting up integration with NIS, the following properties need to be setup (* indicates mandatory):
Note: The password should be stored in the same format (crypt etc) on NIS server as the format on the CVS server machine.
With the WANdisco Security Agent, any CVS access (allowed or denied) by the user is logged in an audit trail file. The text file has a complete history of all CVS actions in the following format:
  # Column syntax -
  # 0 seq | 1 time | 2 txid | 3 cmd | 4 user | 5 ipaddress | 6 access |
  #                                     7 dir | 8 file | 9 rev | 10 branch
The column description is as following:
| Column Number | Description |
|---|---|
| 0 | Record Sequence Number |
| 1 | UNIX Timestamp |
| 2 | Transaction Id |
| 3 | CVS Command Name |
| 4 | CVS User id |
| 5 | IP Address of User |
| 6 | Access Decision (Allow or Deny) |
| 7 | CVS Directory being accessed |
| 8 | CVS File being accessed |
| 9 | User's File Revision |
| 10 | Branch Name |
The audit trail files are created under cvs-security/audit directory. By default they are automatically rotated upto 10 times when they get to 10MBytes. These defaults can be changed via configuration in config/prefs.xml file:
  <Audit>
    <MaxFileSize>10485760</MaxFileSize>
    <MaxFileCount>10</MaxFileCount>
    <Disable>false</Disable>
  </Audit>
The MaxFileSize specifies a size in bytes, MaxFileCount specifies how many files to rotate before recycling the files. By default auditing is enabled in WANdisco Security Agent, it can be turned off by setting Disable to true. To ensure no audit records are lost, please schedule a job (using cron for example) to import the audit records into a SQL database periodically. Inserting in a SQL database also enables complex SQL queries to be made against the audit database.
To create audit files in a different directory just create a symbolic link (cvs-security/audit) to another directory.
The WANdisco Security Agent bundles a tool importauditdb that allows audit records in audit-trail files to be imported to a SQL database. The usage of the import command is as below:
  [admin@smp1 ~/cvs-security]$ bin/importauditdb -h
  Usage:
    importauditdb [-host <db-host>] [-port <db-port>] [-user <db user>]
                  [-pass <db user password>] [-db <database to use>]
                  -f file-pattern1 file-pattern2 .. file-pattern-N
    Defaults:

    host : localhost
    port : Default DB Port
    user : root
    password :  empty
    Database :  wd_audit_db
The import tool requires Perl::DBI module to be installed. Please run Security_Agent_root/bin/checkdbi
to check if the module is installed and correct database driver is available on your system.
Note: Before using import you must create a database (default name is wd_audit_db) on the database server. The import tool will automatically create the table schema in that database, the first time it runs. The import tool uses standard SQL syntax, it makes use of a system function FROM_UNIXTIME, please ensure your database version supports it. MySQL, Microsoft SQLServer support this function.
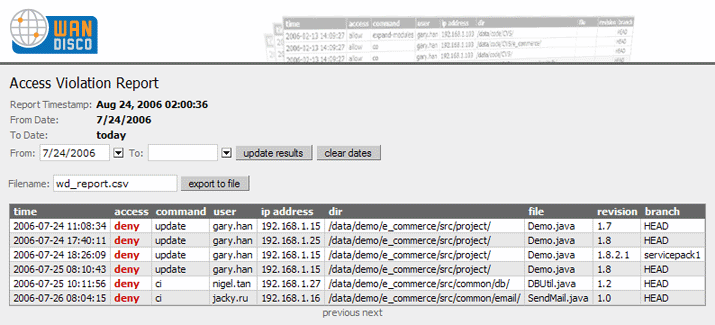
Please note: Audit Reports are only available with the WANdisco Security Agent of the product.
  Alias /reports/ "/home/wandisco/reports/"
  <Directory "/home/wandisco/reports">
      Options Indexes MultiViews
      AllowOverride None
      Order allow,deny
      Allow from all
  </Directory>
apachectl restartor
apache2ctl restart
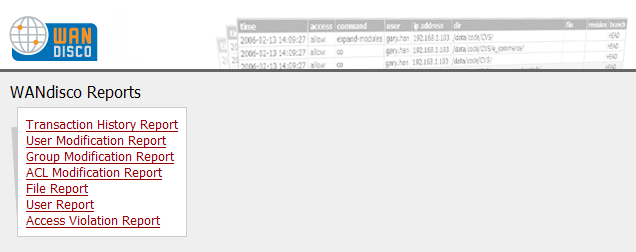
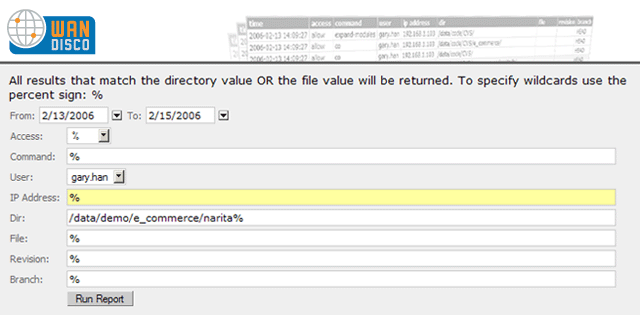
% for wildcards
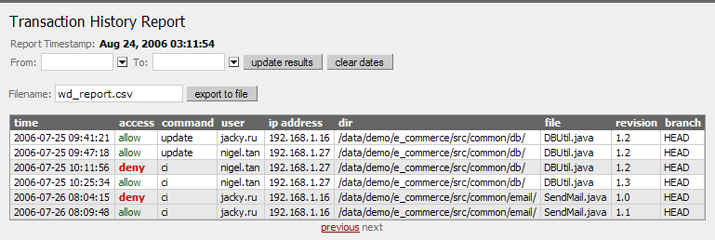
Shows all transactions against the SCM system.
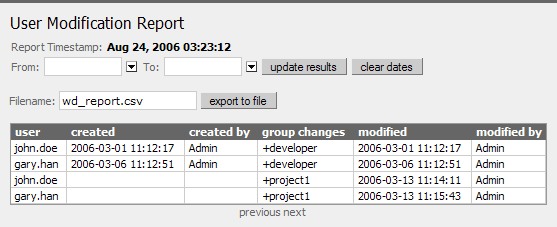
Shows all user modifications made via the proxy's security administration user interface.
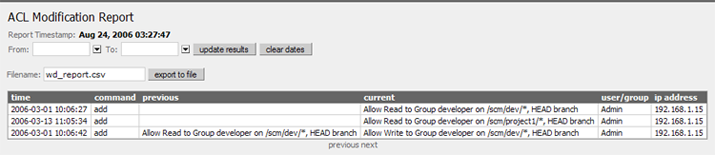
Shows a history of all ACL modifications.
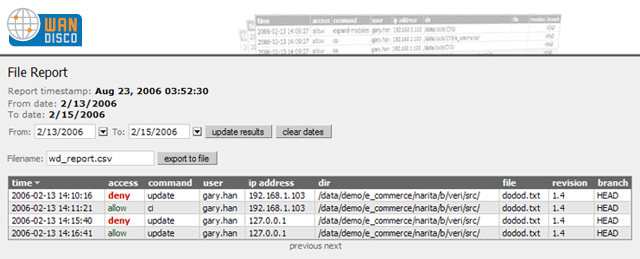
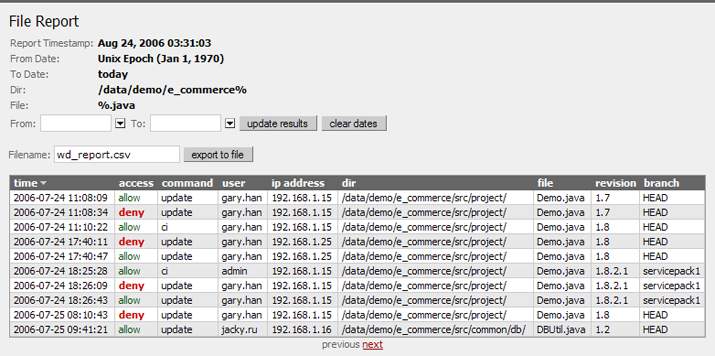
List file access and filter by parameters such as: date, access, command, user, ip address, directory, filename, revision or branch.
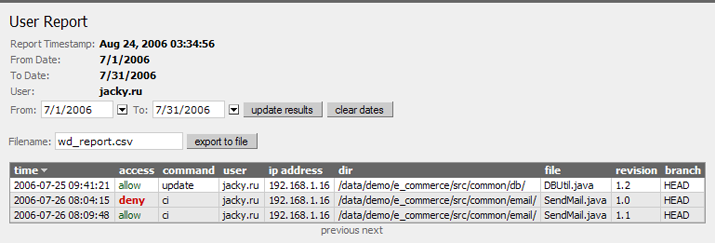
Show SCM allowed / denied access per user.
Display all denied access to the SCM system.