1. Welcome
1.1. Product overview
Use the Fusion Plugin for Live Sentry to extend the WANdisco Fusion server with the ability to replicate policies among Apache Sentry Policy Provider instances. Coordinate activities that modify Sentry policy definitions among multiple instances of the Sentry Policy Provider across separate clusters to maintain common policy enforcement in each cluster. The Fusion Plugin for Live Sentry uses WANdisco Fusion for coordination and replication.
1.2. Documentation guide
This guide contains the following:
- Welcome
-
This chapter introduces this user guide and provides help with how to use it.
- Release Notes
-
Details the latest software release, covering new features, fixes and known issues to be aware of.
- Concepts
-
Explains how Fusion Plugin for Live Sentry through WANdisco Fusion uses WANdisco’s LiveData platform.
- Installation
-
Covers the steps required to install and set up Fusion Plugin for Live Sentry into a WANdisco Fusion deployment.
- Operation
-
The steps required to run, reconfigure and troubleshoot Fusion Plugin for Live Sentry.
1.2.1. Symbols in the documentation
In the guide we highlight types of information using the following call outs:
| The alert symbol highlights important information. |
| The STOP symbol cautions you against doing something. |
| Tips are principles or practices that you’ll benefit from knowing or using. |
| The i symbol shows where you can find more information, such as in our online Knowledge base. |
1.3. Contact support
See our online Knowledge base which contains updates and more information.
If you need more help raise a case on our support website.
1.4. Give feedback
If you find an error or if you think some information needs improving, raise a case on our support website or email docs@wandisco.com.
2. Release Notes
2.1. Live Sentry 2.3 Build 288
- 3 June 2019
-
For the release notes and information on known issues, please visit the Knowledge base - Fusion Plugin for Live Sentry Release 2.3 Build 288.
3. Concepts
3.1. Product concepts
Familiarity with the following concepts will improve your use of the Fusion Plugin for Live Sentry.
- WANdisco Fusion Plugin
-
A plugin is used by WANdisco Fusion to extend its functionality. Plugins are loaded by the WANdisco Fusion server on startup.
- Apache Sentry
-
Sentry is a system for defining and enforcing fine-grained authorization against Hadoop resources. Use Sentry to control and enforce privileges on data for authenticated users and applications in a Hadoop cluster. It supports different data models with a modular architecture.
- Sentry Server
-
The Sentry Server manages authorization metadata. It offers a Thrift interface to allow clients to retrieve and manipulate that metadata.
- Sentry Authorization
-
Sentry limits user access to specific resources. Sentry policies are enforced by Sentry Plugins that are specific to the system for which a policy is enforced. Plugins obtain metadata from the Sentry Server to make authorization decisions.
- Sentry Role
-
A set of privileges that combine multiple access rules.
- Sentry Privilege
-
A rule that allows access to an object.
3.2. Product architecture
WANdisco Fusion provides a LiveData architecture, where data are stored and used in multiple locations, while data are replicated with guaranteed consistency across them all.
The Fusion Plugin for Live Sentry extends that LiveData architecture to metadata managed by Apache Sentry to allow policy changes made in any location to apply consistently across all.
The Fusion Plugin for Live Sentry is a distributed network proxy for the Thrift interface exposed by the Apache Sentry Server. It coordinates and replicates changes made via that interface to ensure that regardless of where or when changes to Sentry policies occur, they result in the same set of policies across multiple environments.
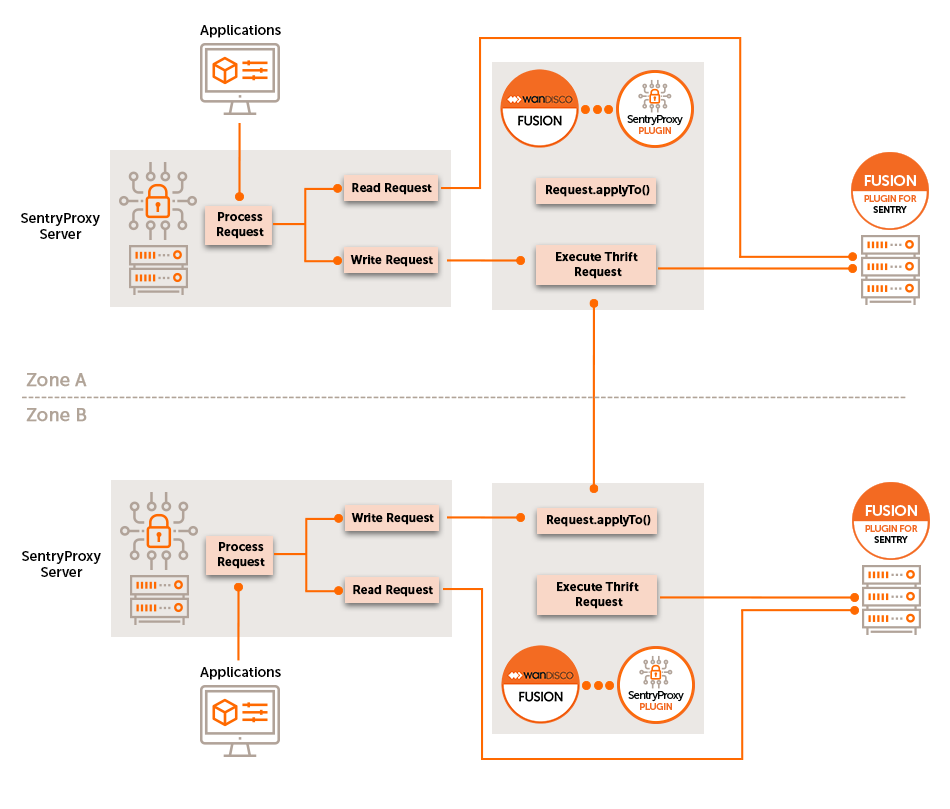
By implementing this coordination and replication via a proxy to the Sentry server, the Fusion Plugin for Live Sentry provides this capability without any change to the underlying Sentry services. Sentry provides a simple, standard means of directing clients to interact with the Sentry server via the proxy, and the proxy is configured to use the existing Sentry server.
3.3. Deployment models
3.3.1. Use Cases for the Fusion Plugin for Live Sentry
Replicate policy definitions between multiple Apache Sentry instances in different clusters using the Fusion Plugin for Live Sentry. Change Sentry policies in any cluster to enforce access to cluster resources with the same authorization rights in each environment.
4. Installation
4.1. Pre-requisites
4.1.1. System Requirements
Along with the standard product requirements that you can find on the WANdisco Fusion Deployment Checklist, you also need to ensure that your clusters:
-
Use Cloudera - see the release notes for your Fusion Plugin for Live Sentry version for details of which CDH versions are supported (Note that builds for alternative CDH versions can be made available).
-
Have configured CDH to use Kerberos or LDAP for user authentication (Note that the installation details here define steps for a Kerberized environment. Please contact WANdisco support for information on installation to a cluster that uses LDAP for user authentication.)
-
Use Apache Sentry for policy enforcement
-
Before starting the installation of the Fusion Plugin for Live Sentry, ensure your Fusion servers are inducted between zones.
4.1.2. Sentry Configuration Requirements
Ensure these configuration properties for Sentry in the sentry-site.xml file are equivalent in replicated zones:
sentry.service.allow.connect-
A comma-separated list of identities that are allowed to connect to the Sentry service. e.g.
hive,impala,hue,hdfs,solr,wd-sentry-user,sentry. Additionally, this list must include the user identities that apply to the Sentry Proxy and Fusion server.
Note: If live-sentry proxy is installed by the Cloudera Manager thenlive_sentryalso needs to be added insentry.service.allow.connect.hdfs (or whichever user the proxy is configured to run as) must be added to this property. sentry.service.admin.group-
A comma-separated list of identities that have administrative privileges for the Sentry service. e.g.
hive,impala,hue,hdfs,solr,sentry.
Note: If live-sentry proxy is installed by the Cloudera Manager, thenlive_sentryalso needs to be added insentry.service.admin.group.
4.2. Installation
The installation of Fusion Plugin for Live Sentry is a 3 step procedure:
4.2.1. Parcel installation
-
Open a terminal session to the location of your parcels repository, it may be your Cloudera Manager server, although the location may have been customized. Ensure that you have suitable permissions for handling files.
-
Download the relevant installer from customer.wandisco.com.
-
Make the downloaded installer file executable, e.g.
# chmod +x live-sentry-installer.<version>.sh Enter -
Run the installer using an account with appropriate permissions to extract the parcel:
# ./live-sentry-installer.<version>.sh extract-parcel EnterIf you have not extracted this on the Cloudera Manager (CM) node, you should transfer the tarball to that server. Perform the following steps on the CM node: * unpack the parcel tarball package * move the parcel and parcel.sha files to the local repository path for CM * use the CM UI to discover the location of the Custom Service Descriptors and copy the extracted CSD to this location * restart the cloudera-scm-server and cloudera-scm-agent services * using the CM parcel interface, ‘Check for New Parcels’ and then distribute and activate the LIVE_SENTRY service If the parcel installation was successful, and you have not already done so, you should install the final Fusion UI plugin components on the fusion node(s). For further guidance and clarifications, go to https://docs.wandisco.com/
-
Unpack the parcel tarball package, for example:
# tar xvzf LIVE_SENTRY-cdh-<version>_<version>.parcel.tar.gz Enter -
Change the ownership of the .parcel and .parcel.sha files so that they match the system account that runs Cloudera Manager:
# chown cloudera-scm:cloudera-scm LIVE_SENTRY* Enter -
Move the files into the server’s local repository, normally
/opt/cloudera/parcel-repo. -
On your Cloudera Manager UI, navigate to Settings → Custom Service Descriptors. Find the Local Repository Descriptor Path.
-
Copy the extracted Custom Service Descriptor file (LIVE_SENTRY-cdhxxx.jar) to the Local Descriptor Repository location.
-
Restart the
cloudera-scm-serverandcloudera-scm-agentservices. -
Open Cloudera Manager and navigate to the Parcels screen by clicking on the Parcel icon.
-
Click Check for New Parcels.
 Figure 2. Check for parcels
 -
The LIVE_SENTRY package is now ready to distribute. Click on the Distribute button to install LIVE_SENTRY from the parcel.
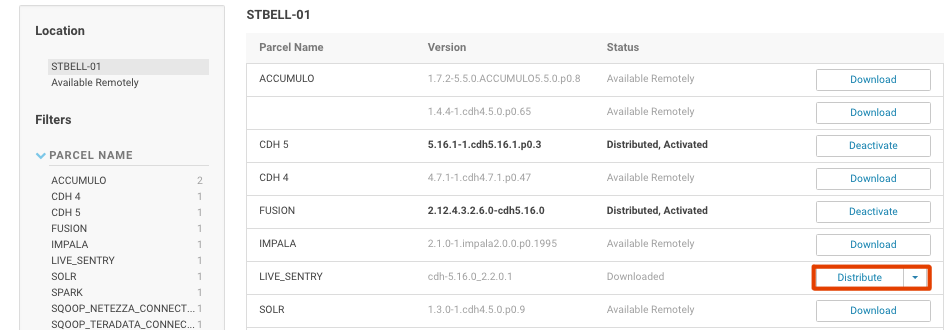 Figure 3. Distribute the parcel
 -
Click on the Activate button to activate LIVE_SENTRY from the parcel.
 Figure 4. Activate the parcel
4.2.2. Service installation
Now install Live Sentry as a service
-
Click Add service
 Figure 5. Add Service
 -
Choose LIVE SENTRY and click continue.
 Figure 6. Choose Live Sentry
 -
Choose hosts to install the service, at least one host is required. The host for the gateway can also be selected. If the gateway is selected, it should be on the same node where the plugin will be installed. If the same host for the gateway is not selected then
proxy-plugin-site.xmlhas to be generated manually.proxy-plugin-site.xmlwill be generated in/etc/live-sentry/confin the gateway host.
Note: The gateway host should be the same as the Fusion node. Figure 7. Assign Roles
 -
Configure the service parameters.
-
You can now see Live Sentry on the Cloudera Manager homepage.
 Figure 8. View service on homepage
4.2.3. CLI Installation
-
Open a terminal session on your WANdisco Fusion node.
-
Download the installer as above and run the installer using an account with appropriate permissions:
# ./live-sentry-installer.<version>.sh EnterThe installer will now start.
Verifying archive integrity... All good.
Uncompressing WANdisco Live Sentry.......................................

    ::   ::  ::     #     #   ##    ####  ######   #   #####   #####   #####
   :::: :::: :::    #     #  #  #  ##  ## #     #  #  #     # #     # #     #
  ::::::::::: :::   #  #  # #    # #    # #     #  #  #       #       #     #
 ::::::::::::: :::  # # # # #    # #    # #     #  #   #####  #       #     #
  ::::::::::: :::   # # # # #    # #    # #     #  #        # #       #     #
   :::: :::: :::    ##   ##  #  ## #    # #     #  #  #     # #     # #     #
    ::   ::  ::     #     #   ## # #    # ######   #   #####   #####   #####

You are about to install WANdisco Live Sentry version 2.3.0.0

Do you want to continue with the installation? (Y/n) Y
The installer will perform an integrity check and confirm the product version that will be installed. Enter Y to continue the installation.
Full installation of this plugin currently requires that the appropriate
'parcel' files are installed on your Cloudera Manager node.

This installer package includes all the currently supported parcels for this.

If you have not already done so, you should run this installer with the
'extract-parcel' sub-command and follow the instructions it gives. You may
wish to do this on the Cloudera Manager server itself.
-
Now navigate to the Cloudera Manager UI and check that the properties listed in Sentry Configuration Requirements and any relevant auto-configured services have been configured. These include
sentry.service.allow.connectandsentry.service.admin.group. If yes, then these services needs to be restarted.
If these properties have not been configured then you will need to do this manually, see the relevant configuration sections for details. -
Once Fusion Plugin for Live Sentry installation is complete, restart the WANdisco Fusion server.
4.3. Uninstallation
Uninstallation can be done with the following steps.
|
Important!
Do not remove the Live Sentry core plugin RPMs/Jars as part of an uninstallation procedure.
There may be cases where Fusion’s database continues to reference the core plugin RPMs after their removal, causing problems with Fusion restarts.
Before removing core plugin RPMs/Jars you must first perform a flush of Fusion’s internal database, which would require a re-induction and configuration of your Fusion deployment.
Contact Support for more information about this procedure.
|
-
Stop the WANdisco Fusion server
# server fusion-server stop Enter -
Uninstall the Live Sentry plugin:
# rpm -e fusion-sentry-plugin-cdh-<version>.noarch Enter -
Start the WANdisco Fusion server
# server fusion-server start Enter -
Now login to the Cloudera Manager to remove the Live Sentry service.
-
On Live Sentry actions, click Stop.
 Figure 9. Stop Service
 -
Once stopped, click Delete.
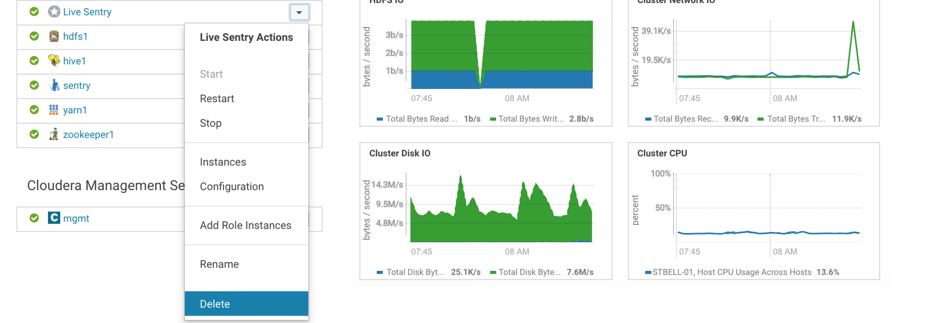 Figure 10. Delete Service
5. Operation
Once Fusion Plugin for Live Sentry installed, restart the WANdisco Fusion server:
# service fusion-server restart EnterYou then need to configure your cluster to access the Sentry server via the WANdisco Sentry Proxy. The instructions below are specific to each type of cluster service that can use Sentry for authorization. Your environment may have one or more of these services in use. Apply the instructions below selectively based on the services operating in your clusters.
5.1. Configuration
From Fusion Plugin for Live Sentry 2.3, Hive, Impala and Solr will be auto-configured during installation. If the automatic configuration script fails then Hive, Impala and Solr would need to be manually configured as in earlier versions.
5.1.1. Services requiring manual configuration
Configure HDFS
-
Open the Cloudera Manager Administration Console and access the HDFS service configuration tab.
-
Select .
-
Locate the Enable Sentry Synchronization property.
-
Enable Sentry synchronization.
-
Save these changes.
-
Restart affected services.
Configure Hue
-
Open the Cloudera Manager Administration Console and access the Hue service configuration tab.
-
Select .
-
Locate the Sentry Service property and ensure that "sentry" is enabled.
-
Locate the Hue Service Advanced Configuration Snippet (Safety Valve) for the
hue_safety_value.iniproperty file and add the properties:[libsentry] hostname={wd.sentry.proxy.thrift.host} port={wd.sentry.proxy.thrift.port} -
Location the Hue Service Advanced Configuration Snippet (Safety Valve) for the
sentry-site.xmlproperty file and add the properties:-
sentry.service.client.server.rpc-address→ The WANdisco Sentry Proxy host -
sentry.service.client.server.rpc-port→ The WANdisco Sentry Proxy port -
sentry.service.server.principal→ The WANdisco Sentry Proxy principal
Note: Sentry Proxy and Sentry need to have the same principal.
-
-
Save these changes.
-
Restart affected services.
5.1.2. Auto-configured services
From Fusion Plugin for Live Sentry 2.3, Hive, Impala and Solr will be auto-configured during installation. If the automatic configuration script fails then Hive, Impala and Solr would need to be manually configured as in earlier versions.
Configure Hive
-
Open the Cloudera Manager Administration Console and access the Hive service configuration tab.
-
Select .
-
Locate the Sentry Service and ensure that
sentryis enabled. -
Locate the Hive Advanced Configuration Snippet (Safety Valve) for the
sentry-site.xmlproperty file and add the properties:-
sentry.service.client.server.rpc-address→ The WANdisco Sentry Proxy host -
sentry.service.client.server.rpc-port→ The WANdisco Sentry Proxy portIf using CDH 5.13.x or later, the sentry.service.client.server.rpc-addressandsentry.service.client.server.rpc-portsettings are replaced with a singlesentry.service.client.server.rpc-addressesentry with a value in the form<proxy host>:<proxy thrift port>. -
sentry.service.server.principal→ The WANdisco Sentry Proxy principal
-
-
Locate the Server Name for Sentry Authorization for the
hive.sentry.serverproperty. -
Add the same name in all Fusion-enabled zones for this property (i.e.
sentry) -
Save these changes.
-
Restart affected services.
Configure Impala
-
Open the Cloudera Manager Administration Console and access the Impala service configuration tab.
-
Select .
-
Locate the Sentry Service property and ensure that "sentry" is enabled.
-
Locate the Impala Service Advanced Configuration Snippet (Safety Valve) for the
sentry-site.xmlproperty file and add the properties:-
sentry.service.client.server.rpc-address→ The WANdisco Sentry Proxy host -
sentry.service.client.server.rpc-port→ The WANdisco Sentry Proxy port ..If using CDH 5.13.x or later, the sentry.service.client.server.rpc-addressandsentry.service.client.server.rpc-portsettings are replaced with a singlesentry.service.client.server.rpc-addressesentry with a value in the form<proxy host>:<proxy thrift port>. -
sentry.service.server.principal→ The WANdisco Sentry Proxy principal
-
-
Save these changes.
-
Restart affected services.
Configure Solr
-
Open the Cloudera Manager Administration Console and access the Solr service configuration tab.
-
Select .
-
Locate the Sentry Service property and ensure that "sentry" is enabled.
-
Locate the Solr Service Advanced Configuration Snippet (Safety Valve) for the
sentry-site.xmlproperty file and add the properties:-
sentry.service.client.server.rpc-address→ The WANdisco Sentry Proxy host -
sentry.service.client.server.rpc-port→ The WANdisco Sentry Proxy port ..If using CDH 5.13.x or later, the sentry.service.client.server.rpc-addressandsentry.service.client.server.rpc-portsettings are replaced with a singlesentry.service.client.server.rpc-addressesentry with a value in the form<proxy host>:<proxy thrift port>. -
sentry.service.server.principal→ The WANdisco Sentry Proxy principal
-
-
Save these changes.
-
Restart affected services.
Steps to connect 'solrctl' shell with sentryproxy:
Create the sentry-site.xml in '/tmp/wd-sentry-conf' and update the sentryproxy server values
<?xml version="1.0" encoding="UTF-8"?>
<configuration>
   <property>
      <name>sentry.service.client.server.rpc-address</name>
      <value>{wd.sentry.proxy.thrift.host}</value>
   </property>
   <property>
      <name>sentry.service.client.server.rpc-port</name>
      <value>{wd.sentry.proxy.thrift.port}</value>
   </property>
   <property>
      <name>sentry.service.server.principal</name>
      <value>{wd.sentry.proxy.server.principal}</value>
   </property>
   <property>
      <name>sentry.service.security.mode</name>
      <value>kerberos</value>
   </property>
</configuration>-
wd.sentry.proxy.thrift.host→ The WANdisco Sentry Proxy host -
wd.sentry.proxy.thrift.port→ The WANdisco Sentry Proxy port -
wd.sentry.proxy.thrift.principal→ The WANdisco Sentry Proxy principal
Export the SENTRY_CONF_DIR to point to /tmp/wd-sentry-conf so that the solrctl will load the custom sentry-site.xml instead the
default one located in /etc/sentry/conf.
# export SENTRY_CONF_DIR=/tmp/wd-sentry-conf EnterNow run command 'solrctl sentry <cmd>'
# solrctl sentry <cmd>5.1.3. Changing the timezone
Logs use UTC timezone by default but this can be manually altered through log4j configuration if required.
To alter the timezone the xxx.layout.ConversionPattern property needs to be overwritten.
log4j.appender.xxxxxlog.layout.ConversionPattern=%d{ISO8601}{UTC} %p %c - %t:[%m]%n
{UTC} can be replaced with, for example {GMT} or {ITC+1:30}.
If offsetting from a timezone, + or - can be used, hours must be between 0 and 23, and minutes must be between 00 and 59.
This property is located in /etc/wandisco/live-sentry-proxy/log4j.properties.
After updating the file, the sentryproxy-server needs to be restarted for the changes to take effect.
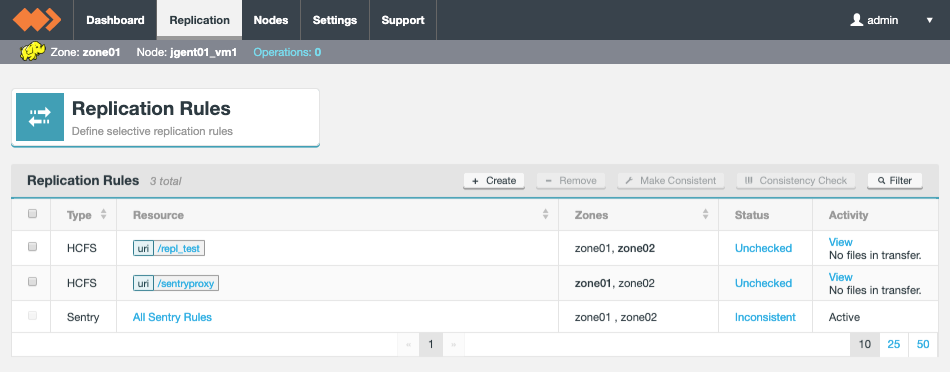
5.2. Replication
5.2.1. View replication rule
Once Fusion Plugin for Live Sentry is installed, the All Sentry Rules replication rule is visible on the Replication tab of the WANdisco Fusion UI.
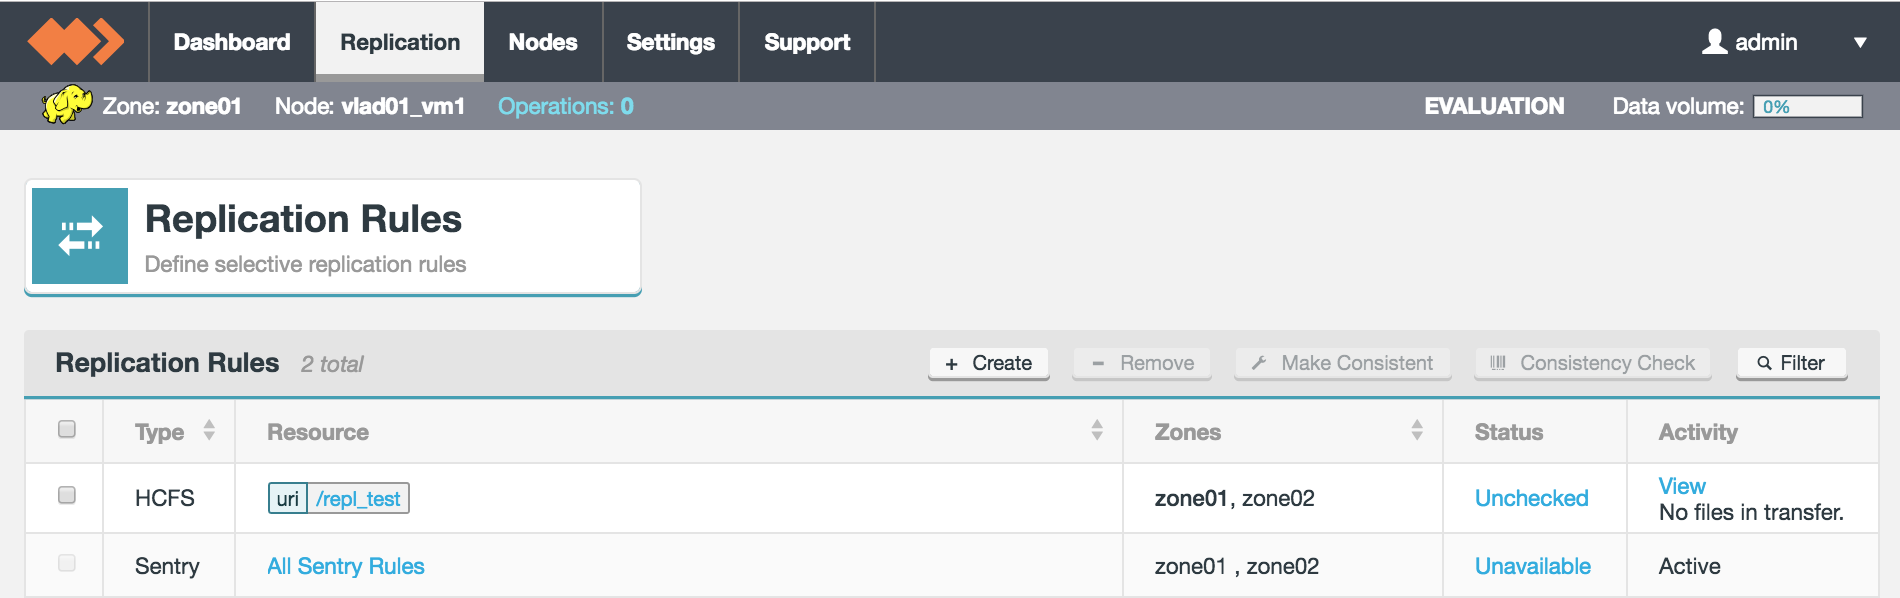
Click on All Sentry Rules to see more details.
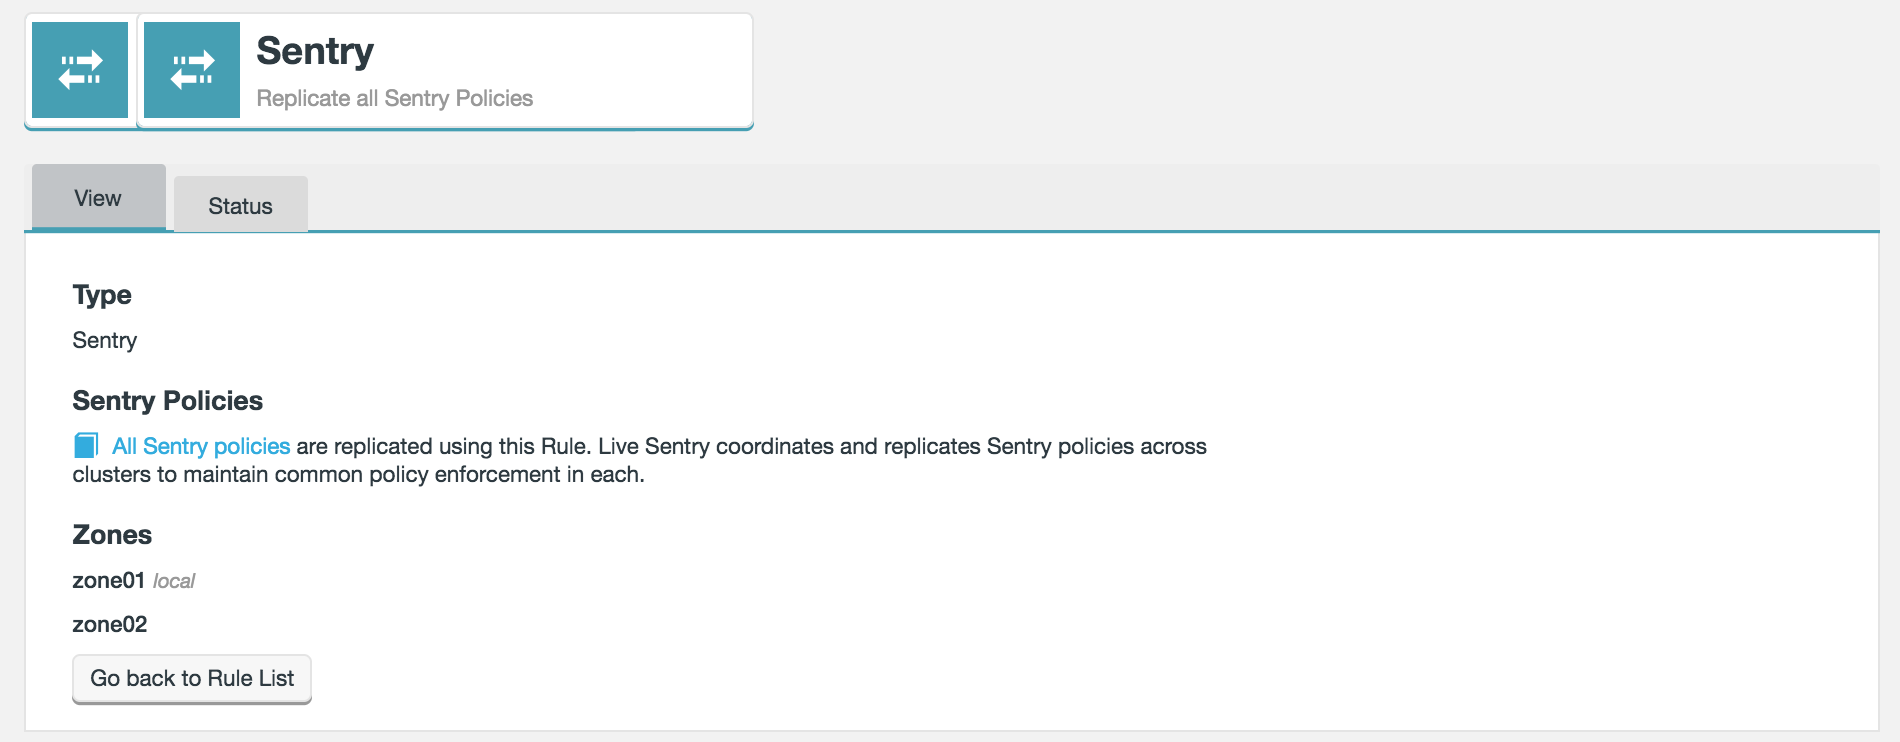
- Type
-
The type of replication rule, in this case the type is "Sentry".
- Sentry Policies
-
All Sentry policies are included in this single rule so that CDH clusters replicate Apache Ranger policy definitions. The rule controls how the data is replicated between zones and does not have any impact on the policies themselves.
- Zones
-
Lists the zones between which this rule’s associated path is replicated. Note that the "local" label identifies which of the zones that the currently viewed node belongs.
Go back to Rule list - click this button to return to the Replication Rules screen.
5.2.2. Consistency check
|
When to perform a consistency check?
|
To perform a consistency check follow the steps below.
-
On the Replication tab, click on All Sentry Rules.
-
On the Status tab you can see the results of the previous consistency check. Click Check now to trigger a new check.
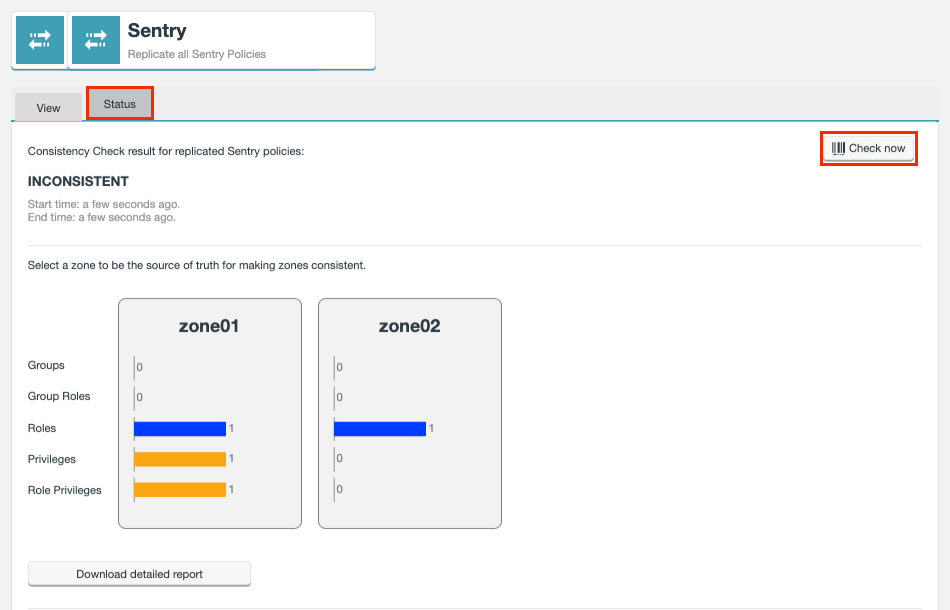
-
The results of the consistency check will now be displayed, the bars will turn yellow if the result is inconsistent. A more detailed report can also be downloaded.
If the result of the consistency check is inconsistent, see the make consistent section for what to do next.
|
Known issue
When all Sentry servers are down, consistency check results will not be reported correctly.
|
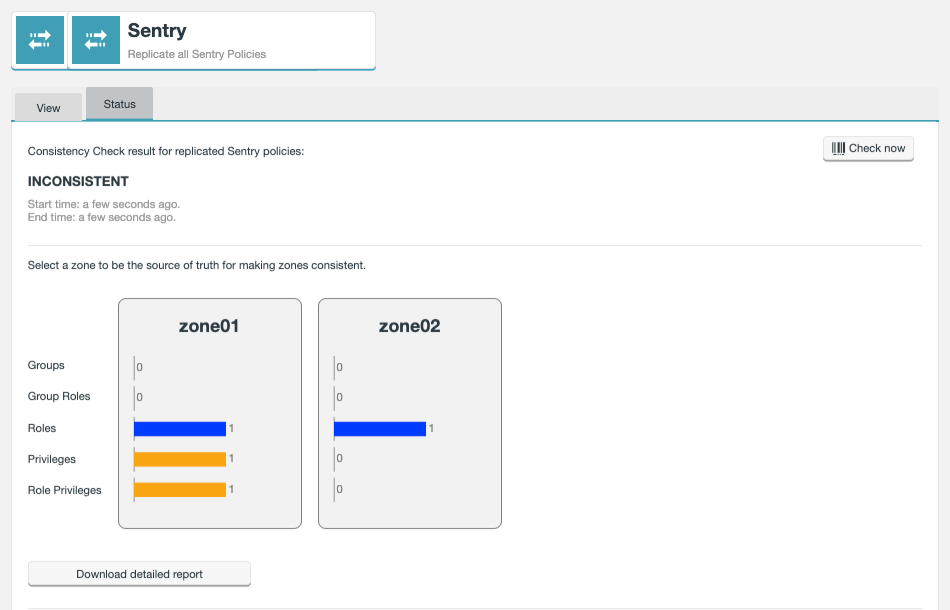
Consistency check results
The consistency check lists the results of 5 items.
- Groups
-
A set of users, maintained by the authentication system, who have been granted one or more authorization roles.
- Group Roles
-
Groups can be granted access to a role to provide a set of users with certain privileges.
- Roles
-
A set of privileges to perform applicable actions and any associated resources.
- Privileges
-
An instruction which allows access to an object, these are associated with a role. The value shown is the total number of privileges in a zone.
- Role Privileges
-
This value is the total number of privileges assigned to roles. For example, if all privileges are assigned to 2 roles, this value will be double the number of privileges.
5.2.3. Make consistent
If you have performed a consistency check and the result is inconsistent, follow the steps below to make the zones become consistent.
-
Select the zone which you want to be the Source of Truth by clicking on the relevant graph.
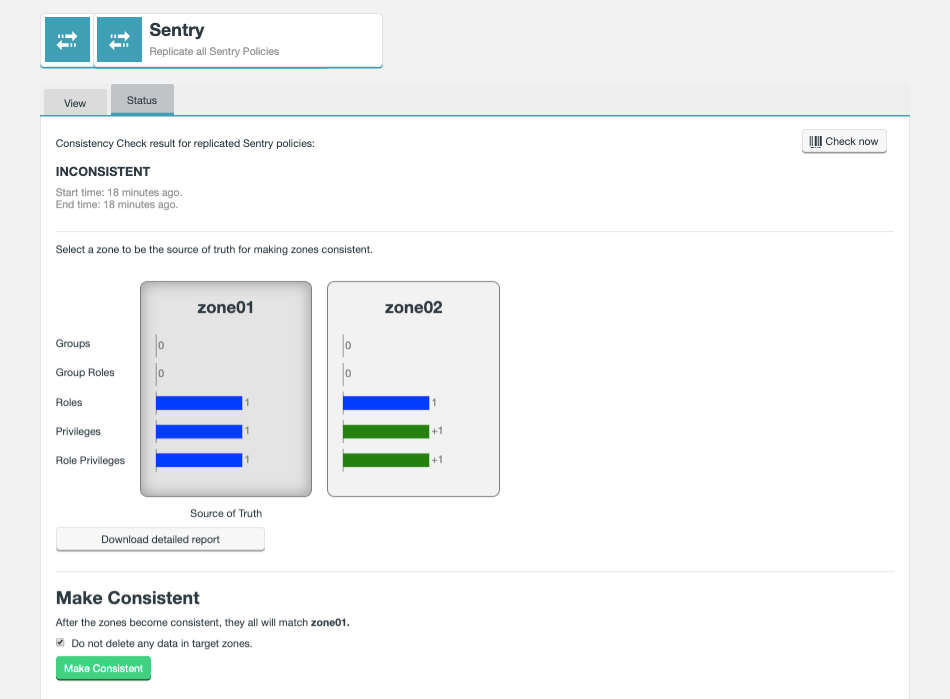
The differences between the zones will now be highlighted.
There are 2 methods to make data consistent.
-
The default method does not delete any data in the target zone. When a zone of truth is selected, the bars will highlighted what the outcome will be. It is still possible with this method, to have an inconsistent final result as we are not removing any data, this will be highlighted in orange.
-
If you select the option Do not delete any data in target zones then data will not be removed.
-
-
The alternative method is to allow data to be deleted from the target zone. This method will always provide a consistent outcome.
Zone may not become consistentIf you have selected Do not delete any data in target zones then no data will be removed, however the graphs will not update to reflect this. A consistency check after the Make Consistent has been performed may still return a result of inconsistent as data will not have been removed.-
Now click Make Consistent.
-
The zones are now consistent, depending on the option selected. You can run another consistency check to show this if required.
-
5.3. Interoperability with Sentry HA
Fusion Plugin for Live Sentry can be used in a Sentry High Availability (HA) enabled environment. Full High Availability is available; at the Sentry, proxy and Fusion levels.
5.3.1. Enable Sentry HA in Cloudera
In Cloudera, the maximum active server instances possible is two. For more information see:
5.3.2. Configuration
You can have one or more instances of Fusion Plugin for Live Sentry in a single cluster, but each instance needs to have the information of all underlying Sentry service instances in the cluster.
The example below is for a Sentry server set up on two nodes.
Enter the SentryProxy server listen host [0.0.0.0]: spx01-vm1.bdauto.wandisco.com Enter
Enter the SentryProxy server listen port [8073]: 8078 Enter
Enter the SentryProxy replication path [/sentryproxy]:
Remote thrift authentication type is kerberos (yes/no)?
  [If yes, you need to provide the principal and keytab]: yes Enter
Enter the sentry proxy kerberos server keytab : /var/run/cloudera-scm-agent/process/870-sentry-SENTRY_SERVER/sentry.keytab Enter
Enter the sentry proxy kerberos server principal : sentry/spx01-vm1.bdauto.wandisco.com@WANDISCO.HADOOP EnterRemote thrift authentication type is kerberos (yes/no)?
[If yes, you need to provide the principal and keytab]: yes Enter5.3.3. Pool related configuration
In order to support Sentry HA, the Sentry Proxy and Sentry Plugin have a pool of transport connections which are implemented using the Apache Common Pool library.
Below are the properties needed to configure the pool.
If you need to alter the value of these properties they need to be changed in both proxy-server-site.xml and proxy-plugin-site.xml.
-
sentry.service.client.server.rpc-connection-timeout- socket connection timeout -
sentry.service.client.server.rpc.retry-total- how many times to retry to connect to the server -
sentry.service.client.connection.pool.enabled- true/false (default is true) -
sentry.service.client.connection.pool.max-total- how many object should be in a pool -
sentry.service.client.connection.pool.max-idle- maximum objects should be in a idle for key particular key -
sentry.service.client.connection.pool.min-idle- minimum objects should be in a idle for key particular key -
sentry.service.client.rpc.retry.interval.msec- waiting time after retrying for thread
The properties below are based on the eviction policy of Apache Common Pool:
-
sentry.service.client.connection.pool.eviction.mintime.sec- minimum time in which objects would be removed from the pool -
sentry.service.client.connection.pool.eviction.interval.sec- waiting time for eviction
If you only have one Sentry server, and so do not want to use the Apache Common Pool then you can disable it as shown below.
The value for this property needs to be change in both proxy-server-site.xml and proxy-plugin-site.xml.
<property>
   <name>sentry.service.client.connection.pool.enabled</name>
   <value>false</value>
</property>
5.3.4. Live Sentry Replication Rules
System critical rules, such as the Live Sentry plugin’s default rules are not displayed in the UI due to their sensitive nature. These rules are critical to the working of the plugin and should never be modified. For this reason the default rules are not exposed through the UI.
| Default plugin replication rules will not appear in the Live Sentry UI, although, if required, you can interact with them through the REST API. |
5.4. Troubleshooting
Observe information in the log files generated for the WANdisco Fusion server and the Fusion Plugin for Live Sentry to troubleshoot issues at runtime. Exceptions or log entries with a SEVERE label may represent information that can assist in determining the cause of any problem.
5.4.1. Operational known issues
-
Only All(*) action is assigned to Privilege of type URI in Sentry.
Underlying Sentry only supports '\*' action for URI as per https://issues.apache.org/jira/browse/SENTRY-862. -
There is significant slow down in write operation processing immediately after Fusion server restart