1. Welcome
1.1. Product overview
Use the Fusion Plugin for Live Sentry to extend the WANdisco Fusion server with the ability to replicate policies among Apache Sentry Policy Provider instances. Coordinate activities that modify Sentry policy definitions among multiple instances of the Sentry Policy Provider across separate clusters to maintain common policy enforcement in each cluster. The Fusion Plugin for Live Sentry uses WANdisco Fusion for coordination and replication.
1.2. Documentation guide
This guide contains the following:
- Welcome
-
This chapter introduces this user guide and provides help with how to use it.
- Release Notes
-
Details the latest software release, covering new features, fixes and known issues to be aware of.
- Concepts
-
Explains how Fusion Plugin for Live Sentry through WANdisco Fusion uses WANdisco’s LiveData platform.
- Installation
-
Covers the steps required to install and set up Fusion Plugin for Live Sentry into a WANdisco Fusion deployment.
- Operation
-
The steps required to run, reconfigure and troubleshoot Fusion Plugin for Live Sentry.
- Reference
-
Additional Fusion Plugin for Live Sentry documentation, including documentation for the available REST API.
1.2.1. Symbols in the documentation
In the guide we highlight types of information using the following call outs:
| The alert symbol highlights important information. |
| The STOP symbol cautions you against doing something. |
| Tips are principles or practices that you’ll benefit from knowing or using. |
| The i symbol shows where you can find more information, such as in our online Knowledgebase. |
1.3. Contact support
See our online Knowledgebase which contains updates and more information.
If you need more help raise a case on our support website.
1.4. Give feedback
If you find an error or if you think some information needs improving, raise a case on our support website or email docs@wandisco.com.
2. Release Notes
WANdisco Inc. is pleased to present the first major revision to the Fusion Plugin for Live Sentry. This release supports the latest version of WANdisco Fusion, 2.12.
2.1. Live Sentry 2.0 Build 143
- 29 June 2018
-
The 2.0 release of the Fusion Plugin for Live Sentry is the first major revision. It includes a handful of new features, issue resolutions, platform support and other enhancements. These release notes include specific information about the product improvements, and should be read in conjunction with the product documentation.
2.1.1. Installation
The release can be installed to a WANdisco Fusion environment by following the installation guide instructions. Automated updates from prior versions is not required as deployment will occur alongside a new major release of WANdisco Fusion.
2.1.2. Highlighted New Features
This release includes the following major new features.
WD-SRP-129-
Integration with Cloudera Manager for creation, management and deployment of principals and keytabs.
WD-SRP-166-
Interoperability with Sentry HA.
WD-SRP-209-
Configuration scripts support non-interactive mode.
2.1.3. System Requirements
Before installing or upgrading, ensure that your systems, software, and hardware meet the requirements. The requirements for WANdisco Fusion are found in the User Guide at http://docs.wandisco.com/bigdata/wdfusion/2.12/#_prerequisites_checklist.
Fusion Plugin for Live Sentry is tested on a more limited number of operating systems then the main product. These are:
-
CentOS 6 x86_64
-
CentOS 7 x86_64
-
RHEL 7 x86_64
-
Ubuntu 16.04LTS
3. Concepts
3.1. Product concepts
Familiarity with the following concepts will improve your use of the Fusion Plugin for Live Sentry.
- WANdisco Fusion Plugin
-
A plugin is used by WANdisco Fusion to extend its functionality. Plugins are loaded by the WANdisco Fusion server on startup.
- Apache Sentry
-
Sentry is a system for defining and enforcing fine-grained authorization against Hadoop resources. Use Sentry to control and enforce privileges on data for authenticated users and applications in a Hadoop cluster. It supports different data models with a modular architecture.
- Sentry Server
-
The Sentry Server manages authorization metadata. It offers a Thrift interface to allow clients to retrieve and manipulate that metadata.
- Sentry Authorization
-
Sentry limits user access to specific resources. Sentry policies are enforced by Sentry Plugins that are specific to the system for which a policy is enforced. Plugins obtain metadata from the Sentry Server to make authorization decisions.
- Sentry Role
-
A set of privileges that combine multiple access rules.
- Sentry Privilege
-
A rule that allows access to an object.
3.2. Product architecture
WANdisco Fusion provides a LiveData architecture, where data are stored and used in multiple locations, while data are replicated with guaranteed consistency across them all.
The Fusion Plugin for Live Sentry extends that LiveData architecture to metadata managed by Apache Sentry to allow policy changes made in any location to apply consistently across all.
The Fusion Plugin for Live Sentry is a distributed network proxy for the Thrift interface exposed by the Apache Sentry Server. It coordinates and replicates changes made via that interface to ensure that regardless of where or when changes to Sentry policies occur, they result in the same set of policies across multiple environments.
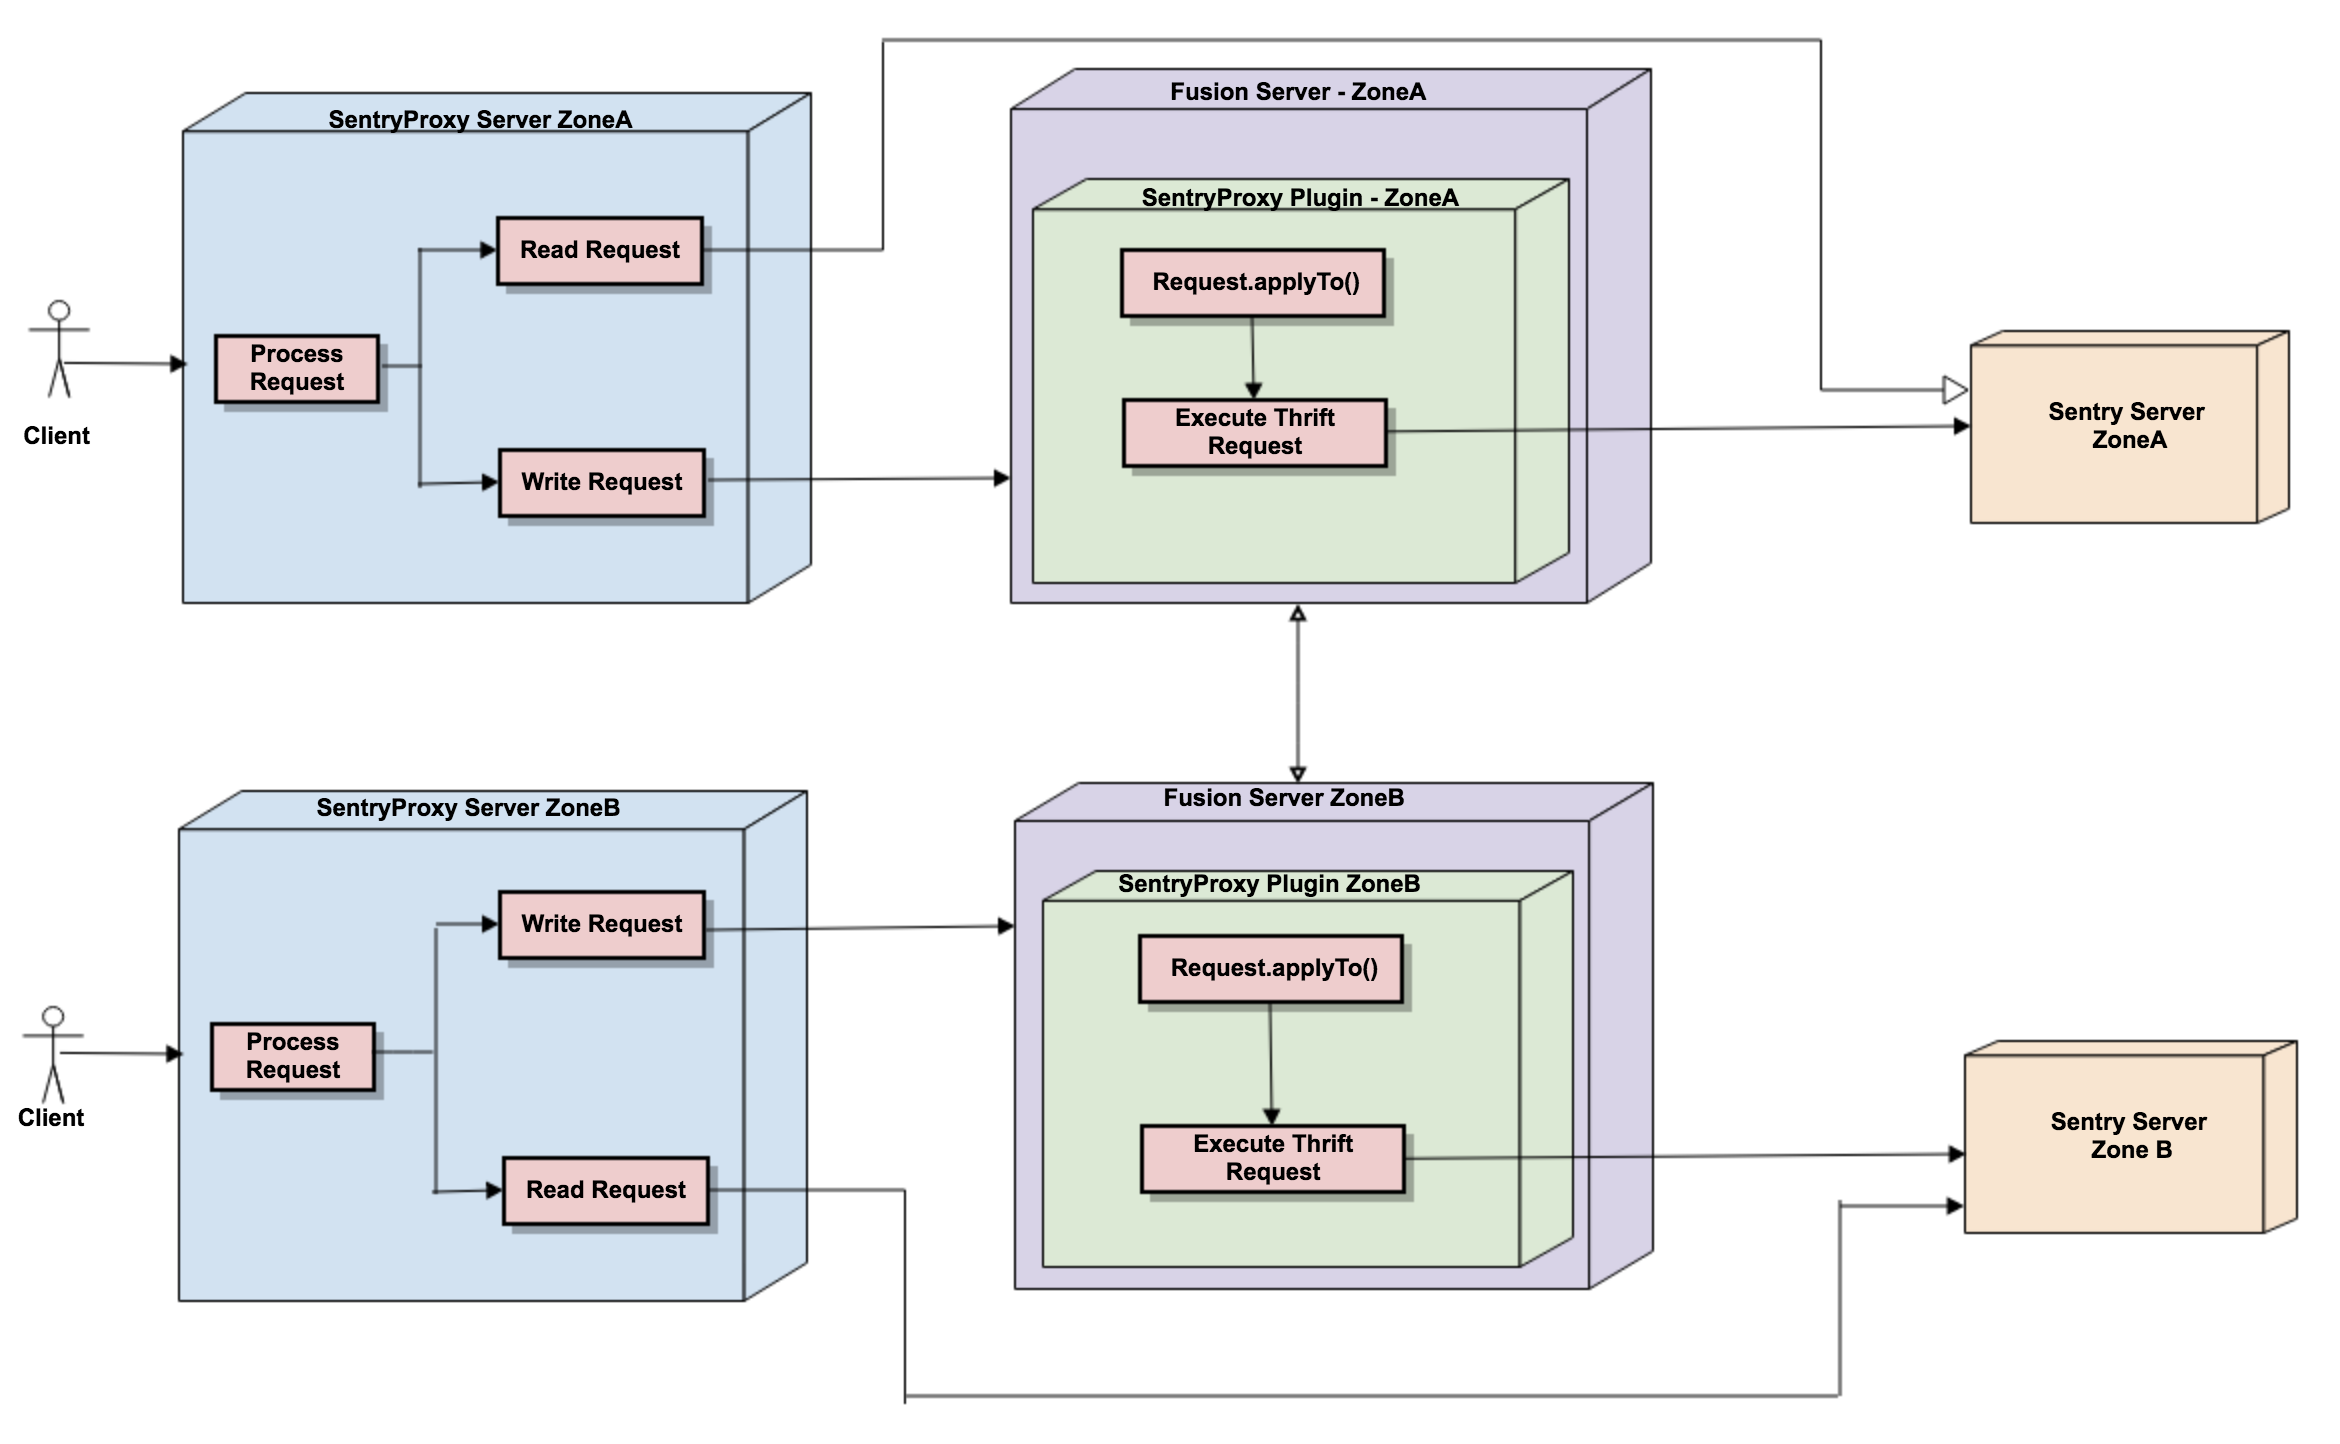
By implementing this coordination and replication via a proxy to the Sentry server, the Fusion Plugin for Live Sentry provides this capability without any change to the underlying Sentry services. Sentry provides a simple, standard means of directing clients to interact with the Sentry server via the proxy, and the proxy is configured to use the existing Sentry server.
3.3. Deployment models
3.3.1. Use Cases for the Fusion Plugin for Live Sentry
Replicate policy definitions between multiple Apache Sentry instances in different clusters using the Fusion Plugin for Live Sentry. Change Sentry policies in any cluster to enforce access to cluster resources with the same authorization rights in each environment.
4. Installation
4.1. Pre-requisites
4.1.1. System Requirements
Along with the standard product requirements that you can find on the WANdisco Fusion Deployment Checklist, you also need to ensure that your clusters:
-
Use Cloudera CDH 5.9.x to CDH 5.13.x (Note that builds for alternative CDH versions can be made available.)
-
Operate with Java 1.7
-
Have configured Cloudera CDH to use Kerberos or LDAP for user authentication (Note that the installation details here define steps for a Kerberized environment. Please contact WANdisco Inc. support for information on installation to a cluster that uses LDAP for user authentication.)
-
Use Apache Sentry for policy enforcement
4.1.2. Security Requirements
Prior to installation, establish the user identity that will be used by the WANdisco Sentry Proxy:
Add the system user wd-sentry-server on each node where the proxy will run.
# adduser wd-sentry-user EnterEstablish Kerberos credentials for the wd-sentry-server user.
# hdfs dfs -mkdir /user/wd-sentry-user Enter
# hdfs dfs -chown wd-sentry-user:wd-sentry-user /user/wd-sentry-user Enter
# hdfs dfs -chmod 755 /user/wd-sentry-user Enter
In the following instructions, <wd sentry proxy hostname> represents the hostname of the WANdisco Sentry Proxy
server, and should be replaced with your actual hostname.
# ssh <kdc hostname> Enterkadmin.local# addprinc -randkey wd-sentry-user/<wd sentry proxy hostname>@<REALM.COM> Enterwd-sentry-proxy.keytab file.kadmin.local# xst -norandkey -kt wd-sentry-proxy.keytab wd-sentry-user/<wd sentry proxy hostname>@<REALM.COM> Enter# scp wd-sentry-proxy.keytab root@<wd sentry proxy hostname>:/etc/security/keytabs Enter# chown sentry:sentry /etc/security/keytabs/wd-sentry-proxy.keytab Enter4.1.3. Sentry Configuration Requirements
Ensure these configuration properties for Sentry in the sentry-site.xml file are equivalent in replicated zones:
sentry.service.allow.connect-
A comma-separated list of identities that are allowed to connect to the Sentry service. e.g.
hive,impala,hue,hdfs,solr,wd-sentry-user. Additionally, this list must include the user identities that apply to the Sentry Proxy and Fusion server.
Note: If live-sentry proxy is installed by the Cloudera Manager thenlive_sentryalso needs to be added insentry.service.allow.connect. sentry.service.admin.group-
A comma-separated list of identities that have administrative privileges for the Sentry service. e.g.
hive,impala,hue,hdfs,solr.
Note: If live-sentry proxy is installed by the Cloudera Manager, thenlive_sentryalso needs to be added insentry.service.admin.group.
4.2. Installation Steps
Install the Fusion Plugin for Live Sentry using a standard RPM- or DEB-based installation process. Configure the plugin with simple command-line tools or manual changes to configuration files that are specific to the plugin. Instructions below refer to the CDH 5.13.x installer. Please account for the specific CDH version in your environment with the selection of the installer version.
| In addition to the documented installation process below, WANdisco Inc. provides a Cloudera-based installation process with this release. Please contact WANdisco Inc. support for details of this improved installation process. |
4.2.1. Locate installation components
There are two RPM files that provide installable components for the plugin:
-
fusion-sentry-plugin-cdh-5.13.0-2.0-xxx.noarch.rpm -
fusion-sentry-proxy-cdh-5.13.0-2.0-xxx.noarch.rpm
Obtain the files so that you can distribute them to the appropriate hosts in your deployment for WANdisco Fusion.
The fusion-sentry-proxy-cdh-5.13.0-2.0-xxx.noarch.rpm needs to be installed on each WANdisco Sentry Proxy server host in your deployment.
The fusion-sentry-plugin-cdh-5.13.0-2.0-xxx.noarch.rpm needs to be installed on each WANdisco Fusion server host.
4.2.2. Install the plugin
Install fusion-sentry-plugin-cdh-5.13.0-2.0-xxx.noarch.rpm on each WANdisco Fusion server host as the superuser:
# rpm -i fusion-sentry-plugin-cdh-5.13.0-2.0-xxx.noarch.rpm Enter4.2.3. Install the proxy
Install fusion-sentry-proxy-cdh-5.13.0-2.0-xxx.noarch.rpm on each host where you want to operate a WANdisco Sentry Proxy.
# rpm -i fusion-sentry-proxy-cdh-5.13.0-2.0-xxx.noarch.rpm Enter4.2.4. Configure the plugin
Change current directory to /etc/wandisco/fusion/plugins/live-sentry:
# cd /etc/wandisco/fusion/plugins/live-sentry EnterExecute the configuration script configure-proxy-plugin. Provide details of how the plugin will operate:
- Remote thrift host
-
The hostname of the existing Sentry policy server.
- Remote thrift port
-
The port used by the existing Sentry policy server (default 8038).
- Thrift authentication type
-
Kerberos
- Thrift Kerberos server principal
-
The Kerberos principal used by the existing Sentry policy server.
An example:
# ./configure-proxy-plugin Enter
Enter the remote thrift host: rpx02-vm0.bdfrem.wandisco.com Enter
Enter the remote thrift port [8038]: 8038 Enter
Remote thrift authentication type is kerberos (yes/no)?
 [If yes, you need to provide the principal and keytab]: yes Enter
Enter the remote thrift kerberos server principal : sentry/rpx02-vm0.bdfrem.wandisco.com@WANDISCO.HADOOP Enter
 ------------------------------------------------------------------------------------------------
* Sentry details *
Sentry Service Thrift Host: rpx02-vm0.bdfrem.wandisco.com
Sentry Service Thrift Port: 8038
Thrift Authentication Type is Kerberos: true
Thrift Kerberos Principal: sentry/rpx02-vm0.bdfrem.wandisco.com@WANDISCO.HADOOP
------------------------------------------------------------------------------------------------
Confirm the sentryproxy plugin configuration details (yes/no): yes Enter
SentryProxy plugin configuration done successfully, restart fusion server to load the plugin
--------------------------------------------------------------------------------------------
Note: You can edit the configuration values anytime in: /etc/wandisco/fusion/plugins/live-sentry/sentryproxy-plugin-site.xml
The fusion server must be restarted for the changes to take effect
--------------------------------------------------------------------------------------------

Note : For version 2.0

Remote thrift host , Remote thrift port, Thrift Kerberos server principal is not required
And If live sentry proxy is added by cloudera manager then
"Is live sentry managed by cloudera manager (yes/no)?  " will be "yes"
and if live sentry proxy is added by rpm or deb installer then it will be "no"
Configuration will be

# ./configure-proxy-plugin Enter Enter

Is live sentry managed by cloudera manager (yes/no)?
  If yes, will use the auto-generated configuration file '/etc/wandisco/fusion/plugins/live-sentry/conf/proxy-plugin-site.xml' by cloudera manger:
Remote thrift authentication type is kerberos (yes/no)?
------------------------------------------------------------------------------------------------

* Sentry details *

Thrift Authentication Type is Kerberos: true
------------------------------------------------------------------------------------------------
Confirm the sentryproxy plugin configuration details (yes/no): yes Enter
SentryProxy plugin configuration done successfully, restart fusion server to load the plugin
--------------------------------------------------------------------------------------------
Note: You can edit the configuration values anytime in: /etc/wandisco/fusion/server/sentryproxy-plugin-site.xml
The fusion server must be restarted for the changes to take effect
---------------------------------------------------------------------
Once completed, the script will produce the configuration file at
/etc/wandisco/fusion/plugins/live-sentry/sentryproxy-plugin-site.xml. You can
modify this file later if required. If modified, restart the WANdisco Fusion
server as configuration properties are obtained on WANdisco Fusion server startup
only.
4.2.5. Configure the proxy
Change current directory to /etc/wandisco/live-sentry-proxy:
# cd /etc/wandisco/live-sentry-proxy EnterExecute the configuration script configure-proxy-server. Provide details for the operation of the WANdisco Sentry Proxy:
- Listen host
-
The hostname or interface on which the proxy should listen for connections
- Listen port
-
The port on which the proxy should listen for connections
- Replication path
-
A path that matches the replication rule that you configured for dedicated use by the Fusion Plugin for Live Sentry
- Remote thrift host
-
The hostname of the existing Sentry policy server
- Remote thrift port
-
The port used by the existing Sentry policy server (default 8038)
- Thrift authentication type
-
Kerberos
- Sentry proxy Kerberos server keytab
-
The path to the keytab for the
wd-sentry-proxyprincipal - Sentry proxy Kerberos server principal
-
The full
wd-sentry-proxyKerberos principal - Sentry service Kerberos server principal
-
The Kerberos principal used by the existing Sentry policy server.
An example:
# ./configure-proxy-server Enter
# Enter the SentryProxy server listen host [0.0.0.0]: rpx02-vm4.bdfrem.wandisco.com Enter
Enter the SentryProxy server listen port [8073]: 8073 Enter
Enter the SentryProxy replication path [/sentryproxy]: /sentryproxy Enter
Enter the remote thrift host: rpx02-vm0.bdfrem.wandisco.com Enter
Enter the remote thrift port [8038]: 8038 Enter
Remote thrift authentication type is kerberos (yes/no)?
[If yes, you need to provide the principal and keytab]: yes Enter
Enter the sentry proxy kerberos server keytab : /etc/security/keytabs/wd-sentry-proxy.keytab Enter
Enter the sentry proxy kerberos server principal : wd-sentry-user/rpx02-vm4.bdfrem.wandisco.com@WANDISCO.HADOOP Enter
Enter the sentry service kerberos server principal : sentry/rpx02-vm0.bdfrem.wandisco.com@WANDISCO.HADOOP Enter
 ------------------------------------------------------------------------------------------------
*** SentryProxy server details ****
SentryProxy server listen host: rpx02-vm4.bdfrem.wandisco.com
SentryProxy server listen port: 8073
SentryProxy server replication path: /sentryproxy
**** Sentry details ****
Remote Thrift Host: rpx02-vm0.bdfrem.wandisco.com
Remote Thrift Port: 8038
Thrift Authentication Type is Kerberos: true
Sentry Proxy Kerberos Keytab: /etc/security/keytabs/wd-sentry-proxy.keytab
Sentry Proxy Kerberos Principal: wd-sentry-user/rpx02-vm4.bdfrem.wandisco.com@WANDISCO.HADOOP
Sentry Service Kerberos Principal: sentry/rpx02-vm0.bdfrem.wandisco.com@WANDISCO.HADOOP
------------------------------------------------------------------------------------------------
Do you confirm the details for configuration (yes/no): *yes Enter
SentryProxy server configuration done successfully, restart sentryproxy-server to load the sentryproxy server
--------------------------------------------------------------------------------------------------------
 Note: You can edit the configuration values anytime in: /etc/wandisco/live-sentry-proxy/sentryproxy-server-site.xml
 The sentryproxy-server must be restarted for the changes to take effect
 -------------------------------------------------------------------------------------------------------

NOTE : For version 2.0
Remote thrift host, Remote thrift port,  Sentry service Kerberos server principal properties are not required

Configuration will be

Enter the proxy server listen host [0.0.0.0]: spx01-vm0.bdauto.wandisco.com  Enter
Enter the proxy server listen port [8073]: 8073  Enter
Enter the proxy replication path [/sentryproxy]:
Remote thrift authentication type is kerberos (yes/no)?
  [If yes, you need to provide the principal and keytab]: yes Enter
Enter the proxy kerberos server keytab : /var/run/cloudera-scm-agent/process/115-sentry-SENTRY_SERVER/sentry.keytab  Enter
Enter the proxy kerberos server principal : sentry/spx01-vm0.bdauto.wandisco.com@WANDISCO.HADOOP  Enter
 ------------------------------------------------------------------------------------------------

 * Proxy server details

Proxy server listen host: spx01-vm0.bdauto.wandisco.com
Proxy server listen port: 8073
Proxy server replication path: /sentryproxy
  Sentry details *

Thrift Authentication Type is Kerberos: true
Proxy Kerberos Keytab: /var/run/cloudera-scm-agent/process/115-sentry-SENTRY_SERVER/sentry.keytab
Proxy Kerberos Principal: sentry/spx01-vm0.bdauto.wandisco.com@WANDISCO.HADOOP

 ------------------------------------------------------------------------------------------------
Once completed, the script will produce the configuration file at /etc/wandisco/live-sentry-proxy/sentryproxy-server-site.xml.
You can modify this file later if required. If modified, restart the WANdisco Sentry Proxy server as configuration properties are obtained on WANdisco Sentry Proxy server startup only.
5. Operation
Once configured, restart the WANdisco Fusion server to use the configuration applied:
# service fusion-server restart EnterThen start each WANdisco Sentry Proxy:
# service sentryproxy-server start EnterThen configure your cluster to access the Sentry server via the WANdisco Sentry Proxy. The instructions below are specific to each type of cluster service that can use Sentry for authorization. Your environment may have one or more of these services in use. Apply the instructions below selectively based on the services operating in your clusters.
5.1. Configuration
5.1.1. Configure Hive
-
Open the Cloudera Manager Administration Console and access the Hive service configuration tab.
-
Select .
-
Locate the Sentry Service and ensure that
sentryis enabled. -
Locate the Hive Advanced Configuration Snippet (Safety Valve) for the
sentry-site.xmlproperty file and add the properties:-
sentry.service.client.server.rpc-address→ The WANdisco Sentry Proxy host -
sentry.service.client.server.rpc-port→ The WANdisco Sentry Proxy portIf using CDH 5.13.x or later, the sentry.service.client.server.rpc-addressandsentry.service.client.server.rpc-portsettings are replaced with a singlesentry.service.client.server.rpc-addressesentry with a value in the form<proxy host>:<proxy thrift port>. -
sentry.service.server.principal→ The WANdisco Sentry Proxy principal
-
-
Locate the Server Name for Sentry Authorization for the
hive.sentry.serverproperty. -
Add the same name in all Fusion-enabled zones for this property (i.e.
sentry) -
Save these changes.
-
Restart affected services.
5.1.2. Configure HDFS
-
Open the Cloudera Manager Administration Console and access the HDFS service configuration tab.
-
Select .
-
Locate the Enable Sentry Synchronization property.
-
Enable Sentry synchronization.
-
Save these changes.
-
Restart affected services.
5.1.3. Configure Impala
-
Open the Cloudera Manager Administration Console and access the Impala service configuration tab.
-
Select .
-
Locate the Sentry Service property and ensure that "sentry" is enabled.
-
Locate the Impala Service Advanced Configuration Snippet (Safety Valve) for the
sentry-site.xmlproperty file and add the properties:-
sentry.service.client.server.rpc-address→ The WANdisco Sentry Proxy host -
sentry.service.client.server.rpc-port→ The WANdisco Sentry Proxy port ..If using CDH 5.13.x or later, the sentry.service.client.server.rpc-addressandsentry.service.client.server.rpc-portsettings are replaced with a singlesentry.service.client.server.rpc-addressesentry with a value in the form<proxy host>:<proxy thrift port>. -
sentry.service.server.principal→ The WANdisco Sentry Proxy principal
-
-
Save these changes.
-
Restart affected services.
5.1.4. Configure Solr
-
Open the Cloudera Manager Administration Console and access the Solr service configuration tab.
-
Select .
-
Locate the Sentry Service property and ensure that "sentry" is enabled.
-
Locate the Solr Service Advanced Configuration Snippet (Safety Valve) for the
sentry-site.xmlproperty file and add the properties:-
sentry.service.client.server.rpc-address→ The WANdisco Sentry Proxy host -
sentry.service.client.server.rpc-port→ The WANdisco Sentry Proxy port ..If using CDH 5.13.x or later, the sentry.service.client.server.rpc-addressandsentry.service.client.server.rpc-portsettings are replaced with a singlesentry.service.client.server.rpc-addressesentry with a value in the form<proxy host>:<proxy thrift port>. -
sentry.service.server.principal→ The WANdisco Sentry Proxy principal
-
-
Save these changes.
-
Restart affected services.
Steps to connect 'solrctl' shell with sentryproxy:
Create the sentry-site.xml in '/tmp/wd-sentry-conf' and update the sentryproxy server values
<?xml version="1.0" encoding="UTF-8"?>
<configuration>
   <property>
      <name>sentry.service.client.server.rpc-address</name>
      <value>{wd.sentry.proxy.thrift.host}</value>
   </property>
   <property>
      <name>sentry.service.client.server.rpc-port</name>
      <value>{wd.sentry.proxy.thrift.port}</value>
   </property>
   <property>
      <name>sentry.service.server.principal</name>
      <value>{wd.sentry.proxy.server.principal}</value>
   </property>
   <property>
      <name>sentry.service.security.mode</name>
      <value>kerberos</value>
   </property>
</configuration>-
wd.sentry.proxy.thrift.host→ The WANdisco Sentry Proxy host -
wd.sentry.proxy.thrift.port→ The WANdisco Sentry Proxy port -
wd.sentry.proxy.thrift.principal→ The WANdisco Sentry Proxy principal
Export the SENTRY_CONF_DIR to point to /tmp/wd-sentry-conf so that the solrctl will load the custom sentry-site.xml instead the
default one located in /etc/sentry/conf.
# export SENTRY_CONF_DIR=/tmp/wd-sentry-conf EnterNow run command 'solrctl sentry <cmd>'
# solrctl sentry <cmd>5.1.5. Configure Hue
-
Open the Cloudera Manager Administration Console and access the Hue service configuration tab.
-
Select .
-
Locate the Sentry Service property and ensure that "sentry" is enabled.
-
Locate the Hue Service Advanced Configuration Snippet (Safety Valve) for the
hue_safety_value.iniproperty file and add the properties:
[libsentry]
  hostname={wd.sentry.proxy.thrift.host}
  port={wd.sentry.proxy.thrift.port}
-
Location the Hue Service Advanced Configuration Snippet (Safety Valve) for the
sentry-site.xmlproperty file and add the properties:-
sentry.service.client.server.rpc-address→ The WANdisco Sentry Proxy host -
sentry.service.client.server.rpc-port→ The WANdisco Sentry Proxy port -
sentry.service.server.principal→ The WANdisco Sentry Proxy principal
-
-
Save these changes.
-
Restart affected services.
5.1.6. Changing the timezone
Logs use UTC timezone by default but this can be manually altered through log4j configuration if required.
To alter the timezone the xxx.layout.ConversionPattern property needs to be overwritten.
log4j.appender.xxxxxlog.layout.ConversionPattern=%d{ISO8601}{UTC} %p %c - %t:[%m]%n
{UTC} can be replaced with, for example {GMT} or {ITC+1:30}.
If offsetting from a timezone, + or - can be used, hours must be between 0 and 23, and minutes must be between 00 and 59.
This property is located in /etc/wandisco/live-sentry-proxy/log4j.properties.
After updating the file, the sentryproxy-server needs to be restarted for the changes to take effect.
5.2. Interoperability with Sentry HA
Fusion Plugin for Live Sentry can be used in a Sentry High Availability (HA) enabled environment. Full High Availability is available; at the Sentry, proxy and Fusion levels.
5.2.1. Enable Sentry HA in Cloudera
In Cloudera, the maximum active server instances possible is two. For more information see:
5.2.2. Configuration
You can have one or more instances of Fusion Plugin for Live Sentry in a single cluster, but each instance needs to have the information of all underlying Sentry service instances in the cluster.
The example below is for a Sentry server set up on two nodes.
Enter the SentryProxy server listen host [0.0.0.0]: spx01-vm1.bdauto.wandisco.com Enter
Enter the SentryProxy server listen port [8073]: 8078 Enter
Enter the SentryProxy replication path [/sentryproxy]:
Remote thrift authentication type is kerberos (yes/no)?
  [If yes, you need to provide the principal and keytab]: yes Enter
Enter the sentry proxy kerberos server keytab : /var/run/cloudera-scm-agent/process/870-sentry-SENTRY_SERVER/sentry.keytab Enter
Enter the sentry proxy kerberos server principal : sentry/spx01-vm1.bdauto.wandisco.com@WANDISCO.HADOOP EnterRemote thrift authentication type is kerberos (yes/no)?
[If yes, you need to provide the principal and keytab]: yes Enter5.2.3. Pool related configuration
In order to support Sentry HA, the Sentry Proxy and Sentry Plugin have a pool of transport connections which are implemented using the Apache Common Pool library.
Below are the properties needed to configure the pool.
If you need to alter the value of these properties they need to be changed in both proxy-server-site.xml and proxy-plugin-site.xml.
-
sentry.service.client.server.rpc-connection-timeout- socket connection timeout -
sentry.service.client.server.rpc.retry-total- how many times to retry to connect to the server -
sentry.service.client.connection.pool.enabled- true/false (default is true) -
sentry.service.client.connection.pool.max-total- how many object should be in a pool -
sentry.service.client.connection.pool.max-idle- maximum objects should be in a idle for key particular key -
sentry.service.client.connection.pool.min-idle- minimum objects should be in a idle for key particular key -
sentry.service.client.rpc.retry.interval.msec- waiting time after retrying for thread
The properties below are based on the eviction policy of Apache Common Pool:
-
sentry.service.client.connection.pool.eviction.mintime.sec- minimum time in which objects would be removed from the pool -
sentry.service.client.connection.pool.eviction.interval.sec- waiting time for eviction
If you only have one Sentry server, and so do not want to use the Apache Common Pool then you can disable it as shown below.
The value for this property needs to be change in both proxy-server-site.xml and proxy-plugin-site.xml.
<property>
   <name>sentry.service.client.connection.pool.enabled</name>
   <value>false</value>
</property>
5.2.4. Live Sentry Replication Rules
System critical rules, such as the Live Sentry plugin’s default rules are not displayed in the UI due to their sensitive nature. These rules are critical to the working of the plugin and should never be modified. For this reason the default rules are not exposed through the UI.
| Default plugin replication rules will not appear in the Live Sentry UI, although, if required, you can interact with them through the REST API. |
5.3. Troubleshooting
Observe information in the log files generated for the WANdisco Fusion server and the Fusion Plugin for Live Sentry to troubleshoot issues at runtime. Exceptions or log entries with a SEVERE label may represent information that can assist in determining the cause of any problem.
5.3.1. Operational known issues
-
Only All(*) action is assigned to Privilege of type URI in Sentry.
Underlying Sentry only supports '\*' action for URI as per https://issues.apache.org/jira/browse/SENTRY-862. -
There is significant slow down in write operation processing immediately after Fusion server restart
6. Reference Guide
6.1. API
The Fusion Plugin for Live Sentry provides a selection of REST API endpoints, detailed here.
In each case, it is assumed that the Fusion Plugin for Live Sentry has been configured to use the /sentryproxy location as its replication rule.
6.1.1. Consistency Check
Initiate a consistency check to identify any inconsistencies among Sentry metadata between clusters. A consistency check can be performed for all metadata, or restricted to a specific role or group. It will be performed as a background task, associated with an identifier returned when initiated that can be used to query task status or retrieve results when the task is complete. See below for consistency check known issues.
# curl -v -i -X POST http://<fusion-server>:8082/plugin/sentryproxy/cc?path=/sentryproxy&type=group&name=hive Enter# curl -v -i -X POST http://<fusion-server>:8082/plugin/sentryproxy/cc?path=/sentryproxy&type=role&name=role1 Enter# curl -v -i -X GET http://<fusion-server>:8082/fusion/task/<task-id>; EnterConsistency Check Known Issues
-
Data is inconsistent after repair if the sourceOfTruth is changed after Consistency Check.
If data is changed in the sourceOfTruth after a consistency check, and before a repair is performed, then the data will be inconsistent. This is because repair will be performed on data collected during the consistency check. -
Repair with privileges * and action * works incorrectly.
This is due to Sentry behaviour - https://issues.apache.org/jira/browse/SENTRY-2204. If a zone contains privilege * with action *, and if a repair operation is performed such that above privilege is revoked during repair, then Sentry will revoke all the other privileges in the zone as well. Zone status will be inconsistent even after repair.
6.1.2. Repair
Perform a repair to resolve inconsistencies that have been identified by a consistency check. You will need to provide the name of the zone that should be used as the source of truth, and specify whether or not to preserve existing Sentry metadata in other zones that would otherwise not be modified through repair.
Repair is normally only required for the transfer of pre-existing Sentry metadata between clusters. Once operational, the Fusion Plugin for Live Sentry will replicate changes to Sentry metadata as they occur.
# curl -v -i -X POST https://<fusion-server>:8082/plugin/sentryproxy/repair/<cc-task-id>/repair?srcZone=<zone-name>&preserve=true Enter