1. Welcome
Welcome to the User Guide for the Fusion Plugin for Live Ranger, version 6.2.
Apache Ranger is a framework to manage data security in Hadoop deployments. It provides centralized security administration, fine-grained authorization and centralized auditing within a single cluster. Use the Fusion Plugin for Live Ranger to extend the capabilities of WANdisco Fusion to Apache Ranger across multiple Hadoop environments, and keep your security policies consistent.
1.1. Product overview
WANdisco Fusion gives you LiveData: consistent data everywhere, spanning platforms and locations, even for changing data at petabyte scale. Business critical data is guaranteed consistent, always available, and accessible from anywhere.
The Fusion Plugin for Live Ranger extends WANdisco Fusion to information managed and used by Apache Ranger. Use it to keep your security policies consistent among Hadoop deployments with WANdisco Fusion. Key features include:
-
Apache Ranger policy replication
-
Coordination of activities that modify policy definitions, including those performed via the Apache Ranger REST API, or from its administrative interface in a browser
-
Integration with WANdisco Fusion
1.2. Documentation guide
This guide contains the following:
- Welcome
-
This chapter introduces this user guide and provides help with how to use it.
- Release Notes
-
Details the latest software release, covering new features, fixes and known issues to be aware of.
- Concepts
-
Explains how Fusion Plugin for Live Ranger through WANdisco Fusion uses WANdisco’s LiveData platform.
- Installation
-
Covers the steps required to install and set up Fusion Plugin for Live Ranger into a WANdisco Fusion deployment.
- Operation
-
Describes the steps required to run, reconfigure and troubleshoot Fusion Plugin for Live Ranger.
- Reference
-
Additional Fusion Plugin for Live Ranger documentation.
1.2.1. Symbols in the documentation
In the guide we highlight types of information using the following call outs:
| The alert symbol highlights important information. |
| The STOP symbol cautions you against doing something. |
| Tips are principles or practices that you’ll benefit from knowing or using. |
| The i symbol shows where you can find more information, such as in our online Knowledgebase. |
1.3. Contact support
See our online Knowledgebase which contains updates and more information.
If you need more help raise a case on our support website.
1.4. Give feedback
If you find an error or if you think some information needs improving, raise a case on our support website or email docs@wandisco.com.
2. Release Notes
The Fusion Plugin for Live Ranger extends WANdisco Fusion by replicating Apache Ranger. With it, WANdisco Fusion maintains a Live Data environment including Ranger content, so that applications can access, use and modify a consistent view of data everywhere, spanning platforms and locations, even at petabyte scale. WANdisco Fusion ensures the availability and accessibility of critical data everywhere.
2.1. Live Ranger 6.2 Build 435
- 27 June 2022
-
For the release notes and information on known issues, please visit the Knowledge base - WANdisco Fusion Plugin for Live Ranger 6.2.0.
2.2. Live Ranger 6.1 Build 8
- 13 July 2022
-
For the release notes and information on known issues, please visit the Knowledge base - WANdisco Fusion Plugin for Live Ranger 6.1.0.
2.3. Live Ranger 6.0 Build 403
- 9 December 2020
-
For the release notes and information on known issues, please visit the Knowledge base - WANdisco Fusion Plugin for Live Ranger 6.0.0.
3. Concepts
Familiarity with the following concepts will improve your use of the Fusion Plugin for Live Ranger.
- WANdisco Fusion Plugin
-
A plugin is used by WANdisco Fusion to extend its functionality. Plugins are loaded by the WANdisco Fusion server on startup.
- Apache Ranger
-
Apache Ranger offers a centralized security framework for fine grained access control over Hadoop and related components (Apache Hive, HBase, Storm, Knox, Solr, Kafka and YARN). Use the Apache Ranger administration console to manage policies for accessing resources (file, folder, database, table, column, etc.) for a particular set of users and/or groups, and enforce those policies within Hadoop.
Ranger has a centralized web application that consists of policy, audit and administration modules. Authorized users can manage security policies via a web interface or the Apache Ranger REST API. Policies are enforced in Hadoop components by Ranger Plugins.
- Apache Ranger Policy Server
-
The Policy Server maintains the policies defined by users, and responds to requests from Ranger Plugins to retrieve policy information.
- Apache Ranger Audit Server
-
The Audit Server can be configured to send access audit logs generated by Apache Ranger Plugins to a range of destinations.
- Apache Ranger Administration Portal
-
The Ranger Administration Portal provides a simple interface for security administrators to create and manage policies enforced by Apache Ranger.
- Apache Ranger Plugin
-
Ranger Plugins are specific to the Hadoop component in which they enforce Ranger policies retrieved from the Ranger Policy Server. They are lightweight Java applications that are embedded in the processes of other cluster components to intercept operations that would always execute without security policy enforcement, and apply those policies to prevent unauthorized operations. Plugins also deliver information to the Ranger Audit Server.
3.1. Product concepts
The Fusion Plugin for Live Ranger implements LiveData for Apache Ranger policies. It intercepts operations that act on policy definitions in the Apache Ranger Policy Server and ensures that they are coordinated and replicated among multiple Ranger Policy Server instances.
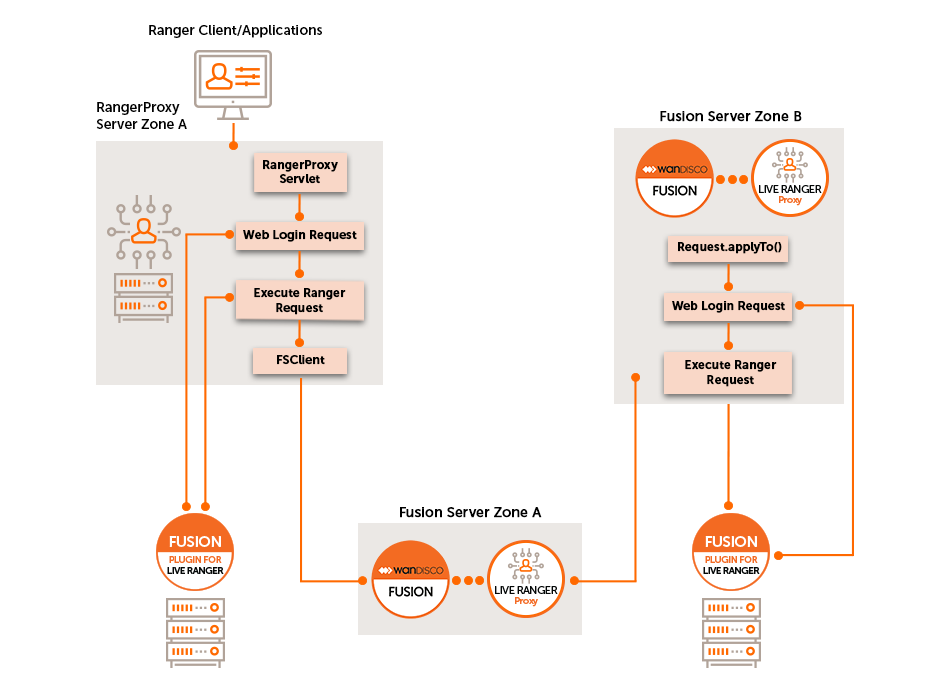
It consists of two key components:
- Live Ranger Proxy
-
The Live Ranger Proxy is a server that sits between clients and the REST API and Web interface of the Ranger Policy Server. Prior to forwarding client requests to the Ranger Policy Server, the proxy first proposes them to the WANdisco Fusion server for coordination.
- Live Ranger Plugin
-
The Live Ranger Plugin is a runtime extension for the WANdisco Fusion server. It accepts proposals for operation coordination from the Live Ranger Proxy, and leverages the LiveData capabilities of the WANdisco Fusion server to ensure that all operations are performed with guaranteed consistent outcomes among multiple Apache Ranger deployments.
This Plugin is also responsible for the execution of operations that originate from other Ranger deployments. It presents those requests to its local Apache Ranger Policy Server as though they originated locally so they can be executed.
3.2. Supported Functionality
The Fusion Plugin for Live Ranger provides functionality and support for the following:
-
Replication of Ranger policy definitions between instances of the Apache Ranger Policy Administration Server using WANdisco Fusion.
-
All methods of which Ranger policies can be created, modified, deleted, etc. are intercepted by Live Ranger to coordinate those operations among multiple Apache Ranger instances.
-
Administrators can check and report on the consistency between policy definitions across multiple Ranger instances.
-
Inconsistencies among policies between Ranger instances can be resolved through WANdisco Fusion.
-
A selection of REST API endpoints by which Live Ranger operation can be managed.
Of note, the following capabilities are explicitly not performed by this product:
-
Synchronization of operations performed by Ranger Plugins that are specific to Hadoop components in each cluster. There is no dependency between the Fusion Plugin for Live Ranger and Ranger Plugins deployed in each cluster. Note that this means that although Ranger policies and their administration will be replicated with guaranteed consistency among Ranger instances, each cluster’s Ranger plugins will poll those policies independently, applying them independently also.
-
Selective replication of Ranger policies. Ranger policy replication is enabled as a whole between clusters when using the Fusion Plugin for Live Ranger. Either all Ranger policies and repositories are replicated, or none are.
3.2.1. Ranger KMS support
The Ranger KMS is a cryptographic key management service that supports "data at rest" encryption in HDFS.
Live Ranger will replicate Ranger KMS policies, however, the following limitations apply:
-
Live Ranger will not replicate keys between zones.
-
Key names must be kept in sync manually between clusters.
4. Installation
4.1. Prerequisites
4.1.1. System Requirements
Along with the standard product requirements for WANdisco Fusion, you need to:
-
Configure the Hadoop environment with Kerberos security.
-
Use Apache Ranger for policy enforcement.
Starting from Fusion Plugin for Live Ranger 6.0, support has been added for Cloudera (CDP 7.x.x, or later). See the release notes for more information. [1]
|
Installation requirement
The Ranger Admin must be active before installing the Fusion Plugin for Live Ranger proxy.
|
4.1.2. Replication Requirements
-
Ranger services must match.
Both zones must have the same set of ranger services. See the Ranger service section for more information.
4.2. Security Requirements
From Fusion Plugin for Live Ranger 6.0, automatic Kerberization is used in both Ambari and Cloudera deployments.
4.2.1. Create keytab
-
Add the system user 'rangerproxy' in all nodes.
useradd rangerproxy -
Create the user directory under hdfs in all the zones.
hdfs dfs -mkdir /user/rangerproxy hdfs dfs -chown rangerproxy:rangerproxy /user/rangerproxy hdfs dfs -chmod 755 /user/rangerproxy -
ssh to the node where the KDC server is running.
-
Create the principal.
kadmin.local# addprinc -randkey rangerproxy/<rangerproxy.host>@<REALM.COM> <rangerproxy.host> => hostname of ranger proxy server -
Create rangerproxy.keytab.
kadmin.local# xst -norandkey -kt rangerproxy.keytab rangerproxy/<rangerproxy.host>@<REALM.COM> -
Copy the key tab onto the node on which the Ranger proxy server is installed.
scp rangerproxy.keytab into root@<rangerproxy.host>:/etc/security/keytabs -
Change the ownership of the keytab to the rangerproxy user.
chown rangerproxy:rangerproxy /etc/security/keytabs/rangerproxy.keytabkeytab
The rangerproxy.keytab should be copied into the node where the Ranger proxy server is running.
4.2.2. Create users for Live Ranger
Add “rangerproxy” and “hdfs” (the default user for Fusion server) into the Ranger admin console with the 'admin' role.
-
Click Settings, then click on the Users/Groups tab.
-
Create 'rangerproxy' user with the admin role.
-
Create 'hdfs' user with the admin role.
4.3. Create users in underlying Ranger for Live Ranger
Add 'rangerproxy' and 'hdfs' (the user used by Fusion server) into Underlying Ranger admin console with 'admin' role.
-
Go to Settings, then the Users/Groups tab.
-
Create 'rangerproxy' user with admin role.
-
Create 'hdfs' user with admin role.
4.4. Installation: Live Ranger UI-Server, UI-Client, Proxy and Plugin
The method requiring the least user input is outlined in the next section - the Ambari Installation method.
| Before starting the installation, ensure your Fusion servers are inducted between zones. |
4.4.1. Install Live Ranger on Cloudera
Live Ranger 6.0 supports Cloudera deployments. Follow these steps to install to your Cloudera cluster using parcels.
Prepare zones
Before you start, ensure that Cloudera and Fusion server are installed on separate host machines. Prepare your zones for data replication with the following steps.
-
In the Fusion UI, induct the zones Live Ranger is to be installed on.
-
In HDFS, create a directory for data replication.
$ ssh zone02-vm-fusion-server
$ sudo su hdfs
$ hdfs dfs -mkdir /rangerproxy-
Create a replication rule for the new directory.
CLI installation steps
-
Download the Live Ranger installer from customer.wandisco.com and open a terminal session on your Cluster Manager node.
-
Make the installer script executable.
chmod +x live-ranger-installer.sh -
As sudo, run the installer.
sudo ./live-ranger-installer.sh extract-parcelThe installer script extracts the installation files.
Verifying archive integrity... All good. Uncompressing WANdisco Live Ranger.................. :: :: :: # # ## #### ###### # ##### ##### ##### :::: :::: ::: # # # # ## ## # # # # # # # # # ::::::::::: ::: # # # # # # # # # # # # # # ::::::::::::: ::: # # # # # # # # # # # ##### # # # ::::::::::: ::: # # # # # # # # # # # # # # # :::: :::: ::: ## ## # ## # # # # # # # # # # # :: :: :: # # ## # # # ###### # ##### ##### ##### This is the WANdisco Live Ranger version 6.0.0.3 installer. Extracting Parcel to '/tmp/LIVE_RANGER-cdh-7.1.0_6.0.0.3.el7.parcel.tar.gz' If you have not extracted this on the Cloudera Manager node, you should copy this to that server. Next, unpack Live_RANGER-cdh-7.1.0_6.0.0.3.el7.parcel.tar.gz and copy Parcel and CSD files to appropriate locations: - copy Live Ranger jar from 'csd' folder to /opt/cloudera/csd - copy Live Ranger Parcel and SHA files from 'parcel' folder to /opt/cloudera/parcel-repo - Modify Live Ranger files owner and access rights: chown cloudera-scm:cloudera-scm /opt/cloudera/csd/LIVE_RANGER* /opt/cloudera/parcel-repo/LIVE_RANGER* chown 644 /opt/cloudera/csd/LIVE_RANGER* /opt/cloudera/parcel-repo/LIVE_RANGER* You should now be able to add the 'Live Ranger Proxy' service through the Cloudera Manager UI. Navigate to Cloudera Manager parcels page and press 'check for New Parcels' button. The activate and distribute Live Ranger. Note that when you 'Assign Masters' for 'Live Ranger' you should select where you want the Proxy Server. NOTE that when you 'Assign Slaves and clients' you should ONLY select nodes that are already Fusion server nodes. If the parcel installation was successful, and you have not already done so, you should install the final Fusion UI plugin components on the Fusion node(s). For further guidance and clarifications, go to https://docs.wandisco.com -
Unpack the parcel archive that matches your version of CDH/CDP.
cd /tmp tar -zxvf LIVE_RANGER-cdh-7.1.0_6.0.0.3.el7.parcel.tar.gz -
Copy
*parcel,*parcel.shaandcsdfollowing the guidance in the above output.cp LIVE_RANGER-cdh-7.1.0_6.0.0.3.el7/parcel/LIVE_RANGER-cdh-7.1.0_6.0.0.3-el7.parcel* /opt/cloudera/parcel-repo/ cp LIVE_RANGER-cdh-7.1.0_6.0.0.3.el7/csd/LIVE_RANGER-cdh-7.1.0_6.0.0.3.jar /opt/cloudera/csd/ -
Change the ownership of the parcel files.
chown cloudera-scm:cloudera-scm /opt/cloudera/parcel-repo/LIVE_RANGER-cdh-7.1.0_6.0.0.3-el7.parcel* -
Restart the Cloudera scm server.
systemctl restart cloudera-scm-server -
Go to Cloudera Manager and install the parcel.
-
Click on Parcels.
-
Click LIVE_RANGER.
-
Click Distribute, then wait for the distribution to complete.
-
Click the Activate button.
-
-
Install Live Ranger Service.
-
Click on Add Service in the cluster menu.
-
Select Live Ranger.
-
Select the server node. This must have Fusion Server installed.
-
Select additional nodes to run as gateways.
Set the parameters for your nodes:
Listen Host: The hostname of the chosen server node, orliveranger_hostin the case of multiple LiveRanger servers.
Zone name: The local zone name, for example, 'zone2'.
Ranger Admin URL: The URL for the Ranger admin server on the local cluster.Examplehttps://cluster-node1:6182 Zone Name : <name-of-local-zone> https://cluster-node20:8072 Ranger Admin Username : <username-to-enter-to-ranger-admin-UI> Ranger Admin Password : <password-to-enter-to-ranger-admin-UI>Define the following properties if the Ranger server is secured using SSL:
trustore
Ranger Admin Truststore Path
storepass
Ranger Admin Truststore Password
Encrypt using the
encrypt-password.shscript from the Fusion installation.If the Live Ranger server is secured behind SSL, set encryption with the following elements:
keystore
Ranger Admin Keystore Path
password
Ranger Admin Keystore Password
-
-
Restart the Live Ranger service and Cloudera Manager server.
-
On all Fusion nodes, run the following steps:
/etc/init.d/fusion-server stopsh ./live-ranger-installer.sh -- install-server-plugin/etc/init.d/fusion-server start/etc/init.d/fusion-ui-server restart -
Check that the plugin is active in the Fusion UI and that Live Ranger service is green in Cloudera Manager.
The Cloudera installation is now complete. Now complete a validation of your installation. See Validation.
4.4.2. Install Live Ranger on Ambari
CLI installation
-
Download the Live Ranger installer from customer.wandisco.com and open a terminal session on your WANdisco Fusion node.
-
Ensure the downloaded file is executable.
chmod +x live-ranger-installer.sh
-
As sudo, run the installer.
sudo ./live-ranger-installer.sh
The installer script extracts the installation files.
Verifying archive integrity... All good.

Uncompressing WANdisco Live Ranger...............................

    ::   ::  ::     #     #   ##    ####  ######   #   #####   #####   #####
   :::: :::: :::    #     #  #  #  ##  ## #     #  #  #     # #     # #     #
  ::::::::::: :::   #  #  # #    # #    # #     #  #  #       #       #     #
 ::::::::::::: :::  # # # # #    # #    # #     #  #   #####  #       #     #
  ::::::::::: :::   # # # # #    # #    # #     #  #        # #       #     #
   :::: :::: :::    ##   ##  #  ## #    # #     #  #  #     # #     # #     #
    ::   ::  ::     #     #   ## # #    # ######   #   #####   #####   #####

You are about to install WANdisco Live Ranger version 6.1.0.0

Do you want to continue with the installation? (Y/n) Y

Installing requested plugin components...
  live-ranger-ui-6.1.0.0_SNAPSHOT-1.noarch.rpm ... Done
All requested components installed.


Full installation of this plugin currently requires that the appropriate
'Management Pack' stack is installed through your Ambari server node.

This installer package includes all the currently supported stacks for this.

If you have not already done so, you should:
  1) copy this installer to the ambari-server node,
  2) run the installer on the ambari-server node with the 'install-stack'
     sub-command, and
  3) use the Ambari UI to Add the service.

For further guidance and clarifications, visit https://docs.wandisco.com/
The installer will perform an integrity check and confirm the product version that will be installed.
A message will appear, warning of the prerequisite 'Management Pack' stack that should be installed through your Ambari server node prior to Live Ranger plugin installation.
-
Enter 'Y' to continue the installation.
The instructions in this section document the
install-stackoption. Note this method stops and starts the Ambari server automatically. -
Copy the installer to the Ambari server node.
Examplescp live-ranger-installer.sh <your-ambari-node>:/tmp
-
On your Ambari server node run:
/tmp/live-ranger-installer.sh install-stack
-
Go to the Ambari UI and complete the following steps.
Installation via the Ambari UI
-
Go to the Ambari UI.
-
Click on Actions.
-
Click on Add Service.
-
Select Live Ranger Proxy and click Next.
-
-
In Assign Masters, select the node where you want to deploy the Live Ranger Proxy Server. Click Next.
If proxy server RPM files from an earlier installation are found by Ambari, the installation will fail. If this happens, remove the files and restart the installation. IMPORTANT: Once the installation is complete, ensure the files are left in place. -
Select the nodes on which Live Ranger plugin is to be installed.
-
In Assign Slaves and Clients, select the client checkboxes for all Fusion Server nodes.
-
Provide the following configuration values and then click Next.
- Ranger Admin Password
-
The Admin user’s password.
- Ranger Admin Username
-
The Admin username for Ranger.
- Zone name
-
The zone name for your local Fusion Server.
-
Review the configuration and click Deploy.
-
Confirm successful deployment and click Next.
The installation of Fusion Plugin for Live Ranger is now complete.
-
Click on Quick Links, then on Live Ranger UI. The Quick Links use the Live Ranger default port, 8072.
Examplehttp://<host-name>:8072 -
Go to the Ranger UI. Changes made using this proxy server will be now be replicated between zones.
 Figure 2. Ranger UI - login
 -
After installation is complete, restart the Fusion server.
-
Now complete the next section to validate the installation.
4.5. Validation
Once your installation is complete, you should verify that replication is working as expected before entering into a production phase. Create a User or Group through the Ranger UI and confirm that it is replicated.
-
Go to your Ranger UI -
http://<Host Name>:<Live Ranger Port>
for example,http://localhost:8072 -
In Settings, click on the Users/Groups tab, add a new User.
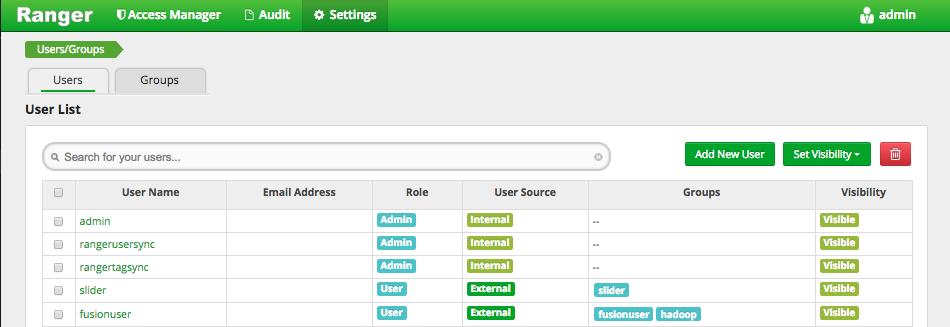 Figure 3. Ranger UI - Add user/group
 -
Once the user is created, go to another zone in Ranger and confirm that the new user has been replicated.
4.6. Upgrade
If you wish to perform a Fusion Plugin for Live Ranger upgrade, please contact WANdisco support.
4.7. Uninstallation
If you wish to uninstall Live Ranger, please contact WANdisco support. The uninstall procedure currently requires manual editing and should not be done without calling WANdisco’s support team for assistance. The process involves both service and package removal. If you had a HA setup, you would also need to edit your load balancer configuration.
5. Operation
5.1. Replication
5.1.1. View replication rule
Once Fusion Plugin for Live Ranger is installed, the All Ranger Rules replication rule is visible on the Replication tab of the WANdisco Fusion UI.
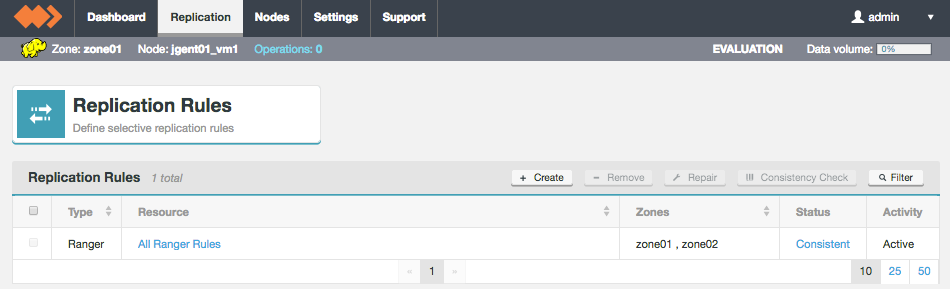
Click on All Ranger Rules to see more details.
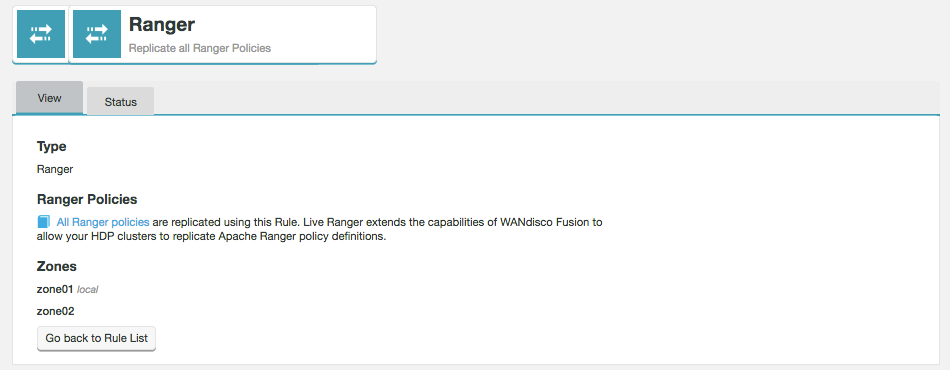
- Type
-
The type of replication rule, in this case the type is Ranger.
- Ranger Policies
-
All Ranger policies are included in this single rule so that HDP clusters replicate Apache Ranger policy definitions. The rule controls how the data is replicated between zones and does not have any impact on the policies themselves which you continue to manage through the Ranger UI.
- Zones
-
Lists the zones between which this rule’s associated path is replicated. Note that the "local" label identifies which of the zones that the currently viewed node belongs.
Go back to Rule list - click this button to return to the Replication Rules screen.
5.1.2. Consistency check
|
When to perform a consistency check?
|
To perform a consistency check follow the steps below.
-
On the Replication tab, click on All Ranger Rules.
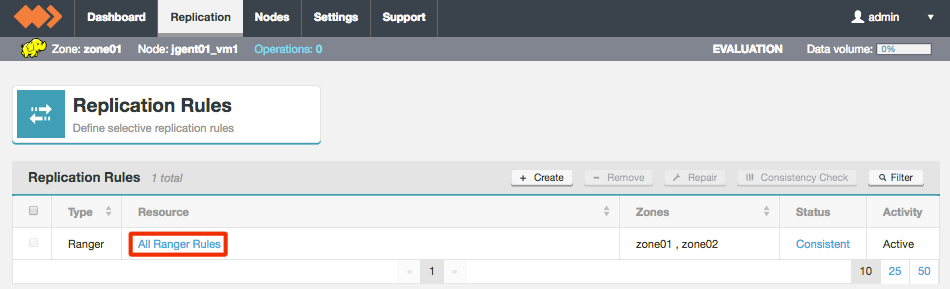 Figure 6. Select All Ranger Rules
 -
On the Status tab you can see the results of the previous consistency check. Click Check now to trigger a new check.
 Figure 7. Trigger consistency check
 -
The results of the consistency check will now be displayed. Yellow bars are inconsistent. A more detailed report can also be downloaded.
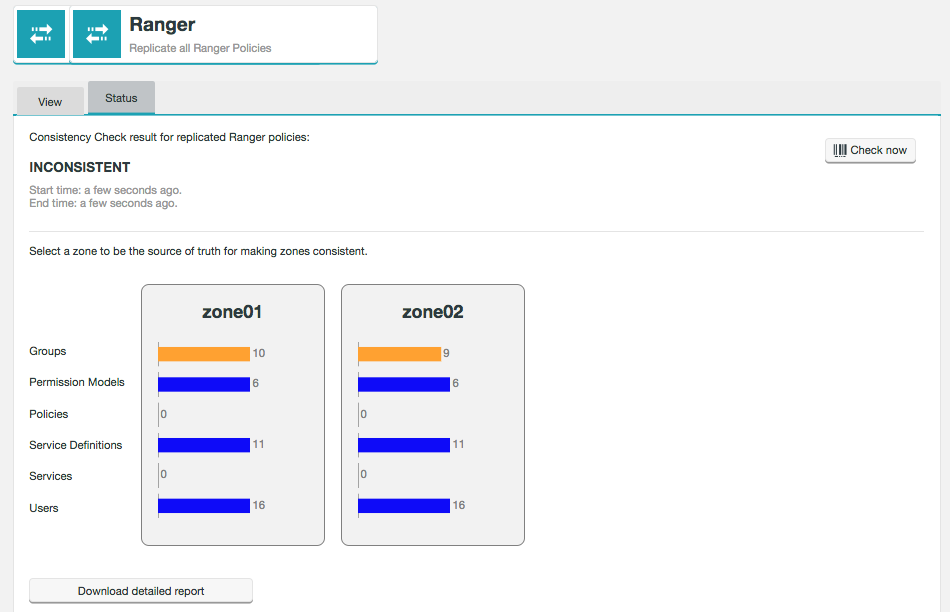 Figure 8. Consistency result
If the result of the consistency check is inconsistent, see the make consistent section for what to do next.
Consistency check results
The consistency check lists the results of 6 items.
- Groups
-
A group of users which can be used to set up policy permission access. Groups can be external or internal.
- Permission Modules
-
These define the access to specific Ranger UI tabs for users or groups. View your Permission Models at Settings > Permissions.
- Policies
-
This gives users or groups permissions to access particular resources for a particular service.
- Services Definitions
-
The mapping of a service to a Ranger configuration for example HDFS, HBase, Hive, YARN and Ranger KMS.
- Services
-
The component supported in Ranger for example HDFS, HBase, Hive, YARN and Ranger KMS.
- Users
-
These can be synced from an external source or created internally in the Ranger UI.
5.1.3. Make consistent
If you have performed a consistency check and the result is inconsistent, follow the steps below to make the zones become consistent.
-
Select the zone which you want to be the Source of Truth by clicking on the relevant graph.
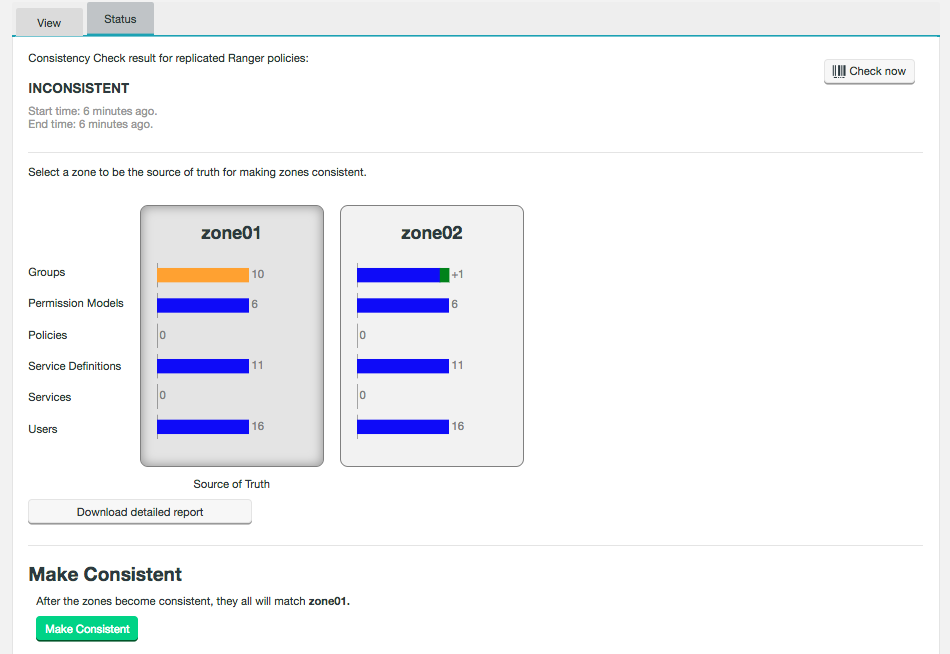 Figure 9. Make consistent
The differences between the zones will now be highlighted. This example shows that one group will be added to zone02 when making the zones consistent. A proportion of the bar will turn red if the source of truth contains less groups, for example, than the other zone. Yellow represents inconsistency, including if the overall number is the same but the content is different.
-
Now click Make Consistent.
-
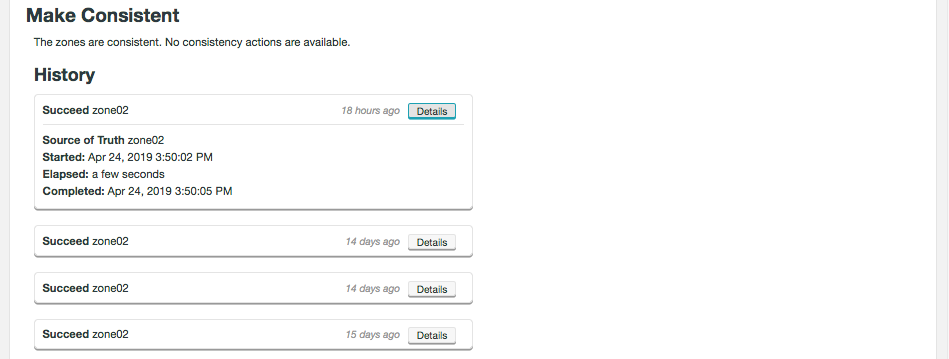
The zones are now consistent. The state will remain as Unknown until a new consistency check is run.
5.1.4. Ranger service
|
Ranger services must match
For consistency check and make consistent to function properly, both zones must have the same set of Ranger services.
This includes, for example, Ranger KMS.
|
Replication
-
Operations on Ranger Services are not replicated. They must be created on a per cluster basis.
-
Policy replication will only occur if the service name is the same between clusters. For example for
c1_hdfsin cluster 1 andc2_hdfsin cluster 2, replication will occur between the clusters. However, replication will not occur betweenc1_hdfsandc2_hdfs1. Note that replication will also occur if the cluster name is omitted, provided the service names match, i.e. it is just calledhdfsin all clusters. -
Everything that is not a Ranger Service is replicated (users, groups etc).
Consistency check
-
Service consistency check will not consider configuration, and will check for the service name based on the cluster. For example, cluster1 name
c1will create the service asc1_<component1>and will be treated same as cluster2 namec2servicec2_<component1>. -
Entities can also be used in consistency checks (API only, not via the UI), for example:
curl -v -s -X POST "http://<fusion-server-host-name>:8082/plugins/rangerproxy/cc?path=/rangerproxy"
The above call will give the consistency check for 6 entities - servicedef, service, policy, user, group and permission.
You can also specify entities, giving more than one entity by comma-separated values, for example:
curl -v -s -X POST "http://<fusion-server-host-name>:8082/plugins/rangerproxy/cc?path=/rangerproxy&<entityName>
where
<entityName>can be one of the 6 listed above in the formatentityName = servicedef,policy.
Make consistent
-
Making services consistent needs to be done manually.
-
As with replication and consistency checks, making policies consistent will only work if the service exists on both clusters (see above).
Once configured, restart the WANdisco Fusion server to use the configuration applied:
service fusion-server restartThen start each Ranger Proxy server:
service rangerproxy-server start5.2. Administration
5.2.2. User levels
There are 3 levels of user when using Kerberos.
- Admin
-
Admin users can perform all operations. This is set in the Ranger UI.
- Kerberos read only users
-
During installation you provide a list of read only users. These users can perform GET operations only.
- Not defined
-
Users which are neither Admin or read only can perform no operations.
5.2.3. Configuration
Configuration of the Fusion Plugin for Live Ranger proxy and server is performed with changes to the configuration files generated at installation time:
-
/etc/wandisco/fusion/plugins/live-ranger/proxy-plugin-site.xml -
/etc/wandisco/live-ranger-proxy/proxy-server-site.xml
The Ranger Administration UI can be enabled for access via SSL. For full details of how to configure the Fusion Plugin for Live Ranger for interoperability with SSL-enabled Ranger installations, please contact WANdisco support.
6. Reference Guide
6.1. Setup Live Ranger HA
| If your clusters are kerberized, errors will occur unless all Fusion Plugin for Live Ranger proxy hosts are added to spnego keytabs in order to be accessible by hdfs namenodes. This is applicable for all versions of Fusion Plugin for Live Ranger. |
-
Follow the steps detailed by Hortonworks on Configuring Ranger Admin HA.
-
Ranger Admin will now be running in HA mode. You should now see the Ranger login page at e.g. http://rpxy01-vm2.bdfrem.wandisco.com:88. In this example, the load balancer is installed on vm2 and Ranger Admin on vm4, vm5.
-
Install Live Ranger on more than one node. While configuring Live Ranger Proxy and Plugin, enter the policy manager url the nodes comma separated, e.g.:
http://rpxy01-vm4.bdfrem.wandisco.com:6080,http://rpxy01-vm5.bdfrem.wandisco.com:6080
-
Change the load balancer configuration to point to Live Ranger Proxy rather than Ranger Admin. This needs to be done on the node on which the load balancer is installed, vm2 in this example.
cd /usr/local/apache2/conf
vi ranger-cluster.conf
Update the following
<Proxy balancer://rangercluster>
    BalancerMember http://rpxy01-vm4.bdfrem.wandisco.com:6080 loadfactor=1 route=1
    BalancerMember http://rpxy01-vm5.bdfrem.wandisco.com:6080 loadfactor=1 route=2
To
<Proxy balancer://rangercluster> BalancerMember http://rpxy01-vm0.bdfrem.wandisco.com:8072 loadfactor=1 route=1 sta retry=30 BalancerMember http://rpxy01-vm1.bdfrem.wandisco.com:8072 loadfactor=1 status=+H retry=0 route=2 -
Run the following commands to restart the httpd server:
cd /usr/local/apache2/bin
./apachectl restart
-
Live Ranger will now be running in HA mode. You should see the Ranger login page at e.g. http://rpxy01-vm2.bdfrem.wandisco.com:88.