1. Welcome
1.1. Product overview
LiveMigrator migrates your data in a single pass while keeping up with all changes to your source zone. The outcome is data which is guaranteed to be consistent between source and target. As data is being migrated it is immediately ready to be used, without interruption.
LiveMigrator is an extension of the WANdisco Fusion platform with the following benefits:
-
Single pass data migration with guaranteed consistency
-
Scalable for large migrations
-
Minimal disruption to business operations
-
Non-blocking migration
LiveMigrator uses a single scan iterator which visits every source file once and once only, replicating data from the source to the target zone. This ensures the target has a complete copy of the data.
One of the biggest challenges faced by businesses is migrating data without disrupting operations. LiveMigrator allows business operations against the source data to occur while migration is occurring. If data is changed which the iterator hasn’t seen yet then the change will simply be picked up when the iterator reaches that content and replicated to the target environment. If changes occur in an area which has already been scanned by the iterator then LiveMigrator transfers the change as soon as it occurs. The result is a completely consistent data copy at the end of migration.
1.2. LiveMigrator terminology
- Source zone
-
The cluster the data originates from, this is normally on premises. It can also be referred to as the donor.
- Target zone
-
The cluster the data is migrating to, this is normally in the cloud. It can also be referred to as the beneficiary.
If you encounter any other unfamiliar terms checkout the Glossary.
1.3. Release Notes
1.3.1. LiveMigrator 6.0 Build 233
20 December 2019
For the release notes and information on known issues, please visit the Knowledge base - LiveMigrator 6.0.
1.4. Contact
See our online Knowledge base which contains updates and more information.
If you need more help raise a case on our support website.
If you find an error or if you think some information needs improving, raise a case on our support website or email docs@wandisco.com.
2. Installation
2.2. Installation
You must install LiveMigrator on all the nodes in a zone, and then move on to the next zone.
-
Obtain the LiveMigrator installer from customer.wandisco.com and open a terminal session on your WANdisco Fusion node.
-
Ensure the downloaded file is executable e.g.
chmod +x migrator-installer.sh
-
Run the installer using an account with appropriate permissions:
./migrator-installer.sh
The installer will now start.
Verifying archive integrity... All good.
Uncompressing WANdisco Live Migrator..................

    ::   ::  ::     #     #   ##    ####  ######   #   #####   #####   #####
   :::: :::: :::    #     #  #  #  ##  ## #     #  #  #     # #     # #     #
  ::::::::::: :::   #  #  # #    # #    # #     #  #  #       #       #     #
 ::::::::::::: :::  # # # # #    # #    # #     #  #   #####  #       #     #
  ::::::::::: :::   # # # # #    # #    # #     #  #        # #       #     #
   :::: :::: :::    ##   ##  #  ## #    # #     #  #  #     # #     # #     #
    ::   ::  ::     #     #   ## # #    # ######   #   #####   #####   #####

You are about to install WANdisco Live Migrator version 6.0

Do you want to continue with the installation? (Y/n)
The installer will perform an integrity check and confirm the product version that will be installed. Press enter to continue the installation.
-
A restart of the Fusion server is required for activation of the LiveMigrator. Enter Y to restart and continue.
  wd-live-migration-plugin-6.0.tar.gz ... Done
  fusion-ui-migration-plugin-6.0-dist.tar.gz ... Done
  fusion-migrator-plugin-6.0.el6-143.noarch.rpm ... Done
All requested components installed.

Running additional post install actions...
Restarting fusion-server is required as part of plugin activation
Do you wish to restart fusion-server now? (y/N)
The Fusion Server can be restarted later, but must be restarted before the LiveMigrator can be used.
-
Your installation is now complete, now go to the WANdisco Fusion UI.
Restarting WANdisco Fusion Server: fusion-server
Stopped WANdisco Fusion Server process 10807 successfully.
Started WANdisco Fusion Server process successfully.

Go to your WANdisco Fusion UI Server to complete configuration.
-
Reload the UI to see the LiveMigrator listed in the plugins section of the dashboard.
Now repeat these steps so LiveMigrator is installed on all the nodes in a zone (if there is more than 1), and then move on to the next zone.
3. Operation
3.1. Performing a migration
To perform a migration, you first need to create a replication rule. See the WANdisco Fusion user guide for how to do this - Create a Rule.
| Migration must be started from the source zone. |
-
On the Replication Rules screen, click on the replication rule you want to migrate.
-
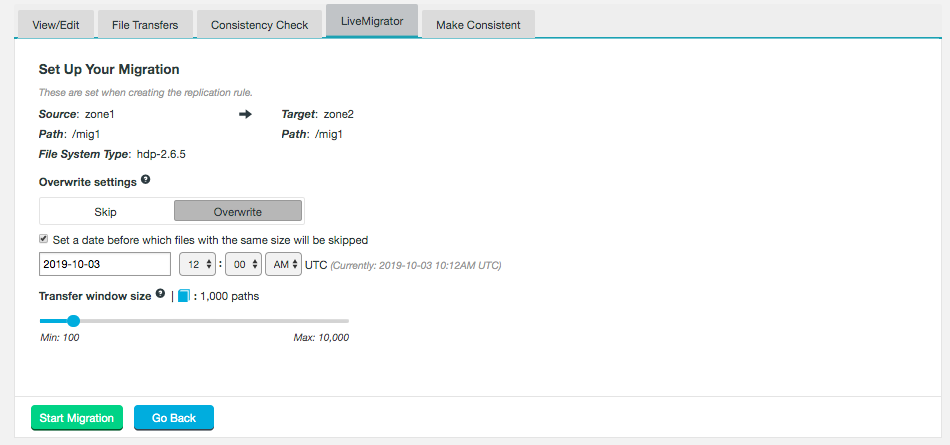
On the LiveMigrator tab, you can see information about the replication rule to be migrated.
 Figure 1. Set Up Your Migration
- Overwrite settings
-
- Skip
-
If the filesize is identical between the source and target, the file is skipped. If it’s a different size, the whole file is replaced.
- Overwrite
-
Everything is replaced, even if the file size is identical.
There are 2 types of overwrite:-
Files are always overwritten
-
Files are overwritten if their timestamp is after a specified time. This time is set in UTC.
-
- Transfer window size
-
Sets the number of paths to be migrated at once.
Small windows are faster to complete, limiting the time in which incoming client requests are delayed. However, small windows potentially increase the number of RPC calls to the underlying storage, adding overhead.
Larger windows increase transfer speed, but the time in which client requests are delayed is increased.
-
Once you have set all relevant settings, click Start Migration.
-
The warm up phase will now occur. For more information see Warm up time.
-
Once the warm up is complete, the migration will begin. The number of files and total amount of data to be migrated is displayed. This is calculated at the start of migration and so may be inaccurate if operations occur during migration.
-
When migration is complete, you have the option to start a new migration.
Figure 2. Migration complete

3.1.1. Pausing migration
To pause migration, simply click Pause Migration on the LiveMigrator tab. Transfer will complete for those files already scanned but no more scanning will occur.
To restart migration, click Resume Migration.
3.1.2. Cancelling migration
To cancel migration, simply click Cancel Migration. Transfer will complete for those files already scanned but no more scanning will occur.
3.1.3. Continuing migration after a Fusion restart
If the Fusion server restarts during a migration, the state of the migration depends on which node restarted.
-
Restart of a non-writer node. There is no impact on migration if a non-writer node goes down, as long as quorum is maintained.
-
Restart of the writer node of the source zone. When restarted, any previously in progress migrations are now in the paused state. See Pausing migration for how to restart migration.
-
Restart of the writer node of the target zone. No user intervention is needed to continue migration after restart as long as quorum is maintained.
Note that you can change the writer node if it goes down, see Writer Selection.
3.2. Configuration
Global Settings for the LiveMigrator can be set in the LiveMigrator Settings section of the Settings tab. Settings are updated across all nodes.
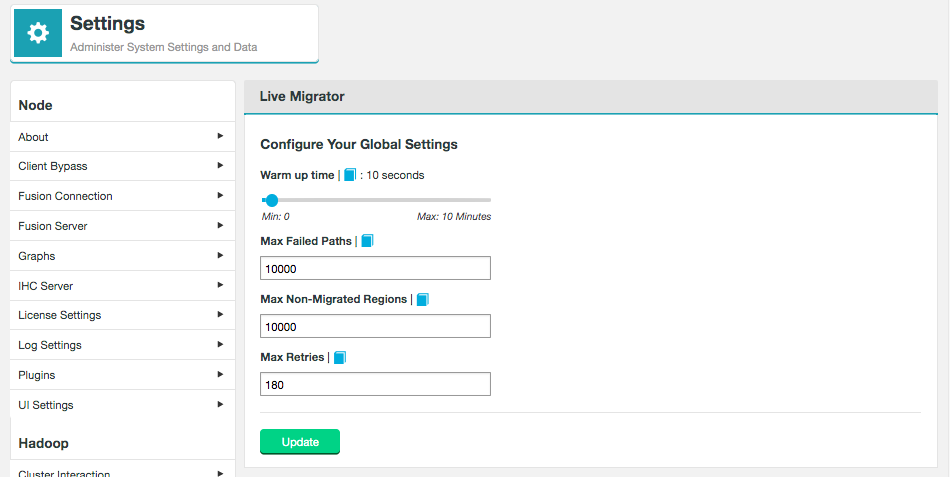
3.2.1. Warm up time
The warm up time is the amount of time between starting the migration in the UI, and file migration starting. This allows LiveMigrator to be aware of any client activity, and allows time for any client requests to finish before migration starts.
The default time is 10 seconds.
3.2.2. Max Failed Paths
The maximum number of failures to migrate paths that can occur before migration is aborted.
The default is 10,000 paths, the minimum 0 and the maximum 50,000.
3.2.3. Max Non-Migrated Regions
The maximum number of non-migrated regions allowed to be created during migration.
One non-migrated region is one directory which has been moved from the area of the filesystem which is yet to be migrated, to the area which has already been migrated. Any directory moved after the maximum limit is reached will fail.
The default is 10,000 regions, the minimum 1 and the maximum 50,000.