1. Welcome
1.1. Product overview
The Fusion Plugin for Live Hive enables WANdisco Fusion to replicate Hive’s metastore, allowing WANdisco Fusion to maintain a replicated instance of Hive’s metadata and, in future, support Hive deployments that are distributed between data centers.
1.2. Documentation guide
This guide contains the following:
- Welcome
-
this chapter introduces this user guide and provides help with how to use it.
- Release Notes
-
details the latest software release, covering new features, fixes and known issues to be aware of.
- Concepts
-
explains how Fusion Plugin for Live Hive through WANdisco Fusion uses WANdisco’s Live Data platform.
- Installation
-
covers the steps required to install and set up Fusion Plugin for Live Hive into a WANdisco Fusion deployment.
- Operation
-
the steps required to run, reconfigure and troubleshoot Fusion Plugin for Live Hive.
- Reference
-
additional Fusion Plugin for Live Hive documentation, including documentation for the available REST API.
1.2.1. Admonitions
In the guide we highlight types of information using the following call outs:
| The alert symbol highlights important information. |
| The STOP symbol cautions you against doing something. |
| Tips are principles or practices that you’ll benefit from knowing or using. |
| The KB symbol shows where you can find more information, such as in our online Knowledgebase. |
1.3. Contact support
See our online Knowledgebase which contains updates and more information.
If you need more help raise a case on our support website.
1.4. Give feedback
If you find an error or if you think some information needs improving, raise a case on our support website or email docs@wandisco.com.
2. Release Notes - Live Hive Plugin 1.0 Build 12
16 March 2018
The Fusion Plugin for Live Hive extends WANdisco Fusion by replicating Apache Hive metadata. With it, WANdisco Fusion maintains a Live Data environment including Hive content, such that applications can access, use and modify a consistent view of data everywhere, spanning platforms and locations, even at petabyte scale. WANdisco Fusion ensures the availability and accessibility of critical data everywhere.
The 1.0 release of the Fusion Plugin for Live Hive is the first release of this new capability, taking advantage of the extensible architecture of WANdisco Fusion to provide an alternative to the existing Fusion Hive Metastore Plugin.
WANdisco recommends that you consult our implementation services to plan the effective introduction of this significant new feature to your Live Data environment.
2.1. Available Packages
This release of the Fusion Plugin for Live Hive supports deployment into WANdisco Fusion 2.11.1 or greater for HDP and CDH Hadoop clusters:
-
CDH 5.12.0 - CDH 5.13.0
-
HDP 2.6.0 - HDP 2.6.4
2.2. Installation
The Fusion Plugin for Live Hive supports an integrated installation process that allows it to be added to an existing WANdisco Fusion deployment. Consult the Installation Guide for details.
2.3. What’s New
This is the first release of the Fusion Plugin for Live Hive, intended to provide enhanced functionality over the Fusion Hive Metastore Plugin. The most notable enhancements are:
- New Replication Architecture
-
The Fusion Plugin for Live Hive adopts a proxy-based architecture that requires that the existing Hive Metastore remains in place without any need for a configuration change. Applications using Hive are directed to it via a Thrift proxy exposed by the Fusion Plugin for Live Hive through the
hive.metastore.urisconfiguration property. - Table-level selective replication
-
By coordinating and replicating operations performed against the standard network interface of the Hive Metastore, the Fusion Plugin for Live Hive allows for selective replication of Hive constructs that provides finer control over replicated Hive data and metadata. Take advantage of regular expressions to match specific Hive content that you want to replicate at either table or database level.
- Consistency check specific tables
-
The Fusion Plugin for Live Hive allows you to perform a consistency check of individual tables to focus on data that are relevant when confirming that replication is effective.
- Repair specific tables
-
Repair individual tables instead of an entire Hive database if required.
2.4. Known Issues
-
LHV-238 - The Live Hive Plugin requires common Hadoop distributions and versions to be in place for all replicated zones.
-
LHV-341 - The proxy for the Hive Metastore must be deployed on the same host as the Fusion server.
-
LHV-342 - The Fusion Plugin for Live Hive does not provide for the removal of a Hive Regex rule.
-
LHV-344 - Replication rules for Hive data locations generated by the Fusion Plugin for Live Hive cannot be edited.
-
LHV-343 - Databases are replicated to all zones on creation regardless of Hive Regex rules.
-
LHV-219 - Consistency check and repair cannot be performed at the level of a Hive Regex rule, but must be performed per-table.
-
LHV-480 - It’s currently not possible to replicate metadata for tables created using the CTAS "create table as select" method.
-
LHV-486 - Unable to trigger repairs to metadata on nodes where the database under repair is absent. The workaround is to ensure that you trigger repairs from a node on which the database is present.
2.5. Planned Enhancements
In addition to the known issues listed above, WANdisco maintains work on planned enhancements for the Fusion Plugin for Live Hive. These include:
-
Selective replication of tables and databases by location in addition to name
-
Replication of existing tables and databases
-
Selective replication of partitions and indices by location
-
Selective replication of Hive functions
-
Scale and manageability enhancements to accommodate extremely large Hive environments
-
Exclusion and inclusion pattern matching for selective replication
-
Supported cross-version and distribution compatibility
3. Concepts
3.1. Product concepts
Familiarity with product and environment concepts will help you understand how to use the Fusion Plugin for Live Hive. Learn the following concepts to become proficient with replication.
- Apache Hive
-
Hive is a data warehousing technology for Apache Hadoop. It is designed to offer an abstraction that supports applications that want to use data residing in a Hadoop cluster in a structured manner, allowing ad-hoc querying, summarization and other data analysis tasks to be performed using high-level constructs, including Apache Hive SQL querys.
- Hive Metadata
-
The operation of Hive depends on the definition of metadata that describes the structure of data residing in a Hadoop cluster. Hive organizes its metadata with structure also, including definitions of Databases, Tables, Partitions, and Buckets.
- Apache Hive Type System
-
Hive defines primitive and complex data types that can be assigned to data as part of the Hive metadata definitions. These are primitive types such as TINYINT, BIGINT, BOOLEAN, STRING, VARCHAR, TIMESTAMP, etc. and complex types like Structs, Maps, and Arrays.
- Apache Hive Metastore
-
The Apache Hive Metastore is a stateless service in a Hadoop cluster that presents an interface for application to access Hive metadata. Because it is stateless, the metastore can be deployed in a variety of configuration to suit different requirements. In every case, it provides a common interface for applications to use Hive metadata.
The Hive Metastore is usually deployed as a standalone service, exposing an Apache Thrift interface by which client applications interact with it to create, modify, use and delete Hive Metadata in the form of databases, tables, etc. It can also be run in embedded mode, where the metastore implementation is co-located with the application making use of it.
- WANdisco Fusion Live Hive Proxy
-
The Live Hive Proxy is a WANdisco service that is deployed with Live Hive, acting as a proxy for applications that use a standalone Hive Metastore. The service coordinates actions performed against the metastore with actions within clusters in which associated Hive metadata are replicated.
- Hive Client Applications
-
Client applications that use Apache Hive interact with the Hive Metastore, either directly (using its Thrift interface), or indirectly via another client application such as Beeline or Hiveserver2.
- Hiveserver2
-
is a service that exposes a JDBC interface for applications that want to use it for accessing Hive. This could include standard analytic tools and visualization technologies, or the Hive-specific CLI called Beeline.
Hive applications determine how to contact the Hive Metastore using the Hadoop configuration property
hive.metastore.uris. - Hiveserver2 Template
-
A template service that amends the hiveserver2 config so that it no longer uses the embedded metastore, and instead correctly references the
hive.metastore.urisparameter that points to our "external" Hive Metastore server. - Regex rules
-
Regular expressions that are used to describe the Hive metadata to be replicated.
- WANdisco Fusion plugin
-
The Fusion Plugin for Live Hive is a plugin for WANdisco Fusion. Before you can install it you must first complete the installation of the core WANdisco Fusion product. See WANdisco Fusion user guide.
| Get additional terms from the Big Data Glossary. |
3.2. Product architecture
The native Hive Metastore is not replaced, instead, Live Hive Plugin runs as a proxy server that issues commands via the connected client (i.e. beeline) to the original metastore, which is on the cluster.
The Fusion Plugin for Live Hive proxy passes on read commands directly to the local Hive Metastore, while a WANdisco Fusion Live Hive Plugin will co-ordinates any write commands, so all metastores on all clusters will perform the write operations, such as table creation. Live Hive will also automatically start to replicate Hive tables when their names match a user defined rule.
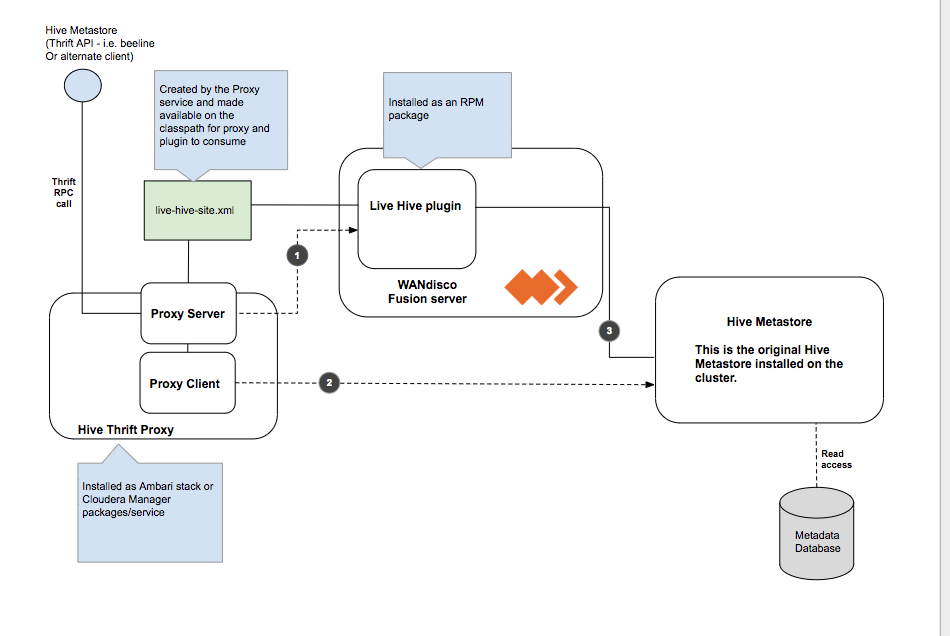
| 1 | Write access needs to be co-ordinated by Fusion before executing the command on the metastore. |
| 2 | Read Commands are 'passed-through' straight to the metastore as we do not need to co-ordinate via Fusion. |
| 3 | Makes connection to the metastore on the cluster. |
3.2.1. Limitations
Membership changes
There is currently no support for dynamic membership changes. Once installed on all Fusion nodes, the Live Hive Plugin plugin is activated. See Activate Live Hive Plugin. During activation, the membership for replication is set and cannot be modified later. For this reason, it’s not possible to add new Live Hive Plugin nodes at a later time, including a High Availability node running an existing Live Hive proxy that wasn’t part of your original membership.
Any change to membership in terms of adding, removing or changing existing nodes will require a complete reinstallation of Live Hive.
Hive must be running at all zones
All participating zones must be running Hive in order to support replication. We’re aware that this currently prevents the popular use case for replicating between on-premises clusters and s3/cloud storage, where Hive is not running. We intend to remove the limitation in a future release.
4. Installation
4.1. Pre-requisites
An installation should only proceed if the following prerequisites are met on each Live Hive Plugin node:
-
Hadoop Cluster (CDH or HDP, meeting WANdisco Fusion requirements, see Checklist)
-
Hive installed, configured and running on the cluster
-
WANdisco Fusion 2.11.1 or later
4.2. Installation
4.2.1. Installer Options
The following section provides additional information about running the Live Hive installer.
Installation files
The Client step of the installer provides a list of available parcel/jar files for you to choose from. You need to select the files that correspond with your platform.
-
LIVE_HIVE_PROXY-2.11.0-el6.parcel -
LIVE_HIVE_PROXY-2.11.0-el6.parcel.sha -
LIVE_HIVE_PROXY-2.11.0.jar
Obtain the files so that you can distribute them to the appropriate hosts in your deployment for WANdisco Fusion. The JAR and parcel files need to be saved to your /cloudera/parcels directory, while the .jar file must be copied to the Local Descriptor Repository, the default path is opt/cloudera/csd.
Installer Help
The bundled installer provides some additional functionality that lets you install selected components, which may be useful if you need to restore or replace a specific file. To review the options, run the installer with the --help option, i.e.
[user@gmart01-vm1 ~]# ./live-hive-installer.sh help
Verifying archive integrity... All good.
Uncompressing WANdisco Hive Live.......................
This usage information describes the options of the embedded installer script. Further help, if running directly from the installer is available using '--help'. The following options should be specified without a leading '-' or '--'. Also note that the component installation control option effects are applied in the order provided.
Installation options
General options:
  help                             Print this message and exit

Component installation control:
  only-fusion-ui-client-plugin     Only install the plugin's fusion-ui-client component
  only-fusion-ui-server-plugin     Only install the plugin's fusion-ui-server component
  only-fusion-server-plugin        Only install the plugin's fusion-server component
  only-user-installable-resources  Only install the plugin's additional resources
  skip-fusion-ui-client-plugin     Do not install the plugin's fusion-ui-client component
  skip-fusion-ui-server-plugin     Do not install the plugin's fusion-ui-server component
  skip-fusion-server-plugin        Do not install the plugin's fusion-server component
  skip-user-installable-resources  Do not install the plugin's additional resources
[user@docs01-vm1 tmp]#
Standard help parameters
[user@docs01-vm1 tmp]# ./live-hive-installer.sh --help
Makeself version 2.1.5
 1) Getting help or info about ./live-hive-installer.sh :
  ./live-hive-installer.sh --help   Print this message
  ./live-hive-installer.sh --info   Print embedded info : title, default target directory, embedded script ...
  ./live-hive-installer.sh --lsm    Print embedded lsm entry (or no LSM)
  ./live-hive-installer.sh --list   Print the list of files in the archive
  ./live-hive-installer.sh --check  Checks integrity of the archive

 2) Running ./live-hive-installer.sh :
  ./live-hive-installer.sh [options] [--] [additional arguments to embedded script]
  with following options (in that order)
  --confirm             Ask before running embedded script
  --noexec              Do not run embedded script
  --keep                Do not erase target directory after running the embedded script
  --nox11               Do not spawn an xterm
  --nochown             Do not give the extracted files to the current user
  --target NewDirectory Extract in NewDirectory
  --tar arg1 [arg2 ...] Access the contents of the archive through the tar command
  --                    Following arguments will be passed to the embedded script

 3) Environment:
  LOG_FILE              Installer messages will be logged to the specified file
4.2.2. Cloudera-based steps
Run the installer
Obtain the Live Hive Plugin installer from WANdisco. Open a terminal session on your WANdisco Fusion node and run the installer as follows:
-
Run the Live Hive Plugin installer on each host required:
# sudo ./live-hive-installer.sh kbd:[Enter] -
The installer will check for install the components necessary for completing the installation:
[user@docs-vm tmp]# sudo ./live-hive-installer.sh
Verifying archive integrity... All good.
Uncompressing WANdisco Live Hive.......................


    ::   ::  ::     #     #   ##    ####  ######   #   #####   #####   #####
   :::: :::: :::    #     #  #  #  ##  ## #     #  #  #     # #     # #     #
  ::::::::::: :::   #  #  # #    # #    # #     #  #  #       #       #     #
 ::::::::::::: :::  # # # # #    # #    # #     #  #   #####  #       #     #
  ::::::::::: :::   # # # # #    # #    # #     #  #        # #       #     #
   :::: :::: :::    ##   ##  #  ## #    # #     #  #  #     # #     # #     #
    ::   ::  ::     #     #   ## # #    # ######   #   #####   #####   #####


You are about to install WANdisco Live Hive version 1.0.0

Do you want to continue with the installation? (Y/n) y
  wd-live-hive-plugin-1.0.0.tar.gz ... Done
  live-hive-fusion-core-plugin-1.0.0-1079.noarch.rpm ... Done
  storing user packages in '/opt/wandisco/fusion-ui-server/ui-client-platform/downloads/core_plugins/live-hive' ... Done
  live-hive-ui-server-1.0.0-dist.tar.gz ... Done
	All requested components installed.
	Go to your WANDisco Fusion UI Server to complete configuration.
|
Installer options
View the Installer Options section for details on additional installer functions, including the ability to install selected components.
|
Configure the Live Hive Plugin
-
Open a session to your WANdisco Fusion UI. You will see message that confirms that the Live Hive Plugin has been detected. Click on plugins link to review the Plugins page.
 Figure 2. Live Hive Plugin Architecture
 -
The plugin Fusion Plugin for Live Hive now appears on the list. Click the button labelled Install Now.
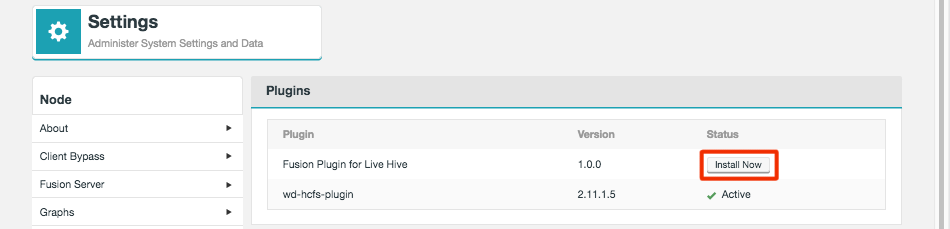 Figure 3. Live Hive Plugin Architecture
 -
The installation process runs through four steps that handle the placement of parcel files onto your Cloudera Manager server.
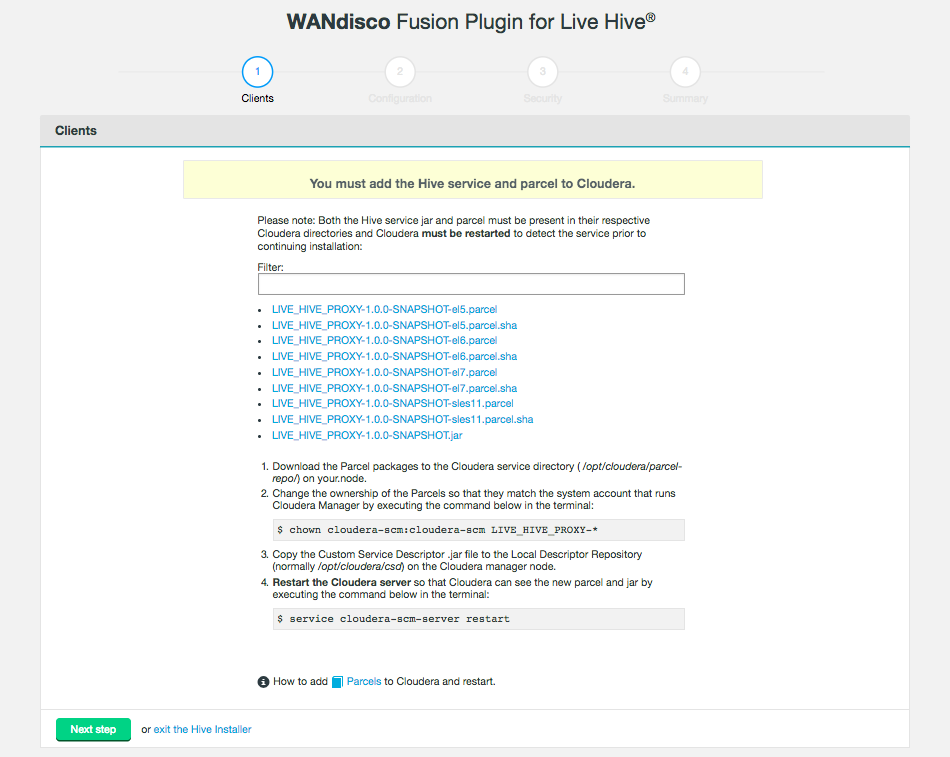 Figure 4. Live Hive Plugin Architecture
 -
The second installer screen handles Configuration. The first section validates existing configuration to ensure that Hive is set up correctly. Click the Validate button.
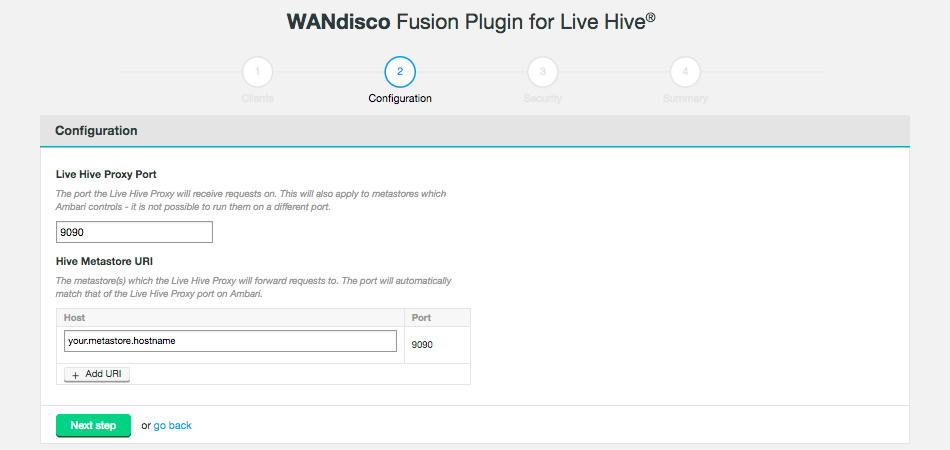 Figure 5. Live Hive Plugin installation - validation (Screen 2)
- Live Hive Proxy Port
-
The HTP port used by the Plugin. Default: 9090
- Hive Metastore URI
-
The metastore(s) which the Live Hive proxy will send requests to.
Add additional URIs by clicking the + Add URI button and entering additional URI / port information.
Note: If you add additional URIs, you must complete the necessary information or remove them. You cannot have an incomplete line.Click on Next step to continue.
-
Step 3 of the installation covers security. If you have not enabled Kerberos on your cluster, you will pass through this step without adding any additional configuration.
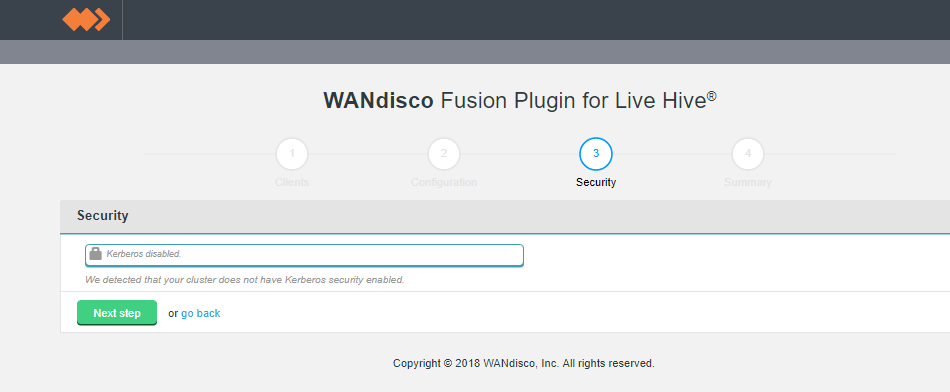 Figure 6. Live Hive Plugin installation - security disabled (Screen 3)
If you enable Kerberos, you will need to supply your Kerberos credentials.
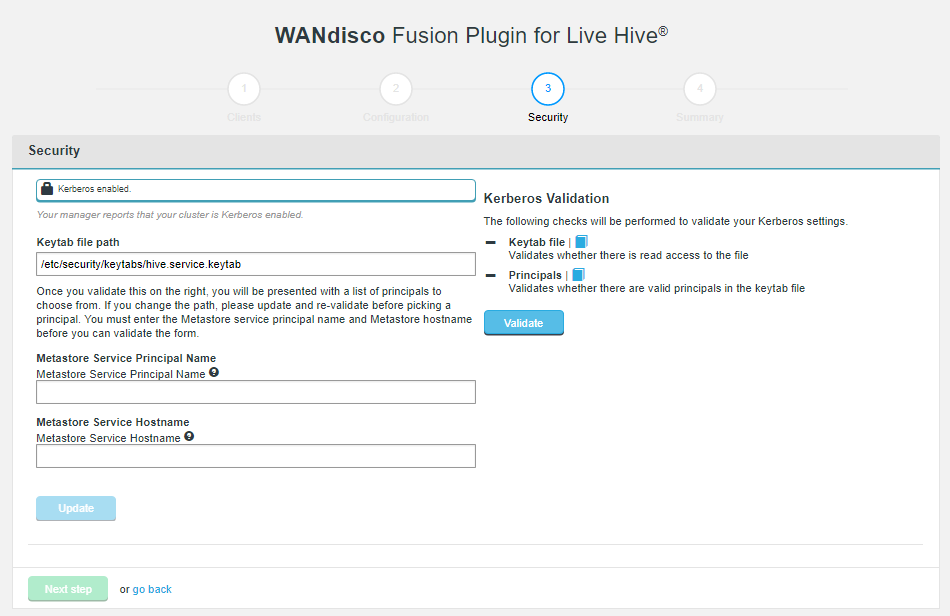 Figure 7. Live Hive Plugin installation - security enabled (Screen 3)
- Keytab file path
-
The installer now validates that there is read access to the keytab that you specify here.
- Metastore Service Principal Name
-
The installer validates where there are valid principals in the keytab.
- Metastore Service Hostname
-
Enter the hostname of your Hive Metastore service.
-
The final step is to complete the installation. Click Start Install.
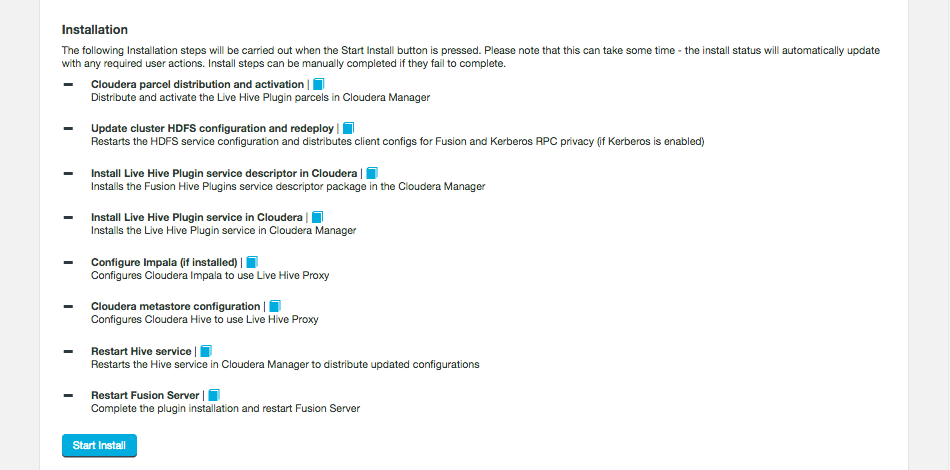 Figure 8. Live Hive Plugin installation summary - screen 4
The following steps are carried out:
- Cloudera parcel distribution and activation
-
Distribute and active the Fusion Hive Plugin parcels in Cloudera Manager
- Update cluster HDFS configuration and redeploy
-
Restarts the HDFS service configuration and distributes client configs for Fusion and Kerberos RPC privacy (if Kerberos is enabled)
- Install Fusion Hive Plugin service descriptor in Cloudera
-
Installs the Fusion Hive Plugin service in Cloudera Manager
- Configure Impala (if installed)
-
Configures Cloudera Impala to use Fusion Hive Plugin proxy
- Configure Hive
-
Configure Cloudera Hive to use Fusion Hive Plugin proxy
- Restart Hive service
-
Restarts the Hive service in Cloudera Manager to distribute update configurations
- Restart Fusion Server
-
Complete the plugin installation and restart Fusion Server
-
The installation will complete with a message "Live Hive installation complete!"
 Figure 9. Live Hive Plugin installation - Completion
Click Finish to close the Plugin installer screens.
Now advance to the Activation steps.
4.2.3. Ambari-based steps
Run the installer
Obtain the Live Hive Plugin installer from WANdisco. Open a terminal session on your WANdisco Fusion node and run the installer as follows:
-
Run the Live Hive Plugin installer on each host required:
# sudo ./live-hive-installer.sh kbd:[Enter] -
The installer will check for install the components necessary for completing the installation:
[user@docs-vm tmp]# sudo ./live-hive-installer.sh
Verifying archive integrity... All good.
Uncompressing WANdisco Live Hive.......................


    ::   ::  ::     #     #   ##    ####  ######   #   #####   #####   #####
   :::: :::: :::    #     #  #  #  ##  ## #     #  #  #     # #     # #     #
  ::::::::::: :::   #  #  # #    # #    # #     #  #  #       #       #     #
 ::::::::::::: :::  # # # # #    # #    # #     #  #   #####  #       #     #
  ::::::::::: :::   # # # # #    # #    # #     #  #        # #       #     #
   :::: :::: :::    ##   ##  #  ## #    # #     #  #  #     # #     # #     #
    ::   ::  ::     #     #   ## # #    # ######   #   #####   #####   #####


You are about to install WANdisco Live Hive version 1.0.0

Do you want to continue with the installation? (Y/n) y
  wd-live-hive-plugin-1.0.0.tar.gz ... Done
  live-hive-fusion-core-plugin-1.0.0.noarch.rpm ... Done
  storing user packages in '/opt/wandisco/fusion-ui-server/ui-client-platform/downloads/core_plugins/live-hive' ... Done
  live-hive-ui-server-1.0.0-dist.tar.gz ... Done
All requested components installed.
Go to your WANDisco Fusion UI Server to complete configuration.
Configure the Live Hive Plugin
-
Open a session to your WANdisco Fusion UI. You will see message that confirms that the Live Hive Plugin has been detected. Click on Plugins link to review the Plugins page.
Figure 10. Live Hive Plugin Architecture -
The plugin live-hive-plugin now appears on the list. Click the button labelled Install Now.
Figure 11. Live Hive Plugin Parcel installation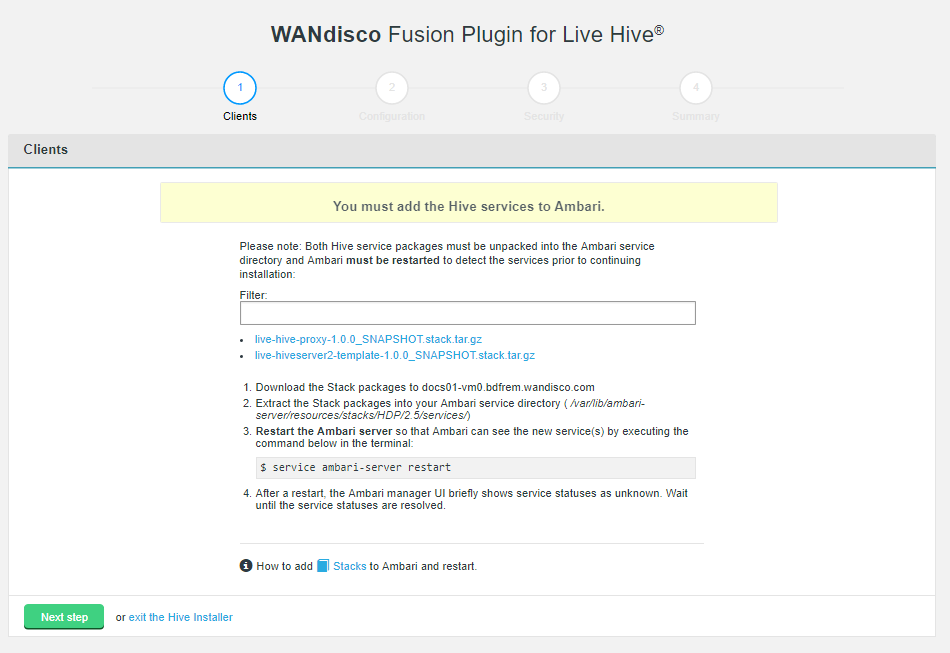 Figure 12. Live Hive Plugin installation - Clients (Screen1)Stacks
Stacks need to be placed in the correct directory to make them available to the manager. To do this:
-
Download the service from the installer client download panel
-
The services are gz files that will expand to the directories /LIVE_HIVE_PROXY and /LIVE_HIVESERVER2_TEMPLATE.
-
For HDP, place this directory in /var/lib/ambari-server/resources/stacks/HDP/<version>/services.
-
Restart the Ambari server.
Note If using centos6/rhel6 we recommend using the following command to restart:initctl restart ambari-server
-
Check on your Ambari manager that the services are present.
 Figure 13. Stacks present
-
-
The second installer screen handles Configuration.
Figure 14. Live Hive Plugin installation - validation (Screen 2)- Live Hive Proxy Port
-
The HTP port used by the Plugin. Default: 9090
- Hive Metastore URI
-
The metastore(s) which the Live Hive proxy will send requests to.
Add additional URIs by clicking the + Add URI button and entering additional URI / port information. Note: If you add additional URIs, you must complete the necessary information or remove them. You cannot have an incomplete line.Click on Next step to continue.
-
Step 3 of the installation covers security. If you have not enabled Kerberos on your cluster, you will pass through this step without adding any additional configuration.
Figure 15. Live Hive Plugin installation - security disabled (Screen 3)If you enable Kerberos, you will need to supply your Kerberos credentials.
 Figure 16. Live Hive Plugin installation - security enabled (Screen 3)
- Hive Proxy Kerberos
-
- Hive Proxy Keytab file path
-
The installer now validates that there is read access to the keytab that you specify here.
- Hive Proxy Principal
-
The installer validates whether there are valid principals in the keytab.
- Metastore Service Kerberos
-
- Metastore Service Hostname
-
The hostname used by the Hive Proxy to connect to the Hive metastore.
- Metastore Service Privileged User Name
-
The username of the meta service who is privileged to access the KDC server.
- KDC Credentials
-
- KDC admin principal
-
Admin principal of your KDC, required by Ambari in order to deploy keytabs for the Live Hive Proxy.
- Password
-
The password associated with the KDC admin principal.
-
The final step is to complete the installation. Click Start Install.
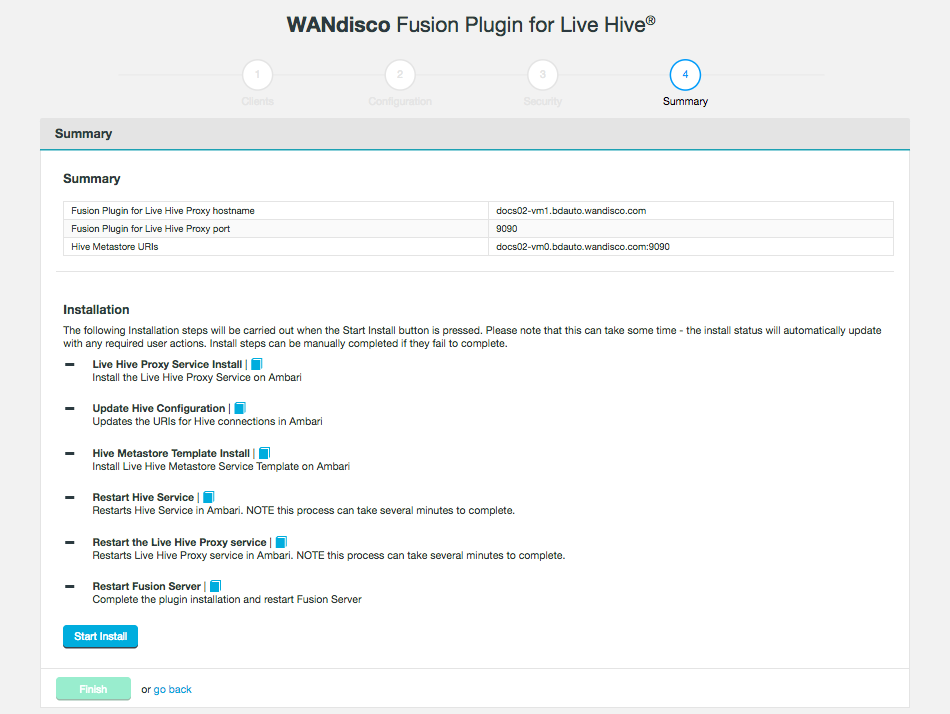 Figure 17. Live Hive Plugin installation summary - screen 4
The following steps are carried out:
- Live Hive Proxy Service Install
-
Install the Live Hive Proxy Service on Ambari.
- Update Hive Configuration
-
Updates the URIs for Hive connections in Ambari.
- Hive Metastore Template Install
-
Install Live Hive Metastore Service Template on Ambari.
- Restart Hive Service
-
Restarts Hive Service in Ambari. NOTE this process can take several minutes to complete.
- Restart Live Hive Proxy Service
-
Restarts Live Hive Proxy Service in Ambari, Note this process can take several minutes to complete.
- Restart Fusion Server
-
Complete the plugin installation and restart Fusion Server.
-
The installation will complete with a message "Live Hive installation complete"
Figure 18. Live Hive Plugin installation - CompletionClick Finish to close the Plugin installer screens. You must now activate the plugin.
4.2.4. Activate Live Hive Plugin
After completing the installation you will need to active Live Hive Plugin before you can use it. Use the following steps to complete the plugin activation.
-
Log into the WANdisco Fusion UI. On the Settings tab, go to the Live Hive link on the side menu. The Live Hive Plugin Activation screen will appear.
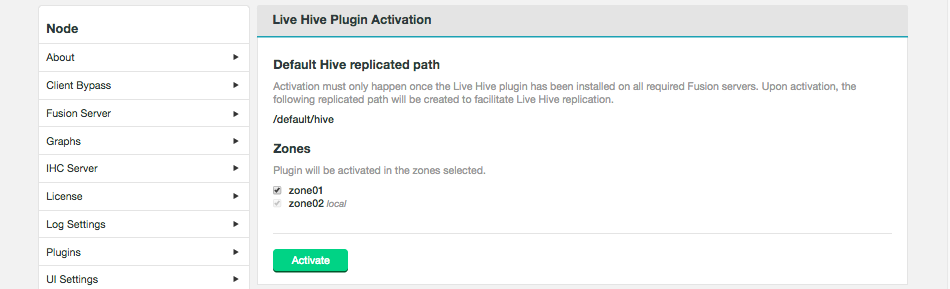 Figure 19. Live Hive Plugin activation - StartEnsure that your clusters have been inducted before activating.The plugin will not work if you activate before completing the induction of all applicable zones.
Tick the checkboxes that correspond with the zones that you will to replicate Hive metadata between, then click Activate.
-
A message will appear at the bottom of the screen that confirms that the plugin is active.
 Figure 20. Live Hive Plugin activation - Completion
The plugin is active and cannot be modified.
4.3. Validation
Once an installation is completed you should verify that hive metadata replication is working as expected, before entering into a production phase.
4.4. Upgrade
Fusion Plugin for Live Hive is upgraded is completed by uninstalling the plugin on all nodes, followed by a re-installation, using the standard installation steps for your platform type.
4.5. Uninstallation
Use the following section to guide the removal.
|
WARNING
Ensure that you contact WANdisco support before running this procedure. The following procedures currently require a lot of manual editing and should not be used without calling upon WANdisco’s support team for assistance.
|
4.5.1. Service removal
If removing Live Hive from a live cluster (rather than just removing Live Hive from a fusion server for re-installation / troubleshooting purposes) the following steps should be performed before removing the plugin:
-
Remove or reset to default the amended
hive.metastore.urisparameter in the Hive service config (either in Ambari or Cloudera Manager) that is currently pointing at the Live Hive Proxy. -
Restart the cluster to deploy the changed config. No Hive clients will now be replicating to the proxy.
-
Stop and delete the proxy service. On Cloudera, deactivate the
LIVE_HIVE_PROXYparcel.
4.5.2. Package removal
Currently there is no programatic method for removing components although you can use the following commands to delete the plugin components, one at a time:
-
Remove any replicated paths related to plugin (i.e. auto-generated paths for tables), and default/hive. You may need to use the REST API to complete this. See Remove a directory from replication.
-
Check for tasks, wait 2 hours, check again. If the /tasks directory is now empty on ALL nodes, proceed with the following:
-
Stop Fusion Plugin for Live Hive, e.g.
[user@docs01-vm1 ~]# service fusion-ui-server stop service fusion-server stop -
Remove installation components with the following commands,
yum remove -y live-hive-fusion-core-plugin.noarch
rm -rf /opt/wandisco/fusion-ui-server/ui-client-platform/downloads/core_plugins/live-hive/
rm -rf /opt/wandisco/fusion-ui-server/ui-client-platform/plugins/wd-live-hive-plugin/
rm -rf /opt/wandisco/fusion-ui-server/plugins/live-hive-ui-server-1.0.0-SNAPSHOT/
sed -i '/LiveHive/d' /opt/wandisco/fusion-ui-server/properties/ui.properties
-
Now restart, e.g.
[user@docs01-vm1 ~]# service fusion-server start
[user@docs01-vm1 ~]# service fusion-ui-server start
The servers will come back, still inducted and with non-hive replication folders still in place.
4.6. Installation Troubleshooting
This section covers any additional settings or steps that you may need to take in order to successfully complete an installation.
4.6.1. Ensure hadoop.proxyuser.hive.hosts is properly configured
The following Hadoop property needs to be checked, when running with the Live Hive plugin. While the settings apply specifically to HDP/Ambari, it may also be necessary to check the property for Cloudera deployments.
Configuration placed in core-site.xml
<property>
  <name>hadoop.proxyuser.hive.hosts</name>
  <value>host1.domain.com,host-live-hive-proxy.organisation.com,host2.domain.com </value>
  <description>
     Hostname from where superuser hive can connect. This
     is required only when installing hive on the cluster.
  </description>
</property>
Proxyuser property
- name
-
Hive hostname from which the superuser "hive" can connect.
- value
-
Either a comma-separated list of your nodes or a wildcard. The hostnames should be included for Hiveserver2, Metastore hosts and LiveHive proxy.
Some cluster changes can modify this property
There are a number of changes that can be made to a cluster that might impact configuration, e.g.
-
adding a new Ambari component
-
adding an additional instance of a component
-
adding a new service using the Add Service wizard
These additions can result in unexpected configuration changes, based on installed components, available resources or configuration changes. Common changes might include (but are not limited to) changes to Heap setting or changes that impact security parameters, such as the proxyuser values.
| Systems changes to properties such as hadoop.proxyuser.hive.hosts, should be made with great care. If the configuration is not present, impersonation will not be allowed and connection will fail. |
Handling configuration changes
If any of the changes, listed in the previous section trigger a system change recommendation, there are two options:
-
A checkbox (selected by default) allowing you to say Ambari should apply the recommendation. You can uncheck this (or use the bulk uncheck at the top) for these.
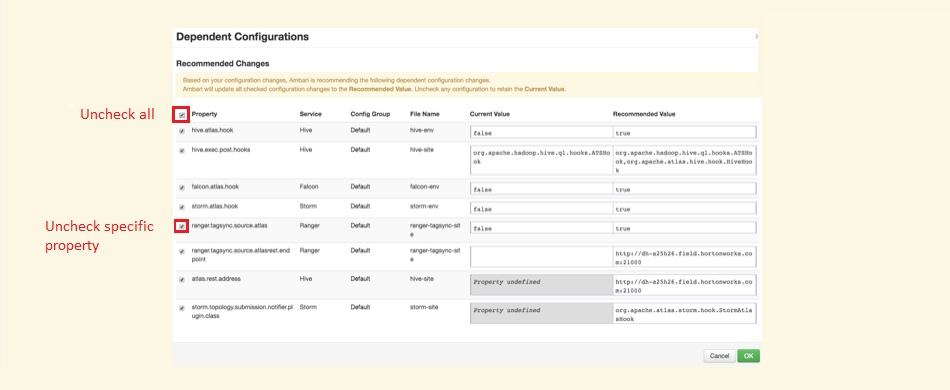 Figure 21. Stopping a system change from altering hadoop.proxyuser.hive.hosts
 -
Manually adjust the recommended value yourself, as you can specify additional properties that Ambari may not be aware of.
The Proxyuser property values should include hostnames for Hiveserver2, Metastore hosts and LiveHive proxy. Accepting recommendations that do not contain this (or the alternative all encompassing wildcard *), will more than likely result in service loss for Hive.
5. Operation
5.1. Configuration
The configuration section covers the essential steps that you need to take to start replicating Hive metadata.
5.1.1. Setting up Hive Metadata Replication
This section covers those steps that are required for replicating Hive Metadata between zones.
| Live Hive Plugin can only replicate transactional data, it isn’t intended to sync large blocks of existing data. |
Create Regex rule for Hive database.
Before you can set up a regular expression-based replication, you must create a Hive Regex rule.
-
Go to the Live Hive Plugin UI and click on Replication tab.
 Figure 22. Live Hive Plugin Replication
 -
Click on Create.
 Figure 23. Live Hive Plugin Replication
 -
From the Type dropdown, select Hive Regex.
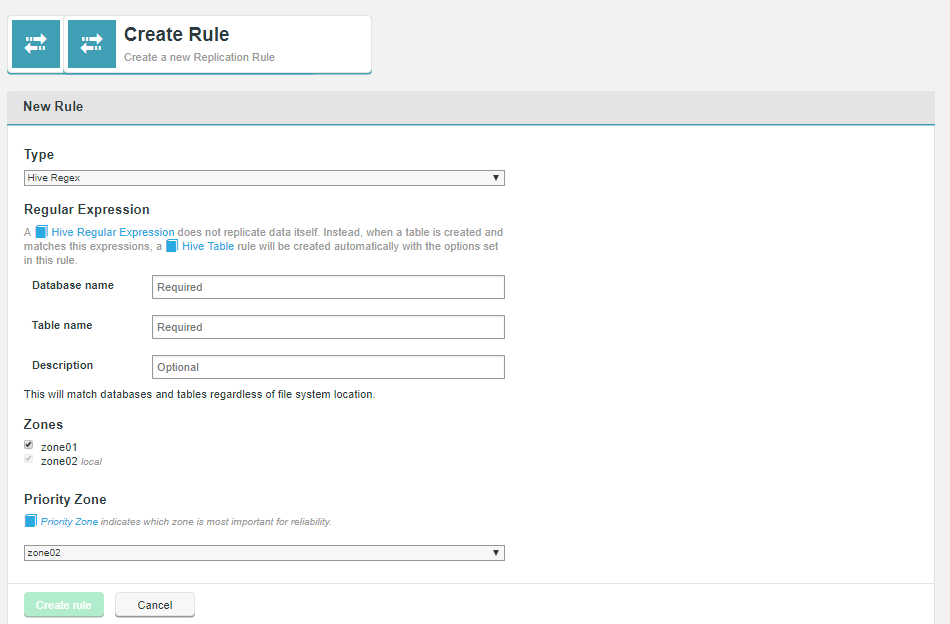 Figure 24. Live Hive Plugin activation - Completion
 -
Enter the criteria for the regular expression pattern that will be used to identify which metadata will be replicated between nodes.
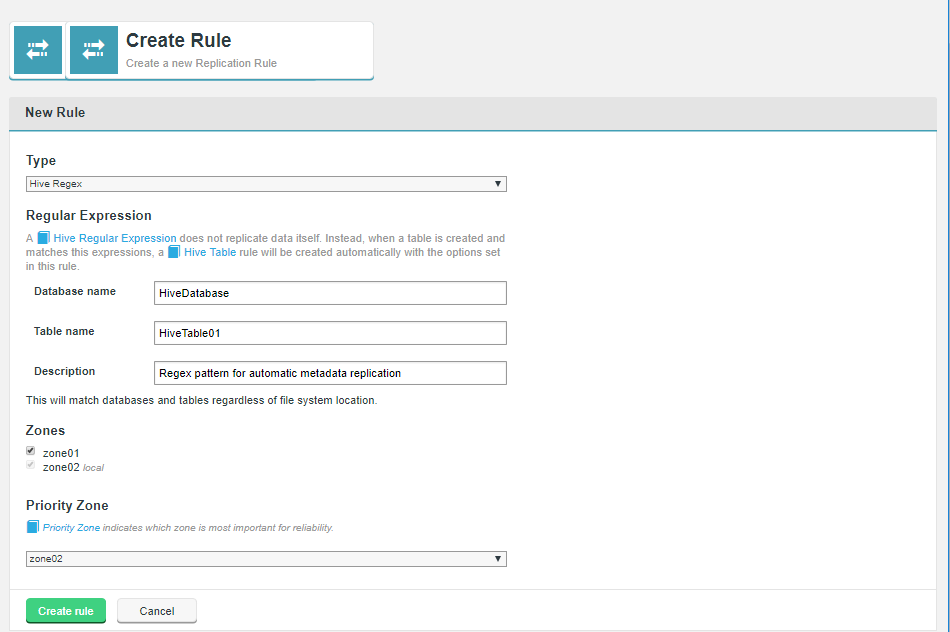 Figure 25. Live Hive Plugin activation - Completion
Regular Expression
The regular expression type rule sets a pattern that Live Hive Plugin compares against new Hive tables. When a new table matches the pattern set in the regular expression, Live Hive- Database
-
Name of a Hive database.
- Table name
-
Name of a table in the above database.
- Description
-
A description that will help identify or distinguish the replication rule.
- Zones
-
The zones between which the rule will be applied.
- Priority Zone
-
Sets the zone which is most important in terms of reliability.
Click Create to apply the rule.
-
Once created, Hive data that matches the regular expression will automatically have a replication rule created.
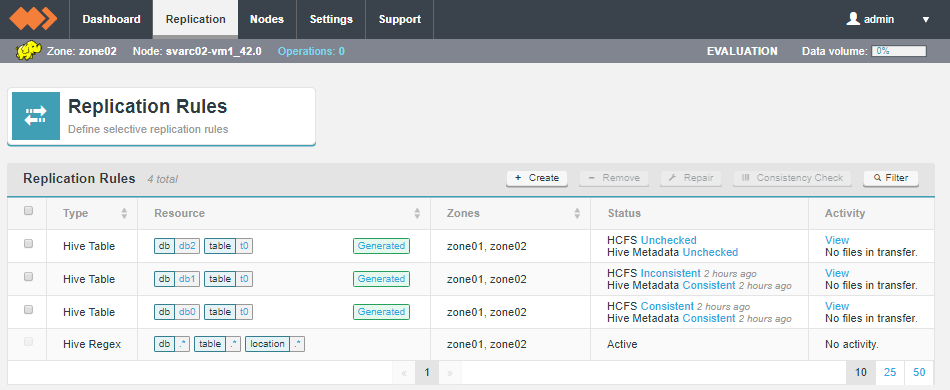 Figure 26. Automatically generated replication rules
5.1.2. Hive table rule
Hive tables are tracked on the Replication Rules screen, along with Hive Regex rules and Hadoop compatible File System HCFS resources.

5.1.3. Hive table
Hive table rules are generated automatically when regex table rules are applied.
Hive table rule
Replication Rules
- Type
-
Rule types, either Hive Table or Hive Regex
- Resource
-
The elements that the replication rule will be applied to. Note that for Hive Table data a "Generated" label will appear because the rule has generated by a Live Hive Regex rule when a new table that is created in Hive matches the Regex. The "Generated" tag links to the Regex which generated the Table rule.
- Zones
-
The Zones in which the replication rule will be applied.
- Status
-
Indicates the state of file system consistency of the noted resources between the zones,
- Activity
-
Identifies any current activity in terms of data transfer.
Replicated Hive table data appear on the Replication Rules table. Click on the Database or table name to view the details of the Hive element. Click on the Generated to see the Hive Regex that generated this Hive Table rule.

Regular Expression
A Hive Regular Expression does not replicate data itself. Instead, when a table is created and matches this expressions, a Hive Table rule will be created automatically with the options set in this rule.
- Database name
-
A name of a Hive databases that will be matched the databases that exist in your Hive deployment.
- Table name
-
The name of a table that stored in the above database that you intend to replicate.
- File system location
-
The location of the data in the local file system.
|
File system location is currently fixed
In Live Hive 1.0 the File system location is locked to the wildcard .* This value ensures that the file system location is always found. In a future release the File system location will be opened up for the user to edit. |
- Description
-
A description that you provide during the setup of the regex rule.
- Zones
-
A list of the zones that take part in the replication of this resource.
| In Live Hive 1.0, it’s not possible to change the zones of an existing rule. |
Generated by
Clicking on the Generated label in the Replicated Rules table will display the replication rules table with a pre-defined filter that only shows the Hive Table rules created by this Hive Regex.
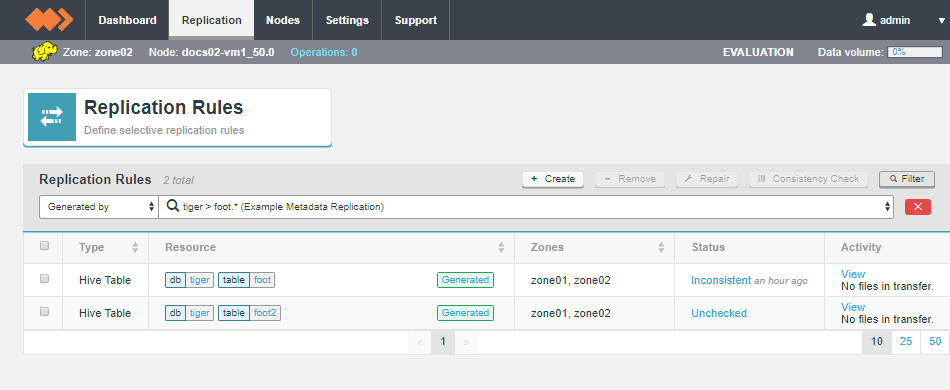
The resulting table filters those rules that are generated by the regex rule. The top bar provides a drop-down that lets you select Generated by.
5.1.4. Running a consistency Checks
Live Hive Plugin provides a tool for checking that replica metadata is consistent between zones. Consistency is checked on a dedicated Hive Metadata Consistency tab.
|
When to complete a consistency check?
|
To complete a check:
-
Click on the Replication tab.
 Figure 31. Live Hive Plugin Consistency Check 1
 -
Click on the status of the applicable Replication Rule. In this example, an unchecked Hive Table rule.
 Figure 32. Live Hive Plugin Consistency Check 2
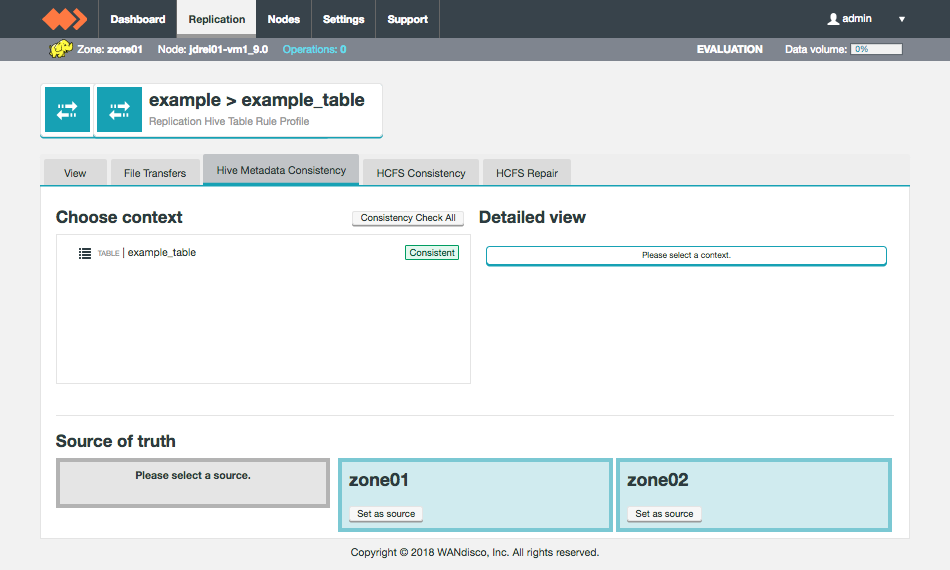
 -
The Hive Metadata Consistency tab will appear. Click on a context to check, in this case table0 (1.), then click on the Consistency CHeck (2.) button for the context. Alternatively, you can select the Consistency Check All button to start a check on all listed contexts.
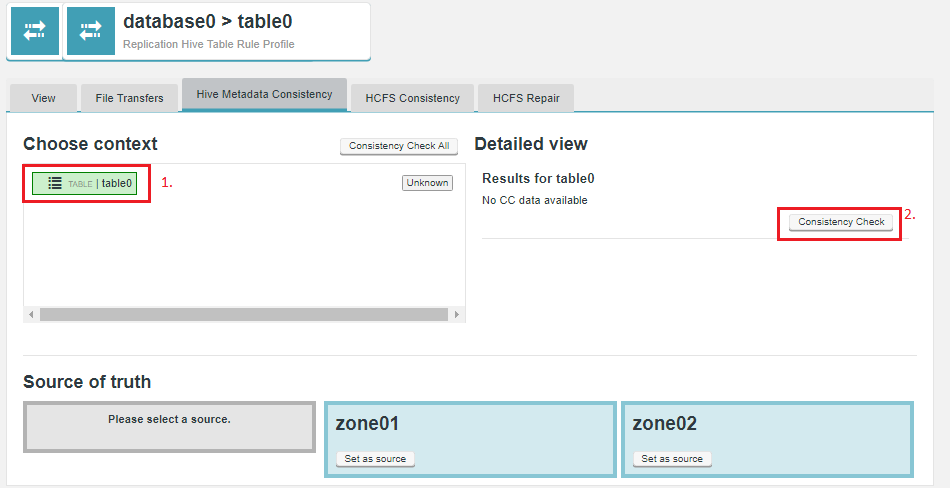 Figure 33. Live Hive Plugin Consistency Check 1
 -
In the Detailed view panel, the results of the check will appear. In this case, the table data is not present in one of the zones.
 Figure 34. Live Hive Plugin Consistency Check 1
5.1.5. Running a repair
In the event that metadata is found to be inconsistent, you can use the repair function to fix the issue.
-
Identify the nature of the inconsistency from the Detailed View panel. Select the zone that contains the correct version of the metadata, then select what actions you want the repair tool to take.
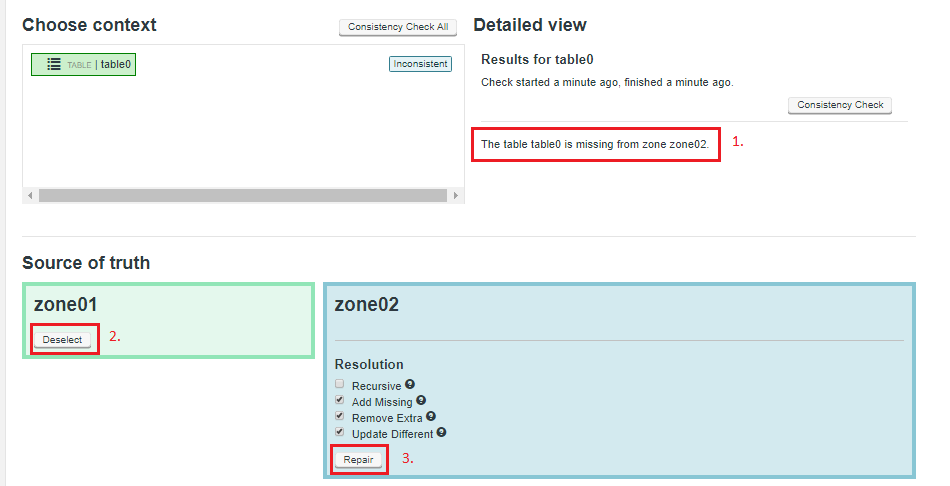 Figure 35. Live Hive Plugin Repair 1
- Recursive
-
If checkbox is ticked, this option will cause the path and all files under it to be made consistent. The default is true, but is ignored if the path represents a file.
- Add Missing
-
Tick to copy data if missing from a zone.
- Remove Extra
-
Should the zone under repair have extra files that are not present on the "Source of truth" zone, then those extra files are removed. Use this option to ensure that zones are in an identical state, rather than simply copying over missing files.
- Update Different
-
Updates files if they are different.
Click Repair
-
You will get a report "Repair successfully triggered". Click on Close.
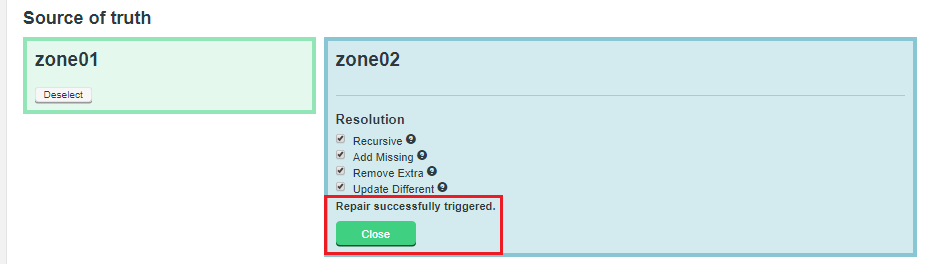 Figure 36. Live Hive Plugin Repair 2
 -
To check if the repair has been successful, re-run the Consistency Check and review the status.
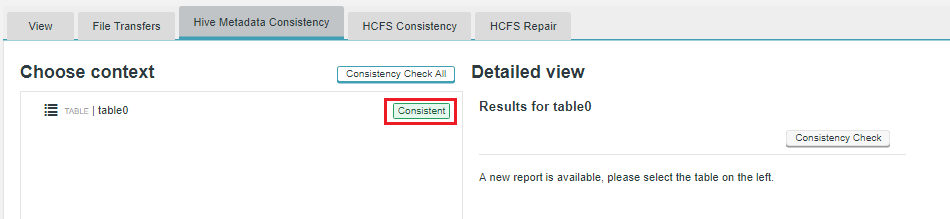 Figure 37. Live Hive Plugin Repair 3
5.2. Troubleshooting
The following tips should help you to understand any issues you might experience with Live Hive Plugin operation:
5.2.1. Check the Release notes
Make sure that you check the latest release notes, which may include references to known issues that could impact Live Hive Plugin.
5.2.2. Check log Files
Observe information in the log files, generated for the WANdisco Fusion server and the Fusion Plugin for Live Hive to troubleshoot issues at runtime. Exceptions or log entries with a SEVERE label may represent information that can assist in determining the cause of any problem.
As a distributed system, Fusion Plugin for Live Hive will be impacted by the operation of the underlying Hive database with which it communicates. You may also find it useful to review log or other information from these endpoints.
6. Reference Guide
6.1. API
Fusion Plugin for Live Hive offers increased control and flexibility through a RESTful (REpresentational State Transfer) API.
Below are listed some example calls that you can use to guide the construction of your own scripts and API driven interactions.
|
API documentation is still in development:
Note that this API documentation continues to be developed. Contact our support team if you have any questions about the available implementation.
|
Note the following:
-
All calls use the base URI:
http(s)://<server-host>:8082/plugin/hive/hiveRegex/<RESOURCE>
-
The internet media type of the data supported by the web service is application/xml.
-
The API is hypertext driven, using the following HTTP methods:
| Type | Action |
|---|---|
POST |
Create a resource on the server |
GET |
Retrieve a resource from the server |
PUT |
Modify the state of a resource |
DELETE |
Remove a resource |
6.1.1. Unsupported operations
As part of Fusion’s replication system, we capture and replicate some "write" operations to an underlying DistributedFileSystem/FileSystem API.
However, the truncate command is not currently supported.
Do not run this command as your Hive metadata will become inconsistent between clusters.
6.1.2. Example WADL output
You can query the API using the following string:
http://example-livehive-node.domain.com:8082/fusion/application.wadl
<application xmlns="http://wadl.dev.java.net/2009/02">
<doc xmlns:jersey="http://jersey.java.net/" jersey:generatedBy="Jersey: 2.25.1 2017-01-19 16:23:50"/>
<doc xmlns:jersey="http://jersey.java.net/" jersey:hint="This is full WADL including extended resources. To get simplified WADL with users resources only do not use the query parameter detail. Link: http://example-livehive-node.domain.com:8082/fusion/application.wadl"/>;
<grammars>
<include href="application.wadl/xsd0.xsd">
<doc title="Generated" xml:lang="en"/>
</include>
</grammars>
<resources base="http://cbark01-vm1.bdauto.wandisco.com:8082/fusion/">
<resource path="/location">
<resource path="{locationIdentity}">...</resource>
<resource path="{locationIdentity}/attributes">...</resource>
<resource path="{locationIdentity}/nodes">...</resource>
<resource path="{locationIdentity}/startIgnoring/{ignoreLocationIdentity}">
<param xmlns:xs="http://www.w3.org/2001/XMLSchema" name="ignoreLocationIdentity" style="template" type="xs:string"/>
<param xmlns:xs="http://www.w3.org/2001/XMLSchema" name="locationIdentity" style="template" type="xs:string"/>
<method id="startIgnoringLocation" name="PUT">...</method>
<method id="apply" name="OPTIONS">...</method>
<method id="apply" name="OPTIONS">...</method>
<method id="apply" name="OPTIONS">...</method>
</resource>
</resource>
<resource path="/zones">...</resource>
<resource path="/replicationGroup">...</resource>
<resource path="/plugins">...</resource>
<resource path="/monitor">...</resource>
<resource path="/configuration">...</resource>
<resource path="/logging">...</resource>
<resource path="/">...</resource>
<resource path="/locations">...</resource>
<resource path="/zone">...</resource>
<resource path="/license">...</resource>
<resource path="/statemachines">...</resource>
<resource path="/nodes">...</resource>
<resource path="/node">...</resource>
<resource path="/task">...</resource>
<resource path="/tasks">...</resource>
<resource path="/replicationGroups">...</resource>
<resource path="/fs">...</resource>
<resource path="/memberships">...</resource>
<resource path="/membership">...</resource>
<resource path="/statemachine">...</resource>
<resource path="/monitors">...</resource>
<resource path="application.wadl">...</resource>
</resources>
</application>
6.1.3. Example REST calls
The following examples illustrate some simple use cases, most are direct calls through a web browser, although for deeper or interactive examples, a curl client may be used.
Optional query params
?dbName= &tableName= &path=
GET /hiveRegex/{hiveRegexRuleId}  > returns a HiveReplicationRuleDTO >
@XmlRootElement(name = "hiveRule")
`@XmlType(propOrder =`
Permitted value
-
private String dbNamePattern = "";
-
private String tableNamePattern = "";
-
private String tableLocationPattern = "";
-
private String membershipIdentity = "";
-
private String ruleIdentity;
-
private String description = "";
List Hive Replicateion Rule DTO
GET /hiveRegex/ > HiveReplicationRulesListDTO
-
(all known rules) list of HiveReplicationRuleDTO (see below for format)
PUT /hiveRegex/addHiveRule/ PAYLOAD HiveReplicationRuleDTO >
{dbNamePattern:'mbdb.*', tableNamePattern:'tabl.*', tableLocationPattern:'.*', membershipIdentity:'824ce758-641c-46d6-9c7d-d2257496734d', ruleIdentity:'6a61c98b-eaea-4275-bf81-0f82b4adaaef', description:'mydbrule'}
GET /hiveRegex/active/ >
-
Returns HiveReplicationRulesListDTO of all ACTIVE hiveRegex rules
GET /hiveReplicatedDirectories > HiveReplicatedDirectoresDTOList<HiveReplicatedDirectoryDTO> :
-
Will get all HCFS replicated dirs that were created via a hive regex rule automatically upon table creation Returns JSON in format:
{"hiveReplicatedDirectoryDTOList":[{"rd":"ReplicatedDirectoryDTO","propertiesDTO":{"properties":"Map<String, String>"},"consistencyTaskId":"str","consistencyStatus":"str","lastConsistencyCheck":0,"consistencyPending":true}]}
GET /hiveReplicatedDirectories/{regexRuleId} >
-
Returns same as above but returns only directories created via a given regex Rule Id as a path parameter.
GET /hiveReplicatedDirectories/path?path=/some/location >
-
Returns same as above again but this time with query param of the path of the HCFS location.
Consistency Checks
Perform a consistency check on the database specified. The response will contain the location of the Platform task that is coordinating the consistency check. This task will exist on all nodes in the membership and at completion each task will be in the same state. The {@code taskIdentity} can be used to view the consistency check report using the {@code /hive/consistencyCheck/{taskIdentity} API.
Start a Consistency Check on a particular Hive Database and Table:
POST /plugin/hive/consistencyCheck?dbName=test_db&tableName=test_table1&simpleCheck=true
-
Both
tableNameandsimpleCheckare optional query parameters and if omitted will default totableName=""andsimpleCheck=true
Get the Consistency Check report for a Consistency Check task previously requested by the API above
GET /plugin/hive/consistencyCheck/{taskid}?withDiffs=true
-
The
withDiffsquery parameter is optional and defaults to false if not suppled.
Get part of the consistency check report depending on the query parameters set
GET /plugin/hive/consistencyCheck/{taskId}/diffs?pageSize=10&page=0&dbName=test_db&tableName=test_table&partitions=true&indexes=true
-
Returns part of the diff from the consistency check. The hierarchy is: dbName / tableName / one of [partitions=true or indexes=true].
- dbname
-
Name of the database to check.
- tableName
-
Name of the database table to check, the default of " " will check all tables. If specified then either partitions or indexes must be specified.
- pageSize
-
Optional. Will default to pageSize = 2,147,483,647
- page
-
Optional. Will default to page=0.
Repair
Start to repair the specified database and table.
PUT /plugin/hive/repair?truthZone=zone1&dbName=test_db&tableName=test_table&partName=testPart&indexName=test_index]&recursive=true&addMissing=true&removeExtra=true&updateDifferent=true&simpleCheck=true
- truthZone (required)
-
Zone which is the source of truth.
- dbName (required)
-
Database to repair in. Note, this database has to exist on zone where this API call is done.
- tableName (optional)
- partName (optional)
- indexName (optional)
- recursive (optional)
-
Defaults to false.
- addMissing (optional)
-
Defaults to true. If true, the objects, which are missing will be created.
- removeExtra (optional)
-
Defaults to true. If true, the objects, which don’t exist in truthZone will be removed.
- updateDifferent (optional)
-
Defaults to true. If true, the objects which are different will be fixed.
- simpleCheck (optional)
-
Defaults to true. If true then the repair operation will only involve a simple check and not include any extended parameters of the objects being repaired.