1. Introduction
1.1. Welcome
This quickstart guide will run you through an installation of WANdisco Fusion to enable you to replicate on-premises data over to an Amazon S3 object store.
This guide first describes how to connect WANdisco Fusion with your Amazon S3 object store. However if you need to install WANdisco Fusion on your on-premises cluster first, follow the steps in section 3 and then return to section 2. You can then continue with the demonstration section.
The aim of this guide is to get you up-and-running as quickly and simply as possible so many details, such as the pre-requisites for running Fusion, and more advanced configurations are not provided here.
|
WANdisco Fusion User Guide
This quickstart guide is meant to be brief.
If you get stuck or want to know more about something, you can get much more information from WANdisco Fusion’s online User Guide.
|
1.2. What is WANdisco Fusion?
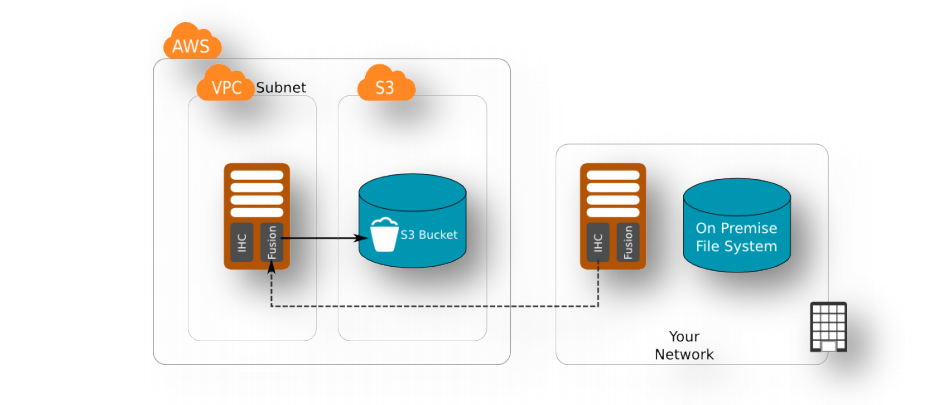
The WANdisco Fusion is a software application that enables organizations to seamlessly replicate their data between File Systems, Object Storage (e.g. S3, WASB) and Hadoop distributions.
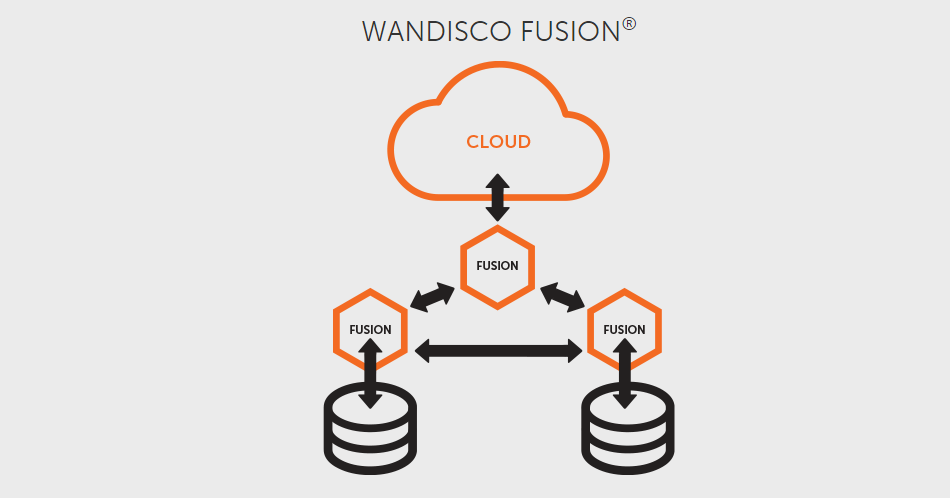
WANdisco Fusion runs as a proxy server on each cluster. Users and applications connect to Fusion instead of directly to HDFS using the standard HDFS URI. It’s non-invasive, requires no modifications to Hadoop source code and can easily be turned on or off. Multiple Fusion servers can be deployed with each cluster for added resilience.
For more information about the WANdisco Fusion platform visit WANdisco’s website - www.wandisco.com.
2. Connect WANdisco Fusion with your Amazon S3 object store
2.1. Getting WANdisco Fusion in the AWS marketplace
-
Login to your AWS account and navigate to the awsmarketplace. Locate the WANdisco’s Fusion products. For the purpose of this guide we’ll deploy the WANdisco Fusion - BYOL, search for WANdisco using the search field.
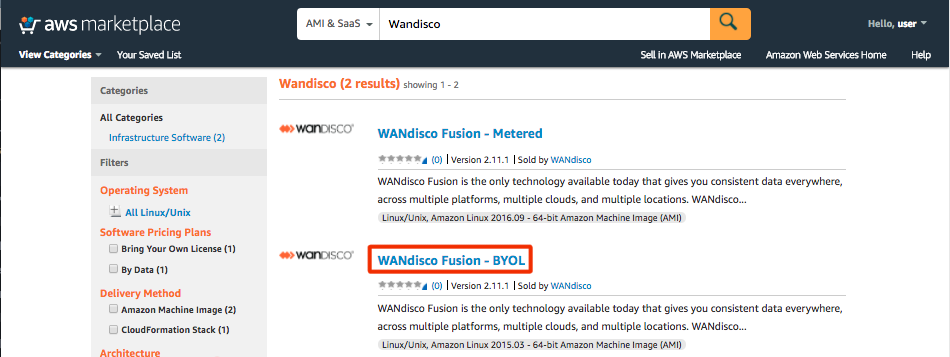 Ensure that you download the appropriate versionThe BYOL (Bring Your Own License) version requires that you purchase a license, separately, from WANdisco.
 -
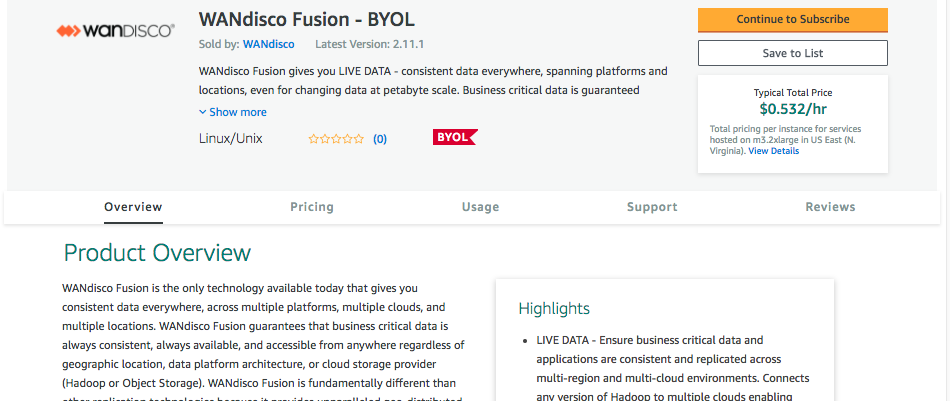
You can review the product details on the product page. Click Continue to Subscribe to begin.
-
Now click Usage instructions.
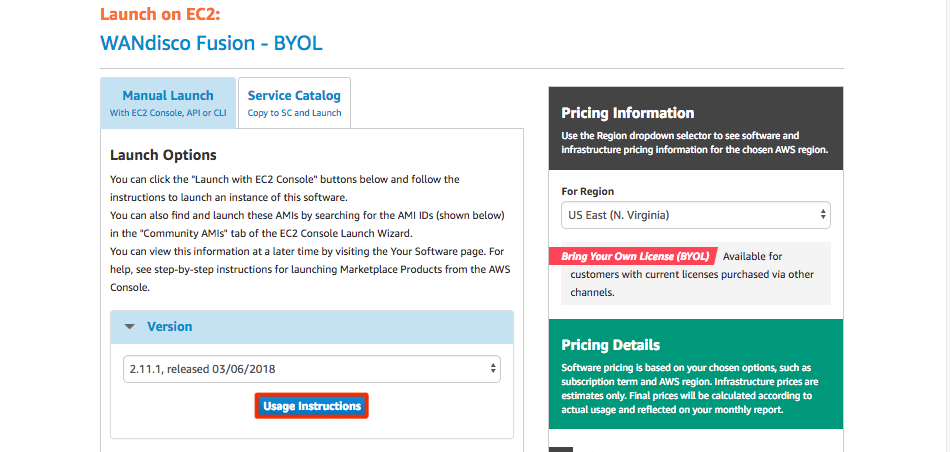 You must accept the terms for your specific version of FusionIf you try to start a CFT without first clicking the Accept Terms button you will get an error and the CFT will fail. If this happens, go to the Amazon Marketplace, search for the Fusion download screen that correspond with the version that you are deploying, run through the screen until you have clicked the Accept Terms button. You can then successfully run the CFT.
|
Networking Guide
In support of this quickstart guide, we’ve included in the appendix a more detailed guide to getting the necessary networking configuration in
place on your AWS platform, so that traffic can run between your cloud and on-premises systems.See Networking Guide for WANdisco Fusion S3 |
2.2. Launching the Cloud Formation Template (CFT)
It’s now time to enter configuration for the Cloud Formation Template. Once completed, an EC2 instance will launch and automatically connect to your on-premises Fusion installation.
The CFT can be found here.
-
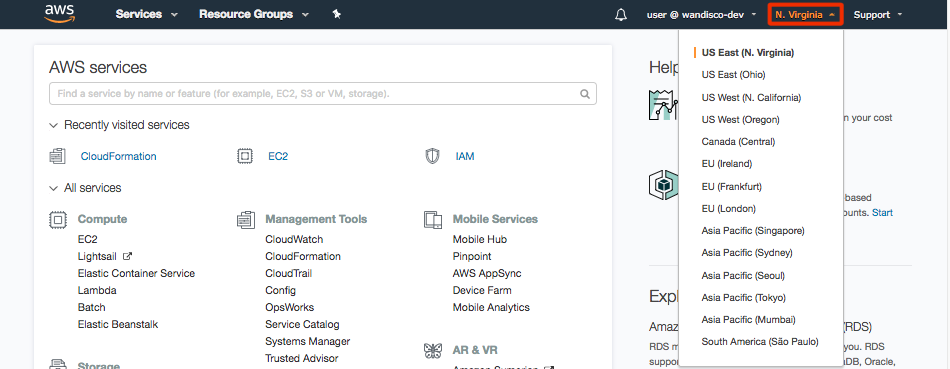
Open up the AWS console and select the same region as your S3 bucket is in.
-
Then under Service choose Cloud Formation.
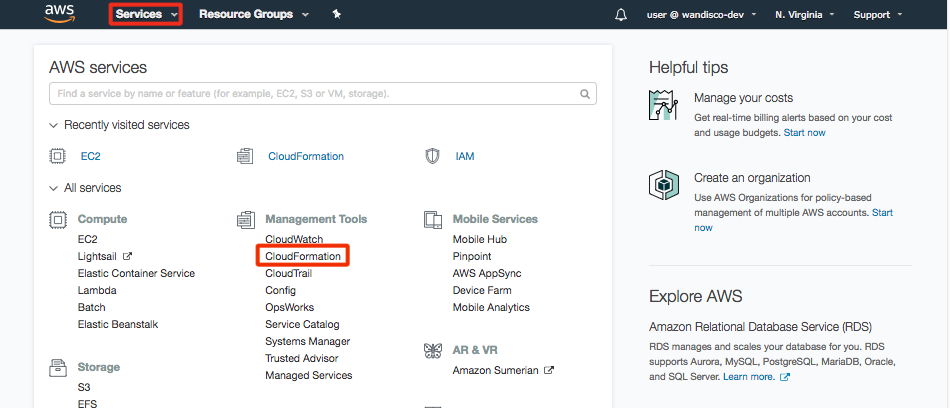 Service - Cloud Formation
 -
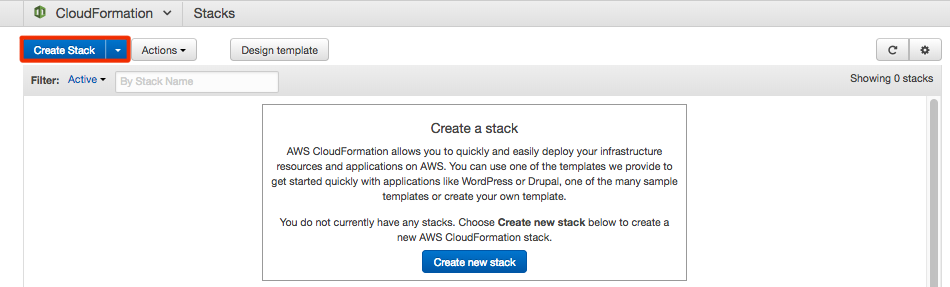
Click Create Stack. If you already have stacks created they will be listed here.
-
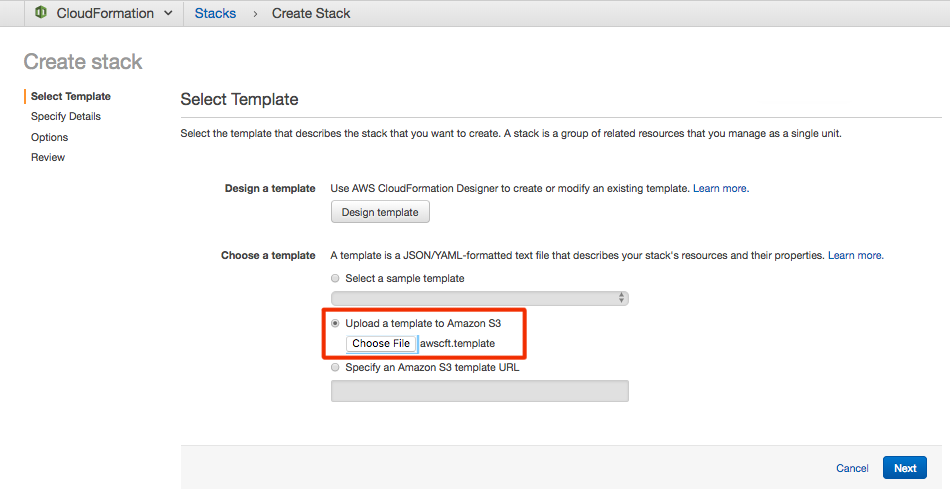
If you are installing from the AWS Market place this section will be pre-filled. If you are using the CFT directly then upload your CFT for WANdisco Fusion. Click Next.
-
On the Specify Details screen, you need to provide key configuration for AWS and WANdisco Fusion.
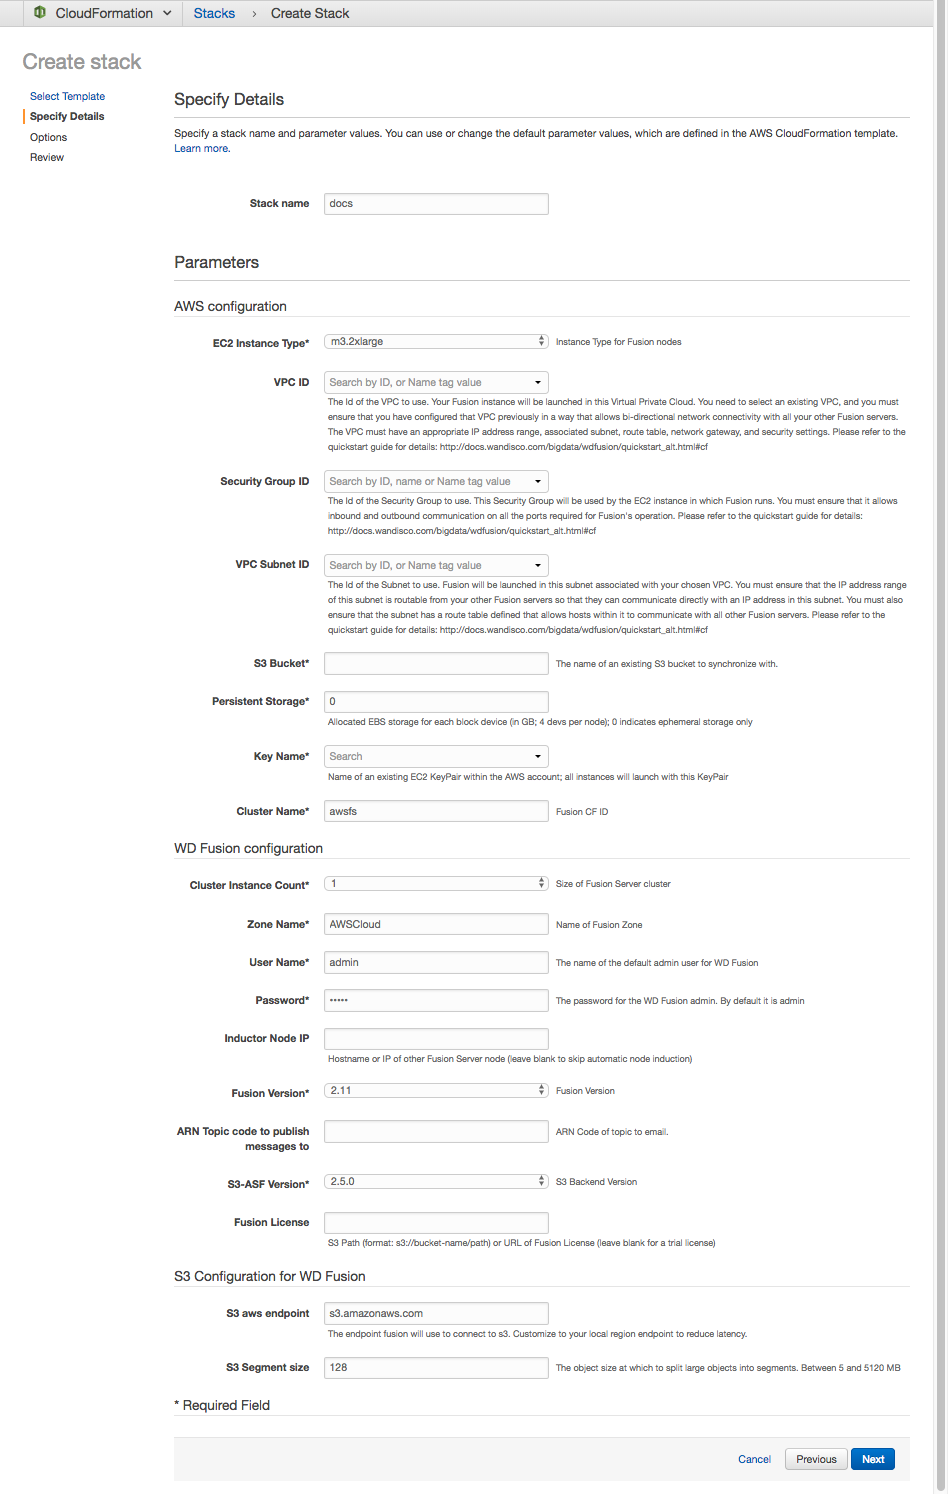
Listed below are the configuration entries that are critical for setup:
- Stack name
-
The name of your stack - only use alphanumeric characters.
- AWS configuration
-
- EC2 Instance Type (dropdown)
-
The size of the EC2 storage is based on data volume. This will default to
m3.2xlarge. - VPC ID (dropdown)
-
The ID of the Amazon Virtual Private Cloud to use. You need to select an existing VPC into which your WANdisco Fusion instances will be launched. Click and select from the list of available VPCs.
- Security Group ID (dropdown)
-
The ID of the Security Group to use. You need to select an existing Security Group. It will need to allow incoming and outgoing connections on the ports specified in the Networking Guide section of this document below.
- VPC subnet ID (dropdown)
-
The ID of the Subnet to use. You need to select an existing Subnet. The CIDR range for that subnet will need to be addressable from all other Fusion servers that you establish in your network. If you use the default
subnet-00000000it will create a new VPC and relate resources which you can use to evaluate WANdisco Fusion against another ec2 instance that acts as the Filesystem to Synch S3 for the purpose of evaluation. - S3Bucket
-
This is the s3 bucket, to which you will replicate files. If this is not filled in correctly it will trigger a rollback event.
- PersistentStorage
-
Use this field to add additional storage for your cluster. In general use, you shouldn’t need to add any more storage, you can rely on the memory in the node plus the ephemeral storage.
- Key Name (dropdown)
-
Enter the name of the existing EC2 KeyPair within your AWS account, all instances will launch with this KeyPair.
- Cluster Name
-
The WANdisco Fusion CF identifier, in the example, awsfs.
- WANdisco Fusion configuration
-
- Cluster Instance Count (dropdown)
-
Enter the number of WANdisco Fusion instances (1-3) that you’ll launch. e.g. "2" This value is driven by the needs of the cluster, either for horizontal scaling, continuous availability of the WANdisco Fusion service, etc.
- Zone Name
-
The logical name that you provide for your zone. e.g. awsfs
- User Name
-
Default username for the WANdisco Fusion UI is "admin".
- Password
-
Default password for the WANdisco Fusion UI is "admin".
- Inductor Node IP
-
This is the hostname or IP address for an existing WANdisco Fusion node that will be used to connect the new node.
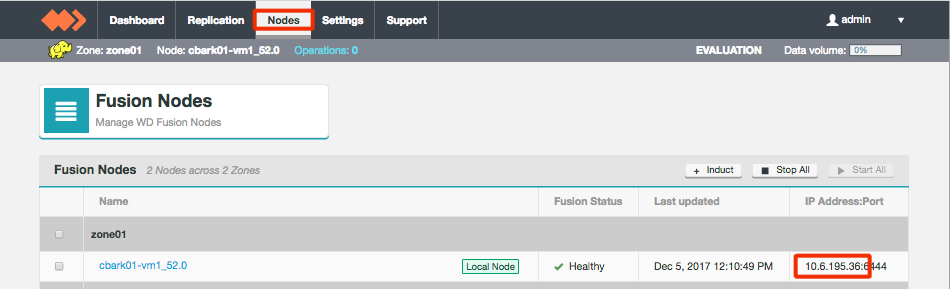
How to get the IP address of an existing WANdisco Fusion Node:-
Log into the WANdisco Fusion UI.
-
On the Nodes tab, the IP address is in the right hand column of the table.
-
- Fusion Version (dropdown)
-
Select the version of WANdisco Fusion that you are running. e.g. 2.11.
- EMR Version (dropdown)
-
The version of Elastic Map Reduce you are running.
- ARN Topic code to publish messages to
-
ARN Code to topic to email. If you set up an SNS service you can add an ARN code here to receive a notification when CFT completes succesfully. This oculd be an email, SMS message or various other message types supported by AWS SNS service.
- FusionLicense
-
This is a path to your WANdisco Fusion license file. If you don’t specify the path to a license key you will automatically get a trial license.
- S3 Security configuration for WANdisco Fusion
-
- KMSKey
-
ARN for KMS Encryption Key ID. You can leave the field blank to disable KMS encryption.
- Enable S3 server-side Encryption (dropdown)
-
"Yes", otherwise leave as "No".
- S3 Server-side Encryption Algorithm (dropdown)
-
The algorithm used for server-side encryption on S3 (default AES256).
-
On the next screen you can add options, such as Tags for resources in your stack, or Advanced elements.
We recommend that you disable the setting Rollback on failure. This ensures that if there’s a problem when you deploy, the log files that you would need to diagnose the cause of the failure don’t get wiped as part of the rollback.
Click Next.
-
Review the summary and acknowledge the creation of the IAM resources.
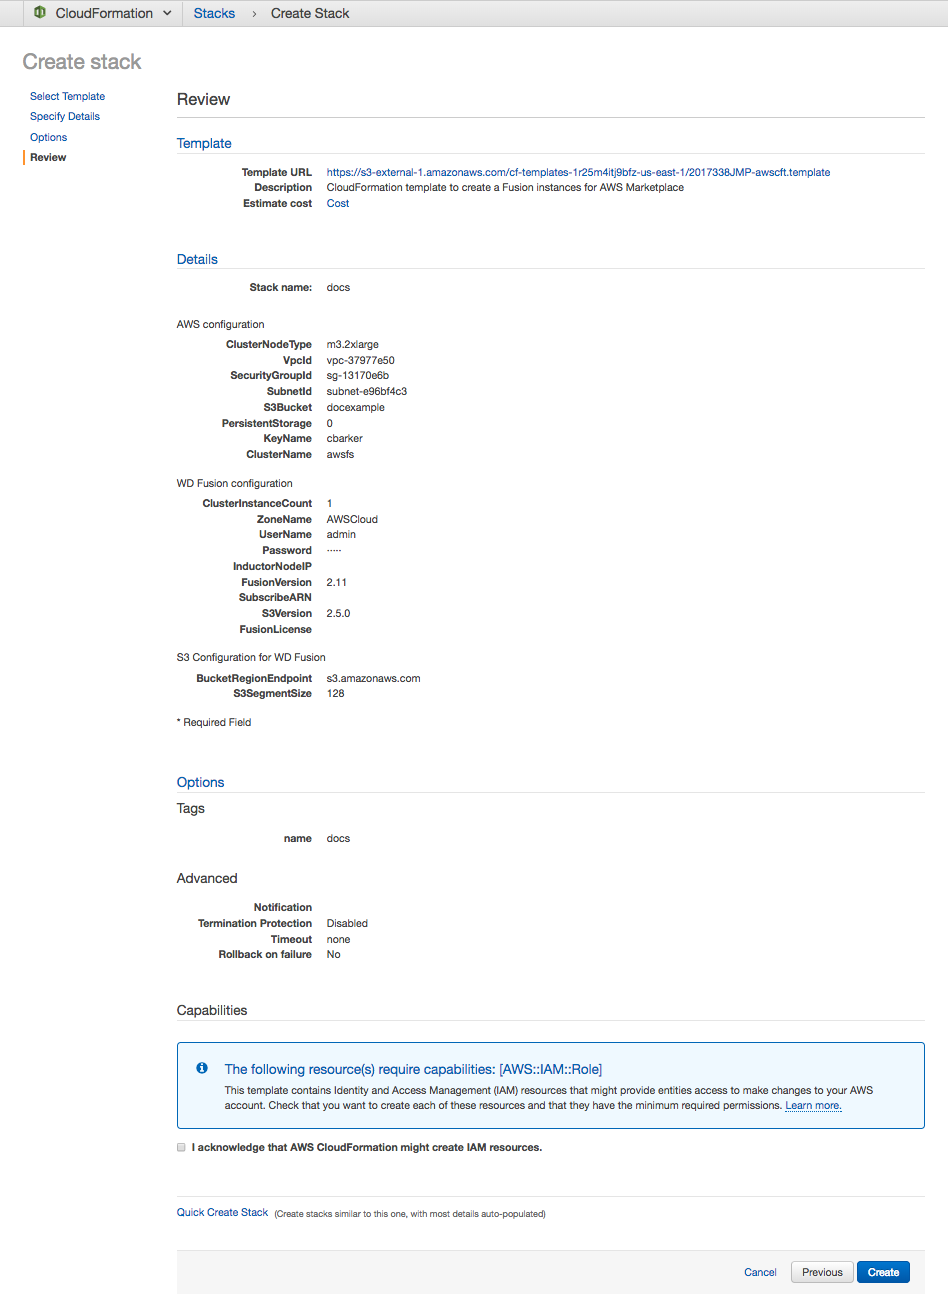
Tick the checkbox and Click Create to continue.
-
After you launch the CFT it will take a few minutes to spin up the environment.

-
When finished, your stack status will change to CREATE_COMPLETE

-
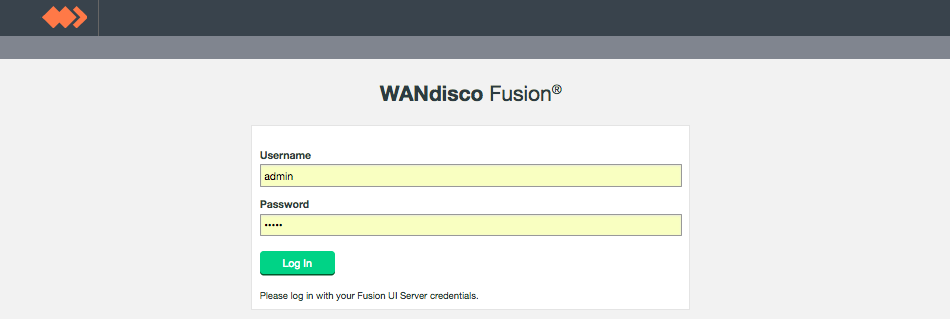
Go to your browser and enter the IP address for the WANdisco Fusion web UI. The URL will take the form:
http://ec2-instance-IP:8083
On the login screen enter the admin username and password that you specified in the CFT.
-
Upon logging into the WANdisco Fusion web UI, you will see the Dashboard with 2 nodes. If you didn’t specify a license during the CFT launch, you will see details for a trial license that will expire 14 days after you first launched the instance.
3. Install WANdisco Fusion in your data center
3.1. Installation
Contact WANdisco for a download link and evaluation license for the WANdisco Fusion File System. Once you receive the download link, copy the installer to the on-premises Linux machine that will be the Fusion Server.
For more information about the requirements for the WANdisco Fusion server machine, see Prerequisites Checklist.
These instructions are for installing on the Local File System but other platforms are available. See the WANdisco Fusion User Guide for more information.
-
Open a terminal session on your first installation server. Download the appropriate installer from WANdisco’s FD website. You need the appropriate one for your platform.
-
Ensure the downloaded files are executable e.g.
chmod +x fusion-ui-server-localfs_rpm_installer.sh
-
Execute the file with root permissions, e.g.
sudo ./fusion-ui-server-localfs_rpm_installer.sh
-
The installer will now start.
Verifying archive integrity... All good.
Uncompressing WANdisco Fusion..............................

    ::   ::  ::     #     #   ##    ####  ######   #   #####   #####   #####
   :::: :::: :::    #     #  #  #  ##  ## #     #  #  #     # #     # #     #
  ::::::::::: :::   #  #  # #    # #    # #     #  #  #       #       #     #
 ::::::::::::: :::  # # # # #    # #    # #     #  #   #####  #       #     #
  ::::::::::: :::   # # # # #    # #    # #     #  #        # #       #     #
   :::: :::: :::    ##   ##  #  ## #    # #     #  #  #     # #     # #     #
    ::   ::  ::     #     #   ## # #    # ######   #   #####   #####   #####

Welcome to the WANdisco Fusion installation

You are about to install WANdisco Fusion version 2.11

Do you want to continue with the installation? (Y/n) y
The installer will perform an integrity check, confirm the product version that will be installed, then invite you to continue. Enter "Y" to continue the installation.
-
The installer checks that both Perl and Java are installed on the system.
Checking prerequisites:

Checking for perl: OK
Checking for java: OK
See the Installation Checklist Java Requirements for more information about these requirements.
-
Next, confirm the port that will be used to access WANdisco Fusion through a browser.
Which port should the UI Server listen on? [8083]:
-
Select the platform version and type from the list of supported platforms.
Please specify the appropriate platform from the list below:

[0] localfs-2.7.x

Which WANdisco Fusion platform do you wish to use?
-
Confirm that you want Fusion to be installed on the current node.
Should the WANdisco Fusion Client be automatically installed on current node? (Y/n)
-
Next, you set the system user group for running the application.
We strongly advise against running WANdisco Fusion as the root user.

For default LOCALFS setups, the user should be set to 'fusion'. However, you should choose a user appropriate for running HDFS commands on your system.

Which user should WANdisco Fusion run as? [fusion]
Checking 'fusion' ...
 ... 'fusion' found.

Please choose an appropriate group for your system. By default LOCALFS uses the 'fusion' group.

Which group should WANdisco Fusion run as? [fusion]
Checking 'fusion' ...
 ... 'fusion' found.
-
Check the summary to confirm that your chosen settings are appropriate: Installing with the following settings:
Installing with the following settings:

Installation Prefix:                /opt/wandisco
User and Group:                     fusion:fusion
Hostname:                           <your.fusion.hostname>
WANdisco Fusion Admin UI Listening on:    0.0.0.0:8083
WANdisco Fusion Admin UI Minimum Memory:  128
WANdisco Fusion Admin UI Maximum memory:  512
Platform:                           localfs-2.7.0 (2.7.0)
Install WANdisco Fusion Client:           yes
WANdisco Fusion Server Hostname and Port: <your.fusion.hostname>:8082

Do you want to continue with the installation? (Y/n)
If these settings are correct then enter "Y" to complete the installation of the WANdisco Fusion server.
-
The package will now install.
Installing localfs-2.7.0 server packages:
  fusion-hcfs-localfs-2.7.0-server-2.11_SNAPSHOT.el6-2707.noarch.rpm ... Done
  fusion-hcfs-localfs-2.7.0-ihc-server-2.11_SNAPSHOT.el6-2707.noarch.rpm ... Done
Installing plugin packages:
Installing fusion-ui-server package:
  fusion-ui-server-2.11-774.noarch.rpm ... Done
Installing localfs-2.7.0 client package:
  fusion-hcfs-localfs-2.7.0-client-localfs-2.11_SNAPSHOT.el6-2707.noarch.rpm ... Done

Starting fusion-ui-server:                                 [  OK  ]
Checking if the GUI is listening on port 8083: .............Done
-
The WANdisco Fusion server will now start up:
Please visit http://<your.fusion.hostname>:8083/ to complete installation of WANdisco Fusion

If <your.fusion.hostname> is internal or not available from your browser, replace
this with an externally available address to access it.
The WANdisco Fusion server and corresponding IHC server will be installed. The next step is to configure the WANdisco Fusion UI through a browser.
3.2. Configuration
Once the fusion-ui-server has started, follow the steps below to configure WANdisco Fusion with Swift through the browser.
-
In the first "Welcome" screen you’re asked to choose between Create a new Zone and Add to an existing Zone.
Make your selection as follows:- Adding a new WANdisco Fusion cluster
-
Select Add Zone.
- Adding additional WANdisco Fusion servers to an existing WANdisco Fusion cluster
-
Select Add to an existing Zone.
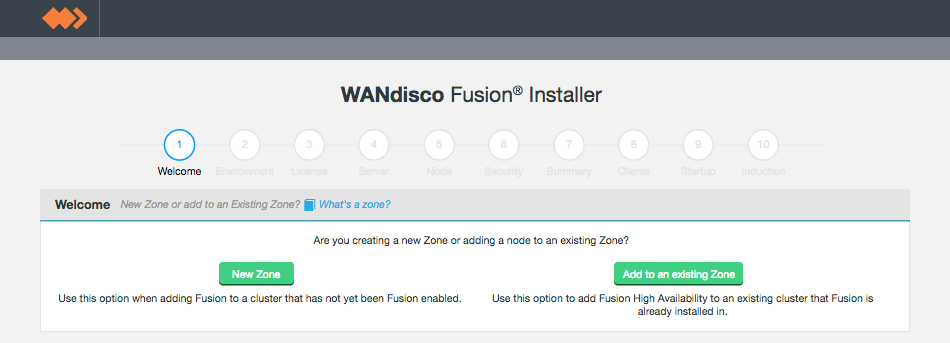 Figure 1. Welcome screen
-
Run through the installer’s detailed Environment checks. For more details about exactly what is checked in this stage, see Environmental Checks in the Appendix.
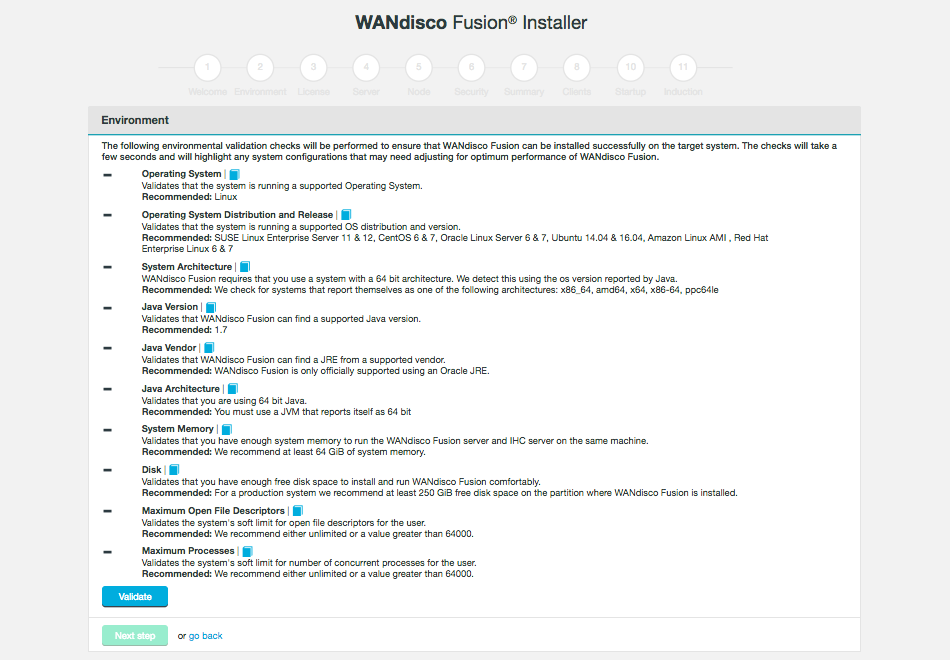 Figure 2. Environmental checks
 -
On clicking Validate the installer will run through a series of checks of your system’s hardware and software setup and warn you if any of WANdisco Fusion’s prerequisites are not going to be met.
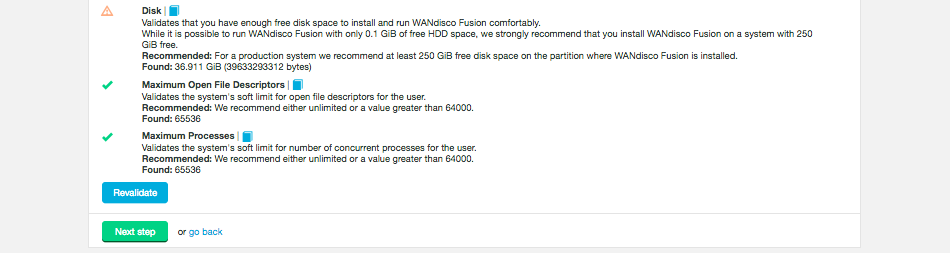 Figure 3. Example check results
Address any failures before you continue the installation. Warnings may be ignored for the purposes of completing the installation, especially if the installation is only for evaluation purposes and not for production. However, when installing for production, you should address all warnings, or at least take note of them and exercise due care if you continue the installation without resolving and revalidating.
-
Select your license file and upload it.
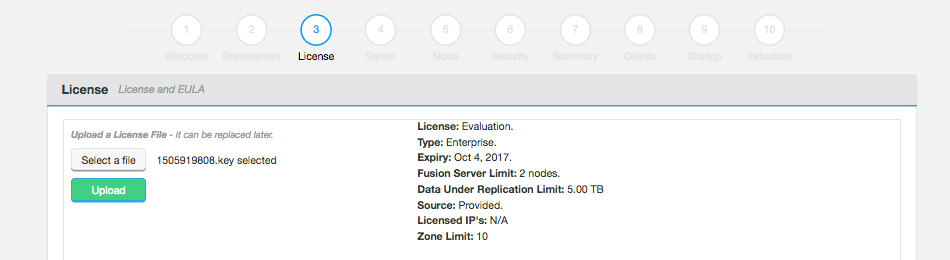 Figure 4. Upload your license file
The conditions of your license agreement will be shown in the top panel.
-
In the lower panel is the EULA.
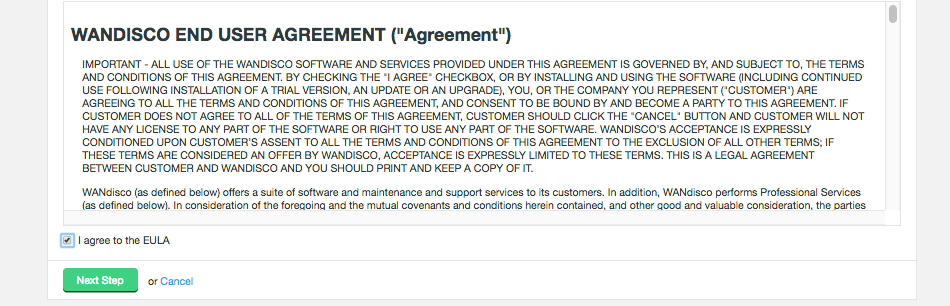 Figure 5. Verify license and agree to subscription agreement
Tick the checkbox I agree to the EULA to continue, then click Next Step.
-
Enter settings for the WANdisco Fusion server. See WANdisco Fusion Server for more information about what is entered during this step.
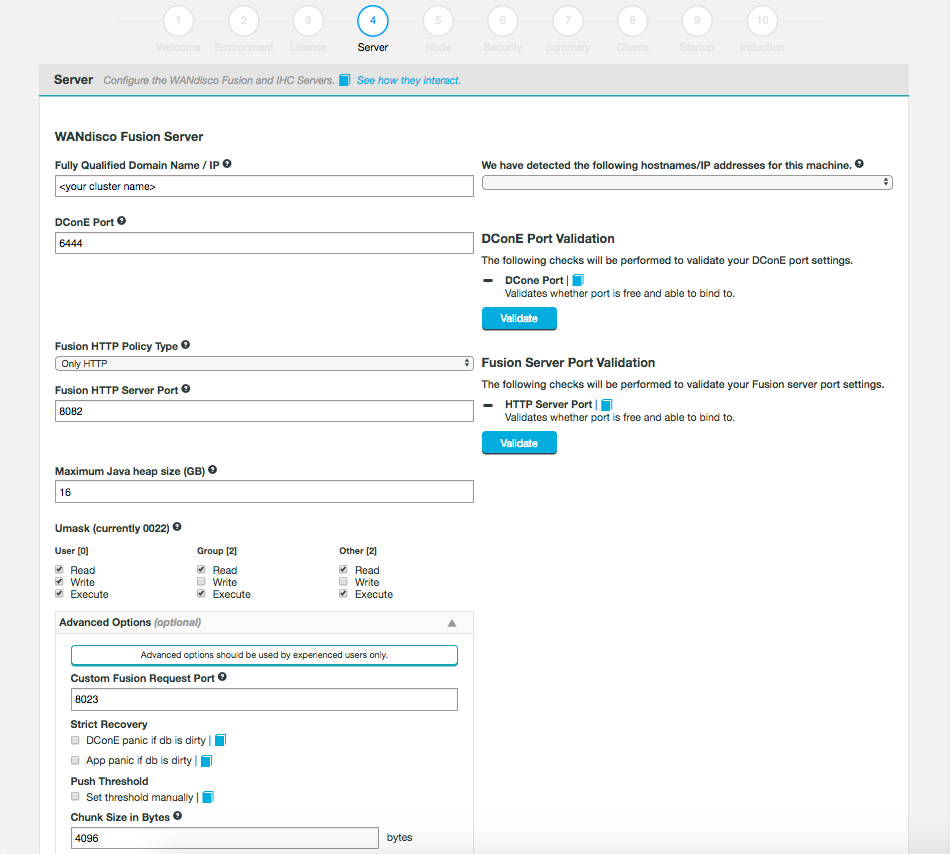 Figure 6. Server information
 -
Enter the settings for the IHC Server. See the on premise install section for more information about what is entered during this step.
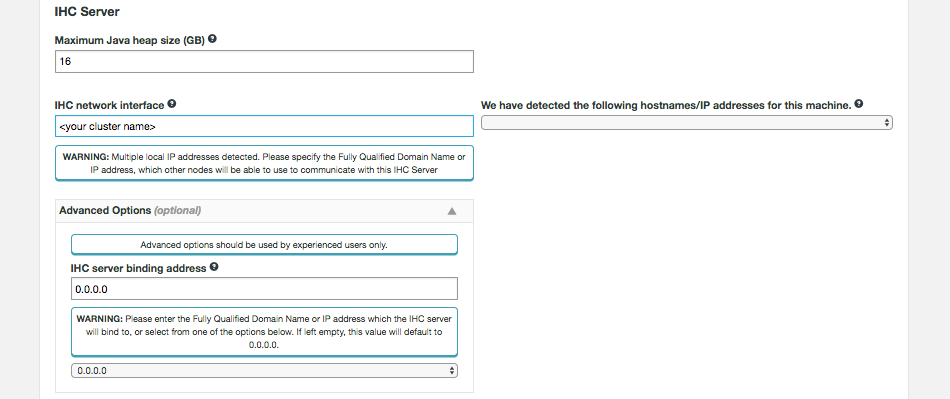 Figure 7. IHC Server information
 -
Next, you will enter the settings for your new Node.
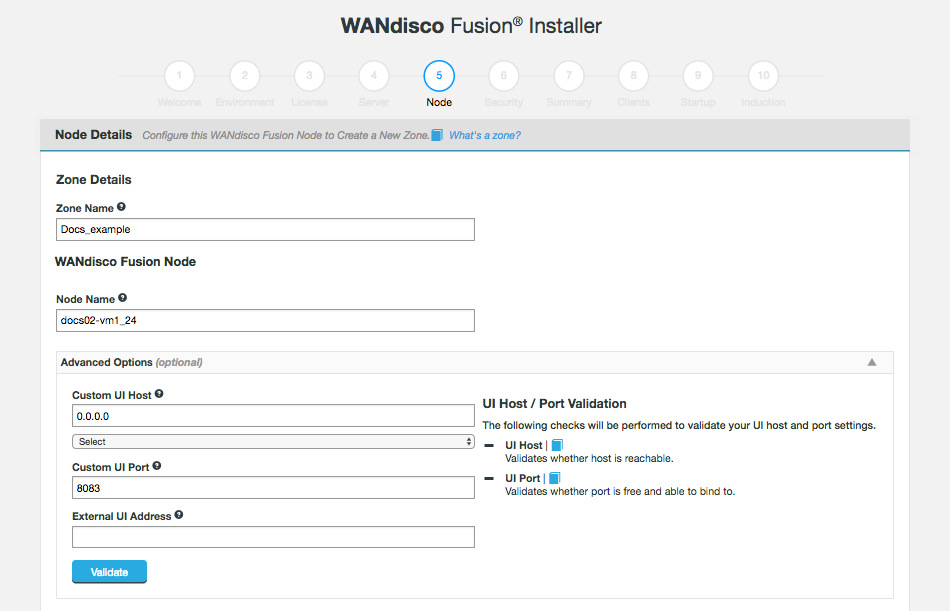 Figure 8. Zone information
- Zone Name
-
Give your zone a name to allow unique identification of a group of nodes.
- Node Name
-
A unique identifier that will help you find the node on the UI.
There are also advanced options but only use these if you fully understand what they do:
- Custom UI Host
-
Enter your UI host or select it from the drop down below.
- Custom UI Port
-
Enter the port number for the Fusion UI.
- External UI Address
-
The address external processes should use to connect to the UI on.
Once these details are added, click Validate.
-
Enter the security details applicable to your deployment.
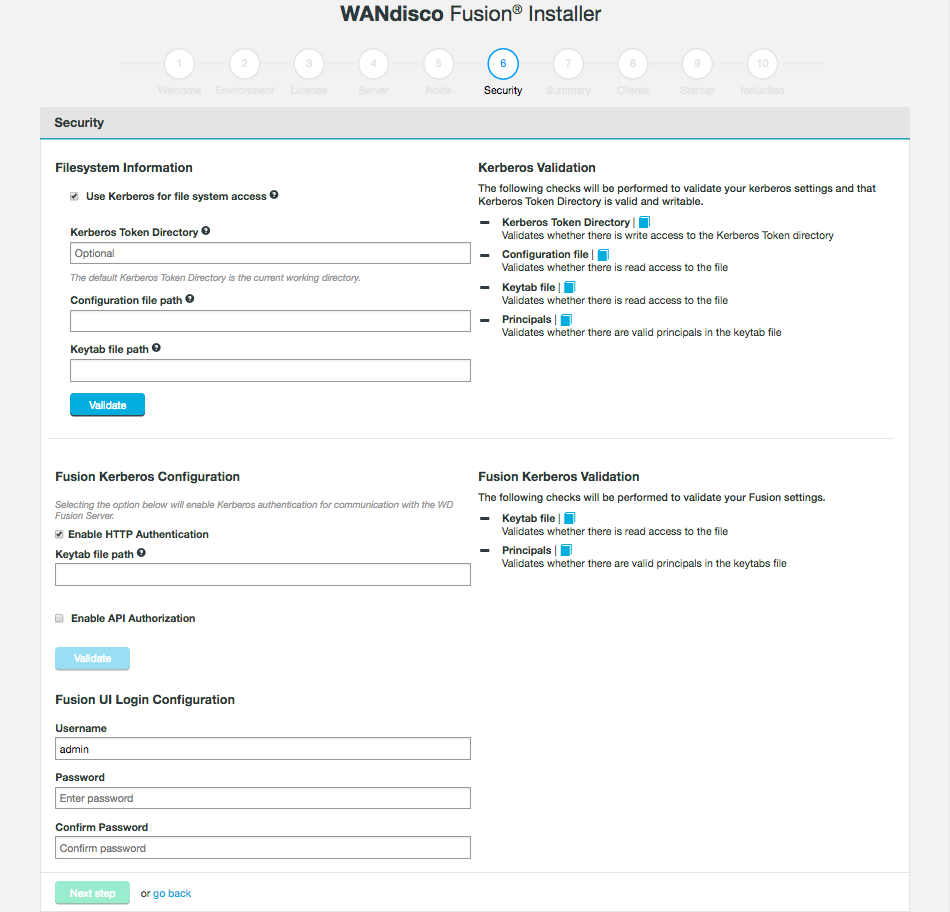 Figure 9. LocalFS installer - Security
If you are using Kerberos, tick the Use Kerberos for file system access check-box to enable Kerberos authentication on the local filesystem.
- Kerberos Token Directory
-
This defines what the root token directory should be for the Kerberos Token field. This is only set if you are using LocalFileSystem with Kerberos and want to target the token creations within the NFS directory and not on just the actual LocalFileSystem. If left unset it will default to the original behavior; which is to create tokens in the /user/<username>/ directory.
The installer will validate that the directory given or that is set by default (if you leave the field blank), can be written to by WANdisco Fusion.
- Configuration file path
-
System path to the Kerberos configuration file, e.g. /etc/krb5.conf
- Keytab file path
-
System path to your generated keytab file, e.g. /etc/krb5.keytab
Name and place the keytab where you likeThese paths and file names can be anything you like, providing they are the consistent with your field entries. - Username
-
The username for the controlling account that will be used to access the WANdisco Fusion UI.
- Password
-
The password used to access the WANdisco Fusion UI.
- Confirm Password
-
A verification that you have correctly entered the above password.
-
At this stage of the installation you are provided with a complete summary of all of the entries that you have so far made. Go through the options and check each entry.
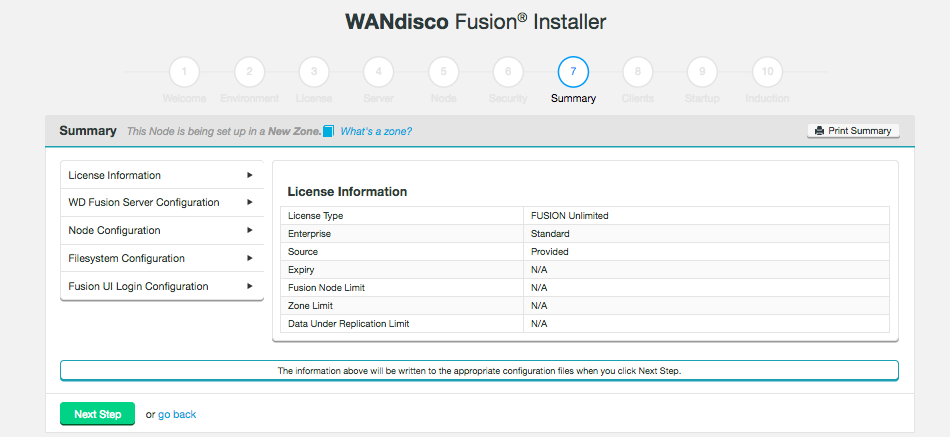 Figure 10. LocalFS installer - Summary
 -
There are no clients to install for a Local File System installation, click Next Step. This step is reserved for deployments where HDFS clients need to be installed.
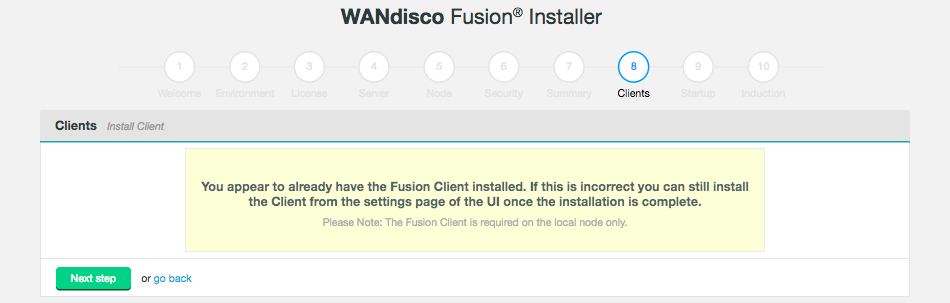 Figure 11. LocalFS installer - Clients
 -
It’s now time to start up the Fusion server. Click Start WANdisco Fusion.
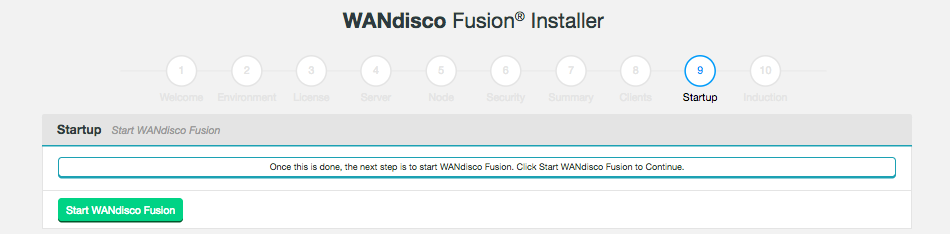 Figure 12. Startup
The Fusion server will now start up.
-
If you have existing nodes you can induct them now. If you would rather induct them later, click Skip Induction.
Induction will connect this second node to your existing "on-premises" node. When adding a node to an existing zone, users will be prompted for zone details at the start of the installer and induction will be handled automatically. Nodes added to a new zone will have the option of being inducted at the end of the install process where the user can add details of the remote node.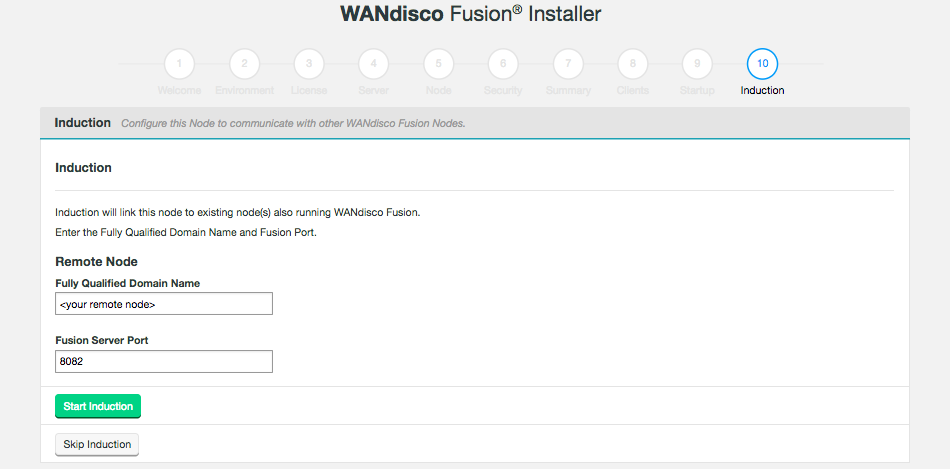 Figure 13. Induction
If you are inducting now, enter the following details then Click Start Induction.
- Fully Qualified Domain Name
-
The full address of the existing on-premises node.
- Fusion Server Port
-
The TCP Port on which the on-premises node is running. Default:8082
For the first node you will miss this step out. For all the following node installations you will provide the FQDN or IP address and port of this first node.
"Could not resolved Kerberos principal" errorYou need to ensure that the hostname of your EC2 machine has been added to the /etc/hosts file of your LocalFS server.What is induction?Multiple instances of WANdisco Fusion join together to form a replication network or ecosystem. Induction is the process used to connect each new node to an existing set of nodes.
-
Log in to WANdisco Fusion UI using the admin username and password that you provided during the installation.
Figure 14. Post-induction login -
The installation of your first node is now complete.
You can find more information about working with the WANdisco Fusion UI in the User Guide.
|
Installation order
If you are first installing WANdisco Fusion onto your on-premises cluster, then now go back to section 2, before continuing with the demonstration below.
|
4. Demonstration
Prepare to test drive WANdisco Fusion.
4.1. Setting up replication
It’s now time to demonstrate data replication from the on-premises cluster to the Amazon storage. First we need to perform a synchronization to ensure that the data stored in both zones is in exactly the same state.
|
Instant Test Data
If you want to evaluate WANdisco Fusion on some generic test files, we’ve produced a script that can automatically generate a set of data that you can use to quickly test replication.
See Test Data Generation Script
|
You can synchronize data in both directions:
- Synchronize from on-premises to S3 zone
-
Login to the on-premises WANdisco Fusion UI.
- Synchronize from S3 to the on-premises zone
-
Login to the WANdisco Fusion UI in AWS.
- Synchronize in both directions (because the data already exists in both locations)
-
Login to either Fusion UI.
The remaining guide covers the replication from on-premises to S3, although the procedure for synchronizing in the opposite direction is effectively the same.
Synchronization
-
First you need to create a Replication Rule. Log in to the on-premises WANdisco Fusion UI and follow the steps in the Administration Guide.
-
When you first create the rule you may notice status messages indicating that the system is preparing for replication. Wait until all pending messages are cleared before moving to the next step.
-
Once set up it is likely that the file replicas between both zones will be in an inconsistent state, in that you will have files on the local (on-premises) zone that do not yet exist in the cloud. Click on the Unchecked button to open the Consistency Check screen.
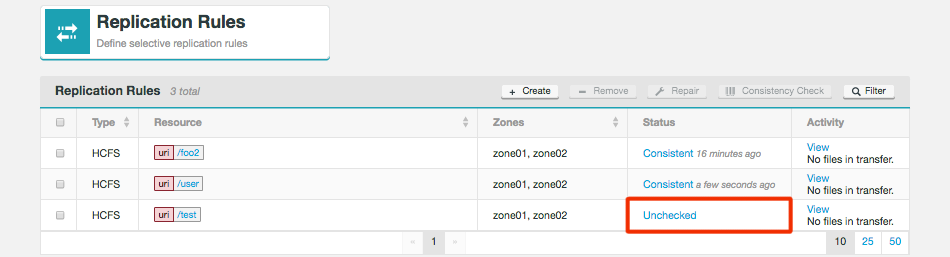 Figure 15. Consistency not yet checked
 -
Click Trigger new check to check for inconsistencies. The consistency report will appear once the check is complete. It shows the number of inconsistencies that need correction.
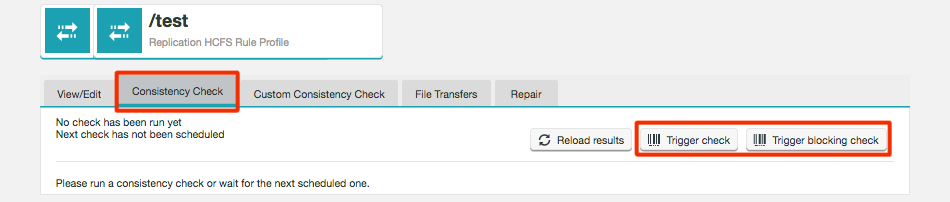 Figure 16. Trigger consistency check
 -
We will use the Bulk resolve inconsistencies option here to repair but see Running initial repairs in parallel for more information on improving the performance of your first sync and resolving individual inconsistencies if you have a small number of files that might conflict between zones.
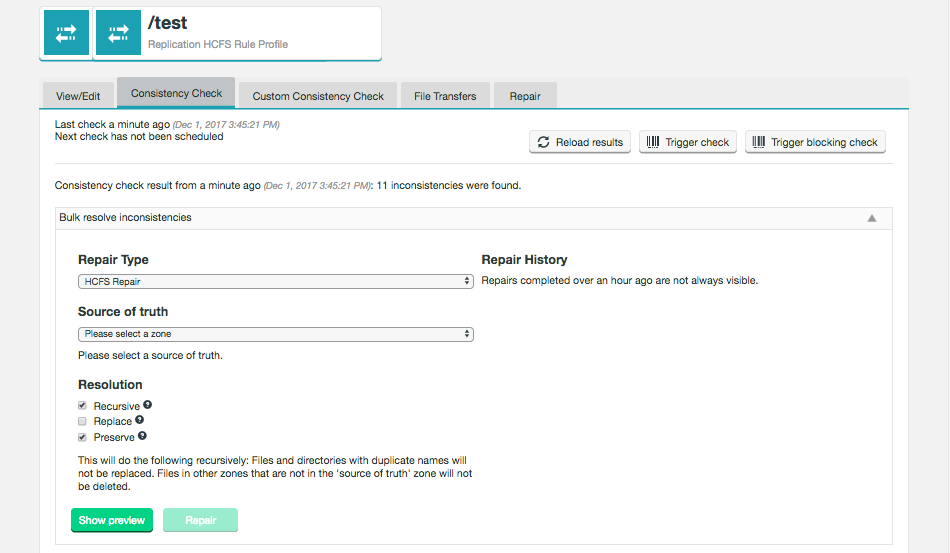 Figure 17. Resolve inconsistencies
Select your repair type and source of truth, in this case the current zone. Tick the appropriate resolution check boxes. Here we use Recursive and also Preserve so that files are not deleted if they don’t exist in the source zone. For more information see the Consistency check section.
Click Repair to begin the file transfer process. -
Now we need to verify the file transfers were successful. First, log in to the WANdisco Fusion UI on the Amazon cluster. Click on the Replication tab and in the File Transfers column, click the View link.
 Figure 18. View transferred files
 -
Details on all files in transfer can be seen in the table.
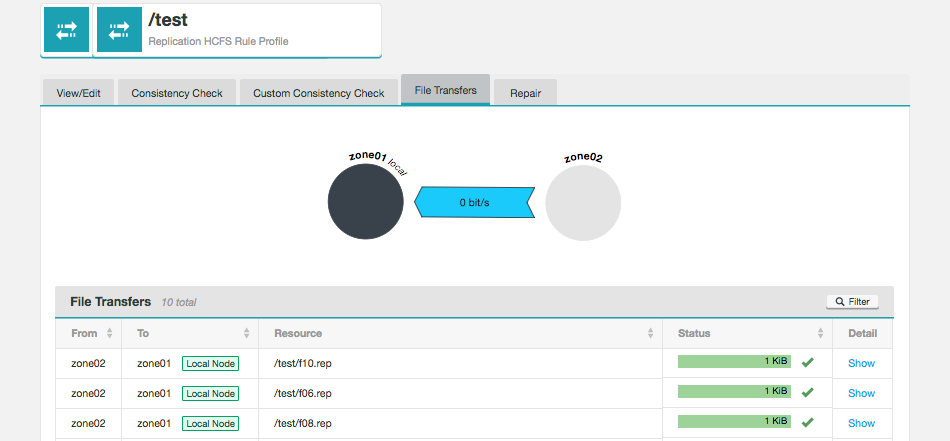 Figure 19. Transferred files
Confirm that all your files have transferred.
-
Congratulations! You have successfully installed, configured, replicated and monitored data transfer with WANdisco Fusion.
4.2. Running checks and repairs
You should complete any necessary repairs to file consistency between your two clusters. Follow the steps provided in the User Guide:
-
Running initial repairs in parallel
-
this will use the API to perform rapid repairs by running processes on multiple directories at the same time.
-
-
-
uses the Custom Consistency Check tool to select specific directories to check and repair.
-
5. Appendix
5.2. Networking Guide for WANdisco Fusion S3
Setting up suitable network connectivity between your WANdisco Fusion zones using the AWS virtual private network system can be difficult to understand and implement if you’re not very familiar with the networking part of the AWS platform. This section of the appendix will give you all the information you need to make the best choices and right configuration for setting up network connectivity between your on-premises and AWS environments.
WANdisco Fusion makes the replication of your on-premise data to S3 simple and efficient. It relies on network connectivity between the two environments, and because a typical on-premises data store will reside behind your firewall, you will need to plan the right approach for that connection.
This document includes information on the requirements that your solution will need to meet, along with options for establishing communication between the environments. You can choose among those options, and perform simple testing to ensure that the configured solution meets all your needs for data replication with WANdisco Fusion.
5.2.1. Networking in WANdisco Fusion
WANdisco Fusion is a distributed system, allowing multiple, separate storage systems to exchange data to replicate content. It includes a collection of services that communicate over the network, requiring the ability to establish and use TCP connections between one another.
The S3 Active Migrator includes components that are created and launched in an AWS Virtual Private Cloud (VPC). Your on-premises WANdisco Fusion components will need to establish connections with these VPC-resident services, and will also need to accept incoming connections from them.
You have many choices for how to establish connectivity between your on-premises environment and the AWS-based WANdisco Fusion node.
Regardless of your choice, you will need to ensure that your network connectivity meets the requirements defined in this document. For information from AWS on VPC connectivity options, please refer to the AWS whitepaper Amazon Virtual Private Cloud Connectivity Options.
5.2.2. VPN Options
The Active Migrator services will be launched in an AWS VPC. This needs to be created by you in advance, along with an appropriate Security Group and Subnet. See WANdisco Cloud Formation Template (CFT).
Pre-existing VPC
Your VPC must be addressable from your on-premises network, where WANdisco Fusion is hosted. In this case, the WANdisco S3 Active Migrator services will be launched in that VPC, using dynamically assigned IPs that should be reachable from your WANdisco Fusion’s host machine. This is the model that AWS describe as "Internal User-to-Amazon VPC Connectivity Option". It is likely to require configuration of a VPN from your on-premises network to the AWS VPC, so that your internal hosts can communicate directly with the private IP addresses of EC2 instances launched in the VPC, and so that those instances can communicate directly with the IP addresses of your internal network.
|
AWS Direct Connect benefit
One benefit of using a pre-define VPC is that you can take advantage of the AWS Direct Connect feature to establish direct physical network
connectivity, and use the increased bandwidth this allows for more rapid replication.
|
VPC Connectivity
The template will expose your S3 Active Migrator services through a single IPv4 address. You then have three options for connectivity between your on-premises Fusion instance and the AWS-hosted S3 Active Migrator services.
-
CFT-defined VPC Option 1
The first option is to create a VPN between your on-premise network and the VPC used in AWS. This is equivalent to the connectivity created for a pre-defined VPC. You should take advantage of one of the options described in the Amazon Virtual Private Cloud Connectivity Options whitepaper.With a VPN in place, your internal Fusion instance will be able to route to the private IP addresses of the S3 Active Migrator Services, and they will be able to address your internal Fusion instance in the same way.
-
CFT-defined VPC Option 2
Without a VPN defined between your on-premise Fusion instance and the VPC-resident S3 Active Migrator Fusion services, you will only be able to ensure connectivity if the following criteria are met:-
Your on-premise hosts on which the Fusion services operate are accessible via a public IPv4 address.
-
The ports described in the section below are open for connections to be established in both directions.
-
You define an iptables rule to direct TCP traffic destined for the private IP address of the S3 Active Migrator Fusion services to the public IP address exposed by WANdisco’s CFT, e.g.:
iptables -t nat -A OUTPUT -p tcp -d ${PRIVATE_S3_IP} -j DNAT \ --to-destination ${PUBLIC_S3_IP}With those configurations in place, you will be able to induct your on-premises WANdisco Fusion environment to your S3 Active Migrator deployment in AWS by providing the public IP address of your on-premises instance during the entry of parameters into the CFT.
-
-
CFT-defined VPC Option 3
A combination of port tunneling and iptables rules can be used to provide the network connectivity needed over a single port. This can be used for low-performance requirements where security restrictions prevent you from allowing many open ports between environments. Once installed on-premises, WANdisco Fusion includes a script to help setup this type of connection. You can find it in/opt/wandisco/fusion/server/tools/bin/setupSSHTunnel.sh.Not recommended for productionThis option is unlikely to be used for production systems, and we advise you to contact WANdisco support for information on this configuration.
5.2.3. Ports
The diagram below shows the Fusion services and the ports they expose, that are used to replicate content between an on-premise local file system and S3.
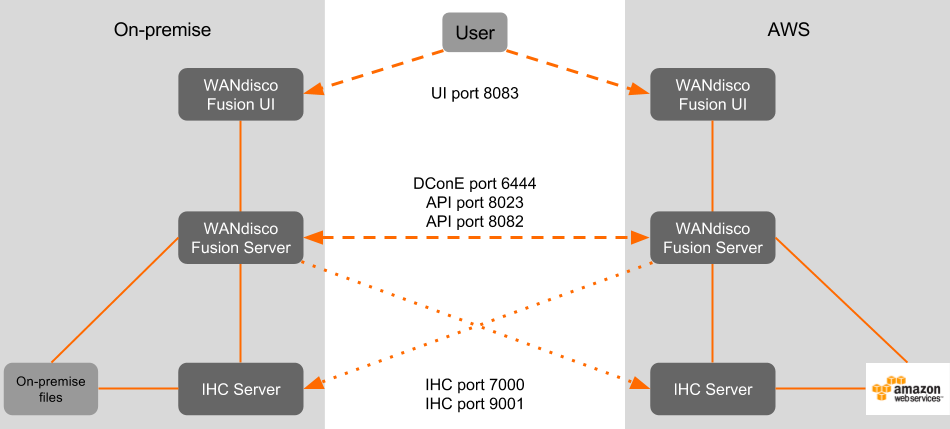
Take careful note of the need for TCP connections to be established in both directions between the hosts on which the Fusion and IHC servers execute. You need to allow incoming and outgoing TCP connections on ports:
- 6444
-
DCone port handles all co-ordination traffic that manages replication. It needs to be open between all WANdisco Fusion nodes. Nodes that are situated in zones that are external to the data center’s network will require unidirectional access through the firewall.
- 8023
-
Port used by WANdisco Fusion server to communicate with HCFS/HDFS clients. The port is generally only open to the local WANdisco Fusion server, however you must make sure that it is open to edge nodes.
- 8082
-
REST port is used by the WANdisco Fusion application for configuration and reporting, both internally and via REST API. The port needs to be open between all WANdisco Fusion nodes and any systems or scripts that interface with WANdisco Fusion through the REST API.
- 7000
-
7000 range, (exact port is determined at installation time based on what ports are available), used for data transfer between Fusion Server and IHC servers. Must be accessible from all WANdisco Fusion nodes in the replicated system.
- 8083
-
Used to access the WANdisco Fusion Administration UI by end users (requires authentication), also used for inter-UI communication. This port should be accessible from all Fusion servers in the replicated system as well as visible to any part of the network where administrators require UI access.
5.2.4. Running initial repairs in parallel
If you have a large directory you can parallelize the initial repair using the Fusion API. This can be accomplished on a single file or a whole directory. Choosing a directory will push all files from the source to the target regardless of existence at the target.
Consider the following directory structure for a fusion replication rule /home.
/home
/home/fileA
/home/fileB
/home/userDir1
/home/userDir2
/home/userDir3
We could run a bulk resolve in the UI against the /home directory, however, to provide parallelism of the repair operations we can use the Fusion API to issue repairs against each directory and the individual files in the /home directory.
REST API Call
"FUSION_NODE:PORT/fusion/fs/repair?path=SYSTEMPATH&recursive=true&src=ZONENAME"
Example - Multiple API Calls using curl
curl -X PUT "FUSION_NODE:8082/fusion/fs/repair?path=/home/userDir1&recursive=true&src=LocalFS"
curl -X PUT "FUSION_NODE:8082/fusion/fs/repair?path=/home/userDir2&recursive=true&src=LocalFS"
curl -X PUT "FUSION_NODE:8082/fusion/fs/repair?path=/home/userDir3&recursive=true&src=LocalFS"
curl -X PUT "FUSION_NODE:8082/fusion/fs/repair?path=/home/fileA&recursive=false&src=LocalFS"
curl -X PUT "FUSION_NODE:8082/fusion/fs/repair?path=/home/fileB&recursive=false&src=LocalFS"
This will spawn simultaneous repairs increasing the performance of the initial synchronization. This is especially helpful when you have small file sizes to better saturate the network.
For files, the recursive parameter is ignored
You can use the file transfers view in the Fusion UI on ec2 to monitor the incoming files.
5.2.5. Test Data Generation Script
To make running through a test of WANdisco Fusion as easy as possible we’ve provided a script that automatically generates a set of test data. However, please note that this script is provided as a convenience, you can always set up your own data sample.
Where to get the script
You can download the script from WANdisco’s public wandisco bucket.
Get it here: https://s3.amazonaws.com/wandisco-public-files/createTestDataA.sh
Running the script
Simply copy the script onto your on-premises WANdisco Fusion server and run, e.g.
./createTestDataA.sh
By default, the script generates directories that are written to HDFS/HCFS. You can optionally, you can have the script limit writing the test data to the local file system by including the following argument:
./createTestDataA.sh yes
What the script generates
The script creates a number of random binary-format data files of various size, placing them in the following directory structure:
├── topLevelDir
    ├── testDataDir1
    │   ├── level2
    │   │   ├── testFile-1-Mb
    │   │   ├── testFile-3-Mb
    │   ├── testFile-1-Mb
    │   ├── testFile-3-Mb
    ├── testDataDir2
    │   ├── level2
    │   │   ├── level3
    │   │   │   ├── testFile-100-Mb
    │   │   ├── testFile-100-Mb
    │   │   ├── testFile-10-Mb
    │   │   ├── testFile-50-Mb
    │   │   ├── testFile-5-Mb
    │   ├── testFile-10-Mb
    │   ├── testFile-50-Mb
    │   ├── testFile-5-Mb
    ├── testDataDir3
        ├── level2
        │   ├── level3
        │   │   ├── level4
        │   │   │   ├── testFile-100-Mb
        │   │   │   ├── testFile-50-Mb
        │   │   ├── testFile-100-Mb
        │   ├── testFile-100-Mb
        │   ├── testFile-50-Mb
        ├── testFile-50-Mb
5.3. Online User Guide
You can find WANdisco Fusion’s full user guide online - WANdisco Fusion User Guide.
More information about specific terms used is also available in the WANdisco Big Data Glossary.