1. Welcome
1.1. Product overview
Big Replicate for IBM Db2 Big SQL provides enhanced functionality for the IBM Big Replicate platform with replication facilities for users of IBM’s Big SQL product. Big SQL is a hybrid SQL on Hadoop engine that allows extensive SQL support against information held in a variety of stores, including Hadoop. It leverages DB2 technologies for query planning and optimization, and integrates with the broader IBM analytics platform.
Big Replicate for IBM Db2 Big SQL extends the functionality of Big Replicate with Live Hive to support active replication of operations performed via Big SQL, deployed in multiple clusters. This includes all DDL operations that modify Big SQL metadata.
1.2. Documentation guide
This guide contains the following:
- Welcome
-
This chapter introduces this user guide and provides help with how to use it.
- Release Notes
-
Details the latest software release, covering new features, fixes and known issues to be aware of.
- Concepts
-
Explains how the IBM Db2 Big SQL Plugin functions, and how it interacts with IBM’s Big Replicate platform.
- Installation
-
Covers the steps required to install and set up Big Replicate for IBM Db2 Big SQL into an IBM Big Replicate deployment.
- Operation
-
The steps required to run, reconfigure and troubleshoot Big Replicate for IBM Db2 Big SQL.
1.2.1. Symbols in the documentation
In the guide we highlight types of information using the following call outs:
| The alert symbol highlights important information. |
| The STOP symbol cautions you against doing something. |
| Tips are principles or practices that you’ll benefit from knowing or using. |
| The i symbol shows where you can find more information, such as in our online Knowledge Center. |
1.3. Contact support
See our online Knowledge Center which contains updates and more information.
1.4. Give feedback
If you find an error or if you think some information needs improving, please Contact us.
2. Release Notes
2.1. IBM Big Replicate Plugin for Db2 Big SQL Release 2.0.2 Build 19
19 December 2018
Big Replicate for IBM Db2 Big SQL extends IBM Big Replicate in environments where IBM Db2 Big SQL is used along with Apache Hive. With it, IBM Big Replicate maintains consistent Big SQL catalog information among multiple deployments.
The 2.0.1 release of the IBM Big Replicate Plugin for Db2 Big SQL is the first release of this new capability, extending Big Replicate for Hadoop.
2.1.1. Available Packages
This release supports deployment into IBM Big Replicate 2.12.2 or greater for HDP Hadoop clusters, Java 8, and IBM Db2 Big SQL 5:
-
HDP 2.6.0 - 2.6.5
-
Java 8
-
IBM Db2 Big SQL 5.0.3
Installation packages are provided for Red Hat Enterprise Linux 7 and CentOS 7 versions.
2.1.2. Getting installed
Big Replicate for IBM Db2 Big SQL supports an integrated installation process that allows it to be added to an existing Big Replicate deployment. Consult the Installation section for details.
The product should be installed into an existing IBM Big Replicate deployment using the installer provided:
bigreplicate-live-bigsql-installer.2.0.2.shPlease find detailed installation instructions in the user guide in the Installation procedure section.
2.1.3. System Requirements
Before installing, ensure that your systems, software and hardware meet the requirements found in our online user guide at Pre-requisites section.
2.1.4. Known Issues
The initial release includes a small set of known issues.
-
Non-selective replication
Current functionality performs replication of operations against all Big SQL constructs, rather than limiting that to those for which Big Replicate performs replication of Hive metadata.
-
No support for zone-specific translation
Operations performed against the Big SQL catalog that reference cluster-specific information such as host names are not translated into equivalent operations in other clusters, but the originating zone’s operation will be applied as-is.
3. Concepts
3.1. Product concepts
3.1.1. Big Replicate for IBM Db2 Big SQL
IBM Db2 Big SQL is an enterprise-grade, hybrid ANSI-compliant SQL on Hadoop engine, that delivers massively parallel processing (MPP) and advanced data query capabilities. Big SQL offers a single database connection or query for disparate sources such as HDFS, RDMS, NoSQL databases, object stores, and WebHDFS.
3.1.2. Big Replicate
IBM Big Replicate for Hadoop enables active-active field system data replication between Hadoop clusters, including across distributions. Big Replicate for Hive extends this capability to Hive metadata.
Big Replicate for IBM Db2 Big SQL
A standard Big SQL deployment allows SQL queries to access information from disparate data sources but does not extend to data sets that are replicated among Big Replicate HDFS clusters. Big Replicate for IBM Db2 Big SQL extends the abilities of Big Replicate to support active replication of operations performed via Big SQL when deployed in multiple clusters. Use it to perform catalog changes and queries that reference data replicated by IBM Big Replicate on any of the replicated Big SQL instances.
3.1.3. Capabilities
-
Create and modify Big SQL table definitions that refer to information held in HDFS, while Big Replicate ensures that both the HDFS-resident data and the Big SQL catalog information that refers to that data can be created, used and modified in any of the replicated instances.
-
Replicate Big SQL metadata changes without any modification to Big SQL services by using a proxy interface to the Big SQL catalog.
-
Maintain compatibility with standard Db2 protocols.
-
Integrate with Big Replicate for Hive to support Hive Metastore and Big SQL Catalog replication.
3.2. Architecture
The following diagram runs through the sequence of operations that make up a basic IBM Db2 Big SQL Plugin replication cycle and illustrate the interactions between Big Replicate, the Filter Proxy, IBM Db2 Big SQL Plugin and Big Replicate for Hive Plugin.

-
Big SQL Client request sent to the Filter Proxy.
-
Filter Proxy forwards the write request to the Big SQL proxy.
-
Big SQL proxy forwards the request to the Big Replicate Server for coordination.
-
The Big Replicate Server coordinates the proposal. The coordinated request is forwarded from Big Replicate to the Big SQL plugin.
-
IBM Db2 Big SQL Plugin forwards the request - In connected context to Big SQL proxy
-
In non-connected context, to Big SQL Management Node via ODBC driver
-
The Big SQL proxy responds to the Filter Proxy
-
The Filter Proxy sends the request to IBM SQL Management Node
-
The Filter Proxy receives the response from IBM SQL Management Node
-
The Filter Proxy forwards to response to the IBM SQL Client
|
No Change to Big SQL Behavior IBM Db2 Big SQL Plugin does not change the way client applications interact with Big SQL. Queries and operations that operated correctly prior to its introduction will operate correctly after it is introduced. |
3.3. Supported Functionality
3.3.1. Features
- Pre-execution coordination
-
Changes made to Big SQL catalog information are replicated among multiple deployments. IBM Db2 Big SQL Plugin coordinates operations among clients between Big SQL catalogs, with changes coordinated before, rather than after execution.
- No scheduled replication
-
While Big SQL provides facilities to schedule updates of the Big SQL catalog based on changes made in the Hive metastore, Big Replicate for IBM Db2 Big SQL makes continuous updates to all points, supporting active modifications in any instance with no potential for conflict.
- Low overhead
-
Adding replication capabilities to a IBM Db2 Big SQL Plugin deployment does not impose a significant overhead compared to regular operation for the system.
- Compatibility
-
Big Replicate for IBM Db2 Big SQL is compatible with current versions of IBM Db2 Big SQL Plugin.
- Cross-version replication
-
IBM Db2 Big SQL Plugin is not tightly coupled to the schemas in the Big SQL catalog, and will accommodate mixed versions of Big SQL.
- Minimal administrative overhead
-
An administrator doesn’t need to spend additional time maintaining a system in which replication functionality has been enabled.
- Scalability
-
IBM Db2 Big SQL Plugin can scale to deployments of any size, data or of any complexity and large rates of change of data.
3.3.2. Limitations
IBM Db2 Big SQL Plugin has the following known limitations.
-
No data replication for native or HBase tables. The data replication of Hadoop (Hive tables) is handled by the Fusion product.
-
IBM Db2 Big SQL Plugin should be used with Big Replicate for Hive to interact with the Hive metastore.
-
Federated queries are not completely supported. See Federated Queries Support below.
-
IBM Db2 Big SQL Plugin 2.0.x does not include support for Kerberos-based authentication.
-
High Availability is supported for the Filter proxy/Datasunrise, but not for IBM Db2 Big SQL Plugin and the BigSQL database.
Federated Queries support
In this release, federated queries are not completely supported.
Fields which differ between zones, such as PASSWORD, are not mapped to correct values across deployments.
-
If the query is executed from zone1, then zone2 will execute the query without converting the
PASSWORD,HOSTandPORTvalues. -
The replication path in both zones must be same.
For example, consider the federated queries below.
CREATE SERVER MYDB1
TYPE DB2/UDB
VERSION 11
AUTHORIZATION "<bigsql-username>" PASSWORD "<bigsql-password>"
OPTIONS (HOST '<Big Replicate-FQDN>', PORT '32051', DBNAME 'bigsql');DROP SERVER MYDB1;CREATE USER MAPPING
FOR USER
SERVER MYDB1
OPTIONS (
REMOTE_AUTHID 'userMap',
REMOTE_PASSWORD 'bigsql'
)4. Installation
Installing IBM Db2 Big SQL Plugin requires that you run through a series of installations, using the following plan.
-
Check prerequisites - Ensure that your cluster is ready for the installation, e.g., check Big Replicate for Hive installed and working.
-
Install Filter Proxy - The Filter Proxy is used to parse the incoming DDL/DML and only forwards DDL to the Big SQL proxy.
-
Configure Filter Proxy - Configuration steps for the Filter Proxy.
-
-
Install IBM Db2 Big SQL Plugin - Install IBM Db2 Big SQL Plugin.
-
Copy db2jcc.jar in place - Place db2jcc driver on all hosts where IBM Db2 Big SQL Plugin is installed.
-
4.1. Pre-requisites
This is a list of the software applications that must be installed on a cluster
-
HDP 2.6.0 - 2.6.5
-
Big Replicate running with a minimum of 2 inducted zones and a replication rule
The installation section refers to a replication rule using the example path /sqlproxy. You must create a rule using the following steps in the Live Hive documentation. Remember to use your rule path instead of "/sqlproxy." Also, note guidelines for file and folder permissions also apply to this path. -
ODBC driver for DB2 - (v11.1.3fp3a_linuxx64_odbc_cli.tar.gz )
| Only use version v11.1.3fp3a_linuxx64_odbc_cli.tar.gz * Big Replicate for Hive v2.0 |
-
[Not required but useful for client machines] Database client (e.g. dbeaver, jsqsh)
| All Big SQL Client connections must be changed to reflect where the IBM Db2 Big SQL Plugin proxy is located. |
4.1.1. Supported Operating Systems
IBM Db2 Big SQL Plugin supports the following operating systems.
-
CentOS 7
-
Red Hat Enterprise Linux 7
4.1.2. Server OS
There is the need for strict consistency between Big Replicate nodes, running IBM Db2 Big SQL Plugin. Your nodes should, as a minimum, be running with the same versions of:
-
Hadoop/Manager software
-
Linux
-
Check to see if you are running a niche variant, e.g. Oracle Linux is compiled from RHEL but it is not identical to a RHEL installation.
-
-
Java
-
Version 8
Only Java 8 is supported. -
Ensure you are running the same version, on consistent paths.
-
4.1.3. Hadoop Environment
Confirm that your Hadoop clusters are working.
-
All nodes must have a "fusion" system user account for running Fusion services.
-
Check the Hadoop daemon log files for any errors that might cause problems with your installation.
|
Folder Permissions
When installing the Big Replicate for Hive proxy or plugin, the permissions of /etc/wandisco/fusion/plugins/xxxx/ is set to match the Big Replicate user (FUSION_SERVER_USER) and group (FUSION_SERVER_GROUP), which are set in the Big Replicate node installation procedure. Permissions on the folder are also set such that processes can write new files to that location as long as the user associated with the process is the FUSION_SERVER_USER or is a member of the FUSION_SERVER_GROUP. No automatic fix for permissioning
Changes to the fusion user/group are not automatically updated in their directories. You need to manually fix these issues, following the above guidelines. |
4.1.4. Firewalls and Networking
-
If iptables or SELinux are running, you must confirm that any rules that are in place will not block IBM Db2 Big SQL Plugin communication.
-
If any nodes are multi-homed, ensure that you account for this when setting which interfaces will be used during installation.
-
Ensure that you have hostname resolution between clusters, if not add suitable entries to your hosts files.
-
Check your network performance to make sure there are no unexpected latency issues or packet loss.
Server utilisation
-
Confirm whether IBM Db2 Big SQL Plugin will be running on a dedicated server or sharing resources with other applications.
-
Check you will be running with sufficient disk space, will you be installing to non-default paths.
-
Use ulimit -a to check on the the open processes being sufficient.
-
Consider using SCP to push large files across the WAN to ensure that no data transfer problems occur.
4.2. Installation Steps
4.2.1. Install the Filter Proxy
|
The Filter Proxy is now bundled with IBM Db2 Big SQL Plugin installer. Only follow these steps if you need to manually install the filter proxy. |
-
If not already installed, start by installing the included Filterproxy, in this case we are using DataSunrise - Download DataSunrise 4.4.0 64-bit Linux.
-
Take the IBM Db2 Big SQL Plugin installer and run the following command:
sudo ./bigreplicate-live-bigsql-installer.2.0.2.sh extract-dsNote: This will extract to /tmp/DataSunrise_Suite_4_4_0_49719.linux.64bit.run
(You can also provide a full path, e.g. "extract-ds=$HOME/installers/DataSunrise_Suite.run") -
You may need to install the unixODBC driver manager, which will provide the necessary API for interacting with IBM Db2 Big SQL Plugin. To install, run the following command with the appropriate system privileges or invoke sudo.
sudo yum install unixODBCIf necessary,
chown odbcinst.inito ensure correct ownership if not running as root user, e.g.sudo chown <user>:<group> /etc/odbcinst.ini
-
Run the Filter Proxy install script, using the command:
./DataSunrise_Suite_4_4_0_49719.linux.64bit.run install -f --no-passwordRunning with the no password flag, as this installation will be run only through the command line.
#  ./DataSunrise_Suite_4_3_0_46719.linux.64bit.run install -f --no-password
Verifying archive integrity...  100%   All good.
Uncompressing SFX installer  100%
Installing DataSunrise
16:55:47 Copying files... ok
16:55:48 Copying libraries... ok
16:55:49 Applying changes... ok
16:55:49 Generating certificate... ok
16:55:50 Installing init.d service... ok
16:55:50 Setting up... ok
16:55:50 Starting service...
16:55:51 Service started
DataSunrise installed

To access Filter Proxy GUI, open the following address in your web browser:
https://localhost:11000
#
Install with passwordYou can run without the "no password" flag, giving you the default password at the end of the installation, e.g.
# ./DataSunrise_Suite_4_4_0_49719.linux.64bit.run install
Verifying archive integrity...  100%   All good.
Uncompressing SFX installer  100%
Installing DataSunrise
Target directory [/opt/datasunrise]:
12:03:18 Copying files... ok
12:03:20 Copying libraries... ok
12:03:20 Applying changes... ok
12:03:20 Generating certificates... ok
12:03:27 Installing init.d service... ok
12:03:28 Setting up... ok
12:03:29 Starting service...
12:03:29 Service started
DataSunrise installed

To access DataSunrise GUI, open the following address in your web browser:
https://localhost:11000
To enter the GUI, use the following credentials:
login:    admin
password: HXRI0skk
You can then reset the default password with the following command.
./AppBackendService set_admin_password=<new_password>
-
Next we install the ODBC Drivers. Get the appropriate driver (v11.1.3fp3a_linuxx64_odbc_cli.tar.gz) from the IBM download site and install on the path /home/datasunrise/.
Only use version v11.1.3fp3a_linuxx64_odbc_cli.tar.gz tar -xvf v11.1.3fp3a_linuxx64_odbc_cli.tar.gz -C /home/datasunrise/ -
Set the odbc driver path by placing the following properties into /etc/odbcinst.ini.
[IBM DB2 ODBC DRIVER]
Description=DB2 Driver
Driver=/home/datasunrise/odbc_cli/clidriver/lib/libdb2.so
FileUsage=1
DontDLClose=1
Configure Filter Proxy
-
Connect to Filter Proxy server.
./executecommand.sh connect -host 127.0.0.1 -login adminexecutecommand.sh is located in the path '/opt/datasunrise/cmdline/'. -
DataSunrise requires its own license, which you must get separately from IBM Db2 Big SQL Plugin. You can get a license key from here.
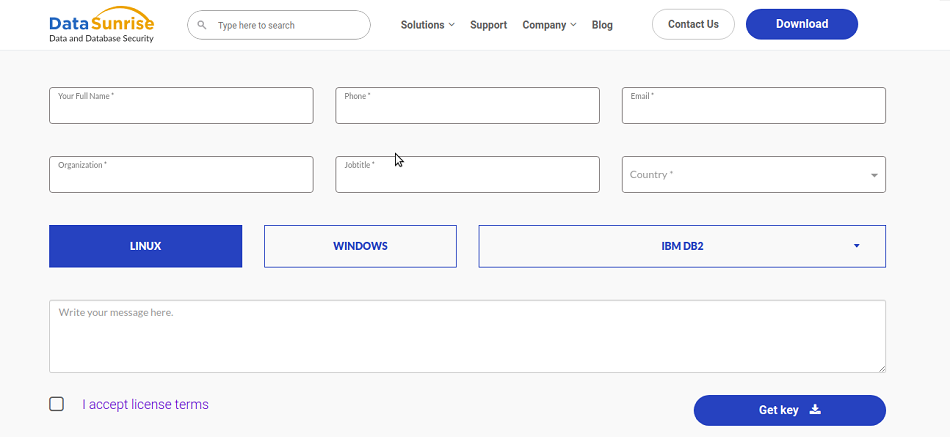 Figure 2. License request form
 -
Add the license key.
./executecommand.sh updateLicense -key <keystring> -json -
Add database parameters.
./executecommand.sh addInstancePlus -database <db-alias> -dbType db2 -dbHost <bigsql-host> -dbPort <bigSqldbPort> -proxyHost <proxyhost> -proxyPort 50000 -login bigsql -name <bigsqlUserName> -password <bigsqlPassword>Note:
<db-alias>- The name (alias) used for the database (-database <db-alias>)
<bigSql-host>- Big SQL database hostname/IP address (-dbHost)
<bigSqldbPort>- Big SQL database port (-dbPort) (default value : 18051)
<proxyHost>- Filter Proxy Host (-proxyHost)
50000- Filter Proxy Port for listening request from client (-proxyPort 50000)
<bigSqlUserName>- Bigsql database username (default value : bigsql)
<bigSqlPassword>- Bigsql database password (default value : bigsql) -
Update the SQL Proxy host.
./executecommand.sh changeParameter -name EDServerDefaultHost -value <edServerDefaultHost>Note:
In the above command
<edServerDefaultHost>: Big SQL Proxy Server host -
Update the SQL proxy port.
./executecommand.sh changeParameter -name EDServerDefaultPort -value <edServerDefaultPort>Note:
In the above command
<edServerDefaultPort>:Big SQL Proxy Server port (default 53002) -
Restart the core process.
./executecommand.sh restartexecutecommand.sh is located in the following path '/opt/datasunrise/cmdline/'. -
Add all the Rules in Filter Proxy to filter and send DDL statements to the proxy server.
-
Connect to Filter Proxy server from command line.
./executecommand.sh connect -host 127.0.0.1 -login adminIf Filter Proxy is installed with a password then, run./executecommand.sh connect -host 127.0.0.1 -login admin -password <password>
-
Add query group.
./executecommand.sh addQueryGroup -name <query-group>Note:
<query-group>: Name of queryGroup to be created.The QueryGroup is used to filter out the SQL statements. If we add a rule with a statement then only that statement would replicate, the other statements would only be executed locally, through filter proxy.
-
Add rule for create statement.
./executecommand.sh addQueryOfGroup -sql "(?i)CREATE .*" -name <query-group> -regExp true -
Add rule for Drop statement.
./executecommand.sh addQueryOfGroup -sql "(?i)DROP .*" -name <query-group> -regExp true -
Add rule for Alter statement.
./executecommand.sh addQueryOfGroup -sql "(?i)ALTER .*" -name <query-group> -regExp true -
Since use statement is required to track current schema in proxy server a rule is added to filter 'USE' statement to proxy server.
./executecommand.sh addQueryOfGroup -sql "(?i)USE .*" -name <query-group> -regExp true -
After adding all the queries to QueryGroup add create query based Rule.
./executecommand.sh addExtDispRule -name extDispQueryBased -instance <db-alias> -dbType DB2 -filterType group -intercSqlGr <query-group>Note:
<query-group>: Name of queryGroup to be which was created in Step 13b (Add query group).
<db-alias>: Alias Name for database (-database) created in Step 9 (Add database parameters).
-
4.2.2. Install IBM Db2 Big SQL Plugin
| Ensure you have read all known issues and pre-requisites before beginning installation. |
CLI
-
Obtain the installer from customer.wandisco.com and open a terminal session on your IBM Big Replicate node.
-
Ensure the downloaded file is executable e.g.
# chmod +x bigreplicate-live-bigsql-installer-2.0.2.sh -
Run the installer using an account with appropriate permissions:
# ./bigreplicate-live-bigsql-installer-2.0.2.shThe installer will now start.
Verifying archive integrity... All good.
Uncompressing WANdisco Big SQL..................

    ::   ::  ::     #     #   ##    ####  ######   #   #####   #####   #####
   :::: :::: :::    #     #  #  #  ##  ## #     #  #  #     # #     # #     #
  ::::::::::: :::   #  #  # #    # #    # #     #  #  #       #       #     #
 ::::::::::::: :::  # # # # #    # #    # #     #  #   #####  #       #     #
  ::::::::::: :::   # # # # #    # #    # #     #  #        # #       #     #
   :::: :::: :::    ##   ##  #  ## #    # #     #  #  #     # #     # #     #
    ::   ::  ::     #     #   ## # #    # ######   #   #####   #####   #####

You are about to install WANdisco Big SQL version 2.0.2.1

Do you want to continue with the installation? (Y/n)
The installer will perform an integrity check and confirm the product version that will be installed. Enter Y to continue the installation.
-
The plugin components will now be installed.
Installing requested plugin components...
  fusion-ui-bigsql-plugin-2.0.2.1-dist.tar.gz ... Done
All requested components installed.

Running additional post install actions...
-
Two options for installation will now be displayed. The instructions in this section document the
install-stackoption, the second option in the CLI. Note this method stops and starts the Ambari server automatically. For the alternative method see Manually extract the stack.Full installation of this plugin currently requires that the appropriate 'Management Pack' stack is installed through your ambari server node. This installer package includes the supporting stack package for this. If you have not already done so, you can either * extract the stack and manually run ambari-server commands to install, or * request that this installer runs the commands for you. For the first option: 1) run this installer with the 'extract-stack' sub-command 2) if necessary copy the extracted stack to the ambari-server node 3) run the following commands on the ambari-server node: ambari-server stop ambari-server install-mpack --mpack=<extracted-stack.tar.gz> -v ambari-server start For the second option: 1) copy this installer to the ambari-server node 2) run the installer with the 'install-stack' sub-command. After this you will be able to use the Ambari UI to Add the service. For further guidance and clarifications, go to https://docs.wandisco.com/ -
Copy the installer to the Ambari server node e.g.
# scp bigreplicate-live-bigsql-installer-2.0.2.sh <your-ambari-node>:/tmp -
On your Ambari server node run:
# /tmp/bigreplicate-live-bigsql-installer-2.0.2.sh install-stack -
Now go to your Ambari UI and follow the steps below.
Installation via the Ambari UI
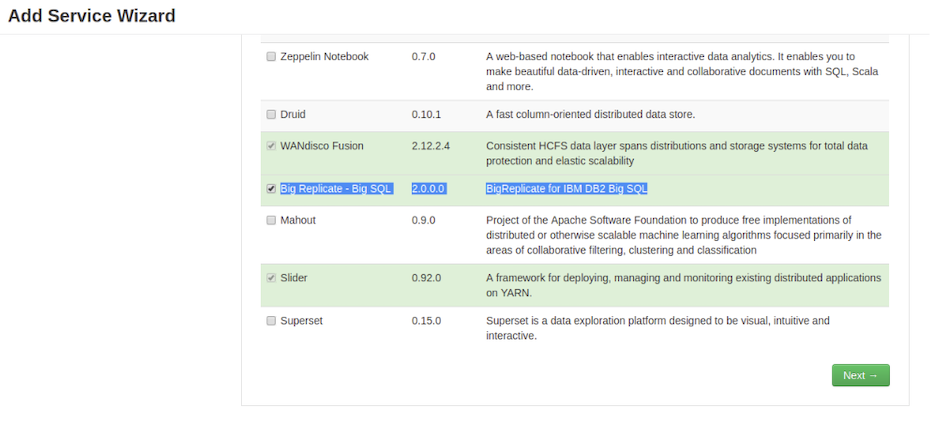
-
Click on Actions → + Add Service
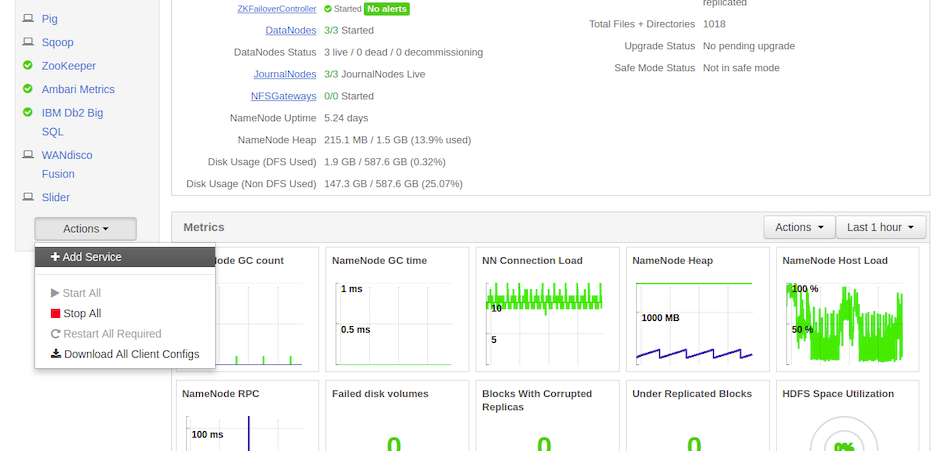
-
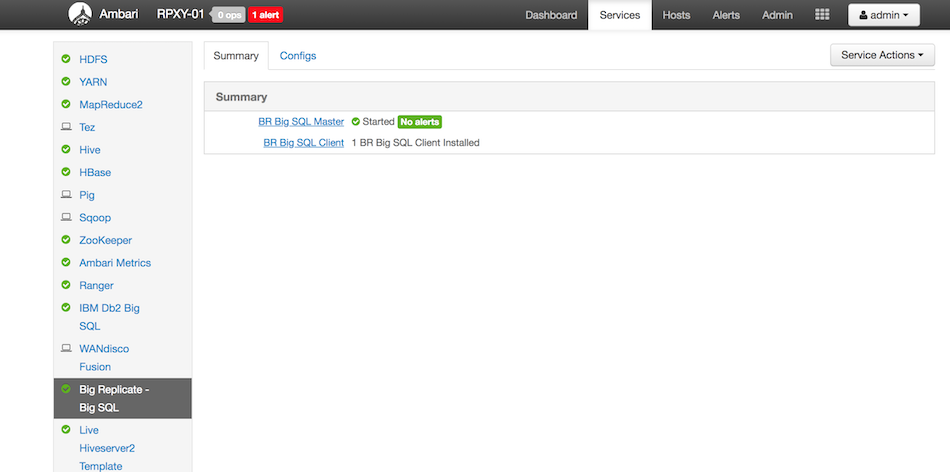
Check Big Replicate - Big SQL and then click Next.
-
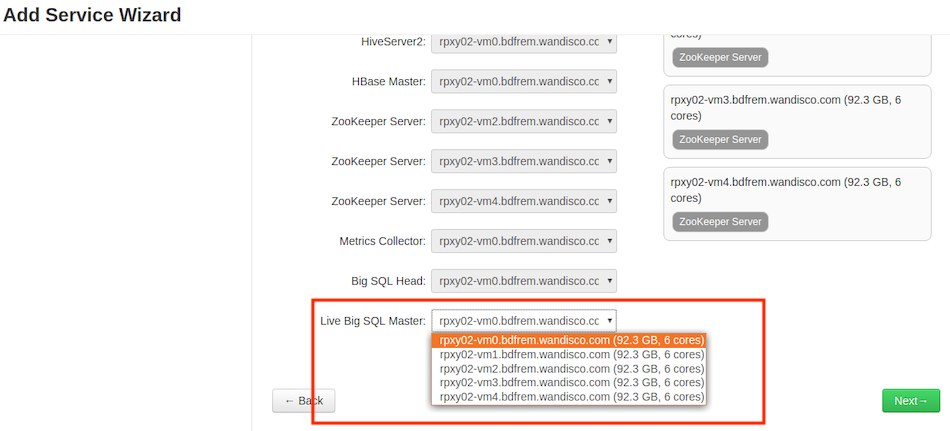
In Assign Masters for Live Big SQL, select the node where you want to deploy Live Big SQL Proxy Server. In this example we are installing it on 'rpxy02-vm0' and click on Next.
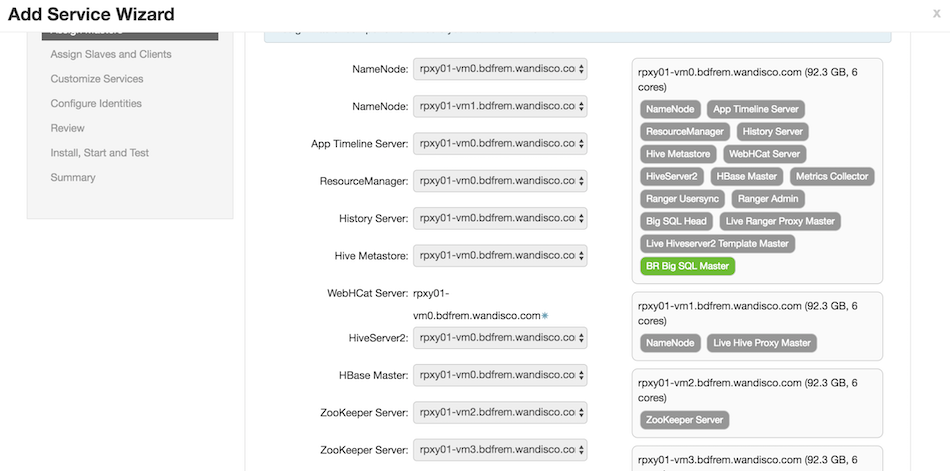
-
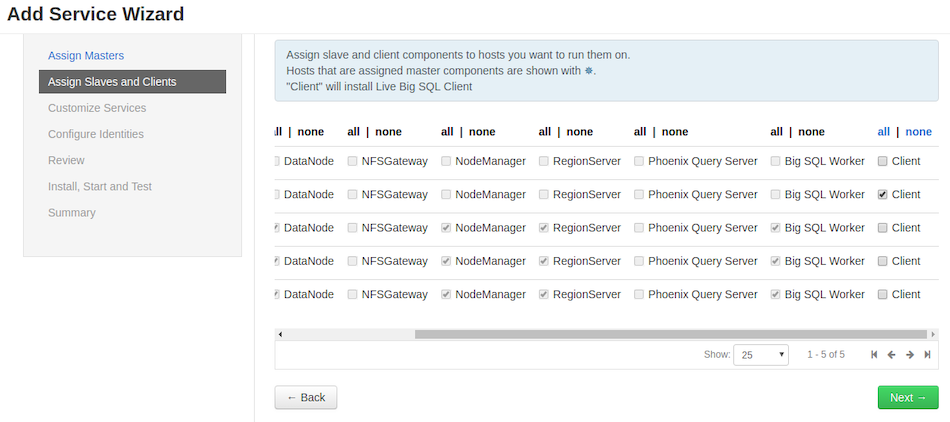
In Assign Slaves and Clients, deploy it on node where your Big Replicate server is being installed. Currently, the Big Replicate server is being deployed on rpxy02-vm1.
Make sure you check only those options where the Big Replicate server is installed and click Next.
-
Wherever there are alerts, provide proper values for the configuration and click on Next.

-
Plugin/Server configuration.
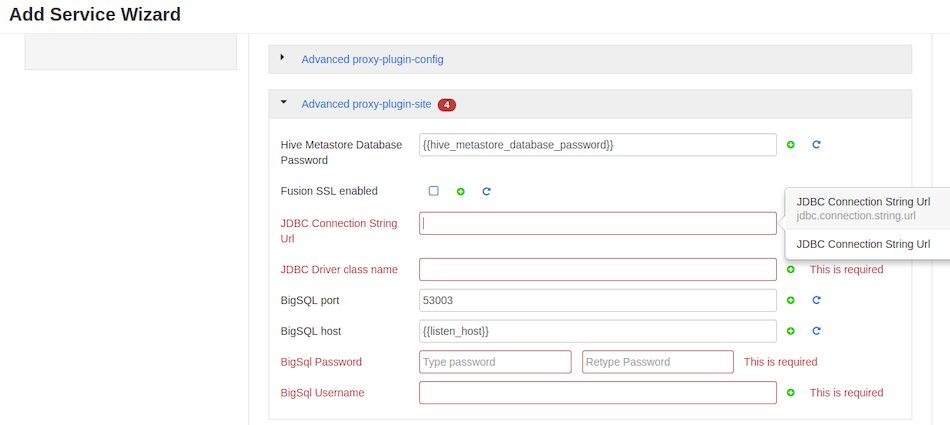
Complete all required entry fields, i.e.
- JDBC Connection String Url
-
The string that your DBMS JDBC driver uses to connect to a database.
- JDBC Driver class name
-
The class name of the JDBC -
com.ibm.db2.jcc.DB2Driver. - BigSql Password
-
The password required for the Big SQL login.
- BigSql Username
-
The account username used for the Big SQL login.
-
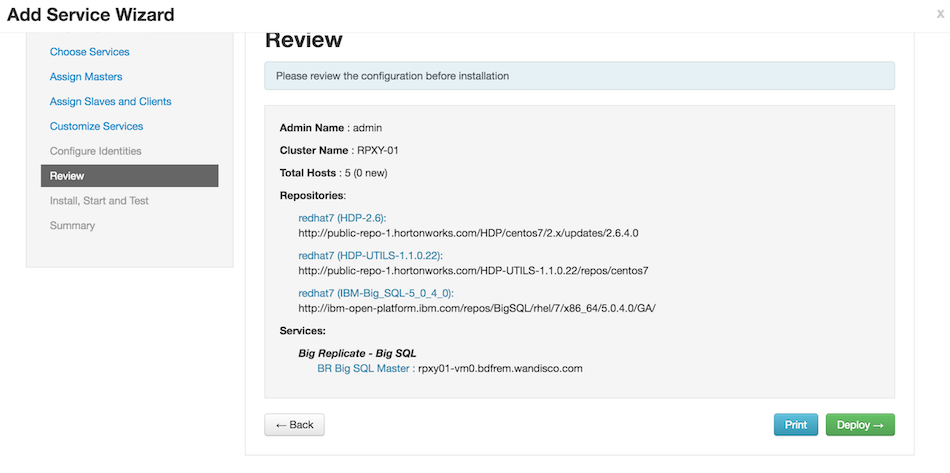
Review the configuration and click Deploy.
-
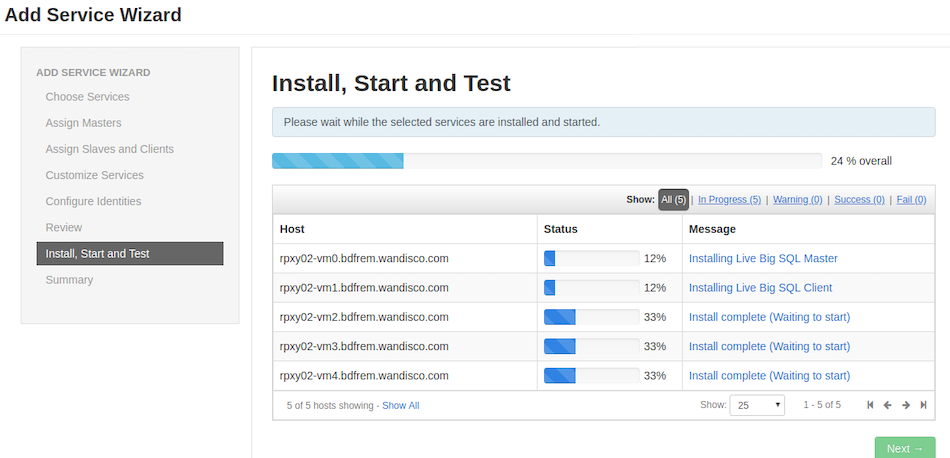
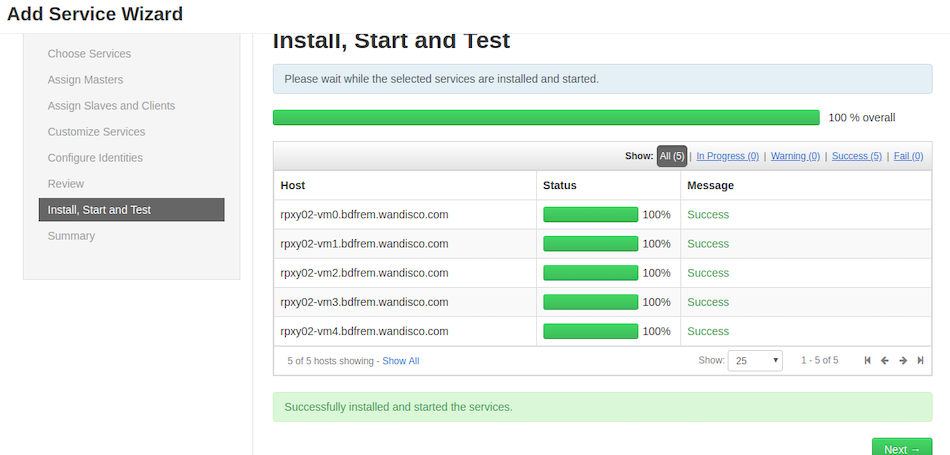
Click on Next once we get the 100% successful message in the Install, Start and Test window.
-
Restart the Big Replicate servers.
When the IBM Db2 Big SQL Plugin service is deleted from Ambari, the RPM for IBM Db2 Big SQL Plugin needs to be uninstalled manually.
-
Now follow the next section to put the
db2jcc.jarin place.
Copy db2jcc.jar in place
-
Now copy db2jcc.jar to '/opt/wandisco/fusion/plugins/live-bigsql/'
You can download it from the IBM Support portal - Direct Link.
-
You can copy the file onto your server, e.g.
wget <above-direct-link-URL>
-
Extract the archive file, e.g.
tar -xzvf v11.1.3fp3_jdbc_sqlj.tar.gz
-
Move to the jdbc_sqlj directory, e.g.
cd jdbc_sqlj
-
Unzip the drive file, e.g.
unzip db2_db2driver_for_jdbc_sqlj.zip
-
Copy the jar file into the plugin directory, e.g.
cp db2jcc.jar /opt/wandisco/fusion/plugins/live-bigsql/
The jar will need to be given Big SQL permissions (default values are hdfs:hadoop).
-
Restart the Fusion servers, i.e.
# service fusion-ui-server restart
# service fusion-server restart
Manually extract the stack
This is an alternative method to the install-stack option described above.
Once you have completed the steps here you will then need to complete the Installation via the Ambari UI section.
-
Perform steps 1-3 above.
-
Run:
# ./bigreplicate-live-bigsql-installer-2.0.2.sh extract-stack -
Transfer the stack file to the
/tmpfolder on the Ambari server node e.g.# scp fusion-bigsql-proxy_2.0.2-centos.stack.tar.gz root@<Ambari-host>:/tmp -
Connect to Ambari Server node and stop Ambari Server.
# service ambari-server stop -
Install the stack for Ambari.
# ambari-server install-mpack --mpack=/tmp/fusion-bigsql-proxy_2.0.2-centos.stack.tar.gz -
Start the Ambari Server.
# service ambari-server start -
Now follow the steps in the Installation via the Ambari UI section to complete your installation.
4.2.3. Installer Help
# ./bigreplicate-live-bigsql-installer-2.0.2.sh helpRunning the following commands on the installer will generate a number of helpful outputs:
General options:
  help                             Print this message and exit

Component installation control:
  only-fusion-ui-server-plugin     Only install the plugin's fusion-ui-server component
  only-fusion-server-plugin        Only install the plugin's fusion-server component
  only-proxy-server                Only install the plugin's proxy component
  skip-fusion-ui-server-plugin     Do not install the plugin's fusion-ui-server component
  skip-fusion-server-plugin        Do not install the plugin's fusion-server component
  skip-proxy-server                Do not install the plugin's proxy component
  extract-ds                       Extract the DataSunrise component
  extract-ds=<target>              Extract the DataSunrise component to specified <target>
                                   Note that if a full path is not given, the artifact will be placed in /tmp/<target>
  install-ds                       Run the DataSunrise installer component

Validation control:
  skip-java-version-checks         Do not run tests to check the java version meets current criteria

Component configuration control:

Post Install service restart control:
  These options if not set will result in questions in interactive script use.
  restart-fusion-server            Request fusion-server restart (if fusion-server component installed)
  restart-proxy-server             Request proxy-server restart (if proxy component installed)
  skip-restart-fusion-server       Skip fusion-server restart
  skip-restart-proxy-server        Skip proxy-server restart
  restart-all-servers              Request all servers where relevant components have been installed
4.3. Validation
Once installation and configuration is completed, complete the following steps.
-
Login to Big Replicate UI and confirm that IBM Db2 Big SQL Plugin is displayed as Active on the Plugins screen.
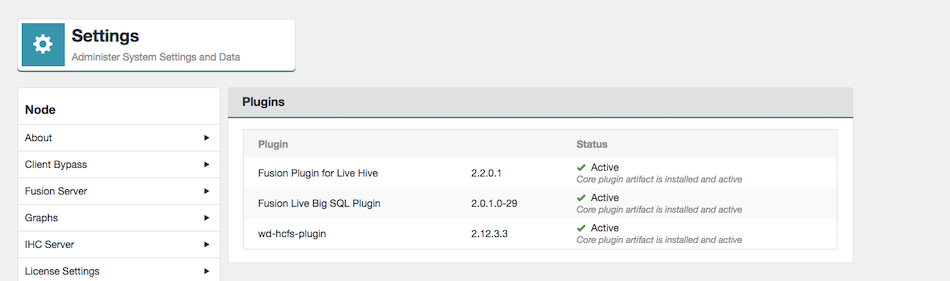 Figure 3. IBM Db2 Big SQL Plugin Status - Settings
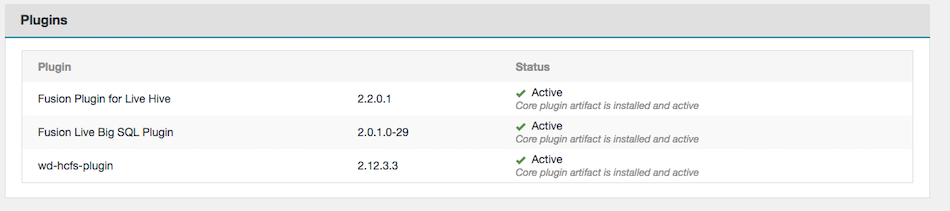 Figure 4. IBM Db2 Big SQL Plugin Status - Dashboard
 -
Use a database client (dbeaver or jsqsh, etc) to open a command shell. You can type specific Big SQL commands or statements into this shell and view output from Big SQL queries.
4.3.1. Test the plugin is functional
-
Run jsqsh command on the node where BigSQL is installed, e.g.
# jsqsh -
Run setup, e.g.
# \connect --setup -
Add a new connection that will connect to the filter proxy by entering
A.JSQSH CONNECTION WIZARD - (edits $HOME/.jsqsh/connections.xml The following connections are currently defined: Name Driver Host Port --- -------------------- ---------- ------------------------------ ------ 1 bigsql db2 <bigSql-host> 32051 Enter a connection number above to edit the connection, or: (B)ack, (Q)uit, or (A)dd connection: A -
Enter
1to select the db2 driver, e.g.JSQSH CONNECTION WIZARD - (edits $HOME/.jsqsh/connections.xml) Choose a driver for use by your new connection Name Target Class --- ---------------- -------------------- -------------------------------------------------- 1 *db2 IBM Data Server (DB2 com.ibm.db2.jcc.DB2Driver 2 *db2zos IBM DB2 z/OS com.ibm.db2.jcc.DB2Driver 3 *hive2 Apache Hive org.apache.hive.jdbc.HiveDriver 4 *netezza IBM Netezza org.netezza.Driver 5 derby Apache Derby Server org.apache.derby.jdbc.ClientDriver 6 derbyembed Apache Derby Embedde org.apache.derby.jdbc.EmbeddedDriver 7 firebird Firebird JayBird org.firebirdsql.jdbc.FBDriver 8 hive Apache Hive org.apache.hadoop.hive.jdbc.HiveDriver 9 informix IBM Informix com.informix.jdbc.IfxDriver 10 jdbcodbc JDBC ODBC Bridge sun.jdbc.odbc.JdbcOdbcDriver 11 mssql MS SQL Server com.microsoft.jdbc.sqlserver.SQLServerDriver 12 mssql-jtds MS SQL Server jTDS net.sourceforge.jtds.jdbc.Driver 13 mssql2k5 MS SQL Server 2005+ com.microsoft.sqlserver.jdbc.SQLServerDriver 14 mysql MySQL com.mysql.jdbc.Driver 15 oracle Oracle oracle.jdbc.OracleDriver 16 oracleoci Oracle OCI oracle.jdbc.driver.OracleDriver 17 pgsql PostgreSQL org.postgresql.Driver 18 sybase Sybase ASE com.sybase.jdbc3.jdbc.SybDriver 19 sybase-asa Sybase ASA com.sybase.jdbc2.jdbc.SybDriver 20 sybase-jtds Sybase ASE jTDS net.sourceforge.jtds.jdbc.Driver * = Driver is available. If a driver is unavailable you may choose (D) below to jump to the driver wizard to provide a classpath Enter the driver number, (D)river wizard, (B)ack or (Q)uit: 1After selecting
1, you will see the Connection URL variables, e.g.JSQSH CONNECTION WIZARD - (edits $HOME/.jsqsh/connections.xml) The following configuration properties are supported by this driver. Connection name : _temp_ Driver : IBM Data Server (DB2, Informix, Big SQL) JDBC URL : jdbc:db2://${server}:${port}/${db} Connection URL Variables ------------------------ 1 db : <db-alias> 2 port : 50000 3 server : <proxyHost> 4 user : root 5 password : 6 Autoconnect : false JDBC Driver Properties ------------------------ None Enter a number to change a given configuration property, or (T)est, (B)ack, (Q)uit, Add (P)roperty, or (S)ave:-
Enter
1to change the db to the BigSQL database name (i.e., bigsql). -
Enter
2to change the port to point to the filter proxy (i.e., 50000) -
Enter
3to edit the server entry to point to the Filter Proxy node hostname. -
Enter
4to change user and5for password to connect to the database. -
After changing, enter
Sin order to save and will ask the connection name.Below is the connection URL, after changing its properties.
JSQSH CONNECTION WIZARD - (edits $HOME/.jsqsh/connections.xml)

The following configuration properties are supported by this driver.

    Connection name : bigsql_filter
             Driver : IBM Data Server (DB2, Informix, Big SQL)
           JDBC URL : jdbc:db2://${server}:${port}/${db}

Connection URL Variables
------------------------
1                db : bigsql
2              port : 50000
3            server : <proxyHost>
4              user : bigsql
5          password : ******
6       Autoconnect : false

JDBC Driver Properties
------------------------
None

Enter a number to change a given configuration property, or
(T)est, (D)elete, (B)ack, (Q)uit, Add (P)roperty, or (S)ave:
-
-
Enter
Tto test whether the connection details are connect.ExampleEnter a number to change a given configuration property, or (T)est, (D)elete, (B)ack, (Q)uit, Add (P)roperty, or (S)ave: T Attempting connection... Succeeded! Hit enter to continue:
4.3.2. Validate connection using jsqsh
-
Run jsqsh command on the node where BigSQL is installed, e.g.
# jsqsh -
To see the connections that have been created, enter the following command.
Execute - \connect --listExample# \connect --list +--------+--------+--------------+-------+----------+--------+----------+----------+--------+--------+--------+------------+ | Name | Driver | Server | Port | Database | SID | Username | Password | Domain | Class | URL | Properties | +--------+--------+--------------+-------+----------+--------+----------+----------+--------+--------+--------+------------+ | bigsql | db2 | 10.6.120.102 | 50000 | BIGSQL | [NULL] | bigsql | ******* | [NULL] | [NULL] | [NULL] | [NULL] | +--------+--------+--------------+-------+----------+--------+----------+----------+--------+--------+--------+------------+
-
Connect to the database using the created Filter Proxy connection (e.g. bigsql_filter) and create a test table.
Example# \connect bigsql #create hadoop table #product_cat(Id INTEGER,Name CHAR(25),Price DECIMAL(8,2)); 0 rows affected (total: 10.543s) # insert into # product_cat values(1, 'abc', 10.5); # row affected (total: 14.960s) -
Display a record from the test table.
# select * from
# product_cat;
+----+------+-------+
| ID | NAME | PRICE |
+----+------+-------+
|  1 | abc  | 10.50 |
+----+------+-------+
1 row in results(first row: 2.822s; total: 2.827s)
#
4.4. Upgrade
The following steps provide a basic sequence for upgrading an existing IBM Db2 Big SQL Plugin installation.
-
Stop the Big Replicate server
service fusion-server stop
-
Stop the IBM Db2 Big SQL Plugin proxy server
service bigsql-server stop
-
Upgrade the plugin RPM.
rpm -U fusion-bigsql-plugin-2.0.x.y.noarch.rpm
-
Upgrade the proxy RPM.
rpm -U fusion-bigsql-proxy-2.0.x.y.noarch.rpm
-
Start the Big Replicate server
service fusion-server start
-
Start the IBM Db2 Big SQL Plugin proxy server
service bigsql-server start
4.5. Uninstallation
4.5.1. Remove the packages
RPM
-
Stop the Big Replicate server, e.g.
# service fusion-server stop -
Check version of installed rpm with the following command:
# rpm -qa | grep fusion* -
Run the package remove command, e.g.
# yum remove fusion-bigsql-proxy # yum remove fusion-bigsql-plugin -
Manually remove the UI directory, e.g.
# rm -rf "/opt/wandisco/fusion-ui-server/plugins/fusion-ui-bigsql-plugin-2.0.2/"
4.5.2. Remove rules from Filter Proxy
-
Navigate to /opt/datasunrise/cmdline.
-
Run the command
# ./executecommand.sh connect -host 127.0.0.1 -login admin -
Run the command
# ./executecommand.sh delRule -name "extDispQueryBased"(where 'extDispQueryBased' is the name/alias of the rule created during Filter Proxy installation)
-
Run the command
# ./executecommand.sh delQueryGroup -name <querygroup>
(where '<querygroup>' is name/alias of group creating to filter rules during Filter Proxy installation)
5. Operation
5.1. Configuration
Replication of Big SQL catalog information is driven through Big Replicate for Hive’s metadata replication. Currently, there’s no IBM Db2 Big SQL Plugin configuration available through the Big Replicate UI.
For setting up replication rules, see Setting up Hive metadata replication.
5.1.1. Supported SQL Statements
The following set of SQL statements are currently supported:
You can get more information about Big SQL DDL query links:
Create table
In Big SQL, data is stored in tables.
Tables are composed of rows and columns as in a relational database.
The definitions of tables are created by using Create statements, and those definitions are recorded in the Big SQL catalog.
The definitions can be changed or dropped.
Examples
- SQLTable
Create table Product(Id INTEGER,Name CHAR(25),Price DECIMAL(8,2));- Hive Table
Create hadoop table test.hive_table(col1 bigint);- Hive PartitionTable
Create hadoop TABLE test.partition_table (id smallint,name varchar(20),dept varchar(10),yoj integer) PARTITIONED BY (year integer);- HBase Table
Create hbase table test.hbase_table (k0 smallint, k1 double,k2 bigint,k3 integer) column mapping ( key mapped by (k0,k1,k2,k3));- HBase View
Create view test.hbase_view as SELECT k0, k1, k2, k3 FROM test.hbase_table WHERE k3 > 1;5.1.2. High Availability (HA)
High Availability is supported for the Filter Proxy, but not for Big Replicate for IBM Db2 Big SQL and the Big SQL database.
To enable HA for the Filter Proxy you need to add properties to JSqsh. These properties need to be added on the client side only (with JSqsh), no changes need to be made to the Filter Proxy.
To do this follow the steps below.
-
First run JSqsh e.g.
# jsqsh --setup -
Enter
Cfor the Connection wizard. -
Select your Filter Proxy connection to edit.
JSQSH CONNECTION WIZARD - (edits $HOME/.jsqsh/connections.xml The following connections are currently defined: Name Driver Host Port --- -------------------- ---------- ------------------------------ ------ 1 bigsql db2 rpxy01-vm0.bdfrem.wandisco.com 18051 2 bigsql_datasunrise db2 10.10.214.122 50000 Enter a connection number above to edit the connection, or: (B)ack, (Q)uit, or (A)dd connection: *2 -
Enter
Pto add a property.JSQSH CONNECTION WIZARD - (edits $HOME/.jsqsh/connections.xml) The following configuration properties are supported by this driver. Connection name : bigsql_datasunrise Driver : IBM Data Server (DB2, Informix, Big SQL) JDBC URL : jdbc:db2://${server}:${port}/${db} Connection URL Variables ------------------------ 1 db : bigsql 2 port : 50000 3 server : 10.10.214.122 4 user : bigsql 5 password : ****** 6 Autoconnect : false JDBC Driver Properties ------------------------ None Enter a number to change a given configuration property, or (T)est, (D)elete, (B)ack, (Q)uit, Add (P)roperty, or (S)ave: *P -
Enter
Mto manually add the properties.DRIVER PROPERTIES The following properties are published by the driver. Note that not all properties may be published by your driver, and you may manually enter a property if needed. 1 user 2 password Enter a property number to edit that property. A question mark after the property name (e.g. "2?") will display a description, if available: (M)anually enter, or (B)ack: *M -
Add the following:
Property name: clientRerouteAlternateServerName
Property value: <IP address for Filter Proxy Node 1>,<IP address for Filter Proxy Node 2>

Property name: clientRerouteAlternatePortNumber
Property value: <Filter Proxy Node 1 port>,<Filter Proxy Node 2 port>

Property name: enableClientAffinitiesList
Property value: 1

Property name: blockingReadConnectionTimeout
Property value: <timeout in ms>
-
Enter
Sto save. -
Your set up is now configured for Filter Proxy HA.
|
Automatic failover - known issue
There is a known issue with automatic failover.
If executing an SQL command when a node is stopped you may get an exception.
Execute the command again and it will work.
|
5.2. Troubleshooting
-
Check the Release notes
-
Check log Files
5.2.1. File Locations
The following file locations will assist in troubleshooting investigations.